FW 700 - Mincer GRAEF - Free user manual and instructions
Find the device manual for free FW 700 GRAEF in PDF.
Frequently Asked Questions - FW 700 GRAEF
User questions about FW 700 GRAEF
0 question about this device. Answer the ones you know or ask your own.
Ask a new question about this device
Download the instructions for your Mincer in PDF format for free! Find your manual FW 700 - GRAEF and take your electronic device back in hand. On this page are published all the documents necessary for the use of your device. FW 700 by GRAEF.
USER MANUAL FW 700 GRAEF
Safety instructions 21
Information on these operating instructions 22
Intended use 23
Limitation of liability 23
Unpacking 24
Requirements on the installation location 24
Prior to first use 24
Operation 24
Mincing machine attachment. 24
Sausage stuffing attachment 25
Kebbe attachment 26
Spritz biscuit attachment. 26
Reset button 27
Storage accessories 27
Cleaning 27
After-sales service 29
Disposal 29
Two-year warranty 29
DE
EN
FR
IT
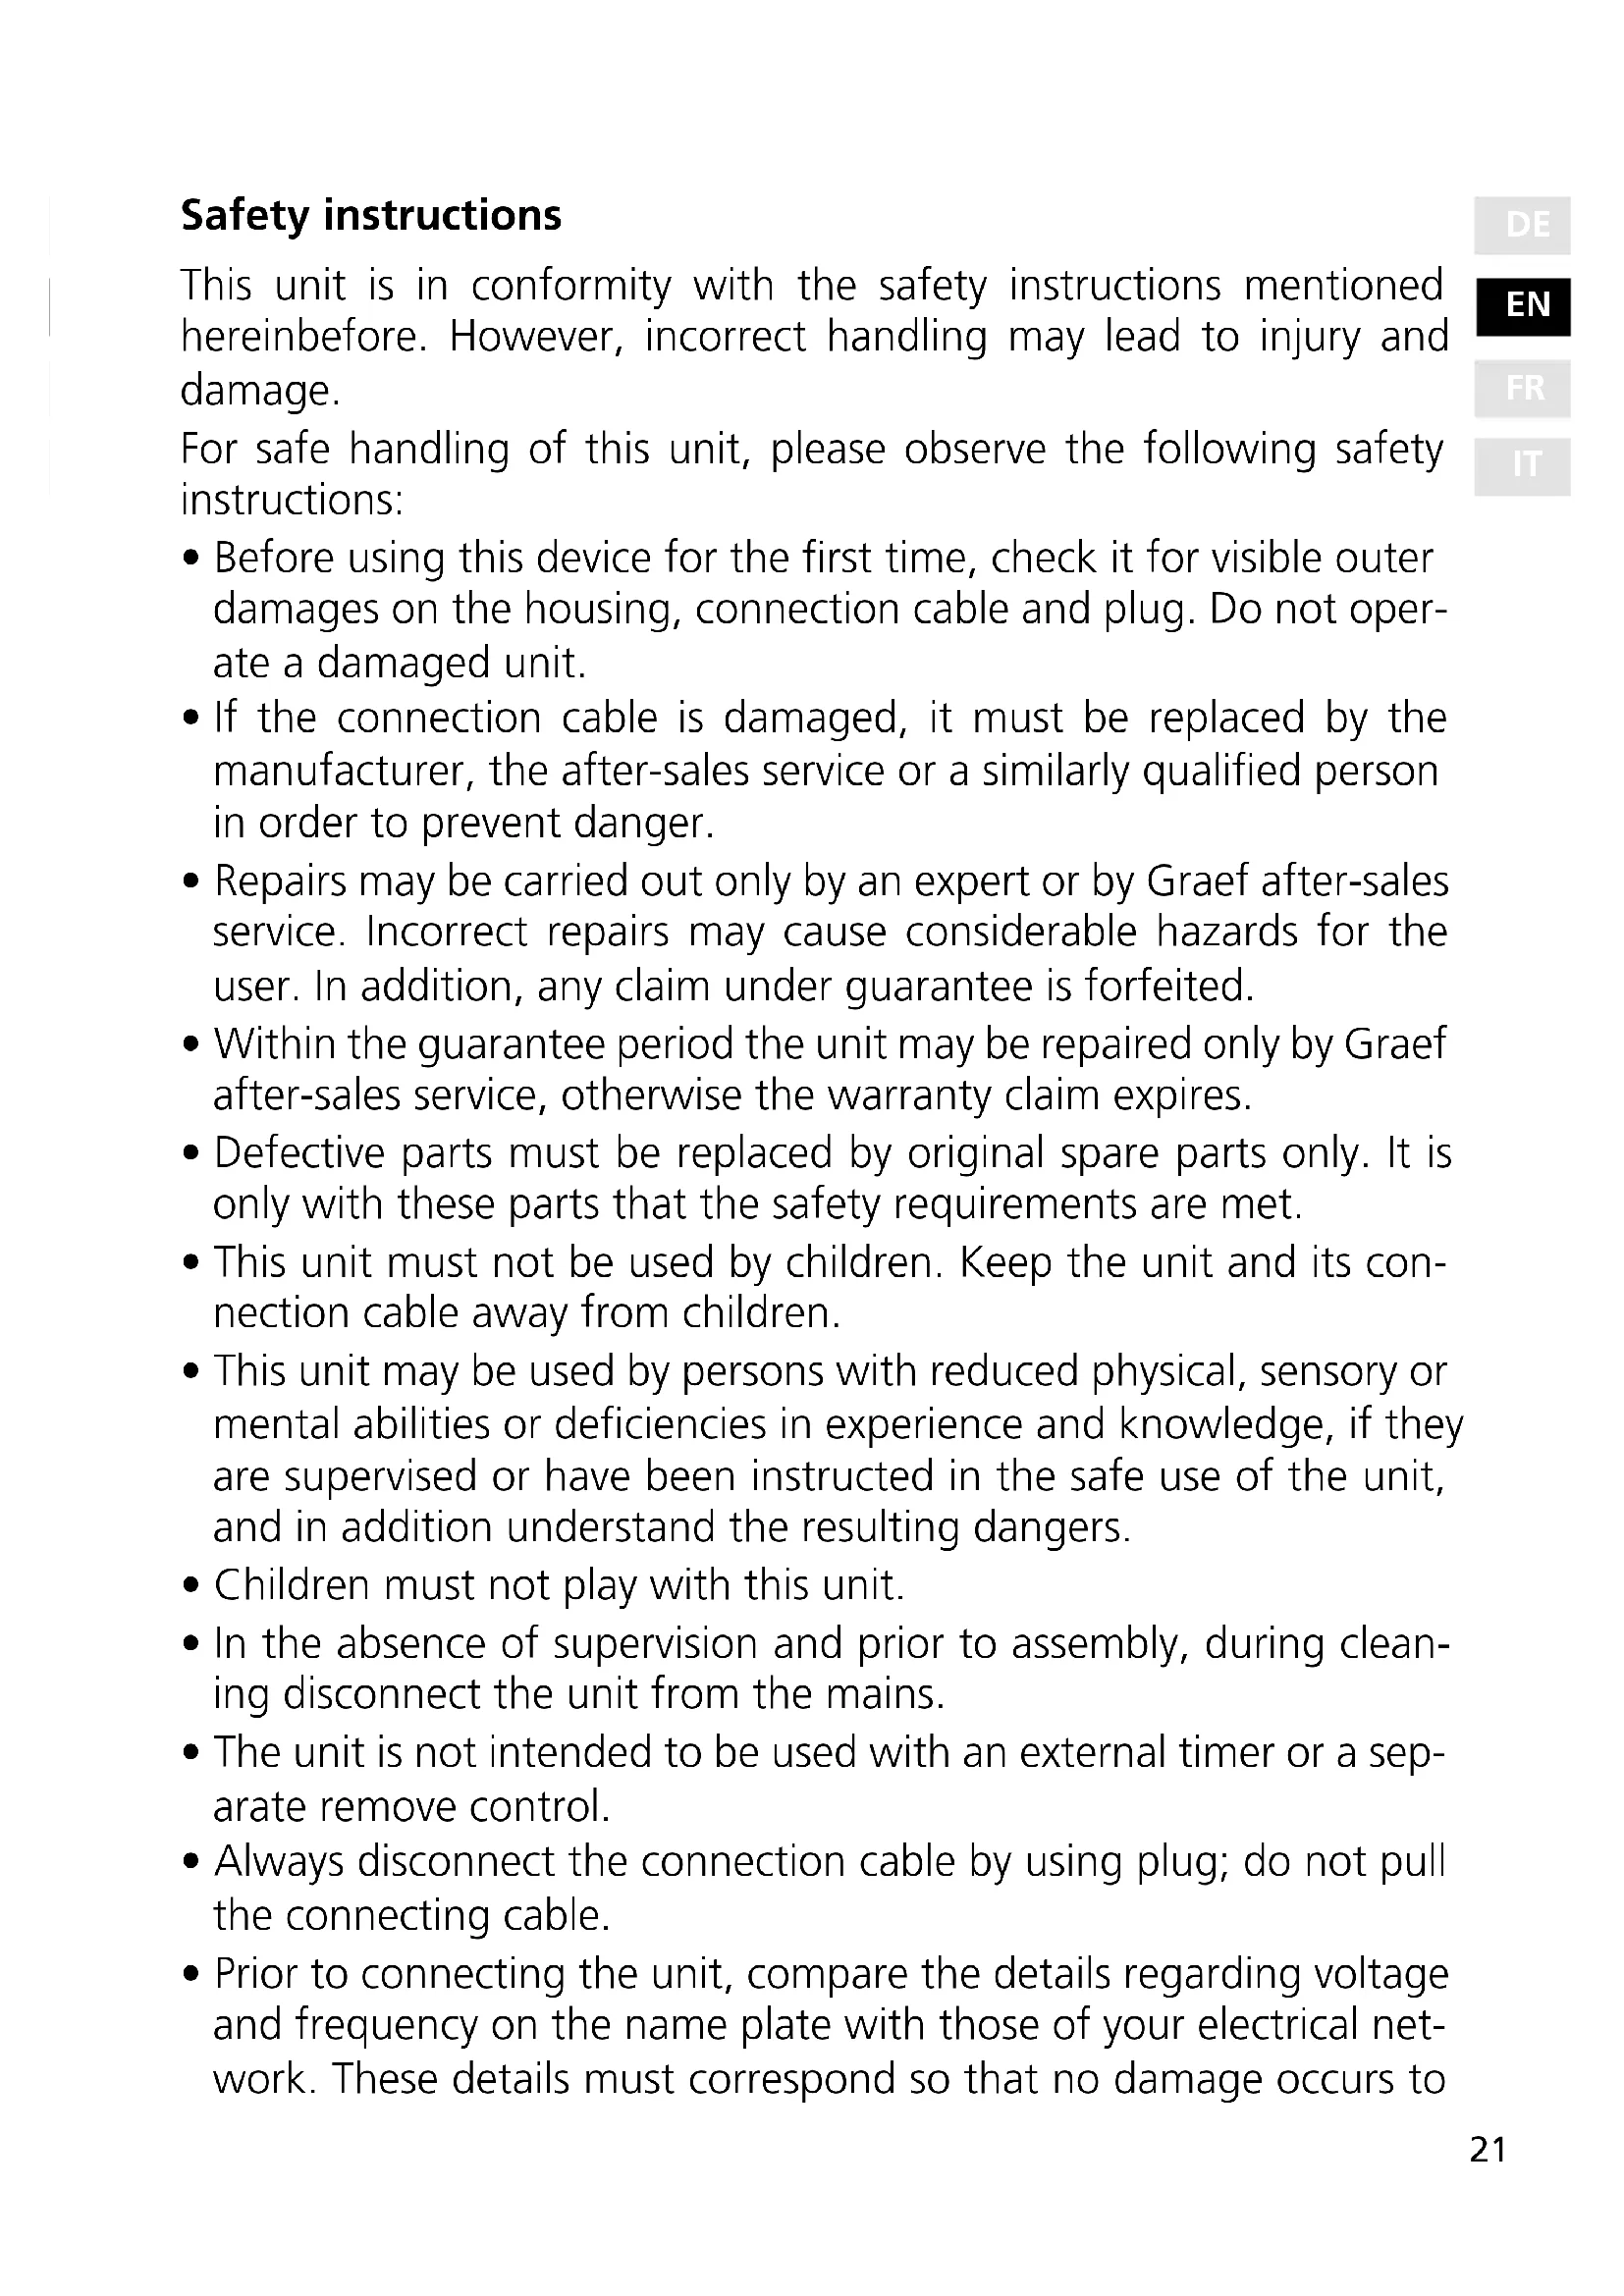
Product overview
- Control knob
- Reset button
- Display
- Storage compartment
- On / off switch
- Cable / cable compartment
-
Stuffer
-
Filling tray
- Worm housing
- Worm
- Pre-cutting knife
- Blade
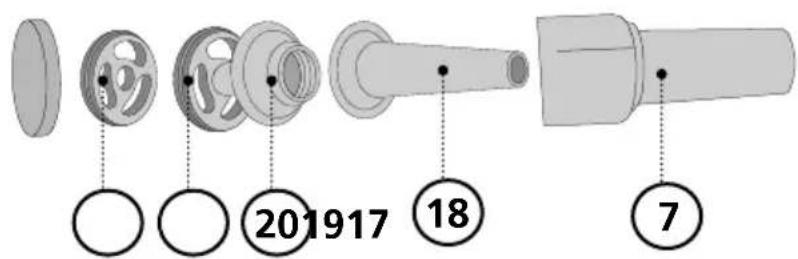
-
Perforated disc (fine diam. 3 mm, medium diam. 5 mm, course diam. 8 mm)
-
Ring nut
- Releasing button
-
Drive
-
Support ring
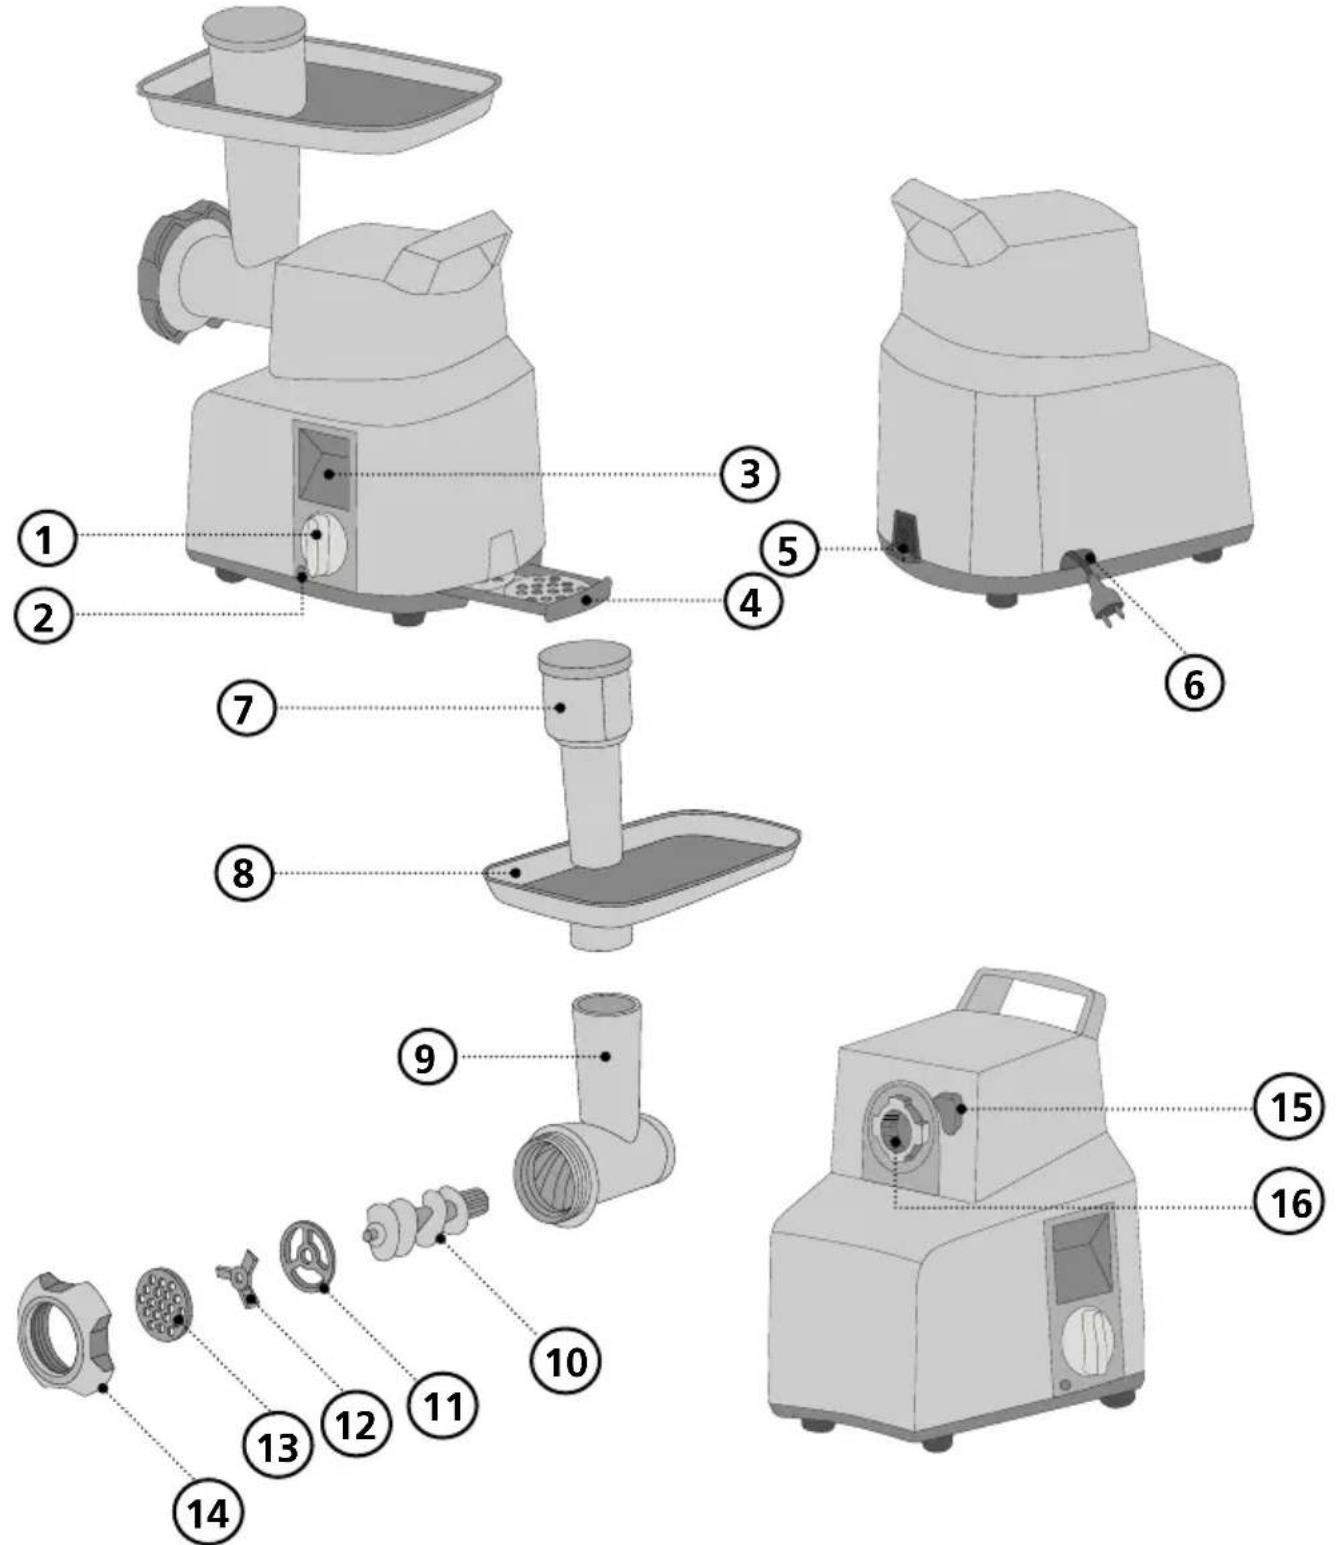
- Sausage stuffing attachment
Sausage stuffing attachment
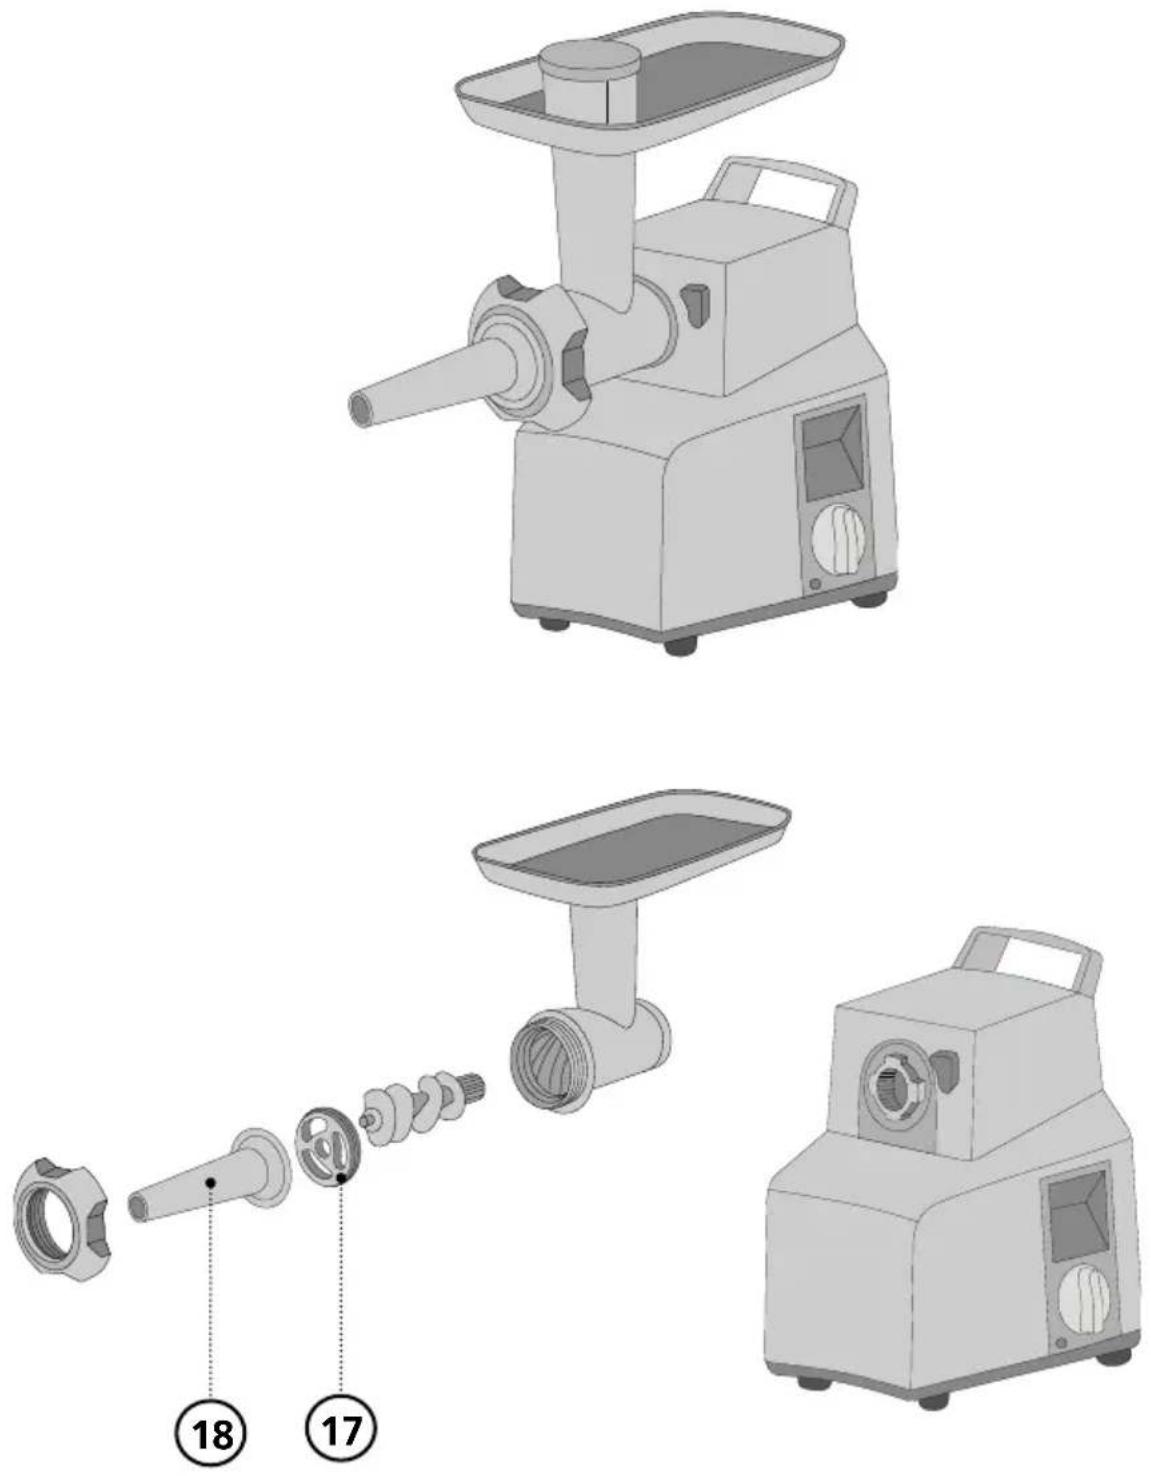
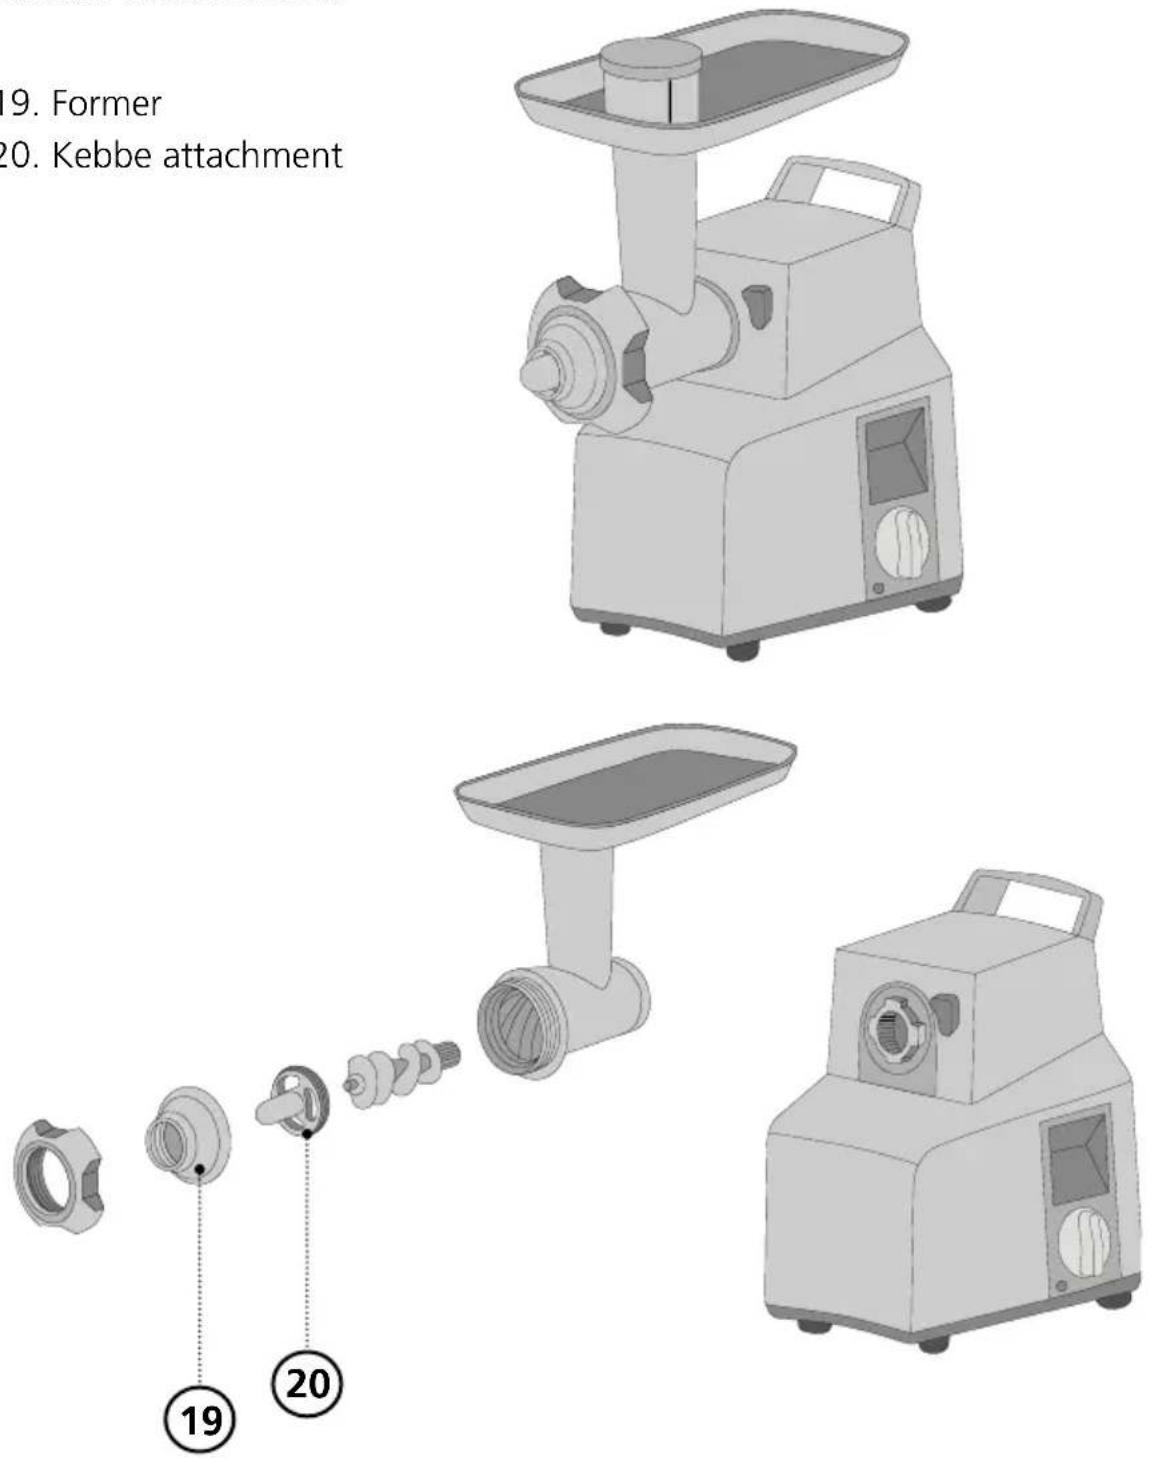
Kebbe attachment
- Former
- Kebbe attachment
Storage
Safety instructions
This unit is in conformity with the safety instructions mentioned herein before. However, incorrect handling may lead to injury and damage.
For safe handling of this unit, please observe the following safety instructions:
- Before using this device for the first time, check it for visible outer damages on the housing, connection cable and plug. Do not operate a damaged unit.
- If the connection cable is damaged, it must be replaced by the manufacturer, the after-sales service or a similarly qualified person in order to prevent danger.
- Repairs may be carried out only by an expert or by Graef after-sales service. Incorrect repairs may cause considerable hazards for the user. In addition, any claim under guarantee is forfeited.
- Within the guarantee period the unit may be repaired only by Graef after-sales service, otherwise the warranty claim expires.
- Defective parts must be replaced by original spare parts only. It is only with these parts that the safety requirements are met.
- This unit must not be used by children. Keep the unit and its connection cable away from children.
- This unit may be used by persons with reduced physical, sensory or mental abilities or deficiencies in experience and knowledge, if they are supervised or have been instructed in the safe use of the unit, and in addition understand the resulting dangers.
Children must not play with this unit. - In the absence of supervision and prior to assembly, during cleaning disconnect the unit from the mains.
- The unit is not intended to be used with an external timer or a separate remove control.
- Always disconnect the connection cable by using plug; do not pull the connecting cable.
- Prior to connecting the unit, compare the details regarding voltage and frequency on the name plate with those of your electrical network. These details must correspond so that no damage occurs to
the unit.
- Do not use the unit if the mains cable or plug are damaged.
- Prior to using the appliance any further, have a new connection cable installed by the Graef customer service or by an authorised skilled person.
- Do not open the housing under any circumstances. If live connections are touched or the electrical and mechanical construction are modified, there is the danger of electric shock.
- Never touch live parts. This might cause an electric shock or, in the worst case, lead to death.
- Never carry the unit by its power cable.
- Never transport the appliance while it is in operation.
- Never touch the plug with moist hands.
- Packaging materials must not be used for playing. There is a danger of suffocation.
- Before cleaning, make sure that the unit is switched off and is not connected to the power supply.
- Do not use any aggressive or abrasive detergents and no solvents.
- Do not scratch off stubborn soiling with hard objects.
- Do not flush the unit in water and do not immerse it in water.
- The food processes must be free of hard components (such as bones, frozen pieces).
Information on these operating instructions
These operating instructions provide important information on putting into operation, safety, intended use and the care of the universal cutter (hereinafter referred to as unit). The operating instructions shall have to be available at the unit at all times. The instructions have to be read and applied by every person who deals with
- initial operation,
- operation,
troubleshooting and/or
or is instructed to clean the unit.
Keep these operating instructions and pass them on to the next owner along with the unit. These operating instructions cannot take into consideration every conceivable use. For further information or in case of problems which are not dealt
with or not dealt with sufficiently in these instructions, please get in touch with Graef customer service or your specialist dealers.
Intended use
This unit is not intended for commercial use. Use the mincing machine in closed-up rooms only. You can process meat, fish, poultry, bacon and dough. By no means cut hard matter, such as frozen foodl, bones, wood, sheet metal, or the like. Another or any exceeding use shall not be considered intended. This appliance is intended for domestic and similar use, such as:
- Staff kitchens in shops and office
In agricultural estates - In hotels, motels and other residential areas
- In bed and breakfast boarding houses
IMPORTANT!
- Use only for applications akin to households!
Another or any exceeding use shall not be considered intended.
CAUTION!
The appliance can cause dangers, if is not used as intended.
- Use the unit exclusively as intended.
- Observe the procedures described in these operating instructions.
Claims of any kind caused by damage by unintended use shall be excluded. The risk shall be borne sole by the operator.
Limitation of liability
All technical information, data and notes on the installation, the operation and the care contained in these operating instructions correspond to the last status before printing, and are rendered under consideration of our previous experience and to the best of knowledge. No claims may be derived from the particulars, illustrations and descriptions in these instructions.
The manufacturer shall not assume any liability for damage caused by:
- non-observation of the instructions
- unintended use
- incorrect repairs
- technical modifications
- use of unapproved spare parts
Translations shall be carried out to the best of knowledge. We shall not assume any liability for translation mistakes. The original German text only shall be binding.
Unpacking
Proceed as follows to unpack the unit:
- Pull the unit out of the cardboard box.
- Remove all packaging and possible stickers on the unit (do not remove the name plate).
Requirements on the installation location
For safe and fault-free operation of the unit, the following has to be observed during installation:
- Use a firm, even, horizontal, non-slip and heat resistant surface with a sufficient load capacity.
- Choose the location in such a way that children cannot reach moving parts (in particular the blade) of the unit.
- The unit is not designed for installation in a wall or a built-in cupboard.
- Do not set up the unit in a hot, wet or moist environment.
- The power outlet must be easily accessible so that the power cable can be quickly removed in case of emergency.
Prior to first use
Clean all individual parts thoroughly in order to remove potential production leftovers. See "Cleaning".
Operation
NOTE
- The maximum duration of use is abt. 15 minutes. Subsequently let the unit cool down at room temperature (approx. 1 hour).
IMPORTANT!
- Handle the blade with care as it may be sharp and may lead to injuries.
- The smooth side of the knife must point in direction of worm.
- Check to see that the opening is on the locating bolt in the housing.
- Turn on the control knob to "R" when food has got stuck in the worm. Hold this button for approx. 5 seconds.
- Never put your fingers into the feed chute. Always use the stuffer.
- Remove or place the worm housing only at standstill and the connecting cable removed.
Mincing machine attachment
-
Take the requested perforated disc from the storage compartment.
-
Place the worm in the worm housing.
- Subsequently place the pre-cutting blade and the blade.
- Place the requested perforated disc.
- Now screw on the ring nut.
- Incline the worm housing slightly to the right towards the drive. Turn the worm housing counter-clockwise until the attachment locks into place.
- Insert the filling tray.
- Insert the plug into the socket.
- Press the on / off button.
- Put a plate or bowl below the outlet.
- Place the food to be processed into the filling tray. Cut meat into strips of abt. 2.5cm in width and abt. 6cm in length.
- Turn on the control knob to the right. Here you have the choice between two speed levels (low and high).
- Subsequently use the provided stuffer to push only.
- After finishing the mincing process, turn the control knob to "Standby".
- Subsequently switch the unit off.
- In order to mount the unit, press the release button, turn the attachment clockwise and remove; and disassemble all individual parts in reverse sequence.
Sausage stuffing attachment
- Place the worm in the worm housing.
- Place the support ring and subsequently the sausage stuffing attachment.
Now screw on the ring nut. - Incline the worm housing slightly to the right towards the drive. Turn the worm housing counter-clockwise until the attachment locks into place.
- Insert the filling tray.
- Insert the plug into the socket.
- Press the on / off button.
- Put a plate or bowl below the outlet.
- Pull the artificial or natural sausage skin over the sausage stuffing attachment nose.
- Place the food to be processed into the filling tray.
- Turn on the control knob to the right. Here you have the choice between two speed levels (low and high).
- Subsequently use the provided stuffer to push only.
- After finishing the mincing process, turn the control knob to "Standby".
- Subsequently switch the unit off.
- In order to disassemble the unit, press the release button, remove the attachment; and disassemble all individual parts in reverse sequence.
Kebbe attachment
- Place the worm in the worm housing.
- Place the former and subsequently the Kebbe attachment.
- Now screw on the ring nut.
- Incline the worm housing slightly to the right towards the drive. Turn the worm housing counter-clockwise until the attachment locks into place.
- Insert the filling tray.
- Insert the plug into the socket.
- Press the on / off button.
- Put a plate or bowl below the outlet.
- Place the food to be processed into the filling tray.
- Turn on the control knob to the right. Here you have the choice between two speed levels (low and high).
- Subsequently use the provided stuffer to push only.
- After finishing the mincing process, turn the control knob to "Standby".
- Subsequently switch the unit off.
- In order to disassemble the unit, press the release button, remove the attachment; and disassemble all individual parts in reverse sequence.
Spritz biscuit attachment
- Take the requested perforated disc from the storage compartment.
- Place the worm in the worm housing.
- Subsequently place the blade.
- Place the requested perforated disc.
- Place the spritz biscuit attachment in the ring nut so that it rests front at the opening.
- Now screw on the ring nut. Before screwing the ring nut tight, lock the spritz biscuit attachment to short so that it is straight on the ring nut.
- Now fit the mould for the different spritz biscuit variations.
- Incline the worm housing slightly to the right towards the drive. Turn the worm housing counter-clockwise until the attachment locks into place.
- Insert the filling tray.
- Insert the plug into the socket.
- Press the on / off button.
- Put a plate or bowl below the outlet.
- Place the dough to be processed into the filling tray.
- Turn on the control knob to the right. Here you have the choice between two speed levels (low and high). We recommend the low speed level.
-
Subsequently use the provided stuffer to push only.
-
After finishing the mincing process, turn the control knob to "Standby".
- Subsequently switch the unit off.
- In order to disassemble the unit, press the release button, remove the attachment; and disassemble all individual parts in reverse sequence.
Reset button
If the unit blocks and switches itself off, let the unit cool down, and press the "Reset button". Subsequently set the rotary control to "R" for 5 seconds maximum. The screw rotates into the opposite direction.
Storage accessories
The no longer needed perforated disc can be stored on the rear side of the unit in the storage compartment. Press on to the compartment, and then you can remove the compartment. The plastic parts (support ring, sausage stuffing attachment, former and Kebbe attachment) can be stored in the stuffer.
Cleaning
Clean the unit with a soft moist cloth, and let to dry subsequently. Do not flush the unit in water and do not immerse it in water.
NOTE
- Pull the mains plug before each cleaning process.
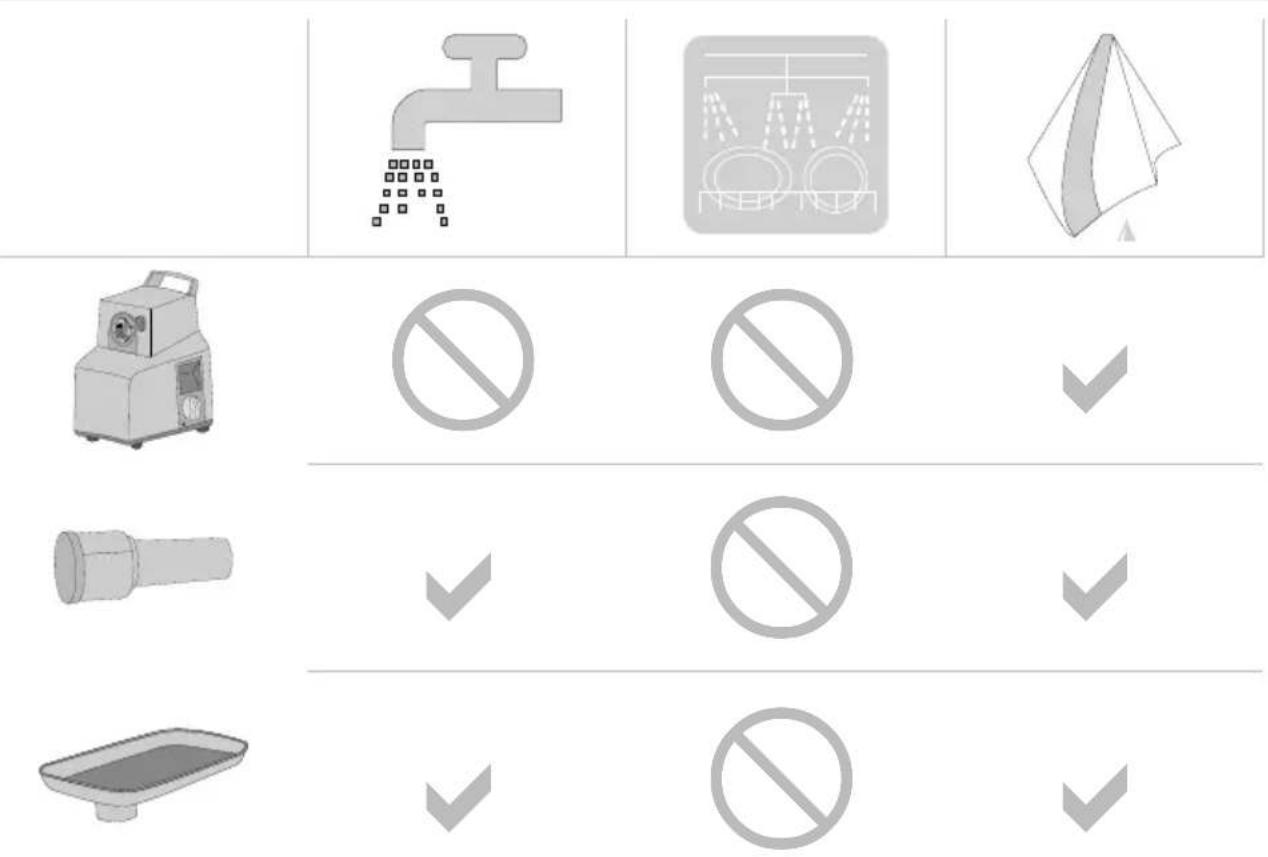
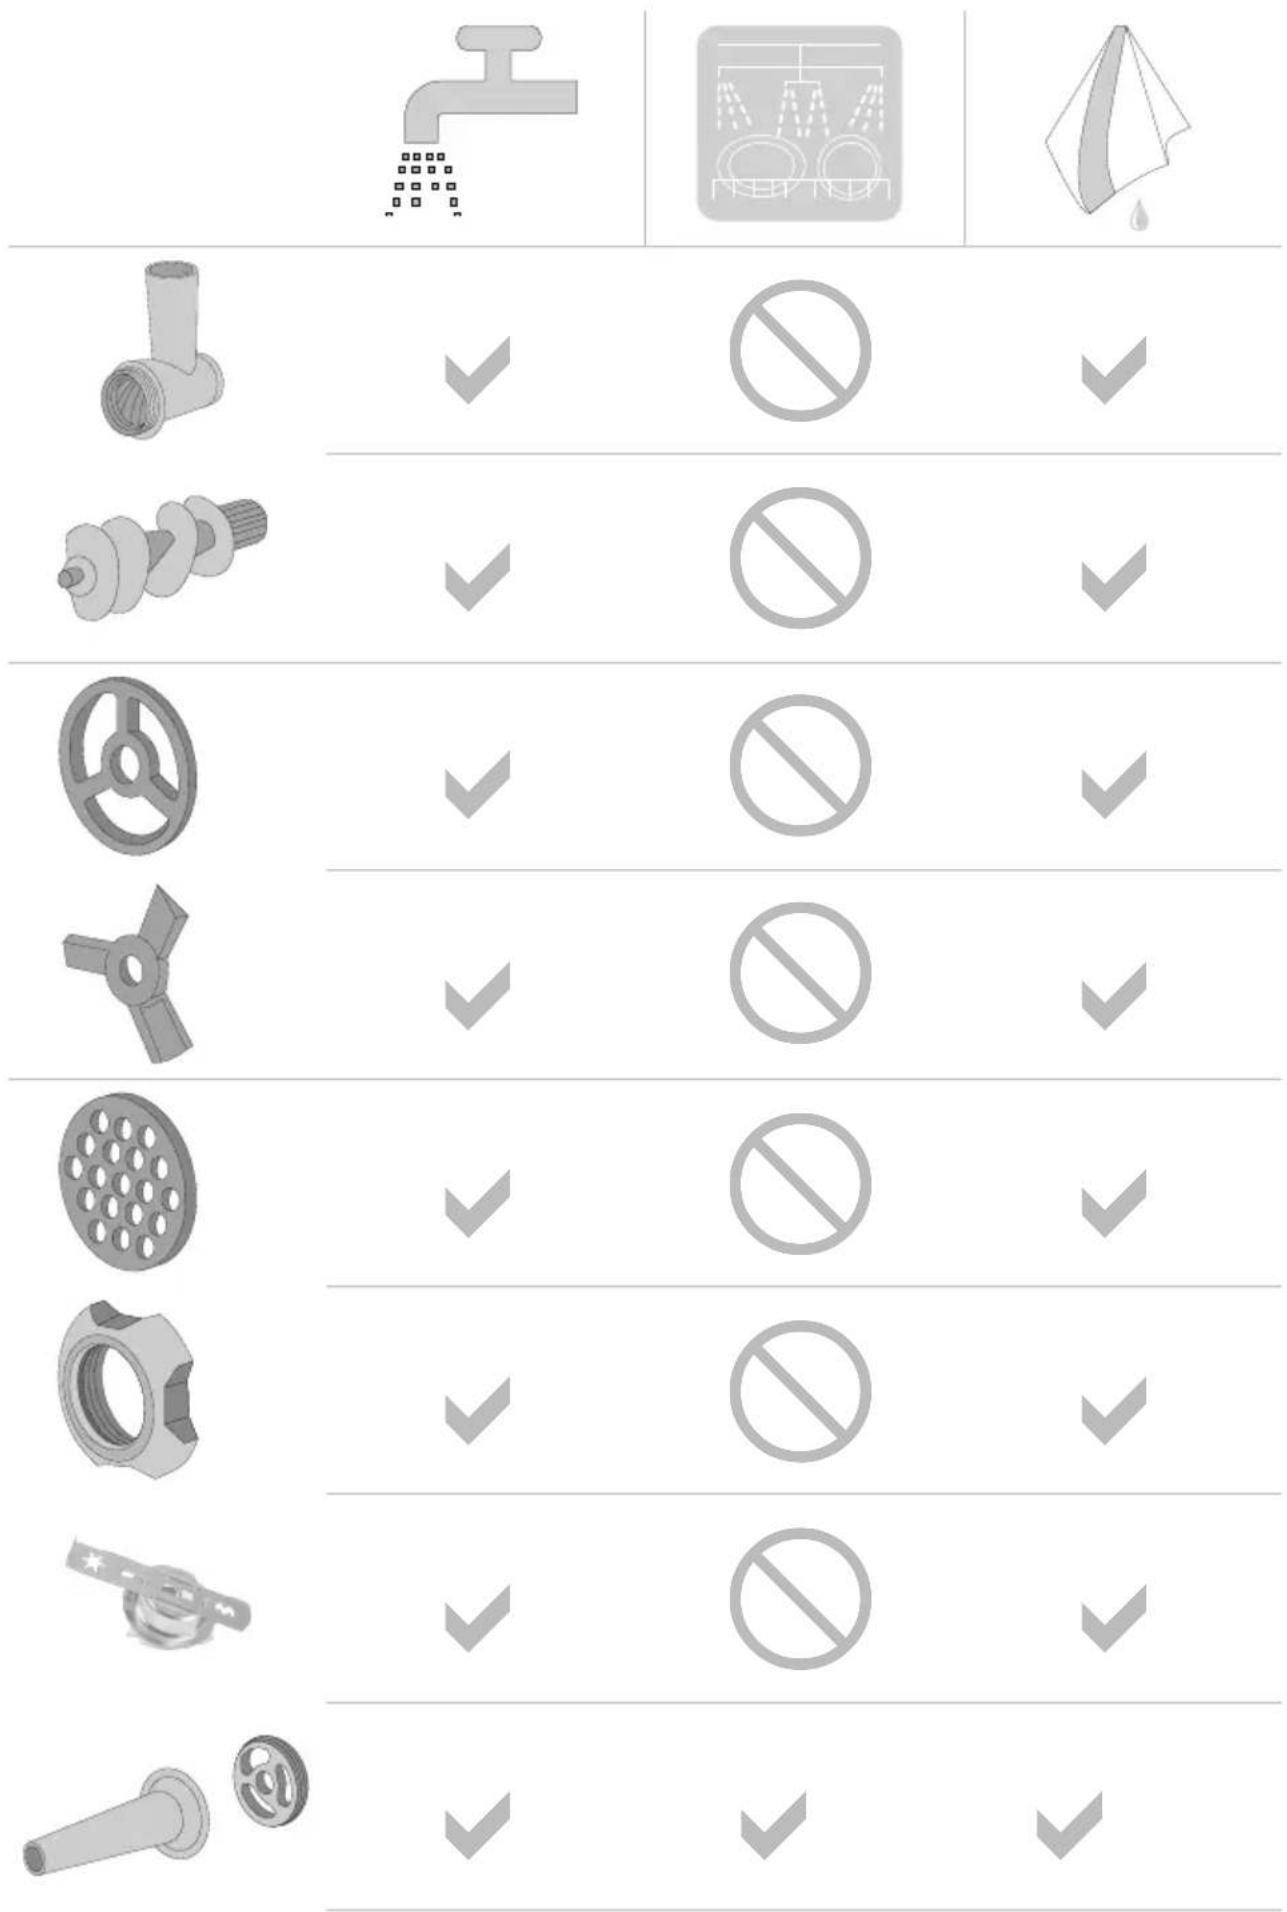
Let all parts dry completely after cleaning. Reassembly the mincing machine attachment again. The no longer needed perforated disc can be stored in the storage compartment.
After-sales service
If your unit is defective, please contact your specialist dealer or the Graef customer service on +49 2932-9703677 or write an e-mail to service@graef.de

Disposal
At the end of its service life, this product cannot be disposed of in normal domestic waste, but has to be taken a collection point ensuring the recycling of electronic household waste. The symbol on the product and in the operating instructions point out to this fact. Reuse the materials according to their marking. With the reuse, recycling or other forms of recycling of old equipment, you make an important contribution to the protection of our environment. Please ask your municipal administration for the disposal point.
Two-year warranty
For this product, we assume 24 months manufacturer warranty for defects, which are due to production or material defects. Your legal warranty claim in conformity with Section 439 et seq. of the German Civil Code (BGB) shall remain unaffected by this regulation. The guarantee does not cover any damage which is caused by incorrect handling or use as well as defects which only slightly influence the function or the value of the unit. We do not assume any liability for damage caused by lack of or insufficient maintenance. In this case, the warranty will become null and void as well. Moreover, transport damage provided we are not responsible shall be excluded from the claims under guarantee. Guarantee shall be ruled out for damage, the repair of which has not been carried out by us or one of our representations. In case of justified complaints, we shall repair the defective product or replace it by a product without defects at our discretion.
Sommaire
Stockage accessories. 41
Nettoyage. 41