TUCSON1211 - Pressure washer Lavor - Free user manual and instructions
Find the device manual for free TUCSON1211 Lavor in PDF.
| Product type | High pressure cleaner |
| Brand | Lavor |
| Model | TUCSON1211 |
| Power supply | 230-240 V ~ 50 Hz (single-phase) or 400-415 V ~ 50 Hz (three-phase) |
| Maximum pressure | 110 bar (typical estimate for this model) |
| Minimum required water flow | 20 l/min |
| Maximum water inlet temperature | 40 °C |
| Maximum water inlet pressure | 1 MPa (10 bar) |
| Detergent tank | Yes, integrated |
| Main functions | High pressure cleaning, detergent suction and dosing, pressure regulator, automatic stop (Total Stop), overload protection |
| Maintenance | Engine oil change (SAE 20/30) after 50 h then every 500 h; cleaning of water inlet filter; replacement of nozzle if worn |
| Safety | Gun with safety catch, motor thermal protection, bypass valve, automatic stop when trigger is released, anti-backflow device |
| Spare parts and repairability | Use only original parts; contact an authorized service center for any repairs |
| Languages of the manual | FR, DE, EL, EN, ES, FI, IT, NL, PT, RU, SL |
| General information | Professional outdoor use; do not use without supervision; suitable for cleaning surfaces requiring pressurized water |
Frequently Asked Questions - TUCSON1211 Lavor
User questions about TUCSON1211 Lavor
0 question about this device. Answer the ones you know or ask your own.
Ask a new question about this device
Download the instructions for your Pressure washer in PDF format for free! Find your manual TUCSON1211 - Lavor and take your electronic device back in hand. On this page are published all the documents necessary for the use of your device. TUCSON1211 by Lavor.
USER MANUAL TUCSON1211 Lavor
PROGRAMMA MANUTENZIONI PROGRAMMATE
- This appliance's performance and userfriendliness make it suitable for PROFESSIONAL use.
- The appliance can be used for washing surfaces outdoors, whenever pressurised water is required to remove dirt.
- With special optional accessories, it can be used for foaming and sandingblasting, and for washing with a rotary brush for application to the gun.
- The working temperature must range between +5^ and +50^ .
It is forbidden to carry out any modification to the structure and to any elements of the machine.
> THECNICAL DATA
(see technical data plate) pag.101,102..
> SYMBOLS

WARNING: It is important to be careful of the following items.

IMPORTANT: NOTE

LOCKED

OPEN

IF PRESENT
SAFETY PRECAUTIONS
>WARNINGS
- CAUTION! It is important to be careful on safety grounds.
WARNING: This appliance is for outdoor use only.
WARNING: Always disconnect the electricity and water supplies on completion of every job.
WARNING: Never use the appliance if the electrical cable or important parts of the appliance are damaged, e.g. safety devices, high pressure hose, gun, etc.
WARNING: This appliance has been designed for use with the detergent provided or the detergent specified by the manufacturer, such as a neutral shampoo based on biodegradable anionic surface active detergents. The use of other detergents or chemicals may put the appliance's safety at risk.
WARNING:
05a WARNING: Do not use the machine within range of persons unless they wear protective clothing.
05b - Do not allow other people or animals within a range of 5m when operating the machine.
05c - Always wear suitable protective clothing in order to protect yourself against ricocheting parts.
05d - Do not touch the plug and the appliance with wet hands or when barefoot.
05e - Wear safety goggles and non-slip rubber footwear.
WARNING: Do not direct the nozzle toward mechanical parts containing lubricant grease, as the grease will dissolve and spread over the surrounding ground. Vehicle tyres/tyre valves may only be cleaned from a minimum distance of 30~cm otherwise the vehicle tyre/tyre valve could be damaged by the high-pressure jet. The first indication of this is a discoloration of the tyre. Damaged vehicle tyres/tyre valves can be deadly dangerous.
- 07WARNING:High pressure jets may be dangerous if improperly used. Jets must never be pointed at people, animals, life electrical equipment or the appliance itself.
- WARNING: The hoses, accessories and high pressure couplings are important for the appliance's safety. Use only hoses, accessories and couplings recommended by the manufacturer (it is extremely important to protect these components against damage by avoiding their improper use and protecting them against bending, knocks and scratches).
WARNING: Appliances not equipped with T.S.- Automatic Stop System: must not be left in operation for more than 2 minutes with the gun released. The recycled water heats up considerably, seriously damaging the pump.
WARNING: Appliances equipped with T.S.-Automatic Stop System: these appliances should not be left in standby for more than 5 minutes.
11WARNING: Switch the appliance off com
EN
pimately (master switch on OFF) whenever it is left unattended.
12WARNING: Every machine is tested in its operating conditions, so it is normal for a few drops of water to be left inside it.
13WARNING: Take care not damage the electric cable. If the supply cord is damaged, it must be replaced by the manufacturer, its service agent or similarly qualified persons in order to avoid a hazard
14WARNING: Appliance with fluid under pressure. Keep a firm hold on the gun and be prepared to take the kickback pressure. Only use the high pressure nozzle provided with the appliance.
16WARNING: This appliance is not intended for use by persons (including children) with reduced physical, sensory or mental capabilities, or lack of experience and knowledge, unless they have been given supervision or instruction concerning use of the appliance by a person responsible for their safety.
17WARNING: Children should be supervised to ensure that they do not play with the appliance.
18WARNING: Never start the high-pressure cleaner without first completely unwinding the high-pressure hose.
19WARNING: When winding and unwinding the pipe take care not to cause the high-pressure cleaner to overturn.
20WARNING: Before unwinding or winding the hose, switch the machine off and release the pressure in the hose itself (switching off).
21WARNING: Risk of explosion — Do not spray flammable liquids.
22WARNING: To ensure machine safety, use only original spare parts from the manufacturer or approved by the manufacturer.
23WARNING: Do not direct the jet against yourself or others in order to clean clothes or foot-wear.
24WARNING: High pressure cleaners shall not be used by children or untrained personnel.
WARNING: Water that has flown through backflow preventers is considered to be non-potable.
- XX WARNING: the machine shall be disconnected from its power source, by removing the plug from the socket-outlet, during cleaning or maintenance and when replacing spare parts
XJ WARNING: If an extension cord is used, the plug and socket must be of watertight construction.
- XY WARNING: Inadequate extension cords can be dangerous.
WARNING: It is absolutely forbidden to use the machine in potentially explosive environments or areas.
WARNING:
- NEVER EVER TOUCH THE MACHINE WITH WET HANDS OR BARE FEET.
- NEVER PULL THE POWER SUPPLY CABLE OR MACHINE IN ORDER TO DISCONNECT THE PLUG FROM THE SOCKET.
- IF DURING FUNCTIONING THE POWER SUPPLY RUNS OUT, FOR SAFETY REASONS, TURN THE MACHINE OFF.
> SAFETY DEVICE
WARNING: the gun is fitted with a safety catch. Whenever use of the machine is interrupted it is important to operate the safety catch to prevent accidental activation of the jet.
- Safety features: gun equipped with safety locking device, appliance equipped with (Class I) overload cutout, pump equipped with by-pass valve or shutdown device.
- The safety button on the gun is not there to lock the lever during operation, but to prevent its accidental operation.
STABILITY
WARNING: The machine must be always kept on horizontal bases, in a safe and stable way.
USAGE
> UNPACKING
After opening the package, check the entire unit.
In case of problems with this unit do not use it until you have consulted an authorized service/ centre.
- (pict.1,2) Due to transport and packing dimension reasons, some accessories can be supplied disassembled; in this case the fitting has to be carried out following the instructions on this booklet.
- All possible harmful parts of the package (plastic bags, foamed polystyrene, nails etc.) should be kept out of children's reach.on ground and take the pallet off.
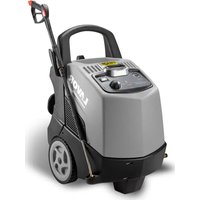
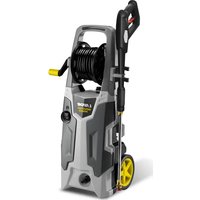
> DESCRIPTION OF THE MACHINE
(pict.3,4)
① Handle
② Pressure control
③ Pressure-gauge
④ High pressure water outlet
⑤ Water inlet + filter
⑥ Power cord
⑦ ON/OFF switch
Detergent tank
H.P. nozzle
Rubber hose fitting
① Lance
12 High pressure hose
⑬ Gun trigger lever
14 Spray gun
> WATER SUPPLY
Water supply connection

WARNING: (synb) machine not suitable for connection to the potable water mains.
Caution - Danger!
Only clean or filtered water should be used for intake. The delivery of the water intake tap should be equal to the double of the maximum pump range.
- Minimum delivery rate: 20 l/min.
Maximum intake water temperature: 40^ - Max inlet water pressure: 1Mpa
Place the cleaner as close to the water supply system as possible.
Water supply from the water main
- (pict.5 pos. ⑤) Connect a supply hose (not included) to the water inlet of the unit and to the water supply (max. pressure 10 bar).
- (pict.6 pos. ④) Connect high pressure hose to the machine connection and turn on the water tap.
The cleaner can be connected directly to the mains drinking water supply hose is fitted with a backflow preventer valve as per current regulations in force.
Make sure that the hose is at least 0.13mm and that it is reinforced.
Failure to comply with the above conditions causes serious mechanical damage to the pump and the loss of warranty cover.
> HIGH PRESSURE HOSE
WARNING: The high pressure hose is designed and produced to withstand high pressures. To avoid damage, it must be handled with special care.
Misuse may lead to premature breakages or damage and cause the loss of warranty cover. See illustrations (pict.24). Use the hydrocleaner only if the hose is completely uncoiled and extended.
> ELECTRICITY SUPPLY
- The appliance's electrical connection must comply with the IEC 364 standard.
IMPORTANT: Before connecting the appliance, make sure that the nameplate data are the same as those of the electrical mains and that the socket is protected by a differential security breaker with tripping sensitivity below 0.03 A - 30 ms. - If the appliance's plug is not compatible with the socket, have the socket replaced with another of suitable type by professionally qualified staff.
- Never use the appliance in ambient temperatures below 0^ if it is equipped with a PVC (H VV-F) cable.
Check that the mains voltage is the same as that of your machine, indicated on the technical data plate. Your electrical system must be constructed by qualified technicians capable of working in accordance with the requirements of the regulations in force (earth connection, fuses, differential security breaker, etc).
In case of failure to comply with one of the regulations stated above, the manufacturer declines all responsibility for the staff and provides no warranty.
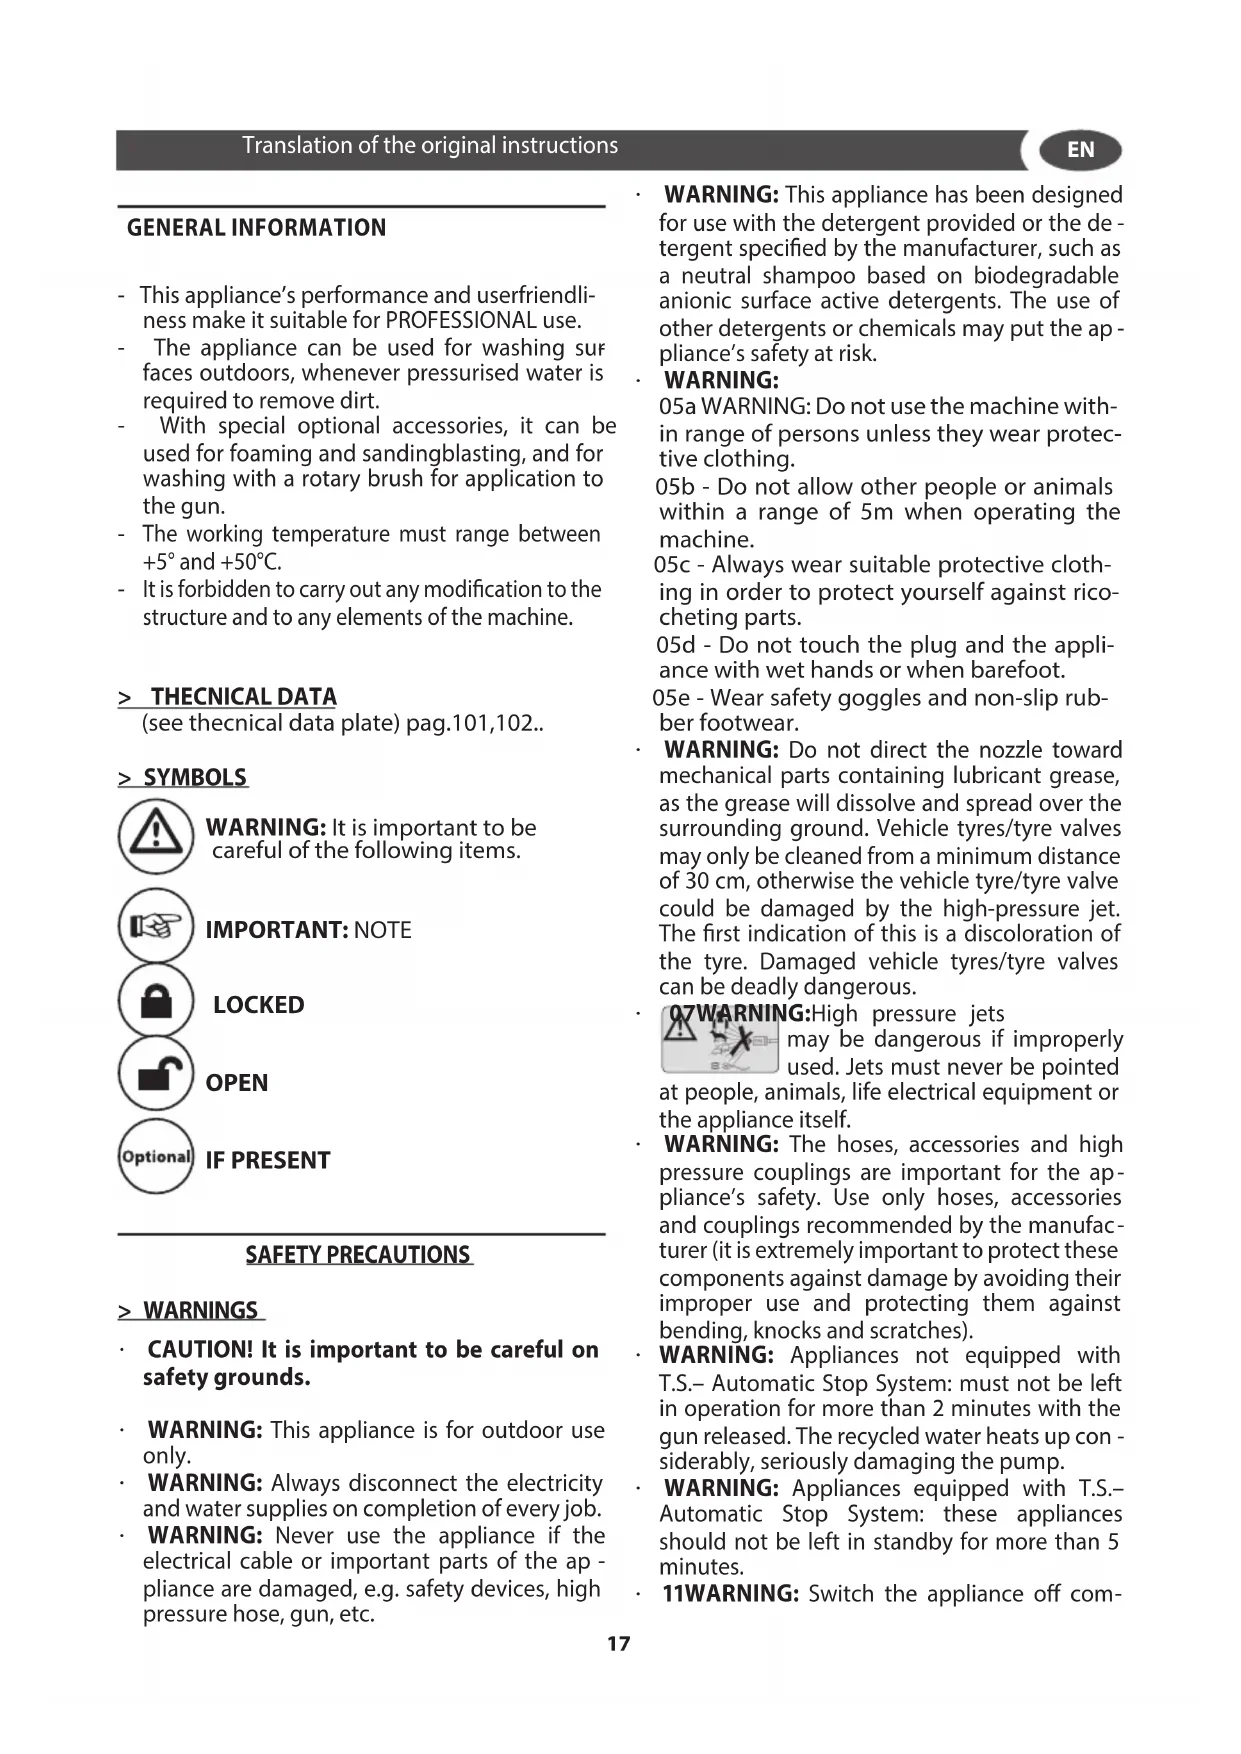
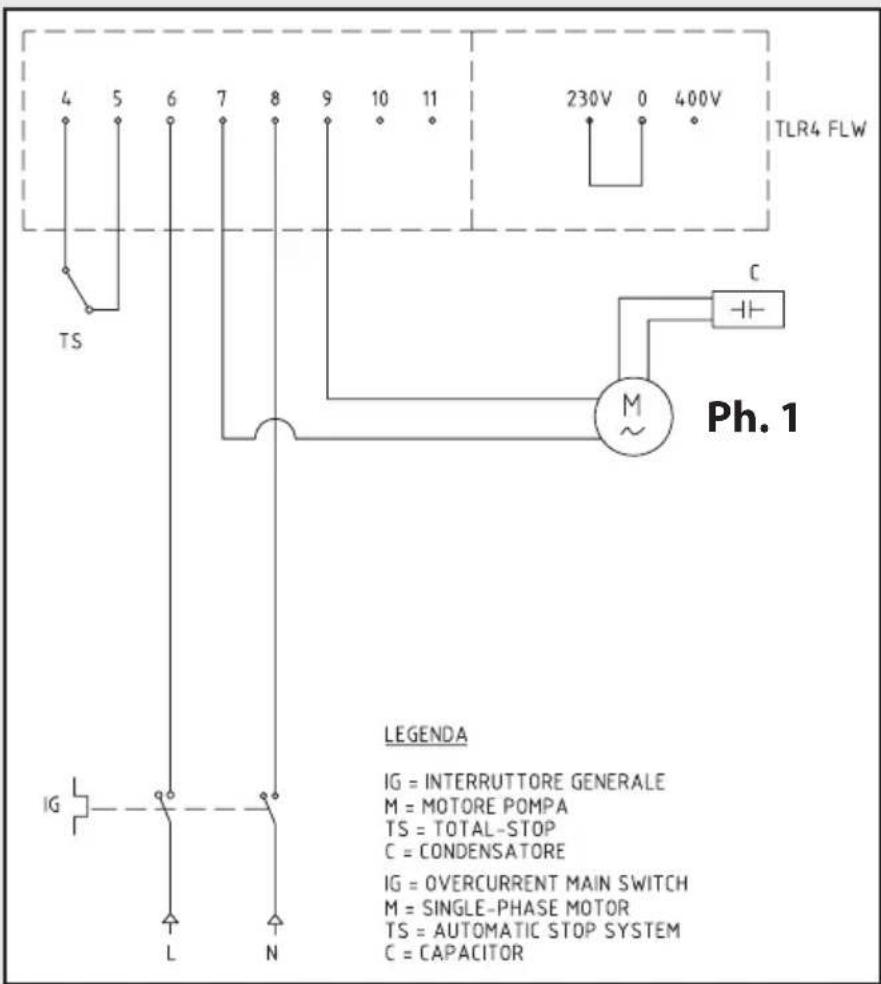
IMPORTANT: Regarding three-phase motors, pay attention to the connection of the electric cable to the plug (see electric diagram). - XY WARNING: Inadequate extension cords can be dangerous.
XJWARNING :If an extension cord is used, the plug and socket must be of watertight construction.
Information for supply may also be obtained from the plug manufacturer.
230-240V 400-415V
3G 2,5 mm²
4G 2,5 mm²
max 20 m max 30 m
T.S.
(if fitted)
Machines equipped with Total Stop:
- When the machine is working, by releasing the gun lever, the motor stops automatically to prevent component wear during the pump bypass phase (motor in stand-by).
- By pressing the gun lever the motor starts automatically.
WARNING: do not leave the stand-by mode active for more than 5 minutes. - At the end of the operation, set the switch to "OFF".
TS Total Stop 24V
(if fitted)
Machines equipped with delayed, low-voltage Total Stop:
- When the machine is working, by releasing the gun lever, after approximately 15 seconds the motor stops automatically to prevent component wear during the pump by-pass phase (motor in stand-by).
- By pressing the gun lever the motor starts automatically.
WARNING: do not leave the stand-by mode active for more than 5 minutes. - At the end of the operation, set the switch to "OFF".
IMPORTANT: (pict.11). It is advisable to put on the safety of the pistol trigger whenever the machine is stopped, in order to avoid unintentional starting.
- Any automatic start of the machine without pressing the gun trigger is attributable to air bubbles in the water or other similar phenomena which do not imply the existence of any defects in the machine.
- Please check that the coupling of the high pressure hose with the appliance and the gun supplied as standard equipments made correctly, that is to say without any water leak.
> PRESSURE REGULATOR
If the appliance is equipped with a pressure regulator:
- when the pressure is set to minimum the T.S.may not trigger. Therefore, do not allow the appliance to function in by-pass for more than 1 minute.
- do not act on the gun lever too frequently (this
may cause a malfunction).
> INSTALLATION
- (0) (pict.4) Check that the master switch is turned to "OFF" and that the water filter is fitted into the pump's inlet pipe (pict.5 pos. ⑤).
- (pict.5 pos. ⑩) Screw the snap connection into place by hand, without the aid of tools.
- Connect the water supply hose to the snap connection. The hose must have an inside diameter of at least 13mm (1/2^ )
- (pict.6 pos. ④) Connect the high pressure hose to the pump's outlet pipe. Press the high pressure hose coupling fully down and then screw into place by hand without the aid of tools.
- (pict.7) Connect the high pressure hose to the gun.
- Turn the water tap fully on. The water temperature absolutely must be below 40^ .
IMPORTANT: The washer machine has to operate with clean water in order to avoid any damages to the washer machine itself.
- (pict.11)Release the gun safety catch and keep the trigger pressed, allowing the water to flow until all the air has been expelled.
- (pict.8) Fit the lance into the gun.
- Fit the nozzle into the lance.
- Connect the plug to the power socket.
>1ST START-UP
When starting up for the first time or after a long period out of use, connect the intake line only for a few minutes so that any dirt is vented from the delivery outlet
> START-UP
IMPORTANT: (pict.12,13) Whenever using the high-pressure cleaner, users are urged to hold the gun in the correct position, with one hand on the grip and the other on the spray rod.
- To start the machine, press the gun trigger and at the same time turn the master switch to "ON"
> DETERGENT SUCTION
(pict.3, pos.8) Fill up the detergent tank with the suggested products, suitable for the kind of washing to be carried out.
- CAUTION: Make use only of liquid detergent, do not absolutely use acid or too much alkaline products. We suggest you to make use of our products, which have been studied for the use with washer machines.
- CAUTION: For proper use of the tank, do not introduce flammable or chemically harsh substances.
The adjusting head allows you to select water jet at low and high pressure. Pressure can be adjusted by acting on nozzle knob (pict.17): pict.B means low pressure, A means high pressure. The selection of low or high pressure shall be carried out with gun in closed position. The detergent suction is automatic when the adjusting head of the lance is positioned for low pressure operation. When you start the machine, the mixing of the detergent with the water is automatic at the water passage.
> APPLIANCES PROVIDED WITH THERMAL VALVE (OPTIONAL)
This device enables the machine's by-pass operation through automatic water discharge whenever it reaches a temperature of nearly 60^ and cooling working components.
- CAUTION: appliances that are not provided with this disposal must not operate for more than 2 minutes with released gun. Recycled water raises its temperature remarkably causing great damages to the pump.
> GUN SAFETY DEVICE
Whenever the machine has to be stopped, it is important to engage the safety catch (pict.14, pos. S) on the gun so that it cannot be operated accidentally.
>STORAGE
(pict.17,18,19,20)
- Move the machine only by grasping the carrying handle
- Store the appliance and the accessories in a frost-safe room.
Appliances and accessories that are not completely drained can be destroyed by frost. Completely drain appliance and accessories and protect them against frost.
To avoid damage:
- Detach the appliance from the water supply.
- Detach spray lance from the trigger gun.
- Switch the appliance on ("I/ON"), press the trigger gun lever until no further water is discharged (approx. 1 min). - Turn off the appliance (pict.21).- Store the appliance and the entire accessories in a frost free room (pict.22).
CARE AND MAINTENANCE
SCHEDUED MAINTENANCE PLAN Visit www.lavorservice.com website and download the scheduled maintenance plan.
IMPORTANT: Before doing any work on the cleaner, discharge the pressure and disconnect the electricity and water supplies.
Check the oil level periodically. The oil must be changed for the first time after 50 working hours, with subsequent changes every 500 hours. SAE 20/30 oil is recommended - Oil capacity 0.5Kg
CHECKING THE WATER INTAKE FILTER
Inspect and clean the water intake filter (pict.23) on the intake union periodically. This is important to prevent fouling which may impair operation of the pump.
REPLACING THE SPRAY ROD NOZZLE
Replace the nozzle when the pressure drops below the normal values.
ELECTRICAL CORD
- WARNING: Take care not damage the electric cable. Have a damaged power cord replaced immediately by an authorized service point or an electrical specialist.
> ELECTRIC DIAGRAM
See illustrations, page 100.
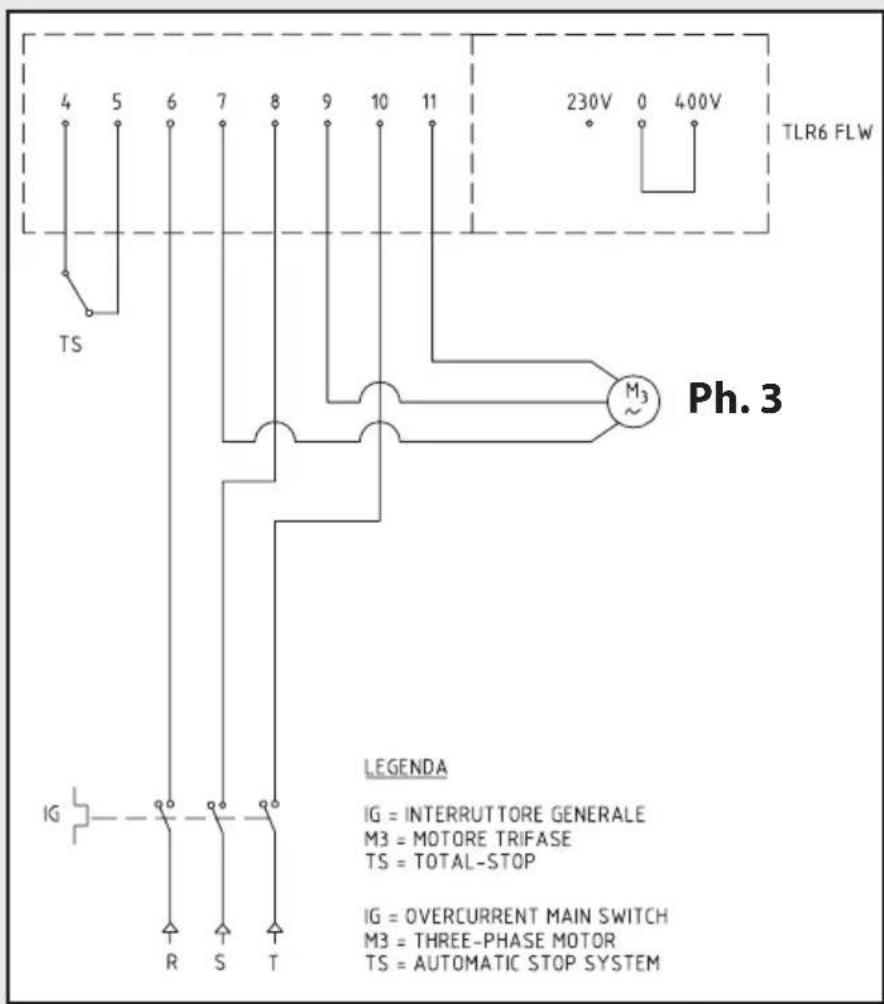
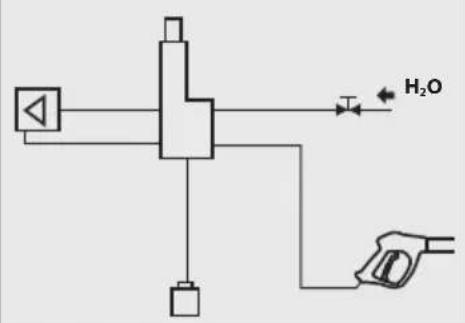
WATERDIAGRAM
See illustrations, page 100.
WARRANTY CONDITIONS
All our machines are subjected to strict tests and are covered against manufacturing defects in accord - 21ance with applicable regulations. The warranty is
EN
effective from the date of purchase.
The following are not included in the warranty: - Parts subject to normal wear. - Rubber parts, charcoal, filters and the accessories and optional accessories. - Accidental damage, caused by transport, neglect or inadequate treatment, incorrect or improper use and installation failing - The warranty shall not cover any cleaning operations to which the operative components may be subjected, such as clogged nozzles and filter blocked due to limestone.
> DISPOSAL

As the owner of electrical or electronic equipment, the law (in accordance with the EU Directive 2012/19/EU on waste from electrical and electronic equipment and the national laws of the
EU Member States that have implemented this Directive) prohibits you from disposing of this product or its electrical / electronic accessories as municipal solid waste and obliges you to make use of the appropriate waste collection facilities. The product can be disposed of by returning it to the distributor when a new product is purchased. The new product must be equivalent to that being disposed of. Disposing of the product in the environment can cause great harm to the environment itself and human health.
The symbol in the figure indicates the urban waste containers and it is strictly prohibited to dispose of the equipment in these containers. Non-compliance with the regulations stipulated in the Directive 2012/19/EU and the decrees implemented in the various EU Member States is administratively punishable.
> REPAIRS - SPARE PARTS
For any problems not mentioned in this manual, or if the machine breaks down, you are urged to contact an Authorized After-Sales Service for the relative repair or for any replacement of components with original spare parts. Use exclusively original replacement parts.
> TROUBLESHOOTING
Before doing any work on the machine, disconnect the electricity and water supplies and discharge the pressure. Proceed systematically to identify faults following the chart below; if you are still unable to eliminate the problem, call in the Authorized After-Sales Service.
| Fault | When switch “ON” the machine will not start working |
| Cause - Plug not | properly inserted in socket. - Electric socket is faulty. - The main voltage is insuf - ficient. - The pump is stuck. - Gauge of extension lead not sufficient. |
| Repair | - Fit plug in power socke correctly. - Have electrical socket checked. - Have a check made on the suitability of the mains system. - Turn switch to ON while keeping nozzle trigger pressed; if problem persists, contact an authorised service centre. - Refer to maintenance section. |
| Fault | The motor stops suddenly |
| Cause - Thermic | safety switch has tripped due to the overheating. - Cable extension seems to be inadequate. |
| Repair | - Leave motor to cool for a few minutes. If the problem persists, contact an authorised service centre. - Refer to maintain section. |
| Fault | The pump doesn't reach the necessary pressure |
| Cause - Insufficient flow. | - Water inlet filter is clogged. - Suction/delivery valves are clogged or worn out. - Pressure regulator valv set on minimum. - The nozzle is worn out. |
| Repair | ·Check that the delivery rate is 30% higher than the value stated on the appliance's technical data plate. ·Remove and clean the filter. ·Contact an authorised service centre. ·Increase the pressure by screwing in the pressure regulator knob. ·Replace the nozzle. |
| Repair | - Contact an authorised service centre. - Tighten the unions; if the problem persists, contact an authorised service centre. - Contact an authorised service centre. - Tighten the unions; if the problem persists, contact an authorised service centre. |
| Fault | Fluctuating pressure |
| Cause - The nozzle is either clogged or deformed. - Suction/delivery valves are clogged or worn out. - Worn gaskets. - Pressure regulator valve gaskets worn. - The filter is dirty. | - Dismantle the lance and clean the nozzle with the pin provided. - Contact an authorised ser - vice centre. - Contact an authorised ser - vice centre. - Contact an authorised ser - vice centre. - Remove and clean the filter. |
| Repair |
| Fault | Abnormal noise |
| Cause - Suction | delivery valves are clogged or worn out. - Worn bearings. - The filter is dirty. - Extreme water temperature. |
| Repair | Contact an authorised service centre. Contact an authorised service centre. Remove and clean the filter. Bring the temperature under 50°. |
| Fault | Water leak from appliance |
| Cause - Water leaking from the pump. - Leaks from hose reel (if present). - Leaks from pressure regulator valve. - Leaks from water unions. |
| Fault | Water is in the oil |
| Cause | - O-rings (water and oil) are worn out. |
| Repair | - Contact an authorised service centre. |
| Fault | The machine does not suck wax or detergent |
| Cause - Tanks empty. | - Rod knob on high pressure position. - Disconnected pipe in detergent suction system. |
| Repair | - Replace oil with double frequency that is suggested. - Fill the tanks. - Turn it to the low pressure position. - Return it into position. |
INDICATIONS GÉNÉRALES
> UTILISATION PRÉVUES
TS Total Stop (si incluse)
> CONDITIONS DE GARANTIE
> CONDITIONS DE GARANTIE
> MACHINE UITGEVOERD MET THERMI-SCHEKLEP (OPTIE)
kai kateβaote to npoypauma npoypaumatoueVwv oepic.

> HAEKTPIKO DIAPAMMA
BHIMAHHE: Boda, kOTopaI npoxoIte3 npOTIBOTOK, cHTaeTcH He NITbeBOI
BHMaHne - OnachOcTb!
IcnoJb3yInTe TOnbKO fNtPOBaHHyU nIN YnCTyO BDOy. Pa36OpHbI KpaH BoDbl OJXeH oBecneuNbTb NODaU, 06beM KOToPoi BDBOE PpeBbIshaet MaKcIMaJIbHyIO IpON3BOIDTEJBHOCTb HaOcCa.
- MnHmAbbHa npOn3BODnteHbHOCTb: 20 n/ MnH.
- MakcimambHa TEmnepaTpa BoBla Ha BXOJe: 40°C
- MakcmaJIbHOe daBHeHne BOdyHa BXOJe: 1Mpa
Inpoouunctntelcneyet pa3MeaTaKaK MoXHO 6nke K BOOCha6ntelbHoi CETn.
Iopaaya BOdbI OT BOOnpOBOHOn CETN
-Подсоeннге rбкишанг поачвовы (He BXoДТВ KOMплeКТ NOCTaВКИ) K WtUepy Дя BAOBi Ha annapate (pnc. 5 po3. ⑤)и K nCToUHnky noDAuN BODbl (MaKc. dAblenhe 10 6ap).
CoeINHITb Tpy6y BbICOKO r daBHeHn C MyTOBbIM CoeINHeHnEM BbIXoJa BObl N3 annapata (pnc.6 no3. 4) n OTKpbITb BOJHOI KpaH.
IindpooHCTeINb MOxHO NOKIOUaTb HEnOcpeDCTBeHHO K O6uEMy BOOnPOBOy TnTbeBOrO BDOChA6JKeHnra ToNbKO npu ycNoBn, UTO B Tpy6OpBODe NODaun BoDbl yCTaHOBne-HO YCTPOIcTB0 3auntbI OT o6paTHoro nToKa C ONOPOKHeHnEM, COOTBeTCTByIOUe e DeiCTByIOUIM HopMaTnBaM. Y6eNTecb B TOM, UTO WJaHr YcJIeH, a erO dNaMeTp CoCTaBnReT He MeHee 13MM
Heco6IIOJeHne BbIeuyKa3aHHbIX ycNoBn npINBOJNT K cepBe3HOMy MexaHnueckOMy NOBpeXKeHnIO HacOca, a TaKxE K nOTepe rapaHTm.
> UJIAHr BblCOKOTo DABJIeHnIa
BHIMAHNE:KoHCTpykunu n u3roTOBHeHne
RU
BbICOKOHaOpHOro ⅢJHaRa N03BOJAreT emy BbldepxkBaTb BblcOKoe daBneHne. Bo n36exaHne NOBpeXdEHN C Hm cJeDyET o6paatbcra c Oco6oONctopoXHOCTbIO.
HeaJIeKaIe ee 6paueHne MoKet npVBecTN K npexKeBpeMeHHbIM NOBpeXDeHnA M Nn HApIOMAM I, KaK CNeIcTBnE, K npekpaueHIO DeIcTBnRA rapaHTm (pnc.24).
> CNTEMA 3JEKTPONITAHNIA
-Подкlioуене annapaТа Kэл ekTpocetNdoJxHo coOTBeTCTBOBaTb cTaHapTy IEC 364.
Ipejxde yem noKlnuOHTb annapaT K cetn y6eINTecb B TOM, yTO daHHbIe Ha fnpMeHHoT Ta6JNue COOTBeTCTBYOT XapaKTepNCtUKaM 3JIeKTPnueCKo CETn I PO3ETKa 3aUHcHa aBTOMaTHueCKm IpeOxpaHNTeJbHbIM BblIOUaTeJeM, cpa6aTBiaIOUIm npi NOABLeHN TOKa yTeKN, C nopOROBOn yBCTBnTEJbHOCTbIO HNXe 0,03A-30MC.
- Ecnn ceteBaBnka annapaTa He noDxOuNT K po3eTKe, 3aMeHnte po3eTKy Ha nOxDxOJaUyU, dIra 3TOrO o6paTntecb K cneuaJIInCTy.
He nCnoIb3OBA Tb annapaT npn TemnepaType Hnke 0^ ,ecn OH ochaueH uHaHrom n3 nbx (H V-F).
y6eHbBcB COOTBeCTBnN 3neKtpnuecko Cetn C daHHbIMn PnPBedeHHbIMn Ha nDeHTnΦnKaunOH Ho Ta6nUKe Ha rnpooocntTeNE. PoKnIOye Hne rnpooocntTeJr DOxHNO pOn3BOITbcr TOIbKO KbaINΦnUPOBAHbIM 3neKtpNKOM B COOTBeCTBnC DeNCTByIOuIMN HopMaMn KacaIOuXcra3aEMHeHn, npedoxpahnteNe n 3aUnTHbIX yCTPOINCTB).
IIO6oI yUeep6, BBi3BaHHbI HecO6JIIOJeHem BblweyKa3aHHbIX HopM BeTeK npeKpaueHIO DeiCTBnra rapaHTnHbIX ycNoBn I BeTe K nONHOMy CHATNIO BCAKO OTBeTCTBeHHOCTn CO CTOPHOI fHpMbI-N3rOTOBuTEJI.
BAXHO: 6paTb 0co6oe BHNMaHne Ha NOdcoeINHeHne 3NeKtpoka6eN TpexΦa3HbIX DBnIraTeJe C PO3eTKoJ (CMOTpeTb 3NeKtpocxemy).
XY BHUMAHNE: HenoOxOJaUne ydInHnTeJI MOryT npEcdTabJrTo b OnaCHOCTb.
XJ BHIMAHHE:Пи ИСПОЛБ3OBaHnnydINHITeIbHOrO Ka6eNЯ WTeKePи po3eTKaДOLKHBi 6bITb BOHOHePOnHuaEМbIMn,akabIbdoJIkeHNMeTb pa3Mepbl,pnBedeHHbIeB cneDyUoSeY Ta6nue.
230-240V 400-415V
3G 2,5 mm²
4G 2,5 mm²
max 20 m max 30 m
TS Total Stop (ecnn ectb)
MaunHbCfynKcnei Total Stop:
- Ppi OTnyckaHn pbyiura nuctoIeta B ycNoBnx pa60tbl annapata DBuratEnb ABTomauYeCKN BbIKIOUaEcTc, PpeDynpexJaTe TM CaMbIM N3HOC KOMNOHeTOB Ha 3TaNe 6xOda Hacoca (DBuratEnb PBexKMe OxuHaHna).
- Ppn Haxatn Ha pbiuar nctoJeTa dBurTaIb aBTOMaTneCKn 3anyCKaeTc.
BHIMAHHE: He octabTb annapaT B pexime oXnDaHna 6oJee 5 MNHyT. - Pocne 3aBepueHn pa60tby yCTaHOBNTb BblouateIb B noJoxHe «Bbl.
TS Total Stop 24V
MaunHb c fynKcne 3aepKk Total Stop n Hn3KOBOJbTHbIM HaipjKeHnEM:
Cnyctra npimepno 15 cekynd nocne otnyckanhy pblura nictoleta B ycnoBnx pa60tbi annapata DBNrAteIb aBTOMATnueCKN BblKIOUaETCA, npedynpexkdaTem cambIM u3HOC KOMNOHETOB Ha 3Taane o6xoHa HAcoca (DBNrAteIb B peXmE OxndaHna).
- Ppn Haxatn Ha pbiuar nctoJeTa dBnraTeIb abTomaueckn 3anyckaetc.
BHIMAHHE: He ocTabIaTb annapat B peXnme oXnDaHn8 6OJIe 5 MNHyT.
- Pocne 3aBepueHna pa60tby yCTaHOBnTb BblouateIb b noJoxeHne «BblI.»
BAXHO: (pnc. 11) NoTOMy uelecoo6pa3HOn npn KaKdoN OCTaHOBKe MaunHbI CTaBNTb NCTOJET Ha npedeoxpaHnteJb, pacnoLoXeHHbI Ha CnyCKOBOM KpUoyKe, BO n36exKaHne CnyauHOrO BKluOeHnMaunHbl.
- Camonpon3BolbHoe BKNIOUeHne MaunHbI 6e3 Haxatna Ha NCTOJET MOKET npou3oHTn, HApnPmep, n3-3a Ny3bIPbKOB BO3dyxa BBOJe.
-Проверьт e npaBnIbHocTb coeINHeHnHaNoPHorO 7naHra C annapaTom n npeducmOTpeHHbIM B KaueCTBeOBopydoBaHnI NICTOJeTOM.
PERYIATOPOM DABNEHNA
EcnMaunHa Cha6KeHa peryIaTOpOM daBHeHnA:
CdaBneHnem,OTpeRyInpoBaHHbIM Ha MmHImaJIb HyIO BENuHy,ABTOMaTNueCKa NocJeIOBaTeNbHOCTb BKIOUeHn (T.S.) MoKeT He BMeuATcR. CneoBaTeJbHo, n36eraTb pa60Tb MaUNHb I nepenycke 6OJee 1 MNHTbl.
- I36eraTb BkIoueHn pbIyara NICTOJeTa C NOBbl -WeHHo YactOTOn (MOrY T Bbl3BaTb OCTaHOBbl IN NobpeKdEHHa).
>YCTAHOBKA
- PpOBepbTe, yTO6bl OCHOBHO BbIKIOUaTeIb HaxOuINcB nOJKeHn "OFF" (0) (pnc.4), a BOJHOH NlTp 6bl yCTaHOBJeH Ha BnyCKHOI NaTPy60K (pnc.5 no3.⑤).
- (pnc.5 no3. 10) YcTaHOBnTe coeHHeHne dIy IJIaHaRa nOdaun BOdbl BpyHyIO, 6e3 NOMoUINHCTpyMeHTOB.
- POncoeHnHTe ⅢaHr Noaayn BObI K coeHNHeHIO. BHyTpEHn DnaMeTp ⅢaHaRa dOJKeH 6bITb He MeHee 13 MM (1/2").
- (pnc.6 no3. ④)ПОДСоЕДИНTEШанг ВсICOKORO Давлиеня К ВыпунсHOMу nATpy6ky. НадаВиTe Ha COeДИнHeHne Шанг ВсICOKORO Давлиеня Do улopa и 3aTeМпрКPyTnte erO BpyHyU, 6e3 ПOMоци ИНСТPyмEHTOB.
- (pnc.7) ПОДСоЕДИНITE WJIанг BBICOKORO Давлиеня К ВОДЯHOMY ПИСТОЛЕТY.
-Полноctью OTКpoITe KpaH NOДaЧи BOДы. Temпepатура подааБМои BOДы ДОЛЖHa 6bITb MeHee 40^
BAXHO: Pa60b1 MoKn DOJXHa NCIOJIb3OBAbC8 YIcTa8 BOa BO n36eKaHne ee NOBpeKdEHH. - (pnc.11)Tnyctnte 6IokupaTop Kypka BoJHoro NICTOJeTa HaxMITE Ha KypOK, Do BbIXOda BO3dyxa n3 wJnaHra.
- (pnc.8) YcTaHOBnTe KOnBe Ha nIcToJeT
BCTaBbTe BUNKy Bpo3eTKy.
> BBOI B 3KCIpyATAUIO. INPBbI 3AInyCK
Iocne IInTeBHO OCTaHOBKn IIN npn nepbOM 3anycke, Heo6xOIMo NOcOeHNHTb BCacbiBaIOyIO Tpy6y Ha HeCKoJIbKO MmHyT dNn BblNycka BO3MOXHbIe HOpOJHbIe TeJa N BO n36exKaHne 3acopeHn foPCsyHKn nCTOneTa.
>3ANYCK
BAXHO: (pnc.12,13) Čeρka nICTOJET B npabunbHOM noIooKeHn, pyka c OndH CTOpOHbl, n CXBaTtB KOnbe c dpyroCTOpOHbl.
-ДяЗаусka obopydOBaHЯ HaxMnte Ha KypOK BOJHOrO NICTOJIeTa N OJHOBpeMeHHO npUBeIte OCHOBHOn BbIKJIouaTeJIb B noLoXeHne "ON".
> BCACbIBAHNE MOIOUeRO CPEdCTBA
(pnc.3,no3. ⑧ )InpoouocntteIb cnpoeKtnpoBaH InncnoB3OBaHnCpekomeHnyembIMN3roTO-BNTeJEMMOUxxCpeDCTB.
BHIMAHHE: NcNoIb3OBaTb TOnbKO XnKne MOIOUHNE CpeCTBa HN B KOEM Cnyae He NOIb3OBaTbCRA KNCblE NN CNIWKOM UeNOu-HbIE BeueCTBa. NcNoJIb3OBaHne Dpyrnx MoIOUHX CpeCTB Nn XmMkATOB MOKeT BnIyTB OTPucaTeJbHO Ha 6e3onachyko pa6Oty rNDpOoHCTNTeJI.
BHUMAHNE: B yactHOCTn, 3aIpeuaeTcBcAcbBaTb B3pbIOONaCHbIE XNIOKCTN IN Koppo3NBHbE XUMNKaTbl.
Perynnpyemar rOIOBka daet BO3MOXHOCTb Bbl-6paTb ctpyH Hn3KOro N BbICOKOro daBLeHnR. BbI6op DaBLeHnR BO3MOxEN 6laRoDapr Bpa-7aioueenra rOIOBko . DnryBvEnuHnR daBLeHnRAOBepHyTb perynpyeMyTOLOBky B HaNPaBHeHne yacOBn CTpeKN; Dnry NOHNKeHnR daBLeHnR NOBepHyTb npOTNB YACOBn CTpeKN (pnc.14).BCacbBaHne moUeero CpeCTBa npOCXODNT aBTOMaTHueCKN, KOrda perynpyeMaR OIOBka rNDpOMOHHTopa Bpaaaetc dner pa60TBI Pexkme Hn3KOro daBLeHnR (npOTNB YACOBn CTpeKN).Ppi BkInoueHHn annapata n noDaun BOdbi CMeWbAHne MOUeero CpeCTBa C BODo IPONCXODNT aBTOMaTHueCKN.
> TINDPOOUCHNTTEIIN OCHAUeHHbIE KJIANAHOMTEPMOPEYUNPOBAHNA(OIIOHOH)
3To yctpoiCTBO obycIOBnBaet pa6ote rnpoo - uHCTnTeJI B 6aIpaCHOM pexmE c aBTOMTu- yeCKIM BblyckOM BObl KOrDa BOda DOCTnraeT Tempeatpy np6n. 60^ n C oxlaXdHnem pa - 6oynx opraHOB.
BHIMAHHE:InpooocntteHHe OchaueHNbIE 3TUM yCTPOINCTBOM He DOJXHBpa6oTaTB6Oee 2 MnH npn OTnyuenceHOM nCtOneTe.
RU
TemnepaTpa peu npKyIauHHO BODbl NOBbIaETcN npBOINT K NOBpeXdHIO HAcocca.
> 3AUHTbI CTONOP NICTOJETA
Дя octaHOBKn rnpooNCTnTeNa nCNoIb3OBA Tb 3aHTbI CTOnOp (pnc.11, no3.⑤)Ha nCToJeTe BO n36eKaHne erO cnUyauHoro cpa6aTbIBaHnJ.
> XPAHEHNE INPUNBOPA
-Пибор TЯнть 3a pyuKу ДпяТранспортуpoВа_HЯ.
CLOKHTb Ka6eIb NITAHN O T3NEKTPOCeTn IN npHaJIeXHOCTN Ha yCTpOJCTBe. XpaHtB yCTpOJCTBO B cyxNX NOMeUeHNx, Bepey ot dTei.
BhimaHne
He nonHOCTbIO onOpOXHeHHbIe yCTPOINCTBa n O6OpUdOBaHne MOryT 6bITb NOBpeKdEhI pa3pyuWeHnIO npn BO3JeICTBmN MOpO3a. POnHOCTbIO onOpOXHNrB yCTPOINCTBO n PpHaadJIeXHoCTn, a TaKKe oBeCneuNTb 3aunTy OT MOpO3a.
(Fig. 17,18,19,20) Bo n36exkaHne nobpeKdHn:
-OTdennbannapaT OBOOcha6KeHHa.
- OtdeIntb ctpyHny tpy6ky ot pyuHoro nictOJeTa-pacnbilnteJIa.
- Bключntь npибop (1/ON) И нахимаънha рьчаг руноги постонета-pacnbilnteя, пoka He пpeкразиь сь BAITEKAHne BOdbl (OK. 1 MнHyTa) (Fig.21).
-Bbiklounte np6op.
-XpaHnTe npnbop n Bce npHaadneJxHocTn B 3aunueHHOM OT MOpO3a NomeeHNn (Fig.22).
TEXO6CJIyKUBAHNE
ПОГРAMMA ПЛАHOBOTO TEXOBСЛУЖИBAHAЯ
3auiTe Ha caT www.lavorservice.com
I ckaaainTe nporpaMMy nlaHOBOrO Texo6cnyKIN BaHn.

BAXKHO:пегд Вьилн HeHnem JIO6O ro poJa
epaunnoTexo6cnyxnbHnIO rnpooocnT 1y, BbInyCTntb daBneHne n OTcoeHHnTb eO OTekTPOcTeN rnpabNNuecko cnCTembl.
KOHTPOJIb yPOBn MAcIa B HACOCE
PpOBeRbI nepNoiDnueckn ypoBeH MaCna.IpeByo CmEny Macla BblOnHnTb Chee3 50 pa6OuNx YacOB, 3aTeM Chee3 KaKdIe 500.PekOMeHdyeTc npIme - HeHne Maclo SAE 20/30-BMeCTUMocTb:500r.
KOHTPOJIbФИЛbTPAACINPAUINBOДbl
IpoBepaTb n nepnoDnueckn npoynuatab hnbltp acnpauun BODbi (pnc. 23), pa3meuenHbHn Ha MyfTe BXOJa. 3TO OueHb BaxHo BO n36exKaHne 3acopeHn n CO3daHn aHomalhbx CNTyaCn B pa6ote Hacocca.
3AMEHA ΦOPCYHKN
3aMeHnTbΦOpcyKvB Cnyae cHxKeHna daBne - HnHxE HopMaIbHbIX BEnuHH.
3NEKTPONPOBOD
BHUMAHNE: O6paTntb BHIMaHne Ha To, UTo6bl He NOBpeiNb Tbe JektpoPpOBo. HeMeJeHHo 3aMeHHTb NOBpeXeHHb I npOBOd JIeKTPoPnITaHnra, O6paTnBUnc b ABTOpNtpoBaHHyO Cnyx6y 06CnyxuBaHnra KJIneHTOB/K aBTOpN3npoBaHHOMy JIeKtpnKy-CneuaNJNCTy.
> 3NEKTPOCXEMA
Cm. nllnoctpaun, ctp. 7.
> TnDPABJIuYeCKA CXEMA
Cm. nllnoctpaun, ctp.7.
> yCIOBnI rAPAHTnI
I3 rapaHTn INCKIIOUaOTc: - DBNJxUeC, NOB- BepXeHbIe N3HOCy DeTAn; - IJIaHR BblCOko- ro DaBLeHnI INPINAADNeXHOCTN, He BXODAUIE BV KOMPIEKT NOCTABKN; - ClyuAHbIe NOBpeXJeHnI INOBpeXJeHnI, INPUNHOKOTOpbIX CTANI NEpeBO3KA, H6peXHOCTb INN HENPAuINbHoe O6paueHne, INCNOJb3OBAHnE He No HA3HaueHnIO INN HENPAuINbHbIM MOHTaK, INPOTNBOpeuaSNe NOLOKeHNM PYKOBOdCTBa NO 3KcIIpyaUIN. - YcLyrN IO rapaHTn He PpeDcMaTPNBAtO OUnCTky pa6oTaOuNX qacte. RapaHTnHBIn PEMoHT BKIOUaET 3AmEHy DEΦeKT-HbIX DeTanei (3a INCKIIOUeHnEM yNAKObKN i OT- pabKn). RapaHTn He PpeDcMaTPNBaET 3AmEHy annapata INN INPODNHe RapaHTnHORO cPoka nCNE NOBLeHnI HenCnpaBHOCTN. IN3ROTOBtJIb HE Hecet OTBETCTBeHHOCTb 3A BO3MOXHbIE TpaB-Mbl INN MaTePNaIBhIn yUep6, INpNUHeHHbIe B pe3YNbTaTe HENPAuINbHOrO MOHTaKa INN HEnAd-JeJaUeIO NCNOlb3OBAHnI Annapata.
BHIMAHHE! TaKne DeΦeKTbI KaK 3a6nTbIe φOp-cyHKn, 6LoKInPOBka MaunHbI n3-3a OCTaTKOB n3-BeCTHKOBOH HaKNuN, NOBpeKdEHHbIe akceccyapbl (HaNPmep nepexKaTaI Tpy6a) u/uN MaunHbI, KO-TOpbIe He NImeOT DeΦeKTob, HE NOKPbITbl IA- PAHTNEI.
> YTNIN3AUJIA

3aKOH (B COOTBeTCTBUN C DnpeKtNB0E EC 2002/96/EC ot 27 RaHbapr 2003 roda no OTXoam 3neKtpnueckoro n 3neKtpoHHoro
obopyoBaHnHaauHOaHbHbIX 3aKOHOB rOcy -dapCTB-ueHOB EC, KOtOpbIe pa3pa6oTaII 3Ty dpeKTbBy) 3anpeaaet Bnaednbuy 3neKtpnueeCKoro IINn 3neKTPoHHORO np60pa yHnTuXKeHHe 3TOrO npOyKa Tnn erO 3neKTPnueecknx/3neKTPoHHbIX qacteB KaueCTBe TBepdbix TOpOcKnx 6bITOBbIX OT-XOIOB N O63bIbAet erO cdaBaTb 3TN OTXoDbI B CnEuaN3npoBaHHbIe ceHTpbI. MoxHo cDaTb npOdyKT HeNoCpeDCTBeHHO DnCTpN6bIoTOPy B3aMeH HOBOr OKBnBaJIeHTHO rpoNyKa. Bbl6poc npOdyKa T BOKpykaUoyu CpeDy MoKeT Haectn cepbe3hIn yueP6 camo CpeDe n 3doPobBu uenobeka. Ha pn-cynke H3o6paXeH KOteHep dIy MyHnUaNbHbIX OTXoOB; cTPOrO 3aPpeaETcB b16paCbIBaTb anPa -pat B 3TN KOtNeHepbl. Hec6nJeHne pykoOJa-uei DnpeKTHBbl 2002/96/EC n nCnoHNHeTBbIX DeKpeTob pa3nUHbIX CTpan Coo6ueCTBa nOJNE -KNT aDMNHnCTpaTNBHomHaKa3aHnIO.
> PEMOHT-3ANACHbIEYACTN
IЯ peMOHTa n npno6peTeHnrauchTeN o6paTntbC B Cneuaan3npoBaHHbI ΚeHtp no texo6cnyKuBaHIO. Nolb3OBaTbCnckLIOUHTeNbHO opnRHaNbHbIMN 3anaChbIMN YaactMn. IcNoJb3yIneNCKLIQUHTeNbHO opnRHaNbHbIe 3anaChbIe YaactN.
> HENCINPABHOCTN IN CNOCObI INX YCTPAHE - HNA
Ipeed BbINHHeHem IIO60 onepaunn Ha MaUNHe, OTKIOHTb 3JIeKTPoNTaHne, NOdauy C rNIDpaBNI -YeCKO CNCTeMbI N IOHN3uTb DaBJeHne. NocToHHO npOBepaTb Ha HAnuue HeNoJADOK No cNedyUoSei CXeMe; HO eCIn, HecMOTpHa 3TO, He ydaETcYyda- JNTb HEnOJaKy, CBXkntEcB C ABTopn3npOBaHHbIM cepBnCHbIM O6cnyKINBaHnEM.
| Hemcpnbavnoctn - Haxab BykIIOUATEb 3JIeKTPoHaCoc He npINBO-DITcB DJeCTBVe | Способь устpanени- Pa3o6paTb rIqpOMOHITOp I OuNCTNtB φорсунушпilьков BxOJЯшьВ KOMPлeКТпоставК. -ОБразьсВТВ TexHniцескь LTeHTP. -ОБразьСВТВ TexHniцескь LTeHTP. -ОБразьСВТВ TexHniцескь LTeHTP. -ОБразьСВТВ TexHniцескь LTeHTP. |
| Пччны - Вика He BCTaBNeHa B po3eTKy. -Розета He pa6Toaet. -Наряженье сети HeNoCTaTOUHO. -Hacoc 3a6nOKIpOBaH. -Сецны удINHITENHe He COOTBETCTBYUOSeE. | Hemcpnbavnoctn -Утеки Вodyl |
| Способь устpanени- BCTaBIVb BvNKU Bpo3eTKy. -Прobерпьtabpo6ToCnO6bOCTbpo3eTKn. -Прobерпь tabpo6ToCnO6bOCTb yCTaHOBK. -ПозиюнрOBaTb BvIKIIQUaTeMb Ha UITn B To We BEma HaxaTb Ha pblay nIcSTOnelTa; ecnnp6bIema npOIoJIaAeTcB o6patNTbCS B TexHniцескь LTeHTP. -ПосмOTpeT b flaby "TexOscnyKIBaHne". | Пччны -Утеки Насca. -Утеки hamatibateялшалга. -Утеки рergynipyeMOrO klanana H3HOseHb. -Утеки latpy6koB rIqrabInueckoy CnCTeMbl. |
| ДвогATeLb OCTAHABINBaETc HEOXnDAHNO | Способь устpanени -ОБразьСВТВ TexHniцескь LTeHTP. -Заверпь tabpo6Kи eс们 anHomamna npOIoJIaAeTcB o6patNTbCS B TexHniцескь LTeHTP. -ОБразьСВТВ TexHniцескь LTeHTP. -Заверпь tabpo6Kи eс们 anHomamna npOIoJIaAeTcB o6patNTbCS B TexHniцескь LTeHTP. |
| Пччны - Сра6БТВВИЕпЕТрМOBbIKNIOUATEЛЯ. -Сецны уdINHITENHa He COOTBETCTBYUOSeE. | Повышенишуm |
| Способь устpaneni - Дат b DvRiAteJIIO OCTbTb Na HeCKOLbKO MInHT. -Ес们 anHomamna npOIoJIaAeTcB o6patNTbCS B TexHniцескь LTeHTP. -ПосмOTpeT b flaby "TexOscnyKIBaHne". | Пччны - Клианы BCASbIBaHry Илп падуч 3azopenerblIIMI IN3HOseHb. -Пдшпнikи nI3HOseHb. -ВсасыбЮшйфыт засорен. -Темпepатура BXODЯшь BODы сIишkom BbICOKа. |
| Зелtrponacoc pasobTaET, HO He Na6pRaET Dablenie | Способь устpaneni -ОБразьСВТВ TexHniцескь LTeHTP. -ОБразьСВТВ TexHniцескь LTeHTP. -Ра3o6paTb I OuNCTNtB φIINlbTp. -Установпь Tempepataунунke МAKSCIMaIbHORO 3HAChENY npINBeDEHNHO B HAcTOnIeMpyKOBODCTBE. |
| Зелtrponacoc pasobTaET, HO He Na6pRaET Dablenie | Hailuches BoDbl B MaCle |
| Пччны - OvlnotnITbIbHbIe KOJIbCaIbIa | Пччны -УлnotnITbIbHbIe KOJIbCaIbIa I3HOseHbl. |
| Способь устpaneni -УбeIITbCS B TOM,ЧTo NaPap Na 30aIbIbIe 3HAChENy Na Ta6nIcKe texHniцескNs DaHbIX AnnapaTa. | Способь устpaneni -ОБразьСВТВ B TexHniцескь LTeHTP. |
| -Замен'tb Форсуну. | Annapat He BCasbIBaET MoIooee CpeDCTBO |
| Hemcpnbavnoctn - Форсунka zacopeha. -Клары bcsbIBaHry Илп podaч 3azopenerblIIMI IN3HOseHbl. -Пробakнii IN3HOseHbl. -Пробakнii peryIpyeMoro klanana H3HOseHbl. -Всасывоший ФынlbTr pI3HOseHn. | Пччны -Бak moIOUeTo cpeDCTBa nIyctO. -Руka rIqpOMOHITOp B no3Iznn BbICOKOrO daVBLeHn. -ШаHR cIcTeMb BCasbIBaHry OTcoEdnHn. |
| Способь устpaneni -Заравпь b6ak. -Поверпьъ erg в поЗицю nIh3KOrO daBLeHn. -ВocstahOBnItb nCXOJHy IO3Iznn. | Способь устpaneni -Заравпь b6ak. -Поверпьъ erg в поЗицю nIh3KOrO daBLeHn. |
INTRODUÇÃO
> UTILIZACAO PREVISTA
jlll lal baii liy jlll baiy
aag a ccll jy clll jn Jnn Lg, yssll
y
y
1.60364 IEC
"
.ms30-A0,03
J 1
0 1
(FHW) 1
JyX
a
| 230-240V | 400-415V |
| 3G 2,5 mm2 | 4G 2,5 mm2 |
| max 20 m | max 30 m |
()
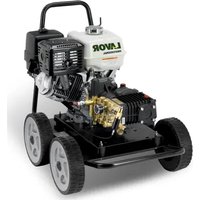
Diesel
(Diesel)
A
a 12) a
A 05
Aaill aiaIaII (OFF-0) 111
12
13
- j . a . a
14
Aaal aaa aal glal baaal aa aagaa
y 16
a 1
AisLslypepee 17
yIay IaaiyI Jg JgaiyI JaSla 18
19
()j 20
Jaiyai jayj y jy Jaiy 21
a 22
23
Aisuip 24
ylll yg gnnnngnnaa aal 1
aal 1 aal J 1 1 1 1 1 1 1 1 1 1 1 1 1 1 1 1 1 1 1 1 1 1 1 1 1
1jiaqaii 5y
xJ
A
aannnnnnae
y
Ae (OFF)
Aolal Cg
a
y
jglg

T.S
Total Stop
:J5U J3U 0
jaiy jay jay jay jay jay jay jay jay jay jay jay jay jay jay jay jay jay jay jay jay jay jay jay jay jay jay jay jay jay jay jay jay jay jay jay jay jay jay jay jay jay jay jay jay jay jay jay jay jay jay j
j
A

( s) = s^2 ds


G

Optional

www.lavorservice.com
.
aicui
01
02
03
04
Aaill Aaa aayy 1 y
SCHEMA ELETTRICO
ELECTRIC DIAGRAM
- SCHEMA ELECTRIQUE
- ELEKTROSCHEMA
- ESQUEMA ELECTRICO
- ELEKTRICITEITSSCHEMA
- HAEKTPIKO ΔIATPAMMA
- SÄHÖKAAVIO
- 3ЛЕКТСХEMA
- ESQUEMA ELECTRICO
- ELEKTRICNA SHEMA
- ELEKTRICNA SHEMA
SCHEMA IDRICO
- WATERDIAGRAM
- SCHEMA HYDRAULIQUE
WASSERUMLAUFSCHEMA - ESQUEMA HÍDRICO
WATERSCHEMA - ΣXEΔIO YΔPEYΣHΣ
- VEDENKYTKENTÄKAAVIO
- ΓιπρΑΡΑΒΙΝΥΕCKΑ ΚΧΕΜΑ
- ESQUEMA HIDRAULICO
- SHEMA VODENOG KRUGA
- VODOVODNA SHEMA
| MODELLO·MODEL·MODELE·MODELL·MODEL·MONTEAO·MALLI·MODEЛь·MODELO· MODEL·MODEL·MODELL·MODELL | |
| Collegamento eletrico · Power connection. · Branchement électrique · Stromanschluß ·Conexión a la red electrónica · Stroomaansluiting · Hλεκτρική σύνδεοη · Sähköliitäntä · ∃lektreueckoe ποίσουνηνηνε · Conexão electrolytica · Elektricno povezivanje · Elektricna povezava · Elförsörjning · Strømforsyning | V n° Phase Hz |
| Potenza ass. · Power consump. · Puisance · Motor · Potencia abs. en · Aansluitvermogen · Ал. IOύχς · Virrankulutus · Ποτρέβλ. мошносты Вт · Potência abs. en · Ap sorbirana snaga. · Porabljena moč · Förbrukad effekt · Adsorbert effekt | W |
| Motore · Motor · Moteur · Motor · Motor · Kivητήρας · Moottori · Двигател · Motor · Motor · Motor · Motor · Motor | |
| Prestazioni · Performance data · Caracteristicques de puissance · Leistungsdaten Potencia y rendimientos ·Capaciteit · Δεδομένα απόδοης · Suorituskyktytiedot · Θκυρуatazoионныхаразкетериски · Dados de potência · Podaci o radnom učinku · Podatki o izkoristku · Prestanda · Ytelsesdata | |
| Pressione di esercizio · Working Pressure · Pression de service · Arbeitsdruck · Presiòn de trabajo · Werkdruk · Пίεη · Paine · Давлие · Pressão · Pritisak · Tlak · Tryck · Trykk | bar (MPa) |
| Pressione max. · Pressure max. · Pression max. · Druck max. · Presión max. · Max. druk · Мéviçosη πίεη · Paine max. · Мaks. давлие · Pressão max. · Maks.pritisak. · Najvišji tlak · Maximaltryck · Maksimal trykk | bar max. (MPa) max. |
| Portata Max. · Volume Max. · Dèbit Max. · Leistung Max. · Caudal Max. · Max. Debit · Méviçosη παροχή· Syöttövirtaama (max) · Мaks. Прочьная способость · Capacidade max. · Maks. nosivost. · Največja zmogljivost · Maximal effekt · Maksimal kapasitet | max I/min π/ min |
| Peso · Weight · Poids · Gewicht · Peso · Gewicht · Báρος · Paino · Bec · Peso · Težina · Teža · Vikt · Vekt | Kg |
La ditta costrutrice si riserva il diritto di modificare alla preavviso i dati indicati - The manufacturer reserves the right to modify the declared data without advance notification - La maison se reserve le droit de modifier sans préavis les données déclarées - Das Haus gehalt sich das Recht vor, die genommen Angaben ohne Vorankündigung zuändern - La entreprise se reserva el derecho de modificar sin preaviso los datos declarados - De fabrikant behoudt zich hetrecht voor om de verklaarde gegevens zonder Voorafgaand bericht te wijzigen - H KATAOKEUAOTIK ΕΑIPEIA ΕΠιρυλασει Αθικαιωμα Αν τροπιοίησιχωpi προεδοποίηη Αν Φόδεικυόμενα δεδομένα - Valmistaja pidattä oikeuden muuttaa tietoja ilman erillista ilmoitusta - ΙβROTOBITEL ΜEET ΠΡΑΟ BHCNTB

I3MeHnB yka3aHHbIe IaHHbIe 6e3 npEynpExHn. - A Empresa fabricante reserva-se o direito de modificar os dados indicados sem aviso previo. - Poduzec proizvodač ostavlja sebi na pravo da unese izmjene navedenih podataka bez da prethodno obavijesti o tome - Podjetje proizvajlca si pridržuje pravico do spremembe navedenih podatkov brez vnaprejsnjega obvestila - Tillverkaren forbehaller sig ratten att utan foregäende meddelande andra de angiva uppgifterna - Produsenten forbeholder seg retten til a endre de angitte dataene uten forhandsvarsel
| Collegamento idrlico. • Water connection. • Branchement de l'eau. • Wasseranschluß. • Conexión a la red de agua. • Wateraansluiting. • Yδατικό Μουνδεοη. • Vesiliitäntä. • Γίπρανλυνεcksο πούcoεινης • Ligação de agua. • Povezivanje sa vodom. • Vodovodna povezava. • Vattenanslutning. • Tilkobling til vannettet. | ||
| Temp. di alimentazione (max.) • Supply temp. (max.) • Temp. maxi. d'arrivée d'eau • Zulauftemp. (max.) • Temp. del agua de entrada (max.) • Aanvoertemperatuur (max.) • Θερμ. trροφόδότηος (μέγιση) • Syöttölampötila max. • Bremn noáu (máčc.) • Temp. de admissão (max.) • Vrijeme napajanja (maks.) • Temperatura napajanja (najveć) • Matningstemperatur (max) • Forsyningstemperatur (maksimal) | °C 40 | |
| Portata di alimentazione (min.) • Supply rate (min.) • Débit mini. d'arrivée d'eau • Zulaufmerge (mid.) • Caudal de alimentación (min.) • Min. ingaande water debiet • Παροχή trροφόδóτηος (ελάχιση) • Syöttövirtaama (min) • Προρуckná瘴octb noáu (mín.) • Quantidade de admissão (min.) • Nosivostnapajanja (min.) • Zmogljivostnapajanja (min) • Matningseffekt (min.) • Forsyningskapasitet (minimal) | I/min π/ MmN 25 | |
| Pressione entrata max. • Pressure inlet max. • Pression entrée max. • Druck Einlauf max. • Presión entrada max. • Toevoedruk • Méγιση πεση εισόδου • Syöttöpaine max. • Mák. Bxodnóe daílvène • Pressão entrada max. • Maksimalni ulazni pritisak • Maksimalni tlak na vstopu | MPa 1 | |
| Prevalenza per alimentaz. da serbatoio • Suction height from a tank • Hauteur d'aspiration dans un réservoir • Saughohe aus offenem Behalter • Altura de aspiración desde un recipientie • Aanzuighoogte van een tank • Yπεροχή για τροφόδότηος από δεξαμενή • Pääasialisesti sällösyööttöinen • Всotasnapopa n3-3a noáu ch on 6ika • Altura para alimentação desde reservatório • Prevaga za napajanje iz spremnika • Sesalna visina za napajanje posode | m 1 | |
| Forza di reazione sulla pistola alla pressione di lavoro (max) • Recoil force of gun at operating pressure (max) • Force de recul au niveau de la pistole à la pression de service maxi• Rückstoßkraft an der Handspritzpirbole • Fuerza de retroceso en la pistola a max. presión de trabajo • Terugstotende kracht op het spuitpirstool bij werkdruk (max) • Δúvαμη αντιδρασηtou πιστολιου υεκασμού • Pistoolin takaiskukky työpaineeseen nähden • Peakuzonná cima nictoleta piñs páoczem dàvallén • Forca de repulsao na pistola com uma pressão de regime (max.) • Jaçaina reakcije pistoljua o odnosu na radni pritisak (maks.) • Reakcijska sila na brizgalki z delovnim tlakom (najveć) • Reaktionskraft på pistolen vid (maximalt) driftstryck Mättt • Reaksjonskraft for pistolen ved arbeidstrykk (maksimalt) | N 26 - 50 | |
| Vibrazioni trasmesse all'utilizzatore • Arm vibrations • Vibrations transmits à l'utiliseur • Effektivbeschleunigung Hand-Arm Vibrationswert • Vibraciones transmitidas al usorio • Op de gebrüker overgebrachte trillingen • Taλavτωοεις μεταδομενες στον χρηση • Efektivivenen kihtyyuys känden-käsiivarren tärinäarvo • ΕφέκτινBHe yscopēne Bvibraçuni Kinstb/pукa • Acceleração efectiva, valor relativo à vibrationação maior-braco • Vibracije koje se prenose na korisnika • prenos vibracij na uporabnika • Vibrationer som überförs till användaren • Vibrasjoner overfort til Brukeren | m/s2M/c22 - 2,3 | |
| Dimensioni • Dimensions • Dimensions • Abmessungen • Dimensiones • Maten • Διαστάσεις • Koko • Γαδapιθnhépie παρερβε • Dimensões • Dimenzije • Mere • Dimensioner • Mäl • Mäl | mm MM 760 x 410 x 750 | |
| Serbatoio detergento • Detergent tank capacity • Capacité réservoir detergent • Fassungsvermögen Reiniger • Capacidad tanque detergente • Cap. schoonmaekmiddeltank • Δεξαμενή απορριαντικού • Reservatório detergente • Pesunestesäliö • Bauchok mojuero cstrectba • Spremnik deterdženta • Posoda za cistilo • Tank med rengöringsmedel • Vaskemiddelbeholder | € 2,8 | |
IT DICHIARAZIONE CE/EU DI CONFORMITA EN CE/EU DECLARATION OF CONFORMITY FR DECLARATION DE CONFORMITE CE CE/EE CE/EU-ERKLÄRUNG BESCHEINIGUNG
ES DECLARACION DE CONFORMIDAD CE/EU CE/EUVERKLARING
PL DECLARacao DE CONFORMIDADE CE/EU
CE
Dichiara sotto la propria responsabilità che la macchina: Declares under its responsibility that the machine: Atteste sous sa responsabilité que la machine: Eklart unter der eigenen Verantwortung dass die Maschine: Declara bajo su propria responsabilitad que laquina Verkaart geheel onder eigen verantwoordelijkheid dat de machine: Declara sob propria responsabilitadque a maquina:
Lavorwash S.p.A via J.F.Kennedy, 12 - 46020 Pegognaga (MN) - Italy
IT PRODOTTO: IDROPULITRICE AD ALTA PRESSIONE EN PRODUCT: HIGH PRESSURE CLEANER FR PRODUIT: NETTOYEUR HAUTE PRESSION DE PRODUCT: HOCHDRUCKREINIGER ES PRODUCTO: (HIDRO)LIMPIADOR DE ALTA PRESI O NL PRODUCT: HOGEDRUKREINIGER PT PRODUCTO: LAVADORA DE ALTA PRESSAO
MODELLO-TIPO:
MODEL-TYPE:
MODELE-TYPE:
MODELL-TYP:
MODELO-TIPO:
MODEL-TYPE:
MODELO-TIPO:
P86.0607
é conforme alle direttive CE/EU e loro successive modificazioni, ed alle norme EN: en complies with directives CE/EU, and subsequent modifications, and the standards EN: est conforme aux directives CE/EU et aux modifications successives ainsi qu'aux normes EN: entspricht folgenden CE/EU-Richtlinien einschließlich späteren Änderungen und EN-Normen: ta en conformidad con las directivas CE/EU y sus sucesivas modificaciones y también con la norma EN: in overeenstemming is met de Richtlijnen CE/EU en latere wijzigingen waarop en de normen EN: esta em conformidade com as direcrizes CE/EU e bem como com as normas EN e as suas sucessivas modificacoes.
2006/42/EC
2014/35/EU
2014/30/EU
2000/14/EC-2005/88/EC
2011/65/EU
EN 60335-1 EN 55014-1:2006+A1:2009+A2:2011
EN 60335-2-79 EN 55014-2:1997+AC:1997+A1:2001+A2:2008
EN 62233:2008 EN 61000-3-2:2006+A1:2009+A2:2009. EN 61000-3-3:2008. EN 61000-3-11:2000
2000/14/EC: L'apparecchiatura é definita al n°27 dell'allegato I. Procedura di valutazione della conformità secondo l'allegato V. EN 2000/14/EC: The appliance is defined by no. 27 of the enclosure I. Conformity evaluation procedure in accordance with enclosure V. FR 2000/14/EC: L'outillage est definiti par nr. 27 du annexe I. Procedure d'évaluation de la conformité conformément l'annexe V. DE 2000/14/EC: Das Gerät ist am Nr. 27 der Anlage I bestimmt. Konformitätswertungsverfahren gemäß der Anlage V. ES 2000/14/EC: El produit es definido en el n°27 anexo I. Procedimiento de evaluación de la conformidad de acuerdo con el anexo V. NL 2000/14/EC: De apparatuur wird gedefiniéd er van de n°27 volgens aanhangsel I. Wegingsmethode van de conformiteit volgens aanhangsel V. PT 2000/14 EC: O produits é définito peso n°27 anexo I. Procedimento de avaliação da conformidade de acordo com anexo V.
LpA 80dB(A) LwA
LwA 88dB(A) K (uncertainty) 1dB (A)
89dB(A)
- Livello pressione acustica
- Acoustic pressure
- Niveau de pression acoustique
Schalldruckpegel - Nivel de ruido
Geluidsdrukniveau - Nível da pressão acústica
IT Livello di potenza acustica misurato EN Acoustic power measured FR Niveau du puissance sonore mesure DE Abgemestes Schalleistungsniveau ES Nivel de potencia acustica mesurad NL Geluidsdrukniveau LwA gemeten PT Nivel de potencia acustica mensura
IT Livello di potenza acustica garantito EN Acoustic power granted FR Niveau du puissance sonore garanti DE Garantiertes Schalleistungs niveau ES Nivel de potencia acustica garantido NL Geluidsdrukniveau LwA gegardeerd PT Nivel de potencia acustica garantida
IT I fascicolo technique si trova presso EN Technical booklet at FR Dossier thecnique apres de: DE Das technische Aktenbundel befindet sich bei manual technique se encapserta en: NL Technisch dossier bij: Processo technique em:
Lavorwash S.p.A via J.F.Kennedy, 12 - 46020 Pegognaga (MN) - Italy
Direttore generale General manager FR Directeur general DE Generaldirektor ES Director general NL Algemeen directeur PT Director geral
Pegognaga 03/02/2014 Giancarlo Lanfredi
△HAΩΣH ΣYMM'OPΦΩΣHCE/EU
CE/EU TODISTUS
3AABJIEHNE O COOTBETCTBUN TPEBOAHNMRCE/EU
CE/EU-IZJAVA O SKLADNOSTI
CE/EU-IZJAVA O SKLADNOSTI

: Iakuuttaa omalla vastuullaan etta ko ne: 8nBnT noC6oO OTBeTCTBeHocTB, UTO: SL Izavlja pod lastno odgovornostjo, da je naprava H Izavljuje pod vlastitom odgovornoscu da stroj:
Lavorwash S.p.A via J.F.Kennedy, 12 - 46020 Pegognaga (MN) - Italy
II IPOI:
MHXANHMA KAOAPI\SMOY ME Y HAH\PIE\SH KORKEAPAINEPESURI
MONTEAOY-TYTIIOs
RV ANIAPAT:
TINDOOCHNTIEb BbICOKOTO DABJIENHIA
MALLI-TYYPPI:
PROIZVOD:
VISOKOTLAÇNI VODNI CISTILNI APARAT
MODEJIb-TTN:
PROIZVOD:
VISOKOTLACNI VODENI CISTAC
MODEL-VRSTE:
MODEL-TIP:
P86.0607
Eivai ouoovn me TIC odnyie, kai tic metayevotepec tponoioinoeic touk kaohc kai teouk kavoviouoc kai tic metayevotepec tponoioinoec touc.
H Malli vastaa direktiivejCA/EU ja myohempia muutoksia sekka standardeja, ja myohempia muutoksia: RU cootbetctbyet Tpe6oBaanm DnpeKTHB CE/EU n noCleNyUOxMoDnOfKauN, EN u cTaNdaptam, n noCleNyOuXMoDnOfKaaui. W skladu z direktivami CE/EU in njunimi kasnejsimi sprembam ter s standardi, in z njihovimi kasnejsimi sprembam. HR je u skladu sa direktivama CE/EU, te njihovim naknadnim modifikacijama te standardima, njihovim naknadnim modifikacijama.
2006/42/EC
2014/35/EU
2014/30/EU
2000/14/EC - 2005/88/EC
2011/65/EU
EN 60335-1
EN 55014-1:2006+A1:2009+A2:2011
EN 60335-2-79
EN 55014-2:2015
EN 62233:2008
EN 61000-3-2:2006+A1:2009+A2:2009.
EN 61000-3-3:2008.
EN 61000-3-11:2000
2000/14/CE: H oukeun npooiopietai oto apoouv mevoulaia aoloyonnc niootntac omuwva e to ounuupevo V.
2000/14/CE: Laite on määritetly litteen I kohdassa n°27. Vaatimustemukaisuuden arvointimenettely liitteen V mukaan I. 2000/14/EC: yctpoCTBO He onpeDeneHO. 27 KOpnyca I. PioueDypa OueHKn COOTBeTCTBnB B COOTBeTCTBnC C npInIOxHeM V. 2000/14/EC: aparat je dolocen v st. 27 priloge I. Izjava o skladnosti je v skladu s prilogo V. HR 2000/14/CE: aparat je odreden u br. 27 priloga I. Izjava o skladnosti u skladu je s prilogom V.
LpA 80dB(A)
LwA 88dB(A) K(uncertainty) 1dB (A)
LwA89dB(A)
-τaθμn nxtiknc πεonc
Aanen paineen taso
UpoBHe 3ByK OBOr DaBneHn
- Stopnja zvočnega hrupa
Razina akustichnog pritiska
E Metpneyn otaogn nxtikc loxuoc
Mitattu aanitehotaso
Akyctnuecka n3MepeHHa MOUHOCTb
56 Izmerjen nivo zvočne moci
HR Izmjerena razina zvučne snage
Eeyunueynoatogn nxtikc loxuc
Taattuaanitehotaso
Akyctnuecka MOHOCb npedoctabneHo
Zagotovljen nivo zvočne moci
HR Zajamcena razina zvučne snage
0 TeXViKoc akEaoc Bpioketai otn otyn odo looston thecnique
alkaen: RU Texnueckne 6pouHopby Ha
Tehnični akti so pri podjetju
HR Tehnicki akti nalaze se pri poduzecu
Lavorwash S.p.A via J.F.Kennedy, 12 - 46020 Pegognaga (MN) - Italy
E Toimitusjohtaja
Rr TenehaBnDnpeKTopGhavni
direktor Generalni direktor
Pegognaga 03/02/2014
Giancarlo Lanfredi