Predator 180 - Pressure washer Lavor - Free user manual and instructions
Find the device manual for free Predator 180 Lavor in PDF.

| Product type | High pressure cleaner |
| Brand | Lavor |
| Model | Predator 180 |
| Usage | Non-professional (private) |
| Double insulation | Yes (if included) |
| Max water inlet temperature | 40 °C |
| Max water inlet pressure | 1 MPa |
| Min supply flow rate | 15 L/min |
| Gun | With safety lock |
| Automatic shut-off system (T.S.) | Yes |
| Motor protection | Yes (protection device) |
| Detergent aspiration | Yes |
| High pressure lance | Included |
| Cleaning types | High pressure, foaming, sandblasting, rotating brush |
| Maintenance | Exterior cleaning with dry cloth, water filter cleaning, nozzle cleaning |
| Storage | Dry and safe place, out of reach of children |
| Warranty | Against manufacturing defects (excluding normal wear, transport, incorrect use) |
| Spare parts | Original or Lavor approved |
| After-sales service | DIRECT Lavor after-sales service (France) |
| Power supply | Connection to mains according to IEC 60364-1 standard |
Frequently Asked Questions - Predator 180 Lavor
User questions about Predator 180 Lavor
0 question about this device. Answer the ones you know or ask your own.
Ask a new question about this device
Download the instructions for your Pressure washer in PDF format for free! Find your manual Predator 180 - Lavor and take your electronic device back in hand. On this page are published all the documents necessary for the use of your device. Predator 180 by Lavor.
USER MANUAL Predator 180 Lavor
WARNING: read the instructions carefully before use.
INSTRUCTION MANUAL - SAFETY WARNINGS pag. 14
MANUEL D'INSTRUCTION - AVERTISSEMENTS DE SÉCURITÉ page 20
natural_image
Simple line drawing of a hairdryer with a hose and bulb, labeled '1A.' (no text or symbols on the diagram itself)1B. 1C.
B
C
natural_image
Illustration of a hand holding a flashlight with a magnified inset showing a rotating mechanical component (no text or symbols)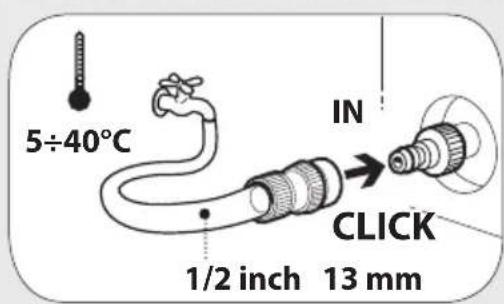

natural_image
Simple line drawing of a faucet with a lock attached (no text or symbols)

natural_image
Illustration of a hose emitting spray from a nozzle (no text or symbols)getto ventaglio spread pattern jetlo'eau en eventail
natural_image
Diagram of two types of cable connectors with arrows indicating flow direction (no text or symbols)getto spillo/ventaglio spread pattern/pencil jet jet
variable DE vario Duese Echorro regulable dunne straal/
natural_image
Two types of cable connectors with internal components and radiating lines, no text or symbols presentIT getto spillo/ventaglio EN pread pattern/pencil jet jek variable DE vario Duese Ishorro regulable durne straal/waaiervormige straal PT jato variavel Čvějiřová/prímá tryska DA nălesprøjt/viftesprøjt EL tibakaç karpfitoa/βενταλια ET peenjoa/levvikotsik pistemäinen/viuhkamainen suihku HV egyenes / legyező alakú vízsugár liesios/ vèduoklinės čiurkslės LV parasta / vēdeklveida strūkla MT gett ta’ ilma dirett/f’forma ta’ mrewħa ND tynn stråle/vifteformet stråle PL strumień szpilka/wachlarz 10 чечная/ веерообразная струя. SK vejárovitá/priama prúdnica glasti/pahljačasti curek vode SV nál-/solfjädersformad stråle BG a права/ветрилообразна струя HR mlaznica-fi ni mlaz/raspršivač jet ac/ evantai jet TR püskürtme/jet fan UK точковий струмінь/ віялоподібний SR sprej čvrsto / sprej isključen FA نازل سوزنى / طرح پاشش
IT bassa pressione endow pressure basse pression nieder-druck-Lanze baja presión lage druk baixa pressao CS nízkotlaká tryska DAVT tryk χρηλη πιεση ET madalsurve FI matala paine palacsony nyomás žemas slègis LVzema spiediena strūkla pressjoni baxxa NO lavtrykk Pniskie ciśnienie HISKOE давление nizkSK tlak SL nízkotlaková prúdnica slåg tryck HISKO налягане HR mlaznica-niski tlak RCjoasă presiune alçak basinç UK NIZBKYI TISK nizak pritiska FA فشار کم
IT getto ventaglio EN spread pattern FR jet d'eau en eventail DE großen Wasserstrahl ES chorro grandes NL waaiervormige straal PT jato grande CS vějířová tryska DA viftesprøjt TH δακας βενταλία ET
waaiervormige straal Fviuhkamainen suihku vejárovitá prúdnica legyező alakú vízsugár Lvéduoklinés čiurkšlés védeklveida strūkla vifteformet stråle PL strumień wachlarzowy RU веерообразная струя strumień wachlarzowy spahljačasti curek vode selfjädersformad stråle BG за ветрилообразна струя mlaznica raspršivač jet evantai jet fan TR UK струмінь віялоподібний sprej isključen FA طرح پاشش

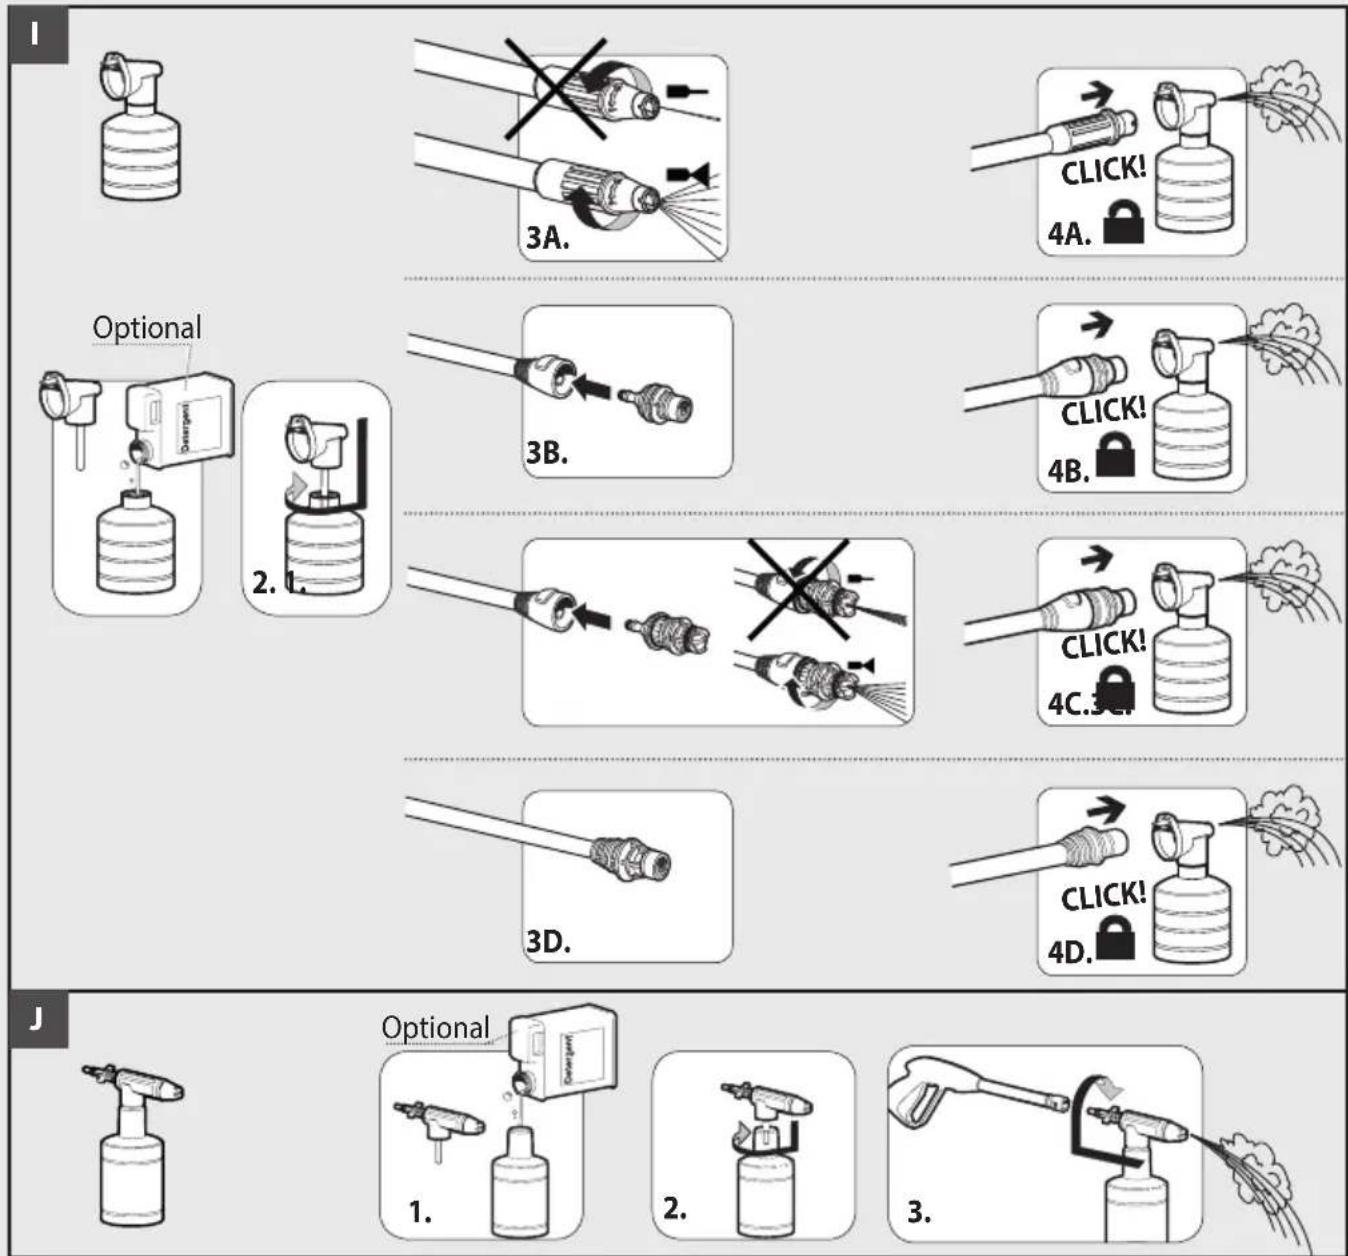
Optional
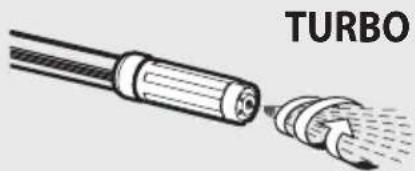
IT lancia turbo turbo lance lance turbo Turbo Lanze ES lanza turbo turbo lans jturbo lança tryska turbo DA turbolanse Eektoξευτηρας turbo turbo suihkuputki NO turbo-lanse Planca turbo насадка турбо turbo руйник turbo mlaznica lance-turbo turbo lans a LT turbo antgalis LV turbo smidzinātājs MT parti ta' quddiem UK турбо-насадка SR Mlaznica visokog pritiska Turbo FA توربولنس
pištola SV turbolans BTurbo stryhnik Turbo mlaznica lanceo turbo turbo lans turbootsik HU szennymaró ländzsa LT turbo antgalis LV turbo smidzinātājs MT parti ta' quddiem tal-gan turbo SK turbo prúdnica UK turbo-hacadka SR Mlaznica visokog pritiska Turbo FA törbolns
natural_image
Illustration of a turbo oil plug with visible internal structure and tip, no text or symbols presentOptional
IT lancia turbo turbo lance lance turbo Turbo Lanze ES lanza turbo turbo lans jturbo lança tryska turbo DA turbolanse Eektosευτηρας turbo turbo suihkuputki NO turbo-lanse Planca turbo насадка турбо turbo руйник turbo mlaznica lance-turbo turbo lans a LT turbo antgalis LV turbo smidzinātājs MT parti ta' quddiem UK турбо-насадка SR Mlaznica visokog pritiska Turbo FA توربولنس
pištola SV turbolans B1turbo струйник turbo mlaznica lanceoturbo turbo fans ET turbootsik HU szennymaró lándzsa LT turbo antgalis LV turbo smidzinātājs MT parti ta' quddiem tal-gan turbo SK turbo prúdnica UK turbo-насадка SR Mlaznica visokog pritiska Turbo FA توربولنس
flowchart
graph TD
    A["Optional"] --> B["3A."]
    B --> C["CLICK! 4A."]
    D["Optional"] --> E["3B."]
    E --> F["CLICK! 4B."]
    G["Optional"] --> H["3C."]
    H --> I["CLICK! 4C."]
    J["Optional"] --> K["3D."]
    K --> L["CLICK! 4D."]
flowchart
graph TD
    A["Power System"] --> B["Optional"]
    B --> C["Power System"]
    C --> D["Optional"]
    D --> E["Power System"]

flowchart
graph TD
    A["1A. Optional"] --> B["1B. Optional"]
    B --> C["2. Airflow with hose"]
    C --> D["3. Hand pump"]
    D --> E["4. House cooling system with temperature reading"]
    style A fill:#f9f,stroke:#333
    style B fill:#f9f,stroke:#333
    style C fill:#ccf,stroke:#333
    style D fill:#cfc,stroke:#333
    style E fill:#fcc,stroke:#333
INDICE....PAG
ILLUSTRAZIONI....2
INTRODUZIONE 8
SIMBOLI 8
SICUREZZA 8
USO....10
SAFETY PRECAUTIONS 14
USAGE 16
PUT INTO SERVICE / STARTING UP 17
CARE AND MAINTENANCE 18
TROUBLESHOOTING....18
WARRANTY CONDITIONS.... 18
DISPOSAL (WEEE) 19
GENERAL INFORMATION
> INTENDED USE
- The appliance can be used for washing surfaces outdoors, whenever pressurised water is required to remove dirt.
- With special optional accessories, it can be used for foaming and sandingblasting, and for washing with a rotary brush for application to the gun.
- This appliance's performance and userfriendliness make it suitable for NON PROFESSIONAL use.
> TECHNICAL DATA
(see technical data plate)
SYMBOLS

WARNING: read the instructions carefully before use.

CAUTION! It is important to be careful of the following items.

IMPORTANT

LOCKED

OPEN

IF PRESENT

Double insulated (IF PRESENT):
supplementary insulation is applied to the basic insulation to protect against electric shock in the event of failure of the basic insulation.
SAFETY PRECAUTIONS
> WARNINGS
- 01WARNING: This appliance is for outdoor use only.
·02WARNING: Always disconnect the electricity and water supplies on completion of every job. - 03WARNING: Do not use the machine if a supply cord or important parts of the machine are damaged, e.g. safety devices, high pressure hoses, trigger gun.
- 04WARNING: This appliance has been designed for use with the detergent provided or the detergent specified by the manufacturer, such as a neutral shampoo based on biodegradable anionic surface active detergents. The use of other detergents or chemicals may put the appliance's safety at risk.
- 05a WARNING: Do not use the machine within range of persons unless they wear protective clothing.
05b - Do not allow other people or animals within a range of 5m when operating the machine.
05c - Always wear suitable protective clothing in order to protect yourself against ricocheting parts.
05d - Do not touch the plug and the appliance with wet hands or when barefoot.
05e - Wear safety goggles and non-slip rubber footwear. - 06WARNING: Do not direct the nozzle toward mechanical parts containing lubricant grease, as the grease will dissolve and spread over the surrounding ground. Vehicle tyres/tyre valves may only be cleaned from a minimum distance of 30 cm, otherwise the vehicle tyre/tyre valve could be damaged by the high-pressure jet. The first indication of this is a discoloration of the tyre. Damaged vehicle tyres/tyre valves can be deadly dangerous.
07WARNING: High pressure jets can be dangerous if subject to misuse. The jet must not be dirsons, animal, live electrical equipment machine itself.
·08WARNING: High pressure hoses, fittings
and couplings are important for the safety of the machine. Use only hoses, fittings and couplings recommended by the manufacturer. (it is extremely important to protect these components against damage by avoiding their improper use and protecting them against bending, knocks and scratches).
- 09WARNING: Appliances not equipped with T.S. – Total Stop: must not be left in operation for more than 2 minutes with the gun released. The recycled water heats up considerably, seriously damaging the pump.
- 10WARNING: Appliances equipped with T.S.-Total Stop: these appliances should not be left in standby for more than 5 minutes.
- 11WARNING: Switch the appliance off completely (master switch on (0)OFF) whenever it is left unattended.
·12WARNING: Every machine is tested in its operating conditions, so it is normal for a few drops of water to be left inside it.
·13WARNING: Take care not damage the electric cable. If the supply cord is damaged, it must be replaced by the manufacturer, its service agent or similarly qualified persons in order to avoid a hazard - 13b WARNING: The power cord should not be used to pull or lift the machine.
·14WARNING: Appliance with fluid under pressure. Keep a firm hold on the gun and be prepared to take the kickback pressure. Only use the high pressure nozzle provided with the appliance.
·16WARNING: This appliance is not intended for use by persons (including children) with reduced physical, sensory or mental capabilities, or lack of experience and knowledge.
·17WARNING: Children should be supervised to ensure that they do not play with the appliance.
·18WARNING: Never start the high-pressure cleaner without first completely unwinding the high-pressure hose.
·19WARNING: When winding and unwinding the pipe take care not to cause the high-pressure cleaner to overturn.
·20WARNING: Before unwinding or winding the hose, switch the machine off and release the pressure in the hose itself (switching off).
·21WARNING: Risk of explosion — Do not spray flammable liquids.
· 22WARNING: To ensure machine safety, use only
original spare parts from the manufacturer or approved by the manufacturer.
- 23WARNING: Do not direct the jet against yourself or others in order to clean clothes or footwear.
·24 WARNING: Water that has flown through backflow preventers is considered to be non-potable.
·25 WARNING: machine must be disconnected from its power source during cleaning or maintenance and when replacing parts or when converting the machine to another function. - 26 WARNING: Improper extension cables can be dangerous. If an extension cord is used, it must be suitable for outdoor use, and the connection must be kept dry and clear of the ground. It is recommended that this be done using a cable reel that holds the plug at least 60 mm from the ground.
- 27 WARNING: If an extension cord is used, the plug and socket must be of watertight construction.
·28 WARNING: During the use of high pressure cleaners, aerosols may form. Inhalation of aerosols can be dangerous to health. - 29 WARNING: Depending on the application, shielded nozzles can be used for high pressure cleaning, which will drastically reduce the emission of hydrated aerosols. However, not all applications allow the use of such a device. If the armored nozzles are not applicable for aerosol protection, a respiratory mask of class FFP 2 or equivalent may be necessary, depending on the cleaning environment.
> SAFETY DEVICE
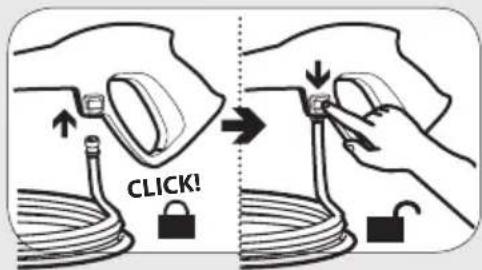
- WARNING: the gun is fitted with a safety catch. Whenever use of the machine is interrupted it is important to operate the safety catch to prevent accidental activation of the jet.
- Safety features: gun equipped with safety locking device, appliance equipped with (Class I) overload cutout, pump equipped with by-pass valve or shutdown device.
- The safety button on the gun is not there to lock the lever during operation, but to prevent its accidental operation.
- WARNING: The appliance is equipped with a motor protection device: in case of device intervention, wait some minutes or, in alternative, disconnect and re-connect the product to the electric
EN
system. In case this problem repeats again or if the product does not start again, take the product to the nearest After Sales Service Point
> STABILITY
- WARNING: The machine must be always kept on horizontal bases, in a safe and stable way.
USAGE
> DESCRIPTION OF THE MACHINE
See the specific instructions manual provided.
> ASSEMBLY INSTRUCTIONS
See the specific instructions manual provided.
> WATER SUPPLY
Water supply collection
Water supply from the water main
- Connect a supply hose (not included) to the water inlet of the unit and to the water supply.
- Open the water supply.

WARNING: (symbol) machine not suitable for nction to the potable water mains.
The cleaner can only be connected to the water mains if the water mains is separated by a backflow preventer. Make sure that the hose is at least ∅ 13mm-1/2 inch and that it is reinforced, 5-25 m.
- WARNING: Water that has flown through backflow preventers is considered to be nonpotable.
IMPORTANT: Only clean or filtered water should be used for intake. The delivery of the water intake tap should be equal to the double of the maximum pump range.
- Minimum delivery rate: 15 l/min.
- Maximum intake water temperature: 40°C
- Max inlet water pressure: 1Mpa
Place the cleaner as close to the water supply system as possible.
Water supply from an open container
- Unscrew the coupling part for the water inlet.
- Screw the suction hose with filter (not included) onto the water connection of the unit.
- Hang the filter in the container.
- Vent the unit before operation.
-
Unscrew the high-pressure line at the high-pressure outlet of the unit.
-
Switch on the unit and let it run until water free of bubbles emerges at the high-pressure outlet.
- Switch off the unit and screw on the high-pressure hose again.
Failure to comply with the above conditions causes serious mechanical damage to the pump and the loss of warranty cover.
> ELECTRICITY SUPPLY
- The appliance's electrical connection must comply with the IEC 60364-1 standard.
IMPORTANT: Before connecting the appliance, make sure that the nameplate data are the same as those of the electrical mains and that the socket is protected by a differential security breaker with tripping sensitivity below 0.03 A - 30 ms.
- If the appliance's plug is not compatible with the socket, have the socket replaced with another of suitable type by professionally qualified staff.
- Never use the appliance in ambient temperatures below 0^ C if it is equipped with a PVC (H VV-F) cable.
- No actions needed for adjusting machines marked with dual voltage and frequency.
- 26 WARNING: Improper extension cables can be dangerous. If an extension cord is used, it must be suitable for outdoor use, and the connection must be kept dry and clear of the ground. It is recommended that this be done using a cable reel that holds the plug at least 60 mm from the ground.
- 27 WARNING: If an extension cord is used, the plug and socket must be of watertight construction.
Information for supply may also be obtained from the plug manufacturer.
| <16 A | <25 A | |
| <20 m | 1,5 mm^2 - 14 AWG | 2,5 mm^2 - 12 AWG |
| 20 m - 50 m | 2,5 mm^2 - 12 AWG | 4,0 mm^2 - 10 AWG |
> PLUG
HOW TO CONNECT THE CORD TO A U.K. PLUG:
IMPORTANT The wires in the mains lead are coloured in accordance with the following code: Blue Neutral Brown Live Yellow/Green Earth
Please read the instructions given below before connecting the cord to a plug. If in doubt please consult
a qualified electrician. As the colours of the wires in the mains lead of this appliance may not correspond with the coloured markings identifying the terminals in your plug, proceed as follows:
The wires that is coloured Brown must be connected to the terminal which is marked with the letter L or coloured Red. The wire that is coloured Blue must be connected to the terminal which is marked with the letter N or coloured Black.
Safety points for rewireable or moulded plug:
The mains lead of this appliance may be already fitted with a BS1363 13A plug.
- If your socket outlet is not suitable for the plug, then the plug must be removed (cut off if it is a moulded on plug), the flexible cord insulation should be stripped back as appropriate and a suitable 3 pin plug fitted.
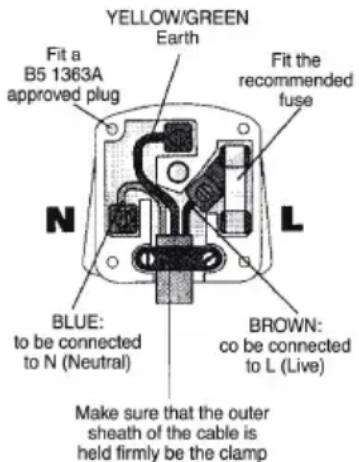
WARNING: Dispose of a plug that has been cut from the power supply cord, as such a plug is hazardous if inserted in a live 13A socket outlet elsewhere in the house.
- Should the need to be replaced an ASTA marked fuse, approved to BS1362, of the same rating must be used.
- Always replace the fuse cover after fitting a fuse. The plug must NOT be used if the cover is omitted or lost until a replacement is obtained.
- Make certain that only the correct fuse cover is used and fitted.
- For plugs with detachable fuse cover the replacement must be the same as the colour insert in the base of the plug, or as directed by the embossed wording on the base of the plug.
- If the detachable fuse cover is lost a replacement may be purchased from a Service Centre.
PUT INTO SERVICE / STARTING UP
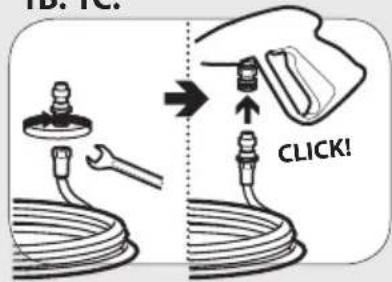
See fig. A
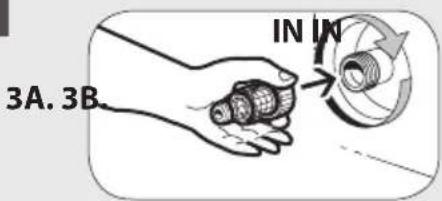
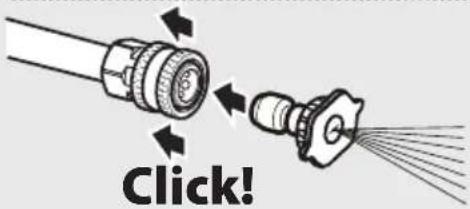
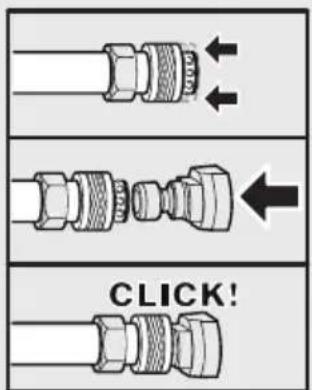
- Connect the high pressure hose to the trigger gun.
- Push the high pressure hose into the trigger gun.
Note: Make sure the connection nipple is aligned correctly.
- Check the secure connection by pulling on the high pressure hose.
See fig. B
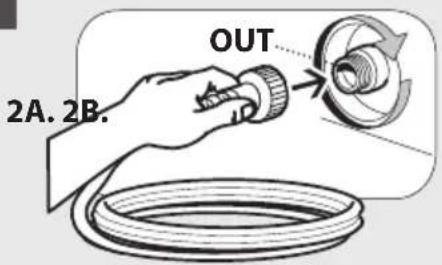
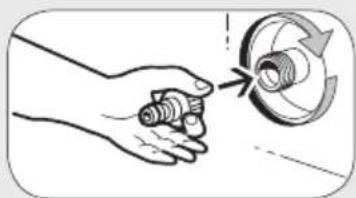
- Insert the high pressure hose tightly into the quick coupling on the appliance
See fig. C
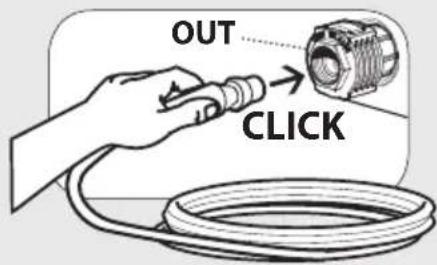
- Screw the coupling element to the water connection on the appliance.
- Attach the water supply hose to the coupling on the water connection.
NOTE: The supply hose is not included.
- Connect the water supply hose to the water supply.
- Completely open the water tap.
- Insert the mains plug into the socket.
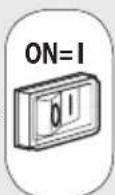
- Turn on the appliance "I/ON".
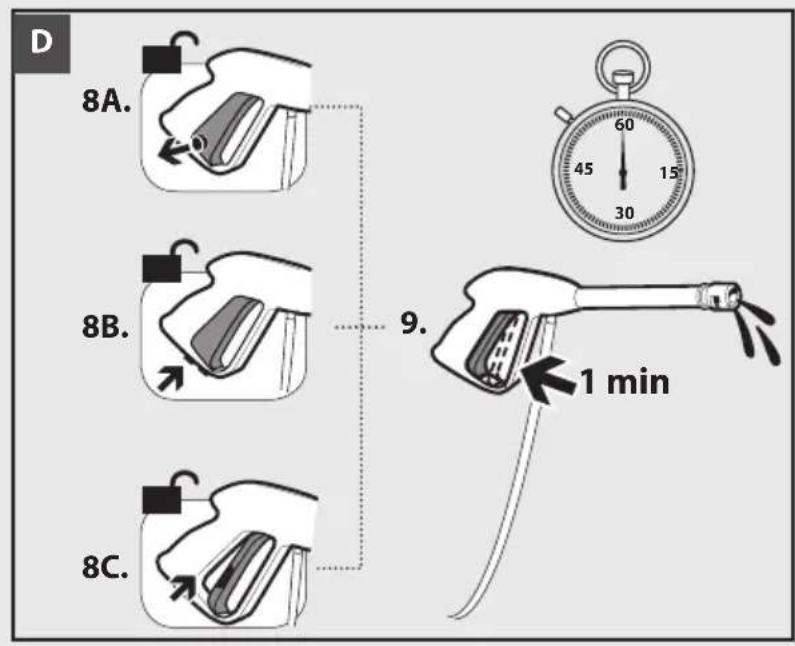
See fig. D
- Unlock the lever on the trigger gun.
- Pull on the lever of the trigger gun; the device will switch on.
- Switch the appliance on for a (max. of 1 minute) and wait until the water exits at the hand spray gun without bubbles.
- Release the lever on the trigger gun.
fuse NOTE: Release the lever of the trigger gun; the device will switch off again.
- High pressure remains in the system.
See fig. E
- Lock the lever on the trigger gun.
Operation
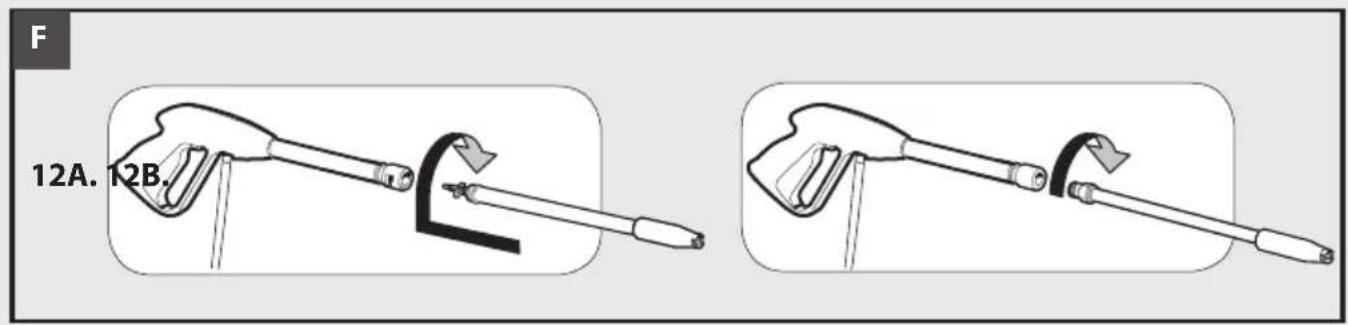
See fig. F
- Push the spray lance into the trigger gun and fasten it by turning it through 90°.
- Unlock the lever on the trigger gun.
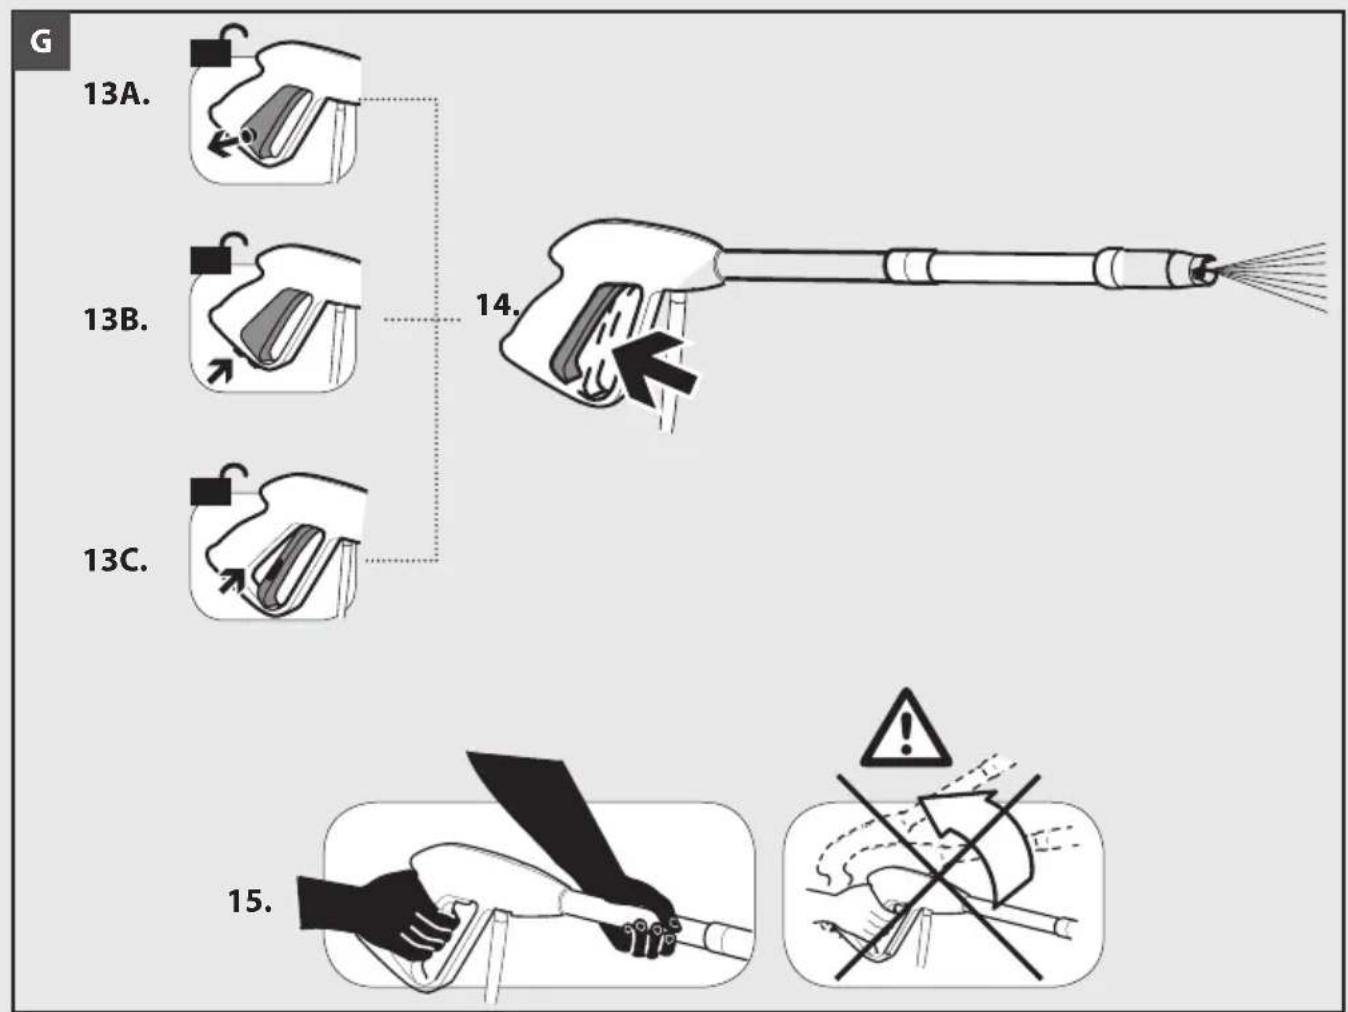
See fig. G
- Pull on the lever of the trigger gun; the device will switch on.
·14WARNING: Appliance with fluid under pressure. Keep a firm hold on the gun and be prepared to take the kickback pressure.
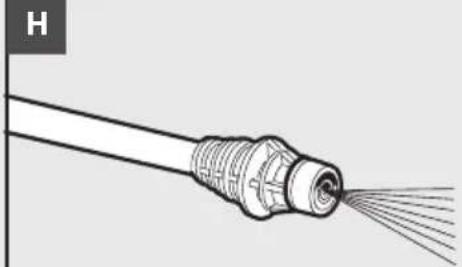
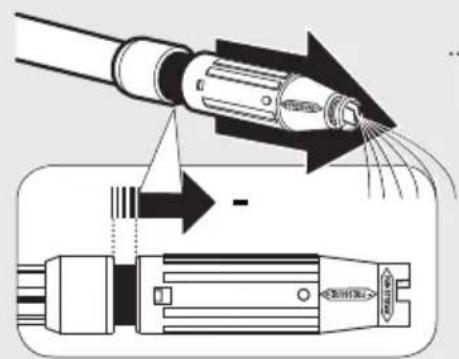
See fig.H
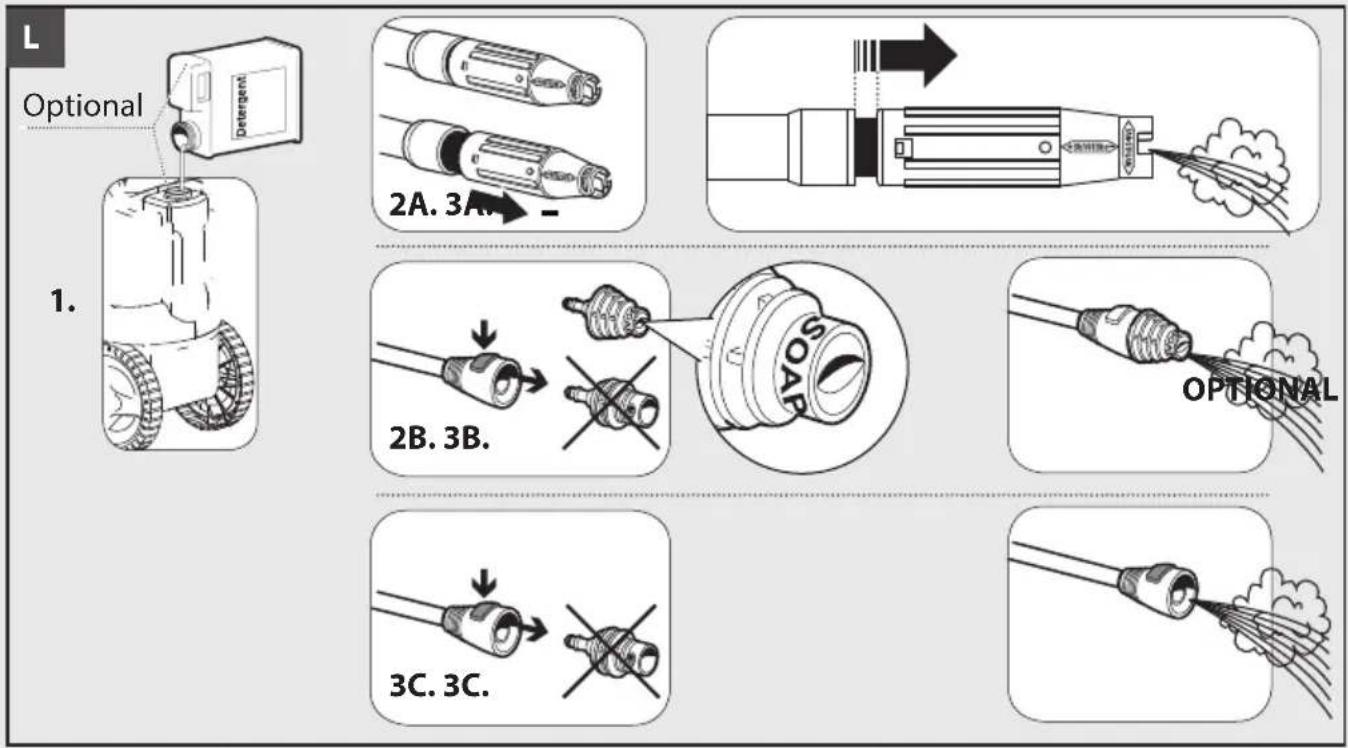
> HIGH PRESSURE LANCE
See fig. I J K L
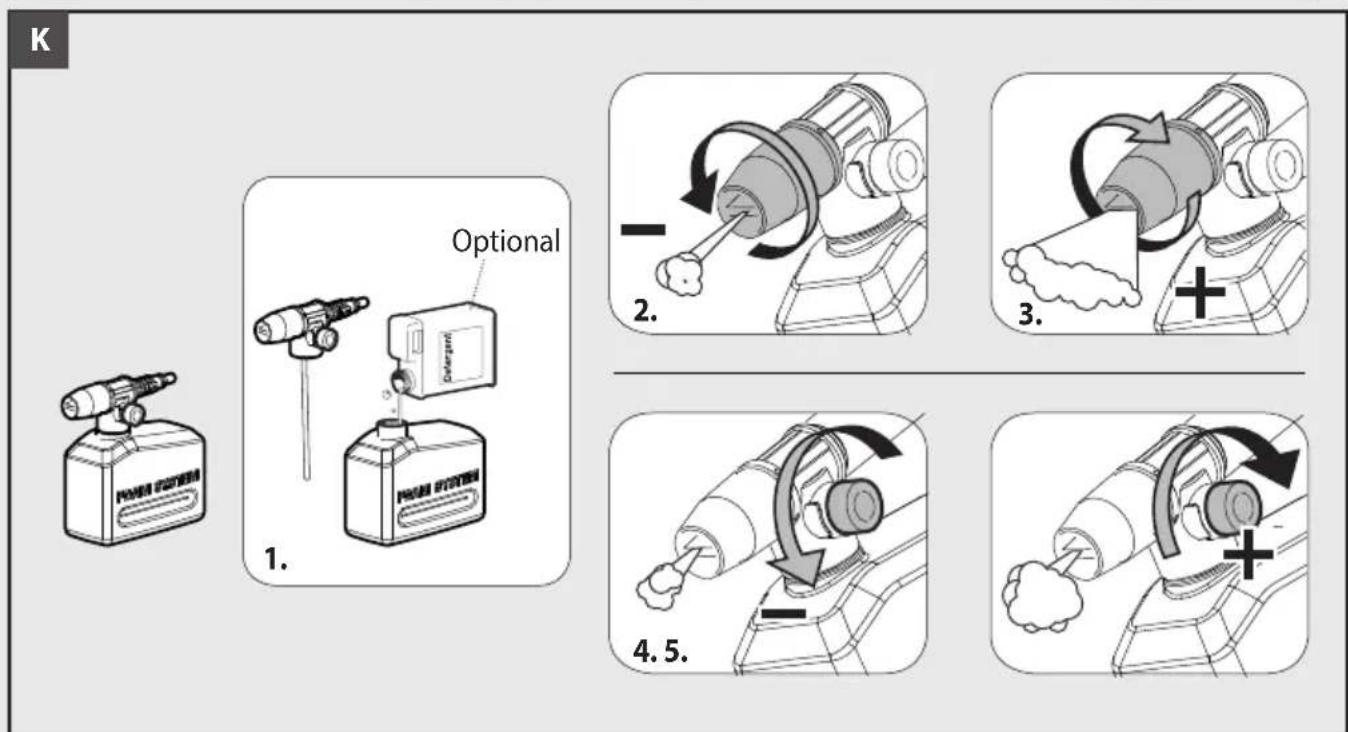
DETERGENT SUCTION
See fig.M
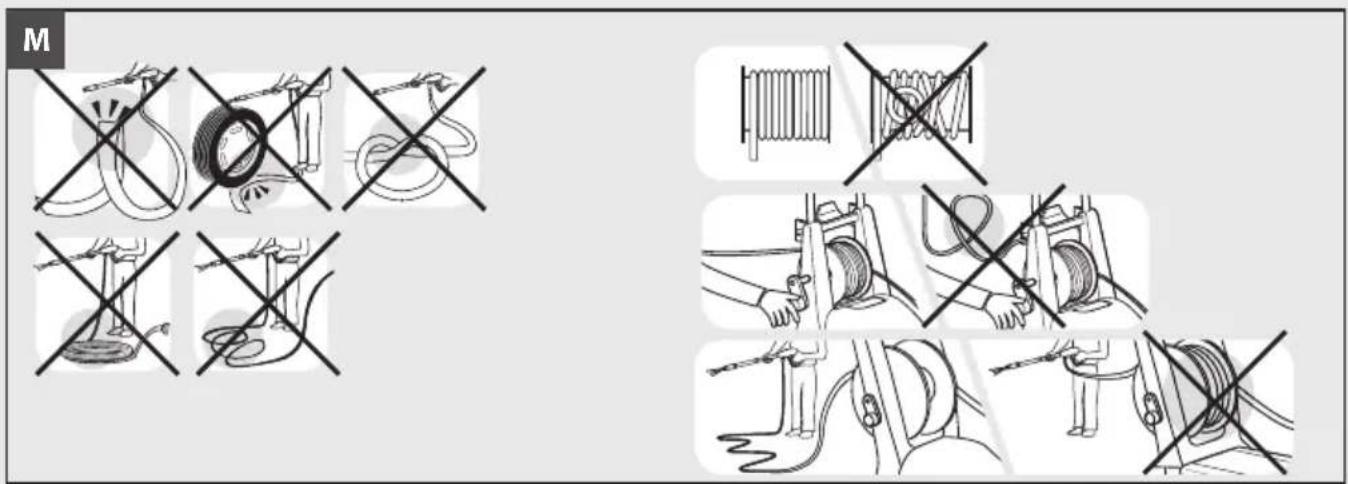
HIGH PRESSURE HOSE
Use the hydrocleaner only if the hose is completely uncoiled and extended.
See fig. N
SWITCHING OFF
T.S. Total Stop (if fitted)
NOTE: Total Stop, which stops the machine during the bypass phase. To start the water cleaner, it is therefore necessary to set the switch on position (I) "ON"; after that press the pistol trigger: the Total Stop will start the machine and will stop it automatically when the trigger is released. It is advisable to put on the safety of the pistol trigger whenever the machine is stopped, in order to avoid unintentional starting.
- Any automatic start of the machine without pressing the gun trigger is attributable to air bubbles in the water or other similar phenomena which do not imply the existence of any defects in the machine.
- Do not leave the appliance unattended during the standby for more than 5 minutes. Contrarily, for the safety of the appliance it is necessary to re-turn the switch into the (0) OFF position.
- Please check that the coupling of the high pressure hose with the appliance and the gun supplied as standard equipment made correctly, that is to say without any water leak.
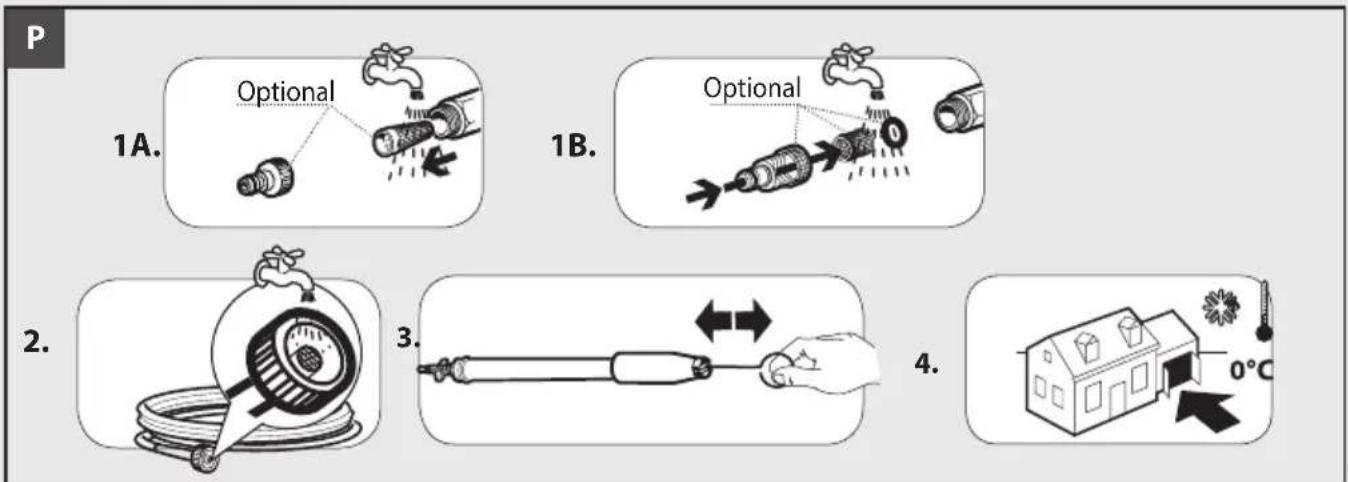
CARE AND MAINTENANCE
See fig. P
The unit is maintenance-free.
- 25 WARNING: the machine shall be disconnected from its power source, by removing the plug from the socket-outlet, during cleaning or maintenance
-
WARNING: Do not spray the appliance with water and do not use detergents or aggressive solvents. Machine could be damaged.
-
Clean the exterior part of the machine with a dry cloth.
STORAGE
See fig. P - Move the machine only by grasping the carrying handle
- Store the appliance and the accessories in a frost-safe room.
TROUBLESHOOTING
Appliance does not work
- Check whether the voltage shown on the rating plate corresponds to that of the power source.
- Check the connector cable for damage.
Appliance does not reach operational pressure
- Vent the appliance: allow the pump to operate without the high-pressure hose until water appears at the high-pressure outlet without any more bubbles. Then reattach the high-pressure hose.
- Clean the strainer in the water connection.
- Clean the filter placed inside the hose coupling (if set)
- Check the inlet water flow rate.
- Check all inlet pipes to the pump for leaks or blockage.
Strong pressure fluctuations
- Clean the high-pressure nozzle. Remove dirt from the nozzle hole with a needle and then rinse out with water from the front.
Pump leaks
- 10 drops per minute are permissible. In the case of more serious leakage, you should contact the authorized customer service.
Replacement parts
- Use only original spare parts or spare parts suggested by the manufacturer.
WARRANTY CONDITIONS
All our machines are subjected to strict tests and are covered against manufacturing defects in accordance with applicable regulations. The warranty is effective from the date of purchase.
The following are not included in the warranty: - Parts subject to normal wear. - Rubber parts, charcoal, filters and the accessories and optional
accessories. - Accidental damage, caused by transport, neglect or inadequate treatment, incorrect or improper use and installation failing - The warranty shall not cover any cleaning operations to which the operative components may be subjected, such as clogged nozzles and filter blocked due to lime stones. This machine is intended to be used for domestic and hobby work: the warranty does not cover any other different kind of use.
DISPOSAL (WEEE)
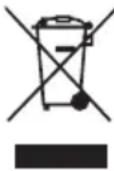
As the owner of electrical or electronic equipment, the law (in accordance with the EU Directive 2012/19/EU on waste from electrical and electronic equipment and the national laws of the EU Member States that have implemented this Directive) prohibits you from disposing of this product or its electrical / electronic accessories as municipal solid waste and obliges you to make use of the appropriate waste collection facilities. The product can be disposed of by returning it to the distributor when a new product is purchased. The new product must be equivalent to that being disposed of. Disposing of the product in the environment can cause great harm to the environment itself and human health.
The symbol in the figure indicates the urban waste containers and it is strictly prohibited to dispose of the equipment in these containers. Non-compliance with the regulations stipulated in the Directive 2012/19/EU and the decrees implemented in the various EU Member States is administratively punishable.
SOMMAIRE....PAG.
ILLUSTRATIONS 2
INDICATIONS GÉNÉRALES ...... 20
SYMBOLES....20
SÉCURITÉ 20
UTILISATION....22
INSTALLATION / DEMARRAGE 23
NETTOYAGE ET ENTRETIEN....24
PROBLÈMES ET SOLUTIONS....24
CONDITIONS DE GARANTIE 24
ÉLIMINATION 25
INDICATIONS GÉNÉRALES
> UTILISATION PRÉVUES
T.S. Total Stop (si incluse)
CONDITIONS DE GARANTIE
Contact direct sav@lavorwash.fr
INDHOLD ...... SIDE.
FOTOSERIEN....2
INTRODUKTION 56
SYMBOLER....56
SIKKERHED....56
ANVENDELSE 58
INSTALLERING / IDRIFTTAGNING....59
VEDLIGEHOLDELSE RENG∅RING....60
UDBEDRING I TILFÆLDE AF FEJLFUNKTION ...... 60
GARANTIBETINGELSER 60
SKROTNING....60
INTRODUKTION
> BEREGNET ANVENDELSE
> VED ARBEJDETS AFSLUTNING
T.S. Total Stop
STELL OG VEDLIKEHOLD....100
FEILRETTING 100
GARANTIVILKÅR....100
AVSKAFFELSE 101
GENERELLE MERKNADER
STELL OG VEDLIKEHOLD
Se fig. P
INNEHÅLLSFÖRTECKNING......SIDA
ILLUSTRATIONER, RITNINGAR....2
INLEDNING 124
SYMBOLER....124
SÄKERHET....124
HANDHAVANDE....125
INSTALLATION / INDRIFTTAGANDE......126
SKÖTSEL OCH UNDERHÅLL.... 127
ÄTGÄRDER VID FELFUNKTION 127
GARANTIVILLKOR 128
UNDANSKAFFANDE 128
INLEDNING
> FÖRUTSEDD ANVÄNDNING
ILUSTRATII, IMAGINI 2
INDICATII GENERALE....140
SIMBOLURI 140
NORME DE SIGURANTA 140
UTILIZAREA 142
INSTALARE / PORNIRE 143
T.S. Total Stop (UKOLIKO POSTOJI)
ZNAČAJNO: (Total Stop ) koji isključuje uređaj za pranje pod pritiskom visokog pritiska tokom by-pass faze. Za pokretanje uređaj za pranje pod pritiskoma visokog pritiska stoga je neophodno postaviti prekidač na (l) ON, potom pritisnuti prekidač na dršci mlaznica, sistem T.S. će uključiti uređaj isključujući ga automatski svaki put kad se otpusti prekidač. Savetuje se stoga da se prekidač na ručki stavi u položaj sigurnosti svaki put se kad se zaustavi Uređaj kako bi se izbeglo slučajno uključivanje.
- Spontana uključivanja Uređaja bez dodirivanja ručke mlaznica mogu se pripisati mehurićima vazduha u vodi i drugome ali ne grešci na uređaju.
- Ne ostavljajte uređaj u stand-by položaju
duže od 5 minuta bez nadzora. U suprotnom, za zaštitu Uređaja je potrebno vratiti prekidač u položaj (0) OFF.
- Proveriti da je spoj cevi visokog pritiska sa uređajem i ručkom mlaznica ispravan, znači bez curenja vode.