MCHPX - Pressure washer Lavor - Free user manual and instructions
Find the device manual for free MCHPX Lavor in PDF.

| Product type | High pressure cleaner |
| Brand | Lavor |
| Model | MCHPX |
| Use | Domestic (private) |
| Power supply | 230 V ~ 50 Hz |
| Maximum pressure | Up to 150 bar |
| Water flow rate | 480 l/h |
| Maximum inlet water temperature | 40 °C |
| Maximum water supply pressure | 1 MPa |
| Motor type | Single-phase electric |
| Main functions | High pressure washing, detergent suction, sandblasting (with accessory), rotary brushing (with accessory) |
| Included accessories | High pressure lance, gun, high pressure hose |
| Safety | Gun with safety lock, overload protection, bypass valve, total stop system (TS) depending on version |
| Maintenance | Regular cleaning of the water inlet filter and nozzle |
| Repairability | Original spare parts recommended |
| Warranty | Against manufacturing defects (according to conditions) |
| Weight | Approximately 12 kg |
| Dimensions (L x W x H) | Approximately 400 x 300 x 400 mm |
Frequently Asked Questions - MCHPX Lavor
User questions about MCHPX Lavor
0 question about this device. Answer the ones you know or ask your own.
Ask a new question about this device
Download the instructions for your Pressure washer in PDF format for free! Find your manual MCHPX - Lavor and take your electronic device back in hand. On this page are published all the documents necessary for the use of your device. MCHPX by Lavor.
USER MANUAL MCHPX Lavor
natural_image
Diagram of a hairdryer with a hose and handle, no text or symbols present1B. 1C.
B
C
natural_image
Illustration of a hand holding a mechanical component next to a circular component with an arrow indicating rotation (no text or symbols)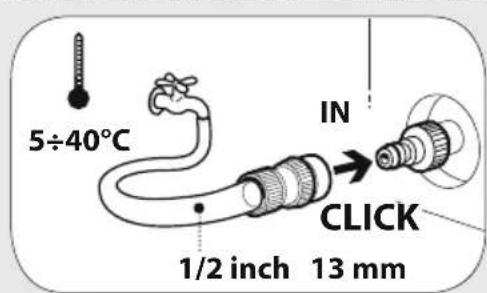

natural_image
Simple line drawing of a faucet with a handle and lock (no text or symbols)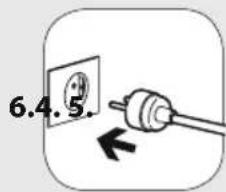

H
natural_image
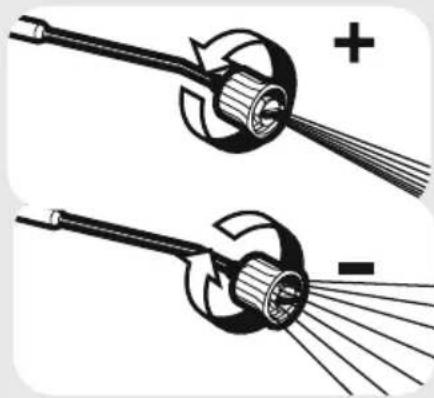
Two identical diagrams showing a tool emitting a circular object with radiating lines, labeled with plus and minus signs (no text or symbols on the objects themselves)It alta/bassa pressione high/low pressure haute/basse pression Hoch/nieder-druck-lanze alta/ baja presión NL hoge/lage druk alta/baixa pressao vysokotlaká/nízkotlaká tryska hojt/lavt tryk υψηλη/χαμηλη πίεση korkea/matalapaine høytrykk/lavtrykk wysokie/niskie ciśnienie RU высокое/низкое давление SL vysokotlaková/nízkotlaková prúdnica högt/låg tryck za Bvisоко/ниско налягане HR mlaznica-visoki/niski tlak thaltä/joasä presiune alçak/yüksek basinç ekõrg/madalsurve alacsony/magas nyomás LT aukštas/žemas slėgis Laugsta/zema spiediena strūkla MT pressjoni għolja/baxxa visoki/nizki tlak високий/низький тиск

natural_image
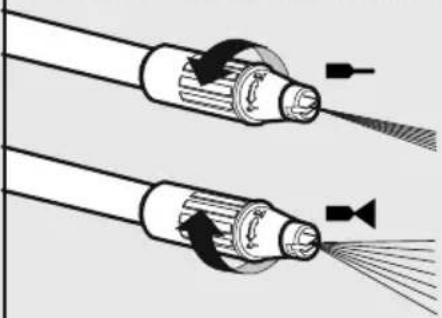
Illustration of a cable with exposed internal wires (no text or symbols)IT getto ventaglio Spread pattern je d'eau en eventail DE großen Wasserstrahl echorro grandes waiervormige straal jato grande vějřová tryska viftesprojt piðakaç EL βενταλια viuhkamainen suihku vifteformet stråle PL strumień wachlarzowy beepoобразная струя pahljačasti curek vode s'solfjädersformad stråle зветрилообразна струя HR mlaznica raspršivač RO jet evantai TR jet fan ET waiervormige straal hegyező alakú vízsugár věduoklinès čiurkšlès vědeklveida strūkla gett ta' ilma f'forma ta' mrewha vejárovitá prúdnica струмінь віялоподібний
natural_image
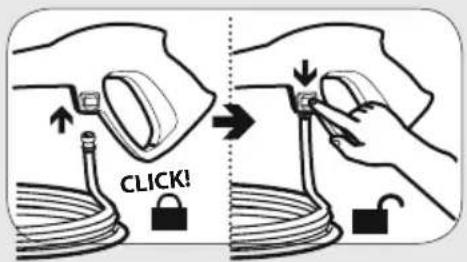
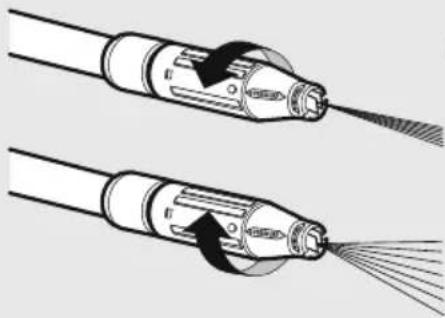
Diagram of two types of cable connectors with arrows indicating flow direction (no text or symbols)IT getto spillo/ventaglio Spread pattern/pencil jet je FR variable DE vario Duese Echorro regulable dunne straal/waaiervormige straal PT jato variavel cvějířová/prímá tryska DA nálesprøjt/viftesprøjt EL πιδακας καρφίτοα/βενταλια ET peenjoa/lehvikotsik pistemäinen/viuhkamainen suihku HU egyenes / legyező alakú vízsugár tiesios/ véduoklinés čiurkslès LV parasta / vēdeklveida strūkla Mgett ta' ilma dirett/f'forma ta' mrewha NO tynn stråle/vifteformet stråle PL strumień szpilka/wachlarz точечная/ weeroобразная струя. SK vejárovitá/priama prúdnica glasti/pahljačasti curek vode SV nål-/solfjädersformad stråle BC,a права/ветрилообразна струя HR mlaznica-fi ni mlaz/raspršivač jet ac/ evantai jet TR püskürtme/jet fan UK точковий струмінь/ віялоподібний SR sprej čvrsto / sprej isključen FA نازل سوزنى / طرح پاشش
natural_image
Two diagrams showing a cable being welded with a wire, no text or symbols present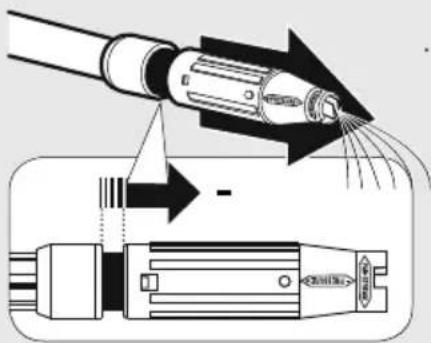
IT getto spillo/ventaglio ENspread pattern/pencil jet jek variable DE vario Duese Echorro regulable dunne straal/waaiervormige straal PT jato variavel cvějířová/prímá tryska DA nălesprøjt/viftesprøjt ELiđakaç karpfitoə/βενταλια ET peenjoa/levvikotsik pistemäinen/viuhkamainen suihku HU egyenes / legyező alakú vízsugár lijesios/ vēduoklinės čiurkšlės LV parasta / vēdekļveida strūkla MTjett ta’ ilma dirett/f’forma ta’ mrewħa NO tynn stråle/vifteformet stråle PL strumień szpilka/wachlarz TOчечная/ veeroобразная струя. SK vejárovitá/priama prúdnica ilglasti/pahljačasti curek vode SV năl-/solfjädersformad stråle BG a права/ветрилообразна струя HR mlaznica-fi ni mlaz/raspršivač jet ac/ evantai jet TR püskürtme/jet fan UK точковий струмінь/ віялоподібний SR sprej čvrsto / sprej isključen FA نازل سوزنى / طرح پاشش
ICS IT bassa pressione EN low pressure basse pression DE nieder-druck-Lanze baja presión lage druk baixa pressao CS nízkotlaká tryska DA lavt tryk χομηλη πιεση ET madalsurve FI matala paine palacsony nyomás LT žemas slégis LV zema spiediena strūkla pressjoni baxxa NO lavtrykk PIiskie ciśnienie HIJKOE давление nizkiK tlak SL nízkotlaková prúdnica Šag tryck HIJKO налягане HR mlaznica-niski tlak RC joasă presiune alçak basinc UK низький тиск nizak pritiska FA فشار کم
IT getto ventaglio EN spread pattern FR jet d'eau en eventail DE großen Wasserstrahl ES horro grandes NL waaiervormige straal PT jato grande CS vějířová tryska DA viftesprojt Elnišakačs βενταλια
ET waaiervormige straal viuhkamainen suihku legyező alakú vízsugár LT véduoklinés čiurkšlès ľvedeklveida strūkla gett ta' ilma f'forma ta' mrewha NO vifteformet strāle Kstrumień wachlarzowy veēroобразная струя SK vejárovitá prúdnica pahljačasti curek vode solfjädersformad strāle BG за ветрилообразна струя māznica raspršivač jet evantai jet fan CK rymíнь bīajlopodibний sprej isključen FA طرح پاشش

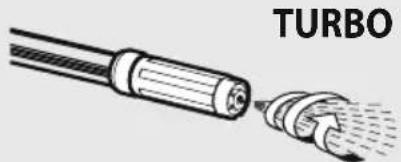
Optional
IT lancia turbo turbo lance lance turbo Turbo Lanze ES lanza turbo Turbo lans jturbo lança tryska turbo DA turbolanse ektoξευτηρας turbo turbo suihkuputki turbo-lanse lanca turbo насадка турбо turbo pištola urbo mlaznica lance turbo turbo lans turbootsik Galis LV turbo smidzinātājs MT parti ta' quddiem tal-gan turbo SK Mlaznica visokog pritiska Turbo FA توربولنس
SV turbolans ETurbo 3pryHK turbo mlaznica lanceTurbo turbo lams turbootsik ET HU szennymaró ländzsa LT turbo antgalis LV turbo smidzinātājs MT parti ta' quddiem tal-gan turbo SK turbo prúdnica UK Turbo-hacadka SR Mlaznica visokog pritiska Turbo FA tworobolns
natural_image
Illustration of a turbo oil pipe joint with visible spray and coating (no text or symbols)Optional
IT lancia turbo turbo lance lance turbo Turbo Lanze ES lanza turbo Turbo lans jturbo lança tryska turbo DA turbolanse ektoξευτηρας turbo turbo suihkuputki turbo-lanse lanca turbo насадка турбо turbo pištola turbo mlaznica lance turbo turbo lans turbootsik Galis LV turbo smidzinātājs MT parti ta' quddiem tal-gan turbo SK Mlaznica visokog pritiska Turbo FA توربولنس
flowchart
graph TD
    A["Optional"] --> B["Detergent"]
    B --> C["1. Gas jar"]
    B --> D["2. Gas jar"]
    B --> E["3a. Spray bottle"]
    E --> F["3b. Spray bottle"]
    E --> G["4. Spray bottle with air outlet"]
    style A fill:#f9f,stroke:#333
    style B fill:#ccf,stroke:#333
    style C fill:#cfc,stroke:#333
    style D fill:#fcc,stroke:#333
    style E fill:#cff,stroke:#333
    style F fill:#ffc,stroke:#333
    style G fill:#fcc,stroke:#333
flowchart
graph LR
    A["1. 2. 3. 5."] --> B["Optional"]
    B --> C["Optional"]
    C --> D["Optional"]
    D --> E["Optional"]

flowchart
graph TD
    A["Optional"] --> B["Water Flow"]
    C["Optional"] --> D["Fire Outlet"]
    E["Special Cable"] --> F["Wireless Pipe"]
    G["Electrician"] --> H["Hand Pulling"]
    I["House"] --> J["Refrigeration Unit"]

IT TARGHETTA DI IDENTIFICAZIONE.- EN IDENTIFICATION PLATE.- FR PLAQUE SIGNALÉTIQUE.- DE TYPENSCHILD. ES PLACA DE IDENTIFICACIÓN.- NL TYPE- PLAATJE.- PT PLACA DE IDENTIFICAÇÃO. CS IDENTIFIKAČNÍ ŠTÍTEK.- DA TYPESKILT. EL PINAKIDA ANAΓNΩΡΙΣΗΣ.- ET ETIKETT TEHNILISED ANDMED.- FI ARVOKILPI. HU AZONOSÍTÓ TÁBLA.- LT LIPDUKAS TECH- NINIAI DUOMENYS.- LV ETIΚETES TEHNISKIE DAT.- MT TEKNICI TA 'DATA TIKKETTA.- NO IDENTIFIKASJONSSKILT. - PL TABLICZKA ZNAMIONOWA.- RU TABLIYCHA ИДЕНТИФИКАЦИИ.- SK IDENTIFIKAČNY ŠTÍTOK.- SL IDENTIFIKACIJSKA TABLICA.- SV TYPSKYLT.- BG ИДЕНТИФИКАЦИОННА ТАБЕЛКА.- HR PLOCICU SA TEHNICKIM PODA- CIMA.- RO DATELE TEHNICE ETICHETA. - TR ETIKET TEKNIK BILGI. - UK ETIKETKA TEXHIЧИ ХАРАКТЕРИСТИКИ. - SR PLOČICU SA TEHNIČKIM PODACIMA.
1 IT Costruttore - EN Manufacturer - FR Fabricant - DE Hersteller - ES Fabricante - NL Fabrikant - PT Fabricante - CS Výrobce - DA Fabrikant - EL Kataokevaotnç - ET - FI Valmistaja - HU Gyártó - LT Gamintojas - LV Ražotājs - MT Manifattur - NO Produsent - PL Producent - RU Производитель - SK Výrobca - SL Proizvajalec - SV Tillverkare - BG Производител - HR Proizvođač - RO Producător - TR Üretici firma - UK Bиробник- SR Произвођач 8 Proizvođač). 2 IT Modello - EN Model - FR Modèle - DE Modell - ES Modelo - NL Model - PT Modelo - CS Modelka - DA Model - EL Movtélo - ET - FI Malli - HU Modell - LT Modelis - LV Modelis - MT Mudell - NO Modell - PL Model - RU Модель - SK Model - SL Model - SV Modell - BG Модел - HR MODEL - RO Modelul - TR Model - UK Model - SR Model. 3 W - IT Potenza assorbita - EN Abs.power - FR Puissance absorbée - DE Aufgenommene Stromleistung - ES Potencia absorbida - NL Opgenomen vermogen - PT Potência absorvida - CS Příkon - DA Effektforbrug - ET - FI Tehonkulutus - EL Апоррофоύμενη ισχύς - HU Felvett teljesítmény - LT Prijungiamų įtaisų galia - LV Pieslēguma jauda - MT konsum tal-energija - NO Strømforsyning - PL Moc pobierana - RU Поглощаемая мощность - SK Příkon - SL Absorbirana električna moč - SV Effektförbrukning - BG Вход - HR Priključna snaga - RO Puterea absorbită - TR Bağlanti gücü- UK Загальна потужність - SR Апсорбована снага (Apsorbovana snaga). 4 IT Indirizzo - EN Address - FR Adresse - DE Adresse - ES Dirección - NL Adres - PT Endereço - CS Adresa - DA Adresse - EL Διεύθυνοη - ET - FI Osoite - HU Cím - LT Adresas - LV Adrese - MT Indirizz - NO Adresse - PL Adres - SK Adresa - SL Naslov - SV Adress - RU Адрес - BG Адрес - HR Adresa - RO Abordare - TR Adres - UK Адреса - SR Адреса (adresa). 5 A - IT Consumo di corrente - EN Current consumption - FR Consommation de courant - DE Aktueller Verbrauch - ES Consumo de corriente - NL Huidig verbruik - PT Consumo de corrente - CS Odběr proudu - DA Strømforbrug - EL Kataváλωση ρεύματος. - ET - FI Nykyinen kulutus - HU Áramfelvétel - LT Dabartinis suvartojimas - LV Pašreizējais patērinš - MT Konsum currenti - NO Strømforbruk - PL Pobór prądu. - RU Текущий расход - SK Aktuálna spotreba - SL Poraba električne energije - SV Strömförbrukning - BG Консумация на електроенергия - HR Strujna zaštita - RO Siguranță pentru rețea - TR Șebeke sigortasi – UK Запобіжник – SR Потрошња струje 6 IP - IT Grado di protezione IP (IEC 60259) – EN IP degree of protection – FR Indice de protection IP – DE Schutzart (IP) – ES Grado de protección IP – CS Stupeň krytí (IP) – DA Beskyttelses graden (IP) – EL Проста Sofia IP – ET – FI IP-luokitusjärjestelmä – HU IP-védettség – NL IP-aanduiding – PT Grau de proteção IP – LT Saugiklio rūšis IP – LV Aizsardzības līmenis – MT Grad ta 'protezzjoni IP- NO IP beskyttelsesgrad – PL IP stopień ochrony – RU Степень защиты IP- SK IP stupeň ochrany – SL Zaščita IP – SV IP skydd grad – BG IP степен на защита – HR Stupanj zaštite – RO Grad de protectie – TR Koruma derecesi- UK Ступінь захисту – SR адреса заштићена заштитом. 7 V\~HZ – IT Rete di alimentazione – EN Power supply – FR Réseau d'alimentation – DE Netzversorgung – ES Red de alimentación – NL Netvoeding – PT Rede de alimentação – CS Napájecí sit’ – DA Strømforsyning – EL Δίκτυο τροφοδοίας – ET – FI Sähköverkko – HU Táphálózat – LT Elektros jranga – LV Elektropadeve – MT Provvista ta 'energija – NO Strømforsyning – PL Sieć zasilająca – RU Сеть питания – SK Napájacia siet’ – SL Omrežje napajanja – SV Strömförsörjning – RU Сеть питания – BG Захранване – HR Električni priključak – RO Racordul electric – TR Elektrik bağlantısı – UK Електричні з’єднання – SR напон напајања (napon napajanja). 8 MPa – IT Pressione di lavoro – EN Working pressure – FR Pression de service – DE Arbeitsdruk – ES Presión de trabajo – NL Werkdruk – PT Pressão de trabalho – CS Provozní tlak – DA Arbejdstryk – EL Пиеση λειτουργίας – ET – FI Työpaine – HU Územi nyomás – LT – LV – MT – NO Arbeidstrykk – PL Ciśnienie robocze – RU Рабочее давление – SK Pracovný tlak – SL Delovni tlak– SV Arbetstryck – BG Работно налягане – HR Radni tlak – RO Presiunea de lucru – TR Çalışma basinci– UK Робочий тиск – SR Радни притисак (Radni pritisak). 9 MPA – IT Pressione massima – EN Maximum pressure – FR Pression maximum – DE Maximaler Druck– ES Presión máxima – NL Maximum druk – PT Pressão máxima – CS Maximální tlak – DA Maksimalt tryk – EL Méγιστη πίεση – ET – FI Maksimipaine – HU Maximális nyomás – LT Maks. slégis – LV Spiediens (maks.) – MT
Pressjoni (massimu) - NO Maksimalt trykk - PL Maksymalne ciśnienie - RU Maksимальное давление - SK Maximálny tlak - SL Najvišji tlak - SV Högsta tryck - BG Maksimalno налягане - HR Maks. dozvoljeni tlak - RO Presiunea maximă admisă- TR Maksimum müsaade edilen basinç - UK Maks. допустимий тиск - SR Maks. притисак (Maksimalni pritisak. 10 MPa - IT Massima pressione acqua di alimentazione - EN Maximum supply water pressure - FR Pression de l'eau d'alimentation maximum - DE Maximaler Druck des zugeführten Wassers - ES Presión máxima del agua de alimentación - NL Maximum druk toevoerwater - PT Máxima pressão da água de alimentação - CS Maximální tlak připojené vody - DA Maksimal vandforsyningstryk - EL Méyiotn pleson vépoú troфобоїас vépoú - ET - FI Syöttöveden suurin sallittu paine - HU A tápviz maximális nyomása - LT Vandens prijungimo antgalis Maks. atitekančio vandens slęgis - LV Údens pieslęgums Pievadāmā üdens spiediens (maks.) - MT Konnessjoni ma 'l-ilma, Pressjoni tad-dhul (massimu) - NO Maksimalt vannforsyningstrykk - PL Maksymalne ciśnienie wody zasilającej - RU Maksимальное давление воды подачи - SK Maximálny tlak napájacej vody - SL Največji tlak napajalne vode - SV Högsta tryck ingångsvatten - BG Maksimalno налягане на подаваната вода - HR Priključak za vodu Dovodni tlak (maks.) - RO Presiunea de circulare de Racordul de apă (max.) - TR Su Besleme bağlantısı : basınç (maks.) - UK Подача води: Тиск, що подається (макс.) - SR притисак воде у доводу (Maks) (Maks. pritisak vode u dovodu). 11 I/min - IT Portata nominale - EN Nominal flow rate - FR Débit nominal - DE Nennfördermenge - ES Caudal nominal - NL Nominaal debiet - PT Caudal nominal - CS Jmenovitý průtok - DA Nominelt flow - EL Ovojaotní Хврпікότητα - ET - FI Nimellinen virtausnopeus - HU Névleges átfolyás - LT Vandens debitas - LV Údens patériňš - MT rata tal-fluss - NO Nominell vannmengde - PL Przepływ nominalny - RU Номинальный расход - SK Maximálny tlak - SL Nazivni pretok - SV Nominell flödeshastighet - BG Номинален дебит - HR Protok vode - RO Debit, apă- TR Besleme miktari, su- UK Продуктивність насоса, об'єм подачі - SR Проток воде (Protok vode) 12 I/min - IT Portata massima - EN Maximum flow rate - FR Débit maximum - DE Höchstfördermenge - ES Caudal máximo - NL Maximum debiet - PT Caudal máximo - CS Maximální průtok - DA Maksimalt flow - EL Méyiotn Хврпікότητα - ET- FI Maksimivirtausnopeus - HU Maximális átfolyás - LT Didžiausias debitas - LV Maksimalais padeves daudzums - MT Rata massima tal-fluss - NO Maksimal vannmengde - PL Maksymalny przepływ - RU Максимальный расход - SK Maximálny prietok - SL Največji pretok - SV Högsta flödeshastighet - BG Maks. дебит - HR Maksimalni protok - RO Debit, apă maxim- TR Maksimum sevk miktari, su- UK Maks. об'єм подачі - SR Максimalни проток (Maks. protok vode). 13 IT Massima temperatura acqua di alimentazione - EN Maximum supply water temperature - FR Température maximum eau d'alimentation - DE Wasserversorgungshöchsttemperatur - ES Temperatura máxima agua de alimentación - NL Maximum temperatuur toevoerwater - PT Máxima temperatura da água de alimentação - CS Maximální teplota připojené vody - DA Maksimal fremløbstemperatur - EL Méyiotn सеррокраоia troфобоїас vépoú - ET - FI Syöttöveden maksimilämpötila - HU Tápviz maximális hőmérséklet - LT Maks. atitekančio vandens temperatūra - LV Pievadāmā üdens temperatūra - MT Temperatura massima tal-provvista tal-ilma - NO Maksimal vannforsyningstemperatur - PL Maksymalna temperatura wody zasilającej - RU Максимальная температура воды питания - SK Maximálna teplota napájacej vody - SL Najvišja temperatura napajalne vode - SV Högsta ingångsvattentemperatur - BG Maks. температура на водоснабдяване - HR Priključak za vodu Dovodna temperatura (maks.)- RO Temperatura de circulare de Racordul de apă (max.)- TR Su Besleme sicakligi (maks.)- UK Подача води: допустимий тиск (макс.)- SR Доводна температура (макс.) (Dovodna temperatura (maks.) 14 Kg- IT Massa- EN Weight-FR Poids- DE Gewicht- ES Peso-NL Gewicht- PT Peso-CS Hmotnost- DA Vægt- EL Máça- ET- FI Paino-HU Tõmeg- LT Masė-LV Svars-MT Piž- NO Vekt- PL Ciężar-RU Macca-SK Hmotnost'-SL Teža-SV Vikt-BG Terlo-HR Težina-RO Greutate-TR Ağırlık-UK Bara-SR Težina. 15 IT TIPO-EN TYPE-FR TYPE-DE TYP-ES TIPO-NL TYPE-PT TIPO-CS TIPO-DA TYPE-EL TYIÓS-ET TÜÜP-FI TYYPPI-HU TÍPUS-LT TIPAS-LV TIPS-MT TÍP-NO TYPU-PL TYPU-RUTIП-SK TYP-SL VRSTE-SV TYP-BG TYI-P-HR TÍP-RO TÍP-TR TÍP-IUK TYP-SR OZNAKA TIPA. 16 IT Numero di serie-EN Serial number-FR Numéro de série-DE Seriennummer-ES Número de serie-NL Serienummer-PT Número de série-CS Výrobní číslo-DA Serienummer-EL Σεριακό αριθμό-ET-FI Sarjanumeron-HU Sorozatszámot-LT serijos numeris nuo-LV sērijas numurs no:-MT numru tas-serje minn-NO Serienumret-PL Numer seryjny-RU Серийный номер-SK Výrobné číslo-SL Serijska številka-SV Serienummer-BG Сериен номер-HR serijskim brojem-RO Numărul de serie-TR Seri numarası-UK Серійний номер від-SR serijski broj. 17 IT Codice-EN Code-FR Code-DE Code-ES Código-NL Code-PT Código-CS Kód-DA Kode-DE Code-EL Кюбікós-ET-FI Koodi-HU Kód-LT kodas-LV kods-MT kodici-NO Kode-PL Kod-RU Kod-SK Kód-SL Koda-SV Kod-BG Kod-HR kodirati-RO cod-TR kod-UK kod-SR kod(kod). 18 IT Anno di costruzione-EN Year of manufacture-FR Année de construction-DE Baujahr-ES Año de construcción-NL Bouwjaar-PT Ano de construção-CS Rok výstavby-DA Byggear-EL Etoç kataσκευής-ET-FI Rakennusvuosi-HU Építés éve-LT Pagaminimo metai-LV Izgatavošanas gads-MT Sena tal-manifattura-NO År med bygging-PL Rok budowy-RU Год постройки-SK Rok výstavby-SL Leto izgradnje-SV Byggår-BG Година на построване-HR Godina proizvodnje-RO Anul fabricatiei-TR Üretim yll-UK Pik виготовлення-SR Година производње(Godina proizvodnje). 19 dB-ITLivello di potenza sonora(Garantito)-EN Sound power level (Guaranteed)-FR Niveau de puissance acoustique(Garanté)-DE Schalleistungspegel(Garantiert)-ES Nivel de potencia acústica(Garantizado)-NL Geluidsvermogensniveau(Gegarandeerd)-PT Nível de potência acústica(Garantido)-CS Hladinu akustického(Garantovanou)-DA lydeffektniveau(Garanteret)-EL στάθμη ηχητικής πίεοης(Eyyυμένη)-ET-FI Äänen tehotaso(Taattu)-HU Hangteljesítményszint(Garantált)-LT Garantuotas garso galios lygis-LV Garantêta skañas limena jauda-MT II-livell ta' qawwa ta' hoss garantit NO Lydeffektnivå(Garanteret)-PL Poziom mocy akustycznej(Gwarantowany)-RU Уровень мощности звука(Гарантировано)-SK Úroveň akustického výkonu(Zaručovaná)-SL Raven zvočne moči(Zajamčeno)-SV Ljudeffektsnivå(Garantterad)-BG ниво на шум(Гарантирано)-HR Zajamčena razina zvučne snage-RO Nivelul de putere acustica garantat-TR Garanti edilen akustik güç seviyesi-UK Гарантований рівень звукової потужності-SR Dozvoljeni nivo zvučne snage
INDICE....PAG
ILLUSTRAZIONI....2
SAFETY PRECAUTIONS 17
USAGE 19
PUT INTO SERVICE / STARTING UP 20
PRESSURE REGULATOR: 22
CARE AND MAINTENANCE 22
TROUBLESHOOTING....23
WARRANTY CONDITIONS....23
DISPOSAL (WEEE) 23
GENERAL INFORMATION
> INTENDED USE
- The appliance can be used for washing surfaces outdoors, whenever pressurised water is required to remove dirt.
- With special optional accessories, it can be used for foaming and sandingblasting, and for washing with a rotary brush for application to the gun.
- The appliance is intended for professional use.
> TECHNICAL DATA
(see technical data plate)
SYMBOLS

WARNING: read the instructions carefully before use.
CAUTION! It is important to be careful of the following items.

IMPORTANT

LOCKED

OPEN

IF PRESENT

Double insulated (IF PRESENT): supple-
mentary insulation is applied to the basic insulation to protect against electric shock in the event of failure of the basic insulation.
SAFETY PRECAUTIONS
> WARNINGS
⚠ WARNING: This appliance is for outdoor use only.
⚠ WARNING: Always disconnect the electricity and water supplies on completion of every job.
⚠ WARNING: Do not use the machine if a supply cord or important parts of the machine are damaged, e.g. safety devices, high pressure hoses, trigger gun.
⚠ WARNING: This appliance has been designed for use with the detergent provided or the detergent specified by the manufacturer, such as a neutral shampoo based on biodegradable anionic surface active detergents. The use of other detergents or chemicals may put the appliance's safety at risk.
WARNING:
^3 a Do not use the machine within range of persons unless they wear protective clothing.
^3 b - Do not allow other people or animals within a range of 5m when operating the machine.
^3 c - Always wear suitable protective clothing in order to protect yourself against ricocheting parts.
^3 d - Do not touch the plug and the appliance with wet hands or when barefoot.
^3 e - Wear safety goggles and non-slip rubber footwear.
⚠ WARNING: Do not direct the nozzle toward mechanical parts containing lubricant grease, as the grease will dissolve and spread over the surrounding ground. Vehicle tyres/tyre valves may only be cleaned from a minimum distance of 30 cm, otherwise the vehicle tyre/tyre valve could be damaged by the high-pressure jet. The first indication of this is a discoloration of the tyre. Damaged vehicle tyres/tyre valves can be deadly dangerous.
WARNING: High pressure jets can be dangerous if subject to misuse. The jet must not be directed nimal, live electrical equipment or itself.
⚠ WARNING: High pressure hoses, fittings and couplings are important for the safety of the machine. Use only hoses, fittings and couplings rec-
EN
ommended by the manufacturer. (it is extremely important to protect these components against damage by avoiding their improper use and protecting them against bending, knocks and scratches).
⚠ WARNING: Appliances not equipped with T.S. – Total Stop : must not be left in operation for more than 2 minutes with the gun released. The recycled water heats up considerably, seriously damaging the pump.
⚠ WARNING: Appliances equipped with T.S. – Total Stop : these appliances should not be left in standby for more than 5 minutes.
⚠ WARNING: Switch the appliance off completely (master switch on (0)OFF) whenever it is left unattended.
⚠ WARNING: Every machine is tested in its operating conditions, so it is normal for a few drops of water to be left inside it.
⚠a WARNING: Take care not damage the electric cable. If the supply cord is damaged, it must be replaced by the manufacturer, its service agent or similarly qualified persons in order to avoid a hazard
⚠ b WARNING: The power cord should not be used to pull or lift the machine.
⚠ WARNING: Appliance with fluid under pressure. Keep a firm hold on the gun and be prepared to take the kickback pressure. Only use the high pressure nozzle provided with the appliance.
⚠ WARNING: This appliance is not intended for use by persons (including children) with reduced physical, sensory or mental capabilities, or lack of experience and knowledge.
⚠ WARNING: Children should be supervised to ensure that they do not play with the appliance.
⚠ WARNING: Never start the high-pressure cleaner without first completely unwinding the high-pressure hose.
⚠ WARNING: When winding and unwinding the pipe take care not to cause the high-pressure cleaner to overturn.
⚠ WARNING: Before unwinding or winding the hose, switch the machine off and release the pressure in the hose itself (switching off).
⚠ WARNING: Risk of explosion — Do not spray flammable liquids.
⚠ WARNING: To ensure machine safety, use only original spare parts from the manufacturer or approved by the manufacturer.
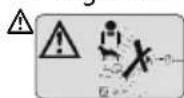
⚠ WARNING: Do not direct the jet against yourself
or others in order to clean clothes or foot-wear.
⚠ WARNING: Water that has flown through backflow preventers is considered to be non-potable.
⚠ WARNING: machine must be disconnected from its power source during cleaning or maintenance and when replacing parts or when converting the machine to another function.
⚠ WARNING: Improper extension cables can be dangerous. If an extension cord is used, it must be suitable for outdoor use, and the connection must be kept dry and clear of the ground. It is recommended that this be done using a cable reel that holds the plug at least 60 mm from the ground.
⚠ WARNING: If an extension cord is used, the plug and socket must be of watertight construction.
⚠ WARNING: During the use of high pressure cleaners, aerosols may form. Inhalation of aerosols can be dangerous to health.
⚠ WARNING: Depending on the application, shielded nozzles can be used for high pressure cleaning, which will drastically reduce the emission of hydrated aerosols. However, not all applications allow the use of such a device. If the armored nozzles are not applicable for aerosol protection, a respiratory mask of class FFP 2 or equivalent may be necessary, depending on the cleaning environment.
⚠ WARNING: NEVER PULL THE POWER SUPPLY CABLE OR MACHINE IN ORDER TO DISCONNECT THE PLUG FROM THE SOCKET.
⚠ WARNING: IF DURING FUNCTIONING THE POWER SUPPLY RUNS OUT, FOR SAFETY REASONS, TURN THE MACHINE OFF.
> SAFETY DEVICE
⚠ WARNING: the gun is fitted with a safety catch. Whenever use of the machine is interrupted it is important to operate the safety catch to prevent accidental activation of the jet.
- Safety features: gun equipped with safety locking device, appliance equipped with (Class I) overload cutout, pump equipped with by-pass valve or shutdown device.
- The safety button on the gun is not there to lock the lever during operation, but to prevent its accidental operation.
⚠ WARNING: The appliance is equipped with a motor protection device: in case of device intervention, wait some minutes or, in alternative, disconnect and re-connect the product to the electric
system. In case this problem repeats again or if the product does not start again, take the product to the nearest After Sales Service Point
> APPLIANCES PROVIDED WITH THERMAL VALVE (OPTIONAL)
This device enables the machine's by-pass operation through automatic water discharge whenever it reaches a temperature of nearly 60^ and cooling working components.
⚠ WARNING: appliances that are not provided with this disposal must not operate for more than 2 minutes with released gun. Recycled water raises its temperature remarkably causing great damages to the pump.
> STABILITY
⚠ WARNING:The machine must be always kept on horizontal bases, in a safe and stable way.
USAGE
> DESCRIPTION OF THE MACHINE
See the specific instructions manual provided.
> ASSEMBLY INSTRUCTIONS
See the specific instructions manual provided.
> WATER SUPPLY
Water supply collection
Water supply from the water main
- Connect a supply hose (not included) to the water inlet of the unit and to the water supply.
- Open the water supply.

WARNING: (symbol) machine not suitable for connection to the potable water mains.
The cleaner can only be connected to the water mains if the water mains is separated by a backflow preventer. Make sure that the hose is at least ∅ 13mm-1/2 inch and that it is reinforced, 5-25 m.
⚠ WARNING: Water that has flown through backflow preventers is considered to be nonpotable.
IMPORTANT: Only clean or filtered water should be used for intake. The delivery of the water intake tap should be equal to the double of the maximum pump range.
- Minimum delivery rate: 15 l/min.
- Maximum intake water temperature: 40°C
- Max inlet water pressure: 1Mpa Place the cleaner as close to the water supply system as possible.
Water supply from an open container
- Unscrew the coupling part for the water inlet.
- Screw the suction hose with filter (not included) onto the water connection of the unit.
- Hang the filter in the container.
- Vent the unit before operation.
- Unscrew the high-pressure line at the high-pressure outlet of the unit.
- Switch on the unit and let it run until water free of bubbles emerges at the high-pressure outlet.
- Switch off the unit and screw on the high-pressure hose again.
Failure to comply with the above conditions causes serious mechanical damage to the pump and the loss of warranty cover.
> ELECTRICITY SUPPLY
- The appliance's electrical connection must comply with the IEC 60364-1 standard.
IMPORTANT: Before connecting the appliance, make sure that the nameplate data are the same as those of the electrical mains and that the socket is protected by a differential security breaker with tripping sensitivity below 0.03 A - 30 ms.
- If the appliance's plug is not compatible with the socket, have the socket replaced with another of suitable type by professionally qualified staff.
- Never use the appliance in ambient temperatures below 0^ C if it is equipped with a PVC (H VV-F) cable.
- No actions needed for adjusting machines marked with dual voltage and frequency.
A QUALIFIED ELECTRICIAN must carry out the following:
- Check that the power supply system is in accordance with the data indicated on the identification plate: the voltage should not vary by more than ±5%;
- If the power supply cable is not available and if the device is not to be connected in a fixed manner to the power supply, fit a plug in compliance with the standard of the country in which the machine is installed;
- Check that the power socket the machine is plugged into is fitted with a suitable fuse (the value is indicated on the identification plate and
EN
on the Technical data chart).
- If a fixed appliance is not fitted with a supply cord and a plug, or with other device ensuring omnipolar disconnection from the mains, with a contact separation in all poles that allows full disconnection under overvoltage category III conditions, these disconnection devices must be incorporated in the supply mains in accordance with the installation rules.
NOTE: in the instruction manuals, the machine is always intended as being connected to the mains power supply by means of a plug. If the machine is permanently connected in a fixed manner to the power supply, it is intended that:
- having the disconnection device from the supply mains in the off position ("0") and its actuator locked with a padlock or similar means is the same as having the plug disconnected from its mains power supply socket;
- having means for disconnection from the supply mains in the on position (position "1") is the same as having the plug connected to the mains power socket.
IMPORTANT: Regarding three-phase motors, pay attention to the connection of the electric cable to the plug (see electric diagram).
⚠ WARNING: Improper extension cables can be dangerous. If an extension cord is used, it must be suitable for outdoor use, and the connection must be kept dry and clear of the ground. It is recommended that this be done using a cable reel that holds the plug at least 60 mm from the ground.
⚠ WARNING: If an extension cord is used, the plug and socket must be of watertight construction. Information for supply may also be obtained from the plug manufacturer.
| <16 A <25 A | ||
| <20 m ø 1,5 | mm ^2 - 14 AWGø 2,5 mm ^2 - 12 AWG | |
| 20 m - 50 mø 2,5 mm ^2 - 12 AWGø 4,0 mm ^2 - 10 AWG | ||
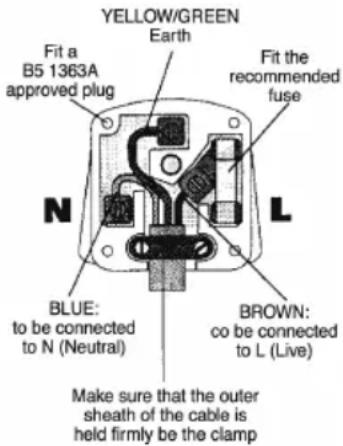
> PLUG
HOW TO CONNECT THE CORD TO A U.K. PLUG:
IMPORTANT The wires in the mains lead are coloured in accordance with the following code:
| Blue | Neutral |
| Brown | Live |
| Yellow/Green | Earth |
Please read the instructions given below before connecting the cord to a plug. If in doubt please consult
a qualified electrician. As the colours of the wires in the mains lead of this appliance may not correspond with the coloured markings identifying the terminals in your plug, proceed as follows:
The wires that is coloured Brown must be connected to the terminal which is marked with the letter L or coloured Red. The wire that is coloured Blue must be connected to the terminal which is marked with the letter N or coloured Black.
Safety points for rewireable or moulded plug:
The mains lead of this appliance may be already fitted with a BS1363 13A plug.
- If your socket outlet is not suitable for the plug, then the plug must be removed (cut off if it is a moulded on plug), the flexible cord insulation should be stripped back as appropriate and a suitable 3 pin plug fitted.
⚠ WARNING: Dispose of a plug that has been cut from the power supply cord, as such a plug is hazardous if inserted in a live 13A socket outlet elsewhere in the house.
- Should the fuse need to be replaced an ASTA
marked fuse, approved to BS1362, of the same rating must be used.
- Always replace the fuse cover after fitting a fuse. The plug must NOT be used if the cover is omitted or lost until a replacement is obtained.
- Make certain that only the correct fuse cover is used and fitted.
- For plugs with detachable fuse cover the replacement must be the same as the colour insert in the base of the plug, or as directed by the embossed wording on the base of the plug.
- If the detachable fuse cover is lost a replacement may be purchased from a Service Centre.
PUT INTO SERVICE / STARTING UP
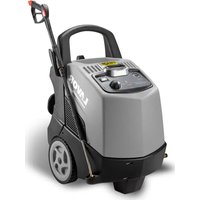
See fig. A
- Connect the high pressure hose to the trigger gun.
- Push the high pressure hose into the trigger gun.
Note: Make sure the connection nipple is aligned
correctly.
- Check the secure connection by pulling on the high pressure hose.
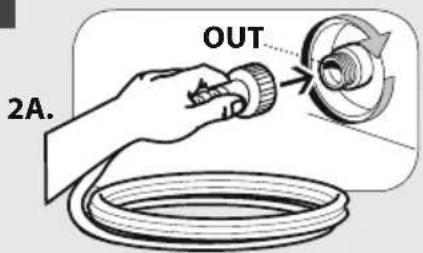
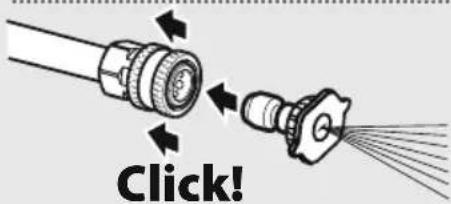
See fig. B
- Insert the high pressure hose tightly into the quick coupling on the appliance
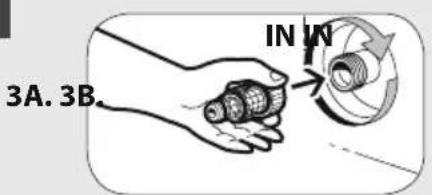
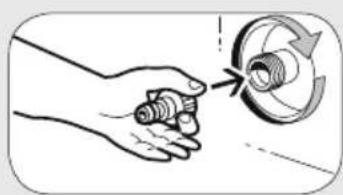
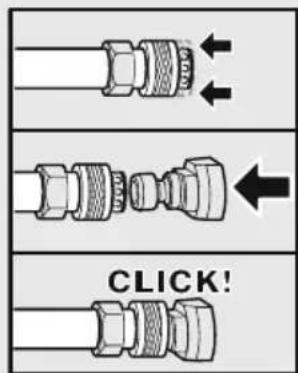
See fig. C
- Screw the coupling element to the water connection on the appliance. - Attach the water supply hose to the coupling on the water connection.
NOTE: The supply hose is not included.
- Connect the water supply hose to the water supply.
- Completely open the water tap.
- Insert the mains plug into the socket.
- Turn on the appliance "I/ON".
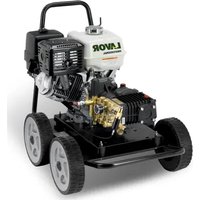
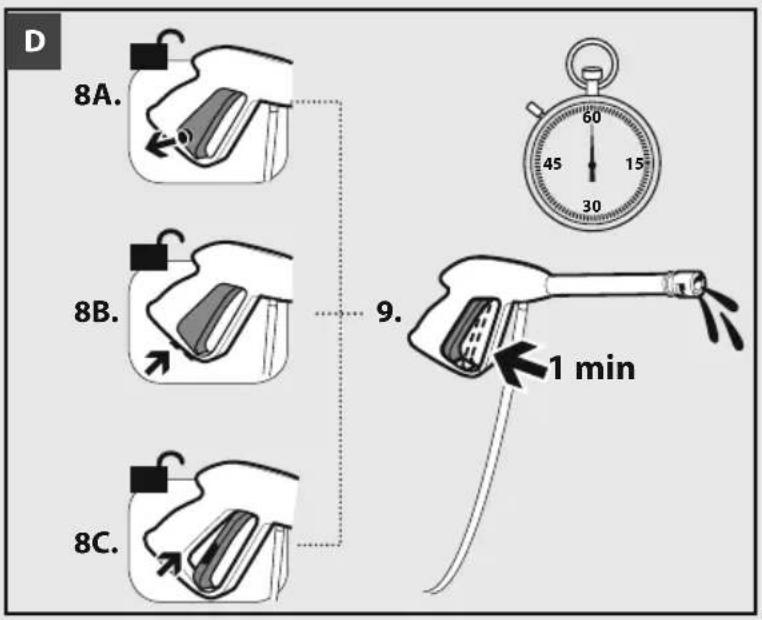
See fig. D
- Unlock the lever on the trigger gun.
- Pull on the lever of the trigger gun; the device will switch on.
- Switch the appliance on for a (max. of 1 minute) and wait until the water exits at the hand spray gun without bubbles.
- Release the lever on the trigger gun.
NOTE: Release the lever of the trigger gun; the device will switch off again. - High pressure remains in the system.
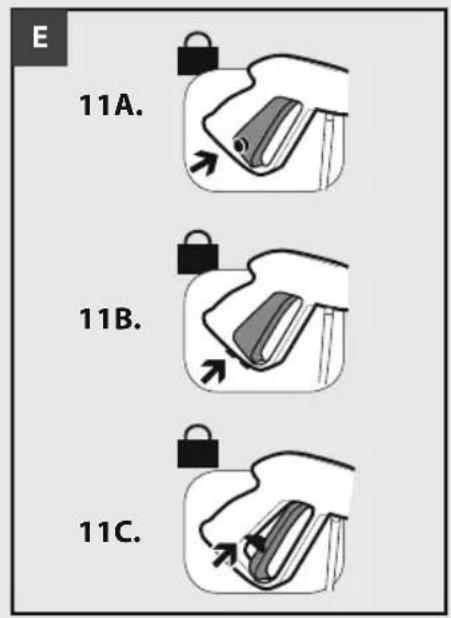
See fig. E
- Lock the lever on the trigger gun.
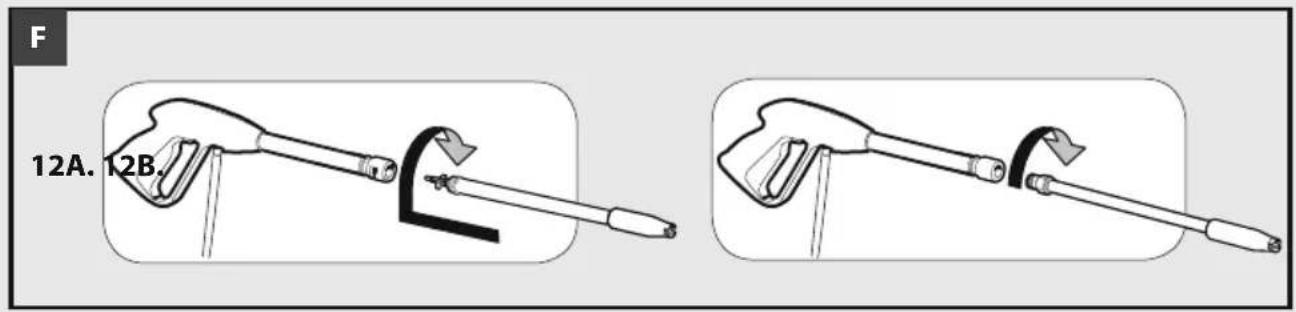
Operation
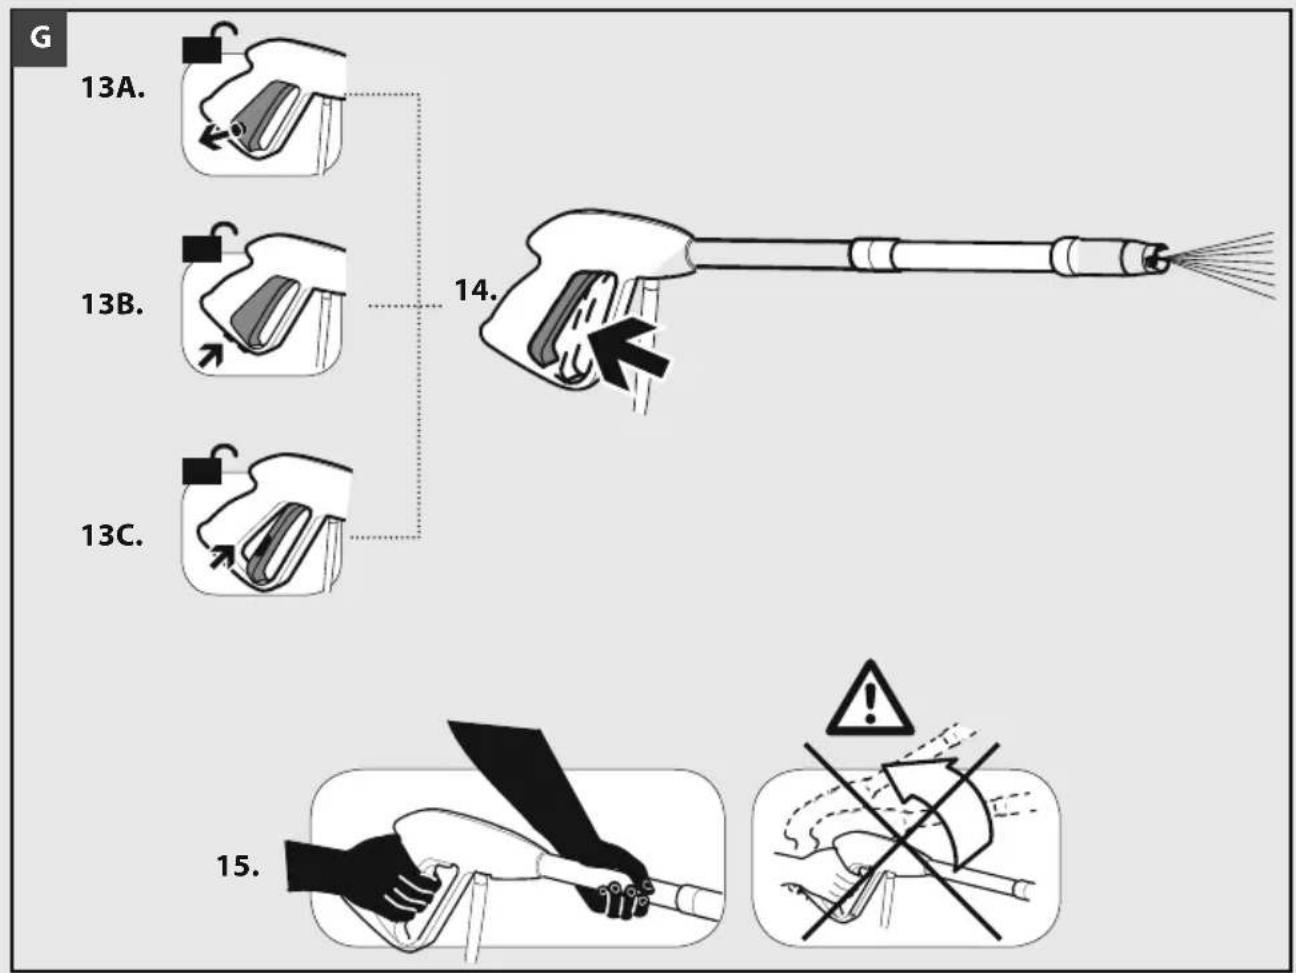
See fig. F
- Push the spray lance into the trigger gun and fasten it by turning it through 90°.
- Unlock the lever on the trigger gun.
See fig. G
- Pull on the lever of the trigger gun; the device will switch on.
⚠ WARNING: Appliance with fluid under pressure. Keep a firm hold on the gun and be prepared to take the kickback pressure.
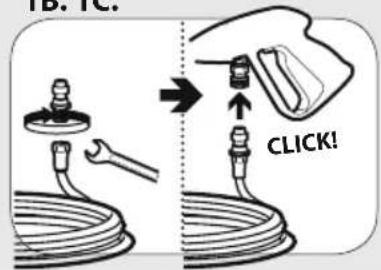
See fig.H
HIGH PRESSURE LANCE
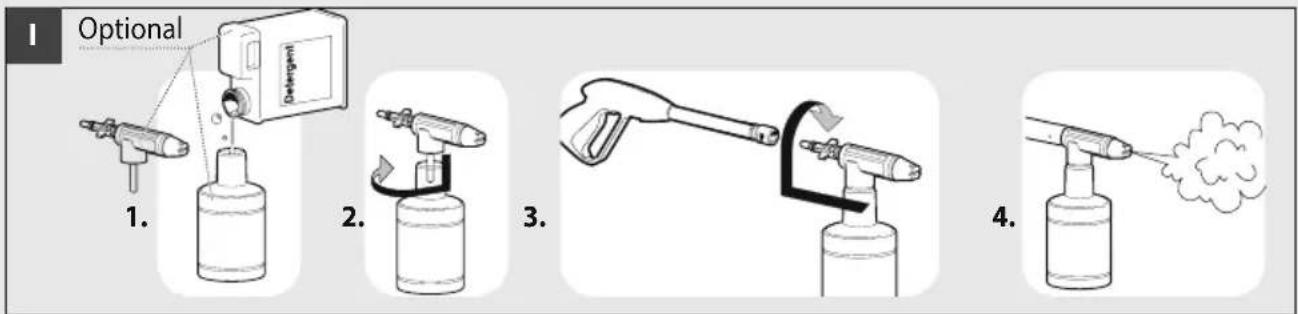
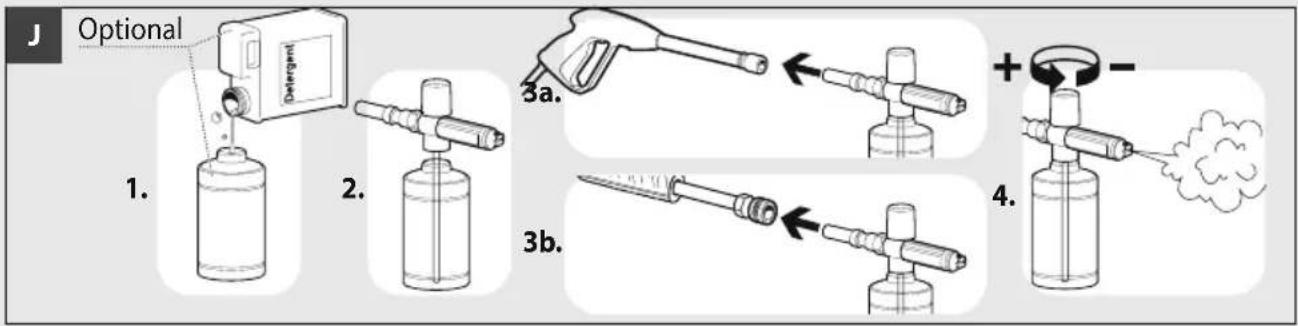
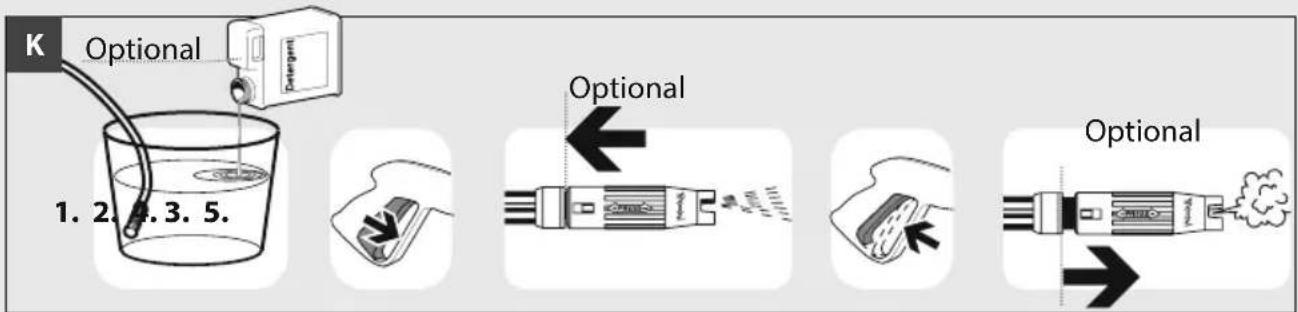
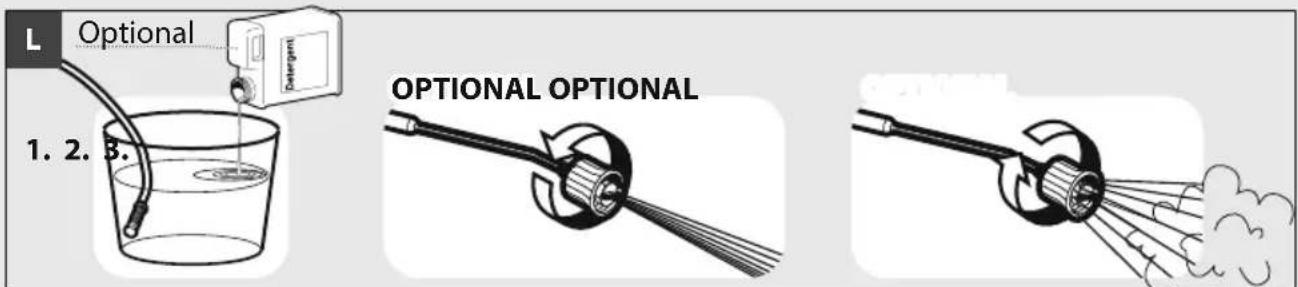
See fig. I J K L
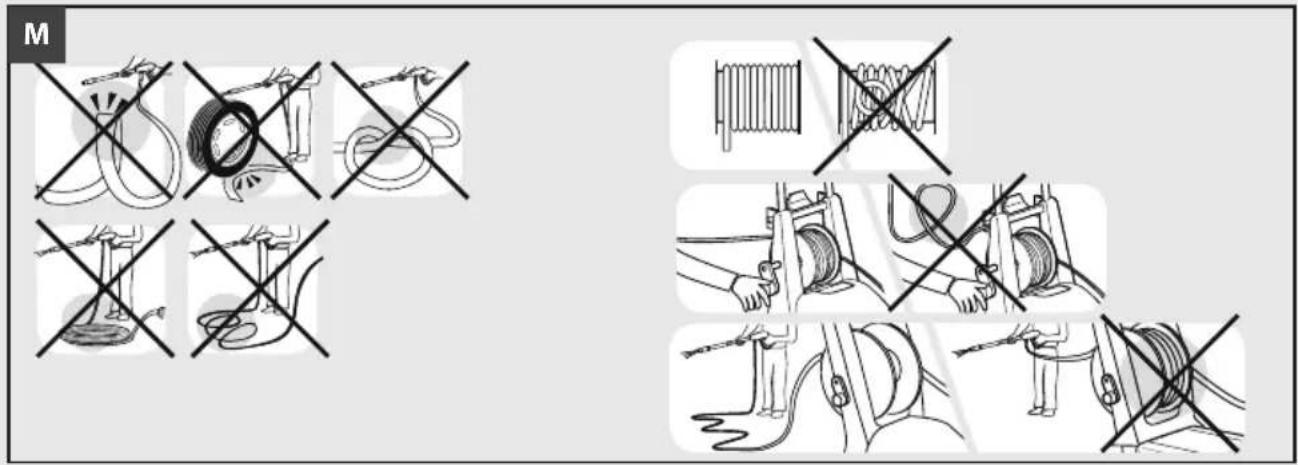
DETERGENT SUCTION
See fig.M
HIGH PRESSURE HOSE
Use the hydrocleaner only if the hose is completely uncoiled and extended.
See fig. N
Turn off the appliance
⚠ WARNING:
- Set the appliance switch to "0/OFF".
- Shut off water supply.
- Open the hand spray gun.
- Turn on pump shortly (appr. 5 seconds) with device switch.
- Pull main plug out of socket with dry hands only.
- Remove water connection.
- Activate hand spray gun until device is pressure less.
- Lock the trigger gun.
TS Total Stop
Machines equipped with Total
Stop:
When the machine is working, by releasing the gun lever, the motor stops automatically to prevent component wear during the pump bypass phase (motor in stand-by).
By pressing the gun lever the motor starts automatically.
Attention: do not leave the stand-by mode active for more than 5 minutes.
At the end of the operation, set the switch to "OFF".
TS
Total Stop 24V (if fitted)
Machines equipped with delayed, low-voltage Total Stop:
When the machine is working, by releasing the gun lever, after approximately 15 seconds the motor stops automatically to prevent component wear during the pump by-pass phase (motor in stand-by). By pressing the gun lever the motor starts automatically.
EN
⚠ WARNING: do not leave the stand-by mode active for more than 5 minutes.
At the end of the operation, set the switch to "OFF".
Activate hand spray gun until device is pressure less.

Total Stop 24V (if fitted)
Machines equipped with delayed, low-voltage Total Stop with intelligent switch-off:
When the machine is working, by releasing the gun lever, after approximately 15 seconds the motor stops automatically to prevent component wear during the pump by-pass phase (motor in stand-by). By pressing the gun lever the motor starts automatically.
⚠ WARNING: do not leave the stand-by mode active for more than 5 minutes.
If the machine remains in stand-by mode for more than 20 minutes, it switches off automatically and completely: in fact, by pressing the gun lever the machine does NOT start working.
For this reason, if you need to start the machine it is necessary to set the switch to (0) "OFF" and then to (I) "ON".
At the end of the operation, set the switch to "OFF".
Activate hand spray gun until device is pressure less.
PRESSURE REGULATOR:
If the appliance is equipped with a pressure regulator:
- when the pressure is set to minimum the T.S. may not trigger. Therefore, do not allow the appliance to function in by-pass for more than 1 minute.
- do not act on the gun lever too frequently (this may cause a malfunction).
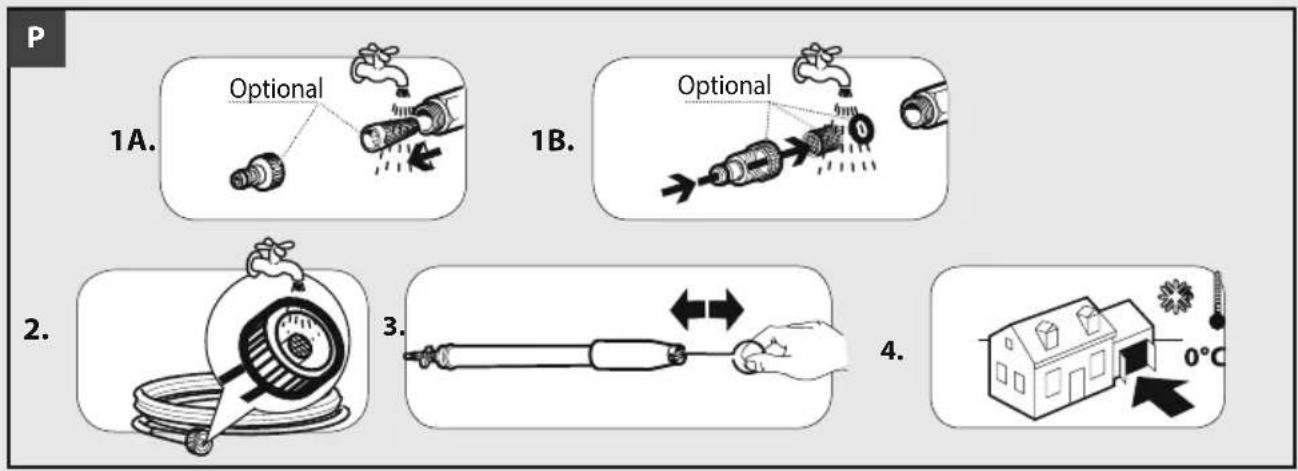
CARE AND MAINTENANCE
See fig. P
IMPORTANT: Before doing any work on the cleaner, discharge the pressure and disconnect the electricity and water supplies.
⚠ WARNING: the machine shall be disconnected from its power source, by removing the plug from the socket-outlet, during cleaning or
maintenance
⚠ WARNING: Do not spray the appliance with water and do not use detergents or aggressive solvents. Machine could be damaged.
- Clean the exterior part of the machine with a dry cloth.
ROUTINE MAINTENANCE
Follow the instructions for "STOPPING WORK" and those provided in the table below
Every time the cleaner is used.
- Check the power cord, the high pressure hose, the connectors, the cleaner gun and the lance pipe.
Should any of these look damaged, do not use the cleaner for any reason and contact a Qualified Technician.
Once a Week
- Check the water inlet filter and clean it if necessary.
Remove the filter.
Running water or compressed air is generally all that is needed to clean the filter.
In the most difficult cases, use a limescale remover or replace it, contacting a Specialized Technician to buy the spare part.
Mount the filter again, following the above steps in reverse order.
Once a Month
- Clean the nozzle.
To clean the nozzle, it is generally sufficient to insert the pin supplied into thevnozzle's hole. If no appreciable results are obtained, contact a Qualified Technicianvto buy the spare part. The nozzle can be replaced using a 14 mm/0.55" spanner (not supplied).
SUPPLEMENTARY MAINTENANCE
Supplementary maintenance should only be carried out by a Qualified Technician, following the table below (guideline only):
Every 100 hours
- Check the pump's hydraulic circuit (water).
- Check the pump is firmly secured.
- Adjust the electrodes.
- Check/top up the pump's oil level.
- Check/replace the water filter.
Every 300 hours
- Change the pump oil.
- Check the pump delivery/suction valves.
- Check the tightness of pump screws.
STORAGE
See fig. P
- Move the machine only by grasping the carrying handle
- Store the appliance and the accessories in a frost-safe room.
TROUBLESHOOTING
Appliance does not work
- Check whether the voltage shown on the rating plate corresponds to that of the power source.
- Check the connector cable for damage.
Appliance does not reach operational pressure
- Vent the appliance: allow the pump to operate without the high-pressure hose until water appears at the high-pressure outlet without any more bubbles. Then reattach the high-pressure hose.
- Clean the strainer in the water connection.
- Clean the filter placed inside the hose coupling (if set)
- Check the inlet water flow rate.
- Check all inlet pipes to the pump for leaks or blockage.
Strong pressure fluctuations
- Clean the high-pressure nozzle. Remove dirt from the nozzle hole with a needle and then rinse out with water from the front.
Pump leaks
- 10 drops per minute are permissible. In the case of more serious leakage, you should contact the authorized customer service.
Replacement parts
- Use only original spare parts or spare parts sug-gested by the manufacturer.
WARRANTY CONDITIONS
All our machines are subjected to strict tests and are covered against manufacturing defects in accord-
ance with applicable regulations. The warranty is effective from the date of purchase.
The following are not included in the warranty: - Parts subject to normal wear. - Rubber parts, charcoal, filters and the accessories and optional accessories. - Accidental damage, caused by transport, neglect or inadequate treatment, incorrect or improper use and installation failing - The warranty shall not cover any cleaning operations to which the operative components may be subjected, such as clogged nozzles and filter blocked due to limestones. This machine is intended to be used for domestic and hobby work: the warranty does not cover any other different kind of use.
DISPOSAL (WEEE)

As the owner of electrical or electronic equipment, the law (in accordance with the EU Direc-
tive 2012/19/EU on waste from electrical and tronic equipment and the national laws of the Member States that have implemented this Di-ive) prohibits you from disposing of this product's electrical / electronic accessories as municipal waste and obliges you to make use of the appropriate waste collection facilities. The product can disposed of by returning it to the distributor in a new product is purchased. The new product t be equivalent to that being disposed of. Dis-ng of the product in the environment can cause it harm to the environment itself and human th.
The symbol in the figure indicates the urban waste containers and it is strictly prohibited to dispose of the equipment in these containers. Non-compliance with the regulations stipulated in the Directive 2012/19/EU and the decrees implemented in the various EU Member States is administratively punishable.
FR
CONDITIONS DE GARANTIE....30
ÉLIMINATION .... 30
INDICATIONS GÉNÉRALES
> UTILISATION PRÉVUES
CONDITIONS DE GARANTIE
>MACHINE UITGEVOERD MET THERMISCHE KLEP (OPTIE)
INDHOLD ...... SIDE.
FOTOSERIEN....2
TYPESKILT 8
INTRODUKTION 66
SYMBOLER....66
SIKKERHED....66
ANVENDELSE 68
INSTALLERING / IDRIFTTAGNING ....69
TRYKREGULATOR: 70
VEDLIGEHOLDELSE RENG∅RING 71
UDBEDRING I TILFÆLDE AF FEJLFUNKTION ...... 71
GARANTIBETINGELSER 72
SKROTNING....72
INTRODUKTION
> BEREGNET ANVENDELSE
> VED ARBEJDETS AFSLUTNING
HOITO JA HUOLTO....90
KORJAUSTOIMENPITEET TOIMINTAHÄIRIÖN
SYNTYESSÄ 91
TAKUUEHDOT 91
HÄVITYS....91
JOHDANTO
> KÄYTTÖTARKOITUS
MANUTENZJONI TA' L-APPARAT....114
RIMEDJI F'KAŽ TA' OPERAT HAZIN ......115
KUNDIZZJONIJIET TAL-GARANZIJA ....115
RIMI 115
INFORMAZZJONI GENERALI
> INTENZJONI TAL-UŽU
> TAGHMIR MGHAMMAR B'VALV TERMALI (MIXTRI APPARTI)
SAKXIN TAD-DETERGENT
ara l-figura
IJKL
PAJP TA' PRESSJONI GHOLJA
ara l-figura.
M
L-apparat ta' idrotindif ghandu jintuža biss jekk il-manka hi miftuha lura ghal kollox u stirata.
WARAX-XOGHOL
ara l-figura
N
TS Total Stop
Magni mghamma b'sistema ta' Totali:
Meta l-magna tkun qed taħdem, malli titlaq il-grillu tal-pistola tal-ilma, il-mutur jieqaf jaħdem waħdu sabiex ma jħallix il-komponenti jitgħarrqu waqt li l-pompa tkun fuq is-sistema tal-by-pass (mutur stand-by).
MANUTENZJONI/INTERVENT MINN ŻMIEN GHAL ŻMIEN
Kull darba li jintuża l-apparat ta' idrotindif
MANUTENZJONI MIŻJUDA
Il-manutenzjoni addizzjonali trid issir biss minn Tekniku Kkwalifikwat billi jimxi mat-tabella li ğejja (mogħtija bħala gwida biss):
Kull 100 siegħa
- Icčekkja ĉ-ćirkwit idrawliku (tal-ilma) tal-pompa.
- Iččekkja li l-pompa hija marbuta sew.
- Icčekkja/žid il-livell taž-žejt fil-pompa.
- Iččekkja/biddel il-filtru tal-ilma.
Kull 300 siegħa
• Biddel il-pompa taż-żejt.
- Iččekkja I-valvi li jigbdu/jwasslu I-ilma.
- Iččekkja u ssikka jekk meħtieġ il-viti tal-pompa.
- Iččekkja I-valv li jirregola I-pompa.
- Icčekkja l-apparat tas-sigurtà.
HAZNA
ara l-figura P

- Mexxi l-apparat biss mill jifhimha-twettiq manku
- Żomm it-taghmir u l-accessorji ta 'l bogħod niexfa u sigur mit-tfal.
RIMEDJI F'KAŽ TA' OPERAT HAZIN
L-apparat ma jaħdimx
- Ikkontrolla t-tensjoni elettrika.
- Kun żgur li m'hemmx ŋsara fil-wajer ta'l-elettriku.
L-apparat ma jtellax pressjoni
> APPARATER UTSTYRT MED TERMISK VENTIL (EKSTRAUTSTYR)
STELL OG VEDLIKEHOLD
Se fig. P
ORDINÄRT VEDLIKEHOLD
Utfør arbeidet som forklares i avsnittet STANS. Følg tabellen nedenfor.
VEDLIKEHOLDS INTERVALL / INNGREP
EKSTRAORDINÄERT VEDLIKEHOLD
Det ekstraordinære vedlikeholdet må kun utføres av Kvalifisert Personale. Følg tabellen nedenfor (veiledende data):
Hver 100. driftstime
(AK JE K DISPOZÍCII)
(AK JE K DISPOZÍCII)
Total Stop 24V (AK JE K DISPOZÍCII)
INNEHÅLLSFÖRTECKNING......SIDA
ILLUSTRATIONER, RITNINGAR....2
TYP SKYLT 8
INLEDNING....148
SYMBOLER.... 148
SÄKERHET....148
HANDHAVANDE....150
INSTALLATION / INDRIFTTAGANDE.... 151
TRYCKREGLAGE 152
SKÖTSEL OCH UNDERHÅLL....152
ÄTGÄRDER VID FELFUNKTION 153
GARANTIVILLKOR 153
UNDANSKAFFANDE 153
INLEDNING
> FÖRUTSEDD ANVÄNDNING
>APPARATER MED TERMISK VENTIL
⚠️ DİKKAT: T.S. – Total Stop (Otomatik Stop Siste-
Kamalk ل heritage koerbi ani al kontroni qui ban la que (طبا lojogih) 2010/39/2002.12.14.15.16.17.18.19.20.21.22.23.24.25.26.27.28.29.30.31.32.33.34.35.36.37.38.39.40.41.42.43.44.45.46.47.48.49.50.51.52.53.54.55.56.57.58.59.60.61.62.63.64.65.66.67.68.69.70.71.72.73.74.75.76.77.78.79.80.81.82.83.84.85.86.87.88.89.90.91.92.93.94.95.96.97.98.99.100.101.102.103.104.105.106.107.108.109.110.111.112.113.114.115.116.117.118.119.120.121.122.123.124.125.126.127.128.129.130.131.132.133.134.135.136.137.138.139.140.141.142.143.144.145.146.147.148.149.150.151.152.153.154.155.156.157.158.159.160.161.162.163.164.165.166.167.168.169.170.171.172.173.174.175.176.177.178.179.180.181.182.183.184.185.186.187.188.189.190.191.192.193.194.195.196.197.198.199
المراد إقصاوه,