GOAT O800 RTK - Vacuum Cleaner ECOVACS - Free user manual and instructions
Find the device manual for free GOAT O800 RTK ECOVACS in PDF.

| Product type | Robotic lawn mower |
| Model | GOAT O800 RTK |
| Brand | ECOVACS |
| Dimensions (L × l × H) | 600 × 400 × 263 mm |
| Net weight (battery included) | 10.7 kg |
| Battery | Lithium-ion 18 V / 4 Ah |
| Rated voltage | 21 V (mower), 21 V (station) |
| Cutting width | 22 cm |
| Cutting height | 3 – 8 cm (adjustable) |
| Maximum working capacity | 800 m² |
| Charging time | ≈ 100 minutes |
| Sound power level (LWA) | 61 dB(A) |
| Connectivity | Wi-Fi 2.4 GHz, Bluetooth, RTK (GNSS + LoRa) |
| Main functions | Automatic mowing with RTK mapping, obstacle avoidance (LiDAR 3D-ToF + AI camera), scheduling, control via ECOVACS HOME app |
| Safety | STOP button, anti-theft PIN code, safety sensors, automatic stop on lift/obstacle |
| Routine maintenance | Clean AI camera and ToF sensors every 1 to 2 weeks; replace blades every 4 to 6 weeks |
| Winter storage | Clean, disconnect power, store in a dry and cool place (5-40 °C) |
| Included spare parts | Spare blade kit, assembly screws, Allen key |
| Repairability | Blades and battery replaceable by a professional; RTK reference station resettable |
| Operating temperature | 5 °C to 40 °C |
| Warranty and compliance | Compliant with EU directives (2014/53/EU, 2006/42/EC); declaration available online |
Frequently Asked Questions - GOAT O800 RTK ECOVACS
User questions about GOAT O800 RTK ECOVACS
0 question about this device. Answer the ones you know or ask your own.
Ask a new question about this device
Download the instructions for your Vacuum Cleaner in PDF format for free! Find your manual GOAT O800 RTK - ECOVACS and take your electronic device back in hand. On this page are published all the documents necessary for the use of your device. GOAT O800 RTK by ECOVACS.
USER MANUAL GOAT O800 RTK ECOVACS
Instruction Manual....EN I P3
1. Important Safety Instructions – Read Carefully Before Use and Keep for Future Reference
Read the instructions carefully. Make sure you understand the instructions and be familiar with the controls and the proper use of the appliance. Please understand that you can reduce the risk by following the instructions and warnings in this manual, but you cannot eliminate all the risks. Lawn Mowing Robot (hereinafter referred to as "GOAT") has many built-in safety sensors, however, safety risks still exist.
All related residual risks have been described or informed in this manual.
Description of intended use: Intelligent lawn mowers are mainly used in mowing grass, especially in parks, private villa yards, and football fields.
For machines used in public areas, that warning signs shall be placed around the working area of the machine.
They shall show the substance of the following text: WARNING! Automatic lawnmower!
Keep away from the machine! Supervise children! DO NOT modify the mower by yourself.
Modifications could interfere with mower
operations, result in serious injury and/or damage, or void the Limited Warrant. Use only Ecovacs approved parts and accessories.
Warning
Never allow children, persons with reduced physical, sensory or mental capabilities or lack of experience and knowledge or people unfamiliar with these instructions to use the machine, local regulations may restrict the age of the operator.
To avoid using the machine and its peripherals in bad weather conditions especially when there is a risk of lightning.
Before each mowing session, check that all parts of the mower can function normally.
Periodically inspect the area where the machine is to be used and remove all stones, sticks, wires, bones, and other foreign objects.
NEVER allow children to touch the power supply unit, charging station, blades, the battery compartment, or any parts with gaps such as the wheels.
Warning
Never to operate the machine and/or its peripherals with defective guards or shields, or without safety devices, or if the cord is damaged or worn.
Keep away from the rotating blades! DO NOT put hands or feet under or near the rotating blades.
Keep a safe distance from the mower when operating.
DO NOT overreach. Keep your balance at all times and always be sure of the footing on slopes. Walk, never run while operating the machine or its peripherals.
Warning
Never allow children to be in the vicinity or play with the machine when it is operating.
Warning
DO NOT touch moving hazardous parts before they have come to a complete stop.
Warning
For the purposes of recharging the battery, only use the detachable supply unit provided with this appliance (CH2492E/CH2492F).
This appliance contains batteries that are only
replaceable by skilled persons.
Safe Usage:
Not to connect a damaged cord to the supply or touch a damaged cord before it is disconnected from the supply for the reason that damaged cords can lead to contact with live parts; keep extension cords away from moving hazardous parts to avoid damage to the cords which can lead to contact with live parts; to connect the machine and/or its peripherals only to a supply circuit protected by a residual current device (RCD) with a tripping current of not more than 30 mA.
Unplug the Power Supply from the power socket and then untangle when the power cord or the extension cable is damaged or entangled during use. During the operation, pull the body of the plug rather than the cord to avoid the hazard.
Contact Customer Service and let the skilled professional to repair or replace the cord.
Please use the extension cable manufactured by ECOVACS. If you have any problem, contact Customer Service.
If the SUPPLY CORD is damaged, it must be replaced by the manufacturer, its service agent or similarly qualified persons in order to avoid a
hazard.
Press the STOP Button at once when the mower makes the abnormal sound or raises the alarm. In case of leakage of electrolyte flush with water or neutralizing agent, ask for medical help once it gets contact with the eyes etc.
If there are abnormal vibrations, please restart the mower. If the problem persists, please Contact Customer Service.
Instructions to always wear substantial footwear and long trousers while operating the machine with a manual controller.
Additionally when using the manual controller a) Mow only in daylight or in good artificial light.
b) Avoid operating the machine in wet grass.
c) Do not operate the machine when barefoot or wearing open sandals. Always wear substantial footwear and long trousers.
d) Always be sure of your footing on slopes.
e) Use extreme caution when reversing the machine towards you.
f) Always switch on the motor according to instructions with feet well away from the blade(s).
Device Update
Typically, some devices are updated bi-monthly, but not always so specific.
Some devices, especially those that went on sale more than three years ago, will only be updated if a critical vulnerability is found and fixed.
Do not use and store in extremely hot or cold environments (below 5^ C / 41^ F or above 45^ C/ 113^ F).
This equipment must be installed and operated in accordance with provided instructions and the antenna(s) used for this transmitter must be installed to provide a separation distance of at least 20 cm from all persons and must not be collocated or operating in conjunction with any other antenna or transmitter.
European Union Compliance Statement
Information on Disposal for Users of Waste Electrical & Electronic Equipment

This symbol on the product or on its packaging indicates that used electrical and electronic products should not be mixed with unsorted municipal waste. For proper treatment, it is your responsibility to dispose of your waste equipment by arranging to return it to designated collection points.
Disposing of this product correctly will help save valuable resources and prevent any potential negative effects on human health and the environment, which could otherwise arise from inappropriate waste handling.
To return your used device, please use the return and collection systems or contact the retailer where the product was purchased, which is free of charge, please contact your local authority for further details of your nearest designated collection point.
Penalties may be applicable for incorrect disposal of this waste, in accordance with your national legislation.
Information on Disposal for Users of used batteries

This symbol means that batteries and accumulators, at their end-of-life, should not be mixed with unsorted municipal waste. Your participation is an important part of the effort to minimize the impact of batteries and accumulators on the environment and on human health. For proper recycling you can return this product or the batteries or accumulators it contains to your supplier or to a designated collection point, which is free of charge.
Disposing of this product correctly will help save valuable resources and prevent any potential negative effects on human health and the environment, which could otherwise arise from inappropriate waste handling.
Penalties may be applicable for incorrect disposal of this waste, in accordance with your national legislation.
there are separate collection systems for used batteries and accumulators.
Please, dispose of batteries and accumulators correctly at your local community waste collection/recycling center.
Restriction of the use of certain hazardous substances (RoHS) Directive
Ecovacs Home Service Robotics Co., Ltd. hereby declares the whole product including parts (cables, cords, and so on) meets the requirements of RoHS Directive 2011/65/EU and amendment Commission Delegated Directive (EU) 2015/863 on the restriction of the use of certain hazardous substances in electrical and electronic equipment ("RoHS recast" or "RoHS 2.0").
Radio Equipment Directive
Ecovacs Home Service Robotics Co., Ltd. hereby declares that the product listed in this section comply with the essential requirements and other relevant provisions of the Radio Equipment Directive 2014/53/EU.
Machinery Directive
Ecovacs Home Service Robotics Co., Ltd. hereby declares that the product listed in this section comply with the essential requirements and other relevant provisions of the Machinery Directive 2006/42/EC.
Europe Authorised Representative:

ECOVACS Europe GmbH Holzstrasse 2 I D-40221 Düsseldorf I Germany
Ecovacs Home Service Robotics Co., Ltd. hereby declares that the product comply with the essential requirements and other relevant provisions of the RoHS Directive 2011/65/EU and amendment Commission Delegated Directive (EU) 2015/863, the Radio Equipment Directive 2014/53/EU and the Machinery Directive 2006/42/EC.
The declaration of conformity can be viewed at the following address: https://www.ecovacs.com/global/compliance.
 | Class III appliance |
| [SCTG] | Direct current |
 | Alternating current |
 | This product conforms to the applicable EC Directives. |
 | Polarity of the charging port |
 | Before charging, read the instructions. |
Symbols
 | WARNING—Read instruction manual before operating the machine. |
 | WARNING—Keep a safe distance from the machine when operating. |
 | WARNING—Do not ride on the machine. |
 | WARNING—Operate the disabling device before working on or lifting the machine. |
 | CAUTION—Do not touch rotating blade. |
2. What's in the Box
2.1 Package Contents

text_image
GOAT O600 RTK ① ②
text_image
RTK Reference Station ComponentsGOAT O800 RTK 6 7 8 9 10 11 ×8 ×4
text_image
Charging Station Components Spare Parts ② ③ ④ ⑤ ×6
text_image
13 ×9
flowchart
graph TD
    A["14 Instruction Manual"] --> B["15 Quick Start Guide"]
1 ECOVACS GOAT O600 RTK (including Blade*3)/O800 RTK (including Blade*3)
4 Charging Station Fastening Anchors
8 RTK Reference Station Mounting Poles
12 Spring Washer
5 Allen Key
9 Power Cable Loop Fastener 10 RTK Reference Station Cable Clips
13 Spare Blade Kit 14 Instruction Manual
6 RTK Reference Station
10 RTK Reference Station Cable Clips
14 Instruction Manual
2 Charging Station
3 Power Adapter
7 RTK Reference Station Fixing Anchor
11 RTK Pole Assembly Screw
15 Quick Start Guide
2.2 Views and Functions
① Top View(O600 RTK)
Top View(O800 RTK)

text_image
STOP Button STOP Button Control Panel Control Panel Rain Sensor Rain Sensor RTK Rover RTK Rover Assistant light Al Camera Bumper Bumper Height Adjustment Knob Al Camera 3D-ToF LiDAR Height Adjustment KnobNote:
The Assistant Light turns on when GOAT is returning to the charging station to assist with docking. It turns off automatically after charging begins.
Sensors
| Name Description | |
| AI camera | Perceive the environmental information in front of GOAT, identify special targets, and help GOAT to interact with the user intelligently.Horizontal: 150 degrees; Vertical: 80 degrees. |
| 3D-ToF LiDAR(O800 RTK) | Perceive obstacle information in front of GOAT and help GOAT to avoid obstacles actively.Range: Detect the longitude and latitude coordinates of GOAT position.Horizontal: 90 degrees; Vertical: 70 degrees.The farthest distance is 3~4 m.(9.84'~13.12') |
| Rain sensor Detect wh | ether it is raining in the current environment, and help GOAT decide whether to continue working. |
| RTK Reference Station | Help the mobile robot obtain the relative distance between itself and the Locator RTK Reference Station, which is used to assist GOAT to build a home map.Range: With the RTK Reference Station at the center, the effective range of the signal is within a radius of 140 m.(459.3') |
Interface
| Name Description | |
| Bluetooth(GOAT) | Enable Bluetooth during network setup to connect GOAT to the network. During regular use, enable Bluetooth mode to perform tasks like manual mapping and manual mowing. |
| Wi-Fi* Enable Wi-Fi to transmit data between the app and GOAT, allowing app-based control. | |
| ECOVACS HOME APP | Download and enable the latest version of the ECOVACS HOME app to access smart features such as network setup, mapping, and mowing (features may vary by product). |
| Charging Contacts Enable charging by connecting GOAT to a power source. | |
| RTK Rover | The rover continuously receives differential correction data from the satellite Reference Station, enabling RTK positioning calculations and achieving high-precision RTK localization. |
| Lora Base Station and Communication Device | Facilitate data transmission between RTK rover and RTK Reference Station. The RTK Reference Station transmits positioning correction data to the rover for calculations, while the rover sends requests back to the Charging Station. Additionally, this setup supports OTA updates for RTK firmware. |
② Bottom View

text_image
Rear Wheels Battery Compartment Blades Blade Disc Front Wheels③ Back View

natural_image
Front view line drawing of a tracked robotic vehicle with visible tracks and wheels (no text or symbols)④ Charging Station and RTK Reference Station

text_image
RTK Reference Station RTK Reference Station Indicator Light Solid Blue: Strong signal Flashing Blue: Poor signal. Please select a new location for installation. Charging Station Charging Station Indicator Light Solid Blue: Powered on/ Fully charged Quick Flashing Blue: Charging3. Get Your GOAT Ready
3.1 GOAT and App Setup
① Start GOAT and Set PIN Code
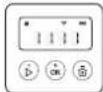
Control Panel:

text_image
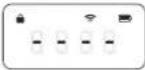
STOP STOP POWER ON/OFF ADD START OK DISPLAY SUBTRACT CHARGEPanel Icons:
| Lock |  | GOAT locked. Please enter PIN code to unlock GOAT.If it flashes, please set the PIN code. |
WiFi Conne to Wi-Fi. to Wi-Fi. | ||
| Battery | [2323] | Battery level.White --- More than 15% charge.Red --- Less than or equal 15% charge.Flashing indicates charging.Steady indicates in use or fully charged. |
Buttons and Functions
 |
Reset: All data, except for the lifespan of accessories such as blades and camera brushes, will be cleared during the reset process.
Panel Display Reads:
| Display Description | |
 | Standing by. No task assigned. |
 | Current Battery Level (For example, the number shown in the image represents the current battery level as 100%.) |
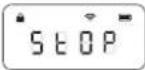 | STOPGOAT is paused. Please press ➤-> OK to continue working, or ➤-> OK to return to the charging station. |
 | ONGOAT is working. |
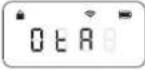 | OTAGOAT is undergoing OTA updates. |
 | E and a 3-digit Error Code.Go to the Troubleshooting section of this manual or visit https://www.ecovacs.com/global for the meaning of the Error Code messages and recommended solutions. |
1. Start GOAT:
Press and hold [OK] for 3 seconds on GOAT and the digital tube display will flash as below.


Note: Your GOAT will be automatically powered on when it docks at the Charging Station.
2. Set PIN Code:
The PIN code you set for your GOAT at the very beginning is used to prevent the device from being stolen or operated by children. When GOAT is off map or to be powered on or reset, it will automatically be locked. You can unlock it by entering the right PIN code.
- Set the PIN code when the display shows as below.
- Press [+) or [-] to select the PIN code numbers one by one. After the first digit is decided, press [OK] to confirm, and the cursor will move to the next digit.
- If the 🔒s flashing, please set the PIN code.
- If the ☑s solid, enter the previously set PIN code.
- Once unlocked, the will disappear. If unlocking fails, the will flash again, prompting you to reset the PIN code.

text_image
Illustration showing five sequential steps of a digital timer application, with each step displaying a display and control buttons.Note:
• 0000 is an invalid PIN code.
- PIN code is to be entered twice to confirm the setting.
- If you enter the wrong numbers while setting the PIN code, the setting process will start all over again.
- You may change the PIN code on the App.
② Download the ECOVACS HOME App
Scan the QR code on GOAT, Download and install the ECOVACS HOME App, complete the resgistration, and log in. You may also find the instruction manual and How-to-use by scanning the QR code.


③ Connect GOAT to the App
Note:
- Your mobile phone is connected to a Wi-Fi network.
- The 2.4GHz band wireless signal is enabled on your router.
- Make sure your GOAT and your phone are in the same 2.4GHz network router environment.
- Ensure your phone has Bluetooth function and your GOAT is within the effective distance of 10 m(32.81').
- GOAT series robotic lawn mowers are designed for domestic mowing scenarios. A home Wi-Fi network is required for operation, and anti-DDOS protection can only be set up through router settings.
Bluetooth Connection and Wi-Fi Connection
- Turn on the Bluetooth on your phone.
- Scan the QR Code on GOAT or select GOAT manually in the App.
- Follow the instructions in the App to complete the Bluetooth and Wi-Fi connections.

flowchart
graph LR
    A["Mobile App"] --> B["Robot"]
    B --> C["Smart Phone Icon"]
    C --> D["Smart Phone Icon"]
- on GOAT's panel display will light up after successful connection.

text_image
Diagram of a smart home control panel with Wi-Fi signal icon and status buttonsHow to unbind your GOAT?
Allowing binding to one App account currently, your GOAT is unable to be bound to another App account before unbinding. You can unbind your GOAT in the App. Feel assured to take this operation which would not erase the working data such as schedules of your GOAT. You can also unbind the device by clicking the small triangle next to the device name and selecting Delete GOAT.
3.2 Station Installation
① Install the Charging Station
- The specific range will be formed around the Charging Station installation site(as shown in the figure), and it needs to meet the following conditions.
• Strong Wi-Fi signal coverage
- Flat and open area without slopes
• No obstacles around the Charging Station
- Precut the grass around the Charging Station to a height< 6 cm(2.36")
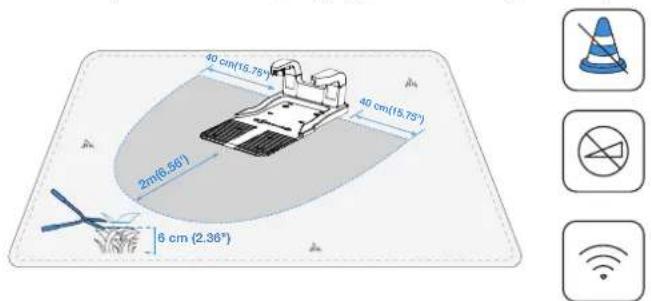
text_image
40 cm(15.75°) 40 cm(15.75°) 2π(6.56°) 6 cm (2.36°)- Connect the longer cable to the Power Adapter. Please align the notch (A) with the groove (B) and screw the nut until they are locked into each other.
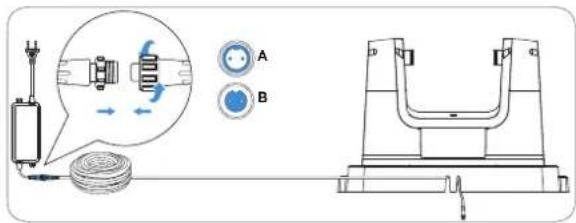
text_image
Technical diagram showing mechanical assembly with labeled components A and B, including a magnified inset of a device component.Note: The Charging Station has two cable ports: the longer one is for the Power Adapter and the short one is for the RTK Reference Station.
- Connect the Charging Station Plug to the power supply and ensure the blue light is steady on.
Note:
- Please ensure the Power Adapter is positioned 30 cm (11.8") above the ground to prevent water and moisture damage.
- Please plug the device into an indoor outlet or an outdoor waterproof outlet.
- You can choose to buy the extension cable by connecting it to the power interface if needed.

text_image
30 cm (11.8°)- If you want to fix the Charging Station to the ground, use the Charging Station Fastening Anchors and the Allen key.
Note: You may want to do this after you have settled down everything.

natural_image
Technical line drawing of a mechanical device with mounting holes and a grid base (no text or symbols)② Install the RTK Reference Station
Note: You may explore additional accessories for RTK Reference Station installation at https://www.ecovacs.com/global.
- Choose an open area for the RTK Reference Station, a spot recommendedly at least 2m (6.56") away from buildings and trees for better RTK Reference Station performance.

text_image
≥ 2 m(6.56°) ≥ 2 m(8.68°)- Assemble the upper and lower parts of the RTK Reference Station Mounting Poles, ensuring the buckle clicks securely into place.

natural_image
Technical line drawing of a mechanical assembly with a magnified inset showing a component (no text or symbols)- Attach the RTK Reference Station signal head to the RTK Reference Station Mounting Pole by tightening the RTK Pole Assembly Screw.
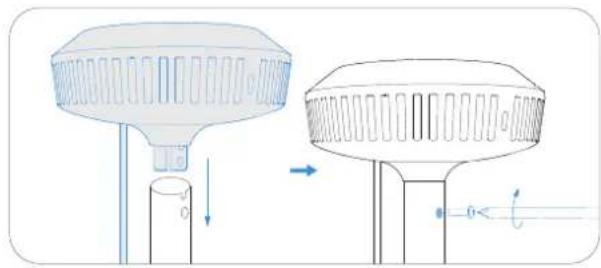
natural_image
Technical line drawing of a two-stage lamp or stand with internal structure and directional arrows (no text or symbols)- Install the mounting pole to the fixing anchor and tighten up.

natural_image
Diagram of a medical or laboratory procedure showing a tool interacting with a tube, with an inset magnified view of the tube being inserted (no text or labels present)- Connect the RTK Reference Station power cable to the shorter cable of the Charging Station and tighten the nut.

text_image
A B- After powering on, please wait one minute to check the indicator light status. If the RTK Reference Station indicator remains steady blue, the location is ideal with good signal; if it flashes, relocate the RTK Reference Station, until you find the perfect position.

text_image
Diagram showing a lamp with two labeled test tubes (✓ and ×) and a checkmark, indicating a confirmation or rejection point.- After locating the perfect spot, insert the RTK Reference Station Fixing Anchor into the ground.
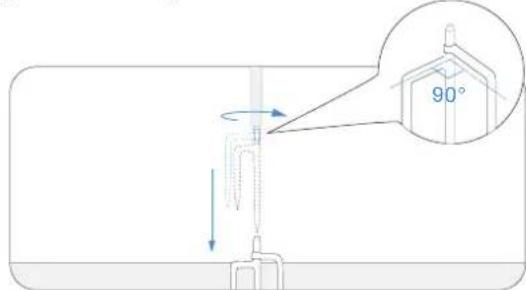
text_image
90°Note:
- DO NOT install the RTK Reference Station to a spot where the ground is soggy and mushy, otherwise the pole may easily tilt, thus undermining the working accuracy of the RTK Reference Station.
- The RTK Reference Station should be oriented vertically, as shown below:

natural_image
Simple diagram of a vertical pole with a blue checkmark on a flat base (no text or symbols)
natural_image
Simple diagram showing a pole with a cross symbol, no text or labels present- Secure the RTK Reference Station power cable to the mounting pole with the RTK Reference Station Cable Clips and use the Power Cable Fastening Pegs to secure other cables to the ground.
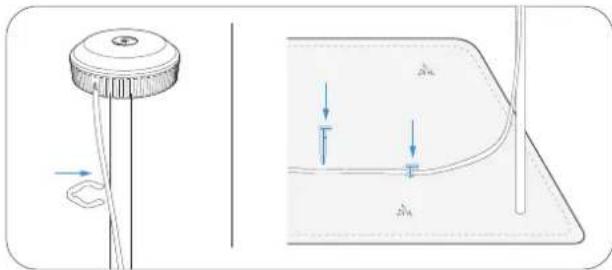
natural_image
Technical diagram showing a mechanical component and its cross-sectional view with force arrows (no text or symbols)3.3 Charge Your GOAT
• Fully charge your GOAT before first use.
- Place it at the Charging Station for charging. The 📄 on GOAT's panel will flash white, displaying the current battery level on the screen. The indicator light on the Charging Station will flash blue during charging and turn solid blue when fully charged, with the screen showing "100".

natural_image
Simple line drawing of a robotic device connected to a power source and sensor on a flat surface (no text or symbols)4. Map Your Garden
To ensure smooth mapping across separated lawn areas, prepare a connection path in advance:
- For roads under 3 cm (1.18") in height, create a path to connect the two parts when mapping.
- For roads over 3 cm (1.18"), place a ramp or mat of the same height and at least 1.2 m (3.94') wide to allow access between areas.

text_image
>1.2 m (3.94) >3 cm(1.18")- Do not create the virtual boundary on a slope that exceeds 17% .
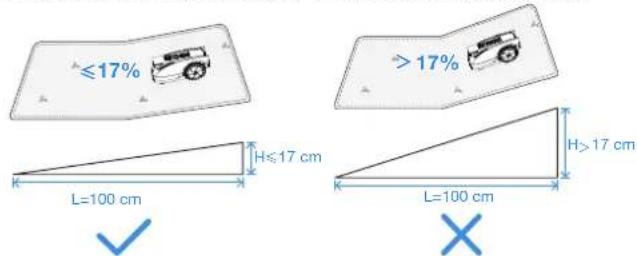
text_image
≤17% H≤17 cm L=100 cm H>17 cm L=100 cm >17%Note: If GOAT needs to pass through a narrow passage, ensure that the minimum width of the passage is greater than 0.7 m (2.30') meters.

text_image
>0.7 m(2.30')- Make sure that the turning angle is greater than 90^ .

text_image
>90°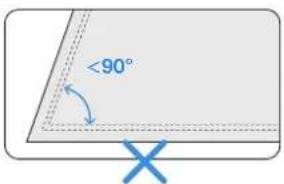
text_image
<90°4.2 Create a Map
4.2.1 Set the Virtual Boundary
① Boundary Types
Various types of boundaries define the outline of your lawn, such as hedges, fences, and drainage ditches. For different types of physical boundaries, it is recommended that when remotely controlling GOAT, you pay attention to the distance between GOAT and the boundary to achieve the best cutting results.
- Barriers
Walls or fences that rise more than 5 cm(1.97") above ground level.
Recommendation: When mapping along this type of boundary, remotely control GOAT to follow the barrier's edge closely.

natural_image
Technical line drawing of a tracked vehicle on a track with a shelving unit nearby (no text or symbols)• Restrained Boundaries
Steps with a height of 3 cm(1.18") above ground level.
Concave surfaces lower than the surrounding ground.
Recommendation: When mapping, keep GOAT approximately 10 cm(3.94") away from this type of boundary.
GOAT O600 RTK

text_image
>20 cm(7.87") >3 cm(1.18") >3 cm(1.18")GOAT 0800 RTK

text_image
>10 cm(3.94") >3 cm(1.18") >3 cm(1.18°)- Flat Boundaries
Flat road surfaces flush with the lawn.
Recommendation: When mapping along this type of boundary, extend the mapping path slightly outward.

natural_image
Top-down schematic of a device with control panel and ventilation slots (no text or symbols)② Map Creation Operation
- Build the map at daytime under optimal sunlight.
- Ensure your GOAT docks properly at the Charging Station and starts from there.
- Keep close to GOAT within 6 m (19.69') for a steady Bluetooth connection.

text_image
Illustration showing a person using a robotic arm to interact with a cart, with an inset image of a hand holding a phone and a hand pulling a tire.- Tap to start mapping on the APP. GOAT will automatically exit the Charging Station.
- Once GOAT has exited the station, use on the APP to control its movement.
- Drive GOAT to the boundary and position it at a suitable starting point, then tap to start mapping.
- Control GOAT along the boundary following the recommendations in the "Boundary Types" chapter.
- When GOAT approaches the starting point, the "Done" button will appear on the APP. Tap to close the boundary and generate the map.

text_image
300 Boot RTK Create A Map Named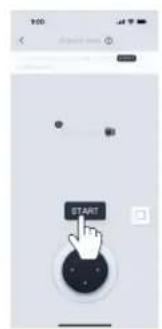
text_image
START
text_image
Mobile interface screenshot showing a simple diagram with a cursor clicking a button, alongside a control panel with icons and status bar.
flowchart
graph TD
    A["Start"] --> B{Process Step}
    B -->|Yes| C["End"]
    B -->|No| D["End"]
③ Function Button during Mapping
A This function becomes available when GOAT detects a clear boundary between grass and non-grass areas. The button will flash to indicate availability.
Tap it, and GOAT will automatically follow the boundary until the boundary becomes unclear.
*Monitor GOAT and switch to manual mode if the automatic mapping is not as expected.
This function allows GOAT to reverse its most recent mapping path.
Press and hold the button until GOAT returns to the point where you want it to stop reversing.

text_image
9:00 Create up! Your own user is better with the right, you can http://www.123456/ Auto Driver4.2.2 Explore Map Features
You can explore more mapping features on the App. You can enter Map Editing once the map is finished.
① Map Editing Functions
- Area
A working area that you can add, delete, merge, or divide. The first area is the boundary you just drew by remotely controlling GOAT.
- Path
A connection between two areas.
A path can be created manually using the add path function or generated automatically when you create a new area by starting from one area and reaching the starting point of another.

text_image
9:00 Send RTX Route 1 Route 2 Start
text_image
Map Editor Area Path No-go Zone High coverage Zone- No -Entry Zone
A zone that GOAT will not enter.
It is necessary to set up No -Entry Zones for objects, such as flowerbeds, trampolines, vegetable plots, raised tree roots, exposed wires, and slopes that exceed 45%.
You can create a No-Entry Zone and control GOAT to draw a boundary around the zone—just like creating the map, including setting the starting point and end point.
Note:
It is recommended to keep the No-Entry Zone boundaries 30 cm away from dangerous areas such as ponds or cliffs.
• High Coverage Area
To ensure a comprehensive mowing experience, GOAT is equipped with sensitive multi-obstacle avoidance sensors. Sometimes, the obstacle avoidance function may be triggered by taller objects such as dandelions or wild grass. This feature allows you to create Non-Obstacle Avoidance Areas, enabling GOAT to cut smoothly through these plants.
Note:
If the wild grass covers a large area, it is recommended to use a push mower for cutting.
- Map
It involves functions such as map modification, backup, deletion, and restoration.
② Mowing Settings
• Mowing Parameter Setting
Once the mapping is complete, you can set mowing parameters such as mowing direction, mowing speed, and cutting height. Different parameters can be assigned to each area, allowing you to create the optimal mowing plan for your lawn.

text_image
9:00 Goat RTK Auto Start
text_image
9:00 Settings GOAT RTK Other Clean Log 0 0 0 Mowing settings GOAT settings Unit name inch Upgrade Time zone Language Find GOAT• Boundary Type Settings
Please refer to Chapter "Boundary Types" By default, GOAT will strictly follow the original path recorded during mapping.
You can also choose boundary sections such as Barriers or Flat Boundaries, as described in "Boundary Types."
Select these sections on the App and enable the Adaptive Mode. This allows GOAT to intelligently identify the actual grass-non-grass edge and extend mowing coverage.
5. Time for Mowing
5.1 Tips Before First Mowing
- Cut the grass to a height of no more than 10 cm (3.94") with your manual lawnmower and clear away obstacles including debris, piles of leaves, toys, wires and stones.
- Do not let your children play on the lawn when your GOAT is mowing.

text_image
≤10 cm (3.94")5.2 Manually Triggered Tasks
• Auto
Tap and select the cutting sequence for the area. GOAT will start mowing the entire area. After completing logical mowing within the area, it will mow along the boundaries, including the Area and No-Entry Zone boundaries.
This function can also be triggered from GOAT's panel.
- Area
Tap and select the mowing area. GOAT will start mowing the selected areas. After completing logical mowing within these areas, it will mow along their boundaries, including the Area and No-Entry Zone boundaries.
- Edge
Tap and select the edge mowing function. GOAT will mow along the boundaries of the selected areas, including the Area and No-Entry Zone boundaries.
- Manual
Tap to enter manual mode, allowing GOAT to mow or trim under Bluetooth control.
Note:
Keep within 6 m (19.69') of GOAT to maintain an effective Bluetooth connection.

text_image
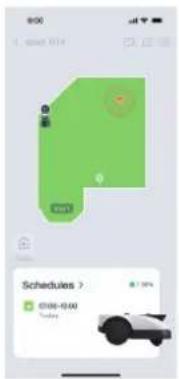
Auto Area Edge Manual5.3 Schedule Triggered Tasks
text_image
9:00 12:00 01:04 Schedules > 03:00-05:00 Sunday
text_image
Schedule Volume 10x Volume Sun Mon Tue Mon Thu Fri Sat 16:13 16:14 16:15 16:16 16:17 16:18 16:19 16:20 16:21 16:22 16:23 16:24 16:25 16:26 16:27 16:28 16:29 16:30 16:31 16:32 16:33 16:34 16:35 16:36 16:37 16:38 16:39 16:40 16:41 16:42 16:43 16:44 16:45 16:46 16:47 16:48 16:49 16:50 16:51 16:52 16:53 16:54 16:55 16:56 16:57 16:58 16:59 16:60 16:61 16:62 16:63 16:64 16:65 16:66 16:67 16:68 16:69 16:70 16:71 16:72 16:73 16:74 16:75 16:76 16:77 16:78 16:79 16:80 16:81 16:82 16:83 16:84 16:85 16:86 16:87 16:88 16:89 16:90 16:91 16:92 16:93 16:94 16:95 16:96 16:97 16:98 16:99 2020• Animal Protection Time
To protect nocturnal animals, you can set non-working time periods. By default, this period is 19:00-7:00. Tap to adjust the time period as needed.
• Auto Mowing Time
You can set a mowing schedule if needed. GOAT will then mow automatically according to the schedule.
6. Maintenance
For better performance and a longer lifespan of your GOAT, please maintain it properly and replace worn parts as needed.
6.1 General Safety Precautions
• Always power off your GOAT before maintenance operation.
• Always wear protective gloves especially when replacing the Blades.
- Please lift your GOAT properly. Hold the handle and the head simultaneously when picking it up, ensuring the Blade Disc is facing downward.
- DO NOT use a high pressure sprinkler because high pressure water can enter the sealings and damage electronic and mechanical parts.
6.2 Routine Maintenance
① Recommended Frequency
| Part | Frequency |
| AI Camera Wipe every 1 | to 2 weeks |
| ToF Sensor Wipe every 1 | to 2 weeks |
| Blades Replace every 4 | to 6 weeks |
Note: Please utilize only the original battery or that of the same model as specified by ECOVACS.
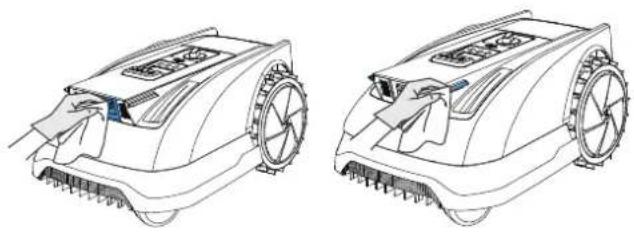
② Steps to Clean the Main Parts:
- Power off GOAT.
- Gently turn your GOAT over on a soft surface.
- Clean the Blade Disc and the chassis with a brush.
- Check that the Blade Disc can rotate freely and Blades can spin freely.
- Clear the mud from the Rear Wheels and Front Wheels with a brush.
- Wipe other components with a clean, dry cloth. Avoid using cleaning sprays or detergents.
natural_image
Technical line drawings of two agricultural robots with visible blades and wheels (no text or symbols)③ RTK Reference Station Maintenance
If the RTK Reference Station includes the mounting pole tilts, make sure it is set properly.

natural_image
Two identical diagrams showing a vertical pole with a checkmark and an X symbol, placed on a flat base (no text or labels)4 RTK Reference Station Reset and Rebinding
Resetting
If the RTK Reference Station malfunctions or cannot be connected, you can unbind it manually:
-
Press the Reset button located on the bottom of the RTK Reference Station 5 times.
-
If the blue indicator light flashes 3 times, the unbinding is successful.
Rebinding
To rebind the RTK Reference Station in the app:
1. Open the control page of the connected GOAT
2. Navigate to Settings > RTK Settings
3. Scan the QR code on the RTK Reference Station again or enter the pairing code to bind the reference station and restore normal operation.

natural_image
Diagram of a biological or mechanical structure with no visible text, numbers, or symbols
text_image
3x
text_image
Diagram showing a device with a QR code inside, likely for scanning or data entry.Note:
All maps will be deleted after unbinding. Please remap before using GOAT.
⑤ Blade Replacement
WARNING
• Always power off your GOAT before operation.
• Always wear protective gloves when replacing the Blades.
- Use only the Blades manufactured by ECOVACS and new screws when assembling the Blades.
- Wipe the unwashable components with a clean and dry cloth. Please do not use cleaning sprays or other detergents.
STEPS TO REPLACE THE BLADES
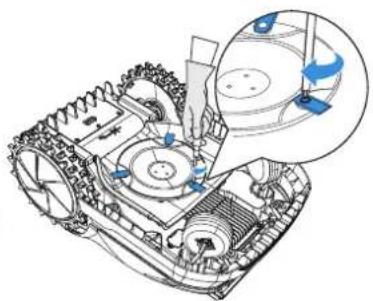
- Power off GOAT.
- Gently turn your GOAT over on a soft surface.
- Loosen the Screws with a screwdriver.
- Remove the Screws and the Blades.
- Tighten the new Blades and the Screws.
- Make sure that the Blades can spin freely.

text_image
Diagram illustrating the progressive assembly of a tank with valve mechanisms and control panel, showing step-by-step assembly from engine to final motor.⑥ Battery Maintenance
- For long-time storage, it is recommended to charge GOAT every 6 months. The Limited Warrant does not cover battery damage caused by over-discharge.
- The battery CANNOT be charged when the ambient temperature is above 40^ / 104^ (O800 RTK) and 45^ / 113^ (O600 RTK) or below 5^ / 41^ (O800 RTK and O600 RTK).
- The recommended temperature for GOAT operation is between 5-40°C/41\~104°F(O800 RTK and O600 RTK).
- The storage temperature range is -20 - 75^ / -4 167^ (O800 RTK and O600 RTK).
Note: The life-span of GOAT's battery depends on the frequency of usage and the total hours of use. It is not separately rechargeable and must be charged through GOAT. DO NOT dispose of disused or faulty batteries casually. Check with your Local Authority for advice.
6.3 Seasonal Maintenance
1 Winter Storage
GOAT
- Power off your GOAT after it is fully charged.
- Clean it thoroughly.
- Store it with water-proof and dust-proof coverings in a cool, well-ventilated, and dry place indoors.
Charging Station and RTK Reference Station
- Unplug the Power Supply from the power socket.
- Disconnect Power Supply from the Charging Station.
- Mark the spot where you set the Charging Station and the RTK Station for reference in the new working season.
- Store the Stations, the Power Adapter, and cables in a cool, well-ventilated, and dry place away from direct sunlight.
Note: It is necessary to put both Stations in the original position for working in a new season. Otherwise, it may lead to location faults or map invalidation.
② Spring Restart
- Remove all coverings from your GOAT and the Stations.
- Assemble both Stations, putting them back to where they were in the last working season.
- Check the cables for any damage or breaks and repair or replace as needed. Connect the cables that are safe and qualified to use.
- Check the Blades for sharpness and replace them if necessary. Refer to the Maintenance section of this manual for detailed steps and tips.
- Power on your GOAT and test if it is connected to the App and works properly.
7. Troubleshooting
If there is something wrong with your GOAT when working, you can consult the table below. The ECOVACS HOME App will also send detailed problem notifications. Please contact our Customer Service if the problems still exist.
| Issue | Error Code | Cause Solution | |
| The Indicator Light on the Charging Station does NOT light up. | / | There is no power supply or the current and voltage are unstable. | 1. Ensure the Charging Station is properly connected to a power supply, and the plug is inserted into a suitable socket.2. If the issue persists, please contact the Customer Service. |
| GOAT stops within the working area. | E504E505E650 | There is an issue with the RTK Reference Station's location or RTK signal. | 1. Check if the RTK Reference Station has been moved. If it has, place it back in its original position.2. Check if the light is steady. If it flashes, find a location with better signal and remap.3. Please control/place GOAT back the Charging Station and restart. |
| / | GOAT fails to dock at the Charging Station. | 1. Ensure the Charging Station is connected to a power supply. The Indicator Light should be steady blue.2. Check if the reflective film on the Charging Station is blocked.3. Check for obstacles near the Charging Station, and remove them if necessary.4. Check if the front AI camera and ToF sensor are dirty or blocked,and remove them if necessary.5. Check whether the assistant light turns on normally during charging. If the assistant light does not illuminate in front of the Charging Station, please contact Customer Service.6. Ensure the Charging Station is installed correctly.7. If not, reinstall it properly. If the problem still exists, please contact Customer Service. | |
| E621E622E623E627 | GOAT is lifted or trapped for a long time. | 1. It is recommended to turn off GOAT to avoid injury, then place it back on a level lawn.2. If GOAT detects that the issue has been resolved, the error code will disappear.3. If the error code is still displayed, please turn off GOAT and check for any obstacles or conditions that might be causing it to get trapped.4. Remove any obstacles that may cause GOAT to get stuck, or set up a no-entry zone. | |
| GOAT stops working and returns to the Charging Station. | E674 | The battery temperature is out of range. | 1. Place GOAT in an area with an appropriate temperature, or wait until the battery temperature returns to normal.2. Restart GOAT.3. If the problem persists, please contact Customer Service. |
| / The battery voltage is low. Wait until the battery is fully charged. | |||
| / | The Rain Sensor is triggered or it is the end of a scheduled task. | Normal phenomenon, please wait until the task resumes, or you can change the rain delay setting or schedule in the APP. | |
| GOAT is not operating at the correct time. | / | The schedule for GOAT is not correct or the timezone is not correct. | Please check if the settings are correct. |
| / | GOAT automatically starts the recutting task, due to reasons like recharging, rain delay, or an uncut shadow area from last time because of poor lighting. | 1. The recutting of uncut shadow areas is set to start on the next morning by default. The next day, you can set the proper schedule to allow GOAT to work within the allowed time.2. You can also set the "Animal Protection" time on the APP to limit the time GOAT can operate.3. The O600 RTK cannot mow in low-light conditions, and the assistant light does not support nighttime mowing. | |
| Other Issues or Situations. / | Any other abnormal phenomena. | 1. You can check the error message on the APP for detailed information.2. Resolve the issue, and then you can restart GOAT to resume operation.3. If the problem still exists, please contact the Customer Service. | |
- Technical Specifications
| Basic Information | Product Name Lawn Mowing Robot | ||
| Model | GOAT O600 RTK GOAT O800 RTK | ||
| MR2509/ MR2509A/ MR2509B MR2452M/ MR2452N/ MR2452O | |||
| Brand ECOVACS | |||
| Dimensions:Length (mm) × Width (mm) × Height (mm) | 600*400*263(23.62""15.75""10.35") | 600*400*263 (23.62""15.75""10.35") | |
| Net Weight (kg) (Battery Included) 10.4(22.93lb) | 10.7(23.59lb) | ||
| Mower Parameters | Rated Voltage | 21V 21V | === |
| Working Capacity (m2) | 600 800 | ||
| Cutting Width (cm) 19(7.48 in.) 22(8.66 in.) | |||
| Cutting Height (cm) 3-8(1.2"-3.2") | |||
| Charging Time (min.) ≈55 ≈100 | |||
| Noise Emissions | Measured Sound Power Level LWA | 58 dB(A) | 61 dB(A) |
| Sound Power Uncertainties KWA | 3 dB(A) | ||
| Sound Pressure Level LpA | 50 dB(A) | 53 dB(A) | |
| Sound Pressure Uncertainties KpA | 3 dB(A) | ||
| Connectivity Frequency Range | Bluetooth®(GOAT) 2400MHz ~ 2483.5MHz | ||
| Wi-Fi 2400MHz ~ 2483.5MHz | |||
| RTK(GNSS) | BDS: 1559 MHz -1610 MHzGalileo: 1559MHz-1610MHz, 1164MHz - 1215MHz, 1215MHz - 1300MHz GLONASS: 1559 MHz -1610 MHz, 1215MHz -1300MHzGPS: 1559MHz - 1610MHz, 1215MHz - 1300MHz, 1164MHz - 1215MHz | ||
| RTK(LoRa) 863-870MHz | |||
| MAX. radio-frequency power | Bluetooth®(GOAT) ≤20dBm | ||
| Wi-Fi ≤20dBm | |||
| RTK ≤14dBm | |||
| Driving Motor | Rated Speed (r/min) 1976 | ||
| Top Speed (r/min) 2823 | |||
| Blade Motor Speed (r/min) 2600 2250 | |||
| Battery (Mower) | Battery Type Lithium-ion | ||
| Rated Voltage 18V 18V | --- | --- | |
| Battery Capacity 2.5Ah 4Ah | |||
| RTK Reference Station | Usage Temperature -40°C~+85°C | ||
| Storage Temperature -40°C~+95°C | |||
| Power Supply | Supply Unit Model | GC44-210180-2DGGC44-210180-SDGGC44-210180-3DG | |
| Input Voltage 100-240~ 50-60Hz | |||
| Output Voltage 21V | --- | ||
| Output Current 1.8A 1.8A | |||
| Station | Model CH2492E CH2492F | ||
| Input Voltage 21V | --- | ||
| Input Current 1.8A 1.8A | |||
| Output Voltage 21V | --- | ||
| Output Current 1.8A 1.8A | |||
| Output Voltage(RTK) | 5V --- | ||
| Output Current(RTK) | 1A | ||
Note: Technical and design specifications may be changed for continuous product improvement. Explore more accessories at https://www.ecovacs.com/global.
natural_image
Front view line drawing of a tracked robotic vehicle with visible wheels and sensor array (no text or symbols)text_image
Illustration showing five sequential steps of a digital timer application, with each step displaying a numeric display and control buttons.Hinweis:
text_image
Diagram of a smart home control panel with Wi-Fi signal icon and status buttonstext_image
Technical diagram showing mechanical assembly with labeled components A and B, including a magnified inset of a device component.natural_image
Diagram of a mechanical device with vertical rods and a grid base, no visible text or symbolsnatural_image
Technical diagram showing a mechanical assembly with an inset magnified view of a cylindrical component (no text or symbols present)natural_image
Technical line drawing of a mechanical component with arrows indicating motion or assembly (no text or symbols)natural_image
Diagram of a mechanical device with directional arrows indicating motion or force, showing internal components and movement (no text or symbols)text_image
Diagram showing a device with a circular component and two labeled test tubes (blue and red) with checkmark indicators.natural_image
Two identical diagrams showing a vertical pole with a checkmark and an X symbol, mounted on a flat base (no text or labels)text_image
Technical diagram showing a mechanical component with force arrows and a cross-sectional view of a curved structure with labeled dimensions ΔA.natural_image
Simple line drawing of a robotic device with wiring and sensor, no text or symbols presentnatural_image
Side profile illustration of a tracked vehicle with visible tracks and wheels, next to a shelving unit (no text or symbols)natural_image
Top-down schematic of a device with control panel and ventilation slots (no text or symbols)text_image
Illustration showing a person using a robotic arm to interact with a cart, with an inset image of a hand holding a phone and a hand pulling a tire.text_image
Mobile phone interface screenshot showing a hand cursor clicking a button with control buttons and a simple line drawing.
flowchart
graph TD
    A["Start"] --> B{Decision}
    B -->|Yes| C["End"]
    B -->|No| D["Control Button"]
text_image
Map Editor Area Path No-go Zone High coverage Zone- Sperrzone
text_image
9:00 Settings GOAT RTK Other Clean Log 0 0 0 Mowing settings GOAT settings Unit New Inch Upgrade Time zone Language Find GOATtext_image
Diagram showing various illustrations of animals and a magnified view with a dimension label '≤10 cm' indicating a measurement range.text_image
9:00 6 Count NETS 4:31 Schedules > 07:00-10:00 Todding
text_image
Schedule Morning Sun Mon Tue Wed Thu Fri Sat 12:00 13:00 14:00 15:00 16:00 17:00 18:00 19:00 20:00 21:00 22:00 23:00 24:00 25:00 26:00 27:00 28:00 29:00 30:00 31:00 32:00 33:00 34:00 35:00 36:00 37:00 38:00 39:00 40:00 41:00 42:00 43:00 44:00 45:00 46:00 47:00 48:00 49:00 50:00 51:00 52:00 53:00 54:00 55:00 56:00 57:00 58:00 59:00 60:00 61:00 62:00 63:00 64:00 65:00 66:00 67:00 68:00 69:00 70:00 71:00 72:00 73:00 74:00 75:00 76:00 77:00 78:00 79:00 80:00 81:00 82:00 83:00 84:00 85:00 86:00 87:00 88:00 89:00 90:00 91:00 92:00 93:00 94:00 95:00 96:00 97:00 98:00 99:00natural_image
Technical line drawings of two identical robotic car components (no text or symbols)natural_image
Two identical diagrams showing a pole with a checkmark and an X symbol, mounted on a flat base (no text or labels)natural_image
Diagram of a biological or mechanical structure with no visible text, numbers, or symbols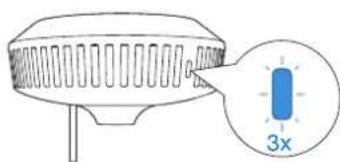
text_image
3x
text_image
Diagram showing a device with a QR code inside, likely for scanning or data verification purposes.Hinweis:
Directive relative aux machines
natural_image
Line drawing of a robotic lawn mower with visible blades and wheels (no text or symbols)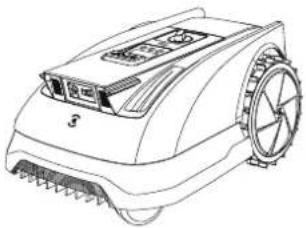
natural_image
Line drawing of a tracked robotic vehicle with visible wheels and sensor array (no text or symbols)natural_image
Technical line drawing of a mechanical component with no visible text or symbols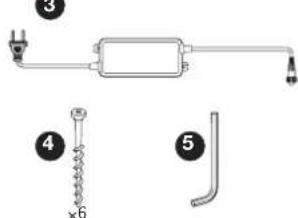
text_image
Technical diagram showing labeled components of a mechanical or electrical device with numbered parts and cross-sectional views.13

14
Instruction Manual
15
Quick Start Guide
natural_image
Front view line drawing of a tracked robotic vehicle with visible wheels and sensor array (no text or symbols)text_image
Illustration showing five different hand gestures and a digital timer control panel, illustrating step-by-step function callouts.Remarque :
flowchart
graph LR
    A["App Interface"] --> B["QR Code"]
    B --> C["Robot Tracking"]
    C --> D["QR Code Icon"]
text_image
Digital display with Wi-Fi signal icon and control buttons including play, OK, and home buttontext_image
Technical diagram showing mechanical assembly with labeled components A and B, including a magnified inset of a valve mechanism.natural_image
Technical line drawing of a mechanical device with mounting holes and a grid base (no text or symbols)natural_image
Technical diagram showing a mechanical assembly with a magnified inset of a cylindrical component (no text or symbols present)natural_image
Technical diagram showing two views of a mechanical component with arrows indicating motion or force direction (no text or symbols present)natural_image
Diagram of a mechanical device with a tool and rotating shaft, showing motion direction (no text or symbols)text_image
Diagram showing a device with a circular inset highlighting two blue test tubes, one marked with checkmark and one with cross.natural_image
Two identical diagrams showing a vertical pole with a checkmark and an X symbol, mounted on a flat base (no text or labels)natural_image
Technical diagram showing a mechanical component and its cross-sectional view with force arrows (no text or symbols)natural_image
Simple line drawing of a mechanical device with wires and a sensor, no text or symbols presenttext_image
>1.2 m (3,94) >3 cm (1,18")natural_image
Line drawing of a tracked vehicle on tracks with a storage cabinet nearby (no text or symbols)natural_image
Top-down schematic of a device with control panel and ventilation slots (no text or symbols)text_image
Illustration showing a person using a robotic arm to interact with a cart, with a magnified inset showing hand gestures and motion arrows.text_image
Clear PTK Clear A Map
text_image
START
text_image
Screenshot of a software interface showing a hand cursor clicking a button with control buttons and a numeric input field.
flowchart
graph TD
    A["Red Circle"] --> B["End"]
    B --> C["Black Button"]
text_image
9:00 Goat RTK Area 1 Area 2 Auto Start
text_image
Map Editor Recwell Area Step 1 Path Area 2 No-go Zone High coverage Zone Name Paths Manager Zesk High Cover Hot Open Drive Window Help- Zone interdite
text_image
9:00 Settings GOAT RTK Other Clean Log 0 0 0 Mowing settings GOAT settings Unit CMAY inch Upgrade Time zone Language Find GOATtext_image
≤10 cm (3,94")bar
| Day | Value | |---|---| | Mon | 10.0 | | Tue | 12.0 | | Wed | 14.0 | | Thu | 16.0 | | Fri | 18.0 | | Sat | 20.0 | | Sun | 22.0 |natural_image
Technical line drawings of two agricultural robots with visible blades and wheels (no text or symbols)natural_image
Two identical diagrams showing a vertical pole with a checkmark and an X symbol, mounted on a flat base (no text or labels)natural_image
Technical line drawing of a mechanical component with no visible text or symbols
text_image
3x
text_image
Diagram showing a device with a QR code and a speech bubble containing Chinese characters.Remarque :
text_image
Diagram illustrating the progressive assembly of a tank with valve mechanisms and control panel, showing step-by-step states from engine to final assembly.natural_image
Front view line drawing of a tracked robotic vehicle with visible wheels and sensor array (no text or symbols)text_image
Illustration showing five sequential steps of a digital timer application, with each step displaying a display and control buttons.N.B.:
text_image
Diagram of a smart home control panel with Wi-Fi signal icon and display screen showing 8:10, 8:20, 8:30, and 8:40 time slots.Come dissociare GOAT
text_image
Technical diagram showing mechanical assembly with labeled components A and B, including a magnified inset of a device component.text_image
30 cm [11,8°]natural_image
Technical line drawing of a mechanical device with mounting holes and a grid base (no text or symbols)natural_image
Technical diagram showing a mechanical assembly with a component and a magnified inset of a cylindrical component (no text or symbols)natural_image
Technical illustration of a mechanical device with two views: top shows a cylindrical component, bottom shows a multi-layered cylindrical component (no text or symbols)natural_image
Diagram of a laboratory apparatus with tubing and a magnified inset showing fluid flow direction (no text or labels)text_image
Diagram showing a device with a circular component and two labeled test tubes (blue and red) with checkmark indicators.natural_image
Simple diagram of a vertical pole with a blue checkmark on a base, no text or symbols present.
natural_image
Simple diagram showing a pole with a cross symbol, no text or labels presentnatural_image
Technical diagram showing a mechanical component and its cross-sectional view with force arrows (no text or symbols)3.3 Ricaricare GOAT
natural_image
Simple line drawing of a robotic device with a sensor and antenna, no text or symbols presenttext_image
>1.2 m (3,94) >3 cm (1,18")natural_image
Side-view line drawing of a tracked vehicle with large tires and a front-mounted platform (no text or symbols)- Confini impedenti
natural_image
Top-down schematic of a device with control panel and ventilation slots (no text or symbols)text_image
Illustration showing a person using a robotic arm to interact with a cart, with an inset image of a hand holding a phone and a hand pulling a tire.text_image
Mobile interface screenshot showing a simple diagram with a cursor clicking a button and a hand icon, likely for UI or editing purposes.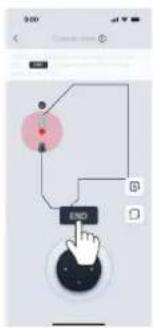
flowchart
graph TD
    A["Start"] --> B{Decision}
    B -->|Yes| C["End"]
    B -->|No| D["Control Button"]
text_image
9:00 Outside screen Auto Auto Screwtext_image
Map Editor Area Path No-go Zone High coverage Zonetext_image
9:00 Goet RTK Auto Start
text_image
9:00 Settings GOAT RTK Other Clean Log 0 0 0 Mowing settings GOAT settings Unit meter inch Upgrade Time zone (minutes) Language (minutes) Find GOATtext_image
≤10 cm (3,94")natural_image
Technical line drawings of two agricultural robots with visible blades and wheels (no text or symbols)natural_image
Two identical diagrams showing a pole with a checkmark and an X symbol, mounted on a flat base (no text or labels)natural_image
Diagram of a mechanical or electrical component with no visible text, numbers, or symbols
text_image
3x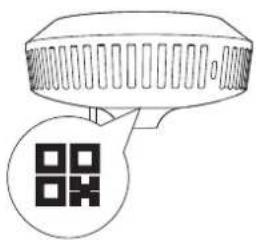
text_image
Diagram showing a device with a QR code inside, likely for scanning or data entry.Nota:
flowchart
graph TD
    A["Truck with hydraulic cylinder"] --> B["Brake with valve"]
    B --> C["Motor with battery"]
    C --> D["Brake with battery"]
    D --> E["Brake with battery"]
    style A fill:#f9f,stroke:#333
    style B fill:#ccf,stroke:#333
    style C fill:#cfc,stroke:#333
    style D fill:#fcc,stroke:#333
    style E fill:#cff,stroke:#333
natural_image
Line drawing of a robotic lawn mower with visible blades and wheels (no text or symbols)
natural_image
Line drawing of a robotic lawn mower with visible blade and wheel (no text or symbols)natural_image
Technical line drawing of a mechanical component with no visible text or symbols3

text_image
Technical diagram showing electrical components and labeled parts, including a spring and bent tube with numbered annotations.13

14
Instruction Manual
15
Quick Start Guide
natural_image
Front view of a tracked robotic vehicle with visible wheels and sensor array (no text or symbols)text_image
Illustration showing five different hand gestures and a numeric display, likely demonstrating digital counter control or measurement.Nota:
flowchart
graph LR
    A["Smartphone Interface"] --> B["QR Code Payment"]
    B --> C["Robot Tracking System"]
    C --> D["Mobile App Interface"]
text_image
Digital display showing Wi-Fi signal icon above a 8:10 interface with play, OK, and home control buttonstext_image
Technical diagram showing mechanical assembly with labeled components A and B, including a magnified inset of a device component.natural_image
Technical diagram of a mechanical device with mounting holes and a grid base, no visible text or symbolsnatural_image
Technical diagram showing a mechanical assembly with a magnified inset of a cylindrical component (no text or symbols present)natural_image
Technical line drawing of a mechanical component with directional arrows indicating motion (no text or symbols)natural_image
Diagram of a mechanical device with a shaft and pipe, showing motion direction (no text or symbols)text_image
Diagram showing a device with a circular icon containing two blue symbols (✓ and X) and a checkmark, indicating a status or inspection.text_image
Diagram showing a mechanical or fluid system with directional arrows and an inset image of a 90-degree pipe connection.Nota:
natural_image
Two identical diagrams showing a vertical pole with a checkmark and an X symbol, mounted on a flat base (no text or labels)natural_image
Technical diagram showing a mechanical component and its internal structure with force arrows (no text or symbols)3.3 Cargue su GOAT
natural_image
Simple line drawing of a robotic device connected to a power source and sensor on a flat surface (no text or symbols)text_image
>1.2 m (3,94) >3 cm (1,18")natural_image
Technical line drawing of a tracked vehicle on a track with a storage unit nearby (no text or symbols)natural_image
Top-down schematic of a device with control panel and ventilation slots (no text or symbols)text_image
Illustration showing a person using a robotic arm to interact with a cart, with an inset image of a hand holding a phone and a hand pulling a tire.text_image
Mobile phone interface screenshot showing a hand cursor icon and control buttons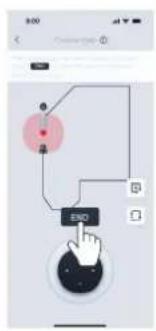
flowchart
graph TD
    A["Start"] --> B{Process Step}
    B -->|Yes| C["END"]
    B -->|No| D["End"]
text_image
9:00 Create empty ① Container installed with home, way can Hold pin: 16-45/2023 Auto Browsetext_image
9:00 Map Editor Named Area Path No-go Zone High coverage Zonetext_image
9:00 Settings GOAT RTK Other Clean Log 0 0 0 Mowing settings GOAT settings Unit notes index Upgrade Three zones PNC Language Find GOATtext_image
≤10 cm (3,94")natural_image
Technical line drawings of two agricultural robots with visible blades and wheels (no text or symbols)natural_image
Two identical diagrams showing a pole with a checkmark and an X symbol, mounted on a flat base (no text or labels)natural_image
Diagram of a mechanical or electrical component with no visible text, numbers, or symbols
text_image
3x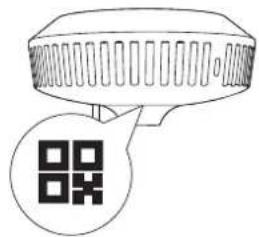
text_image
Diagram showing a device with a QR code and a speech bubble containing the code symbolNota:
text_image
Diagram illustrating the progressive assembly of a tank with valve mechanisms and tool positioning, showing step-by-step assembly from engine to final motor.flowchart
graph TD
    A["14 Instruction Manual"] --> B["15 Quick Start Guide"]
1 ECOVACS GOAT O600 RTK (inkludert blad*3)/O800 RTK (inkludert blad*3)
4 Festeankre for ladestasjon
8 RTK referansestasjonens monteringsstenger
12 Fjærskive
5 Unbrakonøkkel
9 Løkkefeste for strømkabel
13 Reservebladsett
natural_image
Front view line drawing of a tracked robotic vehicle with visible tracks and wheels (no text or symbols)Paneldisplayet viser:
text_image
Illustration showing five sequential steps of a digital timer application, with each step displaying a display and control buttons.Merk:
• 0000 er en ugyldig PIN-kode.
• PIN-koden må tastes inn to ganger for å bekrefte innstillingen.
- Hvis du taster inn feil tall när du stiller inn PIN-koden, starter innstillingsprosesen på nytt.
• Du kan endre PIN-koden i appen.
② Last ned ECOVACS HOME-appen
Skann QR-koden på GOAT. Last ned og installer ECOVACS HOME-appen. Fullfør registreringen og logg inn. Du finner også bruksanvisningen og hurtigstartveiledningen ved å skanne QR-koden.


③ Koble GOAT til appen
Merk:
flowchart
graph LR
    A["Mobile App"] --> B["QR Code Payment"]
    B --> C["Robot Tracking"]
    C --> D["QR Code Icon"]
text_image
Diagram of a smart home control panel with Wi-Fi signal icon and status buttonstext_image
Technical diagram showing mechanical assembly with labeled components A and B, including a magnified inset of a device component.natural_image
Technical line drawing of a mechanical device with mounting holes and a grid base (no text or symbols)natural_image
Technical diagram showing a mechanical assembly with a magnified inset of a cylindrical component (no text or symbols present)natural_image
Technical illustration of a two-step industrial lamp mechanism with no text or symbolsnatural_image
Diagram of a mechanical device with a shaft and pipe, showing motion direction (no text or symbols)text_image
Diagram showing a device with a circular inset highlighting two blue test tubes, one marked with checkmark and one with cross.natural_image
Simple diagram of a vertical pole with a blue checkmark on a flat base (no text or symbols)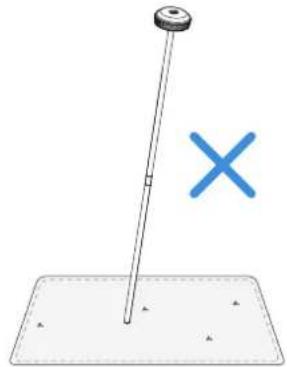
natural_image
Simple diagram showing a pole with a cross mark and a dashed base, no text or symbols present.natural_image
Technical diagram showing a mechanical component and its cross-sectional view with force arrows (no text or symbols)3.3 Lad GOAT
natural_image
Simple line drawing of a robotic device with a sensor and antenna, no text or symbols presentnatural_image
Technical line drawing of a tracked vehicle on a track with a shelving unit nearby (no text or symbols)• Begrensede grenser
natural_image
Top-down schematic of a device with control panel and ventilation slots (no text or symbols)text_image
Illustration showing a person using a robotic arm to interact with a robot, with an inset image of a hand holding a small object and a hand pulling a small object.text_image
Mobile phone interface screenshot showing a hand cursor clicking a button with a finger icon, alongside a simple line drawing and control buttons.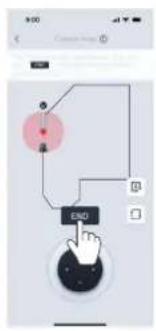
flowchart
graph TD
    A["Start"] --> B{Decision}
    B -->|Yes| C["Process"]
    B -->|No| D["End"]
    C --> E["Control Button"]
text_image
9:00 Map Editor Areas Area Path No-go Zone High coverage Zone- Forbudsområde
text_image
9:00 Settings GOAT RTK Other Clean Log 0 0.0 0 Mowing settings GOAT settings Unit meter inch Upgrade Time zone SWITCH Language Find GOAT• Innstillinger for grensetype
text_image
Diagram showing various animal and animal poses with a magnified view indicating a minimum height of 10 cm.text_image
Auto Area Gbps Manualnatural_image
Technical line drawings of two identical robotic car components (no text or symbols)natural_image
Two identical diagrams showing a vertical pole with a checkmark and an X symbol, mounted on a flat base (no text or labels)text_image
Diagram illustrating the progressive assembly of a tank with valve mechanisms and control panel, showing step-by-step assembly from engine to final motor.flowchart
graph TD
    A["14 Instruction Manual"] --> B["15 Quick Start Guide"]
natural_image
Front view line drawing of a tracked robotic vehicle with visible tracks and wheels (no text or symbols)text_image
Illustration showing five different hand gestures and a numeric display, likely demonstrating digital counter control or measurement.Observera:
flowchart
graph LR
    A["Mobile App"] --> B["Robot"]
    B --> C["QR Code Scan"]
    C --> D["Mobile Phone"]
text_image
Diagram of a smart home control panel with Wi-Fi signal icon and status buttonstext_image
Technical diagram showing mechanical assembly with labeled components A and B, including a magnified inset of a device component.text_image
30 cm [11,8°]natural_image
Technical line drawing of a mechanical device with mounting holes and a grid base (no text or symbols)② Montera RTK-referensstationen
natural_image
Technical diagram showing a mechanical assembly with a magnified inset of a cylindrical component (no text or symbols present)natural_image
Technical line drawing of a mechanical component with directional arrows indicating motion (no text or symbols)natural_image
Diagram of a mechanical device with directional arrows indicating motion or force, showing internal components and movement (no text or symbols)text_image
Diagram showing a device with a circular component and two labeled test tubes (blue and red) with checkmark indicators.natural_image
Simple diagram of a vertical pole with a blue checkmark on a flat base (no text or symbols)
natural_image
Simple diagram showing a pole with a cross symbol, no text or labels presentnatural_image
Technical diagram showing a mechanical component and its cross-sectional view with force arrows (no text or symbols)3.3 Ladda GOAT
natural_image
Simple line drawing of a robotic device with sensors and wiring, no text or symbols presenttext_image
>1.2 m (3,94) >3 cm (1,18")natural_image
Side profile illustration of a tracked vehicle with visible tracks and wheels, next to a shelving unit (no text or symbols)natural_image
Top-down schematic of a device with control panel and ventilation slots (no text or symbols)② Skapa en karta
text_image
Illustration showing a person using a robotic arm to interact with a robot, with a magnified inset highlighting the hand holding a small object.text_image
900 © Excel PTR Create A Map Manual
text_image
START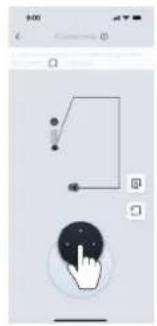
text_image
Mobile phone interface screenshot showing a hand cursor clicking a button with a simple line diagram and control buttons
flowchart
graph TD
    A["Start"] --> B{Condition}
    B -->|Yes| C["End"]
    B -->|No| D["Control Signals"]
    D --> E["End"]
text_image
Map Editor Area Path No-go Zone High coverage Zone- Förbjuden zon
text_image
9:00 Goat RTK Ams1 Auto 60% Start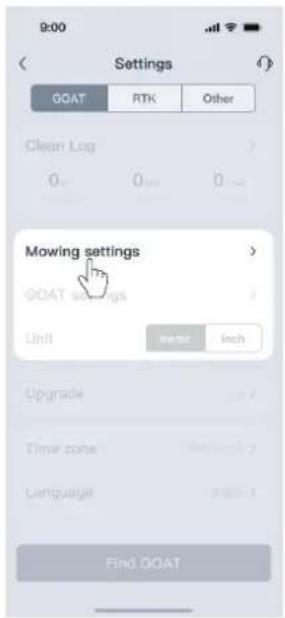
text_image
9:00 Settings GOAT RTK Other Clean Log 7 0 0 0 Mowing settings > GOAT settings Unit meter inch Upgrade 2 Time cone Network 2 Language 1 Find GOATtext_image
≤10 cm (3,94")natural_image
Technical line drawings of two agricultural robots with visible blades and wheels (no text or symbols)natural_image
Two identical diagrams showing a vertical pole with a checkmark and an X symbol, placed on a flat base (no text or labels)natural_image
Technical line drawing of a mechanical component with no visible text or symbols
text_image
3x
text_image
Diagram showing a device with a QR code and a speech bubble containing the same QR code.Observera:
natural_image
Technical line drawing of a tank internal components with no visible text or symbols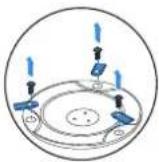

text_image
Diagram showing three identical containers with a blue upward arrow pointing to a device labeled 'XX' (XX)
natural_image
Technical line drawing of a mechanical assembly with no visible text or symbols6 Batteriunderhåll
natural_image
Front view line drawing of a tracked robotic vehicle with visible tracks and wheels (no text or symbols)④ Ladestation og RTK-referencestation

Panelets display viser:
text_image
Illustration showing five different hand gestures and a numeric display, likely illustrating digital counter control or measurement instructions.Bemærk:
flowchart
graph LR
    A["Mobile App"] --> B["QR Code Scan"]
    B --> C["Robot Tracking"]
    C --> D["QR Code Icon"]
text_image
Diagram of a smart home control panel with Wi-Fi signal icon and status indicatorstext_image
Technical diagram showing mechanical assembly with labeled components A and B, including a magnified inset of a device component.natural_image
Technical diagram of a mechanical assembly with mounting holes and a grid base (no text or symbols)② Installer RTK-referencestationen
natural_image
Technical diagram showing a mechanical assembly with a magnified inset of a cylindrical component (no text or symbols present)- Fastgør RTK-referencestationens signalhoved til RTK-referencestationens monteringsstang ved at stramme RTK-stangens monteringsskrue.

natural_image
Technical line drawing of a two-tiered lamp or stand with directional arrows indicating motion (no text or symbols)natural_image
Diagram of a medical or laboratory procedure showing a tool interacting with a tube, with an inset magnified view of the tube's internal structure (no text or symbols)text_image
Diagram showing a device with a circular icon and two labeled test marks (✓ and X) pointing to it, likely indicating a diagnostic or testing setup.natural_image
Two identical diagrams showing a vertical pole with a checkmark and an X symbol, mounted on a flat base (no text or labels)natural_image
Technical diagram showing a mechanical component and its cross-sectional view with force arrows (no text or symbols)3.3 Oplad din GOAT
natural_image
Simple line drawing of a robotic device with wiring and sensor, no text or symbols present4. Kortlæg din have
text_image
>1.2 m (3,94) >3 cm (1,18")natural_image
Side profile illustration of a tracked vehicle with visible tracks and wheels, next to a shelving unit (no text or symbols)natural_image
Top-down schematic of a device with control panel and ventilation slots (no text or symbols)text_image
Illustration showing a person using a robotic arm to interact with a cart, with an inset image of a hand holding a phone and a hand pulling a tire.text_image
Mobile phone interface screenshot showing a hand cursor clicking a button with control buttons and a simple diagram on the right.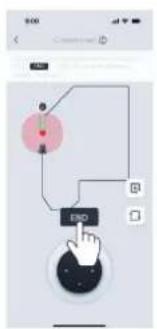
flowchart
graph TD
    A["Start"] --> B{Loop}
    B -->|Yes| C["End"]
    B -->|No| D["Control knob"]
text_image
9:00 Onset mode ① A voids your information the body you can any change no change SET Auto Browser4.2.2 Udforsk kortets funktioner
text_image
Map Editor Periphery Area Path No-go Zone High coverage Zone Open Enter No-go Zone High Zone- Forbudsområde
text_image
9:00 Settings GOAT RTK Other Clean Log 0 0 0 Mowing settings GOAT settings Unit lower inch Upgrade Time zone (minutes) Language (minutes) Find GOATtext_image
≤10 cm (3,94")natural_image
Technical line drawings of two agricultural robots with visible blades and wheels (no text or symbols)natural_image
Two identical diagrams showing a pole with a checkmark and an X symbol, mounted on a flat base (no text or labels)natural_image
Technical line drawing of a mechanical component with no visible text or symbols
text_image
3x
text_image
Diagram showing a device with a QR code and a speech bubble containing the text '扫码' (Scan).Bemaerk:
natural_image
Front view line drawing of a tracked robotic vehicle with visible tracks and wheels (no text or symbols)④ Laadstation en RTK-referentiestation
RTK-referentiestation
text_image
Diagram of a smart home control panel with Wi-Fi signal icon and status indicatorstext_image
Technical diagram showing mechanical assembly with labeled components A and B, including a magnified inset of a valve mechanism.natural_image
Technical diagram of a mechanical device with mounting holes and a grid base, no visible text or symbolsnatural_image
Technical diagram showing a mechanical assembly with a magnified inset of a cylindrical component (no text or symbols present)natural_image
Technical illustration of a two-stage lamp mechanism with rotating base and side view (no text or symbols)natural_image
Diagram of a medical or laboratory procedure showing a tool interacting with a tube, with an inset magnified view of the tube being inserted (no text or labels present)text_image
Diagram showing a lamp with two labeled test tubes (✓ and ✗) and a checkmark, likely illustrating a test setup or inspection.text_image
Diagram showing a mechanical or fluid system with directional arrows and an inset image of a 90-degree pipe fitting.Opmerking:
natural_image
Two identical diagrams showing a vertical pole with a checkmark and an X symbol, mounted on a flat base (no text or labels)natural_image
Technical diagram showing a mechanical component and its cross-sectional view with force arrows (no text or symbols)3.3 GOAT opladen
natural_image
Simple line drawing of a robotic device connected to a sensor and antenna (no text or symbols)4. Uw gazon in kaart brengen
text_image
>1.2 m >3 cmtext_image
≤17% > 17% H≤17 cm L = 100 cm H= 17 cm L = 100 cm Xnatural_image
Line drawing of a tracked vehicle on tracks with a storage cabinet nearby (no text or symbols)natural_image
Top-down schematic of a device with control panel and display, no text or symbols presenttext_image
Illustration showing a person using a robotic arm to interact with a cart, with an inset image of a hand holding a phone and a hand pulling a bicycle.text_image
Mobile phone interface screenshot showing a hand cursor button and control buttons, with icons for navigation and input functions.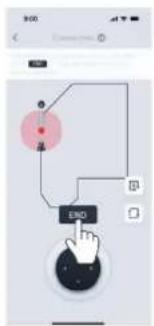
flowchart
graph TD
    A["Start"] --> B{Decision}
    B -->|Yes| C["End"]
    B -->|No| D["Control Button"]
text_image
9:00 Create new ① Auto Erasertext_image
9:00 Open RTK Area 1 Area 2 Auto Start
text_image
Map Editor Area1 Area2 Area3 Path No-go Zone High coverage Zone- Geen toegang-zone
text_image
9:00 Goat RTK Area 1 Auto 60% Start
text_image
9:00 Settings GOAT RTK Other Clean Log 0 0 0 Mowing settings GOAT settings Unit meter inch Upgrade Time zone OUTSIDE > Language zone > Find GOATtext_image
Diagram showing various illustrations of a person running with icons and a magnified detail indicating a minimum height of 10 cm.5.2 Handmatig gestarte taken
- Auto
natural_image
Technical line drawings of two agricultural robots with visible blades and wheels (no text or symbols)natural_image
Two identical diagrams showing a vertical pole with a checkmark and an X symbol, placed on a flat base (no text or labels)natural_image
Diagram of a mechanical or electrical component with no visible text, numbers, or symbols
text_image
3x
text_image
Diagram showing a device with a QR code and a speech bubble containing the text '扫码' (Scan).Opmerking:
natural_image
Front view line drawing of a tracked robotic vehicle with visible tracks and wheels (no text or symbols)text_image
Illustration showing five different hand gestures and buttons for a digital timer application, with Chinese labels indicating function callouts.Huom:
flowchart
graph LR
    A["Smartphone Interface"] --> B["QR Code Payment"]
    B --> C["Robot with Sensor"]
    C --> D["Mobile App Interface"]
text_image
Diagram of a smart home control panel with Wi-Fi signal icon and display screen showing 8:18:18text_image
Technical diagram showing mechanical assembly with labeled components A and B, including a magnified inset of a valve mechanism.text_image
30 cm [11,8°]natural_image
Technical line drawing of a mechanical device with mounting holes and a grid base (no text or symbols)natural_image
Technical diagram showing a mechanical assembly with a magnified inset of a cylindrical component (no text or symbols present)natural_image
Technical line drawing of a mechanical component with directional arrows indicating motion (no text or symbols)natural_image
Diagram of a laboratory apparatus with tubing and a magnified inset showing fluid flow direction (no text or labels)text_image
Diagram showing a lamp with two labeled test tubes (✓ and ×) and a checkmark indicator, likely illustrating a test setup or inspection.natural_image
Simple diagram of a vertical pole with a blue checkmark on a flat base (no text or symbols)
natural_image
Simple diagram showing a pole with a cross symbol, no text or labels presentnatural_image
Technical diagram showing a mechanical component and its cross-sectional view with force arrows (no text or symbols)3.3 Lataa GOAT
natural_image
Simple line drawing of a robotic device with wiring and sensor, no text or symbols present4. Kartoita pihasi
text_image
>1.2 m (3,94) >3 cm (1,18")natural_image
Side profile illustration of a tracked vehicle with visible tracks and wheels, next to a shelving unit (no text or symbols)- Rajoitetut rajat
natural_image
Top-down schematic of a device with control panel and ventilation slots (no text or symbols)② Kartan luominen
text_image
Illustration showing a person using a robotic arm to interact with a cart, with magnified views of the robot and hand interacting.text_image
Mobile interface screenshot showing a hand cursor icon and control buttons, likely for editing or navigation.
flowchart
graph TD
    A["Start"] --> B{Decision}
    B -->|Yes| C["End"]
    B -->|No| D["Control Button"]
text_image
Map Editor Maps Arts Path No-go Zone High coverage Zonetext_image
9:00 Settings GOAT RTK Other Clean Log 0 0 0 Mowing settings GOAT settings Unit meter inch Upgrade Time zone cart time Language Find GOATtext_image
≤10 cm (3,94")natural_image
Technical line drawings of two agricultural robots with visible blades and wheels (no text or symbols)natural_image
Two identical diagrams showing a vertical pole with a checkmark and an X symbol, mounted on a flat base (no text or labels)natural_image
Diagram of a mechanical or electrical component with no visible text, numbers, or symbols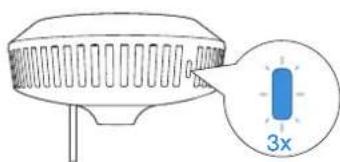
text_image
3x
text_image
Diagram showing a device with a QR code and a speech bubble containing the text '扫码' (Scan).Huomautus:
natural_image
Technical illustration of a tank with internal components and a close-up view of a mechanical assembly (no text or symbols)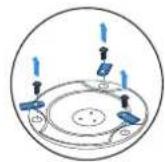
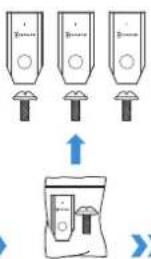
text_image
Diagram showing three identical containers with circular indicators and an upward arrow, next to a bag with a small object.

natural_image
Technical line drawing of a mechanical assembly with no visible text or symbols⑥ Akun huolto
Save the trouble for return.
Contact us, we are here to help!
Ecovacs Home Service Robotics Co., Ltd.
No.518 Songwei Road, Wusongjiang Industry Park, Guoxiang Street, Wuzhong District, Suzhou, Jiangsu, China.
451-2452-2103