
D63S - Vacuum Cleaner ECOVACS - Free user manual and instructions
Find the device manual for free D63S ECOVACS in PDF.


| Product type | Robot vacuum |
| Brand | ECOVACS |
| Model | D63S |
| Dimensions (L x W x H) | 33 x 33 x 8 cm |
| Weight | 2,8 kg |
| Power supply | Li-ion battery 14,8 V / 2600 mAh |
| Runtime | Approximately 90 minutes |
| Charging time | Approximately 4 hours |
| Dustbin capacity | 300 ml |
| Navigation system | Infrared sensors and obstacle detection |
| Cleaning modes | Automatic, edge, spot |
| Scheduling | Daily timer |
| Remote control included | Yes |
| Filter | Washable HEPA filter |
| Noise level | Approximately 55 dB |
| Maintenance | Regular cleaning of brushes and filter |
| Auto shut-off | Yes, in case of low battery or blockage |
| Spare parts available | Brushes, filters, dustbin, battery |
| Warranty | 2 years |
Frequently Asked Questions - D63S ECOVACS
User questions about D63S ECOVACS
0 question about this device. Answer the ones you know or ask your own.
Ask a new question about this device
Download the instructions for your Vacuum Cleaner in PDF format for free! Find your manual D63S - ECOVACS and take your electronic device back in hand. On this page are published all the documents necessary for the use of your device. D63S by ECOVACS.
USER MANUAL D63S ECOVACS
natural_image
Close-up of a white and black robotic vacuum cleaner with control buttons (no visible text or symbols)Live Smart. Enjoy Life.
Congratulations on the purchase of your Ecovacs Robotics DEEBOT!
We hope it brings you many years of satisfaction. We trust the purchase of your new robot will help keep your home clean and provide you with more quality time to do other things.
Before you go any further, please register your product on the Ecovacs website at www.ecovacsrobotics.com/registration/. We also suggest you record your model number, serial number, date of purchase and attach your receipt to this page for safekeeping.
MODEL # ____
SERIAL # ____
DATE OF PURCHASE ____ / ____ / ____
Should you have any problems programming the robot or getting your robot to function properly, please call us before contacting or returning it to the place of purchase. For more information, assistance or Warranty information, please visit the Ecovacs Robotics website at www.ecovacsrobotics.com or call 1-844-ECOVACS (1-844-326-8227).
Thank you for choosing DEEBOT!
Contents
- Important Safety Instructions....2
- Package Contents and Technical Specifications....4
2.1 Package Contents....4
2.2 Specifications....4
2.3 Product Diagram....5
- Operating and Programming....7
3.1 Notes Before Cleaning....7
3.2 Quick Start....8
3.3 Cleaning Mode Selection....10
3.4 Intelligent Scheduling....12
- Maintenance....13
4.1 Dust Bin and Filters....13
4.2 Main Brush and Side Brush....14
4.3 Other Components....15
- Troubleshooting....16
1. Important Safety Instructions
When using an electrical appliance, basic precautions should always be followed, including the following:
READ ALL INSTRUCTIONS BEFORE USING THIS APPLIANCE.
SAVE THESE INSTRUCTIONS
- This Appliance is not intended to be used by children under 8 or anyone lacking knowledge on proper use. Supervision may be necessary. Do not allow children to sit on or play with the Appliance.
- Clear the area to be cleaned. Remove power cords and small objects from the floor that could entangle the Appliance. Tuck rug fringe under the rug base, and lift items such as curtains and tablecloths off the floor.
- If there is a drop off in the cleaning area due to a step or stairs, you should operate the Appliance to ensure that it can detect the step without falling over the edge. It may become necessary to place a physical barrier at the edge to keep the unit from falling. Make sure the physical barrier is not a trip hazard.
- Only use as described in this manual. Only use attachments recommended or sold by the manufacturer.
- Please make sure your power supply voltage matches the power voltage marked on the Charging Dock.
- For INDOOR household use ONLY. Do not use the Appliance in outdoor, commercial or industrial environments.
- Use only the original rechargeable battery and Charging Dock provided with the Appliance from the manufacturer. Non-rechargeable batteries are prohibited. For battery information, please refer to Specifications section.
- Do not use without dust bin and/or filters in place.
- Do not operate the Appliance in an area where there are lit candles or fragile objects.
- Do not use in extremely hot or cold environments (below -5ircC/23ircF or above 40ircC/104ircF ).
- Keep hair, loose clothing, fingers, and all parts of body away from any openings and moving parts.
- Do not operate the Appliance in a room where an infant or child is sleeping.
- Do not use Appliance on wet surfaces or surfaces with standing water.
- Do not allow the Appliance to pick up large objects like stones, large pieces of paper or any item that may clog the Appliance.
- Do not use Appliance to pick up flammable or combustible materials such as gasoline, printer or copier toner, or use in areas where they may be present.
- Do not use Appliance to pick up anything that is burning or smoking, such as cigarettes, matches, hot ashes, or anything that could cause a fire.
- Do not put objects into the suction intake. Do not use if the suction intake is blocked. Keep the intake clear of dust, lint, hair, or anything that may reduce air flow.
- Take care not to damage the power cord. Do not pull on or carry the Appliance or Charging Dock by the power cord, use the power cord as a handle, close a door on the power cord, or pull power cord around sharp edges or corners. Do not run Appliance over the power cord. Keep power cord away from hot surfaces.
- If the power cord is damaged, it must be replaced by the manufacturer or its service agent in order to avoid a hazard.
- Do not use the Charging Dock if it is damaged.
- Do not use with a damaged power cord or receptacle. Do not use the Appliance or Charging Dock if it is not working properly, has been dropped, damaged, left outdoors, or come in contact with water. It must be repaired by the manufacturer or its service agent in order to avoid a hazard.
1. Important Safety Instructions
- Turn OFF the power switch before cleaning or maintaining the Appliance.
- The plug must be removed from the receptacle before cleaning or maintaining the Charging Dock.
- Remove the Appliance from the Charging Dock, and turn OFF the power switch to the Appliance before removing the battery for disposal of the Appliance.
- The battery must be removed and discarded according to local laws and regulations before disposal of the Appliance.
- Please dispose of used batteries according to local laws and regulations.
- Do not incinerate the Appliance even if it is severely damaged. The batteries can explode in a fire.
- When not using the Charging Dock for a long period of time, please unplug it.
- The Appliance must be used in accordance with the directions in this Instruction Manual. Ecovacs Robotics cannot be held liable or responsible for any damages or injuries caused by improper use.
2. Package Contents and Technical Specifications
2.1 Package Contents

natural_image
Line drawing of a robotic vacuum cleaner (no text or symbols)Robot

natural_image
Line drawing of a mechanical device with no visible text or symbolsCharging Dock Instruction Manual
natural_image
Line drawing of a remote control with two batteries (no text or symbols)Remote Control with Batteries

chemical
Simple molecular structure diagram showing three identical rings with central atoms and double bonds(2) Side Brushes

natural_image
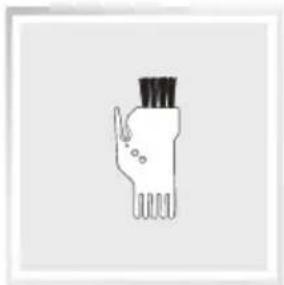
Simple line drawing of a hand holding a segmented object (no text or symbols)Multi-Function Cleaning Tool
2.2 Specifications
| Model D63S | |||
| Working Voltage (V) 12 | === | Rated Power (W) 30 | |
| Charging Dock Model CH1118D | |||
| Rated Input Voltage (V) 120~ Rated Output Voltage (V) 14.5 | === | ||
| Rated Output Current (A) 0.75 Rated Power (W) | 20 | ||
| Remote Control Model RC0917 | Input voltage (V) 3 | === | |
| Battery | Ni-MH SC 2100mAh | ||
* Technical and design specifications may be changed in the course of continuous product improvement.
2. Package Contents and Technical Specifications
2.3 Product Diagram Robot
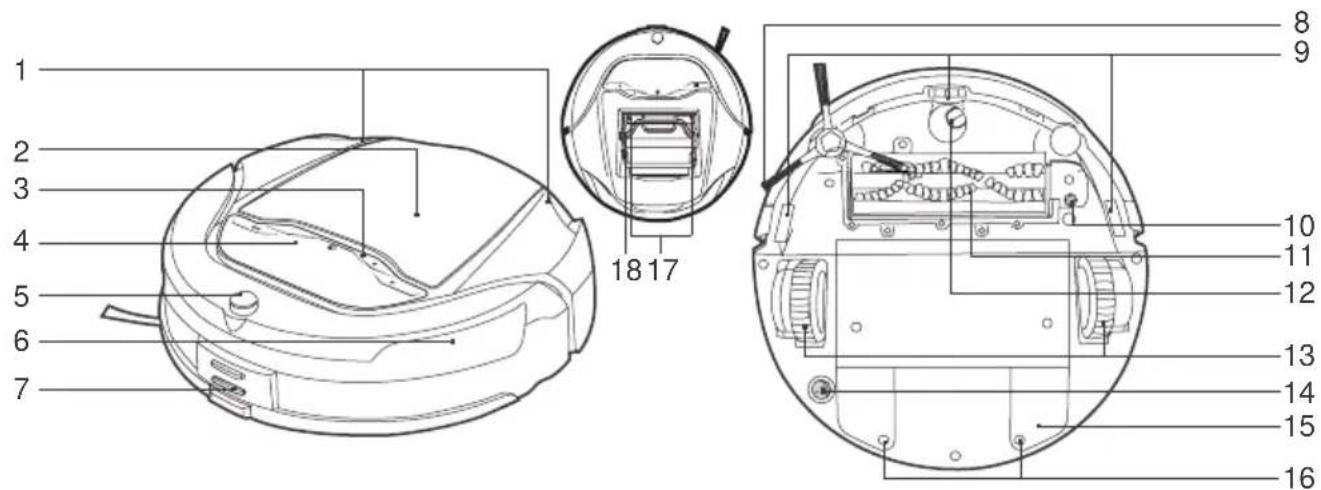
- Status Light Indicators
- Top Cover
- Control Panel
- Control Panel Screen
- Infrared Receiver for Remote Control
- Anti-Collision Sensors
- Charging Contacts
- Side Brush
- Anti-Drop Sensors
- Main Brush Screw
- Main Brush
- Universal Wheel
- Driving Wheels
- Bottom Power Switch
- Battery Cover
- Battery Cover Screws
- Dust Sensors
- Dust Bin
Control Panel

- Battery Display
- Return to Charger Mode Indicator
- Alarm Indicator
- AUTO Cleaning Mode Indicator
- Intelligent Scheduling Indicator
- Intensive Cleaning Mode Indicator
- AUTO Mode Button
- Intelligent Scheduling Button
- Return to Charger Mode Button
- Intensive Cleaning Mode Button
2. Package Contents and Technical Specifications
Charging Dock

- Lock/Release Button
- Charging Dock Pins
- Charging Dock Top Lid
- Infrared Signal Generator
- Anti-Slip Strips
- Charging Dock Base
Remote Control

- Pause Button
- AUTO Mode Button
- Spot Cleaning Mode Button
- Edge Cleaning Mode Button
- Direction Control Buttons
- Intensive Cleaning Mode Button
- Return to Charger Mode Button
- Infrared Emitter
Dust Bin

- Dust Bin Handle
- Dust Bin Lock
-
Filter Net
-
Anti-Bacterial Sponge Filter
- High Efficiency Filter
- Dust Bin Cover
3. Operating and Programming
3.1 Notes before Cleaning
Before Operating DEEBOT, take a few moments to survey the area to be cleaned and remove any obstacles.

Remove power cords and small objects from the floor that could entangle the product.
natural_image
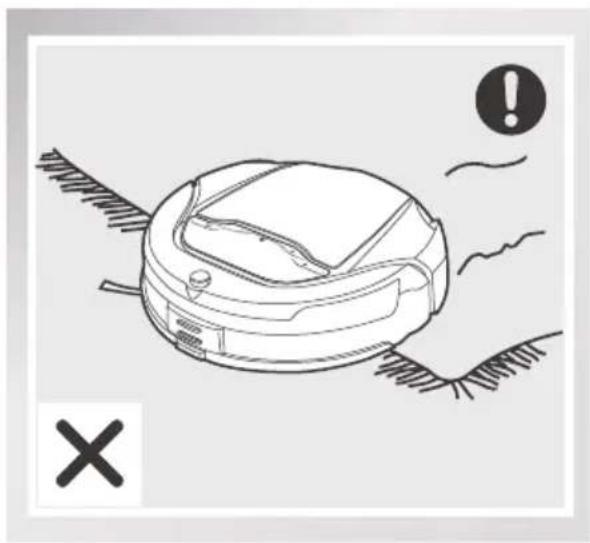
Line drawing of a robotic vacuum cleaner with warning symbols (no text or labels)The product is not suitable for use on long-pile carpet. Before using the product near a long-pile area rug or on a short-pile area rug with tasseled edges, please fold area rug edges under themselves.

natural_image
Line drawing of a sofa with a pillow placed on the backrest, supported by two legs and wheels (no text or symbols)Please be aware that the robot needs at least a 10cm (4") clearance to clean under furniture without complications.

natural_image
Line drawing of a staircase with an open lid on top, no text or symbols presentIf there is a step or stairs in the cleaning area, please operate DEEBOT 6 to ensure its Anti-Drop Sensors can detect the drop off. It may be necessary to place a physical barrier at the edge of the drop off to keep the unit from falling over the edge.
3. Operating and Programming
3.2 Quick Start
1 Charging Dock Placement
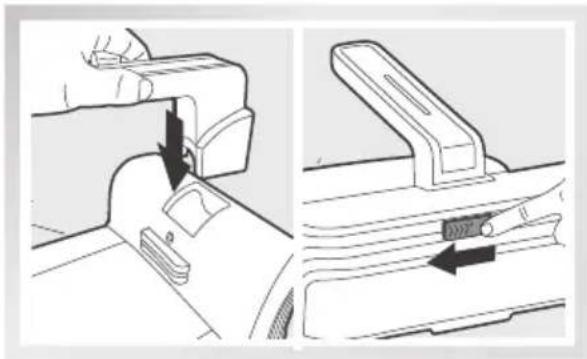
■ Assemble Charging Dock: Insert the Charging Dock Top Lid into the slot on the Charging Dock Base. Slide the Lock/Release button on the back of the Charging Dock to the left to lock the Top Lid in place.
- Placement: Place the Charging Dock on a level floor surface against the wall with the base perpendicular to the ground. Keep the immediate area 1.5m (5') in front of the charger and 0.5m (1.6') on both sides of the charger clear of objects and reflective surfaces.
■ Plug the Charging Dock in.
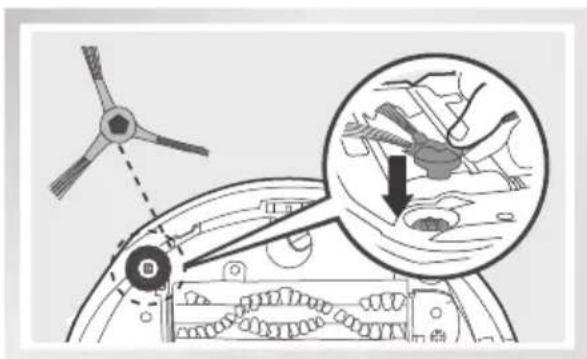
2 Install Side Brush
- Attach the Side Brush to the bottom of DEEBOT 6 by pressing the brush into the slot until it clicks.
3 Power ON
- Turn the robot's Bottom Power Switch to the ON position. "I" indicates ON and "O" indicates OFF.
* When DEEBOT 6 is not working, it is suggested to keep it powered ON and charging, instead of powered OFF.
natural_image
Technical illustration showing a hand operating a mechanical component with a close-up view of the side panel (no text or symbols present)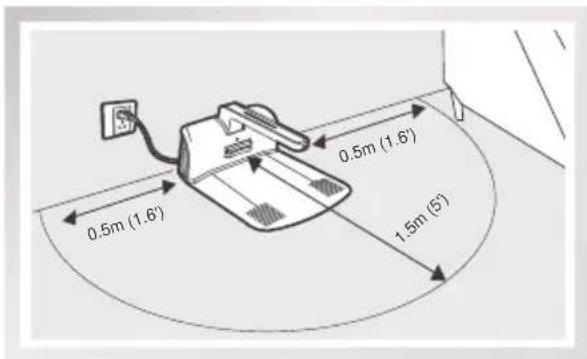
natural_image
Diagram of a mechanical assembly with a propeller and a magnified inset showing internal components (no text or symbols)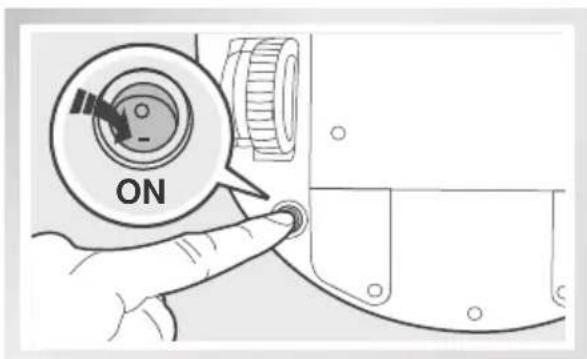
3. Operating and Programming
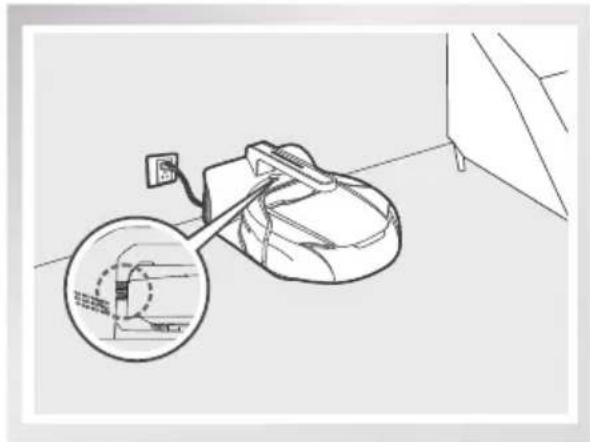
4 Charge DEEBOT 6
■ Place DEEBOT 6 on the Charging Dock making sure the Charging Contacts on DEEBOT 6 and the Charging Dock Pins make a connection.
* Charge DEEBOT 6 for at least 12 hours before the first use.
* The Status Light Indicators on the top of the robot and the Battery Display on the robot's Control Panel Screen blink when DEEBOT 6 is charging and go off when DEEBOT 6 is fully charged.
natural_image
Line drawing of a car with a magnified inset showing internal components (no text or symbols)5 Start
■ Press the AUTO Mode Button on the robot or on the Remote Control.DEEBOT 6 starts to work immediately in AUTO Cleaning Mode.
* To choose another Cleaning Mode, please refer to section 3.3 Cleaning Mode Selection for details.

6 Pause
■ Pause DEEBOT 6 by pressing any button on DEEBOT 6 or the Pause Button on the Remote Control.
* DEEBOT 6 can be directed to move forward, backward, left and right using the Direction Control Buttons on the Remote Control when it is Paused. DEEBOT 6 does not clean when Paused.

3. Operating and Programming
3.3 Cleaning Mode Selection
DEEBOT 6 has several Cleaning Modes for you to choose from to effectively clean different floors. Cleaning Modes are selected using the robot's Control Panel Buttons or using the Remote Control.
* Pause DEEBOT 6 before switching Cleaning Modes.
AUTO Cleaning Mode
This is the most commonly used mode. In AUTO Cleaning Mode, DEEBOT 6 cleans in a straight line and changes direction when it meets an obstacle.
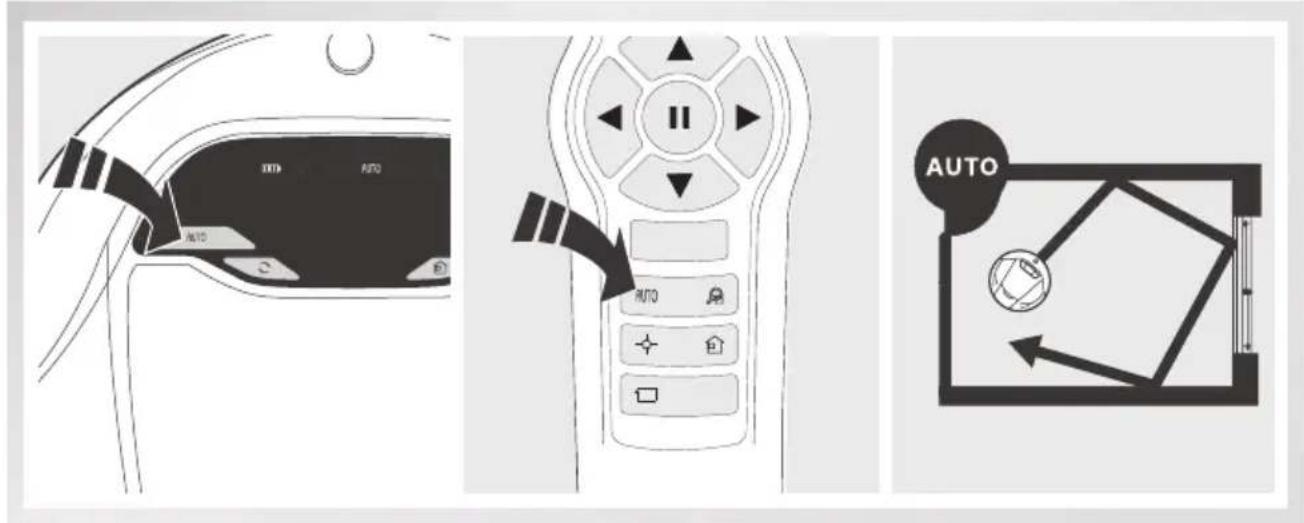
Intensive Cleaning Mode
This mode is good for aggressive cleaning or for extremely dirty or dusty floors. In this mode, DEEBOT 6 is more sensitive to dirt and dust and performs a more thorough cleaning. In this mode, DEEBOT 6 follows the same cleaning pattern as AUTO Cleaning Mode, but performs a more thorough cleaning.

3. Operating and Programming
Spot Cleaning Mode
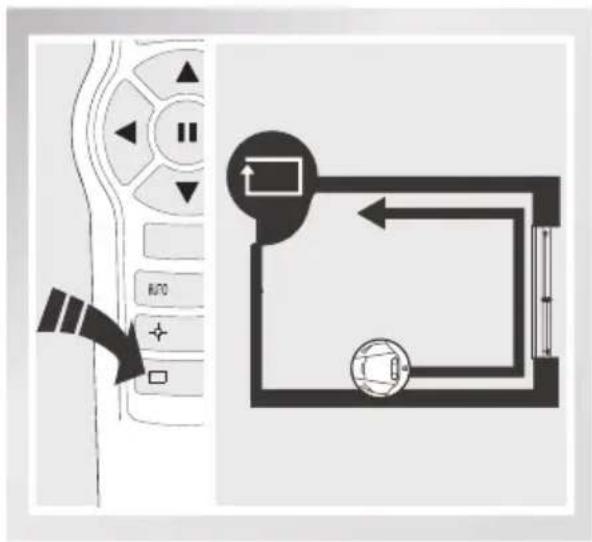
This mode is applicable for an area of highly concentrated dirt or dust. In Spot Cleaning Mode, DEEBOT 6 focuses on a specific area to clean.
Edge Cleaning Mode
This mode is good for cleaning the edges and corners of a room. In Edge Cleaning Mode, DEEBOT 6 cleans along a border (e.g. wall).

natural_image
Diagram showing a remote control interface with a scroll icon and a camera module (no text or symbols)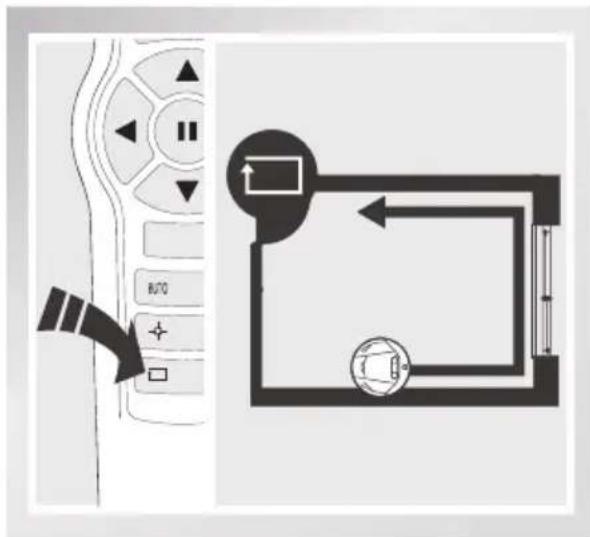
* These modes can only be selected using the Remote Control.
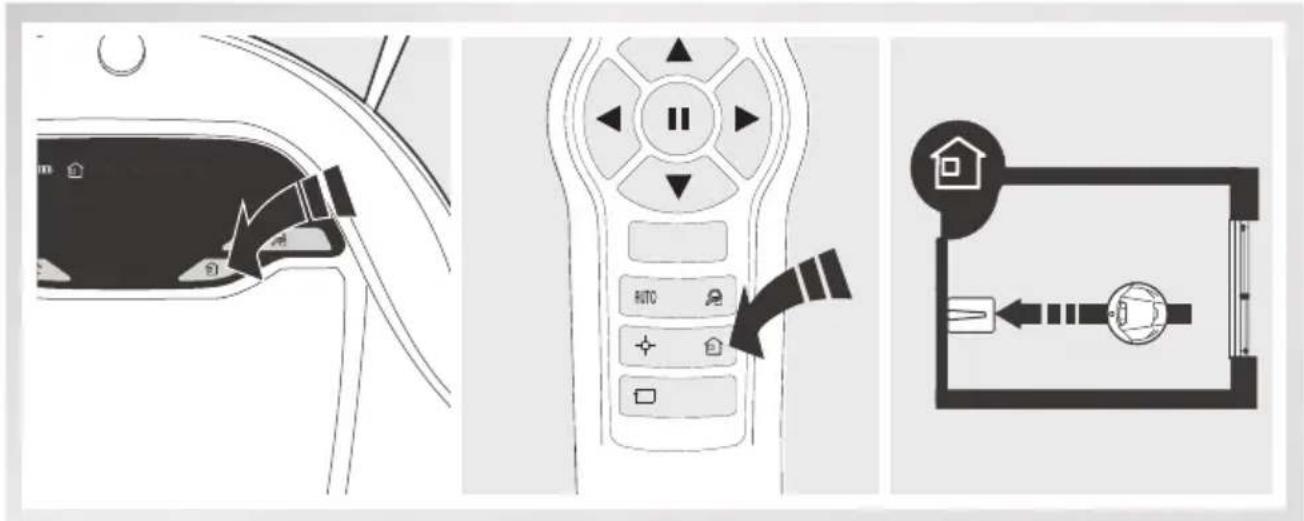
Return to Charger Mode
When battery power gets low, DEEBOT 6 automatically switches to Return to Charger Mode and returns to the Charging Dock to recharge itself.
DEEBOT 6 can be also be sent back to the Charging Dock at any time by pressing the Return to Charger Mode Button on DEEBOT 6 or on the Remote Control.
3. Operating and Programming
3.4 Intelligent Scheduling
DEEBOT 6 has an Intelligent Scheduling function. DEEBOT 6 can be scheduled to clean once per day at the same time, even if nobody is at home.
Set Intelligent Scheduling
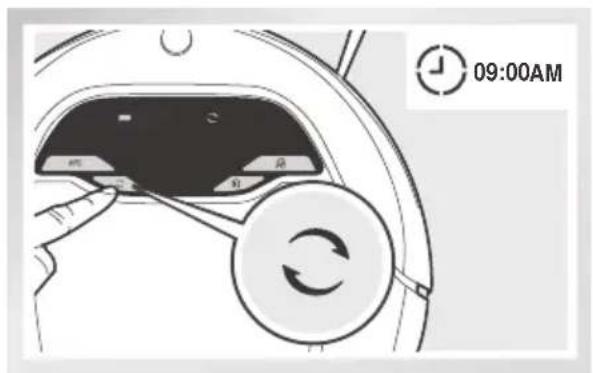
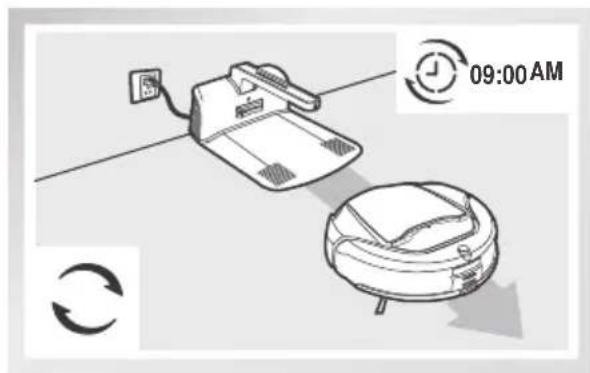
Press ☐ on DEEBOT 6 to set the current time as the scheduled cleaning time. Intelligent Scheduling is set successfully when ☐ indicator on the robot's Control Panel Screen illuminates. DEEBOT 6 immediately starts the first scheduled cleaning, and will automatically clean at the same time every day.
For example: Press ⚙ at 09:00 am. ⚙ indicator on robot's Control Panel Screen illuminates. DEEBOT 6 automatically cleans at 09:00 am every day.
Cancel Intelligent Scheduling
Cancel Intelligent Scheduling using one of the methods below:
- Press any mode button on the Remote Control to cancel Intelligent Scheduling. Intelligent Scheduling is cancelled when ⬇ indicator on the robot's Control Panel Screen goes off.
- Press any button on the robot to pause DEEBOT 6, and then press any mode button to cancel Intelligent Scheduling. Intelligent Scheduling is cancelled when ⭕ indicator on the robot's Control Panel Screen goes off.
* To automatically clean at another time, first cancel the current Intelligent Scheduling, then set Intelligent Scheduling again at the desired time.
* If DEEBOT 6 is turned OFF, Intelligent Scheduling function is cancelled.


4. Maintenance
* Before performing cleaning and maintenance on DEEBOT 6, turn the Bottom Power Switch to the OFF position and unplug the Charging Dock.
4.1 Dust Bin and Filters
Open DEEBOT 6's Top Cover and remove the Dust Bin. Open the Dust Bin Cover and empty the Dust Bin.

natural_image
Illustration showing two steps of cleaning a container: adding a brush to a container and pouring liquid into a bucket (no text or symbols present)Rinse the Dust Bin, Anti-Bacterial Sponge Filter and Filter Net under running water.

natural_image
Illustration of a hand holding a water tap with a bag, and another showing the same faucet with liquid being inserted (no text or symbols)Remove the filters. Pat the High Efficiency Filter clean. Do not rinse the High Efficiency Filter under water.

natural_image
Illustration showing a battery pack and its cleaning process with a hand holding a sponge (no text or symbols present)Dry the Dust Bin and filter components completely before reinstalling.

natural_image
Illustration of a portable electronic device with solar radiation symbol above it, no text or symbols present4. Maintenance
4.2 Main Brush and Side Brush
* A Multi-Function Cleaning Tool is provided for easy maintenance. Handle with care, this cleaning tool has sharp edges.
Cleaning the Main Brush
Unscrew the Main Brush Screw and remove the Main Brush. Use the Multi-Function Cleaning Tool to cut off and remove any hair tangled around the Main Brush.

natural_image
Three-step automotive engine toolpath diagram showing tool application, assembly, and maintenance (no text or symbols)Cleaning the Side Brush
Remove the Side Brush. Wipe the Side Brush and its slot with a dry cloth.
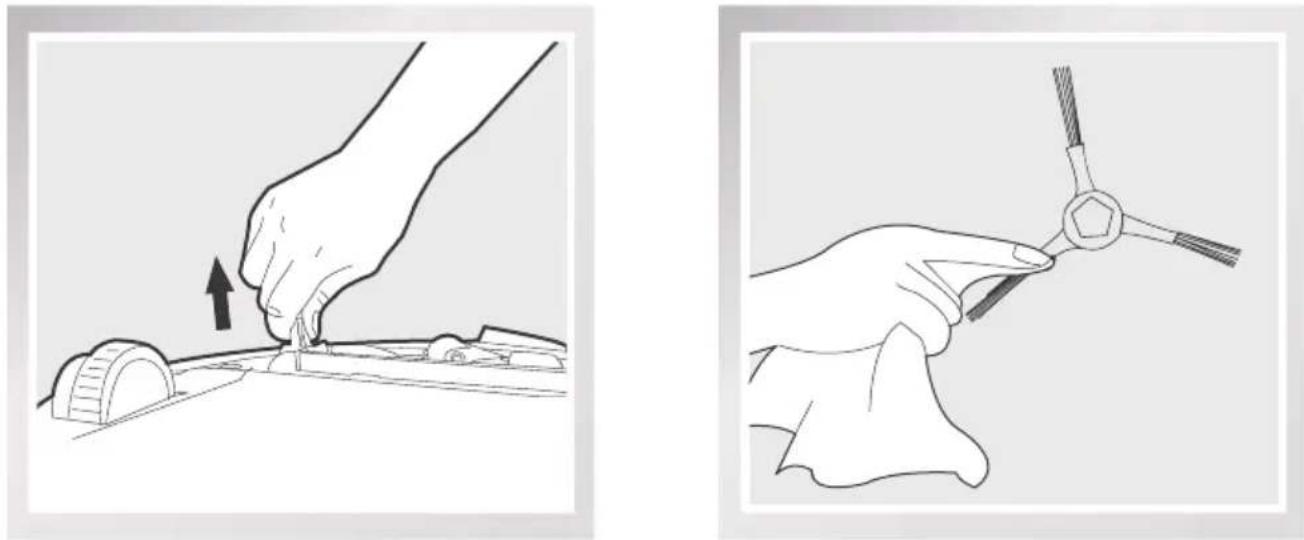
natural_image
Two-step illustration showing hands using a tool to adjust the base of a mechanical part, with no visible text or symbols.4. Maintenance
4.3 Other Components
Clean the Universal Wheel by removing any hair tangled around the Universal Wheel.

natural_image
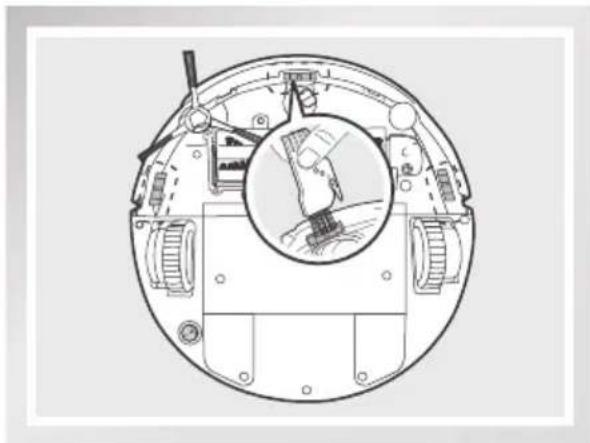
Technical diagram of a mechanical device with an inset showing a hand operating a tool (no text or symbols present)Wipe the Dust Sensors with the brush or the felt side of the Multi-Function Cleaning Tool to maintain their effectiveness.
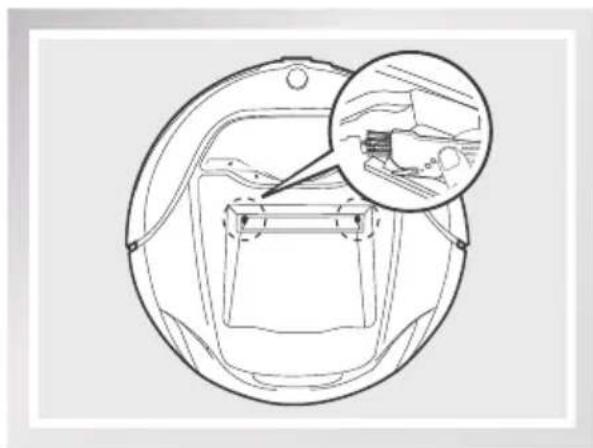
Wipe the Anti-Drop Sensors with the brush or the felt side of the Multi-Function Cleaning Tool to maintain their effectiveness.
natural_image
Technical line drawing of a mechanical device with internal components and a circular inset showing a hand interacting with a component (no text or symbols)Wipe the Charging Contacts and Charging Dock Pins clean with a dry cloth.
natural_image
Technical line drawing of a mechanical component with an inset showing a close-up view of internal components (no text or symbols)
natural_image
Illustration of hands using a tool to clean or adjust a helmet (no text or symbols present)* Remove DEEBOT 6's battery if the robot will not be used for a long time. In case of battery leakage, please remove the battery and wipe the battery slot clean while wearing protective gloves.
* If battery is fully discharged or not used for a long time, its capacity may decrease and need to be reactivated.
* To reactivate the battery: Place the robot on the Charging Dock by hand, remove after charging for 3 minutes; repeat 3 times, then charge normally for 3-5 hours.
* DEEBOT 6 uses a long life Ni-MH battery, and does not require frequent replacement. To replace the battery, contact Customer Service or follow the below instructions:
a. Unscrew the Battery Cover Screws, remove Battery Cover.
b. Remove the battery and disconnect the fasteners.
c. Connect the corresponding positive and negative fasteners on the new battery. Insert the new battery, reassemble the Battery Cover and screw in the Battery Cover Screws.
5. Troubleshooting
Please use this chart to troubleshoot common problems using DEEBOT 6.
| NO. Malfunction Possible Causes Solutions | |||
| 1 | DEEBOT 6 will not charge. | The Bottom Power Switch on the bottom of DEEBOT 6 is not turned ON. | Turn the Bottom Power Switch to the ON position. |
| DEEBOT 6 has not made a connection with the Charging Dock. | Be sure that DEEBOT 6 has made a connection with the Charging Dock Pins. You may move the robot manually to make the connection if necessary. | ||
| Charging Dock is unplugged while robot's Bottom Power Switch is ON, which causes battery consumption. | Plug in the Charging Dock and ensure the robot's Bottom Power Switch is turned ON. Keep DEEBOT 6 on the Charging Dock to make sure it has a full battery to work at any time. | ||
| The battery is completely discharged. | Re-activate the battery. Place DEEBOT 6 on the Charging Dock by hand, remove after charging for 3 minutes, repeat 3 times; then charge normally. | ||
| 2 | DEEBOT 6 gets into trouble while working and stops. | DEEBOT 6 is tangled with something on the floor (electrical cords, drooping curtains, carpet fringe etc.). | DEEBOT 6 will try various ways to get itself out of trouble. If it is unsuccessful, manually remove the obstacles and restart. |
| 3 | DEEBOT 6 returns to the Charging Dock before it finishes cleaning. | When battery power gets low, DEEBOT 6 automatically switches to Return to Charger Mode and returns to the Charging Dock to recharge itself. | This is normal. No solution necessary. |
| Working time varies according to floor surface, room complexity and the selected Cleaning Mode. | This is normal. No solution necessary. | ||
| 4 | DEEBOT 6 will not clean automatically at scheduled time. | Intelligent Scheduling function is cancelled. | Please refer to section 3.4 Intelligent Scheduling for details. |
| The Bottom Power Switch on the bottom of the robot is OFF. | Turn the Bottom Power Switch to the ON position. | ||
| The robot's battery is low. | Keep DEEBOT 6 powered ON and on the Charging Dock to make sure it has full battery to work at any time. | ||
| DEEBOT 6's components are tangled with debris. | Turn DEEBOT 6's Bottom Power Switch OFF, clean the Dust Bin, and invert the robot. Clean the Side Brushes and the Main Brush. | ||
5. Troubleshooting
| NO. | Malfunction Possible | Causes Solutions | |
| 5 | Remote Control failure (effective control range of Remote Control is 5m (1.6')). | The batteries in the Remote Control need to be replaced. | Replace with new batteries making sure they are installed correctly. |
| The Bottom Power Switch is turned OFF, or DEEBOT 6's battery is low. | Make sure DEEBOT 6's Bottom Power Switch is ON and fully charged. | ||
| The infrared signal cannot be transmitted because the Infrared Emitter on the Remote Control or DEEBOT 6's Infrared Receiver on DEEBOT 6 is dirty. | Use a dry cloth or the Multi-Function Cleaning Tool to wipe the Infrared Emitter on Remote Control and the Infrared Receiver on DEEBOT 6. | ||
| There is other equipment interfering with the infrared signal to DEEBOT 6. | Avoid using the Remote Control near other equipment using infrared signals. |
Live Smart. Enjoy Life.
natural_image
Line drawing of a robotic vacuum cleaner (no text or symbols)Robot

natural_image
Line drawing of a mechanical device with a handle and base plate (no text or symbols)natural_image
Line drawing of a remote control with two batteries (no text or symbols)natural_image
Simple line drawing of a three-bladed propeller or fan with no text or symbolsnatural_image
Simple line drawing of a hand holding a segmented object (no text or symbols)natural_image
Line drawing of a robotic vacuum cleaner with warning symbol and cross mark (no text or labels)natural_image
Line drawing of a sofa with a pillow placed on top, supported by two legs and wheels (no text or symbols)natural_image
Line drawing of a staircase with an open lid on top, no text or symbols presentnatural_image
Diagram showing a hand operating a mechanical component with a directional arrow indicating motion (no text or symbols present)
natural_image
Line drawing of a car with an attached electrical outlet and a magnified inset showing internal components (no text or symbols)5 Débuter
natural_image
Illustration showing hands using a tool to remove or clean a container with particles (no text or symbols)natural_image
Illustration showing two stages of cleaning a battery: one with internal components and the other with surface dust removal (no text or symbols)natural_image
Illustration of a hand washing a water tap into a container and another showing the same faucet (no text or symbols present)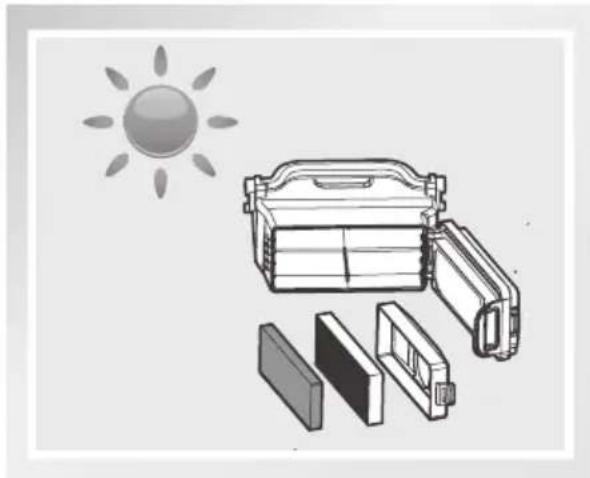
natural_image
Illustration of a solar-powered battery pack with its open lid and internal compartments, accompanied by a sun symbol (no text or labels)4. Entretien
natural_image
Four-step automotive engine toolpath diagram showing tool application, cutting, disassembly, and cleaning (no text or symbols)natural_image
Two-step illustration showing hands using a tool to adjust or install a mechanical part, with no visible text or symbols.4. Entretien
4.3 Autres pièces
natural_image
Diagram of a robotic device with a hand inserting a tool into the interior (no text or symbols present)natural_image
Technical line drawing of a mechanical device with internal components and a circular inset showing a hand interacting with a component (no text or symbols)natural_image
Technical line drawing of a mechanical component with an inset magnified view (no text or symbols)natural_image
Line drawing of a robotic vacuum cleaner (no text or symbols)Roboter

natural_image
Line drawing of a mechanical device with no visible text or symbolsPuerto de Carga Manual de
Instrucciones
natural_image
Line drawing of a remote control with two batteries (no text or symbols)chemical
Simple molecular structure diagram showing three identical rings with central atoms(2) Cepillos laterales
natural_image
Simple line drawing of a hand holding a segmented object (no text or symbols)natural_image
Line drawing of a robotic vacuum cleaner with warning symbols (no text or labels)natural_image
Line drawing of a sofa with a pillow placed on top, supported by two legs and wheels (no text or symbols)natural_image
Line drawing of a staircase with an open lid on top, no text or symbols presentnatural_image
Diagram showing a hand operating a mechanical component with a directional arrow indicating movement (no text or symbols present)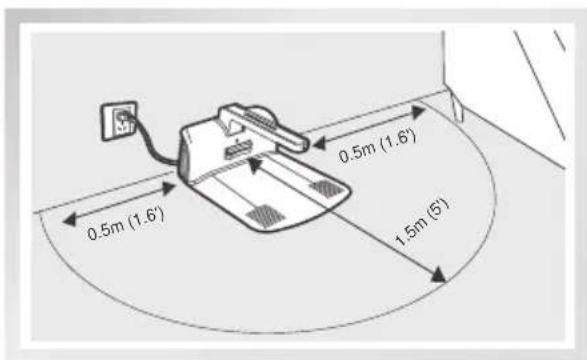
2 Instale el Cepillo Lateral
3 Encendido
natural_image
Line drawing of a car with an attached electrical outlet and a magnified inset showing internal components (no text or symbols)5 Inicio
natural_image
Diagram showing a remote control interface with a scroll icon and a device panel (no text or symbols)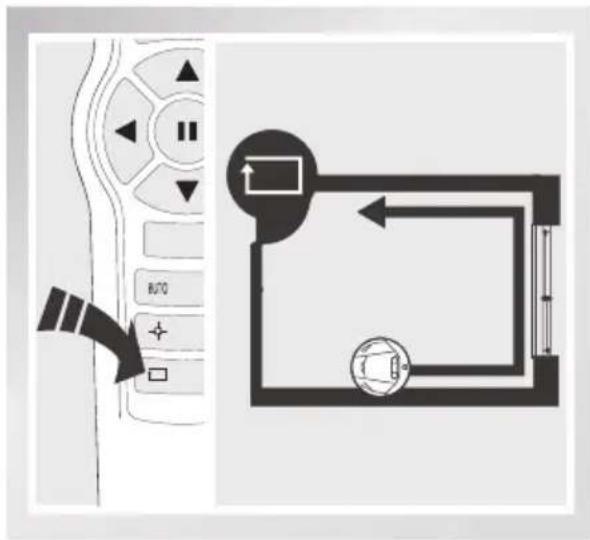
natural_image
Illustration showing hands using a tool to remove or clean a car interior, with a bucket containing particles nearby (no text or symbols)natural_image
Illustration showing a device being cleaned with foam and dust, alongside its magnified view (no text or symbols)natural_image
Illustration of a hand washing a faucet and a drain with a tool, both without any text or symbols.
natural_image
Illustration of a portable electronic device with sun symbol above it, no text or symbols present4. Mantenimiento
4.2 Cepillo Principal y Cepillo Lateral
natural_image
Four-step automotive engine toolpath diagram showing tool application, cutting, disassembly, and cleaning (no text or symbols)natural_image
Two-step illustration showing hands using a tool to adjust or install a mechanical part, with no visible text or symbols.4. Mantenimiento
natural_image
Technical diagram of a mechanical device with a magnified inset showing internal components (no text or symbols)natural_image
Technical line drawing of a mechanical device with internal components and a circular inset showing a hand operating a component (no text or symbols)natural_image
Technical line drawing of a mechanical component with an inset close-up showing internal components (no text or symbols)
natural_image
Illustration of hands using a tool to adjust or install a mechanical component (no text or symbols visible)natural_image
Close-up of a white plastic or paper edge with curved edges and a dark corner (no text or symbols visible)


- Contents
- Important Safety Instructions
- READ ALL INSTRUCTIONS BEFORE USING THIS APPLIANCE.
- SAVE THESE INSTRUCTIONS
- Package Contents and Technical Specifications
- Package Contents
- Specifications
- Product Diagram Robot
- Control Panel
- Operating and Programming
- Notes before Cleaning
- Quick Start
- Charging Dock Placement
- Install Side Brush
- Power ON
- Charge DEEBOT 6
- Start
- Pause
- Cleaning Mode Selection
- AUTO Cleaning Mode
- Intensive Cleaning Mode
- Spot Cleaning Mode
- Edge Cleaning Mode
- Return to Charger Mode
- Intelligent Scheduling
- Set Intelligent Scheduling
- Cancel Intelligent Scheduling
- Maintenance
- Dust Bin and Filters
- Main Brush and Side Brush
- Cleaning the Main Brush
- Cleaning the Side Brush
- Other Components
- Troubleshooting
- Live Smart. Enjoy Life.
- Débuter
- Entretien
- Autres pièces
- Instale el Cepillo Lateral
- Encendido
- Inicio
- Mantenimiento
- Cepillo Principal y Cepillo Lateral
Brand : ECOVACS
Model : D63S
Category : Vacuum Cleaner