
ATMOBOT Andy - Vacuum Cleaner ECOVACS - Free user manual and instructions
Find the device manual for free ATMOBOT Andy ECOVACS in PDF.

| Product Type | Air Purifier / Vacuum Cleaner (Air Purifier) |
| Model | KJ500G-LX11-01 (ATMOBOT Andy) |
| Rated Input | 24V ⎓ 3.75A |
| Charging Dock Model | CH1915 (Input: 24V ⎓ 3.75A, Output: 24V ⎓ 3.75A) |
| Power Adapter Model | GM95-240375-D (Input: 100-240V~ 2.5A, Output: 24V ⎓ 3.75A) |
| Wi-Fi Module Frequency | 2400MHz - 2483.5MHz (2.4GHz only) |
| Laser Sensor | D-ToF Laser 905nm, 7200Hz, 5Hz/s rotation |
| Airflow Levels | Smart, Quiet, Normal, High |
| Purification Modes | Mobile Purification, Spot Purification, Area Purification (via App) |
| App Control | ECOVACS HOME App (iOS/Android) |
| Filter Type | Replaceable air filter (clean every 2-3 months in sunlight) |
| Battery | Rechargeable Li-Ion (replaceable by skilled persons) |
| Charging Time | Minimum 4 hours for first use |
| Auto-Return to Dock | Yes (low battery or purification complete) |
| Safety Features | Anti-drop sensors, Line Laser Anti-Collision Bumpers, Infrared Bumper |
| Obstacle Clearance | Passes through spaces ≥65 cm wide |
| Operating Temperature | -5°C to 40°C (23°F to 104°F) |
| Maintenance | Clean filter, air outlet, charging contacts, sensors, driving wheels with dry cloth |
| Warranty | Refer to manufacturer; contact customer service for battery replacement |
Frequently Asked Questions - ATMOBOT Andy ECOVACS
User questions about ATMOBOT Andy ECOVACS
0 question about this device. Answer the ones you know or ask your own.
Ask a new question about this device
Download the instructions for your Vacuum Cleaner in PDF format for free! Find your manual ATMOBOT Andy - ECOVACS and take your electronic device back in hand. On this page are published all the documents necessary for the use of your device. ATMOBOT Andy by ECOVACS.
USER MANUAL ATMOBOT Andy ECOVACS
EN Instruction Manual....2
KO 사용 설명서 29
Live Smart. Enjoy Life.
Should you encounter situations that have not been properly addressed in this Instruction Manual, please contact our Customer Service Center where a technician can address your specific problem or question.
For more information, please visit the ECOVACS ROBOTICS official website: www.ecovacs.com
The company reserves the right to make technological and/or design changes to this product for continuous improvement.
Thank you for choosing ATMOBOT!
CONTENTS
- Important Safety Instructions ....4
- Package Contents......6
- Using ATMOBOT....10
- Maintenance .... 19
- Troubleshooting....24
- Product Specifications....28
1. Important Safety Instructions
When using an electrical appliance, basic precautions should always be followed, including the following:
READ ALL INSTRUCTIONS BEFORE USING THIS APPLIANCE
SAVE THESE INSTRUCTIONS
- This Appliance is not intended for use by persons (including children) with reduced physical, sensory or mental capabilities, or lack of experience and knowledge, unless they have been given supervision or instruction concerning use of the Appliance by a person responsible for their safety.
- Children should be supervised to ensure that they do not play with the Appliance.
- Clear the area to be purified. Remove power cords and small objects from the floor that could entangle the Appliance. Tuck rug fringe under the rug base, and lift items such as curtains and tablecloths off the floor.
- If there is a drop off in the purifying area due to a step or stairs, you should operate the Appliance to ensure that it can detect the step without falling over the edge. It may become necessary to place a physical barrier at the edge to keep the robot from falling. Make sure the physical barrier is not a trip hazard.
- Only use as described in this manual. Only use attachments recommended or sold by the manufacturer.
- Please make sure your power supply voltage matches the power voltage marked on the Charging Dock and AC Adapter.
- For INDOOR household use ONLY. Do not use the Appliance in outdoor, commercial or industrial environments.
- Use only the original rechargeable battery, AC Adapter and Charging Dock provided with the Appliance from the
manufacturer. Non-rechargeable batteries are prohibited. For battery information, please refer to Specifications section.
- Do not use without filters in place.
- Do not operate the Appliance in an area where there are lit candles or fragile objects.
- Do not use in extremely hot or cold environments (below -5^/23^ or above 40^/104^ ).
- Do not use Appliance on wet surfaces or surfaces with standing water. Do not use Appliance in areas where they may be present.
- Do not touch the plug or the Appliance with wet hands.
- Take care not to damage the power cord. Do not pull on or carry the Appliance AC Adapter or Charging Dock by the power cord, use the power cord as a handle, close a door on the power cord, or pull power cord around sharp edges or corners.
- Do not run Appliance over the power cord. Keep power cord away from hot surfaces.
- If the supply cord is damaged, it must be replaced by a special cord or assembly available from the manufacturer or its service agent.
- Do not place the power cord under carpets, furniture, product, etc. Keep the power cord away from crowded areas.
- Do not use the Charging Dock or AC Adapter if it is damaged.
- Do not use with a damaged power cord or receptacle. Do not use the Appliance, AC Adapter or Charging Dock if it is not working properly, has been dropped, damaged, left outdoors, or come in contact with water. It must be repaired by the manufacturer or its service agent in order to avoid a hazard.
- Turn OFF the power switch before cleaning or maintaining the Appliance.
-
The plug must be removed from the receptacle before cleaning or maintaining the Charging Dock and AC Adapter.
-
Remove the Appliance from the Charging Dock and AC Adapter, and turn OFF the power switch to the Appliance before removing the battery for disposal of the Appliance.
- The battery must be removed and discarded according to local laws and regulations before disposal of the Appliance.
- When not using the Charging Dock or AC Adapter for a long period of time, please unplug it.
- The Appliance must be used in accordance with the directions in this Instruction Manual. ECOVACS ROBOTICS cannot be held liable or responsible for any damages or injuries caused by improper use.
- The robot contains batteries that are only replaceable by skilled persons. To replace the robot's battery, please contact Customer Service.
- If the robot will not be used for a long time, fully charge the robot and power OFF for storage, and unplug the Charging Dock and AC Adapter.
To satisfy RF exposure requirements, a separation distance of 20 cm or more should be maintained between this device and persons during device operation.
To ensure compliance, operations at closer than this distance is not recommended. The antenna used for this transmitter must not be co-located in conjunction with any other antenna or transmitter.
Output power of the Wi-Fi module is less than 100mW.
| --- | Direct current |
| ~ | Alternating current |
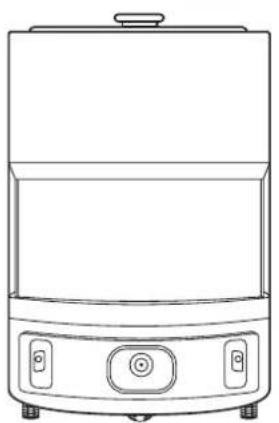
2. Package Contents/2.1 Package Contents
natural_image
Line drawing of a modern kitchen appliance with control buttons and a lid (no text or symbols)ATMOBOT
natural_image
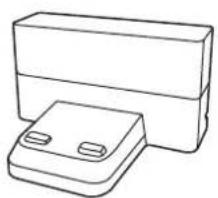
Simple line drawing of a rectangular device with two small buttons, no text or symbols present.Charging Dock
Instruction Manual
natural_image
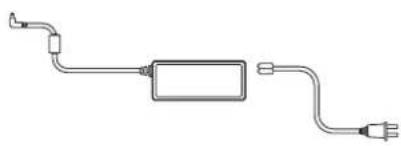
Pure electrical circuit lines without any symbolsPower Adapter + Power Cord
Quick Start Guide
Note: Figures and illustrations are for reference only and may differ from actual product appearance.
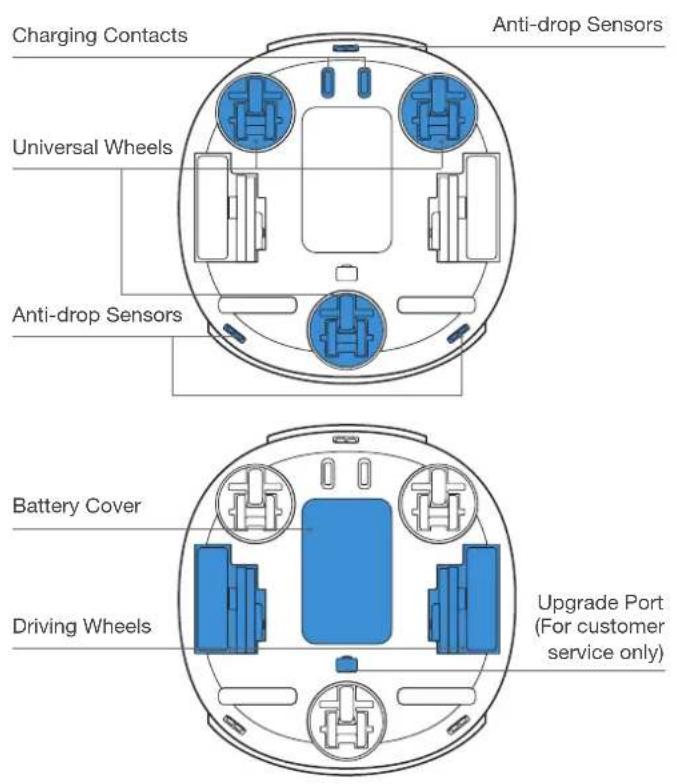
2. Package Contents/2.2 Product Diagram
Top Front
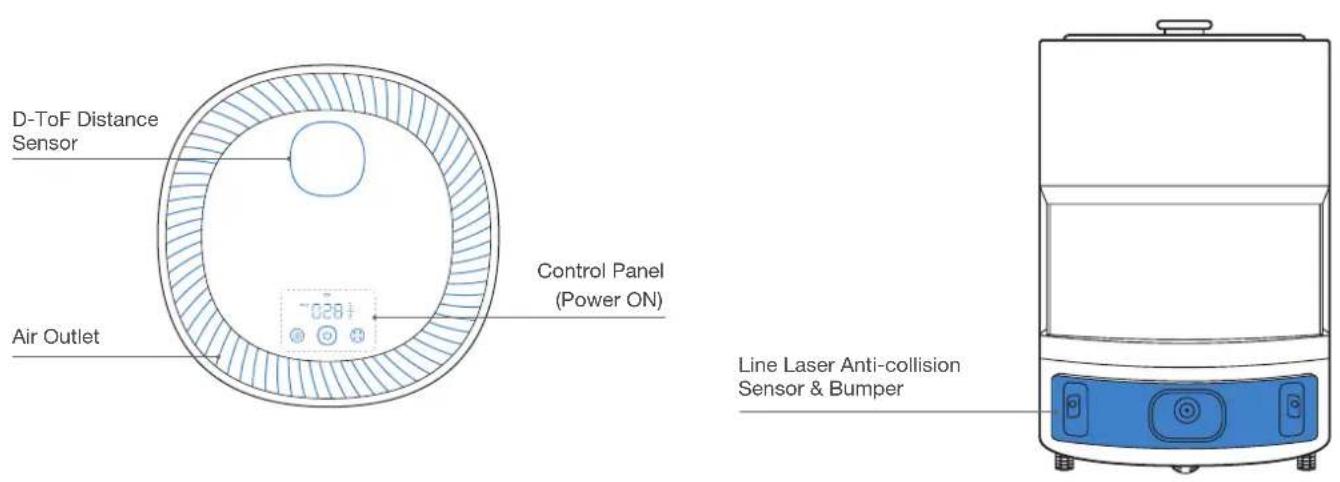
Back
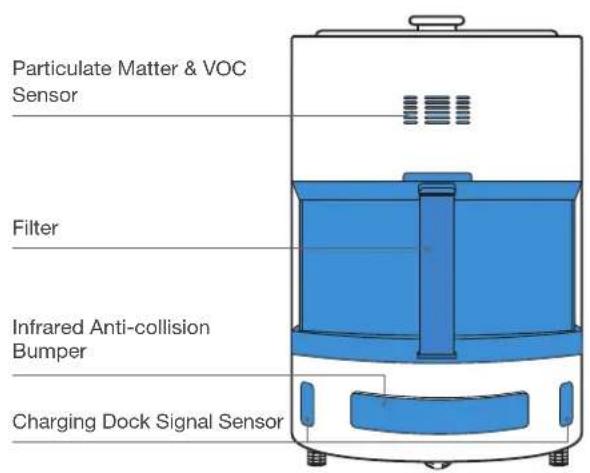
Back (Filter Uninstalled)
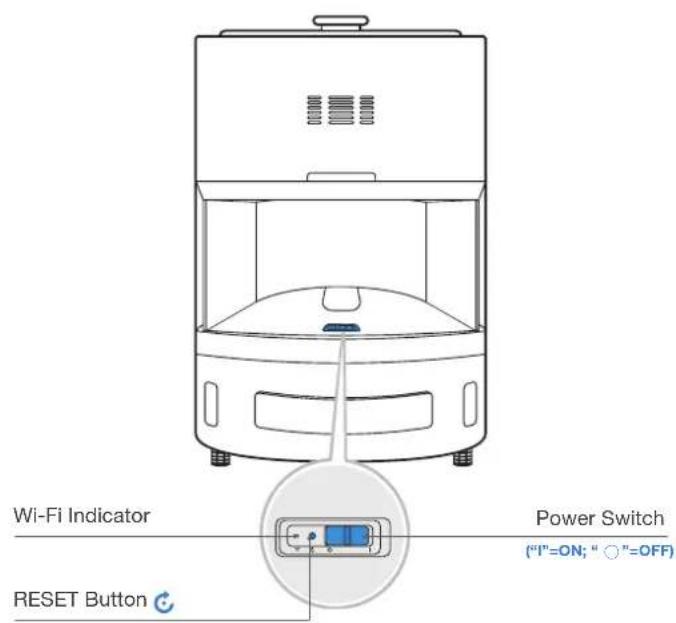
For network setup: Press the RESET Button To restore the factory setting: Press and hold RESET Button for 5 seconds.
Bottom Charging Dock

3. Using ATMOBOT/3.1 Notes Before Use
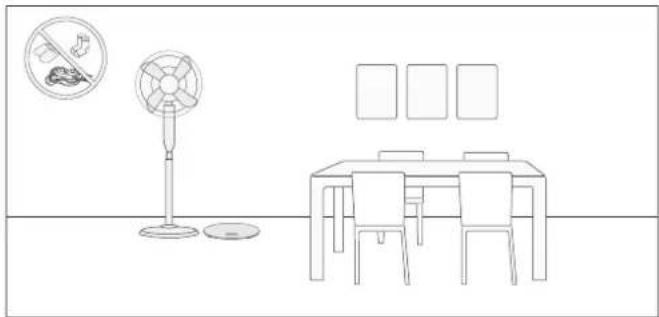
natural_image
Line drawing of a dining table with chairs, a floor lamp, and a fan with a 'no litter' icon (no text or symbols)Before each use, tidy up the area by putting furniture in their proper place and remove loose items such as power cords and toys.
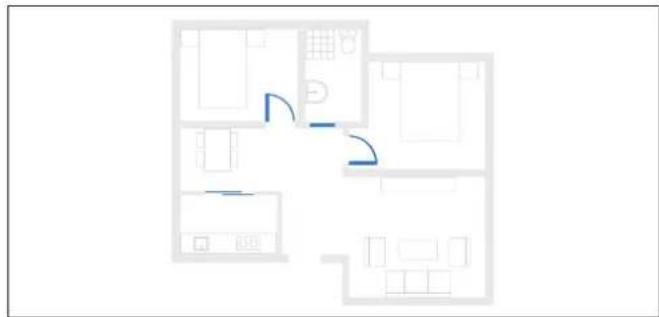
natural_image
Floor plan diagram with room layouts and a curved arrow indicating direction (no text or labels)Open the room doors to allow ATMOBOT to explore the home environment during the first mobile purification. It is recommended to close the doors of the bathroom and the kitchen to prevent ATMOBOT from slipping or falling in places with standing water.
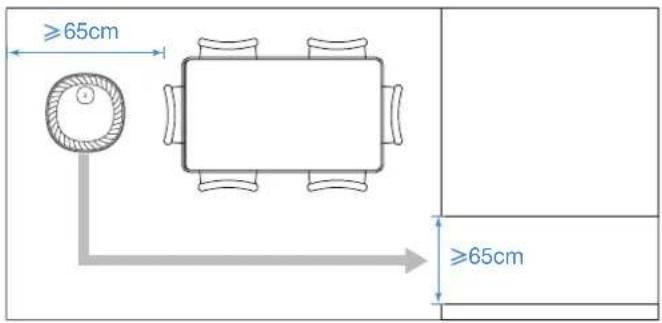
ATMOBOT can pass a space of no less than 65 centimeters in width. Please avoid blocking ATMOBOT during mobile purification.

natural_image
Cartoon illustration of a child sitting on a box with a cross symbol, no text or symbols presentDo not place items on top of ATMOBOT or use ATMOBOT as a seat.

natural_image
Line drawing of a hand holding a cylindrical device with a cross symbol on its cover (no text or symbols present)Do not push or tip ATMOBOT.
natural_image
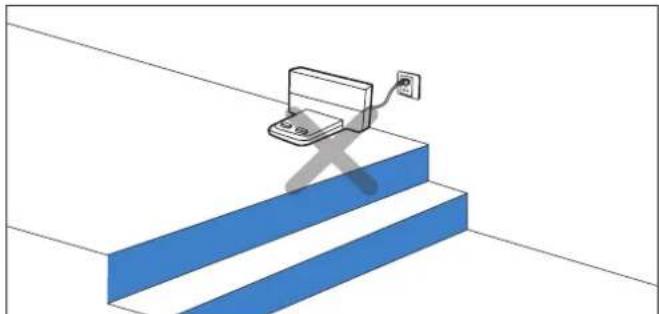
Illustration of a laptop connected to a power outlet on a staircase (no text or symbols)Do not place the Charging Dock near stairs or a drop off to prevent ATMOBOT from falling over the edge.
natural_image
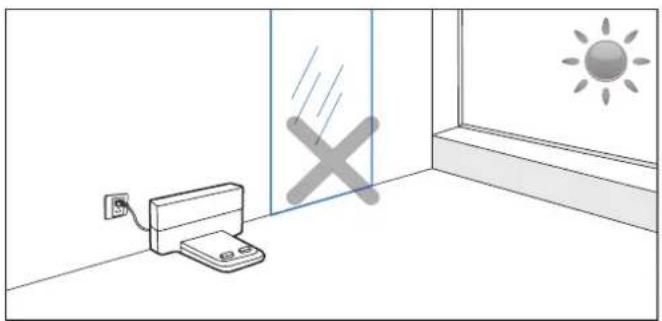
Simple line drawing of a printer placed near a window with a sun symbol and a cross mark (no text or labels)Do not place the Charging Dock in direct sunlight or near reflective objects such as mirrors. The strong light and reflection may keep ATMOBOT from finding its way back to the Charging Dock.
natural_image
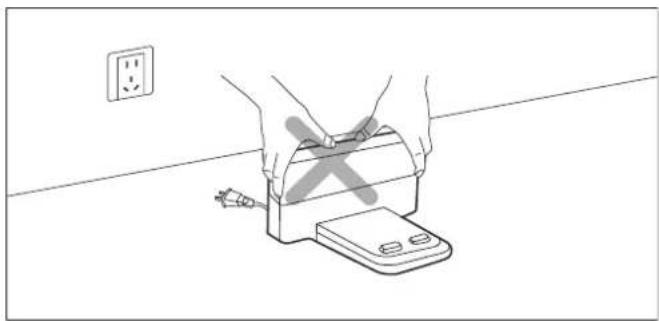
Line drawing of hands using a device to clean or install an appliance, with a wall socket and power plug nearby (no text or symbols)Avoid moving the Charging Dock. If the Charging Dock is moved, ATMOBOT may fail to locate itself and may lose the map.
3. Using ATMOBOT/3.2 Quick Start
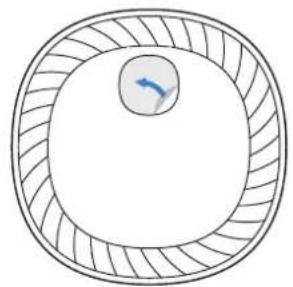
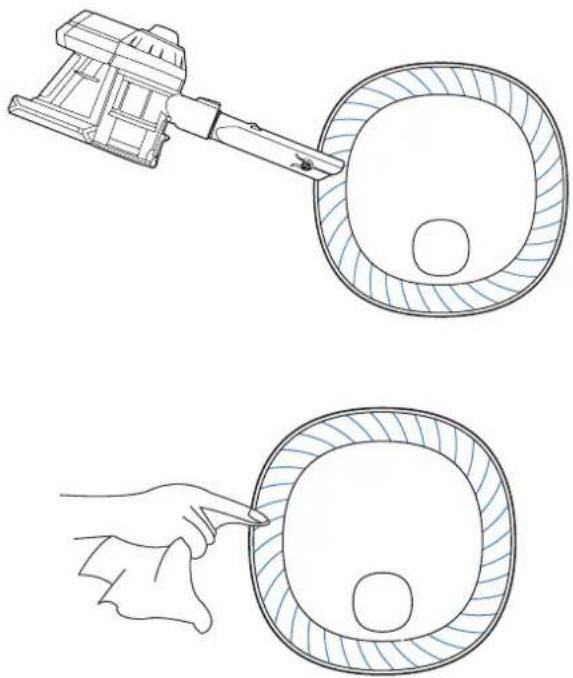
Remove Protective Materials
ATMOBOT
natural_image
Diagram of concentric circular layers with a central arrow, no text or symbols present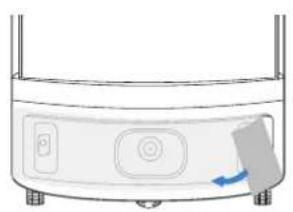
natural_image
Diagram of a cylindrical device with a button and arrow indicating rotation (no text or symbols)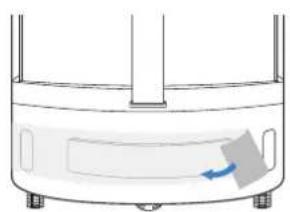
natural_image
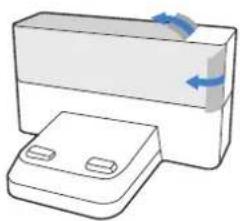
Diagram of a container with a side panel and a blue arrow indicating flow or movement (no text or symbols)Charging Dock Filter
natural_image
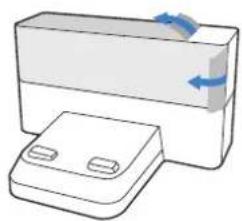
Illustration of a rectangular device with a side panel and blue directional arrows indicating rotation (no text or symbols)
natural_image
Line drawing of a rice cooker with a hand operating the lid and two blue arrows indicating motion (no text or symbols)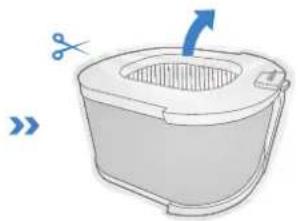
natural_image
Illustration of a small boat with a handle and arrow indicating direction (no text or symbols)Charge ATMOBOT
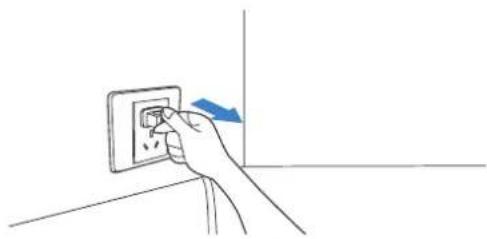
1 Assemble the Power Adapter and Charging Dock Power ON
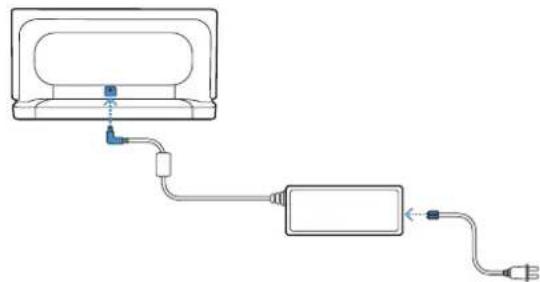
natural_image
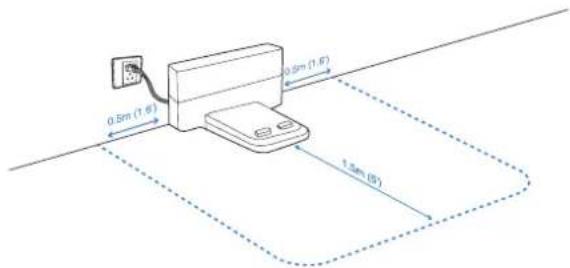
Pure electrical circuit lines without any symbols2 Place Charging Dock Charge ATMOBOT
Place the Charging Dock on a level floor surface against a wall with the base perpendicular to the ground. Keep the immediate area 1.5m / 5^ in front of and on both sides clear of objects and reflective surfaces.
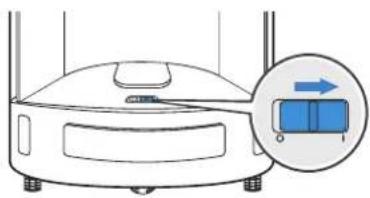
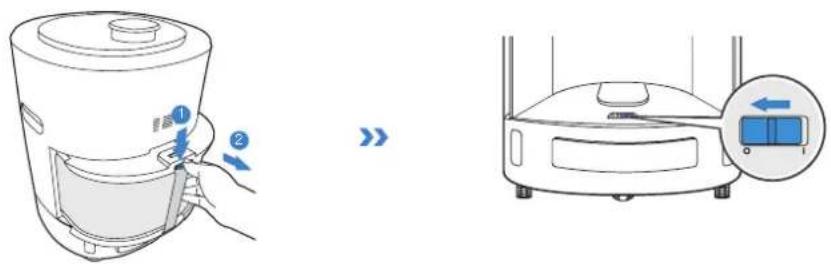
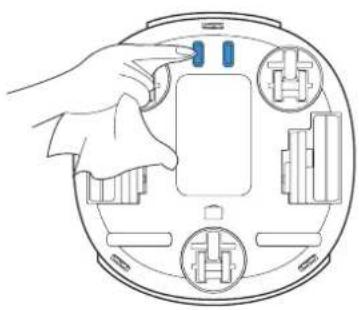
3
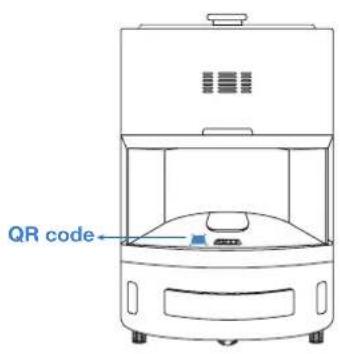
Uninstall the filter, and move the Power Switch to "I". "I" = ON; "O" = OFF. ATMOBOT is powered ON when the control panel is illuminated.
natural_image
Diagram of a robotic vacuum cleaner with a magnified inset showing a blue box (no text or symbols)4
Install the filter, and place ATMOBOT on the Charging Dock. Ensure the charging contacts on ATMOBOT and the Charging Dock Pins make contact. ☐ glows solid WHITE when ATMOBOT is fully charged. ☐ appears when the battery is low.
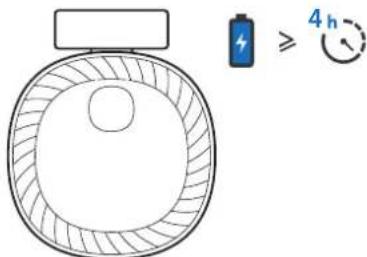
Note:
* Before charging ATMOBOT, pleas power the robot ON.
* Charge ATMOBOT for a minimum of 4 hours before the first use.
3. Using ATMOBOT/3.3 ECOVACS HOME App
ATMOBOT can be operated via ECOVACS HOME App. Download ECOVACS HOME App to access more features: mobile purification, area purification, customized area purification, and automatic purification based on data interconnection.
Scan the QR code to download ECOVACS HOME App.
OR
Search the App Store for "ECOVACS HOME" to download ECOVACS HOME App.

flowchart
graph TD
    A["Download on the App Store"] --> C["ECOVACS HOME"]
    B["GET IT ON Google Play"] --> C
Note:
- Before network setup, please make sure your mobile phone is connected to home Wi-Fi.
- After installing ECOVACS HOME App, please complete the network setup according to App guidance.
3. Using ATMOBOT/3.4 Use ATMOBOT
1 Control Panel
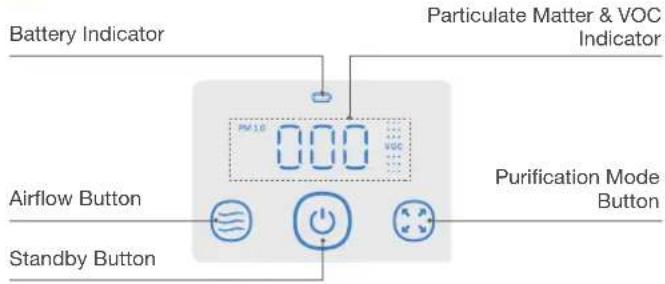
| Indicator Status | |
| Quiet | |
| Normal | |
| High | |
| Smart airflow | |
| GlowingWHITEStandby/ Purifying | |
| Malfunction Alert | |
| Mobile Purification | |
| Spot Purification | |
| Indicator Status | ||
| 010 | BLUE 0-15 Excellent | |
| 016 | GREEN 16-35 Good | |
| 036 | ORANGE 36-75 Lightly Polluted | |
| 076 | RED ≥76 Heavily Polluted | |
| Flashing BLUE VOC sensor starting | ||
| BLUE Excellent | ||
| GREEN Good | ||
| ORANGE Lightly polluted | ||
| RED Heavily polluted | ||
| Flashing WHITE Charging | ||
| Glowing WHITE Fully charged | ||
| RED Low battery | ||
2 Starting Purification
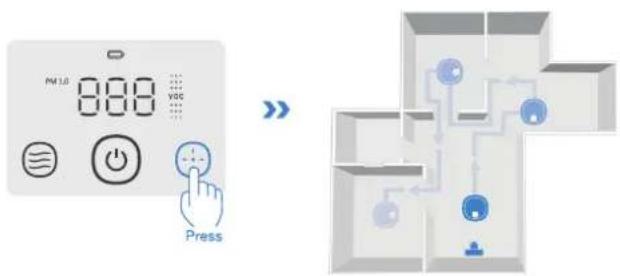
Press to start spot purification.
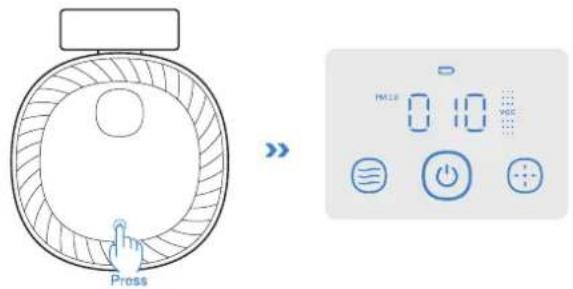
② When ATMOBOT is in mobile purification, press 🙏 The indicator switches to ⚙ and ATMOBOT will start spot purification.
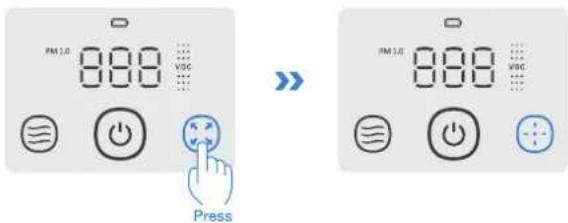
3 Switching Mode
① When ATMOBOT is in spot purification, press ⚙. The indicator switches to 😊 and ATMOBOT will leave the Charging Dock and go to each room to purify.
* Make sure ATMOBOT stays connected to the Charging Dock and keeps charging before the first mobile purification.
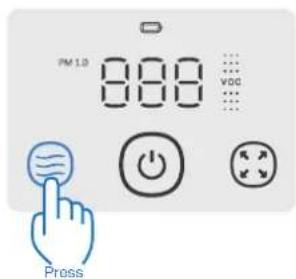
4 Switching Airflow
ATMOBOT has four airflow levels: ☑Smart airflow, ☑quiet airflow, ☑normal airflow, and ☑high airflow.
Press ☑ on the control panel to switch among these airflows.
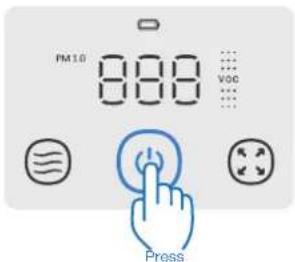
5 Pausing/Ending Purification
Spot Purification: Press to end purification while ATMOBOT is spot purifying. Press again to wake up the robot to start purifying.
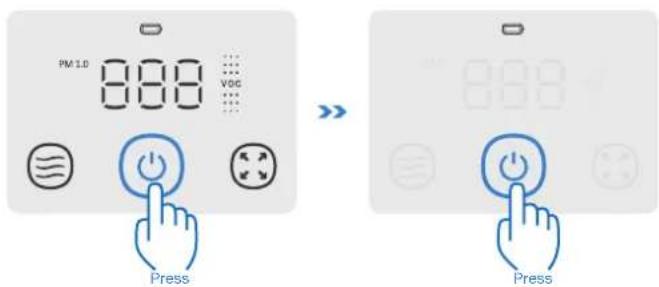
Mobile Purification: When ATMOBOT is in mobile purification, press to pause purification; when purification is paused, press to resume mobile purification.
* During mobile purification, if ATMOBOT is paused for more than 60 minutes, the current mobile purification cycle will be canceled.
6 Return to Charging Dock
Press and hold ⏻ for 3 seconds, and ATMOBOT will automatically return to the Charging Dock to charge.
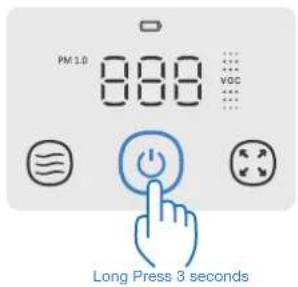
* ATMOBOT will automatically return to the Charging Dock to charge when mobile purification is completed or the battery is low.
3. Using ATMOBOT/3.5 Power OFF for Storage
Uninstall the filter and move the Power Switch to "O". "I" = ON; "O" = OFF.
Note:
- When ATMOBOT is not working, keep the Charging Dock plugged in and keep ATMOBOT powered ON and on the Charging Dock to make sure it has a full battery to work at any time.
- If you will not be using ATMOBOT for a long time, charge it fully and then turn off the power switch before placing it in storage. Be sure to recharge ATMOBOT every three months to prevent the battery from over-discharging.
- If the battery over-discharges or remains unused for a long time, ATMOBOT might become unchangeable. Please contact Customer Service for assistance.
4. Maintenance/4.1 Filter
Note:
- Turn off the robot's power switch and unplug the power cord of the Charging Dock before maintenance.
- It is recommended to maintain and replace the filter regularly to avoid pollution and noise.
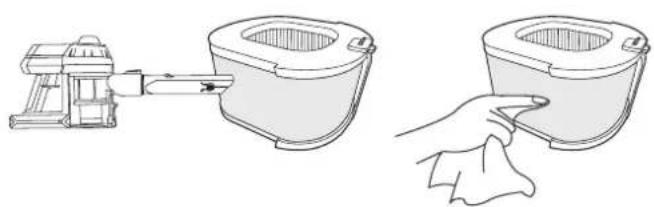
Care and Maintenance
1 Uninstall the filter, and turn off the power switch. Place the filter in sunlight 3 or 2–3 hours.


2 Clean the filter with a vacuum cleaner. Turn on the robot's power switch, and install the filter.
natural_image
Line drawings of a kitchen appliance and its cleaning step, showing a hand holding a cloth (no text or symbols)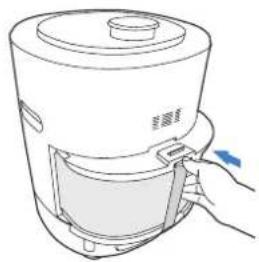
natural_image
Line drawing of a kitchen blender with handle and lid, no text or symbols presentReplacing the Air Filter
Note:
The air filter life varies across different environments.
Replace the filter if it is expired or develops an odor.
Visit https://www.ecovacs.com/global for more information to purchase the filter.
4. Maintenance/4.2 Air Outlet
Regularly clean the Air Outlet with a vacuum cleaner. This will ensure the air outlet by ATMOBOT is clean.
natural_image
Illustration showing a robotic arm interacting with a circular mechanical component, and a hand holding a tool to clean a circular component (no text or symbols present)4. Maintenance/4.3 Other Components
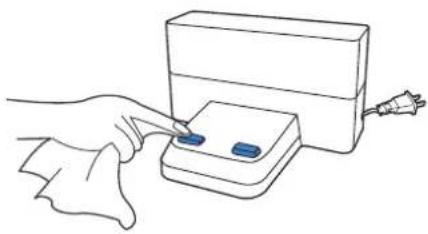
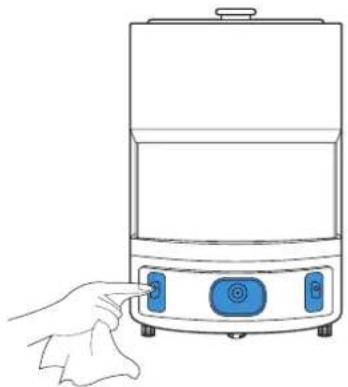
Note: To avoid causing damage, use a dry cloth to clean. Do not use a damp cloth, cleaning solution or cleaning spray to clean these components.
ATMOBOT Charging Contacts Charging Dock Pins
1

natural_image
Diagram of a robotic vacuum cleaner with a magnified inset showing a blue box and directional arrow (no text or symbols)1
natural_image
Hand inserting a wall socket into an electrical outlet (no text or symbols visible)2

natural_image
Diagram of a circular device with labeled components and a hand pointing to a screen (no text or symbols present)2

natural_image
Line drawing of a hand using a handheld device to press or install a rectangular device (no text or symbols present)Line Laser Anti-Collision Sensors Line Laser Anti-Collision Bumpers

natural_image
Line drawing of a hand inserting a blue button into a white container (no text or symbols)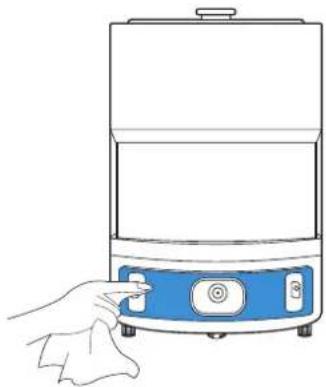
natural_image
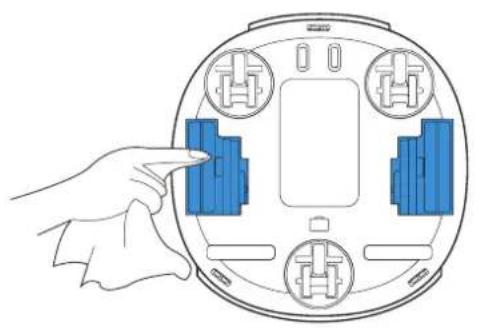
Line drawing of a hand pressing a button on a blue appliance (no text or symbols)Infrared Bumper and Charging Dock Signal Sensors Anti-Dro
natural_image
Diagram of a hand holding a device with four buttons and a central screen, no text or symbols present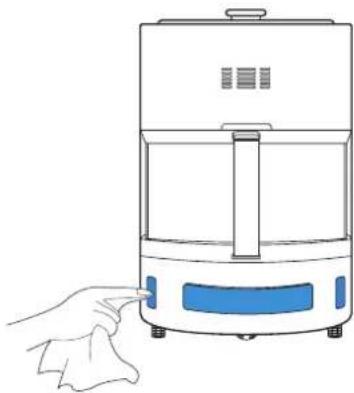
natural_image
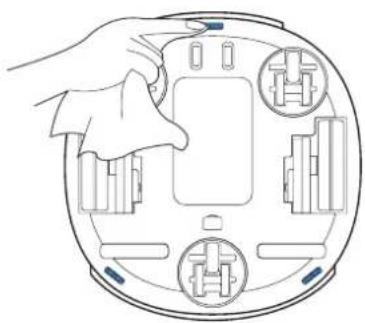
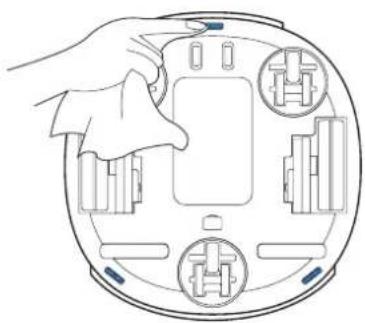
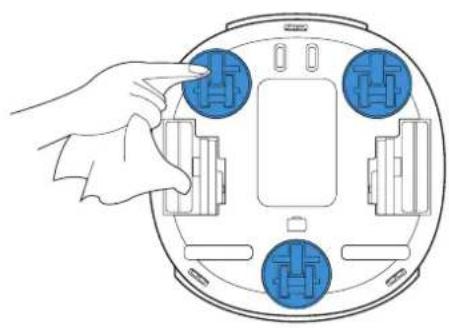
Line drawing of a hand pressing down on a small electric oven (no text or symbols)4. Maintenance/4.4 Driving Wheels and Universal Wheel
Driving Wheels Universal Wheel
natural_image
Diagram of a hand pointing to a circular device with four blue components and a central display (no text or symbols)
natural_image
Diagram of a hand inserting a component into a circular device with four blue buttons (no text or symbols)5. Troubleshooting
Please use this chart to troubleshoot common problems using ATMOBOT.
| No. | Problem Possible cause Solution | ||
| 1 | ATMOBOT will not puri-fy. | ATMOBOT power switch is off. Turn the ATMOBOT power switch on. | |
| ATMOBOT battery is low. | Be sure ATMOBOT is fully charged before the first use. Uninstall the filter and turn on the power switch on the robot. Install the filter again and charge ATMOBOT. | ||
| For everyday use, check if the Charging Dock is plugged in and that the ATMOBOT is powered ON. When ATMOBOT is not working, keep the Charging Dock plugged in and keep AT-MOBOT powered ON and charging to make sure it has a full battery to work at any time. | |||
| ATMOBOT is not responding and needs to be reset. | Turn the power switch off and on to restart it. If the problem persists, press and hold the RESET Button. The robot will revert to factory settings. Restart the ATMOBOT. | ||
| 2 | The filter gives off a strange smell. | It is the smell of new materi-als. | Set the robot in a well-ventilated area and run it until the smell goes away. |
| Long-term use of product in rainy weather causes the filter to become damp. | Place the filter in sunlight and let it get intense sun exposure for about 3 hours before using it. | ||
| The filter has reached the end of its service life. | Visit https://www.ecovacs.com/global to purchase and replace the filter. | ||
| Dust and dirt are accumulat-ing at the air inlet and outlet areas and on the filter. | Clean air inlet, outlet, and filter as demonstrated in Section 4. | ||
| 3 | ATMOBOT is having trouble returning to the Charging Dock. | The Charging Dock is not connected to power. | Make sure that the Charging Dock is fully connected to the power. |
| The Infrared Anti-collision Bumper and Charging Dock Signal Sensor is blocked by dirt or debris. | Wipe the Infrared Anti-collision Bumper and Charging Dock Signal Sensor with a clean, dry cloth. | ||
| 4 | ATMOBOT returns to charge before the purification is com-pleted. | ATMOBOT automatically returns to the Charging Dock to charge when the battery is low. | This is normal. When ATMOBOT is not working, keep the Charging Dock plugged in and keep ATMOBOT powered ON and on the Charging Dock to make sure it has a full battery to work at any time. |
| The home environment is complex, and ATMOBOT may return to recharge be-fore finishing purification. | Tidy up the furniture and the objects on the floor as described in Sec-tion 3. | ||
| 5 | ATMOBOT is not charging. | ATMOBOT power switch is off. Turn the robot's power switch on. | |
| ATMOBOT has not made a connection with the Charging Dock. | Be sure that the Charging Contacts on ATMOBOT have made con-tact with the Charging Dock pins. You can move the robot manually to make the connection if necessary. | ||
| The power adapter has not made a connection with the power cord. | Please make sure the power adapter is fully connected with the pow-er cord. | ||
| The Charging Contacts on ATMOBOT and Charging Dock Pins are covered with dirt. | Clean the Charging Contacts and Charging Dock Pins according to Section 4. | ||
| 6 | ATMOBOT does not follow the purification path properly or the map is missing. | After setting purification areas, the robot was switched OFF or was returned to fac-tory settings, or the map was reset. | Create a new map and set the purification areas. |
| The robot was manually moved to a new environ-ment. | Once the robot is moved back to the Charging Dock, ATMOBOT will recover its map and purification areas. To prevent recovery failure, do not get too close to the robot during the recovery process. | ||
| The Charging Dock is moved, or the home environ-ronment is changed greatly. | Restore the original home environment or put the Charging Dock back where it was previously. | ||
| 7 | ATMOBOT is having trouble mapping the house.. | The robot is followed around while it's mapping. Do not follow the robot around while it is mapping. | |
| The furniture and objects on the floor are not put in place. | Tidy up the furniture and the objects on the floor before having the ro-bot start mapping. | ||
| 8 | ATMOBOT is not moving smoothly or is devi-ating from the Air Purification Path. | The universal wheel is tan-gled with debris. | Remove any debris or hair tangled around the universal wheel. |
| The driving wheels are tan-gled with debris. | Remove any debris or hair tangled around the driving wheels. | ||
| The D-TOF Distance Sensor is blocked. Remove the debris from the D-TOF Distance Sensor. | |||
| There are obstructions in the purification path. | Before starting mobile purification, make sure the preset purification pathway is clear. | ||
| 9 | ATMOBOT often bumps into surrounding objects. | The D-ToF Distance Sensor and Anti-Collision sensors are dirty or damaged. | Check the sensors. If dirty, wipe them gently with a soft cotton cloth. If the problem persists, please contact Customer Care. |
| ATMOBOT is exposed to strong direct sunlight. | Avoid direct sunlight when ATMOBOT is in mobile purification. | ||
| 10 | During mobile purification, ATMOBOT does not go to the purification areas. | There are obstructions in the purification path. If AT-MOBOT cannot go around these, it will purify a spot nearby. | Before starting mobile purification, make sure the preset purification pathway is clear. |
| The room door is closed, preventing the robot from following the set path. | |||
| 11 | ATMOBOT is not able to connect to your home Wi-Fi network. | The home Wi-Fi username or password was entered incorrectly. | Enter the correct home Wi-Fi username and password. |
| ATMOBOT is not within the range of the home Wi-Fi signal. | Make sure ATMOBOT is within the Wi-Fi signal range. | ||
| ATMOBOT is not ready for network setup yet. | Uninstall the filter, turn the power switch to “O”, and press RESET Button ⚙. ATMOBOT is ready for network setup when it emits a voice report. | ||
| ATMOBOT does not operate on your home Wi-Fi band. | ATMOBOT operates on a 2.4GHz band Wi-Fi signal only. Please make sure your home Wi-Fi meets the requirement. | ||
| 12 | ATMOBOT makes much noise when purifying. | The driving wheels and uni-versal wheel are stuck by debris, or the air outlet is blocked. | Clean the driving wheels, universal wheel or air outlet as described in Section 4. |
| The ATMOBOT air volume is set to high 😊. This is normal. | |||
6. Product Specifications
| Model KJ500G-LX11-01 | |||
| Rated Input 24V | 3.75A | ||
| Charging Dock CH1915 | |||
| Rated Input 24V | 3.75A Rated Output 24V 3.75A | ||
| Power Adapter GM95-240375-D | |||
| Rated Input 100-240V~ 2.5A Rated Output 24V | 3.75A | ||
| D-ToF | Laser 905nm | ||
| Frequency 7200Hz | |||
| Rotate Speed 5Hz/s | |||
| Wi-Fi Module Frequency Bands 2400MHz-2483.5MHz | |||
Live Smart. Enjoy Life.
natural_image
Line drawing of a modern kitchen appliance with control buttons and a lid (no text or symbols)ATMOBOT

natural_image
Simple line drawing of a rectangular device with two small circular ports, no text or symbols present.충전 도크
사용 설명서

natural_image
Pure electrical circuit lines without any symbolsnatural_image
Line drawing of a dining table with chairs, a fan, and a trash bin (no text or symbols)natural_image
Floor plan layout with room layouts and a curved blue line indicating a path (no text or labels)natural_image
Cartoon illustration of a child sitting on a box with a cross symbol, no text or symbols presentnatural_image
Line drawing of a hand holding a cylindrical device with a cross symbol on its cover (no text or symbols present)natural_image
Illustration of a mobile phone connected to a wall-mounted power outlet, standing on blue stairs (no text or symbols)natural_image
Simple line drawing of an air conditioner placed near a window with a sun symbol and a cross mark (no text or labels)natural_image
Line drawing of hands holding a device with a switch, next to an electrical outlet (no text or symbols)natural_image
Diagram of concentric circular layers with a central arrow, no text or symbols present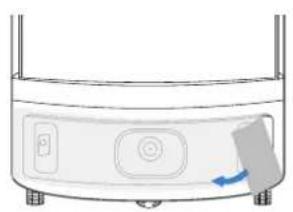
natural_image
Diagram of a cylindrical device with a button and arrow indicating rotation (no text or symbols)
natural_image
Diagram of a container with a side panel and a blue arrow indicating flow or movement (no text or symbols)충전 도크 필터
natural_image
Diagram of a rectangular device with two buttons and directional arrows indicating rotation or movement (no text or symbols)
natural_image
Line drawing of a rice cooker with a hand operating the lid and two blue arrows indicating motion (no text or symbols)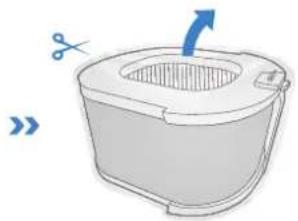
natural_image
Illustration of a small boat with a lid and side arm, showing a blue arrow indicating direction (no text or symbols)ATMOBOT 충전
1 전원 어댑터와 충전 도크 연결

natural_image
Pure electrical circuit lines without any symbols3 전원 켜기
natural_image
Diagram of a robotic vacuum cleaner with a magnified inset showing a blue box (no text or symbols)4
3 모드 전환하기
참고:
natural_image
Line drawings of a kitchen appliance and a hand holding a cloth (no text or symbols)natural_image
Line drawing of a kitchen blender with handle and lid, no text or symbols present공기 필터 교체
참고:
natural_image
Illustration showing a robotic arm interacting with a circular mechanical component, and a hand pointing to a circular component (no text or symbols present)4. 유지보수 /4.3 기타 구성품
natural_image
Diagram of a robotic vacuum cleaner with a magnified inset showing a blue box and arrow (no text or symbols)도크 핀
1

natural_image
Hand inserting a wall socket into an electrical outlet (no text or symbols visible)2
natural_image
Diagram of a hand pressing a button on a circular device with internal components (no text or symbols)2
natural_image
Line drawing of a hand using a tool to press or install a device into a rectangular block (no text or symbols)라인 레이저 충돌 방지 센서 라인
natural_image
Line drawing of a hand inserting a blue button into a white rectangular device (no text or symbols)방지 센서
natural_image
Diagram of a hand holding a device with four buttons and a central screen, no text or symbols present레이저 충돌 방지 범퍼

natural_image
Line drawing of a hand holding a blue control panel with a battery, next to a white cylindrical device (no text or symbols)natural_image
Line drawing of a hand pressing down on a portable air fryer (no text or symbols)natural_image
Diagram of a hand pointing to a circular device with four labeled components (no text or symbols present)힐
natural_image
Diagram of a hand adjusting a circular device with four blue buttons on its side (no text or symbols)5.문제 해결
No. 18 You Xiang Road, Wuzhong District, Suzhou City,
Jiangsu Province, P.R.China
451-1912-1300 A00
- CONTENTS
- Important Safety Instructions
- READ ALL INSTRUCTIONS BEFORE USING THIS APPLIANCE
- SAVE THESE INSTRUCTIONS
- Package Contents/2.1 Package Contents
- Package Contents/2.2 Product Diagram
- Using ATMOBOT/3.1 Notes Before Use
- Using ATMOBOT/3.2 Quick Start
- Charge ATMOBOT
- Assemble the Power Adapter and Charging Dock Power ON
- Place Charging Dock Charge ATMOBOT
- 3
- 4
- Note:
- Using ATMOBOT/3.3 ECOVACS HOME App
- Using ATMOBOT/3.4 Use ATMOBOT
- Starting Purification
- Switching Mode
- Switching Airflow
- Pausing/Ending Purification
- Return to Charging Dock
- Using ATMOBOT/3.5 Power OFF for Storage
- Maintenance/4.1 Filter
- Care and Maintenance
- Replacing the Air Filter
- Maintenance/4.2 Air Outlet
- Maintenance/4.3 Other Components
- ATMOBOT Charging Contacts Charging Dock Pins
- Maintenance/4.4 Driving Wheels and Universal Wheel
- Troubleshooting
- Product Specifications
- ATMOBOT 충전
- 전원 어댑터와 충전 도크 연결
- 전원 켜기
- 모드 전환하기
- 참고:
- 공기 필터 교체
- 유지보수 /4.3 기타 구성품
- 도크 핀
- 5.문제 해결
Brand : ECOVACS
Model : ATMOBOT Andy
Category : Vacuum Cleaner