
DEEBOT Y1 Plus - Vacuum Cleaner ECOVACS - Free user manual and instructions
Find the device manual for free DEEBOT Y1 Plus ECOVACS in PDF.


| Product Type | Robot Vacuum Cleaner with Auto-Empty Station |
| Model (Robot) | DLX32 |
| Model (Docking Station) | CH2319 |
| Rated Input (Robot) | 20V === 1.2A |
| Rated Input (Docking Station) | 100V ~ 50-60Hz, 6.75A (Emptying), 0.65A (Charging) |
| Charging Time | 4-5 hours |
| Battery Type | Lithium-ion, Max 8 cells |
| Battery Capacity | 14.4V, 4800mAh |
| Laser Lidar | 5V === 200 mA, 940 nm, 8m range |
| Wi-Fi Module Output Power | < 100mW |
| Navigation System | TrueMapping with Laser Distance Sensor |
| Sensors | Anti-drop (infrared), Carpet Detection (ultrasonic), Anti-collision |
| Cleaning Modes | Auto, Spot, Scheduled, Continuous Cleaning |
| Mopping Function | Yes, with washable mopping pad and water reservoir |
| Auto-Empty Function | Yes, with dust bag in Auto-Empty Station |
| App Control | Yes, via ECOVACS HOME App (Wi-Fi) |
| Child Lock | Yes, via long press Spot Cleaning button |
| Filter Type | Washable sponge and net filter |
| Operating Temperature Range | 0°C to 40°C |
| Included Accessories | Auto-Empty Station, 2-in-1 Module (dust box & reservoir), Mopping Pad, Side Brush, Main Brush, Filter, Dust Bag, Screwdriver |
Frequently Asked Questions - DEEBOT Y1 Plus ECOVACS
User questions about DEEBOT Y1 Plus ECOVACS
0 question about this device. Answer the ones you know or ask your own.
Ask a new question about this device
Download the instructions for your Vacuum Cleaner in PDF format for free! Find your manual DEEBOT Y1 Plus - ECOVACS and take your electronic device back in hand. On this page are published all the documents necessary for the use of your device. DEEBOT Y1 Plus by ECOVACS.
USER MANUAL DEEBOT Y1 Plus ECOVACS
natural_image
Line drawing of a dining table with a fan, seatbelt, and checkmark (no text or symbols)natural_image
Architectural diagram of a balcony with railings and a circular base, no text or symbols presentJA | 10
natural_image
Floor plan diagram with room layouts and a highlighted path (no text or labels)
natural_image
Diagram of two hands holding a circular device with blue arrows indicating rotation or movement (no text or symbols)natural_image
Line drawing of a robotic vacuum cleaner with a circular inset showing a QR code (no text or symbols on the device itself)natural_image
Line drawing of a kitchen appliance with a wall socket connected to a power outlet (no text or symbols)
natural_image
Line drawing of a robotic vacuum cleaner with a hand inserting a power button (no text or symbols)natural_image
Illustration of a hand pressing a button on a vacuum cleaner's lid (no text or symbols)3 一時停止
natural_image
Line drawing of a hand pressing a button on a vacuum cleaner's rack (no text or symbols)4 起動
natural_image
Illustration of a hand pressing a button on a vacuum cleaner's lid (no text or symbols)5 スポット掃除
natural_image
Illustration of a hand using a circular device to clean a vacuum cleaner (no text or symbols present)6 ダスト 回収
natural_image
Line drawing of a vacuum cleaner and its lid (no text or symbols)2.6 モップ掛けの開始
1 モップ掛けの追加
natural_image
Technical line drawing of a mechanical component with two views showing internal structure and directional arrows (no text or symbols)natural_image
Line drawing of a robotic vacuum cleaner with a power button icon (no text or symbols)注:
natural_image
Technical line drawing of a robotic vacuum cleaner with airflow direction and component details (no text or symbols)2
natural_image
Technical line drawing of a mechanical component with an upward arrow indicator (no text or symbols present)3

natural_image
Line drawing of a hand using a tool to adjust or install a mechanical component (no text or symbols present)4

natural_image
Two technical diagrams showing a device with blue arrows indicating motion or force, no text or symbols present.natural_image
Line drawing of a mechanical device with a blue sun symbol above it (no text or labels)natural_image
Diagram of a robotic device with highlighted internal components and an inset showing a mechanical assembly (no text or symbols present)2
natural_image
Technical diagram of a mechanical assembly with blue components and an upward arrow indicating motion (no text or symbols present)3

natural_image
Illustration of a hand using a tool to cut or draw a piece of bread (no text or symbols present)サイドブラシ
1

natural_image
Technical diagram of a mechanical assembly with no visible text or symbols2

natural_image
Line drawing of a hand holding a pen or tool with a curved line below (no text or symbols)3.4 その他の部品のメンテナンス
バンパー

natural_image
Line drawing of a hand cleaning a vacuum cleaner's lid (no text or symbols)TrueMapping 距離センサ
natural_image
Line drawing of a hand cleaning a circular vacuum cleaner with a cloth (no text or symbols)natural_image
Technical line drawing of a robotic vacuum cleaner with handle and control panel (no text or symbols)充電端子
natural_image
Technical line drawing of a robotic vacuum cleaner with visible internal components and a hand holding the cleanener (no text or symbols)ホイール

natural_image
Technical line drawing of a mechanical device with hands operating it (no text or symbols visible)natural_image
Line drawing of a portable kitchen appliance with open lid and blue internal compartments (no text or symbols)
natural_image
Line drawing of a portable kitchen appliance with open lid and blue internal components (no text or symbols)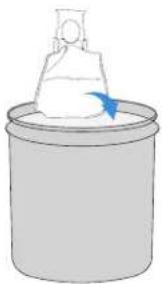
natural_image
Simple line drawing of a container with a lid and a funnel-like top, containing a white object (no text or symbols)natural_image
Line drawing of a portable kitchen appliance with open lid and handle (no text or symbols)
natural_image
Line drawing of a portable electronic device with open lid and blue internal components (no text or symbols)3
natural_image
Line drawing of a portable kitchen appliance with open lid and side ports (no text or symbols)3.6 保管
natural_image
Line drawing of a robotic vacuum cleaner with a power button icon (no text or symbols)Important Safety Instructions IMPORTANT SAFETY INSTRUCTIONS
When using an electrical Appliance, basic precautions should always be followed, including the following:
READ ALL INSTRUCTIONS BEFORE USING THIS APPLIANCE SAVE THESE INSTRUCTIONS
- This Appliance can be used by children aged from 8 years and above and persons with reduced physical, sensory or mental capabilities or lack of experience and knowledge if they have been given supervision or instruction concerning use of the Appliance in a safe way and understand the hazards involved. Children shall not play with the Appliance. Cleaning and user maintenance shall not be made by children without supervision.
- Clear the area to be cleaned. Remove power cords and small objects from the floor that could entangle the Appliance. Tuck rug fringe under the rug base, and lift items such as curtains and tablecloths off the floor.
- If there is a drop off in the cleaning area due to a step or stairs, you should operate the Appliance to ensure that it can detect the step without falling over the edge. It may become necessary to place a physical barrier at the edge to keep the unit from falling. Make sure the physical barrier is not a trip hazard.
- Only use as described in this manual. Only use attachments recommended or sold by the manufacturer.
- Please make sure your power supply source voltage matches the power voltage marked on the Docking station.
-
For INDOOR household use ONLY. Do not use the Appliance in outdoor, commercial or industrial environments.
-
Use only the original rechargeable battery and Docking Station (Auto-Empty Station) provided with the Appliance from the manufacturer. Non-rechargeable batteries are prohibited.
- Do not use without dust bin and/or filters in place.
- Do not operate the Appliance in an area where there are lit candles or fragile objects.
- Do not use in extremely hot or cold environments (below -5^/23^ or above 40^/104^ ).
- Keep hair, loose clothing, fingers, and all parts of body away from any openings and moving parts.
- Do not operate the Appliance in a room where an infant or child is sleeping.
- Do not use Appliance on wet surfaces or surfaces with standing water.
- Do not allow the Appliance to pick up large objects like stones, large pieces of paper or any item that may clog the Appliance.
- Do not use Appliance to pick up flammable or combustible materials such as gasoline, printer or copier toner, or use in areas where they may be present.
- Do not use Appliance to pick up anything that is burning or smoking, such as cigarettes, matches, hot ashes, or anything that could cause a fire.
- Do not put objects into the suction intake. Do not use if the suction intake is blocked. Keep the intake clear of dust, lint, hair, or anything that may reduce air flow.
- Take care not to damage the power cord. Do not pull on or carry the Appliance or Docking station by the power cord, use the power cord as a handle, close a door on the power cord, or pull power cord around sharp edges or corners. Do not run Appliance over the power cord. Keep power cord away from hot surfaces.
-
If the power cord is damaged, it must be replaced by the manufacturer or its service agent in order to avoid a hazard.
-
Do not use the Docking station if it is damaged. The power supply is not to be repaired and not to be used any longer if it is damaged or defective.
- Do not use with a damaged power cord or receptacle. Do not use the Appliance or Docking station if it is not working properly, has been dropped, damaged, left outdoors, or come in contact with water. It must be repaired by the manufacturer or its service agent in order to avoid a hazard.
- Turn OFF the power switch before cleaning or maintaining the Appliance.
- The plug must be removed from the receptacle before cleaning or maintaining the Docking station.
- Remove the Appliance from the Docking station, and turn OFF the power switch to the Appliance before removing the battery for disposal of the Appliance.
- The battery must be removed and discarded according to local laws and regulations before disposal of the Appliance.
- Please dispose of used batteries according to local laws and regulations.
- Do not incinerate the Appliance even if it is severely damaged. The batteries can explode in a fire.
- When not using the Docking station for a long period of time, please unplug it.
- The Appliance must be used in accordance with the directions in this Instruction Manual. Ecovacs Robotics Co., Ltd. cannot be held liable or responsible for any damages or injuries caused by improper use.
- The Robot contains batteries that are only replaceable by skilled persons. To replace the Robot's battery, please contact Customer Service.
- If the Robot will not be used for a long time, power OFF the Robot for storage and unplug the Docking station.
- WARNING: For the purposes of recharging the battery, only use the detachable supply unit CH2319 provided with the Appliance.
The lithium battery type suitable for CH2319 is Max. 8 cells, max. nominal voltage DC14.4V, rated capacity 4,800mAh. The battery must be removed and discarded according to local laws and regulations before disposal of the Appliance.
To satisfy RF exposure requirements, a separation distance of 20 cm or more should be maintained between this device and persons during device operation.
To ensure compliance, operations at closer than this distance is not recommended. The antenna used for this transmitter must not be co-located in conjunction with any other antenna or transmitter.
Device Update
Typically, some devices are updated bi-monthly, but not always so specific.
Some devices, especially those that went on sale more than three years ago, will only be updated if a critical vulnerability is found and fixed.
| [XX30] | Short-circuit-proof safety isolating transformer. |
| [2K5W] | Switch mode power supply. |
| [6D7Z] | For indoor use only. |
 | Direct current. |
 | Alternating current. |
 | Before charging, read the instructions. |
| [A3WS] | Polarity of the charging port. |
| [0ZK3] | Time-lag miniature fuse-link. |
| [055K] | Class II equipment. |
| [0ZZ2] | CLASS 1 LASER PRODUCT. |
1. Package Contents
1.1 Package Content
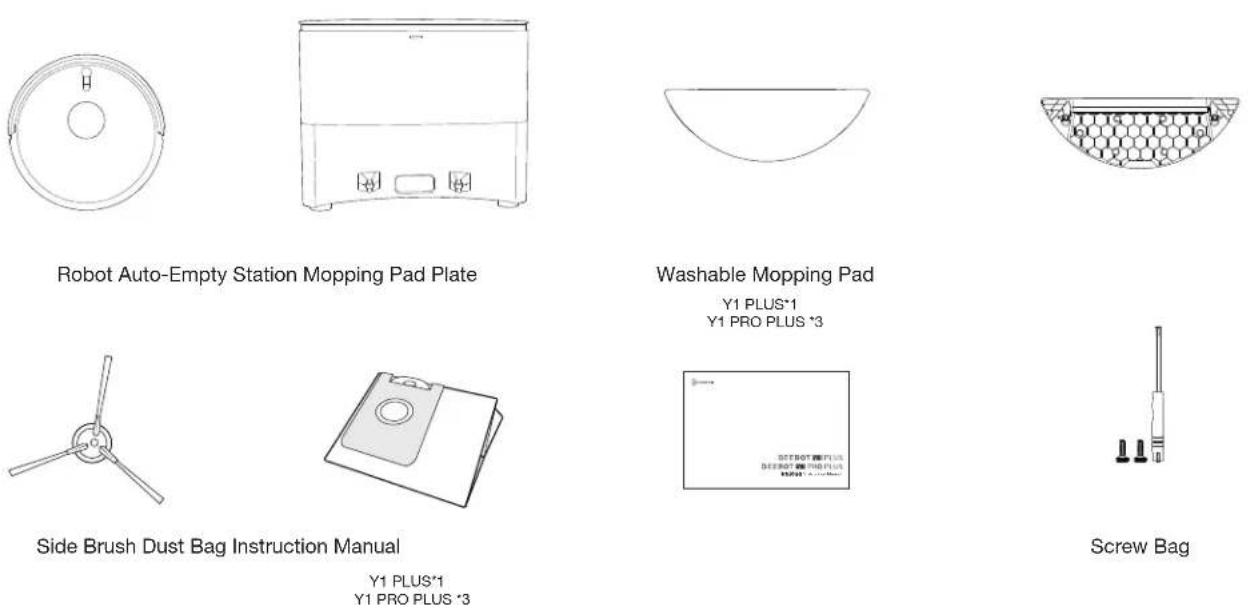
Note: Figures and illustrations are for reference only and may differ from actual product appearance. Product design and specifications are subject to changes without notice.
1.2 Product Diagram
Robot

Charging Button:
Short Press: Go To Charge
Long Press: Reset

- In Child Lock mode, buttons and smart speakers are disabled,
preventing potential dangers from accidental operations by children.
- Restore to factory settings: Long press the charging Button for 10-15s.
2 in 1 Module

Filter

Mopping Pad Module

Bottom View

Auto-Empty Station (AES)
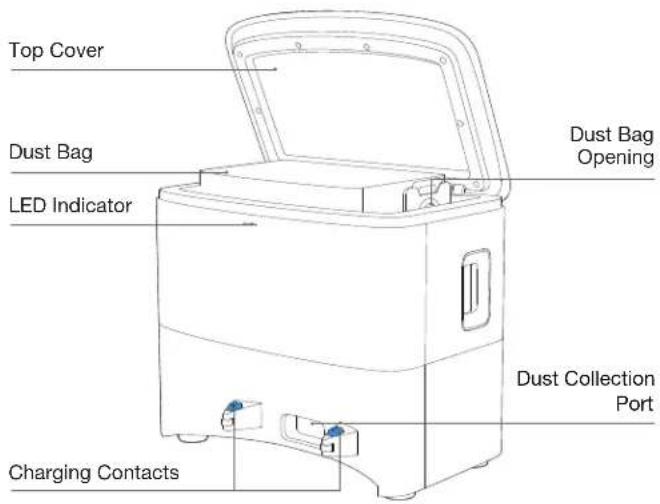
1.3 Sensors
| Name Functional Description | |
| TrueMapping Distance Sensor | With Laser Ranging-measuring the distance between Robot and surroundings through the time difference of reflection, it can map according to the objects around while Robotis moving. Detection of 8m. |
| Anti-drop Sensor | With Infrared Ranging detecting the distance between the bottom of Robot and ground by Infrared Sensor at the bottom, Robot will not move formard when there are stairs in front (For example: White ground height greater than 30mm.) or the identified distance exceeds the preset one, realizing the Anti-drop. |
| Carpet Detection Sensor | The ultrasound probe can emit ultrasonic waves with a frequency of 300KHZ. The energy of the ultrasonic waves is absorbed by the carpet. If the reflected energy is below the threshold, the Robot recognizes the presence of the carpet. |
| Anti-collision Sensor | When the transmitted signal is blocked by an obstacle, the signal receiver will not be able to receive the signal. With this principle, the device will avoid obstacles when colliding with them. |
2. Operations
2.1 Notes Before Cleaning
Tidy up the area to be cleaned by putting furniture, such as chairs, in their proper place.

natural_image
Line drawing of a dining table with a fan, seatbelt, and checkmark (no text or symbols)It may be necessary to place a physical barrier at the edge of a drop to stop the unit from falling over the edge.

natural_image
Architectural diagram of a balcony with railing and circular base, no text or symbols presentEN | 36
During the first use, make sure each room door is open to help Robot fully explore your house.
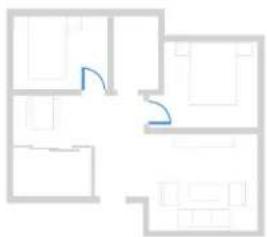
natural_image
Floor plan outline with a blue curved line indicating a path or route (no text or labels)
Put away objects including cables, cloths and slippers, etc. on the floor to improve the cleaning efficiency.

Before using the product on a rug with tasseled edges, please fold the rug edges under.

Please do not stand in narrow spaces, such as hallways, and make sure not to block the camera.
2.2 Quick Start
* Before using the product, please remove all protective materials.

natural_image
Diagram of two hands holding a circular device with blue arrows indicating rotation or movement (no text or symbols)* Before using the product, please take the screwdriver and screws out of the screw pack for installation.

natural_image
Technical line drawing of a mechanical assembly with no visible text or symbols2.3 Download and Connect ECOVACS HOME App
To enjoy all available features, it is recommended to control your Robot via the ECOVACS HOME App.
Method 1: Scan the QR code on the Robot or Instruction Manual to download the App.

natural_image
Line drawing of a robotic vacuum cleaner with a circular icon showing a QR code (no text or symbols on the device itself)Method 2: Search the ECOVACS HOME to download the App.
Connect Robot with App via Wi-Fi.
Note:
- Robot should be fully charged and turned on.
- Wi-Fi indicator is on.
- Turn off the mobile network.
Wi-Fi Network Requirements:
- You are using a 2.4GHz or 2.4/5 GHz mixed network.
- Your router supports 802.11b/g/n and IPv4 protocol.
- Do not use a VPN (Virtual Private Network) or Proxy Server.
- Do not use a hidden network.
- WPA and WPA2 using TKIP, PSK, AES/CCMP encryption.
- WEP EAP (Enterprise Authentication Protocol) is not supported.
- Use Wi-Fi channels 1-11 in North America and channels 1-13 outside North America (refer to local regulatory agency).
- If you are using a network extender/repeater, the network name (SSID) and password are the same as your primary network.
- Please enable the WPA2 on your router.
Please be aware that the realization of intelligent functions such as remote startup, voice interaction, 2D/3D map display and control settings, and personalized cleaning (depending on different products) requires users to download and use ECOVACS HOME App, which is constantly updated. You need to agree to our Privacy Policy and User Agreement before we can process some of your basic and necessary information and enable you to operate the product. If you do not agree with our Privacy Policy and User Agreement, some of the aforementioned intelligent functions cannot be realized through ECOVACS HOME App, but you can still use the basic functions of this product for manual operation.
2.4 Charging Robot
1 Connect the Power Cord.

natural_image
Line drawing of a portable water heater with an outlet plug and blue arrow indicating direction (no text or symbols)2 Place the Auto-Empty Station
The Docking station should be placed against a wall on a flat ground, and no items should be placed with in a range of (0.5m to left and right sides) and (1.5m to the front).

* It is recommended to place the Station on the hard floor to experience complete functions of the Robot.
3 Power ON
Long press the START Button for 3 seconds to turn on the Robot.
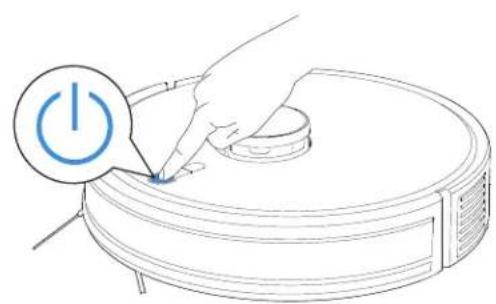
natural_image
Line drawing of a robotic vacuum cleaner with a power button icon (no text or symbols)4 Charging
Short press the Charging button to make Robot return for charging.

* It is recommended that Robot start cleaning from the Station. Do not move the Station while cleaning.
2.5 Start Cleaning
1 Create a map
When creating a map for the first time, please follow ROBOT to help eliminate some minor issues. For example, the Robot may get stuck under low furniture. Take following solutions for reference. Solve the issue as below.
① Lift up the furniture if possible
② Cover the bottom of the furniture, to prevent Robot from entering.
* Set up Virtual Boundary via the App to prevent the Robot from entering.
2 Start Cleaning
Before first vacuuming, please make sure the Robot is in the Auto-Empty Station and fully charged. Short press ⏻ to start cleaning and create a map at the same time.
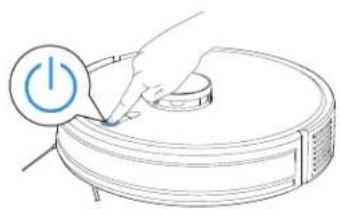
natural_image
Illustration of a hand pressing a button on a vacuum cleaner's lid (no text or symbols)3 Pause
When Robot is working, shot press ⏻ to pause.

natural_image
Line drawing of a hand pressing a button on a vacuum cleaner's rack (no text or symbols)4 Wake up
The indicator light will go out after the Robot is paused for a few minutes. Short press ⏻ to wake it up.

natural_image
Illustration of a hand pressing a button on a vacuum cleaner's rack (no text or symbols)5 Spot Cleaning
Short press ⚙ key, it will clean the area 1.5*1.5m with its position as center.

natural_image
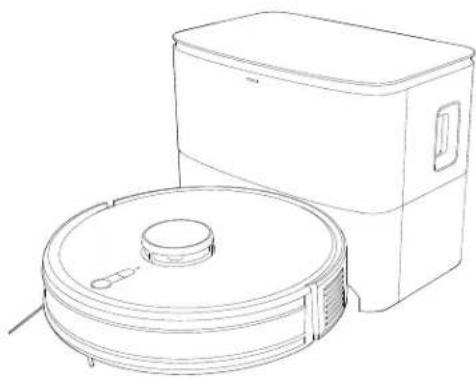
Line drawing of a robotic vacuum cleaner with a hand holding a circular component (no text or symbols)6 Dust collection
The Robot will automatically return to the Auto-Empty Station to collect dust.
natural_image
Line drawing of a vacuum cleaner and a rectangular appliance (no text or symbols)2.6 Start moping
1 Add Water
Take out the 2 in 1 Module, open the Filling Opening and add water.

natural_image
Technical line drawing of a mechanical component with two views showing internal structure and directional arrows (no text or symbols)2 Install Mopping Pad and Mopping Pad Module
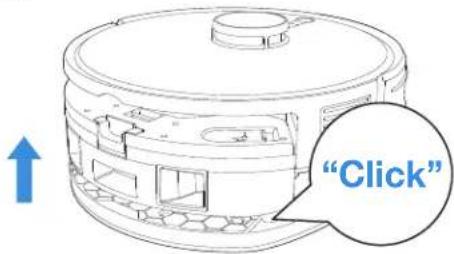
Stick the white side of the Mopping Pad onto the velcro of the Mopping Pad Plate. Insert the protruded part of the Mopping Pad Plate into the installation port. The sound of Click indicates proper installation.
EN | 42
3 Start mopping
Short press ⏻ to start mopping.

natural_image
Illustration of a hand pressing a button on a vacuum cleaner's lid (no text or symbols)Notes:
Do not frequently remove Washable Mopping Pad.
Do not use a rag or any other object to scratch the Moping Pad Plate.
Please empty the reservoir after Robot finishes mopping.
3. Maintenance
3.1 Maintenance frequency
To keep Robot running at peak performance, perform maintenance tasks and replace parts with the following frequencies:
| Part Maintenance frequency | frequency Replacement frequency | |
| Washable Mopping Pad | every time cleaning | every 1-2 months |
| Dust Bag | / | follow APP remind |
| Side Brush | every 2 weeks | every 3-6 months |
| Main Brush | every week | every 6-12 months |
| Filter | every week | every 3-6 months |
| TrueMapping Distance SensorUniversal WheelAnti-drop SensorsBumperCharging Contacts | every week | / |
| Auto-Empty Station | every week | / |
Warm note: If you want to buy accessories, please visit ECOVACS HOME App store or: https://www.ecovacs.com/global
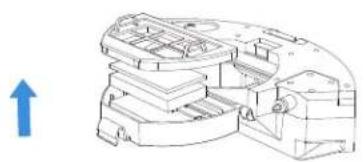
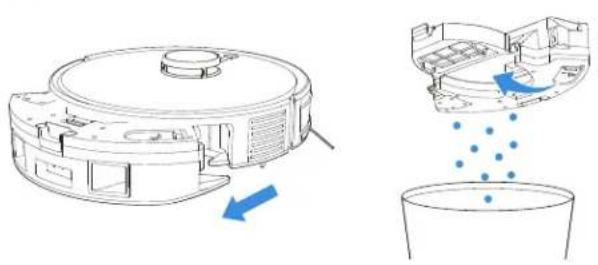
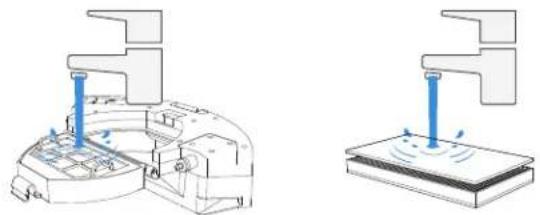
3.2 Maintain Dust Box
1
natural_image
Diagram showing a robotic vacuum cleaner and its internal structure with blue arrows indicating motion (no text or symbols)2

natural_image
Technical line drawing of a mechanical component with an upward arrow indicator (no text or symbols present)3
natural_image
Line drawing of a hand using a tool to adjust or install electronic components (no text or symbols visible)4
natural_image
Two technical diagrams showing mechanical components with blue arrows indicating motion or force, no text or symbols present.Note:
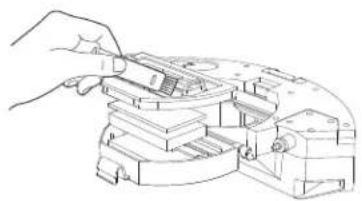
Do not use finger or brush to clean the filter.
5
natural_image
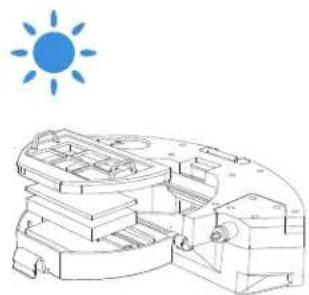
Line drawing of a mechanical assembly under a blue sun (no text or symbols)Note: Completely dry the filter before use.
Explore more accessories at ECOVACS HOME App or at
https://www.ecovacs.com/global
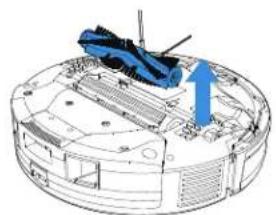
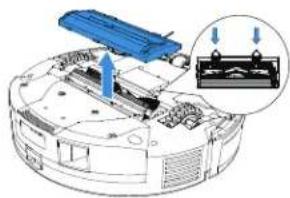
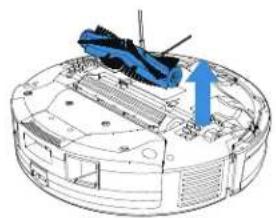
3.3 Maintain Main Brush and Side Brush Main Brush
1
natural_image
Diagram of a robotic device with highlighted internal components and an inset showing a mechanical assembly (no text or symbols present)2
natural_image
3D mechanical assembly diagram showing a blue component inserted into a housing with an arrow indicating direction (no text or symbols present)3

natural_image
Illustration of a hand holding a tool over a bundle of bread or cereal (no text or symbols present)Side Brush
1

natural_image
Technical diagram of a mechanical assembly with no visible text or symbols2

natural_image
Line drawing of a hand holding a pen or tool over a curved surface (no text or symbols)3.4 Maintain Other Parts
Bumper

natural_image
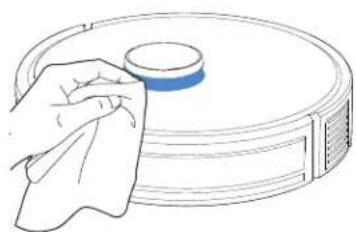
Line drawing of a hand cleaning a vacuum cleaner's lid (no text or symbols)TrueMapping Distance Sensor

natural_image
Line drawing of a hand cleaning a circular vacuum cleaner with a cloth (no text or symbols)Note: Wipe the components with a clean, dry cloth. Avoid using cleaning sprays or detergents.
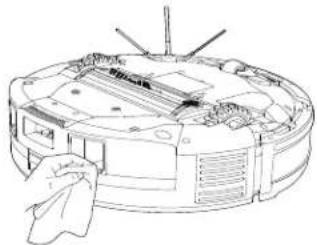
Anti-drop Sensor
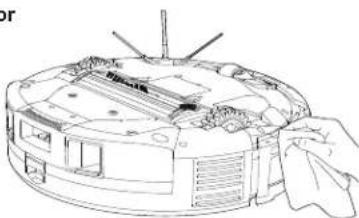
natural_image
Technical line drawing of a mechanical device with internal components and a hand holding a cloth (no text or symbols)Charging Contacts
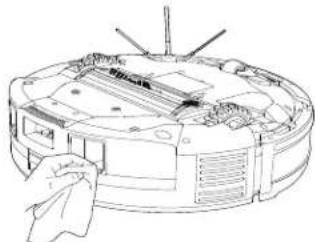
natural_image
Technical line drawing of a mechanical device with internal components and no visible text or symbolsWheels

natural_image
Technical line drawing of a mechanical device with hands operating it (no text or symbols visible)Note: Do not clean Charging Contacts with wet cloths.
3.5 Maintain Dust Bag
1

natural_image
Line drawing of a portable kitchen appliance with open lid and blue internal compartments (no text or symbols)
natural_image
Line drawing of a portable kitchen appliance with open lid and blue internal components (no text or symbols)
natural_image
Simple line drawing of a container with a lid and a small object on top, no text or symbols present.* Hold the Handle to lift out the Dust Bag, which can effectively prevent dust leakage.
2

natural_image
Line drawing of a portable kitchen appliance with open lid and side buttons (no text or symbols)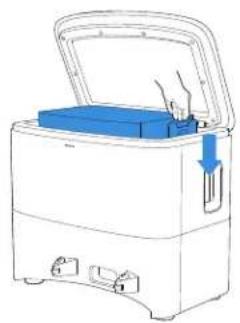
natural_image
Line drawing of a portable water heater with open lid and blue internal components (no text or symbols)3
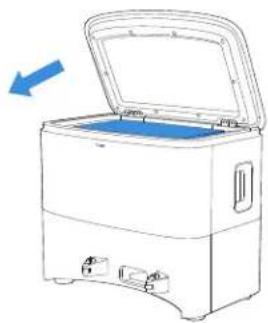
natural_image
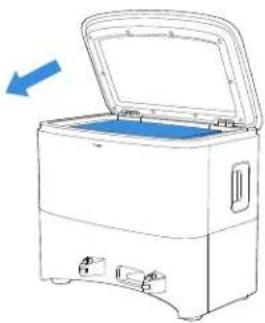
Line drawing of a portable electronic device with an open lid and blue arrow indicating compression (no text or symbols)3.6 Storage
Long press ⏻ for 5 seconds to power off the Robot. Please fully charge and switch OFF the Robot before storage. Please recharge it every 1.5 months to prevent the battery from over-discharge.

natural_image
Line drawing of a robotic vacuum cleaner with a hand inserting a power button (no text or symbols)
Robot can't be charged when the power is turned off.
* If the battery is over-discharged or not used for a long time, the Robot may not be charged. Please contact ECOVACS for help. Do not disassemble by yourself.
- Troubleshooting
| NO. | Issues Possible Causes Solutions | ||
| 1 | Robot can't connect to APP. | The router user name and password are incorrect. | Configure the router network and make sure that the "user name" and "password" of the router are correct. |
| The Robot is not within the network signal coverage of the router. | Ensure the Robot is within the network signal coverage of the router. | ||
| Robot is not in the configuration state. | Make sure Robot is connected to the power supply and turned on. Press Charging Button and Spot Cleaning Button at the same time for 3 seconds. Robot will enter the configuration state when you hear a voice prompt. | ||
| Not use 2.4GHz or 2.4/5GHz network. | The Robot doesn't support 5G network at present. Please choose 2.4GHz or 2.4/5GHz. | ||
| Download the wrong APP. | Please scan the code or download the ECOVACS HOME App in store. | ||
| 2 | Map lost. | It is possible to lose the map if move the Robot manually. | Try to recover by moving the Robot into Auto-Empty Station. Find the stored map in APP map storage, and press "use map" to recover. If this problem persists after trying the above solutions, please restart mapping. |
| 3 | Can't creat maps in APP. | The Robot doesn't start working from Auto-Empty Station. | The Robot must start cleaning from Auto-Empty Station. |
| Move the Robot when it is working. | Don't move the Robot when it is working. | ||
| Cleaning is not finished. | Allow the Robot return to Auto-Empty Station when it finishes the cleaning. | ||
| 4 | Unable to return to Auto-Empty Station. | The position of Auto-Empty Station is incorrect.Auto-Empty Station is powered off or moved by people. | Please place the Auto-Empty Station correctly according to the chapter"Charging Robot" in user manual.Please ensure the Auto-Empty Station is powered on, and don't move Auto-Empty Station. |
| The Robot doesn't start working from the the Auto-Empty Station. | It is recommended that Robot start cleaning from the Auto-Empty Station. | ||
| The charging route is blocked. For example, the door of the room with the Auto-Empty Station is closed. | Keep the charging route clear. | ||
| 5 | Robot returns to the Auto-Empty Station before it has finished cleaning. | The room is so large that Robot needs to return to recharge. | Please enable Continuous Cleaning. For more details, please follow the App instruction. |
| Robot is unable to reach certain areas blocked by furniture or barriers. | Tidy up the area to be cleaned by putting furniture and small objects in their proper place. | ||
| 6 | Robot is unable to charge. | Auto-Empty Station is not connected to power supply. | Ensure Auto-Empty Station is connected to power and the indicator is on. |
| Robot's Charging Contacts are not connected to the Auto-Empty Station Chargings Contacts. | Make sure that the Robot's Charging Contacts have connected to the Auto-Empty Stations Charging Contacts and START Button flashes.Check whether Robot's Charging Contacts and Auto-Empty Stations Charging Contacts are dirty. Please clean these parts according to the instructions in the charpt “Maintenance” section. | ||
| Battery temperature is too high or too low. | Please charge and operate the Robot in the temperature between 0-40 degree. | ||
| Extended periods of non-use may lead to over-discharge of the battery. | We recommend using the product regularly. If extended periods of non-use result in charging issues, please contact customer service for assistance. | ||
| 7 | Abnormal noise during cleaning. | Side brush and Main Brush are entangled. Dust Box and filter are blocked. | It is recommended to clean the side brush, main box, dust box, filter, etc. regularly. |
| The Robot is in max mode. Change to standard mode. | |||
| 8 | Robot gets stuck while working and stops. | Robot is tangled with something on the floor (electrical wires, curtains, carpet fringing, etc.). | Robot will try various ways to free itself. If it is unsuccessful, manually remove the obstacles and restart. |
| Robot might be stuck under furniture with an entrance of similar height. | Please set a physical barrier, or set a Virtual Boundary in the ECOVACS HOME App. | ||
| 9 | The following problems appear when Robot is working: disordered cleaning route, deviation from the cleaning route,repeated cleaning, or missing of small areas to be cleaned. (If there is a large area that has not been cleaned temporarily, Robot will automatically clean the missing area.). | The wires, slippers and other objects placed on the ground affect the normal work of the Robot. | Please tidy up the scattered objects on the ground such as wires, slippers before cleaning. If there is any area missing, Robot will clean the missing area by itself, please do not interfere (such as moving Robot or blocking the route). |
| When the Robot climbs the steps, threshold and door strip, the driving wheel slipped with the ground, which will affect Robot's judgment on the environment of the whole house. | It is recommended to close the door of the area and clean the area separately. After cleaning, it will return to the starting point. Please rest assured to use it. | ||
| Work on freshly waxed and polished floors or smooth tiles, resulting in less friction between the Driving Wheels and the floor. | It is recommended that you wait for the floor wax to dry before using. | ||
| Due to the different house environment, the Robot can not enter some areas. | It is suggested to tidy up the home environment to ensure that the Robot can enter for cleaning. | ||
| The TrueMapping Distance Sensor is dirty or covered. | Clean the TrueMapping Distance Sensor or uncover the objects on it. | ||
| 10 | The Auto-Empty Station can't collect dust when Robot returns. | Auto-Empty Station cover is open. | Close the Auto-Empty Station cover. |
| Dust Bag is uninstalled. | Install dust bag and close the Auto-Empty Station cover. | ||
| Robot is manually moved to Auto-Empty Station and Auto-Empty is not triggered. | Let the Robot returns to Auto-Empty Station automatically, don't move it manually. | ||
| If "Do Not Disturb" mode is activated in ECOVACS HOME App, Auto-Empty Station does not collect dust automatically when the Robot returns. | Cancel the "Do Not Disturb" mode in ECOVACS HOME App, or start the dust collection manually. | ||
| Auto-Empty Station detects that the dust collection efficiency is low. | Replace the dust bag according to "Maintenance" in user manual, and close the Auto-Empty Station cover. If App reminds that the dust bag is not full, reinstall it. | ||
| If the above possible reasons have been ruled out, there may be an abnormality in the components of the Auto-Empty Station. | Please contact after-sales service. | ||
| 11 | Dust Collection failed. | Auto-Empty Station detects that the dust collection efficiency is low. | Replace the dust bag according to "Maintenance" in user manual, and close Auto-Empty Station cover. If App remind that the dust bag not full, reinstall it. |
| The outlet of dust box is blocked. | Take out the 2 in 1 Module, and clean the dust box outlet. | ||
| 12 | The inner side of Auto-Empty Station is dirty. | Fine particles penetrates the dust bag and sticks on the inner side of the Auto-Empty Station. | Clean the inner side of the Auto-Empty Station. |
| The dust bag is broken. | Replace the dust bag. | ||
| Dust leakage occurs during working. | The outlet of Dust Box is blocked. | Take out the 2 in 1 Module, and clean the Dust Box outlet. 13 | |
| 14 | Robot reservoir drops out of place during use. | The reservoir is not correctly installed. Make sure ROBOT reservoir clicks into place when installing. | |
| 15 | Driving wheels are blocked. | Driving wheels are blocked by foreign objects. | Please rotate and press the driving wheels to check whether there is any foreign object wrapped or stuck. If there is any foreign object, please clean it in time. If this problem persists, please contact Customer Care for help. |
| 16 | Robot does not perform Continuous Cleaning. | The Robot is in Do Not Disturb mode. | In Do Not Disturb mode, Robot does not perform Continuous Cleaning. |
| The Robot did not automatically return to the Auto-Empty Station last time. | Continuous Cleaning is not performed when you manually recharge Robot or move it to Auto-Empty Station. | ||
| 17 | Robot does not clean automatically at the scheduled time. | Time Scheduling function is cancelled. | Reset appointment. |
| The Robot is out of power. | Charge the Robot. | ||
| The Robot is in Do Not Disturb mode. | In Do Not Disturb mode, Robot does not perform scheduled cleaning. | ||
If you cannot solve the issues by following the above instructions, please contact after-sales service.
5. TECHNICAL SPECIFICATIONS
| Model | DLX32 |
| Rated input | 20V === 1.2A |
| Charging time | 4-5 hours |
| Docking Station | CH2319 |
| Rated input | 100V ~ 50-60Hz, 6.75A (Emptying), 0.65A (Charging) |
| Rated output | 20V === 1.2A |
| Laser Lidar | 5V === 200 mA 940 nm |
Output power of the Wi-Fi module is less than 100mW.
Note: Technical and design specifications may be changed for continuous product improvement.
Explore more accessories at https://www.ecovacs.com/global.
Ecovacs Robotics Co., Ltd.
No.518 Songwei Road, Wusongjiang Industry Park, Guoxiang Street,
Wuzhong District, Suzhou, Jiangsu, China.


- 一時停止
- 起動
- スポット掃除
- ダスト 回収
- モップ掛けの開始
- モップ掛けの追加
- 注:
- その他の部品のメンテナンス
- 保管
- Important Safety Instructions IMPORTANT SAFETY INSTRUCTIONS
- READ ALL INSTRUCTIONS BEFORE USING THIS APPLIANCE SAVE THESE INSTRUCTIONS
- Device Update
- Package Contents
- Package Content
- Product Diagram
- Sensors
- Operations
- Notes Before Cleaning
- Quick Start
- Download and Connect ECOVACS HOME App
- Connect Robot with App via Wi-Fi.
- Charging Robot
- Connect the Power Cord.
- Place the Auto-Empty Station
- Power ON
- Charging
- Start Cleaning
- Create a map
- Start Cleaning
- Pause
- Wake up
- Spot Cleaning
- Dust collection
- Start moping
- Add Water
- Install Mopping Pad and Mopping Pad Module
- Start mopping
- Notes:
- Maintenance
- Maintenance frequency
- Maintain Dust Box
- Maintain Main Brush and Side Brush Main Brush
- Maintain Other Parts
- Maintain Dust Bag
- Storage
- TECHNICAL SPECIFICATIONS
Brand : ECOVACS
Model : DEEBOT Y1 Plus
Category : Vacuum Cleaner