
WHP6309BT - Headphones THOMSON - Free user manual and instructions
Find the device manual for free WHP6309BT THOMSON in PDF.
| Product type | Wireless stereo headset with charging station |
| Connection technology | Bluetooth 4.1, 2.4 GHz RF (range unspecified) |
| Battery life (listening) | Up to 8 h (minimum volume), 6 h (medium), 5 h (maximum) |
| Battery | Integrated lithium polymer, 3.7 V, 380 mAh |
| Transmitter power supply | 5 V, 550 mA via power adapter (included) |
| Full charge time | About 2-3 hours |
| Main functions | Multipoint (2 Bluetooth devices), built-in microphone for calls, volume and left/right balance adjustment, mute, pause/play, auto stop on station |
| Wired connectivity | Analog audio input (3.5 mm jack or RCA) and digital optical (Toslink) |
| Package contents | Headset, transmitter/charging station, power adapter, 3.5 mm audio cable, RCA adapter, Toslink optical cable, 2 pairs of ear pads |
| Care and cleaning | Clean with a slightly damp soft cloth; avoid harsh detergents. Clean ear pads regularly with an alcohol-free product. |
| Safety | Do not use at high volume for extended periods, do not use while driving, keep out of reach of children, do not open the product, do not expose to moisture or heat |
| Spare parts and repairability | No user-serviceable parts; contact Hama customer service for any repairs. Replaceable ear pads (2 pairs included). |
| General information | Brand Thomson, model WHP6309BT, category Headset. Manual available in multiple languages. |
Frequently Asked Questions - WHP6309BT THOMSON
User questions about WHP6309BT THOMSON
0 question about this device. Answer the ones you know or ask your own.
Ask a new question about this device
Download the instructions for your Headphones in PDF format for free! Find your manual WHP6309BT - THOMSON and take your electronic device back in hand. On this page are published all the documents necessary for the use of your device. WHP6309BT by THOMSON.
USER MANUAL WHP6309BT THOMSON
Thankyouforchoosinga T homsonproduct. Takeourtimeandreadthefollowinginstructionsandinformation completely. Please keep these instructions in a safe place for future reference. If you sell the device, please pass theseoperatinginstructionsonthenewowner.
1.ExplanationofWarningSymbolsandNotes
| Riskofelectricshock Thissymbolindicatesproductpartsenergizedwithadangerousvoltageofsufficientmagnitudetoconstitutea riskofelectricshock. |
| Warning Thissymbolisusedtoindicatesafetyinstructionsortodraw yourattentionospecific hazardssandrisks. |
| Note Thissymbolindicatesadditionalinformationor importantnotes. |
2.Overview
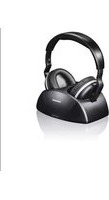
Receiver/headphones-Fig.1
- On/offswitch
2.LEDSignalindicator operation,Bluetoothstatusor batteryindicator) - Volume control (0 = lowest volume, 10 = maximum volume)
- Balance control (R = right, L = left)
Receiver/headphones-Fig.2
- Button for Play / Pause / Accept call / Hang up
6.ButtonforMicrophone/Bluetoothpairing
7.Integratedmicrophone - Headphonechargingcontacts
9.Leftsideofheadphones(grey)withballjoint - Rightsideofheadphones(red)withballjoint
Chargingstation/transmitter-Fig.3
- Transmitterchargingcontacts
12.LEDSignalindicator(operation/Bluetoothstatus)
Chargingstation/transmitterrearview-Fig.4
- Powersupplyconnection(mainsadapterwith5.5V/550mA)
14."Pair"buttonforpairing(chargingstationwithheadphones)
15."AudioIN"connectionforanalogueaudioconnection (3.5-mmstereominijack/RCA c onnectors)
16.Inputselectorswitchforaudioconnection
3.Packagecontents
- Headsetreceiverwithbuilt-inlithiumpolymerrechargeable battery
Transmitterandchargingstation
Plug-inpowersupply - Analogueaudioadaptercable(red/white)
-
2xRCA to 3.5-mmstereominijack
-
Analogueaudiocable(3.5-mmstereominijackinblueon bothends)
Opticalaudiocable(Toslink/ODT)inblack
-2 p airsofearpads
4.SafetyNotes

Warning
Thisproductwasdesignedspecificallyforpersonswith impairedhearing.Therefore,itiscapableofproducing unusuallyhighvolumes.
- Before using this product, persons with normal hearing should turn the volume of the playback device down to the lowest level!
- This device transmits signals at a frequency of 2,400 MHz. Sincethisproductmayinterfere w iththeoperationof pacemakers,personswithpacemakersshouldconsulta doctorbefore purchasingthisproduct.
Highsoundpressure I evel!
- There is a risk of hearing damage.
- Topreventhearingloss,avoidlisteningathighvolume levelsforlongperiods.
Usingthisproductlimitsyourperceptionofambientnoise. For thisreason, donotoperateanyvehiclesormachines whileusingthisproduct.
- Alwayskeep the volume at reasonable level. Loud volumes, even over short periods, can cause hearing loss.
- Protect the product from dirt, moisture and overheating, and onlyuseitina d ryenvironment.
- Donotusetheproductintheimmediatevicinityofheaters orotherheatsourcesorindirectsunlight.
-Usetheitemonlyinmoderateclimaticconditions. - Keepthisproduct,asallelectricalproducts,outofthereach ofchildren!
- Donotoperatetheproductoutsidethepowerlimitsgiven in the specifications.
- Donotusetheproductinmoistenvinronmentssandavoid splashes.
- Donotplaceanycontainersfilledwithliquid,suchasvases, ontopoftheproductorinitsimmediatevicinity. Thecontainermaytipowerandtheliquidspilledmaycompromise electricalsafety.
- Keep the packaging material out of thereach of children duetotheriskofsuffocation.
Thebatteryisintegratedandcannotremoved. - Neveropen, damageorswallowbatteriesorallowthemto entertheenvironment. They can containtoxic, environmentally unfriendly heavymetals.
- Donottamperwithordamage/heat/disassemblethebatteries/rechargeablebatteries.
The productis intended for private, non-commercialuseonly. - Use the product for its intended purpose only.
-
Children should be supervised to ensure that they do not playwiththedevic.
-
Do not use the product in areas where the use of electronic devicesisnot permitted.
- Lay all cables so that they do not pose a tripping hazard.
- Donotbendorcrushthecable.
- Donotdroptheproductanddonotexposeittoanymajorshocks.
- Disposefofpackagingmaterialimmediatelyaccordingto locallyapplicableregulations.
- Do not modify the product in any way. Doing so voids the warranty.
Riskofelectricshock

- Donotopenthedevicerecontinuetooperatietitifit becomesdamaged.
- Do not use the product if the AC adapter, adapter cable or powercableisdamaged.
- Donattempttoserviceorrepairtheproductyourself. Leaveanyandallserviceworktoqualifiedexperts.
5.Introduction
These DIGITAL WIRELESSSTETHOSETHADPHONES
operate using the latest wireless Bluetooth technology and also enable older people to enjoy clean, crystal-clear sound while watching TV and listening to music. At the same time, they provide the option of connecting a smart phone or tablet (multipoint = t wodevices can be connected with the headphone simultaneously).
Simplyconnectthetransmitterwiththedesired audio source: a DVD player, CD player, TV set, hi-fi system, smartphoneortablet.You'llbeenjoyingvivid,mind-blowing soundinminuteshroughextremelysimpleplug/pair& p I ay setup- n o c omplicatedwiringorinstallationrequired.It doesn'tmatterwhetheryouconnecttheheadphonesusingan analogueconnector(RCA or stereominijack),digital(optical) connector, or a directwirelessconnection(viaBluetooth).
6.Generalfunctioning
2.4-GHzwirelessBluetooth technology
ChargingstationwithLEDdisplay
- Productautomaticallypowersoff(whentheheadphonesare placedonthecchargingstation)whenconnecteddirectlyvia Bluetooth.
- Mute feature for speech capture with an internal microphone, or automaticswitchingtothesmartphone/tablet whenmulti-pairedandacceptinga c a l l
- Quick-chargesystem(headphonesfullychargedinapprox. 2 to 3 hours).
-Withindividualvolumecontrol
- Left/right balance adjustment
- Play/Pause and Accept button on the chinbartopause soundorswitchsmartphone/tablet
- LEDstatusindicatorforoperating/batteryindicatorandfor showingthestatusoftheBluetoothconnection/pairing
- Selectorswitchfortheanalogueordigitalconnectiontothe audiosourceonthetransmitter/chargingstation
-Earpadsintwodifferentsizesforcustomfit
- When connected to a smartphone/tablet: Battery charge indicator (depending on smartphone/tablet function)
7. Technical specifications
| Transmittingmode | wirelessBluetooth technology |
| Carrierfrequency | |
| Operatingvoltageof transmitter | 5 V, 5 50mA |
| Operatingvoltageof receiver | 3.7V,380mAhithium polymerrechargeablebattery |
| Frequencyrange | k Hz |
| Distortion | |
| Signal-to-noiseratio | dB |
| Range | |
| Talkingtime/music | Max.volume:5h Mediumvolume:6h Min.volume:8h(withfully chargedbattery) |
| Standby | |
| Bluetoothtechnology | BluetoothV4.1 |
| Bluetoothprofile | HSP,HFP,A2DP,AVRCP,SPP |
| Battery | Integratedlithiumpolymer rechargeablebattery3.7V |
| Batterycapacity | 380mA |
| Frequencyband/ frequencybands | 2,402-2,480MHz |
| Maximumemitted transmittingpower | 4 dBm |
8.Transmitterinstallation,fig.4 +5 + 6
Warning

- Only connect the product to a socket that has been approvedforthedevicethesocketmustbeinstalled closetotheproductandeasilyaccessible.
- Disconnecttheproductfromthenetworkusingthepower button-- if thisisnotavailable, unplugthepowercord fromthesocket.
- When using a multi-socket power strip, make sure that thesumpowerdrawofalltheconnecteddevicesdoesn't exceeditsmaximumthroughputrating.
-
If you will not be using the product for a long period of time, disconnect it from mainspower.
-
Connectthepowersupplytothepowersocketontherear side of the transmitter (fig. 5). To aid in finding the correct socketonthechargingstation, itiscolouredyellowtomatch. Itisconnectedtothepowersupplyina laterstep.
You now have 3 options for connecting:
A) Analogue audio connection, e.g. of a TV/hi-fi via 3.5-mm stereominijackoranRCA a daptercable
B) Optical digital connection of e.g. a TV/hi-fi/soundbar via Toslinkcable
C) Direct Bluetooth connection of a TV/hi-fi/soundbar to the stethosetheadphones
Attachcablesaccordingtothetypeofconnectionyouwishtouse.
8.1 Wiredconnectionoptions
8.1.1 Analogueaudioconnectionviastereominijacker RCA connector (fig. 4 + 6)
- Thestereominijackisofenusedtoconnecttheheadphones to a TV/hi-fi set. Simply connect one end of the stereo mini-jackcabletotheheadphoneoutputoftheTVsetandthe otherendothesocketonthetransmitter/chargingstation. Toaidinfindingthecorrectsocketonthechargingstation (labelled no. 5 in fig. 4), it is coloured blue to match.
- RCA cables are often used for external audio outputs of e.g. set-top boxes, hi-fi or TV sets to provide a direct audio signal (usually indicated by sockets coloured white andred). Connectthe stereominijackcable(blueplug)andtheRCA adaptercable(red/whiteplugs):InserttheRCA p lugsinto the corresponding audio source (e.g. hi-fi, set-top box or TV). Thecoloursindicatetherighttandleftchannels.Redalways indicatetherightchannel.Connecttheotherend(bluestereo m inijackcable)tothesocketofthetransmitter/charging station.Taaidinfindingthecorrectsocketonthecharging station, it is coloured blue to match (socket no. 5 in fig. 4).
8.1.2DigitalaudioconnectionviaToslink/ODT c able:
Connectionbydigitalopticalaudiocableprovideshehighest soundqualityofanycableconnection(withnodelaybetween theimageandthesound).Removethedustprotectorcaps frombothendsofthecable.ThenconnectoneendtotheTV/ hi-fi/soundbarandtheotherendtothetransmitter/charging station.Pleasenotethattheplugshaveguides.Toaidin findingthecorrectsocketonthechargingsation labelledno. 7 in fi g.4),itiscolouredblacktomatch. Ifusinga wiredconnectionsection8.1.1or8.1.2)tothe transmitter/chargingsation,pleasanowselectyourdesired inputsource(switchno.6 in fi g.4).
8.1.3First-timesetupofheadphoneswiththetransmitter/chargingstation
Warning

- Useonlysuitablechargingdevicesforcharging.
- As a rule, do not use charging devices that are defective anddonnottrytorepairthemyourself.
- Donotovercharge the productor allow the battery to completely discharge.
- Avoidstoring, charging or using batteries in extreme temperatures.
- When stored over a long period of time, batteries should becharged regularly (atleasteverythreemonths).
Note

DependingonyourTVset, itmaybemuted whenusingthe3.5-mmaudioheadphonejack. You may needtoadjusttheheadphoneoutput volumeintheconfigurationmenuoftheTV(for usewiththewirelessheadphonesystem, we recommendsettingtheheadphonevolume to approx.80to90percent).Thespeakervolume oftheTVusuallyremainsunaffectedbythis setting.Ifnot,itmayneedtobeadjusted.
Note

Before using the headphones for the first time, make sure that the battery is fully charged. Charge the battery for at least 3 hours before the first use. Make sure that the headphones are switched off during charging.
8.1.3.1Enabling and connecting paired devices(transmitter/chargingstationtostethosetheadphones)
Ensure that when using the headphones for the first time, they are n otconnectedtothechargingstation! Boththetransmitter/chargingstationandtheheadphones are a lreadypaired/synchronisedwhendelivered.Nowswitch the stethoset headphones ON (switch labelled no. 1 in fig. 1).TheLEDonthestethosetheadphones(fig.1,no.2)starts flashing blue slowly. Now connect the mains adapter to the mainssocket(fig.5).Thetransmitter/chargingstationfirst flashes quickly (fig.3,LED no.2). Then the flashing slows and eventuallyremainssteadilylitonctheconnectionhasbeen successfullyestablished. Before putting on the headphones for the first time, first turn thevolumedown.Nowyoucanenjoyyouranalogueaudio source(TV/hi-fiorother).
8.1.3.2Pairingthetransmitterandreceiver(charging stationandstethosetheadset)
If your transmitter and receiver arrive unpaired (with both LEDs on the charging station and thechinbar flashing), then manualpairing is required.
- To do this, first insert the network cable into the socket on the charging station (fig. 4, socket no. 3 in yellow).
Make sure that the headphones are switched off (fig. 1, switchno.1 settoOFF). - Now switch the headphones on (fig. 1, switch no. 1 set to ON).
Pressthemicrophone/pairingbutton(fig.2,buttono.6) for approx. 7 seconds. The LED begins to flash BLUE quickly.
Note

IftheLEDislitgreen, itindicatesthatyoudidnotpress the buttonforlongenough.Repeattheprocedure.
- Nowinsertthemainscableofthetransmittertothesocket of the charging station (fig. 4, socket no. 3 in yellow) and press the PAIR button (fig. 4, button no. 4) for approx. 1 second.
- Wait for a few seconds (up to 15 seconds) until the transmitterandreceiverhavebeensynchronisedandpaired. Whenpairinghassucceeded,bothLEDsremainsteadilylit inBLUE.
Nowyoucanenjoyyyouranalogueaudiosource(asdescribed insertion8.1.3.1).

Note
- Please notetethatthesystemshutoffautomaticallyifthetransmitterandheadphonesare n otpairedwithintwo minutes.
- The transmitter stoptransmittingautomatically when theheadphonesare p lacedinthe transmitter/charging stationcradle.Toreconnect,theheadphonesmust be disconnectedfromthestationandtheon/offswitch mustbeswitchedofforswitchedbackon(couplingnow proceedsautomatically).
8.2Wirelessconnectionoptions(viaBluetooth)
You h avetheoptiontoconnecttheheadphonesdirectlytoyour TV/hi-fi/soundbarorsmartphone/tabletviaBluetooth(provided yourdeviceisequippedwithBluetoothtechnology).
Onlythismethodpermitstheadditionalfeature of m akingcalls usingtheaccept/endcallfunction.
8.2.1.1Bluetoothinitialpairing

Note:Pairing
- Make sure that your Bluetooth-capable terminal device is on and Bluetoothisactivated.
- Make sure that your Bluetooth-capable terminal device is visible for other Bluetooth devices.
- For more information, please refer to the operating instructions of your terminal device.
Note:BluetoothconnectionwithTV/hi-fi/soundbarorsmartphone/tablet

-
Ensure that your device (TV/hi-fi/soundbar/smartphone orother)iscompatiblewiththeBluetoothstethoset headphones.
-
Checkwhetheryoumustcarryoutthepairringprocedure usingtheSound/AudiomenuorusingtheConnection menu.A c onnectiontootheraccessories,suchaskeyboards,isthus prevented.
-
For more information, please refer to your television's operatinginstructions.Yourterminaldevicemustalso supporttheindividualfunctions(inparticular, it must supportBluetoothprofiles).
-
Theheadphonesandtheterminaldevicesshouldbeno furtherthanonemetre a part.Theshortherthedistance, thebetter.Y ourterminaldevicemustalsupporttheindividualfunctions(inparticular,i t m ustsupportBluetooth profiles).
-
Make sure that the headphones are charged.
- First ensure that the transmitter/charging station is disconnected from the mains (fig. 4, socket no. 3 in yellow).
Make sure that the headphones are switched off (fig. 1, switchno.1 settoOFF). -
Now switch the headphones back on (fig. 1, switch no. 1 set toON).
-
Pressthemicrophone/pairingbutton(fig.2,buttonno.6) for approx. 7 seconds. The LED begins to flash BLUE quickly. The headphones are searching for a Bluetooth connection.
Note

IftheLEDislitgreen, itindicatessthatyoudidnotpress the buttonforlongenough.Repeattheprocedure.
- NowopentheBluetoothsettingsyouterterminaldevice (TV, hi-fi, smartphone or other) and search for devices until "WHP6309BT" appearsinthelist.
- Select"WHP6309BT"andwaituntiltheheadphonesare listedasconnectedintheBluetoothsettingsyouterterminal device.TheLEDontheheadphonesflashesslowlyingreen whennosounddisplayingorsteadilyinblueduringplayback.
- You can now use the headphones.
- Please remember to adjust the volume of a paired Bluetooth deviceonthedevicetheftself. Firstreducethevolumeoftheterminaldevice(e.g.TV/smartphone)toonethird of the maximumvolume(toavoidhearingdamage),andthenturn thevolumeontheheadphonesuptomaximum.
Note-Bluethoothpassword

Some terminal devices require a password in order to connecttoanotherBluetoothdevice.
If your terminal device requests a password for connection to the headphones, enter 0000.
8.2.1.2AutomaticBluetoothconnection(aftersuccessfulpairing)
Thestethosetheadphonesconnecttopreviouslypaireddevices automatically when switched on (fig. 1, switch no. 1 set to ON)
8.3 Multi-pointpairing(wiredconnectionincombinationwithwirelessBluetoothconnection)
InadditiontoconnectingthestethosetheadphonestoaTV or hi-fi with a cable, you can also connect them wirelessly. For example, this a llowsyouacceptcallsviayoursmartphone whilewatchingTV.
Note

Toenablethis,thewirelessheadphonesystemWHP6309BT mustalreadyhaveanactivewireless(Bluetooth)connection asdescribedinsection8.2toa t terminaldevice(e.g.a smartphone).
- Nowswitchoffthewirelessconnectiononthterminal device(BluetoothsettoOFFe.g.onthesmartphone).
- Disconnectthemainscablefromthesocketonthecharging station(fig.4,socketno.3 in yellow).
Make sure that the headphones are switched off (fig. 1, switchno.1 settoOFF). - Now switch the headphones on (fig. 1, switch no. 1 set to ON).
Pressthemicrophone/pairingbuttononthechinbar(fig.2, button no. 6) for approx. 7 seconds. The LED begins to flash BLUEquickly.
Note

IftheLEDislitgreen, itindicatessthatyoudidnotpress the buttonforlongenough.Repeattheprocedure.
- Nowinsertthemainscableofthetransmitterbackintothe socket of the charging station (fig. 4, socket no. 3 in yellow) andpressthePAIRbuttononce(fig.4,buttono.4).The LEDonthecchargingstationflashingquicklyinBLUE.
- Wait for a few seconds (up to 15 seconds) until the transmitter and receiver have been synchronised and paired. When pairing hassuccessed, both LEDs remain steadily lit in BLUE.
- Please not etaththesystemshutoffautomatically if the transmitter and headphones are n otpairedwithintwominutes. Now makesure t heconnectionisactivebystarting playbackontheaudiosource(TV/hi-fi).
- Next, activate Bluetooth theterminal device (e.g. smartphone Bluetooth ON) and select the previously paired Bluetooth connection "WHP6309BT".
- NowboththewiredconnectionandthewirelessBluetooth connectionare established(similarlytomulti-pairing).
- Callscanbeacceptedwhilee.g.watchingTV.
8.4Charging,fig.7
Before recharging, make sure that the headphones are switchedoff(fig.1,switchno.1 s ettoOFF).
Placetheheadphonesonthe transmitterstationandmake sure that the charging contacts are touching the charging pins. Charging begins automatically. The LED indicator flashes slowlyinGREEN(fig.1,LEDno.2)duringcharging.Whenthe batteryisfullycharged,thestatusLEDremainssteadilylitin GREEN.A fully charging process takes approx.2 hours.
Note

Topreventdamagetothet batteries,alwayssswitchoffthe headphones when they are not in use. Before using them forthefirsttime,thebatteriesshouldbfullycharged. Toguaranteeanacceptablecharge,thebatteriesshould initially be charged for 3 hours. Make sure that the stethoset headphonesare s witchedoffduringcharging.
8.5 Additional functions
8.5.1.1Usingthemicphoneandgeneralnoteson pausing (fig. 2, button no. 6) + LED (fig. 1, LED no. 2)
Thankstoanintegratedmicrophone,youhaventheoptionof havingambientsounds(e.g.thedoorbellorconversations)reproducedovertheheadphones(LEDlitGREEN)whilelistening toanaudiosource(TV/hi-fi).
Note
Pleasedetathemichrophoneisverysensitive. Becarefultoavoidhearingdamage!
PressingthePlay/Pausebuttonatanytimepausehestaudio (fig.2,buttonno.5).PleasedetaththeLEDonthehead- phonesstartsflashingslowlyinGREEN(duringplayback,it remainssteadilylitinBLUE).
8.5.1.2Usingthemicphoneforphonecalls(Bluetoothwithsmartphone/tablet,fig.2, buttonno.5) + L ED(fig.1,LEDno.2)
WithanactivewirelessBluetoothconnectiontoa smartphone ortablet,youcanpressthePlay/Pausebutton(fig.2,.button no.5)toacceptcallsandspeakthroughtemicrophone (providedthisissupportedbytheterminaldevice).Whena call comes in, the LED flashes green/blue, and during a call, it remainslitblue.Anyrunningaudiplaybackispaseduntil theconversationisended.
8.5.1.3Balancecontrol(fig.1,controlNo.4)
Using the controller, you can balance out a hearing sensitivity difference between the right and left.
8.5.1.4Noteonbatterychargelevel(stethosetheadphones)
When the battery charge level of the stethoset headphone is low, the LED (fig. 1, LED no. 2) starts flashing slowly in BLUE.
8.6Troubleshooting
8.6.1 Nosound
- Checkthatthepowersupplyplugisfullyinsertedinto themainsssocketandtheotherendproperlyconnectedtothepowersupplysocketonthetransmitter.
- Make sure that the power on/off switches on both the transmitter and the headphones are in the ON position.
Thebatteryintheheadphonesmayhaveinsufficientremainingcharge.Chargethebattery. - Check that your TV, hi-fi system or audio source is switched on and a channel is correctly configured to send an audio signal.
Theoutputvolumeoftheaudiosourcemaybetoolow. Adjustthevolumeaccordingly. - Increase the volume using the controlist headphones.
- IsthePausebuttonontheheadphonesactivated(LEDontheheadphonesflashingslowlyinGREEN)?
- The connected audio/video devicemaynotbeinplayback mode. Please start playback.
9.Care and Maintenance
Note

Disconnectthedevicefromthepowersupplybeforecleaning itorifitisnotgoingtobeseusedforalongperiodoftime.
- Only clean this product with a slightly damp, lint-free cloth anddonotuseaggressivecleaningagents.
- For hygienic reasons, clean the earpads regularly. Do not usealcohol-basedagents.
7.WarrantyDisclaimer
HamaGmbH& Co K G assumesnoliabilityandprovidesnowarrantyfordamageresultingfromimproperinstallation/ mounting,improperuseoftheproductormfromfailuroto observetheoperatingsnctionsand/orsafetynotes.
8. Service and Support
PleasecontactHamaProductConsultingifyouhaveany questionsaboutthisproduct.
Hotline:+499091502-115(German/English)
Further support information can be found here:
www.hama.com
9. Recycling Information
Noteonenvironmentalprotection:

AftertheimplementationoftheEuropeanDirective 2012/19/EUand2006/66/EUnthenationallegalsystem,thefollowingapplies:Electricandelectronic devicesaswellasbatteryismustnotbedispersed of
withhouseholdwaste. Consumers are bligedbylawtoreturn electricalandelectronicdevicesaswellasbatteryssattheend oftheirservicelivestothepubliccollectingpointsetupfor this purpose or point of sale. Details to this are defined by the nationallawoftherespectivecountry. Thissymbolonthe product, theinstructionmanualorthepackageindicateshata productissubjecttotheseregulations.Byrecycling,reusing the materialsorotherformsofutilisingolddevices/batteries,you are makinganimportantcontributiontoprotectingour environment.
10.DeclarationofConformity

Hereby, Hama GmbH & Co KG declares that the radio equipmenttype[00131991]isincompliancewith Directive2014/53/EU. The fulltextoftheEU
declarationofconformityisavailableatthefollowinginternet
address: www.hama.com->00131991->Downloads.
Ladestation/Sender-Pic.3
Receptor/auriculares- Fig.1
1.Interruptoron/off
2.Indicadordesenalled(functionamento,estadodeBluetootho ndicadordeestadodelabateria)
3.Reguladordevolumen(0=volume minimizingo,10=voluymaximo)
4. Regulador de la balanza (R = derecha/L = izquierda)
Receptor/auriculares- Fig.2
Nota-P password Bluetooth

Hotline: +499091502-115 (ty/eng)
Duhittarmersupport-informationhar:www.hama.com
(S.A.) or its affiliates used under
licensebyHAMAGmbH& CoK G in
86652Monheim/Germany
www.thomson-av-accessories.eu


WHP6309BT
00131991

- 1.ExplanationofWarningSymbolsandNotes
- 2.Overview
- Receiver/headphones-Fig.1
- Receiver/headphones-Fig.2
- Chargingstation/transmitter-Fig.3
- Chargingstation/transmitterrearview-Fig.4
- 3.Packagecontents
- 4.SafetyNotes
- Warning
- Riskofelectricshock
- 5.Introduction
- 6.Generalfunctioning
- Technical specifications
- 8.Transmitterinstallation,fig.4 +5 + 6
- Wiredconnectionoptions
- Analogueaudioconnectionviastereominijacker RCA connector (fig. 4 + 6)
- 8.1.2DigitalaudioconnectionviaToslink/ODT c able:
- 8.1.3First-timesetupofheadphoneswiththetransmitter/chargingstation
- Note
- 8.1.3.1Enabling and connecting paired devices(transmitter/chargingstationtostethosetheadphones)
- 8.1.3.2Pairingthetransmitterandreceiver(charging stationandstethosetheadset)
- 8.2Wirelessconnectionoptions(viaBluetooth)
- 8.2.1.1Bluetoothinitialpairing
- Note:Pairing
- Note:BluetoothconnectionwithTV/hi-fi/soundbarorsmartphone/tablet
- Note-Bluethoothpassword
- 8.2.1.2AutomaticBluetoothconnection(aftersuccessfulpairing)
- Multi-pointpairing(wiredconnectionincombinationwithwirelessBluetoothconnection)
- 8.4Charging,fig.7
- Additional functions
- 8.5.1.1Usingthemicphoneandgeneralnoteson pausing (fig. 2, button no. 6) + LED (fig. 1, LED no. 2)
- 8.5.1.2Usingthemicphoneforphonecalls(Bluetoothwithsmartphone/tablet,fig.2, buttonno.5) + L ED(fig.1,LEDno.2)
- 8.5.1.3Balancecontrol(fig.1,controlNo.4)
- 8.5.1.4Noteonbatterychargelevel(stethosetheadphones)
- 8.6Troubleshooting
- Nosound
- 9.Care and Maintenance
- 7.WarrantyDisclaimer
- Service and Support
- Recycling Information
- Noteonenvironmentalprotection:
- 10.DeclarationofConformity
- Ladestation/Sender-Pic.3
- Receptor/auriculares- Fig.1
- Receptor/auriculares- Fig.2
- Nota-P password Bluetooth
Brand : THOMSON
Model : WHP6309BT
Category : Headphones