TK 200 - Saw Alpha Tools - Free user manual and instructions
Find the device manual for free TK 200 Alpha Tools in PDF.
User questions about TK 200 Alpha Tools
0 question about this device. Answer the ones you know or ask your own.
Ask a new question about this device
Download the instructions for your Saw in PDF format for free! Find your manual TK 200 - Alpha Tools and take your electronic device back in hand. On this page are published all the documents necessary for the use of your device. TK 200 by Alpha Tools.
USER MANUAL TK 200 Alpha Tools
Carbide-tipped saw blade
Parallel stop
Angle stop
-Push stick
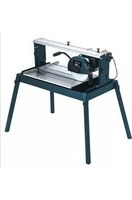
Bench-type circular saw
3. Proper use
The TK 200 bench-type circular saw is designed for the slitting and cross-cutting (only with the angle stop) of all types of timber, commensurate with the machine's size.
The machine is not to be used for cutting any type of roundwood.
The machine is to be used only for its prescribed purpose.
Any use other than that mentioned is considered to be a case of misuse. The user/operator and not the manufacturer shall be liable for any damage or injury resulting such cases of misuse. The machine is to be operated only with suitable saw blades. It is prohibited to use any type of cutting-off wheel.
To use the machine properly you must also observe the safety regulations, the assembly instructions and the operating instructions to be found in this manual. All persons who use and service the machine have to be acquainted with this manual and must be informed about its potential hazards.
It is also imperative to observe the accident prevention regulations in force in your area.
The same applies for the general rules of occupational health and safety.
The manufacturer shall not be liable for any changes made to the machine nor for any damage resulting from such changes.
Even when the machine is used as prescribed it is still impossible to eliminate certain residual risk factors. The following hazards may arise in connection with the machine's construction and design:
- Contact with the saw blade in the uncovered saw zone.
- Reaching into the running saw blade (cut injuries).
- Kick-back of workpieces and parts of workpieces due to improper handling.
Saw blade fracturing. - Catapulting of faulty carbide tips from the saw blade.
- Damage to hearing if essential ear-muffs are not worn.
Harmful emissions of wood dust when the machine is used in closed rooms.
4. Important notes
Please read this manual carefully and pay attention to the information provided. Use this manual to familiarize yourself with the machine, its correct use and safety regulations.

Safety regulations
- Important: Whenever electric tools are used it is imperative to take basic safety precautions in order to rule out risk of fire, electric shock and injury, e.g.: Follow all these instructions before and while you work with the saw.
- Keep these safety instructions in a safe place.
Always pull the plug out of the power socket before adjusting or servicing the machine. - Avoid body contact with earthed parts.
- When equipment is not being used it should be kept in a dry, closed place out of children's reach.
- You will work better and more safely if you keep your tools sharp and clean.
- Check the power cable regularly and have it replaced by an authorized specialist at the first sign of any damage.
- Check your extension cables regularly and replace them if damaged.
- When working outdoors, use only extension cables that are approved for outdoor use and which are marked accordingly.
Concentrate on what you are doing. Take a sensible attitude to your work. - Never use the tool when you are tired.
GB
- Never use a tool with a switch that cannot be turned on and off.
The use of plug-in tools and accessories other than those intended may put you at risk of injury. - Give these safety regulations to all persons who work on the machine.
-Do not use this saw to cut fire wood.
-Do not use this saw to cross-cut roundwood. - Caution! Hands and fingers may be injured on the rotating saw blade.
The machine is equipped with a safety circuit-breaker (11) to prevent it starting up again after a voltage drop.
Before you use the machine for the first time, check that the voltage marked on the rating plate is the same as your mains voltage.
-If you need to use an extension cable, make sure its conductor cross-section is big enough for the saw's power consumption. Minimum cross-section: 1mm^2
If you use a cable reel, the complete cable has to be pulled off the reel.
-Do not carry the machine by ist power cable. - Check the power cable (9). Never use a faulty or damaged power cable.
- Never remove the plug from the socket-outlet by pulling the cable. Protect the cable from heat, oil and sharp edges.
Do not leave the saw in the rain and never use it in damp or wet conditions. - Provide good lighting.
- Never saw near combustible liquids or gases.
Wear suitable work clothes! Loose garments or jewellery may become caught up in the rotating saw blade.
If you have long hair, wear a hair-net. - Avoid abnormal postures.
- Operators have to be at least 18 years of age. Trainees of at least 16 years of age are allowed to use the machine under supervision.
Do not allow other persons, particularly children, to touch the tool or the power cable. Keep them away from your workplace. - Keep children away from the machine when it is connected to the power supply.
- Keep your workplace clean of wood scrap and any unnecessary objects.
Persons working on the machine should not be distracted.
Note the direction of rotation of the motor and saw blade.
After you have switched off the motor, never slow down the saw blade (4) by applying pressure to its side. -
Fit only blades (4) which are well sharpened and have no cracks or deformations.
Use only circular saw blades (4) made of high-alloy high-speed steel (HSS).
The machine is to be operated only with tools which conform with prEN 847-1: 1966. -
Faulty saw blades (4) have to be replaced immediately.
- Never use saw blades which do not comply with the data specified in this manual.
It is imperative to make sure that all devices (2, 15) which cover the saw blade are in good working order. - Never wedge the hinged guard hood (2) in open position.
- Never dismantle the machine's safety devices (2, 5) or put them out of operation.
Damaged or faulty safety devices have to be replaced immediately.
The splitter (5) is an important safety device. Not only does it guide the workpiece, it also prevents the kerf closing behind the blade so that there is no kickback from the workpiece. Note the thickness of the splitter. The splitter should never be thinner than the saw blade body or thicker than the width of its kerf.
The guard hood (2) has to be lowered over the workpiece for each cut. - Be sure to use a push stick (3) when slitting narrow workpieces (smaller than 120mm in width).
- Never cut workpieces which are too small to hold securely in your hand.
The parallel stop has to be clamped on the right-hand side of the saw blade when cutting narrow workpieces. Important: This saw is not to be used for plunge cutting.
Always stand to the side of the saw blade when working with the saw. - Never load the machine so much that it cuts out.
Always press the workpiece firmly against the saw table (1).
Make sure that off-cuts do not catch on the saw blade crown. Risk of catapulting! - Never remove loose splinters, chips or jammed pieces of wood when the saw blade is running.
To rectify faults or remove jammed pieces of wood, always switch off the machine first. - Pull out the power plug!
If the sawing gap is worn, replace the table insert (6). - Pull out the power plug!
Conversions, adjustments, measurements and cleaning jobs are to be performed only when the motor is switched off. - Pull out the power plug!
Before you switch on the machine, check that all wrenches and adjustment tools have been removed. - When you leave your workplace, switch off the motor and pull out the power plug.
Electric installation work, repairs and maintenance are to be carried out only by specialists.
All guards and safety devices have to be refitted immediately after completion of any repairs or maintenance.
GB
It is imperative to observe the manufacturer's safety, operating and maintenance instructions as well as the dimensions quoted in the technical data.
It is imperative to observe the accident prevention regulations in force in your area as well as all other generally recognized rules of safety.
Note the information published by your professional associations (VBG 7j).
- Switch on the dust extraction system each time you use the machine.
Use the saw only with a suitable vacuum extraction system or a standard industrial vacuum cleaner in order to prevent injuries caused by flying pieces of wood.

Wear goggles

Wear ear-muffs

Wear a breathing mask
Noise emission values
The saw's noise is measured in accordance with DIN EN ISO 3744; 11/95, E DIN EN 31201; 6/93,ISO 7960 Annex A; 2/95. The noise may exceed 85dB(A) at the workplace. In this case, noise protection measures need to be introduced for the user (ear-muffs).
Cutting Idling
Sound pressure level LPA 90 dB(A) 68 dB(A)
Sound power level LWA 99 dB(A) 82 dB(A)
The quoted values are emission values and not necessarily reliable workplace values. Although there is a correlation between emission and immission levels it is impossible to draw any certain conclusions as to the need for additional precautions. Factors with a potential influence on the actual immission
level at the workplace include the duration of impact, the type of room, and other sources of noise etc., e.g. the number of machines and other neighbouring operations. Reliable workplace values may also vary from country to country. With this information the user should at least be able to make a better assessment of the dangers and risks involved."
5. Technical data
| Asynchronous motor 230 V 50 Hz | |
| Power rating 600 W | |
| Temporary operation S3 50% | |
| Idle speed n0 2800 rpm | |
| Carbide saw blade 200 x 16 x 2.8 mm | |
| Number of teeth 24 | |
| Table size 500 x 335 mm | |
| Cutting height max. 43 mm / 90° | |
| 26 mm / 45° | |
| Table tilt infinite 0 - 45° | |
| Connector for dust extractor dia. 34 mm | |
| Size, complete | 500 x 335 x 265 mm |
| Packaging | 560 x 360 x 290 mm |
| Weight | 11 kg |
6. Before putting the machine into operation
The machine has to be set up where it can stand firmly, e.g. on a work bench, or it must be bolted to a strong stand.
- All the covers and safety devices have to be properly fitted before the machine is switched on.
It must be possible for the saw blade to run freely.
- When working with wood that has been processed before, watch out for foreign bodies such as nails or screws etc.
- Before you actuate the On/Off switch, make sure that the saw blade is correctly fitted and that the machine's moving parts run smoothly.
- Before you connect the machine to the power supply, make sure the data on the rating plate is the same as that for your mains.
GB
7. Assembly
Always pull out the power plug before carrying out any maintenance or conversion work.
7.1 Fitting the saw blade (Fig. 2)
- Caution! Pull out the power plug.
- Undo the two screws (16).
Take off the chip box (21). - Undo the nut (17) with a size 19 wrench on the nut itself and a second fork wrench (size 8) on the motor shaft (a) to apply counter-pressure.
- Caution! Turn the nut in the direction of rotation of the saw blade (4).
Take off the outer flange (19) and pull the old saw blade (4) off the inner flange (20) by dropping the blade at an angle.
Clean the mounting flange (19/20).
Fit the new saw blade in reverse order. - Caution! Note the direction of rotation (see arrow on the saw blade).
7.2 Adjusting the splitter (Fig. 3)
- Undo the nut (14) from the screw (15) and remove the saw blade guard (2).
Take out the table insert after removing the 6 countersunk head screws (22). - Slacken the screws (23) in order to adjust the splitter (5).
Adjust the splitter (5) so that it forms a line with the saw blade (4) and the distance between the saw blade (4) and the splitter (5) equals 3 - 5mm .
Retighten the splitter. - Refit the table insert and the saw blade guard.
Important!
The splitter has to be adjusted each time the saw blade is changed.
7.3 Fitting the saw blade guard
- Mount the saw blade guard (2) on the splitter (5) and align.
Use the screw (15) and the nut (14) to fasten the saw blade guard (2) to the splitter (5).
7.4 Adjusting the brake (Figure 4)
You will needed to adjust the brake if the maximum braking time of 10 seconds is exceeded.
To do so, turn the screw (a) clockwise so that the brake lining (b) is pressed with greater force against the saw blade. Keep on adjusting the brake until the braking time equals approx. 5 seconds.
8. Using the saw
8.1 Switching on and off (Fig. 5)
The saw can be switched on by pressing the green pushbutton (a). Wait for the saw blade to reach its maximum speed before beginning to saw.
The red pushbutton (b) has to be pressed to switch off the saw.
8.2 Parallel stop (Fig. 6)
The parallel stop (7) has to be used when slitting wood pieces.
- Slide the parallel stop (7) to the left side of the saw table (1).
The parallel stop (7) can be set to the required dimension with the help of the scale fitted to the saw table (1).
Fix the parallel stop with the two knurled screws (12).
8.3 Adjusting the angle (Fig. 7)
- Undo the two knurled screws (24).
- Swing the saw table (1) to the right and tilt to the required angle using the scale on the angle support (a).
Retighten the two knurled screws (24). - Important: Always tighten the knurled screws securely to prevent the saw table dropping accidentally.
9. Sawing operations
After each new adjustment it is advisable to carry out a trial cut in order to check the set dimensions.
9.1 Cutting narrow workpieces (width less than 120mm Fig.8
Adjust the parallel stop (7) to the width of workpiece you require.
- Feed in the workpiece with two hands. Always use the push stick (3) in the area of the saw blade (4).
(A push stick is supplied with the saw!)
Always push the workpiece through to the end of the splitter (5). - Caution! With short workpieces, use the push stick from the beginning.
9.2 Cutting extremely narrow workpieces
(width less than 30~mm Fig.9
Adjust the parallel stop (7) to the width of workpiece you require.
- Use a push block (a) to push the workpiece until its rear end arrives in the splitter zone (5).
- Secure long workpieces against falling off at the end of the cut (e.g. with a roller stand etc.) There is no push block supplied with the saw!
9.3 Bevel cuts
Always use the parallel stop (7) when cutting bevels.
Fix the saw table in the required angle position (see 8.3).
- Move the workpiece along the parallel stop (7). In this connection see also section 9.1 or 9.2, depending on the width of the workpiece.
9.4 45^ -cuts on small workpieces (Fig. 10)
You must always use the parallel stop (7) and the angle stop (13) when making 45^ cuts.
- Mount the angle stop (13) on the parallel stop (7).
Adjust the parallel stop (7) to the required length of the workpiece and clamp securely. - Insert the workpiece in the angle stop (13).
- Switch on the saw and slide the angle stop (13) along the parallel stop (7) toward the saw blade.
- Switch off the saw when the cut is completed.
10. Maintenance
- Remove dust and dirt regularly from the machine. Cleaning is best done with compressed air or a rag.
- Never use caustic agents to clean plastic parts.
11. Ordering replacement parts
Please quote the following data when ordering replacement parts:
-Type of machine
Article number of the machine
- Identification number of the machine
Replacement part number of the part required
F
m = 311 ;
m = 311 ;
11. Bestilling at reservedele
5. TEKNIK ÖZELLIKLER
Asenkron motoru 230V 50Hz
Guc 600 W
Kisa sureli isletme S3 50%
Rolanti devri n0 2800 dev/dak
Sert metal disli testere biag1 200 x 16 x 2,8 mm
Dis adedi 24
Tezgah boyutu 500× 335mm
Kesim yuksekligi max. 43mm / 90^
26 mm / 45°
The guarantee period begins on the sales date and is valid for 3 year.
Responsibility is assumed for faulty construction or material or functional defects.
Any necessary replacement parts an necessary repair work are free of charge.
We do not assume responsibility for consequential damage.
Your customer service partner
GARANTIE
Eschemsbae 6-D-94405 Landaullisar (Germany)
32, Craven Court Winwick Quay
Warrington, Cheshire, WA2 8QU
Tel. 01925 419400, Fax 01925 419292
F V.B.P. Distribution Service Avres Vente
5, allée Joseph Cugnot, Z.I. du Phare
F-33700 Merignac
Tel. 05 56479483, Fax 05 56479525
NL Einhell Benelux
Weberstraat 3
S.C. A Ap. 9 Sector 1
RO 75 121 Bucharest
Tel. 01 4104800, Fax 01 4103568
DAT spol s.r.o
Hrubeho 3
CZ 61200 Brno
Tel. 05 49211107, Fax 05 41214831
Technical changes subject to change