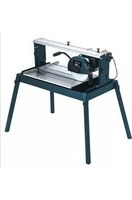
STR 250 - Saw Alpha Tools - Free user manual and instructions
Find the device manual for free STR 250 Alpha Tools in PDF.


| Product type | Electric tile cutter |
| Brand | Alpha Tools |
| Model | STR 250 |
| Motor power | 1100 W (S1) |
| Voltage / Frequency | 230 V ~ 50 Hz |
| No-load speed | 2950 rpm |
| Grinding wheel diameter | 250 mm |
| Bore | 25.4 mm |
| Table dimensions | 660 x 510 mm |
| Working height with stand | 710 mm |
| Max cutting depth at 90° | 65 mm |
| Max cutting depth at 45° | 48 mm |
| Max workpiece length (thickness ≤ 38 mm) | 620 mm |
| Max workpiece length (thickness > 38 mm) | 550 mm |
| Insulation class | B |
| Protection rating | IP54 |
| Sound pressure level (under load) | 97.2 dB(A) |
| Sound power level (under load) | 110.2 dB(A) |
| Cooling | Submersible water pump |
| Cutting angles | 90°, 45° (diagonal and longitudinal) |
| Safety | On/off switch, protective cover, automatic stop |
| Included accessories | Diamond grinding wheel, water pump, wedge stop, feet, keys |
| Maintenance | Regular cleaning, lubrication of moving parts, draining the tank |
| Warranty | 6 years (according to manual) |
Frequently Asked Questions - STR 250 Alpha Tools
User questions about STR 250 Alpha Tools
0 question about this device. Answer the ones you know or ask your own.
Ask a new question about this device
Download the instructions for your Saw in PDF format for free! Find your manual STR 250 - Alpha Tools and take your electronic device back in hand. On this page are published all the documents necessary for the use of your device. STR 250 by Alpha Tools.
USER MANUAL STR 250 Alpha Tools
natural_image
Person using a flatbed machine on a metal table, labeled with parts 1 and 3 (no text or symbols on the device itself)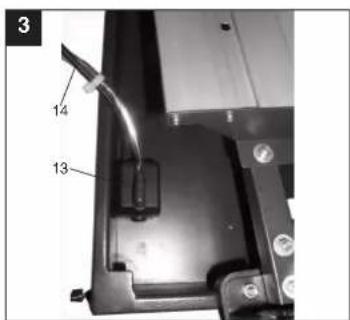
natural_image
Close-up of a hand using a pen to cut a black metal bracket with a small inset showing a circular feature (no text or symbols visible)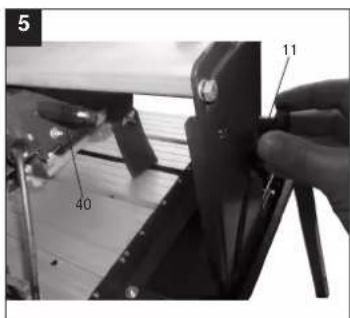
natural_image
Close-up of a mechanical component with a labeled part '16' (no readable text or symbols beyond the label)
3
natural_image
Mechanical device with labeled parts (8, 29, 9) showing internal components and mounting base (no readable text or symbols beyond labels)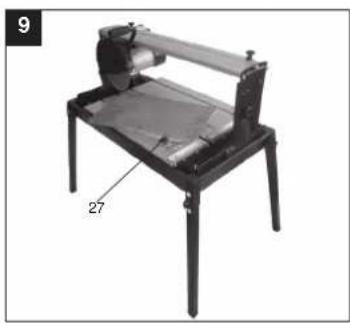
natural_image
Mechanical device with a cylindrical component mounted on a stand, labeled '27' (no visible text or symbols beyond label)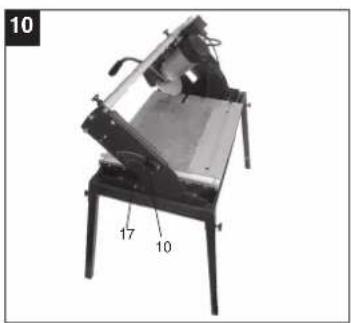
natural_image
Mechanical device with labeled parts (10, 17), no visible text or symbols beyond labels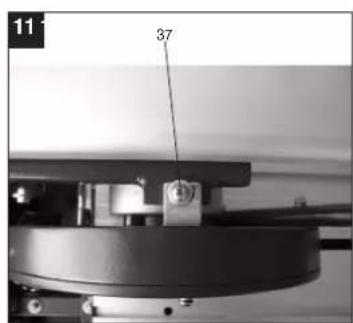
natural_image
Close-up of a mechanical assembly with a labeled component (37) and no visible text or symbols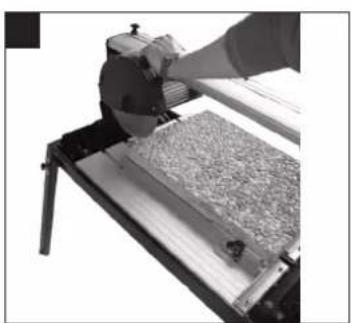
natural_image
Close-up of a hand operating a machine tool on a metal tray with a textured surface (no visible text or symbols)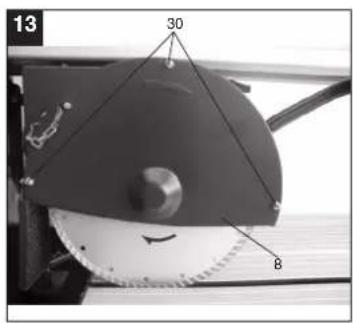

natural_image
Close-up of a hand placing a component onto a metal tray with a bucket nearby (no text or symbols visible)D


- Feet
- Diamond wheel
- Trough
- Aluminum table
- Angle stop
- Rail fence
- Chain bar
- Safety hood for the cutting wheel
- Handle
- Star grip screw for setting the angle
- Star grip screw for securing during transportation
- Thumb screws
- Cooling water pump
- Hose
- Motor
- ON/OFF switch
- Angle scale
2. Items supplied
● Stone cutting machine
● Trough (3)
● Cooling water pump (13)
● Angle stop (5)
- Feet
3. Proper use
The stone cutting machine can be used for normal cutting work on concrete slabs, cobblestones, marble and granite slabs, bricks, tiles, etc. as long as the machine is large enough to take them. It is designed for DIY applications and craft businesses. It should never be used for cutting wood or metal. The machine should be used exclusively for its
intended purpose. No other use is permitted and the manufacturer will not accept liability for any damages or injury resulting from any such use; responsibility rests with the user/operator in any such case. Only use cutting wheels which are suitable for the machine. Saw blades should never be used. Compliance with the safety instructions, the assembly instructions, and advice and instructions on operation contained in the operating instructions also falls under the terms of intended use. All persons operating or carrying out maintenance work on the machine must be acquainted with the above and be aware of all potential dangers. In addition, strict compliance with the accident prevention regulations in force in your area, as well as all other general rules of health and safety at work, is imperative. The manufacturer's liability shall be deemed void if the machine is modified in any way and the manufacturer shall therefore accept no liability for any damages arising as a result of modifications. Even if the machine is used as intended, certain residual risk factors cannot be completely eliminated. For reasons of design and the construction of the machine, the following eventualities are possible:
- Contact with the diamond cutting wheel where it is not covered.
- Contact with the diamond cutting wheel while it is turning.
● Defective diamond tips flying off the cutting wheel.
● Workpieces or parts of workpieces kicking back.
● Damage to hearing if the ear-muffs specified are not used.
4. Important instructions
4.1. General
Please read this manual carefully and pay particular attention to the instructions contained within it. Use this information to get to know the machine, its correct operation and safety regulations (see supplementary sheet) before using for the first time.
4.2. Additional safety instructions
- Set up the machine on a level, non-slip floor.
Make sure that the machine does not wobble. - Check that the voltage on the rating plate is the same as your supply voltage. Only then are you to insert the power plug in the socket-outlet.
● Wear safety goggles.
● Wear ear-muffs.
● Wear safety gloves.
● Never use cracked diamond cutting wheels.
GB
Replace immediately.
● Never use segmented cutting wheels.
- Caution! The cutting wheel runs on after the machine is switched off!
● Never apply side pressure to the diamond cutting wheel in order to bring it to a halt.
- Caution! The diamond cutting wheel must be cooled with water at all times.
● Always pull out the power plug before changing the cutting wheel.
● Use only suitable diamond cutting wheels.
● Never leave the machine unattended in rooms with children.
● Always pull out the power plug before examining the electric motor compartment system.
5. Technical data
Motor rating S1 1100 W
Motor speed 2950 rpm
AC motor 230 V \~ 50 Hz
Insulation material class Class B
Protection type IP54
Table size 660 x 510 mm
Working height with sub-frame 710 mm
Max. workpiece size up to 38 mm thick 620 mm
Max. workpiece size over 38 mm thick 550 mm
Max. workpiece thickness 90° 65 mm
Max. workpiece thickness 45° 48 mm
Diamond wheel ∅ 250 x ∅ 25.4
Noise emission levels
● The noise emitted by this saw is measured in accordance with EN ISO 3744; EN ISO 11201 The noise at the workplace may exceed 85 db (A). The user will require noise protection measures if this is the case. (Wear ear-muffs!)
With-load
No-Load
operation operation
Sound pressure level 97.2 dB(A) 76.6 dB(A)
Sound power level 110.2 dB(A) 89.6 dB(A)
6. Before using for the first time
● The machine must be set up so that it stands firmly, i.e. it must be securely screwed to a work bench, the base frame supplied in delivery, or similar.
- All covers and safety devices must be correctly attached before the machine is used for the first time.
● The cutting wheel must rotate smoothly.
- Check that the voltage on the rating plate is the same as your supply voltage before you connect the machine to the power supply.
7. Assembly and operation (Fig. 3/4/5)
7.1 Assembly of the sub-frame and cooling water pump (Fig. 2-4)
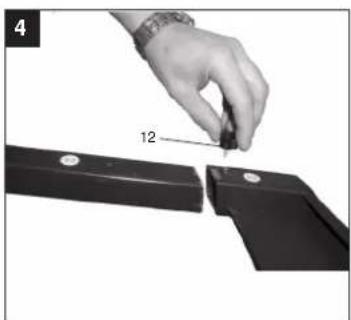
- Secure the feet (1) to the water trough using the thumb screws (12). The feet and the mountings for them are each marked with numbers.
● Turn the sub-frame upright.
● Place the complete tile cutter into the trough (3). - Place the cooling water pump (13) in a suitable position in the water trough and secure it to the base of the trough with the suction cups. The pump, cable and cooling water hose (14) must not be able to get into the cutting area.
● Fill with water until the pump (13) is completely immersed in water. - Remove the star handle screw (11) and spacer (40).
Important: Before you lift the machine out of the trough or transport it, the cutting unit must be secured again with the star handle screw (11) and spacer (40).
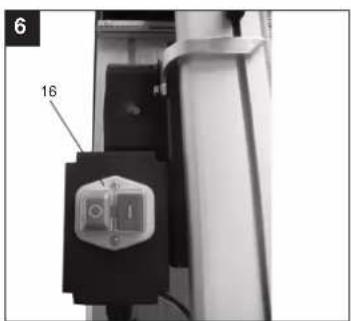
7.2 ON/OFF switch (Fig. 6)
● To switch on, press the "1" on the ON/OFF switch (16).
● Before you begin cutting, wait until the cutting wheel has reached maximum speed and the cooling water pump (13) has started supplying the cutting wheel with water.
● To switch off, press the "0" on the switch (16).
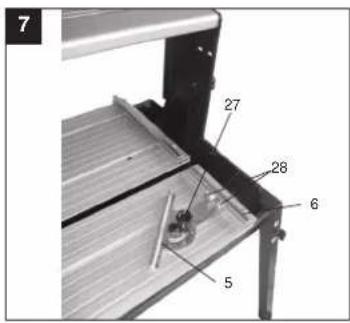
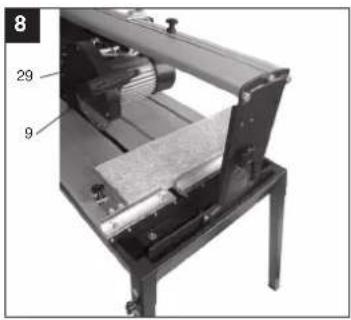
7.3 90° Cutting (Fig. 7/8)
● Loosen the star grip screw (27).
- Set the angle stop (5) to 90^ and retighten the star grip screw (27).
● Retighten the screws (28) to fasten the angle stop (5).
- Move the machine head (29) to the far end with the handle (9).
- Position the tile against the rail fence (6) on the angle stop (5).
● Switch on the tile cutting machine.
- Position the tile against the rail fence (6) and the angle stop (5).
● Switch on the machine.
● Caution: Always wait until the cooling water has reached the cutting wheel (2) first.
- Move the machine head (29) slowly and smoothly forward through the tile with the handle (9).
GB
● Switch off the tile cutting machine after completion of cutting.
7.4 45° Diagonal cut (Fig. 9)
- Set the angle stop (5) to 45°
● Cut as described in 7.3.
7.5 45° Lengthwise cut, "jolly cut" (Fig.10)
● Loosen the star grip screw (10).
● Tilt the guide rail (7) to the left to 45° on the angle scale (17).
● Retighten the star grip screw (10).
● Cut as described in 7.3.
7.6 Machining large workpieces (Fig. 11/12)
To enable you to machine large workpieces, the cutting unit can be pivoted upwards. In this position you can machine workpieces with a length of up to 620 mm (up to a max. workpiece thickness of 38 mm).
- Remove the screw (37) on the top for this purpose.
● The cutting until will pivot upwards automatically.
- You can now complete the required cuts as described in sections 7.2 to 7.5. All that is required is slight additional pressure downwards on the handle.
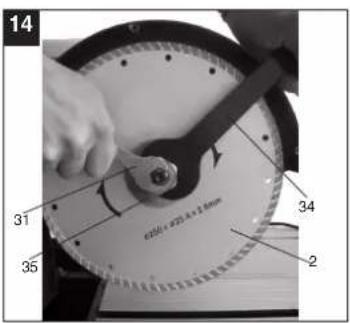
7.7 Changing the diamond cutting wheel (Fig. 13/14)
● Pull out the power plug.
● Unscrew the four screws (30) and remove the safety hood (8) for the blade.
● Place the wrench (31) on the motor shaft and hold.
- Using the wrench (34), loosen the flange nut in the direction of rotation of the cutting wheel (2). (Caution: Left-hand screw-thread.)
- Remove the outer flange (35) and cutting wheel (2).
● Clean the mounting flange thoroughly before fitting the new cutting wheel.
● Fit the new cutting wheel by following the above procedures in reverse and then tighten. Caution: Pay attention to the direction of rotat of the cutting wheel!
● Mount the safety hood (8) for the blade again.
8. Maintenance
● Clean off all dust and soiling from the machine at regular intervals, preferably with a cloth or a brush.
● Lubricate all moving parts at regular intervals.
- Do not use any aggressive cleaning agents to clean plastic parts.
● Clean off any soiling on the trough (3) and cooling agent pump (13) at regular intervals, otherwise the diamond cutting wheel (2) may not be cooled as required. To empty the trough, remove the rubber stopper (36) and drain the water into a suitable vessel (Fig. 15).
9. Ordering of replacement parts
When ordering replacement parts, please provide the following information:
● Machine type
● Article number of the machine
● Identification number of the machine
● Replacement part number of the part to be replaced
F

The image contains no text or characters.
97/23/EG
□
2000/14/EG: L_WM dB(A); L_WA dB(A)
The image contains a single, solid horizontal line, which is a stylistic or background element (like a rule line on paper). According to Rule 2, such lines must be ignored by the OCR result. Therefore, the corrected OCR text is:
[Empty]
90/396/EWG
EN 61029-1; prEN 61029-2-7; EN 12418; EN 60825-1; EN 55014-1; EN 55014-2; EN 61000-3-2; EN 61000-3-3
Landau'lsar, den 05.10.2004
Brunhölz
The product described in these instructions comes with a 5-year warranty covering delete. This 5-year warranty period begins with the passing of risk or when the customer receives the product.
For warranty claims to be accepted, the product has to receive the same maintenance and be put to the proper use as described in the operating instructions.
Your statutory rights of warranty are naturally unaffected during these 5 years.
This awards implies in Germany, or in the respective country of the manufacturer's main regional sales partner, as a supplement to local regulations. Please note the details for contacting the customer service center responsible for your region or the service address listed below.
© CERTIFICADO DE GARANTIA
E Commercial Einball, S. A
Travescio Villa Ester, 9 B
Travada Villa Elater, 5 D Delaware Industrial FINANCIAL
Polgono Industrial E No E-28119 Algate-Madrid
P. Fishbail Portugal Ltd
Ein Mio Portugal Dus. Açartado 2100
Apanado 2100 Rua da Aldeia, 325 Anapada 3100
R-4410-459 Arczela (VNO)
Tel: 122 0917500 Fax: 122 0917539
Investitions: Baugesellschaft
Christofor Stefanidi
Belinskij-102
KZ-486008 st. Chlmkent
Tel:Fax 03252 242
BO Einball Distribution SRI
Drumul Odzii 36 A
Dhrls/ Gdn
Olapeni, mbo BO:075100 Buocuosti
HO-075160 Bucureau
Tel: 021 2664302. Fax: 021 2664313
©z Poker Plus S.R.O.
Areal vu Bechovice
Budava 10 B
CZ-19011 Prahe - Bechovice 911
Tel. 02579 10204. Fax 02579 10204
RG Slow GmbH
Mihai Kolangi, 10 W
ВС 9000 Усего
Tel: 052 601653
Hill Einbell Cross
Velika Ves 2
HP-49324 Lepalcl
Tel 049 342 444. Fax 049 342 392
300 CM4-Elektromechanika d o o
Costa Anpimia Ritonca 115
COSA ANDREJA DITEN SLO 1000 Lihlllans
SLO 1000 Epubljana Tel: 01/5839204 Fax
GR An Maycolipopoulus S.A.
Technical & Commercial Company
-
Paparatou & Askliniqu Sir
-
-
-
-
-
-
-
-
-
-
-
-
-
-
-
-
-
-
-
-
-
-
-
-
-
-
- 1
-
-
-
-
-
-
-
-
-
-
-
-
-
-
-
-
-
-
-
-
-
-
-
-
-
GA 18345 FIRST Tel: 0210-1126159
⑪3 Бергия.Моссия
Altubavskne shosse 2A
BUS-127273 Moscow
Tel. 085 5401750 (ccn
Tel. 035-9003761 (Repair center Moscow)
Tel. 812 2240544 (Repair center St. Petersburg)
E Dirbila
detelo str. 23
LT-02190 Vilnius
Tel 05 2395769. Fax 05 2395770
⑧ AS Balloll
Bou ale
Haarsava valid
EE-62102 Tartu
Tel: 07 301 700 Fax: 07 301 701
Helai Trading Co. LLC
POB 9282, Nakheel Rd, Deira, Shop No. 15
UAE-Dubal
Tel 04 2279554, Fax 04 2217696
in Alborz Abzar Co. Ltd.
No. 111, Bastan Passage, Imam Khomeni Ave.
IR-11146 Teheran
Tel 021 6716072, Fax 021 6727177
③ Einball BiH d.p.o.
Poslovní Centar 96
BA-72250 Vitez
(26) Eurasia Industrial and Automotive Supply
- Besamier St
Duncenville
ZA-Vereeniging 1939
Tel 016 455 571 2. Fax 016 455 571 6
(III) Syvaz Prominvest Ltd
4207-11. Skariny av
BY-220023 Minsk
Tel 017 2642777, Fax 017 2642591
D
The printing or reproduction by any other means, in whole or in part, of documentation and papers accompanying products is permitted only with the express consent of ISC GmbH.
FIN

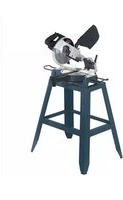
Brand : Alpha Tools
Model : STR 250
Category : Saw