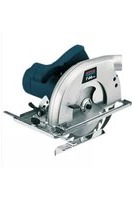
AHS 66/1 - Saw Alpha Tools - Free user manual and instructions
Find the device manual for free AHS 66/1 Alpha Tools in PDF.


User questions about AHS 66/1 Alpha Tools
0 question about this device. Answer the ones you know or ask your own.
Ask a new question about this device
Download the instructions for your Saw in PDF format for free! Find your manual AHS 66/1 - Alpha Tools and take your electronic device back in hand. On this page are published all the documents necessary for the use of your device. AHS 66/1 by Alpha Tools.
USER MANUAL AHS 66/1 Alpha Tools
Wear a mask in dusty
conditions
text_image
Technical diagram of a mechanical device with numbered components for identification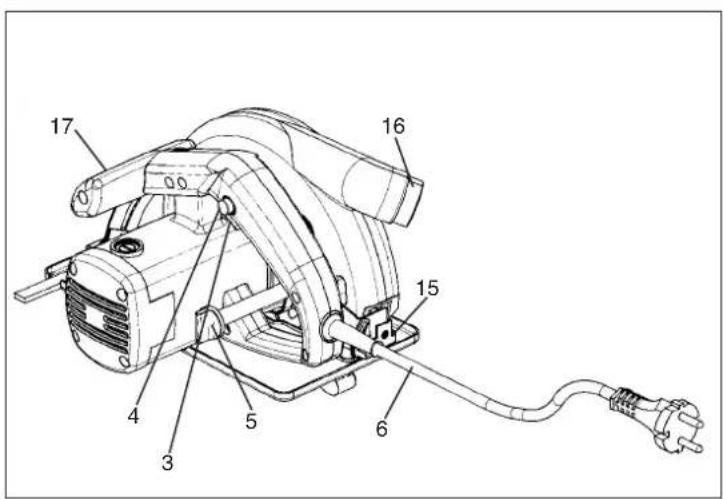
text_image
Technical diagram of an electric motor with numbered components and a power outlet, likely for assembly or maintenance instructions.3
D
Beschreibung:
text_image
Technical diagram of a mechanical device with numbered parts labeled 3, 4, and 56
GB
Description
-
Handle
-
Nameplate
-
On/Off switch
-
Interlock button for On/Off switch
-
Lock screw for the depth of cut setting
-
Power cable
-
Splitter
-
Hinged guard hood
-
Allen screw
-
Shoe
-
Flange
-
Saw blade
-
Parallel stop
-
Lock screw for the parallel stop
-
Lock screws for litre cuts
-
Dust extractor connection
-
Additional handle
-
Actuator for the hinged guard hood
Please read these instructions carefully and pay particular attention to the safety regulations. Keep the instructions together with the circular saw.
Technical data
Voltage 230 V \~ 50 Hz
Power rating 1200 W
Idle speed 4500 rpm
Cutting depth at 0° 64 mm
Cutting depth at 45" 40 mm
Saw blade 185 mm dia.
Saw blade mount 20 mm dia.
Saw blade thickness 2.4 mm
Sound pressure level LPA 95.6 dB(A)
Sound power level LWA 108,6 dB(A)
Vibration a_w 1.70 m/s²
Weight 4.2 kg
Dimensions 34 x 24 x 24 cm
Totally insulated II / ☐
Accessories supplied
Parallel stop
Applications
The hand-held circular saw is designed for sawing straight cuts in wood, in materials similar to wood, and in plastics.
Safety regulations
- Adjust the splitter so that it is no more than 5 mm from the tooth rim of the saw blade and its lowest point is not retracted more than 5 mm relative to the tooth rim.
● Do not use cracked or misshapen saw blades.
- Do not use saw blades made of high-alloy, high-speed steel (HSS).
● Never use saw blades which do not conform with the specifications quoted in these instructions.
● Make sure that all the moving parts of the blade guard work properly without jamming.
● Make sure that all devices which play a role in covering the saw blade are in proper working order.
● The splitter must be properly adjusted and used at all times except for plunge-cuts.
- Do not use the saw near fumes or combustible liquids.
● Use only sharp blades and suitable accessories.
● Always pull the plug out of the socket before converting, cleaning or adjusting the saw.
- Keep the power cable safe from damage. Oil and acid can cause damage to the cable.
● Never use saw blades with plates that are thicker or with sets that are smaller than the thickness of the splitter.
● Never remove the plug from the socket by pulling on the power cable and do not carry the saw by its cable.
● Have repairs carried out only by specialists.
- If you use a cable reel, the complete cable must be drawn off the reel. The conductor must have a minimum cross section of 1.5 ~mm^2 . Maximum fuse rating 16 A.
- Secure all workpieces sufficiently and do not overload the machine.
● Wear suitable clothing and goggles and use a dust mask on dusty jobs.
● Wear ear muffs to protect your ears!
- For lengthy jobs on wood and when cutting materials which produce a great deal of dust, the circular saw should be connected to a suitable dust extractor (observe you country's regulations regarding wood dust extraction).
GB
Working with the hand-held circular saw
● Always hold the circular saw firmly.
● The hinged guard hood will be pushed back automatically by the workpiece.
● Never apply force! Advance the circular saw gently and steadily.
● The off-cut piece should be to the right of the circular saw so that the wide part of the base plate is supported over its entire surface.
- When sawing along a marked line, guide the circular saw along the corresponding groove
- Clamp small pieces of wood securely before sawing. Never hold them in your hand.
● Always observe the safety regulations! Wear goggles!
- Do not use defective saw blades or blades with cracks or flaws.
- Do not use flanges or flange nuts with a hole which is larger or smaller than that of the saw blade used.
- Do not try to stop the saw blade with your hand or by applying pressure to the side of the blade.
● The hinged guard must not jam and must return to its original position once work is completed.
● Before plugging in the circular saw, check that the hinged guard is functioning properly.
- Before each use, always check that the safety devices - the hinged guard, splitter, flanges and adjustment devices - are functioning properly and have been adjusted and secured correctly.
- You can connect a suitable dust extractor to the guard hood. Check that the dust extractor is fitted securely and properly.
● The hinged guard hood is not to be wedged in the retracted guard hood when sawing.
Maintenance
- Keep the cooling vents on the motor housing clean and unobstructed at all times. Blow out any dust and dirt at regular intervals.
● Have a specialist workshop check the carbon brushes in the event of excessive sparking.
● Worn carbon brushes are to be replaced only by a specialist workshop or by our Customer Service Centre. - Keep the machine clean at all times.
● Never use any caustic agents to clean the plastic parts. - If ever you discover any damage, consult the exploded drawing and parts list to determine exactly which replacement parts you need to order from our Customer Service Centre.
text_image
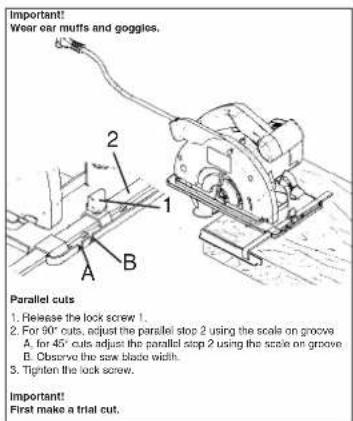
Important! Wear ear muffs and goggles. Parallel cuts 1. Release the lock screw 1. 2. For 90° cuts, adjust the parallel stop 2 using the scale on groove A. for 45° cuts adjust the parallel stop 2 using the scale on groove B. Observe the saw blade width. 3. Tighten the lock screw. Important! First make a trial cut.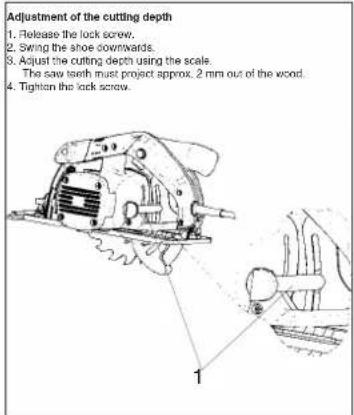
text_image
Adjustment of the cutting depth 1. Release the lock screw. 2. Swing the shoe downwards. 3. Adjust the cutting depth using the scale. The saw teeth must project approx. 2 mm out of the wood. 4. Tighten the lock screw.8
GB
text_image
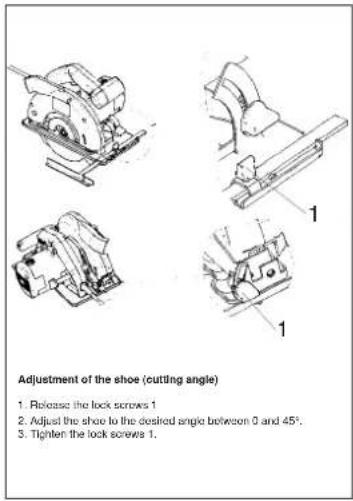
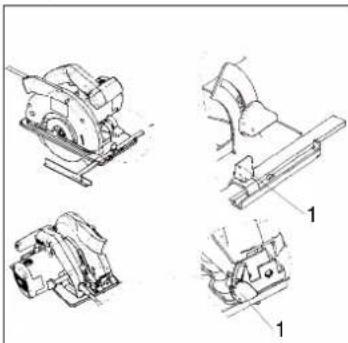
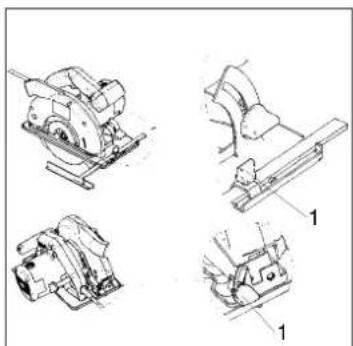
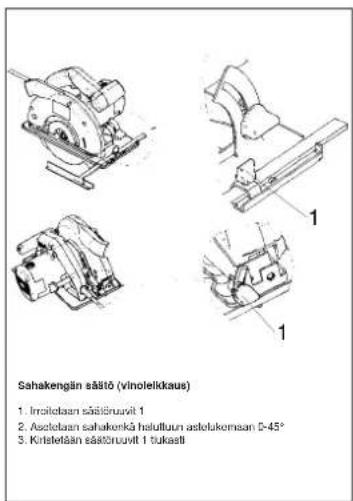
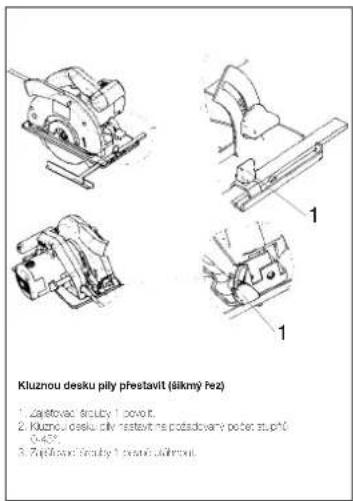
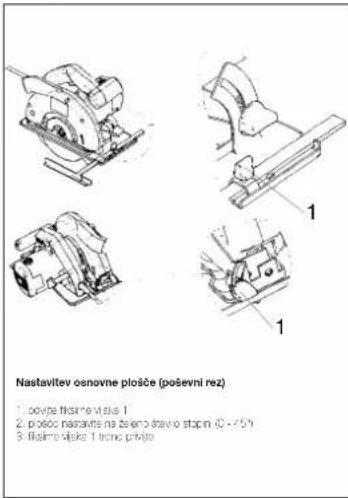
Adjustment of the shoe (cutting angle) 1. Release the lock screws 1 2. Adjust the shoe to the dosed angle between 0 and 45°. 3. Tighten the lock screws 1.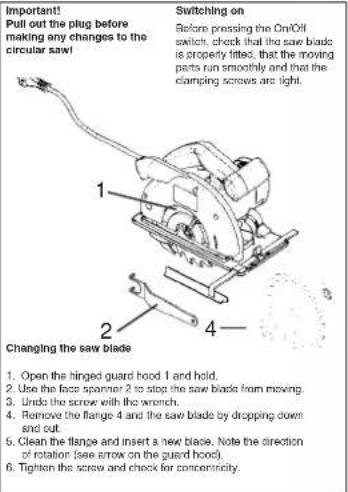
text_image
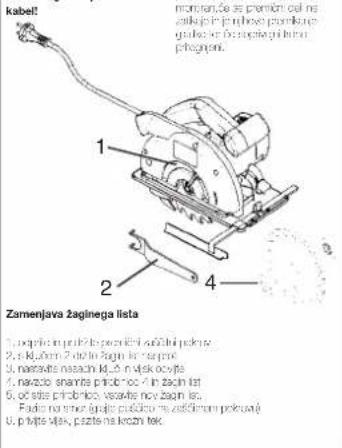
Important! Pull out the plug before making any changes to the circular saw! Switching on Before pressing the On/Oil switch, check that the saw blade is properly fitted, that the moving parts run smoothly and that the clamping screws are light. 1 2 4 Changing the saw blade 1. Open the hinged guard hood 1 and hold. 2. Use the face spanner 2 to stop the saw blade from moving. 3. Undo the screw with the wrench. 4. Remove the flange 4 and the saw blade by dropping down and out. 5. Clean the flange and insert a new blade. Note the direction of rotation (see arrow on the guard hood). 6. Tighten the screw and check for concentricity.Switching on and off
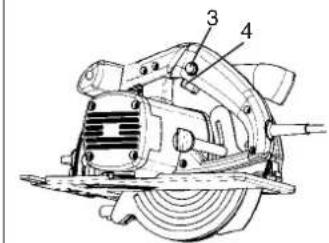
To switch on: Press the interlock button 3 and the switch 4 simultaneously. To switch off: Release the interlock button and the switch
To average \$50. Financials (the financial debt and the other)
text_image
Technical diagram of a mechanical device with numbered components labeled 3 and 4F
Description:
text_image
Technical diagram of a mechanical device with labeled parts A, B, and numbered components 1, 2natural_image
Technical line drawing of a mechanical device with a magnified inset showing a detail (no text or symbols present)F
natural_image
Technical line drawings of four different mechanical components, including a saw and flat tool, with no visible text or symbols.text_image
Technical diagram of a mechanical device with numbered parts labeled 3 and 412
Descripción
natural_image
Technical line drawing of a mechanical tool with a magnified inset showing a detail (no text or symbols present)E
natural_image
Technical line drawings of mechanical components, including a saw and clamping mechanism (no text or symbols)text_image
Technical diagram of a mechanical device with numbered components labeled 3 and 4S
Beskrivning:
text_image
Technical diagram of a mechanical device with numbered components labeled 3 and 418
FIN
Erittely:
natural_image
Technical line drawing of a manual saw cutting into a component, showing blade and handle assembly (no text or symbols)FIN
text_image
Technical diagram of a mechanical device with numbered components labeled 3 and 4DK
Beskrivelse:
text_image
Technical diagram showing mechanical assembly with labeled parts A, B, and numbered components 1, 2text_image
Technical diagram of a mechanical device with numbered parts labeled 3, 4, and 524
Popis:
natural_image
Technical line drawing of a saw cutting machine with a magnified inset showing the blade detail (no text or symbols present)26
CZ
text_image
Kluznou desku pily prestavit (sikmý pez) 1. Zastovac skluby 1 powr. 2. Kluznou desku pily prestavit na požadovany poter, suphó 0-455 3. Zyčklové skluby 1 pravná sklubová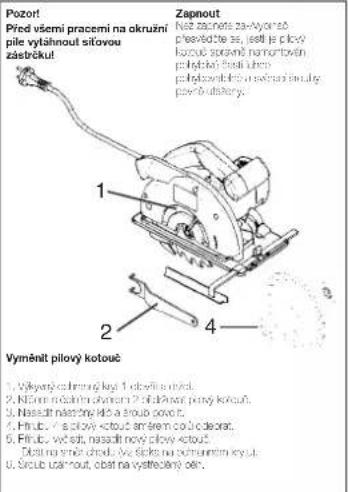
natural_image
Technical line drawing of a mechanical device with labeled parts (no text or symbols present)SLO
text_image
Nastavitev osnovne plosce (poševni rez) 1. ovojte filairne vlaske 1 2. protoc nasavite na zeleno stavno stopin (0 - 45°) 3. filairne vlaske 1 tronic prijitePozor!
Pred vsakim delom na
krožni žagi izklopite el.
Vklop
Hecien zago vlopte se prepitaje,de je lo zaje pravino manran,de se premičn cel ne zaloja je nihove praviknje građe je brasajani hinai pekognati.
text_image
kabel! momanja,3e se promčen cel ne zaklječn je prinkve promkje grakloč na koglačni klimi pikrajek. 1 2 4 Zamenjava zaginega lista 1. odpris in priklje previdni začljen pokrava 2. s klučem 2 odrin zakn te raspre 3. nabratis nasčn kluči svjak ovojte 4. navazno snarita pricko-ocn in zakn list 5. očstis prorbnko, veavle nov zakn te. Fodo na smu ovjilo podčeno ne začljenom pokrusté 6. p bita slas, pezte na kozn tec.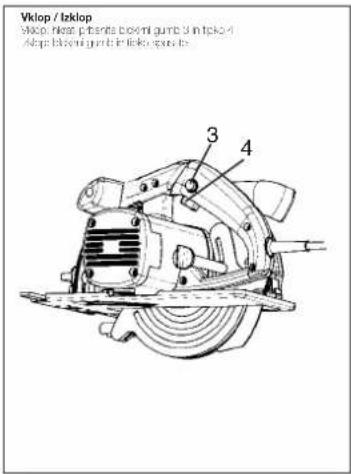
text_image
Vktop / Inklop Vktop / Next - Present Event gurne 3 in Inklop Adap - Blemg gurne in Inklop package30
Leírás:
natural_image
Technical line drawing of a mechanical device with labeled parts (no text or symbols present)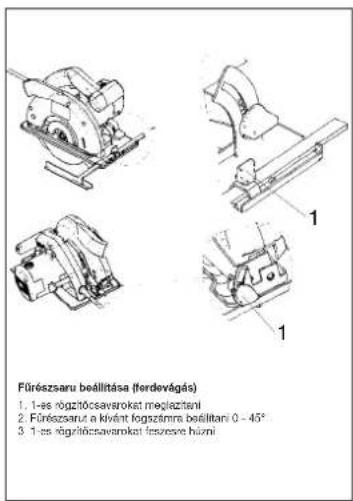
text_image
Technical diagram of a mechanical device with numbered components labeled 3 and 4HR
Opis:
-
ručka
-
označna pločica
-
prekidač
-
tipka za blokiranje prekidača
-
vijak za fiksiranje namještene dubine rezanja
-
priključni kabel
-
razdvojnik
-
preklopni zaštitni poklopac
-
imbusni vijak
-
podnožje pile
-
prirubnica
-
list pile
-
paralelni graničnik
-
vijak za fiksiranje paralelnog graničnika
-
vijci za fiksiranje za rezanje pod kutom
-
priključak za usisavanje prašine
-
dodalna ručka
-
stremen za pokretanje pokretnog zaštitnog
poklopc
Molimo da pažljivo pročitate naputak za upotrebu i da osobito uvažite sigurnosne upute. Čuvajte naputak za upotrebu zajedno s kružnom pilom.
Tehnički podaci:
Napajanje: 230 V - 50 Hz
Primljena snaga: 1200 Watt
Broj okretaja pri praznom hodu: 4500 min-1
Dubina rezanja pri 0°: 64 mm
Dubina rezanja pri 45°: 40 mm
List pile 185 mm R
Prihvat lista pile: 20 mm R
Debljina lista pile 2,4 mm
Razina tlaka zvuka LPA 95,6 dB(A)
Razina snage zvuka LWA 108,6 dB(A)
Vibracija a w 1,7 m/s2
Težina 4.2
Dimenzije 34 x 24 x 24 cm
Zaštitno izolirana
Oprema:
Paralelni graničnik
Područje primjene
Ručna kružna pila je prikladna za rezanje ravnih rezova u drvu, materijalu sličnom drvu i plastici.
Sigurnosne upute:
- Razdvojnik se mora tako namjestiti da razmak do zubaca lista pile ne bude veći od 5 mm, a njegova najdonja točka da ne bude odmaknuta od zubaca više od 5 mm.
- Napuknuti i deformirani listovi pile se ne smiju koristiti.
- Listovi plie od visokolegranog brzoreznog čelka se ne smiju koristiti.
● Listovi pile koji ne odgovaraju specifikaciji iz ovoga naputka za uporabu se ne smiju koristiti. - Treba osigurati da svi pokretni dijelovi zaštitnog
poklopca lista pile funkcioniraju bez smetnje. - Treba osigurati da sve naprave za pokrivanje lista pile funkcioniraju ispravno.
- Razdvojnik se - osim za ureze za umetanje - uvijek mora upotrebljavati i točno podešavati
- Ne koristite pilu u blizini isparivanja ili zapaljivih tekućina.
- Koristite samo oštre listove pile i prikladan pribor.
- Prije svih radova preuredjivanja, čišćenja i podešavanja izvadite utikač iz utičnice.
- Čuvajte priključni kabel od oštećenja. Ulje i kiselina mogu oštetiti kabel.
- Listovi pile tijelo kojih je deblje ili razvodjenje zubaca je manje od debljine razdvojnika, ne smiju se koristiti.
- Ne vucite kabel da biste izvadili utikač iz utičnice, ne nosite uredjaj na kablu.
- Popravke mora izvoditi stručnjak.
- Kada koristite kabelski bubanj, cijeli se kabel mora odmotati od bubnja. Presjek žice najmanje 1,5 mm². Osiguranje najviše 16 A.
- Dovoljno pričvrstite sve predmete koje želite odradjivati, a nemojte preopteretiti stroj.
- Nosite prikladnu odjeću i zaštitne naočale, a prilikom radova pri kojima nastaje prašina, koristite masku protiv prašine.
- Radi zaštite ušiju nosite zaštitnik za ušil
- Pri dužoj obradi drva ili drugog materijala pri piljenju kojega nastaje prašina, električni alat priključite na prikladnu naprave za usisavanje prašine. (U Njemačkoj su za drvene prašine propisane naprave za usisavanje prašine, ispitane po TRGS 553).
natural_image
Technical line drawing of a mechanical tool with a magnified inset showing a detail (no text or symbols present)HR
text_image
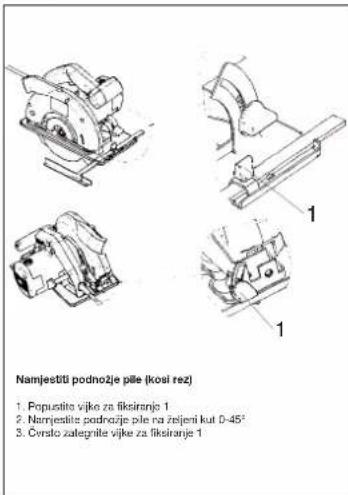
Namjestiti podnozje pile (kosi rez) 1. Popustite vijke za likiranje 1 2. Namjestite podnozje pile na željeni kut 0-45° 3. Čravlo zalegrnite vijke za likiranje 1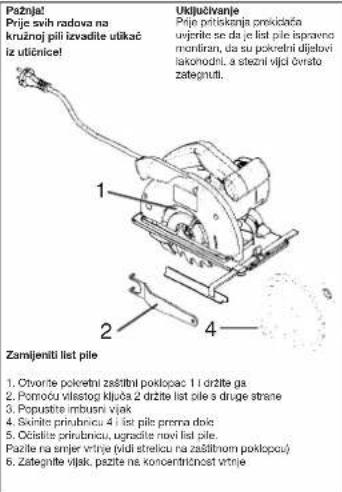
text_image
Pažnja! Prije svih radova na kružnoj pili izvadite utikać iz utičnice! Uključivanje Prije potiskanja prekiclada unjedite se da je list pile ispravno montiran, da su pokretni dijetovi lakomodni, a stezni vljci ovrato zategnuti. 1 2 4 Zamiljeniti list pile 1. Otvorte pokretni zaštlni poklopac 1 i držite ga 2. Pomocu vilstog kljoča 2 držite list pile a druge strane 3. Popustite imbursni vljak 4. Skinite prinubnicu 4 i list pile prima dojo 5. Očislite prinubnicu, ugradite novi list pile. Pazite na smjer vrjne vidi stelicu na zaštlnom poklopou 6. Zategnite vljak, pazite na koncentrinost vrtnjetext_image
Technical diagram of a mechanical device with numbered parts labeled 3 and 436
TR
Tanim:
natural_image
Technical line drawing of a mechanical device with labeled parts (no text or symbols present)38
TR
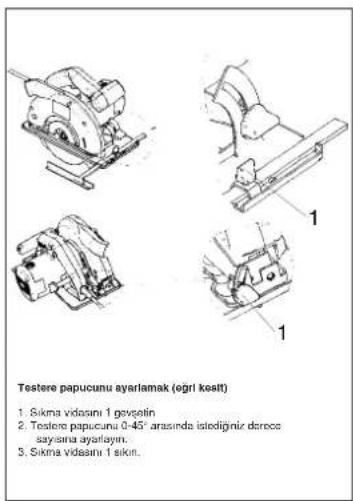
text_image
Technical diagram of a mechanical device with numbered components labeled 3, 4, and 5ISC GmbH
Eschenstraße 6
D-94405 Landau/Isar
x 73/23/EWG_93/68/EEC
R&TTED 1999/5/EG
97/23/EG
Eschenstraße 6 · D-94405 Landau/Isar (Germany)
Info-Tel. 0190-145 048 (62 CI/Min.) • Telefax 0 99 51-26 10 und 52 50
The guarantee period begins on the sales date and is valid for 5 years.
Responsibility is assumed for faulty construction or material or functional defects.
Any necessary replacement parts an necessary repair work are free of charge.
We do not assume responsibility for
consequential damage.
Your customer service partner
F GARANTIE
Technical changes subject to change
Tech 6-8 21 May 2017
Tech Real Valuation, QoQ, 10 Marles
7.10.2014 15:30, 19:30, 19:30
Eszczogá 36, vproskuzámho zimán 100mhozinyen
Les Télzmiyir variautat de la Sichanat Pachmas. Tévelity de Nisotil (40.12) bilés
YU MP Trading d.o.o.
Cika Liubina 8/IV
YU 11000 Beograd
GR An. Mayrofidonoulos S.A
Technical & Commercial company
- Papastratou & Asklipiou Str.
GR 18545 Piräus
Tel 0210 4136155. Fax 0210 4137692
Bermas
Altufyevskoye shosse, 2Λ
RUS 127273 Moscow
Tel 095 3639580. Fax 095 3639581
LH 072003