BKG 1800 UG - Saw Alpha Tools - Free user manual and instructions
Find the device manual for free BKG 1800 UG Alpha Tools in PDF.


User questions about BKG 1800 UG Alpha Tools
0 question about this device. Answer the ones you know or ask your own.
Ask a new question about this device
Download the instructions for your Saw in PDF format for free! Find your manual BKG 1800 UG - Alpha Tools and take your electronic device back in hand. On this page are published all the documents necessary for the use of your device. BKG 1800 UG by Alpha Tools.
USER MANUAL BKG 1800 UG Alpha Tools
natural_image
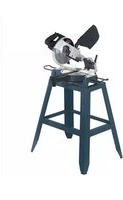
Black-and-white photo of a mechanical cutting machine on a workbench (no visible text or symbols)BKG 1800 UG

⑭ Bitte Seite 2-5 ausklappen
GB Please pull out pages 2-5
© Veuillez ouvrir les pages 2 à 5
© Por favor desdoble las
paginas de 2 a 5
⑤ Var vänlig öppna sidorna 2-5
© Käännä sivut 2-5 auki
© Fold ut 2-5
① Aprire le pagine dalle 2 alla 5
© Prosím nalistujte stranu 2-5
① Prosimo, da strani 2 - 5 razgrnete.
HR Molimo da radirite stranice 2-5
TF Lütfen sayfa 2-5'i açın
© Seite 7 - 12
GB Page 13 - 18
⑤ Page 19 - 24
E Página 25 - 30
sidan 31 - 35
Hik Sivu 36 - 40
Side 41 - 45
① Pagina 46 - 51
© Strana 52 - 56
⑤ Strani 57 - 61
® stranice 62 - 66
① Sayfa 67 - 71
text_image
Labeled diagram of a cutting machine with numbered parts for identification3
text_image
2 ③ ⑰ ⑰ ⑯ ⑬ ⑬ ⑮ ⑩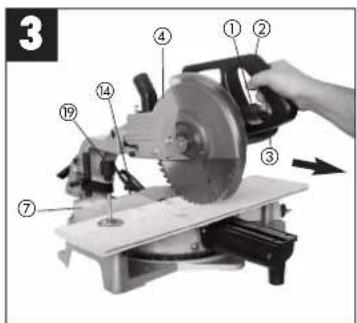
text_image
3 ①② ③ ④ ⑦ ⑬ ⑭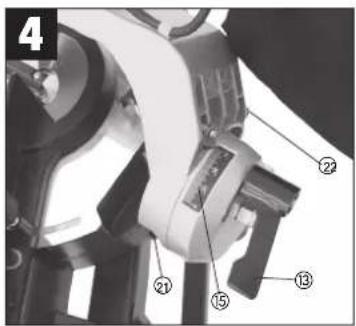
text_image
4 ② ②1 ⑮ ⑬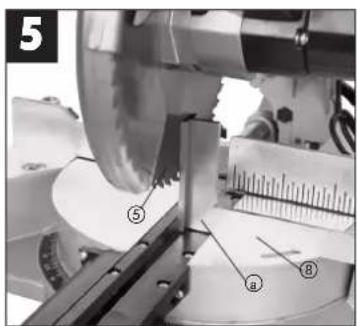
text_image
5 ⑤ ④ ⑧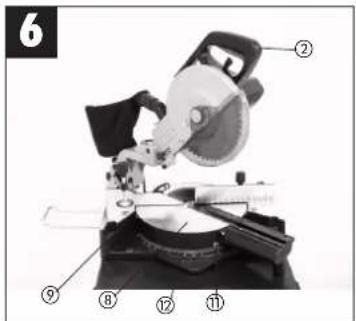
text_image
6 ② ⑨ ⑧ ⑫ ⑪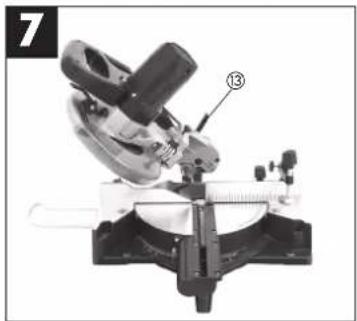
natural_image
Mechanical device with labeled component (13), no visible text or symbols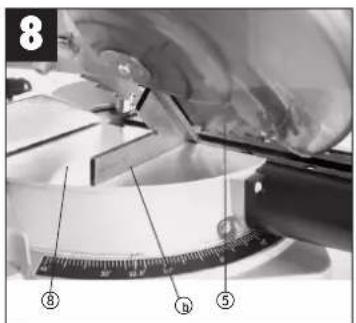
text_image
8 ⑧ ⑨ ⑤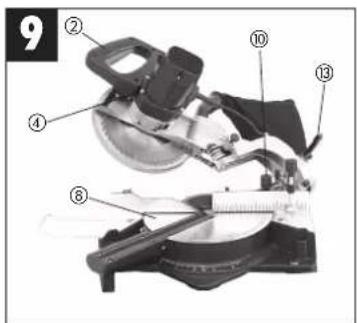
text_image
9 ② ④ ⑥ ⑩ ⑬ ⑬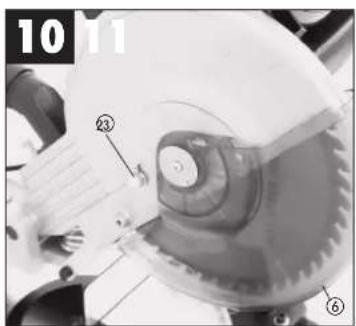
text_image
10-11 ② ⑥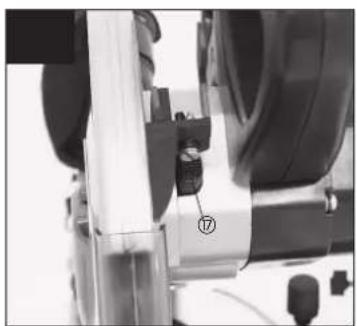
natural_image
Close-up of a mechanical component with a numbered label (17) pointing to a specific part, no readable text or symbols present.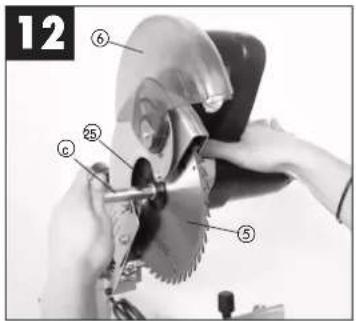
text_image
12 ⑥ ⑤ ②5 ⑥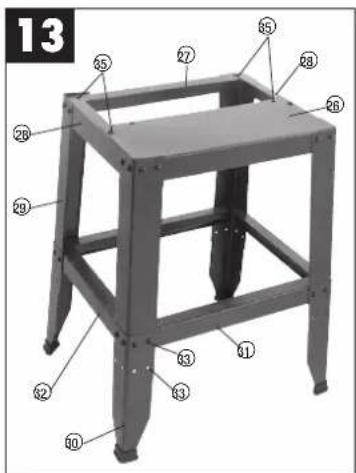
text_image
13 25 27 28 26 29 32 33 31 43 50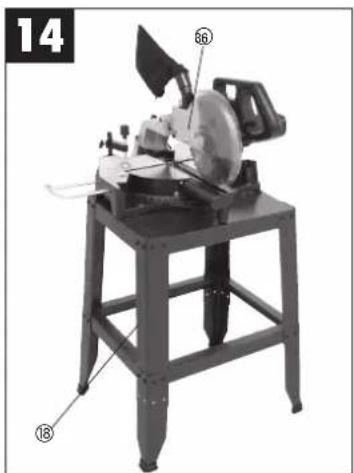
natural_image
Mechanical device with labeled parts, no visible text or symbols on the device itself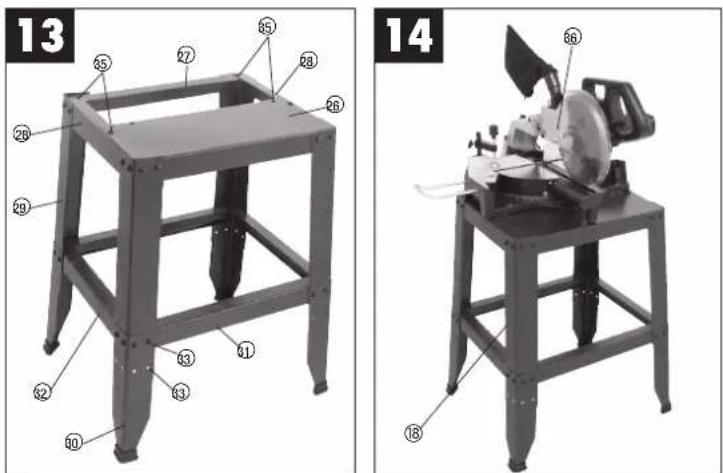
text_image
13 25 27 28 26 26 29 32 33 31 33 50 14 86 18- Release button
- Handle
- On/Off switch
- Machine head
- Saw blade
- Saw blade guard, hinged
- Stop rail
- Turntable
- Base plate, fixed
- Locking handle
- Pointer
- Dial for turntable
- Locking lever
- Thumb screw
- Scale
- Retaining pin
- Saw shaft lock
occupational health and safety.
The manufacturer shall not be liable for any changes made to the machine nor for any damage resulting from such changes.
Even when the machine is used as prescribed it is still impossible to eliminate certain residual risk factors. The following hazards may arise in
connection with the machine's construction and design:
- Contact with the saw blade in the uncovered saw zone.
● Reaching into the running saw blade (cut injuries).
● Kick-back of workpieces and parts of workpieces.
● Saw blade fracturing.
● Catapulting of faulty carbide tips from the saw blade.
● Damage to hearing if essential ear-muffs are not worn.
● Harmful emissions of wood dust when the machine is used in closed rooms.
2. Items supplied
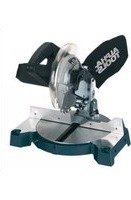
● Circular crosscut and miter box saw
● Base frame (18)
● Clamping device (19)
● Workpiece support (20)
● Carbide-tipped saw blade (4)
● Sawdust bag (24)
4. Important notes
Please read this manual carefully and pay attention to the information provided. Use this manual to familiarize yourself with the machine, its correct use and safety regulations.
3. Proper use
The circular drag, crosscut and miter box saw is designed to crosscut wood and plastic commensurate with the machine's size.
The machine is not to be used for cutting fire wood. The machine is to be used only for its prescribed purpose.
Any use other than that mentioned is considered to be a case of misuse. The user/operator and not the manufacturer shall be liable for any damage or injury resulting from such cases of misuse.
The machine is to be operated only with suitable saw blades. It is prohibited to use any type of cutting-off wheel.
To use the machine properly you must also observe the safety regulations, the assembly instructions and the operating instructions to be found in this manual. All persons who use and service the machine have to be acquainted with this manual and must be informed about its potential hazards.
It is also imperative to observe the accident prevention regulations in force in your area.
The same applies for the general rules of

Safety regulations
● Always pull the plug out of the power socket before adjusting or servicing the machine.
- Give these safety regulations to all persons who work on the machine.
● Do not use this saw to cut fire wood.
● Caution! Hands and fingers may be injured on the rotating saw blade.
● Before you use the machine for the first time, check that the voltage marked on the rating plate is the same as your mains voltage.
- If you need to use an extension cable, make sure its conductor cross-section is big enough for the saw's power consumption. Minimum cross-section: 1.5 mm ^2 .
- If you use a cable reel, the complete cable has to be pulled off the reel.
● Never carry the saw by its cable.
- Do not leave the saw in the rain and never use it in damp or wet conditions.
● Provide good lighting.
● Never saw near combustible liquids or gases.
GB
● Wear suitable work clothes! Loose garments or jewellery may become caught up in the rotating saw blade.
- Operators have to be at least 18 years of age. Trainees of at least 16 years of age are allowed to use the machine under supervision.
- Keep children away from the machine when it is connected to the power supply.
- Check the power cable (9). Never use a faulty or damaged power cable.
- Keep your workplace clean of wood scrap and any unnecessary objects.
● Persons working on the machine should not be distracted.
● Note the direction of rotation of the motor and saw blade.
● After you have switched off the motor, never slow down the saw blade by applying pressure to its side.
● Fit only blades which are well sharpened and have no cracks or deformations.
● The machine is to be operated only with tools which conform with prEN 847-1: 1996.
● Faulty saw blades have to be replaced immediately.
● Never use saw blades which do not comply with the data specified in this manual.
● Make sure that the arrow on the saw blade complies with the arrow marked on the ma
- Make certain that the saw blade does not touch the rotary table in any setting. To do so, pull out the power plug and tilt the saw blade by hand into the 45^ position and the 90^ position. If necessary, re-adjust the saw head as described in Section C/F.
- It is imperative to make sure that all the devices used to cover the saw blade are in good working order.
- Never wedge the hinged guard hood in open position.
- Never dismantle the machine's safety devices or put them out of operation.
● Damaged or faulty safety devices have to be replaced immediately.
● Never cut workpieces which are too small to hold securely in your hand.
- Do not place your hands in awkward positions where one or both may slip suddenly and touch the saw blade.
- When working with long workpieces, use an additional support (table, stand, etc.) to prevent the machine from tipping over.
● Always clamp round workpieces such as dowel rods etc. with suitable devices.
● There must be no nails or other foreign bodies in that part of the workpiece you want to cut.
● Always stand to the side of the saw blade when working with the saw.
● Never load the machine so much that it cuts out.
● Always press the workpiece firmly against the table and the stop rail to prevent it from wobbling or twisting.
● Make sure that off-cuts can be removed from the side of the saw blade. If not, they may catch on the saw blade crown and be catapulted into the surrounding area.
● Never saw several workpieces simultaneously.
● Never remove loose splinters, chips or jammed pieces of wood when the saw blade is running
● To rectify faults or remove jammed pieces of wood, always switch off the machine first. - Pull out the power plug!
- Conversions, adjustments, measurements and cleaning jobs are to be performed only when the motor is switched off. - Pull out the power plug!
● Before you switch on the machine, check that all wrenches and adjustment tools have been removed.
- When you leave your workplace, switch off the motor and pull out the power plug.
● Electric installation work, repairs and maintenance are to be carried out only by specialists.
● All guards and safety devices have to be refitted immediately after completion of any repairs or maintenance.
- It is imperative to observe the manufacturer's safety, operating and maintenance instructions as well as the dimensions quoted in the technical data.
- It is imperative to observe the accident prevention regulations in force in your area as well as all other generally recognized rules of safety.
● Note the information published by your professional associations.(VBG7j)
- Switch on the dust extraction system each time you use the machine.
● The machine may be used in closed rooms only in conjunction with a suitable vacuum extraction system.
● The circular cross-cut must be connected to a 230 V socket-outlet with a minimum 10 A fuse.
● Never use light-duty machines for heavy-duty work.
● Never use the cable for any purpose other than that for which it is intended!
- Adopt a firm standing position and keep your balance at all times.
- Check the tool for signs of damage!
● Before you carry on using the tool it is imperative to check that its safety devices and any slightly
GB
Operation Idle speed
damaged parts are working properly and in the way intended.
- Check that the moving parts work properly and do not jam or whether any of the parts are damaged. All parts must be fitted correctly and satisfy all conditions for the tool to work properly.
● Unless otherwise stated in these instructions, damaged safety devices and parts must be repaired or replaced by experts in an approved specialist workshop.
● Have damaged switches replaced by a customer service workshop.
● This tool complies with the pertinent safety regulations. Repairs are to be carried out only by qualified electricians using original replacement parts. The user may suffer an accident if this condition is not observed.
● Be careful when making vertical cuts.
● Take special care when making double miter cuts. - Do not overload the tool!
● Wear safety goggles.
● Use a breathing mask on dusty jobs. - Check the tool's power cable / extension cable for damage.

Wear goggles

Wear ear-muffs

Wear a breathing mask
Sound pressure level LPA 104.4 dB(A) 97.3 dB(A)
Sound power level LWA 111,4 dB(A) 110,3 dB(A)
"The quoted values are emission values and not necessarily reliable workplace values. Although there is a correlation between emission and immission levels it is impossible to draw any certain conclusions as to the need for additional precautions. Factors with a potential influence on the actual immission level at the workplace include the duration of impact, the type of room, and other sources of noise etc., e.g. the number of machines and other neighbouring operations. Reliable workplace values may also vary from country to country. With this information the user should at least be able to make a better assessment of the dangers and risks involved."
5. Technical data
Asynchronous motor 230 V \~ 50 Hz
Output 1800 W
Operating mode S1
Idle speed n_0
5000 min
Carbide-tipped saw blade ∅ 250 x ∅ 30 x 3.2 mm
Number of teeth 36
Tilting range -45° / 0° / +45°
Mitre cuts 0° to 45° to the left
Saw bed support 500 x 160 mm
Sawing width at 90° 305 x 82 mm
Sawing width at 45° 210 x 82 mm
Sawing width at 2 x 45"
(double mitre cuts) 210 x 39 mm
Noise emission values
- The saw's noise is measured in accordance with DIN EN ISO 3744; 11/95, E Din EN 31201; 6/93, ISO 7960 Annex A; 2/95. The machine may exceed 85 dB(A) at the workplace. In this case, noise protection measures need to be introduced for the user (ear-muffs).
6. Before putting the machine into operation
● The machine has to be set up where it can stand firmly, e.g. bolt it to a work bench, a universal base or similar.
● All the covers and safety devices have to be properly fitted before the machine is switched on.
● It must be possible for the saw blade to run
GB
freely.
- When working with wood that has been processed before, watch out for foreign bodies such as nails or screws etc.
- Before you actuate the On/Off switch, make sure that the saw blade is correctly fitted and that the machine's moving parts run smoothly.
● Before you connect the machine to the power supply, make sure the data on the rating plate is the same as that for your mains.
7. Assembly
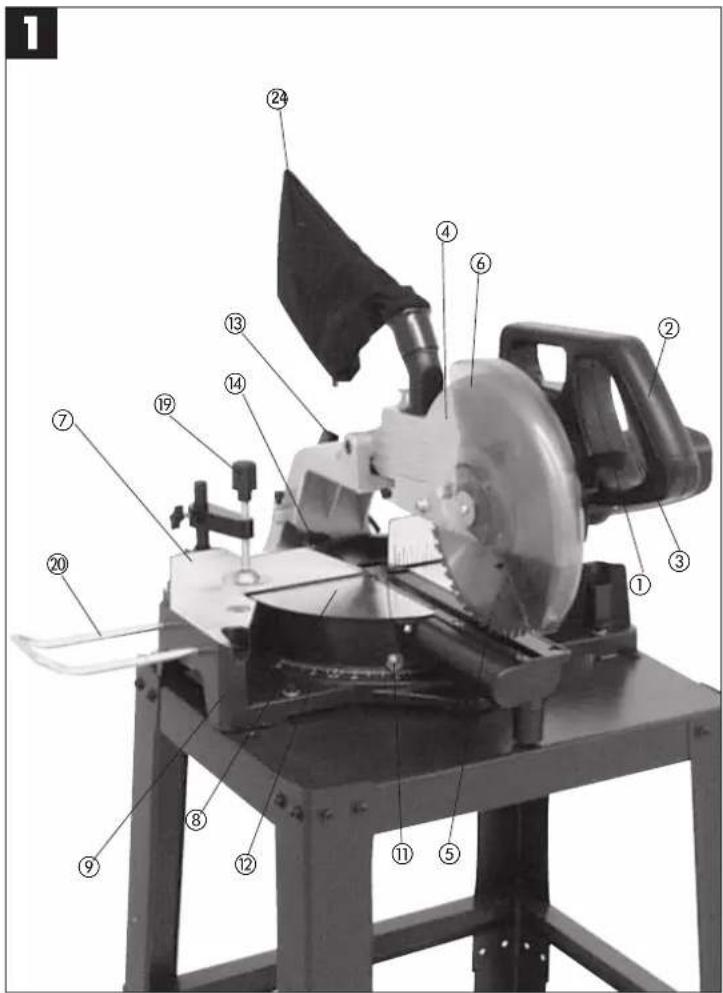
7.1 Setting up the saw unit (Fig. 1/2)
● To adjust the turntable (8), loosen the locking handle (10) by approx. 2 turns, which frees the turntable (8).
● Turn the turntable (8) and scale pointer (11) to the desired angular setting on the dial (12) and lock into place with the locking handle (10).
● Lightly press the machine head (4) down while at the same time pulling the retaining pin (16) out from the motor mounting; this causes the saw to move down to the lower working position.
● Swing the machine head (4) up until the retaining hook latches into place.
● The clamping device (19) and the workpiece support (20) can be fastened on both the right and left sides of the base plate (9).
- By loosening the tightening screw (13), the machine head (4) can be angled to the left up to 45".
7.2 Making 90° crosscuts with turntable at 0° (Fig. 3)
When cutting at widths of up to 170 mm, the drag function of the saw can be affixed to the back position (14) with the thumb screw. If the cutting width exceeds 170 mm, you must ensure that the thumb screw (14) is slackened and that the machine head (14) is able to be moved.
● Bring the machine head (4) to its upper position.
- Push the machine head (4) back by its handle (2) and affix in this position if necessary (depending on the cutting width).
● Place the piece of wood to be cut against the stop rail (7) and on the tumtable (8).
- Secure the workpiece in position with the clamping device (19) on the base plate (9) to prevent the workpiece from moving during the cutting process.
● Turn the release lever (1) to the right to release the machine head (4).
- Press the ON/OFF switch (3) to start the motor.
With steady and light downward pressure on the handle (2), cut through the workpiece.
● After the cutting process is finished, bring the machine head back to its upper (home) position and release the ON/OFF button (3). Caution! The resetting springs in the machine automatically raise the machine head. Do not simply let go of the handle (2) after cutting, but allow the machine head to slowly lift up by applying slight counterpressure.
7.3 90° cross-cuts and 0° rotary table (Fig. 1/2)
- Press the main switch (3) to turn on the saw.
- Important! The material to be sawn must be placed flat on the machining table to that it cannot slip during cutting.
● After switching on the saw, wait for the blade (5) to reach its maximum speed.
● Turn the release button (1) clockwise and, holding the handle (2), lower the machine head smoothly down through the workpiece applying slight pressure. - When the cut is completed, return the machine to its top parking position and let go of the On/Off switch. Caution! A return spring causes the machine head to rise automatically at the end of the cut. Do not let go of the handle (2) as soon as the cut is completed but steady the machine head and allow it to rise slowly.
7.4 Making 90° crosscuts with turntable at 0° - 45° (Fig. 6)
With the BKG 1800 UG your can make right and left angular cuts from 0^ - 45^ to the stop rail.
- Use the handle (2) to set the turntable (8) to the desired angle i.e. the scale pointer (11) on the turntable must coincide with the desired angular setting (12) on the stationary base plate (9).
● Re-tighten the locking handle (10) to lock the turntable (8) into place.
● Cut as described under section 7.2.
7.5 90° cross-cuts and 0°-45° rotary table (Fig.6)
The BKG 1800 UG can be used to make angled cuts of 0^-45^ relative to the stop rail on the left and right side.
● Release the turntable (8) by loosening the locking grip (10).
● Turn the rotary table (8) by its handle (2) to the angle you want, i.e. the mark (a) on the rotary table has to comply with the required angle dimension (17) on the base plate (9).
● Re-tighten the locking handle (10) in order to fix
the rotary table (8) in position.
● Make the cut as described in Section C.).
7.6 Mitre cuts 0°-45° and rotary table 0° (Fig. 6/9)
The BKG 1800 UG can be used to make mitre cuts of 0^-45^ relative to the machine bed on the left side.
● Lift the machine head (4) to its top position.
● Fix the rotary table (8) in 0° position.
- Undo the locking nut (12) and, holding the handle (2), tilt the machine head (4) to the left until the
pointer (11) coincides with the required angle dimension (15).
● Re-tighten the locking nut (12) and make the cut as described in Section C.).
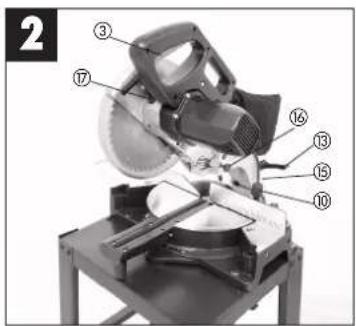
7.7 Precision adjustment of the stop for 45° mitre cuts (Fig. 2/10)
● Lower the machine head (4) and fix with the lock pin (16).
● Fix the rotary table (8) in 0° position.
- Undo the locking nut (12) and, holding the handle (2), tilt the machine head (4) to the left by 45"
- Place the 45^ stop angle (A) between the saw blade (5) and the rotary table (8).
- Slacken the counter nut (30) and adjust the setting screw (18) until the angle between the saw (5) and the rotary table (8) equals exactly 45^ .
7.8 Mitre cuts 0°-45° and rotary table 0°-47° (Fig. 11)
The BKG 1800 can be used to make mitre cuts on the left at an angle of 0^ - 45^ relative to the work top and 0^ - 47^ relative to the stop rail.
● Lift the machine head (4) to its top position.
- Release the turntable (8) by loosening the locking grip (10).
- Adjust the rotary table (8) by its handle (2) to the required angle (see also Section D).
● Re-tighten the locking handle (10) to fix the rotary table in position.
- Undo the clamping nut (12) and, holding the handle (2), tilt the machine head (4) to the left to the required angle dimension (see also Section F).
● Re-tighten the clamping nut (12).
7.8 Chip extraction (Fig. 2)
The saw is equipped with a chip collection bag (14). The chip bag (14) can be emptied by opening the zip fastener at the bottom.
7.9 Changing the saw blade (Fig. 4/12)
● Pull out the mains plug.
● Swing up the machine head (4).
- Slacken the hexagon bolt (23) and flip up the movable saw blade guard (6).
- Press the saw shaft lock (31) with one hand while holding the wrench (c) on the flange bolt (25) with the other.
- Press hard on the saw shaft lock (17) and slowly turn the flange bolt (25) in the clockwise direction. The saw shaft lock engages after no more than one rotation.
● Now, using a little more force, undo the flange bolt (25) by turning in the clockwise direction.
● Turn the flange bolt (25) until it is completely removed.
● Take the saw blade (5) off of the inner flange and pull out.
- Mount and fasten the new saw blade in reverse order. Caution! The cutting angle of the teeth (i.e. the direction of rotation of the saw blade) must coincide with the direction of the arrow on the housing.
● The saw blade flanges must be thoroughly cleaned prior to mounting the saw blade.
● Reattach the movable saw blade guard (6) in reverse order.
● Make sure that the saw shaft lock (17) is disengaged.
- Check to make sure that all safety devices are properly mounted and in good working condition before you begin working with the saw again.
- Caution! Every time that you change the saw blade, check to ensure that it spins freely in the groove of the turntable in both perpendicular and 45° angle settings.
8. Assembling the base frame (Fig. 13/14)
● Place the tray plate (26) and the long (27) and short (28) brackets on a piece of matting.
● Screw the four main leg sections (29) together with the tray plate and the brackets (26 - 28).
- Then screw the extension legs (30) together with the center struts (31/32) and the main leg sections (29). (The center struts (31/32) are fastened to the main leg sections (29) from the inside, whereas the extension legs (30) are fastened to the main leg sections (29) from the outside.)
● The extension legs (30) contain two rows of drill holes (33/34) for various work heights.
● Turn the base frame (18) around, place the saw
GB
unit (36) on the base frame, then connect the saw to the four mounting holes (35) on the frame using the bolts provided.
9. Maintenance
- Keep the machine's air vents unclogged and clean at all times.
- Remove dust and dirt regularly from the machine. Cleaning is best done with compressed air or a rag.
● Re-lubricate all moving parts in regular intervals.
● Never use caustic agents to clean plastic parts.
10. Ordering replacement parts
Please quote the following data when ordering
replacement parts:
● Type of machine
● Article number of the machine
● Identification number of the machine
● Replacement part number of the part required
F
1. Description de la machine (fig. 1)
vacklar eller vrids.
• In a form of the year, we can be satisfied with
■ Postovani zlachu ar
斗chu.
- Zichai 63
which be the most important.
● Postarate se a detrie avallion.
● Nožlo v Blakes: hollavych kapain a plenů.
The undersigned declares in the name of the company that the product is in compliance with the following guidelines and standards.
The product described in these instructions comes with a 5 year warranty revenue reserve. That 5 year warranty will be able to pay the average of risk as
(2) Using (1) and (2). This product is mainly priced together with the price of 10% of which the customer receives the product.
For warranty claims to be accepted, the product has to receive the correct maintenance and other liabilities to be provided in the operation.
maintenance and be put to the proper use as described in the operating instructions.
Your statutory rights of warranty are naturally unaffected during these 5
This warranty applies in Germany, or in the respective country of the
regulations. Please note the details for contacting the customer service center
responsible for your region or the service address listed below:
E CERTIFICADO DE GARANTIA
The spring or yesterday are one more, involved in the all of the construction and works overpaying projects. The first only will be open to an, of 125 Cents.
(7)
A compression of products in the U.S. market is a strong advantage for products including organic oils, also as well as the natural products in the U.S. GmbH.
①
A trapez e frutary intere ocho, avan sottal, con no mace de 6 del mace e compaquency or pocr concerto aio con la pata su roter aio de para de la 120. Sorai.
①
Fridy-lesse man con la nargio appara al ringi renar a soggero, inosera, sononator pratae, cunber en 1200000000000000000000000000000000000000000000000
⑤
Tuchler, so that was able to just alter make the men in a way van zollarsen upend la reductant van Arment of sul du inserden de l'année de 2016.
(III)
fiunan, neerwajyutur rezaman, and a den kapalaraan ve, taşkis mädecejahna, pahua 120 CmH truve r. deli vau. Narmak evi da nortere
102
Babie nebo (ink normedical) sika na vace a pristodin dung na vace, (light peaun vate) (pristodine vace) in sichment. Try the sense.
19.6
Peralu a druge vila noredovenje do anerdoje in spertojek dikas van pravodn pravodna lali e volatni je conoijvo sana e mora in vopajen fama blo kava.
①C
Inserdene bilanzi, i koll'na amodwaje di empiolo je i pristvo pop wach provoole, se il sioni bno kostane, maqale je aeno la mila poplatenja inka DC GmbH
Technische Änderungen vorbehalten
Technical changes subject to change
- Sous réserve de modifications
- Technische wijzigingen voorbehouden
∞ Salvo modificaciones técnicas
② Salvaquardem-se alterações técnicas
② Förbehåll för tekniska förändringer
- Okeus teknisin muutoksiin pidätetään
Der tages forpehold för tekniske engringer
④ Tekniske endringer forbeholdes
① Con riserva di apportare modifiche tecniche
06 Technikai változások jogát fenntarva
© Technické zmény wynszeny
⑤ Tehnične spremembe prioržane.
© Zadržavamo pravo na tehnične izmjene.
Technické změny výhradené
- Zastrzega się wprowadzanie zmian technicznych
Se rezerva dreptu la modificari tecnica
© Сохраняется право на технические изменения
И- Запазва се правото за технически промени
© Καταπενοστης διατρεί το δυακμα
техники оллауров
09 Teknik değişiklikler olabilir
D ISC GmbH
Eschenstraße 6
D-94405 Landau/Isar
Tel. (0180) 5 120 509 (12 Cl/min), Fax (0180) 5 635 630 (12 Cl/min)
E Commercial Einhell, S.A
Travegia Villa Ester. 9 B
Poligono Industrial El Nopal
E-28119 Algete-Madrid
P Einhell Portugal Lda
Apartado 2100
Sc. A. AP 9 Sector 1
RO-75121 Bucures
Tel. 021 4104800. Fax 021 4103568
CZ Poker Plus SBO
Areal yu Bochavico
Burlanca 15 B
CZ-19011 Prahe - Bechovice 911
BG Slav GmbH
HN Einball Creatic d.o.o.
Linnei Credit Volga Vor 2
HR-49224 Lenolol
Tel. 049 342 444. Fax 049 342 392
⑧.0 GMA-Elektromech
Casta Andreia Biterca 115
SLO 1000 Ljubilena
Tel 01/5838304 Fax 01/5183603
GR An. Mavodionouise S.A.
Technical & Commercial Company
-
Banartmou & Arkliniou Sra
-
Papisaio mod 8 GB 19545 Pirchus
Tel. 0210 4136155 Fax 0210 4137692
⑯
Altufogurkon sbasse, 24
(Off) Halai Trading Co. LLC
POB 9262, Nakheel Rd, Delra. Shop No. 15
UAE-Dubal
Tel. 04 2279554, Fax 04 2217086
in Alborz Abzar Co. Ltd.
No. 111, Bastan Passage, Imam Khomeni Ave.
IR-11146 Teheran
Tel 021 6716072 Fax 021 6727177
Einhell BiH d.o.o
Poslovni Centar 96
BA-72250 Vitez
② Eurasia Industrial and Automotive Supply
Bessemer Str
Duraville
ZA-Vereigning 1930
Tel 16 455 571 2 Fax 16 455 571 6
EH 07/2004