HDS 9204 Classic - Pressure washer Kärcher - Free user manual and instructions
Find the device manual for free HDS 9204 Classic Kärcher in PDF.
User questions about HDS 9204 Classic Kärcher
0 question about this device. Answer the ones you know or ask your own.
Ask a new question about this device
Download the instructions for your Pressure washer in PDF format for free! Find your manual HDS 9204 Classic - Kärcher and take your electronic device back in hand. On this page are published all the documents necessary for the use of your device. HDS 9204 Classic by Kärcher.
USER MANUAL HDS 9204 Classic Kärcher
natural_image
Technical line drawing of a portable industrial machine with visible internal components and wheels (no text or symbols)Deutsch 4
English 12
Français 20
Italiano 28
Nederlands 36
Español 44
Português 52
Dansk 60
Norsk 68
Svenska 76
Suomi 84
Ελληνικά 92
Türkçe 100
Русский 108
Magyar 117
Čeština 125
Slovenščina 133
Polski 141
Românește 149
Slovenčina 157
Hrvatski 165
Srpski 173
Български 181
Eesti 190
Latviešu 198
Lietuviškai 206
Українська 214
natural_image
Technical line drawing of a mechanical assembly with no visible text or symbolsInhalt
H. Jenner
Chairman of the Board of Management

S. Reiser
Director Regulatory Affairs & Certification
71364 Winnenden (Germany)
Tel.: +49 7195 14-0
Fax: +49 7195 14-2212
Winnenden, 2021/10/01
Technische Daten
Environmental protection.... 12
Overview of the device 12
Symbols on the device 13
Intended use.... 13
Safety instructions 13
Safety devices 13
Initial startup 13
Operation.... 14
Transport 15
Storage.... 16
Care and service 16
Troubleshooting guide.... 17
Warranty 17
Accessories and spare parts 18
EU Declaration of Conformity.... 18
Technical data 19
General notes


Read these original instructions and the enclosed safety instructions before using the device for the first time. Act in ac-
cordance with them.
Keep both books for future reference or for future owners.
- If the operating instructions and safety instructions are not observed, the device can be damaged and dangers could arise for users and other persons.
- Notify the dealer immediately in the case of shipping damage.
- Check the package contents when unpacking for missing accessories or for damage. Scope of delivery see illustration A.
- At operating elevations of approx. 800 m above sea level or higher, please contact your dealer to have the burner setting adjusted to the elevation and reduced oxygen content.
Environmental protection

The packing materials can be recycled. Please dispose of packaging in accordance with the environmental regulations.

Electrical and electronic appliances contain valuable, recyclable materials and often components such as batteries, rechargeable batteries or oil, which - if handled or disposed of incorrectly - can
pose a potential threat to human health and the environment. However, these components are required for the correct operation of the appliance. Appliances marked by this symbol are not allowed to be disposed of together with the household rubbish.
Notes on the content materials (REACH)
Current information on content materials can be found at: www.kaercher.com/REACH
Supplementary environmental protection instructions
Please do not allow engine oil, heating oil, diesel and petrol to enter the environment. Please protect the ground and dispose of old oil in an environmentally friendly manner.
Overview of the device
Description of the device
Illustration A
① Rubber cover
② Fuel pre-filter
③ Level switch
④ Burner
⑤ Power supply cable
⑥ Holder for crane transport
⑦ Pump unit
⑧ Oil filler plug
9 Oil level gauge
⑩Oil drain plug
⑪ Fastening clip
⑬Water shortage safeguard
15Blower motor
16 Burner blower
⑰ Fuel filter
⑱Type plate
⑲Fuel pump solenoid valve
20 Fuel pump
22Frame
23 Control panel
25 Ignition transformer
26 Water connection
27 High-pressure connection
28 Fine filter (water)
29 Hose holder
30 High-pressure hose
31Retainer
32 Union nut
33 Fuel sieve
34 Filling hole for fuel
35 Fuel tank
36 Spray lance
37 High-pressure gun
38Trigger
40 High-pressure nozzle
⑫Hose (soft damping system) of the water shortage safeguard
⑭Sieve in the water shortage safeguard
21 Steering roller with parking brake
24 Support for high-pressure gun with spray lance
⑲Safety latch of the high-pressure gun
Control panel
Illustration B
0/OFF = off
① Power switch
② Operating mode: Cold water operation
③ Operating mode: Hot water operation (e = Eco mode, hot water max. 60°C)
④ Fuel indicator light
Symbols on the device
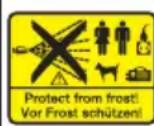
Do not aim the high-pressure jet may at persons, animals, live electrical equipment or the device itself. Protect the device against frost.
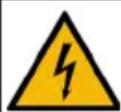
Danger of injury from electrical voltage. Only qualified electricians or authorised and qualified technical specialists are permitted to work on the electrical systems.
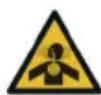
Health risk from poisonous exhaust gases. Never inhale the exhaust gases.
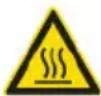
Risk of burns from hot surfaces.
Intended use
Only use the device for cleaning, e.g. machines, vehicles, buildings, tools, façades, terraces and garden equipment.
⚠️DANGER
Use at petrol stations or other hazard zones
Risk of injury
Adhere to the respective safety regulations.
Note
Do not allow waste water containing mineral oil to penetrate soil, waterways or the sewage system. Only wash the motor or the undercarriage in suitable places with an oil separator.
Water supply limit values
ATTENTION
Dirty water
Premature wear and tear or deposits in the device Supply the device using only clean water, or recycled water that does not exceed the specified limit values. The following limit values apply to the water supply:
- pH value: 6.5-9.5
- Electrical conductivity: Conductivity of fresh water + 1200 μS/cm, maximum conductivity 2000 μS/cm
- Settleable particles (sample volume 1 l, settling time 30 minutes): < 0.5 mg/l
- Filterable particles: < 50 mg/l, no abrasive substances
• Hydrocarbons: < 20 mg/l
• Chloride: < 300 mg/l
• Sulphate: < 240 mg/l
• Calcium: < 200 mg/l - Total hardness: < 28 °dH, < 50° TH, < 500 ppm (mg CaCO₃/l)
- Iron: < 0.5 mg/l
• Manganese: < 0.05 mg/l
• Copper: < 2 mg/l
• Active chloride: < 0.3 mg/l
• Free of unpleasant odours
Safety instructions
The following safety instructions apply to the device:
- Observe the respectively applicable national regulations for liquid jet cleaners.
- Observe the respectively applicable national accident prevention regulations. Liquid jet cleaners must be tested regularly and the results of the test recorded in writing.
- Note that the heating system in the device is classified as a furnace. Furnaces must be inspected regularly according to the applicable national regulations.
- No modifications may be made to the device or accessories.
Safety devices
Safety devices protect the user and may not be disabled or functionally circumvented.
Safety valve
- The safety valve opens if the pressure switch is faulty.
- The safety valve is adjusted and sealed at the factory. The adjustment is performed only by customer service.
- The water shortage safeguard prevents the burner from switching on when there is a lack of water.
- A sieve prevents the fuse from becoming contaminated and must be cleaned regularly.
Water shortage safeguard
Exhaust gas thermostat
The exhaust gas thermostat switches the device off when the emission temperature is too high.
Initial startup
⚠ WARNING
Damaged components
Risk of injury
Check that the device, accessories, supply lines and connections are in perfect condition. If the condition is not perfect, you may not use the device.
- Apply the parking brake.
Check the oil level in the high-pressure pump
ATTENTION
Milky oil
Device damage
If the oil is milky, inform authorized Customer Service immediately.
- Place the device on a flat and level surface.
-
Check the high-pressure pump oil level at the oil level display.
The oil level must be in the middle of the oil level indication. -
Top up the oil if necessary.
Activating the oil tank venting
- Unscrew the screw plug.
- Screw in the oil filler plug.
Installing accessories
- Connect the spray lance to the high-pressure gun and hand-tighten.
- Plug the high-pressure nozzle onto the spray lance.
- Mount the union nut and hand-tighten.
- Connect the high-pressure hose to the high-pressure gun and high-pressure connection of the device and tighten hand-tight.
Refuelling
⚠️DANGER
Unsuitable fuel
Risk of explosion
Only use diesel fuel or light heating oil. Unsuitable fuels, such as petrol, must not be used.
ATTENTION
Operation with an empty fuel tank
Destruction of the fuel pump
Never operate the device with an empty fuel tank.
- Open the tank cap.
- Refill the fuel.
- Close the tank cap.
- Wipe up the spilt fuel.
Water connection
⚠ WARNING
Danger of backflow of contaminated water into the drinking water network
Health risk
Observe the regulations of your water supply company. According to applicable regulations, the device must never be used with the drinking water network without a system separator. Use a system separator from KÄRCHER or a system separator as per EN 12729
Type BA. Water that has flowed through a system separator is classified as undrinkable. Always connect the system separator to the water supply and never directly to the water connection on the device.
• See the "Technical data" for the connected loads. Note
The supply hose is not included in the scope of delivery. Note
The system separator is not included in the scope of delivery.
- Connect the system separator to the water inlet (e.g. tap).
- Connect the inlet hose (minimum length 7.5 m, minimum diameter 1") to the water connection of the device and to the system separator.
- Open the water inlet.
Suck water from the container
⚠️DANGER
Suction of fluids containing solvents or drinking water
Risk of injury and damage, contamination of drinking water
Never extract fluids containing solvents such as paint thinner, petrol, oil or unfiltered water. The seals in the device are not resistant to solvents. The spray mist of solvents is highly flammable, explosive and poisonous. Never extract water from drinking water tanks.
-
Connect the suction hose (diameter at least 1") to the water connection.
-
Hang the suction hose in an external water source.
Note
Maximum suction height: 0.5 m
Electrical connection
⚠️DANGER
Unsuitable electrical extension cables
Electric shock
Only use approved and appropriately marked electrical extension cables with a sufficient line cross section for outdoors.
Make sure that the plug and coupling of an extension cable used are watertight.
Always unroll extension cables completely.
ATTENTION
Exceeding the grid impedance
Electrical shock in the event of a short-circuit
The maximum permissible mains grid impedance at the electrical connection point (see Technical data) must not be exceeded.
Contact your electricity supplier in the case of any uncertainties regarding the mains grid impedance at your electrical connection point.
- For connected loads, see technical data and type plate.
- The electrical connection must be carried out by an electrician and comply with IEC 60364-1.
Operation
⚠️DANGER
Flammable fluids
Risk of explosion
Do not spray inflammable liquids.
⚠️DANGER
Operation without spray lance
Risk of injury
Never operate the device without the spray lance installed.
Before each use, check that the spray lance is firmly seated. The screw connection of the spray lance must be tightened hand tight.
⚠️DANGER
High-pressure water stream
Risk of injury
Never fasten the trigger in the actuated position.
Before doing any work on the device, secure the high-pressure gun by folding out the safety lever and engaging it.
Hold the high-pressure gun and spray lance with both hands.
ATTENTION
Operation with an empty fuel tank
Destruction of the fuel pump
Never operate the device with an empty fuel tank.
Changing nozzles
- Switch off the device and operate the high-pressure gun until the device is depressurized.
- Secure the high-pressure gun by folding out the locking catch and engaging it.
- Change the nozzle.
Switching on the device
- Set the trigger to the operating mode. The device starts up briefly and switches off as soon as the working pressure is reached.
- Unlock the high-pressure gun by folding in the safety catch and engaging it. When the high-pressure gun is actuated, the device switches on again.
Note
If no water comes out of the high-pressure nozzle, bleed the pump. See help in the event of malfunctions – device does not build up pressure.
Cleaning
Note
Always initially direct the high-pressure jet at the object to be cleaned from a distance to avoid damage due to excessive pressure.
- Set the cleaning temperature according to the surface to be cleaned.
Cold water operation
For removing light contamination and for rinsing, e.g. garden machines, terrace, tools.
Eco level
The device works in the most economical temperature range (max. 60 °C).
Operation with hot water
⚠️DANGER
Hot water
Risk of scalding
Avoid contact with hot water.
- Set the power switch to the desired temperature.
Recommended cleaning temperatures
• 30-50 °C: Light soiling
- Max. 60 °C: Soiling containing protein, e.g. in the food industry
- 60-90 °C: Car cleaning, machine cleaning
Interrupting operation
- Secure the high-pressure gun by folding out the locking catch and engaging it.
Switching off the device
⚠️DANGER
Hot water hazard
Risk of scalding
After operation with hot water, the device must be operated with an opened gun with cold water for at least 2 minutes.
- Close the water inlet.
- Open the high-pressure gun.
- Switch on the pump with the power switch and let it run for 5-10 seconds.
- Close the high-pressure gun.
- Set the trigger to "0/OFF".
- Only pull the mains plug out of the socket only when your hands are dry.
- Remove the water connection.
- Actuate the high-pressure gun until the device is completely depressurised.
- Secure the high-pressure gun by folding out the locking catch and engaging it.
Storing the device
Note
Do not kink the high-pressure hose or the electrical line.
-
Insert the high-pressure gun in the support on the frame together with the spray lance.
-
Roll up the high-pressure hose and the electrical line and hang them on the supports.
Frost protection
ATTENTION
Frost hazard
Destruction of the device through freezing water
Store the device that has not been completely drained of water in a frost-free place.
In the case of devices that are connected to a chimney, the ingress of cold air must be taken into account.
ATTENTION
Cold air entering through the chimney
Risk of damage
When the exterior temperatures are below 0 ^ , disconnect the device from the chimney.
- Shut down the device if frost-free storage is not possible.
Shutting down
For longer breaks in operation or when frost-free storage is not possible:
- Drain the water.
- Flush the device with antifreeze.
Draining the water
-
Unscrew the water supply hose and the high-pressure hose.
-
Unscrew the supply line at the boiler base and allow the heating coil to drain.
-
Allow the device for run for a maximum of 1 minute until the pump and lines are empty.
Flushing device with antifreeze
Note
Observe the handling instructions of the anti-freeze manufacturer.
- Flush the device (burner off) completely with a commercially available antifreeze.
This also provides a certain degree of corrosion protection.
Transport
ATTENTION
Improper transportation
Risk of damage
Protect the trigger of the high-pressure gun from damage.
△CAUTION
Failure to observe the weight
Risk of injury and damage
Be aware of the weight of the device during transportation.
- When transporting the device in vehicles, secure it to prevent it from slipping or overturning in accordance with the respectively applicable guidelines.
Crane transport
⚠️DANGER
Improper crane transport
Risk of injury from a falling device or falling objects Observe the local regulations for accident prevention and the safety instructions.
The device may only be transported with a crane by persons instructed in the operation of the crane.
Check the lifting gear for damage before each crane transport.
Check the holder on the device for damage before each crane transport.
Only lift the device at the holders for crane transport.
Do not use an slinging chains.
Secure the lifting gear against unintentional unhooking of the load.
Remove the spray lance with high-pressure gun and other loose objects before transporting by crane.
Do not transport any objects on the device during the lifting operation.
Do not stand under the suspended load.
Ensure that no persons are in the hazard zones of the crane.
Do not leave the device handing unattended on the crane.
- Fasten the lifting device to the holders for crane transport of the device.
Illustration C
Storage
⚠CAUTION
Failure to observe the weight
Risk of injury and damage
Be aware of the weight of the device during storage.
Care and service
⚠️DANGER
Inadvertently starting up device, touching live components
Risk of injury, electric shock
Switch off the device before performing any work on the device.
Remove the mains plug.
-
Close the water inlet.
-
Open the high-pressure gun.
-
Switch on the pump with the power switch and let it run for 5-10 seconds.
-
Close the high-pressure gun.
-
Set the trigger to "0/OFF".
-
Only pull the mains plug out of the socket only when your hands are dry.
-
Remove the water connection.
-
Actuate the high-pressure gun until the device is completely depressurised.
-
Secure the high-pressure gun by folding out the locking catch and engaging it.
-
Allow the device to cool down.
Safety inspection/maintenance contract
You can agree on regular safety inspections or close a maintenance contract with your dealer. Please seek advice on this.
Maintenance intervals
Weekly
ATTENTION
Milky oil
Device damage
If the oil is milky, inform authorized Customer Service immediately.
-
Clean the fine filter.
-
Clean the fuel strainer.
-
Clean the fuel prefilter.
-
Clean the fuel filter.
-
Check the oil level.
Monthly
- Clean the sieve in the water shortage safeguard.
Every 500 operating hours, at least annually
-
Change the oil.
-
Descale the device.
-
Have the device maintained by Customer Service.
Maintenance work
Cleaning the fine filter
-
Depressurise the device.
-
Unscrew the fine filter on the pump head.
-
Dismantle the fine filter and take out the filter inlay.
-
Clean the filter inlay with clean water or compressed air.
-
Assemble in the reverse order.
Cleaning the fuel sieve
- Knock out the fuel sieve. Do not allow fuel to enter the environment.
Cleaning the fuel prefilter
-
Pull the rubber cap out of the fuel tank.
-
Clean the fuel prefilter.
-
Put the rubber cover back in place.
Clean the fuel filter
-
Remove the fuel filter.
-
Clean the fuel filter.
-
Remount the fuel filter.
Cleaning the sieve in the water shortage safeguard
-
Depressurise the device.
-
Lever out the fastening clip and pull out the hose (soft damping system) of the water shortage safeguard.
-
Remove the sieve.
Note
If necessary, screw in the M8 screw approx. 5 mm and use this to pull out the sieve.
-
Clean the sieve in water.
-
Slide in the sieve.
-
Push the hose nipple all the way into the water shortage safeguard and secure it with the fastening clip.
Cleaning the fuel tank
-
Pull the rubber cap out of the fuel tank.
-
Unscrew the retainer and remove the fuel tank.
-
Rinse the fuel tank.
-
Reinstall the fuel tank and attach the retainer.
-
Put the rubber cover back in place.
Changing oil
See the "Technical data" section for the oil filling quantity and type.
-
Provide a catch pan for approx. 0.5 litre of oil.
-
Loosen the oil drain plug.
-
Drain the oil into the catch pan.
Note
Dispose of the old oil in an environmentally friendly manner or hand it over to an authorised collection point.
-
Retighten the oil drain plug, torque 20-25 Nm.
-
Unscrew the oil filler plug.
-
Slowly fill with new oil until the level is in the middle of the oil level display. The air bubbles must be able to escape.
-
Screw in the oil filler plug.
Descale the device
Deposits accumulating in the pipelines increase the flow resistance and the motor load becomes too high.
⚠️DANGER
Hazard due to inflammable gases
Risk of explosion
Do not smoke during the descaling process. Ensure good ventilation.
⚠️DANGER
Acid danger
Risk of acid burns
Wear safety goggles and protective gloves.
Execution:
According to legal regulations, only approved boiler solvents with a test certificate may be used for removing deposits.
• RM 101 (order number 6.295-398.0)
-
Fill a 20 litre container with 15 litres of water.
-
Add 1 litre of scale solvent.
-
Connect the water hose directly to the pump head and hang the free end into the container.
-
Place the connected spray lance in the container without a nozzle.
-
Switch the device on.
-
Open the high-pressure gun and do not close it again during descaling.
-
Switch the device off and allow it to stand for 20 minutes. The high-pressure gun must remain open.
-
Then pump the device empty.
Note
For the purposes of corrosion protection and neutralising acid residues, we recommend then pumping an alkaline solution (e.g. RM 81) through the device.
Troubleshooting guide
⚠️DANGER
Inadvertently starting up device, touching live components
Risk of injury, electric shock
Switch off the device before performing any work on the device.
Remove the mains plug.
Device not running
No mains voltage
- Check the power supply and the supply line.
Fault in the voltage supply or current consumption of the motor too high
-
Check the power supply and the mains power supply circuit breaker.
-
Contact Customer Service.
Motor overloaded/overheated or the exhaust gas thermostat has triggered or the protective winding contact of the blower motor has triggered
-
Set the trigger to "0/OFF".
-
Allow the device to cool down.
-
Switch the device on.
Malfunction occurs repeatedly
- Contact Customer Service.
Flame sensor has switched off the burner
- Contact Customer Service.
The fuel indicator light lights up
Fuel tank is empty
- Refill the fuel.
Device not building up pressure
Air in the system
- Venting the pump:
a Unscrew the nozzle from the spray lance.
b Allow the device to run until the escaping water is free of air bubbles.
c In the case of venting problems, allow the device to run for 10 seconds and then switch it off. Repeat the procedure several times.
d Switch off the device.
e Screw the nozzle back on.
- Check connections and lines.
Fine filter dirty
- Clean the fine filter, replace if necessary.
Water supply volume too low
- Check the water supply volume (see "Technical data").
Device is leaking, water is dripping from the bottom of the device
Pump leaking
- If there is a significant leak, have the device checked by Customer Service.
Note
3 drops/minute are permitted.
The device switches on and off continuously when the high-pressure gun is locked
Leak in the high-pressure system
- Check the high-pressure system and the connections for leaks.
Burner not igniting
Water shortage
-
Check the water connection and the supply lines.
-
Clean the sieve in the water shortage safeguard.
Fuel prefilter dirty
- Clean/change the fuel prefilter.
Fuel filter dirty
- Clean/replace the fuel filter.
No ignition spark
- If no ignition spark is visible through the sight glass during operation, have the device checked by Customer Service.
Burner does not switch off despite the water short-age
Leak in the high-pressure system
- Check the high-pressure system and the connections for leaks.
Reed switch stuck in the water shortage safeguard or magnetic piston stuck
- Contact Customer Service.
The set temperature is not reached when operating with hot water
Sooty heating coil
- Have the soot removed from the device by Customer Service.
Customer Service department
If the malfunction cannot be corrected, the device must be checked by the Customer Service department.
Warranty
The warranty conditions issued by our relevant sales company apply in all countries. We shall remedy possible malfunctions on your appliance within the warranty period free of cost, provided that a material or manufacturing defect is the cause. In a warranty case, please contact your dealer (with the purchase receipt) or the next authorised customer service site.
(See overleaf for the address)
Accessories and spare parts
Only use original accessories and original spare parts. They ensure that the appliance will run fault-free and safely.
Information on accessories and spare parts can be found at www.kaercher.com.
EU Declaration of Conformity
We hereby declare that the machine described below complies with the relevant basic safety and health requirements in the EU Directives, both in its basic design and construction as well as in the version placed in circulation by us. This declaration is invalidated by any changes made to the machine that are not approved by us.
Product: High-pressure cleaner Type: 1.030-xxx
Currently applicable EU Directives
2000/14/EC
2006/42/EC (+2009/127/EC)
2009/125/EC
2011/65/EU
2014/30/EU
Harmonised standards used
EN IEC 63000: 2018
EN 55014-1: 2017 + A11: 2020
EN 55014-2: 2015
EN 60335-1
EN 60335-2-79
EN 61000-3-2: 2014
EN 61000-3-11: 2000
EN 62233: 2008
Commission Regulation(s)
(EU) 2019/1781
Conformity evaluation procedure used
2000/14/EC: Annex V
Sound power level dB(A)
Measured: 98
Guaranteed: 100
National standards used
The signatories act on behalf of and with the authority of the company management.

H. Jenner
Chairman of the Board of Management
S. Reiser
Director Regulatory Affairs & Certification
Documentation supervisor: S. Reiser
Alfred Kärcher SE & Co. KG
Alfred-Kärcher-Str. 28 - 40
71364 Winnenden (Germany)
Ph.: +49 7195 14-0
Fax: +49 7195 14-2212
Winnenden, 2021/10/01
Technical data
| HDS 9/20-4 Classic | ||
| Electrical connection | ||
| Mains voltage V 400 | ||
| Phase ~ 3 | ||
| Power frequency Hz 50 | ||
| Degree of protection IPX5 | ||
| Protection class I | ||
| Power rating kW 7,0 | ||
| Power protection (slow-blowing) A 16 | ||
| Maximum permissible mains grid impedance Ω 0.3105 | ||
| Water connection | ||
| Feed pressure (max.) | MPa (bar) | 1 (10) |
| Input temperature (max.) | °C | 30 |
| Input amount (min.) | l/h (l/min) | 1200 (20) |
| Suction height (max.) | m | 0,5 |
| Device performance data | ||
| Water flow rate | l/h (l/min) | 900 (15) |
| Water operating pressure with standard nozzle MPa (bar) 20 (200) | ||
| Excess operating pressure safety valve (maximum) | MPa (bar) | 22 (220) |
| Hot water operating temperature (maximum) | °C | 80 |
| Burner output | kW 64 | |
| Heating oil consumption (max.) | kg/h | 5,9 |
| High-pressure gun recoil force | N 50 | |
| Nozzle size of standard nozzle | 25050 | |
| Dimensions and weights | ||
| Typical operating weight | kg | 145 |
| Length x width x height | mm | 880 x 700 x 900 |
| Fuel tank | l | 30 |
| High-pressure pump | ||
| Oil volume | l | 0,4 |
| Oil type | 15W40 | |
| Burner | ||
| Fuel | EL heating oil or diesel | |
| Determined values in acc. with EN 60335-2-79 | ||
| Sound pressure level L_pA | dB(A) | 83 |
| Uncertainty K_pA | dB(A) | 3 |
| Sound power level L_WA + K uncertainty_WA | dB(A) | 100 |
| High-pressure gun hand-arm vibration value | m/s^2 | 1,4 |
| Spray lance hand-arm vibration value | m/s^2 | <2,5 |
| Uncertainty K | m/s^2 | 1,5 |
Exception according to Regulation (EU) 2019/1781 Annex I Section 2 (12): j) Subject to technical changes without notice.
Contenu
Transport non-conforme
Risque d'endommagement
2006/42/CE (+2009/127/CE)
2009/125/CE
2011/65/EU
2014/30/UE
H. Jenner
Chairman of the Board of Management

S. Reiser
Director Regulatory Affairs & Certification
71364 Winnenden (Germany)
Winnenden, 2021/10/01
H. Jenner
Chairman of the Board of Management

S. Reiser
Director Regulatory Affairs & Certification
71364 Winnenden (Germany)
Tel.: +49 7195 14-0
Fax: +49 7195 14-2212
Winnenden, 2021/10/01
Dati tecnici
28 Fijn filter (water)
29 Slanghouder
30 Hogedrukslang
31 Ophangbeugel
32 Wartelmoer
33 Brandstofzeef
H. Jenner
Chairman of the Board of Management

S. Reiser
Director Regulatory Affairs & Certification
71364 Winnenden (Germany)
Tel.: +49 7195 14-0
Fax: +49 7195 14-2212
Winnenden, 2021/10/01
Technische gegevens
2006/42/CE (+2009/127/CE)
2009/125/CE
2011/65/UE
2014/30/UE
H. Jenner
Chairman of the Board of Management
S. Reiser
Director Regulatory Affairs & Certification
71364 Winnenden (Germany)
Tel.: +49 7195 14-0
Fax: +49 7195 14-2212
Winnenden, 2021/10/01
Datos técnicos
2006/42/CE (+2009/127/CE)
2009/125/CE
2011/65/UE
2014/30/UE

H. Jenner
Chairman of the Board of Management

S. Reiser
Director Regulatory Affairs & Certification
Winnenden, 2021/10/01
Dados técnicos
2006/42/EF (+2009/127/EF)
2009/125/EF
2011/65/EU
2014/30/EU
Chairman of the Board of Management

S. Reiser
Director Regulatory Affairs & Certification
71364 Winnenden (Germany)
Tlf.: +49 7195 14-0
Fax: +49 7195 14-2212
Winnenden, 2021/10/01
Tekniske data
2006/42/EF (+2009/127/EF)
2009/125/EF
2011/65/EU
2014/30/EU
Anvendte harmoniserte standarder
EN IEC 63000: 2018
EN 55014-1: 2017 + A11: 2020
EN 55014-2: 2015
EN 60335-1
EN 60335-2-79
EN 61000-3-2: 2014
EN 61000-3-11: 2000
EN 62233: 2008
2000/14/EF: Vedlegg V
Lydeffektnivå dB(A)
Mält: 98
Garantert: 100
Chairman of the Board of Management

S. Reiser
Director Regulatory Affairs & Certification
71364 Winnenden (Germany)
Tlf.: +49 7195 14-0
Winnenden, 2021/10/01

Chairman of the Board of Management

S. Reiser
Director Regulatory Affairs & Certification
D-71364 Winnenden (Germany)
Tfn: +49 7195 14-0
Fax: +49 7195 14-2212
Winnenden, 2021/10/01
Tekniska data

H. Jenner
Chairman of the Board of Management

S. Reiser
Director Regulatory Affairs & Certification
71364 Winnenden (Germany)
Puh.: +49 7195 14-0
Winnenden, 2021/10/01
Tekniset tiedot
H. Jenner
Chairman of the Board of Management
S. Reiser
Director Regulatory Affairs & Certification
71364 Winnenden (Germany)
Tηλ.: +49 7195 14-0
Φαξ: +49 7195 14-2212
Winnenden, 2021/10/01
2006/42/AT (+2009/127/AT)
2009/125/EG
2011/65/AT
2014/30/AB
Chairman of the Board of Management

S. Reiser
Director Regulatory Affairs & Certification
Winnenden, 2021/10/01
Teknik veriler
H. Jenner
Chairman of the Board of Management

S. Reiser
Director Regulatory Affairs & Certification
71364 Winnenden (Germany)
Тел.: +49 7195 14-0
Факс: +49 7195 14-2212
Winnenden, 2021/10/01

H. Jenner
Chairman of the Board of Management
S. Reiser
Director Regulatory Affairs & Certification
Winnenden, 2021/10/01
Műszaki adatok
2006/42/ES (+2009/127/ES)
2009/125/ES
2011/65/EU
2014/30/EU

Chairman of the Board of Management

S. Reiser
Director Regulatory Affairs & Certification
Winnenden, 2021/10/01
Technické údaje
2006/42/ES (+2009/127/ES)
2009/125/ES
2011/65/EU
2014/30/EU
Chairman of the Board of Management

S. Reiser
Director Regulatory Affairs & Certification
Winnenden, 2021/10/01
Tehnični podatki
| HDS 9/20-4 Classic | ||
| Električni priključek | ||
| Napetost omrežja V 400 | ||
| Število faz ~ 3 | ||
| Omrežna frekvenca Hz 50 | ||
| Stopnja zaščite IPX5 | ||
| Razred zaščite I | ||
| Priključna moč | kW | 7,0 |
| Omrežna varovalka (počasna) A 16 | ||
| Največja dovoljena omrežna impedance | Ω | 0.3105 |
| Priključek za vodo | ||
| Tlak na dotoku (maks.) | MPa (bar) | 1 (10) |
| Temperatura na dotoku (maks.) | °C | 30 |
| Količina dotoka (min.) | l/h (l/min) | 1200 (20) |
| Višina sesanja (maks.) | m | 0,5 |
| Podatki o zmogljivosti naprave | ||
| Črpalna količina, voda | l/h (l/min) | 900 (15) |
| Delovni tlak vode s standardno šobo | MPa (bar) | 20 (200) |
| Dovoljeni delovni nadtlak (maks.) (varnostni ventil) | MPa (bar) | 22 (220) |
| Delovna temperatura tople vode (maks.) | °C | 80 |
| Moč gorilnika | kW 64 | |
| Poraba kurilnega olja (maks.) | kg/h | 5,9 |
| Sila vzvratnega sunka visokotlačne pištole | N | 50 |
| Velikost standardne šobe | 25050 | |
| Mere in mase | ||
| Tipična delovna masa | kg | 145 |
| Dolžina x širina x višina | mm | 880 x 700 x 900 |
| Rezervoar za gorivo | I | 30 |
| Visokotlačna Črpalka | ||
| Količina olja | I | 0,4 |
| Vrsta olja | 15W40 | |
| Gorilnik | ||
| Gorivo | Gretno olje EL ali dizel | |
| Ugotovljene vrednosti v skladu s standardom EN 60335-2-79 | ||
| Raven tlaka hrupa L_pA | dB(A) | 83 |
| Negotovost K_pA | dB(A) | 3 |
| Raven moči hrupa L_WA + negotovost K_WA | dB(A) | 100 |
| Vrednost tresljajev za dlani/roke – visokotlačna pištola | m/s ^2 | 1,4 |
| Vrednost tresljajev za dlani/roke – brizgalna cev | m/s ^2 | <2,5 |
| Negotovost K | m/s ^2 | 1,5 |
2006/42/WE (+2009/127/WE)
2009/125/WE
2011/65/UE
2014/30/UE

H. Jenner
Chairman of the Board of Management

S. Reiser
Director Regulatory Affairs & Certification
71364 Winnenden (Germany)
Tel.: +49 7195 14-0
Winnenden, 2021/10/01
Dane techniczne
Directive UE relevante
2000/14/UE
2006/42/UE (+2009/127/UE)
2009/125/UE
2011/65/UE
2014/30/UE
Norme armonizate aplicate
EN IEC 63000: 2018
EN 55014-1: 2017 + A11: 2020
EN 55014-2: 2015
EN 60335-1
EN 60335-2-79
EN 61000-3-2: 2014
EN 61000-3-11: 2000
EN 62233: 2008
Regulament(e) utilizat(e)
(UE) 2019/1781

H. Jenner
Chairman of the Board of Management
S. Reiser
Director Regulatory Affairs & Certification
71364 Winnenden (Germania)
Tel.: +49 7195 14-0
Fax: +49 7195 14-2212
Winnenden, 2021/10/01
Date tehnice
2006/42/ES (+2009/127/ES)
2009/125/ES
2011/65/EÚ
2014/30/EÚ

H. Jenner
Chairman of the Board of Management

S. Reiser
Director Regulatory Affairs & Certification
71364 Winnenden (Germany)
Tel.: +49 7195 14-0
Fax: +49 7195 14-2212
Winnenden, 2021/10/01
Technické údaje
2006/42/EZ (+2009/127/EZ)
2009/125/EZ
2011/65/EU
2014/30/EU
Primijenjene uskladene norme
EN IEC 63000: 2018
EN 55014-1: 2017 + A11: 2020
EN 55014-2: 2015
EN 60335-1
EN 60335-2-79
EN 61000-3-2: 2014
EN 61000-3-11: 2000
EN 62233: 2008
Primijenjene uredbe
(EU) 2019/1781
Chairman of the Board of Management

S. Reiser
Director Regulatory Affairs & Certification
Opunomoćenik za dokumentaciju:
S. Reiser
Alfred Kärcher SE & Co. KG
Alfred-Kärcher-Str. 28 - 40
71364 Winnenden (Njemačka)
Tel.: +49 7195 14-0
Telefaks: +49 7195 14-2212
Winnenden, 2021/10/01
Tehnički podaci
| HDS 9/20-4 Classic | ||
| Električni priključak | ||
| Napon električne mreže V 400 | ||
| Faza ~ 3 | ||
| Frekvencija električne mreže Hz 50 | ||
| Vrsta zaštite IPX5 | ||
| Klasa zaštite I | ||
| Priključna snaga kW 7,0 | ||
| Strujni osigurač (tromi) A 16 | ||
| Maksimalna dopuštena impedancija mreže Ω 0.3105 | ||
| Priključak za vodu | ||
| Dovodni tlak (maks.) | MPa (bar) | 1 (10) |
| Temperatura dovodne vode (maks.) | °C | 30 |
| Količina dovodne vode (min.) | l/h (l/min) | 1200 (20) |
| Usisna visina (maks.) | m | 0,5 |
| Podaci o snazi uređaja | ||
| Protočna količina, voda | l/h (l/min) | 900 (15) |
| Radni tlak vode sa standardnom mlaznicom | MPa (bar) | 20 (200) |
| Sigurnosni ventil za prekomjerni radni tlak (maksimum) | MPa (bar) | 22 (220) |
| Radna temperatura tople vode (maksimalna) | °C | 80 |
| Snaga plamenika | kW 64 | |
| Potrošnja loživog ulja (maks.) | kg/h | 5,9 |
| Povratna udarna sila visokotlačne ručne prskalice | N | 50 |
| Veličina standardne sapnice | 25050 | |
| Dimenzije i težine | ||
| Tipična težina pri radu | kg | 145 |
| Duljina x širina x visina | mm | 880 x 700 x 900 |
| Spremnik za gorivo | I | 30 |
| Visokotlačna pumpa | ||
| Količina ulja | I | 0,4 |
| Vrsta ulja | 15W40 | |
| Plamenik | ||
| Gorivo | Loživo ulje EL ili dizel | |
| Vrijednosti utvrđene prema EN 60335-2-79 | ||
| Razina zvučnog tlaka L_pA | dB(A) | 83 |
| Nesigurnost K_pA | dB(A) | 3 |
| Razina zvučne snage L_WA + Nesigurnost K_WA | dB(A) | 100 |
| Vrijednost vibracije šaka-ruka visokotlačne ručne prskalice | m/s^2 | 1,4 |
| Vrijednost vibracije šaka-ruka cijevi za prskanje | m/s^2 | <2,5 |
| Nesigurnost K | m/s^2 | 1,5 |
2006/42/EZ (+2009/127/EZ)
2009/125/EZ
2011/65/EU
2014/30/EU
Primenjene harmonizovane norme
EN IEC 63000: 2018
EN 55014-1: 2017 + A11: 2020
EN 55014-2: 2015
EN 60335-1
EN 60335-2-79
EN 61000-3-2: 2014
EN 61000-3-11: 2000
EN 62233: 2008
Primenjena(e) odredba(e)
(EU) 2019/1781
H. Jenner
Chairman of the Board of Management
S. Reiser
Director Regulatory Affairs & Certification
Lice ovlašćeno za dokumentaciju:
S. Reiser
Alfred Kärcher SE & Co. KG
Alfred-Kärcher-Str. 28 - 40
71364 Winnenden (Germany)
Tel.: +49 7195 14-0
Winnenden, 2021/10/01
Tehnički podaci
| HDS 9/20-4 Classic | ||
| Električni priključak | ||
| Napon električne mreže V 400 | ||
| Faza ~ 3 | ||
| Mrežna frekvencija Hz 50 | ||
| Vrsta zaštite IPX5 | ||
| Klasa zaštite I | ||
| Priključna snaga kW 7,0 | ||
| Strujni osigurač (inertan) A 16 | ||
| Maksimalno dozvoljena mrežna impedancea Ω 0.3105 | ||
| Priključak za vodu | ||
| Dovodni pritisak (maks.) | MPa (bar) | 1 (10) |
| Dovodna temperatura (maks.) | °C | 30 |
| Dovodna količina (min.) | l/h (l/min) | 1200 (20) |
| Usisna visina (maks.) | m | 0,5 |
| Podaci o snazi uređaja | ||
| Protočna količina, voda | l/h (l/min) | 900 (15) |
| Radni pritisak vode sa standardnom mlaznicom | MPa (bar) | 20 (200) |
| Prekoračenje radnog pritiska na sigurnosnom ventilu (maksimalno) | MPa (bar) | 22 (220) |
| Radna temperatura tople vode (maksimalna) °C | 80 | |
| Snaga gorionika | kW 64 | |
| Potrošnja lož ulja (maks.) | kg/h | 5,9 |
| Povratna udarna sila visokopritisne ručne prskalice | N | 50 |
| Veličina mlaznice za standardnu mlaznicu | 25050 | |
| Dimenzije i težine | ||
| Tipična radna težina | kg | 145 |
| Dužina x širina x visina | mm | 880 x 700 x 900 |
| Rezervoar za gorivo | l | 30 |
| Pumpa visokog pritiska | ||
| Količina ulja | l | 0,4 |
| Vrsta ulja | 15W40 | |
| Gorionik | ||
| Gorivo | Lož ulje EL ili dizel | |
| Utvrdene vrednosti prema EN 60335-2-79 | ||
| Nivo zvučnog pritiska L_pA | dB(A) | 83 |
| Nepouzdanost K_pA | dB(A) | 3 |
| Nivo zvučne snage L_WA + nepouzdanost K_WA | dB(A) | 100 |
| Vrednost vibracije na šaci-ruci od visokopritisne ručne prskalice | m/s^2 | 1,4 |
| Vrednost vibracije na šaci-ruci od cevi za prskanje | m/s^2 | <2,5 |
| Nepouzdanost K | m/s^2 | 1,5 |
Razlog izuzetka prema uredbi (EU) 2019/1781 prilog I odeljak 2 (12): j)
Zadržavamo pravo na tehničke izmene.
Съдържание
Общи указания.... 181
Chairman of the Board of Management
S. Reiser
Director Regulatory Affairs & Certification
71364 Winnenden (Germany)
Тел.: +49 7195 14-0
Факс: +49 7195 14-2212
Winnenden, 2021/10/01
Технически данни
Tarvikute monteerimine
Vee sisseimemine mahutist
⚠️OHT
Toode: Körgsurvepesur
Tüüp: 1.030-xxx
2006/42/EÜ (+2009/127/EÜ)
2009/125/EÜ
2011/65/EL
2014/30/EL
Chairman of the Board of Management
S. Reiser
Director Regulatory Affairs & Certification
71364 Winnenden (Germany)
Tel: +49 7195 14-0
Winnenden, 2021/10/01
Tehnilised andmed
www.kaercher.com/REACH
Chairman of the Board of Management
S. Reiser
Director Regulatory Affairs & Certification
Winnenden, 2021/10/01
Tehniskie dati
Chairman of the Board of Management

S. Reiser
Director Regulatory Affairs & Certification
Winnenden, 2021/10/01
Techniniai duomenys

H. Jenner
Chairman of the Board of Management
S. Reiser
Director Regulatory Affairs & Certification
71364 Winnenden (Germany)
Тел.: +49 7195 14-0
Факс: +49 7195 14-2212
Winnenden, 2021/10/01
www.kaercher.com/REACH
환경 보호에 대한 추가 지침
www.kaercher.com/REACH
环境保护补充提示
www.kaercher.com/REACH
natural_image
Black and white icon of a hand giving a thumbs-up gesture (no text or symbols)THANK YOU!
Register your product and benefit from many advantages.
www.kaercher.com/welcome


Rate your product and tell us your opinion.
natural_image
Icon showing a gear and wrench inside a square frame (no text or symbols)www.kaercher.com/dealersearch
Alfred Kärcher SE & Co. KG
Alfred-Kärcher-Str. 28-40
71364 Winnenden (Germany)
Tel.: +49 7195 14-0
Fax: +49 7195 14-2212