
Amsterdam 290 BT - Car stereo BLAUPUNKT - Free user manual and instructions
Find the device manual for free Amsterdam 290 BT BLAUPUNKT in PDF.
User questions about Amsterdam 290 BT BLAUPUNKT
0 question about this device. Answer the ones you know or ask your own.
Ask a new question about this device
Download the instructions for your Car stereo in PDF format for free! Find your manual Amsterdam 290 BT - BLAUPUNKT and take your electronic device back in hand. On this page are published all the documents necessary for the use of your device. Amsterdam 290 BT by BLAUPUNKT.
USER MANUAL Amsterdam 290 BT BLAUPUNKT
EN Operating and installation instructions
Audio (Ton)
HINWEIS
[AM]: Wahl des AM-Bands. AM1, AM2
[AM]: Wahl des AM-Bands. AM1, AM2
Bereich (Fläche)*1
Fader

Subwoofers. [0–12 (Standard 6)
Montage
natural_image
Pure electrical circuit lines without any symbolsBluetooth-Antenne
natural_image
Diagram showing a rectangular block being placed into a larger rectangular frame, with an arrow indicating direction (no text or symbols present)Mikrofon
natural_image
Two rectangular panels with internal lines and a small arrow, no text or symbols presentnatural_image
Technical line drawing of a mechanical component with a magnified inset showing internal detail (no text or symbols)natural_image
Hand holding a pen or ruler inserted into a rectangular object, with no visible text or symbolsnatural_image
Illustration of hands using a tool to adjust or install a rectangular object (no text or symbols visible)HINWEIS
natural_image
Simple line drawing of a mechanical component or bracket (no text or symbols)Montage
About the Quick start guide....2
How to read this manual....2
Precautions....3
About this Unit 4
Copyrights 4
Note for Specifications 4
Getting Started ....5
Clock settings....5
Basics 6
Functions of the Buttons on the Front Panel 6
Common operations 6
HOME screen 6
Source control screen 6
USB 7
Preparation....7
Playback operations....7
List screen....7
iPod/iPhone 8
Preparation....8
Playback operations....8
Mirror Link 9
Preparation....9
Playback operations....9
Tuner....9
Tuner Basic Operation....9
Preseting stations 9
Manual memory 10 FAM-DFS features 10
DAB Tuner 10
DAB Tuner Basic Operation....10
External Components....11
Using external audio/video players 11
Rear view camera....11
Bluetooth smartphone 12
Register your smartphone to the unit 12
Receive a phone call....12
Make a phone call....12
Call using the phone book....13
Playing Bluetooth Audio Device 13
Controlling Audio 13
Controlling general audio 13
Loudness 13
Equalizer control 14
Subwoofer setting 14
Installation 14
Before Installation....14
Installing the unit....15
Before use
About the Quick start guide
The Instruction manual is subject to change for modification of specifications and so forth. Be sure to download the latest edition of the Instruction manual for reference.
Precautions
WARNING
To prevent injury or fire, take the following precautions:
• To prevent a short circuit, never put or leave any metallic objects (such as coins or metal tools) inside the unit.
- Do not watch or fix your eyes on the unit's display when you are driving for any extended period.
- If you experience problems during installation, consult your Blaupunkt dealer.
Precautions on using this unit
- The Radio Data System or Radio Broadcast Data System feature won't work where the service is not supported by any broadcasting station.
Protecting the monitor
• To protect the monitor from damage, do not operate the monitor using a ballpoint pen or similar tool with the sharp tip.
Cleaning the Unit
If the front panel of this unit is stained, wipe it with a dry soft cloth such as a silicon cloth. If the front panel is stained badly, wipe the stain off with a cloth moistened with neutral cleaner, then wipe it again with a clean soft dry cloth.
CAUTION
- Applying spray cleaner directly to the unit may affect its mechanical parts. Wiping the front panel with a hard cloth or using a volatile liquid such as thinner or alcohol may scratch the surface or erase screened print.
How to reset your unit
If the unit or the connected unit fails to operate properly, reset the unit.

Reset button
Safty notes
The car sound system was manufactured according to the state of the art and established safety guidelines. Even so, dangers may occur if you do not observe the safety notes in these instructions.
These instructions contain important information to easily and safely install and operate the car sound system.
Read these instructions carefully and completely before using the car sound system.
Keep the instructions at a location so that they are always accessible to all users.
Always pass on the car sound system to third parties together with these instructions.
In addition, observe the instructions of the devices used in conjunction with this car sound system.
Symbols used
These instructions employ the following symbols:

DANGER!
Warns about injuries

CAUTION!
Warns about damaging the CD drive

DANGER!
Warns about high volume

The CE mar confirms the compliance with EU directives.
Identifies a sequencing step
Identifies a listing
Road Safety
Observe the following notes about road safety:
Use your device in such a way that you can always safely control your vehicle. In case of doubt, stop at a suitable location and operate your device while the vehicle is standing.
Remove or attach the control panel only while the vehicle is standing.
Always listen at a moderate volume to protect your hearing and to be able to hear acoustic warning signals (e.g. police sirens). During mute phases (e.g. when changing the audio source), changing the volume is not audible. Do not increase the volume during this mute phase.
General safety notes
Observe the following notes to protect yourself against injuries:
Do not modify or open the device. The device contains a Class 1 laser that can cause injuries to your eyes.
Do not increase the volume during mute phases, e.g. when changing the audio source. Changing the volume is not audible during a mute phase.
Use as directed
This car sound system is intended for installation and operation in a vehicle with 12 V vehicle system voltage and must be installed in a DIN slot. Observe the performance limits in the technical data. Repairs and installation, if necessary, should be performed by a specialist.
Installation instructions
You may only install the car sound system yourself if you are experienced in installing car sound systems and are very familiar with the electrical system of the vehicle. For this purpose, observe the installation instructions at the end of these instructions.
Declaration of conformity
The Blaupunkt Competence Center Car Multimedia-Evo Sales GmbH declares that the devices complies with the basic requirements and the other relevant regulations of the directive 2014/53/EU.
The declaration of conformity can be found on the Internet under www.blaupunkt.com.
Cleaning notes
Solvents, cleaning and scouring agents as well as dashboard spray and plastics care product may contain ingredients that will damage the surface of the car sound system.
- Use only a dry or slightly moistened cloth for cleaning the car sound system.
- If necessary, clean the contacts of the control panel regularly using a soft cloth moistened with cleaning alcohol.
Disposal notes

Do not dispose of your old unit in the household trash!
Use the return and collection systems available to dispose of the old device.
About this Unit
Copyrights
- The Bluetooth word mark and logos are registered trademarks owned by the Bluetooth SIG, Inc. and any use of such marks by Blaupunkt Corporation is under license. Other trademarks and trade names are those of their respective owners.
- Use of the Made for Apple badge means that an accessory has been designed to connect specifically to the Apple product(s) identified in the badge, and has been certified by the developer to meet Apple performance standards. Apple is not responsible for the operation of this device or its compliance with safety and regulatory standards. Please note that the use of this accessory with an Apple product may affect wireless performance.
• Apple, Mac, macOS, OS X, iPhone, iPod, and Lightning are trademarks of Apple Inc., registered in the U.S. and other countries.
• Android is a trademark of Google LLC. - THIS PRODUCT IS LICENSED UNDER THE MPEG-4 VISUAL PATENT PORTFOLIO LICENSE FOR THE PERSONAL AND NON-COMMERCIAL USE OF A CONSUMER FOR (j) ENCODING VIDEO IN COMPLIANCE WITH THE MPEG-4 VISUAL STANDARD ("MPEG-4 VIDEO") AND/OR (jj) DECODING MPEG-4 VIDEO THAT WAS ENCODED BY A CONSUMER ENGAGED IN A PERSONAL AND NON-COMMERCIAL ACTIVITY AND/OR WAS OBTAINED FROM A VIDEO PROVIDER LICENSED BY MPEG LA TO PROVIDE MPEG-4 VIDEO. NO LICENSE IS GRANTED OR SHALL BE IMPLIED FOR ANY OTHER USE. ADDITIONAL INFORMATION INCLUDING THAT RELATING TO PROMOTIONAL, INTERNAL AND COMMERCIAL USES AND LICENSING MAY BE OBTAINED FROM MPEG LA, LLC. SEE HTTP://WWW.MPEGLA.COM.
Note for Specifications
Bluetooth section
Frequency
: 2.402 - 2.480 GHz
Output Power
: Power Class2
General
Speaker Impedance
:4-8Ω
Operating Voltage
: 12 V DC car battery
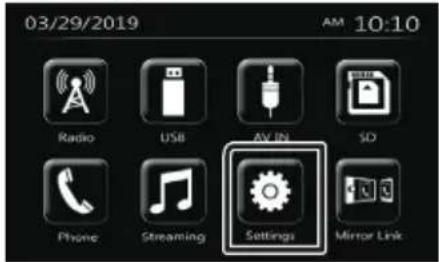
Getting Started
1 Turn the ignition key of your car to ACC.
The unit is turned on.
2 Press the <> button.
3 Touch [Settings].
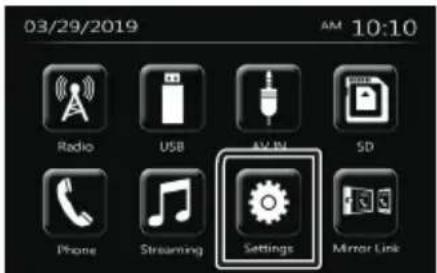
4 Touch the corresponding key and set the value.
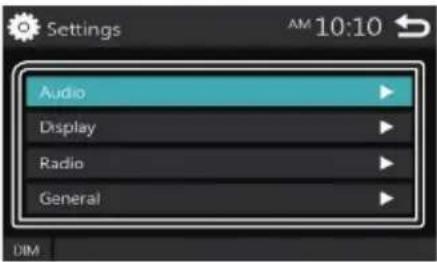
Audio
Sound Effect
Displays the Equalizer screen.
Beep
Activates or deactivates the key-touch tone. "ON" (Default), "OFF"
Loudness
Sets the amounts of boost of low and high tones. "ON", "OFF" (Default)
Subwoofer
Displays the Subwoofer screen.
Display
Panel Adjust
Adjust the sensing position of touch panel.
Aspect
Select the screen mode. "16:9" (Default), "4:3 Pan Scan"
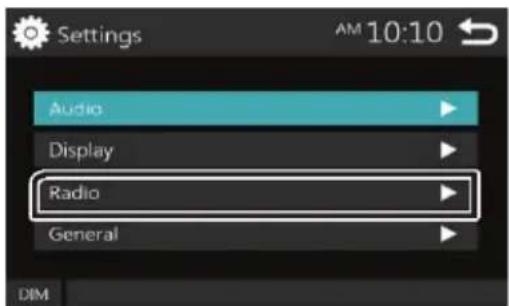
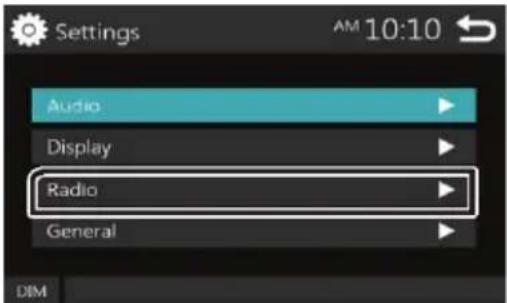
Tuner
Displays the Tuner Settings screen.
General
Language
Select the language used for the control screen and setting items. Default is "English".
1) Touch [Language].
2) Select the desired language.
* You can change the page to display more items by pressing [↑]/[↓]
BT Auto Connection
The unit automatically reconnect when the last connected Bluetooth device is within range. "ON" (Default), "OFF"
Clock Setting
Adjust the clock time. (P.4).
Default
Touch [Default] to set all the settings to the initial default settings.
5 Touch [ ]
Clock settings
Synchronizing the clock time with FM RDS Activate [RDS Clock Sync].
Adjusting the clock manually
NOTE
- Deactivate [RDS Clock Sync] before adjusting the clock.
1 Press the < > button.
2 Touch [Settings].
3 Touch [General].
4 Touch [Clock Setting]. Clock screen appears.
5 Selects time format. [12] / [24] (Default)
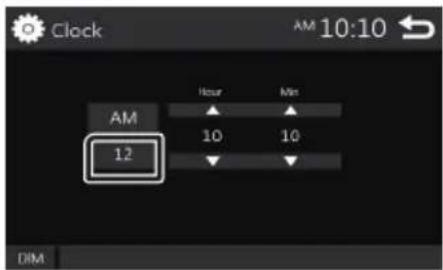
6 Touch [▲or [] to set the clock time.
- If you have selected [12] as the time format, touch [AM] or [PM] before setting the clock time.
7 Touch [ ]
Basics
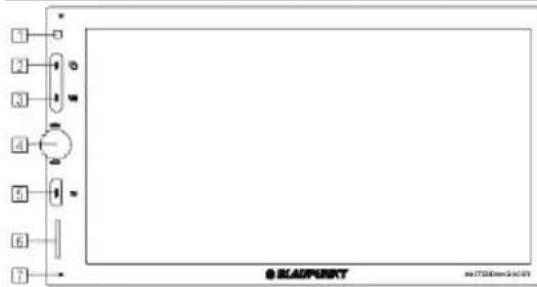
Functions of the Buttons on the Front Panel
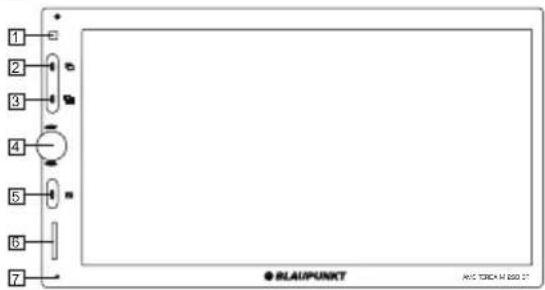
1 Remote Sensor
- Receives the remote control signal.
2 (HOME)
• Displays the HOME screen. (P.5)
- Pressing for 1 second access to rear camera page.
• In rear camera, pressing for 1 second back to home.
3 (MODE)
- Displays the different Mode: Phone>BT Audio>Radio>Rear Camera>USB>SD >AV IN.
4 +, - (Volume)
- Adjusts volume. The volume will go up until 50 when you rotate clockwise.
- Short pressing for Mute.
- Pressing for 1 second turns the power off.
- When the power off, turns the power on.
5 EQ □ (Display off)
• Displays the Equalizer screen.
* During video file playback, you can set only the preset equalizer curve.
* The Equalizer screen is not displayed during picture file playback or on the list screen or
- Pressing for 1 second turns the screen off. When the screen is off, touch the display to turn on the screen.
6 SD
- SD slot.
7 Reset
- If the unit or the connected unit fails to operate properly, the unit returns to factory settings when this button is pressed.
Common operations
Turning on the power
1 Press the rotary VOL button.
Turning off the power
1 Press and hold the rotary VOL button.
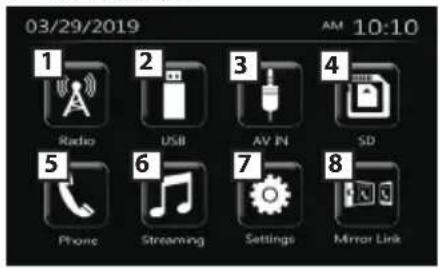
HOME screen
1 Press the < > button. HOME screen appears
Z
1 Switches to the radio broadcast. (P.8)
2 [USB] Plays files on a USB device. (P.6) [iPod] Plays an iPod/iPhone. (P.7)
- When iPod/iPhone is connected.
3 Switches to an external component connected to the AV-IN input terminal. (P.9)
4 Plays files on a SD device.
5 Displays the Hands Free screen. (P.10)
6 Plays a Bluetooth audio player. (P.11)
7 Displays the SETUP screen. (P.4)
8 [Mirroring] Displays the Mirroring screen.
- When android device with "Mirroring OA for Blaupunkt" application installed is connected.
Source control screen
You can perform source playback operations on the source control screen.
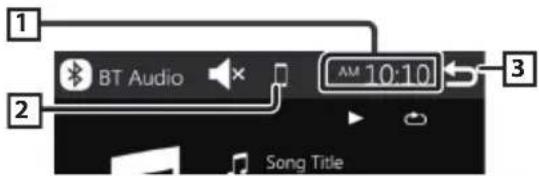
1 Clock display Touch to displays the Clock screen.
2 . ■ appears when the Bluetooth smartphone is connected.
• 🎶 appears when the Bluetooth audio player is connected.
• 📄× appears when the mute function is active.
3 Returns to previous screen.
USB
Preparation
Connecting a USB device
1 Remove the cap of the USB terminal.
2 Connect the USB device with the USB cable.
To disconnect the USB device:
1 Press the <> button.
2 Touch a source other than [USB].
3 Detach the USB device.
Playback operations
Control the music you are listening to on the source control screen.
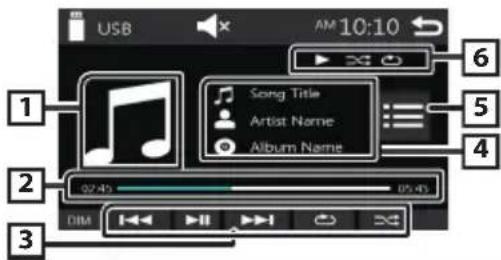
1 The jacket of the currently playing file is displayed.
2 ##:##:## : Song time
Play time bar : For confirmation of current playing position
3 [▶ Plays or pauses.
[◀: S▶ thes the previous/next content.
Touch and hold to fast forward or fast backward.
Touch ▶o resumes normal play.
[ICON]: Selects Repeat playback mode. Lights off (Default): Repeats all files in the USB device.
: Repeats the current file.
FO 📋: Repeats all files in the current folder.
[×]: Selects Random playback mode.
✗: Randomly plays all files.
Lights off (Default): Normal playback.
4 Displays the information of the current file. Only a file name is displayed if there is no tag information.
5 Searches file.
6 ▶, etc.: Playback status
: Repeat playback mode indicator
x: Random playback mode indicator
List screen
There are some common function keys in the list screens of most sources.

1 You can change the page to display more items by pressing [↑]/[↓].
For Video playback
1 When the operation buttons are not displayed on the screen, touch the display.
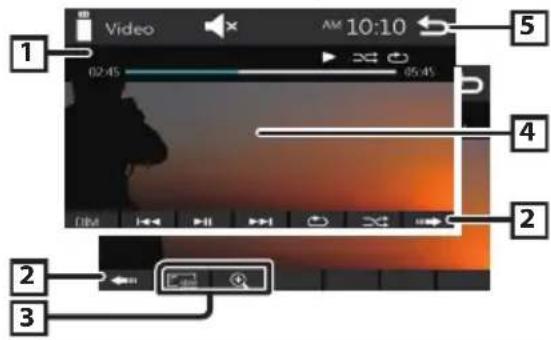
Play time bar: For confirmation of current playing position
2 To switch the operation buttons.
3 [☐]: You can adjust image quality in video screen.
[Brightness]: Adjusts the brightness. (00 to 12)
[Contrast]: Adjusts the contrast. (00 to 12)
[Tint]: Adjusts the tint. (00 to 12)
[Color]: Adjusts the color. (00 to 12)
[Reset]: To clear the adjustment.
[+] : Select the zoom ratio.
"Off", "x2", "x3", "x4", "x5", "1/2", "1/3", "1/4"
[3] [2] [<][>]: Scrolls the screen.
4 The operation buttons disappear when 4 is touched or when no operation is done for about 10 seconds.
5 Displays the File List screen.
* The video file stops.
iPod/iPhone
Preparation
Connecting iPod/iPhone
- For Lightning connector models: Use USB Audio cable for iPod/iPhone.
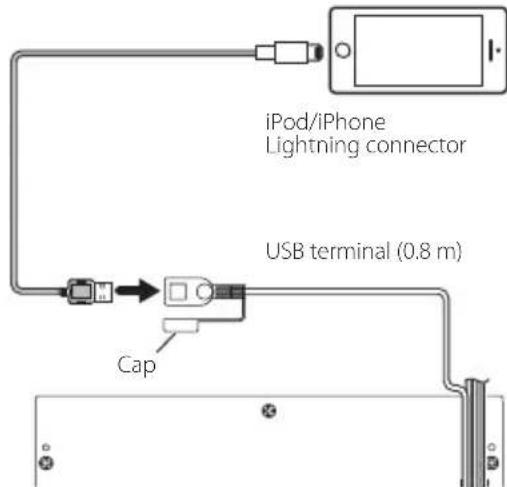
1 Remove the cap of the USB terminal.
2 Connect the iPod/iPhone.
The unit reads the device and playback starts.
To disconnect the iPod/iPhone
1 Press the < > button.
2 Touch a source other than [iPod].
3 Detach the iPod/iPhone.
Connectable iPod/iPhone
The following models can be connected to this unit.
Made for
iPhone XS Max
iPhone SE
iPhone XS
iPhone 6s Plus
iPhone XR
iPhone 6s
iPhone X
iPhone 6 Plus
iPhone 8 Plus
iPhone 6
iPhone 8
iPhone 5s
iPhone 7 Plus
iPhone 7
NOTE
- If you start playback after connecting the iPod, the music that has been played by the iPod is played first.
- Cap the USB terminal whenever not using.
Playback operations
Control the music you are listening to on the source control screen.
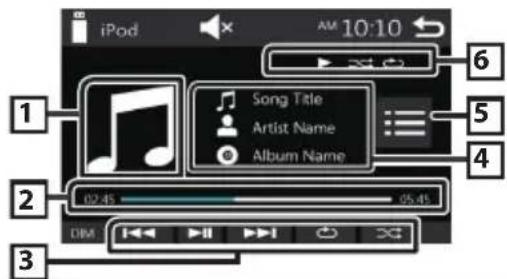
1 Artwork (Shown if the track contains artwork)
2 ##:##:## : Song time
Play time bar: For confirmation of current playing position
3 ▶lays or pauses.
[1]: Searches the previous/next content.
Touch and hold to fast forward or fast backward.
[💡]: Selects Repeat playback mode.
Lights off: Repeat off
: Functions the same as Repeat All.
1: Functions the same as Repeat One.
[×]: Selects Random playback mode.
x: Functions the same as Shuffle Songs.
Lights off: Random off
4 Displays the information of the current file.
5 Searches content.
6 ▶, etc.: Playback status
: Repeat playback mode indicator
x: Random playback mode indicator
Selecting a content in a list
1 Touch [ :].
2 Touch desired item.
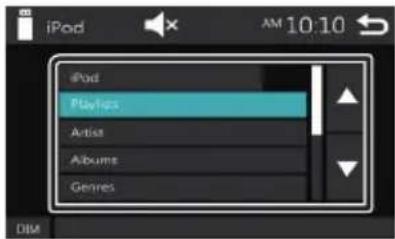
When you touch a category its contents are displayed.
3 Touch desired item from the content list.
Playback starts.
- Touch [→] to moves to the upper hierarchy.
NOTE
• The source control screen appears when you touch
[→] at the top hierarchy.
Mirror Link
Preparation
Connecting your smart phone
- For Lightning connector models: Use USB cable for smart phone.
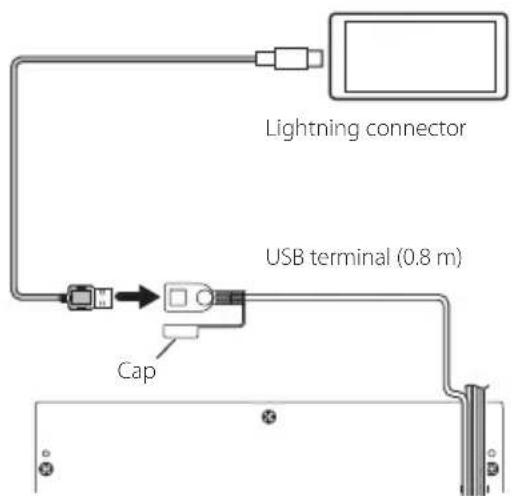
1 Remove the cap of the USB terminal.
2 Connect the the smart phone
The unit reads the device and display below GUI.
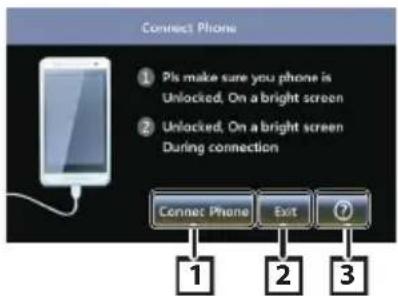
1 Access to Mirrok Link page
2 Exit to Mirror Link mode and return to main menu
3 Access to help page as below:
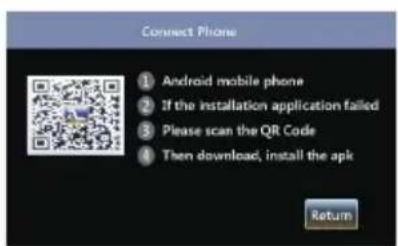
NOTE
- If you complete the apk installation, press return button to lastest page.
- Cap the USB terminal whenever not using.
Tuner
Tuner Basic Operation
1 Press the <> button.
2 Touch [Tuner].
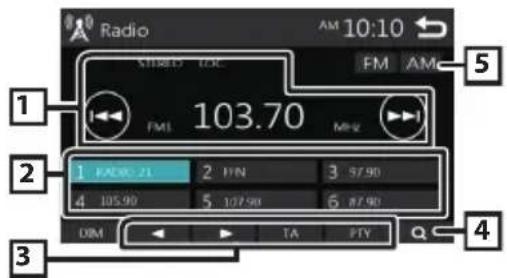
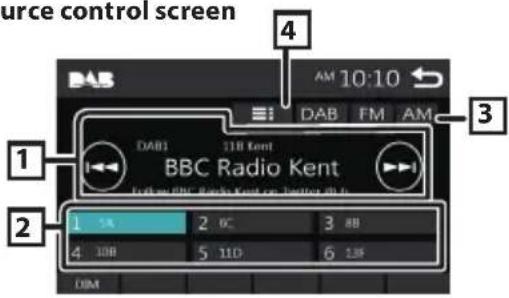
Source control screen
EN
1 Displays the information of the current station: PS name, Frequency, PTY Genre, Indicator Items [I<<][▶▶]: Touch to the next frequency automatically.
2 Recalls the memorized station.
When touched for 2 seconds, stores the current receiving station in memory.
3 ◀:Tunes in a station with good reception manually.
[TA]: Sets the traffic information mode.
"ON", "OFF" (Default)
[PTY]: Select the available Program Type.
*1 If "AF" is set to ON on the Tuner screen, only RDS stations are received.
*2 FM only
4 [ ]Presets stations automatically.
5 [FM]: Switches the FM band. "FM1", "FM2", "FM3"
[AM]: Switches the AM band. "AM1", "AM2"
Presetting stations
Storing stations in the memory
You can preset 18 stations for FM and 12 stations for
AM.
1 Touch [FM] or [AM] to select the band.
2 Touch [ ]
The local stations with the strongest signals are found and stored automatically.
- If "AF" is set to "ON" on the Tuner screen, only RDS stations are stored in the memory.
3 Touch desired item from the preset list.
Preset station starts.
- Touch [] to moves to the upper hierarchy.
NOTE
• The source control screen appears when you touch
[ ] the top hierarchy.
Tuner
Manual memory
You can store the current receiving station in memory.
1 Tune in to a station you want to preset.
2 Touch and hold [#] (#:1-6) in which you want to store the station.
Recalling the preset station
1 Touch [#] (#:1-6).
NOTE
- Only frequencies are registered as preset stations. Information about RDS stations is not registered.
FM RDS features
Search by program type
1 Touch [PTY].
2 Select a program type from the list.
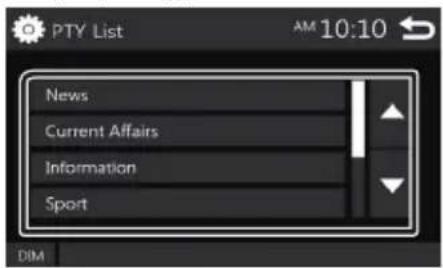
PTY Search starts.
Traffic Information
1 Touch [TA].
Switches to the traffic information automatically when the traffic bulletin starts. (TA indicator lights up.)
"ON", "OFF" (Default)
- If "AF" is set to "ON" on the Tuner screen, the station is switched to the RDS station.
When the traffic bulletin starts
The Traffic Information screen appears automatically.
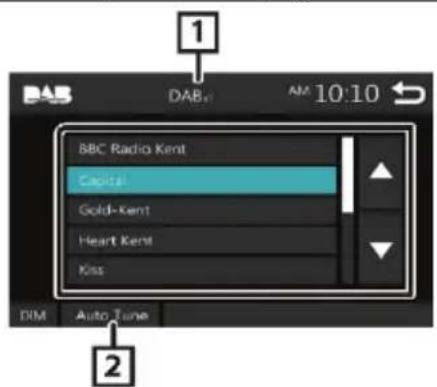
DAB Tuner(Optional)
DAB Tuner Basic Operation
1 Press the < > button.
2 Touch [Tuner].
Source control screen
1 Displays the information of the current station: PS name, Frequency, PTY Genre, Indicator Items
[1<<][▶▶]: Touch to the next frequency automatically.
2 Recalls the memorized station.
When touched for 2 seconds, stores the current receiving station in memory.
3 [FM]: Switches the FM band.
"FM1", "FM2", "FM3"
[AM]: Switches the AM band.
"AM1", "AM2"
[DAB]: Switches the DAB band.
4 [≡]: Access to DAB programme list.
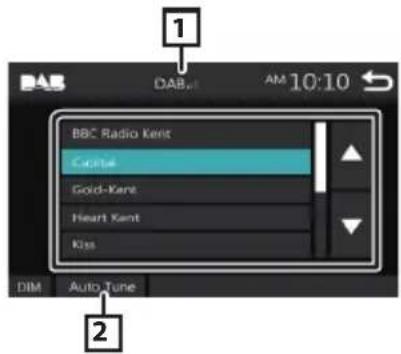
1 [DAB.1]: DAB signal icon
2 Auto search DAB station
3 Touch desired item from the preset list.
Preset station starts.
- Touch [] moves to the upper hierarchy.
NOTE
• The source control screen appears when you touch
[ ] the top hierarchy.
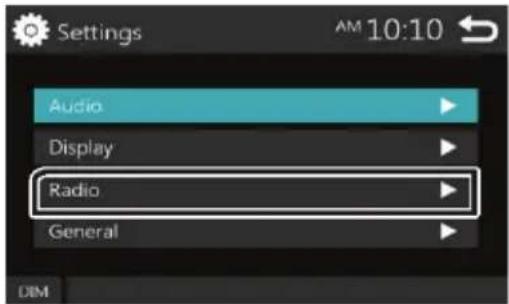
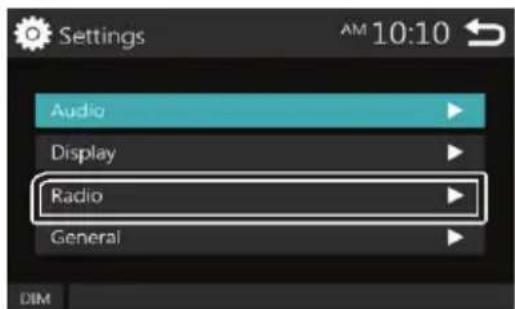
Tuner
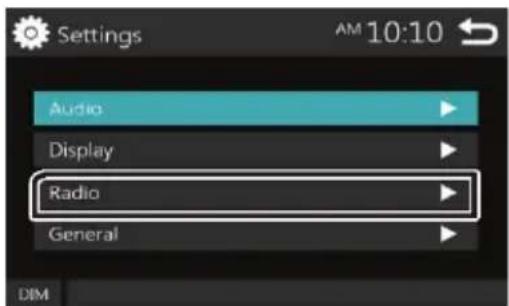
Tuner Setup
Function menu
1 Press the < > button.
2 Touch [Settings].
3 Touch [Tuner].
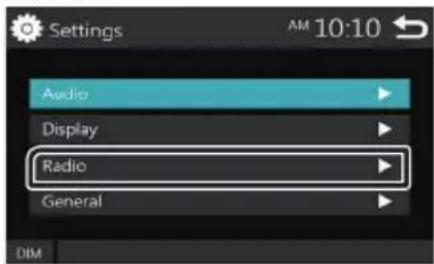
4 Set each item as follows.

Area \*1
North America (Default): For North/Central/South America, AM/FM intervals: 10 kHz/200 kHz.
South America: For some South American countries, AM/FM intervals: 10 kHz/50 kHz.
Europe: For Europe, AM/FM intervals: 9 kHz/50 kHz.
Stereo
Determines whether to receive stereo broadcasts in the stereo mode or monaural mode (the MONO indicator lights up). "ON" (Default), "OFF"
Local
Tunes in only to the stations with sufficient signal strength. (LOC indicator lights up.) "ON", "OFF" (Default)
RDS Clock Sync
Synchronizing the Radio Data System station time data and this unit's clock. "ON" (Default), "OFF"
AF ^*2
When station reception is poor, automatically switches to the station that is broadcasting the same program over the same Radio Data System network. "ON" (Default), "OFF"
*1 North America, South America sales area only
*2 Europe, CIS sales area only
5 Touch [→].

External Components
Using external audio/video players
Starting playback
1 Connect an external component to the AV-IN input terminal.
2 Press the <>button.
3 Touch [AV-IN].
4 Turn on the connected component and start playing the source.
Rear view camera
To use a rear view camera, the REVERSE lead connection is required. For connecting a rear view camera.
Displaying the picture from the rear view camera
The rear view screen is displayed when you shift the gear to the reverse (R) position.
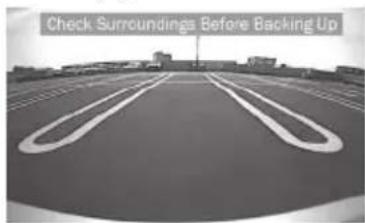
• To erase the caution message, touch the screen.
Bluetooth smartphone
Register your smartphone to the unit
1 Turn on the Bluetooth function on your smartphone/cell-phone.
2 Search the unit from your smartphone/cell-phone. If a PIN code is required, enter the PIN code ("0000").
• appears when the Bluetooth smartphone is connected.
• 🎶 appears when the Bluetooth audio player is connected.
Disconnecting the device
- Turn off the Bluetooth function from your smartphone/cell-phone.
- Turn off the ignition switch.
Receive a phone call
1 Touch [
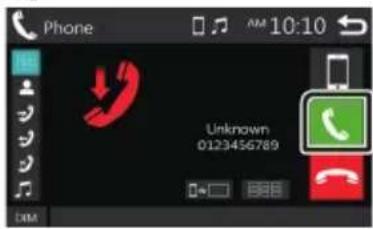
• [ ]. Reject an incoming call.
Operations during a call
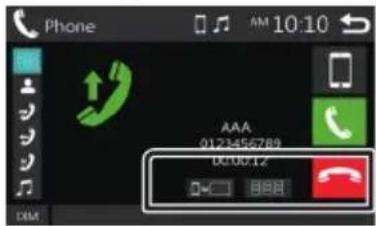

Ending a call

You can send tones by touching desired keys on the screen.

- Touch [ ] to close the window.
Switches the speaking voice output between cell-phone and speaker.
- Adjust the receiver volume Rotate the VOLUME button.
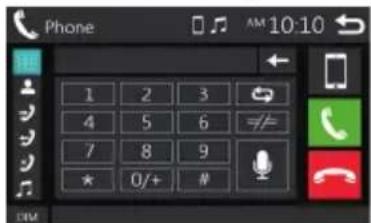
Make a phone call
1 Press the < > button.
2 Touch [Phone].
3 See the table below for each operation method.
• [ ] : Disconnects the Bluetooth smartphone.
• [ ] : Closes the screen for sending tones while talking.
• [ ] : Displays the screen for deleting the previously registered Bluetooth devices.
Call by entering a phone number

1) Touch
2) Enter a phone number with number keys.
3) Touch [ ]
Make a call
- Touch [←] to delete the last entry.
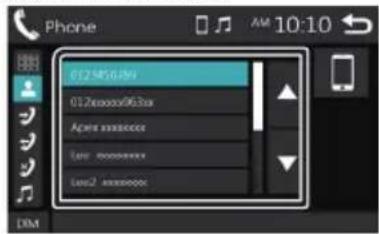
Call using call records
1) Touch [ ] (Incoming Calls), [ ] (Outgoing Calls), [ ] (Missed Calls).
2) Select the phone number from the list.
Make a call
Bluetooth smartphone
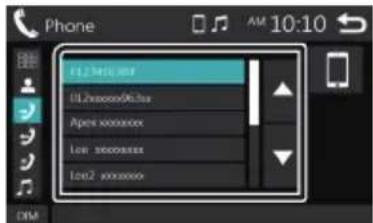
Call using the phonebook
1) Touch [ ]
2) Select the name from the list.
Make a call
• [ ] : Updates the phonebook. Touch this button after you have made a change to the phonebook of your cell-phone.
Playing Bluetooth Audio Device
1 Press the <> button.
2 Touch [BT Audio].
Source control screen

1 [Play or pauses.
[◀]: Searches the previous/next content.
2 Displays the information of the current file. Only a file name and a folder name are displayed if there is no tag information.
3 ▶, etc.: Playback status
: Repeat playback mode indicator *
✗ : Random playback mode indicator *
* The settings on the Bluetooth audio device are displayed.
NOTE
• Operations and display indications may differ according to their availability on the connected device.
Controlling Audio
Controlling General Audio
1 Press the < > button.
2 Touch [Settings].
3 Touch [Audio].
4 Touch [Sound Effect].
5 Touch [ ◀▶ ].
6 Set each item as follows.
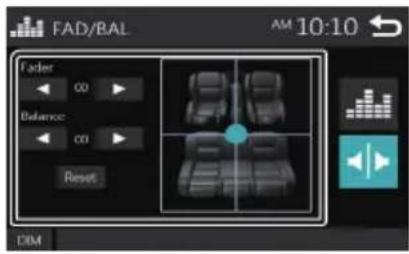
Fader
Adjust the front and rear volume balance.

12 (front) to -12 (rear)
Balance
Adjust the left and right volume balance.

12 (right) to -12 (left)
[Reset]
To clear the adjustment.
Loudness
1 Press the < > button.
2 Touch [Settings].
3 Touch [Audio].
4 Touch [Loudness].
Sets the amounts of boost of low and high tones. "ON", "OFF" (Default)


Controlling Audio
Equalizer Control
1 Press the < > button.
2 Touch [Settings].
3 Touch [Audio].
4 Touch [Sound Effect].
5 Set each item as follows.
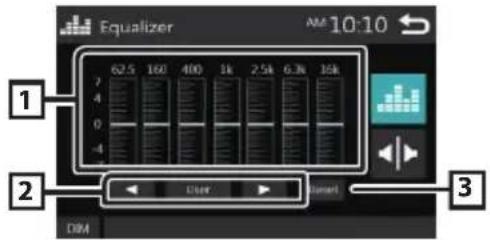
1 You can select frequency bar and adjust its level. (-7 to +7)
- The adjustments are stored and "User" is activated.
2 To recall the preset equalizer curve.
3 The "User" preset and the current EQ curve returns to flat.
Subwoofer settings
1 Press the <> button.
2 Touch [Settings].
3 Touch [Audio].
4 Touch [Subwoofer].
5 Set each item as follows.
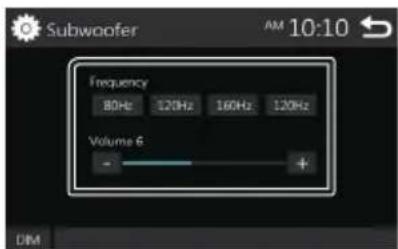
Frequency
[80Hz], [120Hz],
[160Hz], [OFF]
Volume
[-], [+]
Low Pass Filter adjustment. / [OFF]: Turns off the subwoofer output. (Default OFF)
Adjusts the subwoofer level. 0 to 12 (Default 6)
Installation
Before Installation
Before installation of this unit, please note the following precautions.
WARNINGS
- If you connect the ignition wire (red) and the battery wire (yellow) to the car chassis (ground), you may cause a short circuit, that in turn may start a fire. Always connect those wires to the power source running through the fuse box.
- Do not cut out the fuse from the ignition wire (red) and the battery wire (yellow). The power supply must be connected to the wires via the fuse.
CAUTION
- Install this unit in the console of your vehicle. Do not touch the metal part of this unit during and shortly after the use of the unit. Metal part such as the heat sink and enclosure become hot.
NOTE
- Mounting and wiring this product requires skills and experience. For best safety, leave the mounting and wiring work to professionals.
- Make sure to ground the unit to a negative 12V DC power supply.
- Do not install the unit in a spot exposed to direct sunlight or excessive heat or humidity. Also avoid places with too much dust or the possibility of water splashing.
- Do not use your own screws. Use only the screws provided. If you use the wrong screws, you could damage the unit.
- If your car's ignition does not have an ACC position, connect the ignition wires to a power source that can be turned on and off with the ignition key. If you connect the ignition wire to a power source with a constant voltage supply, such as with battery wires, the battery may be drained.
- If the console has a lid, make sure to install the unit so that the front panel will not hit the lid when closing and opening.
- If the fuse blows, first make sure the wires aren't touching to cause a short circuit, then replace the old fuse with one with the same rating.
• Insulate unconnected wires with vinyl tape or other similar material. To prevent a short circuit, do not remove the caps on the ends of the unconnected wires or the terminals. - Secure the wires with cable clamps and wrap vinyl tape around the wires that comes into contact with metal parts to protect the wires and to prevent short circuit.
- Connect the speaker wires correctly to the terminals to which they correspond. The unit may be damaged or fail to work if you share the ⏰ires or ground
Installation
them to any metal part in the car.
- When only two speakers are being connected to the system, connect the connectors either to both the front output terminals or to both the rear output terminals (do not mix front and rear). For example, if you connect the connector of the left speaker to a front output terminal, do not connect the connector to a rear output terminal.
• After the unit is installed, check whether the brake lamps, blinkers, wipers, etc. on the car are working properly. - Do not press hard on the panel surface when installing the unit to the vehicle. Otherwise scars, damage, or failure may result.
- Reception may drop if there are metal objects near the Bluetooth antenna.

Supplied accessories for installation
| 1 |  x1 x1 | 2 |  x2 x2 |
| 3 |  x1 x1 | 4 | 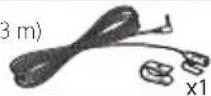 |
| 5 | 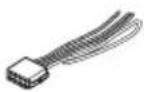 x1 x1 | 6 | 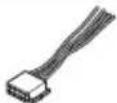 x1 x1 |
| 7 |  (M5 × 6 mm) x4 (M5 × 6 mm) x4 | 8 |  (N mm) x4 (N mm) x4 |
Installation procedure
1) To prevent a short circuit, remove the key from the ignition and disconnect the terminal of the battery.
2) Make the proper input and output wire connections for each unit.
3) Connect the wire on the wiring harness.
4) Take Connector B on the wiring harness and connect it to the speaker connector in your vehicle.
5) Take Connector A on the wiring harness and connect it to the external power connector on your vehicle.
6) Connect the wiring harness connector to the unit.
7) Install the unit in your car.
8) Reconnect the terminal of the battery.
9) Press the reset button.
Installing the unit
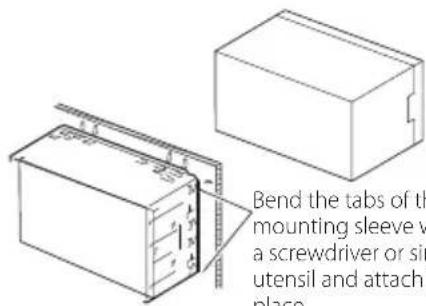
Bend the tabs of the mounting sleeve with a screwdriver or similar utensil and attach it in place.
NOTE
- Make sure that the unit is installed securely in place. If the unit is unstable, it may malfunction (eg, the sound may skip).
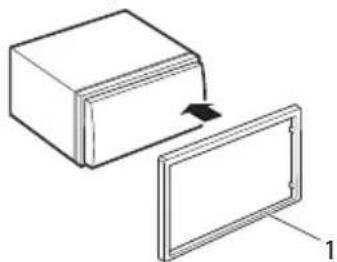
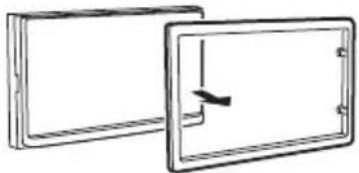
Trim plate
1) Attach accessory 1 to the unit.
natural_image
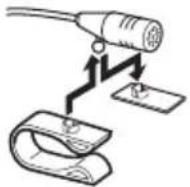
Diagram showing a rectangular box being inserted into a flat panel, with an arrow indicating the insertion direction (no text or symbols present)Microphone unit
1) Check the installation position of the microphone (accessory 4).
2) Clean the installation surface.
3) Remove the separator of the microphone (accessory 4 ), and stick the microphone to the place shown below.
4) Wire the microphone cable up to the unit with it secured at several positions using tape or other desired method.
5) Adjust the direction of the microphone (accessory 4 to the driver.
Installation
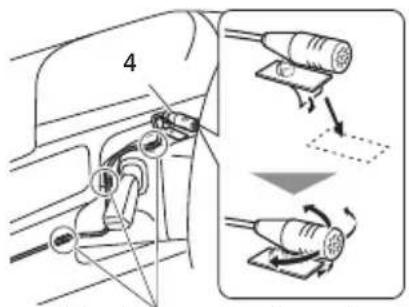
Fix a cable with a commercial item of tape.
NOTE
- Swap the clips if necessary.
Removing the trim plate
Pull the trim plate forward.
natural_image
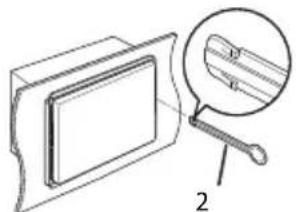
Two rectangular panels with internal lines and mounting holes, no text or symbols presentRemoving the unit
1) Remove the trim plate by referring to step 1 in "Removing the trim plate".
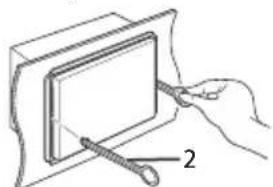
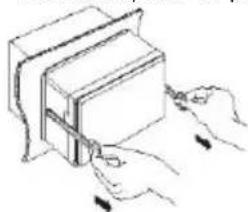
2) Insert the extraction key (accessory 2) deeply into the slot as shown. (The protrusion at the tip of the extraction key must face toward the unit.)
natural_image
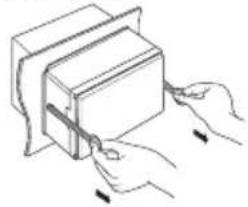
Diagram showing a mechanical component with a magnified inset view of a textured surface (no text or symbols)3) With the inserted extraction key secured, insert the other extraction key into the slot.
natural_image
Hand holding a tool interacting with a rectangular object, labeled with number 2 (no text or symbols on the object itself)4) Pull out the unit halfway.
natural_image
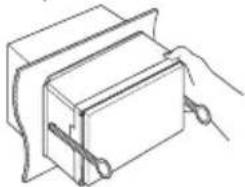
Illustration of hands using a tool to cut or adjust a rectangular object (no text or symbols visible)NOTE
- Be careful to avoid injury from the catch pins on the extraction key.
5) Pull the unit all the way out with your hands, being careful not to drop it.
natural_image
Line drawing of a hand holding a rectangular object with a handle, no text or symbols presentInstallation
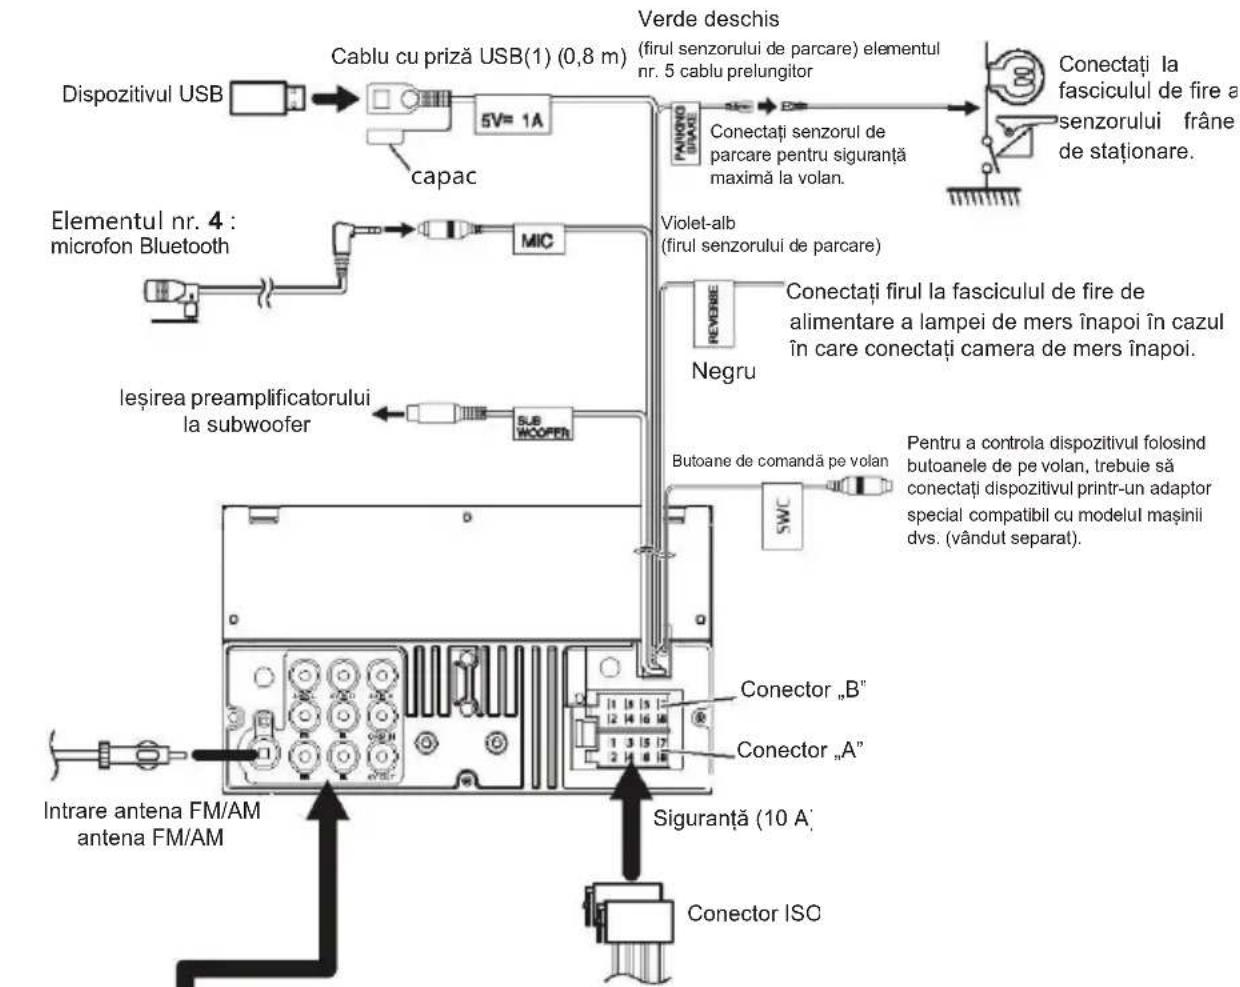
Connecting wires to terminals
![USB device USB terminal[1] (0.8 m) 5V 1A Cap Light Green (Parking sensor wire) Accessory 5 Extension cable For best safety, be sure to connect the parking sensor. Connect to the vehicle's parking brake detection switch harness. Accessory 4 : Bluetooth Microphone MIC Purple/White (Reverse sensor wire) Black Connect to vehicle's reverse lamp harness when using the optional rear view camera. Subwoofer Preout SUB INWOOFER Steering Wheel Control SWC To use the steering wheel remote control feature, you need an exclusive remote adapter (not supplied) matched to your car. FM/AM antenna input FM/AM antenna Connector B Connector A Fuse (10A) ISO Connector](/content/2026/03/556581/images/b9d473836491a7fbc39a937899e5c0d6e759617f2892e8064e1e58e70696e38c.jpg)
Wiring harness connector function guide

USB maximum power supply current: DC 5 V = 1 A
^[2] Max. 300mA, 12V
| Pin | Color and function | ||
| A-4 | Yellow | Battery | |
| A-5 | Blue/White[2] | Power Control | |
| A-7 | Red | Ignition (ACC) | |
| A-8 | Black | Earth (Ground) Connection | |
| B-1/ B-2 | Purple (+) / Purple/Black (-) | Rear Right | |
| B-3/ B-4 | Gray (+) / Gray/Black (-) | Front Right | |
| B-5/ B-6 | White (+) / White/Black (-) | Front Left | |
| B-7/ B-8 | Green (+) / Green/Black (-) | Rear Left | |
• Speaker Impedance: 4-8 Ω
CAUTION
Before you connect the commercially available ISO connectors to the unit, check the following condition:
- Make sure that the pin assignment of the connector matches with the unit.
• Take extra notice of the power wire. - In case battery wire and ignition wire are not corresponding then change them accordingly.
- In case the car does not have an ignition wire, use a commercially available interface.
Technical data
Voltage supply
Operating voltage: 10.5 – 14.4 V
Current consumption
In operation: < 10 A
10 sec. after switch-off : < 3.5 mA
Amplifier
Output power: 4 x 24 watts sine at
14.4 V at 4 ohms.
4 x 50 watts max. power
Tuner
Wavebands in Europe/Asia/Thailand:
FM: 87.5 – 108 MHz
AM (MW): 531 - 1,602 kHz
LW (Europe only): 153 – 279 kHz
Wavebands in the US:
FM: 87.7 - 107.9 MHz
AM (MW): 530 - 1,710 kHz
Wavebands in South America:
FM: 87.5 – 107.9 MHz
AM (MW): 530 - 1,710 kHz
FM frequency response: 30 – 15,000 Hz
Pre-amp out
4 channels: 4 V
Dimensions and weight
W x H x D: 178 x 100 x 130 mm
Weight: approx. 1.4kg
Obsah
Úvod 2
Audio (zvuk)
Off (VYP), x2, x3, x4, x5, 1/2, 1/3, 1/4
[3] [2] [<] [>]: Posouvá (roluje) obsah obrazovky.
natural_image
Gradient color bar transitioning from black to white (no text or symbols)

natural_image
Color palette bar with 12 distinct color swatches (yellow, magenta, blue, etc.) in a horizontal row (no text or symbols)TIP
TIP
Area (oblast)\*1

Ukončení hovoru

Fader

Frequency (frekvence) [80Hz], [120Hz], [160Hz], [OFF] (VYP)
natural_image
Pure electrical circuit lines without any symbolsAnténa Bluetooth
natural_image
Diagram showing a rectangular block being placed into a rectangular frame with an arrow indicating direction (no text or symbols)Mikrofon
natural_image
Two rectangular frames with a vertical arrow indicating direction, no text or symbols presentDemontáž zařízení
natural_image
Diagram showing a magnified view of a mechanical component with a handle, labeled with number 2 (no text or symbols present)natural_image
Hand holding a tool interacting with a rectangular object, no text or symbols visiblenatural_image
Illustration of hands using a tool to adjust or install a rectangular object (no text or symbols visible)TIP
natural_image
Pure technical line drawing of a mechanical component with no text or symbols01_AMSTERDAM 290_1 08.04.2019
Montáž
Κουμπί επαναφοράς
01_AMSTERDAM 290_1
08.04.2019
Audio ['Hxoc]
Sound Effect [Εφέ ήχου]
3 (MODE) [ΛΕΙΤΟΥΡΓΙΑ]
4 + / - (Volume) ['Evταση]
ΕΠΙΣΗΜΑΝΣΗ
Area\*1 [Περιοχή]

01_AMSTERDAM 290_1 08.04.2019
'Ελεγχος ήχου
natural_image
Diagram showing a rectangular block being placed into a rectangular frame with an arrow indicating direction (no text or symbols)Μικρόφωνο
natural_image
Two rectangular frames with a central arrow, no text or symbols presentnatural_image
Diagram showing a magnified view of a mechanical component with a labeled part (no text or symbols present)natural_image
Illustration of a hand using a tool to cut or adjust a rectangular object, with no visible text or symbols.natural_image
Line drawing of hands using a tool to cut or mark a rectangular object (no text or symbols)ΕΠΙΣΗΜΑΝΣΗ
natural_image
Simple line drawing of a mechanical component or bracket (no text or symbols)Εγκατάσταση
Botón de reinicio
Audio (sonido)
SUGERENCIA
1 Toque [#] (#: 1–6).
SUGERENCIA
Area (área)*1
01_AMSTERDAM 290_1 08.04.2019
Ajuste de sonido
Corrección del tono
1 Pulse el botón

natural_image
Pure electrical circuit lines without any symbolsAntena Bluetooth
natural_image
Diagram showing a rectangular box being placed into a smaller rectangular frame with an arrow indicating rotation (no text or symbols present)Micrófono
natural_image
Two rectangular frames with a diagonal line and a small arrow inside, no text or symbols present.natural_image
Hand holding a pen or ruler inserted into a rectangular object, with no visible text or symbolsnatural_image
Illustration of hands using a tool to adjust or install a rectangular object (no text or symbols visible)SUGERENCIA
natural_image
Pure technical line drawing of a mechanical component with no text or symbolsMontaje
AM (ondas medias): 531 – 1.602 kHz
LW (ondas largas) (solo 153 – 279 kHz
Europa):
AM (ondas medias): 530 – 1.710 kHz
AM (ondas medias): 530 – 1.710 kHz
Característica de
AM (MW): 531 - 1.602 kHz
AM (MW): 530 - 1.710 kHz
AM (MW): 530 - 1.710 kHz
Audio (son)
Sound Effect (effet sonore)
3 Retirez l'iPod/iPhone.
INDICATION

▶: Lecture / pause.
Fader

01_AMSTERDAM 290_1 08.04.2019
Réglage du son
natural_image
Diagram showing a rectangular box being placed into a smaller rectangular frame with an arrow indicating rotation (no text or symbols)Microphone
natural_image
Two rectangular frames with a diagonal line and a small arrow, no text or symbols presentnatural_image
Technical line drawing of a mechanical component with a magnified inset showing internal structure (no text or symbols)natural_image
Hand holding a pen writing on a blank sheet, no text or symbols presentnatural_image
Line drawing of hands using a tool to cut or mark a rectangular object (no text or symbols)INDICATION
natural_image
Simple line drawing of a mechanical component or bracket with no text or symbolsInstallation
Visszaállítás gomb
01_AMSTERDAM 290_1 08.04.2019
01_AMSTERDAM 290_1 08.04.2019
Audio (hang)
1 Óra kijelző
TIPP
3 Érintse meg a [Tuner] gombot.
Area (terület)*1

Hívás megszakítása


Hangbeállítás
Hangszínszabályozás
1 Nyomja meg: <>
natural_image
Pure electrical circuit lines without any symbolsBluetooth antenna
natural_image
Diagram showing a rectangular block being placed into a smaller rectangular frame with an arrow indicating direction (no text or symbols)Mikrofon
natural_image
Two rectangular frames with a diagonal line and a small arrow, no text or symbols presentA készülék kivétele
natural_image
Diagram showing a magnified view of a rectangular object with a magnified inset showing internal parallel lines (no text or symbols)natural_image
Hand holding a tool interacting with a rectangular object, no text or symbols visiblenatural_image
Illustration of hands using a tool to cut or mark a rectangular object (no text or symbols visible)TIPP
natural_image
Simple line drawing of a mechanical component with no text or symbols01_AMSTERDAM 290_1 08.04.2019
Beszerelés
Pulsante di reset
01_AMSTERDAM 290_1 08.04.2019
Audio (suono)
CONSIGLIO
3 Toccare [Tuner].
Area (zona)*1

Fine chiamata

01_AMSTERDAM 290_1 08.04.2019

natural_image
Diagram showing a rectangular block being placed into a rectangular frame with an arrow indicating direction (no text or symbols)Microfono
natural_image
Two rectangular panels with internal frame and mounting holes, no text or symbols visiblenatural_image
Diagram of a magnifying glass inspecting a rectangular component, with no visible text or symbolsnatural_image
Hand holding a pen or ruler inserted into a rectangular object, with no visible text or symbolsnatural_image
Illustration of hands using a tool to adjust or install a rectangular object (no text or symbols visible)CONSIGLIO
natural_image
Simple line drawing of a mechanical component or bracket with no text or symbolsInstallazione
AM (onde medie): 531 – 1.602 kHz
LW (onde lunghe) (solo Europa): 153 – 279 kHz
AM (onde medie): 530 – 1.710 kHz
AM (onde medie): 530 – 1.710 kHz
Resetknop
Audio (geluid)
Sound Effect (geluidseffect)
1 Afstandsbedieningssignaalsensor
AANWIJZING
natural_image
Gradient color bar transitioning from black to white (no text or symbols)

natural_image
Color palette bar with 12 distinct color swatches (yellow, magenta, blue, etc.) arranged horizontally.selecteren.
Area (gebied)\*1


Breng de verbinding tot stand.

Geluidsregeling
Tooncorrectie
standaardinstelling is "OFF" -
uitgeschakeld)
Volume [-], [+] Volumeregeling van de subwoofer.
natural_image
Pure electrical circuit lines without any symbolsBluetooth-antenne
Bevestigingsaccessoires inbegrepen

Installatiemethode
natural_image
Diagram showing a rectangular box being placed on a flat plate, with an arrow indicating the direction of movement (no text or symbols present)Microfoon
natural_image
Simple line drawing of two rectangular panels with a diagonal arrow indicating direction (no text or symbols)natural_image
Technical line drawing of a mechanical component with a magnified inset showing a magnified detail (no text or symbols)natural_image
Hand holding a tool interacting with a rectangular panel (no text or symbols visible)natural_image
Illustration of hands using a tool to adjust or install a rectangular block (no text or symbols visible)AANWIJZING
natural_image
Simple line drawing of a hand holding a rectangular object with a curved handle (no text or symbols)
01_AMSTERDAM 290_1 08-04-2019
Spis treści
Wstęp 2
Audio (dźwięk)
1 Wskaźnik zegara
WSKAZÓWKA
Area (obszar)\*1

Wykonaj połączenie.

01_AMSTERDAM 290_1 08.04.2019
Regulacja dźwięku
[160Hz], [OFF] (WYL)
Regulacja filtru
natural_image
Pure electrical circuit lines without any symbolsAntena Bluetooth
natural_image
Diagram showing a rectangular box being placed into a larger rectangular frame with an arrow indicating rotation (no text or symbols present)Mikrofon
natural_image
Two rectangular frames with a diagonal line and a small arrow, no text or symbols presentDemontaż urządzenia
natural_image
Technical line drawing of a mechanical component with a magnified inset showing internal structure (no text or symbols)natural_image
Hand holding a pen writing on a blank sheet, no text or symbols presentnatural_image
Line drawing of hands using a tool to cut or mark a rectangular object (no text or symbols)WSKAZÓWKA
natural_image
Simple line drawing of a mechanical component or bracket with no text or symbolsMontaż
Buton resetare
Note privind securitatea
Audio (sune)
Sound Effect (efect sonor)
INDICATIE
Area (zonă)\*1

Încheierea apelului

Efectuati un apel.
natural_image
Pure electrical circuit lines without any symbolsAntena Bluetooth
natural_image
Diagram showing two 3D rectangular blocks with an arrow indicating a transformation or movement, no text or symbols present.Microfon
natural_image
Simple line drawing of two rectangular panels with a diagonal arrow indicating direction (no text or symbols)natural_image
Hand holding a pen and ruler inside a rectangular frame, with no visible text or symbolsnatural_image
Line drawing of hands using a tool to adjust or install a rectangular block (no text or symbols)INDICATIE
natural_image
Simple line drawing of a mechanical component with a handle and mounting bracket (no text or symbols)RO
01_AMSTERDAM 290_1 08.04.2019
Montaj
Conectarea firelor la borne
AM (unde medii): 530 – 1.710 kHz
AM (unde medii): 530 – 1.710 kHz
Кнопка сброса
Audio (звук)
COBET
3 Коснитесь кнопки [Tuner].
Area (регион)\*1

Завершение вызова

▶: Воспроизведение / пауза.
01_AMSTERDAM 290_1 08.04.2019
Регулировка звука
natural_image
Diagram showing a rectangular block being placed into a rectangular frame with an arrow indicating direction (no text or symbols)Микрофон
natural_image
Two rectangular panels with internal frame and mounting holes, no text or symbols visibleДемонтаж устройства
natural_image
Hand holding a pen writing on a blank sheet, no text or symbols presentnatural_image
Illustration of hands using a tool to adjust or install a rectangular object (no text or symbols visible)COBET
natural_image
Pure technical line drawing of a mechanical component or bracket (no text or symbols)Установка
4 Dotaknite se ustrezne tipke in nastavite vrednost.

Audio (zvok)
6 S tipkama [▲] in [▼] nastavite uro.
- Če ste izbrali obliko prikaza [12], pred nastavitvijo ure pritisnite tipko [AM] (dopoldan) oziroma [PM] (popoldan)
7 Pritisnite


Osnove uporabe
Funkcije tipk na sprednjem panelu
1 Prikaz ure Pritisnite za prikaz ure.
OPOMBA
Lahko shranite 18 postaj v pasu FM in 12 v pasu AM.
1 Pritisnite [FM] ali [AM] za izbiro radijskega pasu.
Pritisnite [ ].
3 [FM]: Izbira pasu FM
FM1, FM2, FM3
[AM]: Izbira pasu AM
AM1, AM2
[DAB]: Izbira pasu DAB
DAB1, DAB2, DAB3
4 [■]: Dostop do seznama programov DAB.
1 [DAB,Ⅱ]: Ikona signala DAB.
3 Pritisnite [Tuner].
Area (območje)\*1
North America (Severna Amerika - privzeto): za
Severno, Srednjo in Južno Ameriko,
frekvenčni interval v pasu AM in FM je 10 kHz
oziroma 200 kHz.
South America (Južna Amerika): za nekatere države Južne Amerike, frekvenčni interval v pasu AM/FM je 10 kHz/50 kHz.
- Dotaknite se zaslona, da zaprete okence z opozorilom.
Telefoni z Bluetooth
Povezovanje pametnega telefona in naprave
1 Vklopite Bluetooth v svojem mobilnem telefonu.

Končanje pogovora

Fader

01_AMSTERDAM 290_1 08.04.2019
Regulacija zvoka
natural_image
Diagram showing a rectangular block being placed on a larger rectangular frame, with an arrow indicating direction (no text or symbols present)Mikrofon
natural_image
Simple line drawing of two rectangular panels with a vertical arrow indicating direction (no text or symbols)Odstranitev naprave
natural_image
Hand holding a tool interacting with a rectangular object (no text or symbols visible)4) Izvlecite napravo do polovice.
natural_image
Illustration of hands using a tool to adjust or install a rectangular block (no text or symbols visible)OPOMBA
- Pazite, da se ne porežete s kavlji, ki so del orodij za odstranitev.
5) Z rokami popolnoma izvlecite napravo. Pazite, da naprava ne pade.

natural_image
Pure technical line drawing of a mechanical component without any text, numbers, or symbolsNamestitev
2
PT
Botão de redefinir
Audio (som)
Subwoofer (sons graves)
Exibe o ecrã de "Subwoofer".
Display (ecră)
3 Desligue o iPod/iPhone.
DICA
3 Toque em [Tuner].
Area (área)\*1
North America (América do Norte – predefinido): para a América do Norte, Central e do Sul,

Terminar a chamada

Faça uma chamada.
Telefones com Bluetooth

Ajuste de som
Correção de tom
natural_image
Pure electrical circuit lines without any symbolsAntena Bluetooth
natural_image
Diagram showing a rectangular block being placed into a larger rectangular frame, with an arrow indicating direction (no text or symbols present)Microfone
natural_image
Simple line drawing of two rectangular panels with a vertical arrow indicating direction (no text or symbols)natural_image
Technical line drawing of a mechanical component with a magnified inset showing internal detail (no text or symbols)natural_image
Illustration of a hand using a tool to cut or mark a rectangular object, with no visible text or symbols.natural_image
Illustration of hands using a tool to adjust or install a rectangular object (no text or symbols visible)DICA
natural_image
Simple line drawing of a hand holding a rectangular object with a handle (no text or symbols)Instalação
Competence Center Car Multimedia
Evo-Sales GmbH
Hastenbecker Weg 33