EWUS020B5B - Wine cellar ELECTROLUX - Free user manual and instructions
Find the device manual for free EWUS020B5B ELECTROLUX in PDF.
| Brand | Electrolux |
| Model | EWUS020B5B |
| Product type | Wine cellar |
| Dimensions (H x W x D) without handle | 820 x 295 x 571 mm |
| Dimensions (H x W x D) with handle and service space | 822 x 300 x 648 mm |
| Total space required for installation | 822 x 348 x 855 mm |
| Storage capacity | 20 bottles of Bordeaux (0.75 L) |
| Adjustable temperature range | +5 °C to +18 °C |
| Default temperature | +12 °C |
| Power supply | 220-240 V, 50 Hz |
| Climate class | 16 °C to 38 °C (ambient temperature) |
| Refrigerant | Isobutane (R600a), flammable gas |
| Interior lighting | LED, replacement by authorized service |
| Main functions | Wine storage, temperature adjustment, lighting, humid box for humidity |
| Recommended wine types and temperatures | Champagne +6 to +8 °C, whites +10 to +12 °C, rosés and light reds +12 to +16 °C, aged reds +14 to +16 °C |
| Maintenance and cleaning | Clean the interior with warm water and baking soda; do not use abrasive detergents; automatic defrost |
| Child safety | Use by children aged 8 years and above under supervision; children aged 3 to 8 can load/unload |
| Installation | By qualified professional; do not expose to heat or sunlight; allow 4 hours before plugging in after door reversal |
| Spare parts availability | Thermostats, sensors, boards, LEDs, handles, hinges (7 years); door gaskets (10 years) |
| Door reversibility | Possible, tools required (screwdriver, spatula) |
| Noise | Sound level not specified, may vibrate if poorly positioned |
| Weight | Not specified |
Frequently Asked Questions - EWUS020B5B ELECTROLUX
User questions about EWUS020B5B ELECTROLUX
0 question about this device. Answer the ones you know or ask your own.
Ask a new question about this device
Download the instructions for your Wine cellar in PDF format for free! Find your manual EWUS020B5B - ELECTROLUX and take your electronic device back in hand. On this page are published all the documents necessary for the use of your device. EWUS020B5B by ELECTROLUX.
USER MANUAL EWUS020B5B ELECTROLUX
WE'RE THINKING OF YOU
Thank you for purchasing an Electrolux appliance. You've chosen a product that brings with it decades of professional experience and innovation. Ingenious and stylish, it has been designed with you in mind. So whenever you use it, you can be safe in the knowledge that you'll get great results every time.
Welcome to Electrolux.
Visit our website to:

Get usage advice, brochures, trouble shooter, service and repair information: www.electrolux.com/support

Register your product for better service: www.registerelectrolux.com

Buy Accessories, Consumables and Original spare parts for your appliance: www.electrolux.com/shop
CUSTOMER CARE AND SERVICE
Always use original spare parts.
When contacting our Authorised Service Centre, ensure that you have the following data available: Model, PNC, Serial Number.
The information can be found on the rating plate.

Warning / Caution-Safety information

General information and tips

Environmental information
Subject to change without notice.
1. SAFETY INFORMATION
Before the installation and use of the appliance, carefully read the supplied instructions. The manufacturer is not
responsible for any injuries or damage that are the result of incorrect installation or usage. Always keep the instructions in a safe and accessible location for future reference.
1.1 Children and vulnerable people safety
- This appliance can be used by children aged from 8 years and above and persons with reduced physical, sensory or mental capabilities or lack of experience and knowledge if they have been given supervision or instruction concerning the use of the appliance in a safe way and understand the hazards involved.
- Children aged from 3 to 8 years are allowed to load and unload the appliance provided that they have been properly instructed.
- This appliance may be used by persons with very extensive and complex disabilities provided that they have been properly instructed.
- Children of less than 3 years of age should be kept away from the appliance unless continuously supervised.
- Children should be supervised to ensure that they do not play with the appliance.
Children shall not carry out cleaning and user maintenance of the appliance without supervision. - Keep all packaging away from children and dispose of it appropriately.
1.2 General Safety
- This appliance is for storing food and baverages only.
- This appliance is designed for single household domestic use in an indoor environment.
- This appliance may be used in, offices, hotel guest rooms, bed & breakfast guest rooms, farm guest houses and other similar accommodation where such use does not exceed (average) domestic usage levels.
-
Use this appliance for storage of wine only.
-
To avoid contamination of food respect the following instructions:
-do not open the door for long periods;
- clean regularly surfaces that can come in contact with food and accessible drainage systems;
- WARNING: Keep ventilation openings, in the appliance enclosure or in the built-in structure, clear of obstruction.
- WARNING: Do not use mechanical devices or other means to accelerate the defrosting process, other than those recommended by the manufacturer.
- WARNING: Do not damage the refrigerant circuit.
- WARNING: Do not use electrical appliances inside the food storage compartments of the appliance, unless they are of the type recommended by the manufacturer.
- Do not use water spray and steam to clean the appliance.
- Clean the appliance with a moist soft cloth. Only use neutral detergents. Do not use abrasive products, abrasive cleaning pads, solvents or metal objects.
- When the appliance is empty for long period, switch it off, defrost, clean, dry and leave the door open to prevent mould from developing within the appliance.
- Do not store explosive substances such as aerosol cans with a flammable propellant in this appliance.
- If the supply cord is damaged, it must be replaced by the manufacturer, its Authorised Service Centre or similarly qualified persons in order to avoid a hazard.
2. SAFETY INSTRUCTIONS
2.1 Installation

WARNING!
Only a qualified person must install this appliance.
- Remove all the packaging.
-
Do not install or use a damaged appliance.
-
Do not use the appliance before installing it in the built-in structure due to safety manner.
- Follow the installation instructions supplied with the appliance.
Always take care when moving the appliance as it is heavy. Always use safety gloves and enclosed footwear. -
Make sure the air can circulate around the appliance.
-
At first installation or after reversing the door wait at least 4 hours before connecting the appliance to the power supply. This is to allow the oil to flow back in the compressor.
- Before carrying out any operations on the appliance (e.g. reversing the door), remove the plug from the power socket.
- Do not install the appliance close to radiators or cookers, ovens or hobs.
- Do not expose the appliance to the rain.
- Do not install the appliance where there is direct sunlight.
- Do not install this appliance in areas that are too humid or too cold.
- When you move the appliance, lift it by the front edge to avoid scratching the floor.
- The appliance contains a bag of desiccant. This is not a toy. This is not food. Please dispose of it immediately.
2.2 Electrical connection

WARNING!
Risk of fire and electric shock.

WARNING!
When positioning the appliance, ensure the supply cord is not trapped or damaged.

WARNING!
Do not use multi-plug adapters and extension cables.
The appliance must be earthed.
- Make sure that the parameters on the rating plate are compatible with the electrical ratings of the mains power supply.
Always use a correctly installed shockproof socket.
- Make sure not to cause damage to the electrical components (e.g. mains plug, mains cable, compressor). Contact the Authorised Service Centre or an electrician to change the electrical components.
- The mains cable must stay below the level of the mains plug.
- Connect the mains plug to the mains socket only at the end of the installation. Make sure that there is access to the mains plug after the installation.
- Do not pull the mains cable to disconnect the appliance. Always pull the mains plug.
2.3 Use

WARNING!
Risk of injury, burns, electric shock or fire.

The appliance contains flammable isobutane (R600a), a natural gas high level of environmental availability. Be careful not to cause age to the refrigerant circuit tuning isobutane.
- Do not change the specification of this appliance.
- Any use of the built-in product as freestanding is strictly prohibited.
- Do not put electrical appliances (e.g. ice cream makers) in the appliance unless they are stated applicable by the manufacturer.
- If damage occurs to the refrigerant circuit, make sure that there are no flames and sources of ignition in the room. Ventilate the room.
- Do not let hot items to touch the plastic parts of the appliance.
- Do not store flammable gas and liquid in the appliance.
- Do not put flammable products or items that are wet with flammable products in, near or on the appliance.
- Do not touch the compressor or the condenser. They are hot.
2.4 Internal lighting

WARNING!
Risk of electric shock.
- Concerning the lamp(s) inside this product and spare part lamps sold separately: These lamps are intended to withstand extreme physical conditions in household appliances,
such as temperature, vibration, humidity, or are intended to signal information about the operational status of the appliance. They are not intended to be used in other applications and are not suitable for household room illumination.
2.5 Care and cleaning

WARNING!
Risk of injury or damage to the appliance.
- Before maintenance, deactivate the appliance and disconnect the mains plug from the mains socket.
- This appliance contains hydrocarbons in the cooling unit. Only a qualified person must do the maintenance and the recharging of the unit.
- Regularly examine the drain of the appliance and if necessary, clean it. If the drain is blocked, defrosted water collects in the bottom of the appliance.
2.6 Service
To repair the appliance contact the Authorised Service Centre. Use original spare parts only.
- Please note that self-repair or non-professional repair can have safety consequences and might void the guarantee.
The following spare parts will be available for 7 years after the model
3. INSTALLATION

WARNING!
Refer to Safety chapters.
has been discontinued: thermostats, temperature sensors, printed circuit boards, light sources, door handles, door hinges, trays and baskets. Please note that some of these spare parts are only available to professional repairers, and that not all spare parts are relevant for all models.
- Door gaskets will be available for 10 years after the model has been discontinued.
2.7 Disposal

WARNING!
Risk of injury or suffocation.
- Disconnect the appliance from the mains supply.
- Cut off the mains cable and discard it.
- Remove the door to prevent children and pets to be closed inside of the appliance.
- The refrigerant circuit and the insulation materials of this appliance are ozone-friendly.
- The insulation foam contains flammable gas. Contact your municipal authority for information on how to discard the appliance correctly.
- Do not cause damage to the part of the cooling unit that is near the heat exchanger.
3.1 Dimensions
| Overall dimensions1 |
| H1 mm 820 |
| W1 mm 295 |
| D1 mm 571 |
1 the height, width and depth of the appliance without the handle
| Space required in use2 |
| H2 mm 822 |
| W2 mm 300 |
| D2 mm 648 |
2 the height, width and depth of the appliance including the handle, plus the space necessary for free circulation of the cooling air
| Overall space required in use3 |
| H2 mm 822 |
| W3 mm 348 |
| D3 mm 855 |
3 the height, width and depth of the appliance including the handle, plus the space necessary for free circulation of the cooling air, plus the space necessary to allow door opening to the minimum angle permitting removal of all internal equipment
3.2 Location
To ensure appliance's best functionality, you should not install the appliance in the nearby of the heat source (oven, stoves, radiators, cookers or hobs) or in a place with direct sunlight. Make sure that air can circulate freely around the back of the cabinet.
This appliance should be installed in a dry, well ventilated indoor position.
This appliance is intended to be used at ambient temperature ranging from 16^ to 38^ .

The correct operation of the appliance can only be guaranteed within the specified temperature range.

If you have any doubts regarding where to install the appliance, please turn to the vendor, to our customer service or to the nearest Authorised Service Centre.

It must be possible to disconnect the appliance from the mains power supply. The plug must therefore be easily accessible after installation.
3.3 Electrical connection
- Before plugging in, ensure that the voltage and frequency shown on the rating plate correspond to your domestic power supply.
- The appliance must be earthed. The power supply cable plug is provided with a contact for this purpose. If the domestic power supply socket is not earthed, connect the appliance to a separate earth in compliance with current regulations, consulting a qualified electrician.
The manufacturer declines all responsibility if the above safety precautions are not observed. - This appliance complies with the E.E.C. Directives.
3.4 Levelling
When placing the appliance make sure that it stands level. This can be achieved by two adjustable feet at the bottom in front.
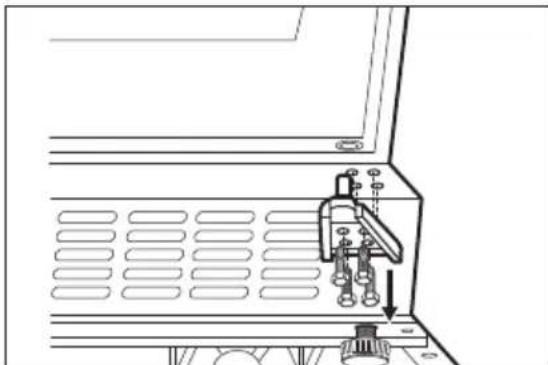
3.5 Installing the upper bracket
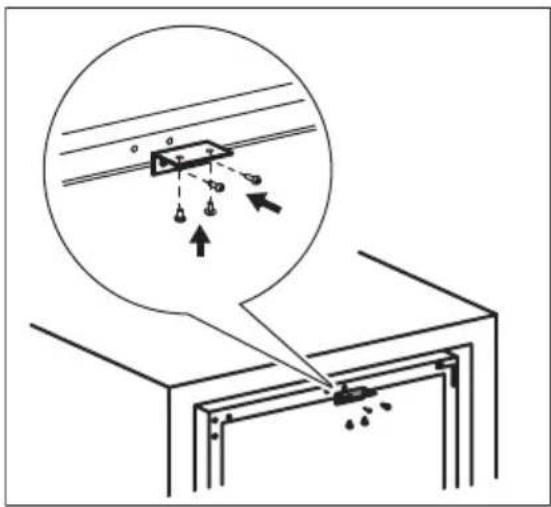
Fasten your appliance:
- Use two screws to install the upper bracket on the top of the appliance.
- Put the appliance in the cupboard and use two screws to fix the upper bracket on the cupboard.
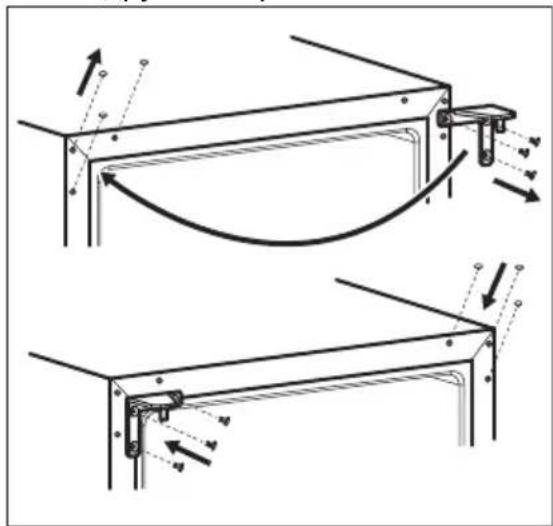
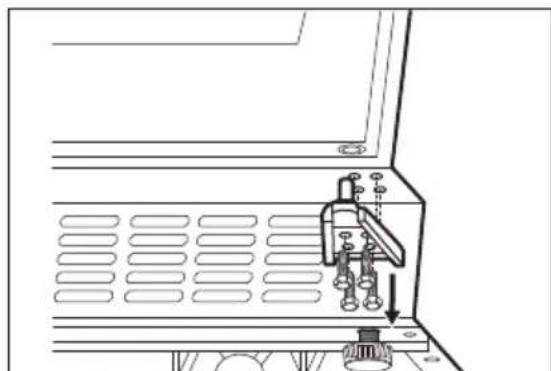
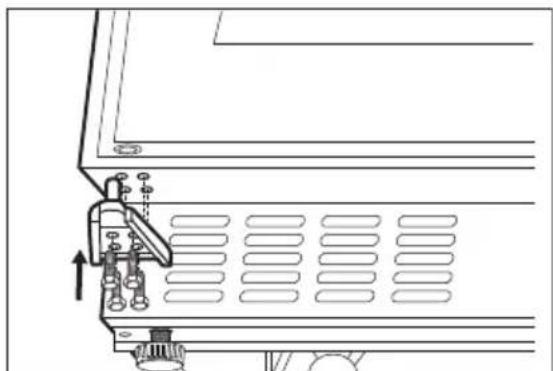
3.6 Door reversibility

WARNING!
Before carrying out any operations, remove the plug from the power socket.
Tools you need:
cross-shaped screwdriver,
- putty knife or thin-blade screwdriver.

- Make sure the appliance stands upright.
- Open the door and remove all wine bottles from the shelves. Close the door.
- Unscrew the 4 screws that connect the bottom hinge. Put the bottom hinge in a safe place together with the screws.
- Remove the door and put it on a soft surface.

- Unscrew the screws that connect the upper hinge at the top right corner of the appliance. Put the upper hinge in a safe place together with the screws.
- Use a putty knife or a thin blade screwdriver to remove 3 screw hole covers from the left upper corner of
the appliance. Transfer and insert the covers to screw holes at the other side.
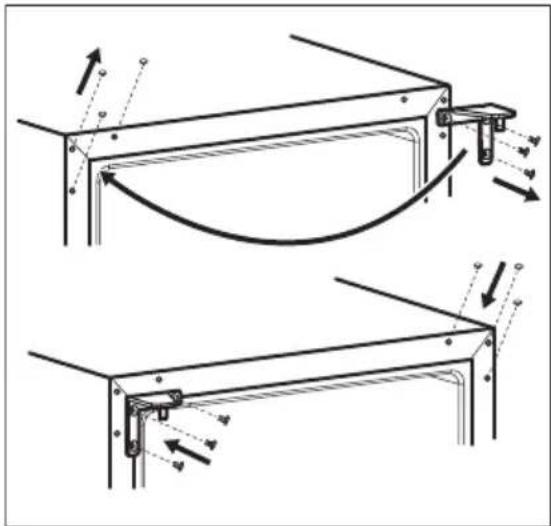
-
Screw the top hinge on the left side of the appliance.
-
Set the door into its new place.
- Secure the lower hinge and do not tighten the screws, until the door is in the closed position and levelled.

- Wait at least 4 hours before connecting the appliance to the power supply.
4.PRODUCT DESCRIPTION
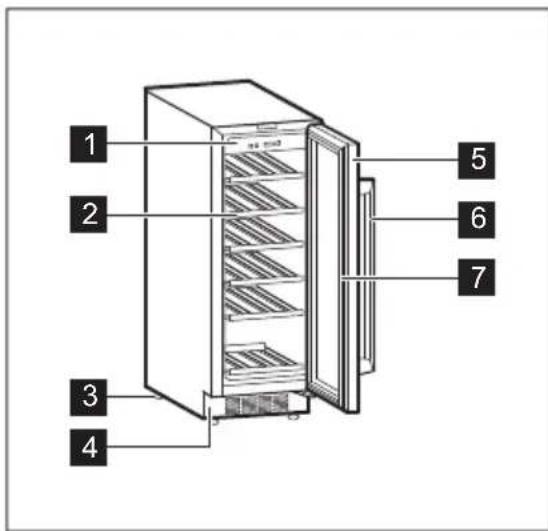
4.1 Product overview
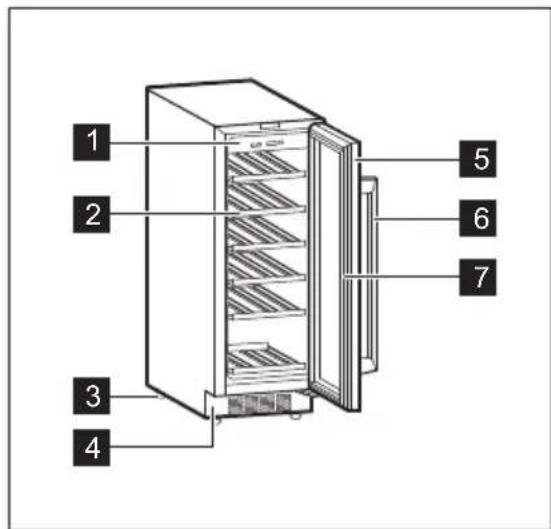
1 Control panel
2 Shelves
3 Feet
4 Decorative frame
5 Tempered glass door
6 Handle
7 Gasket
5. OPERATION
5.1 Control panel
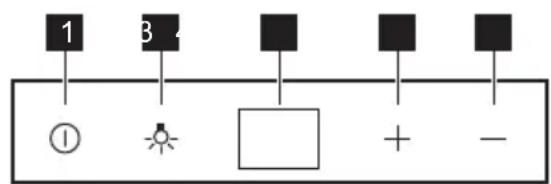
1 Power button
2 Light button
3 Display
4 Temperature warmer button
5 Temperature colder button
5.2 Switching on
- Insert the plug into the wall socket.
- Press the power button if the display is off.
- The display shows the set default temperature (12^)
To select a different set temperature, refer to the "Temperature regulation" section.
5.3 Switching off
- Press the power button for 5 seconds.
- The display switches off.
- To disconnect the appliance from the power, remove the plug from the power socket.
5.4 Light button
To turn the light on and off, press the light button. The light has no negative effect on the quality of the wine.
5.5 Temperature regulation
The default set temperature for the wine cabinet is 12^
The temperature can be adjusted between +5 and +18^
To set the temperature, press the temperature regulators. The display shows the set temperature.
To set the right temperature for each type of wine, refer to "Daily Use" chapter.
6. DAILY USE
6.1 Wine storage

This appliance is intended to be used exclusively for the storage of wine.

Wine storage compartment is the one marked (on the rating plate) with
The storage time for wine depends on age, alcoholic content, type of grapes and level of fructose and tannin in it. At the time of purchase, check if the wine is already aged or if it will improve over time.
Recommended storage temperatures:
- For champagne and sparkling wines, between +6^ and +8^ .
- For white wines, between +10^ and +12^ .
For rose and light red wines, between +12^ and +16^
Aged red wines, between +14^ and +16^
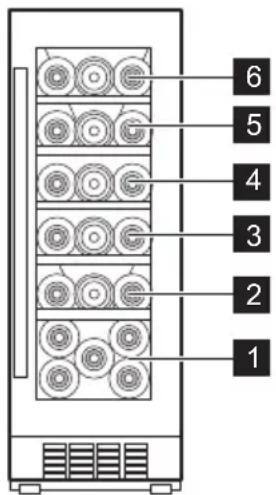
The appliance is designed to store up to 20 botties (0.75 l) by placing:
- 5 bottles on level 1.
- 3 bottles on level 2,3,4,5,6.
Shelf levels

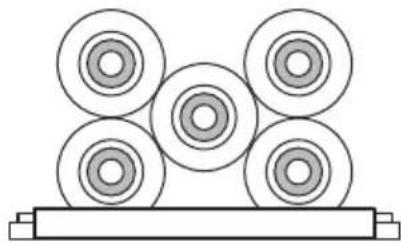
Half shelf level 1
Full shelf levels 2,3,4,5,6
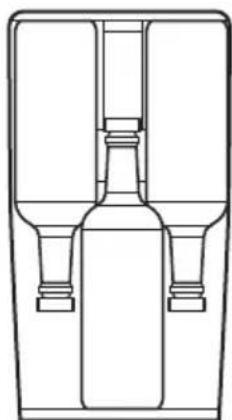
6.2 Humid box
Humid box is located on the top shelf of the wine cabinet. It is detachable. Pour
some water into the humid box to prevent too low air humidity level.

Top shelf can fit:
- 2 bottles with the humid box.
- 3 bottles without the humid box.
6.3 Removing and installing shelves
To remove any shelf from the wine cabinet:
- Open the wine cabinet doors completely.
- Pull the wooden shelf until its notch is under the wine cabinet plastic post.
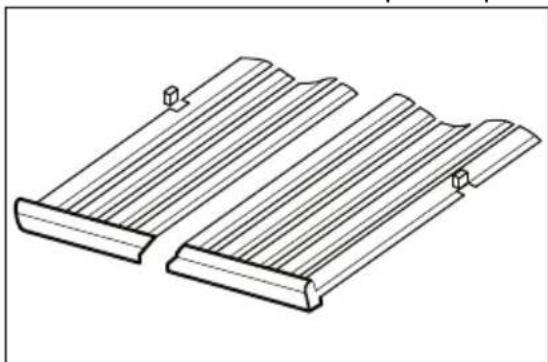
- Lift slightly the front of the shelf and detach it from the appliance.

To put the shelf back into its initial position, follow the above steps in reverse order.
7. HINTS AND TIPS
7.1 Hints for energy saving
- The internal configuration of the appliance is the one that ensures the most efficient use of energy.
8. CARE AND CLEANING

WARNING!
Refer to Safety chapters.
8.1 General warnings

CAUTION!
Unplug the appliance before carrying out any maintenance operation.

This appliance contains hydrocarbons in its cooling unit; maintenance and recharging must therefore only be carried out by authorized technicians.

The accessories and parts of the appliance are not suitable for washing in a dishwasher.
8.2 Cleaning the interior
Before using the appliance for the first time, the interior and all internal accessories should be washed with lukewarm water and some neutral soap to remove the typical smell of a brand-new product, then dried thoroughly.

CAUTION!
Do not use detergents, abrasive powders, chlorine or oil-based cleaners as they will damage the finish.
8.3 Periodic cleaning
The equipment has to be cleaned regularly:
- Do not open the door frequently or leave it open longer than necessary.
-
Ensure a good ventilation. Do not cover the ventilation grilles or holes.
-
Clean the inside with lukewarm water and baking soda solution. The solution should be about 2 tablespoons of baking soda to a quart of water.
- Wring excess water out of sponge or cloth when cleaning the area of the controls, or any electrical parts.
- Clean the outside of the appliance with warm water and some neutral soap.
- Regularly check the door seals and wipe them clean to ensure they are clean and free from debris.
- Rinse and dry thoroughly.
8.4 Periods of non-operation
When the appliance is not in use for long periods, take the following precautions:
- Disconnect the appliance from electricity supply.
- Remove all items.
- Clean the appliance and all accessories.
- Leave the door open to prevent unpleasant smells.
When the appliance is not in use due to power failure:
- Most power failures are corrected within a few hours and don't affect the temperature of your appliance if you minimize the door opening.
- If the power is going to be off for a longer time, you need to take the proper steps described above.
9. TROUBLESHOOTING

WARNING!
Refer to Safety chapters.
9.1 What to do if...
| Problem Possible cause Solution | ||
| The appliance does not operate. | The appliance is switched off. | Switch on the appliance. |
| The mains plug is not connected to the mains socket correctly. | Connect the mains plug to the mains socket correctly. | |
| There is no voltage in the mains socket. | Connect a different electrical appliance to the mains sock- et. Contact a qualified elec- trician. | |
| The circuit breaker trip- ped or a blown fuse. | Turn on the circuit breaker or change the fuse. | |
| The compressor operates continually. | Temperature is set incor- rectly. | Refer to "Operation" chapter. |
| The room temperature is too high. | Refer to "Installation" chapa- ter. | |
| The door is opened too often. | Do not keep the door open longer than necessary. | |
| The door is not closed correctly. | Refer to "Closing the door" section. | |
| The light does not work. The appliance is not plugged in. | Connect the appliance. | |
| The circuit breaker trip- ped or a blown fuse. | Turn on the circuit breaker or change the fuse. | |
| The lamp is defective. Contact the service. | ||
| The light button is not op- erating. | Contact the service. | |
| Too much vibration. The appliance is not sup- ported properly. | Check if the appliance stands stable. | |
| The appliance is noisy. The appliance is not sup- ported properly. | Check if the appliance stands stable. | |
| Water flows on the rear plate of the appliance. | During the automatic de- frosting process, frost melts on the rear plate. | This is correct. |
| Water flows inside the wine cabinet. | Products prevent that water flows into the water collector. | Make sure that products do not touch the rear plate. |
| The temperature in the wine cabinet is too low or too high. | The temperature regulator is not set correctly. | Set a higher or lower temperature. |
| The door is not closed | correctly. | Refer to "Closing the door" section. |

If the advice does not lead to the desired result, call the nearest brand-mark service.
9.2 Replacing the lamp
The appliance is equipped with a longlife LED interior light.
Only service is allowed to replace the lighting device. Contact your Authorised Service Centre.
9.3 Closing the door
- Clean the door gaskets.
- If necessary, adjust the door. Refer to "Installation" chapter.
- If necessary, replace the defective door gaskets. Contact the Authorised Service Centre.
10. NOISES
11. TECHNICAL DATA
The technical information is situated in the rating plate on the internal side of the appliance and on the energy label.
The QR code on the energy label supplied with the appliance provides a web link to the information related to the performance of the appliance in the EU EPREL database. Keep the energy label for reference together with the user manual and all other documents provided with this appliance.
It is also possible to find the same information in EPREL using the link https://eprel.ec.europa.eu and the model name and product number that you find on the rating plate of the appliance.
See the link www.theenergylabel.eu for detailed information about the energy label.
12. INFORMATION FOR TEST INSTITUTES
Installation and preparation of the appliance for any EcoDesign verification shall be compliant with EN 62552. Ventilation requirements, recess dimensions and minimum rear
clearances shall be as stated in this User Manual at Chapter 3. Please contact the manufacturer for any other further information, including loading plans.
13. ENVIRONMENTAL CONCERNS
Recycle materials with the symbol. Put the packaging in relevant containers to recycle it. Help protect the environment and human health by recycling waste of electrical and electronic appliances. Do not dispose of
appliances marked with the symbol with the household waste. Return the product to your local recycling facility or contact your municipal office.
SISUKORD
- OHUTUSINFO 44
- OHUTUSJUHISED 46
3.PAIGALDAMINE 48
4.TOOTE KIRJELDUS 51 - KASUTAMINE 52
- IGAPÄEVANE KASUTAMINE 52
- VIHJEID JA NAPUNAITEID 54
8.PUHASTUS JA HOOLDUS. 54
9.VEAOTSING 55 - HELID 57
- TEHNILISED ANDMED 57
- TEAVE KATSEASUTUSTELE 57
13.JAATMEKAITLUS. 58
MÖTLEME TEILE
9.1 Kayttohairiot...
4 Knapp for hoyere temperature
Knapp for lavere temperature
7.1 Tips for strømsparing
1. CBEDEHnI NO TEXHnke Be3OpACHOCTN
Ipeed yctaHOBkoI n 3KcPlyatauneI np60pa BHNMaTeJIbHO O3HaKOMbTEcB C HAcTOrJSeI INCTpyKuzeI. I3rOToBnteJIb He HecET OTBeTCTBEHHOCtB 3a TpaBMbl/yzep6, Bbl3BaHHbIe HenpaBnIbHOYCTaHOBKOI n 3KcPlyatauneI. O6ra3aTeJIbHO xpaHInTe DaHHyIO IHCTpyKzUHO BMeCTe C np6Opom dIЯ NCpONb3OBaHnRA B 6yduzem.
1.1 Be30napocObTb DeTei N IInC COrpaHnueHHbIMN BO3MOxHOCTaMn
- ΘTOTПрибор может Исплььотьсддьмн CTapшЕ BOCbMЛETИЛцamN C OрраHnueHHbIMN ФИЗЧЕСКIMN,CEHCOPHBIMN IПИ YMCTBEHNBIMN CNoCObHOCТЯМN IN C HeIOCTaTOUHbIM ONbITOM IПИ 3HaHnЯМN TOJIbKO PrN YCNOBn HaxOJdEHNRA NOI PrINCMOTpOM IINca,OTBeuAHOSeRo 3a INX 6e3OnaCHocTb,IIN PONcIe NOLyehnA COOTBETCTByIOxN INHCTpyKcI,PO3BOJIAOxN IM 6e3OnaCHO eKcPnyaTnpOBaTb IN3deJIne IN DAIOxN IM PpeIcTaBLeHne O6 OnaCHocTn,CBra3aHHOJ C erO 3KcPnyaTauznei.
BHIMAHHE! He nepekepbBaIte BeHTnJIaNoHHbIe OTBepCTnB KOpnyce np6opa nII N BO BCTpoEHHO KOHCTpyKcN.
BHIMAHNE! He nCnoJb3yIe mExaHnueckne yCTpoiCTBa IIN dpyrHe cpeiCTBa IIny UCKOpEnia npOcecca pa3MopaxKuBaHnia, KpOme peKOMeHNIOBaHHbIX pON3BODNTeJIeM.
BHIMAHNE! He noBpeJdaIte KoHTyp XoJOnJIbHnka.
BHIMAHNE! He nCloIb3yIe 3JIeKTpOpnp6Opbl B OTdJeHnJx IJa XpaHeHnI pOdyKTOB, ecII OHI He peKOMeHDoBaHbI npOn3BOdnteJIeM.
He nCnoIb3yIe IJRA OUHCTKn PnIbOpa NODaBAeMyIOIoI daBJIeHNiEM BODY I nap.
-Пртпг Te np6op Mяко BnaЖно TkaHbU. IcnoIb3yIte ToIbKO HeItpaIbHbIe MOIOuNe cpeIcTba. He nCnoIb3yIte a6pa3nBHbIe cpeIcTba, abpa3nBHbIe r6Kn, pAcTBOpTeJIu IJIIM MeTaIIInueckne npEdMeTbl.
- Прп OCTаВлЕни ппбopa пустыm в Тechене ДЛNTeNBHO ВрemeH N BblKlHOUHTe erO, pa3MOPo3bTe, OчNTte, BblTPnTe И OCTaBbTe DBePcU OTKpbIToI BO n36жанne obpa3OBaHЯ ппесени BHyTpN ппбopa.
He nCnoJb3yIte npi6op dIy XpaHEnn B3pblBOOnapChbIX BeIeCTB, TaKNX KaK a3p030JIbHbIe 6aJIIOHbIC B3pblBOOnapChbIM rA3OM-BbITECHNTeJeM.
Bcnyae noBpeJdeHnIshHypa nITaHnI BO n36exJaHne HeCuaCTHO CnyaJe OHdoJIxHe 6bITb 3aMeHen N3ROTOBNTeJIeM, aBTOpN3OBaHHbIM cepBnCHbIM ZeHTpOM IIN CNeuAInCTOM c aHaIOnuHNo KBaJIncKaUnei.
2. yka3AHnI NO Bc3OpACHOCTN
2.1 YctaHObKa

BHIMAHHE!
YCTAHOBKa npnbopa DOJXHa OcyueeCTBnTbCra TOnbKO KBaHnΦnUPOBaHHbIM CneuaJIncTOM!
- YdaJInte BCHO ynaKOBky.
He yctaHaBnBaIte n He NOdklOuAte np6Op, mEoum IOBpeKdEHH.
He 3KcnpnyatnpyIte npnbop do eroyctahOBKn B Me6eJIb, B KOtOpyo OHdoJxH 6bITb BCTpoEH, B cJnxco6JIHOENr Mep 6eONaCHOCTN.
CneyuTe HNCTpyKzmaM no yctaHOBKe, BXOJaUIM B KOMnJIeKT npnbopa.
Bcerda 6ydbTe ocToPOxHbI npn nepemeeHnn np6opa, nockoJbky OH TjKeJbI. Bcerda nCNoJb3yJte 3aunTHbIe nepuATkn I 3akpbityo 06yBb. - Y6eIntecb, yTO BOKpyr np6opa nMeetc uRPkyraBn BO3dyxa.
-пегд первоустановковилпегевшваимдверцbl
NoOxIte He MeHe 4 yacOB, npexDe
yem NoKIOuHaTb np6Op K cTeN
3neKTponHTaHn. 3To n03BOJNT
Macny CTeKaTaB o6paTHo B
KOMnpecccop.
- Ppeed BbIOnHeHem IIO6oIonepaunC np6opom (HaNPmep,peBeWNBaHne DBepu) BbIHbTeBnKy n3 CeTeBOI po3eTKN.
He yctahabnBaIte npnbop pIOM c paanatopamN OTONneHn, KxOHhbIMn NNITAMN, DyXOBbIMN WkaqamN INBapOCHbIM NaHeJAMN.
-He noDBepraTe np6Op BO3DeIcTBnIO DOxJa. - He yctaHabJnBaIte np6op noJ npMble coJIHeuHbIe JyU.
He yctaHaBnBaIte npnbop BCINsKOM BnaXHbIX INN XOJIOHbIX MEcTaX. - Pn nepemeuehen np6opa noHmTe ero nepeHn Kpa, T06bI He noapanaTb non.
B npnbope haoonTcnaKet c BnarOnonTneIem. 3To He nrgyka. 3To He npodyk TnTaHn. Pocb6a HemeJeHHO ero yTNnN3npOBaTb.
2.2ПоДКЛЮЧЕНЕК эл ektpocetN

BHIMAHHE!
CyuocTByeT pncK noxapa n nopaxheny 3JIeKtpnueckm TOKOM.

BHIMAHHE!
Pn BbIbope Mecta
yCTaHOBKn Pnp6opa
y6eINTecb, YTO shHyp
3JIeKTPoNtAnHna He 3axKaT n
He NOBpeJKeH.

BHIMAHHE!
He nCnoJb3yIte TpoHnKn u ydnnHnteJI.
-Пибор Должен 6ыть 3азмпeн.
- y6eIntecb, yTO npaMeTpbl, yka3aHHbIe Ha Ta6nUcKe c TexHnueCKIMn DaHHbIMN, COOTBeTCTByOT XapaKTepnCTnKam 3NeKTPocETn.
BknHouaIte npn6Op TOnbKO B npaBnIbHO yCTaHOBNeHHyIO 3NeKTpInueckyIO p03ETKY C KOHTAKTOM 3a3EmHeHr.
CJeInte 3a TeM, yTo6bI He NOBpeIINb 3JIeKTpUneCKNe KOMNoHEnTbI np6Opa (BnIKy Ka6eJr 3JIeKTpOInTaHnR, Ka6eNb 3JIeKTpOInTaHnR, KOMnpecccOp n T.D.) IJa 3aMeHbI 3JIeKTpUneCKNX KOMnoHEnTOB 6paTInTeCb B aBTopu3OBaHHbI cepBnCHbI ueHTp INN K 3JIeKTpNUkY.
- Ka6eIb 3JIeKTpOnuTaHnI DoJIxHe pacNoIarTaBcR HIXe yPoBnB BUNkI 3JIeKTpOnuTaHnI.
BCTABJIte BUNky ceTeBOrO Ka6eNBApo3ETKY TOJbKO B KOHcye yCTaHOBKn np6opa.Y6eINTecb,yTO nocJe yCTaHOBKN np6opa K BUNke ceTeBOrO shHypa ectb CBO6oHNbI DoCTyI.
-Дя OTKluoyehn np6opa ot 3neKtpocetn He TAHNTe 3a Ka6eJIb 3neKtpoNTaHn. Bcerda bepntecb 3a BnIKy ceTeBOrO shhya.
2.3Испобзоване

BHIMAHNE!
CyueCTByeT pCK
IOnyuHn TpaBmbl, OXora,
IopaxHenn 3JNeKtpnuecknM
TOKOM nnn noxapa.

Pnp6op coepKNT ropuChn ra3 TaH (R600a). 3To npnpoHbI ra3, eHbI dIy OkpykaUoSei cpebl.
CJIeInte 3a Tem, YTO6bI He NOBpeIITb KOHTyp XOJODINbHnKa, COdepXaun I306yTaH.
He BHOCHTe N3MeHEnB KOHCTpyKUIO DaHHoro npnbopa.
JIIO6oe nCNoJIb3OBaHHe BCTpaINBaEMO rN3dJIyB KaueCTBe OTdJIbHO CToIeero CToPOr 3anpeuEHO.
He nomeuaTe B np6op 3JIeKtpoPn6OpbI (HanpImep, MOpOKeHnCbl), ecnn nx POn3BOJNTeHem He yka3aHO, YTO nOIO6Hoe npimeHHe DoNyCTmO.
-При поврждениkoHTypa
XOJOДиЛьнka yбeДиТecь,чTOВ
NOMeUSeHIN HeT ПлamEHIN
NCTOчИнКOB BO3rOpaHЯ.ПрОВЕТрпTe
NOMeUSeHIne.
He donyckaTe KOHTaKaTa ropaynx ppeDMeTOB C PnactMaCCOBbIMu qactmnp6opa.
He xpaHnte B npnbope ropuyne ra3bI nKnDkoCTN.
He cTaBbTe Ha np6op nIIN pIOM C HnM IeKOBOCnJaMeHraUcneC MaTePnaJIbI NII npOnNTaHHbI e MM npEdMetbl.
He kacaitec b kompeccopa nnn KOHdeHcaTopa. OHn ropnye.
2.4 BnHyTpeneHHe ocBeueHne

BHIMAHHE!
CyuectByeT onaCHocTb nopaxeHnA 3JekTpuecknM TOKOM.
- O lamnax Bnytpn npnbopa n lamnax, npoandaebmx OTdeJIbHO B KaueCTBe 3anaChbix YacteN: daHHble JAMnbl paCCHTaHbI Ha pa60Ty B 6bITOBbIX npnbopax B NCKJIIOHTeJIbHO CLOXHBIX TEMpepaTypbIX, Bn6paCNOHHbIX N
BIIaXHOCTHbIX YcNOBnX IJI INpeHa3NaYeHbI DnI nepeDaY INΦopMauN O pa6OeM COCToHn INp6opa. OHn He npEdHa3NaYeHbI DnI nCNoJIb3OBAHnB B DpyrNX INp6opax N He NOxOJaT DnI OCBeUeHn8 6bITOBbIX NOMeHn.
2.5 yxod n ounstka

BHIMAHNE!
TO MOKET npBecTN K IOBpeKdEHHIO np6opa nn TpaBMam.
-Перед ВьлОнHeHЯМ onepaи no YnCTKe n yXoDy BvIKIQUHTe npIbOp n N3BVeKInTe BnKу ceTeBOrO uHypa n3 pO3eTKN.
BxOIOINbHOM KOHTpe DaHHOROpnibopa coepkaTcra yrIeBOOpOdbi.TexHnueckoe 6cbnyKuBaHne nIpe3apAka DOJXhbl BbINOJIHrTbcrToNbko KBaIINpUPOBaHHbIM CneuaJIInCTOM.
- Perylnapno npOBepaTe cInBHOe OTBepCTne B KOpnyce npbopa n npn Heo6xOAnMoCTn npouuzaite erO. B Cnyae 3acopEnra OTBepCTn TaIa BA Oda 6ydt CKanJIINBaTbcR B HIXHeJ qactn npbopa.
2.6 CepBnC
Дя ремонта пибopa образпесь в abtopиЗOBaHHbI Сервсны сеHTp. ИспльзуTe TOnБКО opИгИнHaJIbHbIe 3anachbie YAcTn.
- 06paTnte BHHMaHHe, yTO camOCToTeJIbHbI peMOHT nI npMOHT, pON3BeDeHHbI He Ha npOpeCCNoHaJIbHom yPoBHe MOKeT cKa3aTbcra Ha 6e3OnaChocTn np6opa, a rapaHTnIhble 06aTeJIbCTBa MOry TnotepaTb CnIy.
3. YCTAHOBKA

BHIMAHNE!
Cm. rnaBbl, coepkaune CBeJeHnI NO TexHnke 6e3oNaCHOCTN.
CneDyUoIe 3aIacHbIe Yactn DOCTynbl B TeueHne 7 let nocIe CHrTna MoJeN C Ipon3BOcCTBa: TepMoCTaTbI, TepMoDaTcuKN, NeuAThBiE PNaTbI, NcTOUHNK CBeTa, DBepHbIe pyKn, DBePbIe neTIn, NOdOHbI, IpOTNBH IN KOp3INbI. O6paTtTe BHMaHne, UTo prd DaHHbIX 3aIaNChbIX Yacte NDOCTyPeH TOJbKO dIpyoPeCCNoHaJIbHbIX 6Ipo peMOHTa, n UTo He BCE 3aIacHbIe Yactn IOxOJaT KO BCEM MOJeIam.
-Дерные улnotteи дocTyныВ
Teчене 10 пет пося сяты
Модаи с поньдва.
2.7 Ytun3aun

BHIMAHNE!
CyueCTByet onaHocTb TpaBMblnnydyu.
- OTkIouHte npu6op oT anektpocetn.
- OTPeKbTe n yTuInn3npuYte Ka6eJb 3NeKTPoPOnNTaHn.
- YdaJInte DBepuy, yTo6bl npEIOTBpaTnB pNCK ee 3aInpaHn npi nonaHaHn BHyTpB npN6opa DeTei NDOMaUHIX XNBOTbIX.
- CodepKIMoe XoIOnHbHOro KOHTypa N3OJIauNoHHbIe MaTePnaJIbI DaHHoro npu6opa He BpeJrT O3OHOBOMy CNOIO.
- I30JIaUNHbI NeHOpNlact CoepKNT roPouH ra3.ДЯ nOlyeHn HΦopMaun O TOM, KaK HaIneKNT yTINn3uPoBaTb DaHHbI np6Op, o6paTntecb B MeCTHbI MHyNUnPaNbHbI OpraHbI Bnactn.
He noBpeJdaIte yactb y3na oxJaXdEHHa, KOTopA HAXOHTcra pIOM C TeNIOOBMeHHIKOM.
3.1 Pa3mepbl
| ГабарNTье pa3мерbl1 |
| H1 MM 820 |
| W1 MM 295 |
| D1 MM 571 |
1 BBICOTA, uipnHa n rny6nHa npnbopa 6e3 yyeTa pykn
| Heo6xodnme對於pa60tbI mesto2 |
| H2 MM 822 |
| W2 MM 300 |
| D2 MM 648 |
2 BbICota, unpHa n rny6nHa npnbopa, BKIOUyA pyuKy, pIOc npocTpaHCTBO, Tpe6yEmoe dIra CBO6oHOn cIpyaON OXIAKDAIOUeBO3Dyxa
3.2 Bb6op MeCTa yCTaHOBKn
Дя obecneueHn ONTmAbHOB pa60tI np6opa He cIeDyET yCTaHaBnBaTb erO pRdOM C nCTOCHNKOM TENla (dyXOBbIMN shkaФamN, neaMn, padNaTOpamN OTONJIeHnKyXOHbIMN PINTAMN INB BapOuHbIMN NaHeJAMN) INN B MeTe NOnaDaHnPnMaBX COJIHeHbIX LyueN. ObecneYe cBO6oHDHyU cIpyJIaIO BO3dyxa No3aDi 3aDHei CTeKN.
Pnp6op cneDyET yCTaHaBnBaTb BCyXOM, XopoIIO BeHTnIpyEmOM MecTe BHyTpN NOMeHnI.
Pnp6op npedHa3NaeH NCKNHO TELbHO dIpaobTbI npI Tempepatye OkpykaOuSei cpebl O1 16^ do 38^
HaJnEkaaJa pa6oTa npnbopa MoKet 6bITb rapaHTnpOBaHa TOJIbKO B pamkax yKa3aHHoro dnaNa3OHa TempepaTyp.
B clyuae comHeHn B BbIbope MeCTa yCTaHOBKn npibopa o6paTNTecb K npoDaBcy, B cepBnCHbI ueHTp NII B 6JInxAun ABTOPn3OBaHHbI cepBnCHbI ueHTp.

Должна 6ытб obecneуeha BO3MOxHOCtB OTKIIIOUeHnnpibopa O TceTn əNeKTponHTaHn. NToTomy nocne yCTaHOBKn npibopa DoJxhen 6bIb obecneuH nerkn doctyn K BUNke cTeBOrO shHpa.
3.3Поdkлоченke 3JIeKTPocetN
- Ipeed BkIIOueHnem npnbopa B cetb y6eINTecb, YTO HAprrKeHne n qactota, yka3aHHbIe Ha TaBJIuYe C TExHNueCKIMN DaHHbIMN, COOTBETCTBYOT napameTpam DOMaUNHe 3NEKTPnuEckOcTNI.
- Pn6bOp Heo6xOJMo 3a3eMInTb.ДЯ 3ToI ueJI BUNka CeTeBOrO Ka6eJIa Cha6KeHa KOHTaKTOM. EcIIpo3eTKa 3JeKTPnuECKo CEIN He 3a3eMJIeHa, BbINOHNTE OTDeJIbHOe 3a3eMJIeHne Pn6bOp B COOTBeTCTBNI C DeiCTByIOUIMN HOpMaMI, NopyuIB 3Ty ONEpaUIO KBaINΦNUPOBAHOMY 3JeKTPnky.
- I3rotOBnTeJIb CHImaet Cce6BcKyIO OTBeTCTBEHHOCTb B CnyaeHecO6NIODeHnBaIWeyKa3aHHbIX npabIN TexHNK 6e3OnaCHOCTn.
-Данньи npnbop COOTBcTcByeT npimeHmblm Tpe6oBaHnram Texnuecknx pernaMeHTOB EA3C.
3.4 BbipabHnBaHne
Pn yctahOBKe npnbopa y6eHntecb, qTO OH cTOnT pOBHO. 3To dOCTnIraETcC NOMOsbIO DByx peyInpyeMbIX HOXek, paONoJoxeHHbx CnepeDn BHN3y.
3.5 YcTaHOBKa BepXHei cKO6bl
3aKpeNteBaW np6op:
- Pn NOMOuN DByX BnHTOB yCTaHOBnTe BepxHn KpOHTeH HaBepx yCTpoIcTba.
- IomeCTIe np6Op B WkaΦ n DBymBnHTaMn 3akpeiNte BepxHnKPOHHTeH Ha WkaΦy.

3.6пениванедерць

BHIMAHNE!
IpeepBbINOJIHeHnEM IIOboon Oepaunu N3BnEkaTe BnIKy n3 CeTEBOI PO3ETKn.
Bam noHaio6aTc cneDyUoune HHCTpyMeHtbl:
KpeCTOBaorTBeptKa,
- WnataTeIb NII TOHka OTBepTKa C PNOCKIM WJNUEM.
- Y6eIITecb, yTO npI6Op cTOnT BepTNkajbHo.
- OTKpoIte DBepu y n CHIMnTe c noNOK BCE BHHbIe 6yTbIKN. 3akpoIte DBepu.
- BbBnHTnte 4 BnHTa, KpeNaue HxHIO PeTIO. NomeCTnte HxHIO PeTIO B 6e3OnaCHOe MeCTo BmecTe C BnHTAMN.

4. CHIMNTE DBepuy I NOJOKnTe ee Ha MrgkyIO NobepxHOCTb.
5. OTBnHTnte BnHTbI, KpeNaue BepxHIO nTIO B npabOM BepxHem yrJy np6opa. NomeCTnte BepxHIO nTIO B 6e3oNaCHOE MecTO Bmecte C BNHTAMN.
6. Пи пOMOUI WIIaTeIЯИToHKOI OTBepTKU ydaJIte 3 3arLyuKIn C BnHTOB B JEBOM BepXHeM YrIy npIbOpa.IpeMeCTIe N BCTaBbTe 3aRnyuKIN B OTBepCTNIAЯ BnHTOB Ha dpyro CTopoHe.
- Пивntte BepxHIO neTIO Ha neBOI CTOpOHe np6opa.
- YCTaHOBNTe DBepu Ha HOBOE MECTO.
- 3aKpeNITe HxHIOI OTeTIO HHe 3aTAYBaIte BnHTbI, NOKa He 3aBepWNTe BblpaBHNBaHne DBePcbl B 3aKpbITOM NOJIOKeHHN.
YCTaHOBneHHaNo yMOJIaHnIO TempepaTypa BUNHOIkaΦa COCTaBnaET 12°C.

Tempeatypy MoxHo 3aabaB B Dnana3OHe OT +5 do +18^
UTo6bI yCTaHOBnTb TEMpepatyp npnbopa, BOCNoJIb3yInTecb peryJrTopamN Temnepatpyi. Ha dinCnnee OTo6pa3ntc 3aHaHHa Temnepatypa.
UTo6bI yCTaHOBnTb npaBnIbHyIO TEMnepaTpy IJI KaxdOro Tnna BnHa, CM. rIaby «EkeDHeBHOe NCNoJIb3OBaHne>.
6. EXEДНЕВhoe ИСПОЛьЗOBAHNE
6.1 XpaheHne BnHa

Pnp6op npedHa3HaueH NCKIQUHTeNbHO dJa XpaHeHn BnHa.

OTdeneHneIpyXpaHeHnBA HnA TnOmeUeHO CnMBONOM (Ha Ta6nUKe cTexnueckmN DaHHbIMN).
Cpok xpaHEnBnHa 3aBnCnT OT BO3pacta, cOePkaHn aIkoRoj, copTa BnHorpaJa n COePkaHn B HEM fpyKTo3bl TaHHOB. Ppi NOKyNke npOBepbTe, BblEePkaHO nn yKe BnHO, nIe CBOIcTBa ynyuWATcra Co BpeMeHem.
PekomeHnyemay tempeatypa xpaHeHn:
-ДяшamnaHCKOrOиИrPnCTbIXBnHOT+6°Cdo+8°C.
-ДябелыxBH -OT +10°Cdo +12°C.
-Дяpo3OBbIXиCBETIO-KpaChbIX BnH -OT +12°Cdo+16°C.
-ДЯВыдержанньх Красьх ВиH -OT +14°Cdo +16°C.
Pn6op paccuTah Ha xpaHHeNo 20 BHHbIX 6yTBIOK Tnna «6Opdo» (0,75 n) np pa3MeueHN CneDyUoM o6pa3OM:
- 56ytbINOHa ypoBHe 1,
- 36ytbIIOK Ha ypoBHe 2,3,4,5,6.
YpOBHn NOJOK
Ponka noobHHoro pa3mepa, ypoBeHb 1
11. TEXHnueCKNE DAHHbIE
TexHnueckne daHHbIe yka3aHbI Ha Ta6nUKe C TexHnueCKIMN daHHbIMN, pacNoJoxEHHoH Na BHyTpEHHHei CTeHKe np6Opa, n Ha 3TNKeTke 3Hepro3ΦΦeKTHBHOCTN.
QR-KoHa 3TKeTke
3Hepro3ΦΦeKTHBHOCTn, NdyueB
KOMPJIeKTe C np6Opom, CoepXHT Be6-
CcbIky Ha cTpaHnUc C nHΦopMaunE O
npOn3BOaNTeJbHOCTn np6Opa,
pInBeDeHHoB B 6a3e daHHbIX EU
EPREL. CoxpaHnte 3TKeTKy dJa
cnpaBKn HapA dy C pyKOBoDCTBOM
Nolb3OBaTeJI N DpyrIMM DOkymeHTAmN, NdyuIMN B KOMnEKeTc C np6opom.
3Tu INHOpMaUTo TaKKe MOxHO HaHTN B 6a3e DaHHbIX EPREL, DocTyHNO nO Ccblke https://eprel.ec.europa.eu, no HAnMeHOBaHIO MoJeN I HOMepy N3DeJIy, PpNBedeEHbIM Ha TabJIuYKe C TexHnueCKMm DaHHbIMn pnp6opa.
Iopnbie CbeHnO6 3tKeTke 3Hepro300eKTHBHOCTN npBBeHb IocBInke www.theenergylabel.eu.
12. INHΦOPMAUЯ ДЯ ИСПыTATEЛьнБИX OPGAHN3AUи
YctaHOBka N NOIroTOBka np6opa K TeCTnPOBaHIO Ha COOTBeTCTBne DInpeKtNBc EC no 3kONOrn3auu IOnXhbl OTBeuAtb Tpe6oBAHnEM EN 62552. Tpe6oBAHnK BeHTnJIaCm,
pa3MepaHNI IN MInHMaJIbHbIM 3a3Opam c3aI np6opa DoJXHbI COOTBeTCTBOBaT IpeuHIO, npBVeDEHHOMy B rIabe 3 PyKOBODCTBa nOJIb3OBaTeJI. Ipoc6ba o6paUaTbcra K
PON3BOUNTeIIO 3a NIO6OJ DOnONHHTeINbHO INHOpMaUnei, BKIOUyA CXEMbl 3aRpy3KN.
13. OXPAHA OKPYKAIOJIEN CPEIbl
MaTePnAblc CnMBOJOM cNe dyet cDaBaTb Ha nepepa60Ky. NpOxNtE yNaKOBky B COOTBeTCTBvUOuIe KOHTeHepbl dIy c6opa BTOpuHoro cbIp8. PpHIMa yuaCTne B nepepa60Tke CTaporo 3JeKtpo6bITOBoro o6OpyDObAHn, Bbl nomoraTe 3aunTb OKpykaIOuy cpeHy n 3dOpOBbe yeNoBeka. He Bbl6pac6BaIte
Bmecte C 6bITOBbIMN OTXODAMN 6bITOByIO Texnky, NOMEueHHyIO CmMBOJOM Pnp6op cJeMyET DoCTaBNTB MeCTO pa3dJIbHOHaKOpIeHnIc6opa OTXoOB NOTpe6JIeHnI ININ BpyHKT c6opa IcNoJIb3OBaHHo6bITOB0i TexnKnI DnI NocJeDyUOSeYtUNIN3aCNI.

Klacc 3HepeTnuecko 3ΦΦeKTnBHOCTn B PocCnCKo Φedepaun: A
Даразиотовленя Идениya уka3анвero сршим Homepe, Ге первая сфра Homepa COOTBETCTBye TocneДнeи сфpe roda n3rotobelenia, a BTOPAI TpeTBa cHpbl -npdKOBOmy homepy Heelen. Hanpimep, cepnHybHomep 14512345 O3haayet, yTO n3dJIne n3rotOBHeHO Ha copOKЯToHedJe 2021 roda.
Изrobotовел:Electrolux Appliances AB,St. Goransgatan 143, 105 45 Stockholm,Ш趟ия.
N3roTOBJeHO B KInTae.
OBSAH
- BEZPEČNOSTNÉ INFORMÁCIE 216
- BEZPEČNOSTNÉ POKNY 218
- INSTALÁCIA 220
- POPIS VYROBKU 223
5.PREVADZKA 223 - KAZDODENNE POUZIVANIE 224
- TIPY A RADY 225
- Osetrovanie A CISTENIE 225
- RIESENIE PROBLEMOV 226
10.ZVUKY 228 - TECHNICKE UDAJE 228
- INFORMACIE PRE SKUŠOBNÉ USTAVY 228
- OCHRANA ZIVOTNEHO PROSTREDA 229
NAVRHNUTE PRE VÁS
9. RIESENIE PROBLEMOV

VAROVANIE!
reparationsinformation:
www.electrolux.com/support
Registrar a din produkt for bättre service:
www.registerelectrolux.com
3.5 BctaHOBJIeHHBepXHBoro KPOHHTeHa
PnpkiniB npnaIa:
3a DOnOMOrO IO DBOX rBnHTiB BCTaHOBiTb BepXHi KPOHtTeH y BEpxHi YactHi I npJaNy.
BCTaHOBIb npnad y waoKy i 3a DOnOMOIO DOx TBnHTiB 3aKpiniTB BepXHIO cKO6y Ha wa.
3.6 YcTaHOBJIeHHa DBepaT Ha iHsni 6ik

NONEPEDJKEHHI
IpeaBnBnBnBnBnBnBnBnBnBnBnBnBnBnBnBnBnBnBnBnBnBnBnBnBnBnBnBnBnBnBnBnBnBnBnBnBnBnBnBnBnBnBnBnBnBnBnBnBnBnB
IHCTpymeHTn, rki BAM notpi6Hi:
BnKpyTkxAxpecToNoi6HoiΦopMn,
-ⅢnateJIb a6o BnKpyTKa 3 TOHKIM Ne3OM.

1.ПepeKoHaITeCЯ,ио npiJaI cToiTb BeTnKaJIbHo.
2. BiKpnTe DBepuTa Ta BnMiTb yci nIaIKN 3 BnHOM 3 noJIuCb. 3akpnTe DBepuaTa.
3. BiKpyTiB 4 rBnHTn, kI 3'EDHyOTb HxHIO 3aBicy. NoklaIDtB HxHIO 3aBicy pa3OM i3 rBnHTamN B 6e3neUHe Micue.
4.3HIMITb DBepuTa NOKJaDiTb Ix Ha M'AKV NOBepXHO.

- BiKpyTb rBnHTn, kI niD'EDHyOTb BepxHIO 3aBicy y BepxHbOMy npabomy kyTI npuadny. IoknaiTb BepxHIO 3aBicy pa3OM i3 rBnHTamn B 6e3neue He Micue.
- 3a donomoro o shatae a6o BnKpyTKI 3 ToHkIM Je3OM BuaaniTb 3 KpNikrBnHTIB 3 IIBORO BepxHbOro KyTa npnAdy. Nepemicti b i BCTaBTe KpNik, uO6 3akpyTITN OTBOpN 3 IHwOrO 60ky.

- PnKpyTb BepxHIO 3aBicy 3 NIBORO 60ky npJnaIy.
- BctaHOBITb DBepuTa Ha HOBe Micue.
- 3aKpinitb HnXHIO 3aBicy Ta He 3aTAYIte TBnHTN, DOKN DBepraTa He 6ynde 3aunHeHO BnIPIBHNO.
- 3auekaTe npHaMHi 4 roHn, nepu HIX niKIOUATn npuaD do eNeKTpOmepeKi.
4.ОПИСВИРОБY
4.1 Orlny npodnykty
1 NaHnB KepyBaHHa
2 Poiuci
3 Hixk
4 DeKopaTnBHa paMka
5 DBepeTa i3 3arapToBaHoro cKa
6 Puyka
7 PpoknaKa
5. ONIC POBOTN
Akccecyapn Ta Detani npnilady He npn3nayei dny MTTB NocydomnHi MaunHi.
8.2 OuHnEHHa Kamepn
Uo6 ycyHyTu TnOBu 3anax HOBOr npnaDy, nepu HIX KOpNCtYBaTncr Hm, NOMIte KaMepy i BCE BHyTpioHc npnaDra TeNIOO BOIOO 3 HeITpaBnM MnIOM, a NOTIM peTeJbHO BNTPiTb.
He BiDUnHЯTe Yacto DBePcraTa N He 3aJIuShaIte IX BiDUnHHeHIMN DOBWe, HIX ue Heo6XiHo.
Cni3a6e3neuHTn HaneKHy BeHTnlaIIO.He hakpnbaiTe BeHTnlaiHi OTbOpN Ta pewiTkY.

YBAGA
He BnKOpNCToBvIte MInOuChi 3ac06n,abpa3nBHi nopoShKn, xNop a6o 3ac06n dJa YnueHHa OCHOBI Macna, OckINbKN BOH NMOxyTb NOnKOJNTu 03do6neHHa NOBepxHi.
8.3 NepioDnue OunuHn
O6naHaHnHcπipepyIaepHO uCTHTN:
1.ПOMNITe BHyTpIiHIO NOBepxHIO TeIIO BOIO 3 PO3uHOM XapOBOI coI.N.Po3uH IOBHeH cKJaTaTn np6Jn3HO 2 cToJOBI JoxKn xapOBOI COIN Ha NiTp BOIN.
2. BuaJnTe 3aBy Boy 3 ry6Kn a60 TkaHnH NiD Yac YnueHHra 3OHN ynpabJIiHHa 6b-yknx eKeKtpuHx YaCTNH.
3.ПOMNITe 3OBHIHIO NOBepxHIO npIaNy TeIIOBOIO 3 HeITpaJIbHM MNilOM.
4. Perynapno nepebipraTe yuinbHOBaHi DBepuT i npotnpaTe ix, 06 OunchTu BID 6pyTa 3aIIuKIB npOdyKTIB.
5. Petelbno npomnTe Ta BntpiTb.
8.4 Perioop npoctoo
KIO npnnaH He BnKOpncTOByeTbcra pOToIROM TpNBaNoRo Yacy, yXnTe HabeDeHHnx HxKue 3anobixkHnx 3axoDiB.
-
BiДКЛЮчITь пилад BiД eLEKТрОмЕп经i.
-
BnMItb yci enemEnTu.
3.ПомиTe npiJa i Bci akcecyapn. - 3aIIuIte DBePcTa BiDUnHeHUMn, Uo6n 3aNoBirTu yTBOpEHnO HENpNcEMHnx 3anaxiB.
KIO npnnaH He BnKOpNCTOByeTbcrape3 nepe6oB V noctaayHHi eNkTpoEhepri:
Bilbwc360iB y noaieleKtpoeHepriyycBaIOTBcA
IPOTAROM KINbKOX rOdH i He BnBaIOb Ha Tempeatypy BaWoRo npnaNy, kUo MHiMi3yBaTu BiKpTTa DBepaT.
- JIIO XINBHeHn6yDe BmKHeHO Ha TpNBaIIu Yac, Bam Ntpi6Ho BXNTn HAnExKHnx KpOKiB, ONNCAHN Bnue.
9. ycyheHHIPOBJEM

NONEPEDJXEHHRA
IINB. po3diJn 3 iHopmaucieIO 1oDo Texhikn 6e3neKn.
9.1 II B pa3i BnHnKHeHH npo6Jem
9.3 3aKpNbBaHnI DBePcIaT
- OuHCTIb npoknДВepaT.
2.3a noTpe6n BiDperyIHOte DBePcIa. IuB.p0zdiN «YcTaHOBka» - 3a noTpe6n 3amHITb NOsKoJxehi npoknaikn DBePcT. 3BepHITbcrdo aBTOpN3OBAHO cepBicHOrO ceHTpy.
10. WYMN

11. TEXHIYI DAHI
Texhiyu hopmaio Habeedeho Ha Ta6nui 3 texhuyn m daHmN BCEpeuHi npuaHy na eTuKeTci 3 napameTpamn eheproekeKTHBHOCTi.
QR-koHa etnkeTci 3 napameTpamn eheproeΦeKTHBHOCTi, 0o nocTaayebcra 3 npnaIaOM, MICTb NocnlaHna Ha IHopmaIIO CTOCOBHO npOdyKTNBHOCTI npnaIy B6azi daHnx EU EPREL. 36epiraTe etnKeTKy 3 napameTpamn eheproeΦeKTHBOCTI dNpdoIckn pa3OM 3 iHCTpyKJIeIO 3 ekCnlyataqii Ta BCima iHUNM NOKMeHTaMn, 0o HadaOTbcra 3 cIM npnaIaOM.
3a noCuHaHnM
https://eprel.ec.europa.eu i Ha3BOIO
MoJeI Ta HOMePOM BnPo6y, kI
3a3HaYeHO Ha TabJnUcI 3TexHlYHMn
DaHIMN npJaDy, MoKHa TaKoX 3HaHTi
Ty K camy inΦopMaciIO B 6a3i DaHnx
EPREL.
Дokладиwe npo etNKeTKn 3 napametpamn eheproepeKTHBHOCTI nVB. 3a NOcIIaHHm www.theenergylabel.eu.
12. IHΦOPMAζΙΑДΝΟClIДΗικχ YCTAHOB
BctaHOBHeHHn NiidroTyBaHH npuJaDy 6yd-jaKoi nepeBipKn 3a nporpaMOEOcoDesign MaOTb BiNobiDaTn BmOram cTaHdApTy EN 62552. BmOrn oDoBeHTNJraii, po3MipIB Hiwi Ta MiHimaJIbHOI
BIDCTaHI Do CTiH NoBHHI 6yTN Bka3aHI B Po3dINI 3 ciEi IHcTpkyu3 ekCnnyatau. IJRA OTpMaHnHdoTaKOBoi IHOpMaui, y TOMy uNcNI pHaHIB 3aBaHTaXeHHa, 3BepHITbc DO BnPo6HnKa.
13. OXOPOHA IOBkIJIJIa
3dabaTe Ha nobToPhy nepepo6ky MaTepiAn, no3HaueHi BiDnOBiHIM CmBbONOM BnKndaTe ynaKOBky y BiNobiDiHi KOHTeHepn dJa BTOpHHoC npOBHN. DOnOMoxItb 3axnCTnTn HABKOJIuHc cepedOBuIe Ta 3dOpOB' iHxN x IIOJe i 3a6e3neuHTn BTOpHHy nepeo6Ky eJektpuHnx i eJekTPOHnX
npnilaib.He BnKndaTe npnilaHn,
No3NaeHi BiINOBiHM CmB0JOM
pa3OM 3IHWM DOMaWHIM CMITTM.
PiBepHItb npOyKT Do 3aOdy i3
BTOPNHOI nepepo6Kn y BaWi
MICueBOcTi a6o 3BepHtbcrdo MicceBnx
MHyIuHaJIbHNx OprAHIB BnaDN.