HK 70 - Heated blanket BEURER - Free user manual and instructions
Find the device manual for free HK 70 BEURER in PDF.
User questions about HK 70 BEURER
0 question about this device. Answer the ones you know or ask your own.
Ask a new question about this device
Download the instructions for your Heated blanket in PDF format for free! Find your manual HK 70 - BEURER and take your electronic device back in hand. On this page are published all the documents necessary for the use of your device. HK 70 by BEURER.
USER MANUAL HK 70 BEURER
Tested for harmful substances.
www.ceko-fex.com/standard100

DE Heizkissen mit Rückenstütze Gebrauchsanweisung.2
EN Heated back rest Instructions for use. 13
FR Coussin chauffant avec dossier Mode d'emploi 23
ES Respaldo con calor
Instrucciones de uso 34
IT Termoforo con sostegno per la schiena Istruzioni per l'uso 45
TR Bel destekli isi yastigi
Kullanim kilavuzu. 56
RU 3JIeKTPnuecka rpeJka c NOdyuKoI IOd CnHy INHcTpyKzuaNo PrIMHeHIO 66
PL Poduszka elektryczna z podporka pod plecy Instrukcja obslugi 76
DA Varmepude med rygstotte Betjeningsvejledning 87
SV Värmekudde med ryggstöd Bruksanvisning 97
NO Varmepute med ryggstotte Bruksanvisning 107
FI Selkäa tukeva lampötyyny
Käyttoohje 117
DEUTSCH
Thank you for choosing a product from our range. Our name stands for high-quality, thoroughly tested products for applications in the areas of heat, weight, blood pressure, body temperature, pulse, gentle therapy, massage, beauty, air and baby.
With kind regards
Your Beurer team
Contents
- Signs and symbols 13
- Included in delivery 14
2.1 Device description.. 14 - Important information Retain for future reference.. 15
- Intended use. 16
- Operation 17
5.1 Safety 17
5.2 Initial use 17
5.3 Switching the device on 19
5.4 Setting the temperature 19
5.5 Automatic switch-off 19
5.6 Switching the device off 19
6. Cleaning and maintenance 20
7.Storage 21
8. Disposal 21
9.What if there are problems? 21
10. Technical data 21
11. Replacement parts 22
12. Warranty/service 22
1. Signs and symbols
The following symbols are used on the device, in these instructions for use, on the packaging and on the type plate for the device:
Read instructions! Extra-delicate cycle at
30^ C
Do not bleach
Do not insert needles!
Do not tumble dry
Do not use when folded or bunched up!
Do not iron
Do not dry clean
Do not wash
Must not be used by very young children (0-3 years old).
The fabrics used in this device meet the high ecological requirements of Oeko-Tex
Dispose of packaging in an environmentally friendly manner
Standard 100 as verified by the Hohenstein Research Institute.
20
PAP
| --- | Direct current | Manufacturer | |
| The unit is double-protected and thus corresponds to protection class 2. | |||
| Disposal in accordance with the Waste Electrical and Electronic Equipment EC Directive - WEEE. | |||
| CE | This product satisfies the requirements of the applicable European and national directives. | ||
| EAC | Certification symbol for products that are exported to the Russian Federation and members of the CIS | ||
| WARNING; warning instruction indicating a risk of injury or damage to health | |||
| IMPORTANT; safety note indicating possible damage to the device/accessory | |||
| NOTE; note on important information | |||
2. Included in delivery
Check that the exterior of the cardboard delivery packaging is intact and make sure that all contents are present. Before use, ensure that there is no visible damage to the device or accessories and that all packaging material has been removed. If you have any doubts, do not use the device and contact your retailer or the specified Customer Service address.
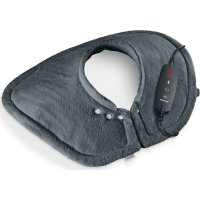
1 x Heated back rest
1 x Mains adapter
1 x Car adapter
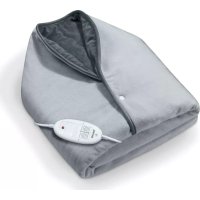
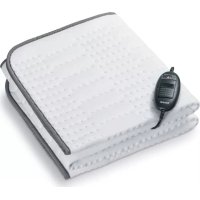
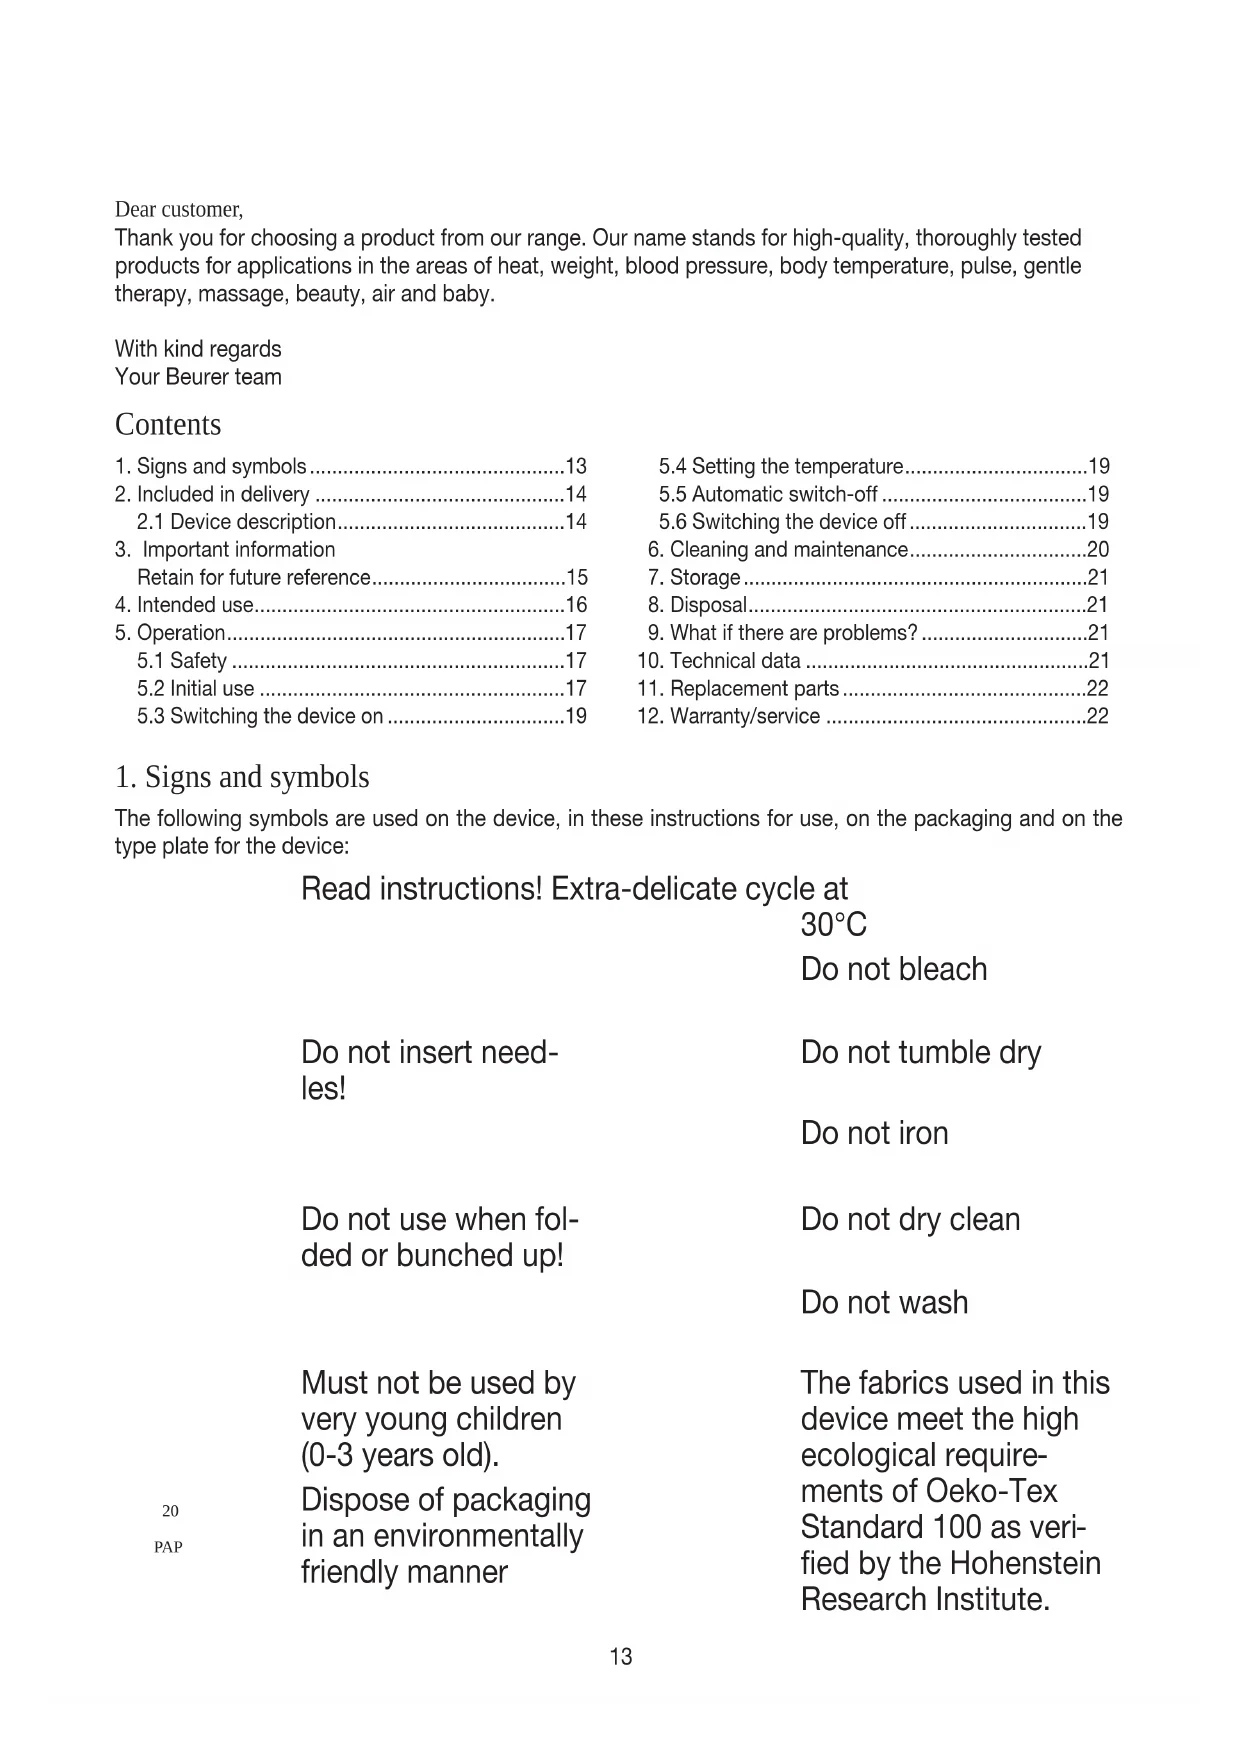
2.1 Device description
1 Heat pad
2 Mains adapter
3 Car adapter
4 Hook-and-loop fastening bands for attaching to the backrest of the chair
5 Plug-in coupling
6 ON/OFF button with LED display
7 Car fastening straps
3. Important information Retain for future reference

WARNING
- Non-observation of the following notes may result in personal injury or material damage (electric shock, skin burns, fire). The following safety and hazard information is not only intended to protect your health and the health of others, it should also protect the product. For this reason, pay attention to these safety notes and include these instructions when handing over the product to others.
- This heat pad must not be used by persons who are not sensitive to heat or by other vulnerable persons who may not be able to react to overheating (e.g. diabetics, people with skin alterations due to illness or scarred tissue in the application area, after taking pain relief medication or alcohol).
- This heat pad must not be used by very young children (0-3 years old) as they are unable to respond to overheating.
- The heat pad can be used by children older than 3 and younger than 8 years of age provided they are supervised. For this, the control must always be set to the minimum temperature.
- This heat pad may be used by children over the age of 8 and by people with reduced physical, sensory or mental skills or a lack of experience or knowledge, provided that they are supervised and have been instructed on how to use the heat pad safely, and are fully aware of the consequent risks of use.
Children must not play with the heat pad. - Cleaning and user maintenance must not be performed by children unless supervised.
- This heat pad is not designed for use in hospitals.
- This heat pad is only intended for domestic/private use, not for commercial use.
- Do not insert needles.
- Do not use when folded or bunched up.
- Do not use if wet.
- This heat pad may only be used in conjunction with the control specified on the label.
-
This heat pad must only be connected to the mains voltage that is specified on the label.
-
The electrical and magnetic fields emitted by this heat pad may interfere with the function of a pacemaker. However, they are still well below the limits: electrical field strength: max. 5000 V/m, magnetic field strength: max. 80 A/m, magnetic flux density: max. 0.1 millitesla. Please therefore consult your doctor and the manufacturer of your pacemaker before using this heat pad.
- Do not pull, twist or make sharp bends in the cables.
- If they are not positioned properly, there may be a risk of becoming entangled in, being strangled by, tripping over, or stepping on the cable and control of the heat pad. The user must ensure that excess lengths of cable, and cables in general, are safely routed.
- Please check this heat pad frequently for signs of wear and tear or damage. If any such signs are evident, if the heat pad has been used incorrectly or if it no longer heats up, it must be checked by the manufacturer before being switched on again.
- Under no circumstances should you open or repair the heat pad (including the accessories) yourself because faultless functionality can no longer be guaranteed thereafter. Failure to observe this will invalidate the warranty.
- If the mains connection cable of this heat pad is damaged, it must be disposed of. If it cannot be removed, the heat pad must be disposed of.
-
When this heat pad is switched on:
-
Do not place any sharp objects on it
-
Do not place any heat sources, such as hot water bottles, heat pads or similar, on it
-
The electronic components in the control warm up when the heat pad is in use. For this reason, the control must never be covered or placed on the heat pad when it is in use.
- It is essential to observe the information relating to the following chapters: Operation, Cleaning and maintenance, Storage.
- If you should have any questions about using our devices, please contact our Customer Services department.
4. Intended use
IMPORTANT
This heat pad is only designed to warm up the human body.
5. Operation
5.1 Safety

IMPORTANT
The heat pad is fitted with a SAFETY SYSTEM. This sensor technology provides protection against overheating across the entire surface of the heat pad with an automatic switch-off in the event of a fault.
5.2 Initial use

IMPORTANT
Ensure that the heat pad will not bunch up or become folded during use.
It is possible to position the plug-in coupling at either the bottom left or bottom right of the heat pad. Please first check on which side the socket is closest. To change the position, open the zip fastening on the rear, remove the moulded foam part, push the plug-in coupling from the outside through the cover to the inside, and then guide the plug-in coupling back out through the other opening. Then re-insert the moulded foam part and close the zip fastening.
Use at home or at work
- Fasten the heat pad to the backrest of the chair by opening the two hook-and-loop fastening bands at the side (4) and connecting and closing them at the rear of the backrest.
- First, connect the mains adapter to the heating pad by inserting the plug-in coupling (5).
- Then insert the mains adapter (2) into the socket. The ON/OFF button with LED display (6) will flash briefly.
Use in cars

IMPORTANT
- Under no circumstances use the hook-and-loop fastening bands at the side of the heat pad to attach it to the car seat! Doing so would impair the function of the side airbag!
- Therefore, please close the side fastening bands at the rear of the heat pad, so that they do not interfere with anything and the hook-and-loop sections cannot damage the backrest. Once closed, they should lie flat against the rear of the heat pad.
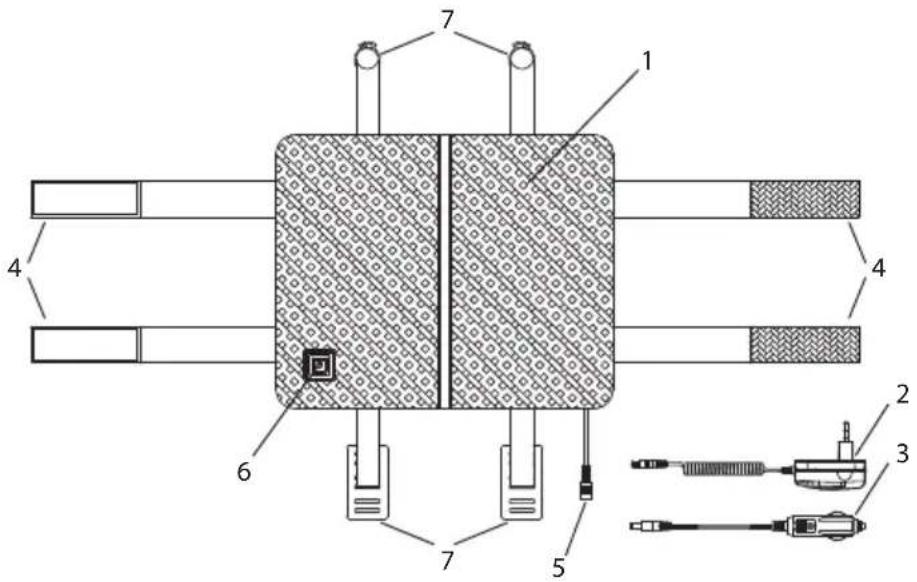
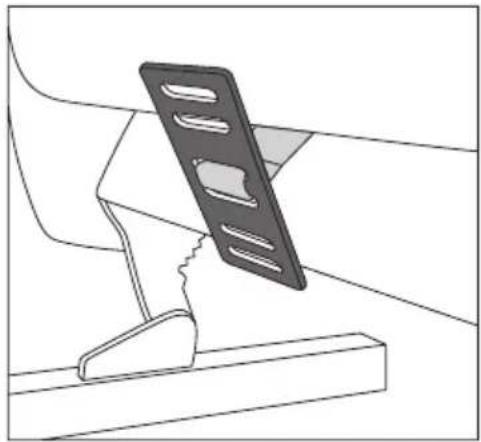
First attach the car fastening straps (7) to the car seat. Place the car fastening strap on the seat surface so that the smoother side is facing upwards.
Car seat front
Push the rectangular securing catch through from the front to the back between the seat and backrest, and orient the securing catch vertically at the back.
Car seat rear
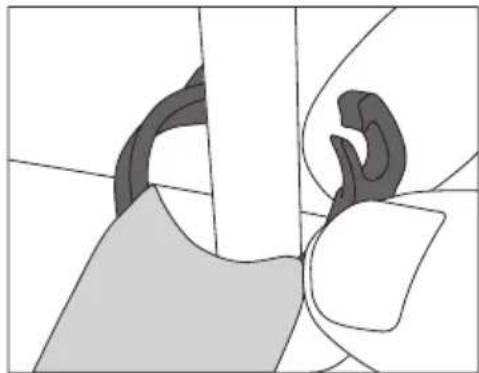
Then attach the clip to the headrest support. To do so, slide the two ends apart towards the sides, as shown in the diagram.
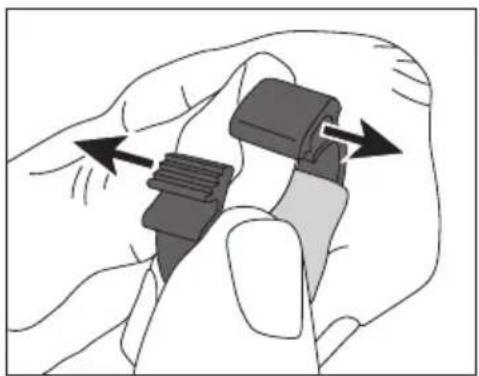
Then use this opening to guide the clip over the headrest support so that it can be closed again.
Close the clip by pressing it together until it securely encloses the headrest support.
Headrest support
The car fastening straps must not cross one another, be entangled, or be mounted with the loop side facing the seat.
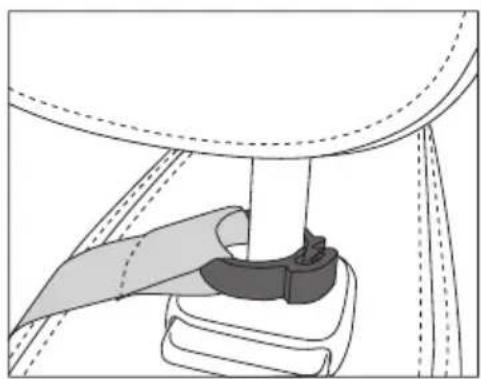
Now take the heat pad in your hand, open the covers of the 4 hook-and-loop points on the rear, hold the heat pad against your back with the curved side at the level of the lumbar vertebrae, and lean back against the backrest.
Then check the hook-and-loop connection. If the hook part does not lie fully on the loop part, you can now correct it, continuing until all 4 points are securely fastened.
You can change the position of the cushion at any time using the hook-and-loop fasteners on the rear of the heat pad.
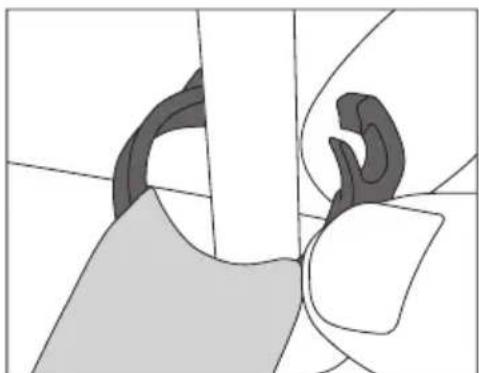
Removal of car fastening straps from car seat
To open the clip, slide the two ends apart again towards the sides. Then push the rectangular securing catch through from the back to the front between the backrest and the seat.
5.3 Switching the device on
To switch on the heat pad, press and hold the ON/OFF button (6). The ON/OFF button will light up red. Temperature setting 3 - maximum heat - is active.

NOTE
Depending on the make, the 12-V socket in the vehicle may be activated at different times:
permanently
- after opening the vehicle
- depending on the ignition or on whether the engine is running

IMPORTANT
If the 12-V socket in the car is permanently activated, we recommend always disconnecting the car adapter from the 12-V socket when leaving the vehicle.
5.4 Setting the temperature
To change the temperature, briefly press the ON/OFF button. The switching sequence is 1-2-3-1-2 ...
Setting 0: OFF
Setting 1: Minimum heat - lights up green
Setting 2: Medium heat - lights up yellow
Setting 3: Maximum heat - lights up red

NOTE
The fastest way to warm up the heat pad is to initially set the highest temperature setting.

NOTE
This heat pad has a fast heating function, which allows the heat pad to warm up quickly in the first 10 minutes.

WARNING
If the heat pad is being used over several hours, we recommend that you set the lowest temperature setting on the control to avoid overheating the heated body part, which may lead to burns to the skin.
5.5 Automatic switch-off
This heat pad is equipped with an automatic switch-off function. This turns off the heat supply approx. 90 minutes after the initial use of the heat pad. The ON/OFF button is then no longer illuminated. You can switch the heat pad on again by pressing the ON/OFF button.

5.6 Switching the device off
To switch off the heat pad, press and hold the ON/OFF button. The ON/OFF button is then no longer illuminated.

NOTE
If the heat pad is not being used, press and hold the ON/OFF button to switch off the heat pad, and pull the mains adapter from the socket or the car adapter from the 12-V socket in the car.
6. Cleaning and maintenance

WARNING
Before performing cleaning work, always first pull the mains adapter from the socket/the car adapter from the 12-V socket in the car. Then disconnect the mains adapter/car adapter from the heat pad by unplugging the plug-in coupling. Otherwise there is a risk of electric shock or damage to the heat pad or adapters.

IMPORTANT
The mains adapter and car adapter must never come into contact with water or other liquids. Otherwise, this could damage them.
- Use a dry, lint-free cloth to clean the mains adapter and car adapter. Do not use any chemical or abrasive cleaning agents.
- Small marks on the heat pad can be removed with a damp cloth and, if necessary, with a little liquid detergent for delicate laundry.

IMPORTANT
Please note that the heat pad must not be chemically cleaned, wrung out, tumble dried, put through a mangle or ironed.
- This heat pad is machine-washable. To do so, open the zip fastening on the rear and remove the moulded foam part. Removing the moulded foam part means the heat pad can dry faster.
- Place the heat pad in a pillowcase and close it. The pillowcase will reduce the mechanical strain on the heat pad while it is being washed.
- Set the washing machine to a particularly gentle wash cycle at 30^ (wool cycle). Use a delicate laundry detergent and measure it out according to the manufacturer's instructions.

IMPORTANT
Please note that frequent washing of the heat pad has a negative effect on the product. The heat pad should therefore be washed in a washing machine a maximum of 10 times during its life.
Remove the heat pad from the pillowcase immediately after it has been washed. Reshape the heat pad to its original dimensions while it is still damp and spread it out flat on a clothes horse to dry.

IMPORTANT
Do not use pegs or similar items to attach the heat pad to the clothes horse. Otherwise the heat pad may be damaged.
Once the heat pad is completely dry, you can re-insert the moulded foam part and close the zip fastening.

WARNING
Do not reconnect the mains adapter or the car adapter to the heat pad until the plug-in coupling and heat pad are completely dry. Otherwise the heat pad may be damaged.

WARNING
Never switch the heat pad on to dry it! Otherwise there is a risk of electric shock.
7. Storage
If you do not plan to use the heat pad for a long period of time, we recommend that you store it in the original packaging. For this purpose, disconnect the heat pad from the mains adapter/car adapter by unplugging the plug-in coupling.

IMPORTANT
- Please allow the heat pad to cool down before storing. Otherwise the heat pad may be damaged.
- To avoid sharp folds in the heat pad, do not place any objects on top of it while it is being stored.
8. Disposal
For environmental reasons, do not dispose of the device in the household waste at the end of its service life. Dispos of the device at a suitable local collection or recycling point in your country. Dispos of the device in accordance with EC Directive - WEEE (Waste Electrical and Electronic Equipment). If you have any questions, please contact the local authorities responsible for waste disposal.
9. What if there are problems?
| Problem Solution | |
| The ON/OFF button is not illuminated while - the mains adapter is properly connected to the heat pad - the mains plug is connected to a working socket - the ON/OFF button was pressed and held to switch on the device | Send the heat pad and the mains adapter for servicing. |
10. Technical data
See the type plate label on the heat pad.
Technical data for mains adapter
| Model identifier: CZH024120200BSWM (BS-plug) | |
| Input voltage: 100 V-240 V | |
| Input AC frequency 50 Hz/60 Hz | |
| Output voltage: 12.0 V | |
| Output current: 2.0 A | |
| Output power: 24.0 W | |
| Average efficiency during operation: 86.5% | |
| Efficiency at a low load: 85.9% | |
| No-load power consumption: | 0.05 W |
| Name/trademark of the manufacturer: | Shenzhen Chanzeho Technology Co., Ltd. |
11. Replacement parts
You can obtain the following replacement parts directly from Customer Services:
| Mains adapter item no. 7170 | |
| Car adapter item no. 7161 | |
| Car fastening straps item no. 714.049 |
12. Warranty/service
Beurer GmbH, Söflinger Straße 218, 89077 Ulm, Germany (hereinafter referred to as "Beurer") provides a warranty for this product, subject to the requirements below and to the extent described as follows.
The warranty conditions below shall not affect the seller's statutory warranty obligations which ensue from the sales agreement with the buyer.
The warranty shall apply without prejudice to any mandatory statutory provisions on liability.
Beurer guarantees the perfect functionality and completeness of this product.
The worldwide warranty period is 3 years, commencing from the purchase of the new, unused product from the seller.
The warranty only applies to products purchased by the buyer as a consumer and used exclusively for personal purposes in the context of domestic use.
German law shall apply.
During the warranty period, should this product prove to be incomplete or defective in functionality in accordance with the following provisions, Beurer shall carry out a repair or a replacement delivery free of charge, in accordance with these warranty conditions.
If the buyer wishes to make a warranty claim, they should approach their local retailer in the first instance: see the attached "International Service" list of service addresses.
The buyer will then receive further information about the processing of the warranty claim, e.g. where they can send the product and what documentation is required.
A warranty claim shall only be considered if the buyer can provide Beurer, or an authorised Beurer partner, with a copy of the invoice/purchase receipt, and the original product.
The following are explicitly excluded from this warranty:
-
deterioration due to normal use or consumption of the product;
-
accessories supplied with this product which are worn out or used up through proper use (e.g. batteries, rechargeable batteries, cuffs, seals, electrodes, light sources, attachments and nebuliser accessories);
- products that are used, cleaned, stored or maintained improperly and/or contrary to the provisions of the instructions for use, as well as products that have been opened, repaired or modified by the buyer or by a service centre not authorised by Beurer;
- damage that arises during transport between manufacturer and customer, or between service centre and customer;
- products purchased as seconds or as used goods;
- consequential damage arising from a fault in this product (however, in this case, claims may exist arising from product liability or other compulsory statutory liability provisions).
Repairs or an exchange in full do not extend the warranty period under any circumstances.
FRANÇAIS
Chere cliente, cher client,
Pemn dIy KpeHneB aBTOMOBnIe He doJXhbl nepeceKaTbCry n CKpeuNBaTbCry; ux HeNb3r npNKpeNJIb T neTne K cndeHbU.
Tepeb Bo3bMITE 3JIeKTPnueckyU rpeKy B pyky, OTKpoIte KpeJexHbIe JInnyKn B 4-x MeCTax c3aI, PnIXMMTE rpeKy I3OrHyToI CTOpOHoK CcINHe Ha ypOBHe NORCHNbIX N03BOHKOB INPnIXMMTECb K CcINHKe.
3aTe m npOBepbTe KpeIeHne Ha IinyuKax. Ecnn KpOuKn I neTm He nOpHocTbIO npUneraOT dpyr K dpyrgy, MoXHO nonpaBHTb rpeNky, HadeXHO 3aΦnKcnpoBaB BCE 4 Tockn.
Moxho MeHbI NOJoxHe NOnuKn-ONOpBIB JIO6oe BpeMa C NOMOsbIO 3aCTeXeK-JINpyek Ha 3aHne CTOpOHe 3JIeKTPnuecko rpeKn.
Tenepb noDcoeHNHTe wTekehpya3bem (5) aanTepa nra aBtOMo6nla. 3aTe m noKIOHnTe aanTep nra aBtOMo6nla (3) K po3eTke 12 B.
OTcoeHNHTe peMHn IJI KpeJIeHnO T aBTOMo6NbHOrOCnDEHb.
YTo6bI OTKpbITb 3aXIM,CHOBa pa3dBnHbTe o6a KOHcBA CTOPOHbI. 3aTeM BbIaBInTe BnpePe npraMoYroJIbHyIO 3aUeIky MeJy cnJeHbEm I CNIHKOI.
5.3 BkIIOueHne
YdepxBaTe KhONky BKJ./BbIKI. (6),yTo6bl BKNIOHTb 3JIeKTPnueckyo rpeNky.KhONka BKJ./BbIKI.ropNT KpaChbIM. AKTINBPOBaH TeMnepatypHbI peXIM 3 - MaKcMaJIbHbI.

YKA3AHNE
B 3abucmocntn ot npon3bOuNTen, po3eTka 12 B b aBTOMo6nJe MOxET pa6oTaTB b pa3Hoe BpeM:
- NOCTOARHHO;
- NOCLTE OTKpbBaHnA bTOMO6NJIA;
B3aBnCIMOCTNOT3axKurHnIu pa6ToIbDnurTaTeJI.

BHIMAHNE
Ecn npotska 12 B aBtOMo6nle pa6oTaET noCToHHO, peKoMeHdyetc rOToeHNrTb aAnTeP, KOrda Bbl BbIXOnTE n3 MaunHbl.
5.4 HactpoKa TempeaTypbI
KopoTKo haxmTe KhoNky BKJ./BblKJI., 706bl N3MeHHTb TemnepaTpy. IocneIOBaTeIbHocTb nepeKluoyenra: 1-2-3-1-2 ...
Pexm0:BbIKJ.
Pexm 1: MHHMaJIbHbI yPoBeHb TeIIa - 3eJIeHa nOcBcTeKa
Pekm 2: CpeHn ypoBHeb TeNla - JeTaa NoCBeTa
Pekm 3: MakcimalbHbI yPOBeH TeIIa - KpaCha noDCBeTka

YKA3AHNE
Ba7a 3JIeKTPnuecka rpeIka harpeeTc8 6bICTpee, ecN Bbl cHa7aJa yCTaHOBNTe cambl BePxHn peXIM TemnepaTypbl.

YKA3AHNE
Данна заелктуеска грелka Имeel Функцию бioctporo HarpeBa, КOTOPА оБecпуньаETбiocтpbИНаревВ TeueHne nepBbix 10 MInHyT.

ПЕДУПЕХДECHNE
Ecn 3neKtpnuecka rpeIka nCNOJb3yeTcB TeueHne HeCKoJIbKnx YacOB, peKOMeHdyETcY cTaHaBnBaTb MInHmAlbHyU TeMnepaTypy BO n36eXaHne nepepeBa n OxOra yAcTei TeJa.