PLGS 2012 A1 - Battery charger PARKSIDE - Free user manual and instructions
Find the device manual for free PLGS 2012 A1 PARKSIDE in PDF.
| Product Type | Smart Battery Charger |
| Brand | Parkside |
| Model | PLGS 2012 A1 |
| Input Voltage | 220-240 V ~ |
| Input Frequency | 50-60 Hz |
| Power Consumption | 300 W |
| Output Voltage | 20 V = |
| Max. Output Current | 12.0 A |
| Output Power | 240 W |
| Battery Compatibility | PAP 20 B1, PAP 20 B3, Smart PAPS 204 A1, Smart PAPS 208 A1 (X 20 V Team series) |
| Protection Class | II (double insulation) |
| Safety Fuse | T6.3A / 250V |
| Connectivity | Wi-Fi 2.4 GHz, Bluetooth, Lidl Home app |
| Frequency Band | 2400-2483.5 MHz |
| Frequency Power | ≤ 20 dBm |
| Charging Modes | Performance, Balance, ECO, Expert, Storage (60%) |
| LED Indicators | Red, yellow, green LEDs depending on charge status and faults |
| Wall Mounting | Possible (screw spacing 101.6 mm) |
| Intended Use | Indoor, charging Parkside X 20 V Team batteries |
| Warranty | 5 years |
| Maintenance | Maintenance-free, clean with dry cloth |
Frequently Asked Questions - PLGS 2012 A1 PARKSIDE
User questions about PLGS 2012 A1 PARKSIDE
0 question about this device. Answer the ones you know or ask your own.
Ask a new question about this device
Download the instructions for your Battery charger in PDF format for free! Find your manual PLGS 2012 A1 - PARKSIDE and take your electronic device back in hand. On this page are published all the documents necessary for the use of your device. PLGS 2012 A1 by PARKSIDE.
USER MANUAL PLGS 2012 A1 PARKSIDE
natural_image
Black outdoor power supply unit labeled 'PARKSIDE' with control panel and buttons (no readable text beyond branding)DE AT CH
Translation of the original instructions
NL BE
Smart acculader 20 V / 12 A
Before reading, unfold the page containing the illustrations and familiarise yourself with all functions of the device.
FR BE
GB / MT Translation of the original instructions Page
Service-Center......22
Importeur ......23
Intended Use......25
General Description ......25
Overview......25
Technical Data......25
Safety information......26
Safety instructions for the battery charger ..... 27
Charging Process......29
Checking the charge status of the battery ..... 29
Charging the battery ..... 30
Connect the charger to the Lidl Home app......31
Features of the app......33
Creating a scenario......34
Privacypolicy....35
Disconnect the device and delete data from the app...35
Problemswiththeapp?
-FAQ....35
Storage ....35
Wall mounting for charger....35
Cleaning....36
Maintenance ....36
Disposal/environmental protection ....36
Guarantee ....37
Repair Service......39
Service-Center......40
Importer ....40
Spare Parts/Accessories....40
Translation of the original EC declaration of conformity ....237
Introduction
Congratulations on the purchase of your new device. With it, you have chosen a high quality product. During production, this equipment has been checked for quality and subjected to a final inspection. The functionality of your equipment is therefore guaranteed.
The operating instructions constitute part of this product. They contain important information on safety, use and disposal. Before using the product, familiarise yourself
with all of the operating and safety instructions. Use the product only as described and for the applications specified. Keep this manual safely and in the event that the product is passed on, hand over all documents to the third party.
Intended Use
The charger is to be used in conjunction with a rechargeable battery from the (Parkside) X 20 V Team series. Any other use can damage the device and thus pose a substantial risk to the user. This device is not suitable for commercial use. The warranty is void in the case of commercial use. The manufacturer is not liable for damage caused by improper use or incorrect operation.
General Description
The illustrations can be found on the front fold-out page.
A Overview
1 Release button
2 Button for the charge status display
3 Battery charge level indicator
4 Rechargeable battery
5 Charger
6 Control display on charger
7 60% button
8 ECO button
9 Wi-Fi display
i Battery is not included.
Technical Data
Battery
Charger .. Smart PLGS 2012 A1
Input voltage ..... 220-240 V\~
Input AC frequency .. 50-60 Hz
Power consumption. .... 300 W
Output voltage.....20V =
Output power 240 W
Output current .....max. 12.0 A
Frequency
performance......≤20dBm
Frequency
band ..... 2400-2483.5 MHz
Protection class ...... Device fuse.....T6.3A/250V
The charger may only be used to charge the following batteries from the (PARKSIDE) X 20 V Team series: PAP 20 B1, PAP 20 B3, Smart PAPS 204 A1, Smart PAPS 208 A1.
An up-to-date list of battery compatibility can be found at: www.lidl.de/akku
The rechargeable battery only reaches its full capacity once it has been charged several times.
Safety information
This appliance can be used by children aged from 8 years and above and persons with reduced physical, sensory or mental capabilities or lack of experience and knowledge if they have been given supervision or instruction concerning use of the ap- pliance in a safe way and understand the hazards involved. Children shall not play with the appli- ance. Cleaning and user maintenance shall not be made by children without supervision.
Symbols in the manual
Warning symbols with information on damage and injury prevention
Hazard symbol with information on the prevention of personal injury caused by electric shock
i Help symbols with information on improving tool handling
Symbols on the Charger

Caution!

This device is part of the X 20 V TEAM series.

Read the operating in- tions before charging.

The charger is for in- door use only.
T6.3A/250V

Miniature fuse

Protection class II (Double insulation)

Electrical appliances must not be disposed with the domestic waste.
text_image
Reset WLANLED display while charging.

text_image
BATTERY(AN) 2.0 3.0 4.0 8.0 TIME(Min) 120 35 180 38 240 42 480 48Charging times table

Charging time in minutes

ECO charging time
Quick charging time

Wi-Fi display
Bluetooth® The Bluetooth® name and logos are registered trademarks owned by the Bluetooth SIG, Inc. and any use of such brands by Grizzly Tools GmbH & Co. KG is subject to a license. Other trademarks and brand names are the property of their respective owners.
Safety instructions for the battery charger

Caution! The following basic safety autions must be ob-
served while using elec- trical devices to protect against electric shock, in- jury and risk of fire:
• Children should be supervised in order to ensure that they do not play with the equipment.
- The charger may only be used to charge batteries of the (Parkside) X 20 V Team series.
Charging other batteries
can lead to a risk of fire
and explosion.
- Do not use the charger if defective and do not open it yourself. Before each use, check the charger, cable and plug. Only have qualified personnel repair a defective device and only use original spare parts. This prevents hazards and maintains the safety of the device.
- Connect the charger only to a socket with an
earth. Ensure that the mains voltage matches the specifications on the charger rating plate. Risk of electric shock.
- Keep the charger clean and away from wet and rain. Do not use the charger outdoors. Dirt and the entry of water increase the risk of electric shock.
- Avoid mechanical damage to the charger. This can result in internal short circuits.
- The charger must not be operated on or near flammable surfaces (e.g. paper, textiles). Risk of fire due to heating during charging.
-
If the power cable for this equipment is damaged, it must be replaced by the manufacturer, a customer service agent of the same or a similarly qualified person in order to prevent hazards.
-
Do not use the charger to charge non-recharge-able batteries.
• To reduce the electric shock hazard, unplug the battery charger from the mains before cleaning the charger. - Do not use any accessories that are not recommended by PARKSIDE.
This can result in electric shock or fire.
To recharge batteries of the (Parkside) X 20 V
Team series, only use a charger belonging to the (Parkside) X 20 V Team series.
- Charge the battery before the first time of use.
• Always take heed of the applicable safety instructions as well as the environmental protection regulations and information.
Charging Process
Do not expose the battery to extreme conditions such as heat or impact. Risk of injury from escaping electrolytic solution! After eye/skin contact, rinse the affected areas with water or a neutraliser and consult a doctor.
Charge the battery in a dry room only. Prior to attaching the charger, check that the battery's outer surface is clean and dry. There is a risk of injury due to electric shock.
Checking the charge status of the battery
The battery charge status indicator (3) on the battery shows the charge status of the battery (4). Press the button for the charge level indicator (2). The charge level of the battery is indicated by illumination of the corresponding LED light.
3 LEDs illuminated (red, orange and green): Battery charged
2 LEDs illuminated (red and orange): Battery partially charged
1 LED illuminated (red):Battery needs to be charged
Charge the battery (4) when only the red LED on the charge level indicator (3) is illuminated.
Charging the battery
If warm, allow the battery to cool before charging. Charge the battery (4) when only the red LED on the charge level indicator (3) is illuminated.
- If necessary, remove the rechargeable battery (4) from the device.
- Slide the battery (4) into the charging slot of the charger (5).
- Plug the charger (5) into a socket.
Charging modes:
- Quick charging: The charger automatically charges in quick charging mode.
• ECO : Press the ECO button (8). -
Store/overwinter: Press the 60% button (7) to charge the battery to 60% (e. g. for over-wintering).
-
Once charging is complete, disconnect the charger (5) from the mains supply.
- Remove the battery (4) from the charger (5).
| Charging time (min.) | Smart PLGS 2012 A1 | |
 ECO q ECO q |  | |
| 2.0 Ah 120 35 | ||
| 3.0 Ah 180 38 | ||
| 4.0 Ah 240 42 | ||
| 8.0 Ah 480 48 | ||
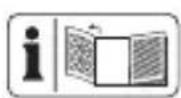
Overview of the LED indicators (6) on the charger:

Red LED fl ashes:
battery charging

Yellow LED fl ashes:
Battery charged to < 80%

Green LED fl ashes:
Battery charged to ≥ 80%

Green LED illuminated:
Battery charged

Yellow LED illuminated:
Battery charged to 60%
-> e. g. for overwintering)

Red + yellow LEDs flash:
Overheated

Red LED illuminated:
Battery defective
Connect the charger to the Lidl Home app

Only Smart Performance chargers can be connected
to the Lidl Home app.

Connecting the device with the Lidl Home App
for the first time requires a 2.4 GHz WLAN connection.
-
Connect the charger to the mains supply.
The WLAN indicator (9) fl ashes blue when the charger is ready to be connected to the app. -
Enable Bluetooth® and
WLAN on your smartphone.
-
Enable Bluetooth® on the device by pressing and holding the ECO button (8) and 60% button (7) at the same time for 5 seconds.
-
Open the Lidl Home App. From here there are options ①, ② and ③ to connect the charger.
① If the charger is the first device you want to connect to the app:
- On the , select the option "Add device". The app scans the area for available devices and indicates if available devices have been found.

If this is not the case,
read on if possible

-
If you select "Go to add", the available devices are displayed in a list.
-
Select the charger by setting the check mark √. Select only one device at a time. If there are other check marks for other devices, clear the check
marks by pressing them.
-
Now press the +, that has the same color as the set check mark.
-
Enter a WLAN name and the corresponding password to connect the charger to the WLAN.
-
Confirm your entry. The charger is now connected to the app. You can recognize a successful connection by the fact that the WLAN indicator (9) lights up blue continuously.
-
Confirm the successful connection with "Finish". The charger is now listed in the tab and can be selected.
② If you have already connected other devices to the app:
- On the tab 🔒, select the + in the upper right. The app scans the area for available devices and indicates if available devices have been found.
If this is not the case, read on if possible ③.
- Proceed as with 1 from point 5.
③ If a list of available devices is not automatically suggested to you:
If the charger is not suggested automatical suggested, follow these steps:
-
On the tab 🔍, select the + in the upper right.
-
Select "Other" in the bar on the left.
-
Select "Other-1".
-
Follow the instructions in the app.
Enter a WLAN with the associated password and confirm with "Next". The app now searches for available devices and suggest them to you.
-
Select the desired charger by pressing the + to add it to the app.
-
First confirm with "Next", then with "Finish".

Upgrading the firmware can change the features of the app.
Features of the app
If you select the charger, this will take you to the overview page.
- Brief overview (above)
The data apply to a battery inserted in the charger:
- the remaining time until the battery has reached the specified charge level.
- the current charge level of the battery in %.
- the current temperature of the battery.
- Charging switch (on/off)
You stop charging the battery when you press the charging switch while the battery is inserted.
- Charging mode
Here you can select between the different charging modes:
Performance, Balance, ECO and Expert.
The charging current adapts to the charging mode.
In Expert mode you can determine the charging current yourself by selecting it while the battery is inserted, selecting the desired value from the list provided and confirming it.
• Current charging current
The current charging current is shown here.
- Charging voltage
The current charging voltage is displayed here.
- Storage
Here you can optimally charge batteries for storage.
- Push notifications
Here you can select to receive a notification on your smartphone:
- when the battery exceeds the overtemperature limit. To do this, select the "Overheated" field.
- when the battery is fully charged. To do this, select the "100% charged" field.
- 10 minutes before charging is completed. To do this, select the "10 min. until fully charged" field.
- °F/°C switch
Here you can select between the temperature display in degrees Celsius and degrees Fahrenheit
• Device information
Here you will find the name of the charger.
- Settings
You will find the ☐ at the top right after you have selected the charger.
- Press the 🔊 icon again and you can assign a new image to the charger under "Symbol", you can rename the charger under "Name" or assign a "Location" to the charger.
- If you go to "Device information" you can, among other things, view the virtual ID or WLAN signal strength.
- With "Tap to run and automate" you can select and deselect smart scenarios and automations. These have to have been created first. See the section "Creating a scenario".
- If you go to "Offline notification" you can be choose to be notified when a device is offline for more than 30 minutes.
- Under "Enable device", you can authorize another user from the same household to control the charger using the Lidl Home app.
- You can find the frequently asked questions under "FAQ".
- Under "Check for firmware upgrade" you can check whether the firmware needs to be upgraded and also perform the upgrade.
- The charger can be removed from the app under "Remove device". See also chapter "Disconnecting the device and deleting data from the app".
Creating a scenario
-
Select the tab "Smart".
-
Select the⊕ at the top right to create a new scenario.
-
Put together the desired scenario and save it.
-
Select or deselect the desired scenario either here on the tab "Smart" or in the device settings under "Tap to run and automate".
Privacy policy
The complete data protection guideline can be found under the tab 📁 in the field "Data protection guideline".
Disconnect the device and delete data from the app
- In the tab, select the device that you want to remove and whose data you want to delete.
- Select the 🔊 icon in the top right.
- Select "Remove device".
- To delete the data, select "Disconnect and delete data". If you just want to disconnect the device without deleting the data, select "Disconnect".
Problems with the app? - FAQ
- Select the charger you have questions about from the device list.
- Select the 🔊 icon in the top
right.
- Select "FAQ" (Frequently Asked Questions).
Storage
Store the appliance in a dry pla- ce well out of reach of children.
Wall mounting for charger (optional)
You can also fix the charger (5) to the wall.
• Using dowels, place two screws 101.6 mm (10,16 cm) apart at the desired position of a wall.
- The screw head can have a diameter of 4 mm.
- Leave the screw heads protruding at a distance of approx. 10 mm from the wall.
- With the openings of the wall bracket, you can attach the charger (5) to the two screws and pull the charger down until it stops.
When drilling, be careful not to damage any supply lines. Use suitable search devices to find these or consult an installation plan for guidance. Contact with electrical cables can lead to electric shock and fire. Contact with a gas line can result in an explosion. Damage to a water pipe can lead to property damage and electric shock.
Cleaning
Clean the charger with a dry cloth or with a paintbrush. Do not use water or metal objects.
Maintenance
The equipment is maintenance free.
Disposal/environmental protection
The device, accessories and packaging should be properly recycled.

Electrical devices do not belong in domestic waste.
Directive 2012/19/EU on waste electrical and electronic equipment: Used electrical devices must be collected separately for disposal and recycled in an environmentally sound manner.
Depending on the implementation in national law, you may have the following options:
- Return to a shop: Food retailers with a total sales area of at least 800 square metres that offer electric and electronic devices multiple times a year or permanently and distribute them on the market are obligated to take back old electric and electronic devices at no charge. When handing a new electric or electronic device to an end user, they have to take back an old device of the same kind from the end user that essentially fulfils the same functions as the new device at the site of
handover or in the immediate vicinity at no charge as well as take back up to three old devices per device type with external dimensions no larger than 25 centimetres in the retail shop or the immediate vicinity at no charge without the purchase of an electric or electronic device at the request of the end customer.
- Hand over to an official collection point: Take the device to a recycling plant. The plastic and metal parts used on your device can be properly sorted according to materials and grades and efficiently recycled. Please contact our service centre for more information.
- Return to the manufacturer/distributor: We will dispose of any defective devices that you send to us free of charge. Please contact our service centre for more information.
This does not affect accessories enclosed with the old devices or tools without any electrical components.
Guarantee
Dear Customer,
This equipment is provided with a 5-year guarantee from the date of purchase.
In case of defects, you have statutory rights against the seller of the product. These statutory rights are not restricted by our guarantee presented below.
Terms of Guarantee
The term of the guarantee begins on the date of purchase. Please retain the original receipt. This document is required as proof of purchase. If a material or manufacturing defect occurs within five years of the date of purchase of this product, we will repair or replace – at our choice – the product for you free of charge. This guarantee requires the defective equipment and proof of purchase to be presented within the five-year period with a brief written description of what constitutes the defect and when it occurred.
If the defect is covered by our guarantee, you will receive either the repaired product or a new product. No new guarantee period begins on repair or replacement of the product.
Guarantee Period and Statutory Claims for Defects
The guarantee period is not extended by the guarantee service. This also applies for replaced or repaired parts. Any damages and defects already present at the time of purchase must be reported immediately after unpacking. Repairs arising after expiry of the guarantee period are chargeable.
Guarantee Cover
The equipment has been carefully produced in accordance with strict quality guidelines and conscientiously checked prior to delivery.
The guarantee applies for all material and manufacturing defects. This guarantee does not extend to cover product parts that are subject to normal wear and may therefore be considered as wearing parts or to cover damage to breakable parts.
This guarantee shall be invalid if the product has been damaged, used incorrectly or not maintained. Precise adherence to all of the instructions specified in the operating manual is required for proper use of the product. Intended uses and actions against which the operating manual advises or warns must be categorically avoided. The product is designed only for private and not commercial use. The guarantee will be invalidated in case of misuse or improper handling, use of force, or interventions not undertaken by our authorised service branch.
Processing in Case of Guarantee To ensure efficient handling of your query, please follow the directions below:
- Please have the receipt and item number
(IAN 390996_2201) ready as proof of purchase for all enquiries.
- Please find the item number on the rating plate.
- Should functional errors or other defects occur, please initially contact the service department specified below by telephone or by e-mail. You will then receive further information on the processing of your complaint.
- After consultation with our customer service, a product recorded as defective can be sent postage paid to the service address communicated to you, with the proof of purchase (receipt) and specification of what constitutes the defect and when it occurred. In order to avoid acceptance problems and additional costs, please be sure to use only the address communicated to you. Ensure that the consignment is not sent carriage forward or by bulky goods, express or other
special freight. Please send the equipment inc. all accessories supplied at the time of purchase and ensure adequate, safe transport packaging.
Repair Service
For a charge, repairs not covered by the guarantee can be carried out by our service branch, which will be happy to issue a cost estimate for you. We can handle only equipment that has been sent with adequate packaging and postage.
Attention: Please send your equipment to our service branch in clean condition and with an indication of the defect.
Equipment sent carriage forward or by bulky goods, express or other special freight will not be accepted.
We will dispose of your defective devices free of charge when you send them to us.
Service-Center

Service Great Britain
Tel.: 0800 404 7657
E-Mail: grizzly@lidl.co.uk
IAN 390996_2201

Service Malta
Tel.: 800 622 30
E-Mail: grizzly@lidl.com.mt
IAN 390996_2201
Importer
Please note that the following address is not a service address. Please initially contact the service centre specified above.
Spare Parts/Accessories
Spare parts and accessories can be obtained at www.grizzlytools.shop
If you have issues ordering, please use the contact form. If you have any other questions, contact the "Service-Center" (see page 40).
Battery:
Smart PAPS 208 A1, 8,0 Ah 80001153
Smart PAPS 204 A1, 4,0 Ah 80001154
PAP 20 B1 80001156
PAP 20 B3 80001157
Charger:
Smart PLGS 2012 A1, EU 80001247
Smart PLGS 2012 A1, UK 80001248
Sommaire
Introduction ......41
Service Réparations ......63
Service-Center......63
Importeur ......63
Pièces de rechange/ Accessoires ....64
- Notifications push
Service Réparations Service-Center
PAPS 208 A1, 8,0 Ah ....80001153
PAPS 204 A1, 4,0 Ah 80001154
PAP 20 B1 80001156
PAP 20 B3 80001157
Chargeur :
PLGS 2012 A1, EU 80001247
PLGS 2012 A1, UK....80001248
Inhoud
Inleiding 65
Gebruik......66
Service-Center......82
Importeur ....82
Reserveonderdelen .....83
text_image
rode LED knippert:Smart PLGS 2012A1, UK....80001248
Spis tresci
Wstęp......84
Service-Center......102
Importer 102
Smart PLGS 2012 A1, UK....80001248
Obsah
Úvod ......104
Service-Center......120
Dovozce....120
Smart PLGS 2012 A1, UK....80001248
Obsah
Úvod 122
Team: PAP 20 B1, PAP 20 B3,
Smart PAPS 204 A1,
Smart PAPS 208 A1.

Smart PLGS 2012 A1, UK....80001248
Indhold
Introduktion 140
Anvendelse 141
Generel beskrivelse ...... 141
Oversigt 141
Tekniske data......141
Symboler og billedtegn ... 142
Service-Center......156
Importør 156
Reservedele 157
Apparatsikring....T6.3A/250V
PAP 20 B1, PAP 20 B3,
Smart PAPS 204 A1,
Smart PAPS 208 A1.
Smart PLGS 2012 A1, UK....80001248
Contenido
Smart PAPS 208 A1, 8,0 Ah....80001153
Smart PAPS 204 A1, 4,0 Ah 80001154
PAP 20 B1 80001156
PAP 20 B3 80001157
Cargador:
Smart PLGS 2012 A1, EU 80001247
Smart PLGS 2012 A1, UK....80001248
Indice
PAP 20 B1, PAP 20 B3,
Smart PAPS 204 A1,
Smart PAPS 208 A1.
Smart PLGS 2012 A1, UK....80001248
Tartalom
Bevezető....197
text_image
Berbell WLANSmart PAPS 208 A1, 8,0 Ah ....80001153 Smart PAPS 204 A1, 4,0 Ah ....80001154 PAP 20 B1 ....80001156 PAP 20 B3 ....80001157
Töltő:
Smart PLGS 2012 A1, EU....80001247 Smart PLGS 2012 A1, UK....80001248
PAP 20 B1, PAP 20 B3,
Smart PAPS 204 A1,
Smart PAPS 208 A1.
Performance, Balance, ECO in Expert.
Smart PLGS 2012 A1, UK....80001248
SI
Pooblaščeni serviser:
Tel.: 080 080 917
E-Mail: grizzly@lidl.si
(Birotehnika, Hodošček Renata s.p., Lendavska ULICA 23, 9000 Murska Sobota)
Garancijski list
| GBMT | Translation of the original EC declaration of conformity |
| We hereby confirm that the Battery Charger design seriesSmart PLGS 2012 A1, 000001 - 098000conforms with the following applicable relevant version of the EU guidelines: | |
| 2014/35/EU • 2014/53/EU • 2011/65/EU* & (EU) 2015/863 | |
| In order to guarantee consistency, the following harmonised standards as well as national standards and stipulations have been applied: | |
| EN 60355-1:2012/A2:2019 • EN 60335-2-29:2004/A11:2018EN 62233:2008 • EN 62841-1:2015 Appendix KEN 55014-1:2017/A11:2020 • EN 55014-2:2015EN IEC 61000-3-2:2019 • EN 61000-3-3:2013/A1:2019EN 301 489-1 V2.2.3:2019 • EN 301 489-17 V3.2.4:2020EN 300 328 V2.2.2:2019 • EN 50663:2017 • EN 50665:2017EN IEC 63000:2018 | |
| This declaration of conformity (22)** is issued under the sole responsibility of the manufacturer: | |
| CEGrizzly Tools GmbH & Co. KGStockstädter Straße 2063762 GroßostheimGermany, 05.08.2022 | Christian FrankDocumentation Representative |
* The object of the declaration described above satisfies the provisions of Directive 2011/65/EU of the European Parliament and the Council of 8 June 2011 on limiting the use of certain harmful substances in electrical and electronic appliances.
** The last two digits of the year in which the CE marking was affixed.
text_image
FSC www.fsc.org MIX Paper from responsible sources FSC® C142944
text_image
FSC www.fsc.org MIX Papier aus ver- antwortungsvolien Quellen FSC® C142944IAN 390996_2201
8