
SSSES 1.5 B2 - Soap dispenser SILVERCREST - Free user manual and instructions
Find the device manual for free SSSES 1.5 B2 SILVERCREST in PDF.
| Brand | SilverCrest |
| Model | SSSES 1.5 B2 |
| Product type | Sensor soap dispenser |
| Power supply | 4 x 1.5 V batteries, type Micro AAA, LR03 |
| Protection rating | IPX4 (protection against water splashes) |
| Tank capacity | Approx. 250 ml |
| Operating temperature | +5°C to +35°C |
| Main function | Automatic dispensing of liquid soap, dish soap, disinfectant gel, or shampoo |
| Soap volume adjustment | 2 selectable quantity levels |
| LED indicators | Green LED (on/quantity) and red LED (off) |
| Usage | Household, private use |
| Cleaning | Damp cloth, do not use abrasive cleaners |
| Warranty | 3 years |
Frequently Asked Questions - SSSES 1.5 B2 SILVERCREST
User questions about SSSES 1.5 B2 SILVERCREST
0 question about this device. Answer the ones you know or ask your own.
Ask a new question about this device
Download the instructions for your Soap dispenser in PDF format for free! Find your manual SSSES 1.5 B2 - SILVERCREST and take your electronic device back in hand. On this page are published all the documents necessary for the use of your device. SSSES 1.5 B2 by SILVERCREST.
USER MANUAL SSSES 1.5 B2 SILVERCREST
Operating instructions
FR BE
SCHUIMZEEP-DISPENSER MET SENSOR
Gebruiksaanwijzing
PL
AUTOMATYCZNY DOZOWNIK MYDŁA
Instrukcja obstugi
ES
DISPENSADOR DE JABÓN EN ESPUMA CON SENSOR
GB/IE Operating instructions Page 1
Contents
Introduction....2
Proper use 2
Package contents and post delivery inspection ..... 2
Appliance description .... 3
Technical specifications....3
Safety information....4
Inserting/replacing the batteries 6
First use ....7
Operation 8
Cleaning and maintenance 9
Storage 9
Disposal 10
Disposal of the appliance....10
Disposal of batteries 10
Disposal of packaging 10
Kompernass Handels GmbH warranty ..... 1
Service....13
Importer 13
Introduction
Congratulations on the purchase of your new appliance.
You have selected a high-quality product.
The operating instructions are part of this product.
They contain important information about safety, usage and disposal. Before using the product, please familiarise yourself with all operating and safety instructions. Use the product only as described and for the range of applications specified. Please also pass these operating instructions on to any future owner.
Proper use
This appliance is exclusively intended for use as a dispenser of liquid soaps/detergents/disinfection gels/shampoo. This appliance is intended solely for use in private households. The appliance is not intended for use in commercial or industrial environments.
Claims of any kind for damage resulting from misuse, incompetent repairs, unauthorised modification or the use of unauthorised replacement parts will not be accepted. The operator bears sole liability.
Package contents and post delivery inspection
◆ Remove all parts of the appliance and the operating instructions from the packaging.
◆ Remove all packaging materials and any films and labels.
Check the contents of the package. The package contents include the following components (see fold-out page for illustrations):
- Sensor foam soap dispenser
● 4 batteries, 1.5 V type Micro AAA - Operating instructions (not shown)
NOTE
▶ Check the package for completeness and signs of visible damage.
▶ If the delivery is incomplete or damage has occurred as a result of defective packaging or during transport, contact the customer service hotline (see section Service).
Appliance description
(See fold-out page for illustrations)
① Control panel cover
② Red LED
③ On/Off button
4 Control panel
⑤ Soap dispenser
6 Sensor
⑦ Main appliance
8 Soap tank
9 Soap tank latch
⑩ Marking max (filling quantity)
⑪ Marking 1:2 (mixture ratio)
⑫ Marking 1:3 (mixture ratio)
⑬ Battery compartment latch
14 Battery compartment
15 Battery holder (with batteries)
16 Soap quantity button
17 Green LED
Technical specifications
| Power supply 4 x 1.5 V (DC) | --- |
| Battery type 1.5 V type Micro AAA, LR03 | |
| Protection class | III / ◆(Protection through low voltage) |
| Protection type | IPX4 (protection against water splashes from any direction) |
| Max. filling quantity approx. | 250 ml |
| Operating temperature +5 °C to +35 °C | |
Safety information
⚠ WARNING! RISK OF INJURY!
This appliance may be used by children aged 8 years and above and by persons with limited physical, sensory or mental capabilities or lack of experience and knowledge, provided that they are under supervision or have been told how to use the appliance safely and are aware of the potential risks.
▶ Do not allow children to use the appliance as a toy.
- Cleaning and user maintenance tasks must not be carried out by children unless they are supervised.
There is a risk of injury if the appliance is misused.
WARNING!
Safety information for handling batteries:
- Do not throw batteries into a fire. Do not attempt to recharge non-rechargeable batteries. There is a risk of explosion and injury!
▶ Never open up the batteries. Never solder or weld batteries. There is a risk of explosion and injury!
▶ Do not use different types of batteries together or mix new batteries with used batteries.
- Remove depleted batteries from the appliance and dispose of them in a safe manner.
WARNING!
Safety information for handling batteries:
▶ Do not short-circuit the terminals.
▶ Always ensure that the batteries are installed in the appliance with the correctly aligned polarity.
▶ Check the condition of the batteries at regular intervals. Leaking batteries can cause damage to the appliance.
▶ If the batteries have leaked, use protective gloves. Clean the battery compartment and the battery contacts with a dry cloth.
- Remove the batteries from the appliance if you are not planning on using it for an extended period.
- Keep batteries out of the reach of children. Children might put batteries into their mouths and swallow them. If a battery is swallowed, seek medical assistance immediately.
CAUTION! DAMAGE TO APPLIANCE!
- Fill the appliance with liquid soap, detergent or disinfection gel only! Other liquids can damage the appliance!
▶ Fill the appliance only with mild liquid soap, not aggressive substances or substances containing solvents!
Inserting/replacing the batteries
CAUTION! MATERIAL DAMAGE
▶ Pay attention to the polarity indicated on the battery compartment 14 when you are inserting the batteries!.
▶ Always use batteries of type Micro AAA, LR03.
▶ Always use batteries of the same type.
NOTE
▶ Please note that after changing the battery, the appliance must be switched on again (see section Operation).
- Rotate the soap tank ⑧ anticlockwise to remove it from the main appliance ⑦.
- Turn the main appliance ⑦ upside down to access the battery compartment latch ⑬. Rotate the battery compartment latch ⑬ anticlockwise towards open 🔒 until the battery compartment latch ⑬ can be removed (see Fig. 1).
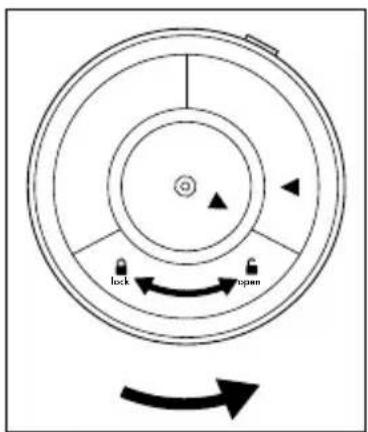

Fig. 1 Fig. 2
- Remove the battery holder 15 from the battery compartment 14.
- Remove the old batteries (if there are any) from the battery holder 15.
- Insert new batteries as shown in the polarity diagram in the battery holder 15.
- Slide the battery holder 15 back into the battery compartment 14. Make sure that the battery holder 15 is inserted into the battery compartment 14 with the contacts entering first (see Fig. 3 and 4).


Fig. 3 Fig. 4
-
Replace the battery compartment latch ⑬. Turn the battery compartment latch ⑬ clockwise towards the lock symbol until the two symbols ▶ and aligned and the battery compartment latch ⑬ audibly clicks into place (see fig. 2).
-
Place the main appliance ⑦ back onto the soap tank ⑧. Then turn the soap tank ⑧ clockwise until it is sitting tight and secure on the main appliance ⑦. The appliance is now ready for use.
First use
- Place the appliance on a level and stable surface.
- Rotate the soap tank ⑧ anticlockwise to remove it from the main appliance ⑦.
-
Turn the soap tank latch ⑨ anticlockwise to remove it from the soap tank ⑧.
-
Fill the soap tank ⑧ with liquid soap:
- up to the marking 1:3 ⑫ to provide a mixture level of 1 to 3 (one part soap to three parts water).
or
-up to the marking 1:2⑪ to provide a mixture level of 1 to 2 (one part soap to two parts water).
- Fill up with water up to the marking max ⑩ in the soap tank ⑧.
NOTE
▶ During filling pay attention to the marking max10 on the soap tank ⑧. Never fill the soap tank ⑧ above the marking max ⑩. Otherwise the soap tank ⑧ will overflow.
-
Place the soap tank latch ⑨ back onto the soap tank ⑧ and turn the soap tank latch ⑨ clockwise until it locks into place. Shake the soap tank ⑧ a few times to mix the water and liquid soap.
-
Place the main appliance ⑦ back onto the soap tank ⑧. Then turn the soap tank ⑧ clockwise until it is sitting tight and secure on the main appliance ⑦. The appliance is now ready for use.
Operation
-
Flip up the control panel cover ① on top of the appliance. Press and hold the On/Off button ② for approx. 3 seconds. The green LED ⑰ lights up for approx. 3 seconds.
-
Briefly press the soap quantity button Ⓧ 16. The green LED 17 lights up once briefly. For a larger soap quantity press the soap quantity button Ⓧ 16 briefly one more time. The green LED 17 lights up briefly twice.
-
Hold your hand underneath the soap dispenser ⑤. The sensor ⑥ activates and the appliance begins to dispense soap.
-
As soon as the soap dispenser ⑤ stops, you can remove your hand.
NOTE
The soap dispense ^5 also stops as soon as you remove your hand. This is true even if the programmed quantity has not yet been dispensed.
- If you do not intend on using the appliance for an extended period of time, press the On/Off button ⏻ ③ for approx. 3 seconds to switch off the appliance. The red LED ② lights up for approx. 3 seconds.
NOTE
If the appliance has not been used for a few days it may be necessary to operate the soap dispenser ⑤ a few times in succession before the appliance will dispense any soap.
Cleaning and maintenance
CAUTION! MATERIAL DAMAGE
▶ Do not use caustic, abrasive or solvent-based cleaning materials. They can damage the surfaces of the appliance.
Switch off the appliance by pressing the On/Off button ③ for approx. 3 seconds. The red LED ② lights up for approx. 3 seconds.
◆ Wipe the appliance with a damp cloth. If required, use a mild washing-up liquid on the cloth.
◆ If the senso⑥ is dirty, clean it carefully with a damp cloth.
If you do not intend to use the appliance for a longer period of time, clean the soap tank ⑧ in the following manner:
- Remove the soap tank ⑧ from the main appliance ⑦.
- Wash out the soap tank ⑧ with clean water to dispose the remains of the soap inside.
- Reattach the soap tank ⑧, which has been filled with a small amount of clean water, to the main appliance ⑦ and switch on the appliance.
- Activate the soap dispenser ⑤ a few times, so that both the soap dispenser ⑤ and the connecting tubes inside the main appliance ⑦ are rinsed out.
- Remove the soap tank ⑧ from the main appliance ⑦. Empty the soap tank completely and leave to stand for a short while with the soap tank latch ⑨ remaining open to allow it to dry out in the open air.
Storage
CAUTION! MATERIAL DAMAGE
▶ Do not turn the appliance upside down when drying! If you do, water may enter the appliance and damage it!
Switch off the appliance by pressing the On/Off button ⏻ ③ for approx. 3 seconds. The red LED ② lights up for approx. 3 seconds.
◆ Always clean the appliance thoroughly before storing.
Remove the batteries from the main appliance ^7 .
◆ Store the appliance in a clean, dry location away from direct sunlight.
Disposal
Disposal of the appliance
The adjacent symbol of a crossed-out wheelie bin means that this appliance is subject to Directive 2012/19/EU. This directive states that this appliance may not be disposed of in normal household waste at the end of its useful life, but must be taken to a specially set-up collection point, recycling depot or disposal company.
This disposal is free of charge for the user. Protect the environment and dispose of this appliance properly.

Your local community or municipal authorities can provide information on how to dispose of the worn-out product.

The product is recyclable, subject to extended producer responsibility and is collected separately.
Disposal of batteries
Used batteries must not be disposed of in household waste. Consumers are legally obliged to dispose of batteries at a collection point in their community/city district or at a retail store.
The purpose of this legal obligation is to ensure that batteries are disposed of in an environmentally-friendly manner. Only return batteries when they are fully discharged.
Disposal of packaging
The packaging materials have been selected for their environmental friendliness and ease of disposal and are therefore recyclable.
Dispose of packaging materials that are no longer needed in accordance with applicable local regulations.
Dispose of the packaging in an environmentally friendly manner.
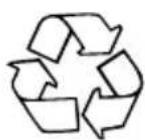
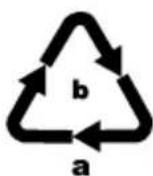
Observe the labels on the different packaging materials and separate them as needed. The packaging materials are labelled with abbreviations (a) and numbers (b) with the following meanings: 1–7: plastics, 20–22: paper and cardboard, 80–98: composites.
This appliance has a 3-year warranty valid from the date of purchase. If this product has any faults, you, the buyer, have certain statutory rights. Your statutory rights are not restricted in any way by the warranty described below.
Warranty conditions
The warranty period starts on the date of purchase. Please keep your receipt in a safe place. This will be required as proof of purchase.
If any material or manufacturing fault occurs within three years of the date of purchase of the product, we will either repair or replace the product for you or refund the purchase price (at our discretion). This warranty service requires that you present the defective appliance and the proof of purchase (receipt) within the three-year warranty period, along with a brief written description of the fault and of when it occurred.
If the defect is covered by the warranty, your product will either be repaired or replaced by us. The repair or replacement of a product does not signify the beginning of a new warranty period.
Warranty period and statutory claims for defects
The warranty period is not prolonged by repairs effected under the warranty. This also applies to replaced and repaired components. Any damage and defects present at the time of purchase must be reported immediately after unpacking. Repairs carried out after expiry of the warranty period shall be subject to a fee.
Scope of the warranty
This appliance has been manufactured in accordance with strict quality guidelines and inspected meticulously prior to delivery.
The warranty covers material faults or production faults. The warranty does not extend to product parts subject to normal wear and tear or to fragile parts which could be considered as consumable parts such as switches, batteries or parts made of glass.
The warranty does not apply if the product has been damaged, improperly used or improperly maintained. The directions in the operating instructions for the product regarding proper use of the product are to be strictly followed. Uses and actions that are discouraged in the operating instructions or which are warned against must be avoided.
This product is intended solely for private use and not for commercial purposes. The warranty shall be deemed void in cases of misuse or improper handling, use of force and modifications / repairs which have not been carried out by one of our authorised Service centres.
Warranty claim procedure
To ensure quick processing of your case, please observe the following instructions:
◆ Please have the till receipt and the item number (IAN) 385281_2107 available as proof of purchase.
You will find the item number on the type plate on the product, an engraving on the product, on the front page of the operating instructions (below left) or on the sticker on the rear or bottom of the product.
If functional or other defects occur, please contact the service department listed either by telephone or by e-mail.
You can return a defective product to us free of charge to the service address that will be provided to you. Ensure that you enclose the proof of purchase (till receipt) and information about what the defect is and when it occurred.
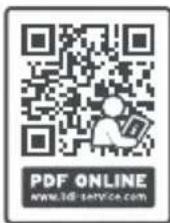
You can download these instructions along with many other manuals, product videos and installation software at www.lidl-service.com.
This QR code will take you directly to the Lidl service page (www.lidl-service.com) where you can open your operating instructions by entering the item number (IAN) 385281_2107.
Service
GB Service Great Britain
Tel.: 0800 404 7657
E-Mail: kompernass@lidl.co.uk
IE ServiceIreland
Tel.: 1890 930 034
(0,08 EUR/Min., (peak))
(0,06 EUR / Min., (off peak))
E-Mail: kompernass@lidl.ie
IAN 385281_2107
Importer
Please note that the following address is not the service address. Please use the service address provided in the operating instructions.
KOMPERNASS HANDELS GMBH
BURGSTRASSE 21
44867 BOCHUM
GERMANY
www.kompernass.com
Inhaltsverzeichnis
Einleitung....16
Abb.1
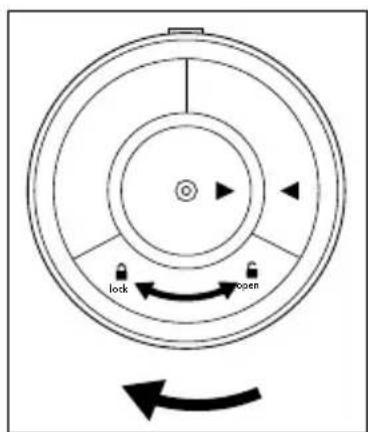
Abb.
2
KOMPERNASS HANDELS GMBH
BURGSTRASSE 21
44867 BOCHUM
DEUTSCHLAND
www.kompernass.com
Table des matières
Introduction 30

Fig. 1 Fig. 2
KOMPERNASS HANDELS GMBH
BURGSTRASSE 21
44867 BOCHUM
ALLEMAGNE
www.kompernass.com
Inhoud
Inleiding 46
⚠ WAARSCHUWING! LETSELGEVAAR!

Afb. 1 Afb. 2
KOMPERNASS HANDELS GMBH
BURGSTRASSE 21
44867 BOCHUM
DUITSLAND
www.kompernass.com
Obsah
Úvod 60
POZOR! HMOTNÉ ŠKODY!
Obr. 1

Obr.
2
KOMPERNASS HANDELS GMBH
BURGSTRASSE 21 • 44867 BOCHUM • NĚMECKO
www.kompernass.com
Spis treści
Wstep....72

Rys. 1 Rys. 2
KOMPERNASS HANDELS GMBH
BURGSTRASSE 21
44867 BOCHUM
NIEMCY
www.kompernass.com
Obsah
Úvod 86

Obr. 1 Obr. 2
- Vyberte držiak batérie 15 z priehradky na batérie 14.
- Vyberte staré batérie z držiaka batérie 15, ak sú vložené.
- Vložte nové batérie v súlade s polaritou uvedenou na držiaku batérie 15.
- Držiak batérie 15 zasuňte znova do priehradky na batérie 14. Dávajte pozor na to, aby držiak batérie 15 sa zasunul s kontaktmi vopred do priehradky na batérie 14 (pozri obr. 3 a 4).


Obr. 3 Obr. 4
KOMPERNASS HANDELS GMBH
BURGSTRASSE 21 • 44867 BOCHUM • NEMECKO
www.kompernass.com
Índice
Introducción 98
Uso previsto 98
Fig. 1

Fig. 2
KOMPERNASS HANDELS GMBH
BURGSTRASSE 21
44867 BOCHUM
ALEMANIA
www.kompernass.com
Indholdsfortegnelse
Indledning....112
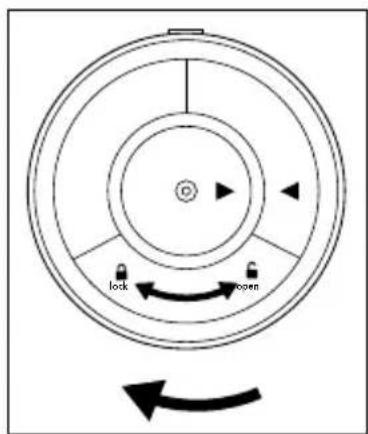
Fig. 1 Fig. 2
KOMPERNASS HANDELS GMBH
BURGSTRASSE 21
44867 BOCHUM
TYSKLAND
www.kompernass.com
Indice
Introduzione....126
Uso conforme....126
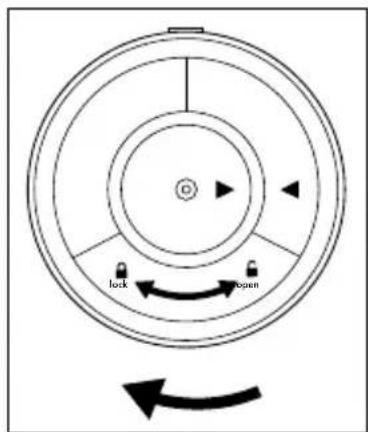
Fig. 1 Fig. 2
KOMPERNASS HANDELS GMBH
BURGSTRASSE 21
44867 BOCHUM
GERMANIA
www.kompernass.com
Tartalomjegyzék
Bevezető 140

KOMPERNASS HANDELS GMBH
BURGSTRASSE 21 • 44867 BOCHUM • NÉMETORSZÁG
www.kompernass.com
Kazalo
Uvod 152
Predvidena uporaba....152
Vsebina kompleta in pregled po prevozu ..... 1 5 2
Opis naprave 153

Slika 1 Slika 2
KOMPERNASS HANDELS GMBH
BURGSTRASSE 21
44867 BOCHUM
NEMČIJA
www.kompernass.com
Pooblaščeni serviser
SI ServisSlovenija
Tel.: 01 888 9273
E-Mail: kompernass@lidl.si
IAN 385281_2107
Garancijski list
KOMPERNASS HANDELS GMBH
BURGSTRASSE 21
44867 BOCHUM
GERMANY
www.kompernass.com
Last Information Update · Stand der Informationen · Version des informations
