BL30 - Digital thermometer TROTEC - Free user manual and instructions
Find the device manual for free BL30 TROTEC in PDF.
User questions about BL30 TROTEC
0 question about this device. Answer the ones you know or ask your own.
Ask a new question about this device
Download the instructions for your Digital thermometer in PDF format for free! Find your manual BL30 - TROTEC and take your electronic device back in hand. On this page are published all the documents necessary for the use of your device. BL30 by TROTEC.
USER MANUAL BL30 TROTEC
text_image
Connected Correct Date 500 Year 11 Month 24 Day Correct Timepoints 1 : 10 : 0 OK CancelDatenlogger Setup
text_image
Connected Sample Setup 0 Second LED Flash Cycle Setup 10s 20s 30s No Light Alarm Setup Temp Alarm Low - Temp Alarm H Unit 0 70 CirCUin RH Alarm Low RH Alarm H 90 90 LED Flash For And Low Alarm Manual Automatic Circulating Process No Circulating Default Setup Canceltext_image
Connected Download Cancel "Abbrechen"natural_image
Abstract waveform diagram with no visible text, numbers, or symbolsRauszoomen
text_image
Y Axis Setup Temp Y Axis Setup From 40 To 70 RHY Axis Setup From 0 To 100 OK CancelFarbeinstellungen
text_image
Color Setup Background: Temp: Grid: Rh: OK CancelGrafikfenster anpassen
text_image
View Temp Temp Alarm Hi Temp Alarm Low RH RH Alarm Hi RH Alarm Low Mark Points X Axis Y Axis OK CancelPunkte markieren:
- Introduction B - 1
- Functions and specifications....B - 1
- Special features ...... B - 2
- Operation B - 3
- Software installation B - 5
This publication replaces all previous versions. No part of this publication may be reproduced or processed, copied or distributed via electronic means in any form whatsoever except with our written permission. We reserve the right to make technical changes. All rights are reserved. Trademarks are used in the following without any guarantee of their free usability and are basically as the manufacturer describes them. The trademarks used are registered and should be treated as such. The right to make design alterations in the interests of continuous product improvement and alterations to the shape or colour is reserved. The package contents may differ from the product illustrations. This document has been prepared with the appropriate care. We can accept no liability for any errors or omissions.© TROTEC®
1. Introduction
The temperature and humidity data logger is a particularly sturdy, high-precision measuring instrument, which is characterised by its fast response time. The data logger is already used in many places to monitor both the ambient temperature and the relative humidity and to collect meaningful measurement data.
2. Functions and technical specifications
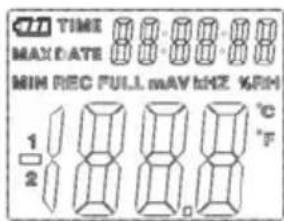
The data logger is a particularly efficient and handy measuring instrument, which is particularly suitable for longer lasting measurement assignments. The measurement results are stored in the data logger and transferred to the PC via a USB cable. The data can subsequently be read out on the PC. The display shows the current MAX, MIN, TIME, DATE, temperature and humidity values.
▲ Moving the appliance from a cold to a warm environment (and vice versa) can lead to the formation of condensation on the measuring circuitry of the appliance. This physical effect, which cannot be prevented by structural means for any measuring instrument, leads to false measurement values. Depending on the temperature difference, the appliance requires an 'acclimatisation time' of approx. 15 - 30 minutes before the measuring procedure can be resumed.
⚠ Make sure that the data logger is always used/stored in an upright position. This also applies after measurements taken at low temperatures or in highly humid environments. The intention is to avoid any condensation that forms collecting in the appliance; instead, it can escape from the lower part of the appliance. Wait until any moisture which may have formed inside the appliance due to physical processes has completely evaporated before the collected data are read out for evaluation. In order to preserve the batteries, the data logger can also be directly connected to the PC via USB. When connected in this manner it draws its power directly from the PC.
3. Special features
- Memory space for 32,700 measured values
- Large, easily readable LCD
- Freely selectable measurement cycle from 1 sec to 24 hrs
-
USB interface for data transmission to the PC
-
Alarm when exceeding/falling below user-defined limit values
- Including analysis software for the purpose of graphically displaying the measurement data.
Spezifikationen
| Humidity | Measurement range | 0 to 100% |
| Accuracy(0 - 20 and 80 - 100%) | ± 5,0% | |
| Accuracy (20 - 40 and 60 - 80%) | ± 3,5% | |
| Accuracy (40 - 60%) | ± 3,0 % | |
| Temperature Measurement range -40 to +70°C | ||
| (-40 to +158°F) | ||
| Accuracy | ± 2,0°C | |
| (-40 to -10 and +40 to +70 °C) | ||
| Temperature Measurement range | -40 to +70°C (-40 to +158°F) | |
| Accuracy | ± 1,0°C | |
| (-10 to +40°C) | ||
| Temperature Measurement range 0 to 100% | ||
| Accuracy | ± 3,6°F | |
| (-10 to +14 and +104 to +158 °F) | ||
| Accuracy | ± 1,8°F | |
| (+14 to +104 °F) | ||
Resolution: 0.1% R.H., 0.1°C
Memory space:....32,700 measured values
Measuring cycle:....1 second to 24 hours
Analysis software:....2000/XP/Vista
4. Operation
-
The battery symbol indicates the charge capacity of the battery. If the battery is flat, the „flat battery“ symbol appears. Insert a new battery. The lifetime of a conventional battery is at least 3 months. Use exclusively batteries of the same type and of high quality, as otherwise the proper function of the appliance cannot be guaranteed. No liability will be accepted for damage caused by the use of the wrong batteries or batteries of inferior quality.
-
Time displays the current time
-
Date displays the current date
-
The display of time and date changes automatically every 10 seconds
-
MAX: Displays the highest measured value, including the associated date and time.
-
MIN: Displays the lowest measured value, including the associated date and time.
-
REC: This message appears throughout the entire measuring procedure
-
FULL: This message appears if the data memory is full. No further data can be stored.
-
%RH: The measured humidity is displayed as a per percentage.
-
°C: Temperature in degrees Celsius
-
°F: Temperature in degrees Fahrenheit
-
Press the MAX/MIN button in order to display the maximum or minimum values stored during the recording period. The appliances returns to measu
text_image
ON TIME MAX DATE MIN REC FULL, max kHz 3RM 1 2 °C °Fring mode after 40 seconds if no further button is pressed.
-
The message „-PC-" appears on the display when transmitting the collected measured data to the PC. The data logger returns to measuring mode after data transmission is complete. The currently measured value is displayed and the recording is stopped. Perform a reset; in other words, prepare the data logger via the PC software for a new measurement in order to be able to start a new recording sequence. As a matter of principle, the measured values can only be read from the display. All settings in the data logger are performed exclusively via the software installed on the PC.
-
Alarm function: The LEDs flash once per minute in the case of exceeding or falling below the set limit values. The red LED indicates that the temperature has exceeded/fallen below the user-selected limit values. The yellow LED indicates that the relative humidity has exceeded/fallen below the user-defined limit values.
-
The message „-LO-“ indicates that the sensor for the temperature and humidity is not correctly connected. In this case, you can proceed as follows: Open the back of the appliance and connect the sensor correctly. As soon as the sensor is correctly connected, the message disappears and the appliance is ready for operation once again. If this action is unsuccessful, please contact our customer service department.
5. Software installation
- First of all, insert the CD supplied into the CD-ROM drive. A pop-up menu appears shortly afterwards. Follow the instructions in the menu to install the software on your PC.
- Leave the CD in the drive even after completion of the software installation. Connect the data logger to your PC using the USB cable supplied. A window for the USB driver is opened. Follow the instructions and select the path for the USB driver (CD drive). The installation takes place shortly afterwards.
Software applications:
You can transfer the collected measured data to your PC with the data logger's USB software. The program supports Excel or similar spreadsheet programs. The data can also be displayed graphically. The most important functions can all be seen in the superordinate main window.
System requirements:
Windows 2000 /Windows XP/Vista, Windows 7
Minimum hardware requirements:
PC or Notebook with Pentium 90 MHz processor or higher; 32 MB RAM; At least 7 MB free hard disk space for the installation of the HT data logger USB software. The recommended display resolution is 1024 x 768 with high colour (16 bits).
Main menu

text_image
File(f) Instrument(I) Help(H)
Save: To save the collected data on the hard disk

Open: To open a stored file

Current time/update the time in the data logger

Data logger setup

Download data from the data logger

Display graph: displays the collected data as a graph

Show list: displays the collected data as a list

Print: prints out the graph or list

Help
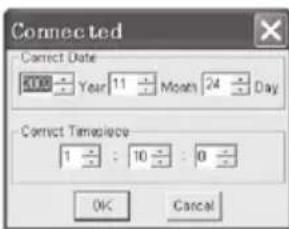
Reset time and date
Click on the 🔒 icon in order to reset the time and date. A new window appears. Enter the correct time and the correct date. Then click on „OK“.
text_image
Connected Correct Date 300 Year 11 Month 24 Day Correct Time/Place 1 : 10 : 0 OK CancelData logger setup
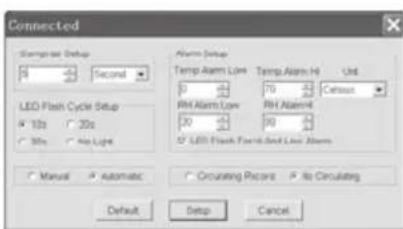
- Click on the icon in the menu. The setup window appears (see below). Proceed as described below in order to set the individual menu items.
text_image
Connected Composite Setup 0 Second Alarm Setup Temp Alarm Low Temp Alarm High Unit 0 70 Cohort LED Flash Cycle Setup 10s 30s RF Alarm Low RF Alarm High 20 30 5° LED Flash Cycle And Low Alarm 30s No Light Manual Automatic Oscattering Record No Circulating Default Setup Cancel- You can set the measurement sampling rate for the data logger with the field „Samprate setup“. Enter the desired number in the left-hand box and the unit of time in the right-hand box.
- You can set the time intervals at which the LEDs flash by clicking the three time intervals (10s/20s/30s=seconds) listed in the „LED Flash Cycle Setup“ field. (If you click „No Light“, the LEDs do not flash when the values exceed/fall below the user-defined limit values. This mode preserves the batteries and ensures a longer life span.
- Click on „Manual“ or „Automatic“ to specify whether the data logger automatically enters recording mode when you close the setup window („Automatic“) or only at a later time („Manual“) by manually pressing one of the two buttons.
- You can configure the upper (HIGH) and lower (LOW) limit values for the temperature and the humidity with the „Alarm Setup“ field. In this field you can also set the temperature units (°C/°F) and deactivate the LEDs.
- By clicking „Circulating Record“ or „No Circulating“, you can decide whether the stored data should be overwritten (Circulating Record) when the memory is full or whether the data logger should not store any further data in this case (No Circulating) and the recording should stop. Click on the SETUP button to save the settings. Click on the „Standard/DEFAULT“ button in order to restore the data logger's factory settings. Click on the „Cancel“ button in order to abort the setup.
⚠️ If the new settings are saved with „Setup“ after the execution of a setup, all previously saved measured values are automatically deleted! In order to prevent such a loss of data, click on the „Cancel“ button during the setup to end the setup procedure prematurely. This way the stored data can still be transferred to another medium (e.g. PC) beforehand. On account of the duration or intensity (e.g. borderline climatic conditions) of an application, the battery life may not be sufficient for the in
tended measurement. Therefore we strongly recommend before performing such an intensive measurement that you check the charge capacity of the batteries and replace them if necessary, in particular if the data are of particular value or the measured values are critical.
Transmission of the data from the data logger to the PC
A. Connect the data logger to the USB port of your PC by means of its USB interface.
B. Open the data logger software program if the program is not already running
C. Click on the Download icon
D. The following window appears. Click on „Download“ to transfer the measured values to the PC
„Download“ Connected × „Cancel“ Download Cancel
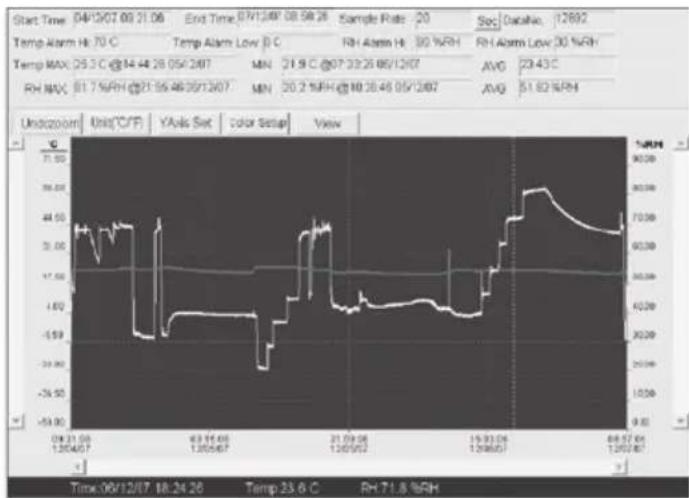
After successful transmission of the data, a window appears with the following graphic display:
line
| Time | Value | | ---------- | --------- | | 04/12/07 | 25.3°C @ 14:44:26 05/28/7 | | 07/12/07 | 21.9°C @ 07:32:26 05/12/07 | | 13/07/07 | 20.2%RH @ 08:38:46 05/12/07 | | | 51.82%RH |The field above the graphic display contains information on the time, sampling rate, number of data, alarm settings and the maximum, minimum and average values).
Undozoom Unit(°C/F) YAxis Set Color Setup View
Zooming in:
- Press and hold the left mouse button. Draw a rectangle with the mouse around the section that you wish to enlarge.
- Release the mouse button again.
- Use the horizontal sc- rollbar to scroll through the data. Use the left- hand vertical scrollbar to scroll through the tem- perature data. Use the right-hand vertical sc- rollbar to scroll through the humidity data.
natural_image
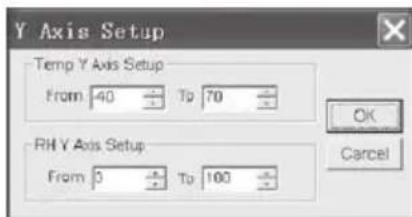
Abstract waveform visualization with no text or symbols, showing fluctuating peaks and a rectangular frame (no readable labels or data)Click on YAxis Set in order to access the setup for the temperature and humidity axis (Y-axis).
text_image
Y Axis Setup Temp Y Axis Setup From 40 To 70 RH Y Axis Setup From 0 To 100 OK CancelColour settings
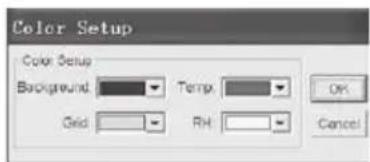
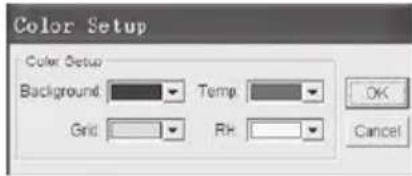
Click on Color Setup, in order to set up the background colour, the grid colour and the colours for the temperature and humidity.
text_image
Color Setup Color Setup Background Temp Grid RH OK CancelZooming out:
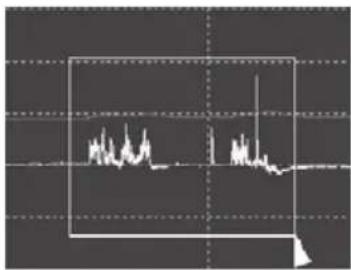
Click on the Undozoom in order to zoom out again and return to the original picture size.
Adapting the graphic window
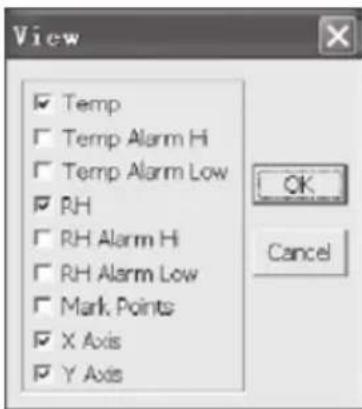
Click on View in order to adapt the graphic window individually.
With these settings the user can determine which data he wishes to see as the data trace or which grid lines should be added to or removed from the X/Y axes.
Marking points:
Set points on the traces in order to determine current data points and to interrupt the natural continuity of the trace.
text_image
View ✓ Temp ✓ Temp Alarm Hi ✓ Temp Alarm Low ✓ RH ✓ RH Alarm Hi ✓ RH Alarm Low ✓ Mark Points ✓ X Axis ✓ Y Axis OK CancelList view
Click on the ☐ to access the list window.
| No. | Time | (%RH) Humidity | (C) Temperature | (F) Temperature |
| 1 | 15/10/07 15:25:13 | 53.5 | 25.5 C | 77.9 F |
| 2 | 15/10/07 15:25:14 | 53.3 | 25.5 C | 77.9 F |
| 3 | 15/10/07 15:25:15 | 52.8 | 25.5 C | 77.9 F |
| 4 | 15/10/07 15:25:16 | 52.6 | 25.5 C | 77.9 F |
| 5 | 15/10/07 15:25:17 | 52.4 | 25.5 C | 77.9 F |
| 6 | 15/10/07 15:25:18 | 52.2 | 25.5 C | 77.9 F |
| 7 | 15/10/07 15:25:19 | 52.1 | 25.5 C | 77.9 F |
| 8 | 15/10/07 15:25:20 | 52.0 | 25.5 C | 77.9 F |
| 9 | 15/10/07 15:25:21 | 51.9 | 25.5 C | 77.9 F |
| 10 | 15/10/07 15:25:22 | 51.8 | 25.5 C | 77.9 F |
Saving and opening files
- Click on the 🔒 icon to open the dialogue window "File save" dialogue window.

text_image
Save As Save In: Desktop My Documents My Computer My Network Places Cell Images Projects File name: 07-02-21 16:01:09.1 Sec Save as type: C:\Users\Files (*.accn\Cat) Save Cancel- Name the file and save it with the standard list of the file extension. The file is saved with the „record“ extension and opened with the HT data logger software program again. The file can also be opened as an „xls“ file by a spreadsheet program or another word-processing program.
Click on the 📄 icon to open an existing, previously saved file that you wish to view in the data graph window.
Printing out the graph and list
Click on the 📄 icon to display the data as a graph. Then click on the 🔊 icon to print out the graph.
Click on the 📄 icon to display the data as a list. Then click on the 🔒 icon to print out the list.
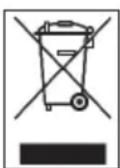
Electronic equipment may not be disposed of as domestic waste, but must be correctly disposed of in accordance with the EUROPEAN PARLIAMENT AND EUROPEAN COUNCIL Directive 2002/96/EC of 27 January 2003 re-
garding used electrical and electronic equipment. Please dispose of this equipment in accordance with the applicable legal regulations when its service life is ended.
Sommaire
text_image
TIME MAX DATE MIN REC FULL max kHz 3RM 1 2 °C °Ftext_image
Connected Sample Setup 0 Second Alarm Setup Temp Alarm Low Temp Alarm Hi Unit 0 70 Cutoff RBI Alarm Low RBI AlarmH 50 80 LED Flash Cycle Setup 10s 20s 30s No Light LED Flash Form And Low Alarm Manual Automass Circulating Picard No Circulating Default Setup Cancelnatural_image
Abstract waveform pattern with no visible text or symbolsZoom arrière :
text_image
Y Axis Setup Temp Y Axis Setup From 40 To 70 RH Y Axis Setup From 5 To 100 OK Canceltext_image
View ✓ Temp ✓ Temp Alarm Hi ✓ Temp Alarm Low ✓ RH ✓ RH Alarm Hi ✓ RH Alarm Low ✓ Mark Points ✓ X Axis ✓ Y Axis OK Canceltext_image
Connected Stamprate Setup 0 Second Alarm Setup Temp Alarm Low Temp Alarm Hi Ust 0 20 Calculus LED Flash Cycle Setup 10s 20s RX Alarm Low RX Alarm Hi 20s 80s LED Flash Fast-H And Low Alarm 30s No Light Manual Automatic Osculating Record No Circulating Default Setup Canceltext_image
Y Axis Setup Temp Y Axis Setup From 40 To 70 RH Y Axis Setup From 0 To 100 OK CancelImpostazioni colore
text_image
Color Setup Color Setup Background Temp: Grid RH: OK Canceltext_image
View ✓ Temp ✓ Temp Alarm Hi ✓ Temp Alarm Low ✓ RH ✓ RH Alarm Hi ✓ RH Alarm Low ✓ Mark Points ✓ X Axis ✓ Y Axis OK CancelMarcare i punti:
text_image
Save As Save As: Desktop My Documents My Computer My Network Places Cell Images Projects File name: 07.02.21 16.07.89.1 sec Save as type: Save as type: Save as type: Save as type: Save as type: Save as type: Save as type: Save as type: Save as type: Save as type: Save as type: Save as type: Save as type: Save as type: Save as type: Save as type: Save as type: Save as type: Save as type: Save as type: Save as type:text_image
Connected Connect Date 2000 Year 11 Months 24 Day Correct Time/Place 1 : 10 : 0 OK CancelGegevenslogger Setup
text_image
Connected Temperature Setup 0 °C Second LED Flash Cycle Setup 4 10s 30s 50s 50s Automatic Temp Alarm Low Temp Alarm-Hd Unit 0 °C 10s Default RH Alarm Low RH Alarm-H 0 °C 80° LED Flash Cycle And Low Alarm Manual Automatic Circulating Record No Circulating Default Setup Cancelnatural_image
Abstract waveform visualization with no text or symbols, showing fluctuating patterns within a rectangular frame (no readable labels or data)Uitzoomen
text_image
Y Axis Setup Temp Y Axis Setup From 40 To 70 RHY Axis Setup From 0 To 100 OK CancelKleurinstellingen
text_image
View ✓ Temp ✓ Temp Alarm H ✓ Temp Alarm Low ✓ RH ✓ RH Alarm H ✓ RH Alarm Low ✓ Mark Points ✓ X Axis ✓ Y Axis OK CancelPunten markeren:
text_image
Connected Correct Date 50.7 Year 11 Month 24 Day Correct Timeplace 1 : 10 0 OK Canceltext_image
Connected Sample Setup 50 Second LED Flash Cycle Setup 10s 20s 30s No Lights Alarm Setup Temp Alarm Low Temp Alarm Hi Unit 0 70 Cutoff RIM Alarm Low RIM Alarm Hi 20 90 LED Flash For-It And Low Alarm Manual Automatic Circulating Process No Circulating Default Setup Cancelnatural_image
Abstract waveform visualization with no visible text or symbolsZoom de alejamiento
text_image
Y Axis Setup Temp Y Axis Setup From 40 To 70 RH Y Axis Setup From 0 To 100 OK CancelAjustes de color
text_image
Color Setup Color Setup Background: Temp: Grid: RH: OK Canceltext_image
View Temp Temp Alarm Hi Temp Alarm Low RH RH Alarm Hi RH Alarm Low Mark Points X Axis Y Axis OK CancelMarcado de puntos:
text_image
Connected Correct Date 00: 11 Month 24 Day Correct Timestamps 1 : 10 : 0 OK Cancel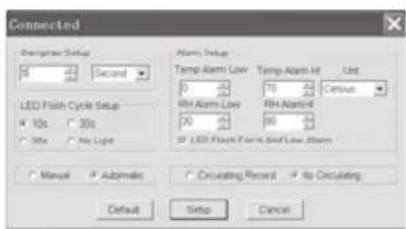
text_image
Connected ChangPrax Setup 0 2nd Second Alarm Setup Temp Alarm Low Temp Alarm Hi Unit 0 2nd 7th Circuit LED Flash Cycle Setup 10s 30s 30s 50s No Light RH Alarm Low RH Alarm Hi 20 30s 80 50s LED Flash Cycle And Low Alarm Manual Automatic Circulating Record No Circulating Default Setup Cancelnatural_image
Abstract waveform visualization with no text or symbols, showing fluctuating peaks and a rectangular frame (no readable labels or data)text_image
Y Axis Setup Temp Y Axis Setup From 40 To 70 RHY Axis Setup From 0 To 100 OK Canceltext_image
Color Setup Color Setup Background Temp Grid RH OK Canceltext_image
View ✓ Temp ✓ Temp Alarm Hi ✓ Temp Alarm Low ✓ RH ✓ RH Alarm Hi ✓ RH Alarm Low ✓ Mark Points ✓ X Axis ✓ Y Axis OK Canceltext_image
Save As Save In Desktop My Documents My Computer My network Places Cell Images Projects File name: 07-02-21 16.01.00 1.docx Save as type: C:\Users\Open Files (*.com/lf) Save Canceltext_image
Connected Correct Date 3000 Year 1 Month 24 Day Correct Timepiece 1 : 10 : 0 OK Canceltext_image
Connected Complicate Setup 0 Second Alarm Setup Temp Alarm Low Temp Alarm H Unit 0 10 Cereus RH Alarm Low RH Alarm H 0 10 LED Flash Cycle Setup 40s 20s 30s NoLight LED Flash For Hi And Low Alarm Manual Automatic Circulating Record No Circulating Default Setup Cancelnatural_image
Audio waveform display showing two distinct peaks with a zoomed-in rectangular frame (no text or symbols)text_image
Y Axis Setup Temp Y Axis Setup From 40 To 70 RH Y Axis Setup From 0 To 100 OK CancelUstawienia kolorów
text_image
Color Setup Color Setup Background: Temp: Grid: RH: OK CancelWygląd okna wykresu
text_image
View Temp Temp Alarm Hi Temp Alarm Low RH RH Alarm Hi RH Alarm Low Mark Points X Axis Y Axis OK Canceltext_image
Connected Corporate Setup 2 Second Alarm Setup Temp Alarm Low Temp Alarm Hd Unit 0 70 Colour RH Alarm Low RH Alarm8 30 60 LED Flash Cycle Setup 10s 30s 30s 50s LED Flash Freq And Low Alarm Manual Automatic Circulating Record As Circulating Default Setup Canceltext_image
Y Axis Setup Temp Y Axis Setup From -40 To 10 RHY Axis Setup From 0 To 100 OK CancelRenk ayarları
text_image
Color Setup Color Setup Background Temp Grid RH OK Canceltext_image
View Temp Temp Alarm Hi Temp Alarm Low RH RH Alarm Hi RH Alarm Low Mark Points X Axis Y AxisNoktaları işaretle:
text_image
My Documents My Computer My Network Places Word Images Presets Filename: 07.05.21 HD/88 86.1 Sec Save As Type: C:\Program Files\1\Windows\df Canceltext_image
Connected Correct Date 10:00 Year 11 Month 24 Day Correct Timepoint 1 : 10 : 0 OK Canceltext_image
Y Axis Setup Temp Y Axis Setup From 40 To 70 RH Y Axis Setup From 0 To 100 OK CancelНастройки цвета
text_image
Color Setup -Color Setup Background Temp Grid RH OK Canceltext_image
View Temp Temp Alarm Hi Temp Alarm Low RH RH Alarm Hi RH Alarm Low Mark Points X Axis Y Axis OK CancelОтметить точки:
text_image
My Documents My Computer My Browse Places Cell Windows Project's Filepath: 07.02.21 10.03.09.1 sec; Name in text: (the main power files) - C:\cmd.exe Save Cancelnatural_image
Audio waveform display showing two distinct peaks with a zoomed-in rectangular frame (no text or symbols)Zoom ud
text_image
Y Axis Setup Temp Y Axis Setup From 40 To 70 RH Y Axis Setup From 3 To 100 OK CancelFarveindstillinger
text_image
Color Setup Color Setup Background Temp OK Grid RH Canceltext_image
View ✓ Temp ✓ Temp Alarm Hi ✓ Temp Alarm Low ✓ RH ✓ RH Alarm Hi ✓ RH Alarm Low ✓ Mark Points ✓ X Axis ✓ Y Axis OK Canceltext_image
File Save Name: Desktop My Documents My Computer My Microsoft Files Unit Systems Products Filename: 07-02-21 16:08:09.1.doc Source code: C:\Users\Omni Files\Omni.dwg Save Cancelnatural_image
Abstract waveform visualization with no text or symbols, showing fluctuating peaks and a sharp downward arrow (no readable text or symbols)Loitonna
text_image
Y Axis Setup Temp Y Axis Setup From 40 To 70 RHY Axis Setup From 0 To 100 OK Cancel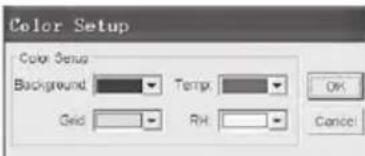
text_image
Color Setup Color Setup Background Temp Grid RH OK Canceltext_image
View Temp Temp Alarm Hi Temp Alarm Low RH RH Alarm Hi RH Alarm Low Mark Points X Axis Y AxisLuettelonäkymä
text_image
Connect Event Connect Event Name: Setup Temp: Alarm Low Temp: Alarm H: Unit 0 10 200 Cathode LED Flash Cycle Setup Mim Alarm Low Mim Alarm H 50 90 IP LED Flash For H And Low Alarm Auto Automatic Circulating Press Key Circulating Default Enable Cancelnatural_image
Abstract waveform visualization with no visible text or symbolsZoome ut
text_image
Y Axis Setup Temp Y Axis Setup From 40 To 10 OK RHY Axis Setup From 0 To 100 Cancel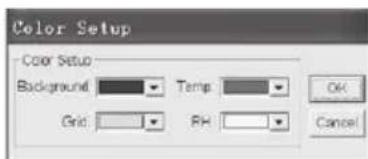
text_image
Color Setup Background Temp Grid RH OK Canceltext_image
View ✓ Temp ✓ Temp Alarm Hi ✓ Temp Alarm Low ✓ RH ✓ RH Alarm Hi ✓ RH Alarm Low ✓ Mark Points ✓ X Axis ✓ Y Axis OK CancelLagre og åpne fil
5. Programvaruinstallation
text_image
Connected Correct Date 10/7 Year 1 Month 24 Day Correct Timepiece 1 : 10 : 0 OK Cancelnatural_image
Audio waveform display with a zoomed-in rectangular frame highlighting two sharp peaks (no text or symbols)Zooma ut
text_image
Y Axis Setup Temp Y Axis Setup From 40 To 70 RHY Axis Setup From 0 To 100 Ok Cancel