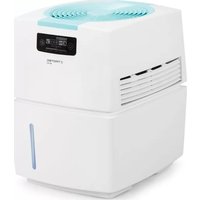
AW 10 S - Humidifier TROTEC - Free user manual and instructions
Find the device manual for free AW 10 S TROTEC in PDF.


| Product Type | Evaporative Air Humidifier |
| Brand | Trotec |
| Model | AW 10 S |
| Dimensions (W x D x H) | 195 x 195 x 295 mm |
| Weight | 1.1 kg |
| Power Supply | 220-240 V, 50/60 Hz |
| Power Consumption | 18 W |
| Water Tank Capacity | 2.0 L |
| Evaporation Rate | 200 ml/h |
| Recommended Room Size | Up to 40 m² |
| Humidification Type | Evaporative (wick filter) |
| Noise Level | < 32 dB |
| Adjustable Mist Output | Yes, 2 levels |
| Auto Shut-off | Yes, when water tank empty |
| Indicator Light | Power and low water |
| Filter Type | Replacement wick (available separately) |
| Filter Replacement Interval | Every 1-2 months depending on water quality |
| Cleaning | Weekly: empty tank, rinse with fresh water; monthly: descale with vinegar solution |
| Safety Features | Tip-over protection, overheat protection |
| Spare Parts Available | Wick filter, water tank, electrode (contact Trotec support) |
| Warranty | 2 years |
| Country of Origin | Germany |
Frequently Asked Questions - AW 10 S TROTEC
User questions about AW 10 S TROTEC
0 question about this device. Answer the ones you know or ask your own.
Ask a new question about this device
Download the instructions for your Humidifier in PDF format for free! Find your manual AW 10 S - TROTEC and take your electronic device back in hand. On this page are published all the documents necessary for the use of your device. AW 10 S by TROTEC.
USER MANUAL AW 10 S TROTEC
Table of contents
Notes regarding the operating manual.... 1
Safety 2
Information about the device.... 3
Transport and storage.... 4
Assembly and installation.... 4
Operation 5
Maintenance 6
Technical annex....9
Declaration of conformity 12
Notes regarding the operating manual
Symbols

Hazardous electric current!
Warns about hazards from electric current which can lead to injuries or even death.

Danger!
Warns of a hazard which can lead to personal injury.

Caution!
Warns of a hazard which can lead to property damage.
The current version of the operating manual can be found at:

AW 10 S

http://download.trotec.com/?sku=1160000010&id=1
Legal notice
This release replaces all previous versions. No part of this publication may be reproduced without written permission from Trotec. The same applies for electronically processing, duplicating or spreading the publication. Subject to technical changes. All rights reserved. Trademarks are used without guarantee that they may be used freely and primarily following the spelling of the manufacturer. Product names are registered.
Changes to construction in the interests of constant improvements to the product, as well as changes to the shape and colour are reserved.
The scope of delivery may vary from product images. This document was created with all due care. Trotec accepts no liability whatsoever for possible mistakes or omissions.
© Trotec
Warranty and liability
The device complies with the fundamental health and safety requirements of the applicable EU regulations and was tested at the factory for perfect functionality multiple times.
However, if faults in the functionality occur and cannot be remedied with the measures in the chapter Errors and faults, please get in touch with your dealer or distributor.
When manufacturer's instructions or legal regulations have not been followed, or after unauthorised changes to the device are made, the manufacturer is not responsible for the resulting damages. Changes to the device or unauthorised replacement of individual parts can drastically impact the electrical safety of this product and leads to the forfeit of the warranty. Liability does not extend to damages to people or property caused by the device being used other than as described in the instructions in this operating manual. Subject to changes to technical design and model changes as part of constant development and product improvement without prior notice.
No liability is accepted for damages resulting from improper use. In such a case, any warranty claims be voided also.
Safety
Read this manual carefully before starting or using the device. Always store the manual in the immediate vicinity of the device or its site of use!
- Do not use the device in potentially explosive rooms.
- Do not use the device in aggressive atmosphere.
- Fill the device with fresh drinking water only.
- Set the device up in an upright and stable position.
- Ensure that the air inlet and outlet are not obstructed.
- Ensure that the side of the device where the air inlet is found is kept free of dirt and loose objects.
- Never reach or put objects into the device.
- Do not cover or transport the device during operation.
- This appliance is not a toy! Do not leave the device running unattended with children nearby.
- Ensure that all electric cables outside of the device are protected from damage (e.g. from animals). Never use the device if the cable or power connection is damaged!
- Only use extensions to the connecting cable which are appropriate to the device power consumption, the length of its cable and its use. Completely unroll extension cables. Avoid electrical overload.
- Unplug the device from the mains before starting with maintenance, service or repair work.
Intended use
Use the device AW 10 S for humidifying and cleaning indoor air, while adhering to and following the technical data. The device is suited for humidifying the room air in order to create an agreeable room climate.
Improper use
The device AW 10 S is not suited for the distribution of liquids other than fresh drinking water. It is not suited for removing heavy contaminations from the air.
Personnel qualifications
People who use this device must:
• have read and understood the operating manual, especially the Safety chapter.
Residual risks

Hazardous electric current!
Work on the electrical components must only be carried out by an authorised specialist company!

Hazardous electric current!
Before any work on the device, remove the mains plug from the mains socket!

Danger!
Dangers can occur at the device when it is used by untrained people in an unprofessional or improper way! Observe the personnel qualifications!

Danger!
Do not leave the packaging lying around. Children may use it as a dangerous toy.
Behaviour in the event of an emergency
- In an emergency, disconnect the device from the mains feed-in: Switch the device off and disconnect it from the mains.
- Do not reconnect a defective device to the mains.
Information about the device
Device description
- Suitable for rooms sized up to 25 m2 / 63 m3
• Humidification performance max. 400 ml/h
• 3-in-1 combination device for air purification, humidification and odour elimination
• Air flow rate max. 126 m³/h
• Display of relative humidity
- Binds pollen, animal hair and house dust
• Electrostatic charging and odours are reduced
- No limescale or wet spots
- Sensor-controlled automatic operation
- Three fan stages
- Noiseless night operation in whisper mode
• Water tank approx. 9 litres
• Water level indicator
• Automatic switch-off when water tank is empty
- Warning signal to indicate an empty water tank
- Quiet operation < 40 dB
Device depiction

| No. Designation | |
| 1 Air inlet | |
| 2 Control panel | |
| 3 Water level indicator | |
| 4 Easy Kit | |
| 5 SecoSan | Stick 10 (optional accessory) |
| 6 Disk | |
| 7 Air outlet | |
| 8 Power cable | |
Transport and storage
Transport
Before transporting the device, proceed as follows:
- Switch off the device at the mains switch.
- Remove the mains plug from the mains socket.
- Prior to every transport check whether the upper and lower part of the device are firmly interconnected.
- Lift the device at the foot.
Storage
Empty and clean the water tank prior to storage (see chapter Maintenance).
When the device is not being used, observe the following storage conditions:
- Dry.
- Protected from dust and direct sunlight.
- With a cover to protect it from invasive dust, if necessary.
Assembly and installation
Assembly
Scope of delivery
- 1 x Air washer AW 10 S
- 1 x Easy Kit combination tool
In addition to the scope of delivery, a SecoSan ® Stick 10 is optionally also available.
Unpacking the device
- Open the cardboard box and take the device out.
- Remove the packaging from the device.
- Open the device by lifting the upper part and putting it aside.
- Remove the packaging from the disk.
- Lift the disk out of the water tank.
- Remove further packaging.
- Refit the disk into the device.
- Leave the device open during the following activities for start-up.
Inserting the SecoSan® Stick (optional)
√ The device is opened.
- Insert the SecoSan ® Stick into the lower part of the water tank.
- Check whether the distance between the SecoSan ® Stick and the disk is sufficient. The disk must be able to move freely.
Installing the device
Keep a sufficient distance to walls and other objects when choosing the device's site of use. The air inlet and outlet must not be obstructed or covered, e.g. by curtains.
Filling the water tank
- Fill the water tank with fresh drinking water.
⇒ The filling level should not exceed the water level line in the water tank. - Place the upper part onto the water tank.
⇒ The display on the upper part and the logo on the lower part should point in the same direction. - Check whether the upper and lower part are properly interconnected as otherwise the device cannot be switched on.
- Plug the mains plug into a sufficiently fused mains socket.
Operation
Operating elements

| No. Designation | |
| 9 Power button | |
| 10 SecoSan | Stick indication |
| 11 Water tank indication | |
| 12 Fan speed indication | |
| 13 Night mode indication | |
| 14 Operating mode button | |
| 15 Humidity level indicationairwasher zone = comfort zone between 40 % and 60 %.The indicator shows the current room humidity level up to 60 %even if the device switches off at 50 %. | |
| 16 Automatic/continuous operation indication | |
| 17 Plasma generator indication | |
| 18 Reset button for SecoSan | Stick |
Switching the device on
√ The water tank is filled with fresh drinking water.
√ The power cable is connected to a sufficiently fused mains socket.
- Press the power button (9).
→ The device switches on.
Setting the operating mode
The following table shows an overview of the operating modes:
| Operating mode | Description Display | |
| Auto | Fan speed control depending on room humidity.When reaching a humidity level of 50 %, the device stops. It continues to operate as soon as the measured humidity level falls below 50 %. |  |
| Night mode | The device runs in night mode. The LED illumination of the control panel is dimmed.The fan runs at the lowest speed.When reaching a humidity level of 50 %, the device stops. It continues to operate as soon as the measured humidity level falls below 50 %. |  |
| Fan max | The fan runs at the highest speed, regardless of the room humidity. | 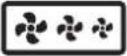 |
| Fan med | The fan runs at medium speed, regardless of the room humidity. |  |
| Fan min | The fan runs at the lowest speed, regardless of the room humidity. |  |
- Press the Operating mode button (14) until the desired operating mode is set.
→ The corresponding display is illuminated.
Refilling with water
If the water tank indication (11) is illuminated, you have to add water.
Note:
After approx. one week of operation, the water tank should be cleaned before refilling with fresh drinking water. Further information on cleaning the water tank can be found in the chapter Maintenance.
- Press the power button (9).
→ The device switches off.
-
Remove the mains plug from the mains socket.
-
Remove the upper part from the water tank.
-
Fill the water tank with fresh drinking water.
⇒ The filling level should be below the filling level line in the water tank.
-
Check whether the SecoSan ® Stick is correctly positioned inside the water tank.
-
Place the upper part onto the water tank.
⇒ The display on the upper part and the logo on the lower part should point in the same direction.
-
Check whether the upper and lower part are properly connected as otherwise the device cannot be switched on.
-
Plug the mains plug into a sufficiently fused mains socket.
-
Press the power button (9).
→ The device switches back on.
Shutdown
- Switch off the device.
- Remove the mains plug from the mains socket.
• Empty and clean the water tank. - Remove the SecoSan Stick.
- Clean the upper louvre.
- Clean the plasma generator.
- Store the device according to the chapter Storage.
Maintenance
Activities required before starting maintenance
- Do not touch the mains plug with wet or damp hands.
- Before any work, remove the mains plug!
Cleaning the housing
Clean the device with a soft, damp and lint-free cloth. Ensure that no moisture enters the housing. Do not use abrasive cleaners.
Cleaning the water tank
Clean the water tank at least once a week and prior to every start-up or shutdown.
√ The device is switched off and disconnected from the mains.
√ The upper part of the device has already been removed from the device.
- Take the disk out of the water tank.
- Take the SecoSan ® Stick out of the water tank.
- Discharge the residual water into a drain.
- Clean the inside of the water tank with a mild detergent.
- Rinse the water tank and the SecoSan ® Stick with clear water thoroughly.
- Dry the inside of the tank with a lint-free cloth.
- Insert the SecoSan ® Stick into one corner of the water tank. Make sure not to block the rotating disk.
- Refit the disk. Check the disk for complete movability. If necessary, reposition the SecoSan® Stick so that the disk can turn freely.
- Fill the water tank with water.
- Put the upper part back on the device.
Exchanging the SecoSan® Stick (optional)
The SecoSan ® Stick should be exchanged approx. every 6 months. The LED display for the SecoSan ® Stick lights up when an exchange is required.
ü The device is switched off and disconnected from the mains.
ü The upper part of the device has already been removed from the device.
- Remove the disk.
- Remove the SecoSan ® Stick and dispose of it properly.
- If necessary, empty the water tank.
- Insert the new SecoSan ® Stick into one corner of the water tank. Make sure not to block the rotating disk.
- Refit the disk. Check the disk for complete movability. If necessary, reposition the SecoSan® Stick so that the disk can turn freely.
- Fill the water tank with fresh drinking water.
- Put the upper part back on the device.
After switching the device back on, you have to reset the LED display for the SecoSan® Stick:
- Press the reset button (18) with a suitable tool (e.g. paper clip or toothpick) for approx. 3 s.
ð The SecoSan ® Stick indication disappears.
Cleaning the disk
ü The device is switched off and disconnected from the mains.
ü The upper part of the device has already been removed from the device.
- In case of slight soiling, insert the Easy Kit between two of the disks and move it back and forth.
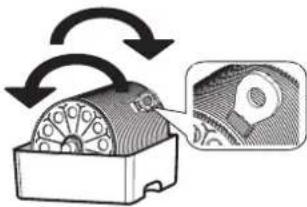
- In case of heavy soiling, you can disassemble the disk into its individual components and clean them thoroughly:
Disassembling the disk
- Take the disk out of the water tank.
- Open the lateral screwing with the Easy Kit or with a coin by turning the cap counter-clockwise.

- Remove the cap.
- You can take the disks off the shaft and clean them individually.
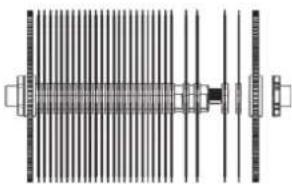
- After cleaning, slide the disks back on the shaft.
- Put the cap back on the shaft and fasten the cap by turning clockwise.
- Reinsert the disk into the device. Check the disk for complete movability. If necessary, reposition the SecoSan ® Stick so that the disk can turn freely.
- Put the upper part back on the device.
Cleaning the upper louvre
Clean the upper louvre if it shows visible soiling.
√ The device is switched off and disconnected from the mains.
- Loosen the upper screw at the rear of the device with a suitable screwdriver (Phillips, +).
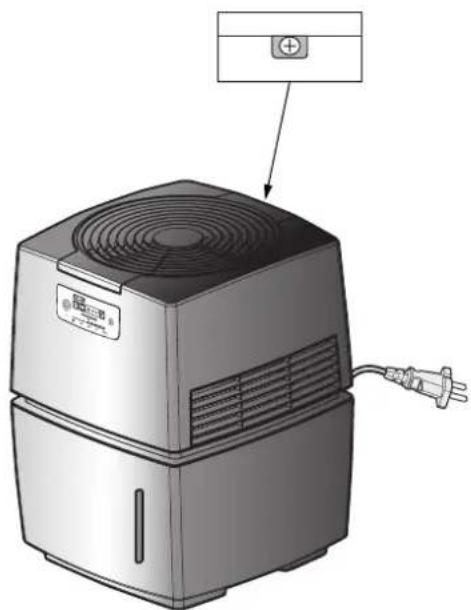
- Remove the louvre.

- Clean the louvre with a damp, lint-free cloth or with a vacuum cleaner.

-
Should the fins of the fan be heavily soiled too, you can remove the dust with a dry duster or a vacuum cleaner (low stage). Make sure that no moisture enters the fan.
-
Place the louvre back on the device until it engages.
-
Tighten the screw at the rear.
Cleaning the plasma generator
Clean the electrodes of the plasma generator about every two weeks.
Use customary cotton buds for cleaning. You can slightly dampen the cotton buds with water. If you are using damp cotton buds, always wipe dry with a dry cotton bud.
√ The device is switched off and disconnected from the mains.
- Loosen the upper screw at the rear of the device with a suitable screwdriver (Phillips, +).
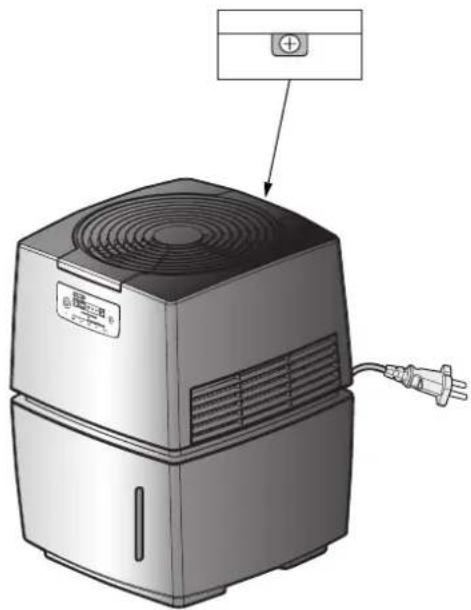
- Remove the louvre.

- Carefully wipe over both electrodes with a cotton bud.

-
Place the louvre back on the device until it engages.
-
Tighten the screw at the rear.
Technical annex
Technical data
| Parameter Value | |
| Suitable for rooms sized up to 25 m2/63 m3 | |
| Humidification performance max. 400 ml/h | |
| Display of relative humidity 20 % to 60% | |
| Amount of air 66-78-126 [m3/h] | |
| Mains connection 1/N/PE ~ 220V / 50 + 60 Hz | |
| Power input max. 11 W | |
| Sound pressure level 32 dB | |
| Water tank 9 l | |
| Dimensions (packaging excluded, length x width x height) | 315 x 310 x 390 [mm] |
| Weight (packaging excluded) 6 kg | |
| Water filter SecoSan | Stick 10 |
Wiring diagram
![graph TD A["Power Source"] --> B["Switch"] B --> C["Measurement Unit"] C --> D["Control Unit"] D --> E["Ground"] F["Load"] --> G["Ground"] H["Ground"] --> I["Ground"] J["Input"] --> K["Ground"] L["Input"] --> M["Ground"] N["Input"] --> O["Ground"] P["Input"] --> Q["Ground"] R["Input"] --> S["Ground"…](/content/2026/06/1350388/images/bffa3462e1c465a92090ccaa1a3cc66a736629a1f623b92e543e53ad52001ce1.jpg)
Exploded assembly drawing
Note!
The position numbers of the spare parts differ from those describing the positions of other parts mentioned in this operating manual.
![graph TD A["13"] --> B["12"] B --> C["6"] C --> D["8B"] D --> E["8"] E --> F["7D 7C 7B 7A"] F --> G["9"] G --> H["10"] H --> I["11"] I --> J["4D"] J --> K["3"] K --> L["4"] L --> M["5"] M --> N["7D 7C 7B 7A"] N --> O["2B"] O --> P["2A"] P --> Q["2C"] Q --> R["2D"]](/content/2026/06/1350388/images/ec2a8f9ab0c73a89688cf4091b1eb24c797b7a7e015c44cf1986ef14ebe39c44.jpg)
List of spare parts
| No. Spare part No. Spare part No. Spare part | |||||
| 1 WATERTANKASSY 7 (FAN) MOTOR ASSY 9 POWERCORD | |||||
| 2 DISKASSY 7A FAN MOTOR CASE 10 BASEBODYASSY | |||||
| 2A SHAFT 7B FAN MOTOR 10A BASE BODY | |||||
| 2B DISK 7C FAN MOTOR RUBBER(FM) 10B CONTACT LEVER | |||||
| 2C SIDE DISK 7D FAN MOTOR COVER 10C GRILLE(OUTLET) | |||||
| 2D CAP 8 DISK MOTOR ASSY 11 AIRGUIDE | |||||
| 3 BODY COVER SUB ASSY 8A DISK MOTOR COVER 12 PROPELLER | |||||
| 4 MAIN CONTROL ASSY 8B DISK MOTOR 13 GRILLE(INLET) | |||||
| 4D HUMID SENSOR ASSY 8C DISK MOTOR GEAR 14 DOCUMENTSET | |||||
| 5 SHROUD(A) 8D DISK MOTOR INSU(DM_LOW) 14A INSTRUCTION MANUAL | |||||
| 6 INSU(DM_UP) 8E DISK MOTOR HARNESS 15C EZKITASSY | |||||
Disposal

In the European Union, electronic equipment must not be treated as domestic waste, but must be disposed of professionally in accordance with Directive 2002/96/EC of the European Parliament and of the Council of 27 January 2003 on waste electrical and electronic equipment (WEEE). At the end of its life, please dispose of this device according to the valid legal requirements.
Declaration of conformity
in accordance with the EC Low Voltage Directive 2006/95/EC and the EC Directive 2004/108/EC about electromagnetic compatibility.
Herewith, we declare that the device AW 10 S was developed, constructed and produced in compliance with the named EC directives.
Applied standards:
EN 60 335-2-98: 2003 + A1: 2005 + A2: 2008
EN 60 335-1: 2002 + A1: 2004 + A11: 2004 + A12: 2006
+ A2: 2006 + A13: 2008
EN 62 233: 2008
EN 55014-1 + A1: 2009
EN 55014-2 + A2: 2008
EN 61000-3-2: 2006
EN 61000-3-3: 2008
The C€ marking is found on the rear of the device.
Manufacturer:

- TABLE OF CONTENTS
- NOTES REGARDING THE OPERATING MANUAL
- SYMBOLS
- HAZARDOUS ELECTRIC CURRENT
- DANGER
- CAUTION
- LEGAL NOTICE
- WARRANTY AND LIABILITY
- SAFETY
- READ THIS MANUAL CAREFULLY BEFORE STARTING OR USING THE DEVICE. ALWAYS STORE THE MANUAL IN THE IMMEDIATE VICINITY OF THE DEVICE OR ITS SITE OF USE
- INTENDED USE
- IMPROPER USE
- PERSONNEL QUALIFICATIONS
- RESIDUAL RISKS
- BEHAVIOUR IN THE EVENT OF AN EMERGENCY
- INFORMATION ABOUT THE DEVICE
- DEVICE DESCRIPTION
- TRANSPORT AND STORAGE
- TRANSPORT
- STORAGE
- ASSEMBLY AND INSTALLATION
- ASSEMBLY
- SCOPE OF DELIVERY
- UNPACKING THE DEVICE
- INSERTING THE SECOSAN® STICK (OPTIONAL)
- INSTALLING THE DEVICE
- FILLING THE WATER TANK
- OPERATION
- SWITCHING THE DEVICE ON
- SETTING THE OPERATING MODE
- REFILLING WITH WATER
- NOTE
- SHUTDOWN
- MAINTENANCE
- ACTIVITIES REQUIRED BEFORE STARTING MAINTENANCE
- CLEANING THE HOUSING
- CLEANING THE WATER TANK
- EXCHANGING THE SECOSAN® STICK (OPTIONAL)
- CLEANING THE DISK
- DISASSEMBLING THE DISK
- CLEANING THE UPPER LOUVRE
- CLEANING THE PLASMA GENERATOR
- TECHNICAL ANNEX
- EXPLODED ASSEMBLY DRAWING
- LIST OF SPARE PARTS
- DISPOSAL
- DECLARATION OF CONFORMITY
Brand : TROTEC
Model : AW 10 S
Category : Humidifier