
M1509SE - Coffee machine Redmond - Free user manual and instructions
Find the device manual for free M1509SE Redmond in PDF.

| Brand | Redmond |
| Model | M1509SE / RCM-M1509S-E |
| Machine type | Drip coffee maker |
| Control type | Electronic |
| Body material | Plastic / Stainless steel |
| Carafe material | Heat-resistant glass / Plastic |
| Water tank capacity | 1.2 L |
| Carafe capacity | 1.2 L |
| Power | 900 W |
| Voltage | 220-240 V, 50/60 Hz |
| Dimensions (Length × Depth × Height) | 215 × 215 × 332 mm |
| Net weight | 2 kg |
| Power cord length | 0.8 m |
| Remote control technology | Ready for Sky (Bluetooth) |
| App compatibility | iOS, Android |
| Display | LED display |
| Functions | Delay brew, strength adjustment, keep warm, anti-drip |
| Permanent filter | Yes, removable and compatible with paper filters |
| Safety | Child lock on control panel, overheat protection |
| Included accessories | Carafe, cleaning brush, recipe book, user manual, service booklet |
| Maintenance | Regular descaling, cleaning of removable parts, do not immerse |
Frequently Asked Questions - M1509SE Redmond
User questions about M1509SE Redmond
0 question about this device. Answer the ones you know or ask your own.
Ask a new question about this device
Download the instructions for your Coffee machine in PDF format for free! Find your manual M1509SE - Redmond and take your electronic device back in hand. On this page are published all the documents necessary for the use of your device. M1509SE by Redmond.
USER MANUAL M1509SE Redmond
natural_image
Exterior view of a Skycoffee coffee maker with clear glass and black handle (no visible text or symbols on device body)User manual
Appliance control via the wireless network. Instruction on the R4S Gateway application installation is available through the link
GBR 5
FRA 11
DEU 18
FIN 25
LTU 31
LVA 37
EST 43
SVK 49
CZE 55
POL 62
RUS 69
U 76
KAZ 83

Carefully read all instructions before operating the appliance and save them for future reference. By carefully following these instructions you can considerably prolong the service life of your appliance.
The safety measures and instructions contained in this manual do not cover all possible situations that may arise during the operation of the appliance. When operating the device the user should be guided by common sense, be cautious and attentive.
IMPORTANT SAFEGUARDS
- The manufacturer is not responsible for any failures arising from the use of this product in a manner inconsistent with the technical or safety standards.
- This appliance is intended for use in household and similar applications such as: apartment buildings, farm houses, staff areas in shops and office buildings, hotels, and other residential type environments. This product is not intended for commercial or industrial use. Manufacturer is not responsible for the consequences of improper use.
-
Before plugging in the appliance ensure that the circuit voltage matches operating voltage of the appliance (see technical specifications or manufacturer's plate on the appliance).
-
Use an extension cord designed for power consumption of the appliance as the parameter mismatch may result in a short circuit or fire outbreak.
- The appliance must be grounded. Connect the appliance only to a properly installed power point. Failure to do so may result in the risk of electrical shock. Use only grounded extension cords.

CAUTION! While in use the appliance heats up! Do not touch the housing while the appliance is operating.
- Unplug the appliance after use, before cleaning or moving. Remove the power cord with dry hands holding it by the plug, not cord.
- Do not place the cord in doorframes or by heat sources. Do not twist or bend the power cord, ensure it is not in contact with sharp objects, corners and edges of furniture.

PLEASE, NOTE: damaging the cord may lead to a failure that will not be covered by the warranty. If the cable is damaged or requires
REDMOND
replacing, contact an authorized service centre to have the cord replaced. Do not place the appliance on soft, unstable surfaces.
- Do not put the appliance on temperature-sensitive surface, do not cover the operating appliance.
- Do not operate the appliance outdoors to prevent water or any foreign object or insect from getting into the device. Doing so may result in serious damage of the appliance.
- Always unplug the device and let it cool down before cleaning. Follow cleaning and general maintenance guidelines when cleaning the unit.
- Do not open the lid of the appliance during the making coffee.

DO NOT immerse the appliance in water or other liquid! Failure to do so may cause the appliance to malfunction!
- This appliance can be used by children aged from 8 years and above and persons with reduced physical, sensory or mental capabilities or lack of
experience and knowledge if they have been given super vision or instruction concerning use of the appliance in a safe way and understand the hazards involved. Children shall not play with the appliance. Keep the appliance and its cord out of reach of children aged less than 8 years. Cleaning and user maintenance shall not be made by children without supervision.
- Keep packaging (film, foam plastic and other) out of reach of children as they may choke on them.
- No modifications or adjustments to the product are allowed. All service and repair works should be carried out by an authorized service centre. Failure to do so may result in device and property damage or injury.

CAUTION! Do not use the appliance in case of any malfunctions.
Technical specifications
Model....SkyCoffee RCM-M1509S-E
Power....1000 W
Voltage 220-240 V, 50/60 Hz
Electrical safety......class I
Type of coffee maker....drip
Type of control......electronic
Housing material....plastic / stainless steel
Carafe material....heat-resistant glass / plastic
Filter ......removable
Water tank capacity....1.5 L
Carafe capacity....1.5 L
Display......LCD
Continuous operation time up to 40 min
Remote control......"Ready for Sky" technology
Data transmission protocol......Bluetooth v4.0
Supported operating systems....iOS,Android
Carafe reheating....yes
Auto shut-off ....yes
Use of paper filters....yes
Timer yes
Strength adjustment.....yes
"Anti-drip" function .... yes
Overheat protection....yes
Time Delay function....yes
Overall dimensions 215 × 215 × 332 mm
Net weight 2.4 kg
Power cord length 0.8 m
Package Includes
Coffee maker ....1 pc.
Carafe 1 pc
Cleaning brush....1 pc.
Cook Book....1 pc.
User manual 1 pc.
Service booklet....1 pc.
Manufacturer reserves the right to make any modifications to design, packaging, or technical specifications of the product without prior notice.
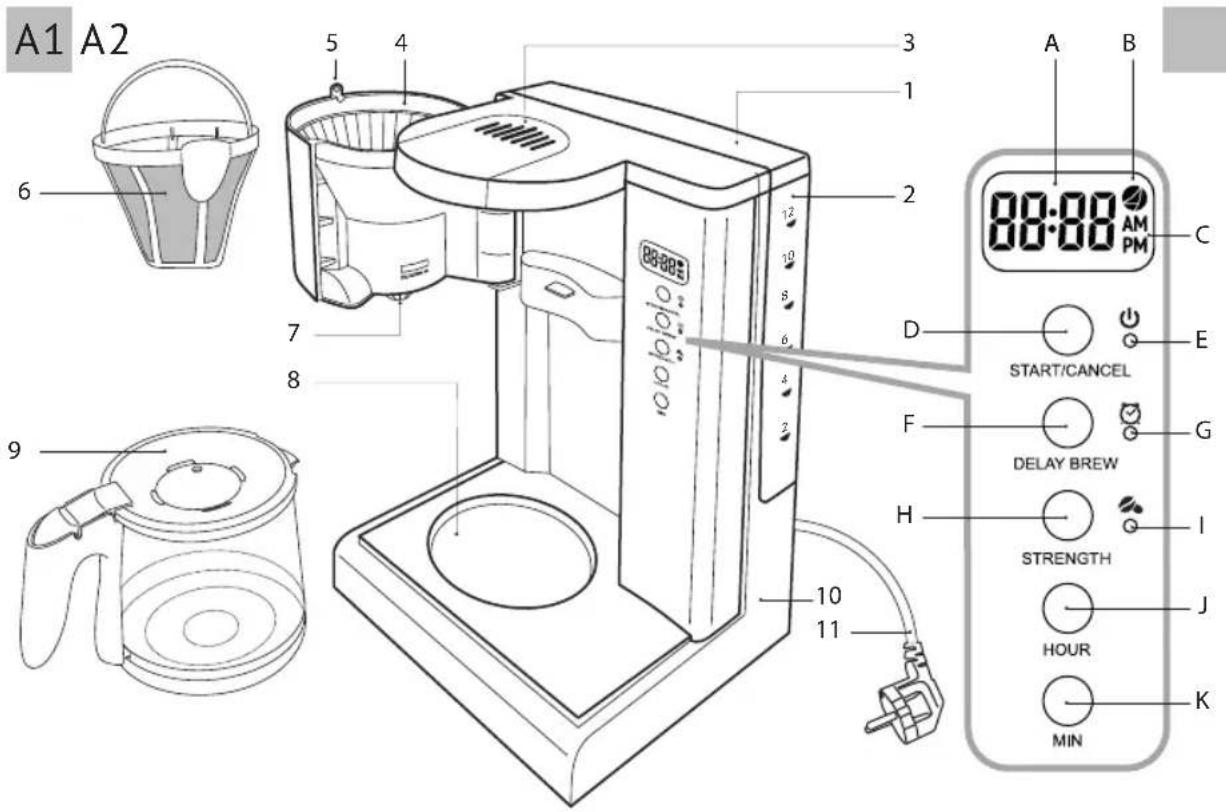
Scale Parts (scheme A1, p. 3)
-
Water tank lid
-
Removable water tank with graduated scale
-
Steaming outlets
-
Filter holder
-
Fixator of filter holder
-
Removable filter with handle
-
Coffee spout with spill protection
-
Metal plate for carafe reheating
-
Coffee carafe
-
Housing with power cord storage compartment
-
Power cord
Control panel with display (scheme A2, p. 3)
A. Current time/Time Delay indicator
B. Connection to Ready for Sky application indicator
C. 12-hour time format indicators
D. "Start/Cancel" button
E. Cooking indicator
F. "Delay brew" button
G. Time Delay function indicator
H. "Strength" button
I. Strength adjustment indicator
J. "Hour" button
K. "Min" button
I. PRIOR TO FIRST USE
Carefully take the appliance and its detachable parts out of the package. Remove all wrapping materials and stickers except for the serial number identification sticker.

Keep all warning labels, including the serial number identification label located on the housing.
REDMOND
After transportation or storage at low temperatures allow the appliance to stay at room temperature for at least 2 hours before using.
Wipe the housing with a moist cloth. Rinse the removable parts with warm water, let dry properly before plugging in.
II. USING THE APPLIANCE
Device remote control via the Ready for Sky application
The Ready for Sky application allows you to control the device remotely in the nearest zone from a smartphone or tablet.
- Download the Ready for Sky application from App store or Google Play (depending on the device operation system) onto your smartphone or tablet.
For the minimum supported OS version, see the company's official website www.redmond.company or the application description at the App Store and Google Play.
-
Start the Ready for Sky app, create an account, and follow the prompts appearing on the screen.
-
To the standby mode press and hold down "Hour" button until three audible signals are heard. Indicator will light up on display.
i After connection is made the indicator will light up constantly. If within 10 seconds connection won't be made, the appliance will switch to the standby mode.
- To disable remote control press and hold the "Min" button until the longer sound signal.
To provide a stable connection, your mobile device should be located no more than 15 meters away from the appliance.
Appliance control via the wireless network. Instruction on the R4S Gateway application installation is available through the link: http://redmond.company/APP_manual_appgateway
If necessary, you can disable the device Bluetooth function. Press and hold down the "Strength" button until the indicator flashes twice and an audible signal sounds. When Bluetooth is disabled, the device cannot be synchronized. To enable the Bluetooth function, press again and hold down the "Strength" button until the indicator flashes twice and an audible signal sounds.
To adjust the current time
-
Plug in the appliance. An audible signal will be heard, the default time value will be displayed (12:00).
-
To change the time value press and hold down the "Delay brew" button. The hour value on display will start flashing.
-
To set the hour value press HOUR, minute value - press MIN. Press and hold the corresponding button to scroll through the digits. The hour value changes irrespective of the minute value. After the maximum value is reached the adjustment starts again.
-
After setting is complete do not press the buttons on the panel for 5 seconds. Settings will be saved automatically.
The default time value is displayed in 24-hour format. To switch the clock into 12-hour format in the current time setting mode simultaneously press and hold "Hour" and "Min" buttons. The current time value in 12-hour format and AM or PM indicators will be displayed. The REDMOND coffee maker SkyCoffee RCM-M1S09S-E does not have non-volatile memory, that's why in case of the temporary disconnection from the power supply it's necessary to readjust the clock.
Time Delay
The time delay function allows setting the start time of making the drink.
-
To switch to the time delay setting mode to the standby mode, repress "Delay brew". 📋 indicator will light up solid, the hour value on display will start flashing.
-
To set the hour value press HOUR, minute value - press MIN. Press and hold the corresponding button to scroll through the digits. The hour value changes irrespective of the minute value. After the maximum value is reached the adjustment starts again.
i After 1 minute of idle time, the appliance will switch into the standby mode.
- After the end of adjustment press "Start/Cancel". The Time Delay function will start its operation.
During the operation of the function the current time value is displayed. To see the set Time Delay value, press "Hour" or "Min".
-
After the end of the function operation the appliance will make three audible signals, ✅ indicator will go out. The drink-making process will start.
-
To disable the Time Delay function repress "Start/Cancel". A long audible signal will be heard, indicator will go out, the appliance will switch to the standby mode.
"Strength" function
This function allows to increase the intensity of the ready drink. The hot water is supplied into the filter with coffee by 10 second periods with 10-second breaks during the function operation. Thanks to that the flavour and aroma of the ready drink become more intense.
To enable the function in any mode of the appliance operation press "Strength" button.
indicator will light up on the panel. To disable the function repress the "Strength" button, indicator will go out.

It is not recommended to use the strength adjustment button when making more than 10 cups of coffee as it may lead to the appliance overheating.
Control panel lock
The appliance is equipped with a control panel lock function to prevent misuse ("child lock").
-
To enable the lock in the standby mode press and hold down the "Strength" button for several seconds. An audible signal will be heard, [ ] symbols will light up on display. When pressing any button in the lock mode [ ] symbols will appear on display.
-
To unlock the control panel, again press and hold the "Strength" button until the longer sound signal is heard. The ] [ symbols will be shown on the display.
Coffee brewing
-
Open the lid of the water tank and remove it by pulling upwards by the handle. Fill the tank with clear water. Fill the tank with clean cold water not exceeding the maximum mark and install it to the housing until tight. Close the lid.
-
Open the filter holder by pulling it by the lock to the left. Install the removable filter into the filter holder. Add the ground coffee into the filter so that no less than a half of the container was empty. Set the filter holder into the working position, by turning it to the right until it clicks.

It is not recommended to tamp ground coffee in the filter. Use medium ground coffee, suitable for the drip coffee makers. When making coffee from beans of different grinding, the filter filling degree may be slightly different.
-
Set the jar onto the metal plate for heating. Plug in the appliance.
-
To brew coffee in the automatic mode press. The indicator will light up.
-
After water tank is empty, the appliance will finish operation in coffee making mode and switch to the mode of keeping the ready drink warm.
-
After the end of operation the appliance will make three audible signals and switch into the standby mode, the indication will go out. To turn the appliance into the standby mode manually, press "Start/Cancel".
III. CLEANING AND MAINTENANCE
Before cleaning please make sure the appliance is unplugged and has cooled down.

DO NOT wash the appliance under running water, immerse into water or wash in dishwasher.
DO NOT use abrasives and chemically aggressive substances, sponges with hard coating when cleaning the appliance.
Removable parts under running warm water after each use. Soft detergent can be used. Clean the housing and metal plate for reheating when required.
During operation, depending on the composition of usable water, oxide spots and scale can appear on the heating element and inner walls of the appliance. To remove it use special nonabrasive cleansers for scale cleaning and removal from kitchen appliances. Before repeated operation or storage completely dry all parts of the appliance. Store the assembled appliance in a dry, ventilated place away from heating appliances and direct sunlight.
During transportation and storage, do not expose the device to mechanical stress, that may lead to damage of the device and/or violation of the package integrity.
Keep the device package away from water and other liquids.
IV. BEFORE CONTACTING SERVICE CENTER
| Problem Possible cause Solution | ||
| Pump makes noise Empty water tank Fill the water tank | ||
| Water doesn't flow through | Empty water tank Fill the water tank | |
| The appliance wasn't properly cleaned after last use | Check the appliance cleaning according to recommendations of the section "Cleaning and maintenance" | |
| The appliance is heavily clogged | ||
| You use coffee of too fine grinding | We recommend you to use ground coffee, intended for use in the coffeemakers of this type | |
| Coffee in the filter is too tamped | When adding coffee to the filter do not apply too much force | |
| Water runs too fast | Coffee is too coarsely ground Try | to use fine ground coffee |
| There isn't enough ground coffee in the filter | Put more ground coffee into the filter next time | |
REDMOND
| Problem Possible cause Solution | ||
| Appliance doesn't function | Appliance is not plugged in | Plug in the appliance to the working outlet |
| There is no power supply in the electrical outlet | ||
| Plastic odour appeared during operation | Appliance is new, the smell comes out of protective cover | The smell will disappear after a few uses |
| Synchronization attempt failed | Bluetooth function on the mobile device is disabled | Enable Bluetooth function on the mobile device |
| Ready for Sky app on the mobile device is deactivated | Run the Ready for Sky app on the mobile device | |
| Sync devices are located too far | Ensure devices are located within 15 metres from each other | |
| The connection with mobile device is broken | When removing the lid the coffee-maker power is cut off, that leads to connection breakdown with mobile device | To resume the connection set the lid into place and reselect the appliance in the mobile app |

NOTE! In case any failure occur in the operation of the Ready for Sky app, it is not obligatory to apply to the service centre. Apply to REDMOND technical support service and obtain the consultation of our specialists on error elimination and/or failure in Ready for Sky operation. Your comments and suggestions concerning application operation will be taken into account upon successive update. Contact data of user support service of REDMOND appliances can be found in your country on the website www.redmond.company. You may also obtain the help, filling the contact form provided on the website.
In case you didn't manage to eliminate the defects, please, refer to the authorized service centre.
Environmentally friendly disposal (WEEE)
The packaging, user manual and the device itself shall be taken to the applicable collection point for the recycling of electrical and electronic equipment. Do not throw away the electronic waste to help protect the environment.
Old appliances must not be disposed with other household waste but must be collected separately. Municipal disposal of recyclable wastes is free of charge. The owners of old appliances are required to bring it to a waste facility centre. With this little extra effort, you can help to ensure that valuable raw materials are recycled and pollutants are treated as appropriate.
This appliance is labelled in accordance with European Directive 2012/19/EU – concerning used electrical and electronic appliances (waste electrical and electronic equipment WEEE).
The guideline determines the framework for the return and recycling of used appliances as applicable throughout the EU.
Bluetooth is the registered trademark of Bluetooth SIG, Inc.
App Store is the service mark of Apple Inc., registered in the USA and other countries.
Google Play is the registered trademark of Google Inc.

F. Painike "Delay brew" ("Siirretty alku")
J. Painike "Hour" ("Tunti")
K. Painike "Min" ("Min")
I. ENNEN ENSIMMÄISTÄ KÄYNNISTYSTÄ
© REDMOND. All rights reserved. 2018
Reproduction, transfer, distribution, translation or other reworking of this document or any part thereof without prior written permission of the legal owner is prohibited.
Produced by Redmond Industrial Group LLC
One Commerce Plaza, 99 Washington Ave, Ste. 805A,
Albany, New York, 12210, United States
www.redmond.company
www.multivarka.pro
www.store.redmond.company
www.smartredmond.com
Made in China
RCM-M1509S-E-UM-2


- IMPORTANT SAFEGUARDS
- REDMOND
- Technical specifications
- Package Includes
- Scale Parts (scheme A1, p. 3)
- Control panel with display (scheme A2, p. 3)
- PRIOR TO FIRST USE
- USING THE APPLIANCE
- Device remote control via the Ready for Sky application
- To adjust the current time
- Time Delay
- "Strength" function
- Control panel lock
- Coffee brewing
- CLEANING AND MAINTENANCE
- Environmentally friendly disposal (WEEE)
- ENNEN ENSIMMÄISTÄ KÄYNNISTYSTÄ
Brand : Redmond
Model : M1509SE
Category : Coffee machine