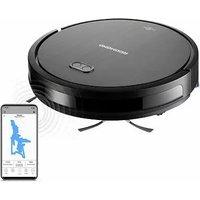
RV-R650S - Robot vacuum Redmond - Free user manual and instructions
Find the device manual for free RV-R650S Redmond in PDF.


| Type of product | Robot vacuum cleaner |
| Model | RV-R650S |
| Brand | Redmond |
| Dimensions (L x W x H) | 340 x 340 x 80 mm |
| Weight | 2.8 kg |
| Battery type | Lithium-ion |
| Battery capacity | 2600 mAh |
| Charging time | 4-5 hours |
| Run time | 90 minutes |
| Suction power | 2000 Pa |
| Dustbin capacity | 600 ml |
| Noise level | 65 dB |
| Cleaning modes | Auto, Spot, Edge, Scheduled |
| Sensors | Anti-drop, Anti-collision, Cliff |
| Navigation | Random / Gyro |
| Filter type | HEPA washable |
| Included accessories | Charging dock, Remote control, Filter, Side brushes |
| Maintenance | Clean dustbin after each use; replace filter every 3-6 months |
| Safety features | Auto-return to charging dock, Overcharge protection |
| Spare parts | HEPA filter, Side brush, Main brush, Battery |
| Color | Black |
Frequently Asked Questions - RV-R650S Redmond
User questions about RV-R650S Redmond
0 question about this device. Answer the ones you know or ask your own.
Ask a new question about this device
Download the instructions for your Robot vacuum in PDF format for free! Find your manual RV-R650S - Redmond and take your electronic device back in hand. On this page are published all the documents necessary for the use of your device. RV-R650S by Redmond.
USER MANUAL RV-R650S Redmond
Robot vacuum cleaner RV-R650S
User manual
The REDMOND Robot application
CONTENT
IMPORTANT SAFEGUARDS....11
Specification....12
Delivery set....12
Parts list....13
I. PRIOR TO THE FIRST USE....13
II. OPERATION OF THE APPLIANCE 13
Assembly 13
Charging the battery....14
Remote control of the appliance via the REDMOND Robot application 14
Use the appliance....14
Choosing mode with remote control 15
UV lamp 15
Cleaning plan function....15
III. OPTIONAL ACCESSORIES....15
IV. CLEANING AND MAINTENANCE 15
Storage and transportation 16
V. BEFORE CONTACTING A SERVICE CENTER 16
Manufacturer: "Power Point Inc Limited" N°1202 Hai Yun Ge (B1) Lin Hai Shan Zhuang Xiameilin Futian Shenzhen China 518049 Under license of REDMOND®
Importer (EU): SIA "SPILVA TRADING" Address: Jelqava, Meiju cels 43 - 62, LV-3007 Req. Nr. 43603078598.
Importer Cyprus (CY): ASBIS Kypros Limited; 26, Spyrou Kyprianou Str, 4040, Germasogeia, Limassol, Cyprus. Tel: +357 25 257 350; Fax: +357 25 322 432, e-mail: info@asbis.com.cy; www.asbis.com.cy
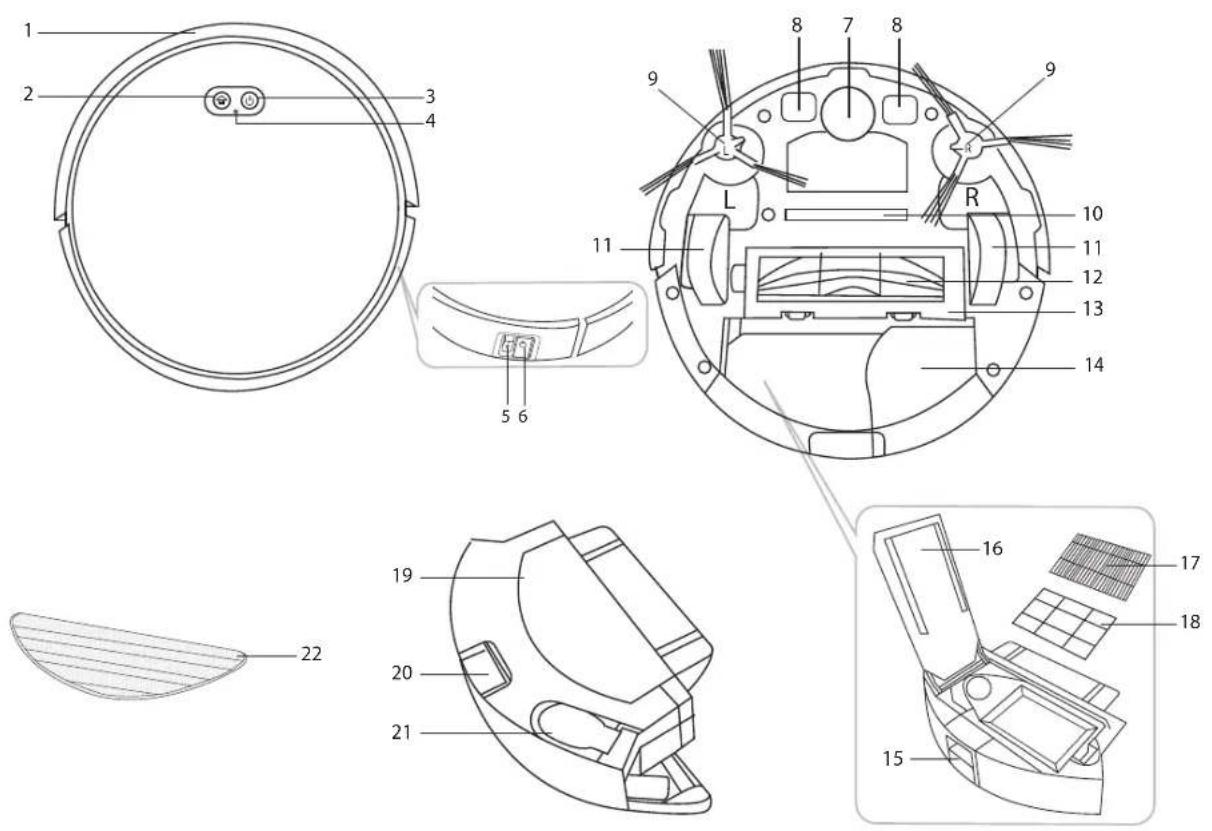
A1

A2

natural_image
Line drawing of a circular vacuum cleaner with attached electrical socket and plug, showing wiring and mounting points (no text or symbols)
A3



Before using this appliance, please read the User Manual carefully and keep it as a reference. Proper use of the appliance will significantly extend its service life.
The safety precautions and instructions contained in this manual do not cover all possible situations that may arise during the operation of the appliance. When working with the appliance, the user should be guided by common sense, be careful and attentive.
IMPORTANT SAFEGUARDS
- The manufacturer is not responsible for damage caused by non-compliance with safety requirements and operating rules of the product.
- This appliance is intended for use in domestic conditions and can be used in apartments, country houses or other similar conditions of non-industrial operation. Industrial or any other misuse of the appliance will be considered as a violation of the conditions of proper use of the product. In this case, the manufacturer is not responsible for the possible consequences.
- Before connecting the appliance to the power supply, check whether its voltage is the same as the nominal voltage of the device adapter (see technical specifications or the product nameplate).
- It is allowed to use the appliance only with the adapter included in the package.
- Use an extension cord designed for the power consumption of the appliance, otherwise any mismatch of parameters can lead to a short circuit or fire of the cord.
- Unplug the appliance from the mains during cleaning. Remove the adapter with dry hands, holding it by the case, not by the wire.
- Do not extend the power cord in doorways or near heat sources. Make sure that the cord is not twisted or bent, not in contact with sharp objects, corners and edges of furniture.

KEEP IN MIND: accidental damage to the power supply cord may cause problems that do not comply with the warranty, as well as
STOP
electric shock. If the power cord is damaged, it must be replaced by the manufacturer, service or similar qualified personnel to avoid danger.
- Before cleaning the appliance ensure that it is unplugged. Remove the adapter with dry hands, holding it by its body, not the cable. Follow cleaning and general maintenance guidelines when cleaning the unit.
Do NOT immerse the appliance in water or place it under a stream of water!
- Do not allow foreign objects to enter the motor compartment of the appliance. Do not block the suction openings. Blocking the air intake may damage the motor.
- Move the device, holding it by its body with both hands.
- Do not install foreign objects in the device, do not sit or stand on the device.
STOP
Protect your eyes from infrared light. Do not aim infrared light at eyes.
- It is not allowed to operate the appliance in the following conditions:
-
In the premises and areas with high humidity. There is a danger of short circuit, motor failure.
-
Outdoors – moisture or foreign objects inside the appliance may cause serious damage to the appliance.
-
Near toxic and flammable substances, in rooms with a high concentration of vapors of combustible substances (paint, solvent, etc.) or combustible dust. There is a danger of explosion or fire.
- It is not allowed to bring the suction nozzle to any parts of the body or clothing. Careless handling can result in serious injury.
- It is not allowed to suck up red-hot or cooled ash, coals, as well as outstanding cigarette butts, smoldering or burning debris. Clogging may cause a fire.
REDMOND
- It is not allowed to suck up any liquids, as well as clean wet surfaces – wet floors or carpets. Ingress of moisture can cause serious damage to the vacuum cleaner.
- It is not allowed to suck in powders for filling cartridges (toners) of copiers and printers, flour and other fine bulk substances, as well as construction dust, particles of plaster, gypsum, concrete or cement. There is a risk of filter clogging or motor damage.
- It is not allowed to suck up sharp objects: nails, broken glass, etc. They may damage the dust collector and filters.
- Do not use the device to clean furniture. Using the device on a soft, uneven surface or falling off a piece of furniture may lead to a malfunction. Do not use the device on long hair rugs (longer than 1 cm).
- This appliance can be used by children over 8 years old and physically or mentally challenged persons or as well as those who lack experience and knowledge only provided they have been given supervision or instruction concerning use of the appliance in a safe way and understand the hazards involved. Children should not play with the appliance. Keep the appliance and the power cord out of reach of children under 8 y.o. Cleaning and maintenance should not be performed by children without supervision.
- Packaging material (film, foam, etc.) may be hazardous to children. Choking hazard! Keep the packaging out of the reach of children.
- It is not allowed to repair the appliance or make any changes in its design. Repair of the appliance must be carried out exclusively by a specialist of an authorized service center. Unprofessional repair can lead to damage to the appliance, injuries and property damage.

ATTENTION! It is not allowed to use the appliance with any faults!
Specification
| Model....RV-R650S |
| Appliance type....robot vacuum cleaner |
| Power....25 W |
| Battery type....li-ion |
| Battery voltage....14,8 V --- |
| Battery capacity....2600 mAh |
| Power adapter input voltage....100-240 V-, 50/60 Hz, 0,4 A |
| Power adapter output voltage....19 V ===600 mA |
| Protection against electric shock....Class II |
| Suction power....1800-2500 Pa/ 22 W |
| Exhaust filter class....HEPA |
| Dust compartment capacity....0,45 L |
| Combined container for wet cleaning capacity....0,55 L + 0,3 L |
| Noise level....62 dB |
| Continuous operation time....up to 140 minutes |
| Full charge time....5,5 hours |
| Number of cleaning modes....5 |
| Remote control....available |
| Remote control power source....2 × LR03 (AAA) |
| Indication....LED, audible |
| Obstacle sensor....18 |
| Reset to charging point....automatic |
| Auto shut-off....when separated from the surface |
| Clean-up planning feature....available |
| Wet cleaning feature....available |
| UV lamp....available |
| Dimensions....333 × 77 × 334 mm |
| Net weight....3,5 kg |
Delivery set
| Robot vacuum cleaner | 1 pc. |
| Charging point | 1 pc. |
| Power adapter | 1 pc. |
| Remote control | 1 pc. |
| Rotating brush | 4 pc. |
| Dust collector and container | 1 pc. |
| Combined container for wet cleaning | 1 pc. |
| Wet cleaning attachment | 2 pc. |
| Exhaust HEPA filter | 2 pc. |
Cleaning brush....1 pc.
User manual 1 pc
Service book....1 pc.
The manufacturer has the right to make changes in the design, configuration or package, as well as in the technical characteristics of the product in the course of continuous improvement of its products without further notice of these changes. The specifications allow the error of ±10% .
Parts list (scheme A1, p. 3–4)
-
Front bumper
-
button - reset to charging point
-
button-start/end of work
-
Connection indicator
-
I/O power switch
-
Socket for connecting power adapter
-
Front wheel
-
Charging contact pins
-
Rotating brushes
-
UV lamp
-
Rear wheels with auto-switch off when removed from surface
-
Main brush
-
Fixing cover for main brush
-
Dust compartment
-
Dust container removal button
-
HEPA-filter cover and pre-filter compartment
-
HEPA filter
-
Pre-filter
-
Combined container for wet cleaning
-
Combined container removal button
-
Water outlet
-
Wet cleaning attachment
-
Remote control
-
Button - start/end of work
-
button- automatic mode
-
buttons- choose movement direction
-
Button- choose strength/water flow amount
-
-button- fast cleaning of a set area
-
button- reset to charging point
-
Button - start/end of work
-
button- corner cleaning mode
-
Battery compartment
-
Power adapter
-
Charging contact pins
-
Charging point
-
Charging point indicator
-
Cleaning brush
-
Replaceable HEPA filter
-
Replaceable wet cleaning attachment
-
Replaceable rotating brushes
I. PRIOR TO THE FIRST USE
Carefully take out the appliance and its components from the box. Remove all the packaging materials and promotional stickers.
Be sure to keep in place warning labels, index stickers (if any) and a label with the serial number of the appliance on its body!
After the transportation or storage at low temperatures, it is necessary to keep the appliance at the room temperature for at least 2 hours before switching on.
Wipe the body of the appliance and all removable parts with a damp cloth and dry. Carefully dry all parts of the device before use. Install batteries (not included) in the remote control, taking note of polarity.
Installing the battery ensure that your hands and the unit are dry.
II. OPERATION OF THE APPLIANCE
Assembly
When beginning assembly, make sure the I/O switch is in the O position and the charging station is disconnected from the power supply.
Assemble the vacuum as shown in diagram A5 on p. 8 (part 1), remove the protective covering between the body and front bumper as shown in diagram A3 on p. 6 (part 2).
For the procedure for assembling and using the device with a dust collector container, see diagram A5 (part 8).
Install the brushes in accordance with the directional markings, R should go into slot R, L into slot L.
REDMOND
Charging the battery
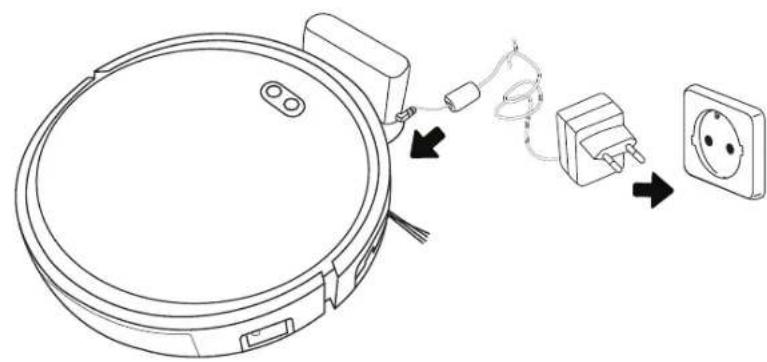
Before using the appliance, the battery must be fully charged (scheme A2, p. 5).
- Connect the charging station to the power supply and install it in a flat position next to the wall, the charging station light will switch on. If the device cannot be installed directly by the wall, place the device on any flat surface. There must not be interference at a radius of up to two metres from the charging station to ensure that the vacuum can return to the charging station to recharge.
- Turn the O/I switch to the I position, all indicators should flash a few times in different colours, then only the button will be lit in green, you will be able to hear "Welcome use robot vacuum cleaner, glad to serve you".
- Place the device on the charging station so that the charging pins touch the contacts on the charging station. You will be able to hear "Charging Start", the button will flash yellow. Full charge time is approximately 5.5 hours.
- The battery can also be charged by plugging a power adapter straight into the device. You will be able to hear "Charging Start", the button will flash yellow. The vacuum will not react to any button presses or the remote control and the cleaning plan function will be unavailable while the power adapter is connected to the device.
Before first use, charging the battery for 12 hours is recommended to increase service life.
4. When the device is fully charged, the button will glow a constant green.
The maximum period of continuous use is 140 minutes, depending on the floor and positioning of furniture in the cleaning area.
WARNING! The charging station must be connected to a power supply.
When charge reaches a critical level, the device will automatically return to the charging station. If the device is unable to return to the charging station, place it on the charging station by hand, making sure the charging pins connect.
When storing for a long period of time, charging the battery completely and turning the I/O switch to the 0 position is recommended.
Remote control of the appliance via the REDMOND Robot application
The REDMOND Robot application allows you to control the appliance remotely using your smartphone or tablet.
- Download the REDMOND Robot application from the App Store or Google Play (depending on the operating system of your device) to your smartphone or tablet.
Check the minimum supported version of the operating system on the official website of www.redmond.company or in the description of the application in the App Store and Google Play.
- Launch the REDMOND Robot application, create an account, and follow the on-screen prompts.
- Click the "+" icon and scan the QR code to add a device to the app.
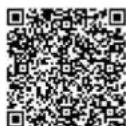
- When connecting, you will hear "Connecting network". The connection indicator light will glow constantly.
- If the device is unable to connect, you will hear "Network connection succeeded". The connection indicator light will flash.
To connect to the app, the device must be in an area with Wi-Fi. The vacuum must not be placed on the charging station and the I/O switch should be in the I position.
You can now remotely control the device. The app has more functions than the remote control.
Use the appliance
- If necessary, use the combined container for wet cleaning (see diagram A3, p. 6). Before first use, rinse and squeeze the wet cleaning attachment, that way it will be able to take on more water from the container. Fill the container through the special hole, lifting the lid first. Close the lid and attach the wet cleaning attachment using the velcro on the surface of the combined container. Place the combined container in the body of the vacuum.
Do not use the combined container for wet cleaning without water or the necessary attachment! Fill the container with tap water only, do not add any cleaning products to avoid clogging the dispensers.
Do not use the container or attachment for wet cleaning on carpets, it will disrupt the vacuum cleaner's movement.
Always pour away water from the combined container after wet cleaning to avoid leaks. - Press the button on the body or the button on the remote control. The device will say "Start Cleaning" (or "Mopping start" if the combined container for wet cleaning is installed) and will start working automatically. The button will glow a constant green light.
- If necessary, change the mode (see "Choosing mode" section).
-
Use the 80 and 120 buttons to set the cleaning strength, if you choose minimum, the device will say "Start silent cleaning", if you choose standard, the device will say "Start standard cleaning", if you choose maximum, the device will say "Start max cleaning". If the combined container for wet cleaning is installed, use the band buttons to select the water flow intensity: if you choose minimum, the device will say "Start mopping with small water", if you choose standard, the device will say "Start mopping with standard water", if you choose maximum, the device will say "Start mopping with large water".
-
To go into waiting mode, press the button on the device or the on the remote, the device will say "Cleaning suspended", the button will be lit in green. Cleaning will not take place during the waiting mode.
- If the device is inactive for a long period of time it will go into sleep mode, the button indicator goes out. During sleep mode, the device will not react to the remote control unless the button is pressed. To exit sleep mode, press the button on the remote or the button on the device; it will make a sound, the button will be lit in green again.
- When work is completed, the device will say "Cleaning has been completed", and then return to its charging station. You can also press the button on the remote control or the pin the device to force the device to return to the charging station. In this case the device will say "Returning to charging base", the button will be lit a yellow.
If the charging station is switched off during cleaning, the device will say "Cleaning has been completed, returning to start position", and will return to where cleaning began.
If for any reason the device's return to the charging station is interrupted, the device will say "Stop back to charging base".
Choosing mode with remote control
You can choose the mode using the corresponding buttons on the remote control in waiting mode or while the device is operating:
- button - automatic mode;
- button - fast cleaning of a set area;
- button- corner cleaning mode
| Fast cleaning of a set area | The device will move in a spiral, gradually increasing trajectory and then will turn around and move again, but this time reducing its trajectory. For cleaning a particularly dusty area | ||
| Automatic mode | The device will then clean the whole area, building a route according to that individual room | Press the button on the device to launch the device in automatic mode | |
| Corner cleaning mode | The device will move along the wall and past obstacles, cleaning the edges of the room | ||
To control the device manually, press and hold the movement direction buttons while the device is in waiting mode or operating:
- forward. The device will move forward while the button is held down;
< - turn left. The device will turn left on its axis while the button is held down;- turn right. The device will turn right on its axis while the button is held down;
- backwards. The device will move backwards while the button is held down.
UV lamp
The RV-R650S robot vacuum is equipped with an ultraviolet light to destroy pathogens and bacteria. The lamp will switch on automatically during cleaning and switch off when cleaning is finished or if the device is removed from the surface.
Protect your eyes from ultraviolet light. Keep ultraviolet light from people and animals!
Cleaning plan function
Available on the REDMOND Robot app.

WARNING! For the function to work, make sure the I/O switch to the I position.
III. OPTIONAL ACCESSORIES
(sold separately)
Additional accessories are not included in the delivery package of the multicooker. You can buy them, as well as learn about new products from REDMOND on the website www.redmond.company or in the shops of official dealers.
RAV-R650S-R670S is a set of changeable accessories
The set includes 4 side brushes, 2 HEPA filters, 2 cloths for wet cleaning and a main brush.
IV. CLEANING AND MAINTENANCE
For maximum effectiveness, perform a full clean of the device once every two weeks. Clean the dust compartment after each use.
Before you start cleaning the appliance, make sure that it is unplugged. Wipe the housing of the appliance and the charging point with a damp, soft cloth. DO NOT ALLOW THE DEVICE TO GET WET!
TOP DO NOT place the appliance body, plug or power supply adapter under a stream of water or submerge it in water.
DO NOT use any chemically aggressive substances or abrasive pastes, a sponge or tissue with hard or abrasive surface.
See diagram A4 (p. 7) for full procedure on cleaning the attachment and container for wet cleaning,
The cleaning brushes and attachment for wet cleaning can be cleaned in running water. If necessary, use a soft cleaning cloth.Dry completely before reuse!
To clean the dirt compartment and HEPA filter, refer to the diagram A5 (p.8).
REDMOND

Do not clean the dust collector or container for wet cleaning, this may damage the device.
Refer to the diagram A6 (p. 9) for the brushes cleaning procedure. Dry completely before reuse!

Check the moving parts of the device periodically for dirt, the device may malfunction if dirt is caught in them!
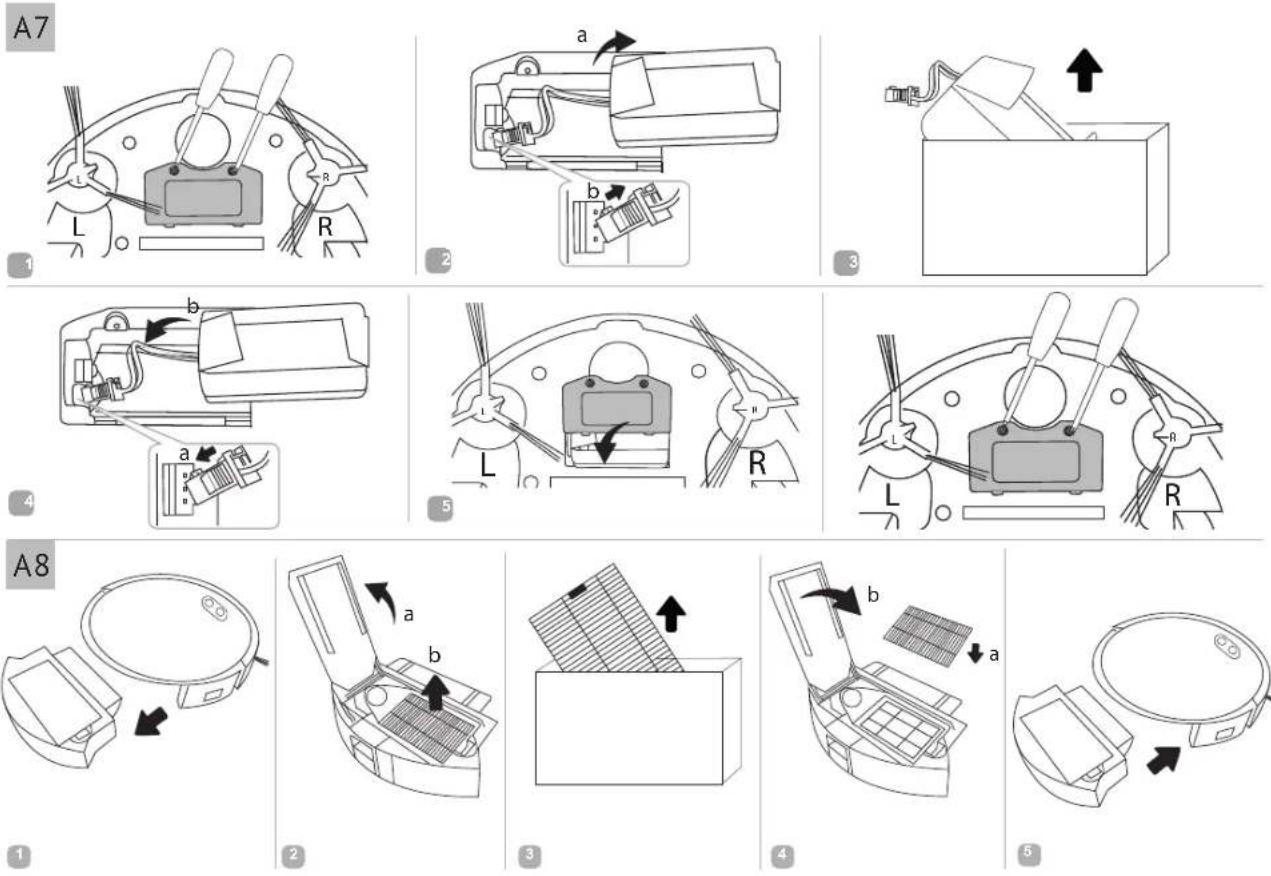
Refer to the diagram A7 (p. 10) for the accumulator battery replacement procedure.
The accumulator battery needs to be replaced after the end of its effective life.
You can purchase the replaceable accumulator battery REB-R650S for this vacuum cleaner model on the website www.redmond.company or in the official dealers' stores.

The accumulator battery must be disposed of in accordance with the local recycling program.
Take care of the environment: do not dispose of such items with normal household waste.
Refer to the diagram A8 (p. 10) for the exhaust HEPA filter replacing procedure.

Do not clean the exhaust HEPA filter, this may damage the device.
The HEPA filter's working life is no more than 12 months.
Storage and transportation
Clean and dry all the components of the appliance completely before storage and re-use. Store the appliance in a dry, ventilated place away from heating appliances and direct sunlight.
During the transportation and storage it is not allowed to expose the appliance to mechanical influences which can cause the damage of the appliance and/or violation of integrity of packing.
It is necessary to protect the packaging of the device from water and other liquids.
V. BEFORE CONTACTING A SERVICE CENTER
| Problem Possible cause Solution | ||
| The appliance does not turn on | The device has been switched off (switch is in the 0 position) | Turn the switch to the 1 position |
| Cleaning is not taking place at the set time | ||
| The device is saying "Low battery", "Low battery, please charge immediately" or "Battery is too low, robot is ready shut down now." | The appliance battery is discharged | Fully charge the battery (see "Charging the battery") |
| The battery does not charge | Power supply failure or wall socket is not working properly | Check the power supply or connect to a properly working wall socket |
| The AC adapter is not connected to the mains | Verify that the AC adapter is connected properly | |
| Problem Possible cause Solution | ||
| The battery does not charge | The device has been placed on the charging station incorrectly | Place the device on the charging station so that the charging pins touch the contacts on the charging station |
| The battery is running out too quickly | The filter, main brush or rotating brushes are dirty | Remove the dirt, clean the device according to the recommendations in the "Cleaning and Maintenance" section |
| The device is saying "Dust bin is not installed, please install it before start" or "Water tank is not installed, please install it before start" | The dust collector or the wet cleaning container is not installed or incorrectly installed in the device | Ensure the dust collector or wet cleaning container is installed correctly |
| The device is saying "Vacuum motor is entangled, please clean vacuum motor" | Dust collector full Clean the dust collector and filters | |
| The device is saying "Collision sensor get stuck,please check the collision sensor" | Device sensors are dirty | Wipe the bottom of the device with a soft cloth |
| The device is saying "Ground sensor is blocked,please clean ground sensor" | The wheels have been separated from the surface | Place the device on an even surface and restart |
| The device is saying "Main roller brush is entangled, please clean it" | The brushes are dirty | Check the brushes and remove the dirt (according to the recommendations in the "Cleaning and Maintenance" section |
| The device is saying "Side brush is entangled, please clean the side brush" | ||
| The device is saying "The robot is trapped, please remove the robot" or "Well sensors are blocked, please check" | Error with front bumper meaning the device cannot move forwards | Do not block the device's path, do not use the device in a small space |
| The device is saying "Left wheel jammed, please clean the left wheel" or "Right wheel jammed, please clean the right wheel" | The device is stuck and the wheels have difficulty turning | Check the device's wheels, do not put pressure on the device, do not place anything on the device |
| The device is saying "Invalid button" | The device is on the charging station while in cleaning mode for a fixed area or cleaning corners | Remove the device from the charging station. You can choose the mode using the corresponding buttons on the remote control in waiting mode or while the device is operating: |
| The device is saying "The network connection failed", "Wi-Fi fault" or "The network has been disconnected" | No Wi-Fi connection Check the Wi-Fi network is functioning | |
| The device is saying "Upgrade failed" | ||
| The attempt of synchronization to the mobile device failed | Internet connection disabled on mobile device | Turn on internet connection on the mobile device |
| The device has been switched off (switch is in the 0 position) | Turn the switch to the 1 position | |
| Problem Possible cause Solution | |||
| Device giving off a loud noise Dust collector full Clean the dust collector | |||
| The device is working but does not respond to the remote | IR signal from the remote control is not reaching the vacuum | The remote control is located too far from the device | Reduce the distance between the remote control and the device |
| The device's IR receive is turned away or there are obstacles between the remote control and the device | Point the remote control in a different direction | ||
| The remote's batteries have run out | Change the batteries (see the "Prior The First Use" section) | ||
| The device does not start cleaning or is moving incorrectly | The device is cleaning a surface that is too dark | Stop the device and move it to a lighter part of the floor | |
| The device is cleaning a strongly reflective surface | Close the curtains to prevent bright sunlight entering the room. Clean the room in a less bright environment | ||

If the problem persists, contact an authorized service center.

Environmentally friendly disposal (WEEE)
The packaging, user manual and the device itself shall be taken to the applicable collection point for the recycling of electrical and electronic equipment. Do not throw away the electronic waste to help protect the environment.
Old appliances must not be disposed with other household waste but must be collected separately. Municipal disposal of recyclable wastes is free of charge. The owners of old appliances are required to bring it to a waste facility centre. With this little extra effort, you can help to ensure that valuable raw materials are recycled and pollutants are treated as appropriate.
This appliance is labelled in accordance with European Directive 2012/19/EU – concerning used electrical and electronic appliances (waste electrical and electronic equipment WEEE). The guideline determines the framework for the return and recycling of used appliances as applicable throughout the EU.
www.redmond.company
www.multivarka.pro
www.store.redmond.company
www.smartredmond.com
Made in China
RV-R650S-GBR-UM

- The REDMOND Robot application
- CONTENT
- IMPORTANT SAFEGUARDS
- STOP
- REDMOND
- Parts list (scheme A1, p. 3–4)
- PRIOR TO THE FIRST USE
- OPERATION OF THE APPLIANCE
- Assembly
- Charging the battery
- Remote control of the appliance via the REDMOND Robot application
- Use the appliance
- Choosing mode with remote control
- UV lamp
- Cleaning plan function
- OPTIONAL ACCESSORIES
- RAV-R650S-R670S is a set of changeable accessories
- CLEANING AND MAINTENANCE
- Storage and transportation
- BEFORE CONTACTING A SERVICE CENTER
- Environmentally friendly disposal (WEEE)
Brand : Redmond
Model : RV-R650S
Category : Robot vacuum