BX11 - Energy meter TROTEC - Free user manual and instructions
Find the device manual for free BX11 TROTEC in PDF.
| Product type | Energy meter |
| Brand | Trotec |
| Model | BX11 |
| Dimensions (approx.) | 12 x 6 x 8 cm |
| Weight (approx.) | 200 g |
| Mains power supply | 230 V AC, 50/60 Hz, max. 16 A |
| Backup power supply | 3 AAA R03/1.5 V batteries |
| Maximum measurable power | 3,680 W |
| Measurement range | 2 W - 3,680 W |
| Maximum recording | 999.9 kWh |
| Maximum recording duration | 9,999 hours |
| Display | Current consumption, voltage, current, frequency, costs, time, day |
| Main functions | Two programmable tariffs, overload alarm, reset, time display |
| Overvoltage category | CAT II (2500 V) |
| Protection class | IP20 |
| Operating temperature | +5 °C to +40 °C |
| Relative humidity | 80% max. at 31 °C, linearly to 50% at 40 °C |
| Maintenance and cleaning | Soft, dry, lint-free cloth. Do not use detergents or immerse. |
| Safety | Indoor use only, respect max. load (16 A), do not open the housing, use a grounded socket. |
| General information | Not certified for official billing. Suitable for indoor use up to 2000 m altitude. |
Frequently Asked Questions - BX11 TROTEC
User questions about BX11 TROTEC
0 question about this device. Answer the ones you know or ask your own.
Ask a new question about this device
Download the instructions for your Energy meter in PDF format for free! Find your manual BX11 - TROTEC and take your electronic device back in hand. On this page are published all the documents necessary for the use of your device. BX11 by TROTEC.
USER MANUAL BX11 TROTEC
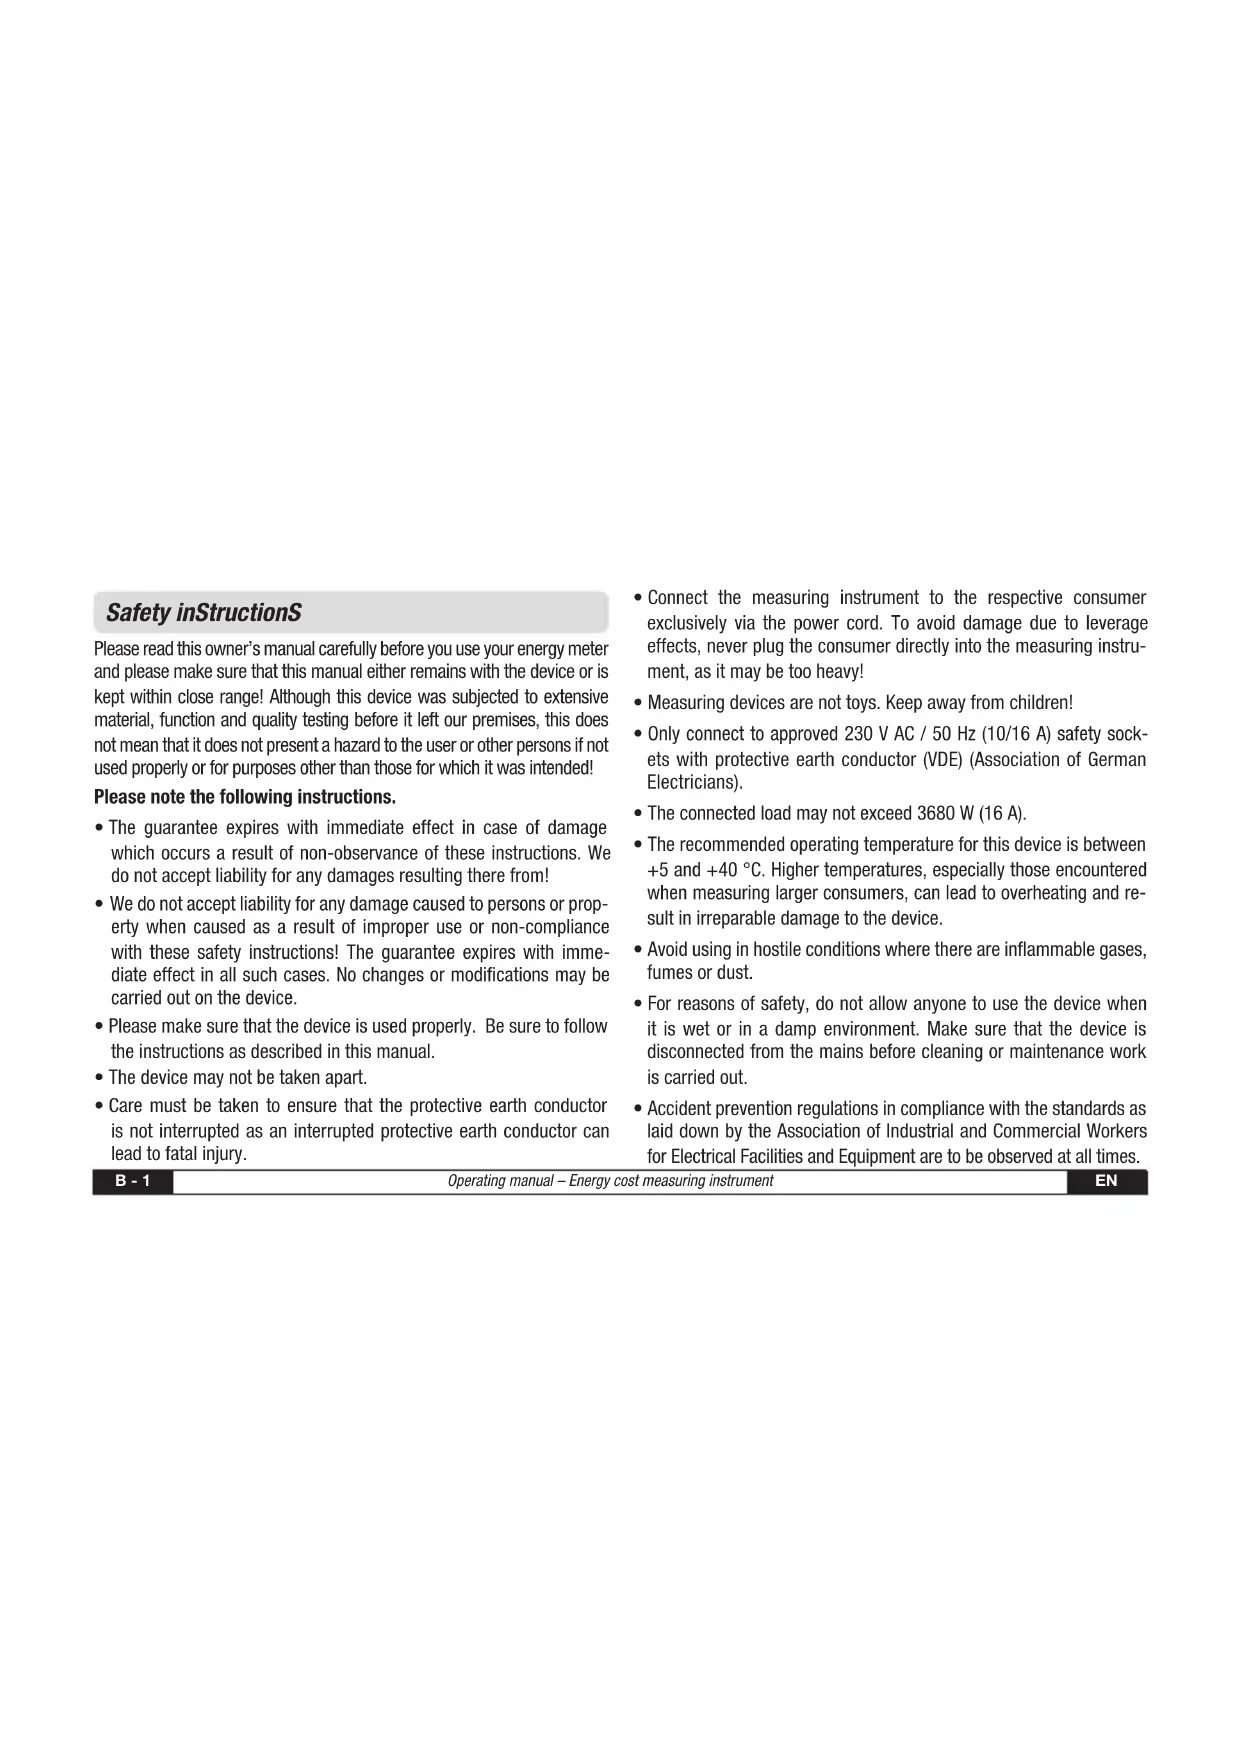
Please read this owner's manual carefully before you use your energy meter and please make sure that this manual either remains with the device or is kept within close range! Although this device was subjected to extensive material, function and quality testing before it left our premises, this does not mean that it does not present a hazard to the user or other persons if not used properly or for purposes other than those for which it was intended!
Please note the following instructions.
- The guarantee expires with immediate effect in case of damage which occurs a result of non-observance of these instructions. We do not accept liability for any damages resulting there from!
- We do not accept liability for any damage caused to persons or property when caused as a result of improper use or non-compliance with these safety instructions! The guarantee expires with immediate effect in all such cases. No changes or modifications may be carried out on the device.
- Please make sure that the device is used properly. Be sure to follow the instructions as described in this manual.
- The device may not be taken apart.
-
Care must be taken to ensure that the protective earth conductor is not interrupted as an interrupted protective earth conductor can lead to fatal injury.
-
Connect the measuring instrument to the respective consumer exclusively via the power cord. To avoid damage due to leverage effects, never plug the consumer directly into the measuring instrument, as it may be too heavy!
- Measuring devices are not toys. Keep away from children!
- Only connect to approved 230 V AC / 50 Hz (10/16 A) safety sockets with protective earth conductor (VDE) (Association of German Electricians).
- The connected load may not exceed 3680 W (16 A).
- The recommended operating temperature for this device is between +5 and +40 °C. Higher temperatures, especially those encountered when measuring larger consumers, can lead to overheating and result in irreparable damage to the device.
- Avoid using in hostile conditions where there are inflammable gases, fumes or dust.
- For reasons of safety, do not allow anyone to use the device when it is wet or in a damp environment. Make sure that the device is disconnected from the mains before cleaning or maintenance work is carried out.
-
Accident prevention regulations in compliance with the standards as laid down by the Association of Industrial and Commercial Workers for Electrical Facilities and Equipment are to be observed at all times.
-
It must be ensured that trained and instructed personnel monitor and ensure the correct use of the device when used in schools, training facilities, hobby and self-help workshops.
- Do not leave any packing material lying around. All packaging material must be disposed of immediately as it can pose a serious health hazard to children.
- If there is evidence which suggests that the device cannot be used safely, then the device must be switched off immediately and measures must be taken to ensure that the device is not used again accidentally. It can be assumed that the device cannot be used safely if the device no longer works or displays visible signs that damage has occurred during storage in unfavourable conditions or over a longer period or when it appears to have been it subjected to stress and strain during transport.
- Do not stick any pins, pieces of metal or any other objects into the device.
intended uSe
The energy meter has a range of 2 to max. 3680 W. Accurate measurements are not possible below or above these thresholds. Measurements carried out outside these limits can lead to an overload and cause irreparable damage to the device.
The BX11 has been designed and developed for the monitoring and measuring of electrical consumers. Although it is able to deliver highly accurate information, it is not officially registered as a means for the settlement of electricity costs between power supply companies and consumers.
- The BX11 is only approved for use with 230 V AC.
- Do only connect electrical consumers with a 230 V AC 50/60 Hz power supply.
- The max. power input of all the connected consumers must not exceed 3680 watts (3000 watts type E max. power 16 A).
- The energy meter may only be used in closed rooms and in dry environments. Outdoor use is strictly prohibited!
- Be sure to observe the information on the type plate of the connected load at all times.
- For reasons of safety, only ever plug the BX11 directly into a suitable mains power socket and never use an extension cable to connect it to the power supply!
- If the energy meter is used for any purpose other than the purpose for which it was originally intended, then this will invariably result in damage to the product. Such misuse can furthermore present a serious threat of danger, e. g. a short circuit, fire, electric shock. The entire product may not be changed or modified in any way. The safety instructions are to be followed and must be complied with at all times.
PRODUCT DESCRIPTION
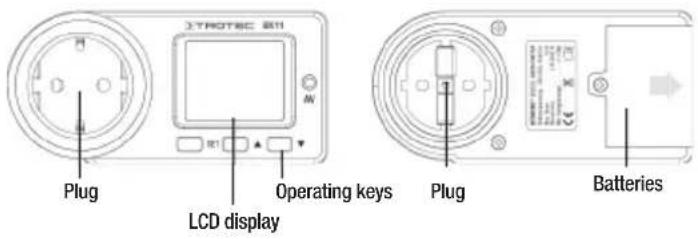
text_image
TROTSEC B11 Plug Operating keys LCD display Plug BatteriesTAKING INTO USE
Place three AAA R03/1. 5V into your energy meter before you connect it to an electrical consumer. In order to do so, fi rst loosen the screw to the battery compartment and then remove the lid. Make sure that the battery poles are properly aligned. Be sure to screw the lid securely into place again before actually taking your energy meter into use!
The display is now activated and can be configured accordingly. Please remember that these settings will be deleted when the batteries are exhausted or when the batteries have been removed from the battery compartment when not connected to the mains. To insert/replace the batteries, the device must not be connected to the power supply! There is a risk of electric shock!
Degrees of contamination
The following are the degrees of contamination as specified according to IEC 664:
- Degree of contamination 1
No or only dry non-conductive contamination.
- Degree of contamination 2
Dry, non-conductive contamination only. Occasional temporary conductivity through dewing must be reckoned with.
- Degree of contamination 3
Conductive contamination or dry, non-conductive contamination which can become conductive can occur because of expected dewing.
- Degree of contamination 4
Contamination leads to consistent contamination because of conductive dust, rain or snow.
Functions
- Display
- time (24h) and day
- current energy consumption (W) and electricity frequency
- voltage, amperage and total recording time
- total energy consumption (kWh) and resulting costs
- Two programmable electricity tariffs
• Overload alarm and reset function
Power supply/Settings
The symbol which indicates that the battery power is low should disappear after the batteries have been inserted. The batteries are powerful enough to operate the LCD display and allow time and tariff settings to be carried out. The condensers are charged as soon as the energy is connected to a mains supply. The device then runs on alternating current instead of batteries. Change the batteries as soon as the “Low Bat” symbol appears on the display. See below to find more information on how to carry out time and tariff settings.
A. Time and day settings
- Press the "SET" key and hold for 3 seconds to access the system menu. Press again to set the day of the week.
- Press the “▲”-key to change the value which is currently blinking on the display from MON to SON.
- Press the "SET" key to set the time.
- Press the “▲”-key to change the value which is currently blinking on the display. The number shown increases when the key is held.
- Press the "SET" key again to save the setting. Repeat the procedure if you wish to change any of the settings.
- When you have entered the time, press the “▲”-key again to enter the individual tariffs.
B. How to carry out settings for energy tariffs and times
- Press the "SET" key to get to "Tin" (time in) in order to enter the time when the tariff starts.
- Press the “▲”-key to change the value which is currently blinking on the display. The number shown increases when the key is held.
- Press the "SET" key to get to the next item.
- Press the "SET" key again after you have entered the starting time (Tin) to enter the time when the special tariff ends (Tout = time out).
- Press the "SET" key again to save the setting. Repeat the procedure if you wish to change any of the settings.
- When you have entered the times for the individual tariffs, press the “▲”-key again to enter the cost tariffs.
C.Tariff cost settings
- You may enter the costs for a standard tariff as well as a special tariff (the unit shown is in euro cents e.g. 10 cents). Tariff 1 is for the normal tariff and Tariff 2 for the energy costs in the special tariff.
- Press the "SET" key to get to the tariff menu.
- Press the “▲” key to change the value which is currently blinking on the display. The number shown increases when the key is held.
- Press the "SET" key to get to the next item.
D. The device will return to its original setting if you fail to press a key within 5 seconds or press the “▼”-key.
E. Press the “▼”-key and hold for longer than 3 seconds to delete all data (the time and day are not deleted). The display blinks three times in succession to remind you of this procedure.
diSplay
There are three different display modes to show the individual values on the display. Press the "s" key to get from one display mode to another.
- Display mode for the time of day (24 hours), weekday, power load and frequency.
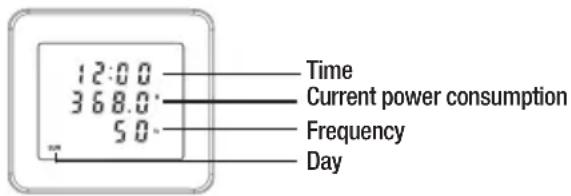
text_image
12:00 368.0 50 Time Current power consumption Frequency Day- Display mode for the current voltage, amperage and the total recording time.
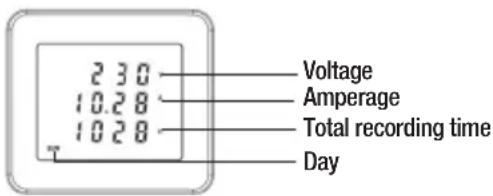
text_image
2 3 0 10.2 8 10 2 8 Voltage Amperage Total recording time Day- Display mode for the total energy consumption and the energy costs resulting therefrom.
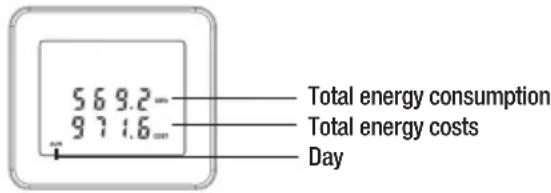
text_image
5 6 9.2 9 7 1.6 Total energy consumption Total energy costs Daymaintenance
- Check your energy meter regularly for any signs of damage.
-
The device is maintenance-free. Wipe the display with a soft, dry, lint-free cloth if necessary. Do not use any cleaning agents.
-
Do not immerse in water.
- Maintenance work may only be carried out by authorised and trained personnel. Do not open the device or change or modify it in any form. The guarantee expires when the device is opened.
⚠ The device does not afford necessary protection if used for purposes other than those for which it was intended.
TECHNICAL DATA
Voltage 230 V, AC, 50/60 Hz
Maximum input. 3680 W / 16 A
Measuring range. 2 W - 3680 W
Transient overvoltage category . . . . . . . . . . . . . . . . . . . . . . . . . . . . . . . . . . . . . . . . . . . . . . . . . . . . . . . . . . . . . . . . . . . . . . . . . . . . . . . . . . . . CAT II (2500)
Maximum recording capacity 999,9 kWh
Maximum recording time 9.999 hours
Minimum energy display....0.1 kWh
Minimum cost display.... 0.1 euro
Batteries....3 x AAA R03/1,5V
Operating temperature ..... +5 °C to +40 °C
Operating conditions....80% relative humidity below 31 °C from 31 °C to 40 °C to 50% decreasing linearly
Protection IP20
Degree of Contamination II (see p. 3)
⚠ For indoor use in rooms up to 2.000 m (6,560 ft) MSL only. Only one energy meter may be used at a time to calculate the energy costs. Do not connect two or more energy meters to each other.
In accordance with the EU (European Union) Directives on Waste Electrical and Electronic Equipment (WEEE), electronic equipment must not be treated as domestic waste, but must be disposed of professionally in accordance with Directive 2002/96EU of the EUROPEAN COUNCIL AND
PARLIAMENT of 27 January 2003 regarding old electrical and electronic equipment. Please dispose of this appliance in a manner appropriate to the relevant legal requirements at the end of its product life.
C. Ajustar as tarifas de custo
D-52525 Heinsberg / Germany
Tel: +49 2452 962-400