
Optima Station 6.0 CPP6000 - Steam cleaner SOLAC - Free user manual and instructions
Find the device manual for free Optima Station 6.0 CPP6000 SOLAC in PDF.
| Product type | Steam cleaner with station and iron |
| Brand | Solac |
| Model | Optima Station 6.0 CPP6000 |
| Power supply | 230 V ~ 50 Hz, 16 A (grounded plug) |
| Temperature setting | Settings for synthetic, silk/wool, cotton, linen (MAX) |
| Steam function | Adjustable steam flow |
| Vertical ironing | Yes, for curtains and hanging clothes |
| ECO function | Yes, energy saving with sufficient steam |
| Automatic shut-off (Stand-by) | Yes, after 8 minutes of inactivity |
| Anti-scale protection | Red indicator light, built-in descaling procedure |
| Soleplate | Non-stick, do not use on metal objects |
| Water tank | Removable, with MAX level indicator |
| Safety | Safety thermal protector, automatic shut-off |
| Use | Household use only |
| Cleaning and maintenance | Clean with damp cloth, regular descaling recommended with anti-scale product |
| Included accessories | Iron, station, steam hose, tank |
| Standards | Complies with EU directives 2014/35/EU, 2014/30/EU, 2011/65/EU, 2009/125/EC |
Frequently Asked Questions - Optima Station 6.0 CPP6000 SOLAC
User questions about Optima Station 6.0 CPP6000 SOLAC
0 question about this device. Answer the ones you know or ask your own.
Ask a new question about this device
Download the instructions for your Steam cleaner in PDF format for free! Find your manual Optima Station 6.0 CPP6000 - SOLAC and take your electronic device back in hand. On this page are published all the documents necessary for the use of your device. Optima Station 6.0 CPP6000 by SOLAC.
USER MANUAL Optima Station 6.0 CPP6000 SOLAC
natural_image
Exterior view of a solac air conditioner unit (no signage or text visible on body)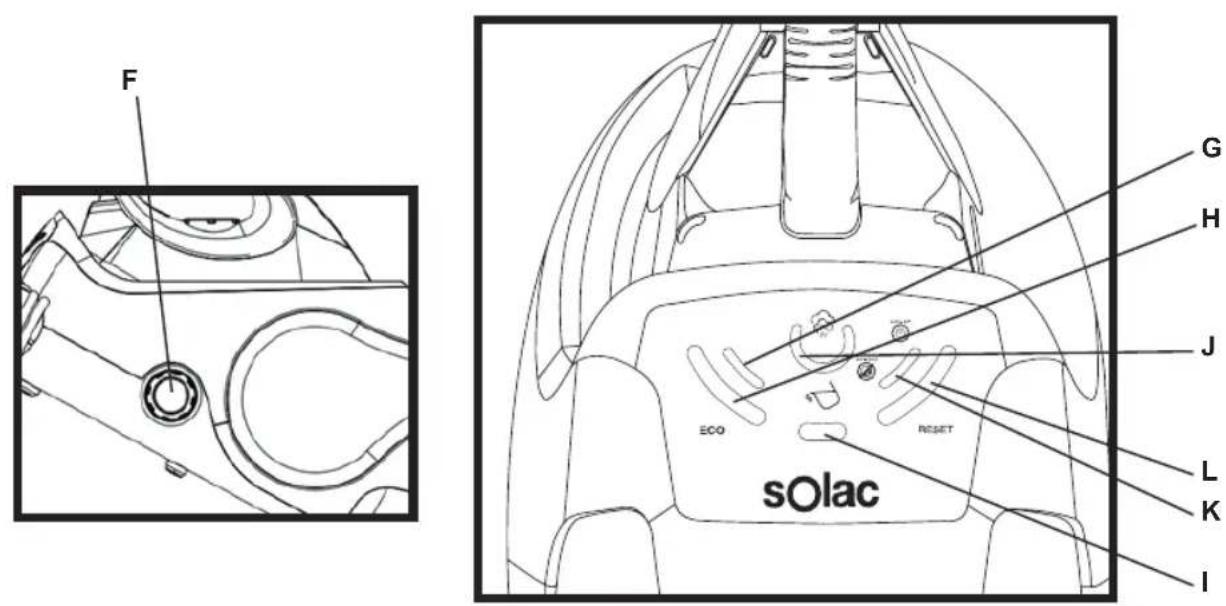
natural_image
Line drawing of a hand holding a device with an arrow indicating left-hand movement (no text or symbols)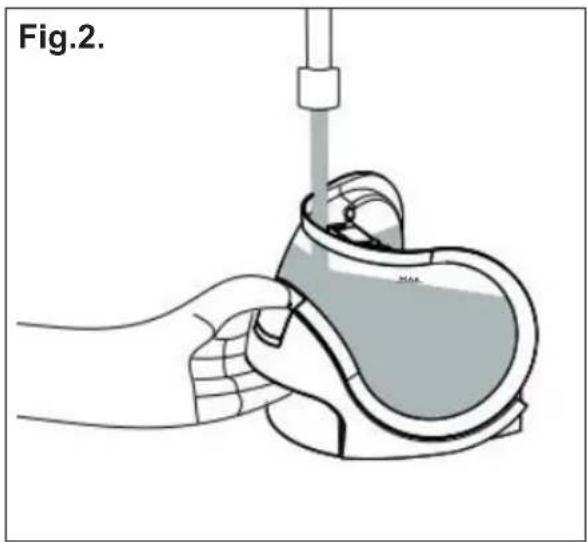
natural_image
Illustration of a hand using a handheld device to interact with a surface (no text or symbols)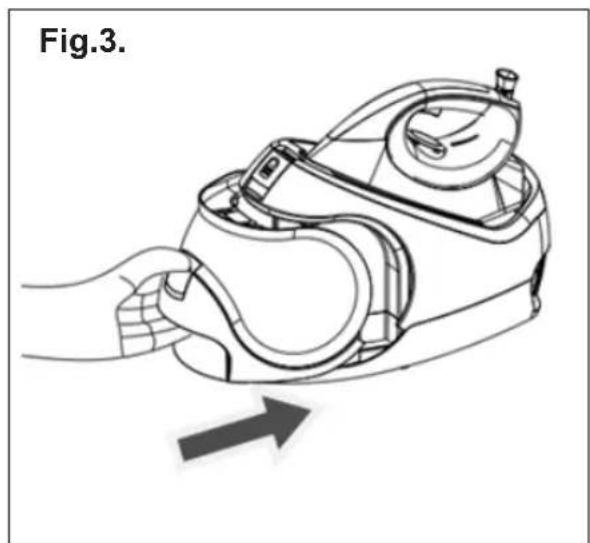
natural_image
Line drawing of a hand holding a device with an arrow indicating direction (no text or symbols)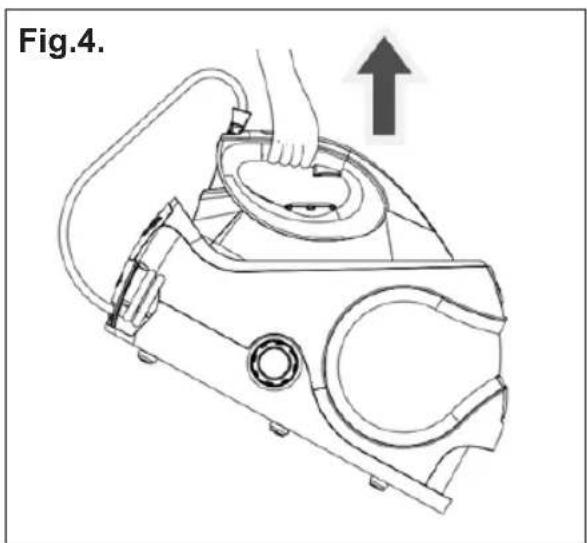
natural_image
Line drawing of a hand operating a vacuum cleaner device with an upward arrow indicating motion (no text or symbols present)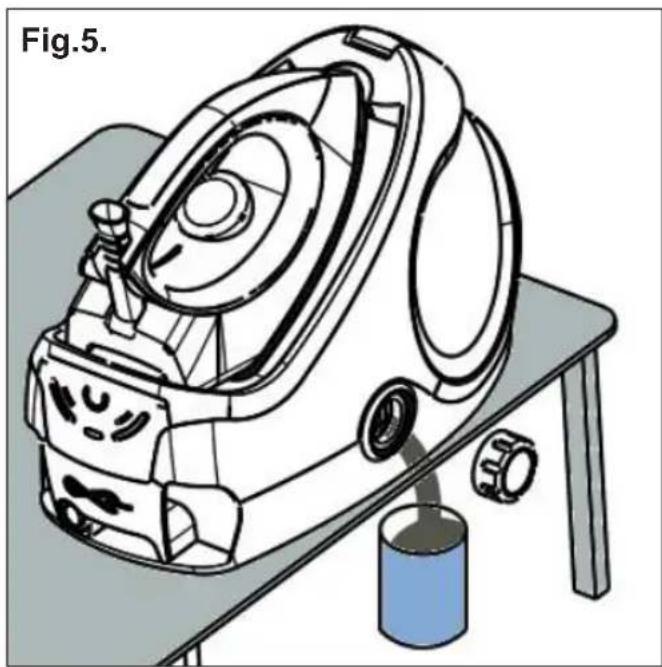
natural_image
Line drawing of a washing machine on a table with a blue cylinder and a magnified inset showing the handle (no text or symbols)ESPAÑOL ES
Many thanks for choosing to purchase a SOLAC brand product.
Thanks to its technology, design and operation and the fact that it exceeds the strictest quality standards, a fully satisfactory use and long product life can be assured.
Read these instructions carefully before switching on the appliance and keep them for future reference. Failure to follow and observe these instructions could lead to an accident.
SAFETY ADVICE AND WAR- NINGS
- The iron must be used and rested on a stable surface.
- When placing the iron on its stand, ensure that the surface on which the stand is placed is stable.
. The iron must not be left unattended while it is connected to the supply mains.
This appliance can be used by children aged from 8 years and above and persons with reduced physical, sensory or mental capabilities or lack of experience and knowledge if they have been given supervision or instruction concerning use of the appliance in a safe way and understand the hazards involved.
· Cleaning and user maintenance shall not be made by children without supervision.
- Keep the iron and its cord out of reach of children less than 8 years of age when it is energized or cooling down
- This appliance is not a toy. Cleaning and user maintenance shall not be made by children without supervision.
The iron is not to be used if it has been dropped, if there are visible signs of damage or if it is leaking.
The temperature of the accessible surfaces may be high when the appliance is in use. - If the supply cord is damaged, it must be replaced by the manufacturer, its service agent or similarly qualified persons in order to avoid a hazard.

Surfaces are liable to get hot during use.
- The plug must be removed from the socket-outlet before the water reservoir is filled with water.
- Does not force open the cleaning cap, make sure the appliance is completely depressurized prior to opening.
- Ensure that the voltage indicated on the rating label matches the mains voltage before plugging in the appliance.
- Connect the appliance to a base with an earth
EN
socket withstanding a minimum of 16 amperes.
- The appliance's plug must fit into the mains socket properly. Do not alter the plug. Do not use plug adaptors.
- Do not use or store the appliance outdoors.
- Do not leave the appliance out in the rain or exposed to moisture. If water gets into the appliance, this will increase the risk of electric shock.
- Do not force the power cord. Never use the power cord to lift up, carry or unplug the appliance.
- Do not wrap the power cord around the appliance.
- Do not clip or crease the power cord.
- Do not allow the power cord to hang or to come into contact with the hot surfaces of the appliance.
- Check the state of the power cord. Damaged or tangled cables increase the risk of electric shock.
- Do not touch the plug with wet hands.
- Do not use the appliance if the cable or plug is damaged.
- If any of the appliance casings breaks, immediately disconnect the appliance from the mains to prevent the possibility of an electric shock.
- Do not touch the heated parts of the appliance, as it may cause serious burns.
USE AND CARE:
- Fully unroll the appliance's power cable before each use.
- Do not use the appliance if the parts or accessories are not properly fitted.
- Do not use the appliance if the accessories attached to it are defective. Replace them immediately.
- Do not use the appliance when empty.
- Do not switch the appliance on without water.
- Do not use the appliance if any of the switches do not work.
- Use the appliance handle/s, to catch it or move it.
- Do not turn the appliance over while it is in use or connected to the mains.
- To keep the non-stick treatment in good condition, do not use metal or pointed utensils on it.
- Respect the MAX level indicator. (Fig.2)
-
Disconnect the appliance from the mains when not in use and before undertaking any cleaning task.
-
This appliance is for household use only, not professional, industrial use.
- Store this appliance out of reach of children and/or persons with physical, sensory or reduced mental or lack of experience and knowledge.
- Do not store or transport the appliance if it is still hot.
- For a correct operation, keep the soleplate in proper conditions does not operate over metal objects (ironing board metal parts, buttons, zips etc.)
- Only use water with the appliance.
- It is advisable to use distilled water, especially if the water in your area contains clay or if it is "hard" (containing lime or magnesium).
- Check that the safety cap screwed on tightly before switching on the appliance.
- Never leave the appliance connected and unattended if is not in use. This saves energy and prolongs the life of the appliance.
- Never rest the appliance into a surface while in use.
- Do not use the appliance on any part of the body of a person or animal.
- Do not use the appliance to dry textiles of any kind.
- Turn the thermostat control to the minimum (MIN) setting. This does not mean that the iron is switched off permanently.
SERVICE:
- Make sure that the appliance is serviced only by specialist personnel, and that only original spare parts or accessories are used to replace existing parts/accessories.
- Any misuse or failure to follow the instructions for use renders the guarantee and the manufacturer's liability null and void.
DESCRIPTION
A Steam hose
B Iron stand
C Mains cable
D ON button
E Hose disconnection tabs
F Boiler cleaning cap
G ECO mode indicator
H Function change button from default to ECO mode
I Low water indicator
J Steam by default indicator
EN
K Scale cleaning indicator (red)
L Stand activator and boiler scale cleaning warning reset button
M On standby indicator (green)
N Water tank release button
O Removable water tank
P Max. water level indicator
Q Transportation lock
R Transportation unlock button
S Filling spout
T Steam activation trigger
U Temperature selection control
V Iron ready indicator
W Soleplate
INSTRUCTIONS FOR USE
BEFORE USE:
- Make sure that all products' packaging has been removed.
- To eliminate the smell given off by the appliance when used for the first time, it is recommended to have it on at full power for 2 hours in a well-ventilated room.
FILLING WITH WATER:
- You must fill the water compartment before turning on the appliance.
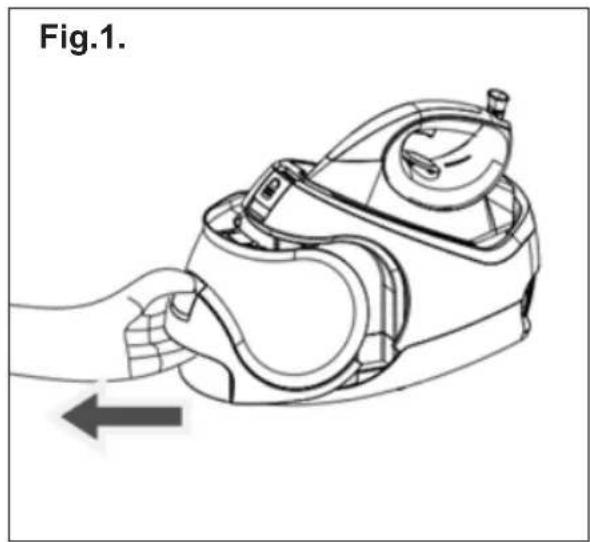
- Remove the appliance's deposit.
- Fill the deposit taking care to observe the MAX level (P) (Fig.1 + Fig.2).
- Put the deposit back into its housing, ensuring that it is inserted properly.
- Check that the safety cap is screwed on tightly before switching on the appliance.
USE:
- Unroll the cable completely before plugging it in.
- Connect the appliance to the mains.
- Turn the appliance on, by using the on/off button.
- The pilot light (J) comes on.
- Turn the thermostat control to the desired temperature position.
- Do not use temperatures higher than those indicated on the garments to be treated.
- Temperature for synthetic fibres (Polyester, Nylon...).
•• Temperature for silk and wool.
●●● Temperature for cotton. (Minimum temperature for steam ironing)
Max Temperature for linen.
- If garment has various kinds of fibres, select the temperature for the fibre that requires the lowest temperature. (For example, select the temperature for polyester for an article made out of 60% polyester and 40% cotton).
- Wait until the steam ready light (J) comes on.
- If the red scale cleaning light is on (K) proceed immediately with the boiler descaling process, see CLEANING section, and then after cleaning press the reset button (L) to restart the cycle again.
DRY IRONING:
- The appliance has a steam activation trigger, which if not pressed makes it possible to iron dry (without steam).
STEAM IRONING:
- It is possible to iron with steam whenever the deposit is filled with water and the adequate temperature is selected.
STEAM FLOW CONTROL:
- The appliance has a control knob (S) that allows to get the control of the steam flow.
VERTICAL STEAMING:
- It is possible to iron hanging curtains, items of clothing on his hanger, etc. To do so, follow the instructions:
- Select the maximum temperature of the iron, while turning the temperature regulator of the iron in a clockwise direction (U
- Move the iron in a top to bottom direction while pressing the steam control (S). Important: for cotton and linen, its recommended to put the iron base in contact with the material. For other more dedicated fibres, it's recommended to keep the iron base at some centimetres of distance.
- During extended periods of vertical ironing, drops of water may come out of the soleplate, put the iron back in the horizontal position, wait a few seconds and then continue normally.
STAND-BY FUNCTION:
- In order to save energy, the appliance passes to stand-by after 8 minutes if the user does not use it.
- The auto-disconnection light (M) will blink to indicate that this function has activated (green color).
- To turn it on again, you simply have to press the on/off button.
ENGLISH EN
ECO
- Select the ECO setting for optimal ironing performance, only select it between the points •• and MAX.
- The ECO function uses less energy, but ensuring sufficient steam
- to iron your clothes properly. Only activate this function when the boiler and iron temperatures are correct. The ECO function can be used with all types of fabrics. Nonetheless, for very thick or heavily creased fabrics we recommend that you use the maximum steam output function to ensure optimal results
ONCE YOU HAVE FINISHED USING THE AP- PLIANCE:
- Select the minimum position (MIN) using the thermostat control.
- Turn the appliance off, using the on/off switch.
- Unplug the appliance from the mains.
- Put the cable back in the cable housing.
- Remove the water from the water tank.
- Clean the appliance.
CABLE COMPARTMENT
- This appliance has a cable compartment situated on its posterior. (E)
PRACTICAL RECOMMENDATIONS:
- Classify the garments into groups by ironing temperature. The appliance heats up more quickly than it cools down, therefore, to avoid accidents, minimise energy consumption and optimise time, it is advisable to start off ironing items that require lower temperatures and progress to those that need higher temperatures.
- Pure wool fabrics (100%) can be ironed with the iron set to steam. Select a high steam temperature and place a cotton cloth between the iron's metal surface and the garment.
SAFETY THERMAL PROTECTOR:
- The appliance has a safety device, which protects the appliance from overheating.
TRANSPORTATION
- Place the iron correctly into its transportation system and lock it, making sure it is seated correctly, and lift it upright by holding the iron handle..
CLEANING
- Disconnect the appliance from the mains and allow it to cool before undertaking any cleaning task (Fig.4).
- Clean the equipment with a damp cloth with a few drops of washing-up liquid and then dry.
- Do not use solvents, or products with an acid or base pH such as bleach, or abrasive products, for cleaning the appliance.
- Never submerge the appliance in water or any other liquid or place it under running water.
- For the appliance to work correctly it should be kept free of limescale or magnesium incrustations caused by the use of hard water.
- To avoid this kind of problem it is advisable to use distilled water.
- However, if it is not possible to use the kind of water recommended above, you should periodically remove the limescale from the appliance.
- A specific anti-lime scale product should be used on this kind of product.
- Homemade solutions are not recommended in the decaling of this appliance, such as the use of vinegar.
CLEANING THE BOILER
- Check that appliance has cooled down (wait at least 3 hours after disconnecting the appliance).
- Empty the water tank and after the boiler (O).
- To empty the boiler, unscrew the cleaning cap (F) in an anti-clockwise direction
- Empty the boiler and close it by screwing the cleaning cap by follow the previous procedure in reverse (Fig.5).
- Fill the water tank (O) with approximately 500ml of water and add the selected anti-lime scale product.
- Connect the appliance (with the maximum selected steam) and wait for 20 minutes approximately in order for the anti-scale product begin to take effect.
- Let all the steam out (in a suitable place, for example the sink) until the water tank is empty.
- Wait the appliance to cooled down, rinse the water tank and boiler with cold water.
ANOMALIES AND REPAIR
- Take the appliance to an authorised technical support service if product is damaged or other problems arise. Do not attempt to disassemble or repair the appliance yourself as this may be dangerous.
ENGLISH EN
FOR EU PRODUCT VERSIONS AND/OR IN CASE THAT IT IS REQUESTED IN YOUR COUNTRY:
ECOLOGY AND RECYCLABILITY OF THE PRODUCT
- The materials of which the packaging of this appliance consists are included in a collection, classification and recycling system. Should you wish to dispose of them, use the appropriate public recycling bins for each type of material.
- The product does not contain concentrations of substances that could be considered harmful to the environment.

This symbol means that in case you wish to dispose of the product once its working life has ended, take it to an authorised waste agent for the selective collection of Waste from Electric and Electronic Equipment (WEEE).

This symbol means that surface could to get hot during the use
This appliance complies with Directive 2014/35/EC on Low Voltage, Directive 2014/30/EC on Electromagnetic Compatibility, Directive 2011/65/EU on the restrictions of the use of certain hazardous substances in electrical and electronic equipment and Directive 2009/125/EC on the ecodesign requirements for energy-related products.
FRANÇAIS FR
Cher Client,
KONTROLA WYPŁYWU PARY:
NIEPRAWIDŁOWOŚCI I NAPRAWA
.(Fig.1 + Fig.2) (P)
تثبيته، وتأکد أنه .
مثبت بالشكل الصحيح.
ومشدودة إ inhib Kern.
قبل توصيل الجهاز.
الاستعمال:
This product enjoys the recognition and protection of the legal guarantee in accordance with current legislation. To enforce your rights or interests you must go to any of our official technical assistance services.
You can find the closest one by accessing the following web link: http://solac.com
You can also request related information by contacting us by phone.
You can download this instruction manual and its updates at http://solac.com
DE) GARANTIE UND TECHNIS- CHER SERVICE
Unit 25 & 26, San Croy Office Park, Die Agora
Road, Croydon, Kempton Park, 1619
Johannesburg
(+27) 011 392 5652
sOlac


- ESPAÑOL ES
- SAFETY ADVICE AND WAR- NINGS
- EN
- USE AND CARE:
- SERVICE:
- DESCRIPTION
- INSTRUCTIONS FOR USE
- BEFORE USE:
- FILLING WITH WATER:
- USE:
- DRY IRONING:
- STEAM IRONING:
- STEAM FLOW CONTROL:
- VERTICAL STEAMING:
- STAND-BY FUNCTION:
- ENGLISH EN
- ECO
- ONCE YOU HAVE FINISHED USING THE AP- PLIANCE:
- CABLE COMPARTMENT
- PRACTICAL RECOMMENDATIONS:
- SAFETY THERMAL PROTECTOR:
- TRANSPORTATION
- CLEANING
- CLEANING THE BOILER
- ANOMALIES AND REPAIR
- ECOLOGY AND RECYCLABILITY OF THE PRODUCT
- FRANÇAIS FR
- KONTROLA WYPŁYWU PARY:
- NIEPRAWIDŁOWOŚCI I NAPRAWA
- .(Fig.1 + Fig.2) (P)
- الاستعمال:
- DE) GARANTIE UND TECHNIS- CHER SERVICE
- sOlac
Brand : SOLAC
Model : Optima Station 6.0 CPP6000
Category : Steam cleaner