
PRF0166941 - Range hood ELICA - Free user manual and instructions
Find the device manual for free PRF0166941 ELICA in PDF.
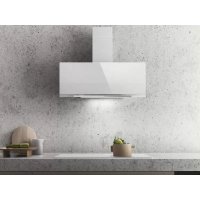



| Brand | Elica |
| Model | PRF0166941 |
| Product type | Kitchen hood |
| Usage | Domestic |
| Version | Extractor (external evacuation) or recirculating (recycling) |
| Number of speeds | 3 (model B) or 3 + booster (model A) |
| Control | Touch with LED indicators |
| Lighting | LED |
| Grease filter | Metallic, dishwasher safe |
| Charcoal filter | Active, replaceable (optional, for recirculation version) |
| Power supply | 220-240 V, 50 Hz |
| Minimum distance cooktop-hood | 45 cm (electric hob) / 65 cm (gas or mixed hob) |
| Programmable timer | Yes, duration depending on speed (20 min to 10 min) |
| Booster | Yes (model A, timeout 5 min) |
| Filter saturation indicator | Yes, for grease filter (40h) and charcoal (160h) |
| Cleaning | Damp cloth with mild detergent, no abrasives or alcohol |
| Safety | Disconnect before maintenance, do not use with naked flame, do not overload |
| Standards | EN/IEC 60335-1, EN/IEC 60335-2-31, EN/IEC 61591, etc. |
| Recycling | Compliant with WEEE directive 2012/19/EU |
Frequently Asked Questions - PRF0166941 ELICA
User questions about PRF0166941 ELICA
0 question about this device. Answer the ones you know or ask your own.
Ask a new question about this device
Download the instructions for your Range hood in PDF format for free! Find your manual PRF0166941 - ELICA and take your electronic device back in hand. On this page are published all the documents necessary for the use of your device. PRF0166941 by ELICA.
USER MANUAL PRF0166941 ELICA
EN Instruction on mounting and use
EN - Instruction on mounting and use
Closely follow the instructions set out in this manual. All responsibility, for any eventual inconveniences, damages or fires caused by not complying with the instructions in this manual, is declined. This appliance is intended to be used in household and similar applications such as: - staff kitchen areas in shops, offices and other working environments; - farm houses; - by clients in hotels, motels and other residential type environments; - bed and breakfast type environments.
The hood can look different to that illustrated in the drawings in this booklet. The instructions for use, maintenance and installation, however, remain the same.
- It is important to conserve this booklet for consultation at any moment. In the case of sale, cession or move, make sure it is together with the product.
- Read the instructions carefully: there is important information about installation, use and safety.
- Do not carry out electrical or mechanical variations on the product or on the discharge conduits.
- Before proceeding with the installation of the appliance verify that there are no damaged all components. Otherwise contact your dealer and do not proceed with the installation.
Note: The parts marked with the symbol "(*)" are optional accessories supplied only with some models or otherwise not supplied, but available for purchase.

Caution

Electrical connection
The mains power supply must correspond to the rating indicated on the plate situated inside the hood. If provided with a plug connect the hood to a socket in compliance with current regulations and positioned in an accessible area, after installation. If it not fitted with a plug (direct mains connection) or if the plug is not located in an accessible area, after installation, apply a double pole switch in accordance with standards which assures the complete disconnection of the mains under conditions relating to over-current category III, in accordance with installation instructions.
WARNING! Before re-connecting the hood circuit to the mains supply and
checking the efficient function, always check that the mains cable is correctly assembled.
WARNING! If the supply cord is damaged, it must be replaced by the manufacturer, its service agent or similarly qualified persons in order to avoid hazard.
- The minimum distance between the supporting surface for the cooking equipment on the hob and the lowest part of the range hood must be not less than 45 cm from electric cookers and 65 cm from gas or mixed cookers.
If the installation instructions for the gas hob specify a greater distance, this must be adhered to.
- Before any cleaning or maintenance operation, disconnect the hood from the mains by removing the plug or disconnecting the mains electrical supply. Always wear work gloves for all installation and maintenance operations.
- This appliance can be used by children aged 8 years and above and persons with reduced physical, sensory or mental capabilities or lack of experience and knowledge if they have been given supervision or instruction concerning use of the appliance in a safe way and understand the hazards involved.
- Children shall not be allowed to tamper with the controls or play with the appliance.
- Cleaning and user maintenance shall not be made by children without supervision.
- The premises where the appliance is installed must be sufficiently ventilated
when the kitchen hood is used together with other gas combustion devices or other fuels.
- The hood must be regularly cleaned on both the inside and outside (AT LEAST ONCE A MONTH).
- This must be completed in accordance with the maintenance instructions provided. Failure to follow the instructions provided regarding the cleaning of the hood and filters will lead to the risk of fires.
- Do not flambe under the range hood.
- Do not remove filters during cooking.
- For lamp replacement use only lamp type indicated in the Maintenance/Replacing lamps section of this manual.
The use of exposed flames is detrimental to the filters and may cause a fire risk, and must therefore be avoided in all circumstances.
Any frying must be done with care in order to make sure that the oil does not overheat and ignite.
CAUTION: Accessible parts of the hood may become hot when used with cooking appliances.
- Do not connect the appliance to the mains until the installation is fully complete.
- With regards to the technical and safety measures to be adopted for fume discharging it is important to closely follow the regulations provided by the local authorities.
- The air must not be discharged into a flue that is used for exhausting fumes from appliance burning gas or other fuels.
WARNING! Failure to install the screws or fixing device in accordance with these instructions may result in electrical hazards.
- Do not use or leave the hood without the lamp correctly mounted due to the possible risk of electric shocks.
- Never use the hood without effectively mounted grids.
- The hood must NEVER be used as a support surface unless specifically indicated.
- Use only the fixing screws supplied with the product for installation or, if not supplied, purchase the correct screws type.
- Use the correct length for the screws which are identified in the Installation Guide.
- In case of doubt, consult an authorized service assistance center or similar qualified person.
WARNING! Do not use with a programmer, timer, separate remote control system or any other device that switches on automatically. - The range hood is intended to be installed over a hob having 6 heating elements. - This appliance is marked according to the European directive 2012/19/EC on Waste Electrical and Electronic Equipment (WEEE). - By ensuring this product is disposed of correctly, you will help prevent potential negative consequences for the environment and human health, which could otherwise be caused by inappropriate waste handling of this product.

- The symbol on the product, or on the documents accompanying the product, indicates that this appliance may not be treated as household waste. Instead it should be taken to the appropriate collection point for the recycling of electrical and electronic equipment. Disposal must be carried out in accordance with local environmental regulations for waste disposal.
- For further detailed information regarding the process, collection and recycling of this product, please contact the appropriate department of your local authorities or the local department for household waste or the shop where you purchased this product.
Appliance designed, tested and manufactured according to:
- Safety: EN/IEC 60335-1; EN/IEC 60335-2-31, EN/IEC 62233.
- Performance: EN/IEC 61591; ISO 5167-1; ISO 5167-3; ISO 5168; EN/IEC 60704-1; EN/IEC 60704-2-13; EN/IEC 60704-3; ISO 3741; EN 50564; IEC 62301.
- EMC: EN 55014-1; CISPR 14-1; EN 55014-2; CISPR 14-2; EN/IEC 61000-3-2; EN/IEC 61000-3-3. Suggestions for a correct use in order to reduce the environmental impact: Switch ON the hood at minimum speed when you start cooking and keep it running for a few minutes after cooking is finished. Increase the speed only in case of large amount of smoke and vapor and use boost speed(s) only in extreme situations. Replace the charcoal filter(s) when necessary to maintain a good odor reduction efficiency. Clean the grease filter(s) when necessary to maintain a good grease filter efficiency. Use the maximum diameter of the ducting system indicated in this manual to optimize efficiency and minimize noise.
Use
The hood is conceived for the suction of cooking fumes and steam and is destined only for domestic use.
The hood is designed to be used either for exhausting or filter version.

Extraction version
In this case the fumes are conveyed outside of the building by means of a special pipe connected with the connection ring located on top of the hood.

CAUTION!
The exhausting pipe is not supplied and must be purchased apart.
Diameter of the exhausting pipe must be equal to that of the connection ring.

CAUTION!
If the hood is supplied with active charcoal filter, then it must be removed.
Connect the hood and discharge holes on the walls with a diameter equivalent to the air outlet (connection flange).
Using the tubes and discharge holes on walls with smaller dimensions will cause a diminution of the suction performance and a drastic increase in noise.
Any responsibility in the matter is therefore declined.
! Use a duct of the minimum indispensable length.
! Use a duct with as few elbows as possible (maximum elbow angle: 90°).
! Avoid drastic changes in the duct cross-section.

Filtration version
The aspirated air will be degreased and deodorised before being fed back into the room.
In order to use the hood in this version, you have to install a system of additional filtering based on activated charcoal.
Installation
As described in the installation drawings perform 6 holes (8 mm diameter, 40 mm deep), in the positions shown in the drilling template, to fix the hood support bracket and the exhaust flue. After installation, check that the hood and exhaust flue are perfectly aligned.
Mounting
Before beginning installation:
- Check that the product purchased is of a suitable size for the chosen installation area.
- Remove the charcoal (*) filter/s if supplied (see also relative paragraph). This/these is/are to be mounted only if you want to use the hood in the filtering version.
- Check (for transport reasons) that there is no other supplied material inside the hood (e.g. packets with screws ( ), guarantees ( ), etc.), eventually removing them and keeping them.
Expansion wall plugs are provided to secure the hood to most types of walls/ceilings. However, a qualified technician must verify suitability of the materials in accordance with the type of wall/ceiling. The wall/ceiling must be strong enough to take the weight of the hood.
Do not tile, grout, or silicone this appliance to the wall. Surface mounting only.
Operation
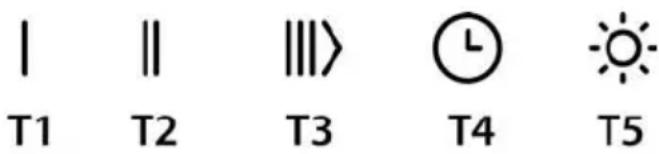
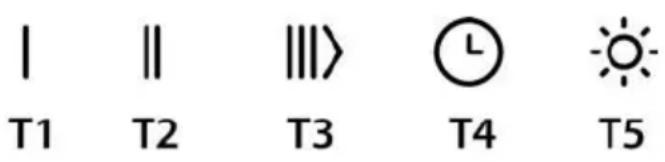
Model A
| I | II | III> | L | |
| T1 | T2 | T3 | T4 | T5 |
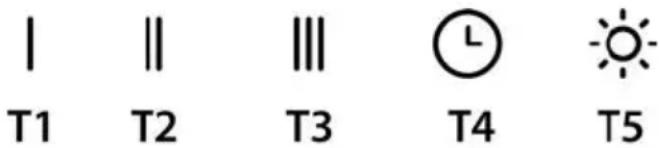
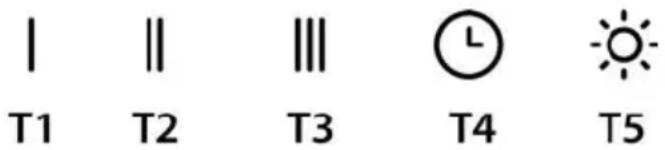
| Model B | ||||
| I | II | III | L | |
| T1 | T2 | T3 | T4 | T5 |
First speed (T1)
Press T1 to activate the first speed. When the function is activated, the LED turns on with a fixed light. Press T1 again to turn the hood off.
Second speed (T2)
Press T2 to activate the second speed. When the function is activated, the LED turns on with a fixed light. Press T2 again to turn the hood off.
Third speed and BOOSTER (T3) model A only
When the hood is off or with the first or second speed active, the third speed can be activated by pressing the button T3 and the LED will turn on with a fixed light.
If T3 is pressed again, the booster turns on. The booster can only be activated if the third speed is already active. When the booster is on, the LED T3 starts to flash. While the booster is working, it is possible to switch to the first or second speed by pressing the desired speed button T1 or T2, the booster will turn off and the selected speed will be activated.
When the booster is on, press T3 again to turn the hood off. After 5 minutes, the booster automatically turns off and the third speed is automatically activated.
Third speed (T3) model B only
Press T3 to activate the third speed. When the function is activated, the LED turns on with a fixed light. Press T3 again to turn the hood off.
Timer (T4)
The timer can be activated when the first, second, or third speed is active. When the function is activated, both the LED of the Timer (T4) and that of the previously selected speed (T1/T2/T3) turn on with a fixed light.
The duration of the timer depends on the selected speed:
First speed T1 = duration 20'
Second speed T2 = duration 15'.
Third speed T3 = duration 10'.
When a speed is timed, the timer can be deactivated by pressing T4, or one of the other two inactive speeds. To turn the hood off, press the speed again to which the timer had previously been linked.
NOTE: model A only
The timer cannot be activated when the booster is active. When the time expires, the hood turns off. When a speed is timed, it is possible to switch to other speeds by pressing the desired speed button, this operation will turn the timer off.
Light (T5)
The light can be activated at any time by pressing key T5. When the function is activated, the LED turns on with a fixed light.
Filter setting
Activation or deactivation of the filter indicators is only possible with the hood off.
To access the configuration menu, hold pressed T2+T3, once inside the menu T1 will start to flash.
The default setting is:
- grease filter indicator (T2) on, therefore active;
- Odour filter indicator (T3) off, therefore not activated.
T2 activates/deactivates the grease filter indicator. T3 activates/deactivates the odour filter indicator. To exit the menu, hold pressed T1 or wait 10 seconds.
Filter reset
The hood signals the need for filter maintenance at regular intervals:
- Grease filter every 40 hours;
- Odour filter every 160 hours.
In this case, with the hood off, when the user touches any button the interface signals two types of needs for a period of 10 seconds:
- If T1+T2 flash: grease filter maintenance;
- - If T1+T3 flash: odour filter maintenance.
During the 10 seconds it is possible to reset the grease filter by pressing T1+T2 and to reset the odour filter by pressing T1+T3. After the reset, the button combinations will flash rapidly twice. The interface will now work as normal.
Please note:
During the 10 seconds, the hood will work normally but without any visual feedback regarding the speed buttons. If during the 10 seconds no operations are carried out, the LEDs will stop flashing and the visual feedback will return to normal.
Maintenance
Cleaning
Clean using ONLY a cloth dampened with neutral liquid detergent. DO NOT CLEAN WITH TOOLS OR INSTRUMENTS. Do not use abrasive products. DO NOT USE ALCOHOL!
Grease filter
Fig. 18
Traps cooking grease particles.
The grease filter must be cleaned once a month using non aggressive detergents, either by hand or in the dishwasher, which must be set to a low temperature and a short cycle. When washed in a dishwasher, the grease filter may discolor slightly, but this does not affect its filtering capacity.
To remove the grease filter, pull the spring release handle.
Charcoal filter (filter version only)
Fig. 19
It absorbs unpleasant odors caused by cooking.
The saturation of the charcoal filter occurs after more or less prolonged use, depending on the type of cooking and the regularity of cleaning of the grease filter.
In any case it is necessary to replace the cartridge at least every four months.
The charcoal filter may NOT be washed or regenerated.
Circular charcoal filter
Apply one on each side as cover to both the shield grids of the motor impeller, then turn clockwise.
For the disassembly, turn counter-clockwise.
Replacing lamps
The hood is equipped with a lighting system based on LED technology.
The LEDs guarantee an optimum lighting, a duration up to 10 times longer than the traditional lamps and allow to save 90% electrical energy.
For replacement, contact the technical service.
WARNING! First check whether
- Grease filter every 40 hours. Odor filter every 160 hours.
Before starting installation:
Circular filter
NOTE: only the model
WARNING: Before operating the appliance, the accessible parts
of the appliance must be heated.
Do not connect the device to the mains until you have completed the installation.
- As for the technical specifications and safety measures that you must take for the evacuation of smoke and fumes, we recommend that you strictly follow the rules provided in the regulations of the competent local authorities.
- The exhaust air must not be discharged into a flue used for exhausting fumes from appliances burning gas or other fuels.
WARNING! Failure to install the bolts and mechanisms for securing in accordance with these instructions may lead to risks of electric shock.
- Do not use or leave the aspirator without properly installed lamps due to the risk of electric shock.
- Never use the aspirator without a properly installed grille!
- The aspirator must never be used as a support surface unless specifically indicated.
- During installation, use only the fixing bolts supplied with the device, or if such are available, suitable bolts.
- Use bolts of appropriate length, as indicated in the installation manual.
- In case of doubt, contact a qualified service technician for technical maintenance and qualified personnel.
WARNING! Do not use with a programmer, timer, separate remote control, or any other device that activates automatically.
- The device is intended for installation above a cooking hob with a maximum output.
This product complies with the requirements of: - European Directive 2012/19/EC - Waste Electrical and Electronic Equipment (WEEE).
Ensure that this device is recycled properly according to local regulations, to contribute to the protection of the environment and your health.
Protection of the environment and your health.

This product is marked with the symbol of the selective sorting of waste electronic equipment. This means that this product must not be disposed of with household waste but must be delivered to a separate collection system for electrical and electronic equipment according to the directive. Please contact your local authorities, the waste collection service for household waste, or the shop where you purchased this product for more detailed information about the disposal, collection, and recycling of this product.
The product has been designed, tested, and manufactured in accordance with:
- Safety: EN/IEC 60335-1; EN/IEC 60335-2-31, EN/IEC 62233.
- Performance: EN/IEC 61591; ISO 5167-1; ISO 5167-3; ISO 5168; EN/IEC 60704-1; EN/IEC 60704-2-13; EN/IEC 60704-3; ISO 3741; EN 50564; IEC 62301.
EMC - Electromagnetic Compatibility: EN 55014-1; CISPR 14-1; EN 55014-2; CISPR 14-2; EN/IEC 61000-3-2; EN/IEC 61000-3-3.
Tips for correct use to reduce environmental impact: Switch on the extractor at minimum speed when you start cooking and leave it running for a few minutes after cooking is finished. Increase the speed only when necessary and use the boost speed only in extreme situations. Replace the grease filters when necessary to maintain good grease filtration efficiency. Clean the grease filters when necessary to maintain good grease filter performance. Use the maximum diameter of the air exhaust system indicated in this manual to optimize efficiency and minimize noise.
Use
The extractors are designed to extract fumes and steam produced during cooking and are intended for domestic use only.
The extractor has a special feature: it can extract and exhaust air to the outside or filter and recirculate it.

Extractor version
The steam is discharged to the outside through an exhaust pipe connected to the flue connection ring.

WARNING!
The exhaust pipe is not included among the accessories and must be purchased separately.
The diameter of the exhaust pipe must correspond to the diameter of the connecting pipe.

WARNING!
The aspirators are supplied with active carbon filters; the filters must be replaced when saturated.
Connect the aspirator to the exhaust pipe and open the wall opening. The pipe diameter must correspond to the diameter of the connecting flange for air exhaust.
Connecting to the exhaust pipe and opening with a smaller diameter will significantly increase noise during operation.
In this case, the manufacturer accepts no responsibility.
Use pipes with the necessary length.
Use pipes with as few bends as possible (maximum number of bends: 90°). Do not sharply bend the pipes!

Recirculation
The aspirated air is filtered and returned to the room through the openings in the upper part of the device. To use the aspirator in this mode, you must install the activated carbon filter system on the device.
Mounting
Drill 6 holes as shown in the template (Ø 8 mm, depth 40 mm), while keeping the template aligned with the markings on the wall, to secure the aspirator and the support bracket for the chimney. After drilling, ensure that the aspirator and the chimney are correctly aligned with each other.
INSTALLATION
Before proceeding with installation:
Ensure that the product you purchased fits the dimensions of the chosen installation location. Remove the grease filter or the activated carbon filter (if your model is equipped with one). To do this, follow the instructions in the relevant paragraph. Install the filter again only if you wish to use the aspirator in recirculation mode. Ensure that during transport, no small parts such as screws, washers, etc., have fallen into the interior of the aspirator; if you find any, remove them and keep them.
Before use, read the instructions carefully to ensure that the supplied accessories are suitable for the appliance. The appliance, as supplied, must be properly assembled to withstand the load.
Instructions for use
Model
| I | II | III> | L | |
| T1 | T2 | T3 | T4 | T5 |
| Моden B | ||||
| I | II | III | L | |
| T1 | T2 | T3 | T4 | T5 |
First speed (T1)
Press T1 to activate the first speed. When the function is activated, the LED indicator lights up with a steady light. Press T1 again to switch off the aspirator.
Second speed (T2)
Press T2 to activate the second speed. When the function is activated, the LED indicator lights up with a steady light. Press T2 again to switch off the aspirator.
Third speed BOOSTER (boost) (T3) only model A
When the aspirator is activated at either the first or second speed, the third speed can be activated by pressing the T3 button, and the LED indicator lights up with a steady light.
Press T3 again to activate the booster. The booster can be activated only when the third speed is already active. When the booster is activated, the LED indicator T3 starts to flash. While the booster is functioning, it is possible to switch to the first or second speed by pressing the respective button, and the booster will be deactivated and the selected speed will be activated. When the booster is deactivated, press T3 again to switch off the aspirator.
The booster is deactivated automatically and the third speed is activated automatically.
Third speed (T3) only model B
Press T3 to activate the second speed. When the function is activated, the LED indicator lights up with a steady light. Press T3 again to switch off the aspirator.
Timer (T4)
The timer can be activated when the first, second, or third speed is active. When the function is activated, the LED indicator of the timer (T4) also
To select a speed, first choose it (T1/T2/T3) and then turn on the fixed light.
The timers will be activated, depending on the selected speed:
First speed T1 = duration 20'.
Second speed T2 = duration 15'.
Third speed T3 = duration 10'.
When a speed with a timer is selected, the timer can be deactivated by pressing T4 from the other speeds, if it is not activated. To turn off the aspirator, press the speed again, to which the timer was previously applied.
NOTE: only mode A
The timer cannot be activated when the booster is activated. After the time has elapsed, the aspirator turns off. When a speed with a timer is selected, it can be switched to other speeds by pressing the button for the desired speed, this operation will turn off the timer.
Light (T5)
The light can be activated at any time by pressing button T5. When the function is activated, the LED indicator turns on with fixed light.
Filter setting
The activation or deactivation of the filter indicators can only be done when the aspirator is connected.
To access the configuration menu, press T2+T3 simultaneously, once, and T1 will not respond.
The setting is as follows:
- Filter with grease indicator (T2) on, therefore activated; - filter with charcoal indicator (T3) off, therefore not activated.
The oil filter indicator activates after 10 seconds. The oil filter indicator for the oil filter activates. To reset, press the buttons T1 and T2 simultaneously for 10 seconds.
Filter reset
The aspirator signals the intervals after which the filters must be replaced:
- Oil filter every 40 hours; - Anti-odor filter every 160 hours. In the case where the aspirator is switched off, when the filter replacement is due, the interval will not be signaled for 10 seconds. Two types of necessity: - if T1+T2 are pressed: replacement of the oil filter; - if T1+T3 are pressed: replacement of the anti-odor filter.
During the 10 seconds it is possible to reset the oil filter by pressing T1+T2 and to reset the anti-odor filter by pressing
T1+T3. After the reset is completed, the combinations of buttons will start to flash quickly. The interval will now work as usual.
Attention:
During the 10 seconds, the aspirator functions normally, but there is a visual indication for the buttons. If during the 10 seconds no operation is performed, the LED indicators will start to flash and the visual indication will return to normal.
Maintenance
Cleaning.
For cleaning use only a cloth dampened with neutral detergent. Do not use instruments or tools for cleaning!
Avoid preparations containing abrasive particles.
Do not use alcohol!
Oil filter
Fig.18
The filter cover is removed when heating.
The device is designed for neutral preparations. I am sure that the machine is on the disc temperature and short mode for heating.
When replacing the oil filter in the machine, it is possible to remove it, but this in no way impairs its filtering capacity.
To remove the oil filter, press it with the release mechanism.
The filter is active carbon (only for the filtering version).
Fig. 19
The cover is removed when pressing.
The active carbon filter should be replaced approximately every 6 months, depending on the intensity of use and the degree of contamination of the filter.
In any case, it is necessary to replace the active carbon filter every six months or when the indicator for filter replacement shows that it is necessary.
It cannot be reused.
Active carbon filter cover
Place one filter on each side, so that the two protective grids of the working coil of the motor are covered, then tighten in the direction of the clockwise arrow.
When mounting, tighten in the direction opposite to the clockwise arrow.
Normal operation of the cover.
The aspirator is equipped with a lighting system with
The manufacturer guarantees optimal lighting for up to 10
years, with no need to replace the lamps, saving 90% on electricity.
For any issues, contact the service department for technical maintenance.
RO - Installation and/or use instructions
was installed correctly.
- Do not use or leave the extractor hood without lamps correctly installed, as there is a risk of electric shock.
- Never use the extractor hood without the correctly installed grille!
- The extractor hood must never be used as a surface for placing objects, unless otherwise indicated.
- Use only the screws provided with the product for installation; if not included, purchase screws of the correct type.
- Use the correct screw length as indicated in the installation manual.
In case of doubt, consult an authorized service center for qualified personnel.
WARNING! Do not use the device with a programmer, timer, separate remote control, or any other device that activates automatically. The hood is intended for installation above a hob with no more than 6 heating elements.
This product has been marked in accordance with European Directive 2012/19/EC on the disposal of electrical and electronic equipment (WEEE).
By ensuring proper disposal of this product, you can help prevent potential negative consequences for the environment and human health.

The packaging of this product indicates that it cannot be treated as ordinary household waste. Instead, it should be handed over to the appropriate collection point for electrical and electronic equipment for recycling.
Disposal must be carried out in accordance with local waste disposal regulations.
For more detailed information on how to handle such products, their recycling and processing, contact your local authorities, the waste disposal service, or the store where you purchased this product.
The device has been designed, tested, and manufactured in accordance with:
- Safety: EN/IEC 60335-1; EN/IEC 60335-2-31, EN/IEC 62233.
- Performance characteristics: EN/IEC 61591; ISO 5167-1; ISO 5167-3; ISO 5168; EN/IEC 60704-1; EN/IEC 60704-2-13; EN/IEC 60704-3; ISO 3741; EN 50564; IEC 62301. EMC: EN55014-1; CISPR 14-1; EN55014-2; CISPR 14-2; EN/IEC61000-3-2; EN/IEC61000-3-3. Recommendations for proper use to reduce impact on the environment: Turn on the extractor hood at minimum speed when you start cooking, and let it run for a few minutes after you finish cooking. Increase speed only in case of large amounts of smoke and steam, and avoid using higher speeds except in extreme situations. Replace the charcoal filter when necessary to ensure good efficiency in reducing odors. Clean the grease filters when necessary to ensure good efficiency of the grease filter. Use the maximum diameter of the air ducts specified in this manual to optimize efficiency and minimize noise levels.
Use
The extractor hood is intended for extracting smoke and odors during cooking and is designed solely for domestic use.
The hood is designed for either ducted air extraction or recirculation.

Using the ducted air extraction mode
In this mode, vapors are expelled outside through a duct connected to the connecting ring.

CAUTION!
The exhaust duct is not included and must be purchased separately.
The diameter of the exhaust duct must match the diameter of the connecting ring.

CAUTION!
If the hood is equipped with a charcoal filter, then...
Connect the exhaust pipe to the outlet pipe with a diameter corresponding to the outlet opening (connecting flange).
Installing pipes with a smaller diameter will reduce the suction power and sharply increase the noise level.
The manufacturer disclaims all liability for the above.
! Use a pipe with the minimum necessary length. ! Use a pipe with the fewest bends (maximum bend angle: 90°). ! Avoid sharp changes in pipe diameter.

Using the timer function
Timer duration: T3 = 15 minutes.
When it operates at a speed with the timer, you can turn off the timer/timer by pressing button T4, or by pressing the button of any other non-activated speed. To turn off the exhaust hood, press again the speed button to which you applied the timer mode.
NOTE: ONLY FOR HOODS
It is impossible to turn on the timer while the hood is off. When the time expires, the exhaust hood turns off. When one of the speeds operates with the timer, you can switch to another by pressing the button of the other speed. This operation turns off the timer.
Lighting (T5)
The light can be turned on at any time by pressing button T5. When this function is activated, the corresponding LED lights up with a steady light.
Filter alarm setting
Turning on and off the filter indicators can only be done with the exhaust hood turned off.
To access the configuration menu, press and hold buttons T2+T3. After entering the menu, T1 starts flashing.
The preset adjustment is as follows:
- The pre-filter indicator (T2) is lit, i.e., on; the deodorizing filter indicator (T3) is not lit, i.e., off. T2 turns on/off the pre-filter indicator. T3 turns on/off the deodorizing filter indicator. To exit the menu, press and hold button T1 for 10 seconds.
Filter reset
At regular intervals, the exhaust hood signals the need for filter maintenance:
- Pre-filter: every 40 hours; deodorizing filter: every 160 hours. In such cases, with the hood on, when the user touches the control panel, the interface will signal for 10 seconds about the two types of required operations:
- If T1+T2 flash: maintenance of the pre-filter; if T1+T3 flash: maintenance of the deodorizing filter.
Within 10 seconds, you can reset the pre-filter indicator by pressing T1+T2, and the deodorizing filter indicator by pressing T1+T3. After performing the reset, quickly press the combination of these buttons twice. The interface will then function as usual.
Attention:
During these 10 seconds, the exhaust hood will operate normally, but there will be no visual feedback on the speed selection buttons. If no action is taken during these 10 seconds, the signal will stop flashing and visual feedback will return to normal mode.
Care
Cleaning
For cleaning, use only a special cloth moistened with a neutral liquid detergent. Do not use any tools for
cleaning. Do not use products containing abrasive materials. Do not use alcohol!
Grease filters
Fig. 18
The carbon filter is a consumable item and must be replaced.
The filter should be cleaned monthly with non-abrasive detergents, by hand or in a dishwasher at low temperature and in an economical cycle.
Washing in a dishwasher may cause some discoloration of the carbon filter, but its filtering characteristics remain absolutely unchanged.
To remove the carbon filter, pull the filter holder towards you.
Carbon filter (only for recirculation models)
Fig. 19
Removes unpleasant odors from the kitchen.
Saturation of the carbon filter occurs after a period of more or less prolonged use, depending on the type of kitchen and the frequency of washing the grease filters. In any case, replace the cartridge at least every 4 months.
The carbon filter cannot be washed or regenerated.
Round carbon filter
Cover both sides of the protective grilles of the motor rotor with the filters, then rotate the filters clockwise.
To remove, rotate the filters counterclockwise.
Replacing the lamp
The hood is equipped with LED lighting. LEDs provide optimal lighting, their service life is 10 times longer than that of traditional bulbs, and they allow saving 90% of electrical energy.
To replace the LED lamp, contact the technical service department.
UK - Installation and operation instructions
Please keep the instructions given in this manual. The manufacturer is not liable for any faults, damage, or injury that may occur as a result of using the appliance not in accordance with the instructions given in this manual. The hood is designed for use with steam and vapor generated during cooking, intended solely for household use.
The kitchen extractor hood may have a design that differs from the hood shown in the figures of this manual, but in any case, the installation, maintenance, and operation instructions remain unchanged.
It is important to keep these instructions so that you can refer to them in the future in case of sale, transfer, or relocation. Make sure that the instructions are with the product. - Read the instructions carefully: they contain important information on installation, use, and safety. It is forbidden to make any electrical or mechanical modifications to the product or to the ventilation ducts. Before starting installation of the product, check that all components are free of defects and not damaged. If not, contact the place of purchase and stop installation.
Note: Parts marked with the symbol (*) are optional accessories and are supplied with some models, or are parts that are not supplied in the kit and must be purchased separately.

Safety warnings

Connection to the electrical mains
The voltage in the electrical mains must correspond to the characteristics indicated on the label located inside the hood. If the plug is not supplied with the appliance, connect the hood to a socket that complies with current standards and is located in an accessible place, which can be done by a qualified electrician. If the plug is not included (direct connection to the electrical mains), or if the socket is not in an accessible place, also by a qualified electrician, then a suitable two-pole switch must be installed.
The switch must ensure complete disconnection from the mains under conditions of overvoltage category III, in full compliance with installation rules.
WARNING! Before reconnecting the hood to the electrical mains and checking its operation, always check that the mains cable has been installed correctly. WARNING! Electrical connection must be carried out by authorized service technicians.
The distance from the lower part of the hood to the cooking surface must be not less than 45 cm in the case of electric hobs, and 65 cm in the case of gas or combination hobs.
It is necessary to take into account the distances indicated in the installation instructions for gas hobs.
Before carrying out any operation on the hood or its maintenance, disconnect the hood from the electrical supply by pulling the plug from the socket or switching off the general switch of the room.
- For all installation and maintenance operations, use work gloves. The device may be used by children aged 8 and above and by persons with reduced physical, sensory or mental capabilities, or lack of experience and knowledge, if they have been given supervision or instruction concerning use of the appliance in a safe way and understand the hazards involved. Children shall not play with the appliance. Cleaning and user maintenance shall not be made by children without supervision.
Children without supervision.
- The appliance must have sufficient ventilation and exhaust when used together with other appliances operating on gas or other fuels.
- The exhaust must be cleaned frequently, both inside and outside (at least once a month), maintaining it in any case according to what is indicated in the maintenance instructions.
Failure to maintain the filters and replace the grease filters increases the risk of fire.
It is strictly forbidden to prepare food over an open flame under the exhaust hood.
For lamp replacement, use only the lamp type specified in the maintenance/replacement section of the manual.
Using uncovered pans can damage the filters and may cause fire, so it is necessary to avoid this in any case.
Maintenance must be carried out by qualified personnel to avoid the risk of fire or electric shock.
WARNING: When the cooking surface is in operation, accessible parts may become hot.
Do not connect the appliance to the electrical supply until the installation is completely finished.
- This applies to technical measures and safety measures in the use of this appliance, which are subject to strict compliance with the standards of local competent authorities.
- The hood must not be connected to the flue used for exhausting fumes from appliances burning gas or other fuels.
WARNING! Incorrect installation of the fixing screws and devices may
cause the risk of electric shock.
- Do not use or leave the hood without the correctly installed lamps, as there is a risk of electric shock. Never use the hood without the correctly installed grille! The hood must never be used as a supporting surface unless expressly indicated. Use the screws for fixing the hood with the product supplied in the kit; if not supplied, purchase the screws of the correct type. Use the correct length of screws as indicated in the installation instructions.
- In case of doubt, consult an authorized service center or qualified personnel.
WARNING! Do not use with a programmer, timer, separate remote control or any other device that switches on automatically. The hood is intended for installation above a hob with no more than 6 heating elements.
This product has been marked in accordance with the European Directive 2012/19/EC on waste electrical and electronic equipment (WEEE). By ensuring the correct disposal of this product, you will help prevent potential negative consequences for the environment and human health, which could otherwise be caused by inappropriate waste handling.

The symbol on the product or on its accompanying documents indicates that this product must not be treated as household waste. It must be handed over to the applicable collection point for the recycling of electrical and electronic equipment. Disposal must be carried out in accordance with local environmental regulations for waste disposal. For more detailed information about treatment, recovery and recycling of this product, please contact your local city office, your household waste disposal service or the shop where you purchased the product.
Designed, tested and certified for safe operation:
- Safety: EN/IEC 60335-1; EN/IEC 60335-2-31, EN/IEC 62233.
- Performance: EN/IEC 61591; ISO 5167-1; ISO 5167-3; ISO 5168; EN/IEC 60704-1; EN/IEC 60704-2-13; EN/IEC 60704-3; ISO 3741; EN 50564; IEC 62301. EMC: EN 55014-1; CISPR 14-1; EN 55014-2; CISPR 14-2; EN/IEC 61000-3-2; EN/IEC 61000-3-3. Advice for correct use and to reduce environmental impact: Switch on the hood at minimum speed before starting to cook and leave it running for a few minutes after cooking. Increase the speed only in case of large amounts of smoke and steam and use the boost speed only in extreme cases. To achieve high efficiency in odor extraction, replace the filters when necessary.
ByrnbHoro(-nx) pInbtpy(-iB).Inna nIITpmaHnBaCOKoi efeKTHBOCTI pInbtpy KnpiB,3a Heo6xIDHOCTI, BIKOHyTe YnCTKy pInbtpy(-iB) KnpiB. BkOpNCToByTE MaKcMaNbHNI dAmetp CNTeMM NOBtPOVOD, 10 BkA3AHy IHCTpyKJI DnRA ONTIMIsaJIe efekTHBOCTI Ta MIHIM3aJIu My.
BukopncTaHHa
BntraKn KOBnak CnpoeKTOBaHn DnRA BCMOKTyBaHHa NMy Ta napy, uO yTbOpHOeTBCr nDac npiroToYBaHHa XkTa npn3HaueHn IINIe IINIO6yTOBOrO BNKOpNCtAHH..
Bntjka po3po6JIeHa IJI pO6OTn B peXmI BCMOKTyBaHnA, BIVoJMy NOBITpRA HAZOBHI a60 B 9IbTpUOCHypeXmI 3 peuRkyJLJIeIO NobITpy.

BapiaHT BiDBeHnHa
Papn BvBOaTbCra Ha3OBHi Chepe BvBHy Tpy6y 3akpinEnHy Do PhaHura 3EHaHH.

YBARA!
BvBiHa Tpy6a He noctaTaEcI TOMy Heo6xIdHO II npu6bTu OKpEmo.
IiameTp BnBidHoi Tpy6n NOBHeH BiNobIdaTn iameTp y 3'edHyBaIbHoro KInb.

YBAGA!
KIO BNTKNI KOBNAK Mac ByinbHcPnTO x Tpe6a 3HATN. PiEHN KOBNAK DO HactIHHO BVBDHOI Tpyo Ta BVBDHOO OTBOPy 3 OHaKOBIM DiameTpOM BNXOy NOBITp (3'EDHyOHNI fnahe).
BnKOpNCTaHH HactiHnX BnBiDnHX Tpy6 Ta OTBopIB 3 MeHsIMdiametpOM npINBeDe do 3MeHsEHHe epeKTNBHOCTI BCMOKTyBaHHraTa 3HaHe 36InbWeHH pIBH wMy.
Tomy Mm 3HimaEMO 3 ce6e 6yIb-ky BiIOBdaJIbHIctb IO BIIuecka3aHOMy.
BukopocToByte HaikopoTun BnTJxHn KaHaJ.
BnKOpNCToByTe BmTgKHN KaHn 3 HaimeHNO KINbKiCTHO NobopoTIB (MaKcMmaHbHN KyT NOBOPOTy: 90°)
YHnKaIe pi3Knx 3MIn nIIOuJI nepepi3y BITraXHorO KaHaNy.

BapiaHT 3 pInbtpaucieIO
BTRAHyTE NOBITRA 3HexHIOCTbC Ta OUYUeTbC Ta 3HOBy NOBepTaAcB INPMiUeHHa. IINr TORO, Uo6 BnKOpNCTOByBaTN KObnak y cybomy pexmI, Heo6xIDHO BCTaHOBN TdoATKOBy CNCTEmy fInbTpiB 3 aKTINBOAHIM ByINlAAM.
Inctanlaia
JIKOKa3aHOHaKpcSeHnXNoyCTAHOBUJpOcBepNTn6OTbOpB (8MM TnIbHNOHO40MM),Bmicx Bka3aHnx Ha 7a6N0Hi CBepHH,IO63akPIMTNBVTRAKKy i KPOHHTeINPiTPMKNKaMHy. PpOBiprTnBkiUjYCTAHOBKnVBrTAAKKaikAMHc6Be3dorOHBOBIPBHnHi.
Inctantia
Ipeep noaTkoM MoTaXy:
IpeebipTe 06pO3MpIn npD6aHOro Bamn Bnp6y nIXoDNnDo BVbpaHOro Micu NOro MoHTaxy. 3HIMITbByrIbHnBn Bt/naRkUo BiH/BOH npCyTHi (DINBNTNC TaKoK BiIDNOBIDHn po3dIn).Bt/Pn 3HOby
BCTAHOBHIOHOBCA RIKUO Bn XOyTe BnKOpNCTOByBaTN KOBNaBpeKIMPeLIPKpyJIi.
IpeBipuTn 06 BcepeHni KOBnaka He 3aHuaNoc npEmTeiB, NomiueHx TuDn Ha Yac NOro TpaHcnpTyBaHHa (HaPnKnaI, NaKeTnKIB 3 uypnAmn, JnCTiB rapaHTi i T.n.), kO BOHN e, BmIMt bix 36peEeKtB.
B KOMNNEKT BNTKKN BXOJTB Wpynn DnI KpINHeHH, po3paXOBaHHa 6iNbWicTb TnIB CTIn/CTen. Ipote Heo6xioHO 3BepHytncdo KBanipikOBaHOro Texhka DnI NepeBipKn npDAtHOCTi MatepiAinB 3aHexHocTi BiD TnY CTHN cTeNi. CtHa/CTeNIOBHNi 6yTu DOCTaTHBo MlHMm, UoB BNTPIMATn Bary BNTKNN.
Функционування
Modenb A
Modenb B
Nepwa wBnDkiCTb (T1)
Press the T1 button to turn on the first speed. When this function is on, the corresponding LED lights up and burns with a steady light. Press the T1 button again to turn it off.
Second speed (T2)
Press the T2 button to turn on the second speed. When this function is on, the corresponding LED lights up and burns with a steady light. Press the T2 button again to turn it off.
Third speed and boost (PULSE) (T3) only for model A
With the switch on, and also with the first or second speed on, you can turn on the third speed by pressing the T3 button, and the corresponding LED will light up with a steady light.
Pressing the T3 button again will activate the boost. The boost can only be turned on after the third speed has been turned on. When the boost is on, the T3 LED starts to flash. During the boost operation, you can switch to the first or second speed by pressing the corresponding T1 or T2 button; the boost will turn off, and the selected speed will turn on.
To turn off the boost, press the T3 button again while the boost is on.
After 5 minutes of operation, the boost automatically turns off, and the device returns to the third speed.
Third speed (T3) only for model B
Press the T3 button to turn on the third speed. When this function is on, the corresponding LED lights up and burns with a steady light. Press the T3 button again to turn it off.
Timer (T4)
The timer can be turned on when the first, second, or third speed is on. If this function is on, the T4 LED and the LED of the selected speed (T1/T2/T3) will be on and burn with a steady light.
The timer operating time depends on the selected speed:
First speed T1 = operating time 20 minutes
Second speed T2 = operating time 15 minutes.
TpetaBncktB:T3=tpnbajicb10xBnlnH.
KoIN OJHa 3 WbNdkOcTe npaIooe 3 TaIMepOM, MoXHa BmKHyTt timer HATNCHeHHM KHONk T4, aOx HATNCHeHHM KHONk 6yDbKAOI IHoi He BKNIOeHOI WbNdkOcTI. IIN BKNIOeHHBnTKHOKOBnaka HATNCKyIte 3HOBy HA KONkY TiE IWBnDKOCTi, DO kOJI 6yB 3actOCOBAHNI TaIMepHN pexmpo6OTN.
PIMITKA: TINbK MoeIb A
Hemoxnbo Bknohtim timer, noK npaOe booster. Picna 3akHHeHHa Yacy BntJHKn KObnk BmMkaetbca. KOnn OHa 3 WBnDKoCTei npaOe 3 TaImePOM, MoXHa nepeKnOHTn Ha iHsy HataNcKaHNm KHONK nOtpiHOi WbNDKOcti. Lra onepaJy BmKHe TaImeP.
PiicbiyuBaHHa(T5)
PiicBHyBaHH MoKe BKnIOuATnC8 B 6yDb-RAIM MOMENT HATNCHeHHM KHONK T5. Pn BKnIOueHHI uei fynkuii, BiINOBiDnH CIcnapaxye i roptb noctinHM cBITTOM.
HanautyBaHHaipbtpy
BkIoueHHH i BmKIOUeHHH iNdkaTOpIB φiNbTy MoKe 3iiCHOBATNCRA JIMSe y BmKHeHO BNTXHO KOBnaka.
Ipyo MeHIO KOHpIpyaII notpioBnKOHATn DOBHe HATNCHEHNA KHONK T2+T3,PiCnBxOyB MeHIO T1 noHne NybcyBatn.
IpeBCTaHOBnHe HanaHTyBaHnTake:
- KInpoynOBnBbHm FInbTp IHnKaTOp (T2) ropntb, T6To BKNIOHEni;
- De3oOpuyoun fInbTp iHdkaTOp (T3) He rOpNTb, T6To He BKNIOHeH.
T2 BKNIOHae /BUNKAc iNkKatop XmpoYIOBnOBAIbHoro qinbTpY.
T3 BKNIOaC / BIMNKaC iNDnKATOp De3OOpyIOHO φINbTpY.ДЯ BIXOy 3 MeHIO BIKOHaTe TpNBaJIe HATNCKaHHa HA KONKy T1 a60 NoyeKaIte 10 cekyHd
BiDHOBHeHHcTaTcyΦinbtpiB
The manufacturer recommends maintenance intervals for the filter:
- Cleanable filter every 40 hours; - Replaceable filter every 160 hours.
In such cases, when the cover is closed, at the moment of pressing any button, the indicator will signal for 10 seconds about the two necessary operations:
- Press T1+T2: maintenance of the cleanable filter;
- Press T1+T3: maintenance of the replaceable filter.
During the 10 seconds, you can reset the cleanable filter indicator by pressing T1+T2, and the replaceable filter indicator by pressing T1+T3. After performing this action, the combination of buttons must be released. The indicator will function as before.
Note:
During the 10 seconds, the cover will operate normally, but there will be no visual feedback on the liquid activation buttons. If no action is performed during the 10 seconds, the indicator will stop pulsing, and the visual feedback will return to normal mode.
Cleaning
Cleaning
For cleaning, use a special cloth moistened with a neutral liquid detergent. Do not use abrasive agents or tools for cleaning!
Do not use cleaning agents or abrasive materials. Do not use alcohol!
Filter delay
Fig. 18
Man. 18
The filter is clogged, which causes it to be removed during preparation.
Clean the filter on site with non-abrasive agents, inside or in the dishwasher at low temperatures and with a short cycle.
When cleaning the filter in the dishwasher, the metal filter may darken, but its filtering characteristics will not change.
To remove the filter, pull it towards you by the spring-loaded filter handle.
Charcoal filter (only for recirculation mode)
Fig. 19
Remove the odors from the kitchen.
The charcoal filter check for saturation is carried out
more often depending on the type of cooking and the frequency of cleaning the filter. In any case, it is necessary to replace the filter cartridges at least every three months.
Do not wash or regenerate.
Round charcoal filter
Place the filter on both sides of the protective grilles of the rotor blades, then turn the filter clockwise.
To remove, turn the filter counterclockwise.
Replacing the lamp
The lamp is based on LED lighting technology.
To ensure reliable lighting, replace them 10 times less often than conventional lamps and save up to 90% on electricity.
For any other issues, contact the technical service department.
Installation and commissioning instructions
The installation and commissioning of the device must be carried out by qualified personnel in accordance with the safety regulations. The device must not be used in explosive or hazardous environments. It is possible to connect additional devices using the diagrams shown in the figures. Installation, commissioning, technical service, and repair work must be performed by qualified personnel.
Before starting the device, read the manual carefully. If the device is used incorrectly or improperly, the warranty may be void. Read the instructions: they contain important information about installation, commissioning, and safe operation. Do not make any changes to the electrical or mechanical structure or to the ventilation channels. If you have any questions about installation or operation, contact the manufacturer or supplier.
Note: (*) Some models may be equipped with additional accessories (not included in the standard delivery), which can be purchased separately.

Instructions

Electrical connections
The device must be connected to the mains power supply in accordance with the technical specifications. If the device is connected incorrectly, it may be damaged, and there is a risk of electric shock or fire. If the device is not connected correctly (e.g., wrong polarity), or if the connection is loose,
If the device does not operate correctly after connection, disconnect it from the power supply and contact the manufacturer or supplier for assistance.
WARNING!
When connecting the device to the electrical network, make sure that the power cord is properly connected.
WARNING! Only authorized technical personnel or qualified electricians should perform the connection.
The distance between the device and the wall or other objects must be at least 45 cm for electrical connections, and at least 65 cm for gas or combined connections.
If the gas connection distance exceeds the specified value, contact the manufacturer.
The device must be operated by qualified personnel in accordance with the operating instructions or disconnected from the power supply by means of an electrical disconnecting device.
Installation and technical service must be carried out by qualified personnel.
The device must be grounded.
This device is not intended for use by persons (including children) with reduced physical, sensory or mental capabilities, or lack of experience and knowledge, unless they have been given supervision or instruction concerning use of the appliance by a person responsible for their safety.
Children should be supervised to ensure that they do not play with the device.
Cleaning and user maintenance shall not be made by children without supervision.
- If the device is used with other gas appliances or other fuels, the device must be installed in a well-ventilated place.
The device must be cleaned both inside and outside (at least once a year) according to the instructions given in the technical service manual.
Cleaning standards and procedures for replacing parts and cleaning intervals
- may be subject to change. The device must be disconnected from the power supply before cleaning.
To clean the device, only use
the cleaning agents specified in the "Technical Service/Cleaning" section of the manual.
The use of other cleaning agents may damage the device, so they should be avoided.
To prevent the device from being damaged or malfunctioning, it must be protected from moisture.
Caution: The device's metal parts may become hot when the device is in operation.
- This device is intended for use in domestic and similar applications.
- Future maintenance and repair work must be carried out by qualified personnel in accordance with the regulations established by the competent authorities.
The device is intended for use in gas or other combustion products exhaust systems, as well as for other purposes
when used in conjunction with the appropriate ventilation system. Do not install or connect the device to the power supply, water supply, or gas supply without following the instructions.
WARNING! Do not use the device without
the proper installation of the electrical connections.
- Do not install the device in a place where it may be exposed to water or moisture. Do not install the device in a place where it may be exposed to water or moisture.
- For installation, use only the provided mounting brackets; if not provided, purchase the appropriate type. Install the brackets as shown in the instructions. If you have any doubts, contact a qualified service technician or the manufacturer.
WARNING! Do not use the device with a damaged power cord or plug, or if it has been dropped or damaged in any way. The device is intended for installation in a fixed position.
Electrical and electronic equipment must be disposed of separately in accordance with the European Directive 2012/19/EC (WEEE).
Do not dispose of the device as unsorted municipal waste. Contact your local waste collection service for proper disposal instructions.
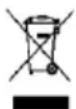
If the device is marked with a crossed-out wheeled bin symbol, it must not be disposed of with household waste. Instead, it should be taken to a designated collection point for recycling of electrical and electronic equipment.
Dispose of the device in accordance with local regulations for waste disposal.
Before installing the appliance, check that the electrical wiring and sockets are suitable for the rated power of the appliance. If the power cord is damaged, it must be replaced by the manufacturer, its service agent, or similarly qualified persons in order to avoid a hazard.
The following standards have been applied:
Safety: EN/IEC 60335-1; EN/IEC 60335-2-31, EN/IEC 62233. - Performance: EN/IEC 61591; ISO 5167-1; ISO 5167-3; ISO 5168; EN/IEC 60704-1; EN/IEC 60704-2-13; EN/IEC 60704-3; ISO 3741; EN 50564; IEC
- EMC: EN 55014-1; CISPR 14-1; EN 55014-2; CISPR 14-2; EN/IEC 61000-3-2; EN/IEC 61000-3-3.
Instructions for safe use of the appliance:
Before starting any work, disconnect the appliance from the power supply and wait at least 2 minutes before cleaning or maintenance. When cleaning, do not use steam cleaners or high-pressure cleaners. To maintain the safety of the appliance, use only original spare parts. To maintain the performance, use only original spare parts. For cleaning and maintenance, follow the instructions given in this manual.
Installation
The hood is designed to be used as a ducted (extraction) or recirculating (filtering) version.
The hood is intended for domestic use or similar non-professional applications.

Ducted version
Connect the exhaust pipe to the flange using a connecting ring.
WARNING!
The diameter of the exhaust pipe must be equal to the diameter of the connecting ring.
WARNING!
The exhaust pipe must not be connected to the flue of the hood. It must be installed separately. Check the exhaust pipe for any obstructions, and if necessary, remove them. Do not reduce the diameter of the exhaust pipe. If the pipe is too long, it may reduce the performance of the hood.
WARNING! The text contains characters from a non-English language. If you do not understand the text, do not use it. The maximum burst pressure is 90°! Do not make any modifications to the device during operation.

Water inlet
If the water inlet is dirty, it can be cleaned with a soft brush.
After turning off the water, remove the filter and clean it with a brush, then reinstall it.
Connection
To secure the device and prevent it from moving, drill two holes (diameter 8 mm, depth 40 mm) in the wall at the marked locations. Then, insert the anchors and screws into the holes.
Mounting
During installation:
- This passage is not in English and appears to be garbled or from another document. It is unusable.
- If the water inlet hose(s) is (are) damaged, replace it/them. If the device's water inlet is leaking, it must be replaced. Check all connections and fittings inside the device (they are secured to prevent loosening). Replace them if necessary and store them in a safe place.
Do not use the device with damaged hoses or connections. However, to ensure the materials are suitable for the connection, use the appropriate tools. The hoses must be checked before installation.
Model A
Model B
First step (T1)
To perform the first step, press the T1 button. When the function is activated,
Type of channel. The flushing is done by pressing the T1 button.
Second flush (T2)
Press the T2 button to perform the second flush. This function is used when the channel is dirty. Press the T2 button to flush.
Third flush and BOOSTER (T3) only in models
When the flushing is insufficient or after the first and second flush, the third flush can be performed by pressing the T3 button, in which case the channel is also cleaned.
If the T3 button is pressed, the booster flush is performed. The booster can only be used after the third flush. When the booster is used, the T3 indicator lights up. If the booster is used for a long time, the first or second flush can be performed by pressing the first or second flush button, after which the booster is deactivated.
When the booster is used, press the T3 button to flush.
The booster is automatically turned off after the third flush and the third flush is automatically turned off after the booster.
Third flush (T3) only in models
Press the T3 button to perform the third flush. This function is used when the channel is dirty. Press the T3 button to flush.
Timer (T4)
After the first, second, or third flush, the timer can be used. When the timer is used, the timer (T4) and the selected flush (T1/T2/T3) are activated simultaneously.
The timer can be set to the selected flush:
First flush T1 = 20 seconds
Second flush T2 = 15 seconds.
The device is designed to operate in a temperature range from -10 to +40 degrees Celsius. In this range, the device can be used without restrictions.
The device must be protected from direct sunlight.
EXPERT: MODEL
When using the device, the temperature must be taken into account. After the device has been turned off, it should be allowed to cool down. If the device is used immediately after being turned off, the temperature may be higher than the specified range, and this may cause damage.
Lamp (T5)
The T5 lamp can be used when the device is turned off. When the device is in use, the lamp should be turned off.
Water supply
The water supply can be connected or disconnected when the device is turned off.
To control the water level, the T2+T3 lamps should be on, and when the water level is reached, the T1 lamp should turn on.
Electrical parameters:
- Water level indicator (T2) is on when the water is full;
- Water level indicator (T3) is on when the water is not full.
The T2 lamp indicates the water level is full. The T3 lamp indicates the water level is not full. To measure, turn on the T1 lamp or the lamp, wait 10 minutes.
Water supply connection
Instructions for technical service and maintenance of the TyTINbIFapbIw TypaKbIyakblT apaIbIKTapbIHd cy3ire:
- Oil filter: 40 carats;
- Water filter: 160 carats.
In this case, the oil filter is replaced, and the water filter is cleaned. Interval: 10 minutes. Take both signals:
- If T1+T2 are active: technical service for the oil filter is required; - If T1+T3 are active: technical service for the water filter is required.
During the 10-minute interval, the oil filter is replaced, and the water filter is cleaned. After replacement, the filters will operate twice as fast. The interval is set by the user. Note:
If the 10-minute interval is not observed, the filters may become clogged and stop working. Replace the filters immediately.
Technical service
Cleaning
For cleaning, use only a soft brush and a dry cloth.
Cleaning the device or the cleaning tool
DANGER! Do not use abrasive materials. Use only a soft cloth.
DANGER!
Oil filter
18 filters
Ac daBHdayaFbMai 6eWekTepi H yctan KanaDbI.
HnIbTpdi aain caBih arpeccnbTi eMeC Kyfbi 3aTTapMeH, KOJImeH HeMeCe bIDbcKxyfbi MaUHaDa, TEmeH TEMepaTypada, YHeMdi Ta3anay TepTbiHne Kyy Kepek.
blbixyfbiMaunHada JybiNfAH MaYcTaTbH pntbTp Tycci3eHyi MymkiH, bipak OdaH OHbIH cy3iKacneti Mynde 03repici3 Kaanabi.
MaCy3riciH aIbIn Tactay yuH cepinnenI 6ocaty TyTKacbln TapTbIHbI3
Kemip cy3riw (tek cy3riw-copfbiuw TypiHne) 19-cypet
Ac nicipren Ke3de xapaamcb13 nicti yctan KaJaDbI.
Kemipji QnIbTpdi KaHbIybl y3ak naidanhy Mep3imini H Kbicka Hemece y3ak etyhe 6aIIaHbICTbl 60ana,b, on ac Yndi Tpyi MeH MaIdbI YCTaIbIH QnIbTpdi YCTaHbIraH MEPIMdJIk Ta3anayMeH anDbIH ana aHbIKtaIaDbI. KaHda JxafdaB60ca da, kaptpndjki Kem dereHe 4 aia6ip pet aybICbIPbIH3.
Kemipji fuijtpdi kyyf a 60nMaNbI xHe de perehepeuHa KapamCb13.
DeHreNek Kemip cy3rici
Ko3faTkbIbIH, KanakTBi DeHreIerHH TopaBHa 6ipeyH opHaTbHb3, cetin onapdbI caF tiniem 6ypaHb3.
Any yuin onapbicaf tinihe kepi 6paHb3.
Wam aybictbipy
Kopnyc Japbik DIOID TexHONORnCbIHa Heri3dJIReH JapbIK KJyncimEn Ka6DbIKtanFaH.
XapbIK dIOdTapbl OHtaNbl XapbIKtbl, eDetteri wamapdah 10 ece apbIK y3aKtbl KaMTamacbl eTei xHe 90% 3NEKtp 3HepnraCbIH caTayra MymkiHdk bepeidi.
Aybictby yuih texnkaanbik Kbi3met Kepcety 6niime Xa6apnaacbI3.
Ohu valjatombega version
a a a a a a a a a a a a
g 100000000000000000000000000000000000000000000000000000
Therefore, the area of triangle OBC equals the area of triangle COD plus the area of triangle BOC minus the area of triangle BOC.
1
a 1
aclll jlac oai uSc aKal
(T5)
Lolie.T5 jllle bally aal y ool y Joo 1000 led
#
Lalalalal, lae w joll cll jao alj g Jaa
T1 aall L3+T2
a
(T2)
jbi jill
(T3)
Jaa
T3. 1000000000000000000000000000000000000000000000
10 1 T1 ic a y
cuii
LED 11 yjg k jc g p jy oolal bblbll 2000 a l l a jn oolal r jy n jn jn jn jn jn jn jn jn jn jn jn jn jn jn jn jn jn jn jn jn jn jn jn jn jn jn jn jn jn jn jn jn jn jn jn jn jn jn jn jn jn jn jn jn jn jn jn jn jn jn j
a
e aal daa
i 1
40
--16 1
j 10 1
aJ2+T2+T1 1
A11jT3+T1
C. c - 1 ①
T3+T1
Since a(1+b) = 1+b
10 11
LED
| T1 | T2 | T3 | T4 | T5 |
| I | II | III | L | |
| T1 | T2 | T3 | T4 | T5 |
| I | II | III | L | |
| T1 | T2 | T3 | T4 | T5 |
1 6
EN/IEC 60335-2- EN/IEC 60335-1:EN/IEC 62233,31 EN/IEC 61591;ISO 5167-1;ISO 5167-3;ISO 5168;EN/IEC 60704-1;EN/IEC 60704-2-13;EN/IEC 60704-3;ISO 3741;EN 50564;IEC 62301
EN 55014-1; CISPR 14-1; EN 55014-2; CISPR 14-2; EN/IEC 61000-3-2; EN/IEC 61000-3-3
100 100
a
15
1 1 1 1 1 1 1 1 1 1 1 1 1 1
1

- EN - INSTRUCTION ON MOUNTING AND USE
- CAUTION
- ELECTRICAL CONNECTION
- USE
- EXTRACTION VERSION
- FILTRATION VERSION
- INSTALLATION
- MOUNTING
- BEFORE BEGINNING INSTALLATION
- OPERATION
- FIRST SPEED (T1)
- SECOND SPEED (T2)
- THIRD SPEED AND BOOSTER (T3) MODEL A ONLY
- THIRD SPEED (T3) MODEL B ONLY
- TIMER (T4)
- NOTE: MODEL A ONLY
- LIGHT (T5)
- FILTER SETTING
- FILTER RESET
- MAINTENANCE
- CLEANING
- GREASE FILTER
- FIG
- CHARCOAL FILTER (FILTER VERSION ONLY)
- CIRCULAR CHARCOAL FILTER
- REPLACING LAMPS
- BEFORE STARTING INSTALLATION
- CIRCULAR FILTER
- NOTE: ONLY THE MODEL
- EXTRACTOR VERSION
- WARNING
- RECIRCULATION
- INSTRUCTIONS FOR USE
- MODEL
- THIRD SPEED BOOSTER (BOOST) (T3) ONLY MODEL A
- THIRD SPEED (T3) ONLY MODEL B
- NOTE: ONLY MODE A
- OIL FILTER
- THE FILTER IS ACTIVE CARBON (ONLY FOR THE FILTERING VERSION)
- ACTIVE CARBON FILTER COVER
- NORMAL OPERATION OF THE COVER
- RO - INSTALLATION AND/OR USE INSTRUCTIONS
- USING THE DUCTED AIR EXTRACTION MODE
- USING THE TIMER FUNCTION
- NOTE: ONLY FOR HOODS
- LIGHTING (T5)
- FILTER ALARM SETTING
- CARE
- GREASE FILTERS
- CARBON FILTER (ONLY FOR RECIRCULATION MODELS)
- ROUND CARBON FILTER
- REPLACING THE LAMP
- UK - INSTALLATION AND OPERATION INSTRUCTIONS
- SAFETY WARNINGS
- CONNECTION TO THE ELECTRICAL MAINS
- BUKOPNCTAHHA
- BAPIAHT BIDBEHNHA
- YBARA
- YBAGA
- BAPIAHT 3 PINBTPAUCIEIO
- INCTANLAIA
- INCTANTIA
- IPEEP NOATKOM MOTAXY
- ФУНКЦИОНУВАННЯ
- MODENB A
- MODENB B
- NEPWA WBNDKICTB (T1)
- THIRD SPEED AND BOOST (PULSE) (T3) ONLY FOR MODEL A
- PIMITKA: TINBK MOEIB A
- PIICBIYUBAHHA(T5)
- HANAUTYBAHHAIPBTPY
- BIDHOBHEHHCTATCYΦINBTPIB
- DURING THE 10 SECONDS, YOU CAN RESET THE CLEANABLE FILTER INDICATOR BY PRESSING T1+T2, AND THE REPLACEABLE FILTER INDICATOR BY PRESSING T1+T3. AFTER PERFORMING THIS ACTION, THE COMBINATION OF BUTTONS MUST BE RELEASED. THE INDICATOR WILL FUNCTION AS BEFORE
- FOR CLEANING, USE A SPECIAL CLOTH MOISTENED WITH A NEUTRAL LIQUID DETERGENT. DO NOT USE ABRASIVE AGENTS OR TOOLS FOR CLEANING
- MAN
- CHARCOAL FILTER (ONLY FOR RECIRCULATION MODE)
- REMOVE THE ODORS FROM THE KITCHEN
- ROUND CHARCOAL FILTER
- INSTALLATION AND COMMISSIONING INSTRUCTIONS
- INSTRUCTIONS
- ELECTRICAL CONNECTIONS
- THE PROPER INSTALLATION OF THE ELECTRICAL CONNECTIONS
- DUCTED VERSION
- WATER INLET
- CONNECTION
- DURING INSTALLATION
- MODEL A
- MODEL B
- FIRST STEP (T1)
- SECOND FLUSH (T2)
- THIRD FLUSH AND BOOSTER (T3) ONLY IN MODELS
- THIRD FLUSH (T3) ONLY IN MODELS
- EXPERT: MODEL
- LAMP (T5)
- WATER SUPPLY
- WATER SUPPLY CONNECTION
- TECHNICAL SERVICE
- CLEANING THE DEVICE OR THE CLEANING TOOL
- DANGER
- FILTERS
- KEMIP CY3RIW (TEK CY3RIW-COPFBIUW TYPIHNE) 19-CYPET
- DEHRENEK KEMIP CY3RICI
- WAM AYBICTBIPY
- OHU VALJATOMBEGA VERSION
- (T5)
- CUII
- E AAL DAA
Brand : ELICA
Model : PRF0166941
Category : Range hood