GL 7734 - Heating Gerlach - Free user manual and instructions
Find the device manual for free GL 7734 Gerlach in PDF.
User questions about GL 7734 Gerlach
0 question about this device. Answer the ones you know or ask your own.
Ask a new question about this device
Download the instructions for your Heating in PDF format for free! Find your manual GL 7734 - Gerlach and take your electronic device back in hand. On this page are published all the documents necessary for the use of your device. GL 7734 by Gerlach.
USER MANUAL GL 7734 Gerlach
natural_image
Exterior view of a modern outdoor heating lamp with vertical pole and circular base (no text or symbols visible)GL 7734
natural_image
Exterior view of a circular mechanical component and three vertical cylindrical components labeled 6, 7, 8, 9, 10 (no text or symbols on the components themselves)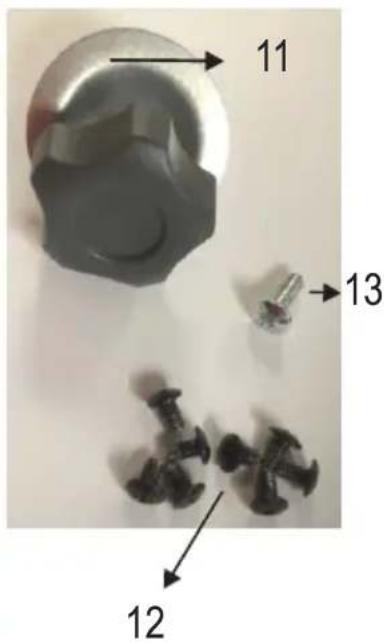
text_image
11 13 12Fig. 1
natural_image
Simple line drawing of a vertical pole-mounted tower with a flat top and a horizontal arrow pointing to the right side (no text or symbols)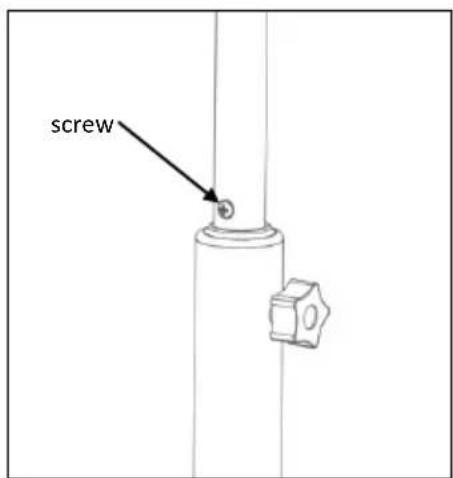
text_image
screwFig. 2
text_image
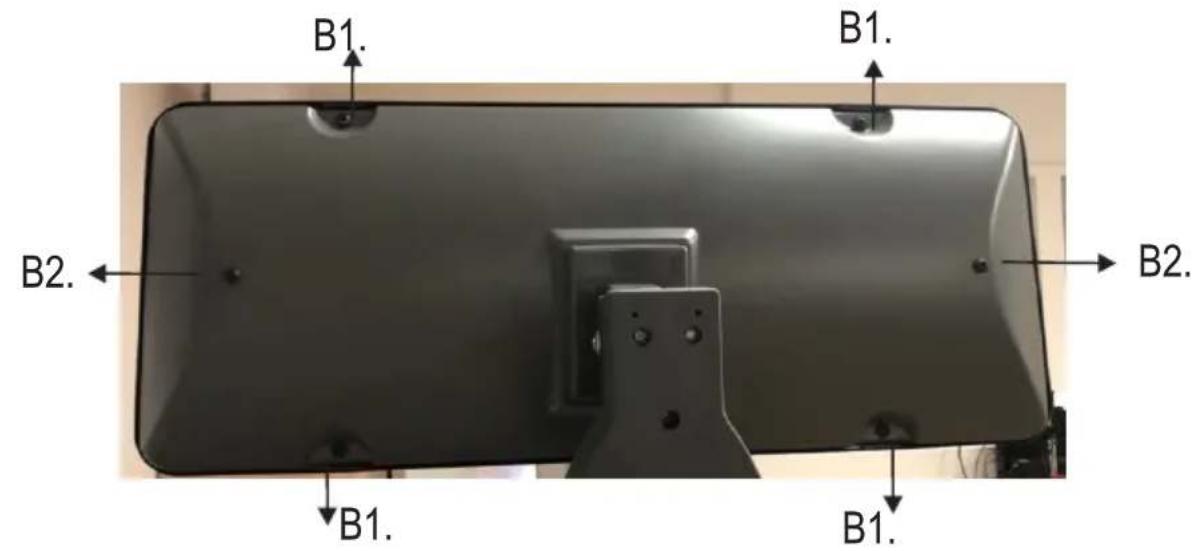
B1. B1. B2. B1. B1. B2.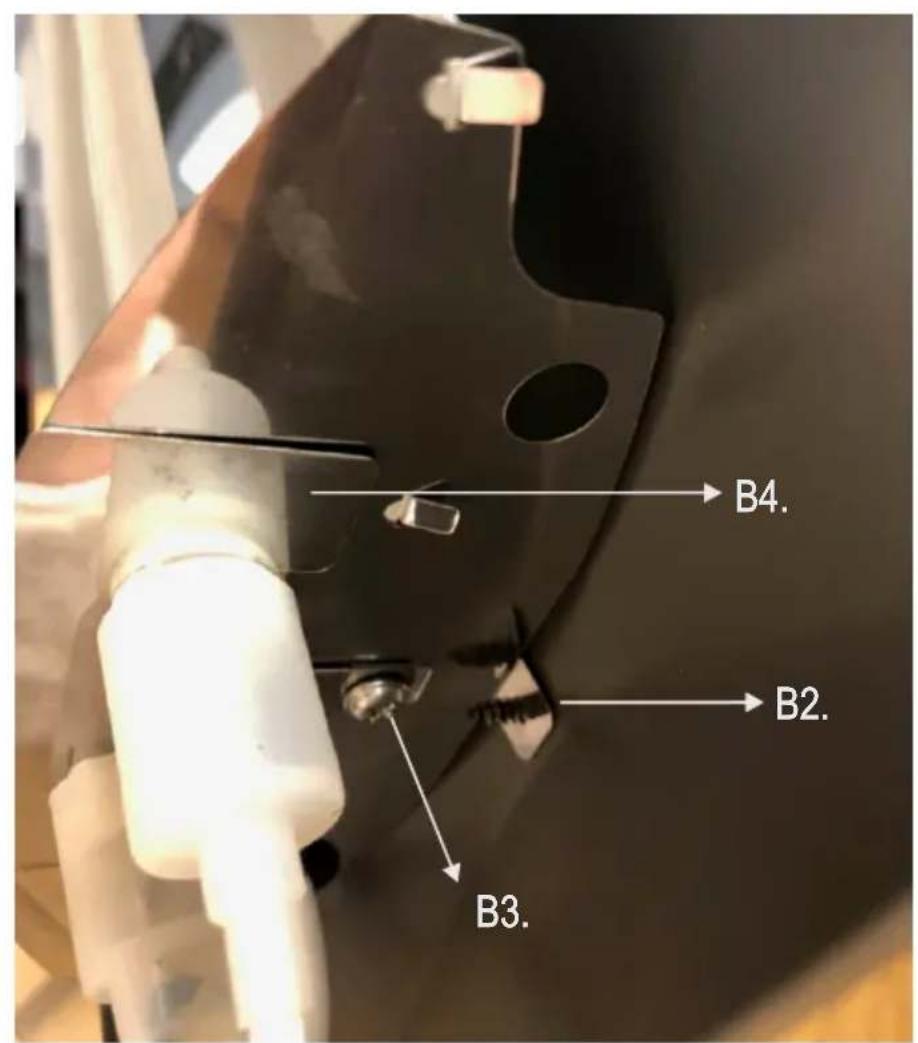
text_image
B4. B2. B3.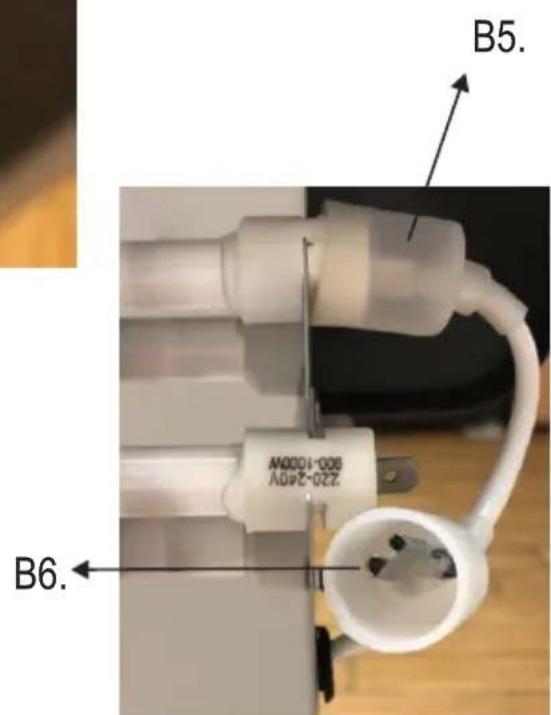
text_image
B5. 220-240V 800-1000W B6.Fig. 3
ENGLISH
GENERAL SAFETY CONDITIONS
IMPORTANT SAFETY INSTRUCTIONS FOR USE MUST BE READ CAREFULLY AND SAVED FOR LATER USE
CAUTION:
The device is NOT intended for commercial / professional use.
The device is NOT suitable for indoor use.
Attention! Before using, it is essential to read this manual in order to avoid any accidents and for the correct use of the device. Keep this manual and keep it so that it can be easily used when needed.
I. INSTRUCTIONS CONCERNING SAFETY OF USE
- Before use, check that the voltage given on the rating plate corresponds to the local power supply parameters, but remember that the designation: AC- is alternating current and DC - is direct current.
- The device must only be connected to a 220-240 V \~ 50/60 Hz earthed socket.
- Unwind and straighten the power cord before use. Keep the power cord away from the hot heater body.
- Make sure that the power cord and plug have no visible damage.
- Before and during use, make sure that the power cord is not stretched over an open fire or other heat source and over sharp edges that may damage the cable insulation.
- Before the first use, remove all packaging elements. Attention! In the case of a housing with metal elements, an invisible protective foil may be stretched over these elements, which must also be removed.
- The device should not be used by children, persons with reduced physical, sensory and mental capabilities without the supervision of authorized or experienced persons and always in accordance with these instructions.
- The equipment is not intended to be operated using external timers or a separate remote control system.
WARNING: This equipment may be used by children over 8 years of age and people with reduced physical, sensory or mental capabilities, or people with no experience or knowledge of the equipment, ONLY if it is done under the supervision of a person responsible for their safety or if they have been instructed on the safe use of the device and are aware of the dangers associated with its use. Children should not play with the equipment. Cleaning and maintenance of the device should not be performed by children, unless they are over 8 years old and these activities are performed under the supervision
- The device must not be left unattended during operation.
- Do not immerse the device and the power cord in water or any other liquids.
- When the device is not used, it should always be disconnected from the power socket.
- When removing the plug from the socket, never pull the power cord by the plug.
- It is not allowed to put ANY OBJECTS inside the device
- The manufacturer is not responsible for any damage caused by improper use of the
device.
- Remember that some parts of the device and housing become very hot during operation, so be extremely careful not to touch them, you may get burned.
- NEVER cover the appliance while it is in operation or when it is not completely cold
- Remember that the appliance's heating elements take time to cool down completely.
- When using the device, ensure adequate space above and around the device, during operation, the device must not touch any easily flammable objects such as decorations, paper towels, curtains, clothing, etc.
- Keep a distance of at least 1 m from other objects.
- The device cannot be used with external timer switches or other separate remote control systems
- Do not expose the device to direct weather conditions such as rain.
- Periodically check the condition of the power cord. If the power cord is damaged, it should be replaced by a specialist repair shop in order to avoid a hazard
- Do not use the device near flammable materials
- Do not use this heater in the immediate vicinity of a swimming pool
- Do not use if there are visible signs of damage to the heater
- The heater must not be placed directly under an electrical socket.
- Use the heater on a level and stable surface or attach it to the wall if the manufacturer has provided for it.
It is recommended that, for increased safety, the electrical installation should be equipped with an automatic residual current device with a starting current of 30mA.
Note: If the power cord or plug is damaged, it must be replaced or repaired by a specialized repair shop.
II. WARNINGS
- Never use the device if it is damaged or not functioning properly.
- Never use the device if it has previously been dropped and shows visible signs of damage.
- Do not use extension cords or other electrical outlets that do not comply with applicable electrical standards and regulations.
- Any repair, disassembly or replacement of any parts should always be performed by a specialized facility.
- In the event that the device and components such as electrical contacts, plug or cable get wet, dry the device and its components before use.
- Do not use the device with wet hands.
- If you are concerned that the device has been damaged, NEVER repair the device yourself.
- Never wash the device under running water or in such a way that water drips down to it.
- Make sure the device has cooled down before storing.
- Do not touch the housing during use. Only the knobs and switches should be used during work. After switching off, wait for the device to cool down.
11. Do not use accessories that are not recommended by the manufacturer. They can be dangerous to the user and may damage the device.
BEFORE FIRST USE
Check that all connections are completely secure and that the device is securely positioned before using it. The device must be placed at a distance of at least 1 meters from the nearest wall. The box with the switch must be at least 30 cm from a ceiling and 1.80 meters above the ground. The device must be placed firmly on an even and completely horizontal surface.
ASSEMBLING
- Place the lower part of the stand (7) on the round base (6) so that the screw holes align. From the bottom of the base, screw in the large knob with a metal washer (11).
- Slide the central part of the stand (8) over the lower part (7). Insert the 4 screws through the double holes and tighten them firmly.
- Then attach the upper part of the stand (9) to the central part (8). To do this, first insert the thinner adjustable part of the stand (10) into the upper part of the stand (9). Insert the 4 screws through the double holes and tighten them firmly.
- Pull out the thinner adjustable part of the stand (10) as far as you want and tighten the fixing knob (5).
- Put the head housing (1) on the top of the stand (10) and tighten the head with the screw (13) on the back of the head.
- The head has a vertically adjustable tilt angle in 3 positions, press the head down or up to choose the best angle of heat.
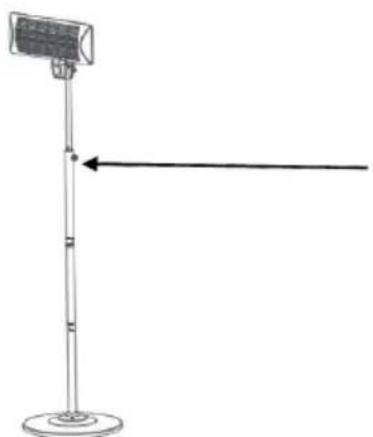
- The thin part of the stand (10) can rotate 360 °, allowing the head (1) of the device to be directed in any direction. The electric cable can be attached to the cable holders on the stand.
Device description – picture 1
-
Head housing 2. Grid 3. ON / OFF switch
-
Stand 5. Fixing knob 6. Round base
-
Stand, lower part 8. Stand, central part 9. Stand, upper part
-
Stand, thinner adjustable part 11. Large knob with a metal washer
-
8 short screws for mounting the stand 13. Screw for securing the head
- Point the head of the device in the correct direction.
- Insert the plug into the socket (220-240V / 50Hz).
- The device is switched on and off by the ON/OFF switch (3).
You also select the heating power output with the switch:
$$ 0 = 0 \text { Watt } $$
$$ \text { Left: } = \text { low power 1000W } $$
$$ \text { Left } + \text { Right } = \text { high power } 2 0 0 0 W $$
- The device does not have a thermostat and continues to give out heat until it is switched off. Always keep a close eye on the device when it is switched on!
- Remove the plug from the socket when the device is not in use.
Heating element replacement - see page 3
-
Set the power switches to position 0. Disconnect the device from power.
-
Remove the 2 upper and 2 lower screws (B1) on the back of the head (1). Remove the heater cover - the grille (2).
- Remove the 2 screws (B2) holding the reflector.
- Unscrew the 2 side screws (B3) on the reflector, remove the part of the reflector that supports the heating elements at the front (B4), and then slide the insulating hat (B5) towards the wires.
- Squeeze the connector (B6) between your fingers, and then pull the connectors away from the heater tube. Slide the heater tube out of the reflector.
- Install the new heater in reverse order.
FALL PROTECTION
The device is equipped a fall safeguard. It will automatically switch off if, despite the precautionary measures you have taken, the device falls over. In this event, unplug the device immediately.
Always check the device carefully for damage, then put it upright again. Never use a damaged device but take it to your dealer or a recognized service point to be checked and/or repaired.
If you cannot find any damage, set the switch (3) on position 0, then plug in and switch on. Monitor the device closely for the first fifteen minutes; if any defects occur, unplug immediately and take it to your dealer/service point to be repaired.
CLEANING
- Always switch the device off and unplug before cleaning. Clean using a damp cloth and, if necessary, a little cleaning fluid. Never use corrosive or abrasive cleaning agents!
- Dust and debris may gather behind the grille (2). The grille can be removed by unscrewing the four small screws (B1) and gently lifting off. Use a soft brush to carefully remove dust and debris. Never use a compressor as this could damage the lamps or the reflector. Replace the grille and secure.
TECHNICAL DATA
Power: 2000W
Power supply: 220-240 \~ 50Hz
Quartz heating element 2.000 hours lifetime (model GL7734.1)
Ip24

"Caution Hot Surface" - The temperature of accessible surfaces may be higher when the equipment is in operation, which at the housing elements become hot during operation during operation, BE CAREFUL !!!
means
WARNING: In order to avoid overheating - do not cover the heater

WARNING: Do not use this equipment near swimming pools or similar water tanks
To protect your environment: please separate carton boxes and plastic bags and dispose them in corresponding waste bins. Used appliance should be delivered to the dedicated collecting points due to hazarsous components, which may effect the environment. Do not dispose this appliance in the common waste bin.
DEUTSCH
Links: = geringe Leistung 1000W
PATIO HEATER DARBIBA
KORIŠTENJE GRIJALA PATIO
- Usmjerite glavu uređaja u ispravnom smjeru.
- Utaknite utikač u utičnicu (220-240V / 50Hz).
- Uređaj se uključuje i isključuje prekidačem ON / OFF (3).
Izlaznu snagu grijanja odabirete i prekidačem:
0 = 0 W
Lijevo: = mala snaga 1000W
Lijevo + Desno = velika snaga 2000W
-
Uređaj nema termostat i nastavlja davati toplotu dok se ne isključi. Uvijek budno pazite na uređaj kada je uključen!
-
Uklonite utikač iz utičnice kada uređaj nije u upotrebi.
Zamjena grijaćeg elementa - vidi stranicu 3
- Postavite prekidače za napajanje u položaj 0. Isključite uređaj iž napajanja.
- Uklonite 2 gornja i 2 donja vijka (B1) na stražnjoj strani glave (1). Uklonite poklopac grijača - rešetku (2).
- Uklonite 2 vijka (B2) koji drže reflektor.
- Odvijte 2 bočna vijka (B3) na reflektoru, uklonite dio reflektora koji podupire grijaće elemente sprijeda (B4), a zatim gurnite izolacijski poklopac (B5) prema žicama.
- Stisnite konektor (B6) između prstiju, a zatim povucite konektore od cijevi grijača. Izvucite cijev grijača iž reflektora.
- Instalirajte novi grijač obrnutim redoslijedom.
ZAŠTITA OD PADA
Uređaj je opremljen zaštitom od pada. Automatski će se isključiti ako, uprkos preduzetim mjerama predostrožnosti, uređaj padne. U tom slučaju, odmah isključite uređaj.
natural_image
Symbol of a trash bin crossed with a diagonal line, representing waste sorting or disposal (no text or labels)$$ 0 = 0 \mathrm{W} $$
VAŽNE SIGURNOSNE UPUTE
PROČITAJTE PAŽLJIVO I SAČUVAJTE ZA BUDUĆU UPOTREBU
OPREZ:
$$ 0 = 0 \mathrm{W} $$
Lijevo: = mala snaga 1000W
Lijevo + Desno = velika snaga 2000W
- Uređaj nema termostat i nastavlja davati toplinu sve dok se ne isključi. Uvijek budno pazite na uređaj kad je uključen!
- Izvadite utikač iz utičnice kada uređaj nije u upotrebi.
Zamjena grijaćeg elementa - vidi stranicu 3
- Postavite prekidače za napajanje u položaj 0. Isključite uređaj iz napajanja.
- Uklonite 2 gornja i 2 donja vijka (B1) na stražnjoj strani glave (1). Uklonite poklopac grijača - rešetku (2).
- Uklonite 2 vijka (B2) koji drže reflektor.
- Odvijte 2 bočna vijka (B3) na reflektoru, uklonite dio reflektora koji podupire grijaće elemente sprijeda (B4), a zatim gurnite izolacijski poklopac (B5) prema žicama.
- Stisnite konektor (B6) među prstima, a zatim povucite konektore od cijevi grijača. Izvucite cijev grijača iz reflektora.
- Instalirajte novi grijač obrnutim redoslijedom.