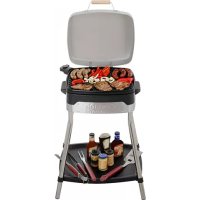
GL 6611 - Barbecue Gerlach - Free user manual and instructions
Find the device manual for free GL 6611 Gerlach in PDF.



| Product type | Electric barbecue |
| Brand | Gerlach |
| Model | GL 6611 |
| Power supply | 220-240 V ~ 50/60 Hz |
| Rated power | 1680-2000 W |
| Maximum power | 2500 W |
| Thermostat | Adjustable with temperature indicator light |
| Cooking plate | Non-stick, removable |
| Lid | With handle, removable (hinges) |
| Drip tray | Removable |
| Support legs | 4 legs with locking latches |
| Plate support | With handle, removable |
| Thermostat | Detachable with power cord |
| Usage | Indoor and outdoor (follow approval marks) |
| Safety | Do not leave unattended; do not immerse thermostat |
| Cleaning | Plate, lid, and drip tray washable with warm water and mild dish soap; do not use abrasive products |
| Warranty | Domestic use; different conditions for commercial use |
Frequently Asked Questions - GL 6611 Gerlach
User questions about GL 6611 Gerlach
0 question about this device. Answer the ones you know or ask your own.
Ask a new question about this device
Download the instructions for your Barbecue in PDF format for free! Find your manual GL 6611 - Gerlach and take your electronic device back in hand. On this page are published all the documents necessary for the use of your device. GL 6611 by Gerlach.
USER MANUAL GL 6611 Gerlach
natural_image
Exterior view of a modern kitchen appliance with a gray top and black base (no text or symbols visible)GL 6611

(GB) user manual 7
Fig.1
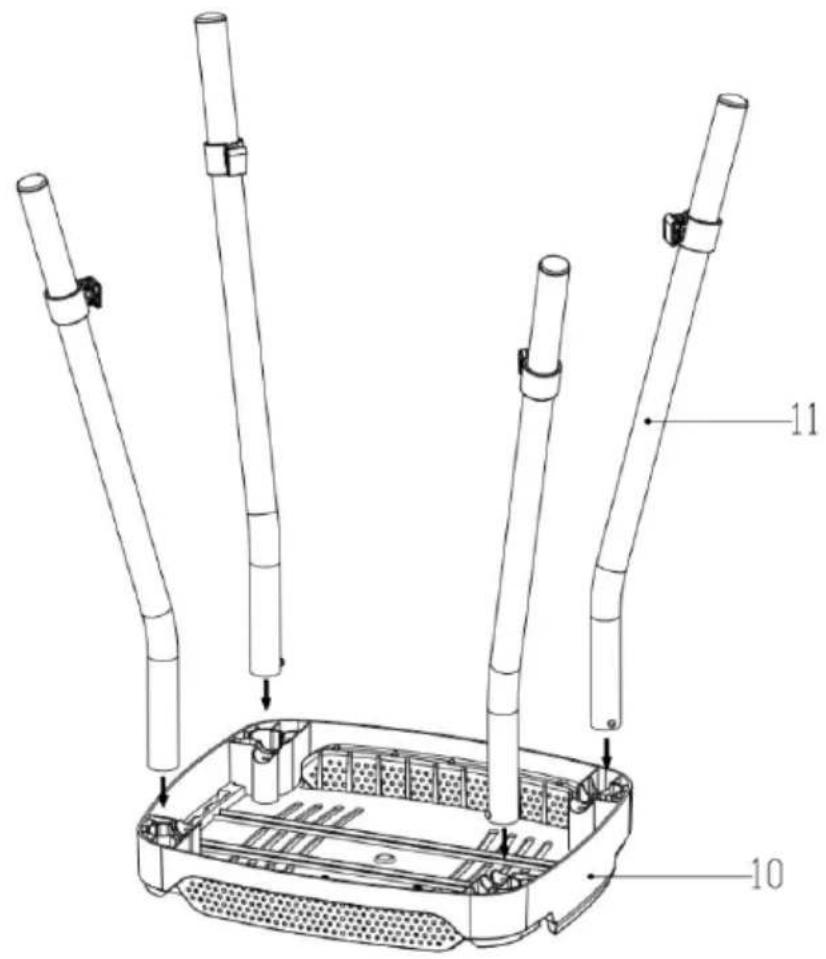
Fig.2
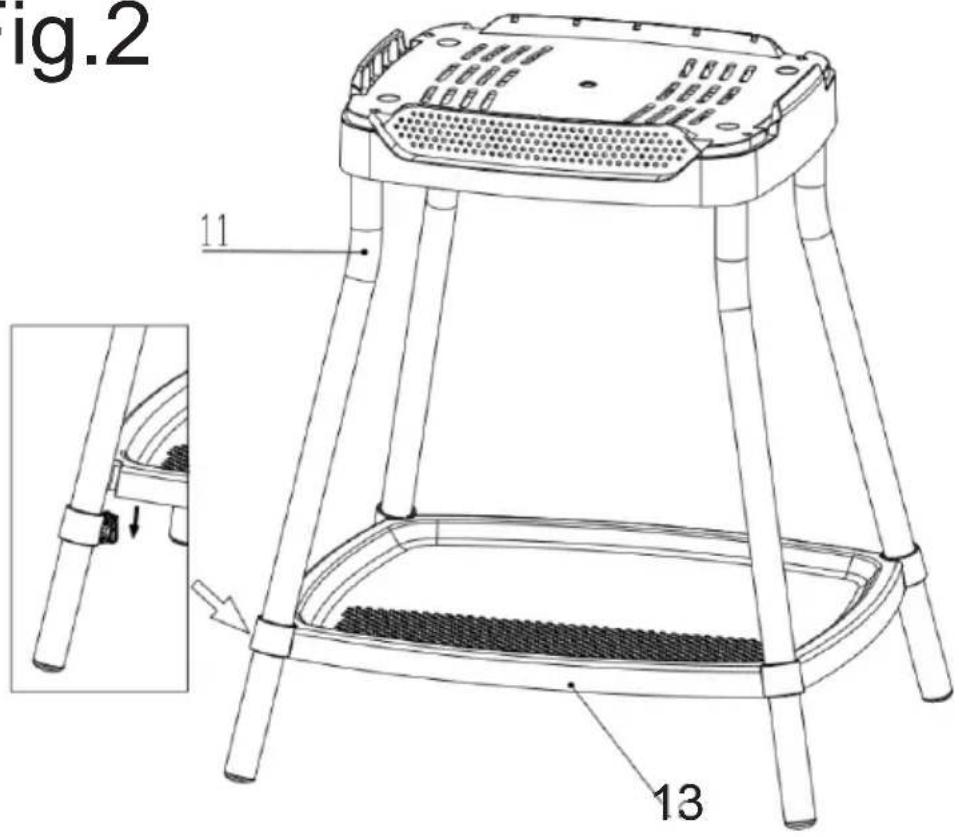
Fig.3
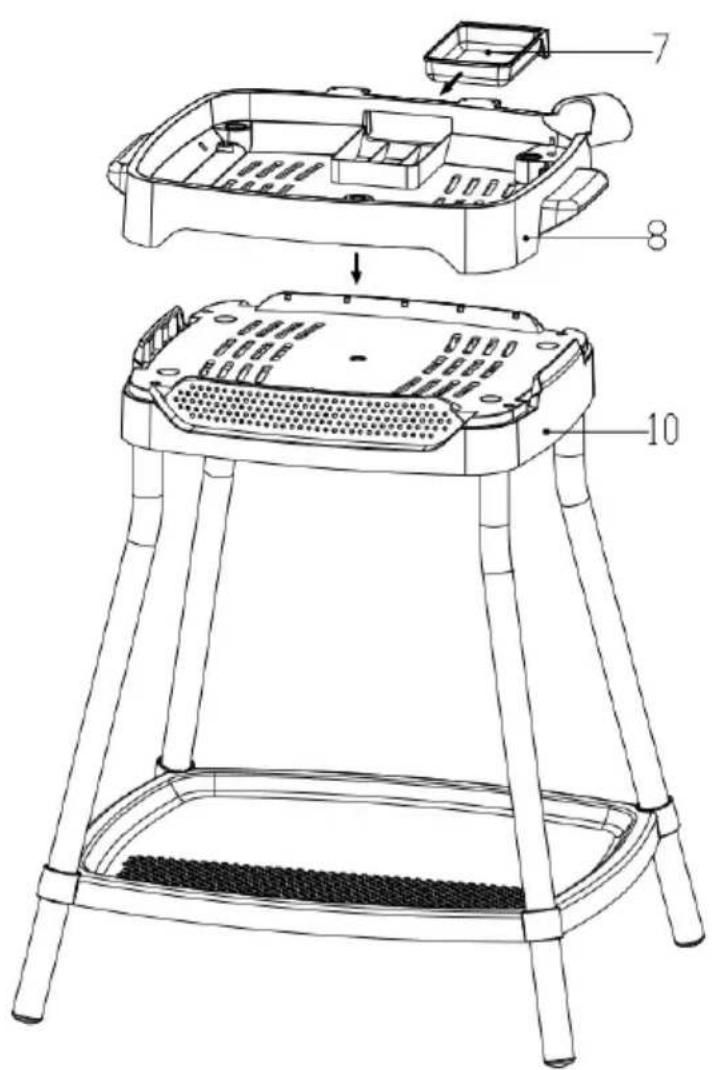
Fig.4
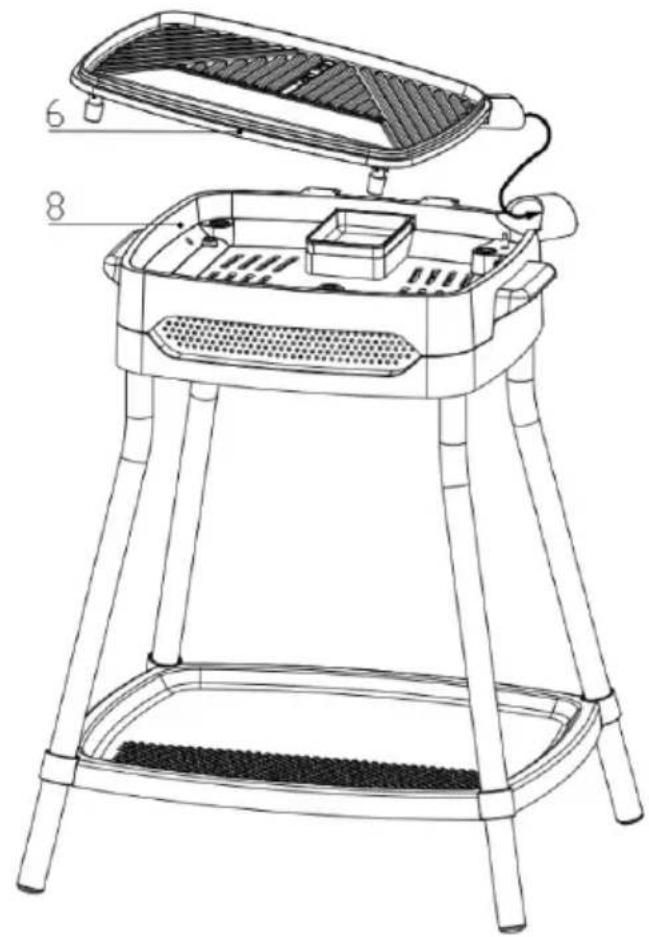
Fig.5
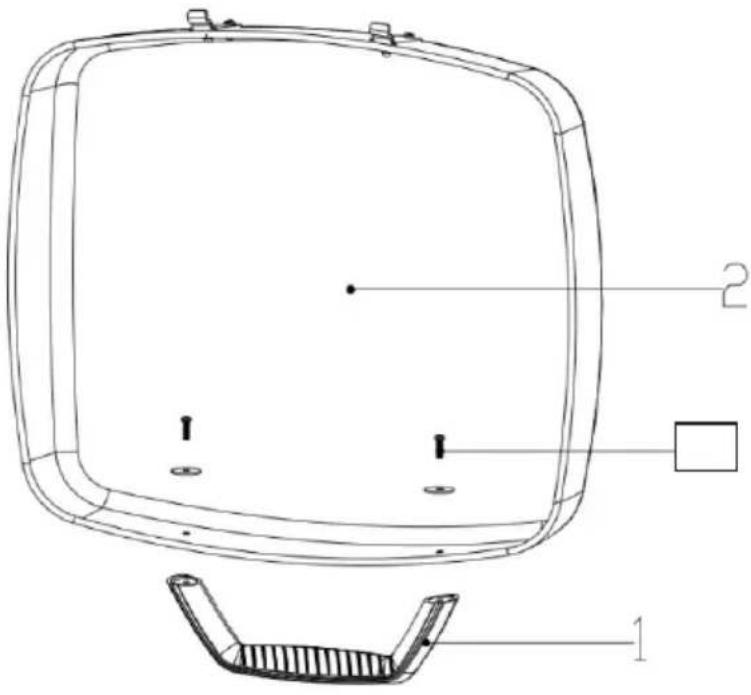
Fig.6
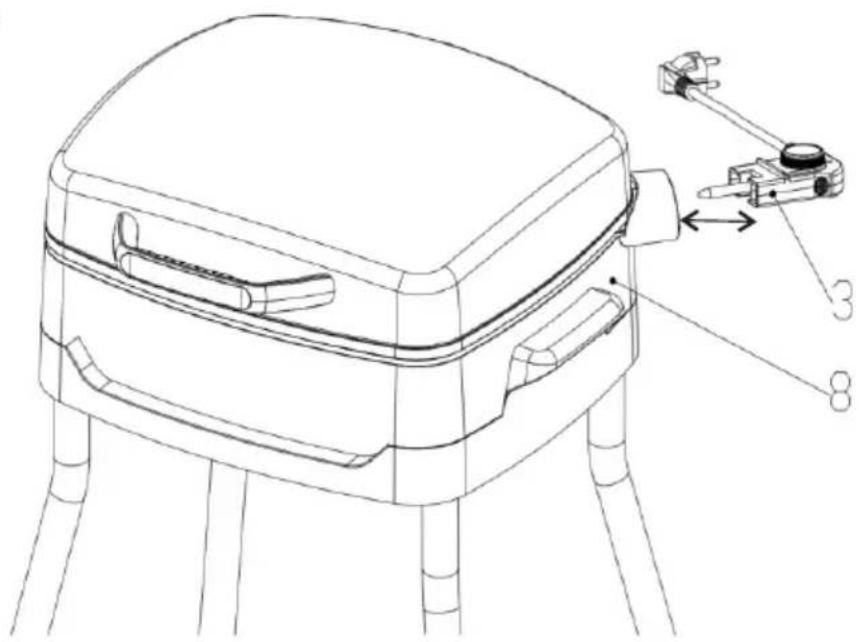
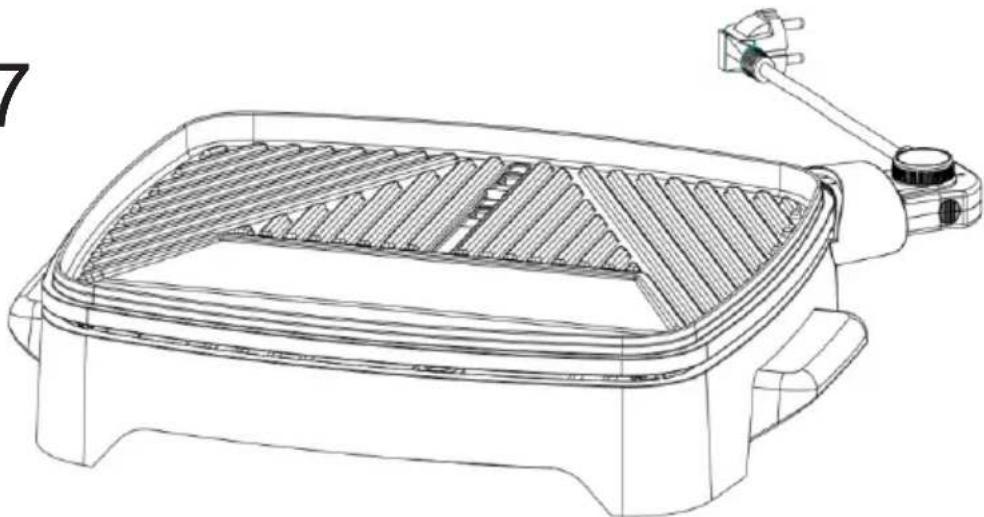
Fig.7
natural_image
Line drawing of a rectangular grater with heat sink and side-mounted stand (no text or symbols)
| PL | Produkt może być użytkowany tylko z przełącznikiem sterującym podanym w oznakowaniu sprzętu: | DCT-004A |
| GB | The product may be used only with the control switch specified in the equipment marking: | DCT-004A |
| D | Das Produkt muss mit der Kontrollmarkierung verwendet werden: | DCT-004A |
| F | Le produit doit être utilisé avec le marquage de contrôle: | DCT-004A |
| E | El producto debe utilizarse con la marca de control: | DCT-004A |
| P | O produto deve ser usado com a marca de controle: | DCT-004A |
| LT | Produktas turi būti naudojamas su kontrolès ženklu: | DCT-004A |
| LV | Produkts jālieto kopā ar kontroles marķējumu: | DCT-004A |
| EST | Toodet tuleb kasutada koos kontrollmärgisega: | DCT-004A |
| RO | Produsul trebuie utilizat cu marcajul de control: | DCT-004A |
| BIH | Proizvod se mora koristiti sa kontrolnom oznakom: | DCT-004A |
| H | A terméket az ellenőrző jelöléssel együtt kell használni: | DCT-004A |
| GR | To προϊόν πρέπει να χρησιμοποιείται με το σήμα ελέγχου: | DCT-004A |
| MK | Производот мора да се користи со контролната ознака: | DCT-004A |
| CZ | Výrobek musí být použit s kontrolním označením: | DCT-004A |
| RUS | Продукт должен использоваться с контрольной маркировкой: | DCT-004A |
| NL | Het product moet worden gebruikt met de controlemarkering: | DCT-004A |
| SLO | Proizvod se mora uporabljati s kontrolno oznako: | DCT-004A |
| HR | Proizvod se mora koristiti s kontrolnom oznakom: | DCT-004A |
| FIN | Tuotetta on käytettävä kontrollimerkinnän kanssa: | DCT-004A |
| S | Produkten måste användas med kontrollmarkeringen: | DCT-004A |
| SK | Výrobok sa musí používať s kontrolným označením: | DCT-004A |
| I | Il prodotto deve essere utilizzato con il marchio di controllo: | DCT-004A |
| SR | Производ се мора користити са контролном ознаком: | DCT-004A |
| DK | Produktet skal bruges med kontrolmærket: | DCT-004A |
| UA | Продукт повинен використовуватися з контрольною маркуванням: | DCT-004A |
| AR | ل ادhedم ل اي ف قم عالل جهازایامخدت س اجعت ن م ل ал ! ح معم ف تا مك حت ل زجو | DCT-004A |
SAFETY CONDITIONS IMPORTANT INSTRUCTIONS ON SAFETY OF USE PLEASE READ CAREFULLY AND KEEP FOR FUTURE REFERENCE
The warranty conditions are different, if the device is used for commercial purpose."
- Before using the product please read carefully and always comply with the following instructions. The manufacturer is not responsible for any damages due to any misuse.
-
The product is only to be used indoors - non-commercial. Do not use the product for any purpose that is not compatible with its application. The device can be used outdoors, observing the approval marks for the instructions.
-
The applicable voltage is 220-240V \~ 50/60Hz. For safety reasons it is not appropriate to connect multiple devices to one power outlet.
-
Please be cautious when using around children. Do not let the children to play with the product. Do not let children or people who do not know the device to use it without supervision.
5.WARNING: This device may be used by children over 8 years of age and persons with reduced physical, sensory or mental capabilities, or persons without experience or knowledge of the device, only under the supervision of a person responsible for their safety, or if they were instructed on the safe use of the device and are aware of the dangers associated with its operation. Children should not play with the device. Cleaning and maintenance of the device should not be carried out by children, unless they are over 8 years of age and these activities are carried out under supervision.
- After you are finished using the product always remember to gently remove the plug from the power outlet holding the outlet with your hand. Never pull the power cable!!!
-
Never put the power cable, the plug or the whole device into the water. Never expose the product to the atmospheric conditions such as direct sun light or rain, etc.. Never use the product in humid conditions.
-
Periodically check the power cable condition. If the power cable is damaged the product should be turned to a professional service location to be replaced in order to avoid hazardous situations.
-
Never use the product with a damaged power cable or if it was dropped or damaged in any other way or if it does not work properly. Do not try to repair the defected product yourself because it can lead to electric shock. Always turn the damaged device to a professional service location in order to repair it. All the repairs can be done only by authorized service professionals. The repair that was done incorrectly can cause hazardous situations for the user.
-
Never put the product on or close to the hot or warm surfaces or the kitchen appliances like the electric oven or gas burner.
-
Never use the product close to combustibles.
12.Do not let cord hang over edge of counter or touch hot surfaces. - Never leave the product connected to the power source without supervision. Even when use is interrupted for a short time, turn it off from the network, unplug the power.
-
In order to provide additional protection, it is recommended to install residue current device (RDC) in the power circuit, with residual current rating not more than 30 mA. Contact professional electrician in this matter.
-
Put the device on surfaces which are resistant to high temperature.
- Do not place any objects on the closed grill.
- For adequate air circulation is necessary minimum distance of 30cm from all sides of device.
- Do not place the device on a fast intermittently hot surfaces.
- Do not place the device on the gas or electric stove, near the wall, as well as in close proximity to heat sources.
- Do not use this device with charcoal or similar combustible materials.
- Before cleaning, movement, dismantling, assembling and storing the grill: Turn off the device, disconnect it from the mains and wait until the grill will cool down.
- Accessible surface temperatures can be high when the appliance is operating.

-
Never touch the hot surfaces of the appliance
-
Never carry the device when it is turned on or when it is hot.
- Do not place the device under kitchen shelves, due to the rising heat and steam.
- The power cord can not be laid over the device, and should not touch or be near hot surfaces. Do not place the device under an electrical socket.
- Clean the unit after each use.
- Do not use the appliance with wet hands.
- Do not touch the surface of the device with any sharp objects (eg. a knife)
- Do not cover the heating plate with aluminium foil, etc., as this can cause cummulation of heat and damage the plastic parts and coating.
- Do not put utensils on the heating plates during use. Grill should be opened with a handle or grip according to the model.
32.Do not use plastic utensils when handling the grill, it can melt. - The equipment is not designed to operate using external timers or a separate remote system.
DESCRIPTION OF THE DEVICE
| 1.Grill Lid handle | 2.Grill Lid | 3.Detachable temperature Regulator with power cord | ||
| 4.Temperature indicator lamp | 5. Thermostats | 7. Fat tray | 8.Grill plate holder | |
| 9.Grill plate holder handle | 10.ase of the grill plate | 11.Support legs | 12.Food tray holder | 13.Food tray |
| 14.Hinges | 15. Hinge holes | B | ||
Installation instructions:
- Put the four supporting legs (1 – 1) into the (10) four holes in to the base of the grill - according with fig. 1 (the supporting legs are equipped with latches
- Put the food trey on the holders - according with fig. 2
- Put the grill plate holder (8) with the oil tray (7) in to the base of the grill (10) -according with fig. 3
- Place the heating plate (6) in the grill plater holder(8) according with fig. 4
- Screw the handle (1) to the grill lid (2) - according with fig. 5
- Place the grill lid (2) on the grill plate holder (8) by inserting the hinges (14) into the holes hinges (15).
The heating plate(6) must only be used Together with
the grill plate holder(8) ! Fig. 7
Recommendation: No grill lid for indoor use.
Attention Please take care. Avoid tripping over by the power cord when operating the appliance, Arrange the power cord so its out of your way. Remember to remove the plug after use.
Before using the appliance for the first time
-Remove all the packaging materials and wash the heating plate(6).Oil collecting tray(7) and grill lid(2)
Important: Dry all the different parts thoroughly.
This applies especially to the power inlet socket.
Never immerse the power cord with regulator(3) in water. Heat the grill to its maximum setting for about 3-5minutes, with the roasting lid in place and without any food. Residues left from manufacturing may cause some smell and smoke when the appliance is used for the first time.
USING THE DEVICE
After Installation
- Connect the thermostat (3) to the thermostat socket (5). Fig. 6
- Insert the grounding plug.
- Adjust the baking temperature with the thermostat (3), to the type of food being grilled. To keep food warm, set the thermostat to the "ON" position and cover with the lid (2) holding the handle (1),
When the thermostat indicator light (4) goes out, it means that the grill has reached the right temperature and is ready for use
When the indicator light is on, it means that the grill is heating up. During operation, the thermostat light turns on and off to indicate that the thermostat is working.
- After grilling, turn the thermostat to the "OFF" position and disconnect the grill from the power source and allow it to cool down.
CAUTION: When turned on for the first time, the grill may produce a small amount of smoke due to heating of some parts. It's normal.
Suggestion: leave the grill on for a few minutes to get rid of the factory smell.
CLEANING AND MAINTENANCE
- Before cleaning the grill, make sure it is cool to the touch and disconnected from the power source.
- Clean the hob, lid and fat tray in warm water with a mild washing-up liquid. Do not soak the thermostat socket (5) in water. Do not clean the appliance with sharp, abrasive cloths or sponges, or use cleaning powders as they may damage the smooth, non-stick coating of the plate.
3 After cleaning, wipe the cleaned parts dry. - Do not immerse the thermostat, cable or plug in water or other liquids.
TECHNICAL DATA
Power source: 220-240V\~50/60Hz Power Nom.: 1680-2000W Power Max: 2500W
Please transfer cardboard packaging to waste paper. Pour the polyethylene bags (PE) into the plastic container Worn device should be returned to the appropriate point storage because it is dangerous in the device ingredients may pose a threat to the environment. The electrical device should be handed over to limit its reuse and use. If in the device there are batteries you have to take out and give to the point stored separately.
(DE) DEUTSCH
BESCHRIJVING VAN HET APPARAAT
natural_image
Symbol of a trash bin crossed with a diagonal line, representing waste sorting or disposal (no text or labels)natural_image
Modern kitchen mixer with whisk and bowl (no visible text or symbols)Planetary Mixing System GL 4219
natural_image
Clear glass coffee maker with black handle and silver lid, no visible text or symbolsKettle GL 1296
natural_image
Black rectangular kitchen oven with a lid and control knob (no visible text or symbols)Waffle Maker GL 3048
natural_image
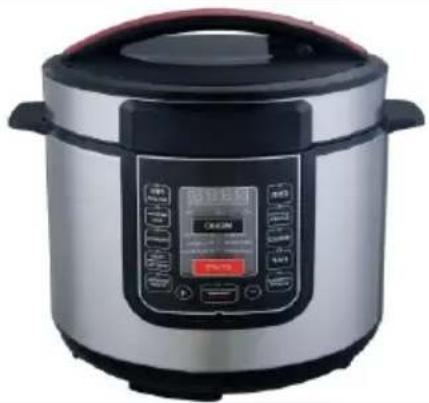
Exterior view of a modern rice cooker with digital display and control buttons (no visible text or symbols)Pressure Cooker GL 6412
natural_image
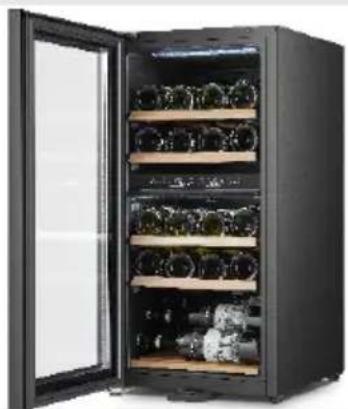
Exterior view of a modern black double-chamber refrigerator with open door opening (no visible text or symbols)Wine Cooler GL 8079
Hair Clipper GL 2829
natural_image
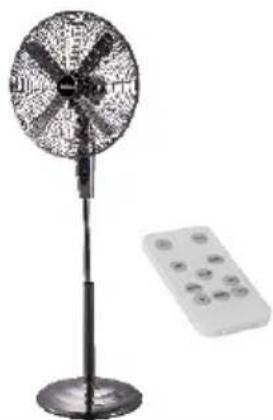
Exterior view of a modern office building (no signage)Stand Fan With Remote GL 7325
natural_image
Close-up of a hairbrush and comb station with digital display (no visible text or symbols)Trimmer Set GL 2932
natural_image
White electrician meat maker with handle and blade (no visible text or labels)Meat Mincer GL 4812

- GL 6611
- SAFETY CONDITIONS IMPORTANT INSTRUCTIONS ON SAFETY OF USE PLEASE READ CAREFULLY AND KEEP FOR FUTURE REFERENCE
- Installation instructions:
- Before using the appliance for the first time
- USING THE DEVICE
- After Installation
- CLEANING AND MAINTENANCE
- TECHNICAL DATA
- (DE) DEUTSCH
- BESCHRIJVING VAN HET APPARAAT
Brand : Gerlach
Model : GL 6611
Category : Barbecue