
Chef & Major KM350 - Food Processor KENWOOD - Free user manual and instructions
Find the device manual for free Chef & Major KM350 KENWOOD in PDF.
| Product type | Food processor |
| Brand | Kenwood |
| Model | Chef & Major KM350 |
| Maximum capacity (yeast dough) | Up to 2.6 kg flour, 5 kg total weight |
| Maximum capacity (shortcrust pastry) | Up to 1.3 kg flour |
| Maximum capacity (egg whites) | Up to 16 whites |
| Speeds | Variable with pulse mode |
| Power | 1000 W (estimated) |
| Power supply | 220-240 V, 50/60 Hz |
| Dimensions (L x W x H) | Approximately 400 x 250 x 300 mm |
| Weight | Approximately 12 kg |
| Bowl material | Stainless steel or plastic depending on version |
| Included accessories | K-beater, whisk, dough hook, spatula, splash guard (depending on model) |
| Main functions | Knead, mix, whisk, beat |
| Care and cleaning | Wipe motor unit with damp cloth; accessories and bowl dishwasher safe; stainless steel bowl without metal brush |
| Safety | Automatic shut-off in case of overload; head locking; do not use if damaged |
| Spare parts available | Many optional accessories (meat grinder, citrus press, etc.) |
| Repairability | Power cord replaceable by Kenwood authorized repairer |
Frequently Asked Questions - Chef & Major KM350 KENWOOD
User questions about Chef & Major KM350 KENWOOD
0 question about this device. Answer the ones you know or ask your own.
Ask a new question about this device
Download the instructions for your Food Processor in PDF format for free! Find your manual Chef & Major KM350 - KENWOOD and take your electronic device back in hand. On this page are published all the documents necessary for the use of your device. Chef & Major KM350 by KENWOOD.
USER MANUAL Chef & Major KM350 KENWOOD
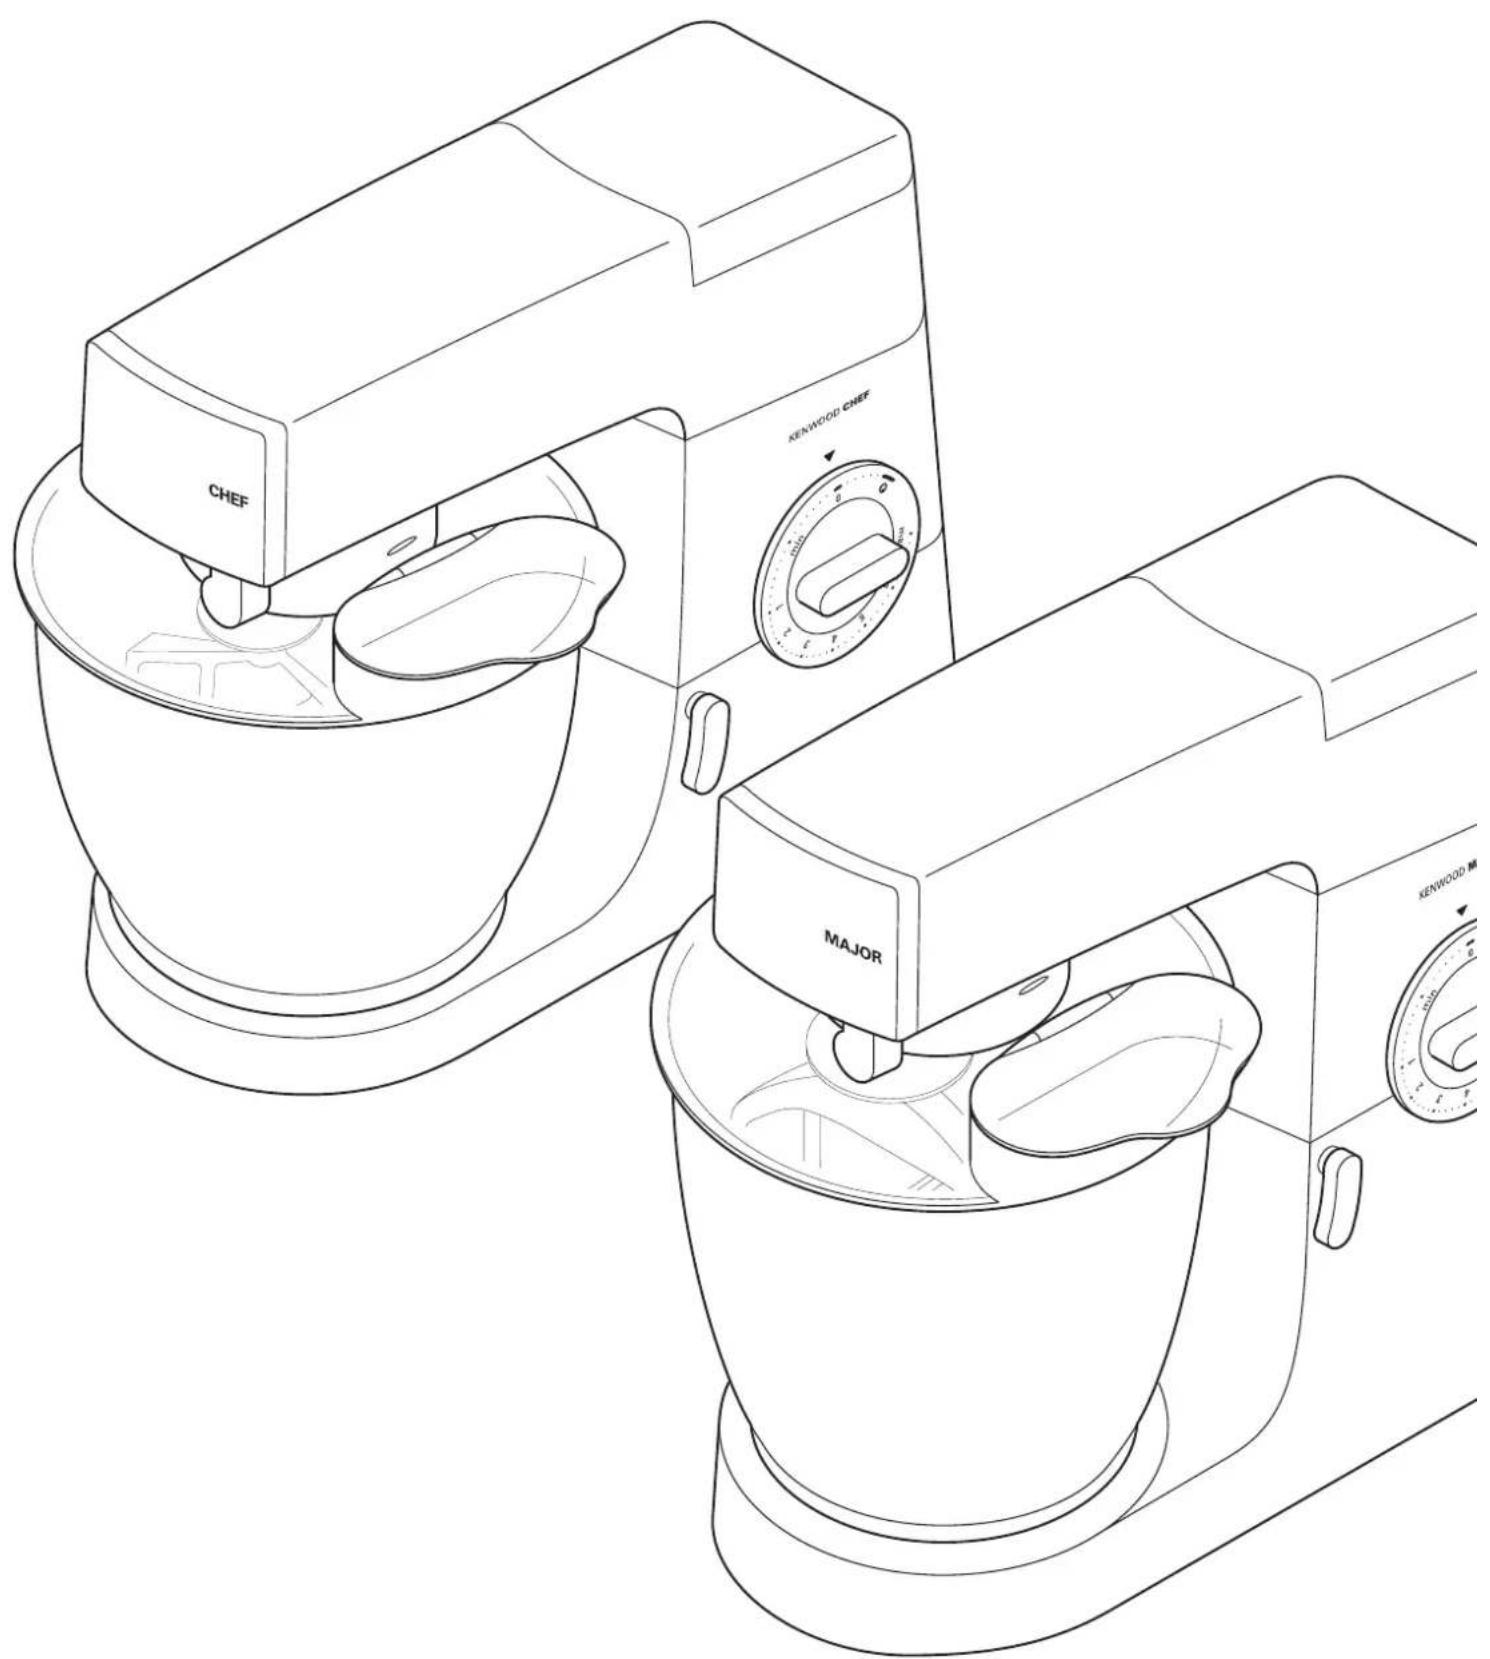
Chef and Major KM330 - KM630 series
KENWOOD
Kenwood
English
page 3 instructions
Congratulations on buying a Kenwood. With such a wide range of attachments available, it's more than just a mixer. It's a state-of-the-art kitchen machine. We hope you'll enjoy it. Robust. Reliable. Versatile. Kenwood.
Français
know your Kenwood kitchen machine
before using your Kenwood appliance
- Read these instructions carefully and retain for future reference.
- Remove all packaging and any labels.
- Switch off and unplug before fitting or removing tools/attachments, after use and before cleaning.
- Keep your fingers away from moving parts and fitted attachments.
- Never leave the machine on unattended.
- Never use a damaged machine. Get it checked or repaired: see 'service', page 8.
- Never operate the mixer with the head in the raised position.
- Never let the cord hang down where a child could grab it.
- Never let the power unit, cord or plug get wet.
- Never use an unauthorised attachment or more than one attachment at once.
- Never exceed the maximum capacities on page 4.
- When using an attachment, read the safety instructions that come with it.
- Take care when lifting this appliance as it is heavy. Ensure the head is locked and that the bowl, tools, outlet covers and cord are secure before lifting.
- This appliance is not intended for use by persons (including children) with reduced physical, sensory or mental capabilities, or lack of experience and knowledge, unless they have been given supervision or instruction concerning use of the appliance by a person responsible for their safety.
- Children should be supervised to ensure that they do not play with the appliance.
- Only use the appliance for its intended domestic use. Kenwood will not accept any liability if the appliance is subject to improper use, or failure to comply with these instructions.
safety
before plugging in
- Make sure your electricity supply is the same as the one shown on the underside of your machine.
- This machine complies with European Economic Community Directive 89/336/EEC.
before using for the first time
- Wash the parts: see 'care and cleaning', page 8.
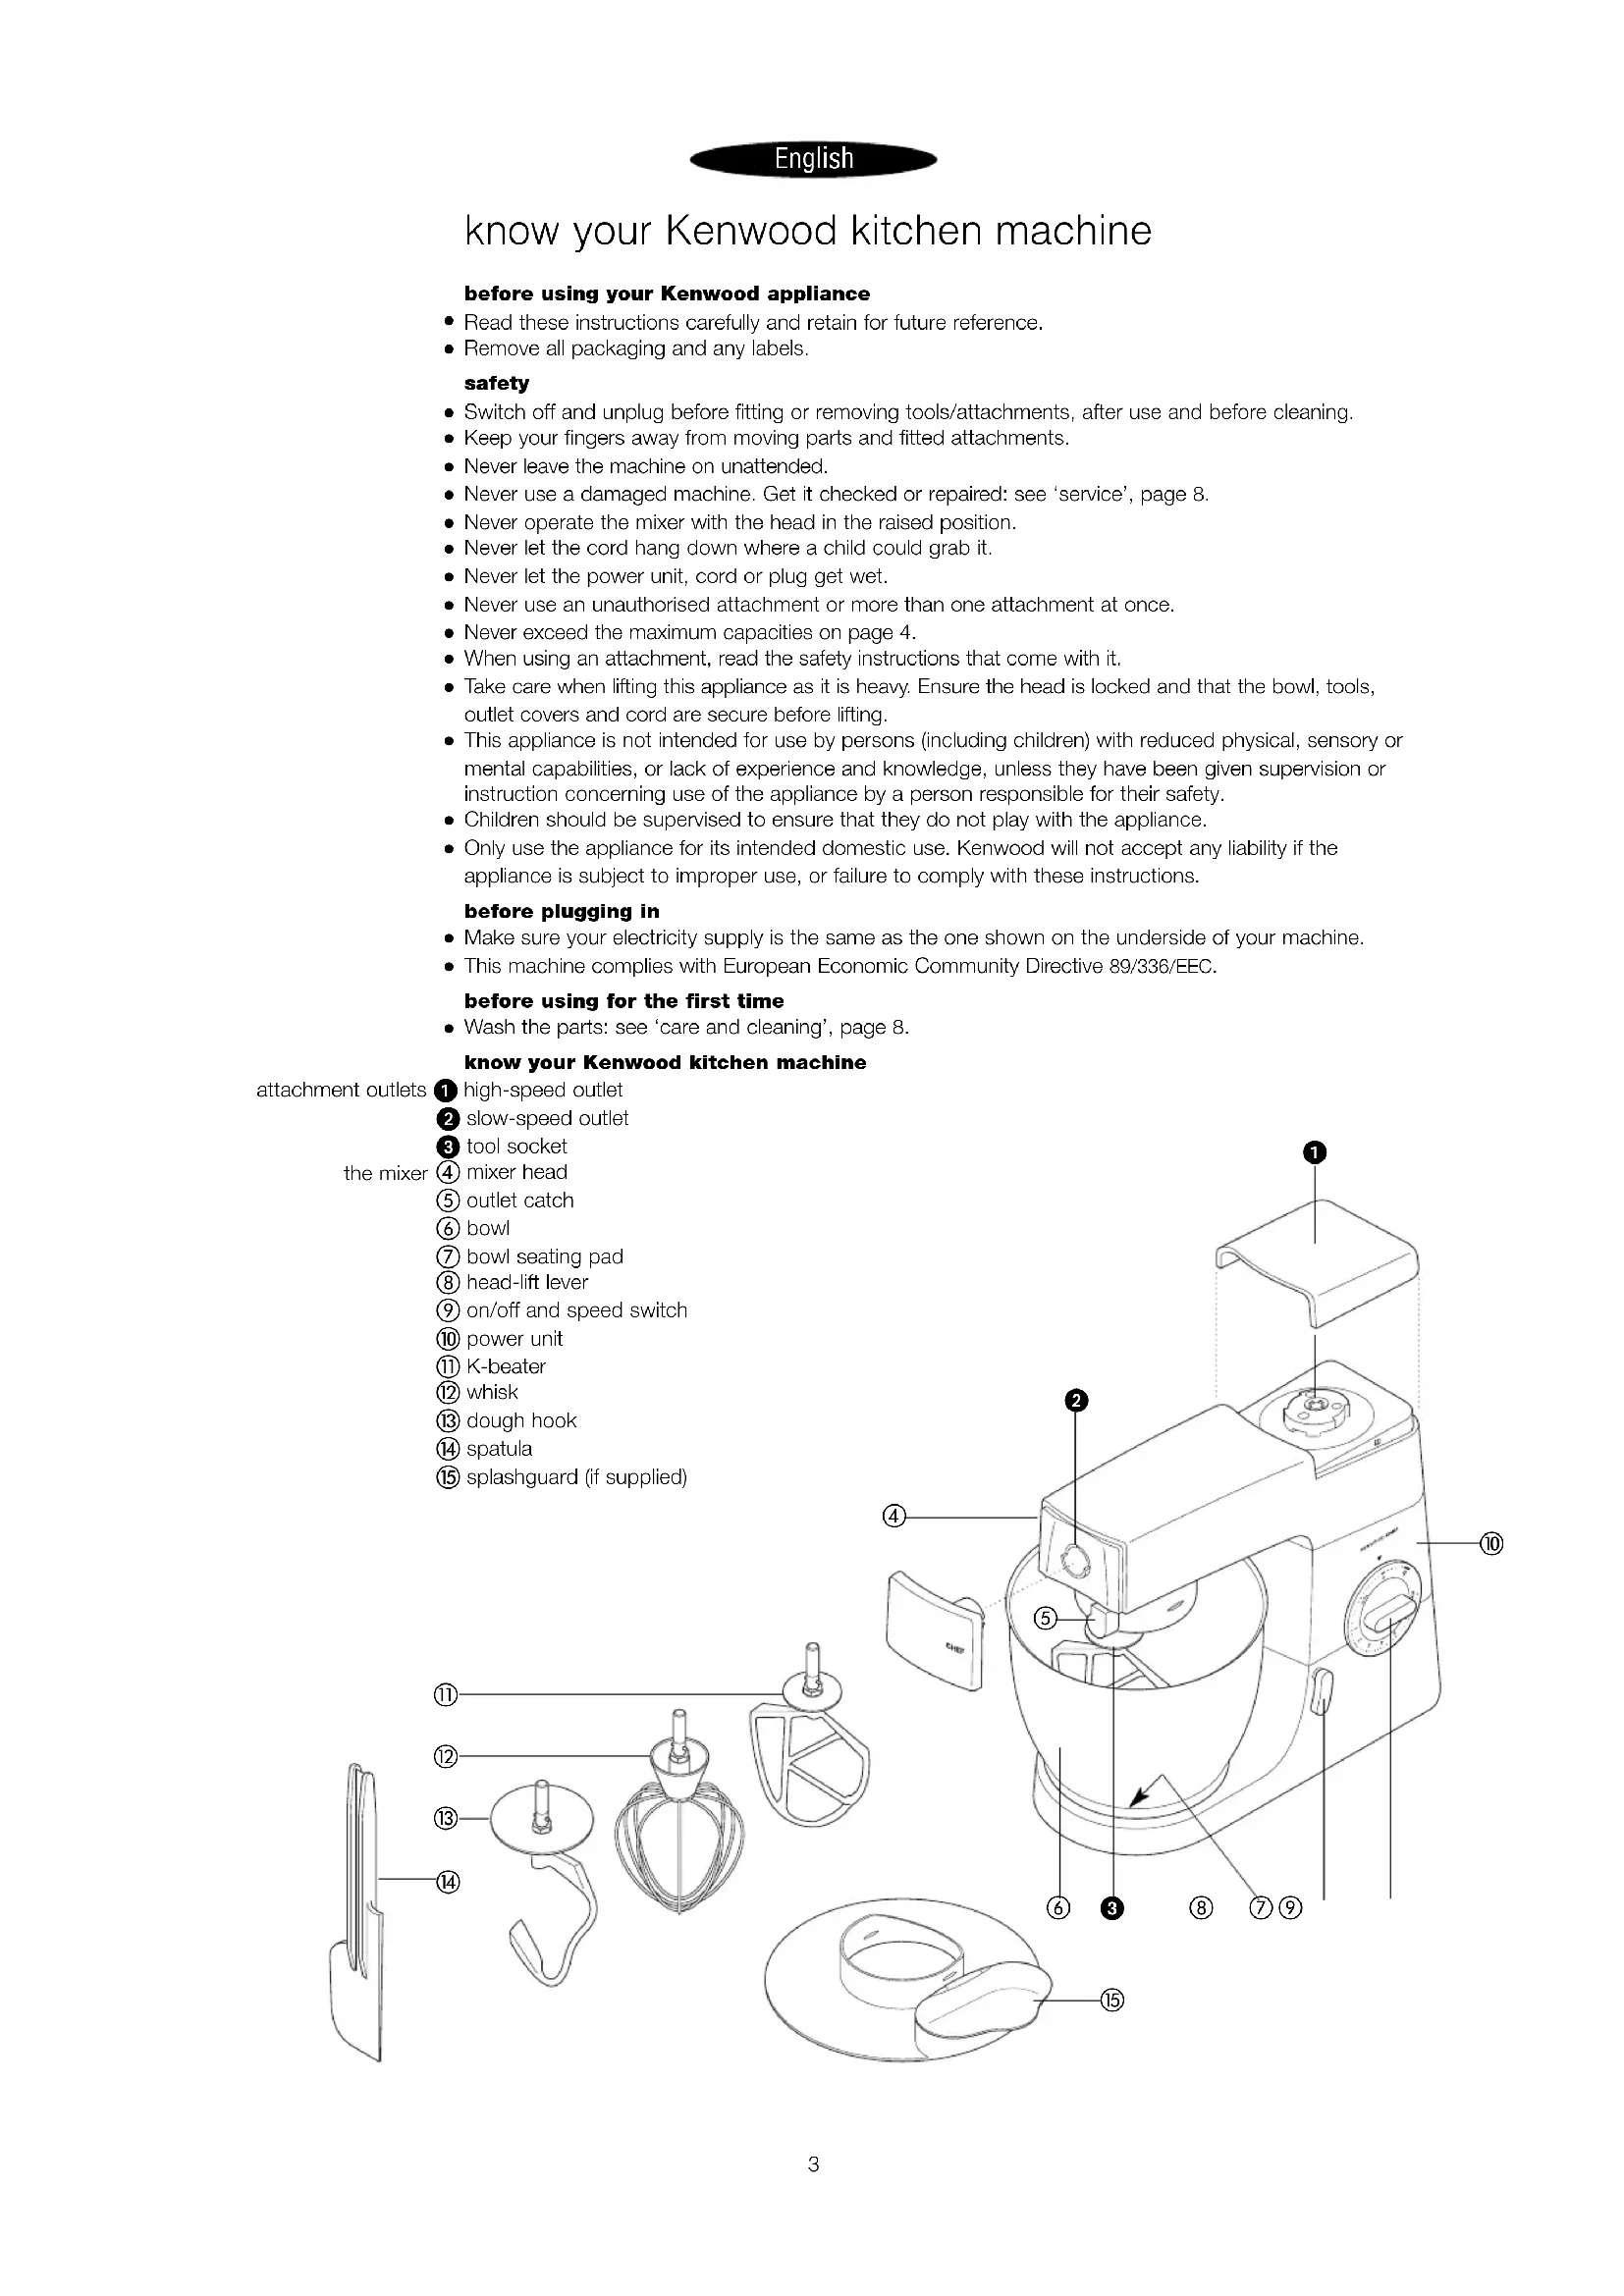
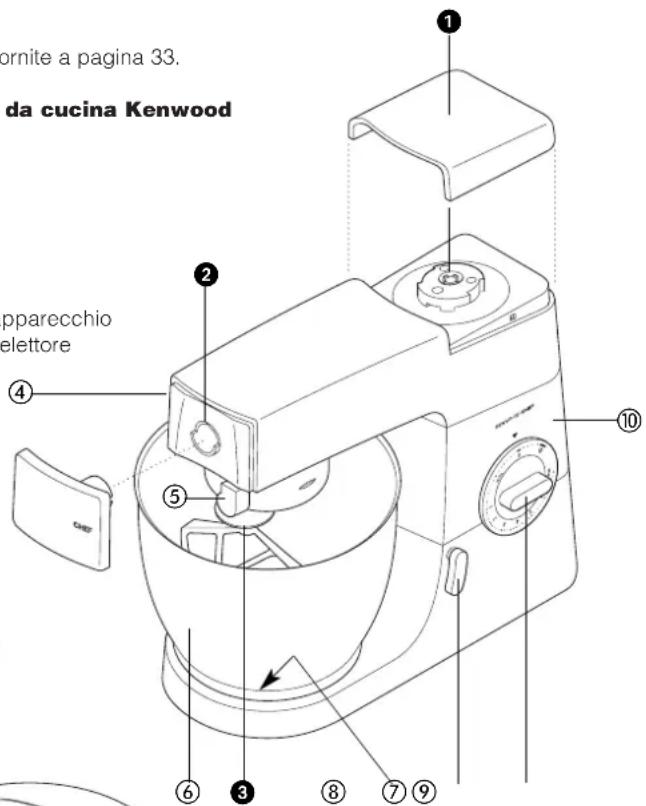
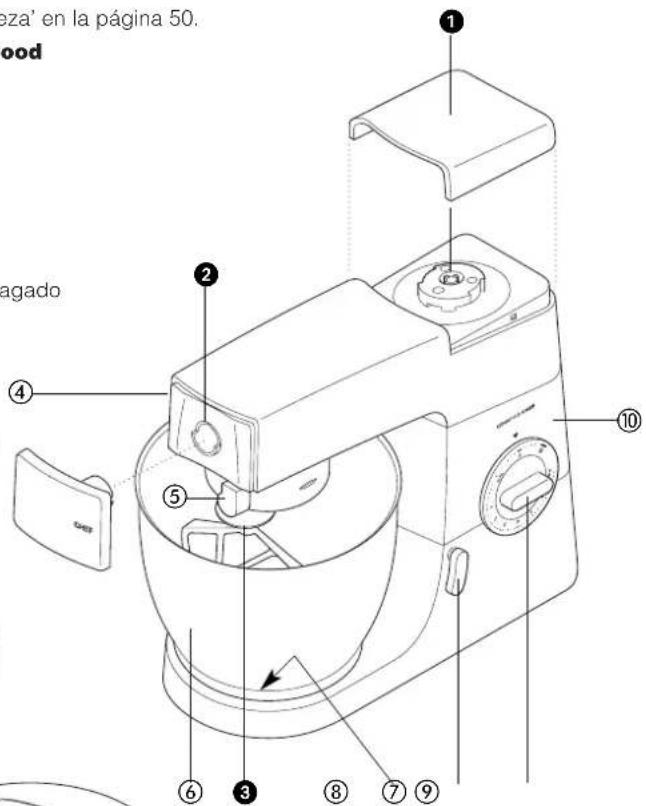
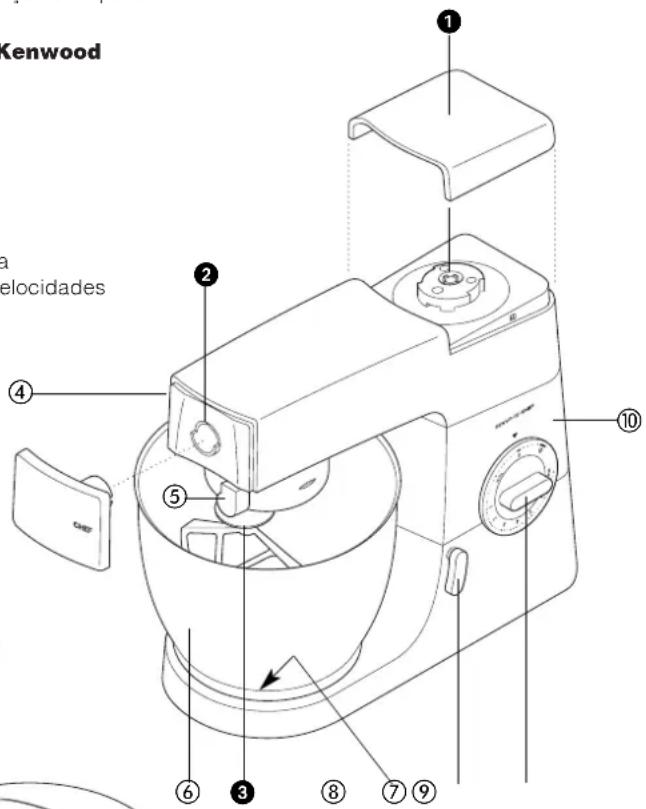
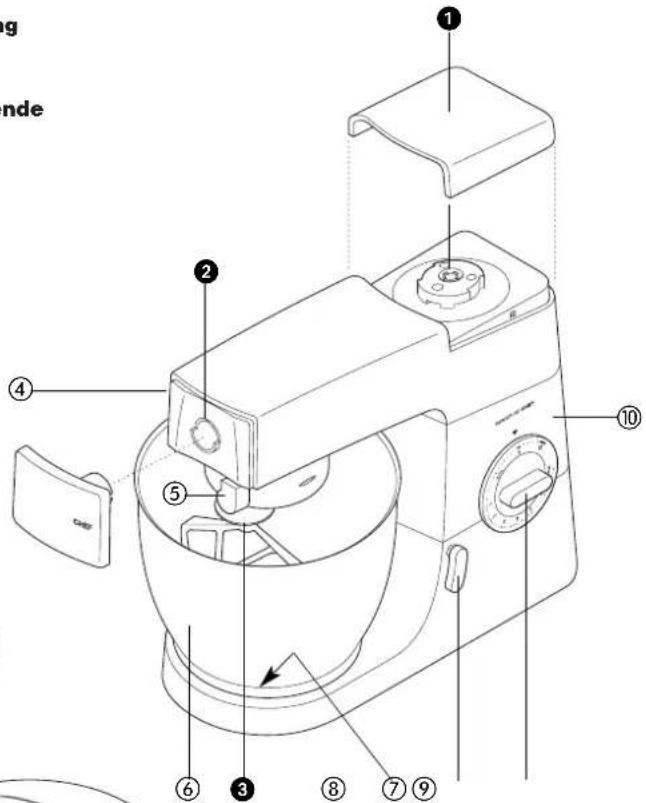
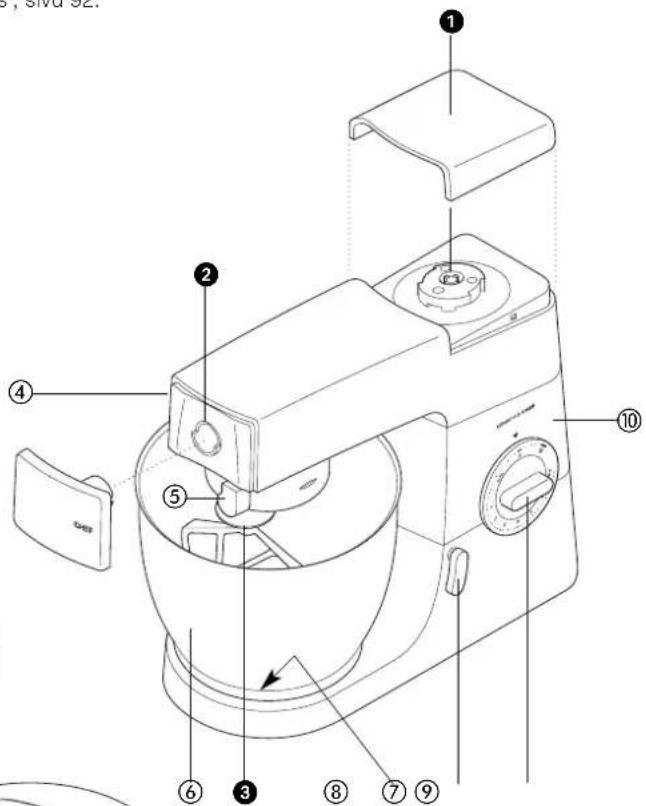
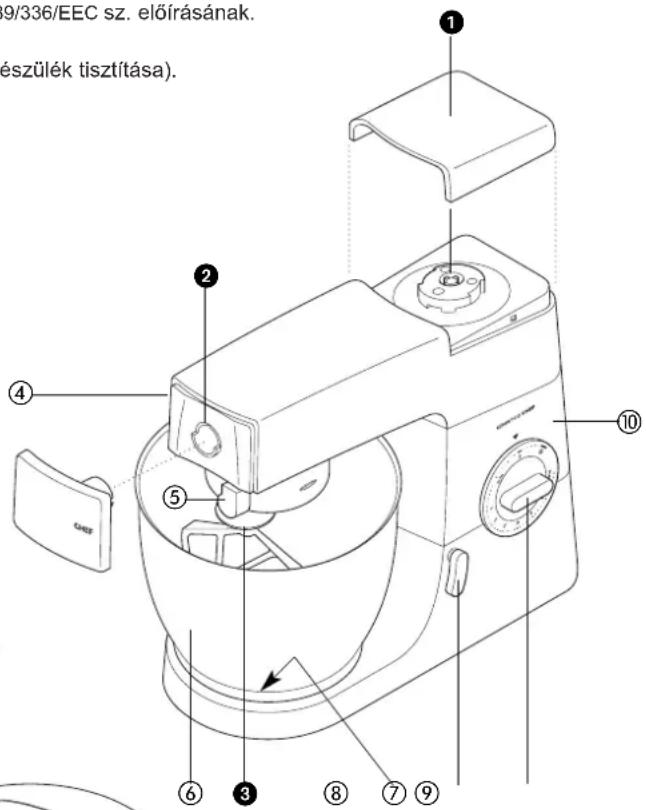
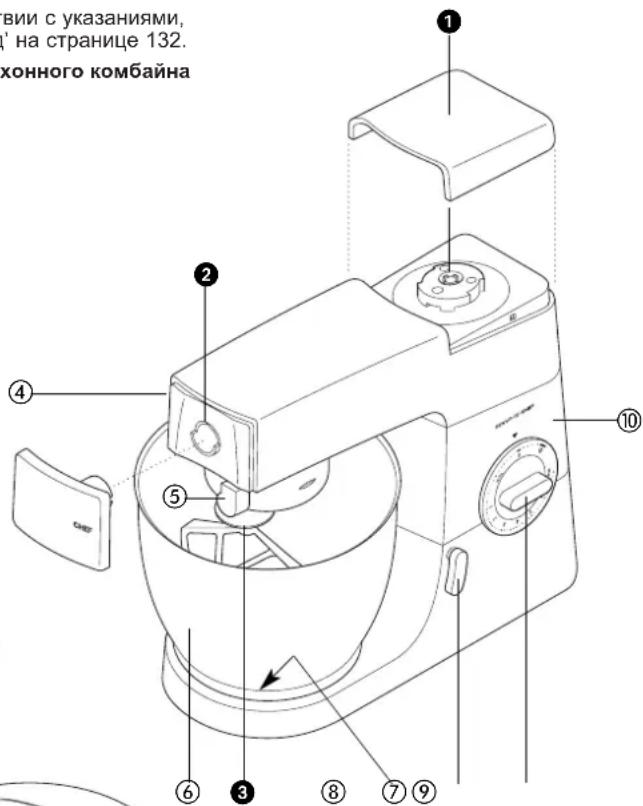
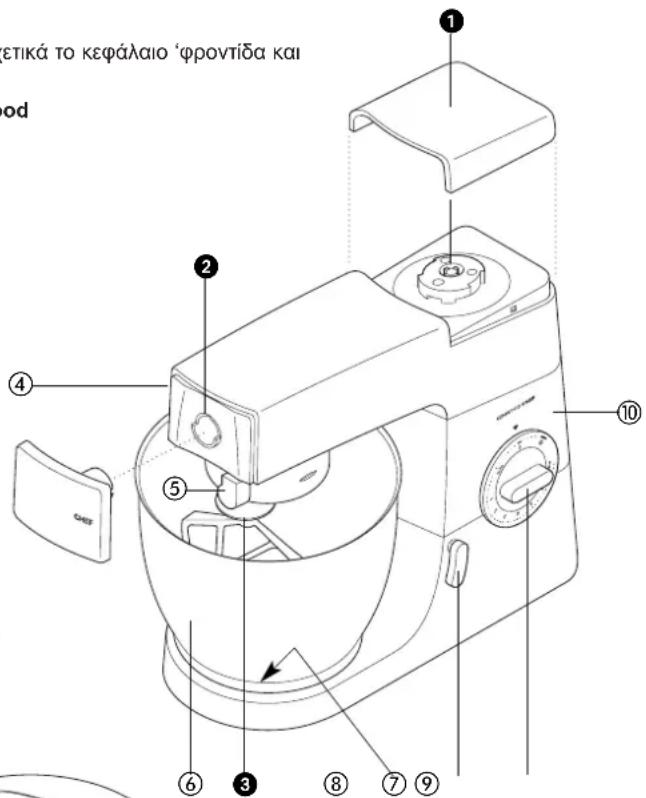
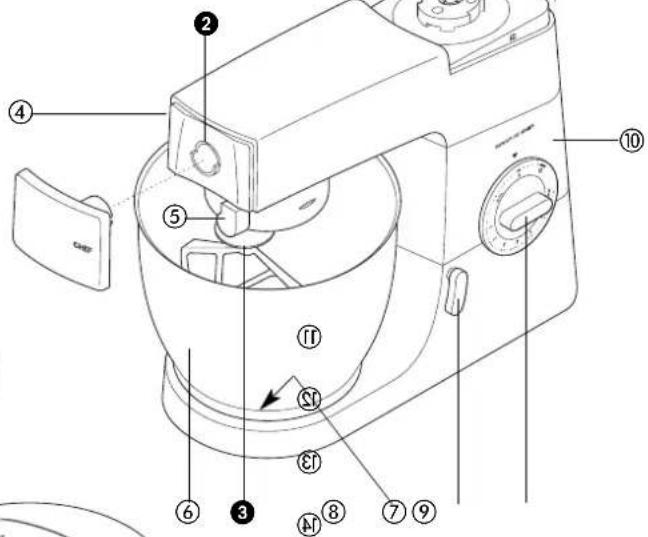
know your Kenwood kitchen machine
attachment outlets ① high-speed outlet
② slow-speed outlet
③ tool socket
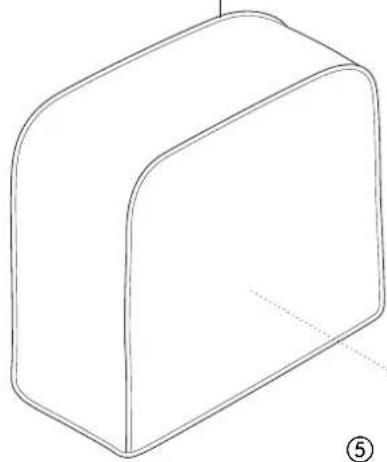
the mixer ④ mixer head
⑤ outlet catch
⑥ bowl
⑦ bowl seating pad
⑧ head-lift lever
⑨ on/off and speed switch
⑩ power unit
⑪ K-beater
⑫ whisk
⑬ dough hook
⑭ spatula
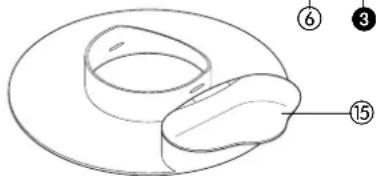
⑮ splashguard (if supplied)

the mixer
the mixing tools and some of their uses
K-beater • For making cakes, biscuits, pastry, icing, fillings, éclairs and mashed potato.
whisk • For eggs, cream, batters, fatless sponges, meringues, cheesecakes, mousses, soufflés. Don't use the whisk for heavy mixtures (eg creaming fat and sugar) - you could damage it.
dough hook • For yeast mixtures.
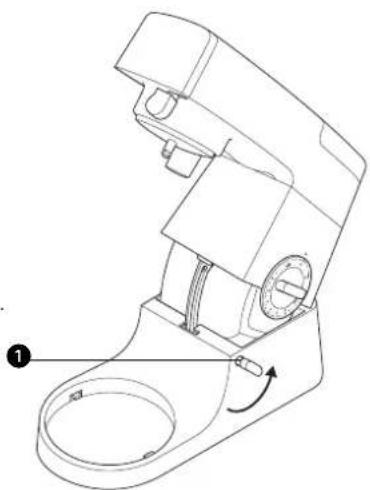
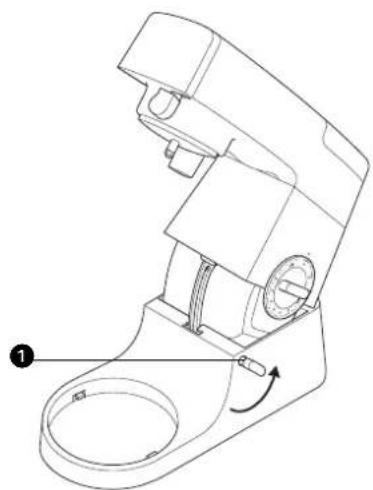
to use your mixer
1 Turn the head-lift lever anti-clockwise ① and raise the mixer head till it locks.
to insert a tool 2 Push up till it stops ② then turn.
3 Fit the bowl onto the base - press down and turn clockwise ③
4 Turn the head-lift lever anti-clockwise and lower the mixer head till it locks. 5 Switch on by turning the speed switch to the desired setting.
- Switch to pulse P short bursts.
to remove a tool 6 Turn and remove.
hints • Switch off and scrape the bowl with the spatula frequently.
- Eggs at room temperature are best for whisking.
- Before whisking egg whites, make sure there's no grease or egg yolk on the whisk or bowl.
- Use cold ingredients for pastry unless your recipe says otherwise.
points for bread making
important • Never exceed the maximum capacities below - you'll overload the machine.
- If you hear the machine labouring, switch off, remove half the dough and do each half separately.
• The ingredients mix best if you put the liquid in first.
maximum capacities
CHEF MAJOR
shortcrust pastry • Flour weight: 680g - 1lb 8oz Flour weight: 910g - 2lb
stiff yeast dough • Flour weight: 1.36kg - 3lb Flour weight: 1.5kg - 3lb 5oz
• Total weight: 2.18kg - 4lb 13oz Total weight: 2.4kg - 5lb 5oz
soft yeast dough • Flour weight: 1.3kg - 2lb 14oz Flour weight: 2.6kg - 5lb 12oz
• Total weight: 2.5kg - 5lb 8oz Total weight: 5kg - 11lb
fruit cake mix • Total weight: 2.72kg - 6lb Total weight: 4.55kg - 10lb
egg whites • 12 16
speed switch 4
K-beater • creaming fat and sugar start on min, gradually increasing to 'max'.
- beating eggs into creamed mixtures 4 - 'max'.
- folding in flour, fruit etc Min - 1
- all in one cakes start on min speed, gradually increase to max.
- rubbing fat into flour min - 2.
whisk • Gradually increase to 'max'.
dough hook • Start on 'min', gradually increasing to 1.
natural_image
Technical line drawing of a mechanical device with a circular base and internal components (no text or symbols)
natural_image
Technical line drawing of a mechanical device with no visible text or symbols
natural_image
Line drawing of a kitchen mixer with a rotating fan and handle (no text or symbols)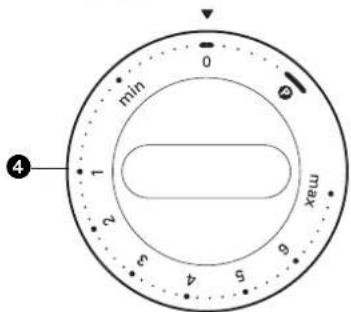
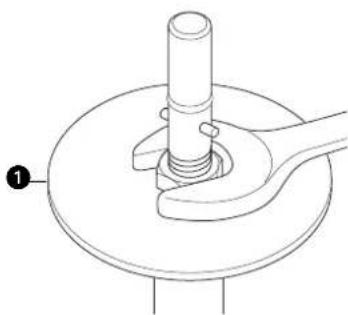
troubleshooting
problem
- The whisk or K-beater knocks against the bottom of the bowl or isn't reaching the ingredients in the bottom of the bowl.
solution • Adjust the height. Here's how:
1 Unplug.
2 Raise the mixer head and insert the whisk or beater.
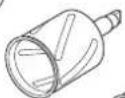
3 Hold it, then loosen the nut 1
4 Lower the mixer head.
5 Adjust the height by turning the shaft. Ideally the whisk/K-beater should be almost touching the bottom of the bowl ②
6 Raise the head, hold the whisk/K-beater and tighten the nut.
problem
• The mixer stops during operation.
solution • Your mixer is fitted with an overload protection device and will stop if overloaded to protect the machine. If this happens, switch off and unplug the mixer. Remove some of the ingredients to reduce the load, and allow the mixer to stand for a few minutes. Plug in and reselect the speed. If the mixer does not restart immediately allow to stand for additional time.
natural_image
Technical line drawing of a mechanical assembly with a cylindrical component and a base (no text or symbols)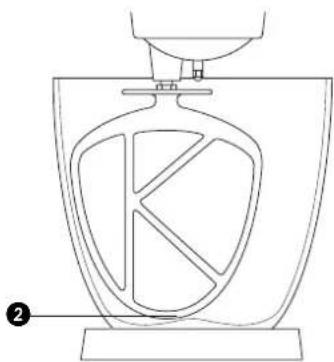
natural_image
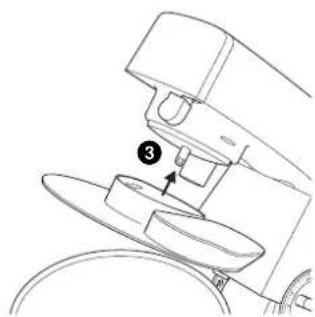
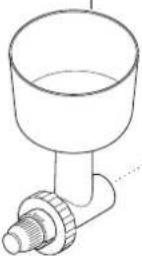
Line drawing of a laboratory apparatus with a container and funnel (no text or symbols)to fit and use your splashguard (if supplied)
1 Raise the mixer head until it locks.
2 Fit the bowl onto the base.
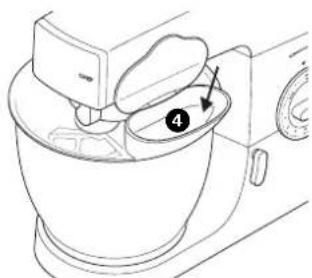
3 Push the splashguard onto the underside of the mixer head ③ until fully located. The hinged section should be positioned as shown.
4 Insert required tool.
5 Lower the mixer head.
- During mixing, ingredients can be added directly to the bowl via the hinged section of the splashguard 4.
- You do not need to remove the splashguard to change tools.
6 Remove the splashguard by raising the mixer head and sliding it down.

natural_image
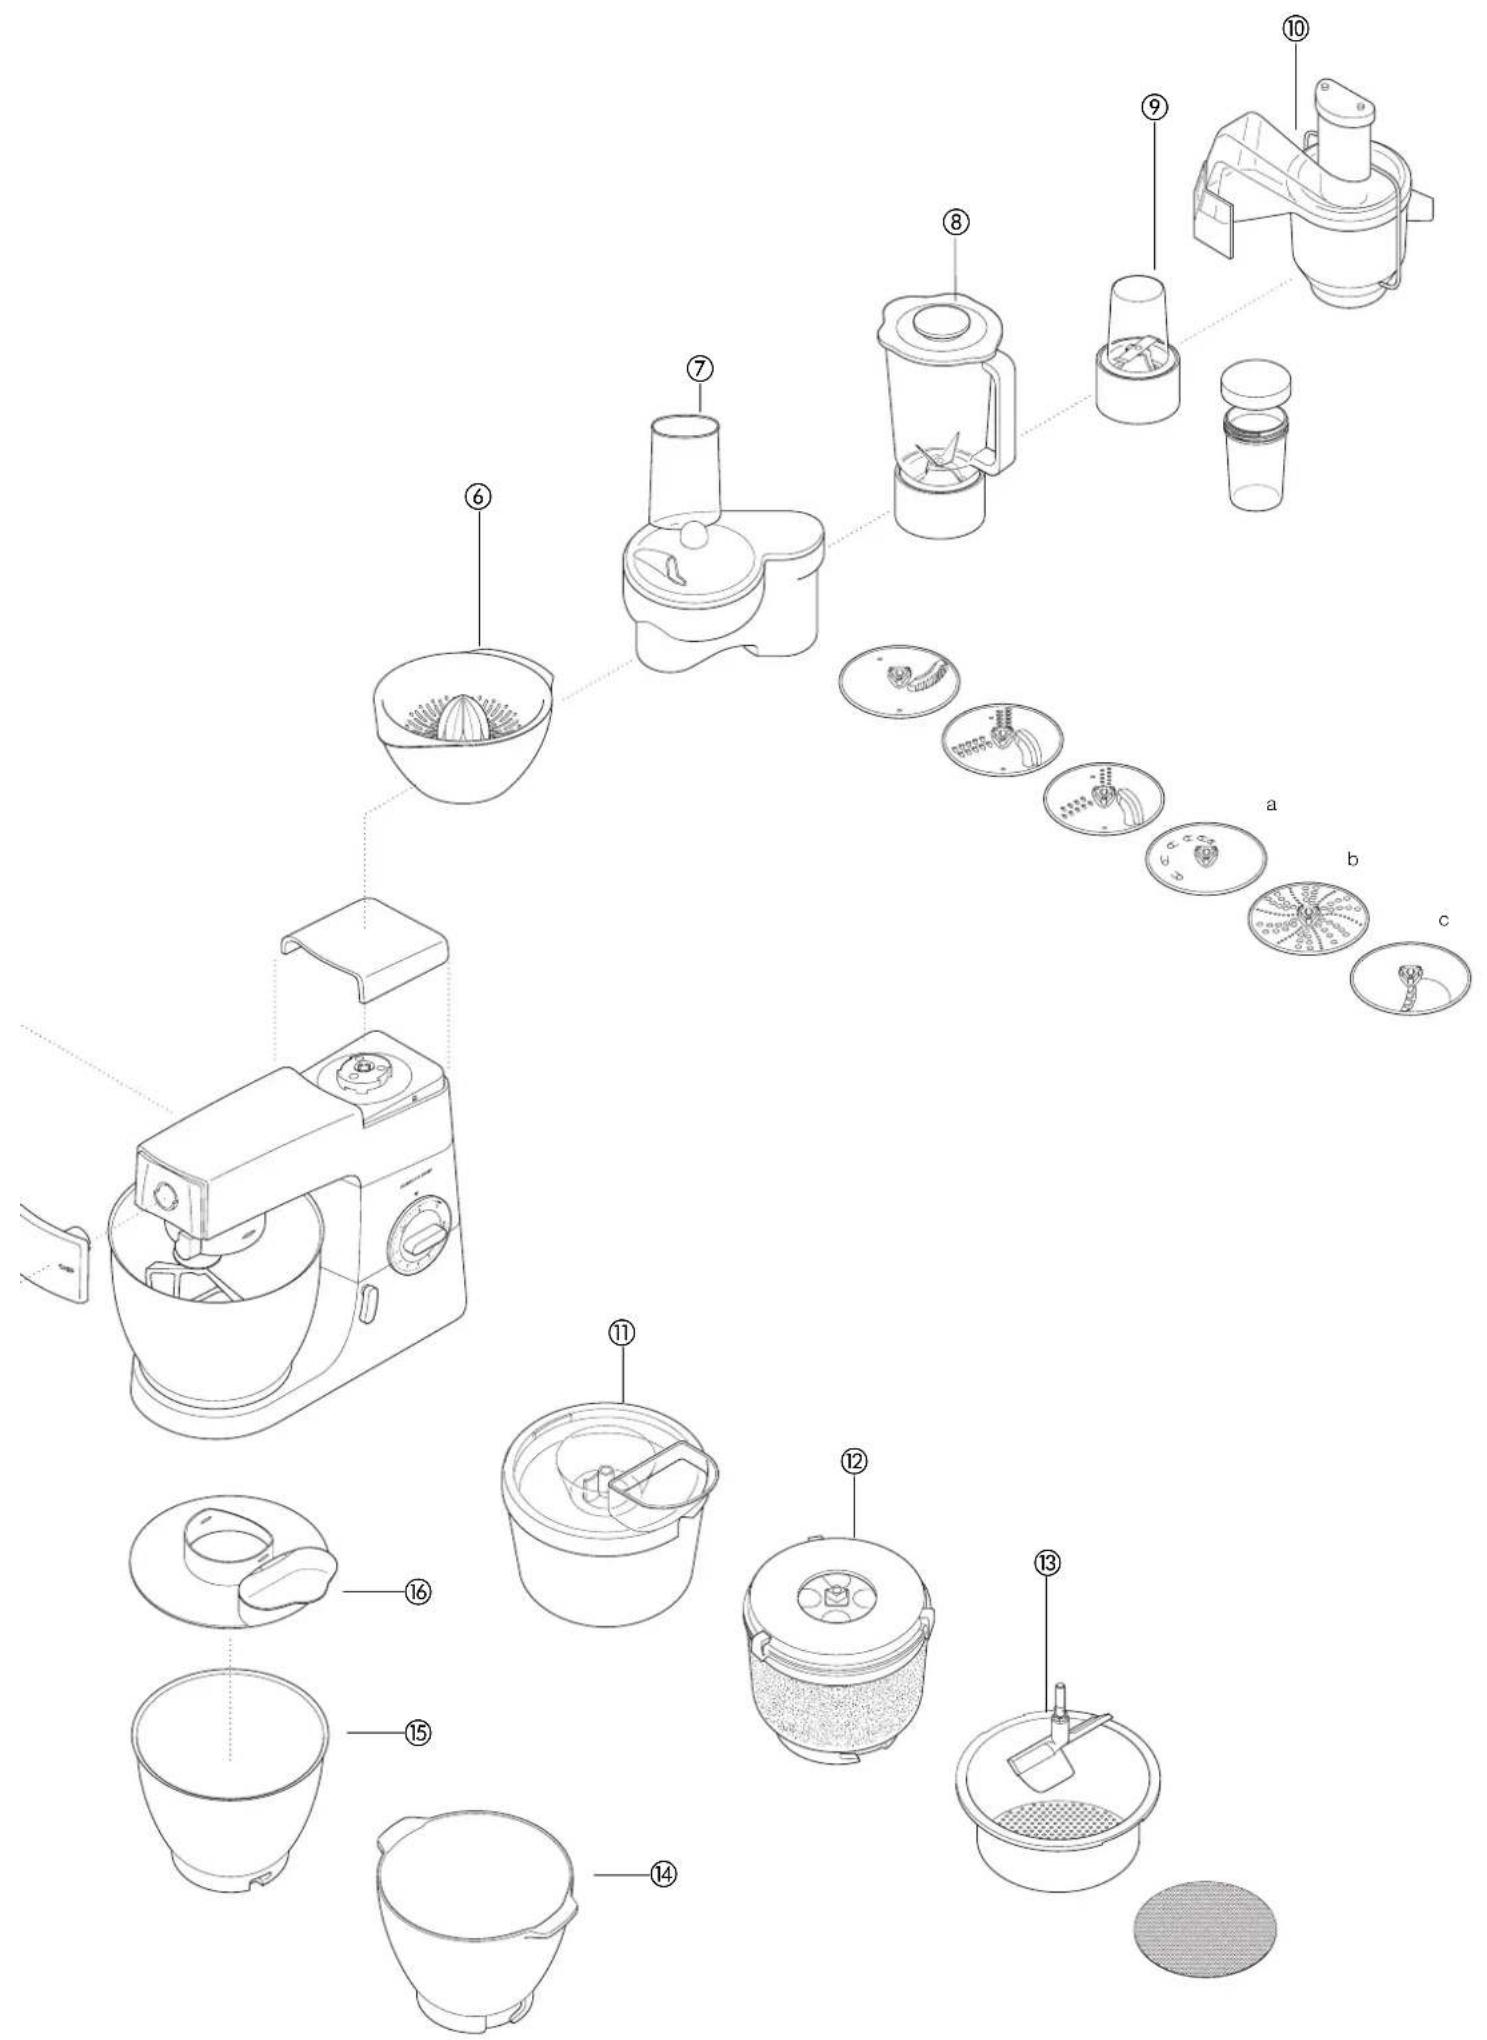
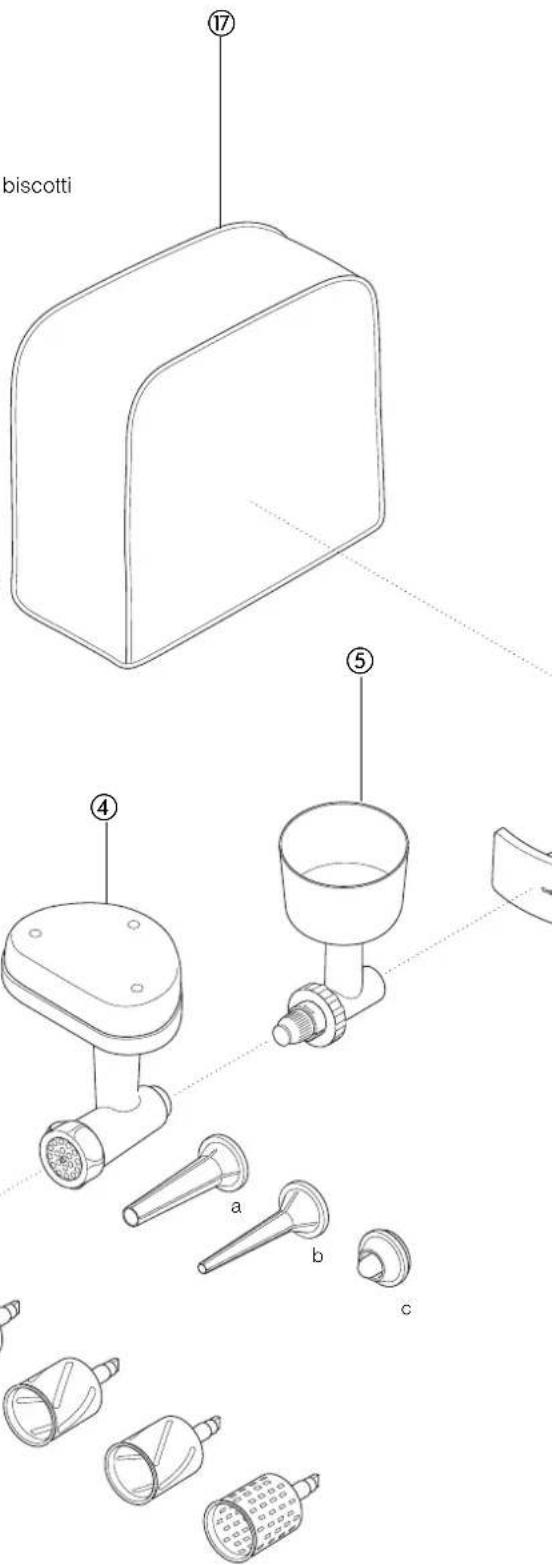
Line drawing of a kitchen mixer with a hand operating the lid (no text or symbols)the attachments available
To buy an attachment not included in your pack, call your KENWOOD repairer.
attachment attachment code
flat pasta maker ① AT970A
additional pasta attachments AT971A tagliatelle
(not shown) used in conjunction AT972A tagliolini
with AT970A AT973A trenette
AT974A spaghetti
pasta maker ② AT910 comes with maccheroni rigati die
(12 optional dies plus biscuit maker can be fitted)
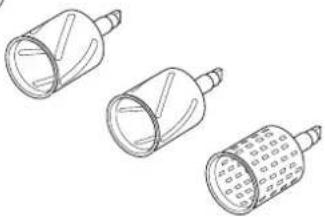
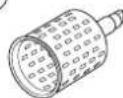
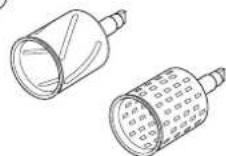
roto food cutter ③ AT948A comes with 4 drums
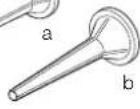
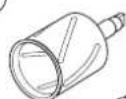
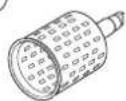
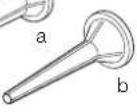
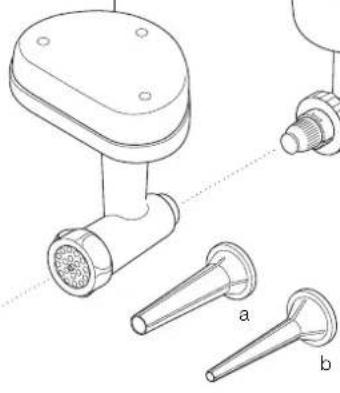
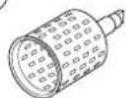
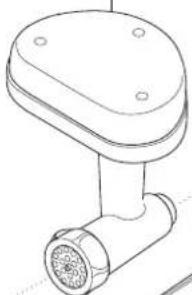
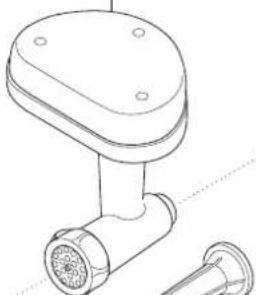
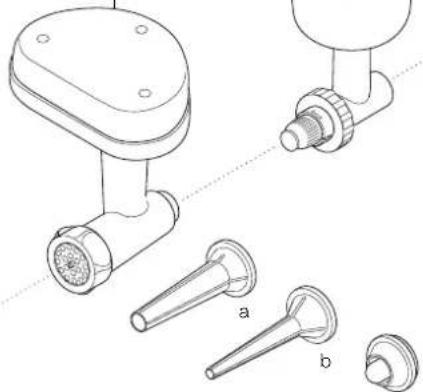
multi food grinder ④ AT950A comes with
a large sausage nozzle
b small sausage nozzle
c kebbe maker
grain mill ⑤ AT941A
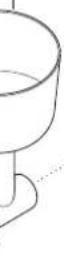
citrus juicer ⑥ AT312
pro slicer/grater ⑦ AT998A includes 3 cutting plates as standard
optional plates for AT998A a extra coarse shredder part number 639021
b rasping plate part number 639150
c standard chipper part number 639083
liquidiser ⑧ 1.5 | acrylic AT337, 1.5 | glass AT338, 1.5 | stainless steel AT339
multi-mill ⑨ AT320 comes with 4 glass jars and 4 lids for storage
non-stop centrifugal juicer ⑩ AT935A
ice-cream maker ⑪ CHEF AT956, MAJOR AT957
potato prep attachment ⑫ CHEF AT934A, MAJOR AT952A
colander and sieve ⑬ CHEF AT992A, MAJOR AT930A
plastic bowls ⑭ CHEF 265026. MAJOR 412095
stainless steel bowls ⑮ brushed: CHEF 343270, MAJOR 343268
polished: CHEF 638821, MAJOR 642779
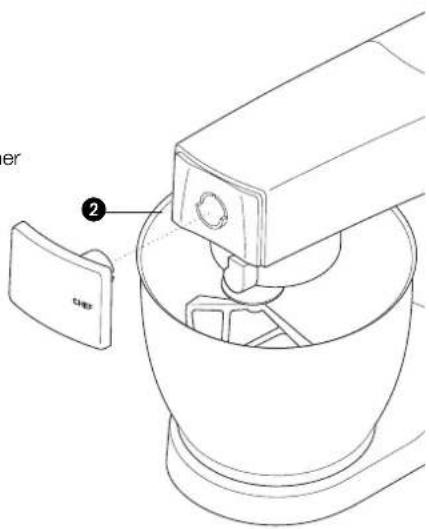
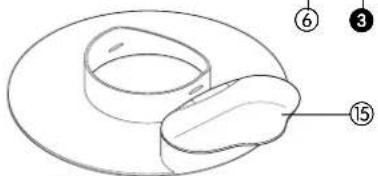
splashguard ⑯ CHEF & MAJOR 693766
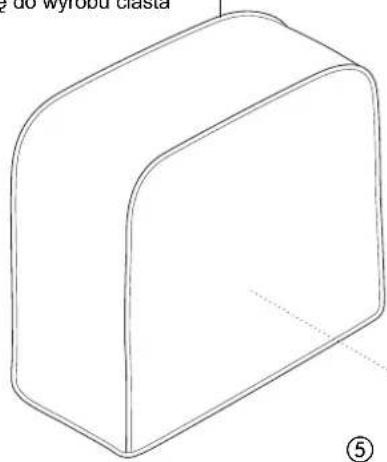
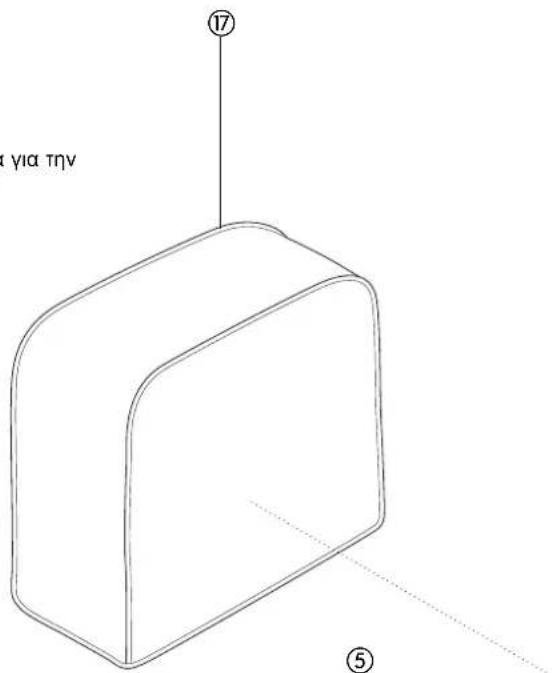
cover ⑰ CHEF, 533722, MAJOR 606397

natural_image
Technical line drawing of a mechanical component with no visible text or symbols
natural_image
Technical line drawing of a manual laboring tool with a labeled component (no text or symbols present)
natural_image
Line drawing of a mechanical device with a circular component and labeled part (no text or symbols)

cleaning and service
care and cleaning
• Always switch off and unplug before cleaning.
- A little grease may appear at outlet ② when you first use it. This is normal - just wipe it off.
power unit, outlet covers
- Wipe with a damp cloth, then dry.
- Never use abrasives or immerse in water.
bowls - Wash by hand, then dry thoroughly or wash in the dishwasher. Always ensure that plastic bowls are loosely packed in the dishwasher to prevent distortion. - If you have a stainless steel bowl never use a wire brush, steel wool or bleach to clean it. Use vinegar to remove limescale.
- Keep away from heat (cooker tops, ovens, microwaves).
- Wash by hand, then dry thoroughly or wash in the dishwasher.
- Wash by hand, then dry thoroughly.
tools splashguard
service and customer care
- If the cord is damaged it must, for safety reasons, be replaced by KENWOOD or an authorised KENWOOD repairer.
If you need help with:
• using your machine
• servicing or repairs
Contact the shop where you bought your machine.
recipes
See important points for bread making on page 4.
white bread stiff yeast dough
ingredients
• 1.36kg (3lb) strong plain flour
• 15ml (3tsp) salt
- 25g (1oz) fresh yeast; or 15g/20ml (½oz) dried yeast + 5ml (1tsp) sugar
- 750ml (1¼pts) warm water: 43°C (110°F). Use a thermometer or add 250ml (9fl oz) boiling water to 500ml (18fl oz) cold water
• 25g (1oz) lard
method
1 dried yeast (the type that needs reconstituting): pour the warm water into the bowl. Then add the yeast and the sugar and leave to stand for about 10 minutes until frothy.
fresh yeast: crumble into the flour.
other types of yeast: follow the manufacturer's instructions.
2 Pour the liquid into the bowl. Then add the flour (with fresh yeast if used), salt and lard.
3 Knead at minimum speed for 45 - 60 seconds. Then increase to speed 1, adding more flour if necessary, until a dough has formed.
4 Knead for 3 - 4 more minutes at speed 1 until the dough is smooth, elastic and leaves the sides of the bowl clean.
5 Put the dough into a greased polythene bag or a bowl covered with a tea towel. Then leave somewhere warm until doubled in size.
6 Re-knead for 2 minutes at speed 1.
7 Half fill four 450g (1lb) greased tins with the dough, or shape it into rolls. Then cover with a tea towel and leave somewhere warm until doubled in size.
8 Bake at 230°C/450°F/Gas Mark 8 for 30 - 35 minutes for loaves or 10 - 15 minutes for rolls.
- When ready, the bread should sound hollow when tapped on the base.
white bread soft yeast dough
ingredients
• 2.6kg (5lb 12oz) ordinary plain flour
• 1.3 litre (2 ^1 /4pts) milk
- 300g (10oz) sugar
• 450g (1lb) margarine
• 100g (4oz) fresh yeast or 50g (2oz) dried yeast
- 6 eggs, beaten
- 5 pinches salt
method
1 Melt the margarine in the milk and bring to 43°C (110°F).
2 dried yeast (the type that needs reconstituting): add the yeast and sugar to the milk and leave to stand for about 10 minutes until frothy.
fresh yeast: crumble into the flour and add the sugar.
other types of yeast: follow the manufacturer's instructions.
3 Pour the milk into the bowl. Add the beaten eggs and 2kg (4lb 6oz) flour.
4 Mix at minimum speed for 1 minute, then at speed 1 for a further minute. Scrape down.
5 Add the remaining flour and mix at minimum speed for 1 minute, then at speed 1 for 2 - 3 minutes until smooth and evenly mixed.
6 Half fill some 450g (1lb) greased tins with the dough, or shape it into rolls. Then cover with a tea towel and leave somewhere warm until doubled in size.
7 Bake at 200°C/400°F/Gas Mark 6 for 20 - 25 minutes for loaves or 15 minutes for rolls.
8 When ready, the bread should sound hollow when tapped on the base.
- Makes about 10 loaves.
recipes continued
strawberry and apricot gâteau
ingredients: sponge
• 3 eggs
- 75g (3oz) caster sugar
- 75g (3oz) plain flour
• 150ml (/4pt) double cream
- Sugar to taste
• 225g (8oz) strawberries
• 225g (8oz) apricots
method 1 Halve the apricots and remove the stones. Cook gently in very little water, adding sugar to taste, until soft.
2 Wash and halve the strawberries.
3 To make the sponge, whisk the eggs and sugar at maximum speed until very pale and thick.
4 Remove the bowl and the whisk. Fold in the flour by hand using a large metal spoon - do this carefully to keep the sponge light.
5 Put the mixture into two 18cm (7") greased and lined sandwich tins.
6 Bake at 180°C/350°F/Gas Mark 4 for about 20 minutes until the cake springs back when lightly touched.
7 Turn out onto a wire rack.
8 Whisk the cream at maximum speed until stiff. Add sugar to taste.
9 Roughly chop the apricots and a third of the strawberries. Fold them into half the cream.
10 Spread this over one of the sponges, then put the other sponge on top.
11 Spread the remaining cream on top and decorate with the remaining strawberries.
meringues
4 egg whites
ingredients
• 250g (9oz) icing sugar, sieved
- Line your baking tray with non-stick baking parchment.
method 1 Whisk the egg whites and sugar at maximum speed for about 10 minutes until it
2 stands in peaks.
3 Spoon the mixture onto the baking tray (or use a piping bag with a 2.5cm (1") star nozzle).
4 Bake at 110°C/225°F/Gas Mark ¼ for about 4 - 5 hours until firm and crisp. If they start to brown, leave the oven door slightly ajar.
- Store meringues in an airtight tin.
shortcrust pastry
• 450g (1lb) flour, sieved with the salt
- 5ml (1tsp) salt
- 225g (8oz) fat (mix lard and margarine straight from the fridge)
- About 80ml (4tbsp) water
- Don't overmix
hint 1 Put the flour into the bowl. Chop the fat up roughly and add to the flour.
method 2 Mix at speed 1 until it resembles breadcrumbs. Stop before it looks greasy.
3 Add the water and mix at minimum speed. Stop as soon as the water is incorporated.
4 Cook at around 200°C/400°F/Gas Mark 6, depending on the filling.
carrot and coriander soup
ingredients
- 25g (1oz) butter
- 1 onion chopped
• 1 clove garlic crushed - 480g (1lb 1oz) carrot cut into 1.5cm cubes for a 1.2 l goblet
- 600g (1lb 6oz) carrot cut into 1.5cm cubes for a 1.5 l goblet
- cold chicken stock
• 10-15ml (2-3tsp) ground coriander - salt and pepper
method 1 Melt the butter in a pan, add the onion and garlic and fry until soft.
2 Place the carrot into the liquidiser, add the onion and garlic. Add sufficient stock to reach the maximum 1.2 level or 1.5 level marked on the goblet. Fit the lid and filler cap.
3 Blend on maximum speed for 5 seconds for a coarse soup or longer for a finer result.
4 Transfer the mixture to a saucepan, add the coriander and seasoning and simmer the soup for 30 to 35 minutes or until cooked.
5 Adjust the seasoning as necessary and add extra liquid if required.
natural_image
Technical line drawing of a mechanical device with a circular base and internal components (no text or symbols)
natural_image
Technical line drawing of a mechanical device with no visible text or symbols
natural_image
Line drawing of a kitchen mixer with a rotating fan and handle (no text or symbols)
natural_image
Technical line drawing of a mechanical device with a numbered component (no text or symbols)
natural_image
Technical line drawing of a mechanical component with no visible text or symbols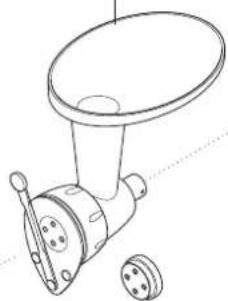
natural_image
Technical line drawing of a mechanical tool with a circular base and flange (no text or symbols)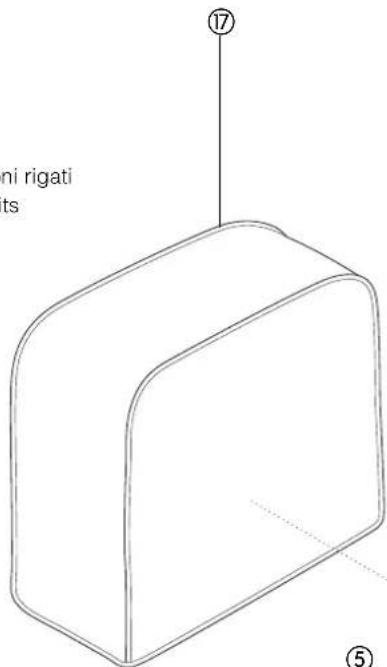
④

natural_image
Line drawing of a mechanical tool or component with a cylindrical shaft and flange (no text or symbols)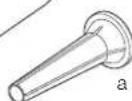


natural_image
Technical line drawing of a mechanical device with no visible text or symbols
natural_image
Technical line drawing of a mechanical device with no visible text or symbols
natural_image
Line drawing of a kitchen mixer with a rotating fan and handle (no text or symbols)
natural_image
Technical line drawing of a mechanical assembly with no visible text or symbols
natural_image
Technical line drawing of a mechanical component with a numbered callout (no text or symbols present)
natural_image
Technical line drawing of a manual laboring tool with a labeled component (no text or symbols present)
natural_image
Line drawing of a mechanical device with a circular component and a numbered label (no text or symbols present)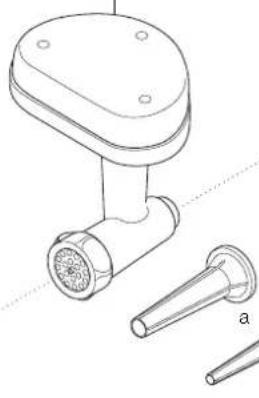
natural_image
Technical line drawing of a kitchen tool with a handle and two inserted parts (no text or symbols)


natural_image
Technical line drawing of a mechanical device with a circular base and internal components (no text or symbols)
natural_image
Technical line drawing of a mechanical device with no visible text or symbols
natural_image
Line drawing of a kitchen mixer with control panel and fan (no text or symbols)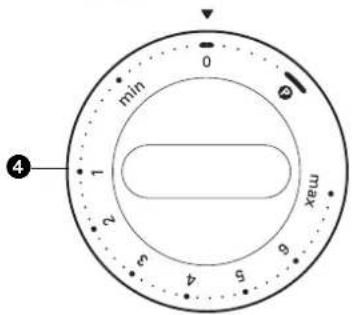
natural_image
Technical line drawing of a mechanical assembly with no visible text or symbols

deeghaak • Voor gistmengsels.
natural_image
Technical line drawing of a mechanical device with a circular base and internal components (no text or symbols)
natural_image
Technical line drawing of a mechanical device with no visible text or symbols
natural_image
Line drawing of a kitchen mixer with a rotating fan and handle (no text or symbols)
natural_image
Technical line drawing of a mechanical assembly with no visible text or symbols
natural_image
Technical line drawing of a mechanical component with a numbered callout (no text or symbols present)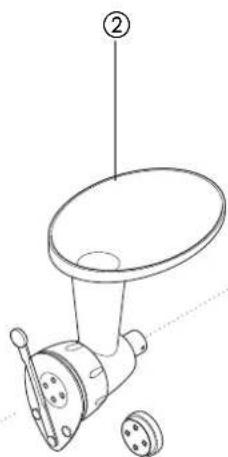
natural_image
Technical line drawing of a mechanical tool with labeled component (no text or symbols present)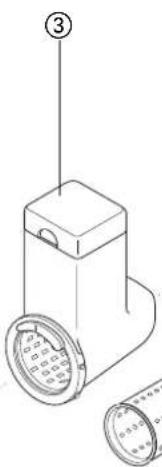
natural_image
Technical line drawing of a mechanical component with a numbered callout (no text or symbols present)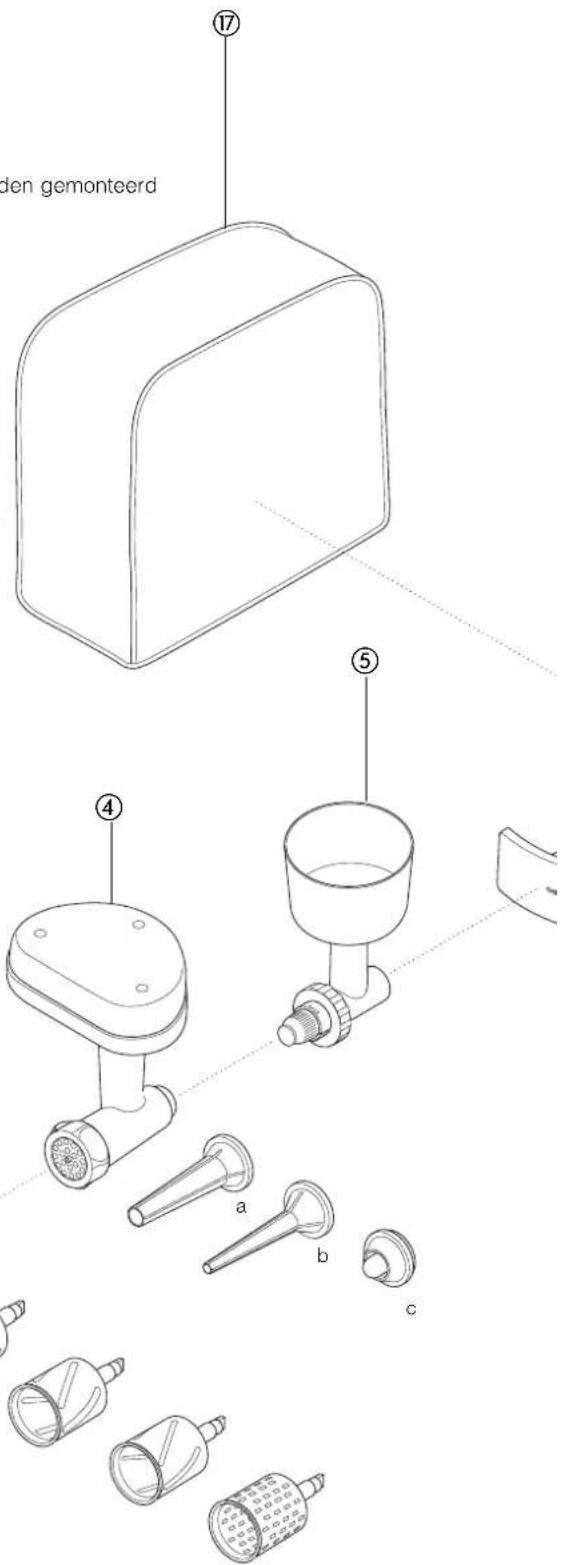

reiniging en service
• service of reparaties
- Ongeveer 80ml water
natural_image
Technical line drawing of a mechanical device with no visible text or symbols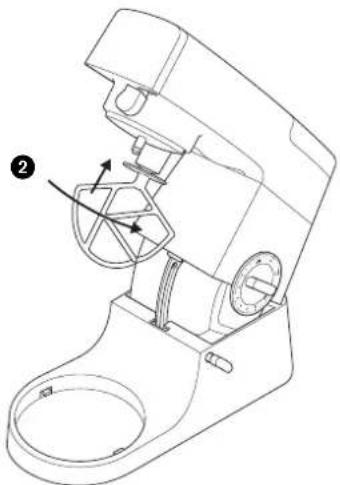
natural_image
Technical line drawing of a mechanical device with no visible text or symbols
natural_image
Line drawing of a kitchen mixer with a rotating fan and handle (no text or symbols)
posibles problemas
problema
natural_image
Technical line drawing of a mechanical assembly with no visible text or symbols
natural_image
Technical line drawing of a mechanical component with a numbered callout (no text or symbols present)
natural_image
Technical line drawing of a manual laboring tool with a labeled component (no text or symbols present)
natural_image
Technical line drawing of a mechanical device with a numbered label (3) pointing to its top section, showing internal components without any text or symbols.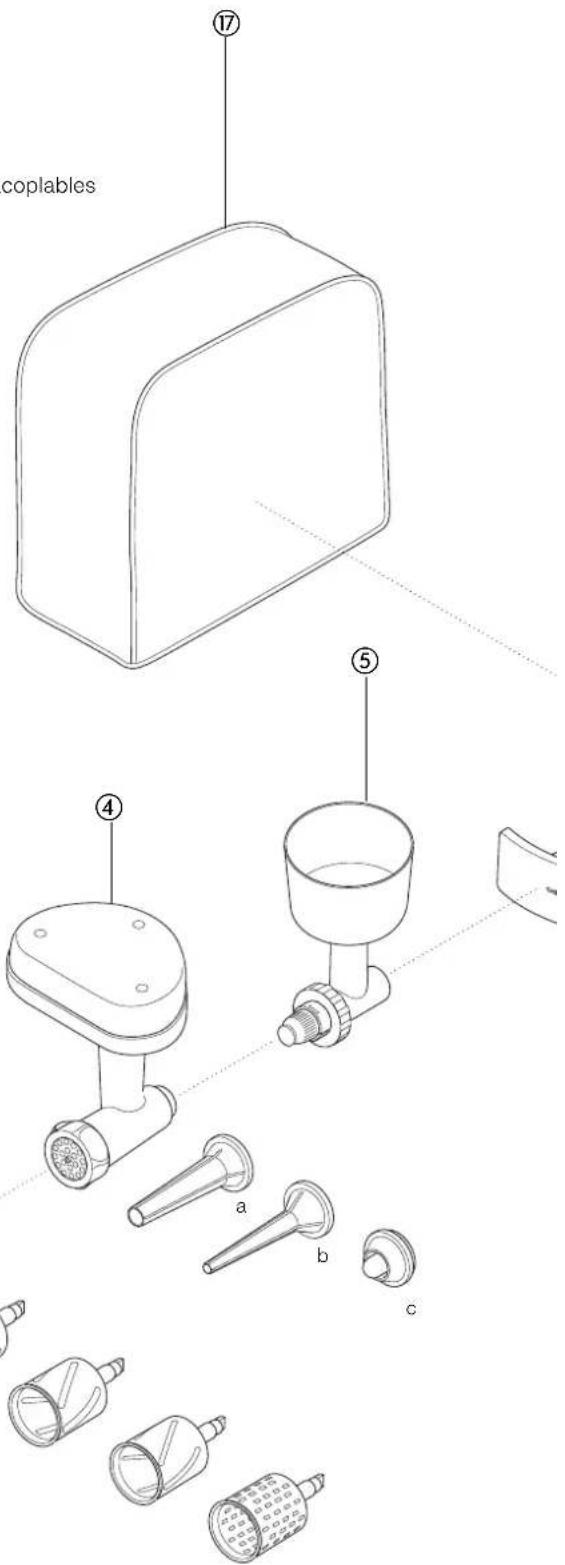

limpieza y servicio
a máquina
batedor em 'K'
pinha
natural_image
Technical line drawing of a mechanical device with a circular base and internal components (no text or symbols)
natural_image
Technical line drawing of a mechanical device with no visible text or symbols
natural_image
Line drawing of a kitchen mixer with a rotating fan and handle (no text or symbols)
natural_image
Technical line drawing of a mechanical assembly with labeled component (no text or symbols)

④
natural_image
Technical line drawing of a mechanical component with labeled parts (a and b), no text or symbols present.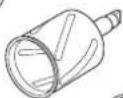


mixeren
natural_image
Technical line drawing of a mechanical device with a circular base and internal components (no text or symbols)
natural_image
Technical line drawing of a mechanical device with no visible text or symbols
natural_image
Line drawing of a kitchen mixer with a rotating fan and handle (no text or symbols)
fejlfinding
problem:
natural_image
Technical line drawing of a mechanical assembly with no visible text or symbols
natural_image
Technical line drawing of a mechanical component with a numbered callout (no text or symbols present)
natural_image
Technical line drawing of a manual laboring tool with a labeled component (no text or symbols present)
natural_image
Technical line drawing of a mechanical device with a labeled component (no text or symbols present)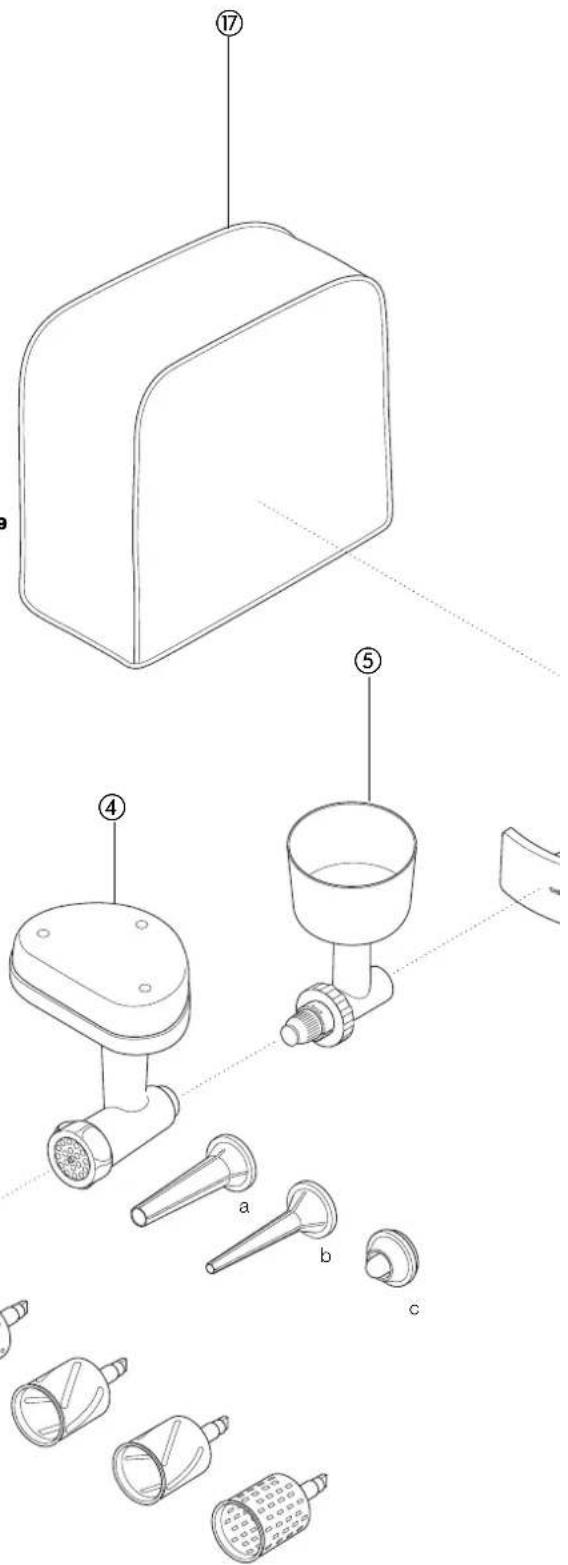

blandaren
natural_image
Technical line drawing of a mechanical device with a circular base and internal components (no text or symbols)
natural_image
Technical line drawing of a mechanical device with no visible text or symbols
natural_image
Line drawing of a kitchen mixer with a rotating fan and handle (no text or symbols)
Rengöring se sid 76
felsökning
problem
natural_image
Technical line drawing of a mechanical assembly with no visible text or symbols
natural_image
Technical line drawing of a mechanical component with a numbered callout (no text or symbols present)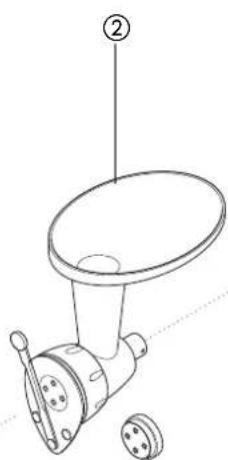
natural_image
Line drawing of a manual laboring tool with a labeled component (no text or symbols present)
natural_image
Line drawing of a small mechanical device with a circular base and handle, labeled with number 3 (no text or symbols on the device itself)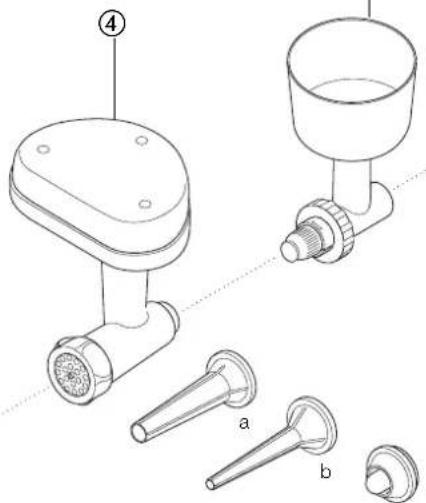

natural_image
Three identical line drawings of cylindrical and perforated objects with no text or symbols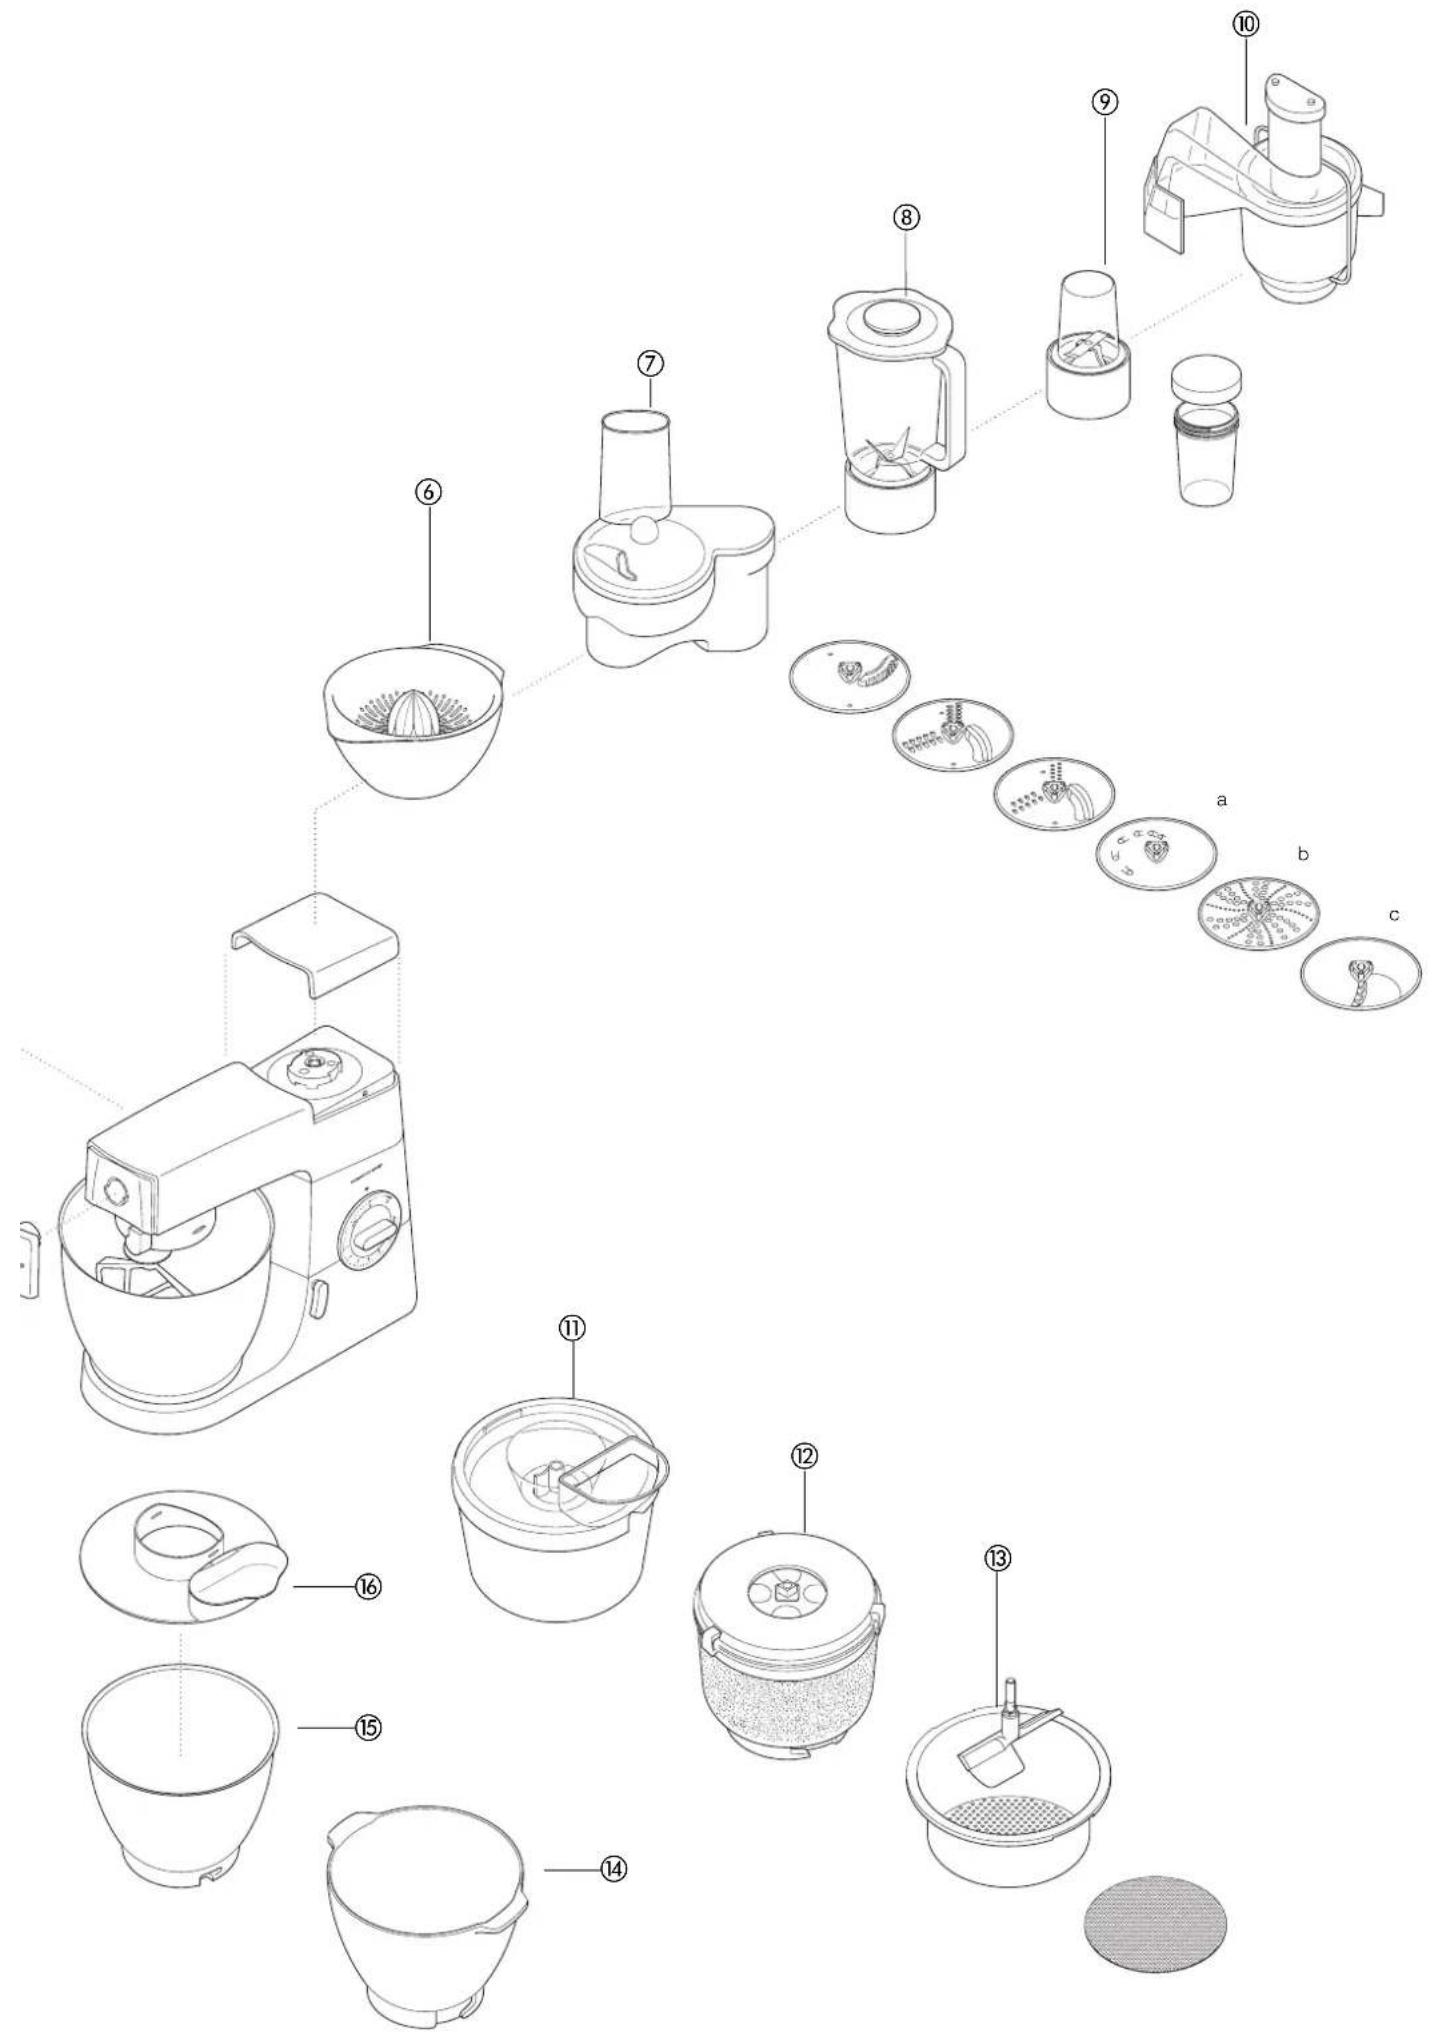

Mikseren
natural_image
Technical line drawing of a mechanical device with a circular base and internal components (no text or symbols)
natural_image
Technical line drawing of a mechanical device with no visible text or symbols
natural_image
Line drawing of a kitchen mixer with a rotating fan and handle (no text or symbols)
Løsning på problemer
Problem
natural_image
Technical line drawing of a mechanical assembly with no visible text or symbols
Ekstra tilbehør
natural_image
Technical line drawing of a mechanical component with a numbered callout (no text or symbols present)
natural_image
Technical line drawing of a mechanical tool with labeled component (no text or symbols present)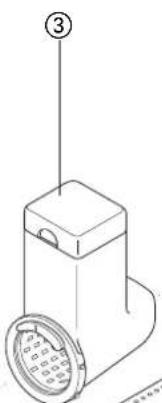
natural_image
Line drawing of a small rectangular device with a circular base and a handle, labeled with number 3 (no text or symbols on the device itself)

Oppskrifter
Se huskeregler for brøddeig på side 80.
hveteloff myk gjærdeig
ingredienser
• 2,6kg hvetemel
• 1,3 | melk
• 300g sukker
- 450g margarin
• 100g fersk gjær eller 50g tørrgjær
- 6 vispede egg
- 5 klyper salt
fremgangsmåte
1 Smelt margarinen i melken og varm det opp til 43°C.
2 Tørrgjær (den typen som må blandes med væske): Ha gjæren og sukkeret i melken, og la det stå i ca 10 minutter til blandingen skummer.
yleiskone
natural_image
Technical line drawing of a mechanical device with a circular base and internal components (no text or symbols)
natural_image
Technical line drawing of a mechanical device with no visible text or symbols
natural_image
Line drawing of a kitchen mixer with a rotating fan and handle (no text or symbols)
lisälaitteet

puhdistus ja huolto
tärkeää

karıştırıcı
natural_image
Technical line drawing of a mechanical device with a circular base and internal components (no text or symbols)
natural_image
Technical line drawing of a mechanical device with no visible text or symbols
natural_image
Line drawing of a kitchen mixer with a rotating fan and handle (no text or symbols)
sorun giderme
sorun
ek parçalar
natural_image
Technical line drawing of a mechanical component with a numbered callout (no text or symbols present)
natural_image
Line drawing of a manual laboring tool with a labeled component (no text or symbols present)
natural_image
Line drawing of a small rectangular device with a circular base and a handle, labeled with number 3 (no text or symbols on the device itself)
natural_image
Three identical line drawings of cylindrical and perforated objects with no text or symbols
temizlik ve bakım
temizlik ve bakım
natural_image
Simple line drawing of a computer mouse and a ring on a circular base, with numbered annotations (6, 3, 15) pointing to the mouse.kuchyňský strojek
natural_image
Technical line drawing of a mechanical device with a circular base and internal components (no text or symbols)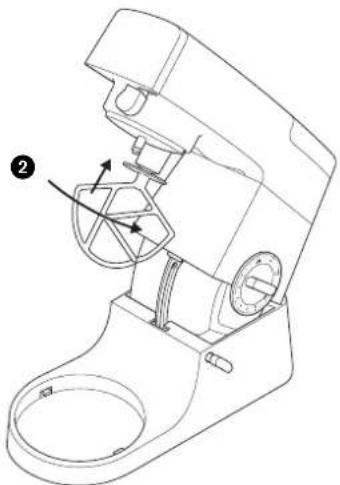
natural_image
Technical line drawing of a mechanical device with no visible text or symbols
natural_image
Line drawing of a kitchen mixer with a rotating fan and handle (no text or symbols)
natural_image
Technical line drawing of a mechanical assembly with no visible text or symbols
natural_image
Technical line drawing of a mechanical component with a numbered callout (no text or symbols present)
natural_image
Technical line drawing of a mechanical tool with labeled component (no text or symbols present)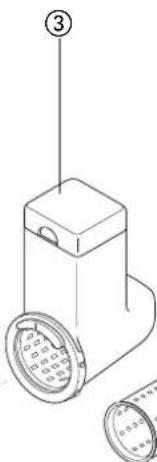
natural_image
Technical line drawing of a mechanical device with a circular component and a separate cylindrical component (no text or symbols)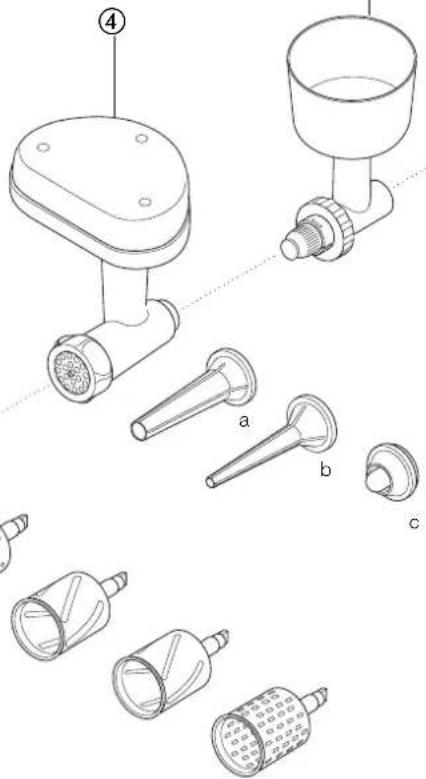

čištění a servis
čištění a péče
natural_image
Technical line drawing of a mechanical device with a circular base and internal components (no text or symbols)
natural_image
Technical line drawing of a mechanical device with no visible text or symbols
natural_image
Line drawing of a kitchen mixer with a rotating fan and handle (no text or symbols)
hibakeresés
a hiba
natural_image
Technical line drawing of a mechanical assembly with no visible text or symbols
natural_image
Simple line drawing of a rectangular prism with rounded edges and a dashed line indicating a hidden edge (no text or symbols)④
natural_image
Line drawing of a mechanical component with a cylindrical shaft and flange (no text or symbols)


natural_image
Technical line drawing of a mechanical device with a circular base and internal components (no text or symbols)
natural_image
Technical line drawing of a mechanical device with no visible text or symbols
natural_image
Line drawing of a kitchen mixer with a rotating fan and handle (no text or symbols)
natural_image
Simple line drawing of a 3D rectangular block with no text or symbols④
natural_image
Technical line drawing of a mechanical device with a cylindrical component and flanged base (no text or symbols)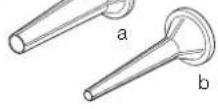


[Non-Text]
[Non-Text]
[Non-Text]
[Non-Text]
[Non-Text]
[Non-Text]
[Non-Text]
[Non-Text]
[Non-Text]
[Non-Text]
[Non-Text]
[Non-Text]
[Non-Text]
[Non-Text]
m = 311
广力云智慧零售收银系统
МИКСЕР
natural_image
Technical line drawing of a mechanical device with a circular base and adjustment knob (no text or symbols)
natural_image
Technical line drawing of a mechanical device with no visible text or symbols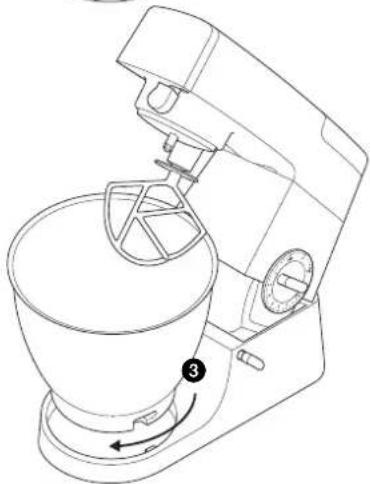
natural_image
Line drawing of a kitchen mixer with a rotating fan and handle (no text or symbols)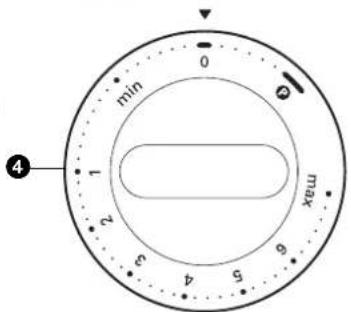
natural_image
Technical line drawing of a mechanical assembly with a cylindrical component and base mount (no text or symbols)
natural_image
Line drawing of a laboratory apparatus with a container and funnel (no text or symbols)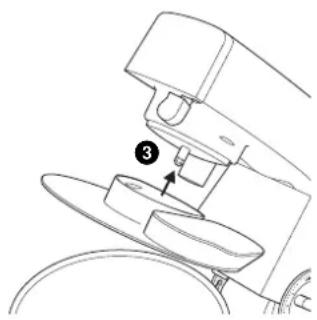
natural_image
Technical line drawing of a mechanical assembly with labeled component (no text or symbols)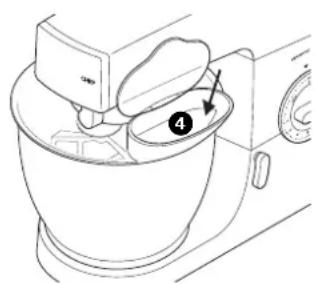
natural_image
Technical line drawing of a mechanical component with no visible text or symbols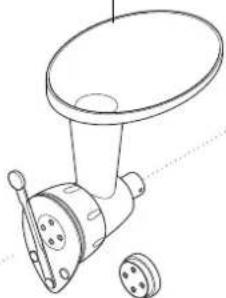
natural_image
Technical line drawing of a mechanical tool with a flanged base and circular component (no text or symbols)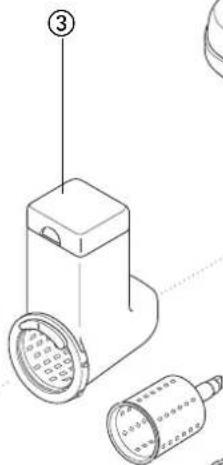
natural_image
Technical line drawing of a mechanical component with numbered callouts (no text or symbols)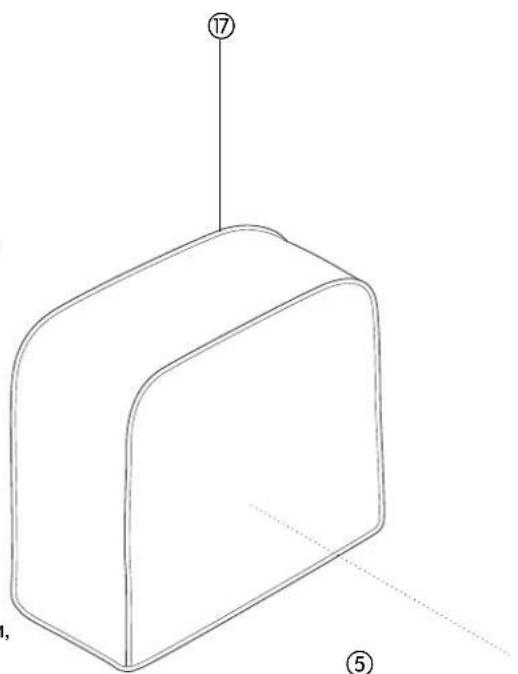
natural_image
3D wireframe diagram of a rectangular prism with labeled points (17 and 5), no text or symbols present.④
natural_image
Technical line drawing of a mechanical device with labeled parts (a and b), no text or symbols present.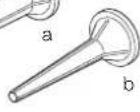

C

ОЧИСТКА И УХОД
Уход и очистка
natural_image
Technical line drawing of a mechanical device with a circular base and adjustment knob (no text or symbols)
natural_image
Technical line drawing of a mechanical device with no visible text or symbols
natural_image
Line drawing of a kitchen mixer with labeled component (no text or symbols)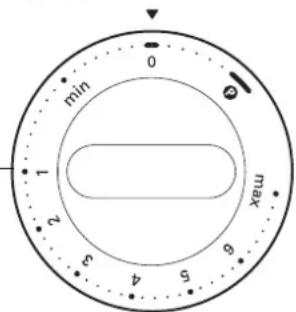
natural_image
Technical line drawing of a mechanical component assembly (no text or symbols)
natural_image
Three identical line drawings of cylindrical and perforated objects with no text or symbols
KENWOOD APPLIANCES HELLAS M.E.Π.E.
natural_image
Technical line drawing of a mechanical component with a numbered callout (no text or symbols present)
natural_image
Technical line drawing of a mechanical tool with labeled component (no text or symbols present)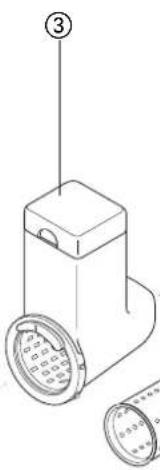
natural_image
Technical line drawing of a mechanical device with a circular component and a separate cylindrical component (no text or symbols)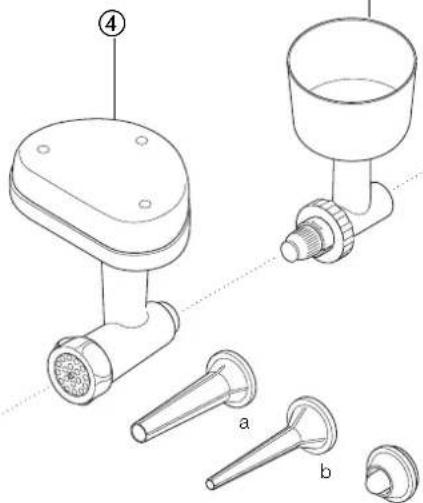

natural_image
Three identical line drawings of cylindrical objects with protrusions, no text or symbols present
natural_image
Technical line drawing of a mechanical clamp or clamping device on a circular base (no text or symbols)المشكة
natural_image
Line drawing of a laboratory apparatus with a funnel and internal components (no text or symbols)المɜكلة
natural_image
Technical line drawing of a mechanical component with labeled parts (no text or symbols)العحaine
natural_image
Technical line drawing of a mechanical device with a circular base and internal components (no text or symbols)natural_image
Technical line drawing of a mechanical device with no visible text or symbols
natural_image
Line drawing of a kitchen mixer with a rotating fan and handle (no text or symbols)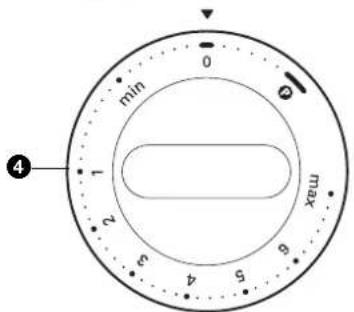
لالتظيف، راجعي ص ٢
Kenwood Limited, New Lane, Havant, Hampshire PO9 2NH, UK www.kenwoodworld.com

- Chef and Major KM330 - KM630 series
- Kenwood
- English
- page 3 instructions
- Français
- know your Kenwood kitchen machine
- before using your Kenwood appliance
- safety
- before plugging in
- before using for the first time
- the mixer
- the mixing tools and some of their uses
- to use your mixer
- points for bread making
- maximum capacities
- speed switch 4
- troubleshooting
- problem
- to fit and use your splashguard (if supplied)
- the attachments available
- flat pasta maker ① AT970A
- cleaning and service
- care and cleaning
- service and customer care
- recipes
- white bread stiff yeast dough
- ingredients
- method
- fresh yeast: crumble into the flour.
- white bread soft yeast dough
- fresh yeast: crumble into the flour and add the sugar.
- - Makes about 10 loaves.
- recipes continued
- strawberry and apricot gâteau
- ingredients: sponge
- meringues
- egg whites
- shortcrust pastry
- carrot and coriander soup
- reiniging en service
- posibles problemas
- problema
- limpieza y servicio
- a máquina
- mixeren
- fejlfinding
- problem:
- blandaren
- felsökning
- Mikseren
- Løsning på problemer
- Ekstra tilbehør
- Oppskrifter
- hveteloff myk gjærdeig
- ingredienser
- fremgangsmåte
- yleiskone
- lisälaitteet
- puhdistus ja huolto
- tärkeää
- karıştırıcı
- sorun giderme
- sorun
- ek parçalar
- temizlik ve bakım
- kuchyňský strojek
- čištění a servis
- čištění a péče
- hibakeresés
- a hiba
- МИКСЕР
- ОЧИСТКА И УХОД
- Уход и очистка
- العحaine
Brand : KENWOOD
Model : Chef & Major KM350
Category : Food Processor