
338902 - Vacuum Cleaner PRINCESS - Free user manual and instructions
Find the device manual for free 338902 PRINCESS in PDF.
| Product type | Robot vacuum cleaner |
| Brand | Princess |
| Model | 338902 |
| Power supply | Mains adapter and charging station |
| Battery type | Built-in rechargeable battery (type not specified) |
| Filter type | HEPA |
| Cleaning modes | Spiral, spot, edge, zigzag |
| Special features | Auto recharge, scheduling, remote control, mopping |
| Included accessories | Side brush, cleaning brush, HEPA filter, washing plate with water tank, mop cloth, remote control, charging station |
| Dimensions (estimated) | Approx. 35 cm (diameter) x 9 cm (height) |
| Weight (estimated) | Approx. 2.5 kg |
| Display | LCD on remote control |
| Safety | Automatic shutdown in case of problems, shock and drop sensors |
| Maintenance | Empty dust bin after each use, clean HEPA filter and brushes regularly |
| Repairability | Original replacement parts available, contact a qualified repair center |
| Batteries for remote control | 2 AAA batteries (not included) |
| Use | Household use only, not suitable for industrial or commercial use |
| Warranty | Not specified, contact manufacturer |
Frequently Asked Questions - 338902 PRINCESS
User questions about 338902 PRINCESS
0 question about this device. Answer the ones you know or ask your own.
Ask a new question about this device
Download the instructions for your Vacuum Cleaner in PDF format for free! Find your manual 338902 - PRINCESS and take your electronic device back in hand. On this page are published all the documents necessary for the use of your device. 338902 by PRINCESS.
USER MANUAL 338902 PRINCESS
natural_image
Black circular robotic vacuum cleaner with white branding and 'SECONDAR®' text on the cover (no additional signage or symbols visible)Robot Vacuum Cleaner
01.338902.01.001
PRINCESS
PARTS DESCRIPTION / ONDERDELENBESCHRIJVING / DESCRIPTION DES PIÈCES / TEILEBESCHREIBUNG / DESCRIPCIÓN DE LAS PIEZAS / DESCRIÇÃO DOS COMPONENTES / DESCRIZIONE DELLE PARTI / BESKRIVNING AV DELAR / OPIS CZĘŚCI / POPIS SOUĆÁSTÍ / POPIS SÚĆASTÍ / ОПИСАНИЕ ЗАПЧАСТИ
natural_image
Diagram showing a robotic vacuum cleaner with open storage compartments and a close-up view of its internal components (no text or symbols present)IMPORTANT SAFETY INSTRUCTIONS
Read all instructions before using your Princess product. By ignoring the safety instructions Princess cannot be held responsible for the damage. When using an electrical appliance, basic safety precautions should always be observed, including the following:
IMPORTANT: This appliance is not intended for use by persons with reduced physical, sensory or mental capabilities, or lack of experience and knowledge, unless they have been given supervision or instruction concerning use of the appliance by a person responsible for their safety. Children shall not use or play with this appliance. Close supervision is necessary to keep appliance and cord out of reach of children during use.
- By ignoring the safety instructions the manufacturer can not be hold responsible for the damage.
- If the supply cord is damaged, it must be replaced by the manufacturer, its service agent or similarly qualified persons in order to avoid a hazard.
- Never move the appliance by pulling the cord and make sure the cord can not become entangled.
- This appliance is only to be used for household purposes and only for the purpose it is made for.
• To protect yourself against an electric shock, do not immerse the cord, plug or appliance in the water or any other liquid.
- The plug must be removed from the socket-outlet before cleaning or maintaining the appliance.
- This appliance can be used by children aged from 8 years and above and persons with reduced physical, sensory or mental capabilities or lack of experience and knowledge if they have been given supervision or instruction concerning use of the appliance in a safe way and understand the hazards involved. Children shall not play with the appliance. Cleaning and user maintenance shall not be made by children without supervision.
SAFETY INSTRUCTIONS
- Risk of suffocation! Keep the packaging material away from children and animals.
- Keep the device, cord and plug away from water or other liquids in order to avoid the risk of an electrical shock. Never touch the mains plug, cord or device with wet or damp hands.
PRINCESS
Instruction manual
- Keep animals, hair, jewellery, loose clothing, fingers and all other parts of the body away from the moving parts or openings of the appliance when it is in operation. They can be caught in the vacuum cleaner. If something gets stuck in the vacuum cleaner, switch the appliance off immediately.
• Take special care to avoid falling when cleaning stairs.
- Use and store the device only out of the reach of children. Improper use can result in injury and electric shock. The power cord may also not be accessible to children.
PROPER USE
• The appliance must only be used domestically, it is not suitable for industrial or commercial use.
• The appliance must not be used to clean:
• People, animals, plants or items of clothing on the body, always keep the appliance away from body parts and hair.
- Glowing or burning objects like ash, charcoal, burning cigarettes, matches or highly flammable substances.
• Water and all other liquids
- Pointed objects like broken glass or nails.
- Fine dust, construction dust.
- Only use and store the device in enclosed areas. Do not use the device outdoors, in rooms with high humidity or on hot surfaces.
- Check the devices and accessories for damage before each use. Do not use the appliance if the appliance, the cord, the plug or the filter are visibly damaged, do not attempt to repair the appliance yourself or replace the parts yourself. In case of damage, contact a qualified repair center or the helpdesk of the supplier.
- Do not use the device if it malfunctions or has vacuumed up liquids. Have the device repaired by a qualified repair center.
- Only use the device if it has been completely and correctly assembled.
- Do not expose the device to extreme temperatures, severe changes in temperature, open flames, direct sunlight, moisture or wetness.
- Never place heavy objects on the device.
- Empty the dust bin after every use. The filters must also be cleaned regularly.
- Allow the dust bin, dust filter and exhaust filter to dry completely before you reinstall them in the device.
- Only use original spare parts provided by the supplier.
- Store the device in a cool, dry area that is not accessible to children and animals when not in use.
- Never fill the dust bin with liquids.
BATTERY WARNING
- Rechargeable battery is only to be charged under adult supervision.
- Do not attempt to open the rechargeable battery or battery pack as there are no serviceable parts inside.
- Do not disassemble, incinerate or short-circuit the battery or the battery pack. Only replace the battery with an original battery, the use of another battery can cause a fire or explosion.
- The battery is a sealed unit and under normal circumstances it does not constitute a safety hazard. If in any case liquid does leak out of the battery don't touch it and consult a doctor immediately in case of inhalation, skin or eye contact.
- Should a battery leak, the device may become damaged. Clean the battery compartment immediately, avoiding touching your skin.
- Avoid storing the battery in extremely hot or cold environment. A device with a hot or cold battery may not work temporarily, even when the battery is fully charged.
- Do not dispose battery in a fire as it may explode. Battery may also explode if damaged. Please dispose it according to local regulation. Do not dispose it as household waste.
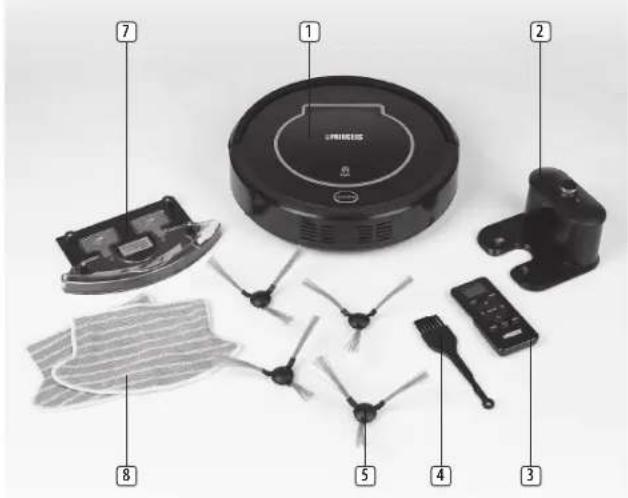
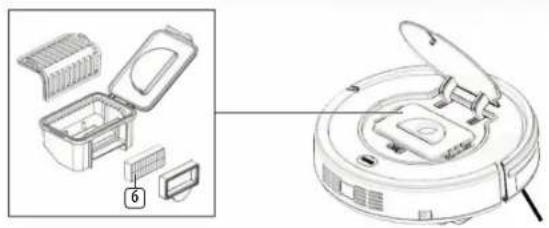
PARTS DESCRIPTION
- Main body
- Charging station
- Remote control
- Cleaning brush
- Side brush
- HEPA filter
- Mopping plate and water tank
- Mopping cloth
Remote control
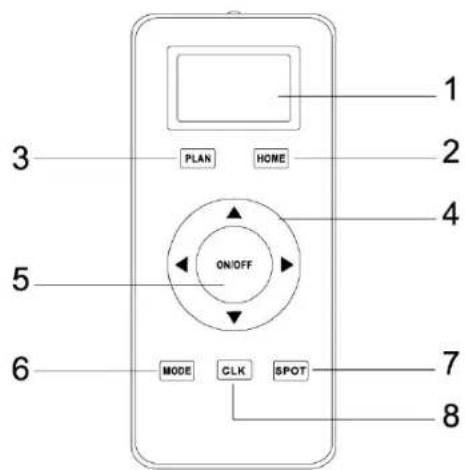
- LCD display
- Auto charging
- Scheduling button
- Direction button
- ON/OFF
- Cleaning mode
- Spot cleaning
- Clock set up
BEFORE THE FIRST USE
• Take the appliance and accessories out the box. Remove the stickers, protective foil or plastic from the device.
- Place 2x AAA batteries into the remote control.
Battery charging
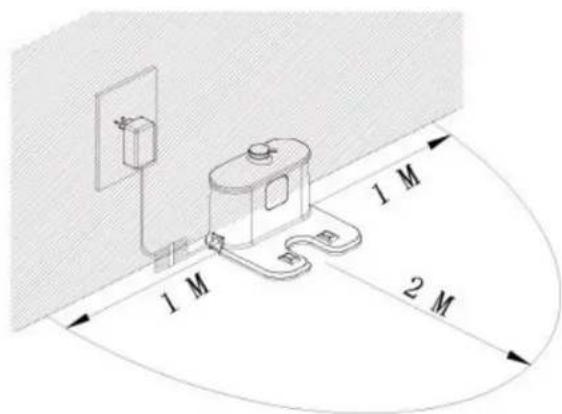
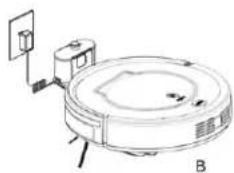
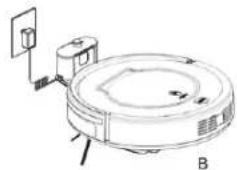
- Place charging station against the wall and remove obstacles within 1 meter at the two sides and 2 meters ahead.
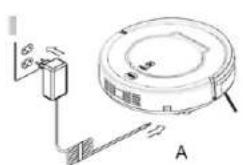
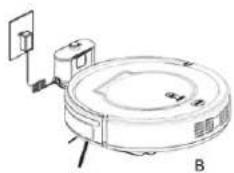
- Charge the cleaner in either of the following ways:
-
Plug the adapter into the cleaner and plug the other end into a power socket. (Fig A)
-
Press "AUTO" button on remote control to direct the cleaner to charging station. (Fig B)
natural_image
Technical line drawing of a circular robotic vacuum cleaner with labeled components (no text or symbols)USE
Remote control
√ Point the remote control at the main unit when pressing a button
-
Time setting: Press "CLK" button. Press direction buttons to set the time. When you have selected the time, press "CLK" again.
-
Cleaning function: Press "ON/OFF" button.
-
Sleep function: Press "ON/OFF" button for 5 seconds.
-
Cleaning mode selection: Press "MODE" button. The LCD display will show in which mode the cleaner currently is. (For details see Cleaning Modes)
-
Scheduling function: Press "PLAN" button to set up the schedule (For details see Scheduling Cleaning section)
-
Auto charging: Press "HOME" button to direct the cleaner to the charging station automatically.
-
Direction buttons: Use to change the direction of the cleaner manually.
Main body

Cleaning button part
A. Switch on the robot, CLEAN button indicator will be in gradual blue.
B. Touch CLEAN button, the robot will have 3 beeps and the indicator will flash in blue, then it will start cleaning if the robot is in good state. And the indicator will keep in blue during cleaning.
C. If the robot is malfunctioned, its indicator will be in different status (details please take reference in troubleshooting).
D. The indicator will flash in red when the robot with low power. E. During charging (robot on charging home base or connected by charging adaptor), CLEAN button indicator will get red gradually. After fully charged, the robot will have 5 beeps and CLEAN button indicator will turn blue.
F. When the robot is successfully scheduled, the indicator will be pink for two seconds. (Press PLAN button for seconds to check whether robot has already scheduled. If yes, the indicator will in pink for two seconds. Otherwise, the indicator will have no color change.)
Starting up / Pause / Sleep
- Starting up
A. Power on the switch at bottom side of the robot, and CLEAN button indicator will be in gradual blue.
B. Press CLEAN button on main body or on remote controller to start cleaning. The robot will have 3 beeps, and the CLEAN indicator will be in gradual blue.
PRINCESS
Instruction manual
Note: if robot is in sleep mode, press CLEAN button to wake the robot up from sleep mode. Then press CLEAN for a second time, the robot starts cleaning automatically.
2. Pause
To stop the robot temporarily from cleaning:
A. Press CLEAN button on main body;
B. Or press ON/OFF button on remote controller.
- Sleep mode
Turn robot into sleep mode, and its display indicator will be off (robot in standby, not powered off);
A. The robot will automatically turn to sleep mode if no command received in 30 seconds.
B. Press CLEAN button on the main body for two seconds or press ON/OFF on remote controller for two seconds, robot will turn to sleep mode.
NOTE: if the robot is not in use for a long time, please turn the power switch off.
Scheduling cleaning
You can schedule the robot to make it start cleaning at a certain time. (Time delay up to 24 hours)
Note:
A. The robot will always work at the scheduled time after scheduling confirmed.
B. All scheduling will be canceled if the robot is turned off.
C. When the cleaner is charging directly by adapter instead of charging it will not accept scheduling set up.
How to Schedule the robot by remote controller:
A. To schedule the robot when it is standby or charging on the charging station. (Press CLEAN to wake up the robot, or press ON/OFF to wake it up.)
B. Press PLAN button until the remote displays flashed figure "00:00".
C. Press up and down direction buttons to set the flashing numbers.
D. Press the left and right direction buttons to switch between hour and minute.
E. After time is confirmed, press ON/OFF to save scheduled setting – robot will have one beep, and the CLEAN button indicator will be in pink for two seconds – robot is successfully scheduled.
F. Press ON/OFF again, scheduled setting will be canceled, robot will have two beeps and the CLEAN button indicator on the robot will be blue.
G. Press PLAN button for seconds, it will get back from scheduling setting.
H. User can press PLAN button to check whether robot has already scheduled, if yes, robot CLEAN button indicator will be in pink for two seconds. Otherwise, the indicator will have no color change but robot beeps once.
Cleaning modes
Mode 1: Spiral cleaning
The robot will clean the room automatically in a spiral way and adjust its cleaning mode according to environment.
To start the auto mode press ON/OFF button on remote control or press CLEAN on main unit.

Mode 2: Spot cleaning
Press SPOT on the remote control to start spot cleaning.
NOTE: only use this mode on areas with a lot of dust/dirt.
When the dusty area is cleaned, the robot will automatically turn to AUTO mode.

Switch the robot on, press MODE on the remote control and select mode 3 (Edge cleaning). The robot will now clean along obstacles by using its side brushes.

Mode 4: Zig-Zag cleaning
When the robot detects an open area it will automatically turn into Zig-Zag mode.

Mopping + Watertank
The principle of overflow water tank
Water flows out of the water tank automatically due to gravity, so please take out the water tank after finishing cleaning.
Water Tank and Mopping Cloth Installation
- Install mopping cloth
Stick mopping cloth on the bottom of water tank as shown in fig 1. Make sure the sticking side and mopping cloth face the appropriate sides, and then stick the mopping cloth on its sticking side.
- Fill water tank with water
Take out rubber plug of water tank, fill it with water, and then put back the rubber plug tightly in position to prevent water leakage.
- Fix water tank on the robot
Turnover the robot, fix the water tank on the robot bottom. Make sure the bolts are firmly pressed into the fixing slots.
CLEANING AND MAINTENANCE
Side brushes
Dust bin and filter
- Make sure you regularly empty the dust container and clean the filter
- Keep the device over a bin and press the unlock button of the dust container.
- Remove the filter holder from the dust container and beat them clean.
- If the filter is very dirty you can clean with a brush, a vacuum cleaner, or rinse with lukewarm water.
- Never immerse the device under water, the device and the various parts are not dishwasher-proof.
- Never block the outlet openings during vacuuming.
- Never vacuum flammable liquids.

Instruction manual
Sensors and charging connection
- Clean the appliance with a damp cloth. Never use harsh and abrasive cleaners, scouring pad or steel wool, which damages the device.
- Never immerse the electrical device in water or any other liquid. The device is not dishwasher proof.
TROUBLESHOOTING
| Problem Possible reason Solution | ||
| Robot suddenly stops cleaning and indicator LED stays blue. | Robot was picked up. | Re-place the robot on the floor and restart the robot. |
| Robot is powered on, indicator LED stays blue. | Cliff sensor fault. Clean | cliff sensor.If the solution does not work, send it back to seller for repair. |
| Robot does not change direction when it comes into contact with obstacle. | Bumper sensor fault. | Check the sensor to see if its covered by a foreign object |
| During charging, LED indicator flashes red and robot beeps. | Robot switch might not be powered on. | Switch the robot on. |
| RED led stays on. Dust | bin is fullOrDust passage is obstructed. | Empty dustbinOrClean dust passage. |
| Blue LED flashes once, Red LED flashes once. | Side brush is stuck. Place the robot on a flat service and clean side brush. | |
| Blue LED flashes once, Red LED flashes twice | Robot bumper is not flexible. | Loosen half circle of bumper bottom screw. |
| Blue LED flashes once, Red LED flashes triple. | Robot wheel is stuck. Check wheels and take out foreign object. | |
NOTE: If all solutions given above are not helpful, please take actions below:
1. Reset the robot by switching on the power button on the control panel
2. If reset doesn't work, please send robot to seller for repairing.
ENVIRONMENT

This appliance should not be put into the domestic garbage at the end of its durability, but must be offered at a central point for the recycling of electric and electronic domestic appliances. This symbol on the appliance, instruction manual and packaging puts your attention to this important issue. The materials used in this appliance can be recycled. By recycling of used domestic appliances you
Instruction manual
contribute an important push to the protection of our environment. Ask your local authorities for information regarding the point of recollection.
The European directive for batteries (2006/66/EC) states that it is not permitted to throw batteries away with the household waste. They may contain substances which are harmful to the environment. Empty batteries can be handed over to a local, public collection point or a local recycling centre. To avoid overheating as a result of a short circuit, lithium batteries must be removed from the product and the poles must be protected using insulation tape or some other means against short-circuiting.
Support
You can find all available information and spare parts at www.princesshome.eu!
EN
BELANGRIJKE VEILIGHEIDSINSTRUCTIES
De accu opladen

natural_image
Line drawing of a robotic vacuum cleaner with labeled components (no text or symbols)GEBRUIK
Afstandsbediening

natural_image
Technical line drawing of a robotic vacuum cleaner with labeled components (no text or symbols)UTILISATION
Télécommande
Akkuaufladung
natural_image
Diagram of a robotic vacuum cleaner with attached circuit board and wiring (no text or symbols)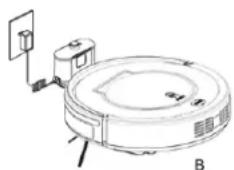
natural_image
Technical line drawing of a circular robotic vacuum cleaner with labeled components (no text or symbols)BENUTZUNG
Fernbedienung
natural_image
Technical line drawing of a circular device with attached components and wiring (no text or symbols)
natural_image
Technical line drawing of a circular device with labeled components and connection points (no readable text or symbols)USO
Telecomando
Carga de las pilas
natural_image
Line drawing of a robotic vacuum cleaner with labeled components (no text or symbols)USO
Mando a distancia

natural_image
Line drawing of a robotic vacuum cleaner with labeled components (no text or symbols)UTILIZAÇÃO
Controlo remoto
Arranque/Pausa/Repouso
Nabíjení baterie
natural_image
Line drawing of a robotic vacuum cleaner with labeled components (no text or symbols)POUŽITÍ
Dálkový ovladač

natural_image
Technical line drawing of a circular robotic vacuum cleaner with labeled components (no text or symbols)ANVÄNDNING
Fjärrkontroll
natural_image
Technical line drawing of a circular device with attached components and wiring (no text or symbols)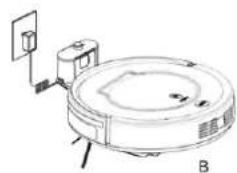
natural_image
Technical line drawing of a circular device with labeled components and connection points (no readable text or symbols)UŻYTKOWANIE
Pilot
Nabijanie batérie
natural_image
Technical line drawing of a circular device with attached components and wiring (no text or symbols)
natural_image
Line drawing of a robotic vacuum cleaner with labeled components (no text or symbols)POUŽÍVANIE
Dialkové ovládanie
natural_image
Technical line drawing of a circular device with attached components and labeled section A (no text or symbols present)
natural_image
Line drawing of a robotic vacuum cleaner with labeled components (no text or symbols)ЭКСПЛУАТАЦИЯ
Пульт ДУ.

- PRINCESS
- IMPORTANT SAFETY INSTRUCTIONS
- SAFETY INSTRUCTIONS
- PROPER USE
- BATTERY WARNING
- PARTS DESCRIPTION
- BEFORE THE FIRST USE
- USE
- Remote control
- Main body
- Cleaning button part
- Starting up / Pause / Sleep
- Pause
- Scheduling cleaning
- Cleaning modes
- Mopping + Watertank
- CLEANING AND MAINTENANCE
- Side brushes
- Dust bin and filter
- Sensors and charging connection
- ENVIRONMENT
- Support
- BELANGRIJKE VEILIGHEIDSINSTRUCTIES
- De accu opladen
- GEBRUIK
- Afstandsbediening
- UTILISATION
- Télécommande
- Akkuaufladung
- BENUTZUNG
- Fernbedienung
- USO
- Telecomando
- Mando a distancia
- UTILIZAÇÃO
- Controlo remoto
- Arranque/Pausa/Repouso
- POUŽITÍ
- Dálkový ovladač
- ANVÄNDNING
- Fjärrkontroll
- UŻYTKOWANIE
- Pilot
- Nabijanie batérie
- POUŽÍVANIE
- Dialkové ovládanie
- ЭКСПЛУАТАЦИЯ
- Пульт ДУ.
Brand : PRINCESS
Model : 338902
Category : Vacuum Cleaner