
332860 Nice Price - Vacuum Cleaner PRINCESS - Free user manual and instructions
Find the device manual for free 332860 Nice Price PRINCESS in PDF.


| Product type | Vacuum cleaner with bag |
| Brand | Princess |
| Model | 332860 Nice Price |
| Power supply | Mains 220-240 V, 50-60 Hz |
| Maximum power | 700 W |
| Tank capacity | 2 L (dust bag) |
| Operating radius | 8 m (power cord) |
| Noise level | 80 dB(A) |
| Dimensions (L x W x H) | 30 x 25 x 40 cm |
| Weight | 4.5 kg |
| Filter type | Washable filter |
| Power adjustment | Yes, manual |
| Included accessories | Crevice tool, upholstery brush |
| Use | Hard floors and carpets |
| Maintenance | Change the bag regularly, clean the filter |
| Safety | Do not use if the cord is damaged |
| Spare parts available | Bags, filters |
Frequently Asked Questions - 332860 Nice Price PRINCESS
User questions about 332860 Nice Price PRINCESS
0 question about this device. Answer the ones you know or ask your own.
Ask a new question about this device
Download the instructions for your Vacuum Cleaner in PDF format for free! Find your manual 332860 Nice Price - PRINCESS and take your electronic device back in hand. On this page are published all the documents necessary for the use of your device. 332860 Nice Price by PRINCESS.
USER MANUAL 332860 Nice Price PRINCESS
natural_image
Line drawing of a vacuum cleaner with attached arm and base (no text or symbols)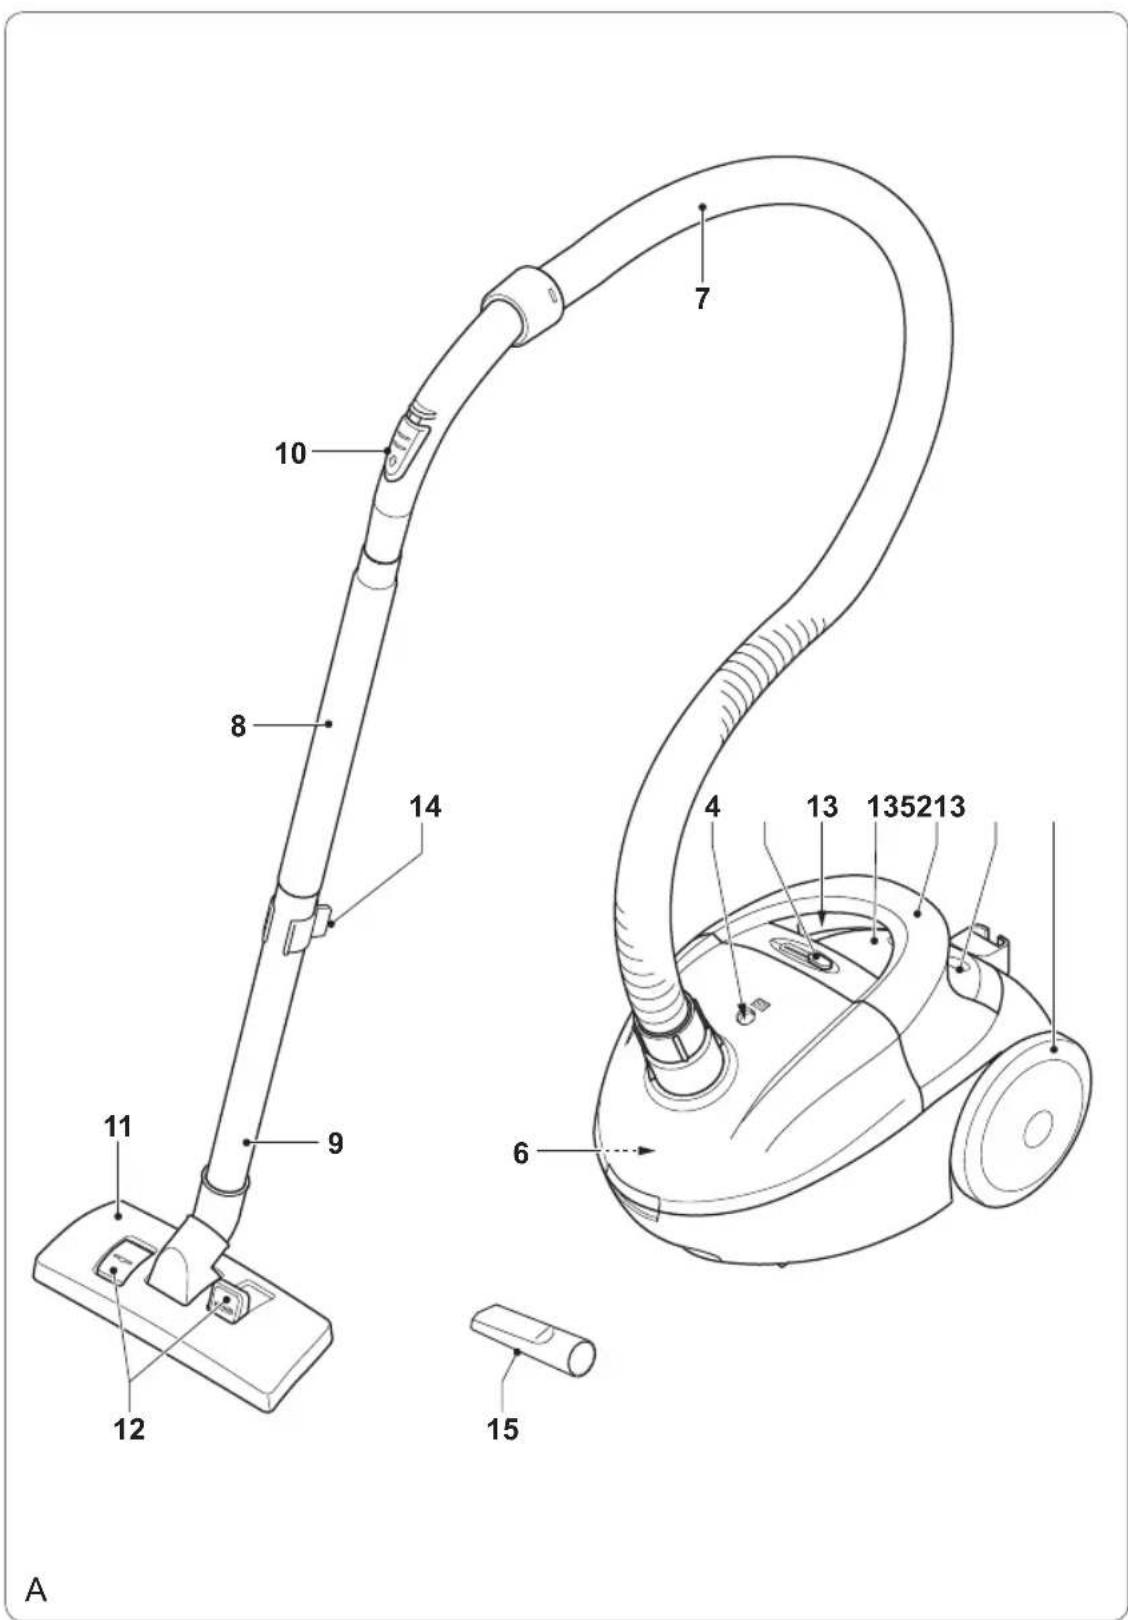




natural_image
Line drawing of a vacuum cleaner with attached device (no text or symbols)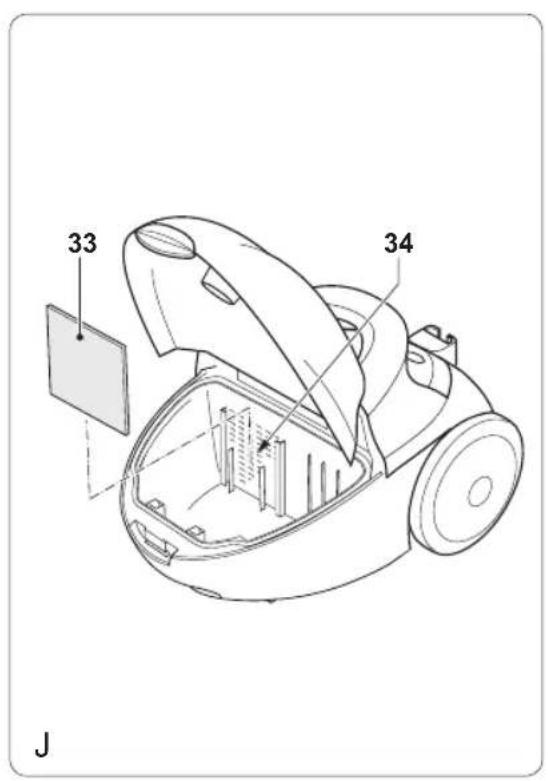

Gefeliciteerd!
You have purchased a Princess appliance. Our aim is to provide quality products with a tasteful design and at an affordable price. We hope that you will enjoy this appliance for many years.
Instructions for use
The instructions for use have been collected in the corresponding section. Be familiar with the safety instructions when you consult the instructions for use.
Safety instructions
Warning!
- When using mains-powered appliances, basic safety instructions must always be followed to reduce the risk of fire, electric shock and personal injury.
- Do not use the appliance near bathtubs, showers, basins or other vessels containing water.
Read the entire manual carefully before use.
The intended use is described in this • manual. The use of any accessory or the performance of any operation with this appliance other than recommended can cause a risk of personal injury.
Keep this manual for future reference. Children should be supervised to ensure that they do not play with the appliance.
- The use of this appliance by children or persons with a physical, sensory, mental or motorial disability, or lack of experience and knowledge can give cause to hazards. Persons responsible for their safety should give explicit instructions or supervise the use of the appliance.
Use
• Always be careful when using the appliance.
• Always protect the appliance from water or excessive humidity.
Carefully guide the mains cable to make • sure that it does not hang over the edge of a worktop and cannot be caught accidentally or tripped over.
Never pull the mains cable to disconnect • the mains plug from the mains. Keep the mains cable away from heat, oil and sharp edges.
Do not remove any part or accessory when the mains plug is connected to the mains. Always first disconnect the mains plug from the mains.
If the mains cable becomes damaged • during use, immediately disconnect the mains plug from the mains. Do not touch the mains cable before disconnecting the mains plug from the mains.
Disconnect the mains plug from the mains • when the appliance is not in use, before assembly or disassembly and before cleaning and maintenance.
Safety of others
Do not allow children or any person • unfamiliar with these instructions to use the appliance.
Do not allow children or animals to come • near the work area. Do not allow children or animals to touch the appliance or mains cable. Close supervision is necessary when the appliance is used near children.
After use
Disconnect the mains plug from the mains • and let the appliance cool down before leaving it unattended and before replacing, cleaning or inspecting any parts of the appliance.
Store the appliance in a dry place when not • in use. Make sure that children do not have access to stored appliances.
Inspection and repairs
Before use, check the appliance for • damaged or defective parts. Inspect the appliance for breakage of parts, damage to switches and other conditions that can affect the operation.
Do not use the appliance if any part is • damaged or defective.
Have any damaged or defective part • repaired or replaced by an authorised repair agent.
Never attempt to remove or replace any • parts other than those specified in this manual.
Before use, check the mains cable for wear or damage.
Do not use the appliance if the mains cable or mains plug is damaged or defective. If the mains cable or mains plug is damaged or defective, it must be replaced by the manufacturer or an authorised repair agent.
Safety instructions for vacuum cleaners
Before use, always check that the mains • voltage is the same as the voltage on the rating plate of the appliance.
The appliance is not intended to be operated by means of an external timer or separate remote-control system.
Make sure that water cannot enter the contact plugs of the mains cable.
Always fully unwind the mains cable.
Only use the appropriate connector to operate the appliance.
Do not use the appliance outdoors. Do not use the appliance near water. Do not immerse the appliance in water.
- Do not use the appliance without the dustbag. Do not use the appliance without the motor filter. Do not use the appliance without the outlet filter.
- Do not use the appliance to vacuum liquids.
- Do not use the appliance to vacuum flammable materials.
• Only hold the appliance by the handgrip. - Keep the motor unit away from your eyes and face.
Always work from bottom up when using the appliance on stairs.
U.K. Wiring instructions
The wires in the mains lead are coloured in accordance with the following code:
BLUE NEUTRAL
BROWN LIVE
As the colours of the wire in the mains lead of this appliance may not correspond with the colour markings identifying the terminals on your plug, proceed as follows:
The wire which is coloured BLUE must be connected to the terminal which is marked with the letter N or coloured black.
The wire which is coloured BROWN must be connected to the terminal which is marked with the letter L or coloured red.
If a 13Amp (BS1363) plug is used, a 13Amp (BS1362) fuse must be fitted, or if any other type of plug is used, a 13Amp fuse must be fitted, either in the plug or adaptor, or on the distribution board.
This is a double-insulated appliance and does not need an earth connection.
Warning! On no account should either the live or neutral wires be connected to the earth terminal.
Description (fig. A)
Your 332860 Princess vacuum cleaner has been designed for vacuuming dry substances. The appliance is not suitable for vacuuming wet substances. The appliance is suitable for domestic use only.
- On/off button
- Mains cable rewind button
- Speed control switch
- Bag-full indicator
- Handgrip
- Dustbag compartment
- Hose
- Tube
- Extension tube
- Airflow control switch
- Suction nozzle
- Floor surface selector
- Wheels
- Parking bracket
- Crevice nozzle
Assembly
Warning!
- Before assembly, always remove the mains plug from the wall socket.
Mounting and removing the dustbag (fig. B - D)
The dustbag and the dustbag holder must be properly mounted in order to close the cover of the dustbag compartment.
Warning!
- Do not use the appliance without the dustbag.
Mounting the dustbag
Keep the release button (16) pressed and open the cover (17).
Remove the dustbag holder (19) from the • dustbag compartment (6).
Insert the dustbag (20) into the slots (21) of the dustbag holder (19) (fig. C1). Slide the dustbag (20) to the end of the dustbag holder (19) (fig. C2).
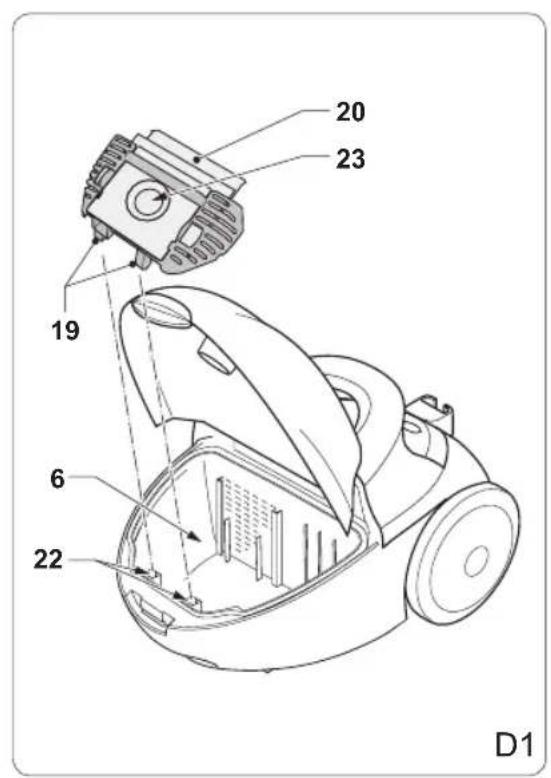
Insert the dustbag holder (19) into the slot • (22) of the dustbag compartment (6) (fig.
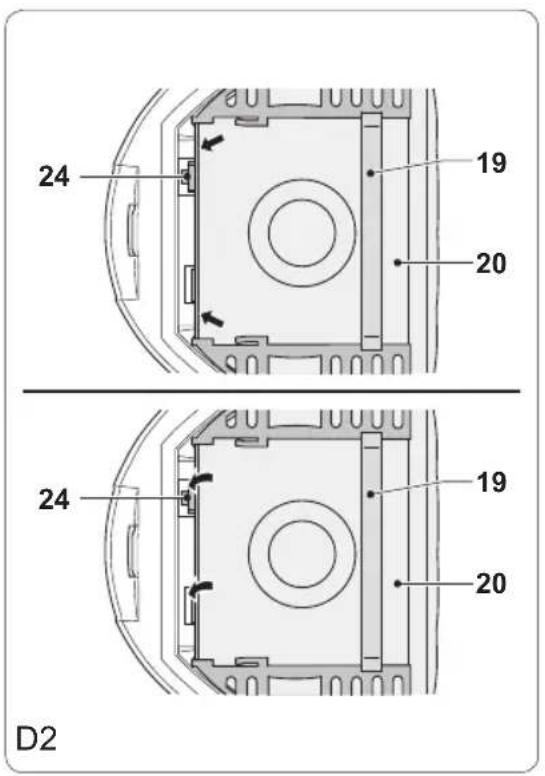
D1). Push the dustbag holder (19) until the dustbag (20) is locked by the dustbag lock (24) (fig. D2).
Close the cover (17) until the release • button (16) clicks into place. Make sure that the hole (23) in the dustbag (20) aligns with the hose connection (18).
Removing the dustbag
Keep the release button (16) pressed and open the cover (17).
Remove the dustbag holder (19) from the • dustbag compartment (6).
Remove the dustbag (20) from the dustbag • holder (19).
Insert the dustbag holder (19) into the slot • (22) of the dustbag compartment (6).
Close the cover (17) until the release • button (16) clicks into place.
Mounting the hose, the tube and the suction nozzle (fig. E - G)
To mount the hose (7), insert the hose • outlet (25) into the hose connection (18) until the release buttons (26) click into place.
To mount the tube (8), insert the tube outlet • (28) into the hose inlet (27).
To mount the extension tube (9), insert the • tube outlet (30) into the tube inlet (29).
To mount the suction nozzle (11), insert the tube inlet (31) into the tube connection (32).
Mounting the crevice nozzle (fig. F & G)
The crevice nozzle (15) can be used for vacuuming in narrow and hard-to-reach places.
To mount the crevice nozzle to the hose • (7), insert the hose inlet (27) into the crevice nozzle (15).
To mount the crevice nozzle to the tube (8), insert the tube inlet (29) into the crevice nozzle (15).
To mount the crevice nozzle to the • extension tube (9), insert the tube inlet (31) into the crevice nozzle (15).
Use
Unwinding and rewinding the mains cable (fig. A)
The mains cable rewind button (2) can be operated by hand or foot.
Caution!
- Do not unwind or rewind the mains cable while the appliance is switched on.
- Always hold the mains plug to unwind the mains cable. Never pull the mains cable.
Before use, hold the mains plug and • unwind a sufficient length of the mains cable from the back of the appliance.
After use, press the mains cable rewind • button (2) to rewind the mains cable back into the appliance. Manually guide the mains cable to make sure that it does not swing back. Make sure that the mains plug is correctly located.
Adjusting the suction nozzle (fig. H)
The floor surface selector (12) can be set to adjust the suction nozzle (11) to the required floor surface. The floor surface selector (12) can be operated by hand or foot.
For vacuuming on laminates, tiles, etc., press the corresponding part (A) of the floor surface selector (12).
For vacuuming on carpets, press the • corresponding part (B) of the floor surface selector (12).
Switching on and off (fig. A)
The on/off button (1) can be operated by hand or foot.
To switch on the appliance, press the • on/off button (1).
To switch off the appliance, press the • on/off button (1) again.
Adjusting the suction force (fig. A)
The speed control switch (3) can be used to adjust the suction force.
- Set the speed control switch (3) to the required position:
- For vacuuming on hard surfaces (e.g. floors), set a high suction force.
- For vacuuming on soft surfaces (e.g. upholstery), set a low suction force.
Adjusting the airflow (fig. A)
The airflow can be adjusted using the airflow control switch (10).
To adjust the airflow, set the airflow control • switch (10) to the required position.
Temporarily parking the suction nozzle (fig. 1)
To temporarily park the suction nozzle, use the park position as shown.
Cleaning and maintenance
Warning!
- Before cleaning or maintenance, remove the mains plug from the wall socket and wait until the appliance has cooled down.
- Do not immerse the appliance in water or any other liquids for cleaning.
Caution!
- Do not use aggressive or abrasive cleaning agents to clean the appliance.
- Do not use sharp objects to clean the appliance.
Regularly check the appliance for possible damage.
Regularly clean the ventilation slots using • a soft brush.
Store the appliance in a dry place, out of • the reach of children.
Replacing the dustbag (fig. B - D)
The dustbag (20) must be replaced when the bag-full indicator (4) comes on. Replacement dustbags are available from our service station. If you have questions regarding the dustbag, contact the service station.
To remove the full dustbag (20), refer to the section "Mounting and removing the dustbag".
To mount the empty dustbag (20), refer to the section "Mounting and removing the dustbag".
Cleaning and replacing the motor filter (fig. B, C, D & J)
Caution!
- Do not wash or rinse the motor filter.
The motor filter (33) reduces the amount of dust entering the motor unit to a minimum. The motor filter (33) must be cleaned regularly. The motor filter (33) must be replaced after several months or whenever worn or damaged. Replacement motor filters are available from our service station.
Keep the release button (16) pressed and open the cover (17).
If necessary, remove the dustbag (20).
Refer to the section "Mounting and removing the dustbag".
Remove the filter (33) from the filter holder • (34).
Remove the dust from the filter using a soft brush. If the filter is worn, use a new filter. Insert the filter (33) into the filter holder (34). If necessary, mount the dustbag (20).
Refer to the section "Mounting and removing the dustbag".
Close the cover (17) until the release • button (16) clicks into place.
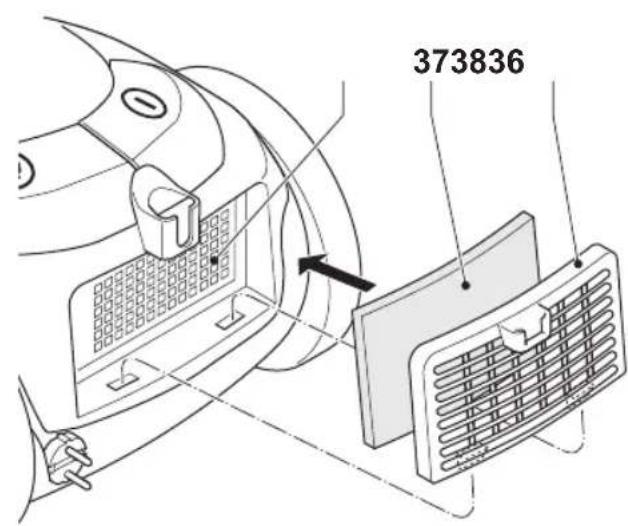
Cleaning and replacing the outlet filter (fig. K & L)
Caution!
- Do not wash or rinse the outlet filter.
The outlet filter (37) reduces the amount of dust entering the motor unit to a minimum.
The outlet filter (37) must be cleaned regularly.
The outlet filter (37) must be replaced after several months or whenever worn or damaged. Replacement outlet filters are available from our service station.
Press the tab (35) and remove the cover • (36).
Remove the filter (37) from the filter holder • (38).
Remove the dust from the filter using a soft • brush. If the filter is worn, use a new filter.
Insert the filter (37) into the filter holder (38).
Mount the cover (36) until the tab (35) • clicks into place.
Disclaimer
Subject to change; specifications can be changed without further notice.
Félicitations!
- Gefeliciteerd!
- Instructions for use
- Safety instructions
- Warning!
- Use
- Safety of others
- After use
- Inspection and repairs
- Safety instructions for vacuum cleaners
- U.K. Wiring instructions
- Description (fig. A)
- Assembly
- Mounting and removing the dustbag (fig. B - D)
- Mounting the dustbag
- Removing the dustbag
- Mounting the hose, the tube and the suction nozzle (fig. E - G)
- Mounting the crevice nozzle (fig. F & G)
- Unwinding and rewinding the mains cable (fig. A)
- Caution!
- Adjusting the suction nozzle (fig. H)
- Switching on and off (fig. A)
- Adjusting the suction force (fig. A)
- Adjusting the airflow (fig. A)
- Temporarily parking the suction nozzle (fig. 1)
- Cleaning and maintenance
- Replacing the dustbag (fig. B - D)
- Cleaning and replacing the motor filter (fig. B, C, D & J)
- Cleaning and replacing the outlet filter (fig. K & L)
- Disclaimer
- Félicitations!
Brand : PRINCESS
Model : 332860 Nice Price
Category : Vacuum Cleaner