
F83 E - Coffee grinder Fiorenzato - Free user manual and instructions
Find the device manual for free F83 E Fiorenzato in PDF.
| Product Type | Professional electronic coffee grinder-doser |
| Model | F83 E |
| Brand | Fiorenzato |
| Dimensions (W x H x D) | 230 x 670 x 270 mm |
| Net weight | 15 kg |
| Power supply | 220-240 V ~ 50 Hz |
| Power consumption | 650 W |
| Burr type | Flat burrs type B |
| Burr diameter | 83 mm |
| Rotation speed | 1350 rpm (50 Hz) / 1550 rpm (60 Hz) |
| Hopper capacity | 1.5 kg |
| Grinding time - single dose | 1.0 to 12.0 s |
| Grinding time - double dose | 1.0 to 25.0 s |
| Grinding time tolerance | ± 0.1 s |
| Recommended daily grinding | 3 to 7 kg |
| Dispensing time - single dose 7 g | 1.9 s |
| Dispensing time - double dose 14 g | 3.8 s |
| Burr replacement frequency (standard) | 45 h or 600 kg of ground coffee |
| Burr replacement frequency (Red Speed) | 180 h or 2400 kg of ground coffee (optional) |
| Operating modes | Standard, Direct, Automatic, Preselection |
| Touch screen | Yes, customizable (light, theme, screensaver) |
| Safety devices | Motor thermal protection, anti-intrusion mushroom, locking lever for adjusting ring |
| Routine maintenance | Daily cleaning of surfaces and grinding chamber |
| Periodic maintenance | Monthly burr cleaning with specific product |
| Manufacturer warranty | 24 months |
Frequently Asked Questions - F83 E Fiorenzato
User questions about F83 E Fiorenzato
0 question about this device. Answer the ones you know or ask your own.
Ask a new question about this device
Download the instructions for your Coffee grinder in PDF format for free! Find your manual F83 E - Fiorenzato and take your electronic device back in hand. On this page are published all the documents necessary for the use of your device. F83 E by Fiorenzato.
USER MANUAL F83 E Fiorenzato
natural_image
Line drawing of a mechanical presser or grinder device (no text or symbols present)IT
Serie ON DEMAND
Serie ON DEMAND
IT
Serie ON DEMAND
IT
natural_image
Technical line drawing of a mechanical device with labeled component (1), no readable text or symbols present.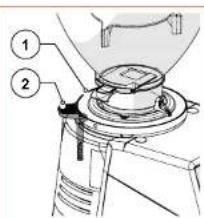
Serie ON DEMAND
IT
3.5 Rischi residui
natural_image
Technical diagram of an electrical switchgear assembly with warning symbol (no text labels)Fig. 6
4 INSTALLAZIONE

natural_image
Technical line drawing of a coffee maker with an inset close-up showing its internal structure (no text or symbols)Fig. 10
IT
Serie ON DEMAND
natural_image
Technical line drawing of a mechanical presser with an inset close-up showing internal components (no text or symbols)natural_image
Technical illustration of a coffee maker with a magnified inset showing the blade and handle (no text or symbols)Serie ON DEMAND
IT
IT
Serie ON DEMAND
6 MANUTENZIONE MACINADOSATORE
natural_image
Technical illustration of a mechanical presser with an inset close-up showing internal components (no text or symbols)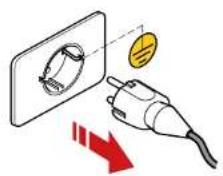
IT
Serie ON DEMAND

natural_image
Line drawing of a vintage mechanical device with no visible text or symbolsSerie ON DEMAND
IT
natural_image
Line drawing of a standard coffee maker with handle and spout (no text or symbols)IT
Serie ON DEMAND
natural_image
Line drawing of a milk carton with two labeled cans (no text or symbols on the carton itself)Electronic coffee grinder-doser
F64 E
F64 EVO
F83 E
F71 EK
Installation, operation and maintenance manual
natural_image
Line drawing of a mechanical grinding machine (no text or symbols)
Read these instructions carefully before using for the first time.


TRANSLATION OF THE ORIGINAL INSTRUCTIONS
Rev.00 Ld 03:2022
EN
ON DEMAND line
ON DEMAND line
EN
1 GENERAL INFORMATION 5
1.1 General information on the manual and how to consult it 5
1.2 Symbols used in the manual 5
1.3 Warnings for the buyer 6
1.4 Manufacturer's contact details 6
1.5 Instructions for requesting assistance 6
1.6 Warranty 7
1.7 Applicable directives 7
2 IDENTIFICATION DATA AND TECHNICAL SPECIFICATIONS 8
2.1 Introduction 8
2.2 Appliance identifi cation 8
2.3 Identifi cation of the main parts of the grinder-doser 9
2.4 Intended use 10
2.5 The models in the ON DEMAND line and technical specifications 10
2.6 Noise level 12
3 SAFETY 12
3.1 General information 12
3.2 Reasonably foreseeable misuse 12
3.3 Precautions for proper and safe use 13
3.4 Safety devices on the grinder-doser 14
3.5 Residual risks 15
3.6 Warning labels attached to the machine 16
4 INSTALLATION 16
4.1 Storage 16
4.2 Choosing the installation location 17
4.3 Unpacking and handling the appliance 17
4.4 Installation and mains connection 18
5 USING THE GRINDER-DOSER 19
5.1 Preparing to use the grinder-doser 19
5.2 Machine controls 20
5.2.1 Switch 20
5.2.2 Activation microswitch 20
5.3 Operator control panel 21
5.3.1 Home page 21
5.3.2 Settings Menu 23
5.3.2.1 Changing dose times 24
5.3.2.2 Operating modes 24
5.3.2.3 Grinding time display 27
EN
ON DEMAND line
5.3.2.4 Manual grinding 28
5.3.2.5 Show statistics 28
5.3.2.6 Triple dose display 28
5.3.2.7 Display brightness 29
5.3.2.8 Screen appearance 29
5.3.2.9 Screensaver 30
5.3.2.10 Language 30
5.3.2.11 Date and time 31
5.3.2.12 Information 31
5.3.2.13 Reset dose times 32
5.3.2.14 Administrator password 32
5.4 Adjusting the degree of grinding 33
6 GRINDER-DOSER MAINTENANCE 34
| 6.1 Routine maintenance | 34 | |
| 6.1.1 | Cleaning the appliance | 35 |
| 6.1.2 | Checking the power cable status | 37 |
| 6.1.3 | Thoroughly cleaning the grinding blades | 38 |
| 6.1.4 | Shutting down the grinder-doser | 38 |
| 6.1.5 | Replacing the grinding blades | 39 |
| 6.2 Supplementary maintenance | 39 | |
7 ANOMALIES - CAUSES - REMEDIES 40
| 8 | REQUESTING SPARE PARTS | 42 |
| 9 | DISPOSAL | 43 |
ON DEMAND line
EN
1 GENERAL INFORMATION
1.1 General information on the manual and how to consult it

Please read this instruction manual carefully before installing and using the electronic coffee grinder-doser by Fiorenzato M.C. S.r.l. for the first time.
This instruction manual has been drawn up in compliance with the provisions of Directive 2006/42/EC and provides all the useful information for the end user to install, adjust and use the electronic coffee grinder-doser manufactured by the company Fiorenzato M.C. S.r.l.
The content of this manual must be thoroughly read and understood before installing and using the grinder-doser. It must also be stored and kept in good condition for future reference.
The images, data, texts and descriptions included in this documentation are the property of Fiorenzato M.C. S.r.l. and reflect the state of the art of the machine at the time it was placed on the market.

Fiorenzato M.C. S.r.l. is always looking for new solutions to improve its products and therefore reserves the right to make changes to the grinder-doser and related documentation over time without considering the products already sold to be inadequate and/or obsolete.
A general index makes it easy to find the subject of interest, and a number of informative symbols draw the user's attention to the contents of particular interest for their own safety and for the correct use of the grinder-doser.
1.2 Symbols used in the manual

WARNING - NOTE! Indicates a warning or important note relating to specific functions and/or useful information for the user. Bear in mind the paragraphs marked with this symbol.

GENERAL DANGER - ATTENTION! General danger sign. Text marked with this symbol indicates that failure to follow the instructions given may result in damage to the machine and/or risk of injury to the user.

LIVE APPLIANCE - ATTENTION! Text marked with this symbol indicates a possible risk of electrocution. Follow the instructions provided.

OPERATION INTENDED FOR AUTHORISED TECHNICIANS: Text marked with this symbol indicates that the action described must be carried out by a specialised technician (technical service).
EN
ON DEMAND line
1.3 Warnings for the buyer
This manual, like the EC Declaration of Conformity, is an integral part of your grinder-doser and must therefore be treated and stored with care. It must be made available to all users and accompany the machine when it is moved or resold to third parties.

In the event of loss and/or deterioration of this documentation, a copy can be obtained from the manufacturer by specifying the manual code on the back cover.
Before allowing another user to use the coffee grinder-doser, please ensure that this person has read and understood the contents of this manual.
The instruction manual contains all the instructions and procedures for use. When correctly followed, they allow you to work safely without causing damage to yourself or to the machine.

It is the purchaser's obligation to provide appropriate training in the use and maintenance of the coffee grinder-doser for the personnel assigned to use it.

The purchaser and all users of the grinder-doser must carefully observe all the specific warnings included in this manual.
1.4 Manufacturer's contact details
If you have any questions, please contact Fiorenzato M.C. S.r.l. at the following address:
1.5 Instructions for requesting assistance
For technical assistance on the machine, the user must contact the dealer from whom the appliance was purchased. For further information or clarification regarding the use and/or maintenance of the grinder-doser, Fiorenzato M.C. S.r.l. remains at your disposal and can be contacted at the above addresses.
ON DEMAND line
EN
1.6 Warranty
Fiorenzato M.C. S.r.l. provides a 24-month warranty for its products from the date of the sales invoice issued by Fiorenzato M.C. S.r.l.
During the warranty period, the manufacturer undertakes to repair or replace, free of charge, any parts and/or components that are originally faulty due to manufacturing defects.
The warranty covering the product shall become void if:
- The warnings/instructions in this manual have not been followed.
- Routine maintenance and machine cleaning operations have not been carried out by a user who has been properly instructed in the correct way to carry them out.
- Repair work has been carried out by personnel who are untrained or not authorised by the manufacturer.
- The product is used for purposes other than those specified in this manual.
- Replacements have been carried out using non-original spare parts (please note that replacements with non-original parts, in addition to invalidating the warranty, also invalidate the "Declaration of Conformity" that accompanies the appliance.
- The warranty is void in the event of damage to the appliance caused by: neglect, installation and/or use not in accordance with the instructions in this manual, poor maintenance (cleaning), damage caused by lightning and atmospheric events, incorrect power supply, overvoltage and overcurrents.
1.7 Applicable directives
All coffee Grinder-dosers manufactured by Fiorenzato M.C. S.r.l. have been designed and made in accordance with the essential requirements of the following EU directives:
- 2006/42/EC [Machinery Directive].
- 2014/35/EU [Low Voltage Directive].
- 2014/30/EU [Electromagnetic Compatibility Directive].
- 2011/65/EU [RoHS Directive].
- 2015/863/EU [RoHS Delegated Directive].
- 2012/19/EU [WEEE Directive].
EN
ON DEMAND line
2 IDENTIFICATION DATA AND TECHNICAL SPECIFICATIONS
2.1 Introduction
Making coffee is an art and in order to master its secrets, you need to follow precise rules. The formula for a perfect cup of espresso coffee is, indeed, very complex and the part played by the appliance is extremely important. For an excellent result and unquestionable quality, three factors must be successfully combined:
- A fine blend.
• The appropriate use of available appliances. - The skill and professionalism of those who make it. To enjoy a good coffee, contrary to popular belief, it is not enough just to choose a particular blend.
The experience and skill of the operator in following the right procedures for preparing the drink and using the appropriate machinery greatly help to create a small masterpiece. This is why professionals attach so much importance to the espresso machine and grinder-doser. Being familiar with these appliances, keeping them in perfect working order and using them to their full potential is a skill that belongs to true coffee masters. The quality of a good espresso coffee depends on a number of operations, including grinding which plays an important role. The grinder-doser is therefore one of the basic appliances for the operator. Its structure must comply with certain characteristics: robustness, resistance and functionality, characteristics that are fully satisfied by all the grinder-dosers manufactured by Fiorenzato M.C. S.r.l.
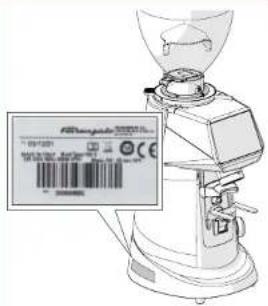
2.2 Appliance identifi cation
On the left side of all grinder-dosers manufactured by Fiorenzato M.C. S.r.l., an identification label is attached, on which the following data is always shown:
• Company name of Fiorenzato M.C. S.r.l.
• CE marking and year of construction.
• Any other certification markings.
• Model and serial number.
- Appliance power.
• Supply voltage and frequency required.
ON DEMAND line
EN
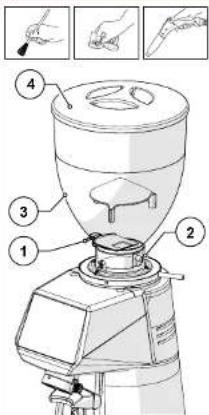
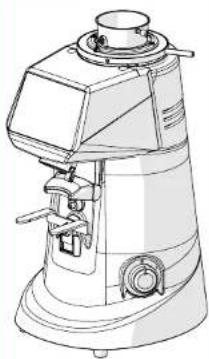
2.3 Identifi cation of the main parts of the grinder-doser
Grinder-dosers consist of a machine body, with all the necessary devices for grinding coffee, and a supply hopper on the top for feeding in the roasted coffeebeans to be ground.
With reference to Fig. 1, all grinder-dosers in the ON DEMAND line consist of the following main parts:
| 1 Hopper lid | |
| 2 Coffee bean feed hopper | |
| 3 Locking slide on hopper | |
| 4 Adjustment disk lock lever | |
| 5 Grinding adjustment disk | |
| 6 Control panel | |
| 7 Machine/user interface display | |
| 8 Removable ground coffee discharge tube | |
| 9 Filter holder cup support fork | |
| 10 Start microswitch | |
| 11 Machine On/Off switch | |
| 12 Cooling fan (only on mod. 'EVO' and 'EK') | |
| 13 Anti-clumping blade |
EN
ON DEMAND line
2.4 Intended use
This appliance has been designed exclusively for grinding roasted coffee beans. Any other use is considered improper and therefore dangerous. The manufacturer accepts no liability for any damage caused by improper or incorrect use. Do not use the appliance to grind other types of food or other materials into granules. Our grinder-dosers are intended for professional use by specialised personnel, and are not for domestic use.
2.5 The models in the ON DEMAND line and technical specifications
Fiorenzato M.C. S.r.l. manufactures grinder-dosers in the ON DEMAND line in the following models:
| F64 EF64 EVOF83 EF71 EK | EFxx EVOK |
How to read the model number
| Fxx E EVO K | |||
| ∅ 64 mm∅ 71 mm∅ 83 mm | Electronic model High-speed electronic model | Conical grinding blades | |
The tables below show the overall dimensions and the main technical features of the ON DEMAND line of coffee grinder-dosers.
Dimensions and weights
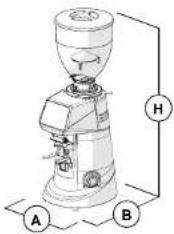 Fig. 2 - Dimensions Fig. 2 - Dimensions | Models | Dimensions[A x H x B mm] | Weight[kg] |
| F64 E 230 x 615 x 270 | 13 | ||
| F64 EVO 230 x 615 x 270 | 13 | ||
| F83 E 230 x 670 x 270 | 15 | ||
| F71 EK 230 x 615 x 270 | 20 |
ON DEMAND line
EN
Technical specifications
| Model | F64 E | F64 EVO | F83 E | F71 EK |
 |  |  |  | |
| Power supply | 220-240V50 Hz | 220-240V50 Hz | 220-240V50 Hz | 220-240V50 Hz |
| Power [Watt] | 350 | 350 | 650 | 850 |
| Grinding blade type | Flat type B | Flat type C | Flat type B | Conical |
| Grinding blade diameter [mm] | 64 | 64 | 83 | 71 |
| Grinding blade rotation speed rpm | 1350 at 50 Hz | 1350 at 50 Hz | 1350 at 50 Hz | 300 at 50 Hz |
| 1550 at 60 Hz | 1550 at 60 Hz | 1550 at 60 Hz | 300 at 60 Hz | |
| Hopper capacity [kg] | 1.5 | 1.5 | 1.5 | 1.5 |
| Single dose grinding time [s] | 1.0 ÷ 12.0 1 | 0 ÷ 12.0 1.0 ÷ | 12.0 1.0 ÷ 12.0 | |
| Double dose grinding time [s] | 1.0 ÷ 25.0 1 | 0 ÷ 25.0 1.0 ÷ | 25.0 1.0 ÷ 25.0 | |
| Grinding time tolerance [s] | ± 0.1 | ± 0.1 | ± 0.1 | ± 0.1 |
| Daily grinding [kg] | 1 ÷ 2 | 2 ÷ 3 | 3 ÷ 7 | 8 ÷ 14 |
| Recommended dispensing time for 7g single dose [s] | 3.4 | 2.1 | 1.9 | 1.4 |
| Recommended dispensing time for 14g double dose [s] | 6.8 | 4.2 | 3.8 | 2.8 |
| Frequency of grinding blade replacement in working hours (h) and in kg of ground coffee [kg] | ||||
| 'Standard' grinding blades (h) - [kg] | (54) - [400] | (33) - [400] | (45) - [600] | (66) - [1200] |
| 'Red Speed' grinding blades (h) - [kg] | (216) - [1600] | (132) - [1600] | (180) - [2400] | (264) - [4800] |
| Optional | ||||
| Hopper 500 g | ||||
| Metal tamper | ||||
| Right or left side tamper | ||||
| 'Red Speed' grinding blades | ||||
EN
ON DEMAND line
2.6 Noise level

The maximum noise emission of our grinder-dosers, measured in a UNI EN ISO 3741 reverberation chamber in accordance with EN 60704-1:1998 and EN 607043:1996 standards. The equivalent noise exposure level for an operator, exclusively related to an appliance operation limit of 240 min over eight hours, is 78 dB(A), in accordance with European Directive 86/188/EEC and subsequent revision 2003/1 0/ EEC. Using the appliance does not therefore require any precautions against risks arising from exposure to noise in workplaces (Articles 3-8 of ED 2003/1 0/EEC).
3 SAFETY
3.1 General information
The purchaser must inform all personnel of any risks arising from the improper use of the appliance, of the safety devices used by the manufacturer and of the general regulations on accident prevention laid down by EU directives and by the legislation of the country where the appliance is used.
Users must be aware of the location and operation of all controls and machine features specified in this manual.

ATTENTION! Before installing, switching on and using the grinder-doser of the company Fiorenzato M.C. S.r.l. for the first time, you must have read and understood all the contents of this documentation and the 'SAFETY INSTRUCTIONS' booklet.

ATTENTION: Tampering with or unauthorised replacement of one or more parts of the machine, the use of accessories that alter the use of the machine and the use of non-original spare parts may result in the risk of injury and compromise the proper operation of the machine.

Failure to comply with the above releases Fiorenzato M.C. S.r.l. from any liability for damage to people and/or to property.
3.2 Reasonably foreseeable misuse
Fiorenzato M.C. S.r.l. accepts no liability and the warranty will be rendered null and void in the event of negligence when using the machine or failure by the user to comply with the operating instructions in this manual.

Any use of the appliance other than that described in this manual is considered improper.
ON DEMAND line
EN
When using the machine, no other work or activities are permitted which are considered to be improper and which, in general, may involve risks in terms of user safety and/or damage to the machine.
Reasonably foreseeable misuse includes:
- Using the machine for grinding products other than roasted coffee beans (e.g. pepper, salt, etc.).
- Using the appliance with pre-ground coffee.
- Improper use of the appliance by personnel who have not been trained to use it and/or have not read this instruction manual.
- Using spare parts that are not original and/or not specifically for the grinder-doser model in your possession.
- Using the machine in a potentially explosive environment.
In addition, the user must never under any circumstances:
- Attempt to remove any foreign objects that may have accidentally fallen into the coffee feed hopper and/or grinding chamber without first disconnecting the appliance from the mains power supply.
- Using the appliance with wet or damp hands.
- Introducing liquids of any kind into the coffee feed hopper and the grinding chamber.

If the machine is not working properly, any necessary steps are the responsibility of the maintenance technicians.
3.3 Precautions for proper and safe use
In order to ensure user safety and to operate the appliance in the best possible way, it is important to comply with some simple but important provisions, namely:
- Avoid improper use of the power cable. Use only cables or extensions with a cross-section suitable for the power installed in the machine.
- Protect the cable from high temperatures, oil and sharp edges.
- Any changes in normal operation (increased power absorption, a rise in temperature, excessive vibration, abnormal noises or alarm signals on the display) indicate improper operation. In order to prevent malfunctioning, which may directly or indirectly cause damage to people or the appliance, ensure you carry out the required maintenance or, if necessary, contact your dealer or a specialised repairer.
- Heavy appliance! Be careful during the phases of transport, handling and installation! Please refer to chapter 4 for proper handling of the appliance.
EN
ON DEMAND line
3.4 Safety devices on the grinder-doser

All grinder-dosers manufactured by Fiorenzato M.C. S.r.l. are equipped with appropriate mechanical and electromechanical devices to protect the safety of the user and the integrity/functionality of the appliance during use.
The grinder-dosers in the ON DEMAND line are equipped with the following safety devices:
- Motor thermal cut-out
The motor of the appliance has a thermal cut-out which protects it against overheating due to overcurrents and intervenes by interrupting the power supply to the motor.
Only the grinder-doser models F64 EVO and F71 EK have a cooling fan on the back of the machine body to prevent overheating of the grinding blade drive motor. This fan is activated electronically. On some models the fan starts after each dispensing process and remains active for 60 seconds, whereas on other models the fan starts when dispensing starts and stops when grinding stops.
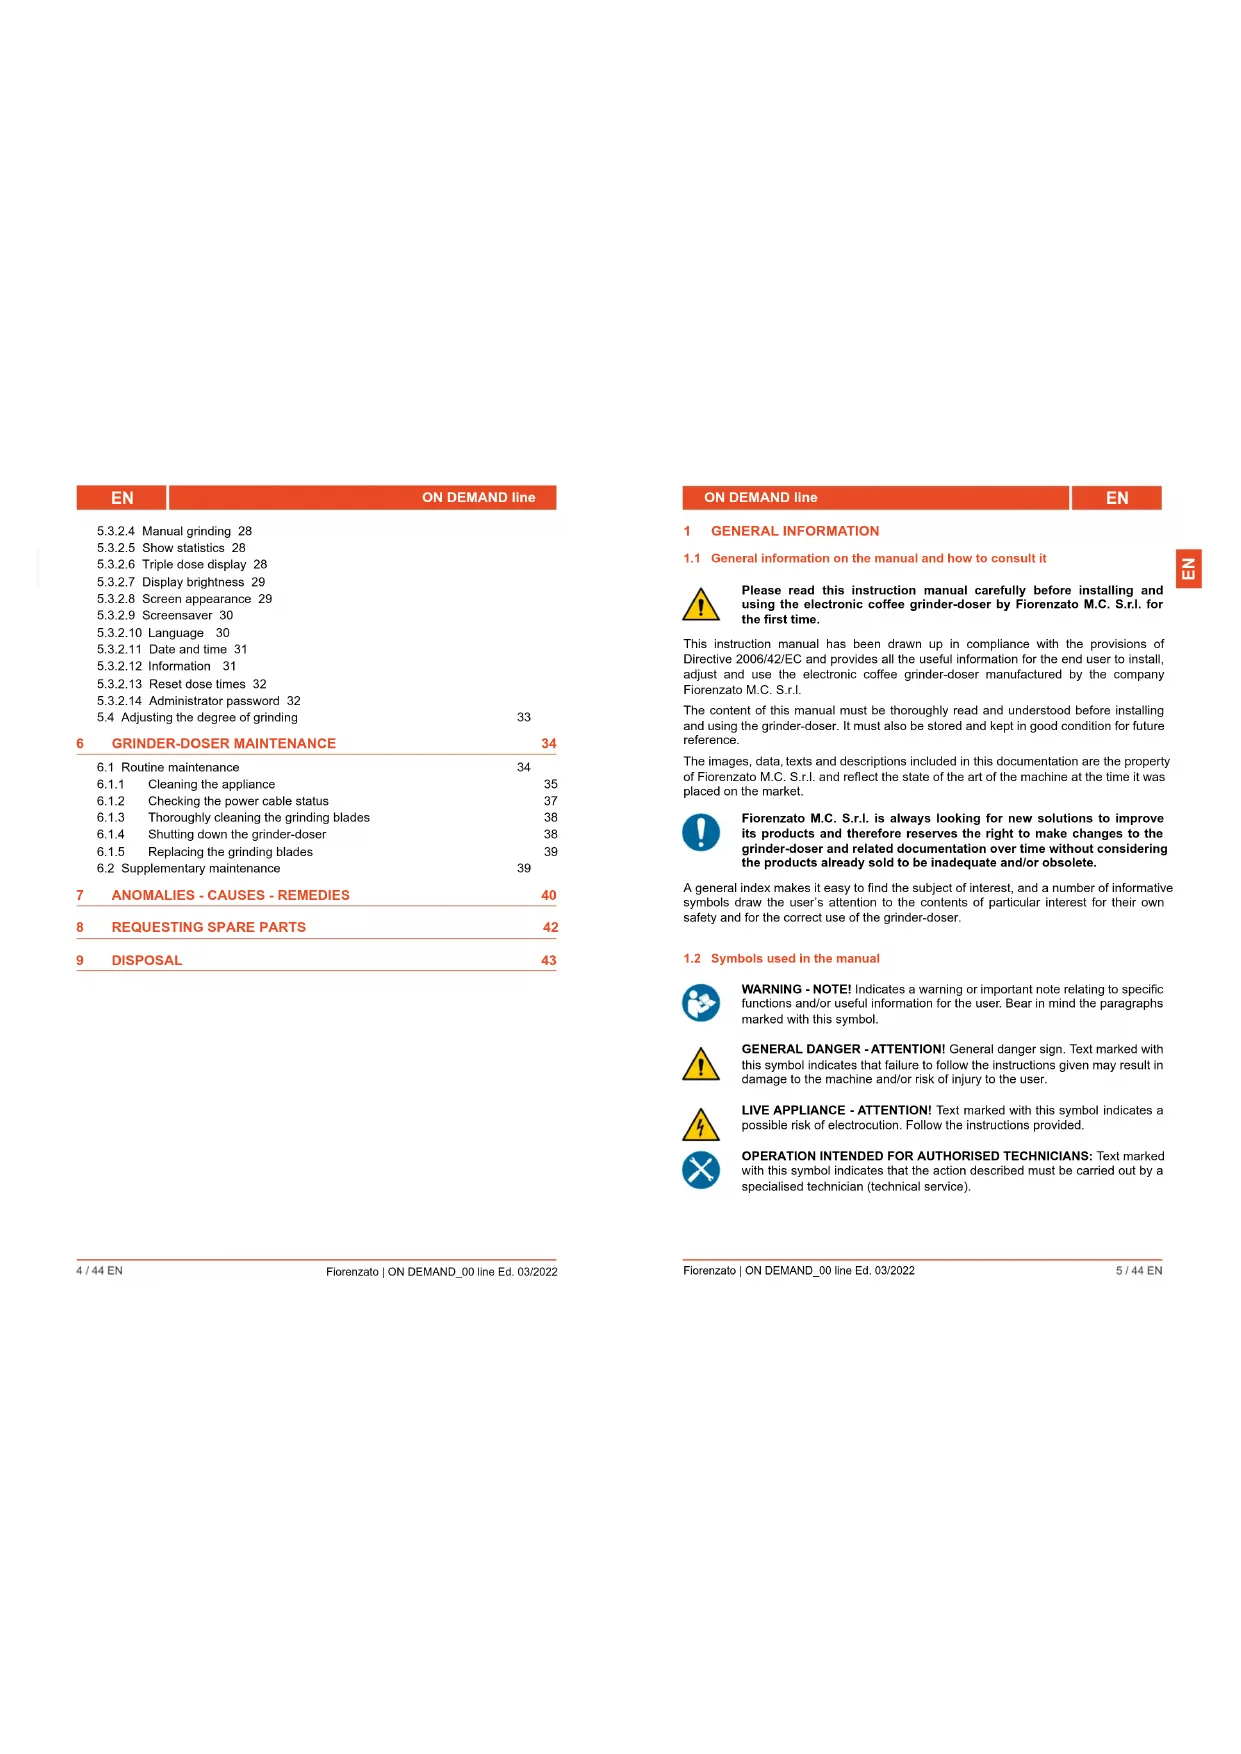
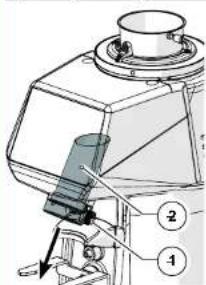
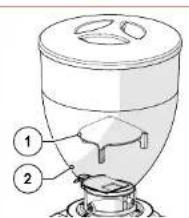
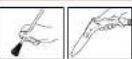
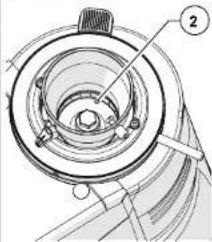
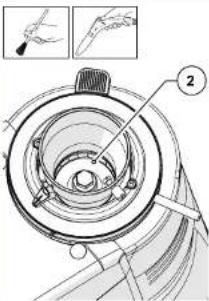
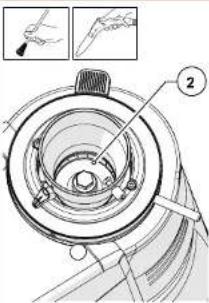
• Anti-intrusion device on coffee supply hopper (Fig. 4)
The anti-intrusion device (Part. 1) inside the supply hopper (Part. 2) allows the coffee beans to pass through to the grinding chamber, preventing operators from accidentally inserting their fingers.
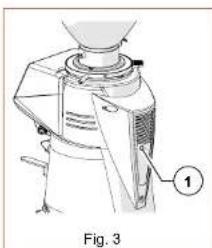
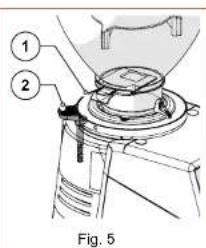
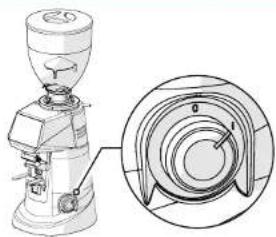
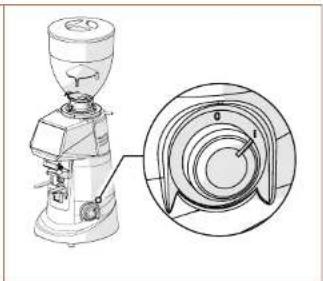
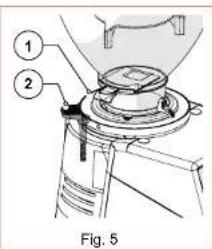
• Safety adjustment disk lock lever (Fig. 5)
To prevent any accidental rotation of the grinding adjustment disk (Part. 1), there is an adjustment disk lock lever (Part. 2) on the rear.
natural_image
Technical line drawing of a mechanical device with labeled component (1), no readable text or symbols beyond label and figure label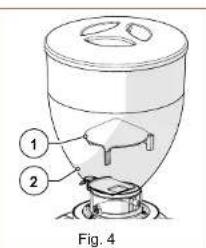
ON DEMAND line
EN
3.5 Residual risks
Fiorenzato M.C. S.r.l. has taken all necessary precautions during the design phase to ensure that the grinder-doser can be used under the safest possible conditions. However, during installation, cleaning and maintenance of the appliance, there are still some residual risks that cannot be eliminated. Their effects can be prevented by appropriately training the user in accordance with the provisions set out in the table below.
For each residual risk, provisions are indicated to limit and/or eliminate the extent of individual risks.
| Residual risk | Present during: | Provisions for reducing the risk |
 Bruising and/or crushing of the upper and lower limbs due to the weight of the appliance. Bruising and/or crushing of the upper and lower limbs due to the weight of the appliance. | Handling the appliance when:Unpacking.Installing Handling the appliance to clean the surface on which it stands. | Grip the appliance firmly before handling it.Make sure you have enough space to handle the appliance safely without hitting any obstacles.Use non-slip gloves if necessary when handling the grinder-doser. |
| [D46C]Electrocution | Connecting and disconnecting the power supply cable. | Check the condition of the power cable frequently and replace it when it appears to be deteriorated or damaged.Make sure that the switch is in the 'O' (OFF) position before connecting the power cable to the grinder-doser. |
EN
ON DEMAND line
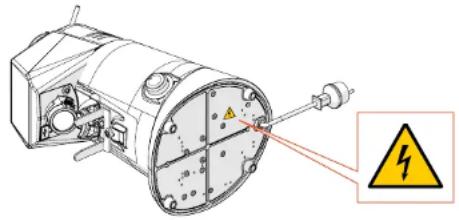
3.6 Warning labels attached to the machine
An adhesive label is attached to the bottom of the grinder-doser near the power cable (see Fig. 1) indicating the danger of electrocution. The label indicates the presence of live components inside the machine body.

ATTENTION! It is forbidden to remove the bottom cover when the plug is connected to the power socket. All electrical maintenance work (e.g. replacement of a damaged cable) must be carried out by qualified technicians when the appliance is disconnected from the mains power supply.
natural_image
Mechanical device with warning symbol and warning label (no readable text or symbols)Fig. 6
4 INSTALLATION

ATTENTION! Please read the following instructions carefully before installing and operating the appliance.
4.1 Storage
If the appliance is not immediately installed where it is to be used and it is necessary to store it temporarily, it should be put in a safe place that meets the following requirements:
- the place chosen for temporarily storing the appliance should be a closed environment, protected from the sun and bad weather conditions;
- the temperature of the storage location must be between 5^ and 40^ , with a relative humidity of between 30% and 90% ;
- if the appliance is to be stored for a long time before being installed, it should be kept in its original packaging to ensure better protection.
ON DEMAND line
EN
4.2 Choosing the installation location
Given the function of the grinder-doser, it is advisable to PLACE IT close to the coffee machine.
Before installing the appliance, please also ensure that the installation location meets the following requirements:
- The surface on which the appliance is to be placed must be flat, well-levelled and strong enough to support its weight;
- the available space must be large enough to allow proper installation and easy use of the appliance;
- the appliance must not be installed near sinks and/or taps, which may cause it to become wet with jets and/or splashes of water;
- The place of use must be sufficiently well-lit and well-ventilated;
- Close to the installation position, there must be a socket, which complies with the regulations in force in the country of use, for connecting the appliance to the mains power supply.

ATTENTION! The socket must be equipped with an efficient earthing system.

ATTENTION! The mains power supply must also be equipped with a thermal-magnetic circuit breaker located upstream of the socket, in a position known to and easily accessible by the operator in order to protect the appliance from overloads and voltage fluctuations and the user from the risk of electrocution.
4.3 Unpacking and handling the appliance
After opening the packaging, carefully check that the appliance is intact and that there are no damaged parts.
- Open the packaging near the point of installation, ensuring that there is enough space to handle the appliance safely.
• Take the appliance out of its packaging, holding it firmly and securely. - Place the grinder-doser on the worktop.

ATTENTION! Take extreme care when handling the appliance. Its weight (18 ÷ 25 kg) and the particular rounded shape of the machine body may lead to the risk of slipping and loss of grip, with possible falling and bruising/crushing of the feet when lifting and/or of the hands when positioning the appliance on the worktop. If you are not sure you have a secure grip, it is advisable to ask another person to help.

ATTENTION! Packaging parts must not be left within the reach of children as they are a potential source of danger. Keep the packaging until the warranty expires.
EN
ON DEMAND line
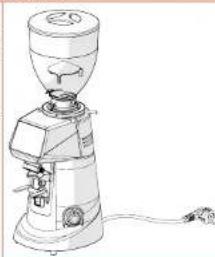
4.4 Installation and mains connection
To complete installation and start using your new coffee grinder-doser, all you need to do is:
- Ensure that the voltage of the mains power supply meets the required power requirements and that the electrical rating of the system is adequate to support the power absorbed by the appliance (see product identification label on the side of the grinder-doser).
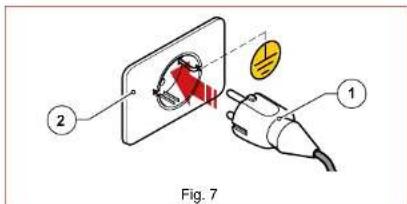
- Put the power cable plug (Fig. 7 Part. 1) into the wall socket provided at the place of use (Fig. 7 Part. 2);

If it is necessary to use power adapters, power strips or extension cables, it is mandatory to use products that comply with the certification standards in force in the country of use.
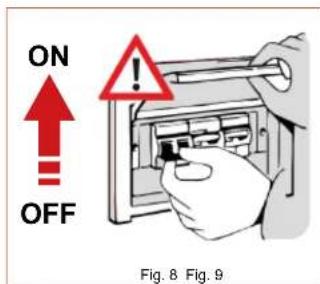
- If present, set the thermal-magnetic circuit breaker located upstream of the power socket to the 'ON' position (Fig. 8).
- Turn the machine power switch (Fig. 9) to the 'I' position.

natural_image
Technical line drawing of a coffee maker with an inset close-up showing its cross-sectional view (no text or labels)The grinder-doser is now powered and ready for use.
ON DEMAND line
EN
5 USING THE GRINDER-DOSER
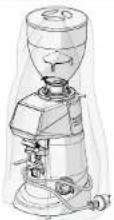
5.1 Preparing to use the grinder-doser
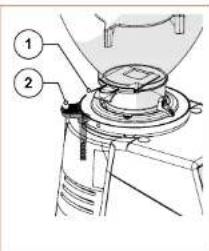
When installation has been completed, the machine is ready for use and can be loaded with coffee beans to be ground. With reference to Fig. 10, to load coffee beans it is necessary to:
- Place the hopper (Part. 1) on the grinder-doser (Part. 2) and lock it into the operating position by tightening the appropriate fastening screw (Part. 3).
- Ensure that the locking slide (Part. 4) is completely closed.
- Remove the lid (Part. 5) and fill the hopper with the roasted coffee beans to be ground.
- Close the hopper with its lid (Part. 5).
• Gradually open the locking slide (Part. 4) to allow the coffee beans to fall into the grinding chamber. - At this point, the grinder-doser is loaded and ready to go to work.
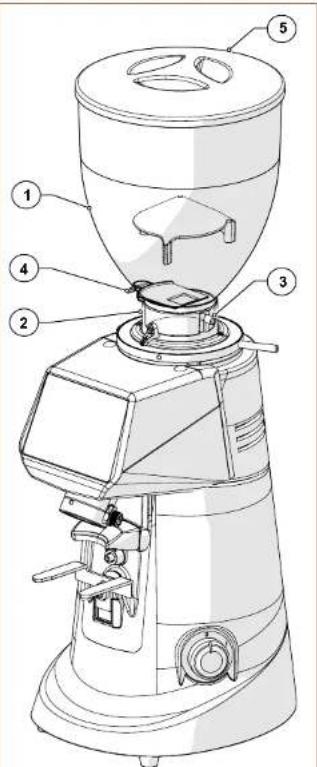
Fig. 10
EN
ON DEMAND line
5.2 Machine controls
The grinder-doser is controlled by the On/Off switch (see paragraph 5.2.1), an activation microswitch located near the fi lter holder fork (see paragraph 5.2.2) and an operator control panel with a TOUCH-type display, for selecting and setting all the operating functions of the appliance (see paragraph 5.3). All information on the operating status of the appliance, working parameters and commands that can be given are shown on the display on the front of the machine. All the command and signalling devices on the grinder-doser are described below.
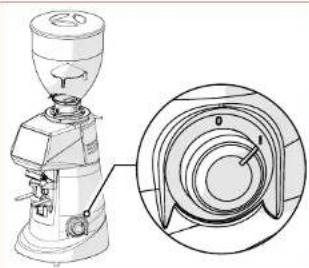
5.2.1 Switch
Switches the appliance on and off.
- Turned to the 'O' position: appliance off (power supply disconnected).
- Turned to the 'I' position: appliance on (electrically powered).
natural_image
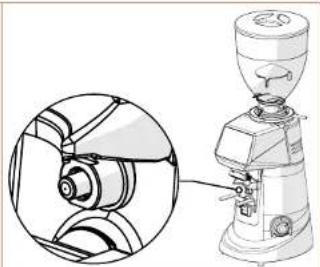
Technical line drawing of a mechanical presser with a close-up inset showing internal components (no text or symbols)5.2.2 Activation microswitch
Controls the start of the grinding cycle when pressed by the filter holder cup. The command is not active in the 'Direct' operating mode (see paragraph 5.3.2.2).
- Enabled for operation only in 'STANDARD', 'AUTOMATIC' and 'PRE-SET' operating modes (see paragraph 5.3.2.2).
- This particular command allows the user to start grinding by holding the filter holder cup after selecting the required dose.
natural_image
Technical line drawing of a grinding machine with cross-sectional view (no text or labels)ON DEMAND line
EN
5.3 Operator control panel
When the grinder-doser is switched on, after a few seconds for the system to start up, the control panel display shows the HOME page, with all the function buttons required to use and manage the appliance.
The management software adopted by Fiorenzato for its coffee grinder-dosers is extremely intuitive to use. This user guide will allow you to quickly become familiar with the function buttons and the various setting options on your new appliance. It has touch-screen panel, which means that functional commands, menu navigation and the setting of preferences and working parameters are carried out with a simple touch of the finger on the sensitive areas of the display.
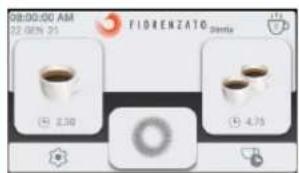
5.3.1 Home page
Fig. 11 shows the HOME page with a description of the function buttons and display fi elds. The HOME page can be customised from the 'Settings menu', therefore the image shown in the fi gure below may differ from the screen actually displayed on your appliance when it is fi rst switched on.
All the functions accessible from the 'Settings menu' are described in the following paragraphs.

Fig. 11 - Home page
With reference to Fig. 11, the display fi elds and function buttons on the HOME page are:
EN
ON DEMAND line
Description
| 1 | Display fi eld for the current date and time. The data can be set by accessing the 'Date and time' screen from the settings menu (§ 5.3.2.11). |
| 2 | Display fi eld for 'Grinding mode' in operation. The type of grinding (Standard, Direct, Automatic or Pre-selection) can be selected from the 'Operating mode' screen of the settings menu (§ 5.3.2.2). |
| 3 | 'Statistics' button. It controls the opening of the window and shows the number of doses dispensed on the current day and week, and the total number of doses dispensed since the grinder-doser was fi rst used. To close the 'Statistics' window simply press the 'Statistics' function button again. The 'Statistics' button is only displayed if the 'Show statistics' function has been enabled in the settings menu (§ 5.3.2.5). |
| 4 | Single Dose Dispensing Button. It activates the dispensing of a single dose of coffee according to the times set on the 'Change dose times' screen (§ 5.3.2.1). The actual start of grinding varies according to the activated operating mode (§ 5.3.2.2). |
| 5 | Display fi eld showing only the grinding time set for the single dose. During grinding, it displays the countdown required to complete the dose. |
| 6 | Double Dose Dispensing Button. Enables the dispensing of a double dose of coffee according to the times set on the 'Change dose times' screen (§ 5.3.2.1). The actual start of grinding varies according to the activated operating mode (§ 5.3.2.2). |
| 7 | Display fi eld showing only the grinding time set for the double dose. During grinding, it displays the countdown required to complete the dose. |
| 8 | Manual Grinding Button. Hold-to-run control for dispensing coffee in the manual mode. If allowed by the activated 'Operating mode' (§ 5.3.2.2), coffee grinding starts when the button is pressed and continues until it is released. |
| 9 | Menu Settings Button. It provides access to the settings menu (§ 5.3.2), which allows the operator to change the various settings and operating modes of the appliance. |
| 10 | Shortcut button to access the 'Change dose times' page. It allows direct access to the page for setting the dose dispensing times (§ 5.3.2.1) without using the 'Settings menu' (§ 5.3.2) |
| 11 | Triple Dose Dispensing Button. Enables the dispensing of a triple dose of coffee according to the times set on the 'Change dose times' screen (§ 5.3.2.1). The actual start of grinding varies according to the activated operating mode (§ 5.3.2.2). The function button is only displayed if the 'Triple dose display' function has been enabled in the 'Settings menu' (§ 5.3.2.6). |
| 12 | Display fi eld showing only the grinding time set for the triple dose. During grinding, it displays the countdown required to complete the dose. |
| 13 | Warning icon. It only appears at the end of the time set by Fiorenzato to indicate the need to replace the grinding blades (§ 6.1.5). |
ON DEMAND line
EN
5.3.2 SettingsMenu
The 'Settings menu' allows you to set and adjust all the parameters and operating modes of your grinder-doser.
The Settings menu is accessed by pressing the function button, always visible in the bottom left-hand corner of the display (see Fig. 11 Part. 9). Once the command has been given, the display will load the menu, allowing you to select the parameter to be changed and/or the function to be activated/deactivated by simply scrolling down the list of possible options until you find the option you require. The Settings menu contains the following items:
Technical Settings
• Change dose times (§ 5.3.2.1)
- Operating mode (§ 5.3.2.2)
• Display grinding times (§ 5.3.2.3)
• Manual grinding (§ 5.3.2.4)
• Show statistics (§ 5.3.2.5)
• Triple dose display (§ 5.3.2.6)
User Settings
• Display brightness (§ 5.3.2.7)
• Screen appearance (§ 5.3.2.8)
- Screensaver (§ 5.3.2.9)
• Language (§ 5.3.2.10)
• Date and time (§ 5.3.2.11)
• Information (§ 5.3.2.12)
Safety Settings
- Reset dose times (§ 5.3.2.13)
• Administrator password (§ 5.3.2.14)

Some items in the menu only allow the specific function to be enabled (ON) or disabled (OFF) using the specific selector ☐, whereas other items, identifiable by the symbol '▶', allow access to a dedicated sub-page for setting/adjusting the parameter. By pressing the function button '☐', (always visible in the top right-hand corner of the menu screen), you can exit the menu and return to the HOME page. The following is a description of the individual items in the Settings menu.
EN
ON DEMAND line
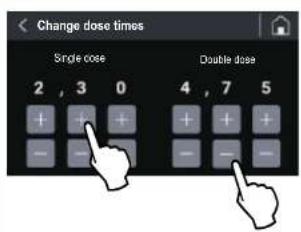
5.3.2.1 Changing dose times
By pressing the 'Change dose times' option in the 'Technical Settings' menu you can access the page for setting the grinding times for a single, double and triple dose.
N.B. The triple dose grinding time is only displayed if the 'Triple dose display' option has been activated in the Settings menu (§ 5.3.2.6).
Use the function buttons or to increase or decrease dispensing times.
The changed parameters are saved automatically when exiting the page.
5.3.2.2 Operatingmodes
By selecting the 'Operating Modes' item in the 'Technical Settings' menu, you can access the setting page, which allows you to activate one of the four different operating modes of the grinder-doser (Standard, Direct, Automatic or Pre-selection) by simply selecting the one required.
The 'Standard' operating mode is the default mode when the machine is switched on for the first time. The change in the operating mode from 'Standard' to 'Automatic', 'Preselection' or 'Direct' (and vice versa) is stored in the memory even after the grinder-doser has been switched off.

Below is an example of how to dispense coffee according to the various selectable operating modes.
ON DEMAND line
EN
- Standard' operating mode
Select the dose required (single, double or triple dose, if enabled) by pressing the relevant function button (see Fig. 11 Part. 4, 6 or 11). The icon of the pressed button starts flashing to indicate that the selection has been made.
You can control the start of the grinding process by pressing the activation microswitch with the filter holder cup. After the command has been given, the grinder-doser is activated for the grinding time corresponding to the specific dose to be processed.
Press and hold the 'Manual Grinding' button (see Fig. 11 Part. 8) to start continuous grinding. The grinding process stops automatically when the button is released.
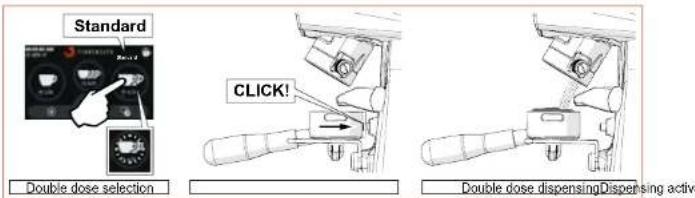
Fig. 12 - Double dose dispensing in 'Standard' mode.
- 'Direct' operating mode
Press the function button for a single, double or triple dose (see Fig. 11 Part. 4, 6 or 11); after the command has been given, the grinding of the required dose is started immediately.
Press and hold the 'Manual Grinding' button (see Fig. 11 Part. 8) to start continuous grinding. The grinding process stops automatically when the button is released. In this operating mode, the activation microswitch is disabled and all the dose selection buttons (see Fig. 11 Part. 4, 6, 8 and 11) can be activated.
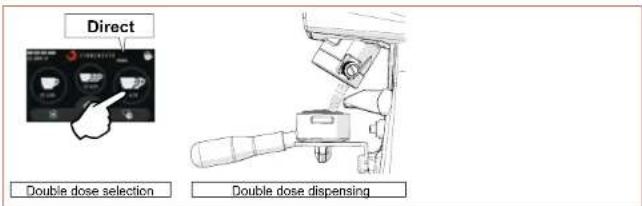
Fig. 13 - Double dose dispensing in 'Direct' mode.
EN
ON DEMAND line
• Automatic' operating mode
Press the activation microswitch with the filter holder cup once to start grinding a single dose; press the activation microswitch twice in quick succession to start grinding a double dose of coffee. The dispensing of a triple dose, if enabled, is controlled by pressing the activation microswitch three times in quick succession. After the command has been given, the grinder-doser is activated for the grinding time corresponding to the specific dose to be processed.
In this operating mode, manual grinding (see Fig. 11 Part. 8) and the single, double and triple dose selection buttons (see Fig. 11 Part. 4, 6 and 11) are disabled.
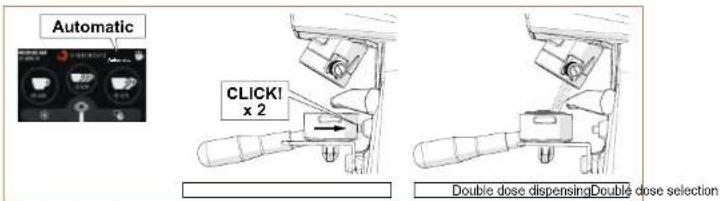
Fig. 14 - Double dose dispensing in 'Automatic' mode.
• 'Pre-selection' operating mode
Select the required dose (single, double or triple, if enabled) by pressing the relevant function button (see Fig. 11 Part. 4, 6 or 11). When the selection has been made, the icon of the pressed button starts to flash to indicate that the selection has been made and remains activated until a different dose is selected. Press the activation microswitch with the filter holder cup (once) to start grinding the selected dose. In this operating mode, manual grinding also (see Fig. 11 Part. 8) remains enabled.
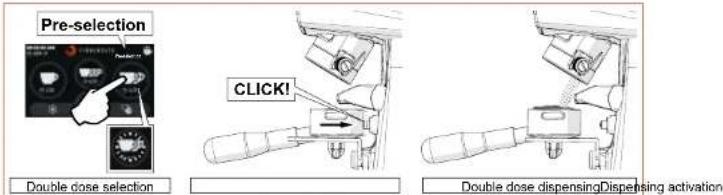
Fig. 15 - Example of double dose dispensing in 'Pre-set' mode.
ON DEMAND line
EN
Regardless of the set operating mode:
- During the grinding process, the countdown of the time required to complete the selected dose is displayed (in seconds and tenths of a second), only if the 'Grinding time display' option is enabled. During the manual grinding process, the time count (ascending) represents the duration of the grinding process.
- At the end of each dispensing process, the statistics counters are updated (see Fig. 11 Part. 3). In the statistics, the continuing grinding process (see Fig. 11 Part. 8) corresponds to an increase of one single unit in the number of dispensing processes. The grinding cycles are stored in the memory even if the 'Show statistics' option is disabled in the Technical Settings menu.
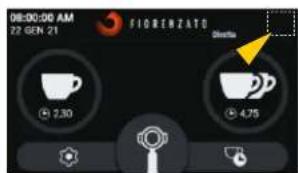
5.3.2.3 Grinding time display
When the item 'Grinding time display' in the 'Technical Settings' menu is activated (the times set for the different dispensing processes are displayed on the HOME screen.
During the dispensing process, the time for the selected dose is decreased in real time until it reaches '0' (zero) at the end of the grinding process. For manual grinding, the time is displayed as it increases and indicates the progressive duration of the actual dispensing process.
If the 'Grinding time display' option is disabled (☐), the dispensing times are not displayed on the HOME screen.
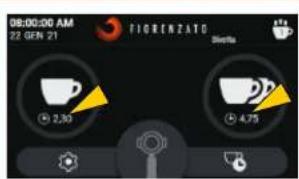
HOME screen with grinding times displayed

HOME screen without grinding times displayed
EN
ON DEMAND line
5.3.2.4 Manualgrinding
This allows you to enable () or disable () the manual grinding mode.
When manual grinding (Fig. 11 Part. 8) is disabled, the relevant function button cannot be selected and is displayed in grey.

HOME screen with manual grinding disabled
5.3.2.5 Show statistics
It enables ( ) or disables ( ) the 'Statistics' function button display on the HOME screen (see Fig. 11 Part. 3).
N.B. The dispensed dose count is increased and stored in the memory even if the 'Show statistics' option is disabled.
HOME screen with 'Statistics' button deactivated
5.3.2.6 Triple dose display
It enables ( ) or disables ( ) the display and management of the triple dose dispensing function button from the HOME screen.
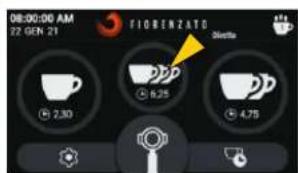
HOME screen with 'Triple dose' button enabled
ON DEMAND line
EN
5.3.2.7 Display brightness
When you select the 'Display brightness' option, you can access the screen shown in the figure, using it to increase or decrease the brightness of the screen by simply moving the adjustment cursor to the right (increase) or to the left (decrease).

HOME screen with 'Triple dose' button enabled
5.3.2.8 Screenappearance
When you select the 'Screen appearance' option, the screen shown in the figure below opens, and you can choose whether to display the screens in 'Dark mode' or 'Light mode'.

HOME screen: 'Black version'
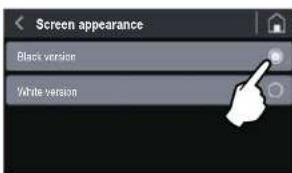
The different way in which the screens are displayed does not affect other options and/or the various parameters that can be set.
HOME screen: 'White version'
EN
ON DEMAND line
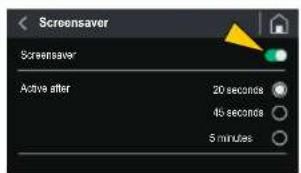
5.3.2.9 Screensaver
When you select the 'Screensaver' option, you can access the screen shown in the figure and use it to activate () or deactivate () the function of the same name and select the duration of stand-by after which it is to be started up.
The start of the screen saver can be set after the appliance has been on stand-by for 20 secs, 45 secs or 5 minutes.
When enabled, and after the selected time has elapsed, the display enters the energy-saving mode, showing only the manufacturer's logo and the current date and time.
To exit 'screen saver' mode, simply touch the display.
HOME screen
with 'Triple dose' button enabled
5.3.2.10 Language
Select 'Language' to access the screen where you can set the language on the display. Once the chosen language has been selected, all menus and function buttons will be displayed in the required language.
The available languages are:
- Italian
- English
- French
• German - Spanish
- Portuguese
- Greek
- Croatian
- Arabic
- Chinese
- Korean

Language selection
ON DEMAND line
EN
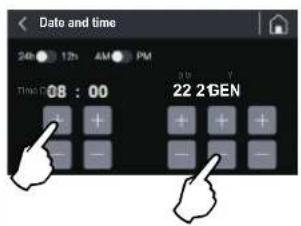
5.3.2.11 Date and time
The 'Date and Time' option allows the current date and time setting page to be loaded.
The two selectors (☐) are for setting the time to the 24 or 12-hour clock. For the 12-hour clock, the time band 'AM' (Ante meridiem) or 'PM' (Post meridiem) must be specified to allow the system to update the date correctly at midnight.
To adjust the time (hours and minutes) or the date (day/month/year), simply press (single tap or hold) the function buttons or
N.B. The setting is stored in the memory in real time, so when you exit the menu, the HOME page will display the correct date and time.
Date and time adjustment
5.3.2.12 Information
Selecting the 'Information' option from the Settings menu will take you to the page shown in the figure below, where you will find the following information:
- The version of the Firmware installed on the panel;
• The serial number of the panel installed on the appliance;
• The total number of doses dispensed since the appliance was first used; - The general counter showing the total time the appliance is actually running (working time of the grinding blade drive motor).
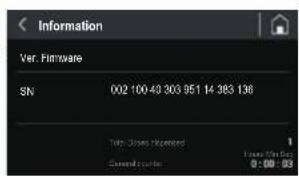
'Information' page
EN
ON DEMAND line
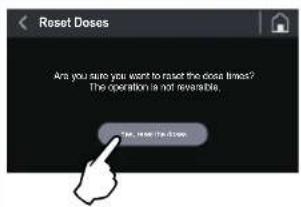
5.3.2.13 Reset dose times
The 'Reset dose times' option allows you to access the reset page illustrated in the figure, so the user can reset customised dose times and restore the factory parameters set by the manufacturer.
Warning: The 'Reset dose times' command is irreversible and results in the loss of the user's customised dose dispensing times. To prevent accidental loss of the set times, the system will ask the user to confirm the action by pressing the 'YES, CONFIRM' button before restoring the factory times.
If you return to the menu [◀] or load the HOME page [◀] without confi rming the Reset action, the customised times will be stored in the memory.
Reset dose times
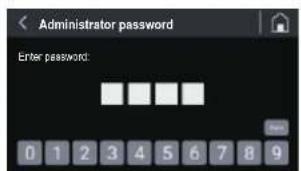
5.3.2.14 Administratorpassword
When you press the 'Administrator password' option (last option in the 'Settings menu'), the authentication page is loaded, shown in the fi gure, which allows only authorised technicians to access the reserved pages containing particular settings and functions for initialising the appliance.
N.B. The numerical authentication password is not given to the end user but only to the manufacturer's specialised technicians and authorised dealers.
Authentication for access to password-protected pages
ON DEMAND line
EN
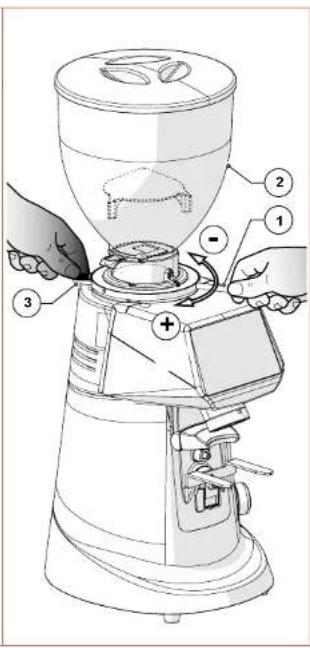
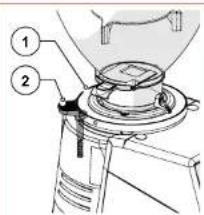
5.4 Adjusting the degree of grinding
To grind coffee more or less finely, adjust the grinding adjustment disk (Part. 1) located under the hopper (Part. 2).
To increase grinding coarseness, it is necessary to:
- Press and hold the adjustment disk lock lever (Part. 3),
- Turn the adjustment disk clockwise for coarser grinding;
- Turn the adjustment disk anti-clockwise for fi ner grinding.
- When adjustment is finished, release the lever (Part. 3) to lock the adjustment disk again.
Adjustment can be made when the motor is in operation. It is advisable to grind small quantities of coffee so that you can visually evaluate the degree of grinding.
EN
ON DEMAND line
6 GRINDER-DOSER MAINTENANCE
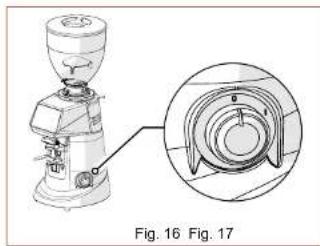
6.1 Routine maintenance

ATTENTION! Before carrying out any routine maintenance work on the grinder-doser, disconnect it from the power supply by turning the power switch (Fig. 16) to the 'O' (OFF) position and disconnect the power plug from its socket (Fig. 17).
natural_image
Technical line drawing of a mechanical presser with an inset close-up view (no text or symbols)
All routine maintenance for your appliance is summarised in the table below.
Fiorenzato M.C. S.r.l. recommends that customers strictly follow the instructions given and carry them out within the stated times and as described.
| ROUTINE MAINTENANCE WORK | |||
| Frequency Type of intervention Implemented by Par. | |||
| At the end of every shift | Thorough cleaning of the appliance | User 6.1.1 | |
| At the end of every shift | Checking the power cable status | User 6.1.2 | |
| Every month | Thorough cleaning of the grinding blades | User 6.1.3 | |
| When necessary Shutting down the Grinder-doser User 6.1.4 | |||
| On the set deadline (indicated on the 'HOME' page by the appearance of the icon to the left of the logo). | Replacing the grinding blades | Qualified operator or specialised technician | 6.1.5 |
ON DEMAND line
EN
6.1.1 Cleaning the appliance
AT THE END OF EVERY SHIFT: Thoroughly clean the appliance.
- Close the locking slide (Part. 1), loosen the fastening screw (Part. 2) and remove the hopper (Part. 3) from the appliance.
- Remove the lid (Part. 4) from the hopper and empty out the coffee beans inside it. We recommend that you pour the coffee beans back into the original bag and seal it hermetically to preserve the aroma.
- Clean the inner and outer surfaces of the hopper using warm water and a pH-neutral, unscented, degreasing and cleaning agent specifically for use in the food industry. Do not use abrasive sponges and/or aggressive detergents that may damage the hopper surfaces.
• Thoroughly dry the washed parts with a soft, dry cloth.

ATTENTION! The hopper cannot be washed in a dishwasher.
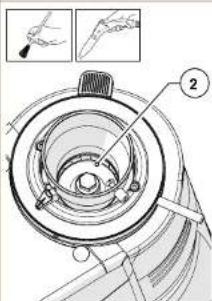
• Using a soft-bristled brush (clean and sanitised) and a vacuum cleaner, remove the coffee beans and coffee powder residue from the grinding chamber (Part. 1).

ATTENTION! Do not use water and/or detergents to clean the grinding chamber and grinding blades.

natural_image
Technical line drawing of a mechanical component with no visible text or symbolsEN
ON DEMAND line
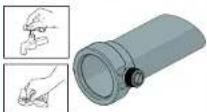
- Loosen the fastening screw (Part. 1) and pull out the coffee discharge tube (Part. 2) from its position.
- Wash the tube with warm water and a pH-neutral, unscented, degreasing and cleaning agent specifically for use in the food industry.
- Wipe dry with a soft cloth.
• Using a vacuum cleaner and a dry cloth, clean all coffee powder residues from the discharge tube housing.

- The exterior of the machine body must be cleaned using soft cloths and products suitable for use in the food industry.

ATTENTION! Do not use abrasive sponges and/or aggressive products that may damage the external surfaces of the machine.

ATTENTION! It is forbidden to use water or steam jets to clean the machine body.
natural_image
Line drawing of a vintage mechanical device with no visible text or symbolsON DEMAND line
EN
• After cleaning, reassemble the machine, put the discharge tube (Part. 1) back into place (Part. 2) and secure it by tightening the screw (Part. 3).
- Place the hopper (Part. 4) and secure it with the appropriate screw (Part. 5).
- Close the hopper with its lid (Part. 6).
The machine is ready to be used again after being fed and filled with coffee beans.

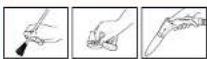
6.1.2 Checking the power cable status
AT THE END OF EVERY SHIFT: check the power supply cable.
- Disconnect the cable from the power socket, check visually and by touching that the protective sleeve is intact, that the wires are not exposed and that the plug is not damaged.

ATTENTION! If the power cable is damaged, replace it with one of the same type.
natural_image
Line drawing of a simple coffee maker with handle and spout (no text or symbols)EN
ON DEMAND line
6.1.3 Thoroughly cleaning the grinding blades
EVERY MONTH: thoroughly clean the grinding blades
The grinding blades should be thoroughly cleaned once a month (or when necessary), using specific cleaning products for grinder-dosers, which are readily available on the market (e.g. PULY GRIND coffee grinder cleaner).
- Thorough cleaning must be carried out after the end-of-shift cleaning. No coffee must be in the machine and the supply hopper must not be attached.
- The grinding blades can be cleaned by pouring a dose of the product into the (completely empty) grinding chamber and starting the grinding process. During grinding, the product (in grains or crystals) regenerates the grinding blades by completely removing all coffee, scale, mould and greasy deposits from their surfaces, absorbing oil and destroying any rancid deposits without leaving any residues.
- In this way, regeneration takes place without the need to disassemble the grinding blades and without having to change the set grinding position.

natural_image
Line drawing of a coffee maker with two labeled boxes above it, showing no text or symbols on the device itself.6.1.4 Shutting down the grinder-doser
If the machine is not used for long periods of time (e.g. festive periods, holidays, etc...), we recommended carrying out the following cleaning operations to keep it in good condition and avoid any potential problems when restarting it.
WHEN NECESSARY: cleaning and shutting down the machine.
- The grinder-doser should be thoroughly cleaned as described in Par. 6.1.1.
- Thoroughly clean the grinding blades as described in Par. 6.1.3.
- Disconnect the power supply cable from the power socket.
- Cover the machine with a cloth to prevent any accumulation of dust and dirt.
ON DEMAND line
EN
6.1.5 Replacing the grinding blades
The scheduled deadline for replacing the grinding blades is set by Fiorenzato M.C. S.r.l. depending on the type of grinders and the grinder-doser model.
At the end of the time set by the manufacturer, the warning icon 🔒 appears on the display, indicating that they need to be replaced.

ATTENTION! The grinding blades must be replaced by a qualified operator or by specialised technicians using original spare parts.
6.2 Supplementary maintenance
There are no scheduled supplementary maintenance operations for the grinder-doser. However, in the event of breakages and/or malfunctioning not covered in the section "7 ANOMALIES - CAUSES - REMEDIES", do not intervene on the appliance yourself but inform your local dealer who will contact the Fiorenzato M.C. S.r.l. service department to solve the problem.
EN
ON DEMAND line
7 ANOMALIES - CAUSES - REMEDIES
The table shows possible faults that may cause the grinder-doser not to work and/or not to function properly. For each anomaly, the possible cause is indicated along with the actions to be taken to restore the correct operation of the appliance.
| Anomaly Cause Remedy | ||
| The grinder-doser does not switch on. | No power supply.• Make sure that the switch is in the 'I' (ON) position;Make sure that the thermal-magnetic circuit breaker upstream of the socket (if present) is in the 'ON' position.Ensure that the power cable is intact and correctly connected to the electrical socket provided at the location of use. | |
| The coffee beans do not fall out of the supply hopper. | Locking slide closed.• Open the locking slide. | |
| The system loses data from previous settings when it is switched on. | The backup battery of the machine management system is fl at. | • Contact the service department to replace the backup battery. |
| The icon ‘O’ appears on the display accompanied by an alert message about the need to replace the grinding blades. | The grinding blades are close to the manufacturer's working hour limit and therefore their replacement must be planned. | • The grinder-doser can be used until the set time limit is reached. When the time limit has been reached, the grinding blades must be replaced in order to guarantee maximum machine effi ciency, following the instructions given in paragraph 6.1.5.Once they have been replaced, the specialist technician resets the time counter for the grinding blades. |
ON DEMAND line
EN
| Anomaly Cause Remedy | ||
| During grinding the motor stops. | Triggering of the motor thermal-magnetic circuit breaker due to blockage of the grinding system if objects or foreign bodies are between the grinding blades. | Switch off the appliance and wait until it has cooled down completely.Disconnect the appliance from the mains power supply.Close the locking slide and remove the supply hopper.Clean the grinding chamber and remove any foreign bodies.Reassemble the appliance and start a grinding cycle. |

ATTENTION! If the anomaly persists even after carrying out the recommended corrective actions, or if functional anomalies occur that are not indicated in the table, contact your local dealer, who will decide whether to contact the Fiorenzato M.C. S.r.l. service department or have the appliance repaired or overhauled by a specialised technician.
EN
ON DEMAND line
8 REQUESTING SPARE PARTS
If it is necessary to replace worn parts of the grinder-doser (e.g. grinding blades), the end user (e.g. bartender/restaurateur, etc.) must contact their local distributor, a direct intermediary with Fiorenzato M.C. S.r.l., and communicate the grinder-doser model in their possession for identification and to request the supply of original spare parts. Only authorised local distributors will then be given the opportunity to register on our website to order the required spare part.
To request spare parts, local distributors must:
- Visit www.fi orenzato.com, enter the spare parts section and select the grinder-doser model indicated by the end user.
- Access the reserved area by entering their credentials on the form provided (at the first login, they must register by entering their identification data).
- Select the necessary spare parts using the exploded view tables of the product on the portal.
- Follow the guided procedure to complete their order and send it to Fiorenzato M.C. S.r.l.
- The local distributor will be contacted by personnel of Fiorenzato M.C. S.r.l., who will take care of the request.

ATTENTION! Please note that the replacement of grinding blades and, in general, of all internal parts of the grinder-doser must be carried out by specialised technicians.

ATTENTION! Fiorenzato M.C. S.r.l. is not liable for any personal injury and/or damage to the appliance caused by the replacement of components with non-original spare parts by unqualified persons.
ON DEMAND line
EN
9 DISPOSAL

ATTENTION! Different countries have different laws regarding the disposal of electrical and electronic products, and therefore the requirements of the specific laws and organisations where disposal takes place must be observed.
- If the identification label attached to the appliance bears the crossed-out wheelie bin symbol shown in the figure, this means that the product is classified, according to current regulations, as an electrical or electronic appliance and complies with EU Directive 2002/96/EC (WEEE) and therefore, at the end of its useful life, it must be disposed of separately from household waste.
- The appliance must therefore be handed over free of charge to a waste sorting centre for electrical and electronic equipment or returned to the retailer when a new equivalent appliance is purchased.
- The user is responsible for taking the appliance at the end of its life to the appropriate collection facilities, under penalty of the sanctions laid down in applicable legislation on waste. Appropriate waste sorting for subsequent delivery of the discarded appliance for recycling, treatment and environmentally sound disposal helps to avoid any possible negative effects on the environment and health, and promotes the recycling of the materials of which the product is made. For more detailed information on available collection systems, please contact your local waste disposal service or the shop where you purchased the product. Producers and importers fulfil their responsibility for environmentally sound recycling, treatment and disposal either directly or by participating in a collective system.

FIORENZATO
natural_image
Line drawing of a mechanical grinding machine (no text or symbols)
Série ON DEMAND
FR
natural_image
Technical line drawing of a mechanical device with labeled component (1), no readable text or symbols beyond label and figure label

Série ON DEMAND
FR
natural_image
Technical diagram of an electrical switchgear assembly with warning symbol (no text labels)Fig. 6
4 INSTALLATION

natural_image
Technical line drawing of a coffee maker with an inset close-up showing its cross-sectional view (no text or symbols present)Fig. 10
FR
Série ON DEMAND
5.2 Commandes de la machine
natural_image
Technical line drawing of a mechanical presser with an inset circular component detail (no text or symbols)natural_image
Technical line drawing of a coffee maker with a side view showing its internal components (no text or labels)Série ON DEMAND
FR
FR
Série ON DEMAND
6 ENTRETIEN DU MOULIN-DOSEUR
6.1 Entretien ordinaire

natural_image
Technical line drawing of a mechanical presser with an inset close-up view (no text or symbols)
FR
Série ON DEMAND

natural_image
Line drawing of a vintage mechanical device with no visible text or symbolsSérie ON DEMAND
FR
natural_image
Line drawing of a mechanical presser with handle and control knob (no text or symbols)FR
Série ON DEMAND
natural_image
Illustration of a milk carton with two labeled dairy products (no text or symbols on the product itself)natural_image
Line drawing of a mechanical grinding machine (no text or symbols)Serie ON DEMAND
DE
natural_image
Technical line drawing of a mechanical presser with an inset close-up showing internal components (no text or symbols)natural_image
Technical line drawing of a coffee maker with an inset close-up showing its cross-sectional view (no text or labels)natural_image
Technical illustration of a mechanical grinding machine with a close-up view of its internal components (no text or symbols present)Serie ON DEMAND
DE
5.3 Bedienfeld
DE
Serie ON DEMAND
natural_image
Technical illustration of a mechanical presser with an inset close-up showing internal components (no text or symbols)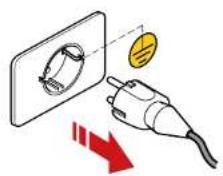

DE
Serie ON DEMAND
natural_image
Technical diagram of a mechanical device with labeled parts (1 and 2), no readable text or symbols beyond labels
natural_image
Line drawing of a mechanical device with no visible text or symbolsSerie ON DEMAND
DE
natural_image
Line drawing of a standard mechanical presser with no text or symbolsDE
Serie ON DEMAND
natural_image
Line drawing of a vintage mechanical device with no visible text or symbolsnatural_image
Line drawing of a mechanical grinding machine (no text or symbols)Serie ON DEMAND
NL
natural_image
Technical line drawing of a mechanical device with labeled component (1), no readable text or symbols present.Fig. 3
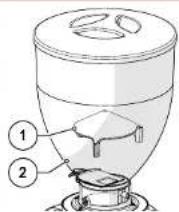
Fig. 4
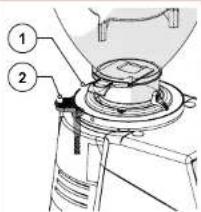
Fig. 5
Serie ON DEMAND
NL
3.5 Restrisico's
Fig. 8 Fig. 9
natural_image
Technical line drawing of a mechanical presser with an inset close-up showing internal components (no text or symbols)Fig. 10
NL
Serie ON DEMAND
5.2 Bedieningen machine
natural_image
Technical line drawing of a mechanical presser with an inset close-up showing internal components (no text or symbols)natural_image
Technical illustration of a coffee maker with a magnified inset showing the blade and handle (no text or symbols)Serie ON DEMAND
NL
HOME in "Heldere modus"
NL
Serie ON DEMAND
5.3.2.9 Screensaver
NL
Serie ON DEMAND
6 ONDERHOUD KOFFIEMOLEN
natural_image
Technical line drawing of a mechanical presser with an inset close-up view (no text or symbols)

NL
Serie ON DEMAND

natural_image
Line drawing of a vintage mechanical device with no visible text or symbolsSerie ON DEMAND
NL
6.1.2 Controle staat voedingskabel
NA ELKE WERKDIENST: controleer de voedingskabel.
natural_image
Line drawing of a mechanical presser with handle and control knob (no text or symbols)NL
Serie ON DEMAND
natural_image
Line drawing of a milk carton with two labeled dairy products (no text or symbols on the carton itself)natural_image
Line drawing of a coffee maker with handle and spout (no text or symbols)Serie ON DEMAND
NL
natural_image
Line drawing of a mechanical grinding machine (no text or symbols)Σειρά ON DEMAND
EL
natural_image
Mechanical device with warning symbol and warning triangle (no text or labels)Eik. 6
4 ΕΓΚΑΤΑΣΤΑΣΗ

natural_image
Technical line drawing of a coffee maker with an inset close-up showing its cross-sectional view (no text or labels)natural_image
Technical line drawing of a coffee maker with cross-sectional view (no text or labels)natural_image
Technical line drawing of a mechanical grinding machine with a circular inset view showing internal components (no text or labels)Σειρά ON DEMAND
EL
EL
Σειρά ON DEMAND

EL
Σειρά ON DEMAND

natural_image
Line drawing of a vintage mechanical device with no visible text or symbolsΣειρά ON DEMAND
EL
natural_image
Line drawing of a mechanical grinding press with no text or symbolsEL
Σειρά ON DEMAND
natural_image
Line drawing of a vintage mechanical device with no visible text or symbolsnatural_image
Line drawing of a mechanical grinding machine (no text or symbols)ON DEMAND sorozat
HU
natural_image
Technical line drawing of a coffee maker with an inset close-up showing its cross-sectional view (no text or labels)natural_image
Technical line drawing of a mechanical presser with a circular inset showing internal components (no text or symbols)natural_image
Technical line drawing of a griddler with an inset close-up showing internal components (no text or labels)ON DEMAND sorozat
HU
5.3 Kezelöpanel
HU
ON DEMAND sorozat
6 AZ ADAGOLÓS KÁVÉDARÁLÓ KARBANTARTÁSA
HU
ON DEMAND sorozat

natural_image
Line drawing of a vintage mechanical device with no visible text or symbolsON DEMAND sorozat
HU
natural_image
Line drawing of a mechanical presser with handle and control panel (no text or symbols)HU
ON DEMAND sorozat
natural_image
Line drawing of a milk carton with two labeled dairy products (no text or symbols on the carton itself)natural_image
Line drawing of a mechanical presser or grinder device (no text or symbols present)
ON DEMAND 시리즈
KO
natural_image
Technical diagram of an electrical switchgear assembly with warning symbol (no text labels)그림 6
4설치

natural_image
Technical line drawing of a mechanical presser with an inset close-up showing internal components (no text or labels)natural_image
Technical line drawing of a mechanical presser with a circular inset showing internal components (no text or symbols)5.2.2 작동 마이크로스위치
natural_image
Technical line drawing of a mechanical grinding machine with cross-sectional view (no text or symbols)ON DEMAND 시리즈
KO
5.3 조작판
KO
ON DEMAND 시리즈
6그라인더 도저 유지관리
6.1 정기 유지관리

KO
ON DEMAND 시리즈

natural_image
Line drawing of a vintage-style mechanical device with no visible text or symbolsON DEMAND 시리즈
KO
6.1.2 전원 케이블 상태 점검
natural_image
Line drawing of a portable coffee maker with handle and spout (no text or symbols)KO
ON DEMAND 시리즈
6.1.3그라인더의 미세 청소
매달:그라인더를 깨끗이 청소합니다
natural_image
Illustration of a milk carton with two labeled dairy products (no text or symbols on the product itself)6.1.4그라인더 도저의 휴지
natural_image
Line drawing of a mechanical grinding machine (no text or symbols)Серия ON DEMAND
RU
natural_image
Technical diagram of a mechanical device with a warning symbol and lightning bolt (no text or labels)Рис. 6
4 УСТАНОВКА

natural_image
Technical line drawing of a mechanical presser with an inset close-up showing internal components (no text or symbols)natural_image
Technical line drawing of a coffee maker with an inset close-up showing its cross-sectional view (no text or labels)natural_image
Technical line drawing of a mechanical grinding machine with cross-sectional view (no text or symbols)Серия ON DEMAND
RU
RU
Серия ON DEMAND
natural_image
Technical line drawing of a mechanical component with concentric rings and a labeled part (no text or symbols present)RU
Серия ON DEMAND
natural_image
Technical line drawing of a mechanical device with labeled parts (no readable text or symbols)
natural_image
Line drawing of a vintage mechanical device with no visible text or symbolsСерия ON DEMAND
RU
natural_image
Line drawing of a mechanical presser with handle and control knob (no text or symbols)RU
Серия ON DEMAND
natural_image
Line drawing of a milk carton with two labeled cans (no text or symbols on the carton itself)natural_image
Line drawing of a mechanical presser or grinder device (no text or symbols present)
Série ON DEMAND
PT
natural_image
Technical line drawing of a mechanical device with labeled component (1), no readable text or symbols present.Fig 3 Fig 4 Fig 5
Série ON DEMAND
PT
natural_image
Technical line drawing of a coffee maker with an inset close-up showing its internal structure (no text or symbols)O moinho dosador está agora energizado e pronto a ser utilizado.
Série ON DEMAND
PT
Fig 10
PT
Série ON DEMAND
natural_image
Technical line drawing of a mechanical presser with an inset close-up showing internal components (no text or symbols)natural_image
Technical line drawing of a mechanical grinding machine with a close-up inset showing internal components (no text or symbols)Série ON DEMAND
PT
5.3 Painel do operador
PT
Série ON DEMAND
natural_image
Technical illustration of a coffee maker with a magnified inset showing its internal structure (no text or symbols present)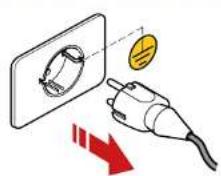
PT
Série ON DEMAND
natural_image
Line drawing of a vintage-style mechanical device with no visible text or symbolsSérie ON DEMAND
PT
natural_image
Line drawing of a coffee maker with handle and spout (no text or symbols)PT
Série ON DEMAND
6.1.3 Limpeza minuciosa das lâminas
natural_image
Line drawing of a vintage mechanical device with no visible text or symbolsnatural_image
Line drawing of a mechanical presser or grinder device (no text or symbols present)
Serie ON DEMAND
ES
natural_image
Technical line drawing of a mechanical device with labeled component (1), no readable text or symbols beyond label and figure label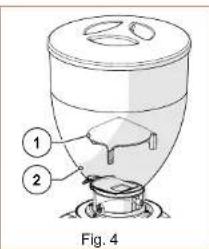
Serie ON DEMAND
ES
natural_image
Technical diagram of a mechanical device with a warning symbol and electrical hazard (no text or labels present)Fig. 6
4 INSTALACIÓN

natural_image
Technical line drawing of a coffee maker with an inset close-up showing its internal structure (no text or symbols)Fig. 10
ES
Serie ON DEMAND
natural_image
Technical line drawing of a mechanical presser with an inset close-up showing internal components (no text or symbols)natural_image
Technical line drawing of a coffee maker with a magnified inset showing the blade and handle (no text or labels)Serie ON DEMAND
ES
5.3 Paneloperador
ES
Serie ON DEMAND
natural_image
Technical line drawing of a mechanical presser with an inset close-up view (no text or symbols)
natural_image
Technical line drawing of a mechanical component with no visible text or symbolsES
Serie ON DEMAND

natural_image
Line drawing of a vintage-style mechanical device with no visible text or symbolsSerie ON DEMAND
ES
natural_image
Line drawing of a mechanical grinding press with no text or symbolsES
Serie ON DEMAND
natural_image
Line drawing of a milk carton with two labeled dairy products (no text or symbols on the main object)natural_image
Line drawing of a mechanical grinding machine (no text or symbols)natural_image
Technical line drawing of a mechanical presser with a magnified inset showing internal components (no text or symbols)natural_image
Technical line drawing of a mechanical presser with an inset circular cross-section showing internal components (no text or labels)natural_image
Technical line drawing of a coffee maker with a magnified inset showing the blade and handle (no text or labels)การเสือภาษา
ภาษาอิตาลี
ภาษาอิตาลี
natural_image
Technical line drawing of a mechanical device with labeled parts (1 and 2), no readable text or symbols beyond labels
โปรดทราบ! Iran provides the first part of a second section, and/or the first section is provided by the other.

natural_image
Line drawing of a vintage mechanical device with no visible text or symbolsnatural_image
Line drawing of a portable coffee maker with handle and spout (no text or symbols)ภาษาอิตาลี
natural_image
Illustration of a milk carton with two labeled dairy products above it (no text or symbols on the main image)natural_image
Line drawing of a mechanical grinding machine (no text or symbols)
natural_image
Mechanical device with warning symbol and lightning bolt icon (no text or labels)Hình 6
4 LÂP ĐẠT

natural_image
Technical line drawing of a coffee maker with an inset close-up showing its internal structure (no text or symbols)natural_image
Technical line drawing of a mechanical presser with an inset cross-section showing internal components (no text or labels)natural_image
Technical line drawing of a mechanical grinding machine with cross-sectional view (no text or symbols)VN
VN

natural_image
Line drawing of a laboratory instrument with no visible text or symbolsnatural_image
Line drawing of a portable coffee maker with handle and spout (no text or symbols)VN
natural_image
Line drawing of a milk carton with two labeled dairy products (no text or symbols on the carton itself)8 YÊU CẦU THAY THẾ PHỤ TÙNG
natural_image
Line drawing of a mechanical presser or grinder device (no text or symbols present)安装、使用与维护手册

ON DEMAND系列
中文
2.3 咖啡研磨机主部件标识
ON DEMAND系列
中文
3.5 剩余风险
natural_image
Technical illustration of a mechanical device with warning symbol and warning label (no readable text or symbols)图6
4 安装;

natural_image
Technical line drawing of a coffee mixer with an inset close-up showing the internal structure (no text or symbols)这时咖啡研磨机已经通电,可以使用了。
ON DEMAND系列
中文
5 研磨机的使用
5.1 咖啡研磨机的使用准备
图10
中文
ON DEMAND系列
5.2 机器控制指令键说明
natural_image
Technical line drawing of a coffee maker with a magnified inset showing internal components (no text or labels)5.2.2 操作激活微动开关
natural_image
Technical line drawing of a coffee maker with a side view showing internal components (no text or labels)ON DEMAND系列
中文
5.3 操作面板
启用“三份剂量显示”的主页屏幕
ON DEMAND系列
中文
5.3.2.7 显示屏亮度
中文
ON DEMAND系列
6 咖啡研磨机的维护
6.1 日常维护

natural_image
Technical line drawing of a mechanical presser with an inset close-up view (no text or symbols)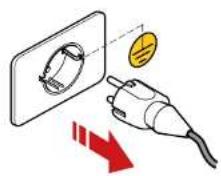
下表汇总了机器所需进行的所有日常维护。
natural_image
Technical line drawing of a mechanical device with labeled parts (1 and 2), no readable text or symbols beyond labels
natural_image
Line drawing of a mechanical device with no visible text or symbolsON DEMAND系列
中文
6.1.2 检查电源线状态
每次轮班结束后:电源线检查。
natural_image
Line drawing of a coffee maker with handle and spout (no text or symbols)中文
ON DEMAND系列
6.1.3 彻底清洁磨轮
每月:进行一次磨轮彻底清洁。
natural_image
Illustration of a milk carton with two labeled dairy products (no text or symbols on the main image)6.1.4 咖啡研磨机搁置处理
natural_image
Line drawing of a mechanical presser or grinder device (no text or symbols visible)הכלהה כרְׁהָהִיַעֹאָם, כרְׁהָהִיַעֹאָם, כרְׁהָהִיַעֹאָם, כרְׁהָהִיַעֹאָם, כרְׁהָהִיַעֹאָם, כרְׁה Los Angeles County, Los Angeles County, Los Angeles County, Los Angeles County, Los Angeles County, Los Angeles County, Los Angeles County, Los Angeles County, Los Angeles County, Los Angeles County, Los Angeles County, Los Angeles County, Los Angeles County, Los Angeles County, Los Angeles County, Los Angeles County, Los Angeles County, Los Angeles County, Los Angeles County, Los Angeles County, Los Angeles County, Los Angeles County, Los Angeles County, Los Angeles County, Los Angeles County, Los Angeles County
HE
ON DEMAND
ON DEMAND
HE
4.2
3.6
.הכלההוּרָהוּרָהוּרָהוּרָהוּרָהוּרָהוּרָהוּרָהוּרָהוּרָהוּרָהוּרָהוּרָהוּרָהוּרָה
;
•
•
natural_image
Technical illustration of a coffee maker with a close-up inset showing its internal structure (no text or symbols)
natural_image
Technical line drawing of a coffee mixer with an inset close-up showing its internal components (no text or labels)natural_image
Technical line drawing of a mechanical grinding machine with a close-up inset showing internal components (no text or symbols)• אַרְשׁו
תְקַרָה אַלְאָה
natural_image
Technical line drawing of a coffee maker with an inset close-up showing its internal structure (no text or symbols)16 בַּוֹ
natural_image
Line drawing of a coffee maker with two labeled boxes above it (no text or symbols on the device itself)natural_image
Line drawing of a mechanical presser or grinder device (no text or symbols present)
Seria ON DEMAND
PL
natural_image
Technical line drawing of a mechanical device with labeled component (1), no readable text or symbols present.Rys. 3

Rys. 4

Rys. 5
Seria ON DEMAND
PL
natural_image
Technical line drawing of a mechanical presser with an inset close-up showing internal components (no text or symbols)natural_image
Technical line drawing of a mechanical presser with an inset close-up showing internal components (no text or symbols)natural_image
Technical line drawing of a mechanical grinding machine with a close-up inset showing internal components (no text or labels)Seria ON DEMAND
PL
5.3 Paneloperatora
PL
Seria ON DEMAND
6 KONSERWACJA MŁYNKA DOZUJĄCEGO
PL
Seria ON DEMAND

natural_image
Line drawing of a vintage mechanical device with no visible text or symbolsSeria ON DEMAND
PL
natural_image
Line drawing of a mechanical grinding press with no text or symbolsPL
Seria ON DEMAND
natural_image
Line drawing of a milk carton with two labeled dairy products (no text or symbols on the main image)natural_image
Line drawing of a modern manual mixer machine (no text or symbols)
AR
• Business Department of the United States, Canada, is a business organization in Canada. The United States is a general government department of the United States, which is a general government department of the United States.
natural_image
Technical diagram of a mechanical device with a warning symbol and a lightning bolt (no text or labels present)6
الثنيت 4
natural_image
Technical line drawing of a mechanical presser with an inset close-up showing internal components (no text or symbols)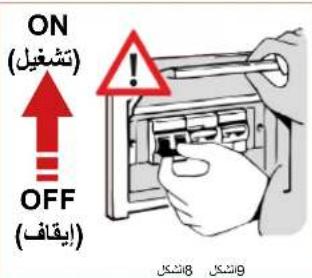
natural_image
Technical line drawing of a coffee maker with an inset close-up showing internal components (no text or symbols)5.2.1 التشغيل;
natural_image
Technical line drawing of a mechanical grinding machine with cross-sectional view (no text or labels)وَتَمْعَيْلِهُ فَطْفَ فِي أَوْضَاعِ الْمَّدْخَمَدٍ «الْقَيْلِى» وَالْتَّلَّاقِيٍ (5.3.2.2) وَالْسَبِّقِ الْتَحَدِيدٍ (أَنْرُ الْقَرْة) وَيَحْجَدَا مُفْتَاحِ لِمَّاْتُمْحَدِ أَنْ بِيَدًا عَلِيَّةِ الْطَّحِنِ مُسْتَحْدِبِدِهُ المُشْعُولِهُ بِدْ حَمْلِ سَالَةِ الْفَلَاتِرِ بِعْ إُحْتِيْارِ نُوعِ الْكُمْبِّةِ الْمُرْغُوبٍ فيُ.
AR
AR
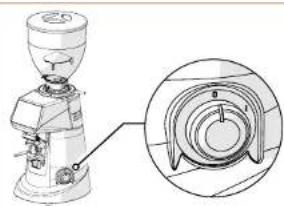
natural_image
Technical line drawing of a mechanical presser with an inset close-up showing internal components (no text or symbols)16 17
natural_image
Illustration of a milk carton with two labeled boxes above it, showing no text or symbols on the device itself.natural_image
Line drawing of a mechanical grinding machine (no text or symbols)Priručnik s uputama za instaliranje, uporabu i održavanje

Serija ON DEMAND
HR
Serija ON DEMAND
HR
3.5. Dodatni rizici

natural_image
Technical line drawing of a coffee maker with an inset close-up showing its cross-sectional view (no text or labels)Sada se mlinac za kavu sa dozatorom napaja i spreman je za uporabu.
Serija ON DEMAND
HR
5. UPORABA MLINCA ZA KAVU SA DOZATOROM
5.1. Priprema za uporabu mlinca za kavu sa dozatorom
Kada završite instaliranje, aparat je spreman za uporabu i u njega možete sipati kavu u zrnu za samljeti. Pogledajte SI. 10, da biste sipali zrna kave potrebno je sljedeće:
- Namontirajte spremnik (Detalj 1) na mlinac za kavu sa dozatorom (Detalj 2) i blokirajte ga u radnom položaju na način što čete zavmuti odnosni vijak za fi ksiranje (Detalj 3).
• Provjerite je li klapna (Detalj 4) do kraja zatvorena. - Skinite poklopac (Detalj 5) i napunite spremnik zmima pržene kave za samljeti.
- Zatvorite spremnik odnosnim poklopcem (Detalj 5).
- Postupno otvorite klapnu (Detalj 4) kako bi zma kave mogla doći u komoru za mljevenje.
- Sada je mlinac za kavu sa dozatorom pun i spreman je za uporabu.
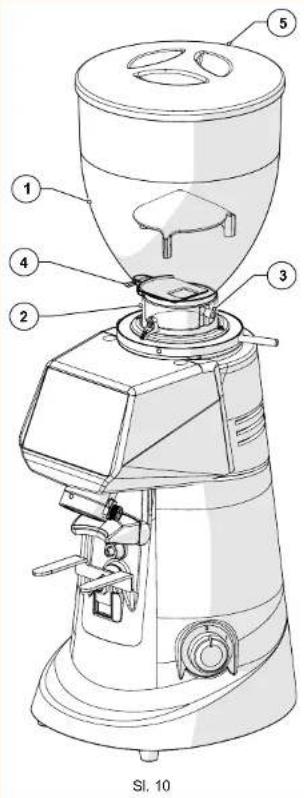
HR
Serija ON DEMAND
5.2. Komande aparata
Mlincem za kavu sa dozatorom upravlja se preko prekidača za uključivanje/isključivanje (pogledajte paragraf 5.2.1), mikroprekidača za uključivanje koji se nalazi u blizini oslonca za držač fi ltra (pogledajte paragraf 5.2.2) i upravljačke ploče sa zaslonom osjetljivim na dodir preko kojega je moguće odabrati i postaviti sve radne funkcije aparata (pogledajte paragraf 5.3). Sve informacije o radnom statusu aparata, radnim parametrima i komandama koje se mogu izdati prikazuju se na zaslonu na prednjoj strani aparata. U nastavku su opisani svi upravljački i signalni uređaji predviđeni na mlincu za kavu sa dozatorom.
5.2.1. Prekidač
natural_image
Technical line drawing of a mechanical presser with an inset close-up showing internal components (no text or symbols)5.2.2. Mikro prekidač za aktiviranje
Daje komandu za početak ciklusa mljevenja kada ga pritisne držač filtra. Ova komanda nije aktivna u "Izravnom" načinu uporabe (pogledajte paragraf 5.3.2.2).
- Omogućeno za rad samo u načinu uporabe "STANDARDNI", "AUTOMATSKI" i "PRESELEKCIJA" (pogledajte paragraf 5.3.2.2).
- Ova posebna komanda omogućuje korisniku da započne mljevenje koristeći ručicu sa držaćem fi ltra nakon što odabere željeni tip doze.
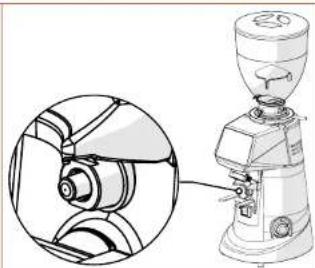
natural_image
Technical line drawing of a mechanical grinding machine with cross-sectional view (no text or symbols)Serija ON DEMAND
HR
HR
Serija ON DEMAND
6. ODRŽAVANJE MLINCA ZA KAVU SA DOZATOROM
6.1. Redovito održavanje

PAŽNJA! Prije vršenja bilo kojeg zahvata redovitog održavanja na mlincu za kavu sa dozatorom, iskopčajte aparat s električnog napajanja i postavite na "O" (OFF) odnosni prekidač (Sl. 16) i iskopčajte utikač za napajanje iz odnosne utičnice (Sl. 17).
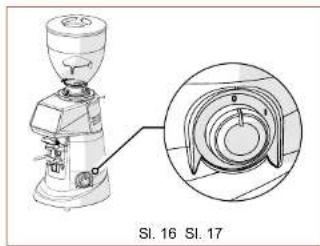
natural_image
Technical illustration of a mechanical grinding machine with an inset close-up view (no text or symbols)
Svi zahvati redovitog održavanja vašeg aparata sažeto su navedeni u donjoj tablici. Tvrtka Fiorenzato M.C. S.r.l. preporuča vlastitim klijentima da savjesno vrše navedene zahvate, u navedenim vremenskim rokovima i na opisani način.
HR
Serija ON DEMAND

- Aparat izvana treba očistiti mekim krpama i sredstvima koja su prikladna za prehrambeni sektor.

PAŽNJA! Nemojte koristiti abrazivne spužve i/ili agresivne deterdžente koji mogu oštetiti vanjsku površinu aparata.

natural_image
Line drawing of a mechanical device with no visible text or symbolsSerija ON DEMAND
HR
- Nakon čišćenja, ponovo namontirajte aparat i na-montirajte cijev za pražnjenje kave (Detalj 1) na odnosno mjesto (Detalj 2) i fi ksirajte je u položaju pritezanjem vijka (Detalj 3).
- Namontirajte spremnik (Detalj 4) i fi ksirajte ga odnosnim vijkom (Detalj 5).
- Zatvorite spremnik odnosnim poklopcem (Detalj 6).
6.1.2. Kontrola stanja kabela za napajanje
natural_image
Line drawing of a mechanical presser with handle and control knob (no text or symbols)HR
Serija ON DEMAND
natural_image
Line drawing of a milk carton with two labeled dairy products (no text or symbols on the main image)6.1.4. Duže nekorištenje aparata
Ako aparat nećete koristiti duži period (npr. blagdani, godišnji odmor, itd...), preporuča se da izvršite sljedeće zahvate čišćenja da bi aparat ostao u dobrom stanju i da ne biste imali eventualne probleme prilikom narednog korištenja aparata.
PO POTREBI: čišćenje i nekorištenje aparata.
- Temeljito očistite mlinac za kavu sa dozatorom kako je navedeno u Par. 6.1.1.
- Temeljito očistite oštrice kako je navedeno u Par. 6.1.3.
- Iskopčajte kabel za električno napajanje iz električne utičnice.
- Pokrijte aparat pokrovom kako se ne bi nakupila prašina i nečistoća.
Serija ON DEMAND
HR
6.1.5. Zamjenaostrica
Programirani vremenski rok za zamjenu oštrica postavila je tvrtka Fiorenzato M.C. S.r.l. ovisno o tipu oštrica i modelu mlinca za kavu sa dozatorom.
natural_image
Line drawing of a mechanical grinding machine (no text or symbols)Serija ON DEMAND
SL
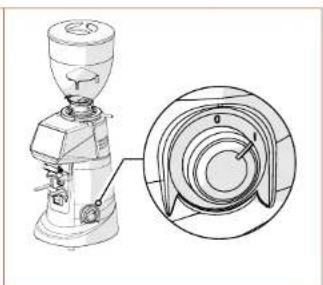
natural_image
Technical line drawing of a coffee maker with a magnified inset showing internal components (no text or symbols)natural_image
Technical line drawing of a coffee maker with a circular inset showing internal components (no text or symbols)natural_image
Technical line drawing of a mechanical grinding machine with cross-sectional view (no text or symbols)Serija ON DEMAND
SL
SL
Serija ON DEMAND
6 VZDRŽEVANJE KAVNEGA MLINA Z ODMERNIKOM
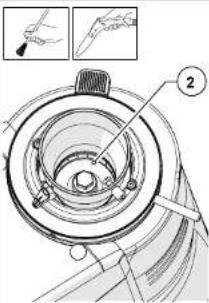
SL
Serija ON DEMAND

natural_image
Line drawing of a vintage-style mechanical device with no visible text or symbolsSerija ON DEMAND
SL
- Po čiščenju aparat ponovno sestavite tako, da vstavite izpustno cev (del 1) na njeno mesto (del 2) in jo pritrdite na položaju s privitjem vijaka (del 3).
• Vgradite posodo (del 4) in jo pritrdite z ustreznim vijakom (del 5). - Zaprite posodo z ustreznim pokrovom (del 6).
Ko aparat priključite na napajanje in napolnite kavo v zrnju, je ponovno pripravljen za uporabo.
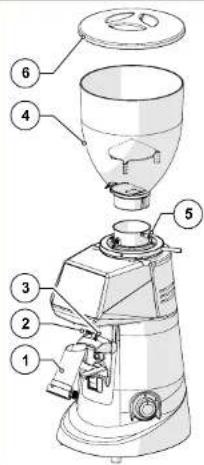
6.1.2 Kontrola stanja napajalnega kabla
OB KONCU VSAKE IZMENE: preverite napajalni kabel
natural_image
Line drawing of a mechanical grinding press with no text or symbolsSL
Serija ON DEMAND
natural_image
Line drawing of a milk carton with two labeled dairy products (no text or symbols on the carton itself)


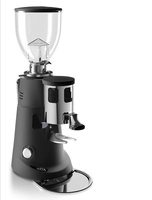
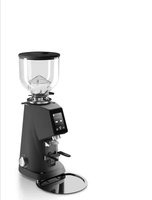
- Serie ON DEMAND
- IT
- Rischi residui
- INSTALLAZIONE
- MANUTENZIONE MACINADOSATORE
- GENERAL INFORMATION 5
- IDENTIFICATION DATA AND TECHNICAL SPECIFICATIONS 8
- SAFETY 12
- INSTALLATION 16
- USING THE GRINDER-DOSER 19
- EN
- ON DEMAND line
- GENERAL INFORMATION
- General information on the manual and how to consult it
- Symbols used in the manual
- Warnings for the buyer
- Manufacturer's contact details
- Instructions for requesting assistance
- Warranty
- Applicable directives
- IDENTIFICATION DATA AND TECHNICAL SPECIFICATIONS
- Introduction
- Appliance identifi cation
- Identifi cation of the main parts of the grinder-doser
- Intended use
- The models in the ON DEMAND line and technical specifications
- Noise level
- SAFETY
- General information
- Reasonably foreseeable misuse
- Reasonably foreseeable misuse includes:
- In addition, the user must never under any circumstances:
- Precautions for proper and safe use
- Safety devices on the grinder-doser
- - Motor thermal cut-out
- • Anti-intrusion device on coffee supply hopper (Fig. 4)
- • Safety adjustment disk lock lever (Fig. 5)
- Residual risks
- Warning labels attached to the machine
- INSTALLATION
- Storage
- Choosing the installation location
- Unpacking and handling the appliance
- Installation and mains connection
- USING THE GRINDER-DOSER
- Preparing to use the grinder-doser
- Machine controls
- Switch
- Activation microswitch
- Operator control panel
- Home page
- SettingsMenu
- Technical Settings
- User Settings
- Safety Settings
- Changing dose times
- Operatingmodes
- - Standard' operating mode
- - 'Direct' operating mode
- • Automatic' operating mode
- • 'Pre-selection' operating mode
- Grinding time display
- Manualgrinding
- Show statistics
- Triple dose display
- Display brightness
- Screenappearance
- Screensaver
- Language
- Date and time
- Information
- Reset dose times
- Administratorpassword
- Adjusting the degree of grinding
- GRINDER-DOSER MAINTENANCE
- Routine maintenance
- Cleaning the appliance
- AT THE END OF EVERY SHIFT: Thoroughly clean the appliance.
- Checking the power cable status
- AT THE END OF EVERY SHIFT: check the power supply cable.
- Thoroughly cleaning the grinding blades
- EVERY MONTH: thoroughly clean the grinding blades
- Shutting down the grinder-doser
- WHEN NECESSARY: cleaning and shutting down the machine.
- Replacing the grinding blades
- Supplementary maintenance
- ANOMALIES - CAUSES - REMEDIES
- REQUESTING SPARE PARTS
- DISPOSAL
- FIORENZATO
- Série ON DEMAND
- FR
- Commandes de la machine
- ENTRETIEN DU MOULIN-DOSEUR
- Entretien ordinaire
- DE
- Bedienfeld
- NL
- Restrisico's
- Bedieningen machine
- ONDERHOUD KOFFIEMOLEN
- Controle staat voedingskabel
- NA ELKE WERKDIENST: controleer de voedingskabel.
- Σειρά ON DEMAND
- EL
- ΕΓΚΑΤΑΣΤΑΣΗ
- ON DEMAND sorozat
- HU
- Kezelöpanel
- AZ ADAGOLÓS KÁVÉDARÁLÓ KARBANTARTÁSA
- ON DEMAND 시리즈
- KO
- 4설치
- 작동 마이크로스위치
- 조작판
- 6그라인더 도저 유지관리
- 정기 유지관리
- 전원 케이블 상태 점검
- 6.1.3그라인더의 미세 청소
- 매달:그라인더를 깨끗이 청소합니다
- 6.1.4그라인더 도저의 휴지
- Серия ON DEMAND
- RU
- УСТАНОВКА
- PT
- Painel do operador
- Limpeza minuciosa das lâminas
- ES
- INSTALACIÓN
- Paneloperador
- ภาษาอิตาลี
- LÂP ĐẠT
- VN
- YÊU CẦU THAY THẾ PHỤ TÙNG
- ON DEMAND系列
- 中文
- 咖啡研磨机主部件标识
- 剩余风险
- 安装;
- 研磨机的使用
- 咖啡研磨机的使用准备
- 机器控制指令键说明
- 操作激活微动开关
- 操作面板
- 显示屏亮度
- 咖啡研磨机的维护
- 日常维护
- 检查电源线状态
- 每次轮班结束后:电源线检查。
- 彻底清洁磨轮
- 每月:进行一次磨轮彻底清洁。
- 咖啡研磨机搁置处理
- HE
- ON DEMAND
- 4.2
- Seria ON DEMAND
- PL
- Paneloperatora
- KONSERWACJA MŁYNKA DOZUJĄCEGO
- AR
- Serija ON DEMAND
- HR
- Dodatni rizici
- UPORABA MLINCA ZA KAVU SA DOZATOROM
- Priprema za uporabu mlinca za kavu sa dozatorom
- Komande aparata
- Prekidač
- Mikro prekidač za aktiviranje
- ODRŽAVANJE MLINCA ZA KAVU SA DOZATOROM
- Redovito održavanje
- Kontrola stanja kabela za napajanje
- Duže nekorištenje aparata
- PO POTREBI: čišćenje i nekorištenje aparata.
- Zamjenaostrica
- SL
- VZDRŽEVANJE KAVNEGA MLINA Z ODMERNIKOM
- Kontrola stanja napajalnega kabla
- OB KONCU VSAKE IZMENE: preverite napajalni kabel
Brand : Fiorenzato
Model : F83 E
Category : Coffee grinder