F4 EVO - Coffee grinder Fiorenzato - Free user manual and instructions
Find the device manual for free F4 EVO Fiorenzato in PDF.

User questions about F4 EVO Fiorenzato
0 question about this device. Answer the ones you know or ask your own.
Ask a new question about this device
Download the instructions for your Coffee grinder in PDF format for free! Find your manual F4 EVO - Fiorenzato and take your electronic device back in hand. On this page are published all the documents necessary for the use of your device. F4 EVO by Fiorenzato.
USER MANUAL F4 EVO Fiorenzato
natural_image
Line drawing of a coffee maker with handle and spout (no text or symbols)text_image
Technical diagram of a portable air purifier with labeled parts 1 and 2Fig. 3
3.5 Rischi residui
text_image
Technical diagram of a mechanical device with warning symbol and warning label in ChineseFig. 4
4 INSTALLAZIONE

text_image
Diagram illustrating the installation of a power plug, showing components labeled 1 and 2 with a red arrow indicating direction.Fig. 5
natural_image
Technical line drawing of a mechanical presser with an inset close-up view showing internal components (no text or symbols)text_image
Technical diagram of a mechanical grinding machine with numbered components for identificationFig. 8
natural_image
Technical line drawing of a coffee maker with an inset close-up showing the internal components (no text or symbols)text_image
Data G M A 22 GEN 97 + + + - - -Regolazione Data
5.3.1.10 Ora
text_image
Technical diagram of a coffee maker with labeled parts and red directional arrows indicating process flow6 MANUTENZIONE MACINADOSATORE
natural_image
Three-step line drawings showing a hand holding a pen, applying adhesive to a tool, and finally adjusting the pen tip (no text or symbols present)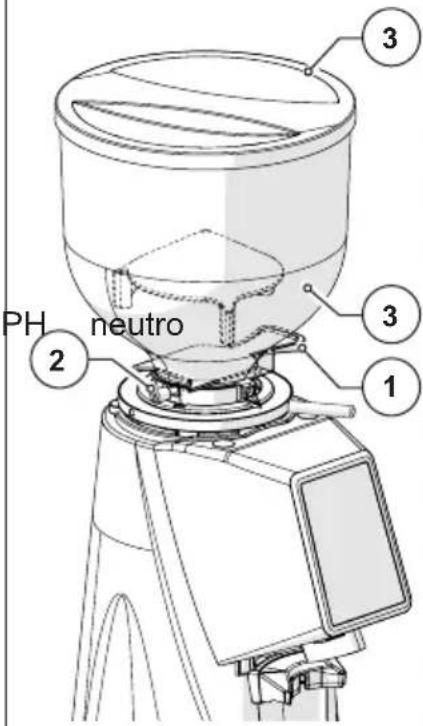
text_image
PH neutro 1 2 3 3

natural_image
Technical line drawing of a mechanical component with no visible text or symbolsnatural_image
Three-step line drawings showing a hand holding a pen, applying adhesive to a tool, and adjusting the tip of a pen (no text or symbols present)
natural_image
Technical line drawing of a mechanical device with labeled component (1), no readable text or symbols present.natural_image
Simple line drawing of a circular object with a pointer and a numbered label (1), no text or symbols present.natural_image
Three-step line drawings showing a hand holding a pen, applying paint to a clip (no text or symbols)
natural_image
Technical line drawing of a mechanical device with no visible text or symbolstext_image
Diagram of a coffee maker with numbered parts and directional arrows indicating process flownatural_image
Technical line drawing of a coffee maker with handle and spout (no text or labels)natural_image
Symbol of a trash bin crossed with a diagonal line, no text or numbers present
FIORENZATO
Electronic coffee grinder-doser
F4 EVO
Installation, use and maintenance manual
natural_image
Line drawing of a coffee maker with handle and spout (no text or symbols)1 GENERAL INFORMATION 5
1.1 General information on the manual and its consultation 5
1.2 Symbols used in the manual 5
1.3 Warnings for the purchaser 6
1.4 Contact details of the manufacturer 6
1.5 Instructions to request interventions 6
1.6 Warranty 7
1.7 Applied directives 7
2 IDENTIFICATION DATA AND TECHNICAL CHARACTERISTICS 8
2.1 Introduction 8
2.2 Appliance identification 8
2.3 Identification of the main parts of the grinder-doser 9
2.4 Intended uses 10
2.5 Technical features 10
2.6 Noise 12
3 SAFETY 12
3.1 General information 12
3.2 Incorrect reasonably foreseeable use 12
3.3 Precautions for correct and safe use 13
3.4 Safety devices applied to the coffee grinder 14
3.5 Residual risks 14
3.6 Warning labels applied to the machine 15
4 INSTALLATION 16
4.1 Storage 16
4.2 Choice of installation point 16
4.3 Unpacking and handling of the appliance 17
4.4 Installation and connection to the electrical network 17
5 USING THE GRINDER-DOSER 19
5.1 Preparation for use of the coffee grinder-doser 19
5.2 Machine controls 20
5.2.1 Switch 20
5.2.2 Operator panel 20
5.3 Operator panel on F4 EVO 21
5.3.1 Settings Menu 23
5.3.1.1 Change Dose Times 24
5.3.1.2 Dose Times Visibility 24
5.3.1.3 Manual Grinding 25
5.3.1.4 Display Statistics 25
EN
F4 EVO
5.3.1.5 Screen Brightness 25
5.3.1.6 Screen Appearance 26
5.3.1.7 Screensaver 26
5.3.1.8 Language 27
5.3.1.9 Date 27
5.3.1.10 Time 28
5.3.1.11 Information 28
5.3.1.12 Reset Dose Times 29
5.3.1.13 Admin Password 29
5.3.2 Dose dispensing (single / double / continuous) on F4 EVO 30
5.4 Grinding size adjustment 32
6 GRINDER-DOSER MAINTENANCE 33
6.1 Ordinary maintenance 33
6.1.1 Cleaning the equipment 34
6.1.2 Supply cable status check 36
6.1.3 Thorough cleaning of the grinders 37
6.1.4 Resting the coffee grinder-doser 37
6.1.5 Replacing the grinders 38
6.2 Extraordinary maintenance 38
7 ANOMALIES - CAUSES - REMEDIES 39
8 REQUESTING SPARE PARTS 41
9 DISPOSAL 42
1 GENERAL INFORMATION
1.1 General information on the manual and its consultation

Read this instruction manual carefully before installing and using the electronic coffee grinder-doser for the first time Fiorenzato M.C. S.r.l.
This instruction manual has been drawn up in accordance with the provisions of Directive 2006/42/EC and provides all the useful information for the end user to install, adjust and use the electronic coffee grinder-doser produced by Fiorenzato M.C. S.r.l.
The contents of this manual must be read and understood in their entirety before installing and using the coffee grinder-doser and must be stored and maintained in good condition to allow future consultation.
The images, data, texts and descriptions contained in this documentation are the property of Fiorenzato M.C. S.r.l. and reflect the state of the art of the machine at the time of its release on the market.

Fiorenzato M.C. S.r.l. is constantly seeking new solutions to improve its products and therefore reserves the right to make changes to the coffee grinder-doser and to its documentation over time without considering the products already sold as being inadequate and/or obsolete.
Consultation of this manual is assisted by a general index that facilitates identification of the topic of interest and by a series of information symbols that draw the user's attention to the contents of particular interest for the purpose of their safety and correct use of the coffee grinder-doser.
1.2 Symbols used in the manual

WARNING - NOTE! It indicates a warning or important note relating to specific functions and/or to useful information for the user. Pay attention to the paragraphs marked with this symbol.

GENERAL HAZARD - ATTENTION! Generic warning sign. The text marked with this symbol indicates that failure to follow the instructions provided may cause damage to the machine and/or result in the risk of injury to the user.
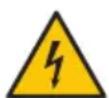
LIVE EQUIPMENT - ATTENTION! Text marked with this symbol indicates the possible risk of electrocution. Pay attention to the instructions provided.

OPERATION INTENDED FOR AUTHORISED TECHNICIANS: The text marked with this symbol indicates that the action described must be performed by a specialist technician (technical assistance).
1.3 Warnings for the purchaser
This manual, like the EC Declaration of Conformity, is an integral part of your coffee grinder-doser and must therefore be treated and stored with care, made available to all users and accompany the machine in case it is moved or resold to third parties.

In case of loss and/or deterioration of this documentation, it is possible to request a copy from the manufacturer indicating the manual code shown on the rear cover.
Before allowing use of the coffee grinder-doser to another user, make sure that they have read and understood the contents of this manual.
The instruction manual contains all the instructions and use procedures which, if properly followed, will enable safe operation without causing damage to yourself and to the machine.

It is the purchaser's obligation to provide adequate training in use and maintenance of the coffee grinder-doser to the personnel responsible for its use.

The purchaser and all users of the coffee grinder-doser are required to carefully follow all the specific warnings contained in this manual.
1.4 Contact details of the manufacturer
For any clarification, please contact the company at the Fiorenzato M.C. S.r.l. following address:
1.5 Instructions to request interventions
For technical assistance on the machine, the user must necessarily contact the dealer from whom they purchased the equipment. For further information or clarifica relating to use and/or maintenance of the coffee grinder-doser, Fiorenzato M.C. S.r.l. remains available and can be contacted at the addresses shown above.
1.6 Warranty
Fiorenzato M.C. S.r.l. applies to its products a warranty of 24 months from the date of the sales invoice issued by Fiorenzato M.C. S.r.l. .
During the warranty period, the manufacturer undertakes to repair or replace free of charge the parts and/or components that are shown to be defective at origin due to manufacturing defects.
The warranty covering the product is void in the event that:
- The warnings/instructions contained in this manual have not been observed.
- The routine maintenance and machine cleaning operations have not been carried out by a user duly instructed on the correct execution procedures.
- Any repairs entrusted to unqualified personnel or to those persons not authorised by the manufacturer.
- The product is used for purposes other than those specified in this manual.
- Any replacements that have been made using non-original spare parts (please note that replacements with non-original spare parts, in addition to voiding the warranty, also invalidate the "Declaration of Conformity" that accompanies the appliance.
- The warranty is void for damage caused to the appliance due to: neglect, installation and/or use that does not comply with the requirements of this manual, insufficient maintenance (cleaning), damage caused by lightning and atmospheric phenomena, incorrect power supply, overvoltages and overcurrents.
1.7 Applied directives
All the coffee grinder-dosers produced by Fiorenzato M.C. S.r.l. have been designed and built in compliance with the essential requirements of the following community directives:
- 2006/42/EC [Machine Directive].
- 2014/35/EU [Low Voltage Directive].
- 2014/30/EU [Electromagnetic Compatibility Directive].
- 2011/65/EU [RoHS Directive].
- 2015/863/EU [RoHS Delegated Directive].
- 2012/19/EU [WEEE Directive].
2 IDENTIFICATION DATA AND TECHNICAL CHARACTERISTICS
2.1 Introduction
Making coffee is an art and to learn its secrets, it is necessary to follow precise rules. The formula for obtaining a perfect cup of espresso is, in fact, very complex and the part played by the equipment is extremely important. For optimal success and indisputable quality, three elements must be correctly combined:
- A fine blend.
• The appropriate use of available equipment. - The wise skill and professionalism of those persons who prepare it. To enjoy a good coffee, contrary to popular belief, it is not enough to simply choose a particular blend.
The operator's experience and skill in following the correct procedures for preparing the drink and using suitable machinery contribute significantly to creating a masterpiece. This is why professionals attach so much importance to the espresso machine and to the coffee grinder-doser. Knowing these tools well, keeping them in perfect working order and using them to their full potential is a skill that belongs to true masters of coffee. The quality of a good espresso stems from a series of operations, where grinding plays an important role. The grinder-doser, therefore, represents for the operator one of the basic tools, whose structure must respond to certain characteristics which are: sturdiness, resistance and functionality, characteristics fully satisfied by all the grinder-dosers produced by Fiorenzato M.C. S.r.l.
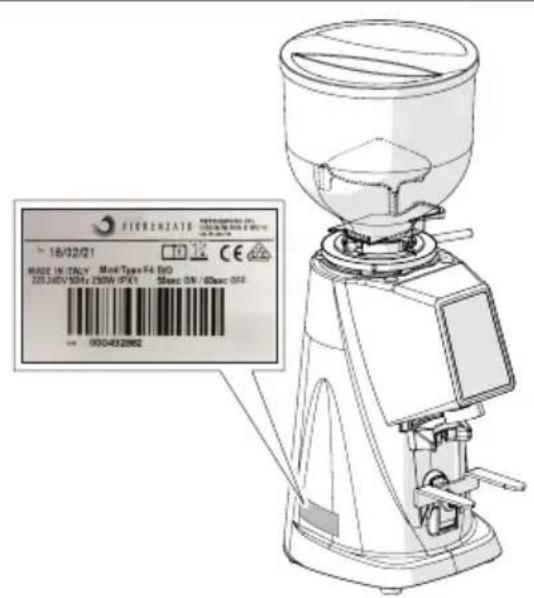
2.2 Appliance identification
An identification label is applied on the left side of all the coffee grinder-dosers produced by Fiorenzato M.C. S.r.l., which always shows the following data:
• Company name of Fiorenzato M.C. S.r.l.
• CE marking and year of manufacture.
• Any other certification marks.
• Model and serial number.
• Power of the appliance.
- Required power supply voltage and frequency.
text_image
FIERINJATE 18/02/21 MADE IN ITALY Mod/Type F4 ISO 220.34V 90Hz 250W IPX1 Match ON / Discount OFF 10040328002.3 Identification of the main parts of the grinder-doser
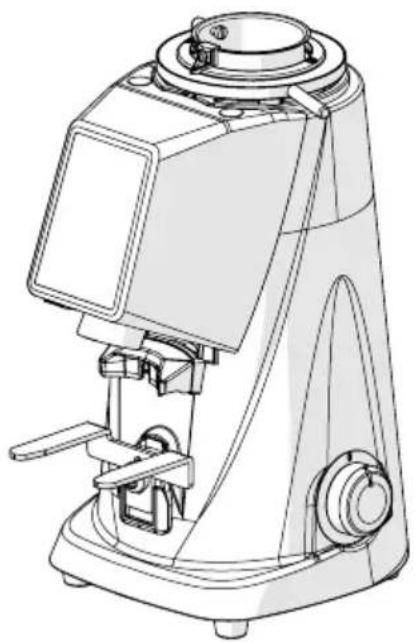
The coffee grinder-dosers consist of a machine body with all the devices needed to grind the coffee and a supply hopper on the top to supply the roasted coffee beans to be ground.
With reference to Fig. 1 the coffee grinder-dosers, model F4 EVO, consist of the following main parts:
| 1 Hopper lid |
| 2 Granular coffee loading hopper |
| 3 Shutter on hopper |
| 4 Ring nut for grinding size adjustment |
| 5 Control panel |
| 6 Machine/user interface display |
| 7 Filter cup support fork |
| 8 Machine on/off switch |
| 9 Coffee brake blade |
| 10 Coffee powder collection tray |
| 11 USB port |
Fig. 1 - Identification of parts
2.4 Intended uses
This appliance has been designed exclusively for the grinding of roasted coffee beans. Any other use is to be considered improper and therefore dangerous. The manufacturer declines all responsibility for any damage due to improper or incorrect use. Do not use the appliance to grind other types of food or other granular materials. Our coffee grinder-dosers are devices intended for qualified personnel for professional use and domestic use.
2.5 Technical features
The following tables show the overall dimensions and the main technical characteristics of the coffee grinder-dosers F4 EVO.
Dimensions and weights

text_image
Technical diagram of a coffee maker with labeled parts A, B, and HFig. 2 - Dimensions
| Model F4 EVO | |
| Dimensions [W x D x H mm] 180 x 237 x 478 | |
| Weight [kg] 9 | |
Technical features
| Model | F4 EVO |
 | |
| Power supply 220-240V 50 Hz | |
| Power [Watts] 250 | |
| Type of grinders Flat coarse | |
| Grinder diameter [mm] 58 | |
| Rpm grinder rotation speed | 1400 at 50 Hz |
| 1600 at 60 Hz | |
| Hopper capacity [g] 500 | |
| Single dose grinding times [s] 1.0 ÷ 12.0 | |
| Double dose grinding times [s] 1.0 ÷ 25.0 | |
| Tolerance on grinding time [s] ± 0.1 | |
| Daily grinding [kg] 1 | |
| Recommended single dose dispensing time 7g [s] 4.5 | |
| Recommended double dose dispensing time 14g [s] 9 | |
| Grinder replacement frequency expressed in kg of ground coffee | |
| “Standard” Grinders / | |
| “Red Speed” Grinders 1000 | |
| Optional | |
| Hopper 500 g | Y |
| Metal presser | Y |
2.6 Noise

The maximum sound emission of our coffee grinder-dosers, measured in a UNI EN ISO 3741 reverberation room in accordance with the EN 60704-1 standards, is in accordance with the EN 60704-1 standards: 1998 and EN 607043: 1996. The equivalent level of sound exposure for an operator, linked exclusively to a limit operation of the appliance of 240 min over eight hours, is 78 dB(A), in accordance with the European Directive 86/188/EEC and subsequent revision 2003/1 0/EEC. Use of the device does not therefore require any precautions against risks arising from exposure to noise in the workplace (articles 3-8 of DE 2003/1 0/EEC).
3 SAFETY
3.1 General information
The purchaser must inform all user personnel about the possible risks deriving from improper use of the appliance, about the safety devices adopted by the manufacturer and about the general rules on accident-prevention provided for by Community directives and by the legislation of the country where the appliance is used.
the Eu
Users must be aware of the position and operation of all the controls and features of the machine listed in this manual.

ATTENTION! Before installing, switching on and using a Fiorenzato M.C. S.r.l.
coffee grinder-doser for the first time, it is necessary to have re understood all the contents of this documentation and of the “SAF INSTRUCTIONS” booklet.

ATTENTION: The unauthorised tampering with or replacement of one or more parts of the machine, the adoption of accessories that modify use of the same and the use of non-original spare parts can cause risks of injury and compromise efficient functioning of the appliance.

Failure to comply with the above exempts Fiorenzato M.C. S.r.l. from any liability for damage to persons and/or property.
3.2 Incorrect reasonably foreseeable use
Fiorenzato M.C. S.r.l. disclaims any liability and the warranty is void in the event of negligence when using the machine or due to failure by the user to comply with the user instructions contained in this manual.

Any use of the device other than that reported in this manual is considered incorrect.
During use of the device, other types of work and activities considered incorrect and which in general could involve risks for the safety of users and/or damage to the machine are not permitted.
Reasonably foreseeable misuse is considered:
- Use of the machine for the grinding of products other than roasted coffee beans (e.g. pepper, salt, etc.).
- Use of the appliance with pre-ground coffee.
- Incorrect use of the appliance by untrained personnel and/or by personnel who have not read this instruction manual.
- The use of non-original and/or non-specific spare parts for the coffee grinder-doser model in your possession.
- Use of the machine in a potentially explosive environment.
Furthermore, the user must never under any circumstances:
- Attempt to remove any foreign bodies that have accidentally fallen into the coffee supply hopper and/or into the grinding area without first disconnecting the appliance from the power supply.
- Use of the appliance with damp or wet hands.
- The introduction of liquids of any kind into the coffee supply hopper and into the grinding area.

In the event of abnormal machine behaviour, any type of necessary intervention is the responsibility of the maintenance operators.
3.3 Precautions for correct and safe use
To ensure the safety of the user and to optimally manage the appliance, it is important to satisfy a number of simple but important provisions, namely:
- Avoid incorrect use of the power cord. Use only cables or section extensions suitable for the power installed in the machine.
- Protect the cable from high temperatures, oil and sharp edges.
- Variations with respect to normal operation (increased power absorption, increased temperature, excessive vibrations, abnormal noises or alarm signals on the display) result in the expectation that operation is not correct. To prevent faults, which can directly or indirectly cause damage to persons or to the appliance, ensure the necessary maintenance or, if necessary, contact the dealer or a specialist repairer.
- Heavy appliance! Pay attention during the transportation, handling and installation phases! Refer to chapter 4 for correct handling of the appliance.
3.4 Safety devices applied to the coffee grinder

All grinder-dosers produced by Fiorenzato M.C. S.r.l. are equipped adequate mechanical and electromechanical devices designed to protect the safety of the user and the integrity/functionality of the appliance during its use.
The coffee grinder-dosers F4 EVO are equipped with the following safety devices:
- Motor thermal protector
The motor of the appliance has a thermal protector that protects it from excessive heating due to overcurrents and intervenes by interrupting the power supply of the motor following the rule of "50 sec ON" / "60 sec OFF" (every 50 seconds of continuous operation, an obligatory stop of the motor is commanded equal to 60 seconds).
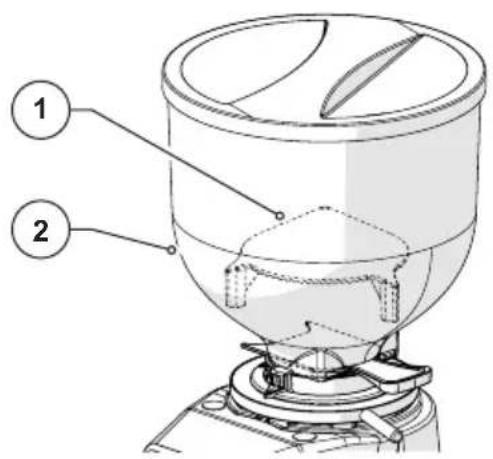
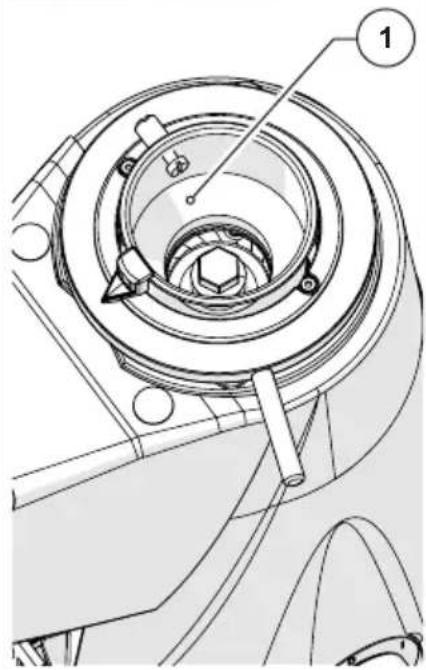
• Anti-intrusion mushroom on the coffee supply hopper (Fig. 3)
The anti-intrusion mushroom (Item 1) present inside the supply hopper (Item 2) allows the passage of coffee beans towards the grinding chamber, preventing the accidental introduction of fingers by the operator.
text_image
Technical diagram of a portable gas stove with labeled components 1 and 2Fig. 3
3.5 Residual risks
During the design Fiorenzato M.C. S.r.l. adopted all the necessary precautions to ensure use of the coffee grinder-doser in conditions of maximum safety. However, during installation, cleaning and maintenance of the appliance, there are a number of residual risks that cannot be eliminated, the effects of which can be addressed by adequately training the user according to the provisions set out in the following table.
For each residual risk, the provisions useful to limit and/or cancel the degree of the individual risks are indicated.
| Residual risk Present during: Provisions to reduce the risk | ||
 Contusion and/or crushing of the upper and lower limbs due to the weight of the device Contusion and/or crushing of the upper and lower limbs due to the weight of the device | Handling of the device for:Unpacking.Installation.Movement of the appliance for cleaning of the relative support surface. | Firmly grip the appliance before moving it.Ensure there is sufficient space to move the appliance safely without striking obstacles.Possibly use anti-slip gloves for handling of the coffee grinder-doser. |
 Electrocution Electrocution | Connecting and disconnecting the power cord. | Frequently check the condition of the power cable and replace it when it is found to be deteriorated or damaged.Make sure that the switch is in the "O" (OFF) position before connecting the power cable to the coffee grinder-doser. |
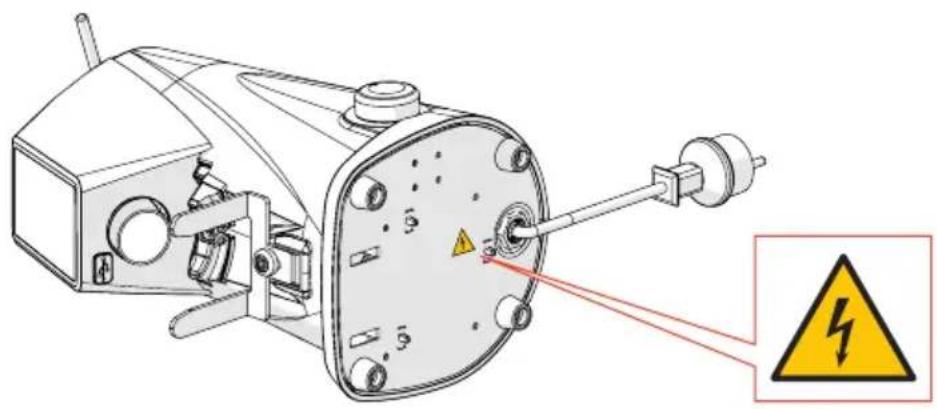
3.6 Warning labels applied to the machine
An adhesive label is applied to the bottom of the coffee grinder-doser, near the power cable (see Fig. 1) indicating the danger of electrocution. The label indicates the presence of live components inside the machine body.

ATTENTION! It is forbidden to remove the lower closing lid with the plug connected to the power socket. All electrical maintenance operations (e.g. replacement of any damaged cable) must be carried out by qualified personnel and with the appliance disconnected from the mains.
text_image
Technical diagram of a mechanical device with warning symbol and warning label in ChineseFig. 4
4 INSTALLATION

ATTENTION! Before proceeding with installation and commissioning of the appliance, read the following carefully.
4.1 Storage
In the event that the appliance is not immediately installed in the place of use and it is necessary to temporarily store it, it should be stored in a safe place that respects the following characteristics:
- the place chosen for the temporary storage of the device is a closed environment, protected from the sun and from weathering;
- the temperature of the storage place is between 5C° and 40°C, with relative humidity of between 30% and 90%;
- if the appliance must remain in storage for a long time before being installed, it is advisable to keep it in its original packaging to ensure more adequate protection.
4.2 Choice of installation point
Considering the function of the grinder-doser, it is advisable to PLACE IT near the coffee machine.
Before proceeding with installation of the device, also make sure that the installation point meets the following requirements:
- The surface intended for positioning of the appliance must be flat, well levelled and sufficiently robust to support its weight;
- The space available must be large enough to allow correct installation and easy use of the appliance;
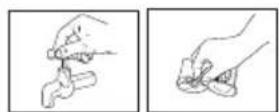
- The appliance must not be installed near sinks and/or taps that can wet it with jets and/or splashes of water;
- The place of use is sufficiently lit and well ventilated;
- A socket is provided near the installation point for the electrical connection of the appliance in compliance with the regulations in force in the country of use.

ATTENTION! The socket must be equipped with an efficient earthing system.

ATTENTION! The electrical power supply system must also be equipped with a safety magnetothermic switch placed upstream of the socket in a known position that can be easily reached by the operator in order to protect the appliance from overloads and sudden changes in voltage and the user from the risk of electrocution.
4.3 Unpacking and handling of the appliance
After opening the packaging, carefully check that the appliance is intact and that there are no damaged parts.
- Open the packaging near the installation point, ensuring there is sufficient space to handle the appliance safely.
- Remove the appliance from the packaging, gripping it firmly and safely.
- Place the coffee grinder-doser on the use surface.

ATTENTION! Pay the utmost attention when handling the appliance. Its weight (approximately 9 kg) and the particular rounded shape of the machine body can generate the risk of slipping and loss of grip with possible falling and contusion/crushing of the feet during lifting and/or of the hands when positioning the appliance on the work surface.

ATTENTION! The parts of the packaging must not be left within the reach of children as they are a source of potential danger. Keep the packaging until the warranty has expired.
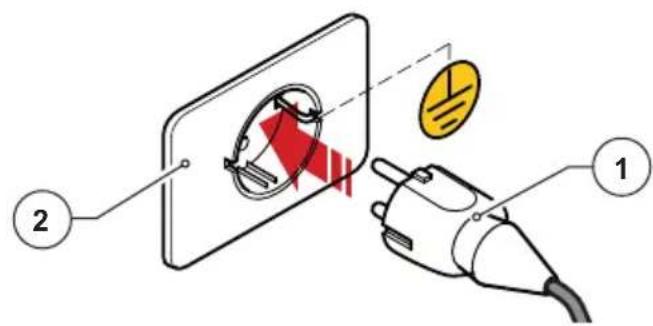
4.4 Installation and connection to the electrical network
To complete the installation and to start using your new coffee grinder-doser, simply:
- Make sure that the voltage of the electrical power system meets the required power requirements and that the electrical capacity of the system is adequate to withstand the power absorbed by the appliance (see product identification label applied on the side of the coffee grinder-doser).
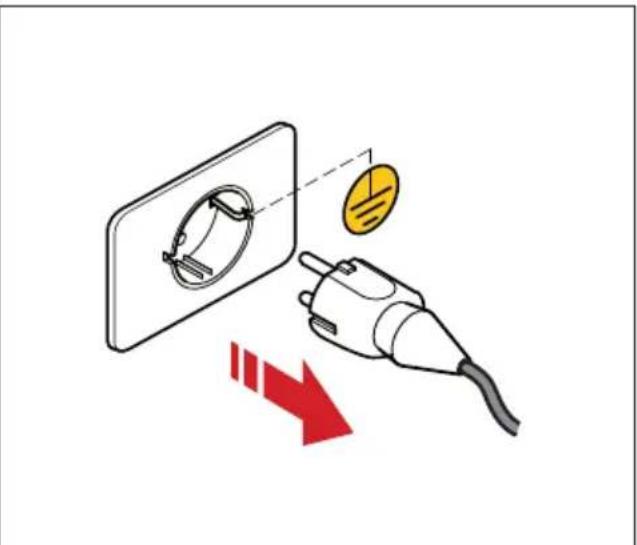
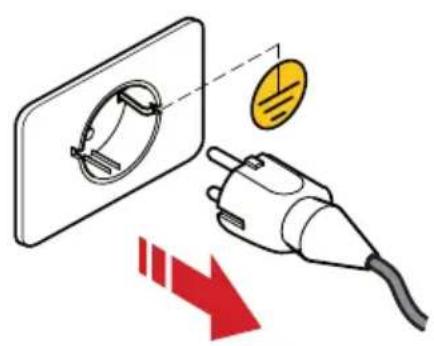
- Insert the power cable plug (Fig. 5 Item 1) into the wall socket located in the place of use (Fig. 5 Item. 2);

If it is necessary to use power adapters, multiple sockets or extensions, it is essential to use products that comply with the certification standards in force in the country of use.
text_image
Diagram illustrating the installation of an electrical plug, showing components labeled 1 and 2 with a red arrow indicating direction.Fig. 5
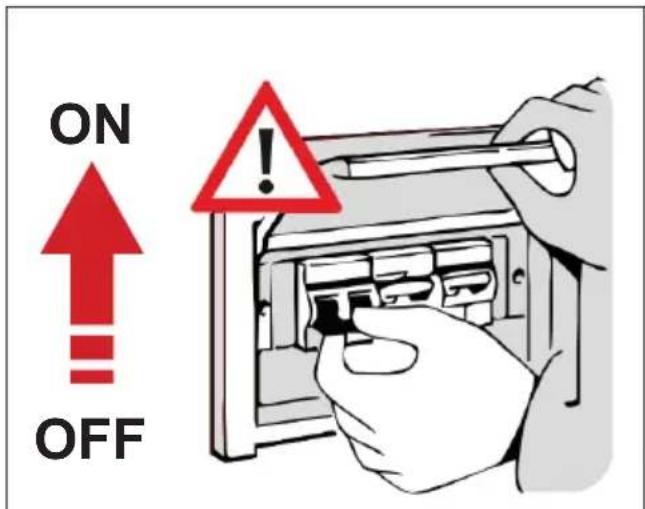
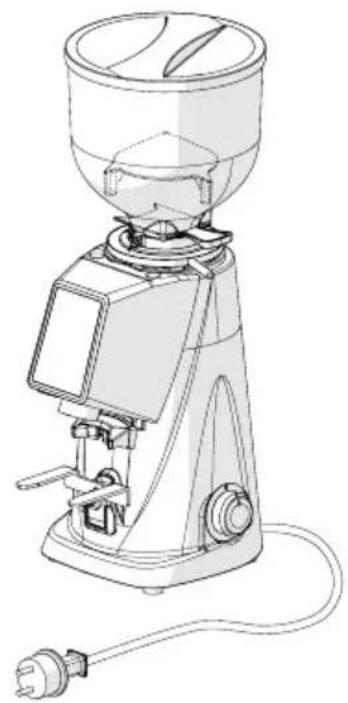
- If present, set the protection magnetothermic switch located upstream of the power socket to the "ON" position (Fig. 6).
- Turn the machine ignition switch to position "I" (Fig. 7).
text_image
ON OFFFig. 6 Fig. 7
natural_image
Technical line drawing of a coffee maker with an inset close-up view showing the mechanical component detail (no text or symbols present)At this point the coffee grinder-doser is powered and ready to be used.
5 USING THE GRINDER-DOSER
5.1 Preparation for use of the coffee grinder-doser
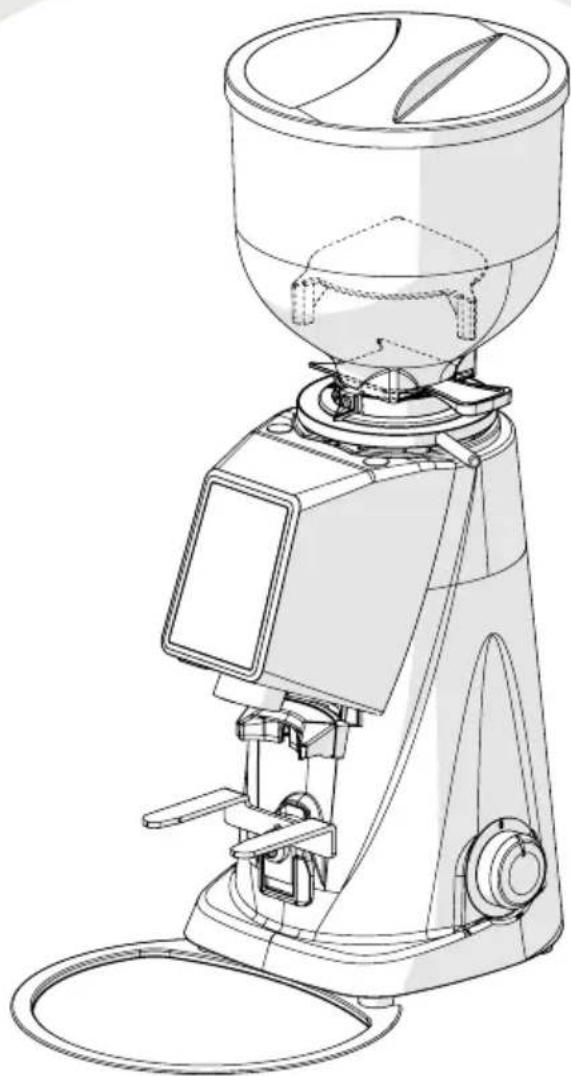
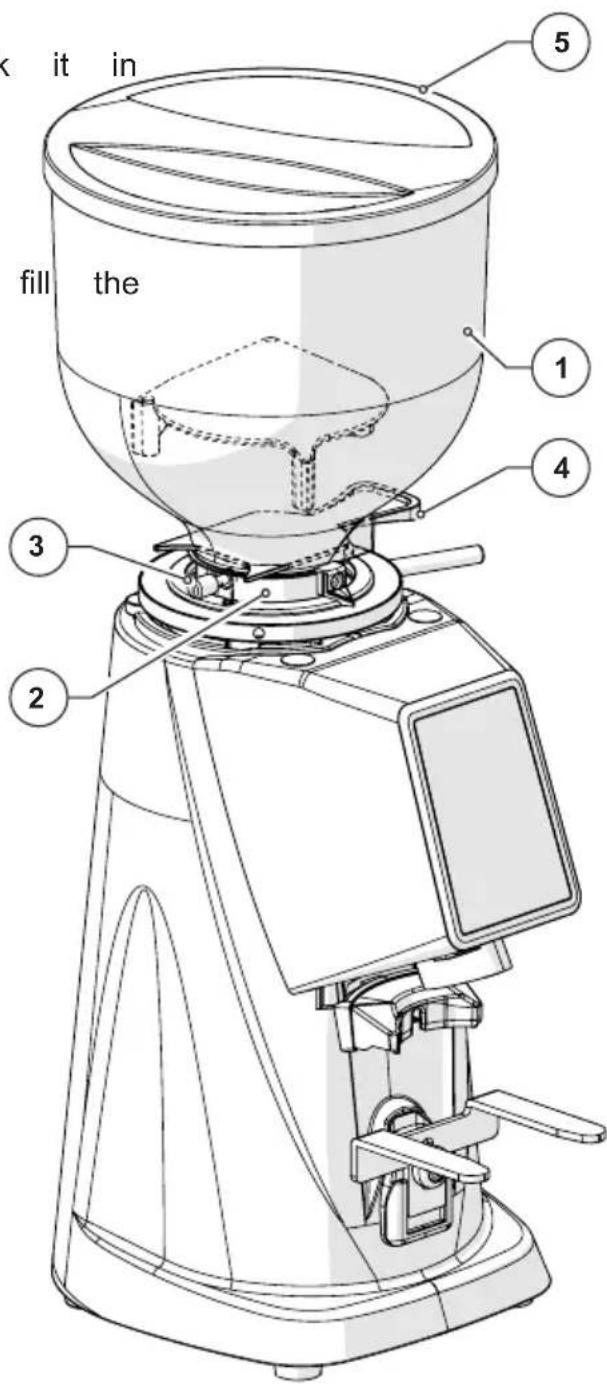
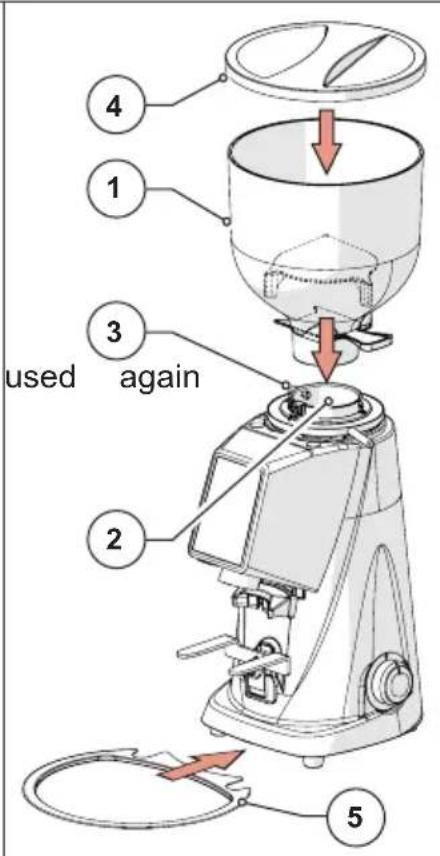
Once installation is complete, the machine is ready for use and can be loaded with coffee beans to be ground. With reference to Fig. 8, to load the coffee beans, proceed as follows:
- Fit the hopper (Item 1) on the coffee grinder-doser (Item 2) and lock the working position by tightening the relative fixing screw (Item 3).
• Make sure that the shutter (Item 4) is completely closed. - Remove the lid (Item 5) and hopper with the roasted coffee beans to be ground.
- Close the hopper with the relative lid (Item 5).
- Gradually open the shutter (Item 4) to allow the flow of coffee beans into the grinding chamber.
- At this point the coffee grinder-doser is loaded and ready to be started for work.
text_image
kit in fill the 1 2 3 4 5Fig. 8
5.2 Machine controls
The F4 EVO coffee grinder-dosers are managed through the on/off switch (see paragraph 5.2.1) and an operator panel with TOUCH type display from where it is possible to select and set all the various operating functions of the appliance (see paragraph 5.2.2). All information on the operating status of the appliance, the working parameters and the commands that can be issued are displayed on the display on the front of the machine.
All the control and management devices provided on the F4 EVO coffee grinder-dosers are described below.
5.2.1 Switch
It is used to turn the appliance on and off.
- Turned to position "O": appliance off (power supply disconnected).
- Turned to position "I": device on (electrically powered).

natural_image
Technical line drawing of a mechanical presser with an inset close-up showing the internal components (no text or symbols)5.2.2 Operator panel
Use of the management software adopted by Fiorenzato for its coffee grinder-dosers is highly intuitive and this user guide will allow you to quickly familiarise yourself with the function keys and the various settings of your new device. The panel is of the touch-screen type, which means that function commands, menu navigation an preferences and operating parameter settings are carried out using a simple tap on the touch sensitive areas on the display.
5.3 Operator panel on F4 EVO
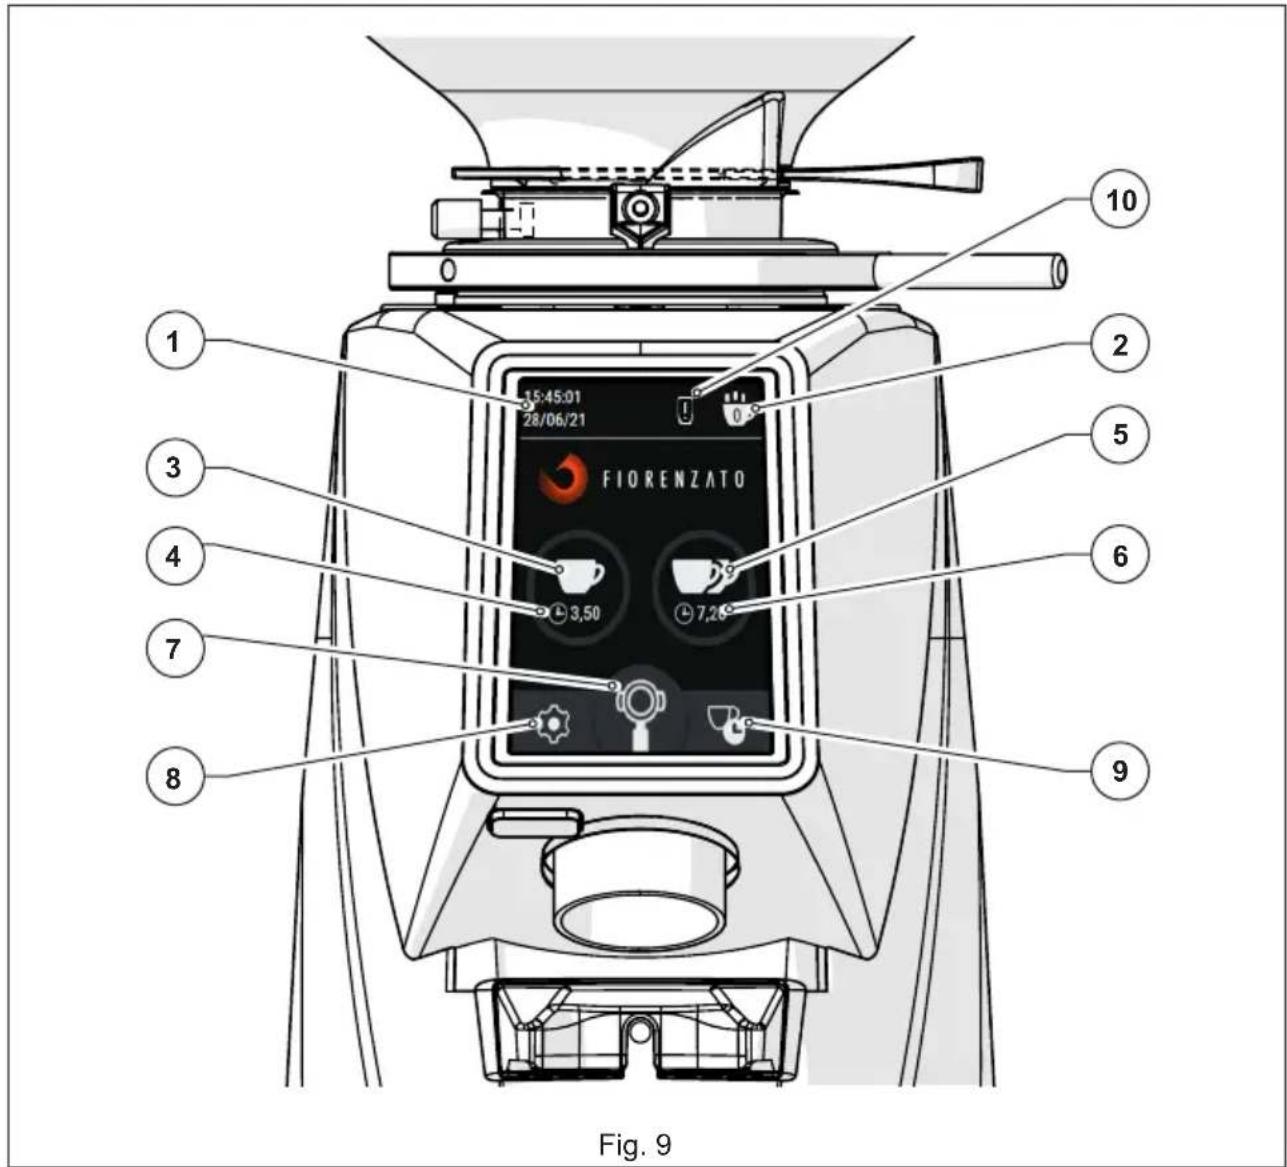
When the F4 EVO coffee grinder-doser is switched on, the HOME page is displayed on the control panel display with all the function keys necessary for use and management of the appliance. The HOME page can be customised using the “Settings menu”, and the image shown in the figure may differ from the screen that is actually displayed on your appliance when it is first switched on.
All the functions accessible using the “Settings menu” are described in sections that follow.
text_image
1 2 3 4 5 6 7 8 9 10 FIORENZATO 15:45:01 28/06/21 3,50 7,20 Fig. 9With reference to Fig. 9, the display fields and function keys on the HOME page are:
| Description | |
| 1 | Display field for current date and time. The data can be set by accessing the “Date” and “Time” screens from the settings menu (§ 5.3.1.9 and § 5.3.1.10). |
| 2 | “Statistics” key. Controls opening of the window with a count of the number of doses dispensed on the current day and week and the total number of doses dispensed since the grinder-doser was first used. To close window, simply press the “Statistics” function key a second time. The “Statistics” key is only displayed if the “Display statistics” function has been enabled in the settings menu (§ 5.3.1.4). |
| 3 | Single Dose Dispense Key. When pulse pressed, it starts dispensing a single dose of coffee according to the times set in the "Change dose times" screen (§ 5.3.1.1). |
| 4 | Display field for grinding time set for single dose only. |
| 5 | Double Dose Dispense Key. When pulse pressed, it starts dispensing a double dose of coffee according to the times set in the "Change dose times" screen (§ 5.3.1.1). |
| 6 | Display field for grinding time set for double dose only. |
| 7 | Manual Grinding Key. Hold-to-run control to dispense coffee in manual mode. Coffee grinding starts when the key is pressed and continues until it is released. Note: The maximum time permitted for manual grinding is 25 seconds, after which the coffee grinder-doser stops automatically. |
| 8 | Settings Menu Key. It is used to access the settings menu (§ 5.3.1) through which it is possible to change the settings of the device. |
| 9 | Shortcut key to access the “Change dose times” page. Grants direct access to the page to set dose times (§ 5.3.1.1) without having to use the “Settings menu” (§ 5.3.1) |
| 10 | Warning icon. It only appears after the time set by Fiorenzato has elapsed to signal the need to replace the grinders (§ 6.1.5). |
the "Statis
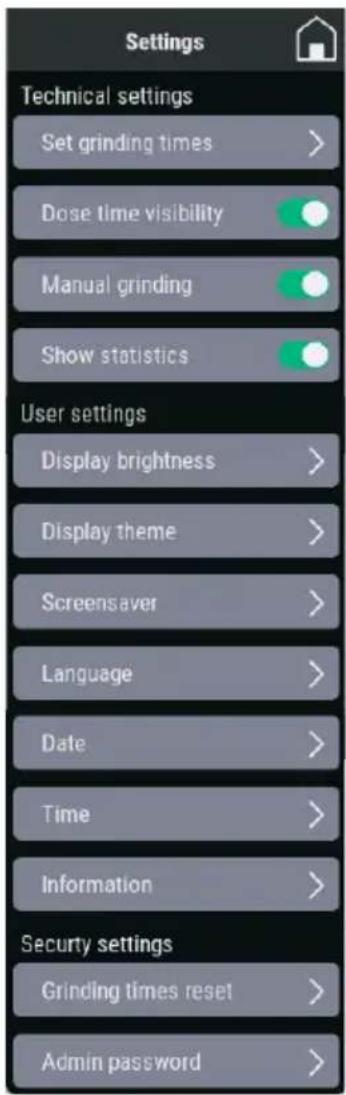
5.3.1 Settings Menu
Through the "Settings menu" it will be possible to set all the operating parameters of your F4 EVO coffee grinder-doser.
To access the settings menu, press the function key that is always visible in the lower left-hand corner of the display (see Fig. 9 Item 8). Once the command has been given, the display will load the menu which can be used to select the parameter to be modified and/or the function to be enabled/disabled by simply scrolling down the list of options until the item has been identified. The Settings menu contains the following items:
Technical Settings
• Change Dose Times (§ 5.3.1.1)
• Dose Times Visibility (§ 5.3.1.2)
• Manual grinding (§ 5.3.1.3)
• Display statistics (§ 5.3.1.4)
User Settings
• Screen brightness (§ 5.3.1.5)
• Screen appearance (§ 5.3.1.6)
- Screensaver (§ 5.3.1.7)
• Language (§ 5.3.1.8)
- Date (§ 5.3.1.9)
• Time (§ 5.3.1.10)
• Information (§ 5.3.1.11)
Safety Settings
- Reset dose times (§ 5.3.1.12)
- Admin Password (§ 5.3.1.13)
text_image
Settings Technical settings Set grinding times > Dose time visibility > Manual grinding > Show statistics > User settings Display brightness > Display theme > Screensaver > Language > Date > Time > Information > Security settings Grinding times reset > Admin password >Some items in the menu only allow the specific function to be enabled (ON) or disabled (OFF) using the “○” selector, while other items, identifiable using the “>” symbol, grant access to a dedicated sub-page to set/edit the parameter. Pressing the function key “(always visible in the top right-hand corner on the menu screen) exits the menu and returns to the HOME page. Individual items in the settings menu are described below.
5.3.1.1 Change Dose Times
Pressing the item "Change Dose Times" from the "Technical Settings" menu access the pages for setting of the grinding time for the single dose and the double dose.
Note: to move from the grinding time setting page for the single dose to the grinding time setting page for the double dose (and vice-versa) simply scroll horizontally the displayed screen.
Use the function keys + or to increase or decrease the delivery times
Saving of the modified parameters takes place automatically when the page is exited.

text_image
Set grinding times Single dose 4, 5 0 + + + - - Set grinding times Double dose 8, 8 0 + + + - - - -Dose Times Setting
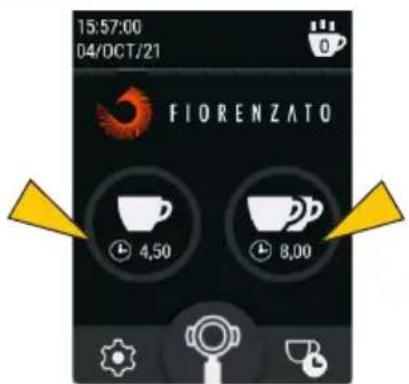
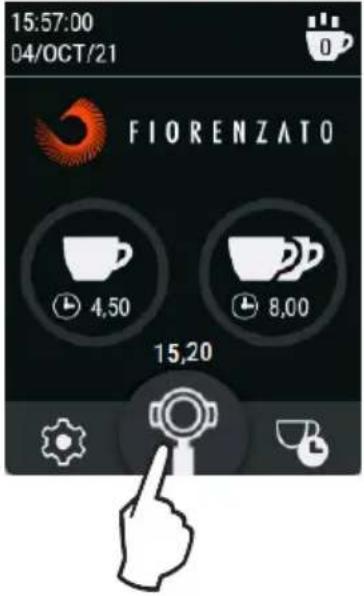
5.3.1.2 Dose Times Visibility
When “Grinding time visibility” in the “Technical settings” menu is enabled (☐), the times set for the different doses are displayed on the HOME screen.
During dispensing, the icon of the key relating to the selected dose begins to flash and to gradually turn red until it is completely filled, thus displaying the progress of the grinding phase in progress. In the case of manual grinding, the time is displayed to increase up to a maximum delivery of 25 seconds, after which the grinding is automatically stopped.
If the "Dose Times Visibility" option is disabled ( ). The dose dispensing times are not displayed on the HOME screen.
text_image
15:57:00 04/OCT/21 FIORENZATO 4,50 8,00Visible dose times

text_image
15:57:00 04/OCT/21 FIORENZATODose times not visible
5.3.1.3 Manual Grinding
Enables ( ) or disables ( ) manual grinding mode.
When manual grinding (Fig. 9 Item 7) is disabled, the respective function key cannot be selected and is greyed out.

text_image
15:57:00 04/OCT/21 FIORENZATO 4,50 8,00Manual grinding disabled
5.3.1.4 Display Statistics
Enables ( ) or disables ( ) display of the "Statistics" function key on the HOME screen (see Fig. 9 Item 2).
Pressing the statistics key loads the summary window of the total doses dispensed on the day, in the current week and the total doses from the time the device was first started. To close the window it is necessary to press the Statistics key again".
Note: The dispensed dose count is incremented and saved in memory even if the "Display statistics" option is disabled.

text_image
15:57:00 04/OCT/21 FIOR TO 4,50 8,00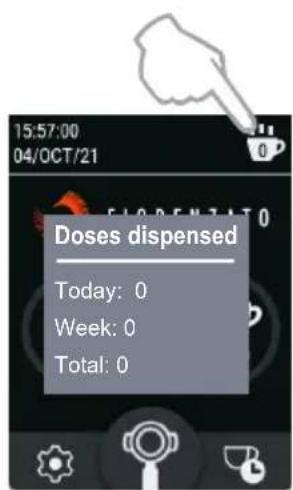
text_image
15:57:00 04/OCT/21 Doses dispensed Today: 0 Week: 0 Total: 0"Statistics" enabled key and "Dispensed doses" window
5.3.1.5 Screen Brightness
Selecting the item "Screen brightness" grants access to the screen shown in the figure, which can be used to increase or decrease the brightness of the screen by simply moving the adjustment cursor to the right (increase) or left (decrease).

text_image
Display brightness 78 %Brightness Adjustment
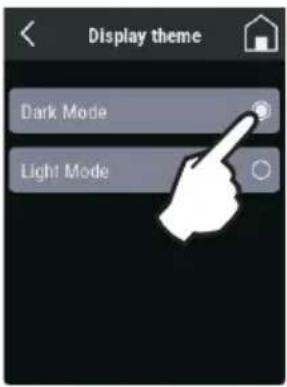
5.3.1.6 Screen Appearance
Selecting the item "Screen appearance", grants access to the screen shown in the figure, which can be used to choose whether to display screens in "Black" (Dark mode) or "White" (Light mode).
text_image
Display theme Dark Mode Light ModeThe different modes in which the screens are displayed does not affect other options and/or the various parameters that can be set.

text_image
15:57:00 04/OCT/21 FIORENZATO 4,50 8,00HOME in "Black" mode

text_image
15:57:00 04/OCT/21 FIORENZATO 4.50 8.00HOME in "White" mode
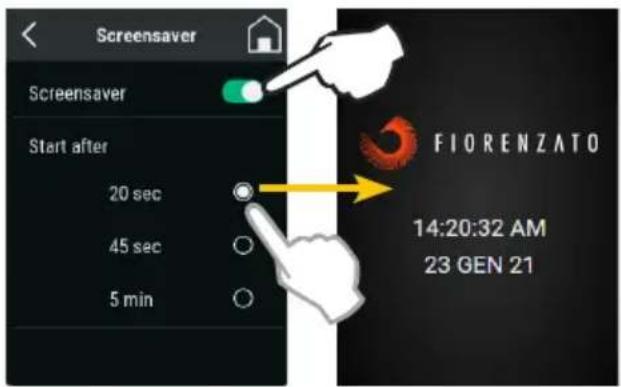
5.3.1.7 Screensaver
Selecting "Screensaver" grants access to the screen shown in the figure, which can be used to enable ( ) or disable ( ) the function and select the idle time before it starts.
The screensaver idle time can be set for 20", 45" or 5 minutes of inactivity.
When enabled, the display enters energy saving mode after the selected time has elapsed and displays only the manufacturer's logo and the current date and time.
To exit screensaver mode, simply touch the display.
text_image
Screensaver Start after 20 sec 45 sec 5 min Fiorenzato 14:20:32 AM 23 GEN 21Screensaver setting and
Screensaver screen activated after 20 seconds of non-use of the coffee grinder-doser
5.3.1.8 Language
Select "Language" to grant access to the screen to change the panel display language. Once a language has been selected, all menus and function keys will be displayed in that language.
The available languages are:
- Italian
- English
- Español
- Deutsch
-한국인(Korean) - Français
- Ελληνικά (Greek)
• Hrvatski (Croatian)
• يېرع (Arabic) - Português
• Русский (Russian) - 中文 (Chinese)

text_image
Language Italiano English Español Deutsch 한국인Select language
5.3.1.9 Date
The "Date" item is used to load the page for setting of the current date.
To adjust the date (day / month / year) simply act appropriately (single tap or
hold down) on the function keys or -
Note: The adjustment is saved in the memory in real time. Therefore, once the menu has been exited, the HOME page will display the set date.

text_image
Date D M Y 04 OCT 21 + + + - - -Date Adjustment
5.3.1.10 Time
The "Time" item is used to load the current time setting page.
By means of the two selectors ( ) the time can be set to 24 or 12 hours and, in the case of 12 hours, the time bands "AM" or "PM" must be specified to allow the system to update the date correctly at midnight.
To adjust the time (hours and minutes) simply act appropriately (single taps or hold down) on the function keys + or -.
Note: The adjustment is saved in the memory in real time. Therefore, once the menu has been exited, the HOME page will display the correct time.

text_image
Time 24h 12h AM PM 15 : 57 + + - -Time Adjustment
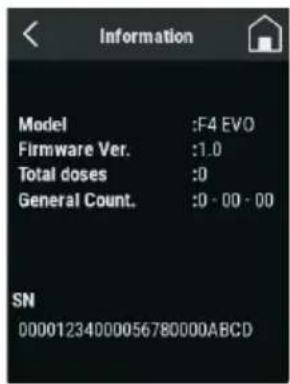
5.3.1.11 Information
Selecting "Information" using the settings menu takes you to the page shown in the figure where you can find the information:
- The model of the coffee grinder-doser;
- The version of the firmware installed on the panel;
- The total number of doses dispensed since the device was first sioned.
- The general counter indicating the total operating time of the appliance in the dispensing phase.
- The serial number of the panel installed on the appliance.
following
text_image
Information Model :F4 EVO Firmware Ver. :1.0 Total doses :0 General Count. :0 - 00 - 00 SN 00001234000056780000ABCD"Information" page
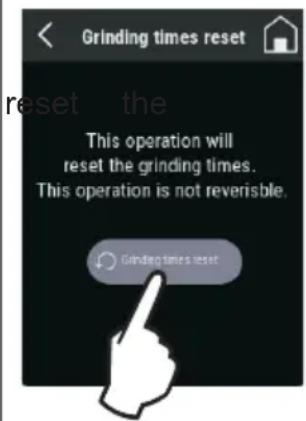
5.3.1.12 Reset Dose Times
The “Reset dose times” item grants access to the reset page illustrated in the figure, which can be used to dose times customised by the user, and restore the factory default parameters set by the manufacturer.
Caution: The “Reset dose times” command is irreversible and results in the loss of the user’s customised dose times. To prevent the accidental loss of set times, the system will request the user to confirm the action by pressing the “YES” key before restoring the factory default times.
Returning to the menu [◀] or loading the HOME page [◀] without confirming the Reset will retain the customised times in the memory.
text_image
Grinding times reset reset the This operation will reset the grinding times. This operation is not reversible. Grinding times reset
text_image
Grinding times reset Are you sure you want to reset the dose times? This operation is NOT reversible SI NOReset dose times
5.3.1.13 Admin Password
Pressing the “Admin Password” item in the “Settings menu”) loads the authentication page illustrated in the figure. This page allows only authorised technicians to access the reserved pages that contain a number of settings and functions to initialise the device.
Note: The numerical authentication password is not provided to the end user but only to the manufacturer's specialist technicians and authorised dealers.
(final

text_image
Admin password Tpye password: 0 1 2 3 4 5 6 7 8 9 DEL.Authentication for access to password-protected pages
5.3.2 Dose dispensing (single / double / continuous) on F4 EVO
To dispense a single or double dose of coffee, simply press the key corresponding to the desired dose. Pulse pressing of the key will start dispensing for the time set in the "Change Dose Times" paragraph (see paragraph 5.3.1.1). During dispensing, the icon of the pressed key starts flashing and progressively colours red until it is completely filled, thus displaying the progress of the grinding phase in progress.
Pressing the STOP "STOP" key commands the immediate cancellation of the dose being dispensed and return to the HOME screen awaiting new commands.
By pressing and holding the key 📋 with the appliance stopped and waiting for commands, continuous grinding is started and the display shows the progressive chrono of the actual dispensing (the maximum continuous delivery time is 25 seconds). Releasing the key 📋 uses the device to stop immediately.
Below is a graphic example of double dose dispensing. The illustrated sequence is also valid for the dispensing of a single dose.
| Device Waiting for command. | Pulse pressing: Double dose dispensing starts until the set dispensing time is reached (or until the key is pressed). | Pulse pressing of the keySTOP: Immediate stopping and cancellation of the dose in progress with return to the HOME screen waiting for a new command. |
 |  |  |
Graphic example of continuous dispensing:
| Appliance awaiting command P | Press and hold the functionkeyContinuousdispensing start for a maximum time of 25 seconds, after which dispensing is automatically stopped. | Releasing of the function key: Immediate stopping of continuous dispensing and return to the HOME page waiting for a new command. |
 |  |  |
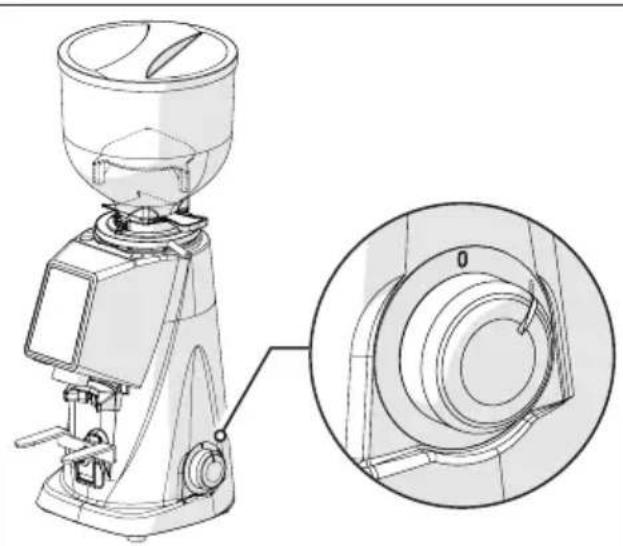
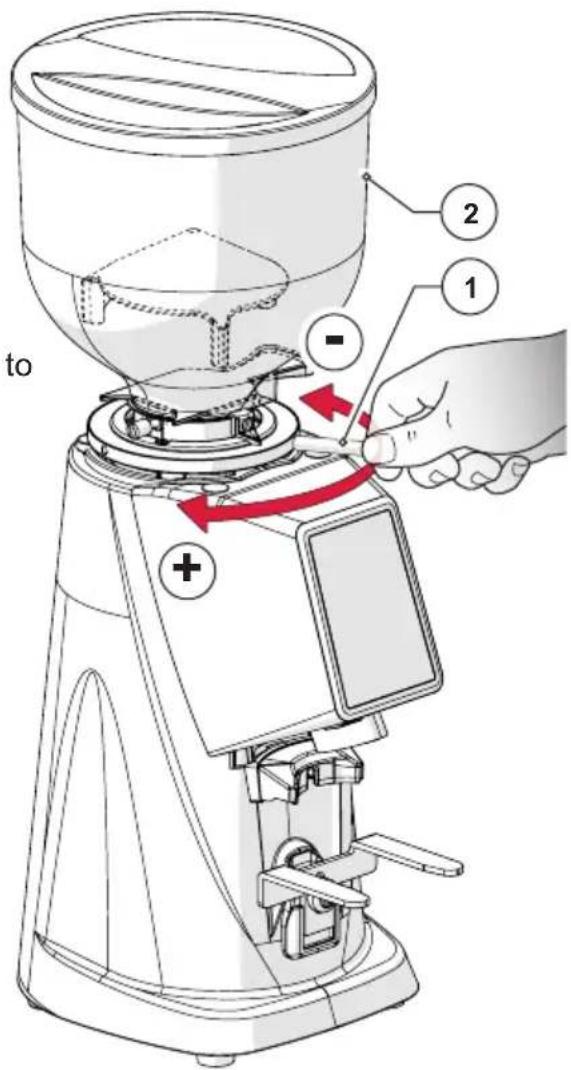
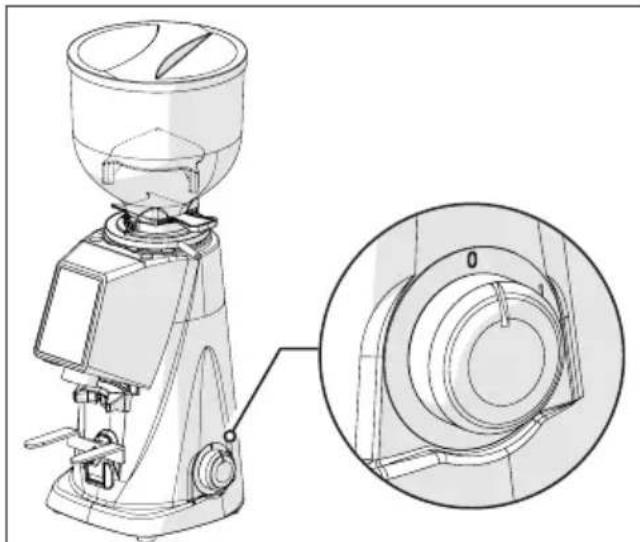
5.4 Grinding size adjustment
To change the degree of grinding of the coffee it is necessary to use the adjustment ring (Item 1) located under the hopper (Item 2).
- Turn the ring nut clockwise to grind coarser.
- Turn the ring nut anti-clockwise grind finer.
The adjustment must be made with the motor running. It is advisable to grind small quantities of coffee for a visual assessment of the degree of grinding.
text_image
to 1 2 -6 GRINDER-DOSER MAINTENANCE
6.1 Ordinary maintenance

ATTENTION! Before performing any ordinary maintenance on the coffee grinder-doser, disconnect it from the power supply by turning the switch (Fig. 10) to the "O" (OFF) position and disconnect the power plug from its socket (Fig. 11).
natural_image
Technical line drawing of a coffee maker with an inset close-up showing the internal components (no text or symbols)Fig. 10 Fig. 11

text_image
Diagram illustrating the installation of a plug into a socket, with a red arrow indicating downward motion.All routine maintenance interventions on your appliance are summarised in the following table.
Fiorenzato M.C. S.r.l. advises its customers to strictly follow the indicated interventions, carrying them out in the times and in the manner described.
| ORDINARY MAINTENANCE INTERVENTIONS | |||
| Frequency Type of Intervention | Executor Para. | ||
| Every end of shift Precise equipment cleaning User 6.1.1 | |||
| Every end of shift Supply cable status check User 6.1.2 | |||
| Monthly Final cleaning of grinders User 6.1.3 | |||
| Whenever necessary | Put the coffee grinder-doser into rest mode | User 6.1.4 | |
| At the set deadline (indicated on the display by the appearance of the icon “☐). | Replacing the grinders | Qualified operator or specialist technician | 6.1.5 |
6.1.1 Cleaning the equipment
AT EACH END OF SHIFT: perform thorough cleaning of the appliance.
- Close the shutter (Item 1), loosen the fixing screw (Item 2) and remove the hopper (Item 3) from the appliance.
- Remove the lid (Item 4) from the hopper and empty out all the coffee beans contained inside. It is advisable to pour the coffee back into the bag of origin and to close it hermetically to preserve its aroma.
- Clean the internal and external surfaces of the hopper using hot water and a neutral PH non-per-fumed detergent and degreaser suitable for the food sector. Do not use abrasive sponges and/or aggressive detergents that could damage the surfaces of the hopper.
- Dry the washed parts thoroughly using a soft, dry cloth.

ATTENTION! The hopper cannot be washed in the dishwasher.
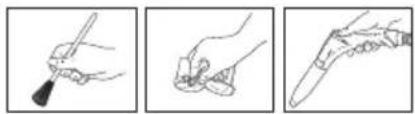
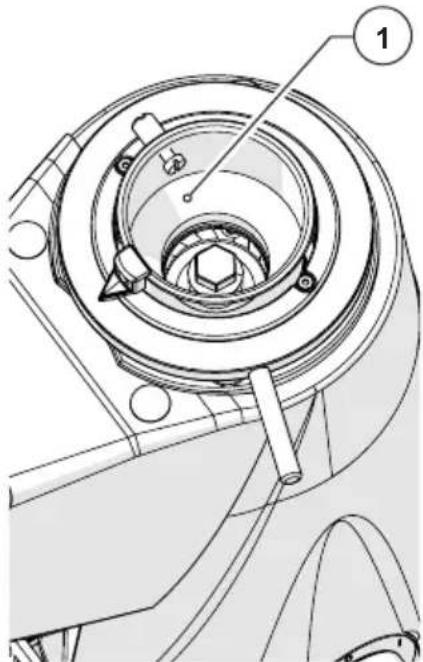
- With a brush with soft bristles (clean and sanitised) and a vacuum cleaner, remove the beans and coffee powder residues from the grinding chamber (Item 1).

ATTENTION! Do not use water and/or detergents to clean the grinding chamber and the grinders.

natural_image
Three-step line drawings showing a hand holding a pen, applying adhesive to a tool, and finally adjusting the pen tip (no text or symbols present)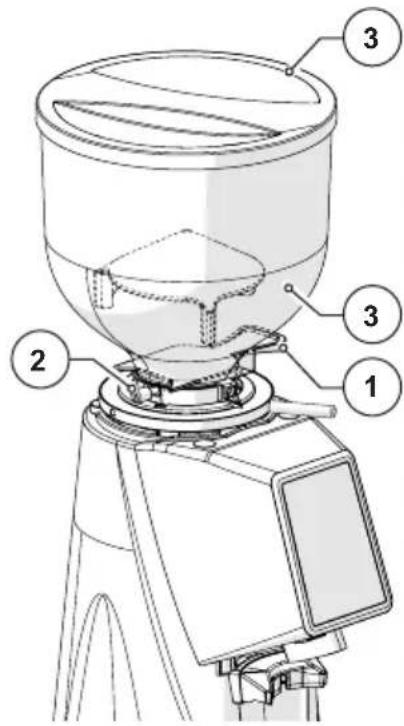
text_image
Technical diagram of a mechanical device with numbered components labeled 1, 2, and 3.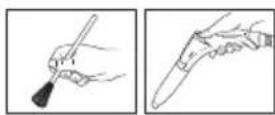

natural_image
Technical line drawing of a mechanical component with no visible text or symbols- With a toothbrush or a soft bristle brush (clean and sanitised) clean the inside of the coffee outlet pipe (Item 1).

ATTENTION! Do not use water and/or detergents to clean the coffee outlet pipe.
natural_image
Three-step line drawings showing a hand holding a pen, applying adhesive to a tool, and adjusting the tip of a knife (no text or symbols present)
natural_image
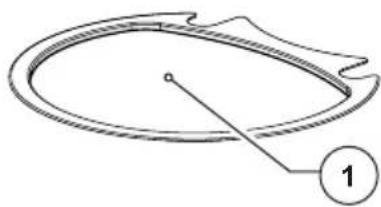
Technical line drawing of a mechanical device with labeled component (1), no readable text or symbols present.- Wash the coffee drip tray (Item 1) with hot water and a non-perfumed detergent and degreaser with a neutral PH and specific for the food sector.
- Dry with a soft cloth.
natural_image
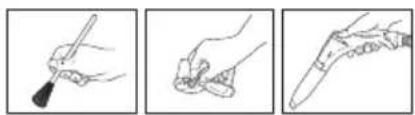
Simple line drawing of a circular object with a pointer and label '1' (no text or symbols on the object itself)- The external cleaning of the machine body must be performed using soft cloths and products suitable for the food sector.

ATTENTION! Do not use abrasive sponges and/or aggressive products that can damage the external surfaces of the machine.
natural_image
Three-step line drawings showing a hand holding a pen, applying paint to a small object, and adjusting a pen tip (no text or symbols)
ATTENTION! It is forbidden to use jets of water or steam to clean the machine body.
natural_image
Technical line drawing of a mechanical device with no visible text or symbols• After cleaning, reassemble the hopper (Item 1) on the grinding chamber (Item 2) and lock it with the relative fixing screw (Item 3).
- Close the hopper with the relative lid (Item 4).
- Position the coffee drip tray (Item 5) at the base of the coffee grinder-doser.
The coffee grinder-doser is ready to be after being electrically powered and filled with coffee beans.
text_image
4 1 3 used again 2 56.1.2 Supply cable status check
AT EACH END OF SHIFT: check the power cable.
- With the cable disconnected from the power socket, check visually and by touch that the protective sheath is intact, that the wires are not exposed and that the plug is not damaged.

ATTENTION! If damage is found to the power supply cable, replace it with one of the same characteristics.
natural_image
Line drawing of a coffee maker with handle and control panel (no text or symbols)6.1.3 Thorough cleaning of the grinders
EVERY MONTH: perform thorough cleaning of the grinders
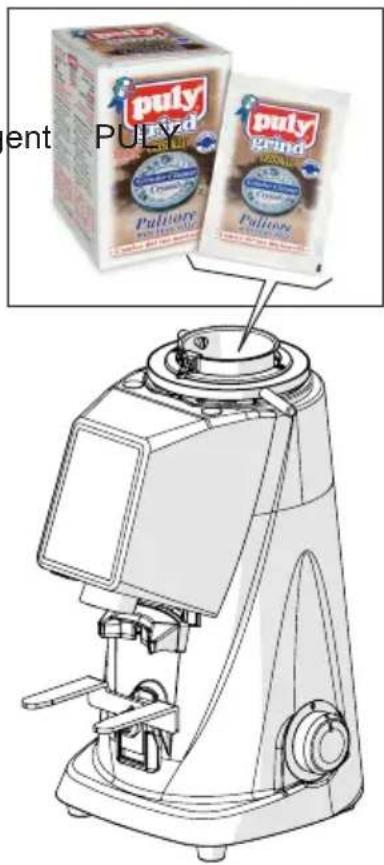
Thorough cleaning of the grinders must be carried out once a month (or when necessary) using specific products for cleaning of the grinder-dosers that are readily available on the market (e.g. the dete GRIND for coffee grinders).
- Thorough cleaning must be performed at the end of shift cleaning, with the machine without coffee and without the supply hopper.
- Cleaning of the grinders is performed by pouring a dose of product into the (completely empty) grinding chamber and starting grinding. During grinding, the product (in grains or crystals) regenerates the grinders, completely removing any coffee deposits, encrustations, moulds and fatty deposits from their surfaces, absorbing the oil and destroying any ran-cid part without leaving residues.
- In this way, regeneration takes place without the need to disassemble the grinders and without having to change the set grinding position.
text_image
PULY PULY PULY PULY PULY PULY PULY PULY PULY PULY PULY PULY PULY PULY PULY PULY PULY PULY PULY PULY PULY PULY PULY PULY PULY PULY6.1.4 Resting the coffee grinder-doser
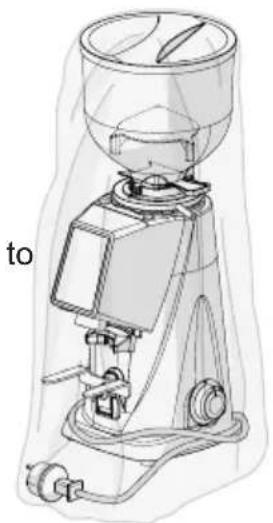
If the machine is not used for long periods (e.g. holidays, annual leave, etc.), it is advisable to carry out the following cleaning operations to keep it in good condition and to avoid possible problems upon subsequent restart.
WHEN NECESSARY: cleaning and putting the machine in rest mode.
- Carefully clean the coffee grinder-doser as reported in Para. 6.1.1.
- Thoroughly clean the grinders as reported in Para. 6.1.3.
- Unplug the power cord from the power outlet.
- Cover the coffee grinder-doser with a cloth protect it from dust and dirt.
natural_image
Technical line drawing of a coffee maker with no visible text or symbols6.1.5 Replacing the grinders
The scheduled deadline for the replacement of the grinders is set by Fiorenzato M.C. S.r.l. according to the type of grinders and the model of coffee grinder-doser.
At the expiry of the effective time of use set, the warning icon “ 🔍 appears on the display, indicating the need to replace them.

ATTENTION! Replacement of the grinders must be carried out by a qualified operator or entrusted to specialist technicians using original spare parts.
6.2 Extraordinary maintenance
There are no scheduled extraordinary maintenance operations for the coffee grinder-doser. However, if there are any breakages and/or malfunctions not covered in this section “7 ANOMALIES - CAUSES - REMEDIES”, do not intervene on the appliance on your own initiative but inform your local dealer who will contact the after-sales service Fiorenzato M.C. S.r.l. to resolve the problem.
7 ANOMALIES - CAUSES - REMEDIES
The table shows the possible anomalies that can cause the coffee gri malfunction and/or not to work properly. For each anomaly, the possible cause that generated it and the actions to be taken to restore correct functioning of the appliance are indicated.
| Anomaly Cause Solution | ||
| The coffee grind-er-doser does not turn on. | No electric power. • Make sure that the switch is in the "I" (ON) position;• Make sure that the circuit breaker upstream of the socket (if present) is in the ON position.• Make sure that the power ca-ble is undamaged and correct-ly connected to the electrical socket envisaged in the place of use. | |
| Coffee beans do not descend from the supply hopper. | Shutter closed. • Open the shutter. | |
| When turned on, the system loses the data of the pre-vious settings. | Machine management system spare battery flat. | • Contact the after-sales service to replace the spare battery. |
| The “ [IMAGE] ” icon appears on the display as an Alert message signalling the need to replace the grinders | The grinders are reaching the limit of working hours set by the manufacturer and it will therefore be necessary to plan for their replacement. | • It is possible to continue to use the coffee grinder-doser ur the set time limit is reached. When the limit is reached, to ensure maximum efficiency the machine, it is necessary to replace the grinders following the instructions provided in the paragraph 6.1.5.• After replacement, the special-ist technician resets the working time counter of the grinders. |
| The motor stops during grinding. | Motor protection thermal cut-out intervention due to blocking of the grinding system in the presence of objects or foreign bodies between the grinders. | Turn off the appliance and wait for it to cool completely.Disconnect the appliance from the power supply.Close the shutter and remove the supply hopper.Clean the grinding chamber and remove any foreign bodies.Reassemble the appliance and start a grinding cycle. |
| During continuous grinding the motor stops. | The time limit set for a single continuous grinding cycle has been reached. | Normally start the new desired dispensing (single, double or continuous).If the coffee grinder-doser does not start immediately, wait 60 seconds to allow the motor to cool as the appliance is set to be able to operate continuously for 50 seconds before imposing a forced stop of the motor for 60 seconds. |

ATTENTION! If the anomaly persists even after carrying out the suggested corrective actions, or if functional anomalies occur that are not listed in the table, contact your local dealer who will decide whether to request the assistance service of Fiorenzato M.C. S.r.l. or to entrust the repair or overhaul of the appliance to a specialist technician.
8 REQUESTING SPARE PARTS
If it is necessary to replace worn parts of the coffee grinder-doser (e.g. grinders), the end user (e.g. barista / restaurateur, etc.) must necessarily contact their local distributor as a direct intermediary with Fiorenzato M.C. S.r.l. and communicate the model of the coffee grinder-doser in their possession for the identification, request and procurement of original spare parts. Only authorised area distributors will then be granted the opportunity to register on our website to order the necessary spare part.
In order to request spare parts, local distributors must:
- Access the website www.fiorenzato.com, enter the section dedicated to spare parts and select the coffee grinder model indicated by the end user.
- Access the reserved area by entering your details in the appropriate form (upon the first access, registration is required by entering your identification data).
- Select the necessary spare parts using the exploded tables of the product present in the portal.
- Follow the wizard to complete the order and send it to Fiorenzato M.C. S.r.l. .
- The local distributor will be contacted by the personnel of Fiorenzato M.C. S.r.l. who will oversee the request.

ATTENTION! Remember that the interventions to replace the grinders and in general all the internal parts of the grinder-doser must be carried out by specialist technical personnel.

ATTENTION! Fiorenzato M.C. S.r.l. is not responsible for any injury to persons and/or damage to the appliance caused by the replacement of components with non-original spare parts and performed by unqualified personnel.
9 DISPOSAL

ATTENTION! Different laws are in force in the various countries regarding the disposal of electrical and electronic products and therefore the requirements imposed by the specific laws and by the bodies responsible for disposal must be observed.
- If the identification label affixed to the appliance shows the symbol of the crossed-out bin shown in the figure, it means that the product is classified, according to the regulations in force, as electrical or electronic equipment and complies with the EU Directive 2002/96/EC (WEEE) and therefore, at the end of its useful life, it must necessarily be treated separately from household waste.
- The appliance must therefore be delivered free of charge to a separate collection centre for electrical and electronic equipment or returned to your dealer when purchasing a new equivalent appliance.
- The user is responsible for taking the appliance at the end of its life to the appropriate collection facilities, otherwise incurring the penalties provided for by the current waste legislation. Adequate separate collection for future use of the equipment assigned for recycling, treatment and environmentally compatible disposal helps to prevent possible negative effects on the environment and on human health and promotes recycling of the materials that compose the product. For more detailed information regarding the collection systems available, contact the local waste disposal service or the store where the purchase was made. Manufacturers and importers must comply with their responsibility for environmentally compatible recycling, treatment and disposal either directly or by participating in a collective scheme.
natural_image
Symbol of a trash bin crossed with diagonal lines, no text or numbers present
FIORENZATO
natural_image
Line drawing of a mechanical grinding machine (no text or symbols present)1 INFORMATIONS GÉNÉRALES 5
text_image
Technical diagram of a coffee maker with labeled parts A, B, and HFig. 2 - Dimensions
| Modèle F4 EVO | |
| Dimensions [A x B x H mm] 180 x 237 x 478 | |
| Poids [kg] 9 | |
text_image
Technical diagram of a portable air vent with labeled components 1 and 2Fig. 3
text_image
Technical diagram of a mechanical device with warning symbol and warning label in ChineseFig. 4
4 INSTALLATION

text_image
Diagram illustrating the installation of an electrical plug, showing components labeled 1 and 2 with a red arrow indicating direction.Fig. 5
natural_image
Technical line drawing of a mechanical presser with an inset close-up view showing internal components (no text or symbols)natural_image
Technical line drawing of a coffee maker with an inset close-up view showing internal components (no text or labels)text_image
15:57:00 04/OCT/21 FIORATO 9,50 7,20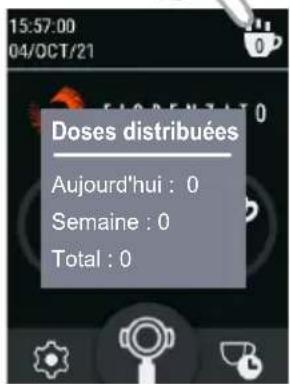
text_image
Date J M A 04 OCT 21 + + + - - -Réglage de la Date
5.3.1.10 Heure
text_image
Technical diagram of a coffee maker with labeled parts and red directional arrows indicating process flow6 ENTRETIEN MOULIN-DOSEUR
6.1 Entretien courant

natural_image
Technical line drawing of a coffee maker with an inset close-up showing the internal components (no text or symbols)Fig. 10 Fig. 11

text_image
Diagram illustrating the installation of a plug into a socket, with a red arrow indicating downward motion.natural_image
Three-step line drawings showing a hand holding a pen, applying adhesive to a tool, and adjusting the tip of a knife (no text or symbols present)
text_image
Technical diagram of a mechanical device with numbered components labeled 1, 2, and 3.

natural_image
Technical line drawing of a mechanical component with no visible text or symbolsnatural_image
Three-step line drawings showing a hand holding a pen, applying adhesive to a tool, and adjusting the tip of a knife (no text or symbols present)
natural_image
Technical line drawing of a mechanical device with labeled component (1), no readable text or symbols present.natural_image
Simple line drawing of a circular object with a pointer and label '1' (no text or symbols beyond the label)natural_image
Three-step line drawings showing a hand holding a pen, applying adhesive to a tool, and adjusting the tip of a knife (no text or symbols present)
natural_image
Technical line drawing of a mechanical device with no visible text or symbolstext_image
Diagram of a coffee maker with numbered parts and directional arrows indicating process flownatural_image
Line drawing of a coffee maker with handle and control panel (no text or symbols)natural_image
Technical line drawing of a coffee maker with handle and spout (no text or labels)7 ANOMALIES - CAUSES - SOLUTIONS
natural_image
Line drawing of a coffee maker with handle and spout (no text or symbols)1 ALLGEMEINE INFORMATIONEN 5
text_image
Technical diagram of a coffee maker with labeled parts A and B, and height indicator Htext_image
Technical diagram of a mechanical device with labeled parts 1 and 2Abb. 3
3.5 Restrisiken
text_image
Technical diagram of a mechanical device with warning symbol and warning label in ChineseAbb. 4
4 INSTALLATION

text_image
Diagram illustrating the installation of a plug, showing components labeled 1 and 2 with a red arrow indicating direction.Abb. 5
natural_image
Technical line drawing of a mechanical presser with an inset close-up showing its cross-sectional view (no text or symbols present)text_image
Technical diagram of a coffee maker with numbered parts for identificationAbb. 8
natural_image
Technical line drawing of a coffee maker with an inset close-up showing the internal components (no text or symbols)5.2.2 Bedienfeld
text_image
15:57:00 04/OKT./21 FIORATO 3,50 7,20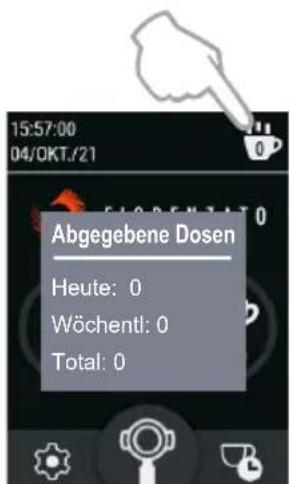
HOME in "Schwarzer Version"

text_image
15:45:01 28/06/21 FIORENZATO 3.50 7.20HOME in "Weiße Version"
text_image
Technical diagram of a coffee maker with labeled parts and directional arrows indicating process flow6 WARTUNG DER KAFFEEMÜHLE MIT DOSIERER
natural_image
Technical line drawing of a coffee maker with an inset close-up showing the internal components (no text or symbols)Abb. 10 Abb. 11

text_image
Diagram illustrating the installation of a plug into a wall socket, with a red arrow indicating downward motion.natural_image
Three-step line drawings showing a hand holding a pen, a close-up of the pen tip, and a close-up of the knife handle (no text or symbols)
text_image
Technical diagram of a mechanical device with numbered components labeled 1, 2, and 3.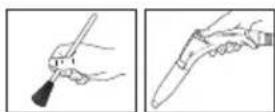

natural_image
Technical line drawing of a mechanical assembly with no visible text or symbolsnatural_image
Three-step line drawings showing a hand holding a pen, applying adhesive to a tool, and adjusting the tip of a knife (no text or symbols present)
natural_image
Technical line drawing of a mechanical device with labeled component (1), no readable text or symbols present.natural_image
Simple line drawing of a circular object with a pointer and a numbered label (1), no text or symbols present.natural_image
Three-step line drawings showing a hand holding a pen, applying adhesive to a tool, and adjusting the tip of a knife (no text or symbols present)
natural_image
Technical line drawing of a mechanical device with no visible text or symbolstext_image
Diagram of a coffee maker with numbered parts and directional arrows indicating process flownatural_image
Line drawing of a coffee maker with handle and control panel (no text or symbols)natural_image
Technical line drawing of a coffee maker with handle and spout (no text or labels)natural_image
Symbol of a trash bin crossed with a diagonal line, no text or numbers present
FIORENZATO
natural_image
Line drawing of a mechanical grinding machine (no text or symbols present)text_image
Technical diagram of a coffee maker with numbered parts for identificationtext_image
Technical diagram of a coffee maker with labeled parts A, B, and HFig. 2 - Dimensiones
| Modelo F4 EVO | |
| Dimensiones [A x B x H mm] 180 x 237 x 478 | |
| Peso [kg] 9 | |
text_image
Technical diagram of a mechanical device with labeled parts 1 and 2Fig. 3
text_image
Technical diagram of a mechanical device with warning symbol and warning label in ChineseFig. 4
4 INSTALACIÓN

text_image
Diagram illustrating the installation of a power plug, showing components labeled 1 and 2 with a red arrow indicating direction.Fig. 5
natural_image
Technical line drawing of a mechanical presser with an inset close-up view showing internal components (no text or symbols)natural_image
Three-step line drawings showing a hand holding a pen, applying adhesive to a tool, and finally adjusting the pen tip (no text or symbols present)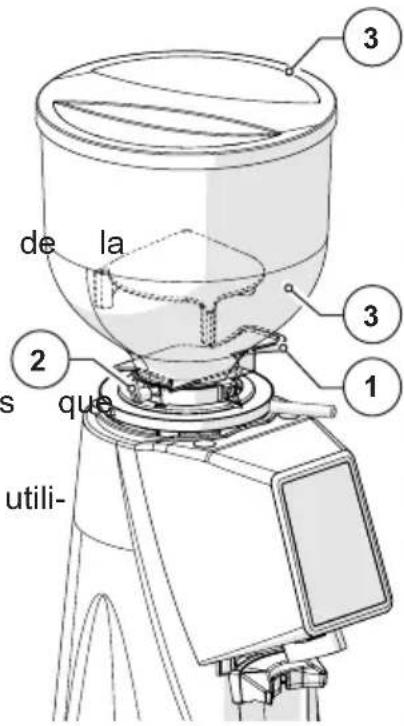
text_image
3 de la 2 s que 1 utili-
natural_image
Technical line drawing of a mechanical component with no visible text or symbolsnatural_image
Three-step line drawings showing a hand holding a pen, applying adhesive to a tool, and adjusting the tip of a knife (no text or symbols present)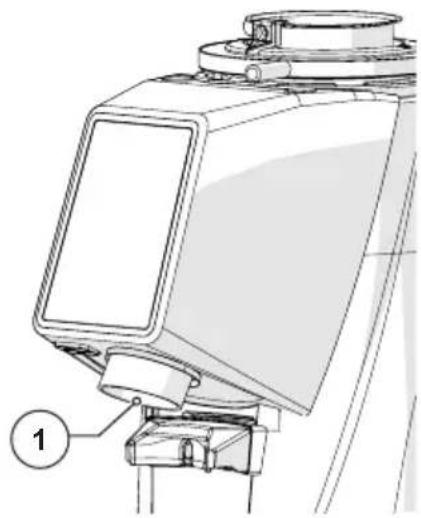
natural_image
Technical line drawing of a mechanical device with labeled component (1), no readable text or symbols present.natural_image
Simple line drawing of a circular object with a pointer and a numbered label (1), no text or symbols present.natural_image
Technical line drawing of a mechanical device with no visible text or symbolsnatural_image
Technical line drawing of a mechanical presser or grinder device with no visible text or symbolsnatural_image
Symbol of a trash bin crossed with a diagonal line, no text or numbers presentdes-

FIORENZATO
natural_image
Line drawing of a coffee maker with handle and spout (no text or symbols)1 INFORMAÇÕES GERAIS 5
text_image
Technical diagram of a coffee maker with numbered parts for identificationtext_image
Technical diagram of a coffee maker with labeled parts A, B, and HFig. 2 - Dimensões
text_image
Technical diagram of a mechanical device with labeled parts 1 and 2Fig. 3
text_image
Technical diagram of a mechanical device with warning symbol and warning label in ChineseFig. 4
4 INSTALAÇÃO

text_image
Diagram illustrating the installation of a power plug, showing components labeled 1 and 2 with a red arrow indicating direction.Fig. 5
natural_image
Technical line drawing of a mechanical presser with an inset close-up view showing internal components (no text or symbols)natural_image
Technical line drawing of a coffee maker with an inset close-up view showing internal components (no text or labels)5.2.2 Painel do operador
natural_image
Technical line drawing of a coffee maker with an inset close-up view showing the internal components (no text or labels)Fig. 10 Fig. 11
text_image
Diagram illustrating the installation of a wall-mounted electrical plug with a magnified view showing its internal structure and a red downward arrow indicating reduction.natural_image
Technical line drawing of a mechanical component with no visible text or symbolsnatural_image
Technical line drawing of a mechanical device with labeled component (1), no readable text or symbols present.natural_image
Simple line drawing of a circular object with a pointer and label '1' (no text or symbols beyond the label)natural_image
Three-step line drawings showing a hand holding a pen, applying adhesive to a small object, and adjusting a pen tip (no text or symbols)
natural_image
Technical line drawing of a mechanical device with no visible text or symbolsnatural_image
Line drawing of a coffee maker with handle and outlet, no text or symbols present6.1.3 Limpeza a fundo dos moinhos
natural_image
Technical line drawing of a portable coffee maker with labeled component 'para' (no other text or symbols)natural_image
Line drawing of a coffee maker with handle and spout (no text or symbols)text_image
Technical diagram of a coffee maker with numbered parts for identificationtext_image
Technical diagram of a coffee maker with labeled parts A, B, and HΕικ. 2 - Διαστάσεις
text_image
Technical diagram of a portable air purifier with labeled componentsEik. 3
text_image
Technical diagram of a mechanical device with warning symbol and warning label in ChineseEik. 4
4 ΕΓΚΑΤΑΣΤΑΣΗ

text_image
Diagram illustrating the installation of a plug into a panel with a magnified view showing internal components and a coin for scale.Eik. 5
natural_image
Technical line drawing of a coffee maker with an inset close-up view showing the internal components (no text or labels)text_image
Technical diagram of a mechanical grinding machine with numbered components for identificationEik. 8
natural_image
Technical line drawing of a coffee maker with an inset close-up view showing internal components (no text or labels)text_image
Technical diagram of a coffee maker with labeled parts and red directional arrows indicating process flownatural_image
Technical line drawing of a coffee maker with an inset close-up showing the internal components (no text or symbols)Eik. 10 Eik. 11

text_image
Diagram illustrating the installation of a cable with a gold coin and a red downward arrow, likely indicating a safety or installation hazard.text_image
Technical diagram of a portable device with labeled parts and three inset images showing hand-cranked tool tips.

natural_image
Technical line drawing of a mechanical component with no visible text or symbolsnatural_image
Three-step line drawings showing a hand holding a pen, applying adhesive to a tool, and adjusting the tip of a knife (no text or symbols present)
natural_image
Technical line drawing of a mechanical device with labeled component (1), no readable text or symbols present.natural_image
Simple line drawing of a circular object with a pointer and a numbered label (1), no text or symbols present.natural_image
Three-step line drawings showing a hand holding a pen, applying paint to a clip (no text or symbols)
natural_image
Technical line drawing of a mechanical device with no visible text or symbolstext_image
Diagram of a coffee maker with numbered parts and directional arrows indicating process flownatural_image
Line drawing of a coffee maker with handle and control panel (no text or symbols)natural_image
Technical line drawing of a coffee maker with handle and spout (no text or labels)natural_image
Symbol of a trash bin with crossed lines indicating no waste or discharge, and a solid black rectangle below (no text or labels)
FIORENZATO
natural_image
Line drawing of a coffee maker with handle and spout (no text or symbols)text_image
FIRBENZATD 18/02/21 CODE IN: ITALY Mod/Type+F4 ISO 22034EV 50Hz 250M IP/E1 Share ON: Share OFF 0004032992text_image
Technical diagram of a coffee maker with labeled parts A, B, and HРис. 2 - Размеры
text_image
Technical diagram of a mechanical device with labeled parts 1 and 2Рис. 3
text_image
Technical diagram of a mechanical device with warning symbol and warning label in ChineseРис. 4
4 УСТАНОВКА

text_image
Diagram illustrating the installation of an electrical plug, showing components labeled 1 and 2 with a red arrow indicating direction.Рис. 5
natural_image
Technical line drawing of a coffee maker with an inset close-up view showing the internal components (no text or labels)text_image
Technical diagram of a mechanical grinding machine with numbered components for identificationРис. 8
natural_image
Technical line drawing of a coffee maker with an inset close-up view showing the internal components (no text or symbols)text_image
Technical diagram of a coffee maker with labeled parts and red directional arrows indicating process flownatural_image
Technical line drawing of a coffee maker with an inset close-up showing the internal components (no text or symbols)Рис. 10 Рис. 11
text_image
Diagram illustrating the installation of a plug into a socket, with a red arrow indicating downward motion.natural_image
Three-step line drawings showing a hand holding a pen, holding a small object, and touching a knife (no text or symbols present)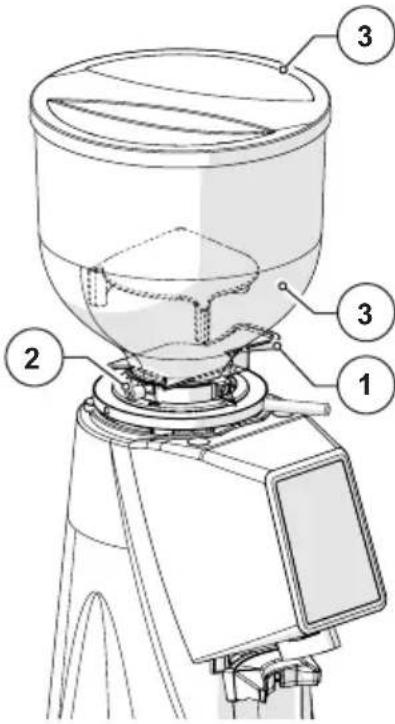
text_image
Technical diagram of a mechanical device with numbered components labeled 1, 2, and 3.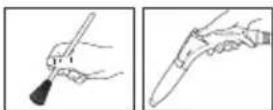
natural_image
Technical line drawing of a mechanical assembly with no visible text or symbolsnatural_image
Three-step line drawings showing a hand holding a pen, applying adhesive to a tool, and adjusting the tip of a knife (no text or symbols present)
natural_image
Technical line drawing of a mechanical device with labeled component (1), no readable text or symbols present.natural_image
Simple line drawing of a circular object with a pointer and a numbered label (1), no text or symbols present.natural_image
Three-step line drawings showing a hand holding a pen, applying paint to a small object, and adjusting a pen tip (no text or symbols)
natural_image
Technical line drawing of a mechanical device with no visible text or symbolstext_image
Diagram of a coffee maker with numbered parts and directional arrows indicating process flownatural_image
Line drawing of a coffee maker with handle and control panel (no text or symbols)natural_image
Technical line drawing of a coffee maker with handle and spout (no text or labels)natural_image
Symbol of a trash bin crossed with no text or numbers, representing environmental restriction (no text present)
FIORENZATO
natural_image
Technical line drawing of a mechanical grinding machine (no text or symbols)安装、使用和维护手册
1 一般信息 5
text_image
Technical diagram of a coffee maker with numbered parts for identification图1-零件标识
2.4 用途
text_image
Technical diagram of a coffee maker with labeled parts A and B, showing internal components and height indicator H.图 2 - 尺寸
text_image
Technical diagram of a mechanical device with labeled parts 1 and 2图3
3.5 残留风险
text_image
Technical diagram of a mechanical device with warning symbol and warning label in Chinese图4
4 安装

text_image
Diagram illustrating the installation of a plug, showing components labeled 1 and 2 with a red arrow indicating direction.图5
natural_image
Technical line drawing of a coffee maker with an inset close-up view showing internal components (no text or labels)定量磨豆机至此已通电并可投入使用。
5 定量磨豆机的使用
5.1 定量磨豆机的使用准备
text_image
Technical diagram of a coffee maker with numbered parts for identification图8
5.2 机器控制
natural_image
Technical line drawing of a coffee maker with an inset close-up showing the circular component detail (no text or symbols)5.2.2 操作面板
text_image
Technical diagram of a coffee maker with labeled parts and directional arrows indicating process flow6 定量磨豆机维护
6.1 常规维护

natural_image
Three-step line drawings showing a hand holding a pen, with separate views of the same hand holding a tool (no text or symbols present)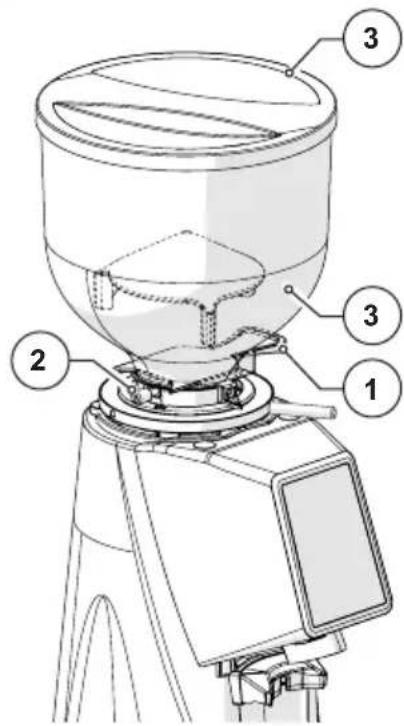
text_image
Technical diagram of a mechanical device with numbered components labeled 1, 2, and 3.natural_image
Technical line drawing of a mechanical component with no visible text or symbolsnatural_image
Three-step line drawings showing a hand holding a pen, applying adhesive to a tool, and adjusting the tip of a knife (no text or symbols present)
natural_image
Technical line drawing of a mechanical device with labeled component (1), no readable text or symbols present.natural_image
Simple line drawing of a circular object with a pointer and label '1' (no text or symbols on the object itself)natural_image
Three-step line drawings showing a hand holding a pen, applying paint to a small object, and adjusting a pen tip (no text or symbols)
natural_image
Technical line drawing of a mechanical device with no visible text or symbolstext_image
Diagram of a coffee maker with numbered parts and directional arrows indicating process flow6.1.2 检查电源线状态
每个班次结束时:检查电源线。
natural_image
Line drawing of a coffee maker with handle and control panel (no text or symbols)6.1.3 磨床的彻底清洁
每月:对磨床执行一次彻底清洁。
natural_image
Technical line drawing of a mechanical press or grinder device (no text or symbols present)6.1.5 磨床更换
natural_image
Symbol of a trash bin crossed with no text or numbers, representing environmental restriction (no text present)
FIORENZATO
natural_image
Line drawing of a mechanical grinding machine with no visible text or symbolsF4 EVO
הכלה, כרִי לְרָא
תְקּרָה
5. ウウコツドマ1
text_image
Technical diagram of a coffee maker with labeled parts A and B, and height indicator Hהַרְאָּהִיָה –
text_image
Technical diagram of a portable gas stove with labeled components 1 and 23 7178
תְרָה בְּבָּוֹת
text_image
Technical diagram of a mechanical device with warning symbol and warning label in Chinese4 779
4
text_image
Diagram illustrating the installation of a plug, showing components labeled 1 and 2 with a magnified view of internal wiring.5 הַיָא
natural_image
Technical line drawing of a coffee maker with an inset close-up view showing the mechanical component detail (no text or symbols present)
text_image
Technical diagram of a coffee maker with numbered parts for identificationהַתָאָ
natural_image
Technical line drawing of a coffee maker with an inset close-up showing the internal components (no text or symbols).(הכלהה)
.(לְרַעָה
• הַלְרָא (בִיּה)
- אַרְשָׁת) אַרְשָׁת
2.2.5
text_image
Settings Technical settings Set grinding times > Dose time visibility Manual grinding Show statistics User settings Display brightness > Display theme > Screensaver > Language > Date > Time > Information > Security settings Grinding times reset > Admin password >תְבָרִי הַלְהָה
בַרְשָׁה בְּרִיָה
תְבָרִי בְּרִי
text_image
Screensaver Start after 20 sec 45 sec 5 min Fiorenzato 14:20:32 AM 23 GEN 21text_image
Date D M Y 04 OCT 21 + + + - - - Handתַעָה בְרִיָה
10.1.3.5

text_image
Time 24h 12h AM PM 15 : 57 + + - -.הכלההוּרָהוּרָהוּרָהוּרָהוּרָהוּרָהוּרָהוּרָהוּרָהוּרָהוּרָהוּרָהוּרָהוּרָהוּרָה
text_image
Grinding times reset This operation will reset the grinding times. This operation is not reversible. Grinding times resetתְבָרִי הַלְהָם

text_image
Technical diagram of a coffee maker with labeled parts and directional arrows indicating process flowtext_image
Diagram illustrating the installation of a fuse with a plug, showing a circular component and a coin symbol.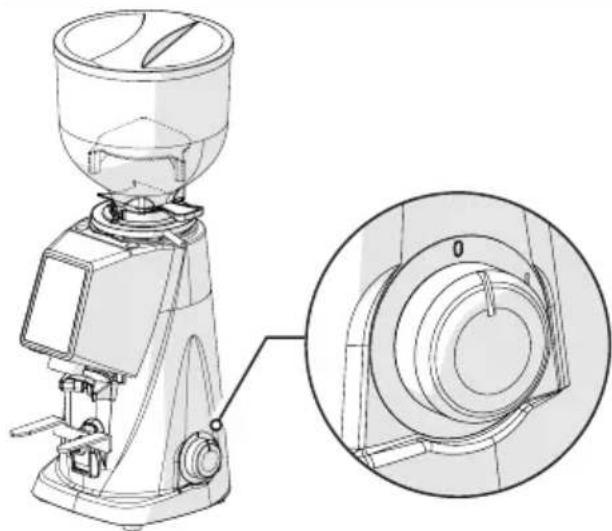
natural_image
Technical line drawing of a coffee maker with an inset close-up view showing internal components (no text or labels)הכלה 10הכלה 11
text_image
Diagram of a coffee maker with numbered parts and directional arrows indicating process flow| .הכלהה כרְהַלְהָה:הכלהה כרְהַלְהָה | |
הכלהה כרְהַלְהָה,הכלהה כרְהַלְהָה,הכלהה כרְהַלְהָה,הכלהה כרְהַלְהָה,הכלהה כרְהַלְהָה,הכלהה כרְהַלְהָה,הכלהה Los Angeles County, Los Angeles County, Los Angeles County, Los Angeles County, Los Angeles County, Los Angeles County, Los Angeles County, Los Angeles County, Los Angeles County, Los Angeles County, Los Angeles County, Los Angeles County, Los Angeles County, Los Angeles County, Los Angeles County, Los Angeles County, Los Angeles County, Los Angeles County, Los Angeles County, Los Angeles County, Los Angeles County, Los Angeles County, Los Angeles County, Los Angeles County, Los Angeles County, Los Angeles County, | •הכלהה כרְהַלְהָה,הכלהה כרְהַלְהָה,הכלהה Los Angeles County, Los Angeles County, Los Angeles County, Los Angeles County, Los Angeles County, Los Angeles County, Los Angeles County, Los Angeles County, Los Angeles County, Los Angeles County, Los Angeles County, Los Angeles County, Los Angeles County, Los Angeles County, Los Aires, Los Angeles County, Los Angeles County, Los Angeles County, Los Angeles County, Los Angeles County, Los Angeles County, Los Angeles County, Los Angeles County, Los Angeles County, Los Angeles County, Los Angeles County, Los Angeles County, Los Angeles County, Los Angeles County, Los Angeles County, Los Angeles County, Los Angeles County, Los Angeles County, Los Angeles County, Los Angeles County, Los Angeles County, Los Angeles County, Los Angeles County, Los Angeles County, Los Angeles county, Los Angeles county, Los Angeles county, Los Angeles county, Los Angeles county, Los Angeles county, Los Angeles county, Los Angeles county, Los Angeles county, Los Angeles county, Los Angeles county, Los Angeles county, Los Angeles county, Los Angeles county, Los Angeles county, Los Angeles county, Los Angeles county, Los Angeles county, Los Angeles county, Los Angeles county, Los Angeles county, Los Angeles county, Los Angeles county, Los Angeles county, Los Angeles county, Los Angeles County, Los Angeles County, Los Angeles County, Los Angeles County, Los Angeles County, Los Angeles County, Los Angeles County, Los Angeles County, Los Angeles County, Los Angeles County, Los Angeles County, Los Angeles County, Los Angeles County, Los Angeles County, Los Angeles County, Los Angeles County, Los Angeles County, Los Angeles County, Los Angeles County, Los Angeles County, Los Angeles County, Los Angeles County, Los Angeles County, Los Angeles County, Los Angeles counties, Los Angeles County, Los Angeles County, Los Angeles County, Los Angeles County, Los Angeles County, Los Angeles County, Los Angeles County, Los Angeles County, Los Angeles County, Los Angeles County, Los Angeles County, Los Angeles County, Los Angeles County, Los Angeles County, Los Angeles County, Los Angeles County, Los Angeles County, Los Angeles County, Los Angeles County, Los Angeles County, Los Angeles County, Los Angeles County, Los Angeles County, Los Angeles County, Los Angeles Counties, Los Angeles County, Los Angeles County, Los Angeles County, Los Angeles County, Los Angeles County, Los Angeles County, Los Angeles County, Los Angeles County, Los Angeles County, Los Angeles County, Los Angeles County, Los Angeles County, Los Angeles County, Los Angeles County, Los Angeles County, Los Angeles County, Los Angeles County, Los Angeles County, Los Angeles County, Los Angeles County, Los Angeles County, Los Angeles County, Los Angeles County, Los Angeles County, Los AngelesCounty, Los Angeles County, Los Angeles County, Los Angeles County, Los Angeles County, Los Angeles County, Los Angeles County, Los Angeles County, Los Angeles County, Los Angeles County, Los Angeles County, Los Angeles County, Los Angeles County, Los Angeles County, Los Angeles County, Los Angeles County, Los Angeles County, Los Angeles County, Los Angeles County, Los Angeles County, Los Angeles County, Los Angeles County, Los Angeles County, Los Angeles County, Los Angeles County, Los Angeles COUNTY, Los Angeles County, Los Angeles County, Los Angeles County, Los Angeles County, Los Angeles County, Los Angeles County, Los Angeles County, Los Angeles County, Los Angeles County, Los Angeles County, Los Angeles County, Los Angeles County, Los Angeles County, Los Angeles County, Los Angeles County, Los Angeles County, Los Angeles County, Los Angeles County, Los Angeles County, Los Angeles County, Los Angeles County, Los Angeles County, Los Angeles County, Los Angeles County, Los Angeles City, Los Angeles County, Los Angeles County, Los Angeles County, Los Angeles County, Los Angeles County, Los Angeles County, Los Angeles County, Los Angeles County, Los Angeles County, Los Angeles County, Los Angeles County, Los Angeles County, Los Angeles County, Los Angeles County, Los Angeles County, Los Angeles County, Los Angeles County, Los Angeles County, Los Angeles County, Los Angeles County, Los Angeles County, Los Angeles County, Los Angeles County, Los Angeles County, Los Angeles县, Los Angeles County, Los Angeles County, Los Angeles County, Los Angeles County, Los Angeles County, Los Angeles County, Los Angeles County, Los Angeles County, Los Angeles County, Los Angeles County, Los Angeles County, Los Angeles County, Los Angeles County, Los Angeles County, Los Angeles County, Los Angeles County, Los Angeles County, Los Angeles County, Los Angeles County, Los Angeles County, Los Angeles County, Los Angeles County, Los Angeles County, Los Angeles County, Los AngelesCity, Los Angeles County, Los Angeles County, Los Angeles County, Los Angeles County, Los Angeles County, Los Angeles County, Los Angeles County, Los Angeles County, Los Angeles County, Los Angeles County, Los Angeles County, Los Angeles County, Los Angeles County, Los Angeles County, Los Angeles County, Los Angeles County, Los Angeles County, Los Angeles County, Los Angeles County, Los Angeles County, Los Angeles County, Los Angeles County, Los Angeles County, Los Angeles County, Los Angeles县城, Los Angeles县城, Los Angeles县城, Los Angeles县城, Los Angeles县城, Los Angeles县城, Los Angeles县城, Los Angeles县城, Los Angeles县城, Los Angeles县城, Los Angeles县城, Los Angeles县城, Los Angeles县城, Los Angeles县城, Los Angeles县城, Los Angeles县城, Los Angeles县城, Los Angeles县城, Los Angeles县城, Los Angeles县城, Los Angeles县城, Los Angeles县城, Los Angeles县城, Los Angeles县城, Los Angeles县城, Los Angeles city, Los Angeles city, Los Angeles city, Los Angeles city, Los Angeles city, Los Angeles city, Los Angeles city, Los Angeles city, Los Angeles city, Los Angeles city, Los Angeles city, Los Angeles city, Los Angeles city, Los Angeles city, Los Angeles city, Los Angeles city, Los Angeles city, Los Angeles city, Los Angeles city, Los Angeles city, Los Angeles city, Los Angeles city, Los Angeles city, Los Angeles city, Los Angeles city, Los Angelescity, Los Angeles city, Los Angeles city, Los Angeles city, Los Angeles city, Los Angeles city, Los Angeles city, Los Angeles city, Los Angeles city, Los Angeles city, Los Angeles city, Los Angeles city, Los Angeles city, Los Angeles city, Los Angeles city, Los Angeles city, Los Angeles city, Los Angeles city, Los Angeles city, Los Angeles city, Los Angeles city, Los Angeles city, Los Angeles city, Los Angeles city, Los Angeles city, Los Angeles town, Los Angeles town, Los Angeles town, Los Angeles town, Los Angeles town, Los Angeles town, Los Angeles town, Los Angeles town, Los Angeles town, Los Angeles town, Los Angeles town, Los Angeles town, Los Angeles town, Los Angeles town, Los Angeles town, Los Angeles town, Los Angeles town, Los Angeles town, Los Angeles town, Los Angeles town, Los Angeles town, Los Angeles town, Los Angeles town, Los Angeles town, Los Angeles town, Los Angelestown, Los Angeles town, Los Angeles town, Los Angeles town, Los Angeles town, Los Angeles town, Los Angeles town, Los Angeles town, Los Angeles town, Los Angeles town, Los Angeles town, Los Angeles town, Los Angeles town, Los Angeles town, Los Angeles town, Los Angeles town, Los Angeles town, Los Angeles town, Los Angeles town, Los Angeles town, Los Angeles town, Los Angeles town, Los Angeles town, Los Angeles town, Los Angeles town, Los AngelesTown, Los Angeles town, Los Angeles town, Los Angeles town, Los Angeles town, Los Angeles town, Los Angeles town, Los Angeles town, Los Angeles town, Los Angeles town, Los Angeles town, Los Angeles town, Los Angeles town, Los Angeles town, Los Angeles town, Los Angeles town, Los Angeles town, Los Angeles town, Los Angeles town, Los Angeles town, Los Angeles town, Los Angeles town, Los Angeles town, Los Angeles town, Los Angeles town, Los Angeles Town, Los Angeles town, Los Angeles town, Los Angeles town, Los Angeles town, Los Angeles town, Los Angeles town, Los Angeles town, Los Angeles town, Los Angeles town, Los Angeles town, Los Angeles town, Los Angeles town, Los Angeles town, Los Angeles town, Los Angeles town, Los Angeles town, Los Angeles town, Los Angeles town, Los Angeles town, Los Angeles town, Los Angeles town, Los Angeles town, Los Angeles town, Los Angeles town, Los Angeles city, Los Angeles city, Los Angeles city, Los Angeles city, Los Angeles city, Los Angeles city, Los Angeles city, Los Angeles city, Los Angeles city, Los Angeles city, Los Angeles city, Los Angeles city, Los Angeles city, Los Angeles city, Los Angeles city, Los Angeles city, Los Angeles city, Los Angeles city, Los Angeles city, Los Angeles city, Los Angeles city, Los Angeles city, Los Angeles city, Los Angeles city, Los Angeles城市, Los Angeles city, Los Angeles city, Los Angeles city, Los Angeles city, Los Angeles city, Los Angeles city, Los Angeles city, Los Angeles city, Los Angeles city, Los Angeles city, Los Angeles city, Los Angeles city, Los Angeles city, Los Angeles city, Los Angeles city, Los Angeles city, Los Angeles city, Los Angeles city, Los Angeles city, Los Angeles city, Los Angeles city, Los Angeles city, Los Angeles city, Los Angeles city, Los Angeles City, Los Angeles city, Los Angeles city, Los Angeles city, Los Angeles city, Los Angeles city, Los Angeles city, Los Angeles city, Los Angeles city, Los Angeles city, Los Angeles city, Los Angeles city, Los Angeles city, Los Angeles city, Los Angeles city, Los Angeles city, Los Angeles city, Los Angeles city, Los Angeles city, Los Angeles city, Los Angeles city, Los Angeles city, Los Angeles city, Los Angeles city, Los Angeles city, Los Angeles urban area, Los Angeles urban area, Los Angeles urban area, Los Angeles urban area, Los Angeles urban area, Los Angeles urban area, Los Angeles urban area, Los Angeles urban area, Los Angeles urban area, Los Angeles urban area, Los Angeles urban area, Los Angeles urban area, Los Angeles urban area, Los Angeles urban area, Los Angeles urban area, Los Angeles urban area, Los Angeles urban area, Los Angeles urban area, Los Angeles urban area, Los Angeles urban area, Los Angeles urban areas, Los Angeles urban area, Los Angeles urban area, Los Angeles urban area, Los Angeles urban area, Los Angeles urban area, Los Angeles urban area, Los Angeles urban area, Los Angeles urban area, Los Angeles urban area, Los Angeles urban area, Los Angeles urban area, Los Angeles urban area, Los Angeles urban area, Los Angeles urban area, Los Angeles urban area, Los Angeles urban area, Los Angeles urban area, Los Angeles urban area, Los Angeles urban area, Los Angeles urbanarea, Los Angeles urban area, Los Angeles urban area, Los Angeles urban area, Los Angeles urban area, Los Angeles urban area, Los Angeles urban area, Los Angeles urban area, Los Angeles urban area, Los Angeles urban area, Los Angeles urban area, Los Angeles urban area, Los Angeles urban area, Los Angeles urban area, Los Angeles urban area, Los Angeles urban area, Los Angeles urban area, Los Angeles urban area, Los Angeles urban area, Los Angeles urban area, Los Angeles urban Area, Los Angeles urban area, Los Angeles urban area, Los Angeles urban area, Los Angeles urban area, Los Angeles urban area, Los Angeles urban area, Los Angeles urban area, Los Angeles urban area, Los Angeles urban area, Los Angeles urban area, Los Angeles urban area, Los Angeles urban area, Los Angeles urban area, Los Angeles urban area, Los Angeles urban area, Los Angeles urban area, Los Angeles urban area, Los Angeles urban area, Los Angeles urban area, Los Angeles urbanArea, Los Angeles urban area, Los Angeles urban area, Los Angeles urban area, Los Angeles urban area, Los Angeles urban area, Los Angeles urban area, Los Angeles urban area, Los Angeles urban area, Los Angeles urban area, Los Angeles urban area, Los Angeles urban area, Los Angeles urban area, Los Angeles urban area, Los Angeles urban area, Los Angeles urban area, Los Angeles urban area, Los Angeles urban area, Los Angeles urban area, Los Angeles urban area, Los Angeles urbana, Los Angeles urban area, Los Angeles urban area, Los Angeles urban area, Los Angeles urban area, Los Angeles urban area, Los Angeles urban area, Los Angeles urban area, Los Angeles urban area, Los Angeles urban area, Los Angeles urban area, Los Angeles urban area, Los Angeles urban area, Los Angeles urban area, Los Angeles urban area, Los Angeles urban area, Los Angeles urban area, Los Angeles urban area, Los Angeles urban area, Los Angeles urban area, Los Angeles urban a, Los Angeles urban area, Los Angeles urban area, Los Angeles urban area, Los Angeles urban area, Los Angeles urban area, Los Angeles urban area, Los Angeles urban area, Los Angeles urban area, Los Angeles urban area, Los Angeles urban area, Los Angeles urban area, Los Angeles urban area, Los Angeles urban area, Los Angeles urban area, Los Angeles urban area, Los Angeles urban area, Los Angeles urban area, Los Angeles urban area, Los Angeles urban area, Los Angeles urban (5C4T) |
3.1.6
.הכלההוּרָהוּרָהוּרָהוּרָהוּרָהוּרָהוּרָהוּרָהוּרָהוּרָהוּרָהוּרָהוּרָהוּרָהוּרָה
• אַרְשָׁ
natural_image
Symbol of a trash bin with crossed lines indicating no waste or discharge, and a solid black rectangle below (no text or labels)natural_image
Line drawing of a mechanical grinding machine with no visible text or symbolsPortrait Classification
1.2 المقدمة
text_image
Technical diagram of a coffee maker with labeled parts A and B, and height indicator Hبعاد 2 الشكل - اللا
| الموديلF4 EVO | |
| [الابعاد H x B x A] 478 x 237 x 180 | |
| [الوزن [كجم] |
المواصفات الفنية
text_image
Technical diagram of a portable air purifier with labeled components 1 and 2الشكل 3
natural_image
Technical diagram of a mechanical device with warning symbol and warning label (no readable text or symbols)الشكل
text_image
Diagram illustrating the installation of a plug, showing components labeled 1 and 2 with a red arrow indicating direction.الشكل
natural_image
Technical line drawing of a coffee maker with an inset close-up view showing internal components (no text or labels)
natural_image
Technical line drawing of a coffee maker with an inset close-up showing the internal components (no text or symbols)text_image
Technical diagram of a coffee maker with labeled parts and directional arrows indicating process flowtext_image
Diagram illustrating the concept of a plug with a cable, showing a magnified view and a red downward arrow indicating reduction or damage.