
SoundForce SP2991Wi - Loudspeaker TRUST - Free user manual and instructions
Find the device manual for free SoundForce SP2991Wi TRUST in PDF.
| Product Type | Speaker / iPod Docking Station |
| Brand | Trust |
| Model | SoundForce SP2991Wi |
| iPod Compatibility | iPod with Dock connector (adapters included) |
| Play Modes | iPod, FM, AM, Auxiliary |
| Main Power | Mains adapter (power input) |
| Remote Control Battery | Lithium 3V CR2025 |
| Remote Control Range | At least 10 meters |
| Display | Built-in screen |
| Connectivity | USB (sync), auxiliary input, video output, radio antenna |
| iPod Sync | Via USB to computer, with iTunes |
| FM/AM Radio | Automatic and manual tuning |
| iPod Charging | Charges even when the station is off |
| Video Output | Via RCA cable (not included), depending on iPod model |
| Settings Memory | Last frequency and mode, volume reset to 06 |
| Care and Cleaning | Clean with a dry cloth |
| Safety | Do not open, do not use in wet environment |
| Warranty | 2 years (registration at trust.com/register) |
| Documentation and Updates | FAQ, drivers and manuals at www.trust.com/15133 |
| Compliance | European directives (DoC at www.trust.com/15133/ce) |
Frequently Asked Questions - SoundForce SP2991Wi TRUST
User questions about SoundForce SP2991Wi TRUST
0 question about this device. Answer the ones you know or ask your own.
Ask a new question about this device
Download the instructions for your Loudspeaker in PDF format for free! Find your manual SoundForce SP2991Wi - TRUST and take your electronic device back in hand. On this page are published all the documents necessary for the use of your device. SoundForce SP2991Wi by TRUST.
USER MANUAL SoundForce SP2991Wi TRUST
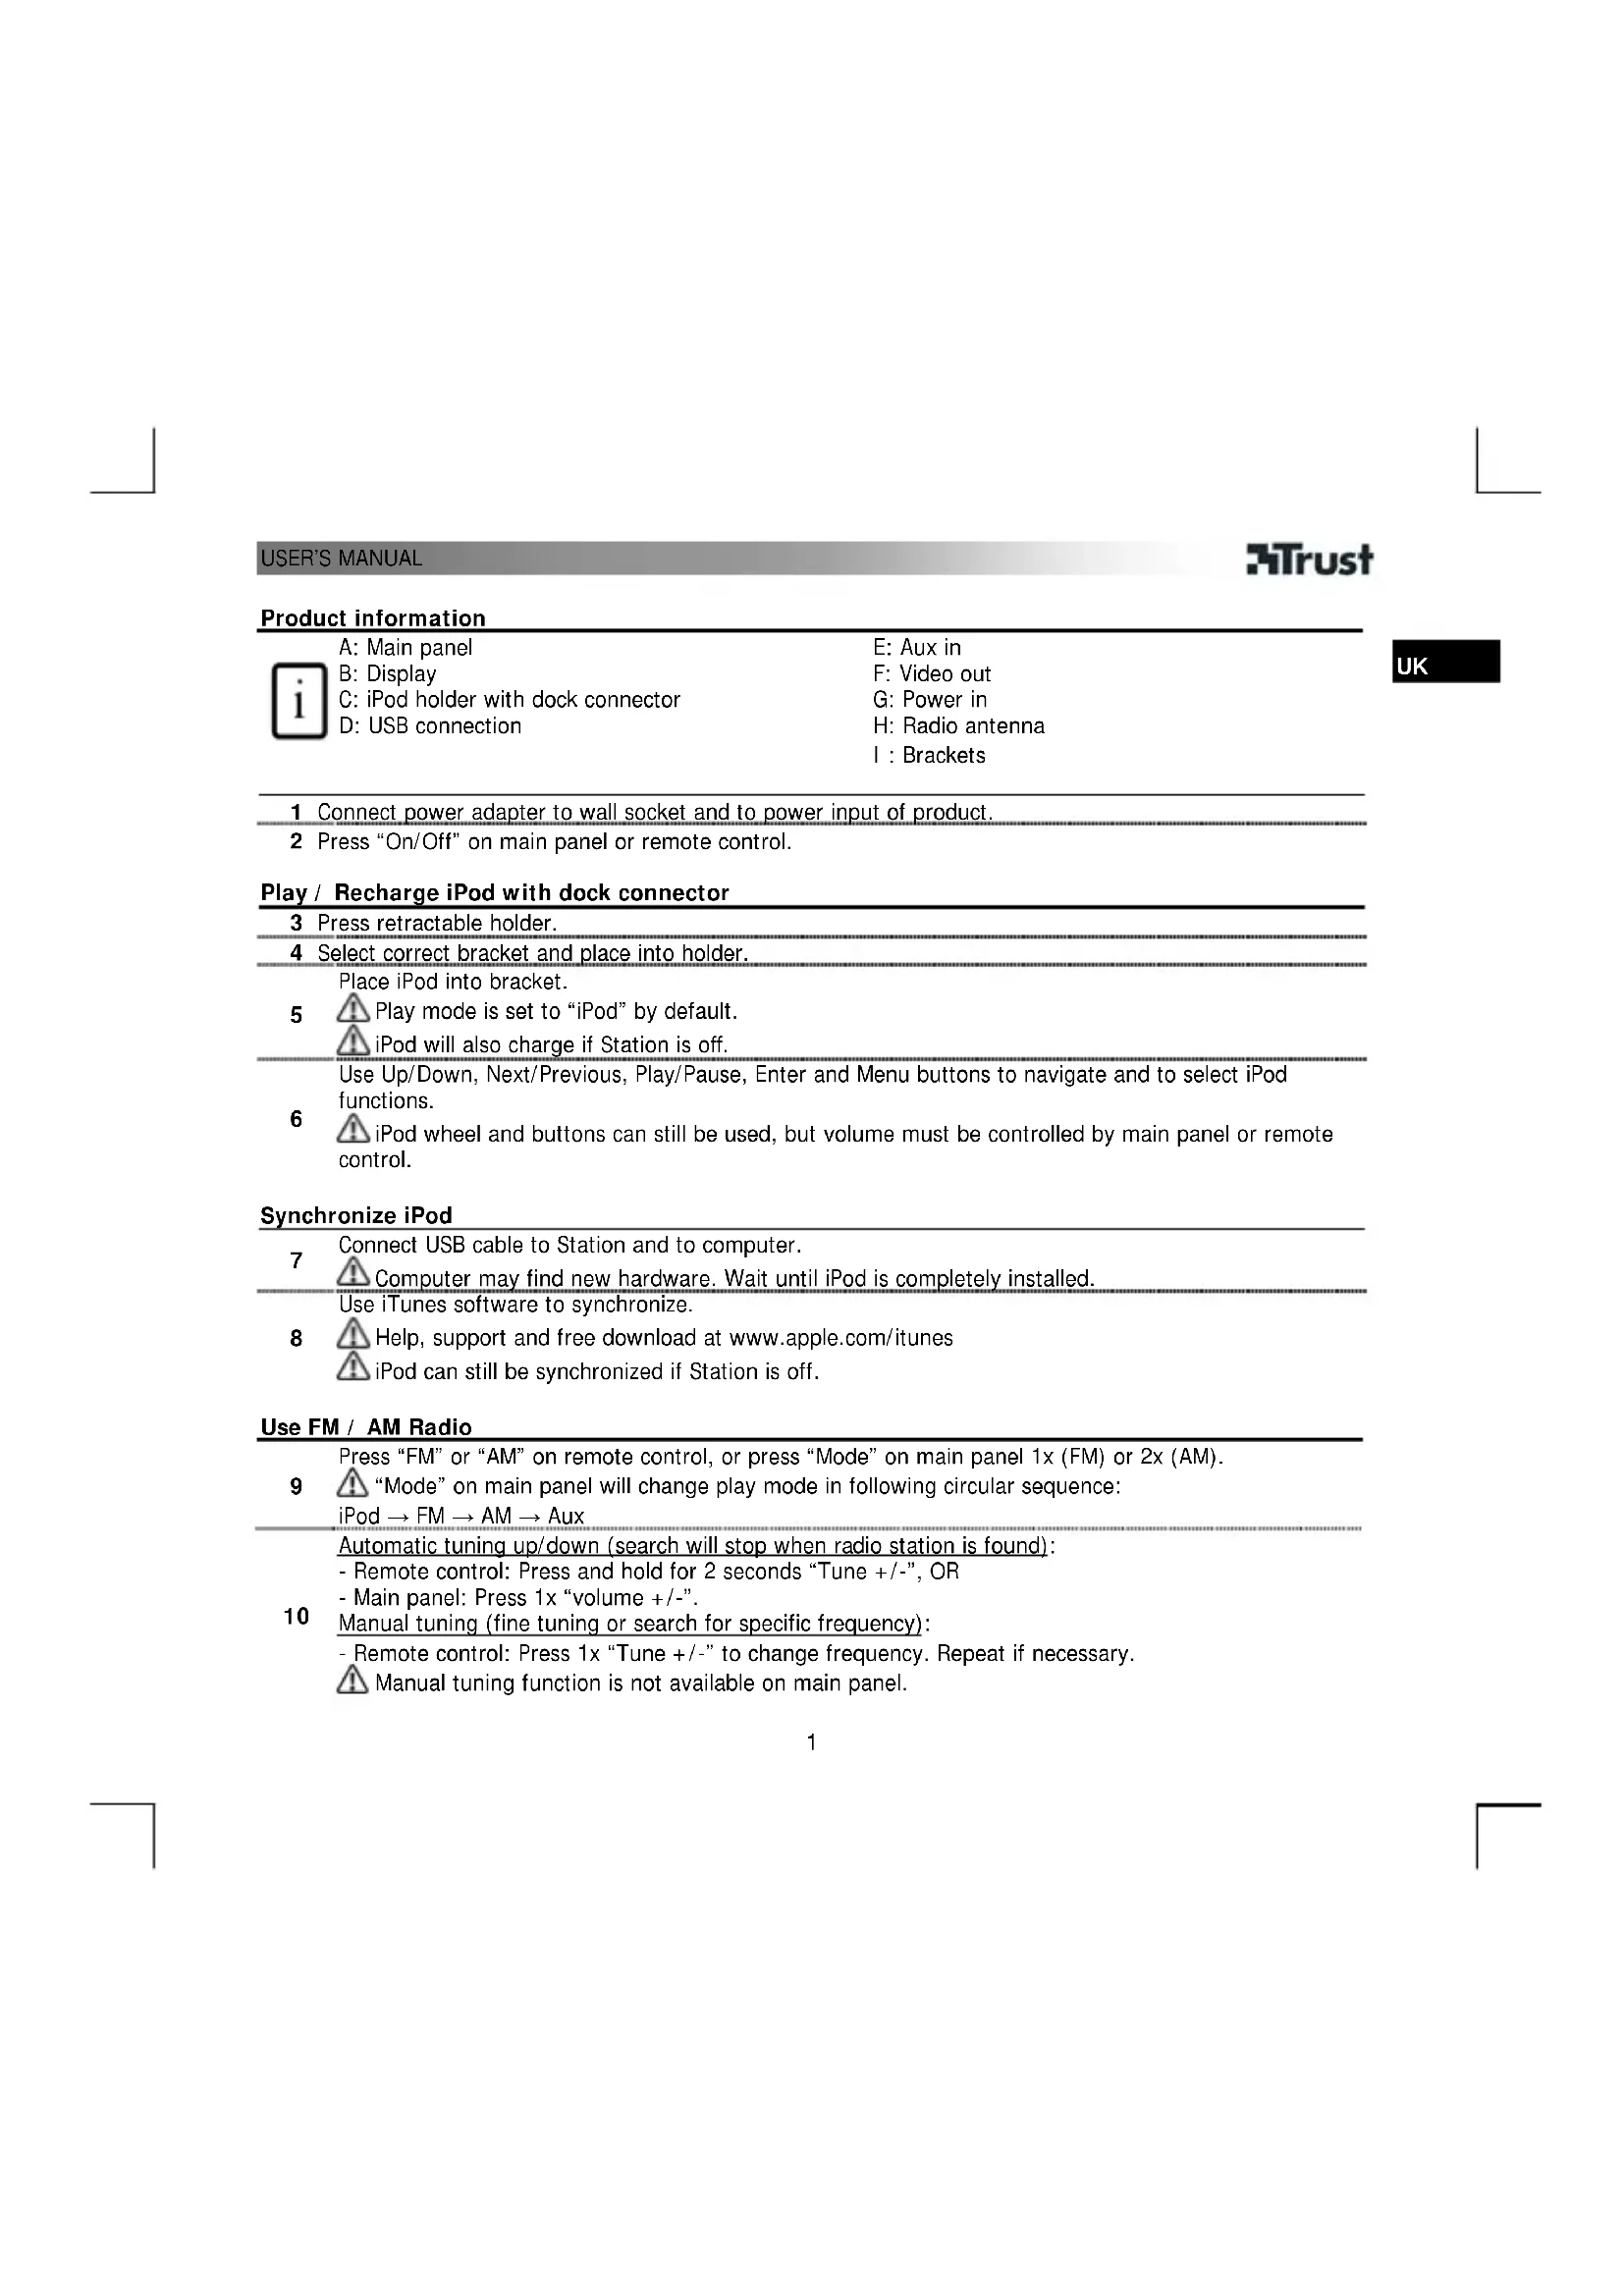
A: Main panel
B:Display
C: iPod holder with dock connector
D: USB connection
E: Aux in
F: Video out
G:Power in
H: Radio antenna
1: Brackets
1 Connect power adapter to wall socket and to power input of product.
2 Press "On/Off" on main panel or remote control.
Play / Recharge iPod with dock connector
3 Press retractable holder.
4 Select correct bracket and place into holder.
Place iPod into bracket.
5
Play mode is set to "iPod" by default.
iPod will also charge if Station is off.
Use Up/Down, Next/Previous, Play/Pause, Enter and Menu buttons to navigate and to select iPod functions.
6
iPod wheel and buttons can still be used, but volume must be controlled by main panel or remote control.
Synchronize iPod
7 Connect USB cable to Station and to computer.
Computer may find new hardware. Wait until iPod is completely installed.
Use iTunes software to synchronize.
8
Help, support and free download at www.apple.com/ iTunes
iPod can still be synchronized if Station is off.
Use FM / AM Radio
Press "FM" or "AM" on remote control, or press "Mode" on main panel 1x (FM) or 2x (AM).
9 "Mode" on main panel will change play mode in following circular sequence:
iPod FM AM Aux
Automatic tuning up/down (search will stop when radio station is found):
- Remote control: Press and hold for 2 seconds "Tune +/-", OR
- Main panel: Press 1x "volume +/-".
10 Manual tuning (fine tuning or search for specific frequency):
- Remote control: Press 1 × "Tune +/-" to change frequency. Repeat if necessary.
Manual tuning function is not available on main panel.
A Set radio volume on main panel: Press and hold for 2 seconds "volume + / -
Play iPod Shuffle or other audio device
| 11 | Connect audio cable to Station and to audio output ("headphone") of device. |
| 12 | Press "Aux" on remote control, or press "Mode" on main panel until Aux is selected, see 9. ▲ Set volume of audio device to maximum. Use volume control from Station. ▲ iPod navigation and control functions on remote control are not available in Aux mode |
Open battery compartment
13
Push the stop side wards and pull the battery holder out.
Place battery as shown in picture (+ side up).
Note

General use
- After turning Station off and on, it will remember last radio frequency and play mode used, but volume will be set to "06".
- After complete power shut down (or disconnecting and reconnecting power adapter), Station will reset memory and return to default settings.
- The display shows volume level in "iPod" and "Aux", and frequency setting in "FM" and "AM" play modes.
- Push iPod holder back into Station when dock is not used.
- Wireless range of remote control is at least 10m

Video output
- Configure iPod with correct video output settings and connect RCA video cable (not included) to TV, DVD, VCR etc.
Video output is only available if iPod model has video output (check iPod specifications), and if the dock connector is used.
See www.trust.com/15133 for up-to-date FAQs, drivers and instruction manuals. For extensive service, register at www.trust.com/register.

Energy
- Change remote control battery when performance is decreasing. Only use 3V CR2025 Lithium batteries.
- Never recharge the batteries provided and never throw them onto a fire.
- Observe local regulations when disposing of batteries.

Safety instructions
- Do not open or repair this device.
- Do not use the device in a damp environment. Clean the device with a dry cloth.

This device meets the essential requirements and other relevant conditions of the applicable European directives. The Declaration of Conformity (DoC) is available at www.trust.com/15133/ce.

- If possible, dispose of the device at a recycling centre. Do not dispose of the device with the household waste.
Warranty & copyright
This device has a two-year product warranty which is valid from the date of purchase. See www.trust.com/warranty for more information.
It is forbidden to reproduce any part of this instruction manual without the permission of Trust International B.V.
Produktinformationen

1x (FM) alebo 2x (AM).
PukOBOCTBOIOLb3OBATEJIa
3Trust
-CnybTa DnCTaHIOHOHorO ynpabHeHnHa HxMnte Ha KhoNky "Tune + / - ",ydepXHBa ee B HaxaTom nnoKeHH 2 cekHybl, Jl60
-COCHOBHOI nAHEN: HAKMITE 1 pa3 Ha KhoNky "volume + / -
HactpoKa BpyHyIO (ToHKa HactpoKa nn NoCK onpeJeHHo qactOtBu):
- C nyibTa DnCTaHcUHOHOrO ynpabIeHnra: Iyra CmehbI cactoTbI HaxMnte 1 pa3 Ha KhoNky "Tune +/-". Ecnn HyKHO, NOBTOpTe Haxatne.
Функцин Habtpoikn Bpyuhyo C ochOBHoi naHelen HeodctynHa.
PerynnpOBka rponKOCTn paHIO npOu3BOIDTC C OCHOBHO NaHEIN: HAXMNTe Ha KONKy"volume + / - "ydepXIBaee B HaxaTOM NIOXKeHN 2 cekyHdbI.
Bocpnon3BeHnna 3aHncei npdpc npeepa iPod nn npyroro 3BykoBocnpon3bOJaero yctpOCTBa
A Mepbi npedoctoPOXHOCTN
He BCKpbBaHTe Hn He NbITaHTecb pMOHTNPOBaTb YCTPOCTBO.
He noIb3yIteCb yCTpoHCTBOM npn noBbIeHHoB BlaXHOCTN. IIny HcTKn yCTpOCTBa noIb3yIteCb cyxOINKahHIO.
CE
- DAnHoe yCTpOHTBO COOTBeTCTByET BaxKHeIIM Tpe6oBaHNm IyCIOBnM, IN3IOKeHHbIM B DupeKTHBAX EBponeckoro Co03a. C DeKnapauee O COOTBeTCTBnN (DoC) MoXHO 03HaKOMITbcr No aDpccy: www.trust.com/15133/ce.

- YTNIN3aIg OTPa60TaHHOrO yCTpoIcTBA IPOIN3BOIDTCN IO BO3MOXHOCTN B CEHTpe BTOpHNOI nepepa6OTKn MaTePnaIOB. He Bb6paCbIABaTe yCTpoIcTBO BMeCTe C 6BITOBbIMN OTXdAMN.
TapaHTHbIe 06aTeJIbCTBa n ABTOpCKne npaba
Ha daHnoe yctpoicTBO paonpocpaHraTeC bByxroUHra rapaHTna, deiCTbYIOua co dhr ernpno6peHen. Ioppo6HcTn CM. no aDpecy: www.trust.com/warranty.
3anpeaaetcnoHoe nHn qactnHoe KOnnpobAHne daHHoro pykoBocTba 6e3 pa3peueHnKOMnaHn Trust International B.V.
RU


- Play / Recharge iPod with dock connector
- Synchronize iPod
- Use FM / AM Radio
- Play iPod Shuffle or other audio device
- Open battery compartment
- Note
- General use
- Video output
- Energy
- Safety instructions
- Warranty & copyright
- Produktinformationen
- PukOBOCTBOIOLb3OBATEJIa
- 3Trust
- Bocpnon3BeHnna 3aHncei npdpc npeepa iPod nn npyroro 3BykoBocnpon3bOJaero yctpOCTBa
- A Mepbi npedoctoPOXHOCTN
- CE
- TapaHTHbIe 06aTeJIbCTBa n ABTOpCKne npaba
Brand : TRUST
Model : SoundForce SP2991Wi
Category : Loudspeaker