
Multipro Compact FDM300SS - Food Processor KENWOOD - Free user manual and instructions
Find the device manual for free Multipro Compact FDM300SS KENWOOD in PDF.

| Product type | Food processor |
| Brand | Kenwood |
| Model | Multipro Compact FDM300SS |
| Power supply | 220-240 V, 50/60 Hz |
| Main bowl capacity | 1.2 L (max) |
| Blender capacity | 1.2 L (max) |
| Included accessories (standard) | Knife blade, dough hook, double whisk, slicing/shredding disc 2 mm, slicing/shredding disc 4 mm, extra fine shredding disc, blender (plastic or glass depending on version) |
| Optional accessories | Citrus press, compact chopper/grinder, mill, centrifuge juicer, Express Dice, Express Serve |
| Speeds | 2 speeds + pulse |
| Main functions | Chop, mix, knead, beat, slice, grate, blend, juice citrus, grind, centrifuge, dice, cut fries |
| Bowl material | Plastic (main bowl and plastic blender) or glass (blender if glass version) |
| Safety | Safety lock (bowl, lid, blender, mill), overload protection, sharp blades |
| Care and cleaning | Bowl, lid, pusher and accessories (except blade units and drive head) dishwasher safe; blade units cleaned with brush; motor unit wiped with damp cloth |
| Spare parts and repairability | Kenwood authorised repair centre; www.kenwoodworld.com website |
| Warranty | In accordance with the legal provisions of the country of purchase |
| Compliance | CE, regulation 1935/2004 for food contact |
Frequently Asked Questions - Multipro Compact FDM300SS KENWOOD
User questions about Multipro Compact FDM300SS KENWOOD
0 question about this device. Answer the ones you know or ask your own.
Ask a new question about this device
Download the instructions for your Food Processor in PDF format for free! Find your manual Multipro Compact FDM300SS - KENWOOD and take your electronic device back in hand. On this page are published all the documents necessary for the use of your device. Multipro Compact FDM300SS by KENWOOD.
USER MANUAL Multipro Compact FDM300SS KENWOOD
- Read these instructions carefully and retain for future reference.
- Remove all packaging and any labels.
- If the plug or cord is damaged it must, for safety reasons, be replaced by Kenwood or an authorised Kenwood repairer in order to avoid a hazard.
- DO NOT touch the sharp blades. The blades and discs are very sharp, handle with care. Always hold by the finger grip at the top, away from the cutting edge, when handling the sharp cutting blades, emptying the bowl and during cleaning.
DO NOT process hot ingredients. - Be careful if hot liquid is poured into the food processor or blender as it can be ejected out of the appliance due to sudden steaming.
- Never leave the appliance unattended when it is operating.
- Do not exceed the maximum capacities stated in the recommended usage chart.
- Do not operate your appliance for longer than the times specified below without a rest period. Processing continuously for longer periods can damage your appliance.
| Function/Attachment Maximum Operation Time | Rest Period Between Operations |
| Blender 60 secs | |
| Heavy mixtures in the bowl (e.g. Dough) | 60 secs |
| Mini Chopper/Mill 30 secs | |
| Grinding Mill 60 secs |
- Do not lift or carry the processor by the handle - or the handle may break resulting in injury.
- Always remove the knife blade before pouring contents from the bowl.
- Keep hands and utensils out of the processor bowl and blender goblet whilst connected to the power supply. If food needs to be pushed down use a suitable utensil such as a spatula.
- Always switch off the appliance and disconnect from the supply if it is left unattended and before assembling, disassembling or cleaning.
- Never use your fingers to push food down the feed tube. Always use the pusher supplied.
-
Never fit the blade assembly to the power unit without the goblet or mill jar/lid fitted.
-
CAUTION: Before removing the lid from the bowl, blender or mill from the power unit:
switch off;
o wait until the attachment/blades have completely stopped;
be careful not to unscrew the blender goblet or mill jar from the blade assembly.
- Do not use the lid to operate the processor, always use the on/off speed control.
-
This appliance will be damaged and may cause injury if the interlock mechanism is subjected to excessive force.
-
Never use an unauthorised attachment.
- Never use a damaged appliance. Get it checked or repaired: see 'Service and Customer Care'.
- Never let the power unit, cord or plug get wet.
- Do not let excess cord hang over the edge of a table or worktop or touch hot surfaces.
- Children should be supervised to ensure that they do not play with the appliance.
- This appliance shall not be used by children. Keep the appliance and its cord out of reach of children.
- Appliances can be used by persons with reduced physical, sensory or mental capabilities or lack of experience and knowledge if they have been given supervision or instruction concerning use of the appliance in a safe way and if they understand the hazards involved.
- Only use the appliance for its intended domestic use. Kenwood will not accept any liability if the appliance is subject to improper use, or failure to comply with these instructions.
- Misuse of your processor, blender or mill can result in injury.
- The maximum rating is based on the mini chopper/mill attachment that draws the greatest load. Other attachments may draw less power.
Blender
DO NOT process hot ingredients.
SCALD RISK: Hot ingredients must be allowed to cool to room temperature before placing in the goblet or before blending.
- Always take care when handling the blade assembly and avoid touching the cutting edge of the blades when cleaning.
- Only operate the blender with the lid in place.
- Only use the goblet with the blade assembly supplied.
- Never run the blender empty.
- Smoothie recipes - never blend frozen ingredients that have formed a solid mass during freezing, break it up before adding to the goblet.
Mill Attachments
- Never fit the blade assembly to the power unit without the jar/ lid fitted.
- Never unscrew the jar/lid while the mill is fitted to your appliance.
- Do not touch the sharp blades - Keep the blade assembly away from children.
- Never remove the mill until the blades have completely stopped.
- The appliance will not work if the mill is incorrectly fitted.
- Do not process hot ingredients in the mill allow to cool down to room temperature before processing.
Mini Chopper/Mill
- The processing of spices is not recommended as they may damage the plastic parts.
Grinding Mill
- Do not process dried turmeric root as it is too hard and may damage the blades.
Juice extractor
- Do not use the juicer if the filter is damaged.
- The cutting blades on the base of the filter drum are very sharp, take care when handling and cleaning the drum.
- Only use the pusher supplied. Never put your fingers in the feed tube. Unplug before unblocking the feed tube.
- Before removing the lid, switch off and wait for the filter to stop.
Express Dice/Express Serve Attachment and Discs
- The cutting grid and discs are very sharp; handle with care when fitting, removing and cleaning. Always hold by the finger grip away from the cutting edge when handling the sharp cutting blades, emptying the bowl and during cleaning.
- Never use your fingers to push food down the feed tube. Only use the pusher supplied.
- Do not use excessive force to push food down the feed tube - you could damage your attachment.
- Before removing the lid, switch off wait until the cutting disc has completely stopped.
- Do not pour hot liquids down the feed tube.
Express Serve
- Avoid contact with moving parts. Keep fingers out of the food outlet opening.
- Do not operate when using the Dicer or Discs without the slinger plate fitted. If the slinger plate is not fitted food will
clog under the plate and not exit the food outlet, resulting in damage to your attachment.
- The citrus juicer is not designed to be used with the Express Serve. Always use the citrus juicer with the main bowl.
Cleaning
- Wipe the power unit and whisk drive head with a damp cloth, then dry. Ensure that the interlock area ⑧ is clear of food debris.
- Do not immerse the power unit, blade assemblies or whisk drive head in water.
- The bowl, lid, pusher and all attachment/tool apart from the blade assemblies and whisk drive head are suitable for both handwashing and dishwashing.
- The blade assemblies should be brushed clean and rinsed under running water.
Before plugging in
- Make sure your electricity supply is the same as the one shown on the underside of your appliance.
This appliance conforms to EC Regulation 1935/2004 on materials and articles intended to come into contact with food.
Before using for the first time
1 Remove the plastic blade covers from the knife blade. Take care the blades are very sharp. These covers should be discarded as they are to protect the blade during manufacture and transit only.
2 Wash the parts see 'Care and Cleaning'.
Key
Processor
Pusher
(2) Feed tube
(3) Lid
(4) Bowl
(5) Detachable drive shaft
6 Power unit
(7) Speed/pulse control
(8) Safety interlocks
(9) Cord storage (at back)
10A Plastic Blender (if supplied)
a Blade assembly
b Sealing ring
C Goblet
d Filler cap
e Lid
10B Glass Blender (if supplied)
a Blade assembly
b Sealing ring
C Goblet
d Lid
eFiller cap
C Standard Attachments
Knifeblade
Dough tool
(13) Dual whisk
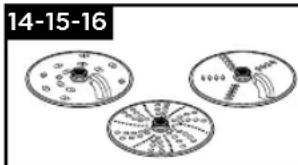
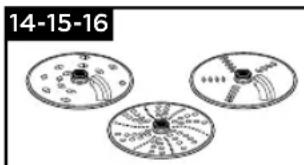
4mm slicing/grating disc
15 2mm slicing/grating disc
16 Extra fine grating disc
Attachments
Not all of the attachments listed below may be included with your food processor. Attachments are dependent upon the model variant. Visit www.kenwoodworld.com for information on how to buy an attachment not included in pack.
D Optional Attachments
Citrus juicer (if supplied)
Glass mini chopper/mill (if supplied)
Plastic mini chopper/mill (if supplied)
Grinding mill (if supplied)
2) Juice extractor (if supplied)
22 Express Dice (if supplied)
23 Express Serve (if supplied)
To Use Your Food Processor
Illustrations 1-3
1 Fit the detachable drive shaft onto the power unit.
2 Then fit the bowl by aligning the on the bowl with the on the power unit, turn clockwise until it locks
3 Fit an attachment over the bowl drive shaft.
Always fit the bowl and attachment onto the processor before adding ingredients.
4 Fit the lid - ensuring the top of the drive shaft/tool locates into the centre of the lid.
- Do not use the lid to operate the processor, always use the on/off speed control.
5 Plug in, switch on and select a speed. (Refer to the recommended usage chart).
- The processor will not operate if the bowl or lid are not fitted correctly into the interlock. Check that the feed tube and bowl handle are situated to the right front hand corner.
- Use the pulse (P) for short bursts. The pulse will operate for as long as the control is held in position.
6 Reverse the above procedure to remove the lid, attachments and bowl.
Always switch off and unplug before removing the lid.
Important
- Your processor is not suitable for crushing or grinding coffee beans, or converting granulated sugar to caster sugar.
- When adding almond essence or flavouring to mixtures avoid contact with the plastic as this may result in permanent marking.
Using The Attachments Refer to recommended usage chart for each attachment.
10A Plastic Blender (if supplied)
To Use Your Blender
Illustrations 4-6
1 Fit the sealing ring into the blade assembly - ensuring the seal is located correctly in the grooved area.
- Leaking will occur if the seal is damaged or incorrectly fitted.
2 Hold the underside of the blade assembly and insert the blades into the goblet - turn anti-clockwise until it is secure. Refer to the graphics on the underside of the blade assembly as follows:
- Unlocked position
- Locked position
3 Put your ingredients into the goblet.
4 Fit the lid onto the goblet and turn clockwise until it clicks. Fit the filler cap.
5 Place the blender onto the power unit, align the G on the blender with the U on the power unit and turn clockwise to lock
- The appliance will not operate if the blender is incorrectly fitted to the interlock.
10B Glass Blender (if supplied)
To Use Your Blender
Illustrations 7 - 9
1 Fit the sealing ring into the blade unit - ensuring the seal is located correctly in the grooved area.
- Leaking will occur if the seal is damaged or incorrectly fitted.
2 Screw the goblet onto the blade assembly. Refer to the graphics on the underside of the blade unit as follows:
- Unlocked position
- Locked position
3 Put your ingredients into the goblet.
4 Fit the lid to the goblet and push down to secure. Fit the filler cap.
5 Place the blender onto the power unit, align the on the blender with the on the power unit and turn clockwise to lock
- The appliance will not operate if the blender is incorrectly fitted to the interlock.
Hints and Tips
- When making mayonnaise, put all the ingredients, except the oil, into the blender. Remove the filler cap. Then, with the appliance running, add the oil slowly through the hole in the lid.
- Thick mixtures, e.g. pâtés and dips, may need scraping down. If the mixture is difficult to process, add more liquid.
- The processing of spices is not recommended as they may damage the plastic parts.
- To blend dry ingredients - cut into pieces, remove the filler cap, then with the appliance running, drop the pieces down one by one. Keep your hand over the opening. For best results empty regularly.
11 Knife Blade
Follow the instructions under 'to use your food processor'.
Hints and Tips
For coarser textures use the pulse control.
Cut food such as meat, bread, vegetables into cubes approximately 2cm.
- Biscuits should be broken into pieces and added down the feed tube whilst the appliance is running.
Take care not to over-process.
- When making pastry use fat straight from the fridge cut into 2cm cubes.
12 Dough Tool
Use for yeasted dough mixes.
Follow the instructions under 'to use your food processor'.
Hints and Tips
- Do not process for longer than 60 seconds.
- Place the dry ingredients in the bowl and add the liquid down the feed tube whilst the appliance is running. Process until a smooth elastic ball of dough is formed.
- Re-knead by hand only. Re-kneading in the bowl is not recommended as it may cause the processor to become unstable.
13 Dual Whisk
Using The Whisk
1 Fit the drive shaft and bowl onto the power unit.
2 Push each beater securely into the drive head.
3 Fit the whisk by carefully turning until it drops over the drive shaft.
4 Add the ingredients.
5 Fit the lid - ensuring the end of the shaft locates into the centre of the lid.
Hints and Tips Important
- The whisk is not suitable for making all in one cake mixes as these mixes are too heavy and will damage it. Always use the knife blade.
- Best results are obtained when the eggs are at room temperature.
- Ensure the bowl and whisks are clean and free from grease before whisking.
14 - 16 Discs
To Use The Cutting Discs
1 Fit the drive shaft and bowl onto the power unit.
2 Holding by the centre grip, place the disc onto the drive shaft with the appropriate side uppermost.
3 Fit the lid.
4 Put the food in the feed tube.
5 Switch on and push down evenly with the pusher - never put your fingers in the feed tube.
Hints and Tips
- Use fresh ingredients
- Do not cut food too small. Fill the width of the feed tube fairly full. This prevents the food from slipping sideways during processing.
- When slicing or grating: food placed upright comes out shorter than food placed horizontally.
- There will always be a small amount of waste on the disc or in the bowl after processing.
17 Citrus Juicer (if supplied)
a Cone
b Sieve
To use the citrus juicer
1 Fit the drive shaft and bowl onto the power unit.
2 Fit the sieve into the bowl - ensuring the sieve handle is locked into position directly over the bowl handle.
3 Place the cone over the drive shaft turning until it drops all the way down.
4 Cut the fruit in half. Then switch on and press the fruit onto the cone.
- The citrus juicer will not operate if the sieve is not locked correctly.
Hints and Tips
- For best results store and juice the fruit at room temperature and hand roll on a worktop before juicing.
- To help with juice extraction move the fruit from side to side when juicing.
- When juicing large quantities, empty the sieve regularly to prevent the build up of pulp and seeds.
18/19 Mini Chopper/Mill (if supplied)
a Jar
b Sealing ring
C Blade assembly
1 Put the ingredients into the jar.
2 Fit the sealing ring into the blade assembly.
3 Turn the blade assembly upside down. Lower it into the jar, blades down.
4 Screw the blade assembly onto the jar until finger tight. Refer to the graphics on the underside of the blade assembly as follows:
G - Unlocked position
- Locked position
5 Place the mill onto the power unit, align the
on the mill with the on the power unit and turn clockwise to lock
6 Select Maximum speed or use the pulse (P).
Hints and Tips
- Baby food/puree - allow cooked food to cool down to room temperature before processing in the mill.
- For best results the main bowl is recommended when chopping herbs.
20 Grinding Mill (if supplied)
a Mill lid
b Grinding mill blade assembly
1 Place your ingredients into the blade assembly.
2 Fit the lid and turn clockwise to lock.
3 Place the mill onto the power unit and turn clockwise to lock.
4 Select maximum speed or use the pulse (P).
Hints and Tips
- For optimum performance when processing spices do not process more than 50g at a time.
Whole spices retain their flavour for a much longer time than ground spices so it is best to grind a small quantity fresh at a time to retain the flavour. - To release the maximum flavour and essential oils whole spices are best roasted prior to milling.
- Do not process dried turmeric root in the mill as it is too hard and may damage the blades.
- Cut ginger and coconut into small pieces before processing.
- For best results the main bowl is recommended when chopping herbs.
21 Juice Extractor (if supplied)
a Pusher
b Juicer lid
C Pulp remover
d Filter drum
e Bowl
f Juicing spout
To use the juice extractor
1 Fit the juicer bowl to the power unit, turn clockwise until it locks - the spout should be situated to the left side when the bowl is fitted correctly.
2 Place the pulp remover into the filter drum - ensuring the tabs locate with the slots in the bottom of the drum.
3 Fit the filter drum
4 Fit the attachment lid - turn clockwise until it locks. Your juicer will not operate if the bowl or lid are not fitted correctly into the interlock .
5 Place a suitable glass or jug under the juice outlet.
6 Cut the food to fit the feed tube.
7 Switch on and push down evenly with the pusher - never put your fingers in the feed tube. Process fully before adding more.
After adding the last piece, let the juicer run for a further 30 seconds to extract all the juice from the filter drum.
important
- If the juicer starts to vibrate, switch off and empty the pulp from the drum. The juicer vibrates if the pulp becomes unevenly distributed.
- Some very hard foods may make your juicer slow down or stop. If this happens switch off and unblock the filter.
- Switch off and clear the pulp collector regularly during use.
Hints and Tips
- Before processing remove stones and pips (eg pepper, melon, plum) and tough skins (e.g. melon, pineapple). You do not need to peel or core apples and pears.
- Use firm, fresh fruit and vegetables.
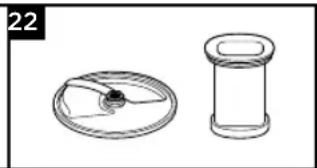
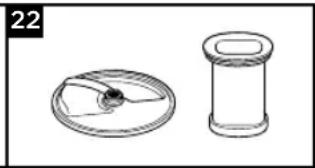
22 Express Dice (if supplied)
a Dicing disc
b Dicing grid
C Dicing pusher
Important: the dicing disc is designed only to be used with the dicing attachment.
To use the Express Dice
1 Fit the drive shaft and bowl onto the power unit.
2 Add the dicing disc and fit the lid.
3 Fit the dicing grid into the feed tube.
4 Switch on and use the dicing pusher to process food items through the dicing grid.
Hints and Tips
- To assist with processing place both hands on top of the pusher and press down firmly.
- For best results, use raw fresh fruit and vegetables.
- To prevent the food from jamming do not pack the food tightly in the feed tube - ideally the food should be cut no larger than:
$$ 5 0 \times 3 0 m m $$
- If the food is too hard to push through the grid cook for approximately 10-15 minutes, then allow to cool in a refrigerator before processing.
Always remove hard skins, stones, pips and seeds etc., from food before processing.
Note:
- Due to the various sizes and shapes of foods, the diced results will contain some misshapen pieces, this is normal.
- Foods such as cheese, ham, and chorizo will clog in the grid so are not recommended for use with this attachment.
Cleaning the grid
Use the end of the pusher to dislodge any food which may become trapped in the dicing grid.
22A The Express Dice can also be used to produce French fries, crudités and batons.
1 Fit the dicing grid without the dicing disc.
2 Then manually push the food through the grid without switching the appliance on.
23 Express Serve (if supplied)
a Express serve drive shaft
b Extension chute
C Base
d Slinger plate
1 Fit the drive shaft and bowl onto the power unit.
2 Fit the small drive shaft to the main shaft - the Express serve will not operate unless fitted.
3 Fit the required attachment/disc - do not apply excessive force. Refer to the Discs and Express Dice sections for further information, hints and tips.
Use in conjunction with the following:
Important - Dicer and Discs
- If the food is not exiting the food outlet, switch off and check that food is not clogging under the disc and the slinger plate is fitted. Clear any trapped food before continuing to process.
Care and Cleaning
Always switch off and unplug before cleaning.
- Handle the blade and cutting discs with care - they are extremely sharp.
- Some foods may discolour the plastic. This is perfectly normal and will not harm the plastic or affect the flavour of your food. Rub with a cloth dipped in vegetable oil to remove the discolouration.
Power Unit
- Wipe with a damp cloth, then dry. Ensure that the interlock area ⑧ is clear of food debris.
- Do not immerse the power unit in water.
- Store excess cord in the storage area at the back of the power unit (9).
Cleaning Instructions - Refer to the relevant illustration 24
Service and Customer Care
- If you experience any problems with the operation of your appliance, before requesting assistance refer to the 'Troubleshooting Guide' section in the manual or visit www.kenwoodworld.com.
- Please note that your product is covered by a warranty, which complies with all legal provisions concerning any existing warranty and consumer rights in the country where the product was purchased.
- If your Kenwood product malfunctions or you find any defects, please send it or bring it to an authorised KENWOOD Service Centre. To find up to date details of your nearest authorised KENWOOD Service centre visit www.kenwoodworld.com or the website specific to your Country.
- Designed and engineered by Kenwood in the UK.
Made in China.

IMPORTANT INFORMATION FOR CORRECT DISPOSAL OF THE PRODUCT IN ACCORDANCE WITH THE EUROPEAN DIRECTIVE ON WASTE ELECTRICAL AND ELECTRONIC EQUIPMENT (WEEE)
At the end of its working life, the product must not be disposed of as urban waste. It must be taken to a special local authority differentiated waste collection centre or to a dealer providing this service.
Recommended Usage Chart
Do not operate your appliance for longer than the times specified below without a rest period.
Do not exceed the maximum capacities stated in the chart below.
Processing continuously for longer periods can damage your appliance.
Processing information supplied is for guidance only and will vary depending on the exact recipe and ingredients being processed.
Do not process hot ingredients
| Tool/ Attachment | Function | (L (Secs) | ||
| All in one cake mixes 2 10 1.2kg total | weight | |||
| Pastry - rubbing fat into flour Adding water to combine pastry ingredients | 2 1-2 | 10 10-20 | 300g flour weight | |
| Chopping fish and lean meat Pâtés and terrines | 2 10 - 30 | 400g max | lean beef | |
| Chopping vegetables P 5 - 10 100 - 500g | ||||
| Chopping nuts 2 30 - 60 | 100g - 200g | |||
| Herbs 2 20 - 30 30-50g | ||||
| Mayonnaise 2 60 - 80 4 egg yolks | ||||
| Pureeing soft fruit, cooked fruit and vegetables | 2 10 - 30 | 500g | ||
| Egg whites | 2 | 60 - 120 | 2 - 6 (200g) | |
| Whipping cream (Processing times may vary, depending on fat content of cream) | 2 | 60 - 120 250 | -500ml | |
| Yeasted mixes | 2 | 60 | 340g flour weight 550g total weight | |
| Recommended Usage Chart Do not operate your appliance for longer than the times specified below without a rest period. Do not exceed the maximum capacities stated in the chart below. Processing continuously for longer periods can damage your appliance. Processing information supplied is for guidance only and will vary depending on the exact recipe and ingredients being processed. Do not process hot ingredients | ||||
| Tool/ Attachment | Function | (L (Secs) | ||
| Grating and slicing firm food items - cheese, carrots, potatoes and foods of a similar texture | 2 | - | Do not fill above the maximum 1.2L marked on the bowl | |
| Slicing softer food items - cucumbers and tomatoes | 1 | - | ||
| Grates Parmesan cheese 2 - | ||||
| Use to squeeze the juice from citrus fruits e.g.oranges, lemons, limes and grapefruits. | 1 | - | - | |
| Cold liquids and drinks (Add ice/frozen ingredients to goblet last) | 2 30 - 60 | 1.2 litre | ||
| Milkshake/Cold milk based mixtures 2 15 - 30 1 litre | ||||
| Ice crushing P 30 - 40 6 ice cubes | (125g) | |||
| Batter mix (Add liquid ingredients first) | 1 2 | 10 50 | 1 litre | |
| Nuts 2 10 - 30 50g | ||||
| Coffee beans 2 30 50g | ||||
| Uncooked meat (beef steak) cut into 2cm cubes | P | 5 | 70g | |
| Processing spices Black peppercorns, cardamom seeds, cumin seeds, coriander seeds and fennel seeds | 2 | 30 - 60 | 50g | |
| Grinding coffee beans | 2 | 50g | ||
| Chopping nuts | P | - | 50g | |
| Processing garlic cloves, fresh chillies and root ginger | P | - | 30g | |
| Fresh coconut | 2/P 30 - 60 | 40g | ||
| Fruit and vegetables | 2 - 600g | |||
| Tool/ Attachment | Function | (L (Secs) | ||
| Use to cut a variety of foods such as carrot, courgette, cucumber, beetroot and apples into cubes. | 2 | - | Do not fill above the maximum capacity marked on the bowl | |
| Use to cut a variety of foods into French Fries and crudités such as potato, carrot, courgette and cucumber. | Manual | |||
| Troubleshooting Guide | ||
| Problem Cause Solution | ||
| The processor will not operate. | No Power.Bowl not fitted to power unit correctly.Bowl lid not locked on correctly. | Check processor is plugged in.Check bowl is located correctly and the handle is situated towards the right front hand corner.Check that the lid interlock is located correctly into the handle area.The processor will not work if the bowl and lid are fitted Incorrectly.If none of the above check the fuse/circuit breaker in your home. |
| Blender or mill will not operate. | Blender or mill not locked on correctly.Blender or mill not assembled correctly. | The blender or mill will not operate if fitted incorrectly to the interlock.Check blade assembly is fully tightened into the goblet/jar. |
| Processor stops during processing | Processor overloaded/ maximum capacities exceeded.Lid unlocked. | Check maximum capacities stated in the recommended usage chart.Check lid is locked correctly. |
| Blender or multi mill leaking from blade assembly base. | Seal missing.Seal incorrectly fitted Seal damaged. | Check seal is fitted correctly and not damaged. To obtain a replacement seal see 'Service and customer care'. |
| Poor performance of tools/attachments | Refer to hints in relevant 'Using the attachment' section. Check attachments are assembled correctly. | |
Nederlands
Hachoir/moulin compact
18/19 Hachoir/moulin compact (si fourni)
-
Oplast position
-
Last position
- Oplast position
- Last position
-
Past position
-
Last position
Nasadka Express Dice/Express Serve i tarcze
10B CkAHH 6aHep (3a HaaBHOCTi)
a HoKOBn 6AoK
b y 1aHIOBaaHe KIAbue
C Yaasa
d KpnuKa
e KoBnaayok 3aANBHOI TOpAOBHIN
C CtaHdapThe npnAaA
Hix
12 HacaKaAABIMiUyBaHHTicTa
13 POnDbiHa 36nBaUka
4-MiIMeTPOBn DNCK DAAHap3aHHHaTnpaHH
15 2-MiImeTPOBn DnCK dAЯ Hapi3aHHHaTnpaHH
16 ANCK AAN OCOBANBO TOHKORO HAITnpaHHA
HacaKn
He BCE 306paXeHe npAaDMy MoXe BXoAnTu DO KOMnAEK TY BaUoro KYXOHHO R KOmbayu. HaraBnictb npAaDMy 3aExkntb BiO o6pahoi moeai. BiDi#aTe www.kenwoodworld.com DAA OTpMaHHI hOpMaui Ipo Te, kKynTN HaCaKn, kI He BXoAryb DO KOMnAEK TY.
D OaATKOBe npnaA
⑰ COKOyABNkAaAaLHTpycoBnx (3aHaRBHOCTi)
18 CkAHH MInHOpi6HOBaU/MnHOK (3a HABHOCTi)
19PiactMacOBmMiHIOaPi6HIOBa/MAHOK (3a HaBHOCTi)
20 HacaKa-noDi6HIOBaY nnnoy (3a HaBHOCTi)
21 COKOBUNKMAKα(3aHaRBHOCTI)
Express Dice (3a HareBhocti)
23 Express Serve (3a HaryBHOCTi)
10B CkAHH 6aHep (3a HaBHOCTi)
K KOpNCTyBaTnC6IeHdepom
MaHIOHOK 7 - 9
1 BcTaHOBIb yUJIaHIOBaIbHe KIAbue B HOKOBIN 6AOK TAKIM YIHOM, UO6 BOHO 6yAo npaBnABHO po3aIOBaHe yKoAO6i.
- 8KIO yUJIaBHOBAu NOUKOJKeHn a6o NOrO 6yAo BCTaHOBAEHO HEnpaBnAho, ce MoXe cnpuHHnI npOTiKaHH.
2 HaKpyTITb YaSy MIKcepa Ha HOXOBn 6AOK. AINB. MaIOHKN Ha 3BOPOTHi CTOpOHHOXOBORO 6AOKa:
- Po36λOKOBaHa no3nizir -36λOKOBaHa no3nizir
3 NOKAAIDITb INrpeAIEHTN DO YAWI.
4 YcTaHOBIb KpIuKU Ha YaUy Ta HAtNCHiTb, Uo6n 3aΦiKCyBaTu Ha Micu. YcTaHOBiTb KOBNaOH 3aANBaA bHOrO OTBOpY.
5 Nomictb yauy kombaHa Ha 6oK eAeKTPoADBnryHa TaK, 06 No3HaUka Ha yaui kombayHy cnBnaaaa 3 no3HaKoHa Ha 6oui, NOBepHt b 3a RoAnHHKOBOO CTPIAKOIO, 06 3abokyBaTN
- RaKIO 6LeHep 6yAo BCTaHOBVAeHO HEnpaBnAByo y Mexahi3Mi 6IoKYBaHHa, PpuaA He npaIOBaTMe.
Kopnchi npaAn
Piud npnroTyBaHHmaHOHe3y, nokAaidYc iHrpeiEHTNdo 6aehepa,3a BnHrtKOMoii.BNTRHTb KOBNaQOK 3aNNBHOIROPAOBHN. Notim yBIMKHITb npnaad TaNOiABHO DOaTe OAIIO uepe3 OTBip yKpui.
PiJac npiroTyBaHHr rycnxC cyMiwei, HapnKlaad, naWTeTIB a6o coycib, moKe TpaHNTncb HaunnaHHr npOdykTu Ha CTiHKn yAwi. Y TakOMy BnnaDky NoTppiHo II Ounchntn. JaKuo IHrpdeJeHTN IOraHO 3MiUOTbcra,doaai Te pINHn.
He pekomeHdyetbcra noapipbHOBaTN cneii, aXKe ce MOKe NOWKOANTN PAACTNKOBI Aetai.
LIO6 3MiWATn cyxihrpeJeHTN, npixkTe ix Ha WMaTOUKN, BNTARHITb KOBnaQOK 3aANBHOI TOpAOBHH, a NOTIM YBIMKHTb pINAA Ta NocAIIOBHO DOaBaHTe NO ODHOMy WMaTOUky Do yawi. Pyky TpImaHTe HAD OTBOPOM. AAnOTpIMaHHaHKnpaIoTO pe3yABtaty, peryAraHPO cnYcTOnuYnte yawy.
11 Hix
DotpmyTecb Bka3iBOK 3 po3aIy «K KOPNCTyBaTnCry KxOHnM KOM6aHOMX.
Kopnci npa
Ara rpybiux TeKcTpy 3acTOcoByTe imyabchn pekum.
Taki npOdyKTn,ЯK M'aco, XaI6, OBOuyi Hapi3yIte Ky6uKaMPO3MpOM npu6An3HO 2cm.
- NeuBO cIa NOKpnHHTn Ta 3acnpatn Hepe3 Tpy6ky y xoDi pO60Tu KOM6aHy.
- CaiKyTe 3a Tm, 06 He niAbaTn IHRpeiEHTN HaMipHi o6pO6u.
KnupAraTicTa CaiHapi3aTu XoAoAHM Ha Ky6uKn no 2 cm.
12 HacaKa AIA BIMiUyBaHHa Ticta
BukopncTOByeTbcA AAn ApKxkoBOrO Ticta
Aotpmyntecb Bka3iBOK 3 po3diy «K KOpNCtYBaTnCk KyXOHHm KOM6aHOM
Kopnchi npaAn
- 06po6ka NOBHHa TpNBaTN He DOBWe 60 CEkyHd.
- Покады cyxi inhpeiEHTN do yama i Доавайт piinHy cheez 3aBaHTaKyBaIbHy Трубky B npoueci po60t npicTpIo.
OboKy npoobKyIte oTo, NOK Ticto He nepeTBopnTbca Ha IaKy eAactNHy KyaIO.
- NOBTOPHO 3amiybaTHn CIAI TIAbKN pykAMn. He peKOMeHdyetybCra 3aIChIOBaTHn NOBTOpHe 3amiyBaHHy y aWi, OCKAIbKN ue MOKe npN3BecTN DO HecTIKOi PObOTn KOM6aHy.
13 NoadBiInHa 36nBaUka
BnKOpncTaHHa 36Nauch
1 BcTaHOBIb BaI npINBOy i aUy Ha 6AoK eAekTPOABBHyHa.
2 HaJInHO BCTaBTe KOKeH BiHcN K y rOAnBky 3 npuBOAoM.
3 BctaHOBIb 36nBaUky, o6epeKHo NOBepTaIouN II, OOKI BOHa He ONyCTITbcra Ha npuBOAHIN BaA.
4 NOKaIb noTpi6Hi iHrpeAieHTN.
5 BctaHOBiB KpNkU, cAikkyuOu 3a Tm, IIO6n TopeCb BaA oINHBCr No ceHTpy KpNkN.
Kopnci nopadnyBara!
He BnKOpNCToBvIe BiHUnk AynibepcaAusbHx cymiuei AAn nporib, OckiAkn ce MoKe NOnKoAHTn HacaAky. BnKOpNCToBvIe HIX AAn 3amiyBaHHa Ticta.
- AIA OTRPMaHHHaIKpaUO pe3yAHTy BnKOpNCTOByIe Rn, Uo 36epiraNc 3a KIMHaTHoi TeMnepaTpyi.
- Npepa 36buaHHn pekehoaHTecra, 100 aWaa i BiHnK uNCTi Ta He MICTaAunKIB KInpy.
14 - 16 ANCKN
1 BcTaHOBtB npINBOHn BaI yHa 6LoK KINBAEHHJ.
2 BcTaHOBiTb HeBeAikn BaA npNBOdy Ha roAOBn npNbiD - Express serve He 6yde npaOBoATn, kso Bin He BcTaHOBaeHn.
3 BctaHObit Heo6xIhHe npAaAra/Anck - He 3actocobyTe HaMipHy cnAy. AHB. po3iA "Anck" Ta "Express IHcTpymeHT AHaHapi3kn Ky6nKaMn "i3 NoaAboIO iHOpMaicio, npimitkamn TaPiKa3kAmn.
BukopncToBynte pa3oM i3 hactynHm:
Baxnbo-HacaKaAHaHapi3Kn yΦopmi Ky6nkIB Ta dNCKN
- RaKUO npOyKTn He BnXoArytB 3 OTbOpY, BIMKHiTb Ta nepeBipTe, Hn He 3aCtpraIa Ika nIa BCTaHOBaeHm Anckom i 3anobixHHm IuTKOM. BuaaiTb 6ydb-ri npOyKTn, Rki 3aCtpraI, nepw HIX npOdoBkyBaTN o6pO6ky.
OorAra Ta uNueHn
3aBKnBnMkAte npnaTa Bia'dHynte NOro BiE aeKtpomepexi neped uHnneHnM.
- ПобадьТecь оберекно 3 HOЖЕм Та ріжуимп днCKами - BOHДУЖе roctpi.
- DeaykTMOkyTB 3he6apBAHOBATN NaactNKOBi deTaI. Ye BBaKaCTbCn HopMaA hM RAuHcEM, He np3BOADtB DO NOWKoXKeHb NAActNKOBnx DeTaIe Ta He BNANBaE Ha CMAK iKi. Lio6 BnuBecTN 3He6apBAEHy PAMy, NotpiB II raHupko3 MOueHO y pocAHHi oii.
BIAOK eAeKToaBnryHa
- PnotpiB BOIoroIO raHcyipKOIO,notIM BucywiTB. NepeKoHaITeCb, 10o 30Ha 6OkyBaHHa ⑧ OUnuHe Ha Bi CMITTJ.
He onyckaTe 6aok ealeKtpoDbnryHa y Body.
36epiraTe 3aBy yactiny hHypa y BiCiKy AIA 36epirAHn, kN p03TaObaHO y 3aHi YacTNI6oKa eAekTpOdBnryHa 9.
IHCtpyKci3uHnEHHa -INB.
BIDIOBIHy IIOCTpaio 24.
O6cIyroByBaHnTa peMOHT
- RaKIO B pO60Ti npuAaDu BNHKn 6yAb-RAI HeNoAaKN, nepeA 3BepHeHHaM AO cAyXbN iADTPnMkn IpouNTaHTe po3dIA «YcyHHeHn HecPpABHoCTe» B CbOMy Noci6HNY a6o 3aNdTb Ha caT www.kenwoodworld.com.
- Nam'raTaIe, 10 Ha npNAAd NOUHPOeTbcraPauHTi, 10 BIDNOBIAe BCIM 3aKOHnM NOLOXKeHHaM 10DO iCHyOoI rapaTii Ta npab cNoxNBAa B TiN KpaHl, De npNAAd 6yB npNDbAHn.
- Пп винкншни Hece npabHocti Bpo60ti
- рилду Kenwood abo prn BnraBaeHHI 6ydb- -якx DepeKtIB, 6ydb Aacka, HadiuAITb abo
- ринесiTb prinlad B aTOpN3OBaHni cepBicHni
- ceHTp KENWOOD. AkTyAblHi KOHTaKTHi daHI
- cepBicnX ceHTpiB KENWOOD Bu 3naideTe ha
- caTI www.kenwoodworld.com abo Ha caTI
- AA BaWoi' kpaHn.
CnpoeKToBaHo Ta po3pO6AeHO KOMnHaHcIO Kenwood, O6'eHaHe KopoAIBCTBO. - 3po6aHbB Kntai.

BAKANBA IHΦOPMAUJCTOCOBHO HAAEXHOIYTNAI3AUII NPOADYKTY 3ΓIADHO 13 ANPEKTOBOIO IPO YTNAI3AUIO EAEKTPNCHOROTAEKTKPOHHORO 0BAAADHAHHRA (WEEE)
IicA 3aKiHcHHe TepMHy eKcnayatauII He BnKaIaIte ue npuaad 3 iHUMN NObyTOBIMn BiXoAMn. BiHeciTb npuaad oMICeBOrO cneuaIbHO r ABTopnIOBaHO rENTpy 3bnpaHHr BiXoIDAB6 AOuAepa, knn MoKe HaATn TaKi NocAYr.

m = 311
i 1000000000000000000000000000000000000000000000000000
a≥g≤1|g≥a≤1
(WEEE)
g jell no jalil pue jiei jai iiaai yai jai gai aai
i 1
aaiia aiee
#
Jusj Jz jzll Jzzyaikzizg 10
1 1
y
. www.kenwoodworld.com
gai jy jia all lij y jia jia jia jia jia jia jia jia
jaii jaiii 1gai i gaiil ai
Lg 1
Jg j 1 Jk Kenwood
joo 100
JyooBjI JgOe OoLagJe Ie JGnN.KENWOOD
yagaa jKENWOOD
www.kenwoodworld.com
山
Kenwood 5Joo Joo
. = ( x1,y1) , = ( x2,y2)
aobly jia 100bly aifal Jk yg paoy b
. gaojol iag agall gall gie gai ta haoi
Jdssg jzjglpogjnl jia aabbl
. jolal lgaoljwby
有 + 2k + 1 < 1k + 1
jS jplab 1jy plabI Lac Jb gioi
22A 111111111111111111111111111
21
()
a
aJall gall bill
all jao C
d
a:blwll e
a1 = 2,an + 1 = n1 + n2
aannnne
()
ailll l aalw y wlll pall g jll
a
Lg
iJbUgSo ydiw!
j 1 j 1 j 1 j 1 j 1 j 1 j 1 j 1 j 1 j 1 j 1 j 1 j 1 j 1 j 1 j 1 j 1 j 1 j 1 j 1 j 1 j 1 j 1 j 1 j 1 j 1 j 1 j 1 j 1 j 1 j 1 j 1 j 1 j 1 j
plabll j 1
a
g 1eabll buele 10a aae Llaaie
()
a
ab = 1
glal 3rLac p
(g)aIbI aIbI bIbI IyR y 1
i 1
Lolai jaiy gia yjg jrgd gao yao yao yao
.
aill biaol jll laii p a i 15il al lae
jcklalll
clicsiig
i 1
Lg jyjcbjc Lyae Jg aSall yai, aesll ay
aal 1e 10
j5 j 84
aaiy aaiy aaiy gaiy ai yaiy s iie
S ACD = S COD + S BDO - S CDO
c
Jus Jus Jus Jus Jus Jus Jus Jus Jus Jus Jus Jus Jus Jus Jus Jus Jus Jus Jus Jus Jus
iagaiy iigll liqall jia kaill uall lij
joo jol 1
y
1 1 1 1 1 1 1 1 1 1 1 1 1 1 1 1 1 1 1 1 1 1 1 1 1 1 1 1
K
11
"pall jaii jiai iiswim" paae aolal lalaill
yai jiu
J 1
s
a 1
jglal
pabll aaii iiaaai ai jyj
o aal o a jiloo jolld gaii ciailaall juijic
y
12
P( a,b)
13
1
12200(gall)aill 1
Sall
J 1
jiehai jia jia jia jia jia jia jia jia jia jia
.0
J 1
all 1000
Loll pJi
10A
l1 l2 l_3
6-4
J 1
J1J 1
KJ 10
y
$$ \text {c i l l} \text {c i s o} = 6 $$
$$ j _ {i} \text {i} _ {i} \text {i} _ {i} = \theta $$
1 1
acllll 100000000000000000000000000000000000000
iill 1bc yj k!
6 2011
aalssgalee gall
aee aee aeell oaeol jie jlll (yjgall)
jaiie 1
co 1 k jai Jai jai Jai
Jaaa
(
eJolip
9-7
10 1
Jus Jus Jus Jus Jus Jus
1
KJ 10
y
a a
JLLS aai jaiil sajglaii glaagall
$$ \text {c i l l} \text {c i t a g e} = 6 $$
$$ j _ {i j} \text {c i g} = 0 $$
1
a j 1 a 2 a d 3 4 5 6
a
6 0dall gjpa (yajall) jlll dagc jll
zlll sglde gall 0xl lglal glsagall
a yaa aac aeall jaeol ayjell ayjll (yagall)
jaiell 230
C
Jaii
12 × 5 = 48 .
J 1111111111111111111111111111111111111111111
Aa
()⑦
() 18
()
(19)
()
a aalaae aae ae aee aee
Jell
ailllll 1 1 1 1 1 1 1 1 1 1 1
LJ 1 Jpabll jai jie aalalll lalil
.
y jyj yj yj yj yj yj yj yj yj yj yj
yall 1
jgl jglgll gss
On/ Caleyll kai Laiu lae
jglal gla glll jll lglal gla g
ailllll l 111111111111111111111111111111111
Pll lioe ie baiol jIg baiill Jiai
alall galllll lly yssaaayy aylll algal
a.1uLulg
gall all j! Jd jdl Jauu Lai g
La
s
aal 100
dLl 1e aesso oLe dJ ll dss
Express Serve
.
- 1
y g
1
. Express Serve
a
1
.
L
1e Ig/111 100 g plb1 100 g 100 g 100
a
.
y j 1j
jlll lalil glaaggl clalglll jlll lalld aolgo Jai no
2004/1935
() 10A
1a
3x - y = 1 恒成立 z1z2
= ( x1,y1) , = ( x2,y2)
aannnnn
glll lblll e
()10B
1a
3y ≤ y p 且 y 1 与 b
= ( x1,y1) , = ( x2,y2)
e
[ \Leftrightarrow \frac{a - b}{b - c} = \frac{c - d}{d - e}]
小
13
()
()()
15
y 1
g. 1
a 1
eill: lii eai iie 10
Jai
“diilgliee jg 1j
2001 23
pIaII 3
1,2,3,4
中
③
aJbU ④
⑤
(2015) ⑥
y
Jolzi
()
/aball ege g kgy jn bn (gog) aag y ge rafal dgsy jz .glal 1bll
. jglj g k j t a ball n g y glal /n bll sce g jz
. Jlbl Jolno ne g afla f -d aal l afl 2
. Lolaonn an en aga aall jtaa ball 1j z
.
.
.
.
.
.
.
.
.
.
.
.
a 10
J 1234567890
J 1234567890
J 1234567890
J 1234567890
J 1234567890
J 1234567890
J 1234567890
J 1234567890
J 123456
Express Dice/Express Serve 1
1234567890
1234567890
1234567890
1234567890
1234567890
1234567890
1234567890
1234567890
1234567890
1234567890
aalaaai aai bll g jzlal gl aialbll n c yglall lbll allj J
:(g)
:J 1
.
()On/Off
ggl ggl lal 111 111 111
.
.
jlll jlll jlll jlll
《》
JLL
y
.
1
1
JLJIJIJIJI
a 1
1
1
jlll jil
1
Joo 100000000000000000000000000000000000000000000000000000000
.
11 11 11 11 11 11 11 11 11 11 11
1
JALI 1
J
.
aalall gabll aal sssy jg yagaae Jolll sic laa
a.b.c. d.e f g
-
- 22222222222222
a
- lèjè 2. jèi
1
1 1
山
a
.
1
Kenwood 111
.Kenwood
y
g g g g g g g g g g g g g g g
Lg
y
g j 1
a
1
J 1
Jg j 1
J 1