
MZE29 - Iron MPM - Free user manual and instructions
Find the device manual for free MZE29 MPM in PDF.
| Product type | Steam iron |
| Brand | MPM |
| Model | MZE29 |
| Power supply | 220-240 V ~ 50-60 Hz |
| Rated power | 2800-3200 W (max 3500 W) |
| Water tank capacity | 330 ml |
| Soleplate type | Ceramic soleplate |
| Steam functions | Continuous steam, powerful steam, spray, vertical ironing |
| Temperature setting | Thermostat with positions: synthetic, silk/wool, cotton/linen |
| Anti-scale system | Active anti-scale cartridge, does not require replacement |
| Anti-drip function | Yes, stops steam if temperature too low |
| Automatic shut-off | Yes, after 8 min in vertical position, 30 sec in horizontal position |
| Self-cleaning function | Self Clean: cleaning of limescale deposits |
| Status indicators | Red (heating), Green (ready) |
| Cord length | 2.5 m |
| Usage | Household only |
| Maintenance | Clean soleplate with damp cloth, rinse tank, Self Clean every 2 weeks |
| Child safety | Supervision required, do not leave children unattended |
Frequently Asked Questions - MZE29 MPM
User questions about MZE29 MPM
0 question about this device. Answer the ones you know or ask your own.
Ask a new question about this device
Download the instructions for your Iron in PDF format for free! Find your manual MZE29 - MPM and take your electronic device back in hand. On this page are published all the documents necessary for the use of your device. MZE29 by MPM.
USER MANUAL MZE29 MPM
EN We wish you satisfaction from using the product and invite you to check a wide range of other MPM appliances
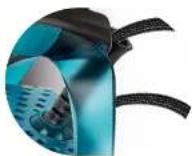
natural_image
Blue and black electric iron with a white steam iron, no visible text or symbols on the device itself.cz NAVOD K OBSLUZE 3
DE BEDIENUNGSANLEITUNG 9
EE KASUTUSIJHEND 16
EL ELXEIPIAIO XPH21E 22
EN USER MANUAL 29
ES MANUAL DE INSTRUCCIONES 35
FR MANUEL DE L'UTILISATEUR 42
HU HASZNALATI UTASITAS 49
IT MANUALE D'USO 55
LT VARTOTOJO VADOVAS 62
LV LIETOTAJA ROKASGRAMATA 68
NL GEBRUIKERSHANDLEIDING 74
PL NSTRUKCJA OBSŁUGI 81
RO MANUAL DE UTILIZARE 88
RU АНСПРУКЦИЯ ПО ОБСЛУЖИВАНИЮ 95
SK POUZIVATELSKA PRIRUCKA 102
UA ПОСІБНИК КОРИСТУВАЧА 108
Steam release button built into the underside of the handle
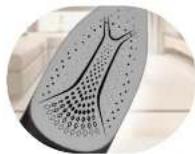
Ceramic soleplate

330 ml water tank
2.5 m power cord
Steam shot up to 190 g/min
Continuous steam output 35 g/min
BEZPEČNOSTNÍ POKYNY PŘI POUŽÍVÁNÍ
-Read the instructions carefully before use.
-The iron should be connected to an earthed mains socket.
- Take special care when children are near the appliance. The iron's soleplate must not be touched during ironing.
- Do not immerse the device, cable or plug in water or other liquids!
-Do not leave the iron unattended if connected to the mains.
- Do not hang the cable on sharp edges or allow it to come into contact with hot surfaces.
- Regularly check the power cord and the connecting hose for any damage.
- Never use a damaged device, including one with a damaged cord or plug, in which case have it repaired at an authorised service centre.
-Always unplug the device when not in use.
-Before cleaning, first unplug the device from the mains socket and wait until it has cooled down completely.
- Disconnect the device from the mains before filling in or emptying the tank.
- Fill the tank with water only. It is recommended to use distilled water to avoid limescale buildup on the iron's internal parts.
- Do not add any chemical agents to the water in the tank - they may damage the device.
- Do not use the device for purposes other than those for which it was intended.
-The device is intended for domestic use only.
-Do not use the device outdoors.
-Do not open the water tank's cover when using the device.
-The iron must be used and put away on a flat surface.
- Do not use the iron if it fell down, shows signs of damage or leaks.
- This equipment may be used by children of at least 8 years of age and by persons of diminished physical, mental capacity and lack of experience and knowledge of the equipment if supervision or instruction is provided regarding the safe use of the equipment so that the hazards involved are understood. Unsupervised children should not perform cleaning and maintenance on the equipment.
- Keep the device and its cord out of reach of children under 8 years of age.
- The device is not a toy and should not be used as such by children.
- Pour out the water remaining in the tank after the ironing is finished.
- Never iron clothes or fabric that are worn or placed on people or pets.
-Risk of burns – do not direct the vapor at people or animals. - Do not pull the plug out of the power socket by pulling the cord.
-Do not connect the plug to the power socket with wet hands. - Do not wind the power cable around the iron until it cools down.
- Do not place the device near electric or gas cookers, burners, ovens, etc.
- The equipment is not designed to operate using external timers or a separate remote control.
- When putting the iron away on the stand, make sure the surface on which the stand is placed is stable.
- Before switching the device on, make sure the mains parameters match the values on the device's identification plate.
- For the safety of children, please do not leave freely accessible parts of the packaging (plastic bags, cardboard boxes, polystyrene, etc.).
- WARNING! Do not allow children to play with the film. Danger of suffocation!
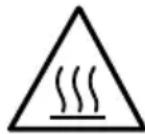
CAUTION! Hot surface! The symbol indicates that the surface of the device may reach very high temperatures during use. Their touch may result in burns, do not touch hot surfaces of the device, such as the working parts of the iron (soleplate), and parts of the housing in the immediate vicinity of the working elements of the device.
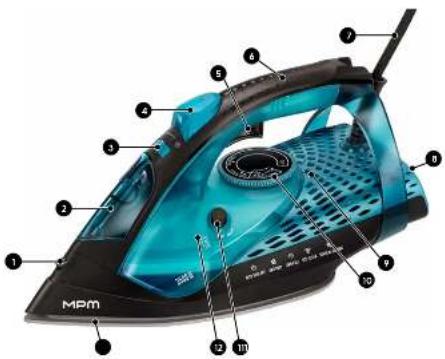
DESCRIPTION OF THE APPLIANCE
- Sprayer hole
- Water filler cover
- Steam control slider
- Water sprayer button
- High steam impact button
-
Hand
-
Mains cable
- Rear housing/base
-
Operational status indicator lights (red to indicate the unit is heating up, green to indicate it is ready for operation)
-
Temperature control knob
-
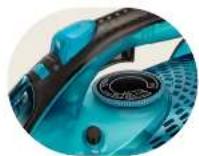
SELF-CLEAN button (self-cleaning the iron from sediment)
-
330 ml water tank
-
Ceramic soleplate
BEFORE FIRST USE
- Remove all stickers, covers and protective film from the iron's soleplate.
- Wash and rinse the measure.
CAUTION! Fumes can emanate from the iron and white powder may appear on its sole-plate during the first use. The fumes should disappear shortly and the white powder should disappear after several uses.
PREPARATION FOR USE
FILLING THE WATER RESERVOIR
- Make sure the device is not connected to the mains.
- Set the steam control slider (3) to the "NO STEAM" position 🎨.
- Open the water filler lid (2).
- Fill the water tank (12) to the maximum level. Check the maximum water level by placing the iron in the vertical position.
CAUTION! Do not fill the tank over the MAX level. In order to get the best results, always use fresh demineralized or distilled water. Do not use chemically descaled water or any other liquids.
- Close the water filler cover (2).
USING THE APPLIANCE
SETTING THE TEMPERATURE
- Connect the power cord plug (7) to a grounded power socket. The operating status light (9) will turn red to indicate that the device is heating up. In a situation where the iron has the temperature control knob (10) in the OFF position, then the operating status light (9) will light up green.
- Place the iron in an upright position and set the required ironing temperature by turning the temperature control knob (9) to the appropriate position. The indicator light (9) will illuminate red to indicate heating.
| MARKING ON THE IRON | THERMOSTAT ADJUSTMENT | FABRIC TYPE |
| • | low temperature synthetic materials | |
| •• | average temperature silk, wool | |
| .../MAX | high temperature cotton, linen | |
CAUTION! Check the required ironing temperature marked on the tag. If you do not know the fabric type of the ironed product, the correct ironing temperature should be determined by ironing the part of the product that will be invisible when worn or used.
We start from the lowest temperature gradually increasing it. Silk, wool and man-made fabrics - to prevent the formation of shiny stains, iron fabrics on the left side covering them with another thin fabric. Do not use the sprayer function to prevent the formation of stains when ironing. Iron velvet and similar materials in one direction, do not hold them in one place. Iron synthetic fabrics and silk on the left side without using steam.
CAUTION! Always start ironing with the products requiring the lowest ironing temper - ature.
- When the iron reaches the desired temperature the operating status light (9) will turn green, wait a moment and you can start ironing.
- During ironing, the indicator light (9) will alternate colours.
CAUTION! The iron has an AUTO SHUT OFF (FIREMAN) function. It is an electronic, safe shutdown of the iron when it is not used for a while. The safety feature works both when the iron is lying flat on a surface and when it is set aside in an upright position.
STEAM IRONING
- Check whether there is an appropriate amount of water in the tank (12).
- Set the recommended temperature (see: "TEMPERATURE SETTING").
- Select the appropriate steam setting 🎨 using the control slider (3).
CAUTION! Steam ironing is possible only at higher ironing temperature (temperature settings from ... to ...).
CAUTION! As the iron reaches the selected temperature, it will start to produce steam.
The device produces steam at a very high temperature!
IRONING WITHOUT STEAM
- Set the steam control (3) to the "NO STEAM" position
- Set the recommended ironing temperature (see: "TEMPERATURE SETTING").

SPRAYER FUNCTION
This function may be used in order to remove the stubborn creases.
- Check that there is enough water in the tank (12).
- In order to moisten the fabric that is to be ironed, press the sprayer button (4) several times.
HIGH STEAM IMPACT FUNCTION
To activate the steam boost function, press the steam release button (5).
CAUTION! The iron ejects a large amount of hot steam! Risk of scalding! Do not point the steam jet at people or animals!
VERTICAL STEAM IRONING VERTICAL IRONING
Hanging curtains and clothes (jackets, suits, coats) can be ironed by holding the iron vertically.
Position the iron with the foot parallel to the material at a distance of a few centimetres and move the iron by pressing the steam ejection key (5).
CAUTION! The iron shoots a lot of hot steam! Risk of scalding! Never aim the steam at people or animals!
ANTI DRIP SYSTEM
The iron is equipped with a drip lock function: the iron will automatically stop producing steam when the temperature is too low.
FIREMAN – AUTO SHUT OFF
The iron features the "FIREMAN" function. This is an electronic, safe shutdown of the iron when it is not used in the upright position for about 8 minutes, and in the horizontal position after about 30 seconds. The function is indicated by a beep, followed by the flashing of the operating status indicator lamp (9).
ANTI CALC FUNCTION – ACTIVE ANTI-SCALE SYSTEM
The anti-scale cartridge prevents the steam outlet holes from being clogged by limescale. It is permanently active and needs no replacement.
Do not use limescale removal agents as this may destroy the anti-scale cartridge.
AFTER FINISHING IRONING
- Set the steam control slider (3) to the "NO STEAM" position
- Set the temperature control knob (10) to the minimum position.
- Unplug the power cord (7) from the electrical socket.
- After ironing with the use of steam, empty the water tank (12).
- Put the iron in a safe place in an upright position and wait for it to cool down.
CLEANING AND MAINTENANCE
CAUTION! Never submerge the iron in water or rinse it under running water.
- Wipe off limescale and other deposits from the iron's soleplate (13) with a damp cloth and a (liquid) non-abrasive cleaner.
CAUTION! To keep the surface of the soleplate unscratched, the iron should not be placed near any metal objects. Do not use scourers, vinegar or other chemicals to clean the soleplate.
- Wipe the upper part of the iron with a damp cloth.
- Regularly rinse the tank with water (12) and empty it after rinsing.
SELF CLEAN FUNCTION – SELF-CLEANING
Use this function once in two weeks. Especially if you use tap water instead of distilled water. If the water in the area is very hard (i.e. limescale falls off the iron's soleplate during ironing), the function should be used more frequently.
- Make sure that the device is not connected to power sources.
- Set the steam slider in (3) the "NO STEAM" position.
- Fill the tank to the MAX level.
- Insert the plug to the earthed electric socket.
- Select the maximum ironing temperature.
- When the red indicator light goes off and the green indicator light comes on (9), unplug the iron from the power source.
-
While holding the iron over the sink, press and hold the SELF CLEAN button (11), then gently shake the iron. Steam and hot water will start to escape from the iron's soleplate. Impurities and limescale deposits will be flushed out.
-
After emptying the tank of water, release the SELF CLEAN switch (11). This activity must be repeated, if there are lots of impurities in the iron.
TECHNICAL DATA
| Model MZE-29 | |
| Power supply 220-240V | ~50-60Hz |
| Rated power 2800-3200W | |
| Maximum power 3500W | |
| Off and standby mode available | unavailable |
| Power consumption in standby mode not applicable | |
| Power consumption in off mode not applicable | |
| Power consumption in network standby mode | not applicable |
| It automatically goes into standby mode after not applicable | |
| Automatically goes into shutdown mode after not applicable | |
| Network standby mode, if the device has a connection function with the appli - cation | not applicable |
| Length of mains cable 2,5m |
CE
CAUTION! MPM agd S.A. reserves the right to technical changes.
Proper disposal of the product (waste electrical and electronic equipment)

Marking on the product indicates that after the service-life of the product expires, it should not be disposed with other type of municipal waste. Used equipment may have a negative impact on the environment and health of people due to potentially containing hazardous substances, mixtures and components. Mixing electric waste with other types of waste or disassembling those in an unprofessional manner may cause a release of substances that are hazardous to the environment and health.
Used equipment should be handed-over to a point for collection of electric waste. In order to obtain detailed information regarding the electric waste collection points, the user should contact the municipal point of electric waste collection or used equipment processing department.
BESCHRIJVING VAN HET APPARAAT
ANTI CALC FUNCTIE - ACTIEF ANTIKALKSYSTEEM
PO ŽEHLENIE JE UKONČENÉ
Legible signature of the buyer


- BEZPEČNOSTNÍ POKYNY PŘI POUŽÍVÁNÍ
- DESCRIPTION OF THE APPLIANCE
- BEFORE FIRST USE
- PREPARATION FOR USE
- FILLING THE WATER RESERVOIR
- USING THE APPLIANCE
- SETTING THE TEMPERATURE
- STEAM IRONING
- IRONING WITHOUT STEAM
- SPRAYER FUNCTION
- HIGH STEAM IMPACT FUNCTION
- VERTICAL STEAM IRONING VERTICAL IRONING
- ANTI DRIP SYSTEM
- FIREMAN – AUTO SHUT OFF
- ANTI CALC FUNCTION – ACTIVE ANTI-SCALE SYSTEM
- AFTER FINISHING IRONING
- CLEANING AND MAINTENANCE
- SELF CLEAN FUNCTION – SELF-CLEANING
- Proper disposal of the product (waste electrical and electronic equipment)
- BESCHRIJVING VAN HET APPARAAT
- ANTI CALC FUNCTIE - ACTIEF ANTIKALKSYSTEEM
- PO ŽEHLENIE JE UKONČENÉ
Brand : MPM
Model : MZE29
Category : Iron