
HWS205GGEH1 - Wine cellar HAIER - Free user manual and instructions
Find the device manual for free HWS205GGEH1 HAIER in PDF.
| Product type | Wine cellar |
| Brand | Haier |
| Model | HWS205GGEH1 |
| Energy efficiency class | G |
| Annual energy consumption | 175 kWh/year |
| Storage volume | 372 L |
| Adjustable temperature | 5 to 20 °C (41 to 68 °F) |
| Number of shelves | 5 |
| Maximum load capacity per shelf | 50 kg |
| Lighting | LED, dimmable |
| Wi-Fi function | Yes (hOn app) |
| Motion Glow function | Motion detection for lighting |
| Door lock | Yes (with key) |
| Door open alarm | Yes (after 3 minutes) |
| Defrost | Automatic |
| Activated carbon filter | Yes, annual replacement recommended |
| Dimension (W × D × H) | 597 × 594 × 1925 mm |
| Packaging dimensions | Not specified |
| Net weight | 75 kg (estimate) |
| Power supply | 220-240 V ~ 50 Hz |
| Climate class | SN, N, ST (10 to 38 °C) |
| Refrigerant | Isobutane (R600a) |
| Noise level | 37 dB(A) (Class C) |
| Door reversibility | Yes (from right to left) |
Frequently Asked Questions - HWS205GGEH1 HAIER
User questions about HWS205GGEH1 HAIER
0 question about this device. Answer the ones you know or ask your own.
Ask a new question about this device
Download the instructions for your Wine cellar in PDF format for free! Find your manual HWS205GGEH1 - HAIER and take your electronic device back in hand. On this page are published all the documents necessary for the use of your device. HWS205GGEH1 by HAIER.
USER MANUAL HWS205GGEH1 HAIER
HWS129GFH1
HWS113GDFH1
HWS127GGH1
HWS111GDGH1
EN
DE
ES
FR
IT
NL
PL
PT
CS
EL
HU
RO
SL
SK
BG
Vinoteca
Guiadelusername
Cave à vin
ENWARNING: Risk of fire/flammable material.
The symbol indicates there is a risk of fire since flammable materials are used. Take care to avoid causing a fire by ingiting flammable material.
HWS129GFH1
HWS113GDFH1
HWS127GGH1
HWS111GDGH1
Thank you
EN
Thank you for purchasing a Haier Product.
Please read these instructions carefully before using this appliance. The instructions contain important information which will help you get the best out of the appliance and ensure safe and proper installation, use and maintenance.
Keep this manual in a convenient place so you can always refer to it for the safe and proper use of the appliance.
If you sell the appliance, give it away, or leave it behind when you move house, make sure you also pass this manual so that the new owner can become familiar with the appliance and safety warnings.

Legend
Warning - Important Safety information

General information and tips

Environmental information
Disposal
Help protect the environment and human health. Put the packaging in applicable containers to recycle it. Help to recycle waste of electrical and electronic appliances. Do not dispose appliances marked with this symbol with the household waste. Return the product to your local recycling facility or contact your municipality office.

WARNING!
Risk of injury or suffocation!
Refrigerants and gases must be disposed of professionally. Ensure that the tubing of the refrigerant circuit is not damaged before being properly disposed of. Disconnect the appliance from the mains supply. Cut off the mains cable and dispose of it. Remove the trays and drawers as well as the door catch and seals, to prevent children and pets to get closed in the appliance.
Old appliances still have some residual value. An environmentally friendly method of disposal will ensure that valuable raw materials can be recovered and used again.
Cyclopentane, a flammable substance not harmful to ozone, is used as an expander for the insulation foam.
By ensuring this product is disposed of correctly, you will help prevent potential negative consequences for the environment and human health, which could otherwise be caused.
For more detailed information about recycling of this product, please contact your local council, your household waste disposal service or the shop where you purchased the product, handled by the professionals.
EN
Content
1-Safety information. 4
2-Safety Tips. 7
3-Maintenance 11
4- Accessories 13
5- Product description 14
6- Installation 15
7-Use 19
8-Energy saving tips 25
9- Equipment 26
10-Care and cleaning. 27
11- Troubleshooting 28
12-Technical data 31
13- Customer Service 32
14-Wine bottle stacking. 33
Safety information
This product is only intended to be used for the storage of bottled wine. Please be careful not to misuse it to avoid unforeseen risks. Before switching on the appliance for the first time read the following safety hints:

WARNING!
Before first use
Make sure there is no transport damage.
- Remove all packaging and keep out of children's reach and dispose them in an environmentally friendly manner.
- Wait at least 0.5 hours before installing the appliance in order to ensure the refrigerant circuit is fully efficient.
- Handle the appliance always with at least two persons because it is heavy.
Installation
The appliance should be placed in a well-ventilated place. Ensure a space of at least 50~mm above and around the appliance.
WARNING: Keep ventilation openings, in the appliance enclosure or in the built-in structure, clear of obstruction.
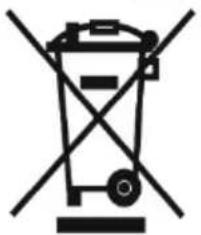
- Never place the appliance in a damp area or location where it might be splashed with water. Clean and dry water splashes and stains with a soft clean cloth.
- Do not install your wine cellar in any location not properly insulated or heated e.g. garage etc. Your wine cellar was not designed to operate in ambient temperature below 10^ .
- Do not install the appliance in direct sunlight or in the near of heat sources (e.g. stoves, heaters).
Install and level the appliance in an area suitable for its size and use.
- Make sure that the electrical information on the rating plate agrees with the power supply. If it does not, contact an electrician.
The appliance is operated by a 220-240 VAC/50 Hz power supply. Abnormal voltage fluctuation may cause the appliance to fail to start, or damage to the temperature control or compressor, or there may be an abnormal noise when operating. In such case, an automatic regulator shall be mounted.
- Do not use multi-adapter and extension cables.

WARNING!
WARNING: Do not locate multiple portable socket outlets or portable power supplies at the rear of the appliance.
WARNING: When positioning the appliance, ensure the supply cord is not trapped or damaged.
Do not step on the power cable.
- Use a separate earthed socket for the power supply which is easy accessible. The appliance must be earthed.
- Only for UK: The appliance's power cable is fitted with 3-cord (grounding) plug that fits a standard 3-cord (grounded) socket. Never cut off or dismount the third pin (grounding). After the appliance is installed, the plug should be accessible.
WARNING: Do not damage the refrigerant circuit.
Daily use
- This appliance can be used by children aged from 8 years and above and persons with reduced physical, sensory or mental capabilities or lack of experience and knowledge if they have been given supervision or instruction concerning use of the appliance in a safe way and understand the hazards involved.
Children shall not play with the appliance.
Children aged from 3 to 8 years are allowed to load and unload refrigerating appliances, but not allowed to clean and install the refrigerating appliances. - Keep away children under 3 years of age from the appliance unless they are constantly supervised.
- Cleaning and user maintenance shall not be made by children with out supervision.
The appliance must be positioned so that the plug is accessible. - If coal gas or other inflammable gas is leaking into vicinity of the appliance, turn off the valve of the leaking gas, open the doors and windows and do not unplug the power cable of the appliance.
- Wait at least 7 minutes to reconnect the power after the power has been disconnected.
Do not lift the appliance by its door handles.
The keys must be kept out of the reach of children and not in the vicinity of the appliance to prevent children from being locked inside the appliance.

WARNING!
- Notice that the appliance is set for operation at the secific ambient range between 10 and 38^ . The appliance may not work properly if it is left for a long period at a temperature above or below the indicated range.
- Do not place unstable articles (heavy objects, containers filled with water) on top of the appliance, to avoid personal injury caused by falling or electric shock caused by contact with water.
- Open and close the door only with the handles. The gap between the door and the cabinet is very narrow. Do not put your hands in these areas to avoid pinching your fingers. Open or close the appliance doors only when there are no children standing within the range of door movement.
- Do not store or use inflammable, explosive or corrosive materials in the appliance or in the vicinity.
- Do not store explosive substances such as aerosol cans with a flammable propellant in this appliance.
- Do not store medicines, bacteria or chemical agents in the appliance. This appliance is a household appliance. It is not recommended to store materials that require strict temperatures.
- Do not set unnecessarily low temperature in the wine cabinet compartment. Minus temperatures may occur at high settings. Attention: Bottles can burst
- Do not touch the inside surface of the appliance compartment when in operation, especially with wet hands, as your hands may freeze onto the surface.
For proper wine cooling, do not overload the appliance.
Unplug the appliance in the event of a power interruption or before cleaning. Allow at least 7 minutes before restarting the appliance, as frequent starting may damage the compressor.
WARNING: Do not use electrical devices inside the appliance, unless they are of the type recommended by the manufacturer. To avoid risk a damaged power cord must be replaced by the customer service (see warranty card).
To prolong the service life of the appliance, avoid turning it off. - Never place the appliance horizontally on the ground. After tilting the appliance more than 45^ , wait for 24 hours before plugging it in.

WARNING!
Maintenance / cleaning
- Make sure children are supervised if they carry out cleaning and maintenance.
- Disconnect the appliance from the electrical supply before undertaking any routine maintenance. Allow at least 7 minutes before restarting the appliance, as frequent starting may damage the compressor.
- Hold the plug, not the cable, when unplugging the appliance.
- Do not clean the appliance with hard brushes, wire brushes, detergent powder, petrol, amyl acetate, acetone and similar organic solutions, acid or alkaline solutions. Please clean with special refrigerator/freezer detergent to avoid damage. Eventually use warm water and baking soda solution - about a tablespoon of baking soda to a litre/quarter of water. Rinse thoroughly with water and wipe dry. Do not use cleaning powders or other abrasive cleaners. Do not wash removable parts in a dishwasher.
WARNING: Do not use mechanical devices or other means to accelerate the defrosting process, other than those recommended by the manufacturer. - If the supply cord is damaged, it must be replaced by the manufacturer, its service agent or similarly qualified persons in order to avoid a hazard.
- Do not try to repair, disassemble or modify the appliance by yourself. In case of repair please contact our customer service.
- If the illuminating lamps are damaged, it must be replaced by the manufacturer, its service agent or similarly qualified persons in order to avoid a hazard.
- Eliminate the dust on the back of the unit at least once in the year to avoid hazard by fire, as well as increased energy consumption.
- When positioning the appliance, ensure the supply cord is not trapped or damaged.
- Do not locate multiple portable socket-outlets or portable power supplies at the rear of the appliance
Safety tips
- Do not spray or flush the appliance during cleaning.
- Do not use water spray or steam to clean the appliance.
- Do not clean the cold glass door with hot water. Sudden temperature change may cause the glass to break.
If you leave your appliance out of use for an extended period, leave it open to prevent odour and unpleasant smells building up inside.
Refrigerant gass information

WARNING!
The appliance contains the flammable refrigerant ISOBUTANE (R600a). Make sure the refrigerant circuit is not damaged during transportation or installation. Leaking refrigerant may cause eye injuries or ignite. If a damage has occurred, keep away open fire sources, thoroughly ventilate the room, do not plug or unplug the power cords of the appliance or any other appliance. Inform the customer service.
In case of eyes get into contact with the refrigerant, rinse it immediately under running water and call immediately the eye specialist.
WARNING: The refrigeration system is under high pressure. Do not tamper with it. Since the flammable refrigerants are used, please, install, handle and service the appliance strictly according to the instruction and contact the professional agent or our after-sales service to dispose of the appliance.
Intended use
This appliance is intended to be used in household and similar applications such as
- staff kitchen areas in shops, offices and other working environments;
- farm houses and by clients in hotels, motels and other residential type environments;
- bed and breakfast type environments;
- catering and similar non-retail applications.
To ensure the safe preservation of wine, please comply with this instruction for use.
The details on the most appropriate part in the compartment of the appliance where specific types of food shall be stored, considering the distribution of temperature that can be present in the different compartments of the appliance are in the other part of the manual.
Changes or modifications to the device are not allowed. Unintended use may cause hazards and loss of warranty claims.
To avoid damaging the quality of the wine, please respect the following instructions:
- Opening the door for long periods can cause a significant increase of the temperature in the compartments of the appliance
- If the wine cabinet is left empty for long periods, power off defrost, clean, dry, and leave the door open to prevent mould developing within the appliance
Disposal
The symbol on the product or on its packaging indicates that this product may not be treated as household waste. Instead it shall be handed over to the applicable collection point for the recycling of electrical and electronic equipment. By ensuring this product is disposed of correctly, you will help prevent potential negative consequences for the environment and human health, which could otherwise be caused by inappropriate waste handling of this product. For more detailed information about recycling of this product, please contact your local city office, your household waste disposal service or the shop where you purchased the product.
Since the flammable insulation blowing gases are used, please contact the professional agent or our after-sale service to dispose of the appliance.
WARNING!
Risk of injury of suffocation!
Refrigerants and gases must be disposed of professionally. Ensure that the tubing of the refrigerant circuit is not damaged before being properly disposed of. Disconnect the appliance from the mains supply. Cut off the mains cable and dispose of it. Remove the trays and drawers as well as the door catch and seals to prevent children and pets to get closed in the appliance.
WARNING: Disconnect the appliance from the power supply before cleaning.
- Do not clean the appliance with hard brushes, wire brushes, detergent powder, petrol, amyl acetate, acetone and similar organic solutions, acid or alkaline solutions. Please clean with special refrigerator detergent to avoid damage.
Clean the appliance when only little or no wine is stored. It is only necessary to clean it when it is dirty.
Clean the inside and housing of the appliance with a sponge damped in warm water and neutral detergent.
- Rinse with clean warm water and dry with soft cloth.
Do not clean any of the parts of the appliance in a dishwasher.
- Allow at least 7 minutes before re-starting the appliance as frequent starting may damage the compressor.
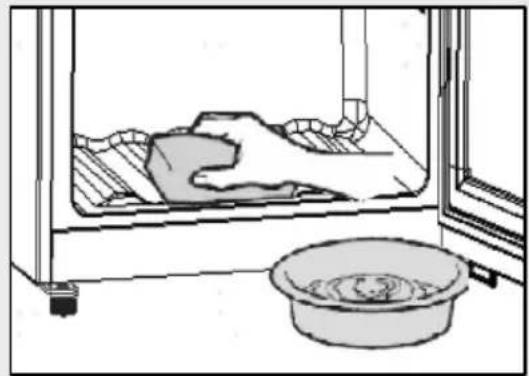
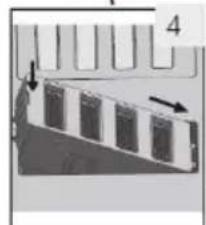
Clean the door gasket:
The door gaskets should be cleaned every 3 months to assure a proper seal. As below: Remove: Grasp the door gasket and pull it out according to the direction of arrow to remove the whole door gasket
in order.
Dip the brush with water or food grade alcohol, clean up the door gasket groove firstly by pulling back and forth the brush. Then wipe door gasket surface with a towel dipped with water or food grade alcohol. Finally, wash the door gasket clean and wipe it dry with a clean towel.
Installation door gasket after cleaning:
Before installation, make sure that there is no water on the door gasket. Insert the door gasket into the groove, and press the door gasket tightly from the top to the bottom by hand until the whole door gasket is inserted into the groove.
Cleaning the shelves:
All shelves can be taken out for cleaning.
Take out all bottles.
- Pull the wine rack forward to the stop, then lift it up at an angle to remove it.
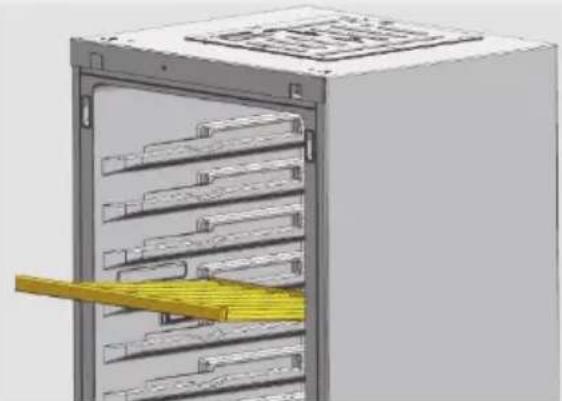
Clean the shelf with a soft towel.
Wait until the shelves are dry before putting them back in
WARNING:
Wait at least 7 minutes to reconnet the power after the power has been disconnected.
Check the accessories and literature in accordance with this list.
| Name | Service Card | Shelf | Hinge-Cover | Energy Label | Key |
| HWS129GFH1 | 1 | 4 | 1 | 1 | 2 |
| HWS113GDFH1 | 1 | 3 | 1 | 1 | 2 |
| HWS127GGH1 | 1 | 4 | 1 | 1 | 2 |
| HWS111GDGH1 | 1 | 3 | 1 | 1 | 2 |

Notice
Due to technical changes and different models, some of the illustrations in this manual may differ from your model.

Picture of appliance

HWS129GFH
HWS111GDG

HWS127GGH1
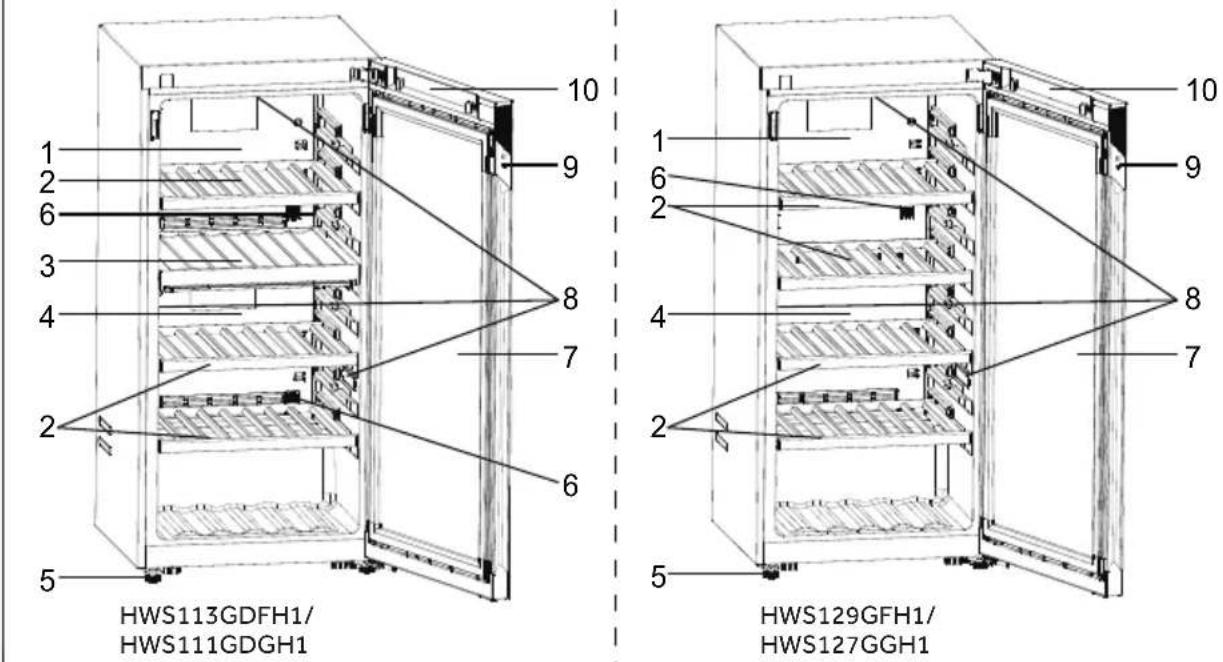
The HWS127GGH1 has only one component 8(LED light)
- Upper air duct
2.Shelf
3.Partition - Lower air duct
5.5. Support I
6.Filter
7. Door
8. LED light
9. Lock
10. Display
1. Unpacking
Take the appliance out of the packaging.
Remove all packaging materials including the foam base and all adhesive tape holding the accessories.
2. Environmental conditions
The room temperature should always be between 10^ and 38^ , since it can influence the temperature inside the appliance and its energy consumption. Do not install the appliance near other heat-emitting appliances (ovens, refrigerators) without isolation.
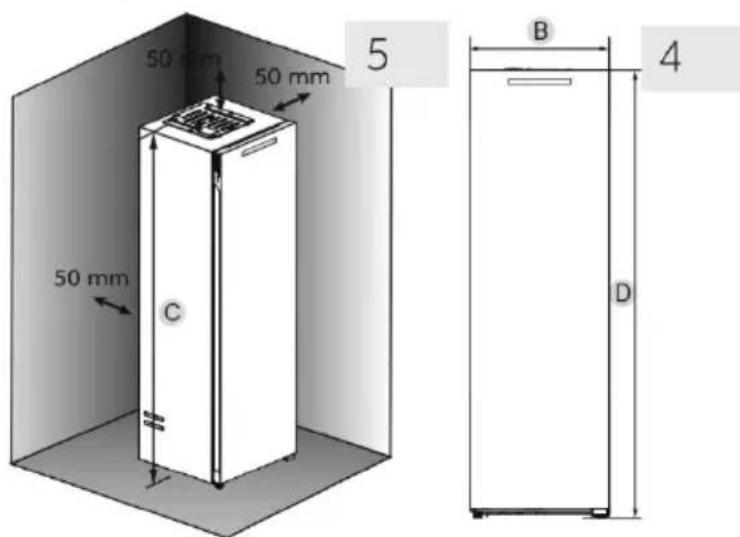
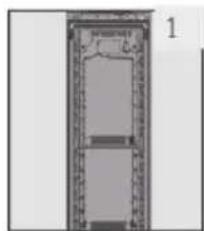
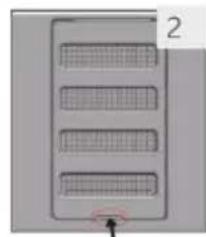
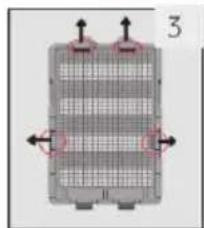
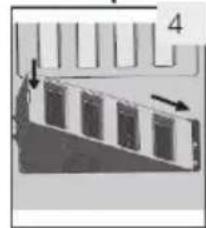
3. Space requirements
Required space to open the door (Fig. 1, 2, 3, 4). To achieve sufficient ventilation of the appliance. for safety reasons, the information of the required ventilation cross sections must be observed (Fig. 5).
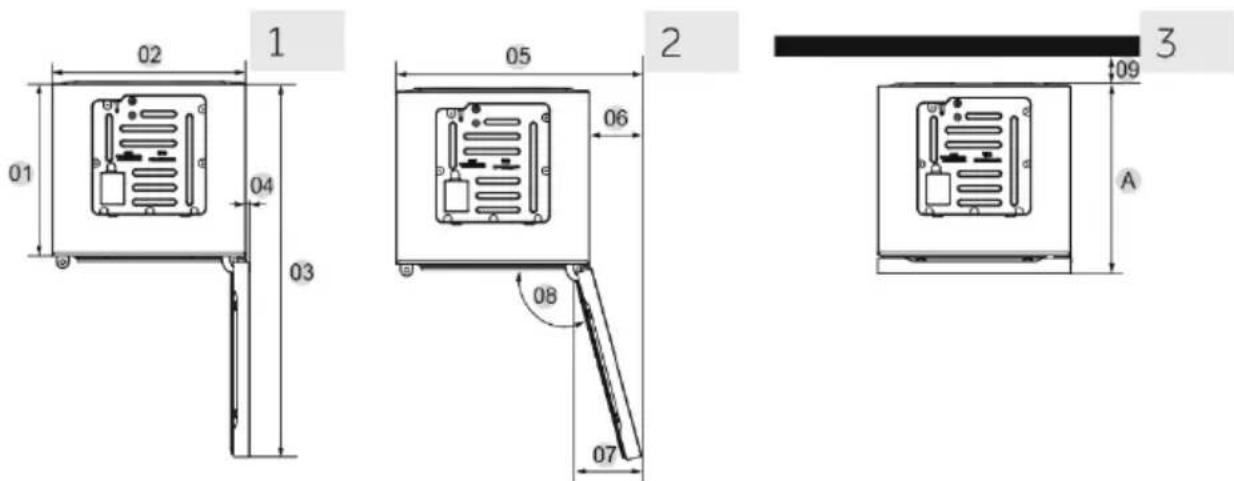
| Measurement: mm | HWS129GFH1 HWS113GDFH1 HWS111GDGH1 HWS127GGH1 |
| Depth A | 594 |
| Width B | 597 |
| Height C | 1265 |
| Overall Height D | 1270 |
| 01 | 532 |
| 02 | 595 |
| 03 | 1150 |
| 04 | 11 |
| 05 | 756 |
| 06 | .161 |
| 07 | 200 |
| 08 | 105° |
| 09 | 50 |

WARNING!
- Keep ventilation openings in the appliance or in the in-built structure clear of obstruction. This refrigerating appliance is not intended to be used as a built-in appliance.
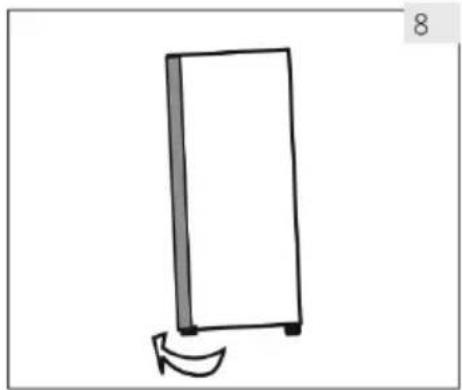
5. Aligning the appliance
The appliance should be placed on a flat and solid surface.
- Tilt the appliance slightly backwards (Fig. 7).
- Set the adjustable front feet to the desired level by turning them.
- The stability can be checked by alternately bumping on the diagonals. The slight swaying should be the same in both directions. Otherwise the frame can warp; possible leaking door seals are the result. A low tendency to the rear facilitates the closing of the door.
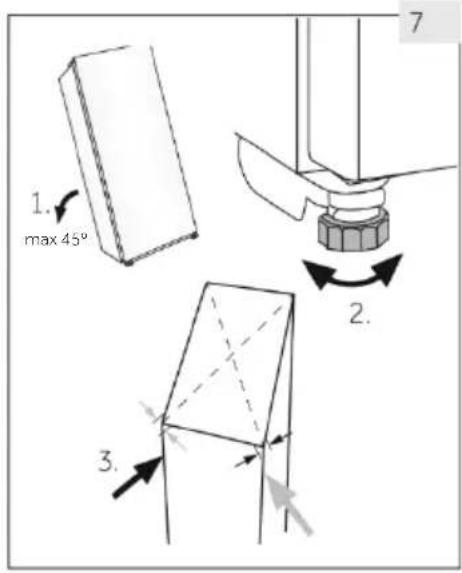
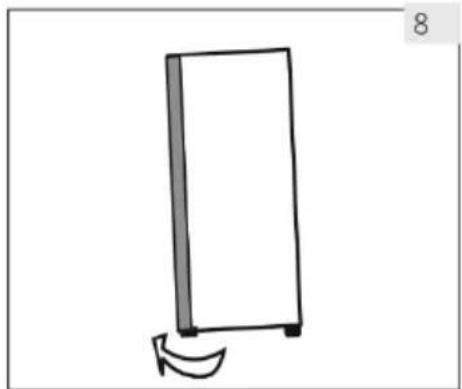
6. Fine tuning of the door
The appliance closes more easily if the levelling feet on the front are used:
Rotate the adjustable feet (Fig. 8) to turn them up or down:
- Turning the feet clockwise raises the appliance.
- Turning the feet counterclockwise lower the appliance.
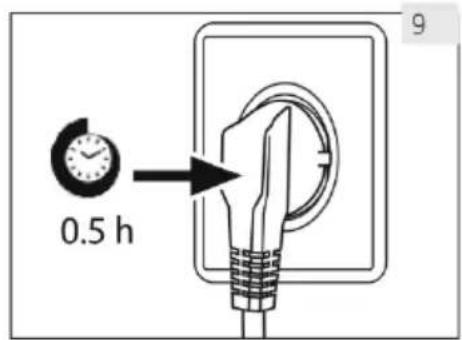
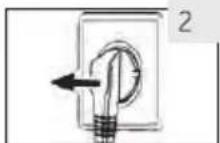
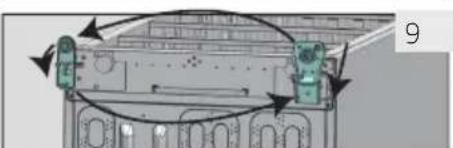
7. Waiting time
The maintenance-free lubrication oil is located in the capsule of the compressor. This oil can get through the closed pipe system during transport if the appliance is tilted. Before connecting the appliance to the power supply, wait 0.5 hours (Fig. 9) so that the oil runs back into the capsule.
8. Electrical connection
Before each connection check if:
power supply, socket and fusing are appropriate to the rating plate.
the power socket is earthed and no multi-plug or extension.
the power plug and socket are fit properly.
Connect the plug to a properly installed household socket.

WARNING!
To avoid risks a damaged power cord must be replaced by the customer service (see warranty card).
9. Door Reversibility
Before connecting the appliance to the power supply you should check, whether the door swing must changed from right (as delivered) to left, if this is required by the installation location and the usability.

WARNING!
The appliance is heavy. You need two persons to carry out the door reversibility.
Before any operation, first unplug the appliance from the mains.
Do not tilt the appliance more than 45^ to prevent damage of the cooling system.
Installation
EN
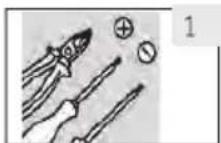
- Prepare the necessary too
- Unplug the power co
-
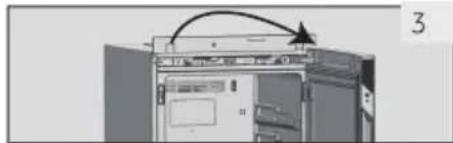
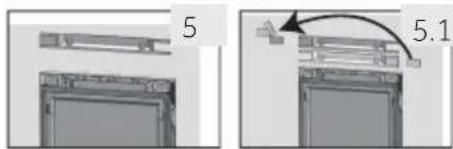
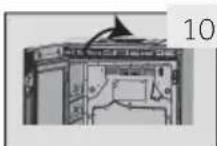
Remove the front cover and small cover of the box, a remove the small cover to the other side.
-
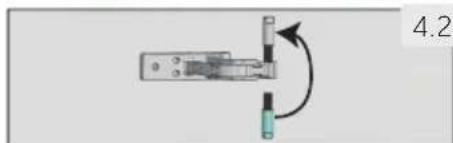
Unplug the connection terminal of the door signal line unplug the body signal line, and remove the upper hinge cover. Remove the upper hinge and unscrew the shaft from the upper hinge, turning it 180^ vertically and unscrew it to the upper hinge in the direction as shown in the picture.
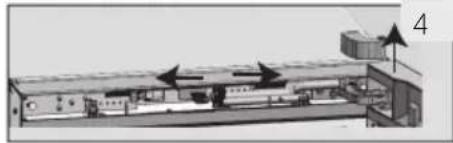
- Remove the front cover and the small cover of the door, then take off the small cover from the right side and install it on the left side.
- Remove the shaft sleeve and rubber plug block and install them on the other side.
- Adjust the outlet position of the door signal line to the other side of the door, insert the upper hinge into the door, and insert the door signal line into the slot of the upper hinge. Remove the upper hinge cover from the instruction manual bag and install it.
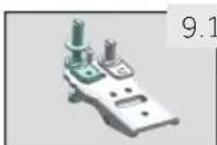
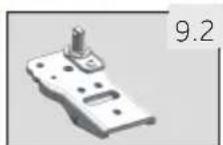
Note: The signal line only needs to show the color mark. - Remove the CAM and door stop from the bottom of the left side of the door and install it on the right side.
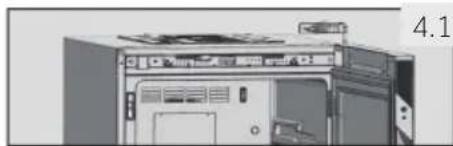
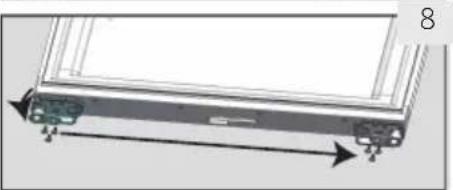
- Remove the foot assembly on the left side of the bottom of the box and the right caster assembly, as shown in the figure, move the shaft and CAM on the caster assembly from the left side to the right side, and fix it through the nut, and install it on the left side of the box.
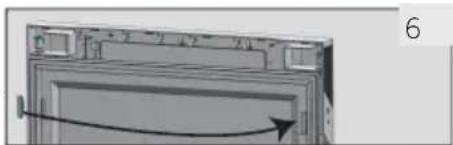
Note: Apply grease to the shaft of the caster assembly. - Install the door on the box body with hinges, connect the terminals of the door signal line, move the magnetic control switch to the other side, and install the front cover of the door and the box body.
- Finished

1. Before first use
- Remove all packaging materials. This includes the foam base and all adhesive tape holding the wine cellar accessories inside and outside. Keep them out of children's reach and dispose them in an environmentally friendly manner.
- Clean the inside and outside of the appliance with water and a mild detergent before putting any wine in it.
After the appliance has been levelled and cleaned, wait for at least 2 hours before connecting it to the power supply. - Once you have plugged the unit into an electrical outlet, let the unit run for at least 30 minutes to acclimatize itself before making any adjustments.
The temperature is automatically set to 12^ . If desired, you can change the temperature manually. Please see TEMPERATURE.
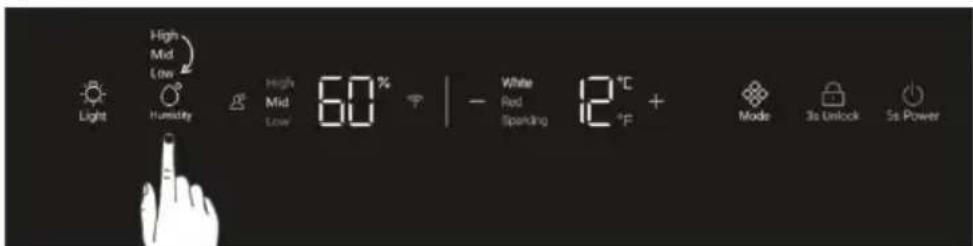
2. Touch button
The buttons on the control panel are touch button, which respond when lightly touched with the finger.
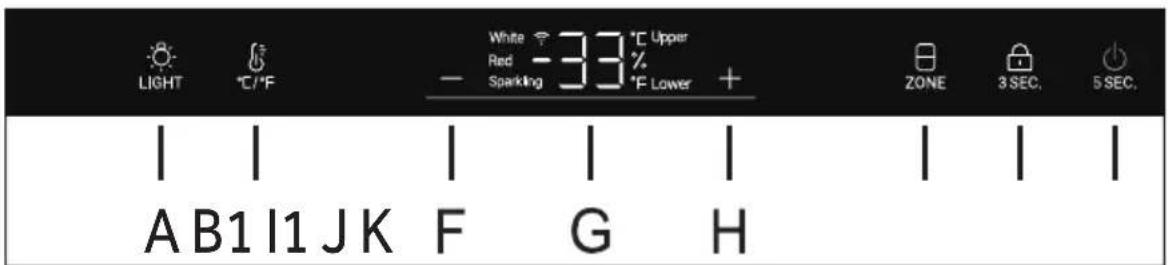
3. Description for control panel
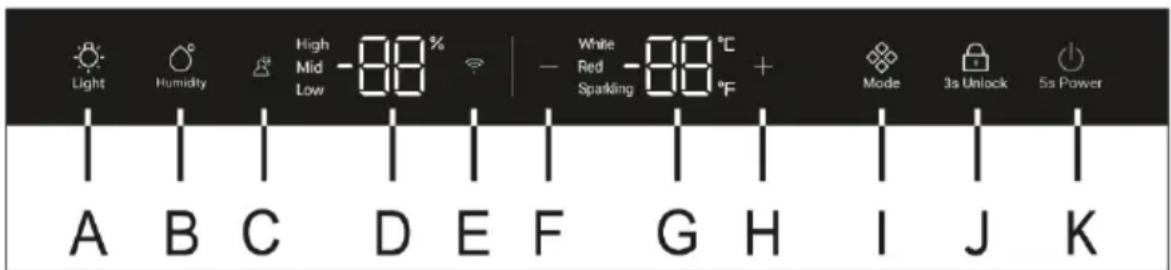
HWS129GFH1
A Light button
B Humidity selection button
C Motion Glow function button
D Humidity display
EWiFi button
F Temperature adjust button: down
G Temperature display
H Temperature adjust button: up
I Mode selection button
J Lock button
K Power button
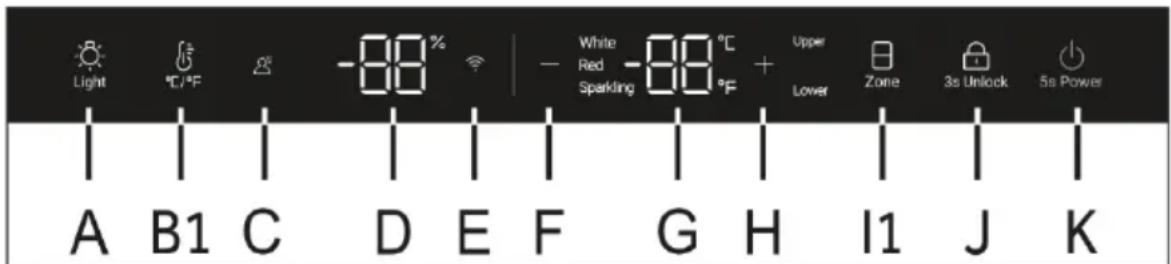
HWS113GDFH1
A Light button
B1 ^ C / °F conversion button
C Motion Glow function button
D Humidity display
EWiFi button
F Temperature adjust button: down
G Temperature display
H Temperature adjust button: up
I1 Temperature Zone selection button
J Lock button
K Power button
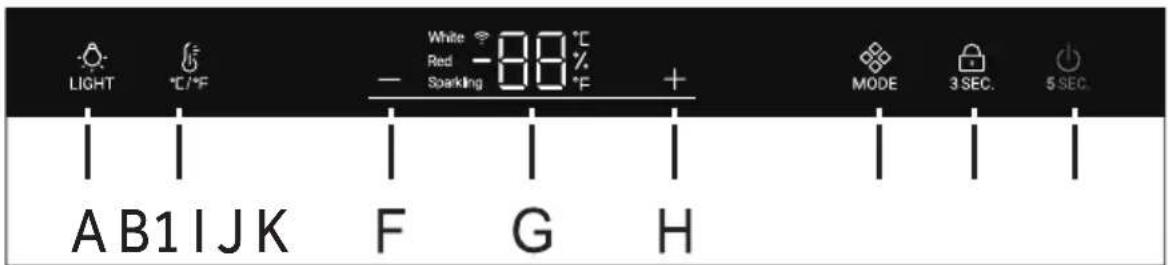
HWS127GGH1
A Light button
B1 ^ C / F conversion button
F Temperature adjust button: down
G Temperature display
H Temperature adjust button: up
I Mode selection button
J Lock button
K Power button
HWS111GDGH1
A Light button
B1 ^ C / 号 F conversion button
F Temperature adjust button: down
G Temperature display
H Temperature adjust button: up
11 Temperature Zone selection button
J Lock button
K Power button
4. Automatically locking function
In the lock screen state, press the lock button for 3s, the display screen will display 3, 2 and 1, the screen is unlocked, and the lock icon is half lit, if there is no operation, the screen will be locked automatically after 30s. In the lock screen state, all icons are on, and the button on the display screen cannot be operated (except the light button)
5. Power function
In the unlocked state, keep pressing the power button for 5s, the display screen displays 5, 4, 3, 2 and 1, and the cabinet will not work.
6. Temperature setting

Notice
Presettings
Once you have plugged the unit into an electrical outlet, let the unit for at least 30 minutes to acclimatize itself before making any adjustments.
- When the appliance is switched on after disconnection from the main power supply, it may take several hours for the correct temperatures to be reached. The exact time varies depending on the environment and the temperature setting.

Press the + or button, the display will start to flash. Press the + or button to set the desired temperature. The temperature setting range: 5-20°C (41-68°F). Stop pressing the key for 3 second, the temperature is confirmed.
7. Mode or Zone function
Press the MODE button. The temperature from sparkling (8°C or 47°F) to white (12°C or 54°F) to red (16°C or 61°F). (for HWS129GFH1, HWS127GGH1) In the unlocking state, the "☑" icon is fully on. If the current display is in the upper temperature zone, the upper icon will be on and the lower icon will be off. At this time, press the "☑" button, the lower icon will be on and the upper icon will be off. (for HWS113GDFH1, HWS111GDGH1)
Recommended temperature settings
The following drinking temperatures are recommended for the different types of wine.
| Red wine | +13℃ to +20℃ (+55°F to +68°F) | Sparkling wine | +5℃ to +8℃ (+41°F to 47°F) |
| White wine | +9℃ to +12℃ (+48°F to +54°F) |
If you store wine for long time, it should be stored at a temperature between +10^ and +12^ (50°F and +54°F).
8. Standby-mode
The display screen lights up automatically when any button is touched or the door is opened, when the Motion Glow function is on, if somebody approaches the door, the display screen and light will light up. (for HWS129GFH1' HWS113GDFH1) If no operation is performed, the display screen and the light will be turn off automatically after 30 seconds.

Notice
Influences on temperatures
The temperature inside the appliance is influenced by the following factors:
Ambient temperature Amount of stored bottles
Frequency of door opening The location of the appliance
The default setting is 12^ C
When display stops flashing, it goes back to showing the current temperature inside the wine cellar. It will take some time to reach the set temperature.
9. Lighting setting
Press the button, the lights will be lighted up gradually. Press the button0 once again and the lights will be off gradually. If the motion glow function is activated, the light will not be controlled by the light button for HWS129GFH1 and HWS113GDFH1.
10. ^ C/^ F function
Press the button, switch between Fahrenheit and Celsius. (except HWS129GFH1). Press the button for 3 seconds to switch between Fahrenheit and Celsius for HWS129GFH1.
11. Wi-Fi function
Press the Wi-Fi button for 3 seconds, the Wi-Fi button starts to flash quickly and automatically enters the configuration mode.
Press the button for 3 seconds the Wi-Fi button starts to flash quickly and automatically enters the configuration mode. (for HWS127GGH1 and HWS111GDGH1)
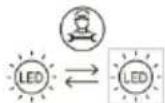
12. Motion Glow function
When Motion Glow function is activated, if somebody approaches the door, the light will turn on. It will be turn off while the person leave for 30 seconds.
Press the Motion Glow function button once again to turn off the function
13. Humidity (for HWS129GFH1)
In the unlocked state, when the temperature is set between 10 and 14 degrees Celsius (suitable for long-term), click the humidity button to choose the0 humidity level inside the cabinet as high, medium, or low.

The wine cooler is equipped with a professional humidity sensor, long-term storage conditions, proper humidity in the wine cooler can prevent the cork from drying out and also avoid mold growth on the wine labels due to excessive humidity.
If you adjust the humidity in the wine cooler, it will take a few days to a week to reach the set value. The humidity control in the wine cooler is effective when the ambient temperature is between 20^ and 27^ .
Please adhere to the following regarding the air humidity inside the wine cooler:
- for wine storage
- The humidity inside the wine cooler depends on the ambient temperature and ambient air humidity, the loading capacity of the wine cooler, and the temperature of the wine cooler, as well as the duration and frequency of door openings.
- The display on the wine cooler will show changes in the air humidity inside the with a delay, displaying the integrated humidity value inside the box over more than 2 hours. Note: If you use your wine cooler in a very dry, or hot environment (air humidity < 30% or ambient temperature < 17^ or ambient temperature >30^ ), it is recommended to add water inside the cooler.
14. Power-Off Memory function
In case of power outage, the wine cellar will save the set temperature. After power recovery, it will run based on the temperature set before the power outage.
15. Door opening alarm
If the door is kept open for 3 minutes, the buzzer will sound until the door is closed or any button is touched.
16. WIFI mode setting
CONNECTIVITY
WIRELESS PARAMETERS
| Technology | WIFI | Bluetooth |
| Standard | IEE 802.11 b/g/n | Bluetooth v4.2, BR/EDR. BLE |
| Frequency Band(s) [MHz] | 2401-2483 | 2402-2480 |
| Maximum power [mW] Band(s) [MHz] | 100 | 10 |
PRODUCT INFORMATION
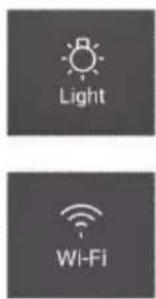
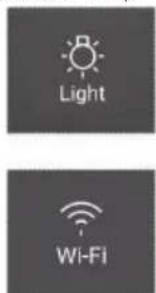
How to activate WIFI module:
Press the light button for 3 seconds to activate the WIFI (for HWS127GGH1 and HWS111GDGH1) Press the WIFI button for 3 seconds to activate the WIFI (or HWS129GFH1 and HWS113GDFH1) · The WIFI module is switched on the WIFI icon starts to blink
- If the wine cellar is enrolled but the WIFI is off the icon will blink
- If the wine cellar is enrolled and connected the WIFI icon is always on
- To reset the WIFI press the light for 3 seconds for HWS127GGH1 and HWS111GDGH1
To reset the WIFI press the WIFI for 3 seconds (for HWS129GFH1 and HWS113GDFH1
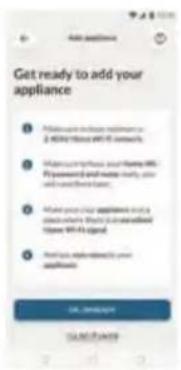
IN APP PAIRING PROCEDURE
Step 1
Download the hOn app on the stores


GETITON
Google Play

Download on the
App Store
Step 2
- Log in or sign up

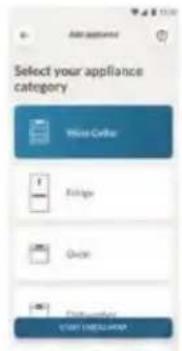
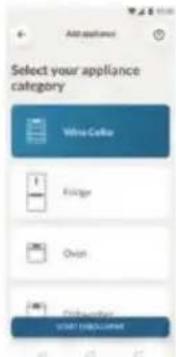
Step 3
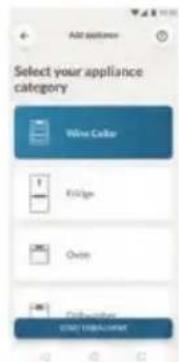
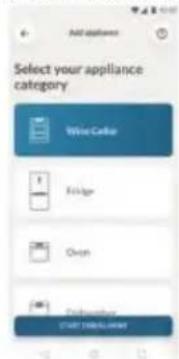
- Add a new appliance selecting the wine cellar from the list
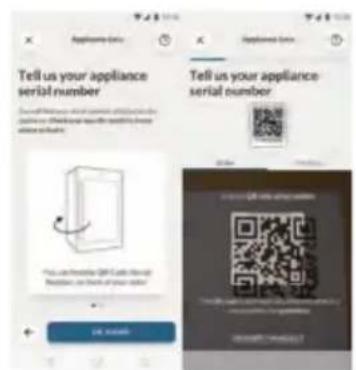
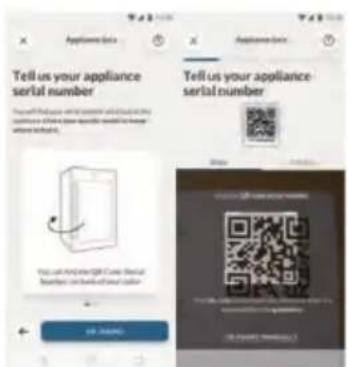
Step 4
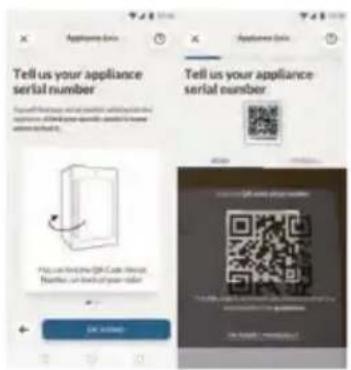
- Scan the QR or insert manually the serial number
Step 5
- Press the light button on the product for 3s to activate the WIFI (for HWS127GGH1 and HWS111GDGH1) Press the WIFI button on the product for 3s to activate the WIFI (for HWS129GFH1 and HWS113GDFH1)
Step 6
- The WIFI icon will blink, the pairing process is in progress
- You will have 5 minutes to complete the pairing process
- When the process is completed the WIFI icon will stop blinking and it will remain always on NOTE

Energy saving tips
Make sure the appliance is properly ventilated (see INSTALLATION).
- Do not install the appliance in direct sunlight or in the near of heat sources (e.g. stoves, heaters).
- Avoid unnecessarily low temperature in the appliance. The energy consumption increases the lower the temperature in the appliance is set.
Open the appliance door as little and as briefly as possible.
Do not exceed the designed amount of bottles to avoid obstructing the air flow.
- Keep door seals clean so that the door always closes correctly.
The most energy-saving configuration requires shelves to be positioned in the appliance on factory-fresh condition, and wine to be placed without blocking the air outlet of the duct
At 10^ , the maximum thermostat setting of 10^ should be used, and the test laboratory needs to conduct the test under this thermostat setting.
Equipment
EN
1.Shelf
- The shelves are designed for easy storage and easy removal of the wine. They can be cleaned with a soft towel.
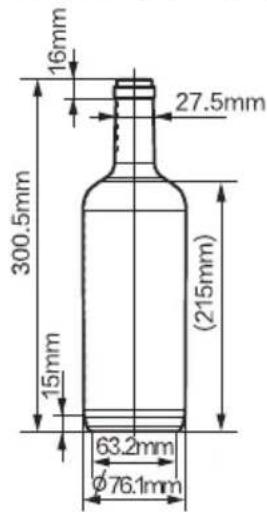
- Regualr bottles with diameter of 76mm can be stacked.
- The quantity can vary from the depicted number or bottles if they are stacked in a different way.
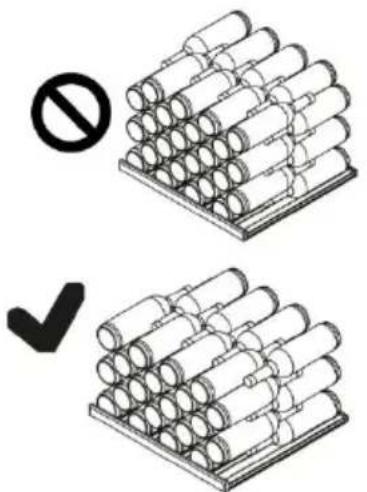
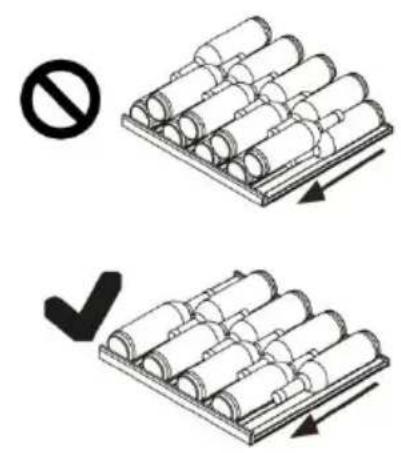
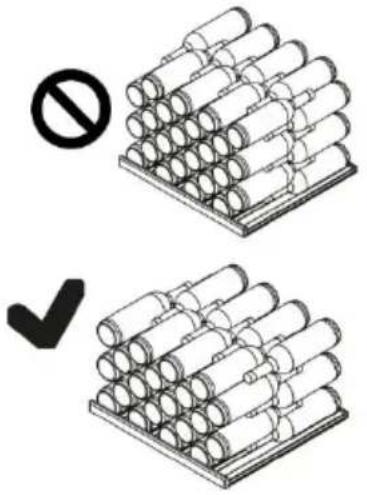
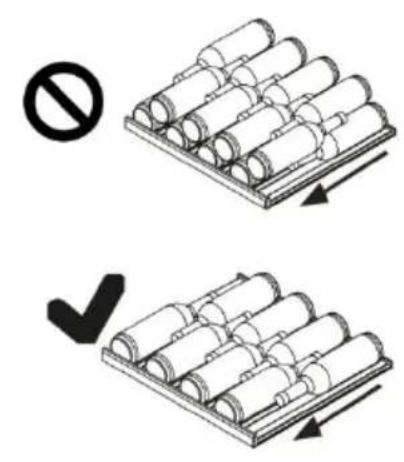
Advice for the layout of your wine cellar
We recommend that the number of wine bottles should not exceed four layers on each shelf, and the bearing capacity of the wine shelves should not exceed 50kg . Before placing the bottles inside the wine cellar, confirm whether or not the wine shelves are completely stable. In addition, confirm whether or not any bottle protrudes from the shelves in order to prevent bottles hitting the glass door upon closing.
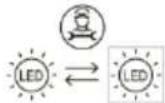
2. The light
The LED light turns on when the door is opened. Touch the light button, the light turns on.
Touch the light button again, the light turns off. To increase the energy, the lights should be turned off when the wine cellar is not being viewed.
3. The lock
To lock the wine cellar, close the door and put the key in the lock:
Lock the door by turning the key clockwise:
Unlock the door by turning the key counterclockwise.
1. Defrosting
The defrosting of the wine cellar is done automatically; no manual operation is needed.
2. Replacing the LED lamp
The lamp LED as its light source, featuring low energy consumption and long service life. If there is any abnormality, please contact the customer service. See CUSTOMER SERVICE
Do not replace the LED lamp yourself. It must only be replaced by either the manufacturer or the authorised service agent.
DC 12V, max Power 1W*3.
3. Non-use for a longer period
Unplug the power cord.
Clean the appliance and door gaskets as described above.
Keep the door open to prevent the creation of bad odours inside.
4. Moving the appliance
- Remove all bottles and unplug the appliance.
- Secure shelves and other moveable parts in the wine cellar with adhesive tape.
- Do not tilt the wine cellar more than 45^ to avoid damaging the refrigerating system.
5. Air exchange with activated carbon filter
The way in which wines continue to mature depends on the ambient conditions. The quality of the air is therefore decisive for preserving the wine. An activated carbon filter has been fitted in the lower area of the rear wall of the appliance to through put remains at an optimum quality.

Notice
We recommend that you replace the filter once a year. Filters can be obtained from your dealer.
Changing the filter
- Remove the wine rack;
- Insert the screwdriver into the position shown in the cable frame and lift out the activated carbon cover;
- Open the guard clamp outwards, remove the activated carbon and replace it;
- Insert the activated carbon shield into the air duct cover plate in the direction shown, and then press down to fasten the shield on the air duct cover plate.
Troubleshooting
EN
Many occurring problems could be solved by yourself without specific expertise. In case of a problem please check all shown possibilities and follow below instructions before you contact an after sales service. See CUSTOMER SERVICE.

WARNING!
Before maintenance, deactivate the appliance and disconnect the mains plug from the mains socket.
- Electrical equipment should be serviced only by qualified electrical experts, because improper repairs can cause considerable consequential damages.
A damaged supply should only be replaced by the manufacturer, its service agent or similarly qualified people in order to avoid a hazard.
| Error Code | Cause | Solution |
| L2 | Low temperature alarm when the temperature control sensor is low for HWS129GFH1 or HWS127GGH1 or HWS113GDFH1 or the upper temperture zone of HWS111GDGH1 | 1. Check the ambient temperature. 2. Check the Compressor connector. 3. Check the resistance of the temperature control sensor. |
| L3 | Low temperature alarm when the lower temperature zone control sensor is low for HWS113GDFH1 or HWS111GDGH1 | 1. Check the ambient temperature. 2. Check the Compressor connector. 3. Check the resistance of the temperature control sensor. |
| Problem | Possible Cause | Possible Solution |
| The compressor does not work. | • Mains plug is not connected in the mains socket. | • Connect the main plug. |
| The appliance runs frequently or runs for a too long period of time. | • The outdoor temperature is too high. • The appliance has been off power for a period of time. • A door of the appliance is not tightly closed. • The door has been opened too frequently or for too long. • The door gaskets are dirty, worn, cracked or mismatched. • The required air circulation is not guaranteed. • The temperature is set too low. | • In this case, it is normal for the appliance to run longer. • Normally, it takes a while for the appliance to cool down completely. • Close the door and ensure the appliance is located on a level ground and there is no food or container jarring the door. • Do not open the door too frequently. • Clean the door gasket or replace them by the customer service. • Ensure adequate ventilation. • The problem will resolved itself when the desired temperature has been reached. |
| The inside of the wine cellar is dirty and/or smells. | • The inside of the wine cellar needs cleaning. | • Clean the inside of the wine cellar. |
| It is not cold enough inside the appliance. | • The temperature is set too high. • Bottles have been added recently. • A door of the appliance is not tightly closed. • The door has been opened too frequently or for too long. • The door gaskets are dirty, worn, cracked or mismatched. | • Reset the temperature. • Allow time for recently added bottles to reach desired temperature. • Close the door. • Do not open the door too frequently. • Clean the doorgasket or replace them by the customer service. |
| It is too cold inside the appliance. | • The temperature is set too low. | • Reset the temperature. |
| Moisture formation on the inside of the refrigerator compartment. | • The climate is too warm and too damp. • A door of the appliance is not tightly closed. • The door has been opened too frequently or for too long. | • Increase the temperature. • Close the door. • Do not open the door/drawer too frequently. |
| Moisture accumulates on the wine cellar's outside surface. | • The climate is too warm and too damp • The door is not closed tightly. The cold air in the appliance and the warm air outside it condensates. | • This is normal in damp climate and will change when the humidity decreases. • Ensure that the door is shut tightly and that the gaskets seal properly. |
Troubleshooting
EN
| Problem | Possible Cause | Possible Solution |
| The appliance makes abnormal sounds | ·The appliance is not located on level ground. ·The appliance touches some object around it. | ·Adjust the feet to level the appliance. ·Remove objects around the appliance. |
| A slight sound is to be heard similar water. | ·This is normal | ·- |
| The interior lighting or cooling system does not work. | ·Mains plug is not connected to the mains socket. ·The power supply is not intact. ·The LED-lamp is out of order. | ·Connect the main plug. ·Check the electrical supply to the room. Call the local electricity company. ·Please call the service for changing |
| The sides of the cooler and door strip get warm | ·This is normal. | ·- |
| The door does not shut properly | ·The appliance is not level. ·The door is blocked. | ·Level the appliance with the leveling feet. ·Check for blockages like bottles or shelves. |
To contact the technical assistance, visit our website:
https://corporate.haier-europe.com/en/
Under the section "website", choose the brand of your product and your country.
You will be redirected to the specific website where you can find the telephone number and form to contact the technical assistance.
Product fiche according to regulation EU No. 2019/2016
| Brand | Haier | Haier |
| Model name / identifier | HWS129GFH1 | HWS127GGH1 |
| HWS113GDFH1 | HWS111GDGH1 | |
| Category | Wine Cellar | Wine Cellar |
| Energy efficiency class | F | G |
| Annual energy consumption (kWh/annum)1) | 99/113 | 156/156 |
| Storage room 1/2 1/2 | ||
| Storage volume (L) | 226/220 226/220 | |
| Climate class: This appliance is intended to be used at an ambient temperature between 10 °C and 38 °C. | SNNST | SNNST |
| Airborne acoustical noise emissions (dB(A) re 1pW) | B(35) | C(37) |
| Type of appliance | Freestanding | Freestanding |
| This appliance is intended to be used exclusively for the storage of wine. | Yes | Yes |
| Dimensions (W/D/H in mm) | 597/594/1270 | 597/594/1270 |
Explanations:
1) based on standard test results for 24 hours. The actual power consumption depends on the actual environment, the amount of bottling, the set temperature, the door opening and closing, etc.
2) The nominal power consumption is the value obtained according to the standard test when the wine cabinet does not turn on the internal light.
- extended temperate: 'this refrigerating appliance is intended to be used at ambient temperatures ranging from 10^ to 32^' ;
- temperate: 'this refrigerating appliance is intended to be used at ambient temperatures ranging from 16^ to 32^ ;
- subtropical: 'this refrigerating appliance is intended to be used at ambient temperatures ranging from 16^ C to 38^ C ;
- tropical: 'this refrigerating appliance is intended to be used at ambient temperatures ranging from 16^ C to 43^ C' ;
Standards and directives
This product meets the requirements of all applicable EC directives with the corresponding harmonised standards, which provide for CE marking.
Customer Service
EN
We recommend our Haier Customer Service and the use of original spare parts.
If you have a problem with your appliance, please first check section TROUBLESHOOTING.
If you cannot find a solution there, please contact
your local dealer or
- the Service & Support area at www.haier.com where you can find telephone numbers and FAQs and where you can activate the service claim.
To contact our Service, ensure that you have the following data available.
The information can be found on the rating plate.
Model Serial No.
Also check the Warranty Card supplied with the product in case of warranty.
For general business enquiries please find our addresses in Europe below:
| European Haier addresses | |||
| Country* | Postal address | Country | Postal address |
| Italy | Haier Europe Trading SRL Via De Cristoforis. 12 21100 Verese ITALY | France | Haier Europe Trading SRL Via De Cristoforis, 12 21100 Verese ITALY |
| Spain Portugal | Haier Iberia SL Pg. Garcia Faria, 49-51 08019 Barcelona SPAIN | Belgium-FR Belgium-NL Netherlands Luxembourg | Haier Benelux SA Anderlecht Route de Lennik 451 BELGIUM |
| Germany Austria | Haier Deutschland GmbH Hewlett-Packard-Str. 4 D-61352 Bad Homburg GERMANY | Poland Czechia Hungary Greece | Haier Poland Sp. zo.o. Al. Jerozolimskie 181B 02-222 Warszawa POLAND |
| United Kingdom | Haier Appliances UK Co. Ltd. One Crown Square Church Street East Woking. Surrey, GU21 6HR UK | Romania Russia | |
AVAILABILITY OF SPARE PARTS: Thermostats, temperature sensors, printed circuit boards and light sources are available for a minimum period of seven years after placing the last unit of the model on the market. Door handles, door hinges, trays and baskets for a minimum period of seven years and door gaskets for a minimum period of 10 year, after placing the last unit of the model on the market
Minimum guarantee is: 2 years for EU Countries, 3 years for Turkey, 1 year for UK, 1 year for Russia, 3 years for Sweden, 2 years for Serbia, 5 years for Norway, 1 year for Morocco, 6 months for Algeria, Tunisia no legal warranty required.
For further information about the product, please consult https://eprel.ec.europa.eu/ or scan the QR on the energy label supplied with the appliance.
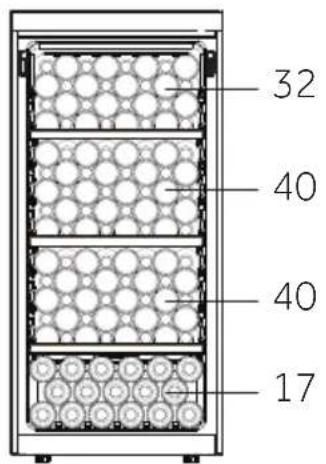
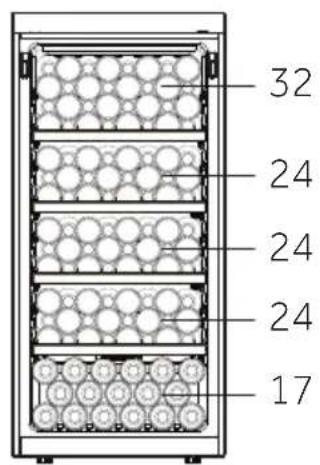
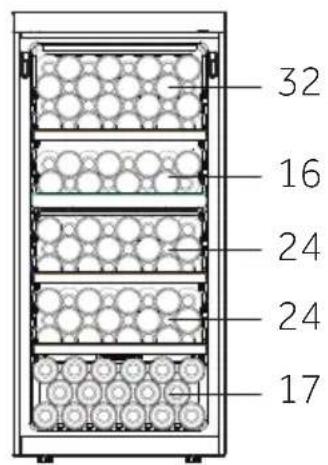
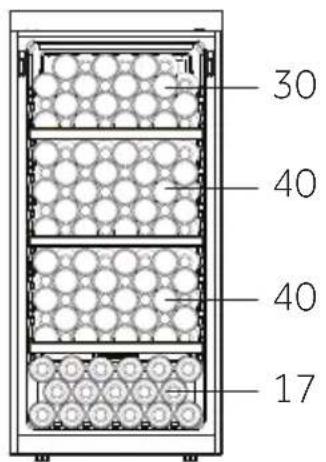
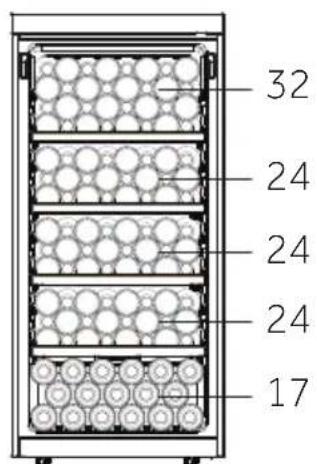
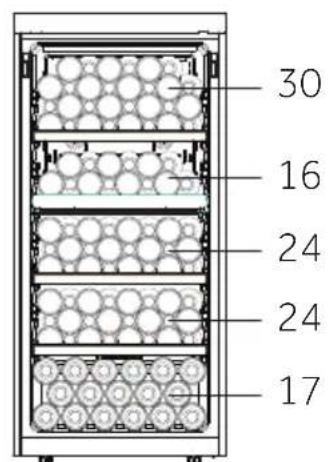
The bottle arrangement is based on a graphic representation of a standard Bordeaux bottle (0.75 l). Due to the different bottle specifications, the actual bottle loading quantity could be different.


HWS129GFH1 (129 bottles, 3 shelves)
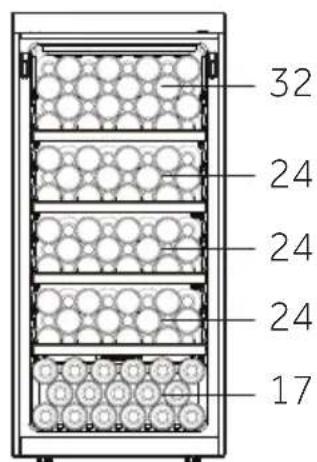
HWS129GFH1 (121 bottles, 4 shelves)
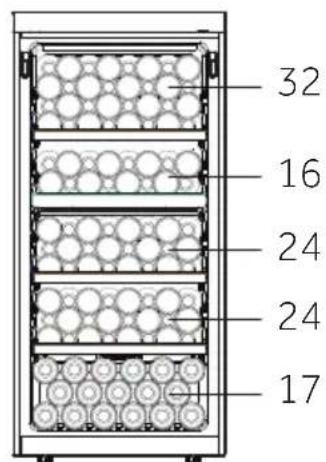
HWS113GDFH1 (113 bottles)
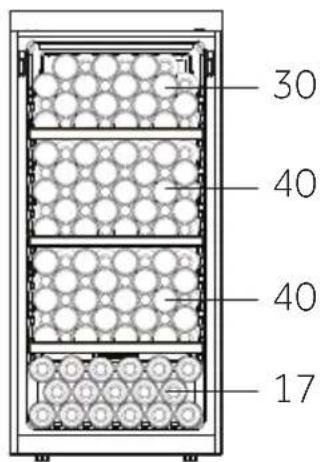
HWS127GGH1 (127 bottles, 3 shelves)
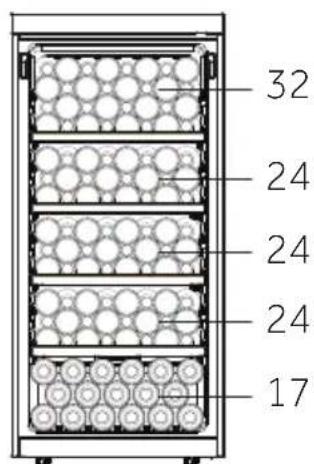
HWS127GGH1 (121 bottles, 4 shelves)
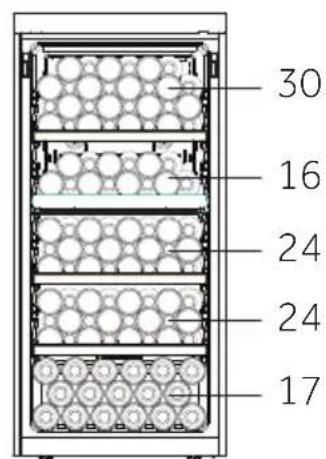
HWS111GDGH1 (111 bottles)
Benutzerhandbuch
Weinklimaschrank
HWS129GFH10
HWS113GDFH10
HWS127GGH10
HWS111GDGH1

HWS111GDGH1
HWS127GGH1
PRODUKTINFORMATIONEN
HWS129GFH1 (129 bottles, 3 shelves)
HWS129GFH1 (121 bottles, 4 shelves)
HWS113GDFH1 (113 bottles)
HWS127GCH1 (127 bottles, 3 shelves)
HWS127GGH1 (121 bottles, 4 shelves)
HWS111GDGH1 (111 bottles)
Manual de usuario
Vinotec
HWS129GFH1
HWS113GDFH1
HWS127GGH1
HWS111GDGH1
Download on the App Store
Paso 2
INFORMATIONS SUR LE PRODUIT
Comment activer le module Wi-Fi:
Download on the App Store
Etape 2
Download on the App Store
Passo 2
De standardinstalling is 12^
Download on the App Store
Krok 2
Download on the App Store
Bnμα2
INFORMATII DESPRE PRODUS
Download on the App Store
Pasul 2
Autentificati-vaa sau inregistrati-va

Pasul 3
- Adäugati un nou aparat selectand din lista crama de vinuri
Pasul 4
- Scanatci codul QR sau introduceti manual numarul de série
Pasul 5
Standardesi directive
Download on the App Store
Krok 2
- Prihlaste sa alebo sa zaregistrujte

Krok 3
Pridajte novy spotrebic a zo zoznamu vybertevinotéku
Krok 4
UpeT Tp6Ba Da 6bJe NocTaBeH Ha paBHa I TBbpda NOBbpxHOCT.
- HakuHete ypeJa IeKo Ha3aI. (fur. 7).
- Harlacete perynilpyemnte npedn Kpaeta Ha keelaHOTO HNO, KaTO r3aBbPTNTe.
- Cta6nHocTt Ma MoKe Da Ce npOBepupe3 nocJeIOBATEJHo yDpRHe No DnaFOHaJInte. I B DBeTe NocOKn Tpr6Ba Da ce NoLyUaBa eHaKBO JeKO JIoJIeEHe. B npOTnBEH cIyau paMkata MoKe Da Ce H3KpNB, B pe3yIITaT Ha KoETO yNtBTHEnrTa Ha BpaTaTa Hma Da npIneBAt NtBTHO. JeKnrT HaKIoH Ha3aD yLeChra 3aTBapRHeTo Ha BpaTnte.

8. PexkIM Ha rOTOBHOCT
EkpaHbT Ha dncnpe CBeTba aBTOMaTuHNO, KOraTO ce DoKOCHe npOn3BOJeH 6yToH nIiCe OTBOpN BpataTa, Korato yHKzra Ta Motion Glow e BKIOueHa, aKO HAKoI ce np6nKn Do BpataTa, ekpaHbT Ha dncnpe N CBeTIINHTe IcE CBeTHaT (3a HWS209G*HWS201*)
Ako He ce n3Bbpln HnkaKBO DeiCTBne, ekpaHbT Ha DnCpIe N CBETInHInTe Ie Ce n3KJIHOaT aBTOMaTHUHO cJeD 30 cekyHdN.

3a6eJekka
Blnnna Bbpxy TempeaTpyTe
Temnepatypata Bbtpre Bypeda ce Bnne OE CneHnTe foKTopn: Temnepatypa Ha OKoJHaTcpeDa KoInueCTBOTO cBxpaHbAHn 6yTuJIKN YeCTota Ha OTBaPHe Ha BpTaTa MeCtOnOLOXKeHnETo Ha ypeDa
HacrpoKaTa no noPra3bupaHe e 12°C Korato dinCnIeT cnpe da mHa, Toi ce BpbUa KbM nOKa3BaHe Ha TeKyuata TemepaTypa BvB BnTpInaTa 3a BNHO. LcE OTHEme N3BeCTHO Bpeme, 3a Da ce DOCTnIg He 3aDaJeHaTa TemepaTypa.
9. HacTpoiKn Ha OcBeTJIeHneTo
HaTnchete 6yToHa CBeTInHte Ie CBeTHaT NoCTeHNo. Pn NOBTOpHo HATnCKaHe Ha 6yToHa CBeTInHte Ie n3rachat NoCTeHNo. Ako yHKuYra Motion Glow e aKtINbIpaHa, CBeTInHaTa HMa Da ce ynpabIraBa OT CBeTInHHna 6yToH 3a HWS209GFH1 u HWS201GDFH1.
10.ФункцЯ ^ C / ^
HaTnchTe 6yToHa , npeBknHoyBa ce Mejdy FapeHxaIr n ZeI3n (cIzKJIouHeHne Ha HWS209GFH1).HaTnchTe 6yToHa B npoIbJxKeHne Ha 3 cekHyd, 3a da npeBknOuHTe Mejdy FapeHxaIr n ZeI3n 3a HWS209GFH1.
11.ФункцЯWi-Fi
HaTnchete 6yToHa 3a Wi-Fi B npOdbIxKeHne Ha 3 cekyn, 6yToHbT 3a Wi-Fi 3aNoUBa Da MInra 6bp30 N aBtOMaTHuHO BnI3a B pexm Ha KOHpypnpaHe.
HaTnchete 6yToHa 3a 3 cekyn, 6yToHbT Wi-Fi 3aNoUBa Da MInra 6bp3o N aBtOMaTHuHO BnI3a B pexm Ha KOHpypnpaHe (3a HWS205GGEH1).
12.Функцma Motion Glow
KoratoФункцяТa Motion Glow eakTNBIPAHa,ako HЯКоI ce npn6JInxn Do BpaTata, CBetlnHaTa Ue Ce BKIOUH. Ta Ie Ce n3KIOUH 30 cekyHn, CneKaTo IuTeO CTpBrHe. HaTnCHete 6byToHa HaФункцяТa Motion Glow OIe BeDHbX, 3a Da n3KIOUHTeФункцяТa.
13. Влажност (за HWS209GFH1)
B OTKJIHcHcO cIbCToHnHe, KOraTo TempeaTpyaTe e 3aJaDeHa MeJy 10 n 14 rpaDyca no LcEJI3n (noXoJauo 3a Dblr nepNo), HATncHete 6yToHa 3a BnaJxHOCT, 3a Da N36epTe HIBOTO Ha BlaxHoCT BbTpRe B OTJeJeHneTO KaTO BnCOKO, CpeINHO nn HnCKO.
OxlaInteIa 3a BIno e o6opUdba c npofoecnoHaJeH ceH3Op 3a BlnaKHOcT, yCIOBnraTa 3a DbIroCpOuHO CbxpaHeHne I NOxOJaTa BnaKHOCT B OXlaINTeIa 3a BIno MoRaT Da IpeIoTbPaTt N3cbXBaHTo Ha KOpKObTa Tana I CbIto TaKa Da IpeIoTbPaTt Obpa3yBaHeTo Ha MyXbl Bbpxy etNkeTITe Ha BInHO To nopaI npekOMepHa BlnaKHOCT.
Ako peryilipaTe BnaJHocTb A OXlaIteJIa 3a BNHO, Ie ca Heo6xOIMN HAKOLKO dHn Do CeMnua, 3a Da ce DoCTnIgHe 3aJaIeHaTa CToHocT. KoHTpoIbT Ha BnaJHocTb A OXlaIteJIa 3a BNHO e eΦeKTHBeH, KOraTO TempePaTypaTa Ha OKoJHaTa CpeJa e MexkDy 20^ n 27^
Mona, cna3BaIte cneHOTo NO OTHOWeHne Ha BnaXHoCTTa Ha Bb3dUxHa BbTpe BoXnAInTeTЯ 3a BnHO:
-3a cxbxpaHeneHa BnHO.
-ВлajнocTTa BbTpE B OXlaДnteЯ 3a BInO 3aBcN OT TempepaTypaHa OKoJHaTa CpeAи ВлajнocTTa Ha OKoJHnBa3dYx, KaNaCtTeTa Ha 3apeKdAnHe Ha OXlaДnteЯ 3a BInO N TempepaTypaHa OXlaДnteЯ 3a BInO, KaKTo N OT npOdbJIknteJIHOCCTTaNueCTOTATA Ha OTBapRNe Ha BpaTaTata.
-Дисплесгт ha oxlaадителя 3a BИно ще пokаже npomehinte BbB влajхocTTa Ha
Вьздуха Вьтpe CBС 3aКьсенHe, KaTO nOKa3Ba ИnterpupaHaTa CTоиHOC T ha
ВлajxHOCCTTа Вьтpe B OTdeIeHneTo 3a NObeYe ot 2Ча. 3a6eJIeKka: Ako
ИЗПОЛЗВATE BaшЯ OXlaадител 3a BИно BMHOrO cyxa Ил ropeца cpeDa (ВлajxHOCt
Ha Вьздуха <30% Ил OkOLHa Temnépatура <17°C Ил OkOLHa
Temnépatура >30°C), ce npenopьчБа д IOбавпTe BODa Bьтpe B OxlaадитELa.
14.Функцяза залamетяbaHe пи пpeКьсBaHe Ha 3axpaHbaHeTo
B clyuayn ha npekbcbahe Ha 3axpaHbAHeTo BntpnuHaTa 3a BInHO 3e 3ana3n 3aadeneHata TemnepaTypa. CneB b3ctaHOBaHe Ha 3axpaHbAHeTo T Ta pabOTn Bb3 OCHOBA Ha TemnepaTypa, 3aadaEHa PpeDn npeKbcBaHeTo Ha 3axpaHbAHeTO.
15.Аларma пи OTBорета Врета
AkoBpataTaCeDbpxn OTBOpEna B npOdbLjKeHne Ha 3 MInHyTn, Ie npO3ByuN 3ByKOB CnHaI, DOKaTO BpataTa He Ce 3aTBOpn Nlln He Ce DOKOCh npOn3BOJeH ByToH.
16. HactpoBbHe Ha WIFIpeKIM
CbbP3AHOCT
B63KNUHNI NAPAMETPN
| Texhoologia | WIFI | Bluetooth |
| Стондэр | IEE 802.11 b/g/n | Bluetooth v4.2, BR/EDR. BLE |
| Чебъен(ни) диапазон(и) [MHz] | 2401-2483 | 2402-2480 |
| Марсимална мошност [mW] диапазон(и) [MHz] | 100 | 10 |
INHΦOPMAU3AПОДУKTA
Kak da akTINBupaTe WIFIMoNyla:
HaTnCHe T CBeTnnHnB 6yToH B npOdbJxKeHne Ha 3 ceKyn, 3a da aKTbupate WIFl (3a HWS205GGEH1)
HaTnSchHe 6yToHa 3a WIFl B npOdbJxKeHne Ha 3 ceKuHn, 3a da aKTbBupate WIFl (c n3KnUoyHne Ha HWS205GGEH1).
·WIFI moynbTe BkJIIOUeH NIKOHaTa 3a WIFl 3anoUBa da Mira.
- Ako BntpnHaTa 3a BnHo epeRncTpnpaHa, Ho WIFl e n3KJIoueH, INKOHaTa Iue Mira.
Ynotpe6a
Ako BntpHaTa 3a BnHO e pernctpupaHa n Cbbp3aHa, IKoHaTa 3a WIFI CBeTn NOCTOHHO.
- 3a Да Нулипате WIFI,Натисные CBETлнотаВ подьжени Ha 3cekyн(DaHWS205GGEH1).
- 3a Да Нулипате WIFI, натусятешо В подьжени Ha 3 cekyн (сизлочен He HWS205GGEH1).
PPOUeDyPA 3ACDBOBAHE B PPNIOXKeHNETO
CTblnka1
- I3terIeTe npiloxKeHneTo hOn ot MaRa3nHInTe


GETITON GooglePlay

Download on the App Store
CTbPk2
Bne3Te nIin ce peHncTpupaTe

CTbNka3
-ДобаBetHe HOBypei, KaTo n36epeTe BnTpHaTa 3a BnHOOT CnncbKa
CTbInka4
CkaHpaTe QR kOda nIbBBeDeTe pBuHO cepnHnHnHomep
CTbInka5
HaTnchTe CBeTnnHHn 6yToH Ha ypeDa B npOdbJIxKeHne Ha 3 cekyHn, 3a da aKtNbupate WIFl (c n3KIOUeHne Ha HWS205GGEH1). HaTnchTe 6yToHa 3a WIFl Ha ypeDa B npOdbJIxKeHne Ha 3 cekyHn, 3a da aKtNbupate WIFl (c n3KIOUeHne Ha HWS205GGEH1).
CTbInka 6
-ИконетазaWIFlueMura,поцьтHaCDBOBaHeeBXOD.
- Κιενματe 5 ΜηγΤι, 3a Да 3аВьршITE пοцеca на СДВОВАнe.
Korato npocecbT npNKnOuNkoHata 3a WIFl ue cnpe daMra u ue CBetn NOCTOHHO.3A6EJIEXKA


CbBETn 3a neCTeHe Ha eHeprna
YBepTe ce,Ye ypeT e MOHTnpaH TaKa,Ye da e OcnrypeHa Do6pa BeHTnlaunia (BxKTe pa3deI ,MOHTAX").
He moHTnpaTe ypeDa TaKa, Ye da e n3IoKeH Ha npraKa CbHueBa CBETnHa Nn Da e B 6n3OCT Do n3ToUHnCu H a ToPnHa (HaNP. RotBapcKn neKn, HarpeBaTeN).
I36raBaiTe HeHyXHo HnCKa TempepaTypa BypeDa. KoHcyMaunTa Ha eHeprna ce yBeJIuYaba, KOJIKOTo NO-HnCKo e 3aJaDeHa TempepaTypaTbBypeDa.
OTBaprIte BpaTata Ha ypeDa Bb3MOxH0 Hai-MaIKo N 3a Bb3MOxH0 Ha- KpaTKO BpeMe.
He npebuwaBaTe npedBndeHTo KOInueCTBO 6yTuKn, 3a Da He ce HapuwaBaCnpKyIpaHTo Ha Bb3DyUHnI NOtOK.
- ПдьраиTe yпьтHeHЯТа Ha BpaTte YnCTN, Taka Ye BpaTaTa BnHaRn da ce 3aTBapЯ npabUNHO.
Ha-eneproceTBAaTa KOHpyaunn3NCKBa yeKMeJKeTaTa da Ce nOCTaBt Bypea BB B3MOxHO Ha-6n3KO do fapuHOTo CbCToHne, a BnHOTa da Ce nOCTaBn NO HauHH, KOITo He 6loKnpa N3XoJa Ha BB3DyXOpBOda.
1. PaΦT
- Paftobete ca npedha3naeHn 3a necho cxbpaHne n necho BaedeHe Ha BInHOTo Te mOrat da ce noyntBaT c Meka Kbpna.
- 06nKHOBeHb 6yTnJIc n C dHaMeTbp 76 MM MoaT da ce nopeXdaT eHa Bbpxy Dpyra.
- KoJIueCTBOTO MoKe Da Bapipa OT n3O6pa3eHn8 6pOJ nnBn 6yTnIKn, aKO ca IIOpeHn IO pa3JIuHn HaunH.
CbBeTu 3a OoOpMleHHeTo Ha BaShaTa BHTpHa 3a BnHO
IpeopbUbame 6pOaT Ha 6yTuKInTe BnHO Da He HaADBuaBa YeTnpi peDa Ha BceKn paΦT Nn HocuT KanaCHT TaHa paΦTOBeTe Da He HaADBuaBa 50 Kr. IpeDn Da NOCTaBtE 6yTuKInTe BB BnTpHaTa 3a BnHO, npOBepTe DaHn paΦTOBeTe Ca HAnbHcO CTaBnHn. OcBeH TOBa npOBepTe DaHn HЯKo 6yTuKka He n3Jn3a OT paΦTOBeTe, 3a Da npEDOTbPaTHe ydap Ha 6yTuKInTe npN 3aTbApRHe Ha CTbKLeHaTa BpTa.
2. OcbetJIeHne
LED ocBtJIeHHeTo CBETBa npI OTbapRHe Ha BpaTata. OOKoCHeTe CBeTJIHHn86yToH, CBETJIHaTa Ce BKJIIOUvBa.
ДOKОСHEТ OTHOBO CBETЛINHня 6уTOH, CBETЛINHaTа ce n3KЛIOчBa. 3a Дa ce yBeЛич eHeprИнHaTа eФeКТИВHOCT, OCBeTЛeHnETo Tpr6Ba Дa ce n3KЛIOчBa, KOraTO BnTpInHaTа 3a BnHO He ce pa3rJIexJa.
3. KIIOUaJIka
3a Da 3aKIOUHTe BITPNHaTa 3a BInHO, 3aTBOpTe BpaTata N NOCTaBeTe KIOUaB KIOUaJIkata:
3aKIOUeTe BpaTaTa, KaTo 3aBbPTnte KIOUa NO NOCOKa Ha YacOBHnKOBaTa CTpeJIka.
OTKlnuye BpaTata, KaTO 3aBbptnte KInOy a No Nocoka o6paTHo Ha yaCoBHNKObTa CTpeNka.
1. Pa3Mpa3RBaHe
Pa3Mpa3BaHTo Ha BnTpHaTa 3a BnHO ce N3BbPbWA aBTOMaTnUHO: He e Heo6xOIMOpbUHO ynpabJIeHHe.
2.Смяна на LEDламнatable
Iamnata n3no3Ba CBeToDnOd 3a CBeTnHEn n3TOuHnK, OTnUaBaUc Ce c HnCKa KOHCyMaunHa eHepnI yNbIg ekCnloatauHOHe JnBOT. B Cnyau Ha aHomalm, MoJr, CBpKTe ce c OTeJa 3a o6cnykBaHe Ha KIneHTN. BnKTe pa3deJ,OBCLyXBAHE HA KJIINEHTN".
He noDMeHnTe camnLED lamnata. Ta Tp6Ba da 6bde 3aMeHnHa cmo ot npOn3BODNTeJI NJI OT yNbJHOMOeH cepBn3eH npeDCTaBnTeJ.
DC 12 V, MaKcImaJIHa MoUHOCT 2,5 W*5.
3. Прилпса на унотpe6a 3a дьльг перiod ot Врeme
N3KJIIOUeTe 3axpaHbAaIg Ka6eJI.
IOnucTeTe ypeDa n UynbTHeHnraTa Ha BpaTaTa, KaKTo e OnncaHo no-rope.
OcTabete BpaTata OTbopeHa, 3a Da ce npedotBpaTn pa3BNTneTo Ha HeepnAHTN Mnpu3Mn BbTppe.
4. Ппемецвае на урEDA
1.ИЗВаДeTe BCnЧК 6yТиЛКИ N I3KЛСЧЕУрEDA OT KOHTaKТа.
2.ПоДсИгуре TИКСО paФТOBeTe И ДPyrIte ПОДВИЖиЧаCTN CpeUy Heжеланo DBИЖЕнe ВБВ BHTpUHaTа 3a BИHo.
3.He HauhaTe BHTpuHaTa 3a BnHO Ha noBuee ot 45^ 3a da n36erHete nobpeHa Ha OXlaNTeJIHaTa CNTeMa.
5.Bb3duyxoo6meHcΦnITbpcaKTHBeH BbIJIeH
HaunbT, no KOnTo BnHata 3peRt, 3aBncn OT ycIobnraTa Ha OKoHaTa cpea. CneIOBaTeJIHO KaueCTBOTo Ha Bb3dyxa e peuBaAio 3a 3ana3BaHeTo Ha BnHOT. NITbPbT C aKTINBeH BbrIeH e MOHTnpaH BdoHaTa Yact Ha 3aHaTa CteHa Ha ypea, 3a Da IooDbpka ONTImaJIHo KaueCTBO npe3 zraLTO BpeMe.

3a6eJekka
IpenopbUBAme BN da cMeHrTe fNtbpa BeHbX rOAnuHO. NITpnte MoarT da 6bDaT B3EtN OT Baunr DnIbP.
CmHaHaΦnIbpa
1.ОТСТРанЕТБИНЕΝΥ paФТ.
2.Пoctabete OTBepTKaTa B NO3nIyTa, NOKa3aHa B paMKata Ha Ka6eJa, INOBdInrHete KaIaKa Ha aKtINBHHa BbIJIeH.
3. OTbopete npedna3HaTa cko6a HABbH, n3BaTe aKTHBnBvIeH ITO CMeHeTe.
4.ПocTaBeTe KaNaKa Ha aKtINBnIeN BbIeH bNOKpNbAaTaT a NIOUa Ha Bb3dYxOnpoBOda B NOKa3aHaTa NOCOKa N CLeT OBa HATNCHeT e HADony, 3a Da 3aKpeNITe KaNa Ka BbpXy NOKpNbAaTa T NIOuHa Bb3dYxOnpoBOda.


ENWARNING: Risk of fire/flammable material.
The symbol indicates there is a risk of fire since flammable materials are used. Take care to avoid causing a fire by ingiting flammable material.
CIMBOJbT NOKa3Ba, Ye CbIeCTByBa ONaCHOCT OT NOJap, TbN KaTO Ce H3NoJ3BaT 3aJaJIIMMaTePnAJI. BnImaBaiTe Da He IpeDn3BnKaTe IOJap Upe3 NoJaIbAHe Ha 3aJaIM MaTePnAJI.
CA AVIS: Risc d'incendi/material inflamable.
Make sure the refrigerant circuit is not damaged during transportation or
Usprevist
FTemperature adjustment button: down
G Temperature display
European Haier addresses
| Country* | Postal address | Country | Postal address |
| Italy | Haier Europe Trading SRL Via De Cristoforis. 12 21100 Verese ITALY | France | Haier Europe Trading SRL Via De Cristoforis, 12 21100 Verese ITALY |
| Spain Portugal | Haier Iberia SL Pg. Garcia Faria, 49-51 08019 Barcelona SPAIN | Belgium-FR Belgium-NL Netherlands Luxembourg | Haier Benelux SA Anderlecht Route de Lennik 451 BELGIUM |
| Germany Austria | Haier Deutschland GmbH Hewlett-Packard-Str. 4 D-61352 Bad Homburg GERMANY | Poland Czechia Hungary Greece | Haier Poland Sp. zo.o. Al. Jerozolimskie 181B 02-222 Warszawa POLAND |
| United Kingdom | Haier Appliances UK Co. Ltd. One Crown Square Church Street East Woking. Surrey, GU21 6HR UK | Romania Russia |