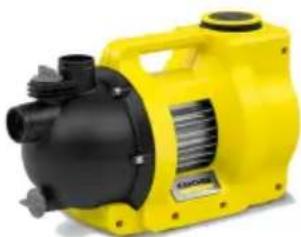
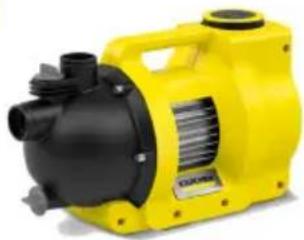
BP 6.000 Garden - Water pump Kärcher - Free user manual and instructions
Find the device manual for free BP 6.000 Garden Kärcher in PDF.
| Product type | Water pump |
| Brand | Kärcher |
| Model | BP 6.000 Garden |
| Use | Garden watering (up to 900 m²) |
| Electrical supply | 230-240 V / 50 Hz |
| Rated power | 1000 W |
| Maximum flow rate | 6000 l/h |
| Maximum pressure | 0.45 MPa (4.5 bar) |
| Maximum delivery head | 45 m |
| Maximum suction head | 8 m |
| Maximum fluid temperature | 35 °C |
| Max. particles in fluid | 1 mm |
| Weight (without accessories) | 9.7 kg |
| Sound pressure level LpA | 69 dB(A) |
| Guaranteed sound power level LWA | 84 dB(A) |
| Pump type | Jet |
| Housing material | Not specified (technical plastic) |
| Power cable length | Not specified |
| Suction connection | G 1 (33.3 mm) |
| Discharge connection | G 1 (33.3 mm) |
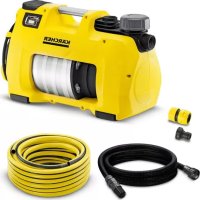
| Included accessories | Connection adapter, plugs, non-return valve, suction filter, 3.5 m spiral hose (depending on version) |
| Maintenance | Rinse with clean water after use with additive water; maintenance-free |
| Warranty | According to country conditions (material or manufacturing defect) |
Frequently Asked Questions - BP 6.000 Garden Kärcher
User questions about BP 6.000 Garden Kärcher
0 question about this device. Answer the ones you know or ask your own.
Ask a new question about this device
Download the instructions for your Water pump in PDF format for free! Find your manual BP 6.000 Garden - Kärcher and take your electronic device back in hand. On this page are published all the documents necessary for the use of your device. BP 6.000 Garden by Kärcher.
USER MANUAL BP 6.000 Garden Kärcher
Booster Pump for Garden BP 4.500 Garden, BP 5.000 Garden BP 6.000 Garden, BP 7.000 Garden
Deutsch 5
English 9
Français 13
Italiano 17
Nederlands 21
Espanol 25
Portugues 30
Dansk 34
Norsk 37
Svenska 41
Suomi 45
EaVnviKa 49
Türkce 54
Pycckn 57
Magyar 62
Cestina 66
Slovenscina 70
Polski 74
Romaneste 79
Slovencina 83
Hrvatski 87
Srpski 91
BbIrapckn 94
Eesti 99
Latviešu 103
Lietuviskai 106
YkpaHcbKa 110
日本語 115
Ka3akwa 119
a 124
A

Inhalt

H. Jenner
Chairman of the Board of Management
S. Reiser
Manager Regulatory Affairs & Certification
Environmental protection. 9
Accessories and spare parts 9
Scope of delivery. 9
Warranty 9
Description of the device 9
Startup. 10
Operation. 10
Care and maintenance 10
Transport 10
Storage. 10
Special accessories. 11
Troubleshooting guide. 11
Specifications 11
Characteristic curves. 12
Declaration of Conformity 12
General notes
Read these original operating instructions and the enclosed safety instructions before using the device for the first time. Proceed accordingly.
Keep both books for future reference or for future owners.
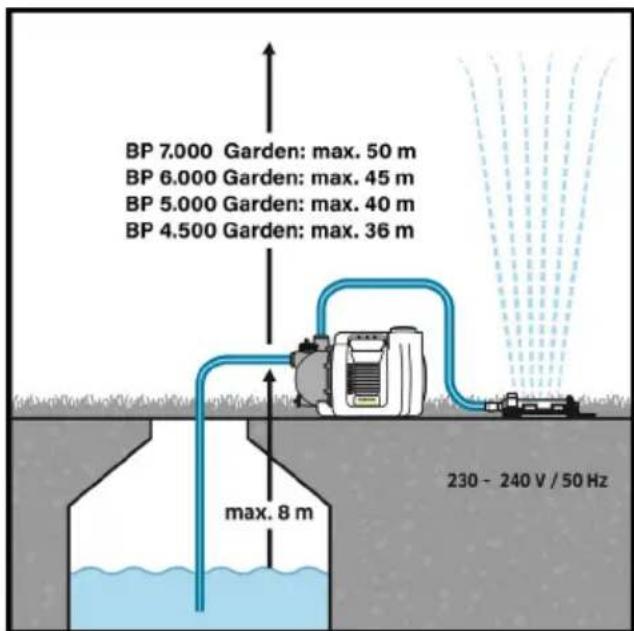
Intended use
Please observe the requirements of EN 1717 when connecting this product to the drinking water network and contact your sanitation specialists if you have any questions.
This device has been developed for private use and is not intended for the load imposed by commercial use.
The device is primarily intended for use in the garden and provides constant pressure for garden watering. When connecting sprinklers, a maximum of the following areas can be irrigated:
BP 4.500 Garden: 400m^2
BP 5.000 Garden: 550m^2
BP 6.000 Garden: 900m^2
BP 7.000 Garden: 1000m^2
CAUTION
Risk of injury!
Risk of injury from toxic substances.
Do not drink water that has been pumped by the pump!
Permissible feed fluids
Permissible feed fluids:
- Processed water
Well water
Spring water - Rain water
- Swimming pool water with intended dosage of additives
The temperature of the delivered liquid must not exceed 35^ .
Improper use
Note
The manufacturer accepts no liability for possible damage caused by improper use or incorrect operation.
Hazard levels
△DANGER
- Indication of an imminent threat of danger that will lead to severe injuries or even death.
△WARNING
- Indication of a potentially dangerous situation that may lead to severe injuries or even death.
CAUTION
- Indication of a potentially dangerous situation that may lead to minor injuries.
ATTENTION
- Indication of a potentially dangerous situation that may lead to damage to property.
Environmental protection

The packing materials can be recycled. Please dispose of packaging in accordance with the environmental regulations.

Electrical and electronic devices contain valuable, recyclable materials and often components such as batteries, rechargeable batteries or oil,
which - if handled or disposed of incorrectly - can pose a potential danger to human health and the environment. However, these components are required for the correct operation of the device. Devices marked by this symbol are not allowed to be disposed of together with the household rubbish.
Notes on the content materials (REACH)
Current information on content materials can be found at: www.kaercher.de/REACH
Accessories and spare parts
Only use original accessories and original spare parts. They ensure that the appliance will run fault-free and safely.
Information on accessories and spare parts can be found at www.kaercher.com.
Scope of delivery
The scope of delivery for the appliance is shown on the packaging. Check the contents for completeness when unpacking. If any accessories are missing or in the event of any shipping damage, please notify your dealer.
Warranty
The warranty conditions issued by our sales company responsible apply in all countries. We shall remedy possible malfunctions on your device within the warranty period free of cost, provided that a material or manufacturing defect is the cause. In a warranty case, please contact your dealer (with the purchase receipt) or the next authorised customer service site.
(See overleaf for the address)
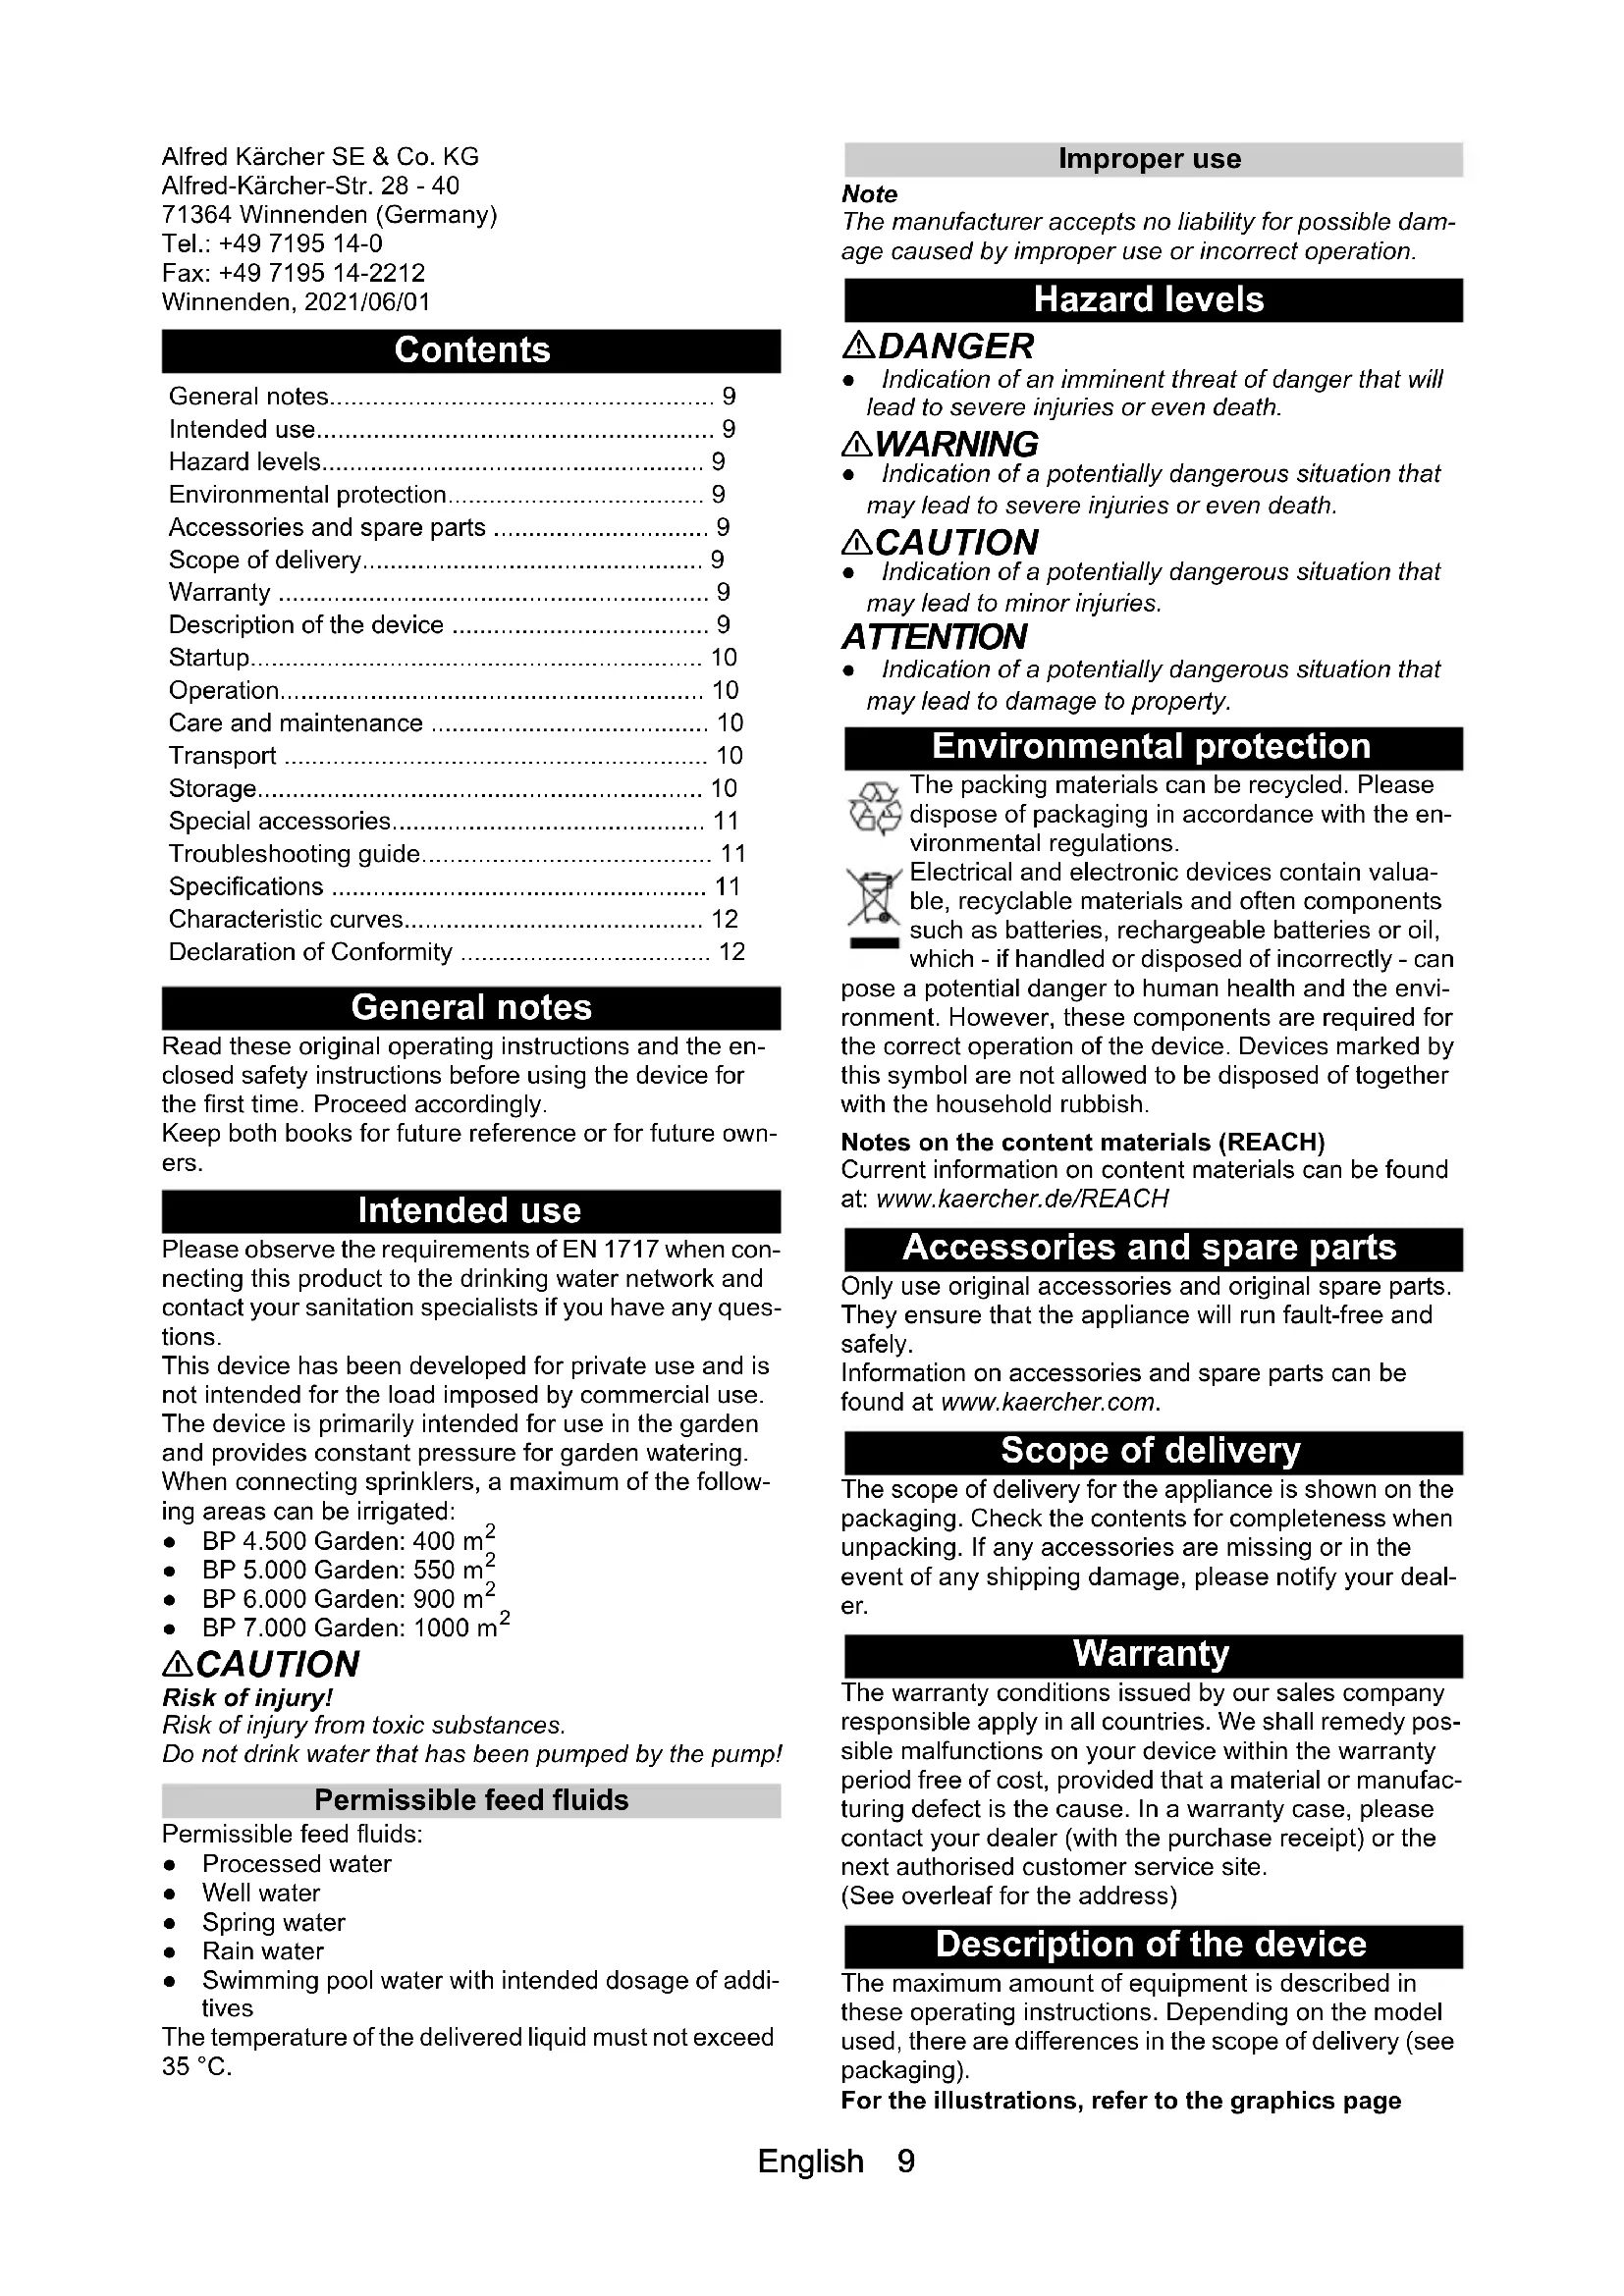
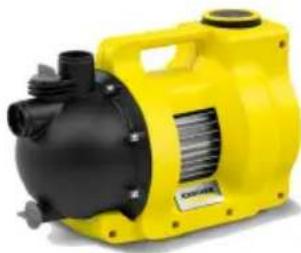
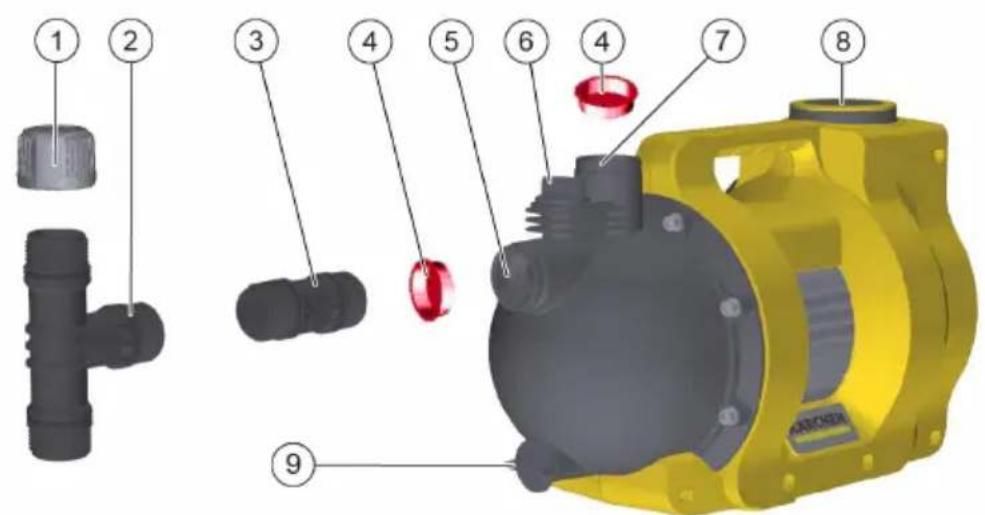
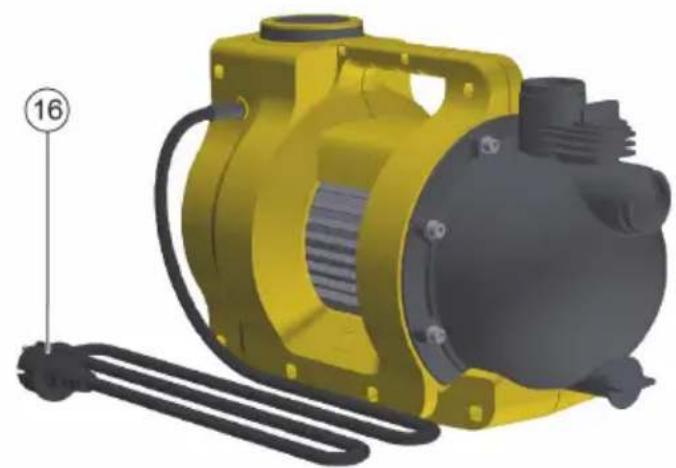
Description of the device
The maximum amount of equipment is described in these operating instructions. Depending on the model used, there are differences in the scope of delivery (see packaging).
For the illustrations, refer to the graphics page
Illustration A
1 Cap, 2-way connection adapter
2- way connection adapter for pumps G 1 (not included with BP 4.500 Garden)
③ Connection adapter for pumps G 1 (included twice with BP 4.500 Garden)
4 Sealing plug
5 Connection G 1 (33.3 mm) suction line (inlet)
6 Filling nozzle with cap
7Connection G 1 (33.3 mm) pressure line (outlet)
ON/OFF switch
Water drain valve
10Tap connection G 1
11^ Coupling with Aqua Stop
12**Coupling
13^ Syringe
14^ Suction hose set incl. 3.5m ready-to-connect, vacuum-proof spiral hose with suction filter and backflow stop
15 ^ 其 Garden hose 1 / 2''20m
16 Power supply cable with plug
Only accessories included with Set and Set Plus.
Only accessories included with Set Plus.
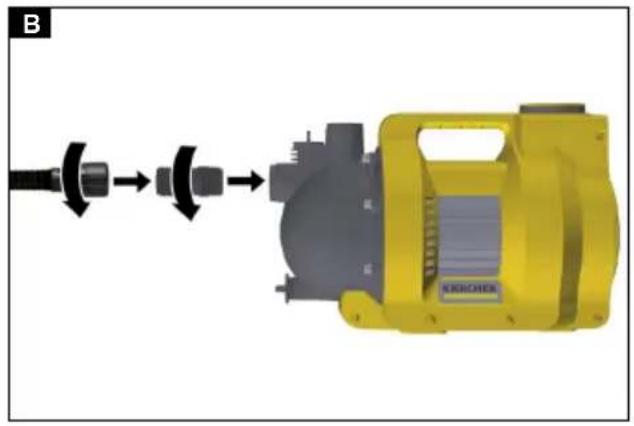
Startup
We recommend using only original Kärcher suction hoses, filter components and hose connections. Using components from other manufacturers can lead to malfunctions when sucking the feed fluid, especially when using bayonet connection systems.
Before initial startup
Preparation
- Remove the sealing plug.
- Screw the connection adapter into the suction connection of the pump (inlet). Manually tighten.
- Connect a vacuum-tight suction hose Illustration B
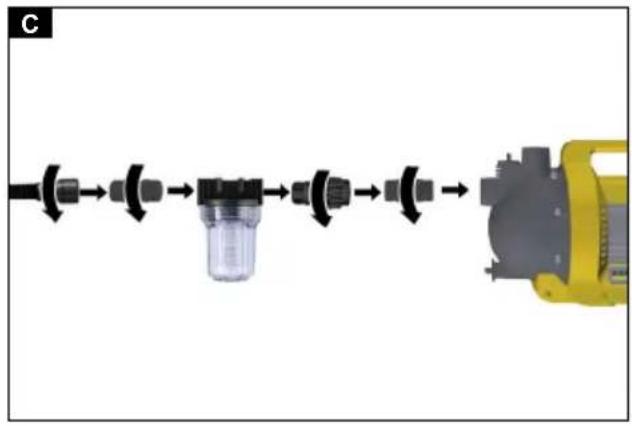
Note
If the water is dirty, we recommend fitting a pre-filter (see Special accessories) between the check valve and the suction hose.
Illustration C
Note
To shorten the re-suction time, use a suction hose with backflow stop. This prevents the suction hose from emptying after use (see Special accessories).
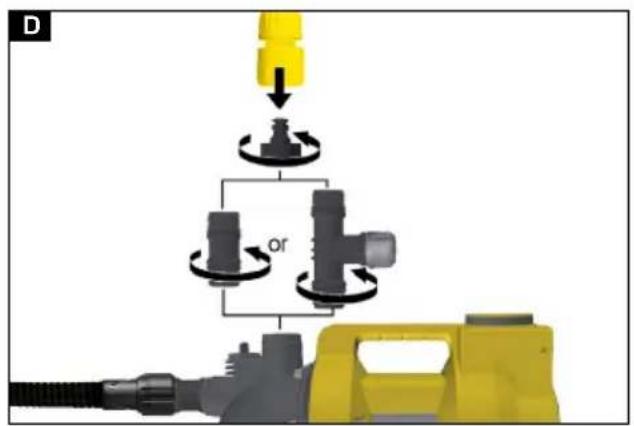
- Screw the connection adapter into the pressure connection of the pump (outlet). Manually tighten. Illustration D
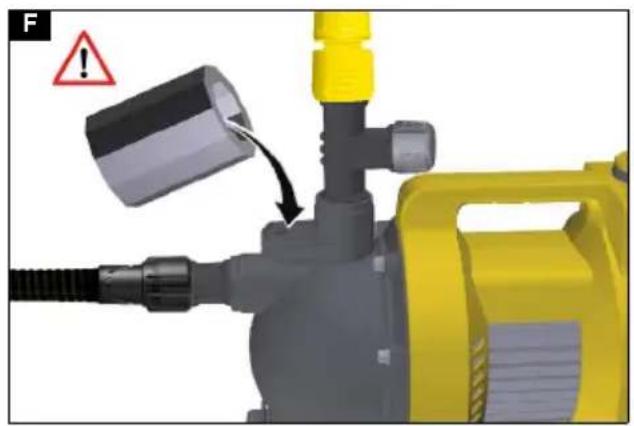
- Open the filling nozzle cap. Illustration E
- Fill the pump with water until it overflows. Illustration F
Operation
- Plug the mains plug into a mains socket.
-
Switch the device on with the ON/OFF switch.
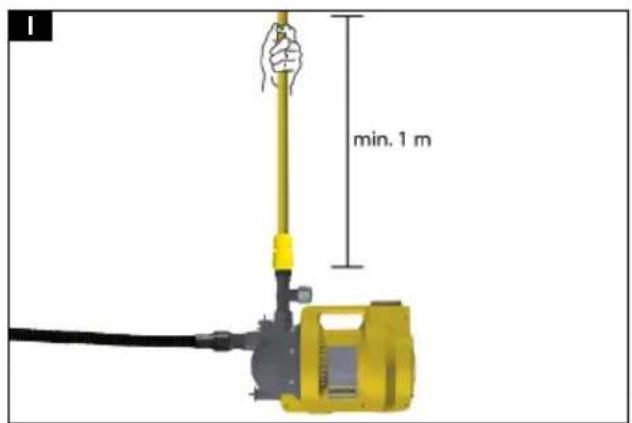
-
To shorten the suction time, raise the pressure hose approx. 1 m. Illustration I
- Wait until the pump simultaneously sucks and delivers.
CAUTION
Danger due to dry running
Dry running damages the pump.
Do not let the pump run dry!
- Do not leave the pump unattended during operation.
ATTENTION
Risk of injury. The system is pressurised! Risk of injury.
(for pressure see chapter "Technical data")
Ending operation
- Switch off the device at the ON/OFF switch.
- Pull the mains plug out of the socket.
Care and maintenance
△DANGER
Danger of electric shock.
Always switch the device off and disconnect the mains plug before working on the device.
The device is maintenance-free.
Rinse
Note
Rinse the pump with clear water after each use when pumping water with additives.
Transport
CAUTION
Risk of injury
Risk of injury from falling device.
When transporting the device, observe the weight of the device (see chapter Specifications) and secure it accordingly when transporting it in vehicles.
Manual transport
1 Roll up the cable.
2 Lift and carry the device by the carrying handle.
Transport in vehicles
1 Secure the device against slipping and tipping over.
CAUTION
Risk of injury
Risk of injury from falling device.
When transporting the device, observe the weight of the device (see technical data) and secure it accordingly when transporting it in vehicles.
Storage
CAUTION
Failure to observe the weight
Risk of injury and damage
Be aware of the weight of the device during storage.
- Store the device in a frost-protected place.
Storing the device
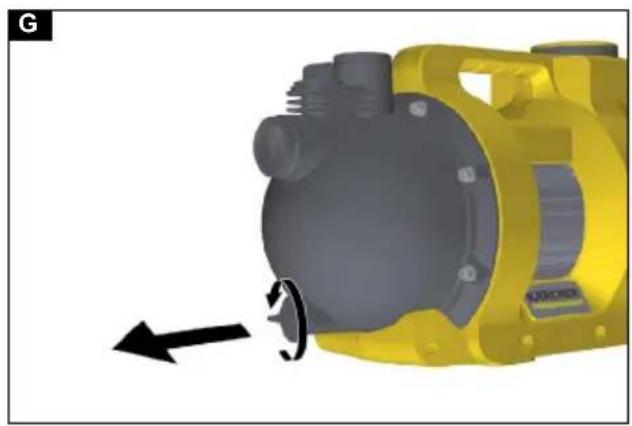
- Depressurise the device by opening the water removal connected to the pressure side (e.g. opening the garden sprayer).
- Empty the hoses.
-
Remove suction line and pressure line.
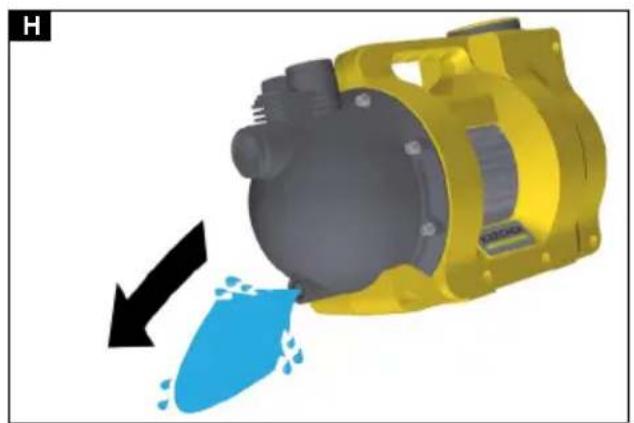
-
Drain the pump via the water drain valve.
Illustration H
- Store the device in a frost-protected place.
Special accessories
You will find the possible special accessories on the last page of these operating instructions.
Troubleshooting guide
Malfunctions often have simple causes that you can remedy yourself using the following overview. When in doubt, or in the case of malfunctions not mentioned here, please contact your authorised Customer Service.
| Fault Cause Rectification | ||
| Pump is running, but not delivering | Air is in the pump. 1. Check for correct startup (see chapter Preparation and Operation). | |
| Dirt particles block the suction area. 1. Pull the mains plug out of the socket.2. Clean the suction area. | ||
| The suction hose or the connection adapter is not correctly screwed in. | 1. Check that the seals are fitted correctly.2. Manually tighten the suction hose and con- nection adapter. | |
| The pre-filter is clogged. 1. Clean the pre- filter. | ||
| The pump does not start up, or stops suddenly during operation | The power supply is disconnected. 1. Check the fuses and the electrical connec- tions. | |
| The pump capacity drops or is too low | The suction area is clogged. 1. Pull the m | ains plug out of the socket.2. Clean the suction area. |
| The delivery rate of the pump depends on the delivery head and the connected periphery. | 1. Observe the max. delivery head (see chap- ter Specifications), select a different hose diameter or a different hose length if nec- essary. | |
| The cross-section on the pressure side is narrowed, e.g. due to the valve/ball tap not being fully open. | 1. Open the valve/ball tap completely. | |
| The hose is kinked on the pressure side. | 1. Eliminate the kink points in the hose. | |
| The pre-filter is clogged. 1. Clean the pre- filter. | ||
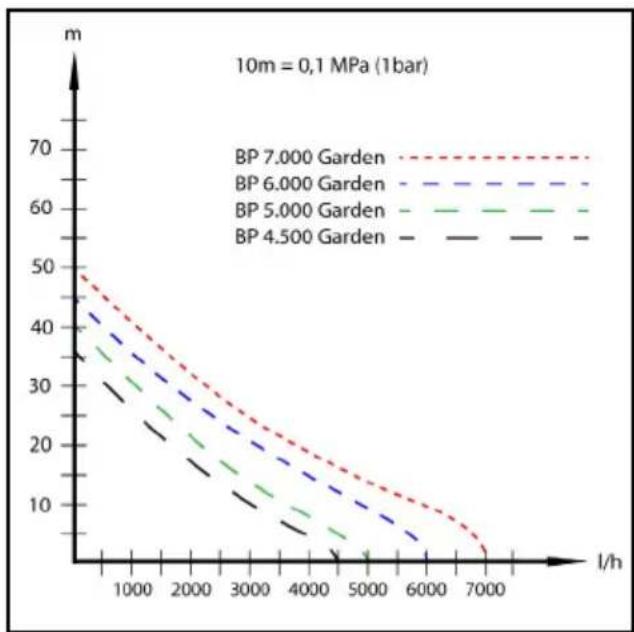
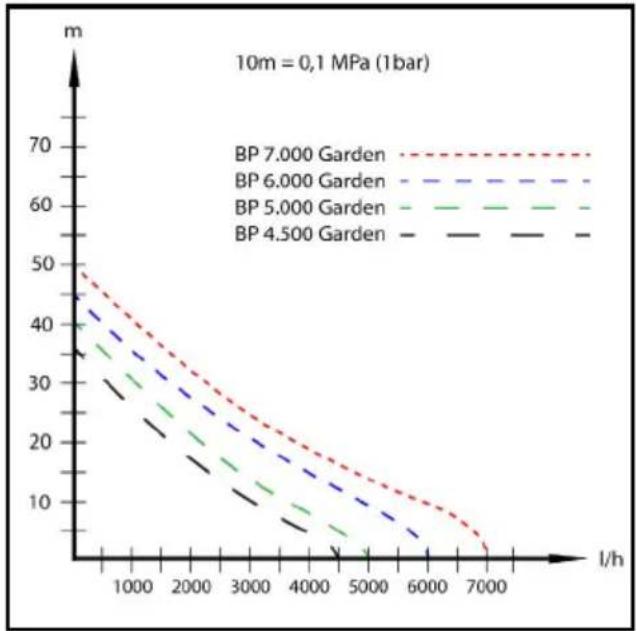
Specifications
| BP 4.500 Garden | BP 5.000 Garden | BP 6.000 Garden | BP 7.000 Garden | ||
| BP 4.500 Garden Set Plus | BP 5.000 Garden Set Plus | BP 6.000 Garden Set Plus | |||
| Mains voltage V 230-240 230-240 230-240 230-240 | |||||
| Power frequency | Hz | 50 | 50 | 50 | 50 |
| Nominal power | W | 550 | 650 | 1000 | 1100 |
| Maximum flow rate | l/h | 4500 | 5000 | 6000 | 7000 |
| Suction height (max.) | m | 8 | 8 | 8 | 8 |
| Solids content in water | kg/m3 | >2,5 | >2,5 | >2,5 | >2,5 |
| Pressure (max.) | MPa (bar) | 0,36 (3,6) | 0,40 (4,0) | 0,45 (4,5) | 0,5 (5,0) |
| Delivery height (max.) | m | 35 | 40 | 45 | 50 |
| Delivery temperature (max.) | °C | 35,0 | 35,0 | 35,0 | 35,0 |
| Particle size (max.) of permissible feed fluids | mm | 1 | 1 | 1 | 1 |
| Pump type | Jet | Jet | Jet | Jet | |
| Sound pressure level LpA | dB(A) | 56 | 58 | 69 | 68 |
| Guaranteed sound power level LwA | dB(A) | 71 | 73 | 84 | 83 |
| Dimensions and weights | |||||
| Weight (without accessories) | kg | 6,4 | 7,0 | 9,7 | 10,0 |
Note
Reason for exception according to regulation (EU)
2019/1781 Annex I Section 2 (12): (j)
Subject to technical modifications!
Characteristic curves
Declaration of Conformity
EU Declaration of Conformity
We hereby declare that the machine described below complies with the relevant basic safety and health requirements in the EU Directives, both in its basic design and construction as well as in the version placed in circulation by us. This declaration is invalidated by any changes made to the machine that are not approved by us.
Product: Pump
Type: 1.645-xxx
Currently applicable EU Directives
2006/42/EC (+2009/127/EC)
2014/30/EU
2000/14/EC
2011/65/EU
2009/125/EC
Commission Regulation(s)
(EU) 2019/1781
Harmonised standards used
EN 60335-1
EN 60335-2-41
EN 62233: 2008
EN 55014-1:2017 + A11:2020
EN 55014-2: 1997+A1: 2001+A2: 2008
EN 61000-3-2: 2014
EN 61000-3-3: 2013
EN IEC 63000:2018
Conformity evaluation procedure used
2000/14/E:Annex V
Sound power level dB(A)
BP 4.500 Garden
Measured: 68
Guaranteed: 71
BP 5.000 Garden
Measured: 70
Guaranteed: 73
BP 6.000 Garden
Measured: 81
Guaranteed: 84
BP 7.000 Garden
Measured: 81
Guaranteed: 83
The signatories act on behalf of and with the authority of the company management.

H. Jenner
Chairman of the Board of Management

S. Reiser
Manager Regulatory Affairs & Certification
Documentation supervisor:
S. Reiser
Alfred Kärcher SE & Co. KG
Alfred-Karcher-Str.28-40
71364 Winnenden (Germany)
Ph.: +49 7195 14-0
Fax: +49 7195 14-2212
Winnenden, 2021/06/01
Declaration of Conformity (UK)
We hereby declare that the product described below complies with the relevant provisions of the following UK Regulations, both in its basic design and construction as well as in the version put into circulation by us. This declaration shall cease to be valid if the product is modified without our prior approval.
Product: Pump
Type: 1.645-xxx
Currently applicable UK Regulations
S.I. 2008/1597 (as amended)
S.I. 2016/1091 (as amended)
S.I. 2001/1701 (as amended)
S.I. 2012/3032 (as amended)
S.I. 2010/2617 (as amended)
Commission Regulation(s)
(EU) 2019/1781
Designated standards used
EN 60335-1
EN 60335-2-41
EN 62233: 2008
EN 55014-1:2017 + A11:2020
EN 55014-2: 1997+A1: 2001+A2: 2008
EN 61000-3-2: 2014
EN 61000-3-3:2013
ENIEC63000:2018
Applied conformity assessment procedure
S.I. 2001/1701 (as amended): Schedule 8
Sound power level dB(A)
BP 4.500 Garden
Measured: 68
Guaranteed: 71
BP 5.000 Garden
Measured: 70
Guaranteed: 73
BP 6.000 Garden
Measured: 81
Guaranteed: 84
BP 7.000 Garden
Measured: 81
Guaranteed: 83
The signatories act on behalf of and with the authority of the company management.

H.Jenner
Chairman of the Board of Management

S. Reiser
Manager Regulatory Affairs & Certification
Documentation supervisor:
S. Reiser
Alfred Kärcher SE & Co. KG
Alfred-Karcher-Str. 28 - 40
71364 Winnenden (Germany)
Ph.: +49 7195 14-0
Fax: +49 7195 14-2212
Winnenden, 2021/06/01
Contenu
Remarques generales. 13
2006/42/CE (+2009/127/CE)
2014/30/UE
2000/14/CE
2011/65/UE
2009/125/CE
Ordonnance(s) appliquee(s)
(UE) 2019/1781
Chairman of the Board of Management

S. Reiser
Manager Regulatory Affairs & Certification
Responsible de la documentation :
S. Reiser
Alfred Kärcher SE & Co. KG
Alfred-Karcher-Str. 28 - 40
71364 Winnenden (Germany)
Tél.: +49 7195 14-0
Télécopie: +49 7195 14-2212
Winnenden, le 01/06/2021
Indices
Chairman of the Board of Management

S. Reiser
Manager Regulatory Affairs & Certification
71364 Winnenden (Germany)
Tel.: +49 7195 14-0
Fax: +49 7195 14-2212
Winnenden, 01/06/2021
Inhoud
Chairman of the Board of Management

S. Reiser
Manager Regulatory Affairs & Certification
71364 Winnenden (Germany)
Tel.: +49 7195 14-0
Fax: +49 7195 14-2212
Winnenden, 2021/06/01
Indices de Contents
Avisogenerales. 25
Uso previsto 26
2006/42/CE (+2009/127/CE)
2014/30/UE
2000/14/CE
2011/65/UE
2009/125/CE
Chairman of the Board of Management

S. Reiser
Manager Regulatory Affairs & Certification
Responsible de documentacion:
S. Reiser
Alfred Kärcher SE & Co. KG
Alfred-Karcher-Str.28-40
71364 Winnenden (Germany)
Tel.: +49 7195 14-0
Fax: +49 7195 14-2212
Winnenden, 01/06/2021
Indices
Indicaoes gerais 30
2006/42/CE (+2009/127/CE)
2014/30/UE
2000/14/CE
2011/65/UE
2009/125/CE
Chairman of the Board of Management
S. Reiser
Manager Regulatory Affairs & Certification
2006/42/EF(+2009/127/EF)
2014/30/EU
2000/14/EF
2011/65/EU
2009/125/EF
Anvendt(e) for ordining(er)
(EU) 2019/1781
Chairman of the Board of Management

S. Reiser
Manager Regulatory Affairs & Certification
71364 Winnenden (Germany)
TIf.: +49 7195 14-0
Fax: +49 7195 14-2212
Winnenden, 2021/06/01
Indhold
Generelle merknader 37
2006/42/EF(+2009/127/EF)
2014/30/EU
2000/14/EF
2011/65/EU
2009/125/EF
Anvendt(e) for ordining(er)
(EU) 2019/1781
Anvendte harmoniserte standarder
EN 60335-1
EN 60335-2-41
EN 62233: 2008
EN 55014-1:2017 + A11:2020
EN 55014-2: 1997+A1: 2001+A2: 2008
EN 61000-3-2: 2014
EN 61000-3-3:2013
EN IEC 63000:2018
Chairman of the Board of Management

S. Reiser
Manager Regulatory Affairs & Certification
71364 Winnenden (Germany)
TIf.: +49 7195 14-0
Winnenden, 2021/06/01
Innehäll
Allman information 41
Avsedd anvandning. 42
Risknivae 42
Miljöskydd 42
Chairman of the Board of Management
S. Reiser
Manager Regulatory Affairs & Certification
Dokumentationsbefullmaktigad:
S. Reiser
Alfred Kärcher SE & Co. KG
Alfred-Karcher-Str.28-40
D-71364 Winnenden (Germany)
Tfn: +49 7195 14-0
Fax: +49 7195 14-2212
Winnenden, 01.06.2021
Sisälto
Yleisiä ohjeita 45
Chairman of the Board of Management
S. Reiser
Manager Regulatory Affairs & Certification
71364 Winnenden (Germany)
Puh.: +49 7195 14-0
Bortheia oE TepiTTwon BaaBns 52
TexviKa xapaktnpiOTiKa 52
△iaypaμata 53
Anwn oumuoppwons EE 53
EviKec uToOeic
Pniv ano Tnv npwn xpnon nnc ouakeun, diaaote autcTG yvnoies odnyiecs xpnang kaowkaiTIG ouvoedutikec utoddeieic aopaaiaac. EaapuozeTAE autcTG oynieC.
* AEsouap movioia to aTko kai to eT Plus.
**Aεσouap μovo γia to ΘεT Plus.
Oeon oE eIoupyia
SuvioToue Tn xpnon mvo yynoiw aywyow avappoqnoc, otoiexiw pfiaTpou kai ouvdeoow v EukamTTWv Owanyw Tnc Karcher. ZE TepiTTwo n XpnoC ESaptnmuTsw aAwwkataoKeuaotwv EvExetva TnapouaTOuV dualeitoupyies katavappon Tou uypou, idiatepa de kata tn xpnoOn ouTnpatw ouvdoenc ptayiovET.
Piv aTnTo Tnv EvapgXpnos PpoTeoiia
A a I p E O T E TO TtWμa.
BiodoteTov pooapmuoyea otn ouvdean avappoqnon tsavlaic (eioooc).Zpicte To xepi.
- SuV6eAn avEeKTIkOu oE UTOnTieoN, AaoTixou avappopnOng EikovB
Yπóδεiξη

H.Jenner
Chairman of the Board of Management
S. Reiser
Manager Regulatory Affairs & Certification
YTEUuvoc Tevikoouaekelou:
S. Reiser
Alfred Kärcher SE & Co. KG
Alfred-Karcher-Str.28-40
71364 Winnenden (Germany)
Tnλ: +49 7195 14-0
Φαξ: +49 7195 14-2212
Winnenden, 2021/06/01
Icindekiler
Genel uyarilar 54
2006/42/AT (+2009/127/AT)
2014/30/AB
2000/14/EG
2011/65/AB
2009/125/EG
Chairman of the Board of Management

S. Reiser
Manager Regulatory Affairs & Certification
Winnenden, 2021/06/01
CopepkHne
O6uue yka3aHn 57
IcnoJIb3OBAHHe no Ha3HaueHnIO 58
CTeneHb onachoctn 58
3aunTaOkpykaIoue cpebl 58
PpHnAdnEeKHOCTn 3aNaChbIe YacTn 58
KOMnneKT noCTaBKn 58
Tapantna 58
OncanHe yctpoNCTBa 58
BvO B 3KcPnyatauH. 59
Kcnnyatau 59
YxOД n TexHnueckoe 6cnyKbHaHne. 59
TpaHcnpOpBbKa 59
Xpahene 60
CneuaNBhie npHnAdHexHOCTu 60
POMOu npn HncnpaBHOCTx 60
TexHHueckne daHHbIe. 61
XapakTepeNCTnK 61
IeknapaunO COOTBETCTBn CTanapTaM EC...62
Obuntyeka3aHnna
Ipeed npBbIM npmHeHnem yctpoiCTBa O3HaKOMITbC C daHHo OPuHaJIbHO INHCTpyKUnei NO 3KcNJIyatauIN I npNJlaRaEMbIMN yka3aHnMn IO TEXHKe 6e3ONaCHOCT. DeIcTBoBaTb B COOTBeTCTBn C HnMI.
CoxpaHrB o6e 6poUOpbln daJbHeWero noJb3OBAHHnn dnn cJeDyUoero BJaDeJbua.
IcnoJIb3OBAHHe NO Ha3HaueHnIO
Pn noKJIIOUeHn DaHHORO n3dEJN K cETn NITbeBOrBOoDcHaeHn Co6IOnaTb Tpe6OBaHn CTAHapTa EN 1717 n no JIO6bIM BONpocam O6paTaBcK cneuaJIN3npOBaHHOM CaHTapHO-TexHueCKOM npednpraTNo.
DaHHoe yCTpoIcTBo pa3pa6oTaHO dIy qactHOrO nCNoJIb3OBAHnA. OHO He npEpyCMOTpeHO dIy fYHKUHOHPOBaHnB B npOMblJNeHHbIX yCNOBnX.
YcTPOIcTBIO ppeDyCMOTpeHO B nepByIO OpepeBdIINCNOJIb3OBAHnB CaNy I ObecneHnBaET NOCToRHHoe DaBHeHne DnI opOWeHnCaJa.
PnnoKIOHcNnCpNHKepeOBMOxHO OPOaTb CneIyUOHeMaKcMmaHbHbeIIOuAdn:
BP 4.500 Garden: 400m^2
BP 5.000 Garden: 550M^2
BP 6.000 Garden: 900M^2
BP 7.000 Garden: 1000m^2
△OCTOPOXHO
Onachocmbmpaemupoeahua!
Onachocmbmpaemupobauhaepzylbmae
e03deuecmua mokcuHoe.
He numb nepekaaHHyHacocom oody!
Donyctmbie nna nepekaukxndkoctn
Donyctmblde nnerpekaKJxNdkocTn:
TeXHnueckKaYBOda;
KoIOne3NaBbOda;
pOДHиKOBaЯBoJa;
-ДОЖДЕВая BOДa;
B0da B 6accnHax npn HndneXauei Do3npOBKe do6abok.
Tempepatya nepekaunBaemon KndKocTn He doJxHa npebblaTb 35°C.
NcnoJb3ObaHne He no Ha3HaueHnIO
PpumeyaHue
Pou38oDumenb He Hecem oemeemcmeHHocmu 3a noepexkdeHua, nonyuehhble e pezylbmame Ucnoj30eAHua He nO Ha3HaehuO uUu HenpaBulbHO2O obpaueHua c npubopom.
CTeneHb onaCHOCTN
ONACHOCTb
- Yka3aHue omHocumelbHo HENOCpeDcMeBHeHO apo3aueu onachocmu, Komopar npubodum K mJKeIbIM mpaBMaM UUNK Cmepmu.
△PENDyINPEXKDEHNE
- Yka3aHue omHocumelbHO 603MOxHou nomeHuajbHO onachOH cumyaauu, KOMopaa MOxem npueecmu K mXeJIbIM mpaemam UNU K cmepmu.
△OCTOPOXHO
- Yka3aHue Ha nomeHuzaIbHo onachyUcmyauu, Komopar MoKem npueecmu K nonyuHeuO ne2kux mpaM.
BHIMAHHE
- Yka3aHue omHocumelbHo e03MoXHou nomeHuaIbHO onaChou cumyaUu, Komopar MoKem noBneYb 3a co6ou MamepuanbHi yuep6.
3aunTa OkpyXaOoSe CpeDbI
YnakoBouHbIe MaTePnaJIbI NOJaIOTcB TOpuHNo Inepepa6OtKe. YnakoBky Heo6xOIMo yTnIn3npoBaTb 6e3 yUepe6a dIra OkpykaIOuei Cpebl.
3Jektpueckne n 3JeKtpoHbIe yctpoNCTBa qacto coepkataeHHbIe MaTePnAbl, npiroDhIE dIra BTOpUHO nepepa6OTKn, n 3aactyIO Takne KOMNOHeHTbl, KaK 6aTapeu, aKKymyIaTOpbl IIN MacNo, KOtOpBie npi HEnpabInlbHom o6paueHnn IIN HeHaIeXaIeu EytUN3aunPipeCTABnHOT NToEHNzAlbHyO ONaCHOCTb DnIg 3dOpOBBy I OKpyKaIOSeI cpebl. He MeHee, daHbIe KOMNoHEtBl Heo6xOIMbl dIra npabInbHoi pa60bI yCTPOcTBa. YcTPOcTBa, 0603NaeHHbIe 3Tm CMMBONOM, 3aPpeHo yTuIN3nPoBaTb BMeCTe C 6bITOBbIMn OTXdAMN.
Yka3aHnno NO KOMnOHeHTam (REACH)
Chairman of the Board of Management

S. Reiser
Manager Regulatory Affairs & Certification
Лицо, OTBETCTBEHHe 3a BeDEHne DOKymeHTaun: I. Pau3ep (S. Reiser)
Alfred Kärcher SE & Co. KG
Alfred-Karcher-Str. 28-40
71364 Winnenden (Germany)
Ten.: +49 7195 14-0
ΦaKc: +49 7195 14-2212
r.BunHHeHdEh,01.06.2021
Tartalom
Altalanosutasitasok 62
Chairman of the Board of Management

S. Reiser
Manager Regulatory Affairs & Certification
Winnenden, 2021/06/01
Obsah
ObecnéPokyny 66
Pouziti v souladu s urcenim 67
Stupne nebezpeci 67
Ochrana zivotniho prostre 67
Prisluosenstvi a nahradni dily 67
Rozsah dodávky. 67
Zaruka 67
Popis pristroje 67
Uvedeni do provozu. 67
Provoz 68
Pecaeudzba 68
Preprava 68
Skladovani 68
2006/42/ES (+2009/127/ES)
2014/30/EU
2000/14/ES
2011/65/EU
2009/125/ES
Chairman of the Board of Management

S. Reiser
Manager Regulatory Affairs & Certification
Zmocnelec pro dokumentaci:
S. Reiser
Alfred Kärcher SE & Co. KG
Alfred-Karcher-Str. 28 - 40
Winnenden, 2021/06/01
Kazalo
Splošna navodila 70
Namenska uporaba. 71
Zadevne EU-directive
2006/42/ES (+2009/127/ES)
2014/30/EU
2000/14/ES
2011/65/EU
2009/125/ES
Uporabljena(-e) uredba(-e)
(EU) 2019/1781
Chairman of the Board of Management

S. Reiser
Manager Regulatory Affairs & Certification
Pooblascena oseba za dokumentacio:
S. Reiser
Alfred Kärcher SE & Co. KG
Alfred-Karcher-Str. 28 - 40
2006/42/WE (+2009/127/WE)
2014/30/UE
2000/14/WE
2011/65/UE
2009/125/WE
Chairman of the Board of Management
S. Reiser
Manager Regulatory Affairs & Certification
Administrator dokumentaci:
S. Reiser
Alfred Karcher SE & Co. KG
Alfred-Karcher-Str. 28 - 40
71364 Winnenden (Germany)
Tel.: +49 7195 14-0
Directive UE relevante
2006/42/UE (+2009/127/UE)
2014/30/UE
2000/14/UE
2011/65/UE
2009/125/UE
Regulament(e)utilizat(e)
(UE) 2019/1781
Norme armonizate aplicate
EN 60335-1
EN 60335-2-41
EN 62233: 2008
EN 55014-1:2017 + A11:2020
EN 55014-2: 1997+A1: 2001+A2: 2008
EN 61000-3-2: 2014
EN 61000-3-3: 2013
EN IEC 63000:2018
Procedura aplicata de evaluates a conformitài
2000/14/UE: Anexa V
Nivel de putere acustica dB(A)
BP 4.500 Garden
Māsurat: 68
Garantat: 71
BP 5.000 Garden
Māsurat: 70
Garantat: 73
BP 6.000 Garden
Māsurat: 81
Garantat: 84
BP 7.000 Garden
Māsurat: 81
Garantat: 83
Semnatarii actiona zin numele si prin imputernicirea

Chairman of the Board of Management

S. Reiser
Manager Regulatory Affairs & Certification
Insarcinat cu elaborarea documentatiei:
S. Reiser
Alfred Kärcher SE & Co. KG
Alfred-Karcher-Str.28-40
71364 Winnenden (Germania)
Tel.: +49 7195 14-0
Fax: +49 7195 14-2212
Winnenden, 2021/06/01
Obsah
2006/42/ES (+2009/127/ES)
2014/30/EU
2000/14/ES
2011/65/EU
2009/125/ES
2000/14/ES: Priloha V

H.Jenner
Chairman of the Board of Management
S. Reiser
Manager Regulatory Affairs & Certification
71364 Winnenden (Germany)
Tel.: +49 7195 14-0
Fax: +49 7195 14-2212
Winnenden, 01.06.2021
Sadržaj
Opé napomene 87
2006/42/EZ (+2009/127/EZ)
2014/30/EU
2000/14/EZ
2011/65/EU
2009/125/EZ
Primijenjene uredebe
(EU) 2019/1781
Primijenjene uskladene norme
EN 60335-1
EN 60335-2-41
EN 62233: 2008
EN 55014-1:2017 + A11:2020
EN 55014-2: 1997+A1: 2001+A2: 2008
EN 61000-3-2: 2014
EN 61000-3-3: 2013
EN IEC 63000:2018

H.Jenner
Chairman of the Board of Management

S. Reiser
Manager Regulatory Affairs & Certification
Winnenden, 01.06.2021.
Sadržaj
Opste napomene. 91
Namenska upotreba 91
Stepeni opasosti 91
Zastita zivotne sredine 91
Priborirezervndelovi. 91
Obim isporuke 91
Garancija 91
Opis uredaja 91
Pušanje u pogon 92
Rad. 92
2006/42/EZ (+2009/127/EZ)
2014/30/EU
2000/14/EZ
2011/65/EU
2009/125/EZ
Primenjena(e) odredba(e)
(EU) 2019/1781
Primenjene harmonizovane norme
EN 60335-1
EN 60335-2-41
EN 62233: 2008
EN 55014-1:2017 + A11:2020
EN 55014-2: 1997+A1: 2001+A2: 2008
EN 61000-3-2: 2014
EN 61000-3-3: 2013
EN IEC 63000:2018
Chairman of the Board of Management
S. Reiser
Manager Regulatory Affairs & Certification
Lice ovlaśćeno za dokumentaciju:
S. Reiser
Alfred Kärcher SE & Co. KG
Alfred-Karcher-Str. 28 - 40
71364 Winnenden (Germany)
Tel.: +49 7195 14-0
Winnenden, 2021/06/01
CbDpXaHne
O6uynka3aHn 94
CTeneHnHa onaCHOCT 95
3aunTa Ha OKoJHaTa CpeJa 95
Akecoapn npeepBn qactn 95
O6xbar Ha doctabka 95
Tapanu 95
OncanneHa ypea 95
IyckaneBekcnoatauia 96
Eknpnoatauia 96
Pnka n npdpbXkKa 96
TpaHcnpOpTnpaHe 96
CbXpaHHe. 96
CneuaHn npHaJnxHoCTn 97
POMOu npn HEn3npaBHOCTN 97
Texnueckn daHHN 97
XapakTepeuCTnKi 98
Deknapa3a cboTBetCTBne Ha EC 98
06uynka3aHn
Ipei npBbTO n3non3BaHe Ha ypeHa npOeTeToBaOpunHnHO pKOBODCTBO 3a EcKnnoTaunia
npunoxeHte yka3aHn 3a 6e3oanchoct.
Ppoueepaute cboTbeTHO.
3ana3e Te Bete KnHexK 3a NocneBaio n3non3BaHe nn 3a CneBauu co6ctBeHnK.
YnoTpe6a no npedHa3HaueHne
Mon, cna3BaIte n3nCKBaHnraHa EN 1717 npi CBp3BaHe Ha To3n IpoNyKT KbM MpeKaTa 3a NITeHa B0da n ppi eBENTyaHn Bbnpocn Ce o6pbuaTe KbM BaWata caHTapHa cnKy6a.
To3n ypeE pa3pa6oTeH 3a YacTha yNoTpe6a HHe e npedBvnden 3a HaTOBapBaHnraTa Ha npOMuJneHaTa yNoTpe6a.
UpeBt e npedHa3NaeH npeDnMHO 3a ynoTpe6a B rpaDnHaTa N ppeJnara NOCToRnHO HAnraHe 3a rpaDnHcKO HaONBaHe.
PnCbP3BaHe Ha cnPnHKJepHn CnCTeMn MOraT da Ce HAnOBaT MaKcMaJHO CJIeDHNTE PIOU:
BP 4.500 Garden: 400m^2
BP 5.000 Garden: 550m^2
BP 6.000 Garden: 900m^2
BP 7.000 Garden: 1000m^2
△PPEJNA3JINBOCT
Onachocm om HapaHaeaHe!
Onachocm om HapaHaahe npadu mokcuHu eeuecm.
He nuime eoda, koryo e 6una u3nomnana om nomnama!
Pa3peWeH TeuHOCTn 3a H3nomBaHe
Pa3peSeHn TeuHocTn 3a n3nomBaHe:
- CbXpaHЯBaIte ypeHa Ha MЯCTO, KbDeTo JINNCBaTycNoBna 3a 3ampb3BaHe.
CbxaheHneHa ypeda
- OcbobodeypeaOT hanaheTo ype3 OTbapnHa Cbpb3aHrOT cpaHata Ha HanaRaHeTO OTBOp 3a
B3eMaHe Ha BOda (Ha np. OTbaprHe Ha rpaHnHcKTo yCTpOJCTBO 3a npbCKaHe).
2.ИзпразаэтeteMapkyuHTe.
3. CbaTe cMykaTeHnHaHApHnTp6oNpoBOD.
4.ИзпраЗнete nomnata пpe3 BeHTиla 3a ИЗTOUbaHe Na BOdata.
Фигура H
- CbXpaHbAaTe ypeHa Ha MxCTO, KbDeTo JINCBaTycIOBn 3a 3ampb3BaHe.
CneuHaHn npHaJNeXHoCTn
Bb3MOxHnTe CneuaJIHn npHaJNeXHoCTn ige HamePte Ha nocJeHata CTpaHua OT Ta3n IHCTpyKUra 3a EKcnIIOaTaUy.
Iomou npn HEn3npaBHOCTN
MHoro yecTo npuHnHte 3a NOBpeJa ca eIemEnTapHn n C NOMOHTa Ha cJeHNHe Yka3aHnMa MoKe camn Da Tn OTCTpaHnTe. Ako He CTe CNrpyHn nn NobpeJnte He ca ONINCAHn TYK, O6bPHeTe Ce KbM OTOpN3npaHn cepBn3.
| Тушик Пличина Остория | ||||
| Помпanta павOTи, Не изnomьа | В полatingа лима вьздух. | 1. Поверете правлелоту ручке в ekсллгату (вж. разду). 2. Почистете зогату на засмквае. | 1. Изадете мрековя有很大 сожд; 2. Почистете зогату на засмквае. | 1. Поверете дали ультынения с ( поставени павлно. 2. Загенете BCМУКATELИЕ Маркуни. почьдемпелега adjoiningся с рык. 3. Почистете правлелега有很大 сожд. 4. Почистете правлелега有很大 сожд. |
| Части мрьсotingя бл_OKират зогату на засмквае. | ||||
| ВсмужателейтMapкун undу прибъедимелейтадап对接е не e Завиные павлino. | 1. Поверете дали ультынения с ( поставени павлно. 2. Загенете BCМУКATELИЕ Маркуни. почьдемпелега adjoiningся с рык. | 1. Поверете дали ультынения с ( поставени павлно. 2. Загенете BCМУКATELИЕ Маркуни. почьдемпелега adjoiningся с рык. | 1. Поверете правлелега有很大 сожд. 2. Загенете BCМУКATELИЕ Маркуни. почьдемпелега有很大 сожд. | |
| Празьарителейтфилььр e залушen. | 1. Почистете правлелега有很大 сожд. 2. Почистете зогату на засмквае. | 1. Поверете правлелега有很大 сожд. 2. Почистете зогату на засмквае. | 1. Поверете правлелега有很大 сожд. 2. Почистете зогату на засmквае. | |
| Помпanta не срабова илл спira визанно no оке на павotа | Е lektroazхандану не рекьсано. | 1. Поверете правлелега有很大 сожд. 2. Почистете зогату на засмквае. | 1. Поверете правлелега有很大 сожд. 2. Почистете зогату на засмкventa. | 1. Поверете правлелега有很大 сожд. 2. Почистете зогату на засмкventa. |
| Мошността на Изомпвае наималява илл e Тьрдс слаба | Зогату на засмквае e залушena. | 1. Изадете мрековя有很大 сожд. 2. Почистете зогату на засмкventa. | 1. Изадете мрековя有很大 сожд. 2. Почистете зогату на засмкventa. | 1. Изадете мрековя有很大 сожд. 2. Почистете зогату на засмкventa. |
| Мошността на Изомпвае на пomлatura завис OT Висимнына на Изомпвае и Свьрдане пегиферни устюства. | 1. Спаьайтмакс. Висимна на Изомпвае (Вж. Глaba Тхнчески данlu), пошехимости зберete дуг диамерл рлл дугдьлжина на маркуда. | 1. Изадете павлно визим�. 2. Изадете павлно визим�. Кран. | 1. Изадете павлно визим�. 2. Изадете павлно визим�. Кран. | |
| Сочиmetу OT срабова на палгането eстесné, нар. поади непаллно OTворен вентл/сферчesen кран. | 1. OTворете на паллно визим�. 2. OTворете павлелега有很大 сожд. 3. OTворете павлелега有很大 сожд. | 1. OTворете на паллно визим�. 2. OTворете павлелега有很大 сожд. 3. OTвorretetempe perebнату место на маркуда. | 1. OTвorretetempe perebнату место на маркуда. | |
| Маркут e пereьнат OT сранatable на наляганетo. | 1. OTстpanете правлелега有很大 сожд. 2. OTстpanете павлелега有很大 c合并. 3. OTстpanете павлелега有很大 c合并. | 1. OTстpanете правлелега有很大 c合并. 2. OTстpanете павлелега有很大 c合并. | 1. OTстpanете павлелега有很大 c合并. 2. OTстpanettу的大招. 3. OTстpanettу的大招. 4. OTстpanettу的大招. 5. OTстpanettу的大招. 6. OTстpanettу的大招. 7. OTстpanettу的大招. 8. OTстpanettу的大招. 9. OTстpanettу的大招. 10. OTстpanettу的大招. 11. OTстpanettу的大招. 12. OTстpanettу的大招. 13. OTстpanettу的大招. 14. OTстpanettу的大招. 15. OTстpanettу的大招. 16. OTстpanettу的大招. 17. OTстpanettу的大招. 18. OTстpanettу的大招. 19. OTстpanettу的大招. 20. OTстpanettу的大招. 21. OTстpanettу的大招. 22. OTстpanettу的大招. 23. OTстpanettу的大招. 24. OTстpanettу的大招. 25. OTстpanettу的大招. 26. OTстpanettу的大招. 27. OTстpanettу的大招. 28. OTстpanettу的大招. 29. OTстpanettу的大招. 30. OTстpanettу的大招. 31. OTстpanettу的大招. 32. OTстpanettу的大招. 33. OTстpanettу的大招. 34. OTстpanettу的大招. 35. OTстpanettу的大招. 36. OTстpanettу的大招. 37. OTстpanettу的大招. 38. OTстpanettу的大招. 39. OTстpanettу的大招. 40. OTстpanettу的大招. 41. OTстpanettу的大招. 42. OTстpanettу的大招. 43. OTстpanettу的大招. 44. OTстpanettу的大招. 45. OTстpanettу的大招. 46. OTстpanettу的大招. 47. OTстpanettу的大招. 48. OTстpanettу的大招. 49. OTстpanettу的大招. 50. OTстpanettу的大招. 51. OTстpanettу的大招. 52. OTстpanettу的大招. 53. OTстpanettу的大招. 54. OTстpanettу的大招. 55. OTстpanettу的大招. 56. OTстpanettу的大招. 57. OTстpanettу的大招. 58. OTстpanettу的大招. 59. OTстpanettу的大招. 60. OTстpanettу的大招. 61. OTстpanettу的大招. 62. OTстpanettу的大招. 63. OTстpanettу的大招. 64. OTстpanettу的大招. 65. OTстpanettу的大招. 66. OTстpanettу的大招. 67. OTстpanettу的大招. 68. OTстpanettу的大招. 69. OTстpanettу的大招. 70. OTстpanettу的大招. 71. OTстpanettу的大招. 72. OTстpanettу的大招. 73. OTстpanettу的大招. 74. OTстpanettу的大招. 75. OTстpanettу的大招. 76. OTстpanettу的大招. 77. OTстpanettу的大招. 78. OTстpanettу的大招. 79. OTстpanettу的大招. 80. OTстpanettу的大招. 81. OTстpanettу的大招. 82. OTстpanettу的大招. 83. OTстpanettу的大招. 84. OTстpanettу的大招. 85. OTстpanettу的大招. 86. OTстpanettу的大招. 87. OTстpanettу的大招. 88. OTстpanettу的大招. 89. OTстpanettу的大招. 90. OTстpanettу的大招. 91. OTстpanettу的大招. 92. OTстpanettу的大招. 93. OTстpanettу的大招. 94. OTстpanettу的大招. 95. OTстpanettу的大招. 96. OTстpanettу的大招. 97. OTстpanettу的大招. 98. OTстpanettу的大招. 99. OTстpanettу的大招. 100. OTстpanettу的大招. 101. OTстpanettу的大招. 102. OTстpanettу的大招. 103. OTстpanettу的大招. 104. OTстpanettу的大招. 105. OTстpanettу的大招. 106. OTстpanettу的大招. 107. OTстpanettу的大招. 108. OTстpanettу的大招. 109. OTстpanettу的大招. 110. OTстpanettу的大招. 111. OTстpanettу的大招. 112. OTстpanettу的大招. 113. OTстpanettу的大招. 114. OTстpanettу的大招. 115. OTстpanettу的大招. 116. OTстpanettу的大招. 117. OTстpanettу的大招. 118. OTстpanettу的大招. 119. OTстpanettу的大招. 120. OTстpanettу的大招. 121. OTстpanettу的大招. 122. OTстpanettу的大招. 123. OTстpanettу的大招. 124. OTстpanettу的大招. 125. OTстpanettу的大招. 126. OTстpanettу的大招. 127. OTстpanettу的大招. 128. OTстpanettу的大招. 129. OTстpanettу的大招. 130. OTстpanettу的大招. 131. OTстpanettу的大招. 132. OTстpanettу的大招. 133. OTстpanettу的大招. 134. OTстpanettу的大招. 135. OTстpanettу的大招. 136. OTстpanettу的大招. 137. OTстpanettу的大招. 138. OTстpanettу的大招. 139. OTстpanettу的大招. 140. OTстpanettу的大招. 141. OTстpanettу的大招. 142. OTстpanettу的大招. 143. OTстpanettу的大招. 144. OTстpanettу的大招. 145. OTстpanettу的大招. 146. OTстpanettу的大招. 147. OTстpanettу的大招. 148. OTстpanettу的大招. 149. OTстpanettу的大招. 150. OTстpanettу的大招. 151. OTстpanettу的大招. 152. OTстpanettу的大招. 153. OTстpanettу的大招. 154. OTстpanettу的大招. 155. OTстpanettу的大招. 156. OTстpanettу的大招. 157. OTстpanettу的大招. 158. OTстpanettу的大招. 159. OTстpanettу的大招. 160. OTстpanettу的大招. 161. OTстpanettу的大招. 162. OTстpanettу的大招. 163. OTстpanettу的大招. 164. OTстpanettу的大招. 165. OTстpanettу的大招. 166. OTстpanettу的大招. 167. OTстpanettу的大招. 168. OTстpanettу的大招. 169. OTстpanettу的大招. 170. OTстpanettу的大招. 171. OTстpanettу的大招. 172. OTстpanettу的大招. 173. OTстpanettу的大招. 174. OTстpanettу的大招. 175. OTстpanettу的大招. 176. OTстpanettу的大招. 177. OTстpanettу的大招. 178. OTстpanettу的大招. 179. OTстpanettу的大招. 180. OTстpanettу的大招. 181. OTстpanettу的大招. 182. OTстpanettу的大招. 183. OTстpanettу的大招. 184. OTстpanettу的大招. 185. OTстpanettу的大招. 186. OTстpanettу的大招. 187. OTстpanettу的大招. 188. OTстpanettу的大招. 189. OTстpanettу的大招. 190. OTстpanettу的大招. 191. OTстpanettу的大招. 192. OTстpanettу的大招. 193. OTстpanettу的大招. 194. OTстpanettу的大招. 195. OTстpanettу的大招. 196. OTстpanettу的大招. 197. OTстpanettу的大招. 198. OTстpanettу的大招. 199. OTстpanettу的大招. 200. OTстpanettу的大招. 201. OTстpanettу的大招. 202. OTстpanettу的大招. 203. OTстpanettу的大招. 204. OTстpanettу的大招. 205. OTстpanettу的大招. 206. OTстpanettу的大招. 207. OTстpanettу的大招. 208. OTстpanettу的大招. 209. OTстpanettу的大招. 210. OTстpanettу的大招. 211. OTстpanettу的大招. 212. OTстpanettу的大招. 213. OTстpanettу的大招. 214. OTстpanettу的大招. 215. OTстpanettу的大招. 216. OTстpanettу的大招. 217. OTстpanettу的大招. 218. OTстpanettу的大招. 219. OTстpanettу的大招. 220. OTстpanettу的大招. 221. OTстpanettу的大招. 222. OTстpanettу的大招. 223. OTстpanettу的大招. 224. OTстpanettу的大招. 225. OTстpanettу的大招. 226. OTстpanettу的大招. 227. OTстpanettу的大招. 228. OTстpanettу的大招. 229. OTстpanettу的大招. 230. OTстpanettу的大招. 231. OTстpanettу的大招. 232. OTстpanettу的大招. 233. OTстpanettу的大招. 234. OTстpanettу的大招. 235. OTстpanettу的大招. 236. OTстpanettу的大招. 237. OTстpanettу的大招. 238. OTстpanettу的大招. 239. OTстpanettу的大招. 240. OTстpanettу的大招. 241. OTстpanettу的大招. 242. OTстpanettу的大招. 243. OTстpanettу的大招. 244. OTстpanettу的大招. 245. OTстpanettу的大招. 246. OTстpanettу的大招. 247. OTстpanettу的大招. 248. OTстpanettу的大招. 249. OTстpanettу的大招. 250. OTстpanettу的大招. 251. OTстpanettу的大招. 252. OTстpanettу的大招. 253. OTстpanettу的大招. 254. OTстpanettу的大招. 255. OTстpanettу的大招. 256. OTстpanettу的大招. 257. OTстpanettу的大招. 258. OTстpanettу的大招. 259. OTстpanettу的大招. 260. OTстpanettу的大招. 261. OTстpanettу的大招. 262. OTстpanettу的大招. 263. OTстpanettу的大招. 264. OTстpanettу的大招. 265. OTстpanettу的大招. 266. OTстpanettу的大招. 267. OTстpanettу的大招. 268. OTстpanettу的大招. 269. OTстpanettу的大招. 270. OTстpanettу的大招. 271. OTстpanettу的大招. 272. OTстpanettу的大招. 273. OTстpanettу的大招. 274. OTстpanettу的大招. 275. OTстpanettу的大招. 276. OTстpanettу的大招. 277. OTстpanettу的大招. 278. OTстpanettу的大招. 279. OTстpanettу的大招. 280. OTстpanettу的大招. 281. OTстpanettу的大招. 282. OTстpanettу的大招. 283. OTстpanettу的大招. 284. OTстpanettу的大招. 285. OTстpanettу的大招. 286. OTстpanettу的大招. 287. OTстpanettу的大招. 288. OTстpanettу的大招. 289. OTстpanettу的大招. 290. OTстpanettу的大招. 291. OTстpanettу的大招. 292. OTстpanettу的大招. 293. OTстpanettу的大招. 294. OTстpanettу的大招. 295. OTстpanettу的大招. 296. OTстpanettу的大招. 297. OTстpanettу的大招. 298. OTстpanettу的大招. 299. OTстpanettу的大招. 300. OTстpanettу的大招. 301. OTстpanettу的大招. 302. OTстpanettу的大招. 303. OTстpanettу的大招. 304. OTстpanettу的大招. 305. OTстpanettу的大招. 306. OTстpanettу的大招. 307. OTстpanettу的大招. 308. OTстpanettу的大招. 309. OTстpanettу的大招. 310. OTстpanettу的大招. 311. OTстpanettу的大招. 312. OTстpanettу的大招. 313. OTстpanettу的大招. 314. OTстpanettу的大招. 315. OTстpanettу的大招. 316. OTстpanettу的大招. 317. OTстpanettу的大招. 318. OTстpanettу的大招. 319. OTстpanettу的大招. 320. OTстpanettу的大招. 321. OTстpanettу的大招. 322. OTстpanettу的大招. 323. OTстpanettу的大招. 324. OTстpanettу的大招. 325. OTстpanettу的大招. 326. OTстpanettу的大招. 327. OTстpanettу的大招. 328. OTстpanettу的大招. 329. OTстpanettу的大招. 330. OTстpanettу的大招. 331. OTстpanettу的大招. 332. OTстpanettу的大招. 333. OTстpanettу的大招. 334. OTстpanettу的大招. 335. OTстpanettу的大招. 336. OTстpanettу的大招. 337. OTстpanettу的大招. 338. OTстpanettу的大招. 339. OTстpanettу的大招. 340. OTстpanettу的大招. 341. OTстpanettу的大招. 342. OTстpanettу的大招. 343. OTстpanettу的大招. 344. OTстpanettу的大招. 345. OTстpanettу的大招. 346. OTстpanettу的大招. 347. OTстpanettу的大招. 348. OTстpanettу的大招. 349. OTстpanettу的大招. 350. OTстpanettу的大招 351. OTстpanettу的大招 352. OTстpanettу的大招 353. OTстpanettу的大招 354. OTстpanettу的大招 355. OTстpanettу的大招 356. OTстpanettу的大招 357. OTстpanettу的大招 358. OTстpanettу的大招 359. OTстpanettу的大招 360. OTстpanettу的大招 361. OTстpanettу的大招 362. OTстpanettу的大招 363. OTстpanettу的大招 364. OTстpanettу的大招 365. OTстpanettу的大招 366. OTстpanettу的大招 367. OTстpanettу的大招 368. OTстpanettу的大招 369. OTстpanettу的大招 370. OTстpanettу的大招 371. OTстpanettу的大招 372. OTстpanettу的大招 373. OTстpanettу的大招 374. OTстpanettу的大招 375. OTстpanettу的大招 376. OTстpanettу的大招 377. OTстpanettу的大招 378. OTстpanettу的大招 379. OTстpanettу的大招 380. OTстpanettу的大招 381. OTстpanettу的大招 382. OTстpanettу的大招 383. OTстpanettу的大招 384. OTстpanettу的大招 385. OTстpanettу的大招 386. OTстpanettу的大招 387. OTстpanettу的大招 388. OTстpanettу的大招 389. OTстpanettу的大招 390. OTстpanettу的大招 391. OTстpanettу的大招 392. OTстpanettу的大招 393. OTстpanettу的大招 394. OTстpanettу的大招 395. OTстpanettу的大招 396. OTстpanettу的大招 397. OTстpanettу的大招 398. OTстpanettу的大招 399. OTстpanettу的大招 400. OTстpanettу的大招 401. OTстpanettу的大招 402. OTстpanettу的大招 403. OTстpanettу的大招 404. OTстpanettу的大招 405. OTстpanettу的大招 406. OTстpanettу的大招 407. OTстpanettу的大招 408. OTстpanettу的大招 409. OTстpanettу的大招 410. OTстpanettу的大招 411. OTстpanettу的大招 412. OTстpanettу的大招 413. OTстpanettу的大招 414. OTстpanettу的大招 415. OTстpanettу的大招 416. OTстpanettу的大招 417. OTстpanettу的大招 418. OTстpanettу的大招 419. OTстpanettу的大招 420. OTстpanettу的大招 421. OTстpanettу的大招 422. OTстpanettу的大招 423. OTстpanettу的大招 424. OTстpanettу的大招 425. OTстpanettу的大招 426. OTстpanettу的大招 427. OTстpanettу的大招 428. OTстpanettу的大招 429. OTстpanettу的大招 430. OTстpanettу的大招 431. OTстpanettу的大招 432. OTстpanettу的大招 433. OTстpanettу的大招 434. OTстpanettу的大招 435. OTстpanettу的大招 436. OTстpanettу的大招 437. OTстpanettу的大招 438. OTстpanettу的大招 439. OTстpanettу的大招 440. OTстpanettу的大招 441. OTстpanettу的大招 442. OTстpanettу的大招 443. OTстpanettу的大招 444. OTстpanettу的大招 445. OTстpanettу的大招 446. OTстpanettу的大招 447. OTстpanettу的大招 448. OTстpanettу的大招 449. OTстpanettу的大招 450. OTстpanettу的大招 451. OTстpanettу的大招 452. OTстpanettу的大招 453. OTстpanettу的大招 454. OTстpanettу的大招 455. OTстpanettу的大招 456. OTстpanettу的大招 457. OTстpanettу的大招 458. OTстpanettу的大招 459. OTстpanettу的大招 460. OTстpanettу的大招 461. OTстpanettу的大招 462. OTстpanettу的大招 463. OTстpanettу的大招 464. OTстpanettу的大招 465. OTстpanettу的大招 466. OTстpanettу的大招 467. OTстpanettу的大招 468. OTстpanettу的大招 469. OTстpanettу的大招 470. OTстpanettу的大招 471. OTстpanettу的大招 472. OTстpanettу的大招 473. OTстpanettу的大招 474. OTстpanettу的大招 475. OTстpanettу的大招 476. OTстpanettу的大招 477. OTстpanettу的大招 478. OTстpanettу的大招 479. OTстpanettу的大招 480. OTстpanettу的大招 481. OTстpanettу的大招 482. OTстpanettу的大招 483. OTстpanettу的大招 484. OTстpanettу的大招 485. OTстpanettу的大招 486. OTстpanettу的大招 487. OTстpanettу的大招 488. OTстpanettу的大招 489. OTстpanettу的大招 490. OTстpanettу的大招 491. OTстpanettу的大招 492. OTстpanettу的大招 493. OTстpanettу的大招 494. OTстpanettу的大招 495. OTстpanettу的大招 496. OTстpanettу的大招 497. OTстpanettу的大招 498. OTстpanettу的大招 499. OTстpanettу的大招 500. OTстpanettу的大招 501. OTстpanettу的大招 502. OTстpanettу的大招 503. OTстpanettу的大招 504. OTстpanettу的大招 505. OTстpanettу的大招 506. OTстpanettу的大招 507. OTстpanettу的大招 508. OTстpanettу的大招 509. OTстpanettу的大招 510. OTстpanettу的大招 511. OTстpanettу的大招 512. OTстpanettу的大招 513. OTстpanettу的大招 514. OTстpanettу的大招 515. OTстpanettу的大招 516. OTстpanettу的大招 517. OTстpanettу的大招 518. OTстpanettу的大招 519. OTстpanettу的大招 520. OTстpanettу的大招 521. OTстpanettу的大招 522. OTстpanettу的大招 523. OTстpanettу的大招 524. OTстpanettу的大招 525. OTстpanettу的大招 526. OTстpanettу的大招 527. OTстpanettу的大招 528. OTстpanettу的大招 529. OTстpanettу的大招 530. OTстpanettу的大招 531. OTстpanettу的大招 532. OTстpanettу的大招 533. OTстpanettу的大招 534. OTстpanettу的大招 535. OTстpanettу的大招 536. OTстpanettу的大招 537. OTстpanettу的大招 538. OTстpanettу的大招 539. OTстpanettу的大招 540. OTстpanettу的大招 541. OTстpanettу的大招 542. OTстpanettу的大招 543. OTстpanettу的大招 544. OTстpanettу的大招 545. OTстpanettу的大招 546. OTстpanettу的大招 547. OTстpanettу的大招 548. OTстpanettу的大招 549. OTстpanettу的大招 550. OTстpanettу的大招 551. OTстpanettу的大招 552. OTстpanettу的大招 553. OTстpanettу的大招 554. OTстpanettу的大招 555. OTстpanettу的大招 556. OTстpanettу的大招 557. OTстpanettу的大招 558. OTстpanettу的大招 559. OTстpanettу的大招 560. OTстpanettу的大招 561. OTстpanettу的大招 562. OTстpanettу的大招 563. OTстpanettу的大招 564. OTстpanettу的大招 565. OTстpanettу的大招 566. OTстpanettу的大招 567. OTстpanettу的大招 568. OTстpanettу的大招 569. OTстpanettу的大招 570. OTстpanettу的大招 571. OTстpanettу的大招 572. OTсtpanattу的大招 573. OTсtpanattу的大招 574. OTсtpanattу的大招 575. OTсtpanattу的大招 576. OTсtpanattу的大招 577. OTсtpanattу的大招 578. OTсtpanattу的大招 579. OTсtpanattу的大招 580. OTсtpanattу的大招 581. OTсtpanattу的大招 582. OTсtpanattу的大招 583. OTсtpanattу的大招 584. OTсtpanattу的大招 585. OTсtpanattу的大招 586. OTсtpanattу的大招 587. OTсtpanattу的大招 588. OTсtpanattу的大招 589. OTсtpanattу的大招 590. OTсtpanattу的大招 591. OTсtpanattу的大招 592. OTсtpanattу的大招 593. OTсtpanattу的大招 594. OTсtpanattу的大招 595. OTсtpanattу的大招 596. OTсtpanattу的大招 597. OTсtpanattу的大招 598. OTсtpanattу的大招 599. OTсtpanattу的大招 600. OTсtpanattу的大招 601. OTсtpanattу的大招 602. OTсtpanattу的大招 603. OTсtpanattу的大招 604. OTсtpanattу的大招 605. OTсtpanattу的大招 606. OTсtpanattу的大招 607. OTсtpanattу的大招 608. OTсtpanattу的大招 609. OTсtpanattу的大招 610. OTсtpanattу的大招 611. OTсtpanattу的大招 612. OTсtpanattу的大招 613. OTсtpanattу的大招 614. OTсtpanattу的大招 615. OTсtpanattу的大招 616. OTсtpanattу的大招 617. OTсtpanattу的大招 618. OTсtpanattу的大招 619. OTсtpanattу的大招 620. OTсtpanattу的大招 621. OTсtpanattу的大招 622. OTсtpanattу的大招 623. OTсtpanattу的大招 624. OTсtpanattу的大招 625. OTсtpanattу的大招 626. OTсtpanattу的大招 627. OTсtpanattу的大招 628. OTсtpanattу的大招 629. OTсtpanattу的大招 630. OTсtpanattу的大招 631. OTсtpanattу的大招 632. OTсtpanattу的大招 633. OTсtpanattу的大招 634. OTсtpanattу的大招 635. OTсtpanattу的大招 636. OTсtpanattу的大招 637. OTсtpanattу的大招 638. OTсtpanattу的大招 639. OTсtpanattу的大招 640. OTсtpanattу的大招 641. OTсtpanattу的大招 642. OTсtpanattу的大招 643. OTсtpanattу的大招 644. OTсtpanattу的大招 645. OTсtpanattу的大招 646. OTсtpanattу的大招 647. OTсtpanattу的大招 648. OTсtpanattу的大招 649. OTсtpanattу的大招 650. OTсtpanattу的大招 651. OTсtpanattу的大招 652. OTсtpanattу的大招 653. OTсtpanattу的大招 654. OTсtpanattу的大招 655. OTсtpanattу的大招 656. OTсtpanattу的大招 657. OTсtpanattу的大招 658. OTсtpanattу的大招 659. OTсtpanattу的大招 660. OTсtpanattу的大招 661. OTсtpanattу的大招 662. OTсtpanattу的大招 663. OTсtpanattу的大招 664. OTсtpanattу的大招 665. OTсtpanattу的大招 666. OTсtpanattу的大招 667. OTсtpanattу的大招 668. OTсtpanattу的大招 669. OTсtpanattу的大招 670. OTсtpanattу的大招 671. OTсtpanattу的大招 672. OTсtpanattу的大招 673. OTсtpanattу的大招 674. OTсtpanattу的大招 675. OTсtpanattу的大招 676. OTсtpanattу的大招 677. OTсtpanattу的大招 678. OTсtpanattу的大招 679. OTсtpanattу的大招 680. OTсtpanattу的大招 681. OTсtpanattу的大招 682. OTсtpanattу的大招 683. OTсtpanattу的大招 684. OTсtpanattу的大招 685. OTсtpanattу的大招 686. OTсtpanattу的大招 687. OTсtpanattу的大招 688. OTсtpanattу的大招 689. OTсtpanattу的大招 690. OTсtpanattу的大招 691. OTсtpanattу的大招 692. OTсtpanattу的大招 693. OTсtpanattу的大招 694. OTсtpanattу的大招 695. OTсtpanattу的大招 696. OTсtpanattу的大招 697. OTсtpanattу的大招 698. OTсtpanattу的大招 699. OTсtpanattу的大招 700. OTсtpanattу的大招 701. OTсtpanattу的大招 702. OTсtpanattу的大招 703. OTсtpanattу的大招 704. OTсtpanattу的大招 705. OTсtpanattу的大招 706. OTсtpanattу的大招 707. OTсtpanattу的大招 708. OTсtpanattу的大招 709. OTсtpanattу的大招 710. OTсtpanattу的大招 711. OTсtpanattу的大招 712. OTсtpanattу的大招 713. OTсtpanattу的大招 714. OTсtpanattу的大招 715. OTсtpanattу的大招 716. OTсtpanattу的大招 717. OTсtpanattу的大招 718. OTсtpanattу的大招 719. OTсtpanattу的大招 720. OTсtpanattу的大招 721. OTсtpanattу的大招 722. OTсtpanattу的大招 723. OTсtpanattу的大招 724. OTсtpanattу的大招 725. OTсtpanattу的大招 726. OTсtpanattу的大招 727. OTсtpanattу的大招 728. OTсtpanattу的大招 729. OTсtpanattу的大招 730. OTсtpanattу的大招 731. OTсtpanattу的大招 732. OTсtpanattу的大招 733. OTсtpanattу的大招 734. OTсtpanattу的大招 735. OTсtpanattу的大招 736. OTсtpanattу的大招 737. OTсtpanattу的大招 738. OTсtpanattу的大招 739. OTсtpanattу的大招 740. OTсtpanattу的大招 741. OTсtpanattу的大招 742. OTсtpanattу的大招 743. OTсtpanattу的大招 744. OTсtpanattу的大招 745. OTсtpanattу的大招 746. OTсtpanattу的大招 747. OTсtpanattу的大招 748. OTсtpanattу的大招 749. OTсtpanattу的大招 750. OTсtpanattу的大招 751. OTсtpanattу的大招 752. OTсtpanattу的大招 753. OTсtpanattу的大招 754. OTсtpanattу的大招 755. OTсtpanattу的大招 756. OTсtpanattу的大招 757. OTсtpanattу的大招 758. OTсtpanattу的大招 759. OTсtpanattу的大招 760. OTсtpanattу的大招 761. OTсtpanattу的大招 762. OTсtpanattу的大招 763. OTсtpanattу的大招 764. OTсtpanattу的大招 765. OTсtpanattу的大招 766. OTсtpanattу的大招 767. OTсtpanattу的大招 768. OTсtpanattу的大招 769. OTсtpanattу的大招 770. OTсtpanattу的大招 771. OTсtpanattу的大招 772. OTсtpanattу的大招 773. OTсtpanattу的大招 774. OTсtpanattу的大招 775. OTсtpanattу的大招 776. OTсtpanattу的大招 777. OTсtpanattу的大招 778. OTсtpanattу的大招 779. OTсtpanattу的大招 780. OTсtpanattу的大招 781. OTсtpanattу的大招 782. OTсtpanattу的大招 783. OTсtpanattу的大招 784. OTсtpanattу的大招 785. OTсtpanattу的大招 786. OTсtpanattу的大招 787. OTсtpanattу的大招 788. OTсtpanattу的大招 789. OTсtpanattу的大招 790. OTсtpanattу的大招 791. OTсtpanattу的大招 792. OTсtpanattу的大招 793. OTсtpanattу的大招 794. OTсtpanattу的大招 795. OTсtpanattу的大招 796. OTсtpanattу的大招 797. OTсtpanattу的大招 798. OTсtpanattу的大招 799. OTсtpanattу的大招 800. OTсtpanattу的大招 801. OTсtpanattу的大招 802. OTсtpanattу的大招 803. OTсtpanattу的大招 804. OTсtpanattу的大招 805. OTсtpanattу的大招 806. OTсtpanattу的大招 807. OTсtpanattу的大招 808. OTсtpanattу的大招 809. OTсtpanattу的大招 810. OTсtpanattу的大招 811. OTсtpanattу的大招 812. OTсtpanattу的大招 813. OTсtpanattу的大招 814. OTсtpanattу的大招 815. OTсtpanattу的大招 816. OTсtpanattу的大招 817. OTсtpanattу的大招 818. OTсtpanattу的大招 819. OTсtpanattу的大招 820. OTсtpanattу的大招 821. OTсtpanattу的大招 822. OTсtpanattу的大招 823. OTсtpanattу的大招 824. OTсtpanattу的大招 825. OTсtpanattу的大招 826. OTсtpanattу的大招 827. OTсtpanattу的大招 828. OTсtpanattу的大招 829. OTсtpanattу的大招 830. OTсtpanattу的大招 831. OTсtpanattу的大招 832. OTсtpanattу的大招 833. OTсtpanattу的大招 834. OTсtpanattу的大招 835. OTсtpanattу的大招 836. OTсtpanattу的大招 837. OTсtpanattу的大招 838. OTсtpanattу的大招 839. OTсtpanattу的大招 840. OTсtpanattу的大招 841. OTсtpanattу的大招 842. OTсtpanattу的大招 843. OTсtpanattу的大招 844. OTсtpanattу的大招 845. OTсtpanattу的大招 846. OTсtpanattу的大招 847. OTсtpanattу的大招 848. OTсtpanattу的大招 849. OTсtpanattу的大招 850. OTсtpanattу的大招 851. OTсtpanattу的大招 852. OTсtpanattу的大招 853. OTсtpanattу的大招 854. OTсtpanattу的大招 855. OTсtpanattу的大招 856. OTсtpanattу的大招 857. OTсtpanattу的大招 858. OTсtpanattу的大招 859. OTсtpanattу的大招 860. OTсtpanattу的大招 861. OTсtpanattу的大招 862. OTсtpanattу的大招 863. OTсtpanattу的大招 864. OTсtpanattу的大招 865. OTсtpanattу的大招 866. OTсtpanattу的大招 867. OTсtpanattу的大招 868. OTсtpanattу的大招 869. OTсtpanattу的大招 870. OTсtpanattу的大招 871. OTсtpanattу的大招 872. OTсtpanattу的大招 873. OTсtpanattу的大招 874. OTсtpanattу的大招 875. OTсtpanattу的大招 876. OTсtpanattу的大招 877. OTсtpanattу的大招 878. OTсtpanattу的大招 879. OTсtpanattу的大招 880. OTсtpanattу的大招 881. OTсtpanattу的大招 882. OTсtpanattу的大招 883. OTсtpanattу的大招 884. OTсtpanattу的大招 885. OTсtpanattу的大招 886. OTсtpanattу的大招 887. OTсtpanattу的大招 888. OTсtpanattу的大招 889. OTсtpanattу的大招 890. OTсtpanattу的大招 891. OTсtpanattу的大招 892. OTсtpanattу的大招 893. OTсtpanattу的大招 894. OTсtpanattу的大招 895. OTсtpanattу的大招 896. OTсtpanattу的大招 897. OTсtpanattу的大招 898. OTсtpanattу的大招 899. OTсtpanattу的大招 900. OTсtpanattу的大招 901. OTсtpanattу的大招 902. OTсtpanattу的大招 903. OTсtpanattу的大招 904. OTсtpanattу的大招 905. OTсtpanattу的大招 906. OTсtpanattу的大招 907. OTсtpanattу的大招 908. OTсtpanattу的大招 909. OTсtpanattу的大招 910. OTсtpanattу的大招 911. OTсtpanattу的大招 912. OTсtpanattу的大招 913. OTсtpanattу的大招 914. OTсtpanattу的大招 915. OTсtpanattу的大招 916. OTсtpanattу的大招 917. OTсtpanattу的大招 918. OTсtpanattу的大招 919. OTсtpanattу的大招 920. OTсtpanattу的大招 921. OTсtpanattу的大招 922. OTсtpanattу的大招 923. OTсtpanattу的大招 924. OTсtpanattу的大招 925. OTсtpanattу的大招 926. OTсtpanattу的大招 927. OTсtpanattу的大招 928. OTсtpanattу的大招 929. OTсtpanattу的大招 930. OTсtpanattу的大招 931. OTсtpanattу的大招 932. OTсtpanattу的大招 933. OTсtpanattу的大招 934. OTсtpanattу的大招 935. OTсtpanattу的大招 936. OTсtpanattу的大招 937. OTсtpanattу的大招 938. OTсtpanattу的大招 939. OTсtpanattу的大招 940. OTсtpanattу的大招 941. OTсtpanattу的大招 942. OTсtpanattу的大招 943. OTсtpanattу的大招 944. OTсtpanattу的大招 945. OTсtpanattу的大招 946. OTсtpanattу的大招 947. OTсtpanattу的大招 948. OTсtpanattу的大招 949. OTсtpanattу的大招 950. OTсtpanattу的大招 951. OTсtpanattу的大招 952. OTсtpanattу的大招 953. OTсtpanattу的大招 954. OTсtpanattу的大招 955. OTсtpanattу的大招 956. OTсtpanattу的大招 957. OTсtpanattу的大招 958. OTсtpanattу的大招 959. OTсtpanattу的大招 960. OTсtpanattу的大招 961. OTсtpanattу的大招 962. OTсtpanattу的大招 963. OTсtpanattу的大招 964. OTсtpanattу的大招 965. OTсtpanattу的大招 966. OTсtpanattу的大招 967. OTсtpanattу的大招 968. OTсtpanattу的大招 969. OTсtpanattу的大招 970. OTсtpanattу的大招 971. OTсtpanattу的大招 972. OTсtpanattу的大招 973. OTсtpanattу的大招 974. OTсtpanattу的大招 975. OTсtpanattу的大招 976. OTсtpanattу的大招 977. OTсtpanattу的大招 978. OTсtpanattу的大招 979. OTсtpanattу的大招 980. OTсtpanattу的大招 981. OTсtpanattу的大招 982. OTсtpanattу的大招 983. OTсtpanattу的大招 984. OTсtpanattу的大招 985. OTсtpanattу的大招 986. OTсtpanattу的大招 987. OTсtpanattу的大招 988. OTсtpanattу的大招 989. OTсtpanattу的大招 990. OTсtpanattу的大招 991. OTсtpanattу的大招 992. OTсtpanattу的大招 993. OTсtpanattу的大招 994. OTсtpanattу的大招 995. OTсtpanattу的大招 996. OTсtpanattу的大招 997. OTс | |
| BP 4.500 Garden | BP 5.000 Garden | BP 6.000 Garden | BP 7.000 Garden | ||
| BP 4.500 Garden Set Plus | BP 5.000 Garden Set Plus | BP 6.000 Garden Set Plus | |||
| Ти помпа | Jet Jet Jet Jet | ||||
| НИВО на звекову налягане LpA | d | B | ( | A | ) 5 |
| НИВО на звекову мошист LWA | d | B | ( | A | ) 7 |
| тaramтырано | |||||
| Размени тетда | |||||
| Терло (бez priноadingности) | kg | 6,4 | 7,0 | 9,7 | 10,0 |
Yka3aHue
Ochobane 3a oceboxdaeane cbanacho PeanameHm (EC)2019/1781, npunoxene I, pa3den 2 (12):j) 3ana3bame cn npaboto Ha texhnueeckn 3meheHHI
XapakTepnCTnKn

71364 Winnenden (Germany)
Ten.: +49 7195 14-0
ΦaKc: +49 7195 14-2212
BunHeHdEn,2021/06/01
Sisukord
Uldised juhised 99
Siftotstarbeline kasutamine 99
Ohuastmed. 99
Keskkonnakaitse 99
Lisavarustus ja varuosad. 99
Tarnekomplekt 99
Garantii. 99
Chairman of the Board of Management

S. Reiser
Manager Regulatory Affairs & Certification
Dokumentatsoonivolinik:
S. Reiser
Alfred Kärcher SE & Co. KG
Alfred-Karcher-Str. 28 - 40
71364 Winnenden (Germany)
Tel: +49 7195 14-0
Winnenden, 2021/06/01
Satures
Visparigas norades 103
Chairman of the Board of Management
S. Reiser
Manager Regulatory Affairs & Certification
Pilvarotais sagatavot dokumentaciju:
S. Reizers (S. Reiser)
Alfred Karcher SE & Co. KG
Alfred-Karcher-Str. 28 - 40
71364 Winnenden (Vacija)
Tār.: +49 7195 14-0
Fakss: +49 7195 14-2212
Vinendene (Winnenden), 01.06.2021.
Turinys
Chairman of the Board of Management

S. Reiser
Manager Regulatory Affairs & Certification
OxopoHa IOBkiJnI 111
Ppunadra ta 3anachi detani 111
KoMnJIeKT NOCTaBKn 111
Tapantia 111
Onnc npnctpo 111
BBeHnB EKcnyataio 112
Eknpnyataia 112
Dorra Ta texHue o6cnyroByBaHH 112
TpaHcnpTyBaHHa 112
36epirannn 112
Cneuiabhe npnndra 113
Dionomora y pa3i HecnpaBHOCTeI 113
Texhihi dani 113
XapakTepeuTnHi KpuiBi 114
Ieknapaia npo BiinobiHicb cTahapam EC. 1
3araJIbHI Bka3iBKn
Ipeed nepuBnKOpncTaHHaMpNCpO O3HaHOMNTcB 3 cio OpriHaJIbHOIO IHCTpyKciEo 3 EKcNpyatai Ta BkazIBKaMn 3 TexhIK6e3neKn, 0doaHTbc. DjTn BiINOBiHO Do HIX.
36epiratn 6nbI 6poUpy nnoaBworo BkopncTahna a6o nla HactynHoro Bnachka.
BnKopncTaHHa 3a npu3HaueHHaM
PiJ uac nIckluoyenHn CbOro Bnpo6y do MepeKi NITHOBOBDIOIOCTaHaHHN DToPmMyTEcB BMOR cTaHdapTy EN 1717 i 3 ycix MOxJIbNx PNTaHb 3BeptaHTecra Do cneiaian3oBaHOrCaHITapHO-TexHiHOro NiIDnpnEMCTBa.
Leynpctpi npn3haeHn dny npnbathoro BkOpnstahnI He nepe6aehn IJRA KomepuHoro BkOpnstahnI.
PnncpiB nepuy eprpy npnaHaeHn dny 3actocybaHHB caNy i 3a6e3neue noctiHn TnCK dny 3poWeHHcaNy.
Ypa3i nikJIOHHe cnpnHKJIepIB MOxHa 3poUyBaTINdIraHKn TakoIMakcmaJIbHOI NLOoi:
BP 4.500 Garden: 400m^2
BP 5.000 Garden: 550M^2
BP 6.000 Garden: 900M^2
BP 7.000 Garden: 1000m^2
△OBEPEXHO
He6e3neka mpaemybaHHra!
He6e3neKa mpa8MyBaHHa mOKCuHaMu.
He nuime eody, uo nepekauyembcn hacocom!
DonyctimiДЯпауВанн piDHH
Donyctnmi dIy nepekahyBaHHp iDHH:
TeXHHaBoJa;
KOJIOJa3Ha BOda;
- DxepeBHa Boga;
O O B a Boa;
- BOda B 6aceHax 3a yMOBn BiINOBiHOro
D03yBaHHr Doabok.
TemnepaTypapidHn,io nepekauyec,He noBHHa nepeBunybaTu 35^
BnKOpncTaanHe 3a npn3HaueHHaM
Bka3ieka
Bupo6Huk He Hece bIDnoeidaIbHocmi 3a 36umku, 3aeDAHI HeiDIOeIHUM afo HnpeuIbHM 3acmocyeAHnM npucmpoio.
CTyniHb He6e3neKn
△HE6E3NEKA
Bka3ieka uo do He6e3neku, kka 6e3nocepeHbo 3aepoxy ma npu3eodumb do mxxmpaem yu cmepmi.
△NONEPEDXKEHH
Bka3ieka uodo nomeHuiHo moKnueoI He63neHoi cumyaui, 0o MoKe npu3becmu do mXkuxmpaM 4u cmepi.
OSEPEXHO
Bka3iKa uodo nomenu Ho he63neuHc cumyaui, kMOke cnpuunmu ompumHa Hn eaKux mpaem.
yB4A
Bka3i8ka uodo moKJIueoI nomHe6e3neHoi cumyaui, 0o MoKe cnpuuHmu MamepiAHi 36umku.
Oxopoha DOBkiiIJIa

Nakybalni MaTepiAn npDAtHi Do BToPnHooi nepepo6Kn. YnakOBky Heo6xIDHO yTnI3yBaTn 6e3 uKoDi nJa DOBkiJIJIa.

EneKtpuHi Ta eNeKtpoHHI npncTpoMiCTaBt buiHIMatepiAHI, kI npuaTHIO BTOPHHOI nepepo6Ki, i cacto KOMnoHeHTN, kK-OT 6aTaepi, akymyJrTopu Nm MactnNo, kki y pa3i
HnnpaBnIbHOro NOBdoKeHHra 3 Hmna a6o
HenpaBnIbHOi yTNI3aui MoKyTB CTBOpNTu NOTeHuiHy He6e3neky dIy 3IOPO'Bra NIOINH Ta DOBkInJr. ODAK ci KOMNoHEHTN Heo6XiDi Iyra HALEXHOI EKCNlyatau II npCTpOIO. PpCTPOI, PO3HaueHi cIM CNMBONOM, 3a6bOpOHcBcRy TNI3yBaTu pa30m i3 NO6yTOBM CMITTM.
Bka3iBkn 0do kOmnoHeHtib (REACH)
AkyJIbHI BiOMOCTI npo KOMnoHETN HaBeJeHi Ha caTI: www.kaercher.de/REACH
PpnaT Ta 3anachi deTani
CniD BnKOpNCToBvBaTn JIWe opRiHaNbHe npNJaJaTa opRiHaNbHi 3aNaChi YacTHInH, TOMy IIO came BOHN rapaHTyIOb 6e3neuHy Ta 6e3nepe6iHy EKcNlyataio npunctpoIO.
Inopmaizj uOIO npJnadTa 3anachnx qactnH MICNTbca Ha caTi www.kaercher.com.
KOMPJIeKT NOCTaBKn
Komnnektaig npnctroo 3a3haueHa ha ynaKobci.Пд уac po3napybaHH npnctropo nepebipntu komnkeTaio.у pa3i Hectaqui npnilaandra60 ykoJxHb, OtpmaHnx nd cac TpaHCnpTyBaHHcniD nobIDOMTN npce ToproBbHiopraHiaui, kana npodana npnctri.
TapaHTia
YkoHni KpaHn DiIOb BiIDNObiDi Hi rapaHTiHi yMOBn, BCTaHOBNeHi yNOHBaXeHOO opraI3aIcIe 36yTu Hauo npOdyKuB vui KpaHn. MoKnBi HecnpabHocTi npICTPO npOTraGM rapaTmHorO cTPOky MN ycBaEMo 6e3KOtOBHo, kUo npuHa HecnpabHocTI noJrae B DepeKtax MaTePiAIB abo Bnpo6HuOmy 6paky. Y pasi BHNKHeHH npTeHsII npOTraGM rapaTmHorO cTPOky npoxAHn 3BepTaTnc, MaOuPi npCobI qek npo NOKynk, do ToproBeNbHOi opraH3aJI, Io npoDaNa npOdyKT, a6o Do hau6nKyoI yNOHBaXeHOI cIyXbC cepBichoro 06cIyROByBaHH.
(Adpecn nB. Ha 3Bopoti)
Onnc npnctpo
Y ci nHcTpykci 3 ekCnnyatau cI ONcaHO MaKcMmaBHy KOMNekTaCiIO. KomNeKT noCTaBKn BiDpi3HReTbcra 3aJexHo BID MoDeNi (INB. yNaKOBky).
PncyHKn DnB. Ha cTopinci 306paXeHHaMm MaHIOHOK A
① KOBnauKo2-xoOBoRo 3'edHyBaJIbHOro aadTepa
2· 2-xoobn3'EDHyBaIbHn aanTepeHaococB G 1(He BXOaNTb B KOMnIeKT nocTabKn BP 4.500 Garden)
3'εdhybaNBHn aanTep nna HacocB G 1 (2 wT. B KOMnneKti nocTabKn BP 4.500 Garden)
④Ipo6ka
⑤ПлкнунеHHG1(33,3MM),BCMOKtyBaJIbHnI Tpy6oNpOBI(BXiD)
⑥ 3aIINBn natpy6ok 3 KpnuKoIO
⑦ПиДКИЧЕНЯ G1(33,3MM),HanipнйТубогровд(BuXiD)
BIMnKaU YBMK./BMK.
9 BoDocnyCKHn BEHTINb
10 **UtucepIpynpneudHaHnHdoKpaHyG1
1 **Myd3AquaStop
12 Mydnta
13**PoznnHOBaY
14*Ha6ipBCMOKTyBaJIbHINXIIaHriB,BKIOUHO3 roTOBIMdoIiDKIIOueHHBAkyHMnCnIPAJIbHM mHaHROM3,5M3BCMOKTyBaJIbHMmΦIbTpOM Ta 3axNCTOM BID 3BOPOTHO NOtOKy
(15) CaO Bn 1/2" 20 M
16 MepexeBn Ka6eBb 3i wTeNCenbHOBO BNKOHO
3actocobybahi rapmohi0baHi cTaNdaptN
EN 60335-1
EN 60335-2-41
EN 62233: 2008
EN 55014-1:2017 + A11:2020
EN 55014-2: 1997+A1: 2001+A2: 2008
EN 61000-3-2: 2014
EN 61000-3-3: 2013
EN IEC 63000:2018
3actocobybaHm MeToD ouiHKn BiIDNOBiaHocti
2000/14/EC:Доатok V
Piben3BykoBoi noTyXHocTi, dB(A)
BP 4.500 Garden
BmipraHn:68
TapaANTOBAHN:71
BP 5.000 Garden
BmipraHn:70
TapaHTOBaHm:73
BP 6.000 Garden
BvmpjHn:81
TapaANTOBaHm:84
BP 7.000 Garden
Bmipn:81
TapaANTOBAHN:83
Oco6n, 0u HxKye niiHncaJnncr, iIOb BiD imHi Ta 3a doBipeHicTIO KepiBnCTBa.

H.Jenner
Chairman of the Board of Management

S. Reiser
Manager Regulatory Affairs & Certification
Ocoba, BiinobiJaIbHa 3a BeDeHHN DOkymeHTauii:
II. Pau3ep (S. Reiser)
目次
一般的注意事項 115
規定に沿った使用. 115
七卡尼T瓦尔.. 115
環境保護. 115
亚克沙里一上S巴一. 115
同棉品. 115
保证. 115
機器に關於説明 115
SettoT. 116
運軌. 116
手人扎与蒙宁.. 116
搬送. 116
保管. 116
**别壳品. 117
障害發生のト. 117
技術一夕. 117
特性曲線. 118
EU准抛宣言. 118
一般的注注意事项

H.Jenner
Chairman of the Board of Management

S. Reiser
Manager Regulatory Affairs & Certification
文書の全權委員:
S. Reiser
Alfred Kärcher SE & Co. KG
Alfred-Karcher-Str. 28 - 40
71364 Winnenden (Germany)
電話番号:+49719514-0
FFJKs: +49 7195 142212
Winnenden, 2021/06/01
Ma3MyHbI
Kannbl Hucaynap. 119
MaKcaTbHa cEiKeC KOndAny 119
Kayin deHreInepi 119
KopwaHaH opTaHbI Kopray 119
KepeK-kaPak KHe KocanKbI 6eJIweKTeP 119
XeKti3iIm XnHaFbI 119
Kenilik 119
KypbIJIbIbIH CnNaTTaMaCbI 120
Painanahyra eHri3y 120
PaiandaHy. 120
Kytim XeHe TexHnKaJIbIK KbI3MeT KepeTy 120
TacbImanay. 120
CaKray. 121
ApaHai KepeK-KapaKTap 121
Keepinep 6oIraHda KEmek any. 121
TexHkaJIbIK CInnattamJapbl 122
Cunatramanapbl 122
EO cTaNdapTtapbHa caiKectiri TypaIbI
deKlapaunia 122
XaJIbI HycKaynap
KypbInfbHb anfaw pet kondaH6ac 6ypbH,ocbl naDanaHy keHiDi eri TynHcKa HyckayIbIK neh 6epinreh Kayinc3dik keHiDi eri HcKaynapdbI Okbl WbIfbHb3. Onapra caa apeket etiH3.
Eki kitanwahbI da api kapa naianda hy Hemece keleci neci yuih caTan KOiBHbI3.
MaKcaTbIHa cEiKeC KOJaHy
Byn eHimdi ayb3 cymen Jka6bIKay jenicihe KockaH Ke3de En 1717 cTaNapTBiHbIN TaanTapBH opbHaHb3 XHe CypaKTapbIH3 TybHaFaH Ke3de, MaMaHaDaHbipbIFAH CaHTapNbIK-TexHnKaJIbIK KcCinOpbIHra KyriHii3.
BykpyblrIbI Xeke naDanaHyra apHanraH XeHe OHbI KOMMepuNblaIK MaKcatta naDanaHyra TbiBIM caJIbHaDbI.
KypbInfbl en aIdbImeH 6akwada naiaIaNHyf aPhanraH kHe 6ay-6akwa Teimdepih cyapy yuH TpaKaTbI KbICbIMDbI KaMTaMaCb3 eTeDi.
KaH6bIpNaTkBiIHTap KocBInFaH Ke3De cyapyfa 60NaTbIH MaKcMaJIDbI ayMaKTap:
BP 4.500 Garden: 400m^2
BP 5.000 Garden: 550M^2
BP 6.000 Garden: 900M^2
BP 7.000 Garden: 1000m^2
△ABAHJIAHbI3
KypblfblHbH CnNaTTamacbl
OcbHyckayIbIKTa KypblfblHbIMAKcMmaJI Ka6dbkTanyb ciNanTaNFaH. YnricHe 6aInnaHbICTbI JeKtiIm KnbIHbIfbHa aBipMaublbkTap 6ap (KaNTamaHb KaapaHb3).
CypeTepdi cypeTepi 6ap 6eTTen KapaHbI3 CypeT A
① 2 kypicti xanfactbipfbi aadantepre aphanfaTbifbl3daTkbli Kaannakwa
② G 1 copfblnapbHa aphaIraH eki KaKTbl KaIfactbIpBliu aanTepi (BP 4.500 Garden Kiyuecihe KipMei)
G1 copfbinapbiba aphaHanfah kanaTactbipfbiW anaTepi (BP 4.500 Garden eki pet Kipeji)
4BiTeyilu TbIfbH
⑤ G1 xanrafbib (33,3 MM), copaTBH K6bip Xenici (Kipic)
6 Tbifbi3aflbi KaKnaftbi 6ap KyIO KeTe Ky6bpbl
⑦ G1 xanfractbipfblu (33,3 MM), apbIH Ky6bip xenici (WbIFbc)
⑧ KOCY/ΘLIPY KOKbIuBi
9 Cy tererih knanaH
10 **G 1 kpaH KocblbMbl
1 水 _ 1 ^ 水 AkBa aJdaamAmeH 6aNaHbICtbyP
12** MyΦTa
13**Hbekun
^14 * Copy xinhaftb3,5 M kocyfa daibH, copfbu ciXaHe Kepi Knaanb6ap BakyMdbI eTKi36eTih cnpanb wanaHrime 6ipre
15 ** BaKaWaFa apHaJIraH ⅢaHaR 1/2" 20 M
16 Awwacbl 6ap kyaat cbimbl
- Tek Set XeHe Set Plus XnbHTbIfbHa KipeTIn KepeKkapaTap.
** Tek Set Plus XnbIHTbIbHa KipeTIN KepeK-kaPaKTap.
PaindaIaHyra enri3y
Tek TynHcKanb Karcher KepeK-KapaKTapbH naIdaIaHydb YcbHAmbI3: copfbiW IuaHriInep, cy3riepDIN KOMnoHeHTTepi MeH IuaHriInepDIN KAKFaTbIPfBiWTApb. BacKa EHNipyWiInepDIN KOMNoHEHTTepi naIdaIaHaBILCa, OHda CynbIKTBkTAPDbI copFaHda, ocipece 6aioHeTTI KocblIMdApDbI naIdaIaHaHaDa dypbc emec Xymbc icTeye eKeenyi MymkiH.
PnIaHaHyra eHri3y anDbInHa
JaibHdaHb3
BiteyiTuTbIfbHDbIaNbHb3.
KocblbIM aadantepiH copfbHBiH copy KocblmbHa (kipic) 6ypaHbI3. KonmeH kataTbIHbI3.
BakyyMdbI eTKi36eH copaTBH uHaHriHi KocbIHb3 Cypet B
Hycay
Eeep cy nac 6onca, Kepi Knaan MeH copy apacbHa aandbH ana cy3aideH emki3ydi ycbiHaMbI3 (KapaHbI3 AphaBJI KepeK-kaPakmap).
Cypem C
Hycay
Kauma monmbipy yaKbimbH KbICkapmy yuih Kei
knanaHb6ap copyb1 naudanaHbHb3. Byn copy
wnaHaHH naudanaHbHfHaHH Keuih 6ocamblyBaHa
kon 6epMeudi (kapaHb3 AphaB1 KepeK-kaqakmap).
KocblmbHa (WbIfbc) 6paHb3. Konme KaTaaiTbHb3.
Cyper D
KyoKeJTe K6bIpbIHdafti KaKaNTb6ypan anbHb3. CypE
Copfbl TOnbln KeTKeHwe cybl TOJtbpHb3. Cypert F
PaindaJany
- Kyat aawacbiH ənEeKTP po3eTKacbiHa KocbiHbI3.
- KOCY/ΘUIPy axkbpataTbIn-KockbilbApkblnbl KypaIbI Kocblb3.
- Copy yaKbIbIH KbIcKapTy yIiH KbIcBIMDbI WJaHrTbI
WamameH 1 M KTepeiHi3.
Cypet I - CopbI copbIn, cydb6ipkaIbInTb6epreHn KyTIiH3.
△ABAHJIAHbI3
KypraKxmbic icmey kayni
Kypfak kymbic icmey copfbihb 3aKbimdaubobl.
CopfbHbH Kpyrak Kymbic icmeyihe kon 6epMeHi3!
- Kymblc Ke3iHne copfbHbI KapaycbI3 KaIdbipMaHbI3.
HA3AP AYdAPbIHbI
Kapaam any kayni. Kyue kbicbim acmbiHoa!
KapaKaam any Kayni.
(KbicbIM any yuih mexHukanbk cunammamanapbI 6eimH kapaHb3)
XymbictbiH aarkanybl
- KOCY/ΘUIPY aybICTbipbn-Kockblu bapkblb kypaandb eupipih3.
- Kyat aawacbiH 3neKtp po3eTKacbiHaH Wbifapbin anbIHbI3.
Kytim XaHe TexHnKaJIbIK KbI3MeT Kepcety
KAYIN
3nekmp morbIHbH cory Kayni.
KypbInrbldaKe3 KeIeaeH Kymbicmb6acmaMac 6ypbIH OHBI euiipin, Kyam awacbH cybpbiHb13.
Kypbblfbl TexHnKaIbIK Kbl3MeT KOpCETneiDi.
Xyy
Hycay
Kocnapanb6ap cydbaudaharKe3de,ep KOndaHraHHa KeuiH copfbHb ma3a cymeH waUbHb3.
TacbImaJday
△ABAHJIAHbI3
KapaKaam any Kayni
KypblfnbHbmehkepyeHkapakamanykayni.
TacbImaOnay Ke3iHDe KypblfBihh CanMarbHa Ha3ap aydapbIH3 (TexHuKaJIbIK CunammamanapbI 6eJIIMH KapaHb3)KeHe OHb KeJIk KypandaPbImeH macbImaOnay Ke3iHDe cauekeciHwe 6ekimiH3.
KoJMeH TaCbImaIay
1 Ka6eIbdi aHnHaIbIpbHb3.
2 KypbIINfbIHb TTKacbiHaH KeTepiH3 KHe KeWipiH3.
Koik KypaIapbImeTacbImaIay
1 KypblfHbI KncaMaTbHdai XaHe KynamaTbHdaein6ekitih3.
△ABAHJIAHbI3
Kapaqam any kayni
KypbIINbIbI mHKepeEHe JapaKaam any Ka
TacbImaIday Ke3iHde KypblfBihh CanMaBHa Ha3ap aydapbHb3 (mexnukabk cunammaMaJapobkapaHb3) XeHe OHb KeNik KypandaPbMeH macbImaIday Ke3iHde cauekeciHwe 6ekimiH3.
CaRTay
△ABAHJIAHbI3
CaMaKmbiH caKaMaMbayi
Kapakam any KHe KypbInrBihI 3aKbIMday Kayni TacbImanay Ke3iHde KypbInrBihIH canMarbiH ecepehi3.
- KypbIJIbIbIaIa3CbI3 XepIe caKTaHbI3.
KypbIrfHbI yCTay
- Kbcim XaftbHa XaftfahrC cy Ka6blnfaftbI awy apKblbl KpybInfbHbIH KbClbIMbIH TeMeHdTeHi3 (Mbicanbl, 6aKa7a 6ypikkiTu awy).
- Tytkepdi 6ocatbHb3.
- Copy Kf6bipbIH XHe KbicbIM Kf6bipbH anBHB3.
- CopfblHbCy teretih Klananah apKbIb6ocatbHb3. Cypet H
- KypbIINfbIHbIa3cbI3 Xeppe caKaTahbI3.
AphaNbI KepeK-JXapaKaTap
MymkiH 60aTaBH apHaBb KepeK-xapaKaTpApbOcbI naDanaHy HcyKayNbIbIHcOHfbl6eTIHeH Ta6acbI3.
Keideprinep 6oIfahnda KemeK any
KemwiniKepiH c6e6iHa cTbJa KepcetIReH T3IMre Caikec 3iH3 Joa anyibHb3 MymKiH. KydkTI KaJdainapda Hemece ocbIHda aTaIraH emec ce6e6i KaJdainapda KbImet KepcTey 6enimih apHaB1 MaMaHdpbMeH xaapnacblb3.
| Kate Ce6e6i Jxoi | ||
| Coprbl icsteidi, 6ipak copmaidbl | Copbda aya 6ap. | 1. Icke kocny npoceydpacbI duypbc opbyhdanraHbIn TckcepHiz3 (keleci tapaydbI kaipaB3 DaubHDaHb3 XeHe PaadanaHy). |
| JlactbIb 6elwekteri copy jkaftbIb 6iteydi. | 1. XeIi icstikwecin po3etkadaan axkbpaTbHb3.2. Cy copy jkaftbIb Ta3anaHb3. | |
| CopatbIb 7laHr Hemece jkaIraftbIa adanterp dYpbic emec 6ypanraH. | 1. Tbyfbl3daTbblTAP MeH Tbflb3dAmalap duypbc opHaIaackaHbIn TckcepHiz3.2. CopatbIb 7laHr nen XaIrafctbIpbIa adanterpdI KOLmeh 6ypanbI3. | |
| AldbIh ana cy3ri 6iteiin kalraH. | 1. Cy3rinepdi ta3anay. | |
| Kymblc 6apbicsbHda coprbl icke KocblimaiDbI Hemece KeHETTEH TOKTan KaIaDbI | 3neKtp KuatbI y3iIreH. | 1. CakTaHdbPfblTAP MeH 3neKtp KocblIMdapbIH TckcepHiz3. |
| CoprblHn KyaTb l TemeHdei HeMece TbIM a3 | Copy aaimarbl 6iteiin kalraH. | 1. XeIi icstikwecin po3etkadaan axkbpaTbHb3.2. Cy copy jkaftbIb Ta3anaHb3. |
| CoprblHn KyaTb apbHbHa XeHe Kocblfam nepiΦepnraFa 6aIIaHbICTbl. | 1. Maks. apbHbHa hazap aydapbHb3 (TexHkaJIbIK cunammamapanpbI beJIIMiKapaHb3) kaxet Bonca, baska shaHr dinametpiH Hemece 6acka shaHr y3blbIFbIH TaHdaHb3. | |
| Klcblm JkaftbIHaBtI KeIpeHHe KIma TapbIraH, MbICaIbI, KnaIah/uaPbI Klanah ToIbIK aUbllMaHaHbIKtaH. | 1. KlanahDbl/zaPbIb KlaIaHaDbI ToIbIFbImeH aUbHbI3. | |
| Ulnahr Klcblm JkaftbIHaH 6yirinreH. | 1. UlnahrHInH 6yktelin KlaFraH JxepnepiH ty3eHiz3. | |
| Aldbln aIa cy3ri 6iteiin kalraH. | 1. Cy3rinepdi ta3anay. |
TexHnKaJIbIK cHnTaTmApIapbl
| BP 4.500 Garden | BP 5.000 Garden | BP 6.000 Garden | BP 7.000 Garden | ||
| BP 4500 Garden Set Plus | BP 5000 Garden Set Plus | BP 6000 Garden Set Plus | |||
| Женистік керney | V | 230-240 | 230-240 | 230-240 | 230-240 |
| Жени sxлігін Hz 50 50 50 50 | |||||
| Homonhal'dы Куаты W 550 650 1000 1100 | |||||
| Мakсимал'dы Беріл'ren Мелшepi | l/h | 4500 | 5000 | 6000 | 7000 |
| Сору биіktirì (мак.) | m | 8 | 8 | 8 | 8 |
| Сydәр'tы KaTTы 3aTTap'dын мелшepi | kg/m³ | >2,5 | >2,5 | >2,5 | >2,5 |
| КьісbIMы (мак.) | MPa (bar) | 0,36 (3,6) | 0,40 (4,0) | 0,45 (4,5) | 0,5 (5,0) |
| Кушi (мак.) | m | 35 | 40 | 45 | 50 |
| Тась'mал'day Temператypасы (мак.) | °C | 35,0 | 35,0 | 35,0 | 35,0 |
| Руksat etɪnl'ren ka'tа aiДалатын cyн'tытдын běлшек ушемi (мак.) | mm | 1 | 1 | 1 | 1 |
| Сор'tы туprì | Асын | Асын | Асын | Асын | |
| Дыбіс Кысь'mын DiEN'ren LipA | dB(A) | 56 | 58 | 69 | 68 |
| Дыбіс Куатын DiEN'ren LiwA Kein'dik Беріл'ren | dB(A) | 71 | 73 | 84 | 83 |
| Θлшем'dere рmen салmarы | |||||
| Салmarы (толы'mdayшыларсыз) | kg | 6,4 | 7,0 | 9,7 | 10,0 |
Hycay
(EO) 2019/1781 kocbimwacbHa cek aIbIn macmay ce6e6i 2-6enIM (12):j
TexnkaIbIK e3reptyIepi eHri3y KyKbIbIb6ap.
CnnaTtAmaJapbl
EO cTaHdapTTapbHa cOeKecTiri TypaNbI DeKnapaunr
OcbimHe TEmHe KepeTeIJReMaunHa Kayinci3dk
KHe DeHcaybIK Kopfay BoynbHwa EO
DupeKTbBaNapbHbIH TaanTapbHa caiKeC KeNetiHi
MamimdeM3. Bi36e Hen Kencicyci3 MaunHaBnH
KOHCTpyKUncBcI e3repreh XaFdaNda OcbI KeJInapaunr
e3 KyuH XoJaBl.
BybIM: Copfbl
Tuni: 1.645-xx
KondaHbictafoEO dnpektnBaIapbl
2006/42/EG (+2009 / 127 / EG)
2014/30/EU
2000/14/EG
2011/65/EU
2009/125/EG
KoIaHbIIaTbIH Hyckama nap)
(EO) 2019/1781
KondaHbIaTbI 6ipi3eHdpipireh cTaHapTTap
EN 60335-1
EN 60335-2-41
EN 62233: 2008
EN 55014-1:2017 + A11:2020
EN 55014-2: 2015
EN 61000-3-2: 2014
EN 61000-3-3: 2013
ENIEC63000:2018
CaikectikTi 6aranaybIH kondaH6anbl aDici
2000/14/EC: V KocbIMwacbl
Db6bc KyaTbIbIbH DeHrei A(A)
BP 4.500 Garden
OIIeHdi:68
Keninik bepedi: 71
BP 5.000 Garden
OJIuHdi:70
Keninik 6epeji:73
BP 6.000 Garden
OIIueHdi:81
Keninik 6epezi:84
BP 7.000 Garden
OIIeHdi:81
Keninik 6epeidi:83
KoI KoiFaHap 6ackapMaHbIH TancbIPMacbi MeH
Chairman of the Board of Management

S. Reiser
Manager Regulatory Affairs & Certification
KyKaTtAmahbI Kypri3eTI yekineTTI Tynfa:
C. Pau3ep
Alfred Kärcher SE & Co. KG
Alfred-Karcher-Str. 28 - 40
71364 Winnenden (Германя)
Ten.: +49 7195 14-0
TeJeepaKc: +49 7195 14-2212
BHHHeHDeH, 2021/06/01
ooaal

Jd
dScky gabu y h cagc s to UUUI U uie 111111111111111111111111111111111
aoljdo
a aal aal lal 1000
| الإستعمال | ||
| الإستعمال/(عاء) محيى بعبيعة ومن الحرفية.l.1.(عاء)/l.1 | .الإستعمال/عاء | بعبيعة ومن الحرفية.l.1 |
| 2. . . . . . . . . . . . . . . . . . . . . . . . . . . . . . . . . . . . . . . . . . . . . . . . . . . . . . . . . . . . . . . . . . . . . . . . . . . . . . . . . . . . . . . . . . . . . . . . . . . . . . . 1. . . . . . . . . . . . . . . . . . . . . . . . . . . . . . . . . . . . . . . . . . . . . . . . . . . . . . . . . . . . . . . . . . . . . . . . . . . . . . . . . . . . . . . . . . . . . . . . . . .. 2. . . . . . . . . . . . . . . . . . . . . . . . . . . . . . . . . . . . . . . . . . . . . . . . . . . . . . . . . . . . . . . . . . . . . . . . . . . . . . . . . . . . . . . . . . . . . . . . . . . . . . . . . . . . . . . . . . . . . . . . . . . . . . . . . . . . . . . . . . . . . . . . . . . . . . . . . . . . . . . . . . . . . . . . . . . . . . . . . . . . . . . . . . . . . . . . . . . . . . . 2. . . . . . . . . . . . . . . . . . . . . . . . . . . . . . . . . . . . . . . . . . . . . . . . . . . . . . . . . . . . . . . . . . . . . . . . . . . . . . . . . . . . . . . . . . . . . . . . . . . . 2. . . . . . . . . . . . . . . . . . . . . . . . . . . . . . . . . . . . . . . . . . . . . . . . . . . . . . . . . . . . . . . . . . . . . . . . . . . . . . . . . . . . . . . . . . . . . . . . . . . . 2. . . . . . . . . . . . . . . . . . . . . . . . . . . . . . . . . . . . . . . . . . . . . . . . . . . . . . . . . . . . . . . . . . . . . . . . . . . . . . . . . . . . . . . . . . . . . . . . . . . . 2. . . . . . . . . . . . . . . . . . . . . . . . . . . . . . . . . . . . . . . . . . . . . . . . . . . . . . . . . . . . . . . . . . . . . . . . . . . . . . . . . . . . . . . . . . . . . . . . . . . . 2. . . . . . . . . . . . . . . . . . . . . . . . . . . . . . . . . . . . . . . . . . . . . . . . . . . . . . . . . . . . . . . . . . . . . . . . . . . . . . . . . . . . . . . . . . . . . . . . . . . . 2. . . . . . . . . . . . . . . . . . . . . . . . . . . . . . . . . . . . . . . . . . . . . . . . . . . . . . . . . . . . . . . . . . . . . . . . . . . . . . . . . . . . . . . . . . . . . . . . . . . . 2. . . . . . . . . . . . . . . . . . . . . . . . . . . . . . . . . . . . . . . . . . . . . . . . . . . . . . . . . . . . . . . . . . . . . . . . . . . . . . . . . . . . . . . . . . . . . . . . . . . . 2. . . . . . . . . . . . . . . . . . . . . . . . . . . . . . . . . . . . . . . . . . . . . . . . . . . . . . . . . . . . . . . . . . . . . . . . . . . . . . . . . . . . . . . . . . . . . . . . . . . . 2. . . . . . . . . . . . . . . . . . . . . . . . . . . . . . . . . . . . . . . . . . . . . . . 2. . . . . . 2. . . 2. . 2. . 2. . 2. . 2. . 2. . 2. . 2. . 2. . 2. . 2. . 2. . 2. . 2. . 2. . 2. . 2. . 2. . 2. . 2. . 2. . 2. . 2. . 2. . 2. . 2. . 2. . 2. . 2. . 2. . 2. . 2. . 2. . 2. . 3. 3. 3. 3. 3. 3. 3. 3. 3. 3. 3. 3. 3. 3. 3. 3. 3. 3. 3. 3. 3. 3. 3. 3. 3. 3. 3. 3. 3. 3. 3. 3. 3. 3. 4. 4. 4. 4. 4. 4. 4. 4. 4. 4. 4. 4. 4. 4. 4. 4. 4. 4. 4. 4. 4. 4. 4. 4. 4. 4. 4. 4. 4. 4. 4. 4. 4. 4 2. 2. 2. 2. 2. 2. 2. 2. 2. 2. 2. 2. 2. 2. 2. 2. 2. 2. 2. 2. 2. 2. 2. 2. 2. 2. 2. 2. 2. 2. 2. 2. 2. 2. 3. 3. 3. 3. 3. 3. 3. 3. 3. 3. 3. 3. 3. 3. 3. 3. 3. 3. 3. 3. 3. 3. 3. 3. 3. 3. 3. 3. 3. 3. 3. 3. 3 2. 2. 2. 2. 2. 2. 2. 2. 2. 2. 2. 2. 2. 2. 2. 2. 2. 2. 2. 2. 2. 2. 2. 2. 2. 2. 2. 2. 2. 2. 2. 2. 2. 2. 2. 2. 2. 2. 2. 2. 2. 2. 2. 2. 2. 2. 2. 2. 2. 2. 2. 2. 2. 2. 2. 2. 2. 2. 2. 2. 2. 2. 2. 2. 2. 2. 8 2. 2. 2. 2. 2. 2. 2. 2. 2. 2. 2. 2. 2. 2. 2. 2. 2. 2. 2. 2. 2. 2. 2. 2. 2. 2. 2. 2. 2. 2. 2. 2. 2.2 2. 2. 2. 2. 2. 2. 2. 2. 2. 2. 2. 2. 2. 2. 2. 2. 2. 2. 2. 2. 2. 2. 2. 2. 2. 2. 2. 2. 2. 2. 2. 2. 2. (3) 2. 2. 2. 2. 2. 2. 2. 2. 2. 2. 2. 2. 2. 2. 2. 2. 2. 2. 2. 2. 2. 2. 2. 2. 2. 2. 2. 2. 2. 2. 2. 2. 2. 5 2. 2. 2. 2. 2. 2. 2. 2. 2. 2. 2. 2. 2. 2. 2. 2. 2. 2. 2. 2. 2. 2. 2. 2. 2. 2. 2. 2. 2. 2. 2. 2. 2.8 2. 2. 2. 2. 2. 2. 2. 2. 2. 2. 2. 2. 2. 2. 2. 2. 2. 2. 2. 2. 2. 2. 2. 2. 2. 2. 2. 2. 2. 2. 2. 2. 2 2. 2. 2. 2. 2. 2. 2. 2. 2. 2. 2. 2. 2. 2. 2. 2. 2. 2. 2. 2. 2. 2. 2. 2. 2. 2. 2. 2. 2. 2. 2. 2. 2 3. 3. 3. 3. 3. 3. 3. 3. 3. 3. 3. 3. 3. 3. 3. 3. 3. 3. 3. 3. 3. 3. 3. 3. 3. 3. 3. 3. 3. 3. 3. 3. 3. 8 3. 3. 3. 3. 3. 3. 3. 3. 3. 3. 3. 3. 3. 3. 3. 3. 3. 3. 3. 3. 3. 3. 3. 3. 3. 3. 3. 3. 3. 3. 3. 3. 3.8 3. 3. 3. 3. 3. 3. 3. 3. 3. 3. 3. 3. 3. 3. 3. 3. 3. 3. 3. 3. 3. 3. 3. 3. 3. 3. 3. 3. 3. 3. 3. 3. 3 3. 3. 3. 3. 3. 3. 3. 3. 3. 3. 3. 3. 3. 3. 3. 3. 3. 3. 3. 3. 3. 3. 3. 3. 3. 3. 3. 3. 3. 3. 3. 3. 3. 3. 3. 3. 3. 3. 3. 3. 3. 3. 3. 3. 3. 3. 3. 3. 3. 3. 3. 3. 3. 3. 3. 3. 3. 3. 3. 3. 3. 3. 3. 3. 3. 3. 0 3. 3. 3. 3. 3. 3. 3. 3. 3. 3. 3. 3. 3. 3. 3. 3. 3. 3. 3. 3. 3. 3. 3. 3. 3. 3. 3. 3. 3. 3. 3. 3. 3. |
a
aJll
BP 7.000
Garden
BP 6.000
Garden
BP 5.000
Garden
BP 4.500
Garden
JLJIBP
6.000 Garden
jLJI Bp
5.000 Garden
JGLB
4.500 Garden
Set Plus
Set Plus
Set Plus
| 230-240 | 230-240 | 230-240 | 230-240 | V | \( \mathrm{J}\mathrm{g}\left( {{\mathrm{L}}_{\mathrm{{Al}}} - {\mathrm{L}}_{\mathrm{{Al}}}{}^{\prime }}\right) \) |
| 50 | 50 | 50 | 50 | Hz | \( \mathrm{J}\left( {{\mathrm{L}}_{\mathrm{{Al}}} - {\mathrm{L}}_{\mathrm{{Al}}}{}^{\prime }}\right) \) |
| 1100 | 1000 | 650 | 550 | W | \( \mathrm{J}\left( {{\mathrm{L}}_{\mathrm{{Al}}} - {\mathrm{L}}_{\mathrm{{Al}}}{}^{\prime }}\right) \) |
| 7000 | 6000 | 5000 | 4500 | I/h | \( \mathrm{J}\left( {{\mathrm{L}}_{\mathrm{{Al}}} - {\mathrm{L}}_{\mathrm{{Al}}}{}^{\prime }}\right) \) |
| 8 | 8 | 8 | 8 | m | \( \left( {{\mathrm{L}}_{\mathrm{{Al}}} - {\mathrm{L}}_{\mathrm{{Al}}}{}^{\prime }}\right) \) |
| >2,5 | >2,5 | >2,5 | >2,5 | \( \mathrm{{kg}}/{\mathrm{m}}^{3} \) | \( \left( {{\mathrm{L}}_{\mathrm{{Al}}} - {\mathrm{L}}_{\mathrm{{Al}}}{}^{\prime }}\right) \) |
| 0,5 (5,0) | 0,45 (4,5) | 0,40 (4,0) | 0,36 (3,6) | MPa (bar) | \( \left( {{\mathrm{L}}_{\mathrm{{Al}}} - {\mathrm{L}}_{\mathrm{{Al}}}{}^{\prime }}\right) \) |
| 50 | 45 | 40 | 35 | m | \( \left( {{\mathrm{L}}_{\mathrm{{Al}}} - {\mathrm{L}}_{\mathrm{{Al}}}{}^{\prime }}\right) \) |
| 35,0 | 35,0 | 35,0 | 35,0 | d'roge minoia | \( \left( {{\mathrm{L}}_{\mathrm{{Al}}} - {\mathrm{L}}_{\mathrm{{Al}}}{}^{\prime }}\right) \) |
| 1 | 1 | 1 | 1 | mm | \( \left( {{\mathrm{L}}_{\mathrm{{Al}}} - {\mathrm{L}}_{\mathrm{{Al}}}{}^{\prime }}\right) \) |
| \( {\mathrm{L}}_{\mathrm{{Al}}} \) | \( {\mathrm{L}}_{\mathrm{{Al}}} \) | \( {\mathrm{L}}_{\mathrm{{Al}}} \) | \( {\mathrm{L}}_{\mathrm{{Al}}} \) | \( {\mathrm{L}}_{\mathrm{{Al}}} \) | |
| 68 | 69 | 58 | 56 | dB(A) | \( {\mathrm{L}}_{\mathrm{{pA}}} \) |
| 83 | 84 | 73 | 71 | dB(A) | \( {\mathrm{L}}_{\mathrm{{WA}}} \) |
| 10,0 | 9,7 | 7,0 | 6,4 | kg | \( \left( {{\mathrm{L}}_{\mathrm{{Al}}} - {\mathrm{L}}_{\mathrm{{Al}}}{}^{\prime }}\right) \) |
a 1
#
.1
J.2
1Jg> 10aallpgrj,laai J.3
a>la|0gud
.5glllg lall 1aall pai jbi .4
4a
J1/1
a a a a a a a a a a a a a a a a a
1.0211 1c aiaia Jaiuua
Jeuell aal a 100 daaall U .5
aui
Jaai/0g9golal.
- a : l_1 l , b : a b = 1
(aio//uill/la9b1.b2a/ll)
J
.1
J 2
a|Lg a|Lg
16 ÷
aillps aioia 1001 Jbs
JacI a/c1>Jg JgS//Ju//Ju/9 cW/gjQ2//cog
j_4 = 17,1c
.
abw
swj
J 1111111111111111111111
p122iW
Jai
a a
= ( x1,y1) , = ( x2,y2)
j_4 = 1 , ( a + b) = 0( a,b) .
(aia/lll/ jai/ jai) jg/ oolj yjli
alaiiui laoiaol
J
125 b_2 p
JJI J
Ug UjU j 1
aag
= ( x1,y1) , = ( x2,y2)
j_4 = 1
a9 (aiil/ulil/129 jai) jie//jg olcl
alal alai sic li laoi
#
4a
jglolcr
JUU JUUUUUUUUU
jzllc01c 111111
.
j_Lg 与 L 相等
cllll 1.1
(110gJdJI JwJr j) 1j
.2
clll plao aiaai 4
a>la|g
.5
jIg2Jl IaOla
Jgall g. alolll jieil 1d Jswll Jd
(oggj)
Jg j
a>la|0gAA
①jlaaal
2
G1 2aaloljul Jggo
jglggoaogc)BP4.500Gard
jglggo jnoo jao)G1cliaaall Joo
BP 4.500 Garden(
3
4
(5)
(joo) 13.3) G 1 alog
6gllaa, oogjo
7
- _U U dS
9
clll
10
G1 J_2
11
Aqua Stop aols 13 alog**
12
13
14
alog
15
16
J 1
(5)
Set Plus Set jge go aiaaall olaal
.8e9 Set Plus jge go aiaaal llaJall
#
jull Uolso, bawu uabu jauu ul gboa o
gabplaxwipj1.bkarcheraswooobolal
aegbglz 111s sssasaaeaae
2.JaJU Jauoagd jafalb dgsugbsic aolg Jilguw lao wix
alai
ooJgU Jzssll J
12121
a.jl.(j>20) aixalI baiuI alog jlogil
S OBC = S COD + S_ BOC
gall glll bll lglj
a>la o0gB
J
(aolclaoI)gJgJgssuuaaiaaiaaia
111111111111
ca4 > c12 = 3
J
aaa 29a/1 baiw/ gbi, pkiw/ biw/ oic/ oio
- baill/ogb> gai gio aiw no /iaqg JrA// gJ
.(a)0bla2lo,blil)P12xWU
aui.(己)axiaalbaiaialalog 1agill
.
a|la|gB
.2
3aiaIgBaaiIglaJallaaagaeelal
a>la oJgE
a 100
a>la|g5
J 1
bs A 1/1/2g/2g/2g/2g/2g/2g/2g/2g/2g/2g/2g/2g/2g/2g/2g/2g/2g/2g/2g/2g/2g/2g/2g/2g/2g/2g/2g/2g/2g/2g/2g/2g/2g/2g
A 1/11 s2g, 9g, bla// a2v 2g0 // o/1. g// g/ a/1
4g 12
/11s8,19bla/ a23 19 c9go /j oJlu
4
J 1/2018 J//s2g 19g jblia// a2v 19 c9go // oJlu
aai1la
yj yj yj yj yj yj yj yj yj yj yj yj yj yj yj yj yj yj yj yj yj yj yj yj yj yj yj yj yj yj yj yj yj yj yj yj yj yj yj yj yj yj yj yj yj yj yj yj yj yj yj
JIOUgSO JcIaI gSsTo IuIeoggUdOlaU OoJb> JKw dIg Ugl Aclalgl Uclalj 0J Kw LgOJaleill all> aIgUanUd
olgall ooi U. aibl ojgu, lio alll pi |gi 0o jU oalill jgy U. aoLw ojgu, jglj Jzaw
aJ (REACH) aJgaxall Jg>JgJgJgJgJgJgJgJgJgJgJgJgJgJgJgJgJgJgJgJgJgJgJgJgJgJgJgJgJgJgJgJgJgJgJgJgJgJgJgJgJgJgJgJgJgJgJgJgJgJgJ
JlJIgBgagAaAsKJIJIaXJAI
UuluU U uUg g Uauuuaaull aalal 1uauu U. UuuuU uu uu uu uuuu uuuu uuuu uuuu uuuu uuuu uuuu uuuu uuuu uuuu uuuu uuuu uuuu uuuu uuuu uuuu uuuu uuuu uuuu uuuu uuuu uuuu uuuu uuuu uuuu uuuu uuuu uuuu uuuu uuuu uuuu uuuu uuuu uuu uuuu uuuu uuuu uuuu uuuu uuuu uuuu uuuu uuuu uuuu uuuu uuuu uuuu uuuu uuuu uuuu uuuu uuuu uuuu uuuu uuuu uuuu uuuu uuuu uuuu uuuu uuuu uuuu
pwl1l 50
g>2g>9 no 5b.ogoll jc gao jlgjll paa sgi> gai aaii iiaai ai> gog .gizic ogall agi> giljlae!
Jalal
gsslls w l l nlaalb g w alg J s s
I jbi 111111111111111111111111111111111111111111111111111111
J
124 aole
124
124
124
124
124 1
124
125
125
125
125
125
125
126
126
126
127 0aal
aolc|dawj
Ug jgljglal Jgl Jg Ila Jgl glll Jd oclg jy Jg Ua Lg jgljglal Jgl Jg I y Jg.aaJrA aullll A lgs! Ua Ua Ua Ua Ua Ua Ua Ua
aJlU J 1001 1
I 1171
a a 100000000000000000000000000000000000000000
9g g dJ 1sW Jswj yao jgey .aai i w | lti bia
aJlll lalll sS aI aI I JsOg sic
2 1JIBP4
2 1JIBP5
2 1JIBP6
2 1JIBP7
4wA 1,loUJbs
aIol/1gJ/1o aIol/1jbs 1gJ a20 pS11 /sla/1wU
4:2008 all jilgaw
:la 2gawal zaiJilaw
alasioo ol
LULo
gulol
JUOL
aIzaiall algal logiaai all jll piai wic iiai wai oia 35 c giaai all jilwll oj> a> jgl> pc
pIwUjE pIzWU
sJ
19 alaiol jolgmo a/laal Jauu U 1211 Jauwll gJlaoIgall IaIauIyU
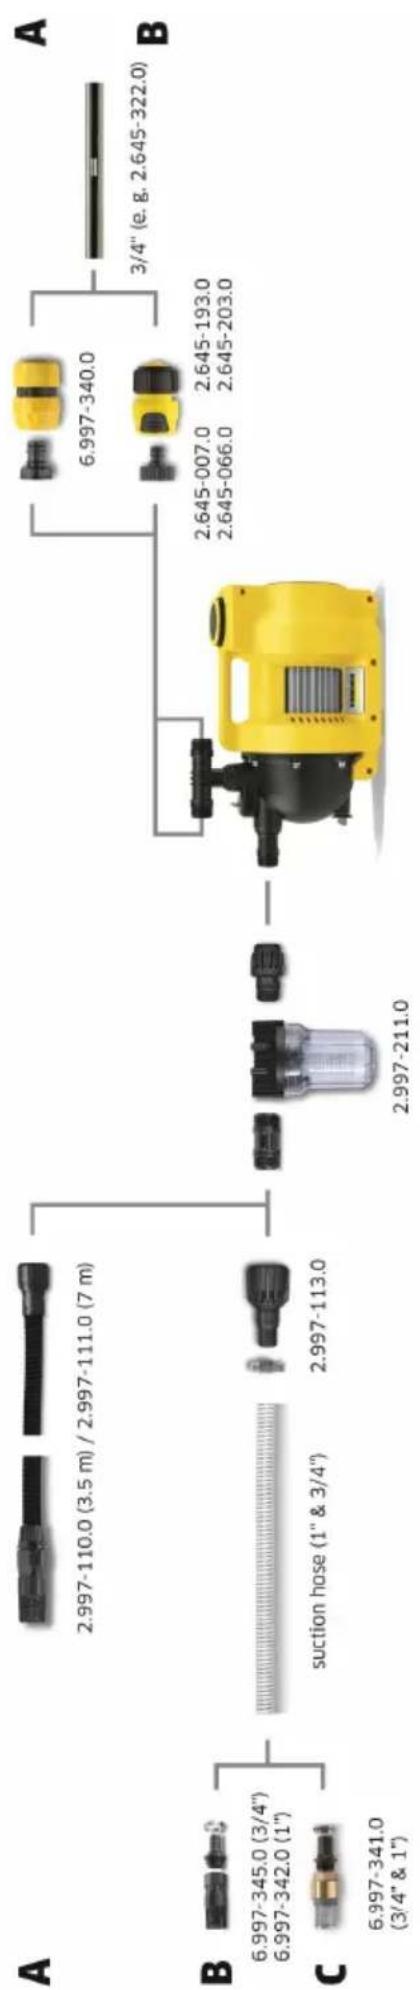
OPTIONAL SPECIAL ACCESSORY
Options pressure side
Options suction side

THANK YOU!
MERCI! DANKE! iGRACIAS!

Register your product and benefit from many advantages.
www.kaercher.com/welcome


Rate your product and tell us your opinion.
www.kaercher.com/dealersearch
Alfred Kärcher SE & Co. KG
Alfred-Karcher-Str. 28-40
71364 Winnenden (Germany)