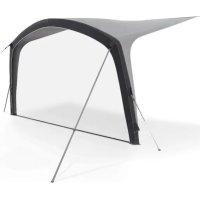
Leggera AIR 220 S - Tent DOMETIC - Free user manual and instructions
Find the device manual for free Leggera AIR 220 S DOMETIC in PDF.
Download the instructions for your Tent in PDF format for free! Find your manual Leggera AIR 220 S - DOMETIC and take your electronic device back in hand. On this page are published all the documents necessary for the use of your device. Leggera AIR 220 S by DOMETIC.
USER MANUAL Leggera AIR 220 S DOMETIC
Elősátor Szerelési és használati útmutató............................... 131EN Copyright © 2024 Dometic Group. The visual appearance of the contents of this manual is protected by copyright and design law. The underlying technical design and the products contained herein may be protected by design, patent or pending patent. The trademarks mentioned in this manual belong to Dometic Sweden AB. All rights are reserved. 2EN List of Figures
- 11EN English 1 Important notes p. 12
- 2 Related videos p. 12
- 3 Explanation of symbols p. 12
- 4 Safety instructions p. 12
- 5 Scope of delivery p. 13
- 6 Accessories p. 13
- 7 Intended use p. 14
- 8 Using the awning tent p. 14
- 9 Cleaning and maintenance p. 16
- 10 Troubleshooting p. 17
- 11 Disposal p. 18
- 12 Warranty p. 18
- 13 Technical data 1 Important notes Please read these instructions carefully and follow all instructions, guidelines, and warnings included in this product manual in order to ensure that you install, use, and maintain the product properly at all times. These instructions MUST stay with this product. By using the product, you hereby confirm that you have read all instructions, guidelines, and warnings carefully and that you understand and agree to abide by the terms and conditions as set forth herein. You agree to use this product only for the intended purpose and application and in accordance with the instructions, guidelines, and warnings as set forth in this product manual as well as in accordance with all applicable laws and regulations. A failure to read and follow the instructions and warnings set forth herein may result in an injury to yourself and others, damage to your product or damage to other property in the vicinity. This product manual, including the instructions, guidelines, and warnings, and related documentation, may be subject to changes and updates. For up-to-date product information, please visit documents.dometic.com. 2 Related videos Find the “How To Set Up Your Motorhome Static Awning” video on qr.dometic.com/bfFUPz. Find the “How To Set Up Your Motorhome Drive-away Awning” video on qr.dometic.com/bfFUxS. Find the “How To Set Up Your Caravan Awning” video on qr.dometic.com/bfFV6O. 3 Explanation of symbols A signal word will identify safety messages and property damage messages, and also will indicate the degree or level of hazard seriousness. DANGER! Indicates a hazardous situation that, if not avoided, will result in death or serious injury. WARNING! Indicates a hazardous situation that, if not avoided, could result in death or serious injury. CAUTION! Indicates a hazardous situation that, if not avoided, could result in minor or moderate injury. NOTICE! Indicates a situation that, if not avoided, can result in property damage. NOTE Supplementary information for operating the product. 4 Safety instructions DANGER! Hazard of carbon monoxide poisoning. Never use a fuel-burning appliance such as barbecues or gas heaters inside. The burning process produces carbon monoxide which accumulates inside as there is no flue. WARNING! Fire hazard p. 19
KEEP ALL FLAME AND HEAT SOURCES
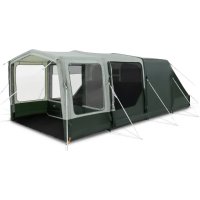
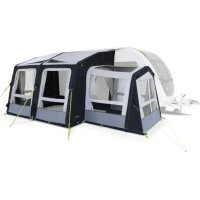
AWAY FROM THE FABRIC. Ensure you know the fire precaution arrangements on the site. Do not cook inside or use open flames. 12EN WARNING! Beware of suffocation Ensure ventilation openings are open all the time to avoid suffocation. CAUTION! Risk of injury. This device is not intended for use by persons (including children) with reduced physical, sensory or mental capabilities, or lack of experience and knowledge, unless they have been given supervision or instruction concerning use of the device by a person responsible for their safety. Do not allow children to play around and ensure that suitable protective footwear is worn. Guy lines are a trip hazard and pegs can be sharp. Cleaning and user maintenance shall not be made by children without supervision. Keep passage ways clear. 5 Scope of delivery Grande AIR Tour, Rally AIR Tour Component Quantity Awning tent 1 Peg set 1 Side panel 2 Front panel 2 Curtain set 1 Draught skirt (Size M excluded) 1 Hand pump 1 Transporation bag 1 Installation and operating manual 1 Leggera AIR Tour Component Quantity Awning tent 1 Peg set 1 Draught skirt (Size M excluded) 1 Hand pump 1 Transportation bag 1 Installation and operating manual 1 Rally AIR Tour DA Component Quantity Awning tent 1 Peg set 1 6 m connection strap 3 Curtain set 1 Side panel 2 Front panel 2 Connection tunnel door panel 2 Connection tunnel monsoon pole 1 Hand pump 1 Transportation bag 2 Installation and operating manual 1 6 Accessories Available as accessories (not included in the scope of delivery): Component Ref. no. Leggera AIR 220 canopy 9120000289 Leggera AIR 260 canopy 9120000288 Grande AIR Tour EXT L/H S 9120002345 Grande AIR Tour EXT R/H S 9120002346 Air Tour Tall annexe 9120002348 Air Tour annexe 9120002349 Air Tour conservatory 9120002350 Storm tie down kit mist 9120002361 Mesh front panel Rally/Grande 390 9120000194 Rally 330 9120000195 Rally 260 9120000196 Rally 200 9120000197 Lighting system SabreLink 150 starter 9120000337 (UK) / 9120000338 (EU) Lighting system SabreLink 150 add-on
- Motorhomes and caravans
- Light to moderate weather
- Touring This awning tent is not suitable for the following applications:
- Very strong winds or snowfall
- Seasonal pitch or commercial use This product is only suitable for the intended purpose and application in accordance with these instructions. This manual provides information that is necessary for proper installation and/or operation of the product. Poor installation and/or improper operating or maintenance will result in unsatisfactory performance and a possible failure. The manufacturer accepts no liability for any injury or damage to the product resulting from:
- Incorrect installation or assembly
- Incorrect maintenance or use of spare parts other than original spare parts provided by the manufacturer
- Alterations to the product without express permission from the manufacturer
- Use for purposes other than those described in this manual Dometic reserves the right to change product appearance and product specifications. 8 Using the awning tent CAUTION! Risk of injury and material damage Never open the zipper on the protective sleeve while an air pole is inflated. This will result in the air pole bursting. CAUTION! Health hazard and material damage A poorly ventilated awning tent can develop condensation and mold. Ensure the awning tent is always well ventilated. Consider using a mesh panel set accessory for better ventilation. NOTE When attaching to fixed awning rails, the optional canopy, extension, annexes and conservatory can be used. When attaching to cassette awning rails, it is recommended to not use the optional canopy, extension, annexes or conservatory.
8.1 Before first use
Before using the product for the first time, perform a test set-up to familiarize yourself with it. Check if the scope of delivery is complete.
Choose a flat site that is protected from wind: 14EN
1. If necessary, use a windbreak.
2. Choose a shaded site to reduce UV degradation of
3. Do not pitch under trees as falling branches, resin, or
other debris can damage the product.
4. Clear the site of sharp stones and debris to protect
5. Set up the product with the doors facing away from
CAUTION! Risk of injury and material damage Do not use any type of compressor designed to inflate car tires. Only inflate the air poles under control of a pressure gauge with a pressure of 9 psi (0.62 bar). NOTICE! Material damage Do not open or close the zippers by force. If a wind-out awning is used to attach the awning tent, support the wind-out awning while working to avoid putting too much stress on it. Aer attaching the awning tent, rewind the wind-out awning fully back into its housing. This product should not be used with the cassette awning in its extended position. NOTE
- The supplied pegs are heavy duty pegs. They will be suitable for most sites, but special pegs may be required for certain ground types. Ask your dealer.
- Drive the pegs at a 45° angle away into the ground.
- Peg the guy lines in line with the seam it starts from. Keep the following tips in mind while setting up the awning tent:
- The figures provide a general overview of the set- up. The actual set-up will vary slightly based on the model of awning tent.
- Get help. The set-up is easier with more people.
- Aer standing the awning tent upright, check the corner pegs and re-peg if necessary. The groundsheet on the inside should be taut and in a rectangular shape.
- Peg the guy lines so that the awning tent is under tension without distorting the shape.
- If available, attach the storm tie down kit.
- Reguarly check the guy lines to ensure adequate tension. If necessary, use the runners to adjust. Set up the awning tent as follows:
2. Attach the awning tent to your vehicle using one of
the following methods:
- Insert the keder into the awning rail and pull the awning tent through to the desired location. Fig. on page3
- Insert the keder into the cassette awning channel and pull the awning tent through to the desired location. Fig. on page4
- (Rally Air Tour DA only) Throw the 6 m connection straps over the top of the vehicle and secure them by either pegging them into the ground or tying them to the vehicle's wheels. Fig. on page4
3. Secure the rear two corners by pegging the
webbing straps about 5 cm under the vehicle. Fig. on page4
4. Inflate the awning tent:
a) Close all deflation valves at the front of the awning tent. Fig. on page5 b) Unscrew the top cap of the inflation valve (typically on the middle of the awning tent). Fig. on page5 c) Insert the pump and inflate the air pole with a pressure between 3 psi and 4 psi initially. Fig. on page5 d) Li the awning tent from either side to help it take shape. Fig. on page6 e) Continue inflating to 9 psi. 15EN f) Remove the pump and secure the top cap of the inflation valve. Fig. on page6
5. Secure the awning tent:
a) Zip in all panels and close all doors. Fig. on page6 b) Peg the front two corners in line with the rear corners, ensuring the awning walls are tensioned. Fig. on page7 c) Peg the orange triangle on either side of the awning tent (adjust center legs if necessary). Fig. on page7 d) Peg the middle leg on the front of the awning tent. Fig. on page7 e) Cross-peg between doorways to reduce tension and ensure smooth zips. Fig. on page8 f) Peg the intermediate pegging points on both sides. Fig. on page8 g) Peg the remaining pegging points on the front of the awning tent. Fig. on page8 h) Peg out the quick pitch guy lines and tighten them. Fig. on page9
i) (Optional) Attach and peg the storm tie down
kit. Fig. on page9 j) (Rally Air Tour DA only) Tension the straps connecting to the upper awning and tighten them. Fig. on page9
6. (Grande AIR Tour, Rally AIR Tour, and Leggera AIR
Tour only (except Size M)) Attach the draught skirt: a) Secure the draught skirt to the awning rail at the bottom of your vehicle. b) Tension the top corners by tying the ropes to the chassis. c) Peg down and tighten the skirt using the webbing straps. Fig. on page10
7. (Except Leggera AIR Tour) Hook the curtains into
position. Fig. on page10 You find the production data on the label next to the fire regulation label inside the back of the awning.
1. Remove any dirt on the outside.
2. Close all window blinds or remove curtains.
3. Close all doors and openings.
5. Remove all lines and straps.
6. Remove all pegs between the corner pegs.
7. Open the valves on each pole.
8. Wait until most of the air has been expelled.
9. Remove the four corner pegs.
10. Fold/roll the awning tent towards the valve to expel
11. When deflated, roll the awning tent to fit into the
12. Ensure that all parts are clean before packing them
into the transportation bag.
13. If the awning tent is wet or damp, dry fully as soon as
possible. 9 Cleaning and maintenance NOTICE! Material damage Do not use sharp or hard objects or cleaning agents for cleaning. Do not use alcohol based materials, chemicals, soap and detergents for cleaning. Remove bird droppings and tree resin as soon as possible to avoid permanent damage to the material.
1. If necessary, clean the product with clean water and
2. Apply impregnation against water and UV radiation
CAUTION! Health hazard and material damage A wet or damp awning tent will quickly develop mold. Mold can also develop if the awning tent is le up for long periods of time with poor ventilation. Fully set up the awning tent for cleaning. Choose a warm and sunny day for cleaning to ensure the material will dry thoroughly.
1. Clean the awning tent.
2. Fully air out the awning tent and ensure it is totally
dry before packing away.
3. Store in a well ventilated, dry place, away from
direct sunlight. 10 Troubleshooting NOTE During first exposure to water there may be some moisture at the seams. Through this moisture the threads will swell and fill the holes that are created in the sewing process. A fully equipped spare parts kit should include:
- Repair tape and repair solution
- Silicone spray for the zippers
- Spare pegs All these spare parts can be purchased from any reputable caravan or camping dealer. Problem Suggested remedy Awning tent inflates with difficulties Check that the valve is fully screwed into the air pole. Check if the inflation tube is twisted at the valve. This may be indi- cated by noise. Untwist the inflation tube. Problem Suggested remedy Check that the hand pump is working. Part of the awning tent does not inflate or deflate Check that all isolation valves that connect the air poles are open. Air poles are kinked Add more air (9 psi /0.62 bar). Air leak Check that the valve is fully screwed into the air pole and the ring seal is in place. Check that the cap of the valve is done up tightly. Check for punctures, see Repairing a punc- ture in the air pole on page18. Check for leaky seams, damaged tapings, and moist areas. If you cannot find any leaks, see Condensa- tion on page17. Water leak If you find any leaks, ap- ply seam sealant. Use repair tape to seal the fabric. Rip in the fabric Have repairs carried out by an authorized specialist.
The product suffers from internal condensation if one or more of the following conditions apply:
- High ground moisture
- A drop in temperature Severe condensation can run down the inside of the roof and drip off ties, tapes and other internal fittings and can be mistaken for leaking. Increase ventilation by opening doors and/or windows. Ensure that the material is not permanently damp. If necessary, dry it completely to avoid mold growth. Install a waterproof groundsheet. 17EN
10.2 Repairing a puncture in the air
pole If the air pole loses air, proceed as follows:
6. Blow some air into the inflatable tube.
7. Submerge the tube in water.
8. Locate the puncture.
9. Use repair tape and repair solution to seal the hole.
10. Zip the inflatable tube back into the protective
11. Zip the air pole back into the outer sleeve.
Fig. on page11 11 Disposal Place the packaging material in the appropriate recycling waste bins, wherever possible. Consult a local recycling center or specialist dealer for details about how to dispose of the product in accordance with the applicable disposal regulations. 12 Warranty The statutory warranty period applies. If the product is defective, please contact the manufacturer's branch in your country (see dometic.com/dealer) or your retailer. For repair and warranty processing, please include the following documents when you send in the device:
- A copy of the receipt with purchasing date