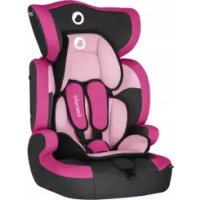
Levi One - Car seat Lionelo - Free user manual and instructions
Find the device manual for free Levi One Lionelo in PDF.



| Product type | Child car seat |
| Brand | Lionelo |
| Model | Levi One |
| Category | Universal, approved according to UN Regulation No. 44, series of amendments 04 |
| Weight groups | Group I (9-18 kg), Group II (15-25 kg), Group III (22-36 kg) |
| Installation | Forward-facing only, on seat equipped with 3-point seat belt |
| Safety harness | 5-point harness for Group I, removable for Groups II and III |
| Adjustments | Adjustable headrest height, 3 positions for harness height |
| Materials | Plastic structure, fabric cover |
| Care and cleaning | Cover washable in warm water with mild soap; clean plastic parts with lukewarm water; do not dry in the sun |
| Safety | Compliant with ECE R44.04 standard; do not modify the seat; replace after an accident |
| General information | Usable from 9 to 36 kg; store away from sunlight in a dry place |
Frequently Asked Questions - Levi One Lionelo
User questions about Levi One Lionelo
0 question about this device. Answer the ones you know or ask your own.
Ask a new question about this device
Download the instructions for your Car seat in PDF format for free! Find your manual Levi One - Lionelo and take your electronic device back in hand. On this page are published all the documents necessary for the use of your device. Levi One by Lionelo.
USER MANUAL Levi One Lionelo
natural_image
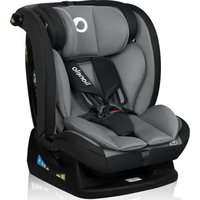
Black and gray car seat with lionelo branding on the backrest (no additional text or symbols visible)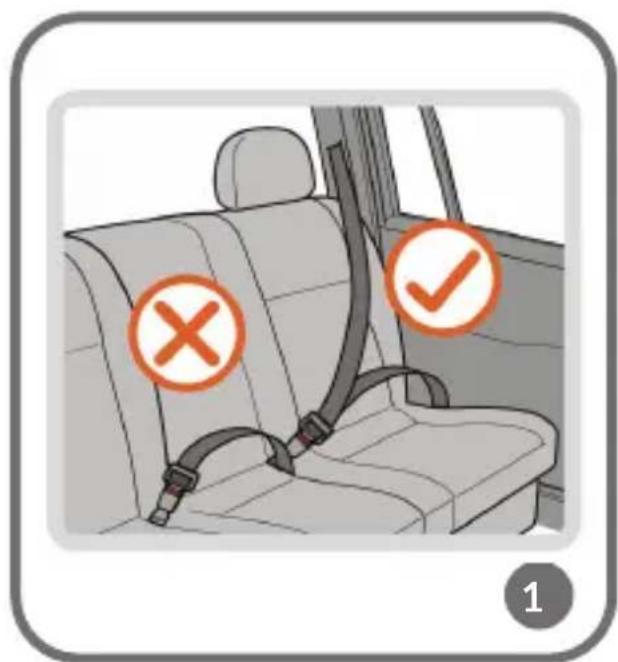
natural_image
Two-step illustration showing hands performing a belt buckle maneuver, with arrows indicating motion direction (no text or symbols)
natural_image
Illustration of a child wearing a car seatbelt, holding a belt buckle (no text or symbols)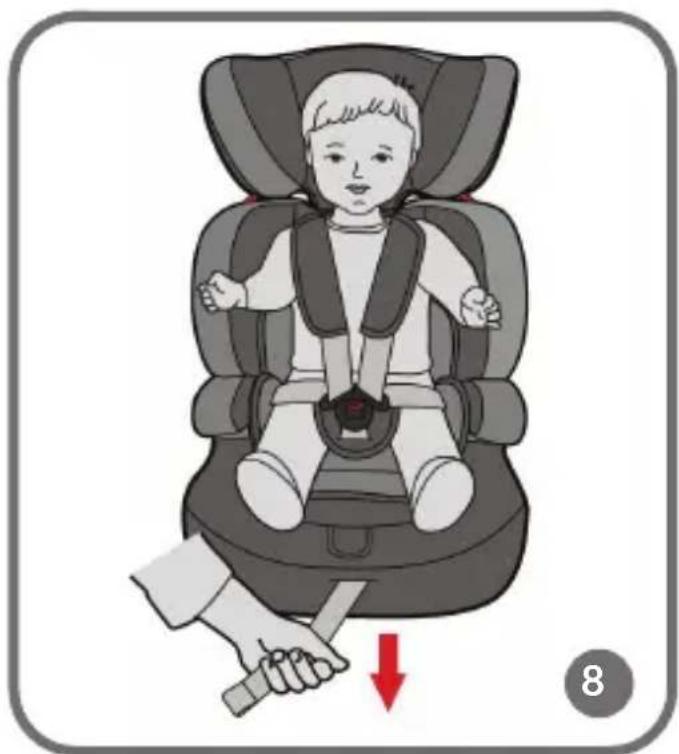
natural_image
Illustration of a baby in a car seat being lifted by a hand, with a red arrow indicating the load (no text or symbols present)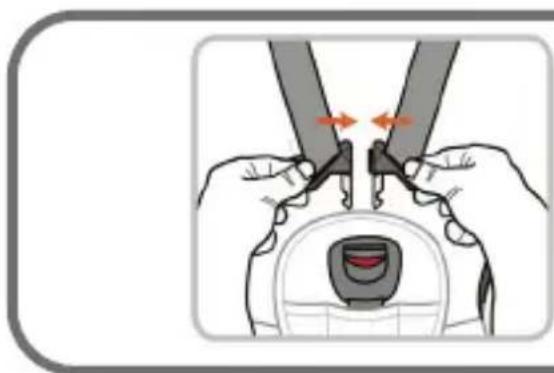
natural_image
Illustration of hands adjusting a belt buckle with arrows indicating motion (no text or symbols)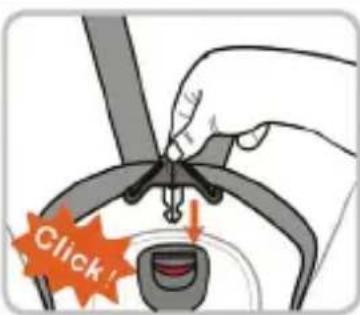
natural_image
Diagram of a mechanical component with no visible text or symbols9
natural_image
Mechanical component diagram showing a seatbelt with red directional arrow indicating movement (no text or symbols)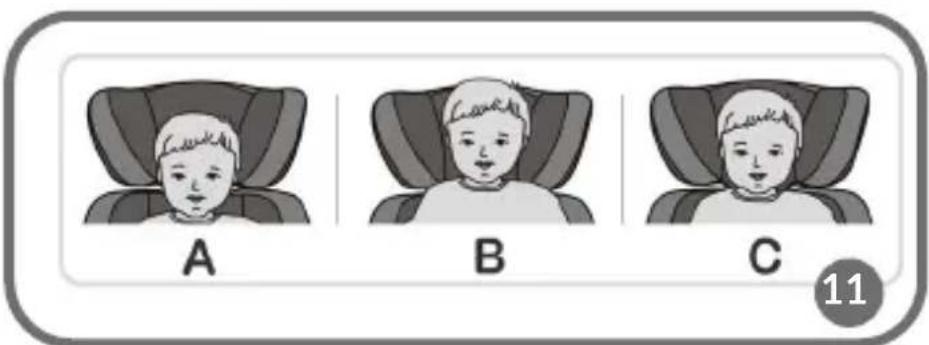
natural_image
Illustration of hands adjusting a seatbelt with orange motion arrows (no text or symbols)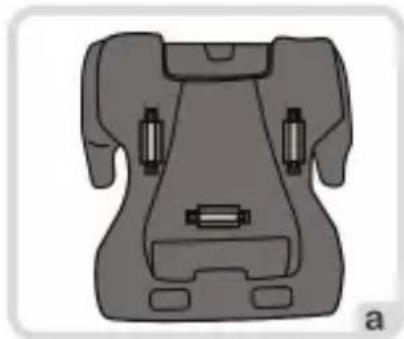
natural_image
Diagram of a vehicle seat or seat with no visible text, numbers, or symbols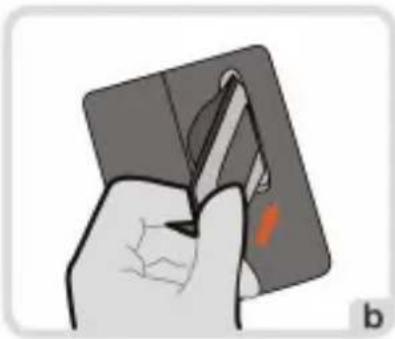
natural_image
Illustration of a hand holding a card with a pen inserted, no text or symbols present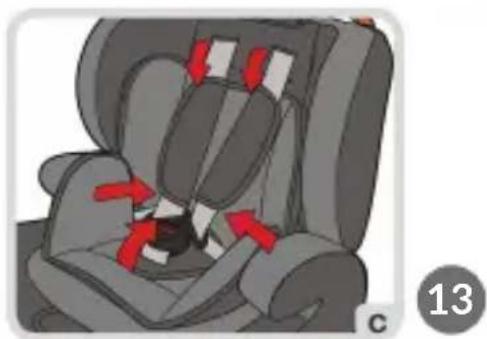
natural_image
Car seat with red arrows indicating seatbelting (no text or symbols)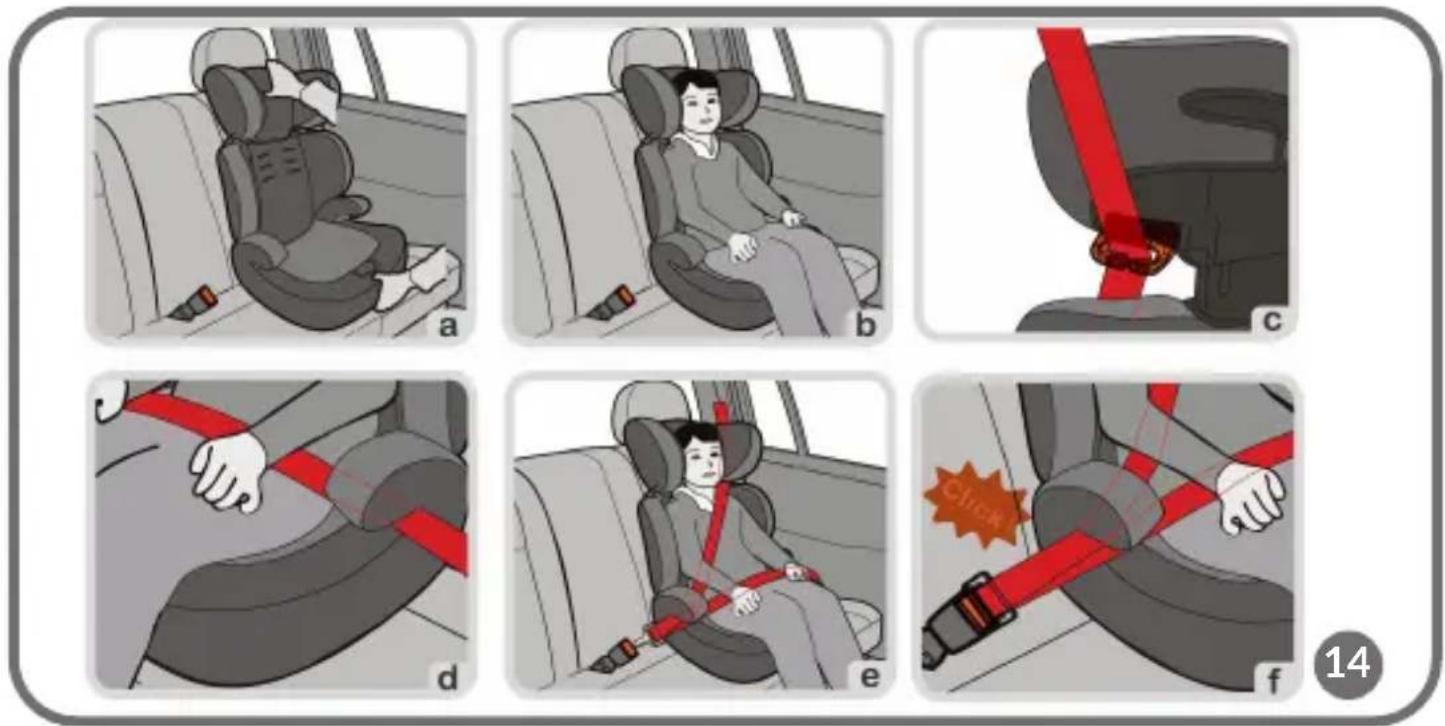
natural_image
Three-step illustration of car seatbelting process: seated, clamped, and locked (no text or symbols)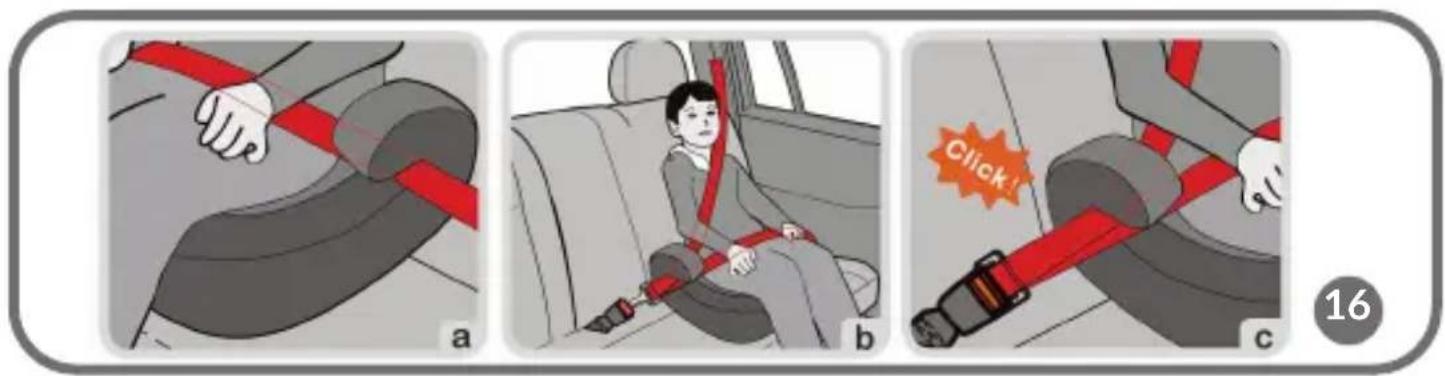
Information
The child restraint system has been categorized as „universal”. Approved in accordance with UN Regulation No. 44, series of amendments 04, for general vehicle use and suitable for mounting on most car seats.
A proper installation is possible if the vehicle manufacturer declared in the vehicle manual that the vehicle is adapted to installation of the child restraint system in “universal” category for this age group.
This child restraint system has been categorized as „universal” in more demanding conditions when compared to previous designs which were not supplied with this information.
Should you have any doubts, please consult the manufacturer or retailer of the product.
Suitable for installation only if type-approved vehicles are equipped with three-point seat belts fitted with a retractor that has been approved in accordance with UN Regulation No. 16 or other equivalent standards.
Dear customer!
Should you have any remarks or questions concerning the product, please do not hesitate to contact us: help@lionelo.com
Before you use the child safety seat for the first time, please read this manual carefully
Producer:
BrandLine Group Sp. z o. o.
Please read this manual before use and keep for future reference. The manual can help you assemble the child safety seat properly. A wrong assembly may pose a threat to the child's health. The manufacturer is not held responsible for potential hazards arising from wrong assembly of the product.
This child safety seat is intended for weight groups I, II and III, which means it can be used by children whose weight ranges from 9 to 36 kg.
Weight group I: 9-18 kg,
Weight group II: 15-25 kg,
Weight group III: 22-36 kg.
- Hard elements and plastic parts of the child restraint system must be placed and installed in a way that they do not get trapped by sliding seat or vehicle door under regulation conditions of use.
- All fixing belts which attach the device to the vehicle must be tight, child fixing belts must be adapted to the child's body and must not be twisted.
- Make sure the hip belts go low enough so that the pelvis is secured firmly.
- If the product has been subject to sudden loads during the accident, replace it.
- Do not alter the seat or install any additional elements without competent authorities' approval. To provide your child with top safety, the product must be mounted and used in accordance with guidelines in the manufacturer's manual.
- Plastic components of this child safety seat may heat up in the sunlight and cause the child's skin to burn.
- Protect the child safety seat against sunlight. Otherwise the product may be too hot for your child's skin.
- Never leave the child in the child restraint system unattended.
- Luggage and other items which may cause bodily injuries in case of accident should be secured properly.
- Do not use the product without upholstery. It is forbidden to replace the seat upholstery with other than recommended by the manufacturer because it is an integral part of the device and influences its functioning.
-
Keep the child safety seat manual when using the device. Store it in the car in which you have installed the product.
-
It is forbidden to use other points of contact than those specified in the manual and marked on the child restraint system.
- Should you have any doubts about position of the adult safety belt buckle in relation to main points of contact, consult the manufacturer of the child restraint system.
Safety in the car:
To provide top safety to yourself and your passengers during the travel, make sure:
- Folding elbow-rests are folded (vertical position).
- All items which may cause damage in the car in case of collision have been secured properly.
- All passengers have fastened their seat belts.
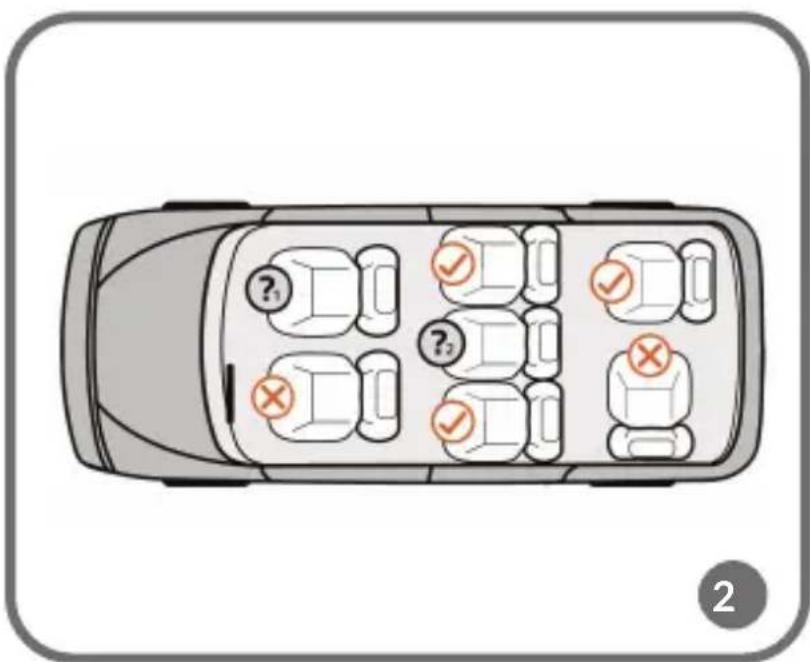
The child safety seat is intended for assembly solely on car seats installed in a forward-facing position. It is forbidden to assemble the product on seats/couches installed in a rear-facing position. These can be found in vans or minibuses.
Do not install the child safety seat on seats equipped with two-point safety belts! (see: fig. 1).
See: fig. 2

Installation in this place is possible

Installation in this place is forbidden

Installation in this place is allowed only if the airbag is inactive

Installation in this place is allowed only if the seat is equipped with threepoint safety belts
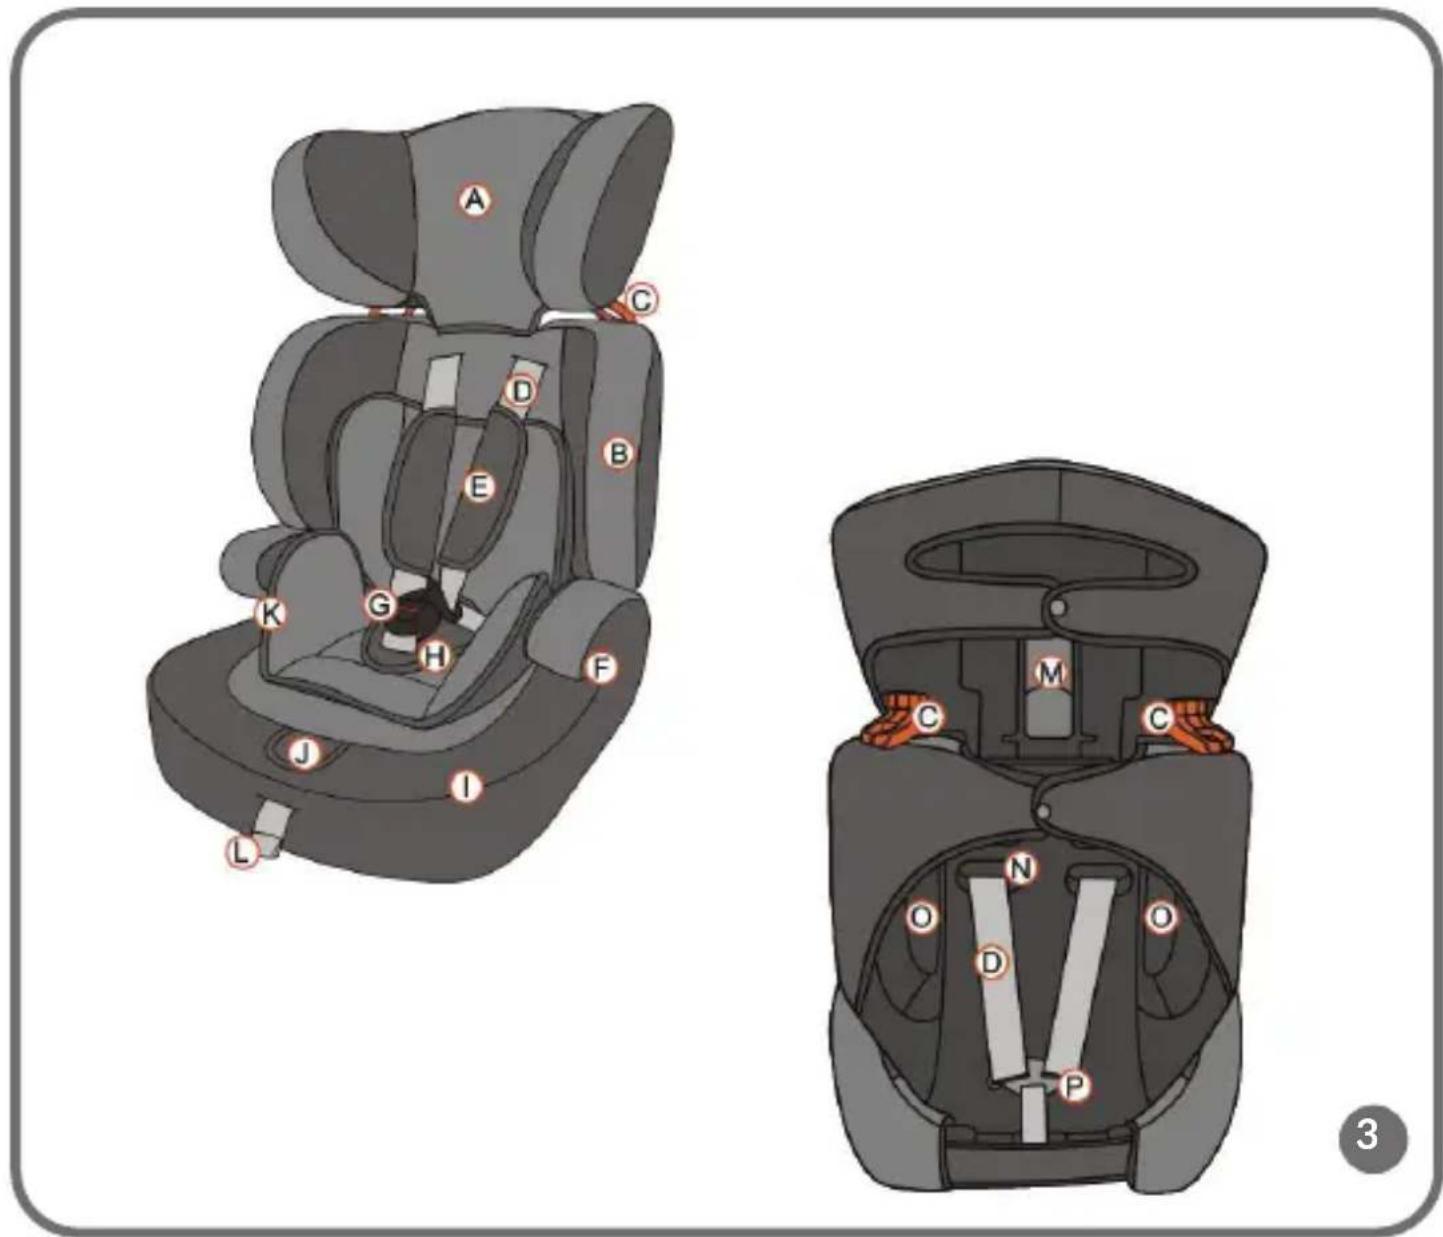
Description (fig. 3)
A. Headrest
B. Backrest
C. Shoulder belt guide
D. Safety belts of the product
E. Belt protective cushions
F. Hip belt guide
G. Buckle
H. Belt protective cushion
I. Child safety seat cover
J. Belt tension adjustment button
K. Seat liner
L. Belt tension adjustment
M. Headrest height adjustment
N. Product belt height adjustment holes
O. Car seat guide
P. Child safety seat belt connector
How to adjust the product
Child safety seat belts
A. Height of child safety seat belts
The children from group I (9-18 kg) must be secured with safety belts of the child safety seat. For other groups, these belts must be detached.
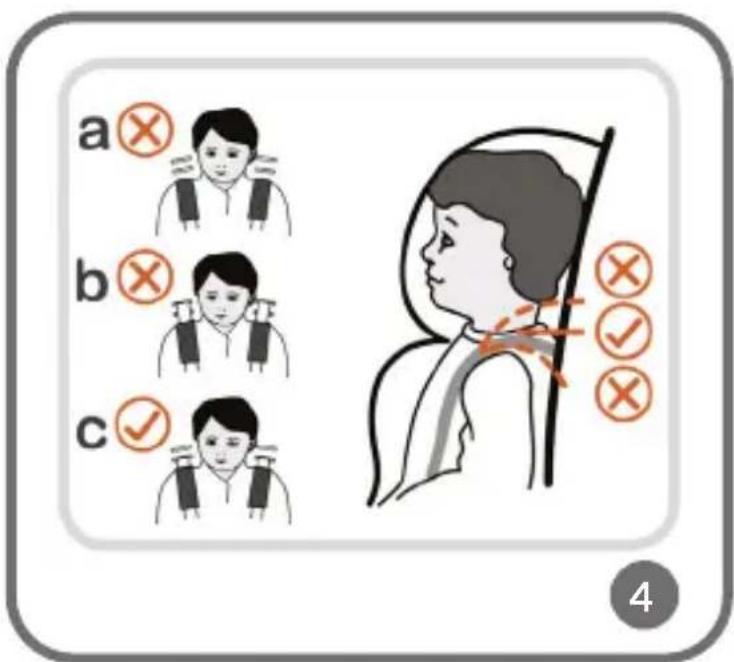
The height of the child safety seat belts must be adapted to the child's height: see fig. 4.
a - too low b - too high c - correct height
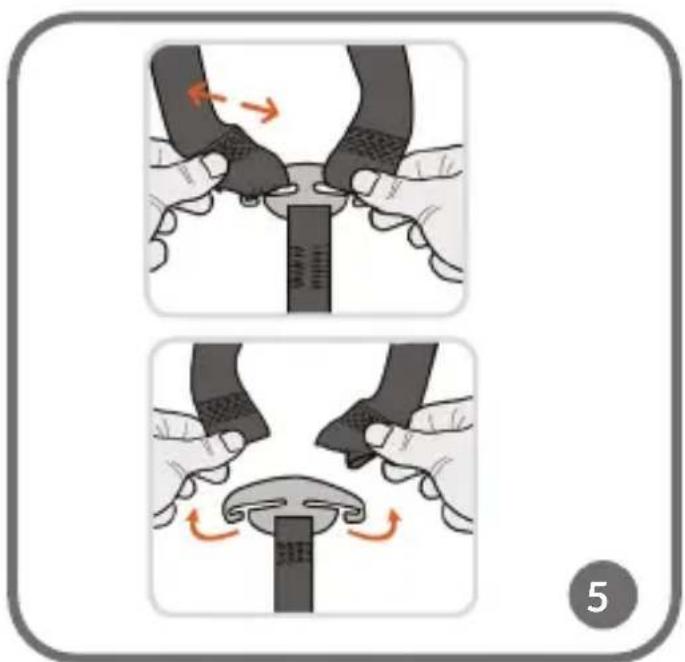
The height of the child safety seat belts can be set in three positions. To change height:
- Loosen the child safety seat belts (see below: How to adjust the belt tension).
- Remove the belts from the connector (P, fig. 5).
- Take the belts out through the hole in the backrest and through the child safety seat cover (N).
- Set the belts at the desired height by carrying them through one of three holes in the cover and backrest.
- Insert the belt ends into the connector (P).
- Make sure the belts have been inserted into the connector correctly and are not twisted.
B. How to adjust belts tension
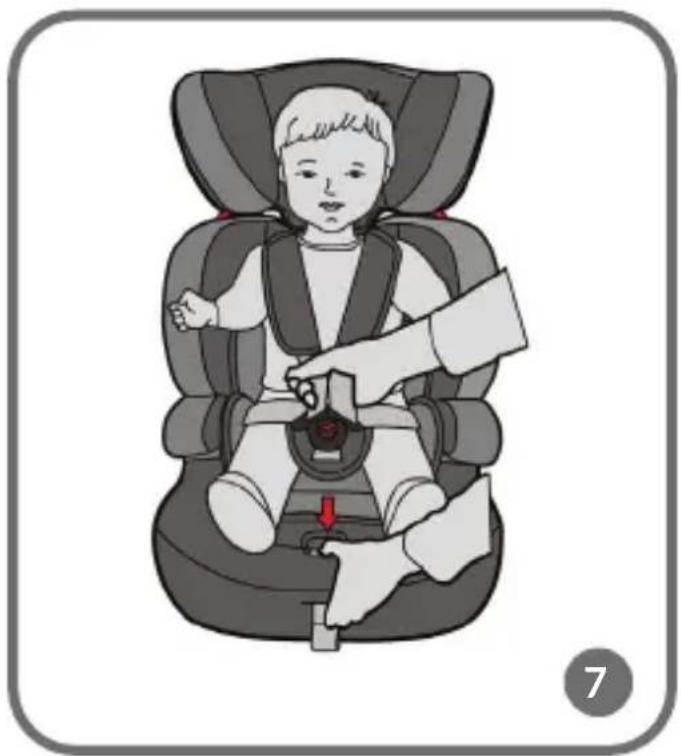
To loosen the child safety seat belts: press the adjustment button (J) and pull the shoulder belts (fig. 7).
To tighten the child safety seat belts up: pull the adjustment belt (L).
Note! Make sure the child safety seat belts fit tight the child's body and are not twisted. Make sure the hip belts go low and secure the child's pelvis. The belts must fit tight the child's body but must not be too tight and cause discomfort.
C. How to fasten and undo belts
Before you fasten the child safety seat belts, make sure the belts are at the proper height (see above: Height of the child safety seat belts).
- Place the child in the child safety seat.
- Pull child's arms through shoulder belts.
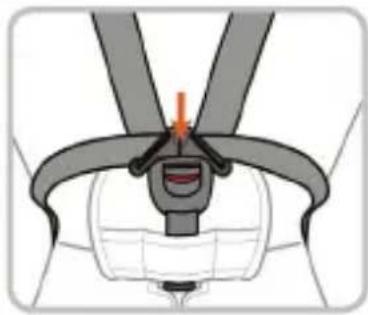
- Connect shoulder belts and insert their tips in the buckle (G). If you can hear a “click”, it means the belts have been fastened properly (fig. 9).
To undo the belts, press the red button on the buckle (G).
D. How to disassemble belts
The child safety seat belts must be disassembled if children from group II and III are the users.
- Loosen the child safety seat belts.
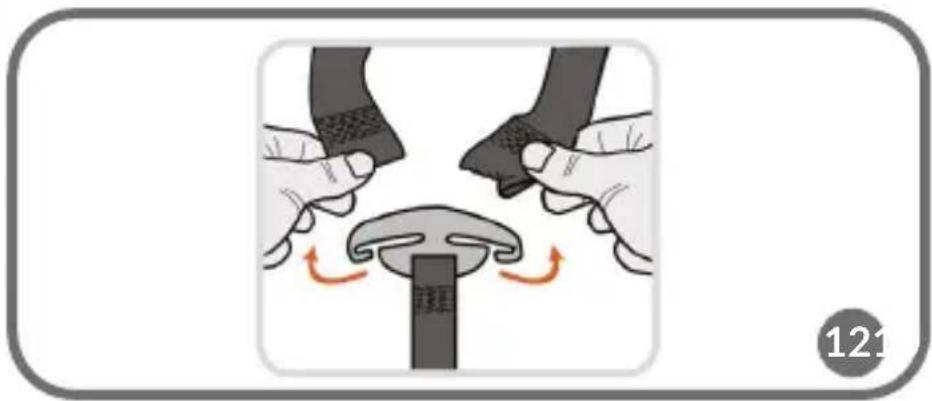
- Remove the belts from the connector (fig. 12).
- Put the child safety seat down. Pull three metal belt fasteners through holes in the body (fig. 13b).
- Pull the belts up to detach them (fig. 13c).
To assemble the belts, repeat the procedures in a reversed order.
Hide the child safety seat belts in a safe place.
Headrest
The height of the headrest must be adapted to the child's height (see: fig. 11).
A - Too high
B - Too low
C - OK
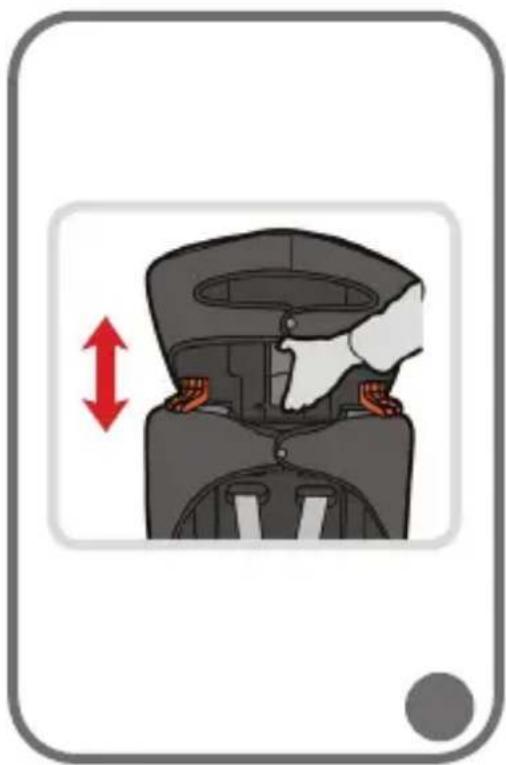
To change the height of the headrest, grab the adjustment lever (M) and then set the desired height. After you have finished, make sure the headrest has been secured in place properly, try to move it up and down.
Seat liner
If the child needs more space in the child safety seat, remove the seat liner.
How to assemble
| Group I Group II Group III | ||
| The child secured with child safety seat belts | Child secured with car safety belts | Child secured with car safety belts |
| Child safety seat with backrest | Child safety seat with backrest or without it (depending on child's height) | Child safety seat without backrest (base only) |
Group I
The child from this group must be secured with child safety seat belts.
- Place the child safety seat on the car seat (fig. 6a).
- Pull the buckle of the car safety seat through the guide (O) to the back of the seat, and then pull forward through the second guide (O) (see: fig. 6e, 6f).
- Make sure the shoulder belt does not go through the guide in the headrest (C) (fig. 6c, 6d).
- The pelvis belt must go under the elbow rest (fig. 6b).
- Fasten car safety belts (fig. 6g).
- Press the child safety seat against the car seat firmly.
- The car seat belts which hold the child safety seat must be tight. Pull the belts to tighten them up (figures 6h-6j).
- Place the child in the child safety seat (fig. 6k) and fasten 5-point safety belts (fig. 6l).
Should you have any doubts about this point, contact the product manufacturer.
Group II - assembly with seat backrest
The child from this group must not be secured with the child safety seat belts.
The child must be secured with 3-point car safety belts.
- Disassemble child safety seat belts (see: child safety seat belts – how to disassemble belts).
- Place the child safety seat on the car seat. Push it against the seat backrest as far as you can (fig. 14a).
- Put the child into the child safety seat (fig. 14b).
- Pull the car safety belt out. Carry:
a. the shoulder belt through the guide in the headrest (fig. 14c).
b. the pelvis belt under the elbow rest of the child safety seat (fig. 14d).
- Make sure the belts are not twisted (fig. 14e).
- Fasten the car safety belts (fig. 14f).
Groups II and III – assembly without child safety seat backrest
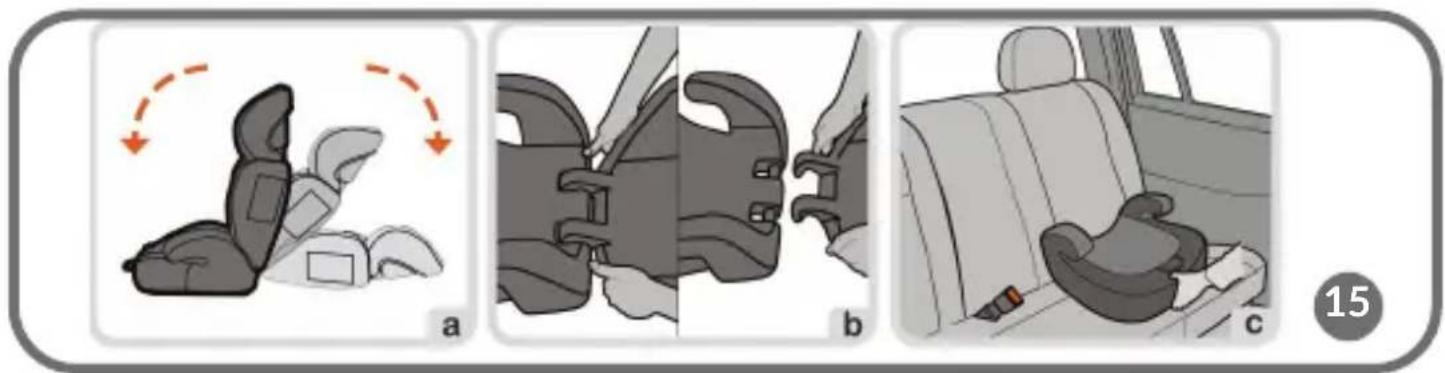
If the height of the child's head is above the headrest (at maximum height), it is necessary to disassemble the backrest of the child safety seat.
- Push the backrest of the child safety seat as presented in the fig. 15a.
- Detach the backrest of the child safety seat from the base (fig. 15b).
- Place the base on the car seat (fig. 15c).
- Put the child on the child safety seat base.
- Pull the car safety belt out. Carry it through elbow rests (fig. 16a and 16b).
- Fasten the car safety belts (fig. 16c).
How to maintain and clean
The cover can be cleaned in warm water with the use of soap or soft detergent. Do not dry the cover in the sunlight. The buckle, child safety seat belts and plastic elements must be washed with warm water. Do not use strong detergents. If you do not use the product, please store it in a dark and dry place, away from sunlight.
The pictures are for reference only. The real design of the products may differ from the pictures presented.
The product meets the requirements of the ECE R44.04 standard
Informacja
BrandLine Group Sp. z o.o.
BrandLine Group Sp. z o.o.
Detailed warranty conditions are available on the website:
Thank you for purchasing our product
- Information
- Dear customer!
- Producer:
- Safety in the car:
- Do not install the child safety seat on seats equipped with two-point safety belts! (see: fig. 1).
- See: fig. 2
- Description (fig. 3)
- How to adjust the product
- Child safety seat belts
- Headrest
- Seat liner
- Group I
- Group II - assembly with seat backrest
- Groups II and III – assembly without child safety seat backrest
- How to maintain and clean
- Informacja
Brand : Lionelo
Model : Levi One
Category : Car seat