MSACUS20 - Memory reader SONY - Free user manual and instructions
Find the device manual for free MSACUS20 SONY in PDF.
| Product Type | Memory Stick USB Reader/Writer |
| Brand | Sony |
| Model | MSAC-US20 |
| Dimensions (W x H x D) | Approx. 42 mm x 22.5 mm x 85.5 mm |
| Weight | Not specified (estimated approx. 50 g) |
| Power Supply | 5 V DC supplied by USB cable |
| Power Consumption | Max. 500 mA during operation |
| Interface | USB 2.0 Full Speed (USB 1.1 compatible) |
| Transfer Speed | Up to 12 Mbps |
| Supported Card Formats | Memory Stick, Memory Stick PRO, Memory Stick Duo (with adapter), MagicGate |
| Compatible Operating Systems | Windows 98 SE, Me, 2000 Pro, XP Home/Pro ; Mac OS 9.0-9.2.2, OS X v10.1-10.2.2 |
| Included Software | USB Driver, SonicStage Ver. 1.5, Memory Stick Formatter Ver. 2.1, PDF manual |
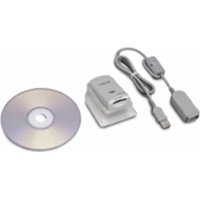
| Supplied Accessories | Reader/Writer, USB cable 1.0 m, USB cable 10 cm, CD-ROM for Windows (2 discs), paper manual |
| Operating Temperature | 0°C to 40°C |
| Mac Compatibility | Yes, without SonicStage software (data transfer only) |
| Main Functions | Reading, writing, formatting Memory Stick; music data transfer with SonicStage |
| Maintenance and Cleaning | Clean connectors with a dry cloth; avoid moisture |
| Safety | Do not disconnect the cable or remove the card when the access indicator is lit |
| Spare Parts / Repairability | USB cable, CD-ROM; visit Sony website for support |
| General Information | Designed for Memory Stick; requires prior driver installation |
Frequently Asked Questions - MSACUS20 SONY
User questions about MSACUS20 SONY
0 question about this device. Answer the ones you know or ask your own.
Ask a new question about this device
Download the instructions for your Memory reader in PDF format for free! Find your manual MSACUS20 - SONY and take your electronic device back in hand. On this page are published all the documents necessary for the use of your device. MSACUS20 by SONY.
USER MANUAL MSACUS20 SONY
Memory Stick USB Reader/Writer
Before operating the unit, please read this instructions thoroughly, and retain it for future reference.
Notice
If static electricity or electromagnetism causes data transfer to discontinue midway (fail), restart the application or disconnect and connect the USB cable again.
Program©2000-2002 Sony Corporation
Documentation©2002 Sony Corporation
- "Memory Stick," "OpenMG," "SonicStage," "MagicGate Memory Stick," "Memory Stick PRO," "Memory Stick Duo," "MagicGate" and "MagicGate" are trademarks of Sony Corporation.
- Microsoft and Windows are registered trademarks of Microsoft Corporation in the United States and/or other countries.
- MMX Pentium is registered trademark or trademark of Intel Corporation.
- Adobe, Acrobat, Acrobat Reader are registered trademarks or trademarks of Adobe Systems, Inc. in the United States and/or other countries.
• Macintosh and Mac OS are registered trademarks of Apple Computer, Inc. in the United States and/or other countries. - All other trademarks and registered trademarks or trademarks of their respective holders.
Furthermore “TM” and “®” are not mentioned in each case in this manual.
Table of contents
Before You Begin
About the operating instructions .... 3
Checking the supplied accessories 4
Parts identification 4
How to Use
Installing the software on your computer 5
Installing the "SonicStage" software on your computer 7
Connecting this unit to your computer 8
Disconnecting the unit from your computer 9
How to Use (When using Macintosh) 10
Other Information
Troubleshooting 11
System requirements 12
Specifications 14
▶Before You Begin
About the operating instructions
Using the Operating Instructions on the CD-ROM (When Using Windows)
The supplied CD-ROM contains more detailed Operating Instructions (PDF file).
For details on how to use this unit, see these Operating Instructions.
Acrobat Reader from Adobe Systems Incorporated is required to view PDF files.
For details on how to use Acrobat Reader, see the online Help manual for Adobe Acrobat Reader.
Checking the supplied accessories
• Memory Stick USB Reader/Writer (1)
• Special USB cable 1.0 m (1)
• Special USB cable 10 cm (1)
• CD-ROM for Windows
MSAC-US20 DISK1 [ENGLISH/FRENCH] (1)
MSAC-US20 DISK2 [GERMAN/ITALIAN] (1)
Note
Select the CD-ROM which contains the language you prefer, when installing "SonicStage".
* The CD-ROM contains the following software programs.
• Device Driver Software
- "SonicStage" Ver. 1.5
• Memory Stick Formatter Ver. 2.1
- Operating Instructions (PDF file)
The operating instructions (PDF file) in DISK1 and DISK2 are the same.
The data of Operating Instructions for this unit (PDF file) is MSAC-
US20Manual_ENG_CE.pdf
- Operating Instructions for this unit (1)
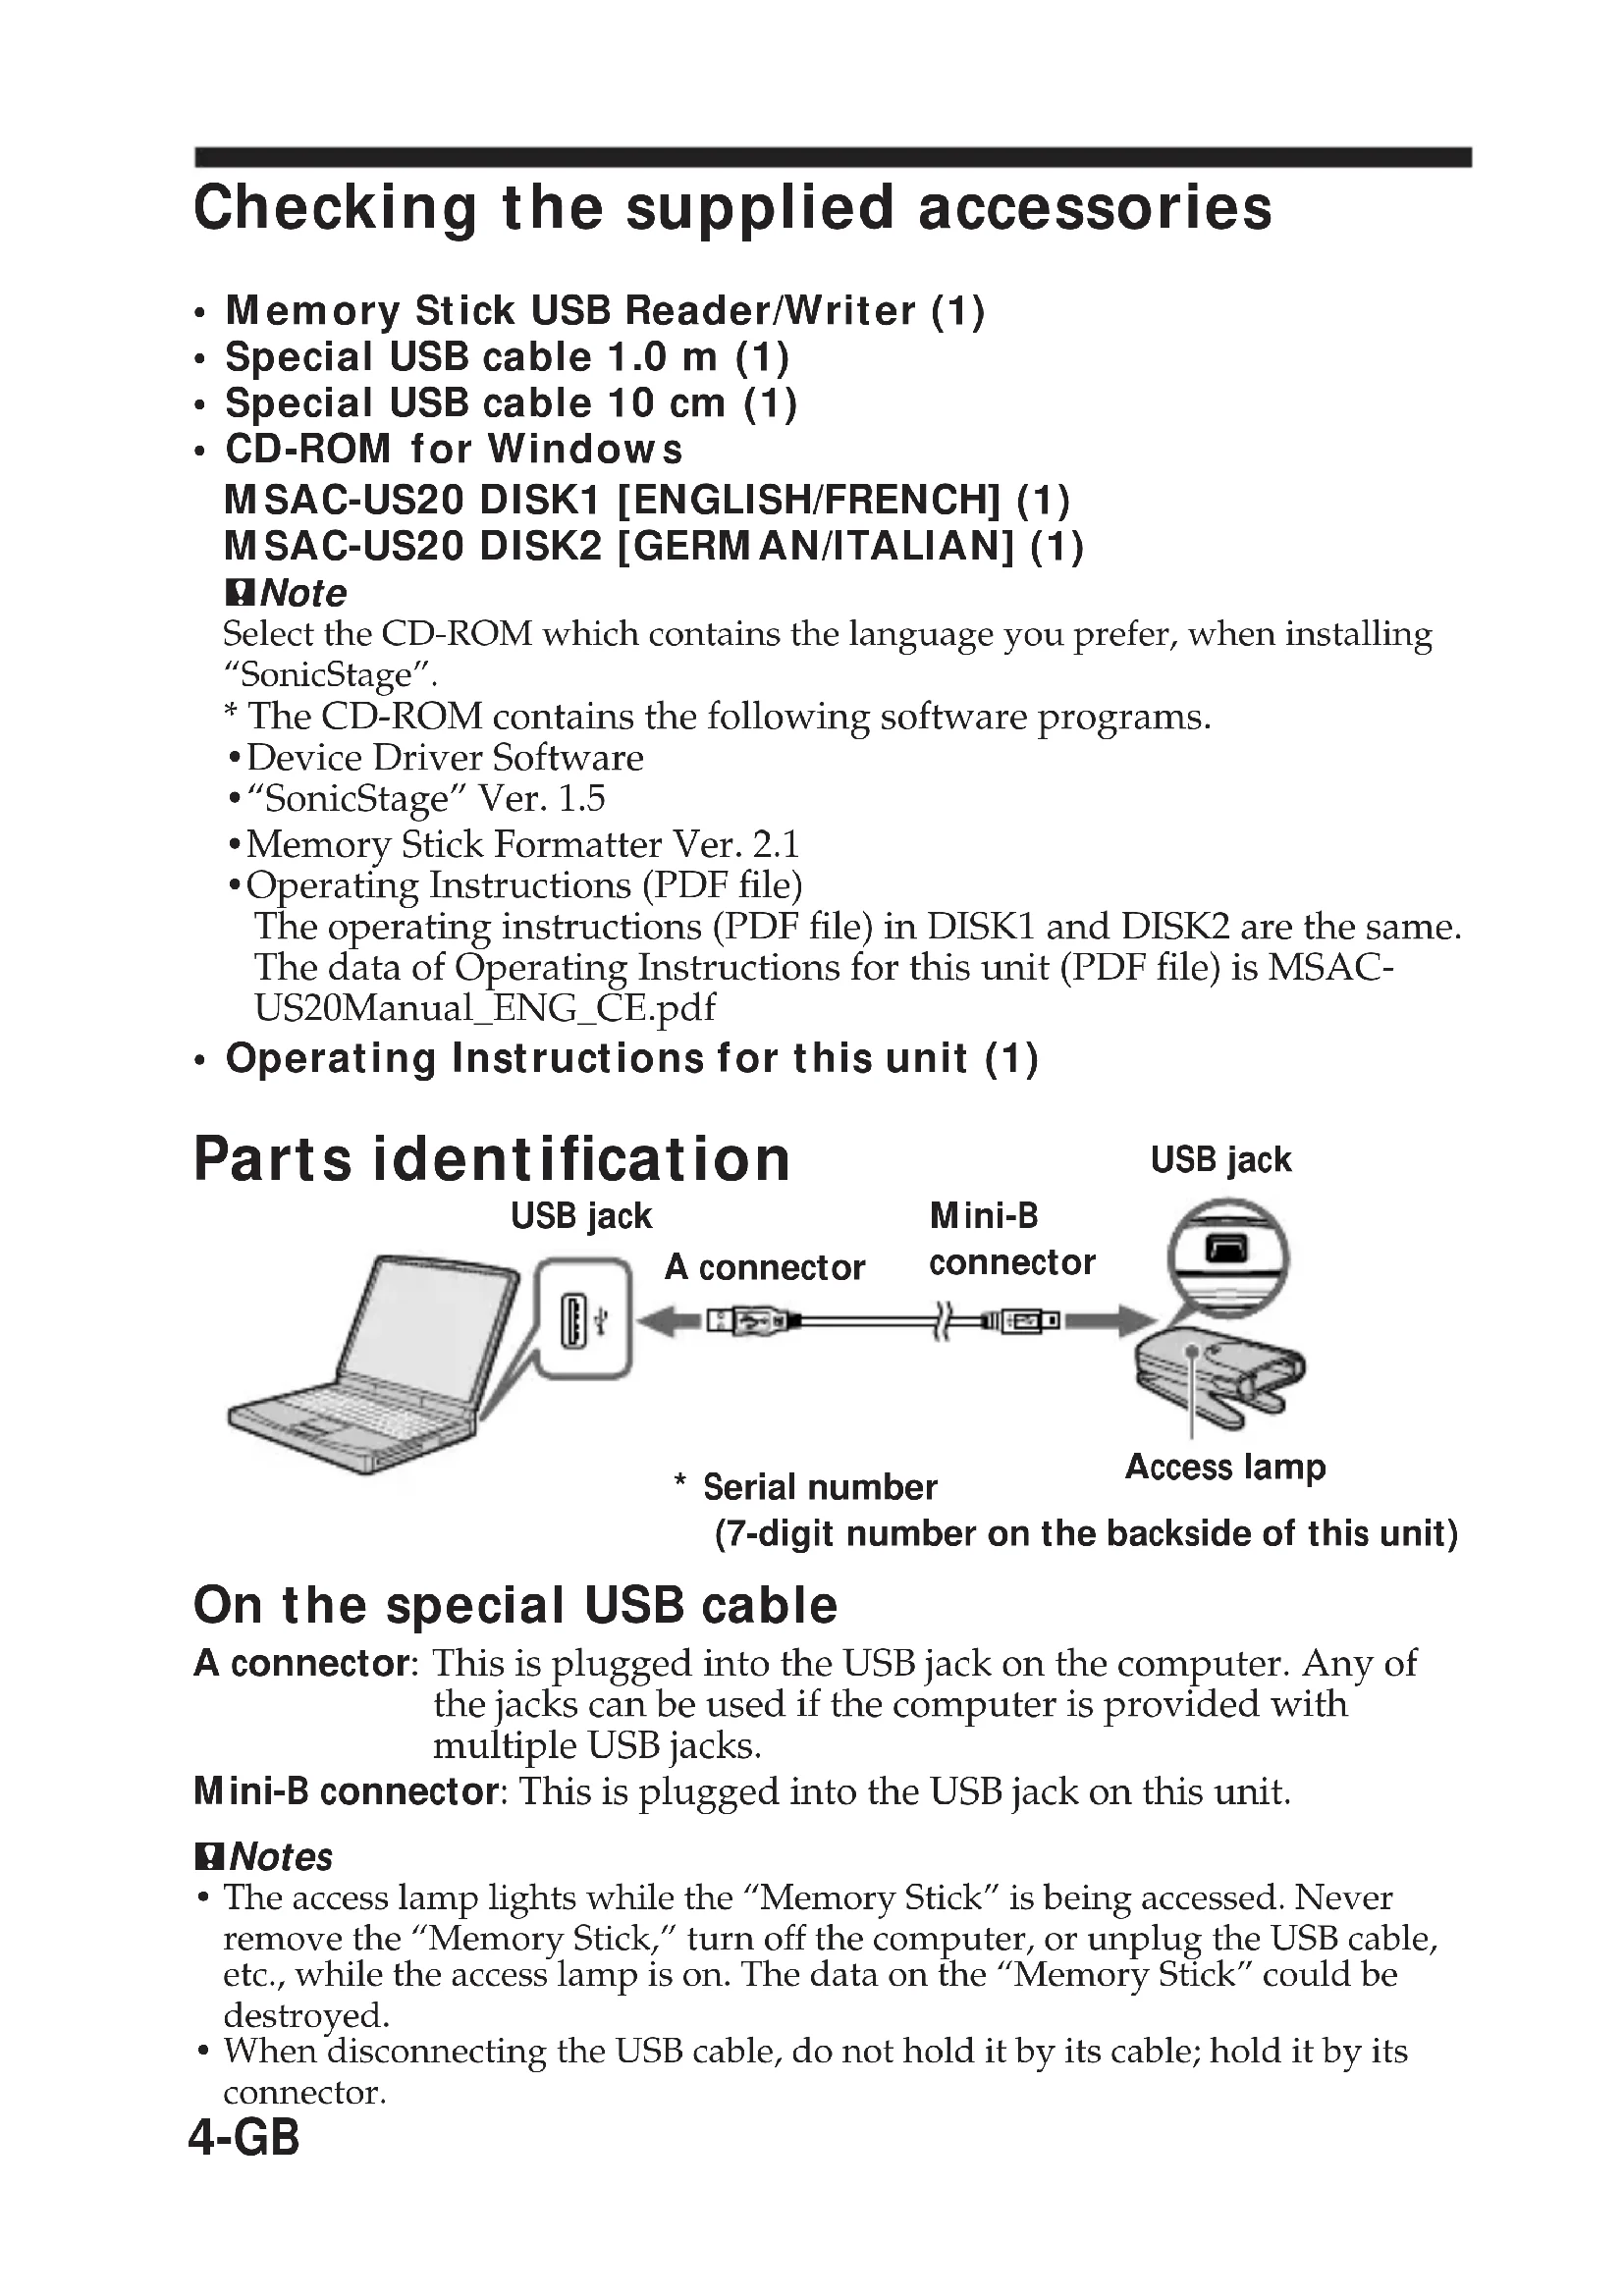
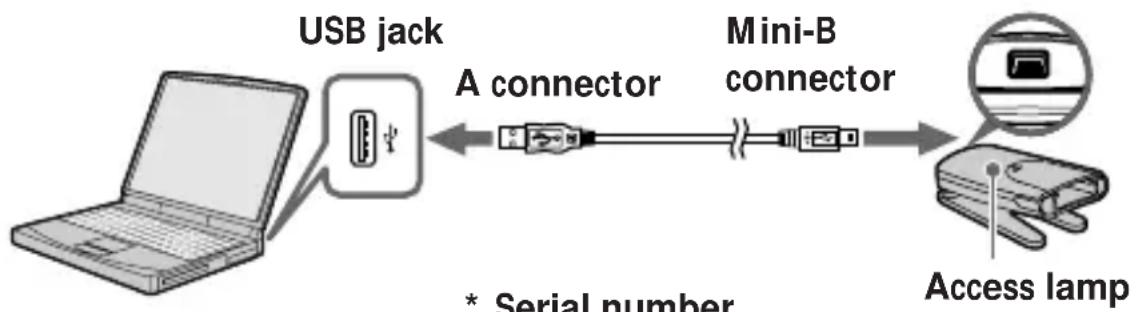
Parts identification
flowchart
graph LR
    A["USB jack"] -->|A connector| B["Mini-B connector"]
    B --> C["Access lamp"]
    style A fill:#f9f,stroke:#333
    style B fill:#ccf,stroke:#333
    style C fill:#cfc,stroke:#333
(7-digit number on the backside of this unit)
On the special USB cable
A connector: This is plugged into the USB jack on the computer. Any of the jacks can be used if the computer is provided with multiple USB jacks.
Mini-B connector: This is plugged into the USB jack on this unit.
Notes
- The access lamp lights while the “Memory Stick” is being accessed. Never remove the “Memory Stick,” turn off the computer, or unplug the USB cable, etc., while the access lamp is on. The data on the “Memory Stick” could be destroyed.
- When disconnecting the USB cable, do not hold it by its cable; hold it by its connector.
4-GB
Installing the software on your computer
Note
Be sure to install the supplied software before you connect this unit to your computer.
Do not perform the installation while this unit is connected to your computer. Restart your computer when installation is completed, and then connect this unit to your computer.
Installing the device driver on your computer
Note
Simultaneously with the installation of the device driver, the “Memory Stick Formatter” and the operating instructions (PDF file) are also installed on your computer.
1 Turn on your computer.
At this point, do not connect this unit to your computer.
Close all running applications.
To install the device driver when you are using Windows 2000 or XP, you must log on with Administrator rights.
2 Insert the supplied CD-ROM (MSAC-US20 DISK1 or MSAC-US20 DISK2) into the CD-ROM drive on your computer.
The Installer launcher starts up automatically.
To install a driver, click the [Driver] button in the menu.
3 Carefully read the License Agreement, and then click the [Agree] button.
When you click the [Agree] button, installation of the driver starts.
4 After this, install the driver and the "Memory Stick Formatter" as prompted on the screen.
To use “Memory Stick Formatter”, select [Start] – [Programs] – [Memory Stick Utility] – [Memory Stick Formatter].
Installing the software on your computer (continued)
5 Following this, installation of the operating instructions (PDF file) is performed automatically.
When installation of the operating instructions is completed, the application selection screen returns.
To end installation of the software at this point, click [Exit].
If you do so, "SonicStage" is not installed.
To view the operating instructions, select [Start] – [Programs] – [Sony Memory Stick Reader Writer] – [MSAC-US20 Instructions].
Note
Acrobat Reader from Adobe Systems Incorporated is required for viewing the operating instructions (PDF file).
Installing the “SonicStage” software on your computer
1 Do as follows to install "SonicStage".
Click the [SonicStage] button in the menu.
2 Carefully read the License Agreement, and then click the [Agree] button.
When you click the [Agree] button, installation of "SonicStage" starts.
3 After this, install "SonicStage" as prompted on the screen.
Restart your computer when installation is completed.
Notes
- Be sure to connect this unit to your computer after you restart the computer.
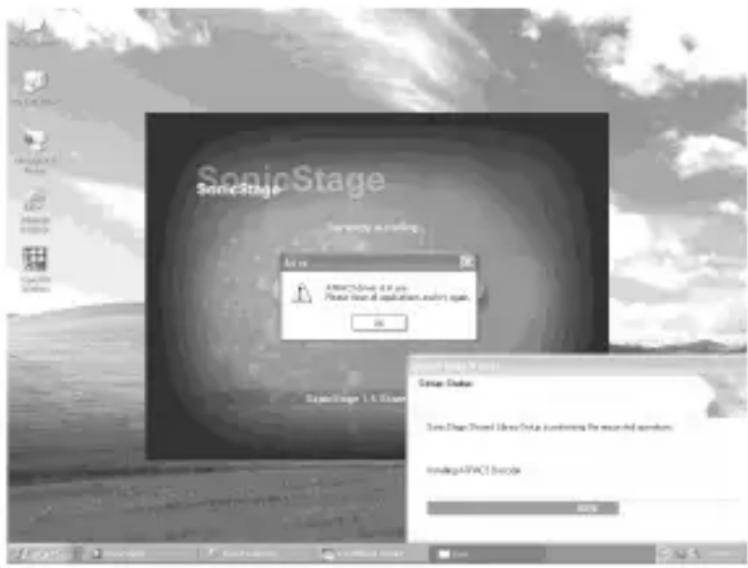
- Precautions for installing the "SonicStage" software Sometimes, the installation may stop.
If this occurs, move installation screen aside and see if a message box has appeared.
Click [Yes] to continue installation.
Connecting this unit to your computer
Note
Be sure to install the supplied software before you connect this unit to your computer. Restart your computer following installation.
1 Firmly insert the Mini-B connector of the USB cable into the USB jack on this unit as far as it will go.
2 Plug the A connector of the USB cable into a USB jack on your computer.
- The “Found New Hardware Wizard” starts up and installation of the driver begins. Depending on the OS, the driver installation may take place automatically.
- When using a computer with multiple USB jacks, do not connect other devices, with the exception of a standard mouse and keyboard, to USB jacks at the same time as this unit. When using a desktop computer, use a USB jack on the main unit of the computer.
3 Select "Install software automatically [Recommended]", and click [Next].
4 When you click [Finish], installation is completed.
You can now start using this unit.
Disconnecting the unit from your computer
- For customers using Windows Me/Windows 2000/Windows XP -
Perform the procedure described below before disconnecting the USB cable from the computer.
Customers using Windows 98SE do not need to perform this procedure.
1 Click the "Unplug or Eject Hardware" icon in the task tray in the lower right corner of the screen.
2 Click "Safely remove Sony Memory Stick USB Reader/Writer (MSAC-US20)-Drive (F:)".
* The drive letter “(F:)”, etc. differs with the computer used.
3 ["Sony Memory Stick USB Reader/Writer (MSAC-US20) can be safely removed."] is displayed.
In this condition, you can safely remove this unit from your computer.
Note
The indications may be different depending on the OS that you are using.
Notes
- When you just want to remove the "Memory Stick" from this unit, the procedure described above is not required.
- Do not remove the “Memory Stick” from this unit while the access lamp is blinking. Data on the “Memory Stick” could be corrupted.
- When you carry out this operation, this unit is not recognized by your computer. To make this unit recognize again, disconnect the USB cable from your computer and connect the USB cable to your computer again.
How to Use (When using Macintosh)
You can use the driver provided as a standard feature of the OS.
Operate as described in the following.
This unit can be used on your computer.
1 Turn on your computer.
2 Insert "Memory Stick" to this unit and connect the USB jack on this unit with a USB jack on the computer main unit using the special USB cable supplied.
See page 8 for how to connect this unit and your computer.
3 Driver installation starts automatically and the driver is installed on the computer.
4 When driver installation is completed, a Memory Stick icon appears on the desktop and this unit can now be used.
Note
Memory Stick icon is not displayed on the desktop when "Memory Stick" is not inserted to this unit.
Removing this unit from your computer or removing "Memory Stick" from this unit.
1 Close the software used by this unit.
2 Confirm that the access lamp is off.
3 Drag the Memory Stick icon to the Trash icon.
Alternatively, place the Memory Stick icon in the selected state and select “Eject” from the “Special” menu in the upper left of the screen.
4 Remove this unit from your computer or remove "Memory Stick" from this unit.
Notes
- Do not remove the "Memory Stick" from this unit while the access lamp is blinking. Data on the "Memory Stick" could be corrupted.
- Removing this unit or the “Memory Stick” in this unit without performing the operations above may cause damage to the “Memory Stick.” Sony will not be liable for any damage caused as a result of not following the instructions above.
10-GB
Troubleshooting
| Symptom | Cause/Solution |
| The Memory Stick icon (Removable disk) is not displayed. | Not connected correctly.→Connect correctly. (Page 8)In addition to this unit, another device is connected to the USB jack on the computer.→Disconnect other USB devices than this unit. Also turn off the power and reboot.The driver is not installed.→Install the driver from the supplied CD-ROM. (Page 5) |
| The “Memory Stick” cannot be accessed from Explorer or My Computer. | No “Memory Stick” inserted.→Insert a “Memory Stick.” |
| The access lamp blinks when a “Memory Stick” is inserted. | Foreign matter adhering to the connector section of the “Memory Stick.”→Check whether dust or dirt is adhering to the connector section of the “Memory Stick.”Remove any foreign matter and insert the “Memory Stick” again. |
| Music data can no longer be used on the computer | The System Restore function found in Windows Me and Windows XP have been executed.→When you have backup data, restore the backup data to the computer. For how to use the backup tool, see the online Help manual for “SonicStage.” |
System requirements
Recommended Windows environment
- OS: Microsoft Windows 98 Second Edition (Windows 98SE)/Windows Millennium Edition (Windows Me)/Windows 2000 Professional (Windows 2000)/Windows XP Home Edition/XP Professional (Windows XP)
* The operating systems mentioned above must be installed on the computer when shipped from the factory.
* Operation is not guaranteed for upgraded operating systems even if they are among those mentioned above.
- CPU: MMX Pentium II 400 MHz or faster processor (Pentium III 450 MHz or faster processor recommended)
• RAM: 64 MB or more
• Available hard disk space: 100 MB or more
(More disk space may be required depending on the version of Windows you are using. Further space is also required for handling music data.)
- CD-ROM drive
- Sound board
- USB jack as standard equipment
(This unit supports USB 2.0 Full Speed (standard USB 1.1).)
- Display: High Color (16-bit) or higher, 800 · 480 pixels or more (800 · 600 pixels or more recommended.)
Recommended Macintosh environment
- OS: Mac OS 9.0\~9.2.2/X (v10.1\~10.2.2)
* The operating systems mentioned above must be installed on the computer when shipped from the factory.
* Operation is not guaranteed for upgraded operating systems even if they are among those mentioned above.
• RAM: 64 MB or more
- Hard disk: 50 MB or more available hard-disk space
- USB jack as standard equipment
(This unit supports USB 2.0 Full Speed (standard USB1.1).)
Notes
- Operation is not guaranteed for all computers even if they comply with the recommended environments.
- "SonicStage" does not support Macintosh. If you are using a Macintosh computer, it is not possible to transfer music data that requires copyright protection.
12-GB
Note
To safeguard copyrights, optical digital output from equipment equipped with optical digital output may be restricted during playback using the supplied software.
When using Windows 2000/Windows XP
The following restrictions apply when “SonicStage” is running under Windows 2000/Windows XP.
- Installation should take place after you log on as Administrator.
For how to log on using the Administrator account, see the manual provided with your computer. - When using the software, log on as an Administrator or as a Power User.
- Do not insert or remove a CD-ROM drive while “SonicStage” is running. Your important data may get lost.
- Only the Professional edition of Windows 2000 can be used.
- NTFS format can only be used when standard-installed (installed when shipped from the factory).
When using this unit on a computer with Service Pack 3 of Windows 2000 installed
Performing the following operations may cause the unit to not be recognized by your computer when using this unit on a computer with Service Pack 3 of Windows 2000 installed:
- Starting Windows with your computer on or rebooting while the products in question are connected to your computer's USB port.
- Unplugging and plugging in the USB cable that is connecting the unit and your computer after starting Windows.
→The products in question will cease to be recognized by your computer.
If the USB cable is not unplugged, these issues will not occur.
To avoid these issues
When starting Windows with your computer on or when rebooting Windows, remove the USB cable that is connecting the products in question and your computer.
Specifications
Memory Stick USB Reader/Writer
Interface: USB interface
Baud rate: Max. 12 Mbps
General
Operating voltage DC 5V (supplied via USB cable)
Power consumption Max. 500 mA (during operation)
Max. 2.5 mA (PC suspend time)
External dimensions Approx. 42 mm · 22.5 mm · 85.5 mm (1 11/16 ·
29/32 · 3 3/8 in.) (Width · Height · Depth)
Mass Approx. 40g (not including "Memory Stick")
Operating conditions Temperature 0^ C to 40^ C ( 32^ F to 104^ F)
(condensation not allowed)
Humidity 20% to 80% (condensation not allowed)
Design and specifications are subject to change without notice.
If you have any questions/comments related to this product, please visit our Customer Support website at
http://www.sony.net/memorystick/supporte
If you have any questions/comments related to "OpenMG", please visit the website at
http://www.openmg.com/
Français
Poids Approx. 40 g (sans "Memory Stick")
3 Appare ["Sony Memory Stick USB Reader/Writer (MSAC-US20) can be safely removed."]
(Programmer)] – [Sony Memory Stick Reader Writer] – [MSAC-US20 Instructions].
Bemærk
3 ["Sony Memory Stick USB Reader/Writer (MSAC-US20) can be safely removed."] vises.
Strømforbrug Maks. 500 mA (under operation)
Maks. 2,5 mA (PC dvale)
Ydre mål
Cirka 42 mm · 22,5 mm · 85,5 mm
將本機與您的電腦相連
註
[Start] - [Programs] - [Sony Memory Reader Writer] - [MSAC-US20 Instruction
![]
( PDF ) Adobe Systems Incorporated Reader 가
“Sonic Stage”
1 “Sonic Stage” [Sonic Stage]
2 [Agree] [Agree] [Agree]. "SonicStage"
3 “Sonic Stage”
![]
1 “Unplug or Eject Hardware
2 “Safely remove Sony Memory Stick US (MSAC-US20)-Drive (F:)” □ □□□□.
* □□□□ □□ “(F:)” □□ □□□□ □□□□ □□ □□□□.
3 [ "Sony Memory Stick USB Reader / Write can be safely removed." ] 가 □□□□□.
![]
OS
![]
• “Memory Stick”
• “Memory Stick” “Memory Stick” “Memory Stick”
• USB USB
□□ □□( Macintosh □□□)
OS
Windows 2000 / Windows XP ☐ ☐ ☐ ☐
Windows 2000 / Windows XP “SonicStage”
- Administrator
Administrators □□□□ □□□ □□ □□□ □□□ □□ □□□ □□□ □□□ □□□ □□□ □□□ □□□ □□□ □□□ □□□ □□□ □□□ □□□ □□□ □□□ □□□ □□□ □□□ □□□ □□□ □□□ □□□ □□□ □□□ □□□ □ - Admin i str at or Power User □ □□□ □ □□□.
- “Sonic Stage” CD-ROM CD-ROM CD-ROM CD-ROM CD-ROM CD-ROM CD-ROM CD-ROM CD-ROM CD-ROM CD-ROM CD-ROM CD-ROM CD-ROM CD-ROM CD-ROM CD-ROM CD-ROM CD-ROM CD-ROM CD-ROM CD-ROM CD-ROM CD-ROM CD-ROM CD-ROM CD-ROM CD-ROM CD-ROM CD-ROM CD-ROM CD-ROM CD-ROM CD-ROM CD-ROM CD-ROM CD-ROM CD-ROM CD-ROM CD-ROM CD-ROM CD-ROM CD-ROM CD-ROM CD-ROM CD-ROM CD-ROM CD-ROM CD-ROM CD-ROM CD-ROM CD-ROM CD-ROM CD-ROM CD-ROM CD-ROM CD-ROM CD-ROM CD-ROM CD-ROM CD-ROM CD-ROM CD-ROM CD-ROM CD-ROM CD-ROM CD-ROM CD-ROM CD-ROM CD-ROM CD-ROM CD-ROM CD-ROM CD-ROM CD-ROM CD-ROM CD-ROM CD-ROM CD-ROM CD-ROM CD-ROM CD-ROM CD-ROM CD-ROM CD-ROM CD-ROM CD-ROM CD-ROM CD-ROM CD-ROM CD-ROM CD-ROM CD-ROM CD-ROM CD-ROM CD-ROM CD-ROM CD-ROM CD-ROM CD-ROM CD-DOMCDOMCDOMCDOMCDOMCDOMCDOMCDOMCDOMCDOMCDOMCDOMCDOMCDOMCDOMCDOMCDOMCDOMCDOMCDOMCDOMCDOMCDOMCDOMCDOMCDOMCDOMCDOMCDOMCDOMCDOMCDOMCDOMCDOMCDOMCDOMCDOMCDOMCDOMCDOMCDOMCDOMCDOMCDOMCDOMCDOMCDOMCDOMCDOMCDOMCDOMCDDMDCDMDMDCDMDMDCDMDMDCDMDMDCDMDMDCDMDMDCDMDMDCDMDMDCDMDMDCDMDMDCDMDMDCDMDMDCDMDMDCDMDMDCDMDMDCDMDMDCDMDMDCDMDMDCDMDMDCDMDMDCDMDMDCDMDMDCDMDMDCDMDMDCDMDMDCDMSDDMSDDMSDDMSDDMSDDMSDDMSDDMSDDMSDDMSDDMSDDMSDDMSDDMSDDMSDDMSDDMSDDMSDDMSDDMSDDMSDDMSDDMSDDMSDDMSDDMSDDMSDDMSDDMSDDMSDDMSDDMSDDMSDDMSDDMSDDMSDDMSDDMSDDMSDDMSDDMSDDMSDDMSDDMSDDMSDDMSDDMSDDMSDDMSDDMSDDMSDSMMDSMMDSMMDSMMDSMMDSMMDSMMDSMMDSMMDSMMDSMMDSMMDSMMDSMMDSMMDSMMDSMMDSMMDSMMDSMMDSMMDSMMDSMMDSMMDSMMDSMMDSMMDSMMDSMMDSMMDSMMDSMMDSMMDSMMDSMMDSMMDSMMDSMMDSMMDSMMDSMMDSMMDSMMDSMMDSMMDSMMDSMMDSMMDSMMDSMMDSMDSMMDSMMDSMMDSMMDSMMDSMMDSMMDSMMDSMMDSMMDSMMDSMMDSMMDSMMDSMMDSMMDSMMDSMMDSMMDSMMDSMMDSMMDSMMDSMMDSMMDSMMDSMMDSMMDSMMDSMMDSMMDSMMDSMMDSMMDSMMDSMMDSMMDSMMDSMMDSMMDSMMDSMMDSMMDSMMDSMMDSMMDSMMDSMMDSMMDSmm DSmm DSmm DSmm DSmm DSmm DSmm DSmm DSmm DSmm DSmm DSmm DSmm DSmm DSmm DSmm DSmm DSmm DSmm DSmm DSmm DSmm DSmm DSmm DSmm DSmm DSmm DSmm DSmm DSmm DSmm DSmm DSmm DSmm DSmm DSmm DSmm DSmm DSmm DSmm DSmm DSmm DSmm DSmm DSmm DSmm DSmm DSmm DSmm DSmm DSmm DSSDSSDSSDSSDSSDSSDSSDSSDSSDSSDSSDSSDSSDSSDSSDSSDSSDSSDSSDSSDSSDSSDSSDSSDSSDSSDSSDSSDSSDSSDSSDSSDSSDSSDSSDSSDSSDSSDSSDSSDSSDSSDSSDSSDSSDSSDSSDSSDSSDSSDSSDTSSDTSSDTSSDTSSDTSSDTSSDTSSDTSSDTSSDTSSDTSSDTSSDTSSDTSSDTSSDTSSDTSSDTSSDTSSDTSSDTSSDTSSDTSSDTSSDTSSDTSSDTSSDTSSDTSSDTSSDTSSDTSSDTSSDTSSDTSSDTSSDTSSDTSSDTSSDTSSDTSSDTSSDTSSDTSSDTSSDTSSDTSSDTSSDTSSDTSSTTTTSMTTSMTTSMTTSMTTSMTTSMTTSMTTSMTTSMTTSMTTSMTTSMTTSMTTSMTTSMTTSMTTSMTTSMTTSMTTSMTTSMTTSMTTSMTTSMTTSMTTSMTTSMTTSMTTSMTTSMTTSMTTSMTTSMTTSMTTSMTTSMTTSMTTSMTTSMTTSMTTSMTTSMTTSMTTSMTTSMTTSMTTSMTTSMTTSMTTSMTTSHTSMTTSMTTSMTTSMTTSMTTSMTTSMTTSMTTSMTTSMTTSMTTSMTTSMTTSMTTSMTTSMTTSMTTSMTTSMTTSMTTSMTTSMTTSMTTSMTTSMTTSMTTSMTTSMTTSMTTSMTTSMTTSMTTSMTTSMTTSMTTSMTTSMTTSMTTSMTTSMTTSMTTSMTTSMTTSMTTSMTTSMTTSMTTSMTTSMTTSMTTSMTTSMTTSMTTSMTTSMTTSMTTSMTTSMTTSMTTSMTTSMTTSMTTSMTTSMTTSMTTSMTTSMTTSMTTSMTTSMTTSMTTSMTTSMTTSMTTSMTTSMTTSMTTSMTTSMTTSMTTSMTTSMTTSMTTSMTTSMTTSMTTSMTTSMTTSMTTSMTTSM TSMTSMTSMTSMTSMTSMTSMTSMTSMTSMTSMTSMTSMTSMTSMTSMTSMTSMTSMTSMTSMTSMTSMTSMTSMTSMTSMTSMTSMTSMTSMTSMTSMTSMTSMTSMTSMTSMTSMTSMTSMTSMTSMTSMTSMTSMTSMTSMTSMTSMTSM
- "Sonic Stage" - - - - - - - - - - - - - - - - - - - - - - - - - - - - - - - - - - - - - - - - - - - - - - - - - - - - - - - - - - - - - - - - - - - - - - - - - - - - - - - - - - - - - - - - - - - - - - - - - - - - - "Sonic Stage" : 10000000000000000000000000000000000000000000000000000000000000000000000000000000000000000000000000000
- "Sonic Stage" : 1250000125125125125125125125125125125125125125125125125125125125125125125125125125125125125125125125125125125
- "Sonic Stage" : 13750013787777777777777777777777777777777777777777777777777777777777777777777777777777777777
- "Sonic Stage" : 143333333333333333333333333333333333333333333333333333333333333333333333333333333333333333333333
- "Sonic Stage" : 14999999999999999999999999999999999999999999999999999999999999999999999999999999999999999999999
- Windows 2000 Professional
- NTFS 000 00 00( 0000 00) 0 000 000 0 000.
Windows 2000 Service Pack 3
Windows 2000 Service Pack 3
-
Windows □ □□□□ □□□□ □ □□□ □□□ USB □□□ □ □□□ □ □ □ □□□ □□ □ □□□ □□.
-
Windows □ □□□ □ □ □□ □ □□□ □□□□ USB □□□□ □□□ □ □ □□. →□□□□ □ □□□ □□□□ □ □□□.
Sony Corporation Printed in Japan
Printed on recycled paper
http://www.sony.net/
Printed on recycled paper
Sony Corporation Printed in Japan
USB طراز Memory Stick قارى/CAST SHIRATI THAI KARTE
- trades thinking in the Windows window.
- Reader Writer] - [MSAC-US20 Instructions]
!ملاحظة
MSAC-US20Manual_ARA.pdf.
"MagicGate Memory Stick" و "SonicStage" و "OpenMG" و "Memory Stick" •
“MagicGate” “Memory Stick Duo” “Memory Stick PRO”
.Sony Corporation لشركة