MSACUS2 - Memory reader SONY - Free user manual and instructions
Find the device manual for free MSACUS2 SONY in PDF.
User questions about MSACUS2 SONY
0 question about this device. Answer the ones you know or ask your own.
Ask a new question about this device
Download the instructions for your Memory reader in PDF format for free! Find your manual MSACUS2 - SONY and take your electronic device back in hand. On this page are published all the documents necessary for the use of your device. MSACUS2 by SONY.
USER MANUAL MSACUS2 SONY
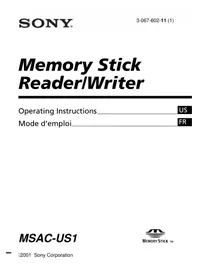
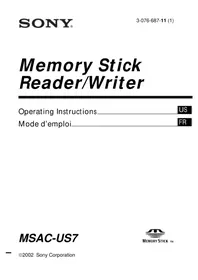
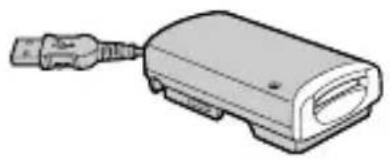
Memory Stick Reader/Writer
Before operating the unit, please read this instructions thoroughly, and retain it for future reference.


N50
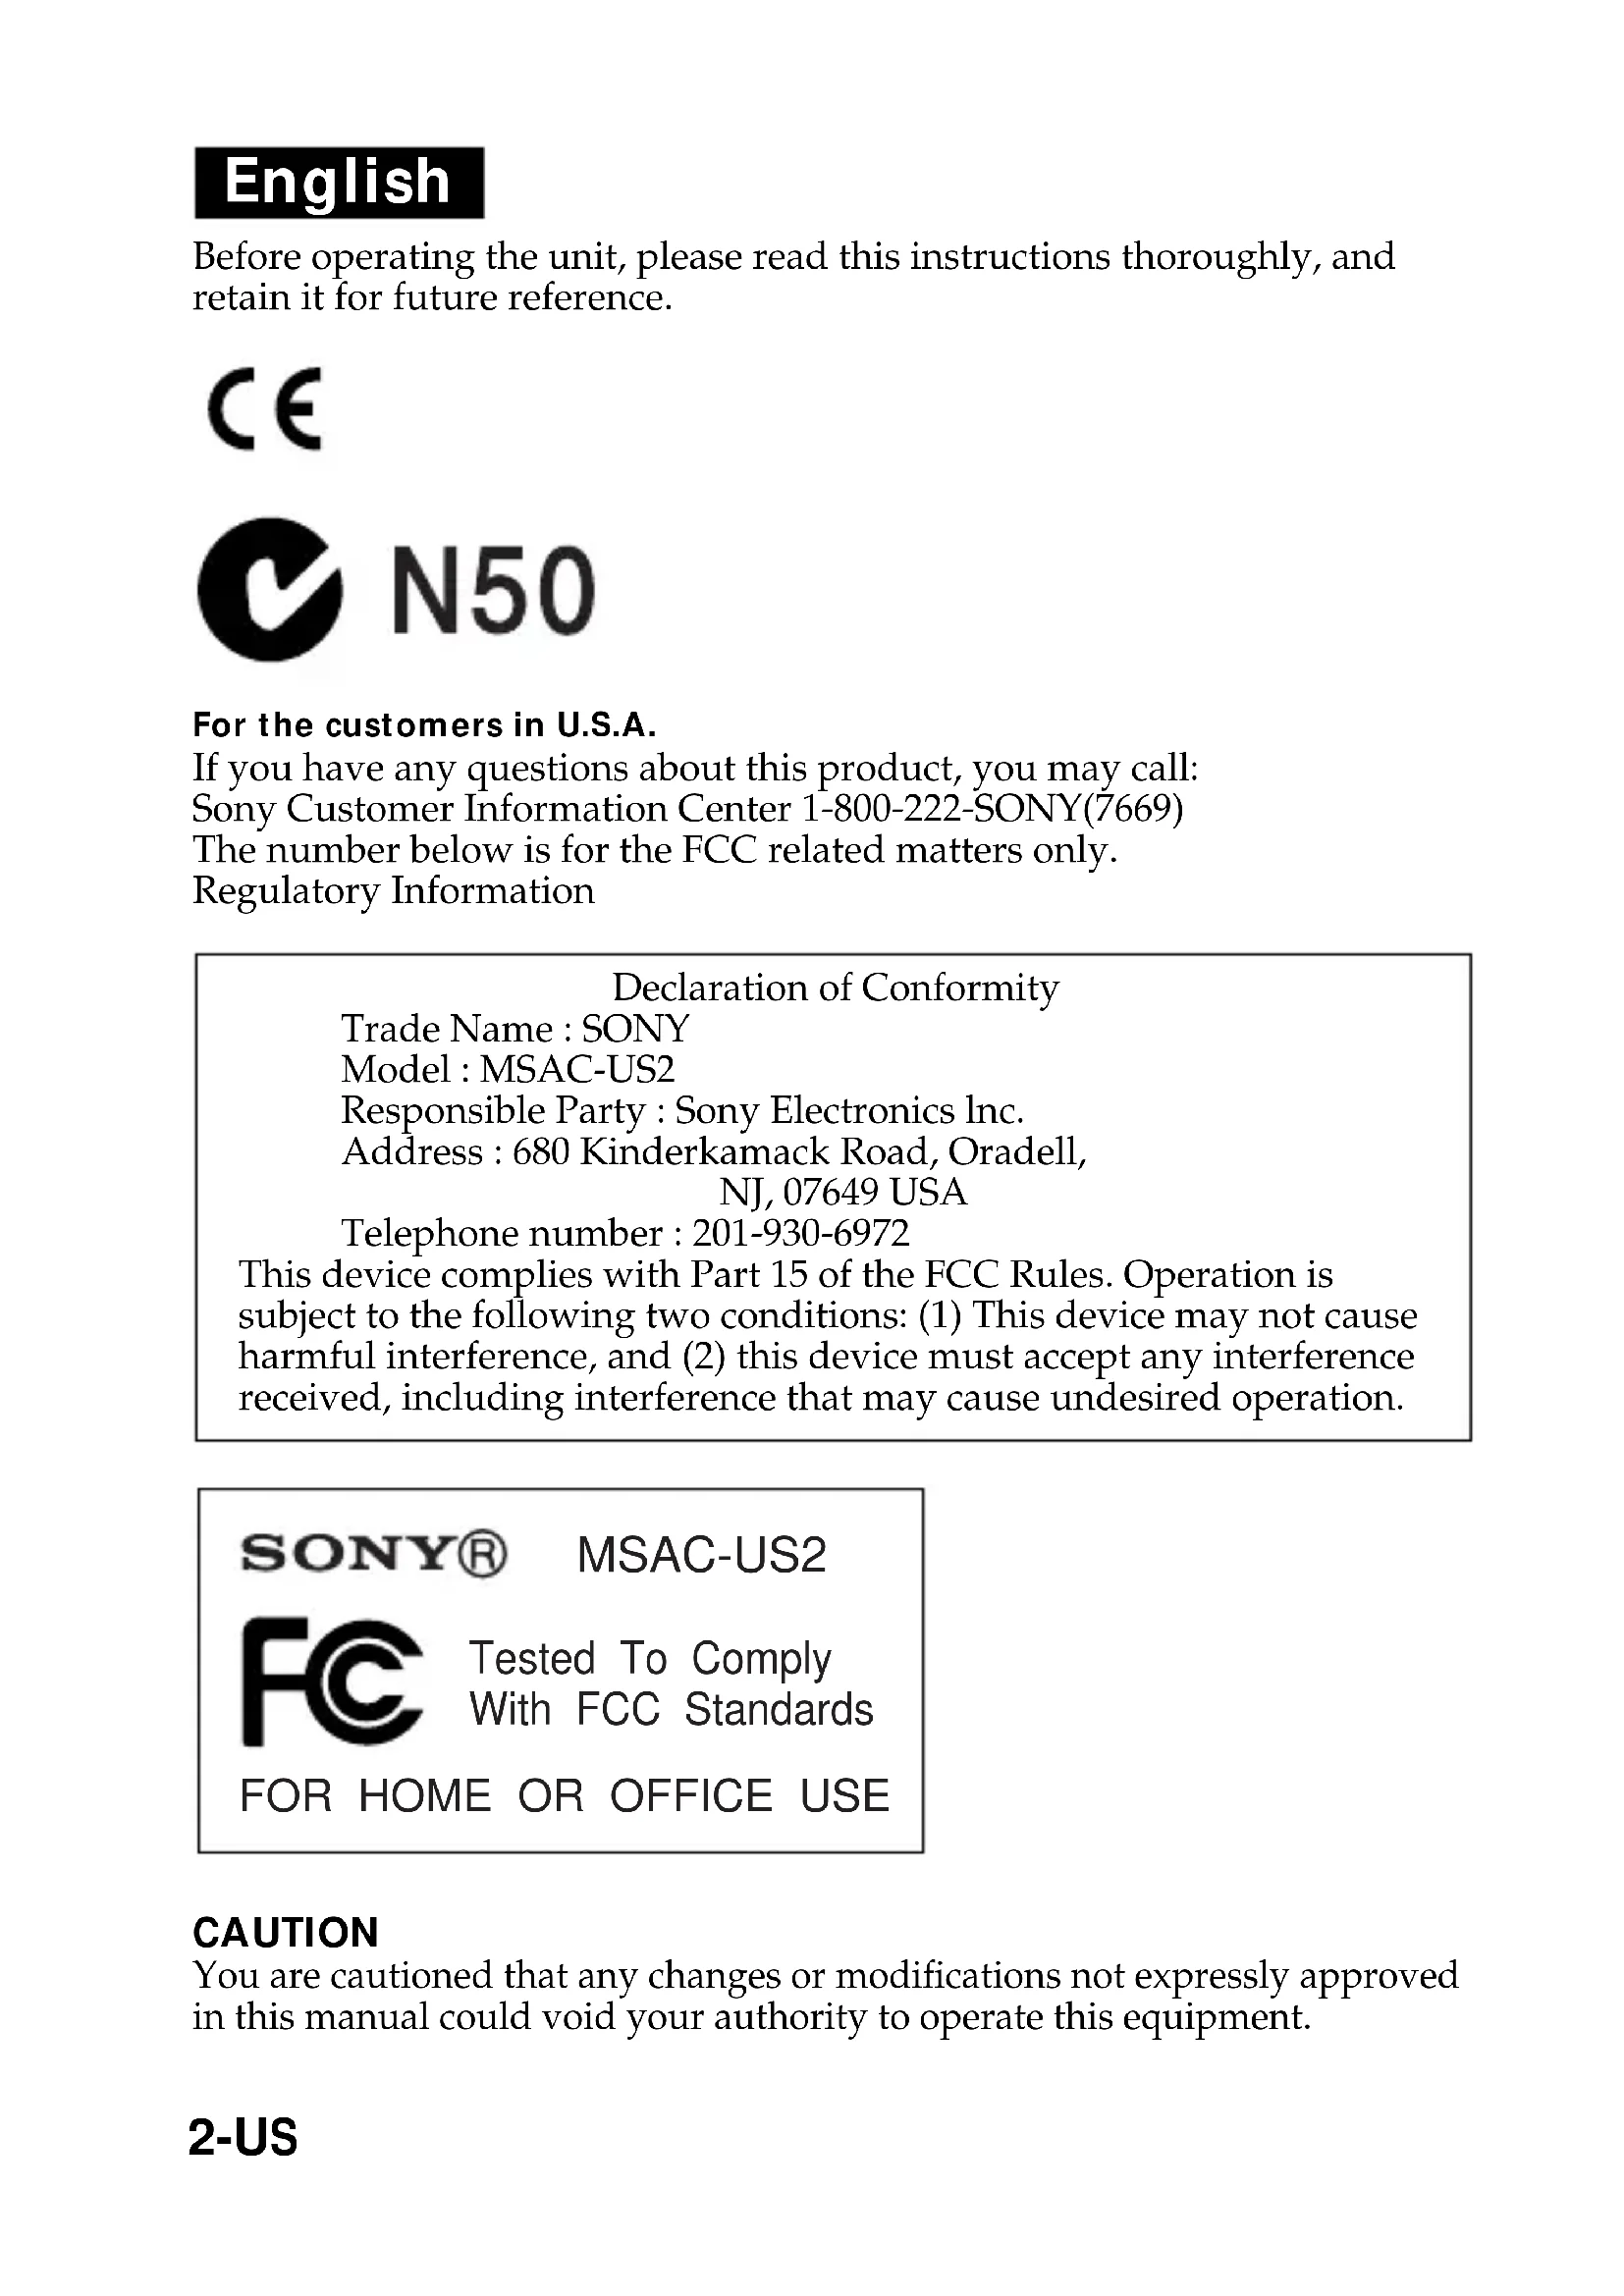
For the customers in U.S.A.
If you have any questions about this product, you may call:
Sony Customer Information Center 1-800-222-SONY(7669)
The number below is for the FCC related matters only.
Regulatory Information
Declaration of Conformity
Trade Name : SONY
Model:MSAC-US2
Responsible Party : Sony Electronics Inc.
Address: 680 Kinderkamack Road, Oradell,
NJ, 07649 USA
Telephone number : 201-930-6972
This device complies with Part 15 of the FCC Rules. Operation is subject to the following two conditions: (1) This device may not cause harmful interference, and (2) this device must accept any interference received, including interference that may cause undesired operation.
SONY®
MSAC-US2

Tested To Comply
With FCC Standards
FOR HOME OR OFFICE USE
CAUTION
You are cautioned that any changes or modifications not expressly approved in this manual could void your authority to operate this equipment.
Note:
This equipment has been tested and found to comply with the limits for a Class B digital device, pursuant to Part 15 of the FCC Rules. These limits are designed to provide reasonable protection against harmful interference in a residential installation. This equipment generates, uses, and can radiate radio frequency energy and, if not installed and used in accordance with the instructions, may cause harmful interference to radio communications. However, there is no guarantee that interference will not occur in a particular installation. If this equipment does cause harmful interference to radio or television reception, which can be determined by turning the equipment off and on, the user is encouraged to try to correct the interference by one or more of the following measures:
- Reorient or relocate the receiving antenna.
- Increase the separation between the equipment and receiver.
- Connect the equipment into an outlet on a circuit different from that to which the receiver is connected.
- Consult the dealer or an experienced radio/TV technician for help.
The specified extension cable (supplied) must be used with the equipment in order to comply with the limits for a digital device pursuant to Subpart B of Part 15 of FCC Rules.
For the customers in Canada
This class B digital apparatus complies with Canadian ICES-003.
You can connect this unit to a personal computer so that data in a "Memory Stick" can be transferred to the personal computer at high speed. You can also use a "Memory Stick" as a removable disk.
This manual describes how to connect this unit, how to install the driver, how to use and customer service.
Precautions
When using this unit, please keep the following in mind.
-
When either using or storing this unit, avoid the following locations. Damage or deformation of the unit could result.
-
Near open flames or in closed locations like the inside of automobiles in the summer sun where temperatures are very high.
-
In direct sunlight or near heating equipment.
-
If the unit becomes dirty, wipe it clean with a soft, dry cloth. Do not use benzene, alcohol, or thinners to clean it. This could lead to deformation or damage to the unit.
- If problems occur with the "Memory Stick" you are using, and recording and playback do not work properly, the images you have recorded previously are not warranted.
- If you set the switch provided on the "Memory Stick" to prevent accidental recording or erasure to the "LOCK" position, you cannot record or erase data.
- If any foreign object gets into the Memory Stick slot, push the shutter open and remove it.
- Before you set your computer to Standby/Suspend modes or reboot your computer, remove the "Memory Stick" from the unit.
"Memory Stick," "MagicGate Memory Stick," and "Memory Stick Duo," as well as , are trademarks of the Sony Corporation.
Microsoft®, Windows® and Windows Media are registered trademarks or trademarks of Microsoft Corporation in the United States and/or other countries.
Macintosh, iMac, Mac OS and QuickTime are trademarks of Apple Computer, Inc.
QuickTime and the QuickTime logo are trademarks used under license.
QuickTime is a trademark and registered trademark in the United States and other countries.
MMX® and Pentium® are registered trademarks or trademarks of Intel Corporation.
All other company names and product names mentioned here may be the trademarks or registered trademarks of their respective companies.
PIXELA ImageMixer for Sony is produced by IXeLA Corporation.
About Formatting "Memory Stick"s
When "Memory Stick"s are shipped from the factory, they are already formatted to a special standard format. When you format "Memory Stick"s, we recommend formatting them on the device you are using so that they are compatible when used on "Memory Stick"-compatible device.
Cautions When Formatting "Memory Stick"s on a Personal Computer Pay attention to the following points when formatting "Memory Stick"s on the personal computer, for example, that you are using.
-
Operation of "Memory Stick"s formatted on Windows machines is not guaranteed on "Memory Stick"-compatible device. To use a "Memory Stick" that has been formatted on a Windows machine, the "Memory Stick" must be reformatted on "Memory Stick"-compatible device. Note, that, in this case all data stored on the "Memory Stick" will be lost.
-
"Memory Stick" formatted on a Macintosh sometimes cannot be used on "Memory Stick"-compatible device. Do not format "Memory Stick" on the Macintosh.
Table of Contents
Before You Begin
Checking the accessories 7
Parts identification 8
Installation and Operation
For Windows 9
Installing USB driver software 9
Installing Image Transfer and PILXELA ImageMixer for Sony 11
Connecting the unit to a personal computer 14
Recommended connections 17
Precautions to be taken when connecting this unit to a computer..... 18
Inserting a "Memory Stick" 20
Confirming the insert 20
Copying images using Image Transfer 21
Removing a "Memory Stick" 22
For Macintosh 24
Installing USB driver software 24
Inserting a "Memory Stick" 25
Removing a "Memory Stick" 26
PIXELA ImageMixer for Sony 27
Installing editorial and image materials on your computer 27
Installing images from a "Memory Stick" 28
Additional Information
The "Memory Stick" 29
Troubleshooting 31
Specifications 32
Checking the accessories
Make sure that you have all the accessories bellow.
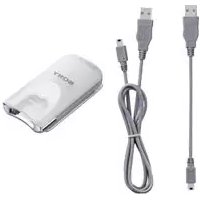
- Memory Stick Reader/Writer (1)
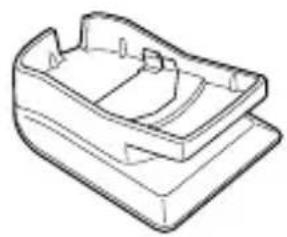
- Stand (1)
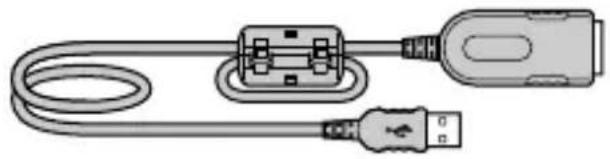
- Specified extension cable (1)
- CD-ROM (SPVD-008 USB DRIVER) (1)
This CD-ROM contains the following software:
- USB DRIVER
-
Image Transfer
-_PIXELA ImageMixer for Sony -
Operating Instructions (1)
Warranty (1)
Parts identification
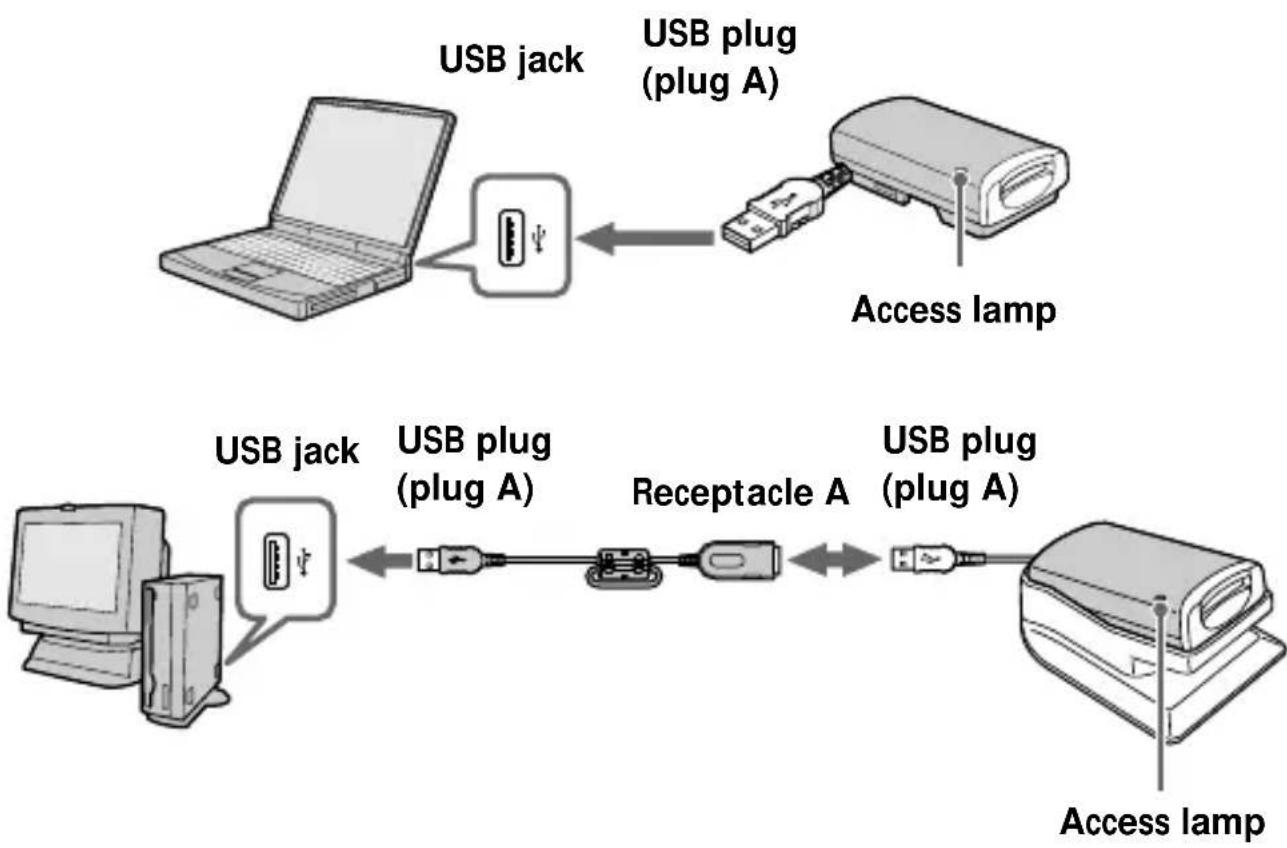
About the specified extension cable
USB plug (plug A): Plug this into the USB jack of your computer. If your computer has more than one USB jack, you can use any of them.
Receptacle A: Plug this into the USB plug of this unit.
Notes
- The access lamp lights or flashes when you access data on a "Memory Stick." When you are accessing data on a "Memory Stick," never remove the "Memory Stick," turn off the power of your computer, or do not disconnect the USB plug or specified extension cable from this unit. This may damage the "Memory Stick."
- When you remove the USB cable or the specified extension cable, grasp the plug, not the cable.
- Do not bend the cable unnecessarily, or apply excessive force to it. This may result in damage to the cable.
- Do not use the specified extension cable as an extension cable for any other device.
For Windows
First, you must install the USB driver software in the package on the personal computer you are using. Follow the procedure below to install the USB driver software.
Installing USB driver software
Turn on the computer to start Windows.
At this stage, do not connect the unit to the personal computer yet. If any applications are running, close them down.
-For Windows Me/XP
You do not need to install the USB driver (SPVD-008 USB DRIVER) from the CD-ROM supplied with the unit. The unit will work using the standard Windows driver.
If you are using Windows XP, you must log on using administrator's privileges.
Go on to page 11, [Installing Image Transfer and PILXELA ImageMixer for Sony].
-For Windows 98/98SE/2000-
At this stage, do not connect the unit to the personal computer yet. If any applications are running, close them down.
If you are using Windows 2000, you must log on using administrator's privileges.
1 Insert the USB driver software CD-ROM (SPVD-008 USB DRIVER) into the CD-ROM drive.
If the title screen does not appear, follow the procedures given below.
① Double-click "My Computer."
Double-click CD-ROM (ImageMixer [E:])*.
- The drive symbol [E:] may differ depending on your computer.
The title screen will appear after a short wait.
For Windows (continued)
2 Click "USB Driver" on the screen.
The "Welcome to the InstallShield Wizard for the Sony USB Driver" window appears.
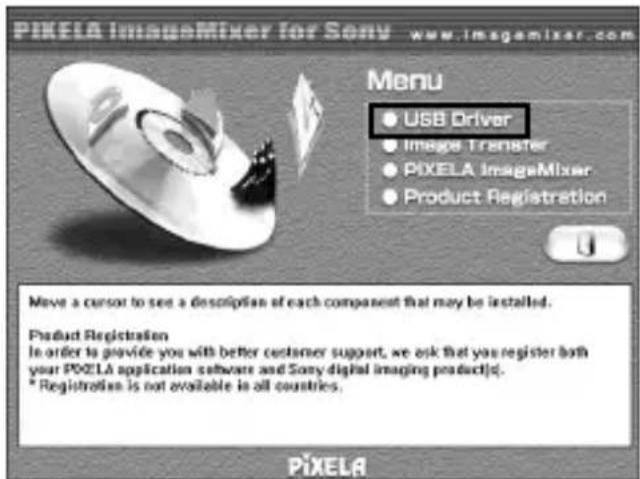
3 Click "Next."
The "Note on installing the USB driver" window appears.
4 After reading the information, click "Next."
5 Follow the on-screen instructions, then close the installation wizard.
Select "Yes, I want to restart my computer now."
Then, click "OK."
The USB driver will be enabled after you reboot your computer.
Do not remove CD-ROM from the CD-ROM drive yet.
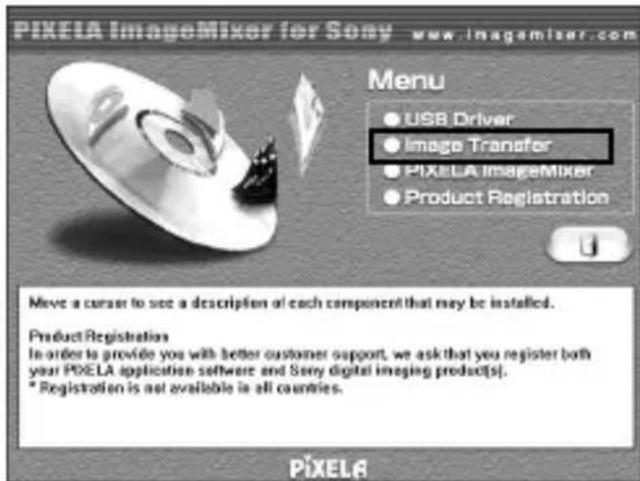
Installing Image Transfer and PILIXELA ImageMixer for Sony
The "Image Transfer" software enables you to automatically transfer (copy) recorded images in a "Memory Stick" to your computer. The "PIXELA ImageMixer for Sony" software enables you to easily view the images that have been copied to your computer.
Note
You cannot register this software.
If you are using Windows 2000/XP, you must log on using administrator's privileges.
Note
Set the screen resolution of your display to 800 × 600 , and be sure the color setting is 16-bit High Color (65,000 colors or above), or above. If the resolution is less than 800 × 600 , and the color setting is 256 colors, or below, the title screen will not display at installation.
Image Transfer
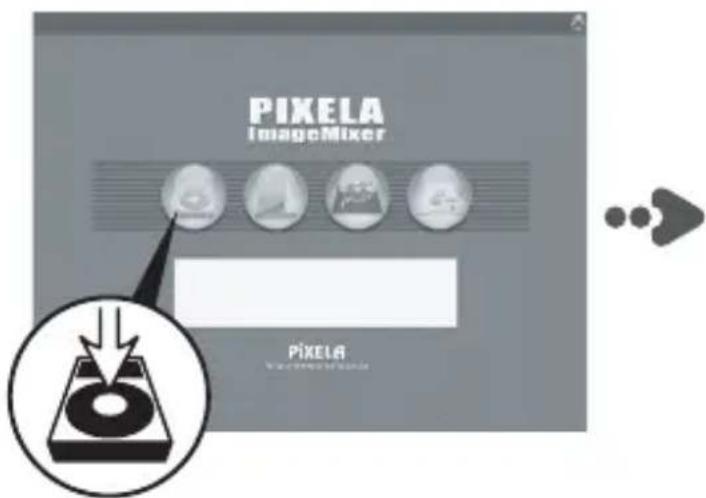
1 Display the CD-ROM's title page on your screen as follows.
① Double-click "My Computer."
Double-click CD-ROM (ImageMixer [E:])*.
- The drive symbol [E:] may differ depending on your computer. The title screen will appear after a short wait.
2 Click "Image Transfer" on the screen.
For Windows (continued)
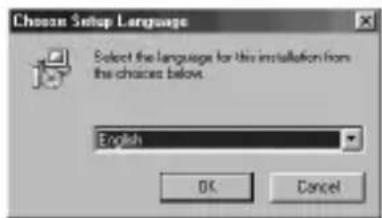
3 Select a language, then click "OK."
4 Following the on-screen instructions, install the application.
Reading the instructions carefully, proceed with the installation.
Note
Read the "License Agreement" carefully, then click "Yes" if you agree.
5 Following the on-screen instructions, click "Next" to complete the installation.
PIXELA ImageMixer for Sony
6 Click "PIXELA ImageMixer" on the screen.

7 Select a language, then click "OK."
8 Following the on-screen instructions, install the application. Read the "License Agreement" carefully, then click "Yes" if you agree.
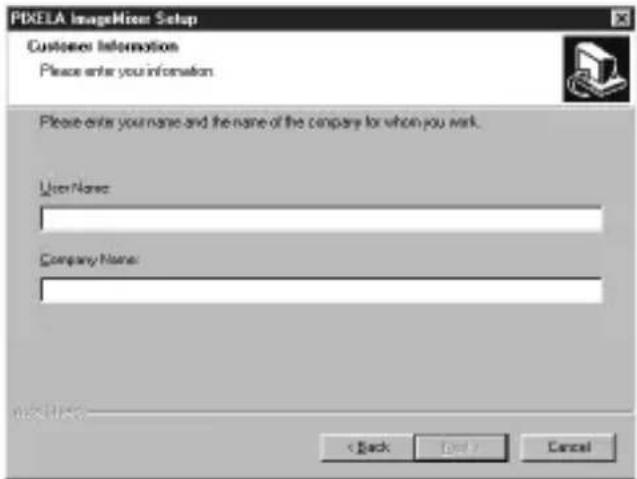
9 Enter user information.
① Enter your name and the name of the company for which you work.
Note
If you do not have a company name to enter, enter your name instead.
② Click "Next."
10 Following the on-screen instructions, complete the installation.
The title screen will appear. Close the screen, and remove the CD-ROM from your computer.
If the DirectX (Version 8.0a or higher) has not been installed on your computer, the "Information" screen will appear.
Follow the instructions starting from step 11 to complete the installation.
- For Windows XP -
Those using Windows XP do not need to install DirectX. Close the title screen, then remove the CD-ROM from your computer.
11 Click "OK."
Read "License Agreement" carefully, then click "Yes."
For Windows (continued)
12 Click "Install."
The installation begins. You may see "Installing Microsoft DirectX" displayed.

13 Confirm that the DirectX setup screen is displayed, then click "OK."
The computer will be restarted.
The "PIXELA ImageMixer for Sony" will be enabled after you reboot your computer.
14 Remove the CD-ROM from the CD-ROM drive.
Connecting the unit to a personal computer
Connect the USB plug of this unit to the USB jack of your personal computer.
If you are using a laptop computer
After connecting the USB plug of this unit (plug A) to the USB jack of the computer, go on to page 17, [Recommended connections].
If you are using a desktop computer
After first connecting this unit and the specified extension cable, connect the USB plug of the specified extension cable (plug A) to the USB jack of the computer.
- For Windows 98SE/2000/Me/XP -
Installation of the USB hub begins automatically. Go on to page 17, [Recommended connections].
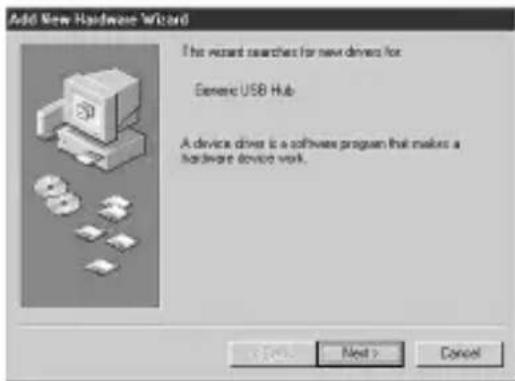
- For Windows 98 -
Following the instructions given on the screens shown below, install the USB hub.
1 Click "Next."
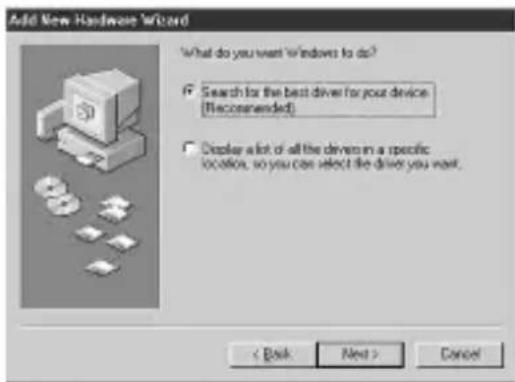
2 Select "Search for the best driver for your device (Recommended)," and click "Next."
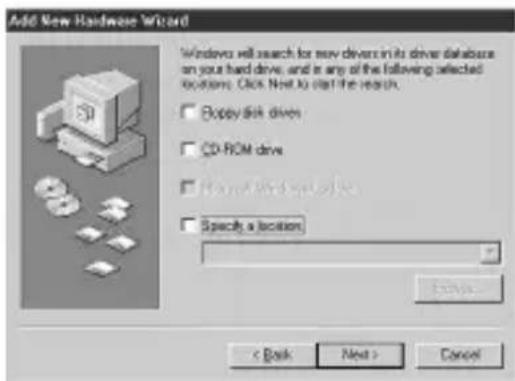
3 Click "Next" without entering any checkmarks.
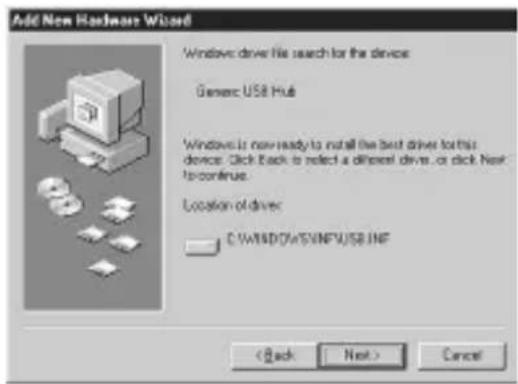
The installation begins. The "Add New Hardware Wizard" starts for the second time.
For Windows (continued)
4 Follow the on-screen instructions until the installation is completed.
Notes
- If you are using a computer where a completely new copy of Windows 98 has been installed, a message that prompts you to install a Windows 98 CD-ROM may appear on the screen. In this case, follow the instructions given, and go on installing the USB hub.
- The location of the USB jack differs depending on your computer.
- If you are using a computer with more than one USB jack, do not connect any devices other than a standard mouse and a keyboard to the main computer when using this unit. Also, when using a desktop computer, connect this unit directly to one of the computer's USB jacks. For more details, see page 17, [Recommended connections].
Recommended connections
Operation when connected as follows has been confirmed.
When this unit is connected to the USB jack on the personal computer, and nothing is connected to the other USB jack:

When a USB keyboard is connected to the USB jack on a personal computer on which a USB keyboard and mouse are equipped as standard, and this unit is connected to the other USB jack using the specified extension cable:
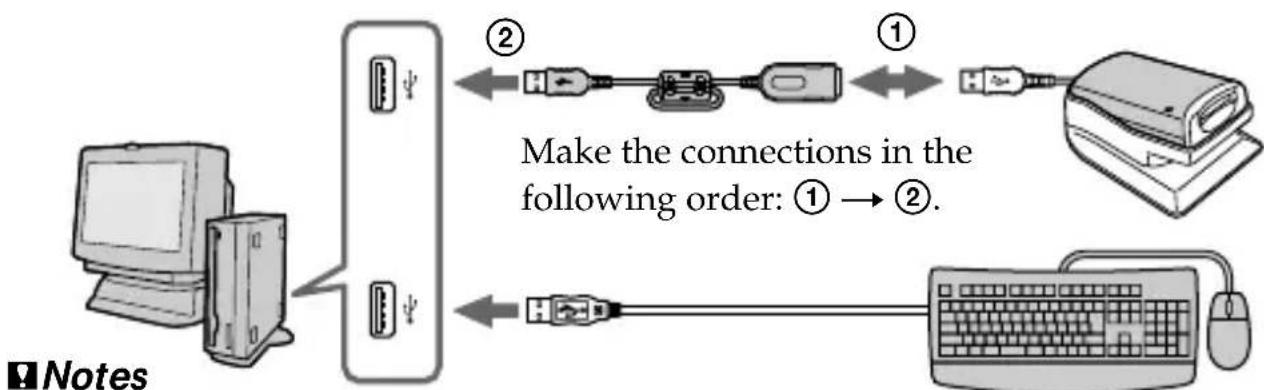
- In either the Windows or Macintosh environments, proper operation cannot be guaranteed when you have two or more USB devices connected to one personal computer, depending on the USB devices than are used simultaneously.
- If you connect this unit through a hub other than the specified extension cable, proper operation is not guaranteed. Be sure to use the specified extension cable.
- Proper operation cannot be guaranteed on some computers even though they may be equipped with the recommended environment.
- If you connect another "Memory Stick"-equipped device, in addition to this unit, to one personal computer, you cannot access two or more "Memory Stick"-equipped devices at the same time. Remove the "Memory Stick" from this unit, or turn the other device(s) off.
- Be sure to connect this unit directly to the USB jack of the personal computer itself. If you connect it through the USB jack of a keyboard or through a USB hub, proper operation is not guaranteed.
For Windows (continued)
Precautions to be taken when connecting this unit to a computer
Removing the plug of the cable from its holder
Grasp both sides of the USB plug to remove the end of the cable from the unit.

Note
Do not remove the end of the cable by pulling on the cable itself.
Putting away the cable
First, insert the end of the USB plug (plug A) into the unit, and then stow the rest of the cable.
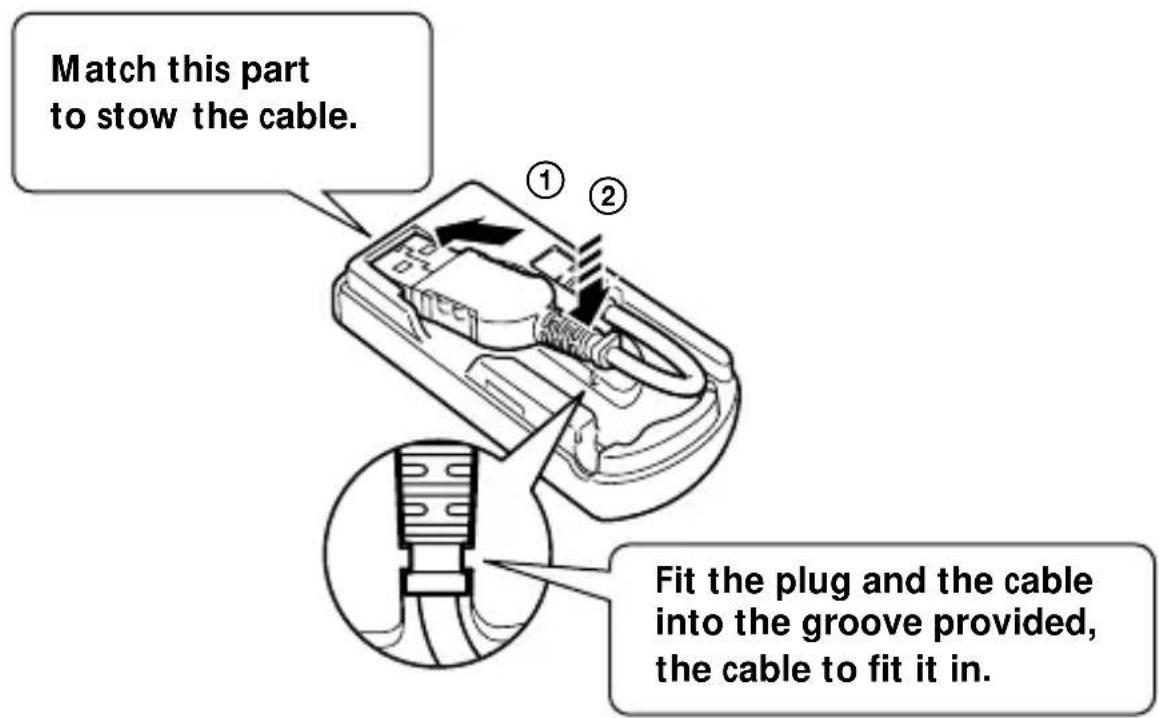
To change the position of the cable emanating from the unit Because you can change the position of the cable emanating from the unit as shown in the illustration, change it to suit the location or position of the USB hub on your computer. When using a USB hub located on the right side of a laptop computer, adjust the cable so that it comes out of the side of the unit.
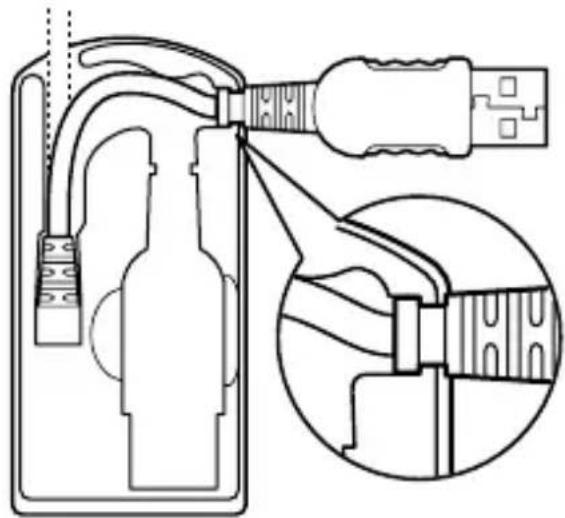
When the cable comes out of the side of the unit, note how the groove in the plug fits into the locking slot of the unit itself.
Note
Do not apply unnecessary force or bend the cable. This may cause unif failure.

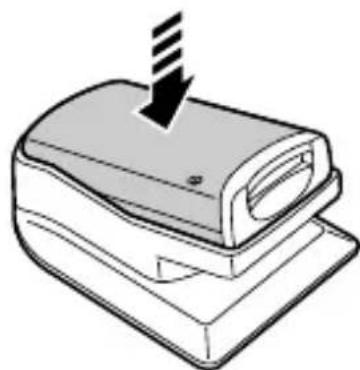
Using the stand provided
When you use the stand provided with the unit, push the unit (down) firmly until it is all the way in.
For Windows (continued)
Inserting a “Memory Stick”
Make sure the "Memory Stick" is pointed in the proper direction, then insert it into the slot in the unit.
When you use the unit for the first time, the installation process for the "Memory Stick" driver will automatically start.
When you insert the "Memory Stick" into the unit, the access lamp lights or flashes.
Note
The access lamp lights or flashes when the "Memory Stick" is being accessed.
Confirming the insert
1 Double click "My computer."
The "My computer" folder appears.
2 Confirm that a new "Removable Disk" icon is displayed.
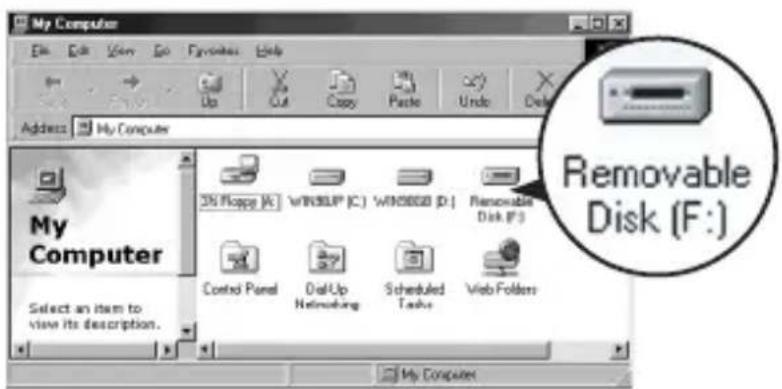
"Removable Disk (F:)" shown on the screen represents this unit, connected to your computer. Depending on the number and configuration of drives on the computer you are using, (F:) may be replaced by another letter.
If the "Removable Disk" icon is displayed, the connection process has been completed.
It may take a little time until the "Removable Disk" icon is displayed.
-For Windows XP Users
With Windows XP, in place of a "Removable Disk" icon, a Sony Memory Stick icon appears.
20-US
Copying images using Image Transfer
- For Windows 98/98SE/2000/Me -
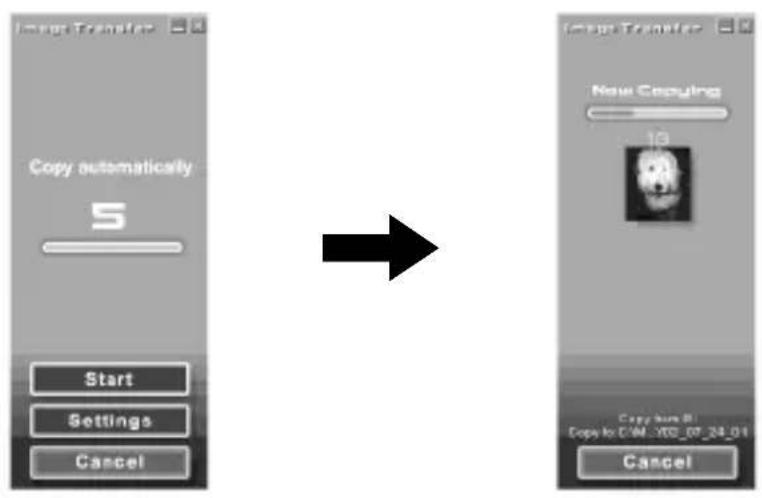
After you connect the unit to your computer and insert the "Memory Stick" into the unit, "Image Transfer" launches and the images are automatically copied to your computer. When copying is complete, "Image Transfer" automatically launches and a list of images appears.
- Normally "Image Transfer" and "Date" folders are created inside the "My Documents" folder, and all of the image files are copied into these folders.
- You can change the "Image Transfer" settings on the settings screens.
Deleting Image Transfer
Select [My Computer] [Control Panel] [Add/Remove programs], and delete [Image Transfer].
- For Windows XP -
Windows XP is set so that the OS Auto Playback Wizard activates. Follow the procedures below to cancel the settings.
Note
This procedure does not need to be performed for subsequent image downloads.
1 Connect the unit to your computer and insert the “Memory Stick” into the unit.
2 Click "Start," then click "My Computer."
3 Right-click "Sony Memory Stick," then click "Properties."
For Windows (continued)
4 Cancel the setting.
① Set "Content type" to "Pictures."
② Check "Select an action to perform" under "Actions" select "Take no action," then click "Apply."
③ Set "Content type" to "Video files" and "Mixed content," and repeat step ②.
④ Click "OK." The "properties" screen closes.
5 Remove and then re-insert the "Memory Stick."
"Image Transfer" starts up automatically and the images are automatically copied to the computer.
Removing a "Memory Stick"
- For Windows Me/2000/XP -
After the copying of image data is complete, those using Windows Me/ 2000/XP must follow the procedures outlined below before removing the "Memory Stick," and before disconnecting this unit from the computer.
1 Click the "Remove Hardware" icon located in the Task tray at the bottom right-hand corner of the screen.
A message will appear.

10:44
2 Click on the little message [e.g., Stop USB Disk-Drive (F:)*] that appears over the Task tray. The message will differ slightly depending on which version of Windows you are using.
After a little while, a message appears.
- The drive letter that appears (e.g., (F:)) will differ depending on the configuration of the computer you are using.
3
Click "OK."
Now you can remove the "Memory Stick" from the unit, and disconnect the unit from the computer safely.
-ForWindows98/98SE-
Those using Windows 98/98SE do not need to follow above procedures.
For Macintosh
If you are using Mac OS 9.1/9.2/Mac OS X (v10.0/v10.1), you do not need to install a USB driver. Just connect this unit to your computer, and it will be recognized as a drive.
Notes
- Image Transfer does not support any version of the Mac OS.
- PILXELA ImageMixer for Sony does not support the Mac OS X operating system.
Installing USB driver software
- For Mac OS 8.5.1/8.6/9.0 -
Follow the steps outlined below.
1 Turn on your computer.
2 Insert the supplied CD-ROM (SPVD-008 USB DRIVER) into your computer's CD-ROM drive.
After a short wait, a software application screen appears.
3 On the software application screen, click the USB Driver button.
4 Double-click the hard disk icon of the device where your operating system is installed.
5 Drag the two files below from the window opened in step 3, and drop them on the system folder icon showing in the window opened in step 4.
- Sony Peripheral USB Driver
- Sony Peripheral USB Shim
6 When the message is displayed, click "OK."
The USB driver will be installed on your computer.
7 Close the software application window.
8 Remove the CD-ROM from the drive in your computer.
9 Reboot your computer.
10 Connect the USB plug on this unit to the USB jack on your computer.
Inserting a "Memory Stick"
Insert a "Memory Stick" after your Macintosh has started up.
1 When you insert a "Memory Stick" into this unit, a Memory Stick icon appears on the desktop.
2 Open the Memory Stick icon.
You can access the data.
The folders stored in the "Memory Stick" cannot be copied
You may not be able to copy the whole of folder on "Memory Stick" at once to the hard disk on the Macintosh. In this case, open the folder first and copy only the contents in the folder.
Notes
-
It may take a little while until the Memory Stick icon appears.
-
The icon will differ depending on which version of the Macintosh operating system you are using.
- For details on how to connect this unit and your computer, see page 17, [Recommended connections] and see page 18, [Precautions to be taken when connecting this unit to a computer].
For Macintosh (continued)
Removing a "Memory Stick"
When you want to remove a "Memory Stick" from this unit, follow the procedure below.
- For Mac OS 8.5.1/8.6/9.0/9.1/9.2 -
1 Close all software running on this unit.
2 Make sure that the access lamp is not lit.
3 Drag the Memory Stick icon to the trashcan. Or, while the Memory Stick icon is selected, select "Eject" from the Special menu at the top left of the screen.
4 Remove the "Memory Stick" from this unit.
-For Mac OS X (v10.0/v10.1)-
Before you remove the "Memory Stick," be sure to turn the computer off.
PIXELA ImageMixer for Sony
Installing editorial and image materials on your computer
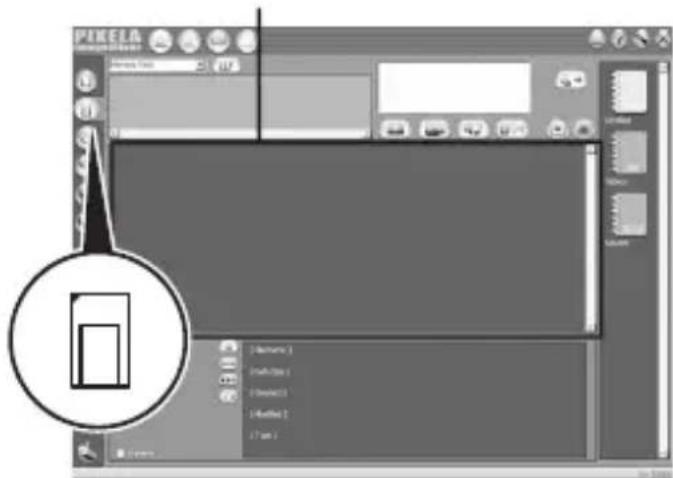
From among the images on the "Memory Stick," you can choose editorial materials you want to use on your computer. This is done from the "Capture mode screen."
Click the Capture Environment) button on the "Main Selector" screen, and the "Capture mode screen" appears.
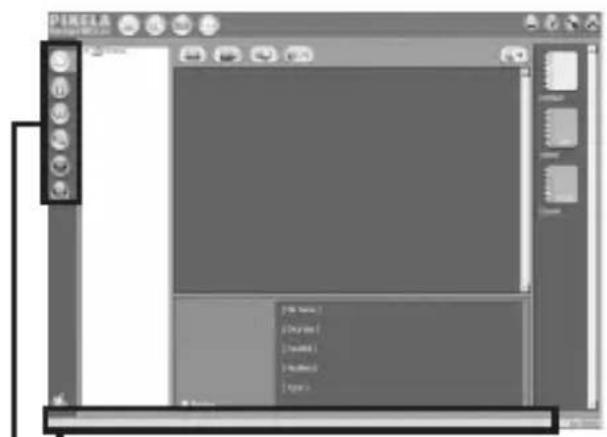
Status bar
When you place the mouse pointer over an icon or a button, an explanation of its function appears here.
Capture mode selector
Select an input mode based on the editorial materials you want to install on your computer.
PIXELA ImageMixer for Sony (continued)
Installing images from a "Memory Stick"
1 Click on the "Capture mode selector" (Digital Camera Import Mode) button.
2 Click the (Refresh) button, the thumbnails of the images stored in the "Memory Stick" will be listed.
3 Click on the images you want to install on your computer.
4 Click the album where you want to store them.
5 Click the import) button.
Note
No sound is emitted while the image files are being transferred.
Thamburger list window
For details on how to edit your images, refer to the "Online Help"
Advice on how to use PILXELA ImageMixer for Sony, called "Online Help" (a set of operating instructions you can view on the screen), has been prepared for you.
Click the menu items in the following order, and the "Online Help" item you want is displayed.
1) [Start] 2) [Program] 3) [PIXELA] 4) [ImageMixer] 5) [Image Mixer Help] 6) the "Online Help" item you want to consult.
The "Memory Stick"
A "Memory Stick" is small and light, but it has far more storage capacity than a floppy diskette. It is the IC storage media for the new century.
Not only can you exchange data between "Memory Stick" compatible devices, but you can also use a "Memory Stick" as a convenient external data storage device that can be easily connected and disconnected.
There are two types of "Memory Stick," an ordinary "Memory Stick," and a "Memory Stick" with built-in copyright protection technology ("MagicGate"*).
- "MagicGate" is a special coding technique that provides the basis for copyright protection technology.
In addition to an ordinary "Memory Stick," there is also a "Memory Stick Duo" that is 1/3 the size and 1/2 the weight of an ordinary "Memory Stick."
For this unit, you can use either a "Memory Stick" or a "Memory Stick Duo."
The "MagicGate Memory Stick"
A "MagicGate Memory Stick" can record either images or music.
Copyright protected music data recorded in a "MagicGate Memory Stick" cannot be transferred from this unit to a personal computer. Also, copyright protected music data saved on the hard disk of a personal computer cannot be transferred to a "Memory Stick" via this unit.
The "Memory Stick" (continued)
The Memory Stick Duo Adaptor
If you use a "Memory Stick Duo" in this unit, be sure to mount it in the Memory Stick Duo Adaptor supplied with the "Memory Stick Duo."
Notes
- When you mount a "Memory Stick Duo" in a Memory Stick Duo Adaptor, be sure to mount it correctly.
- When you mount a "Memory Stick Duo" in a Memory Stick Duo Adaptor to use it in the unit, be sure to do so correctly. Mounting it the wrong way may damage the unit or any attached devices.
- Do not insert a Memory Stick Adaptor into a "Memory Stick"-compatible device when there is no "Memory Stick Duo" mounted in the adaptor. Doing so may damage the unit or any attached devices.
Keep the following in mind when using a "Memory Stick"
When the access lamp is lit, or is flashing, do not remove the "Memory Stick" from this unit. Doing so may damage the data.
Troubleshooting
| Symptom | Cause/Solution |
| You cannot install the USB driver software. | ·The specified extension cable is not correctly connected. →Connect correctly. (page 17) ·Device other than this unit is connected to the USB jack on the personal computer. →Disconnect or turn off the USB devices except this unit. ·“Memory Stick” is not in the unit. →Insert “Memory Stick” into the unit. |
| You cannot start up your computer. (Windows) | ·You have started up your computer with a “Memory Stick” inserted in this unit. →Remove the “Memory Stick” from the unit, and then start up your computer again. |
| Memory Stick icon does not appear in Explorer or My Computer. (Windows) | ·The connection between the personal computer and the unit is not correct. →Connect the cable correctly. (page 17) ·“Memory Stick” is not in the unit. →Insert “Memory Stick” into the unit. |
| Memory Stick icon does not appear. (Macintosh) | ·The connection between the personal computer and the unit is not correct. →Connect the cable correctly. (page 17) ·“Memory Stick” is not in the unit. →Insert “Memory Stick” into the unit. |
Specifications
Memory Stick Reader/Writer
Interface: USB interface
Transfer rate: Max. 12 Mbps
"Memory Stick" access speed: Approx. 6.4 Mbps (reading in)
(Measured using a Sony VAIO PCG-747)
Power, general
Operating voltage: 4.75V to 5.25V (Bus Power)
Power consumption: Action 100mA
Standby Max. 500 A
Dimensions: Approx. 36 × 17.5 × 73 ~mm
(Approx. 1^7 / 16 × ^23 / 32 × 2^7 / 8 in.) (w / h / d)
Mass: Approx. 35g (1.3 oz)(not including "Memory Stick")
Environmental specification:
Temperature 0^ to 40^ (32 F to 104 F)
condensation not allowed)
USB Drivers
Windows
-
Compatible operating systems: Microsoft® Windows® 98/ Windows® 98SE/ Windows® 2000 Professional/ Windows® Millennium Edition/ Windows® XP Home Edition/ XP Professional All of the above must be pre-installed versions of the respective operating system.
-
Proper operation of the software is not guaranteed on upgraded versions of any of the operating systems listed above.
-
Recommended CPU: MMX® Pentium® 200MHz or above.
-
Other equipment required: devices equipped with a standard USB jack, a CD-ROM drive.
-
To play movies saved in a "Memory Stick," you must have Windows® Media Player installed.
-
For Windows® Millennium Edition/ Windows® XP Home Edition/ XP Professional, a USB driver is not required.
Macintosh
- Compatible operating systems: A factory-installed version of Mac OS 8.5.1 / 8.6 / 9.0 / 9.1 / 9.2 / Mac OS X (v10.0/v10.1)
- However, if you have an "iBook," or a "Power Mac G4," with a factory-installed version of Mac OS 8.6, or an iMac with a slot-loading CD-ROM, upgrade to Mac OS 9.0/9.1.
- Other equipment required: devices equipped with a standard USB jack, a CD-ROM drive.
- To play movies saved in a "Memory Stick," you must have QuickTime 3, or later, installed.
- For Mac OS 9.1 / 9.2 / Mac OS X (v10.0/v10.1), a USB driver is not required.
Image Transfer/PIXELA ImageMixer for Sony
- PILLELA ImageMixer for Sony does not support the Macintosh OS X operating system.
- Image Transfer is only compatible with the Windows® operating system.
Windows
- Compatible operating systems: Microsoft® Windows® 98/ Windows® 98SE/ Windows® 2000 Professional/ Windows® Millennium Edition/ Windows® XP Home Edition/ XP Professional
- Recommended CPU: MMX® Pentium® 200MHz or above.
- Software required: DirectX 8.0a, or later. (Because the application uses DirectX technology, you must have it installed when you use the software.)
- Memory: 64 MB, or more. (128 MB or more is recommended.)
- Hard disk space: the program requires about 200MB of free disk space to install, but it is recommended that you have 1 GB or above of usable disk space. (This may change depending on the size of the movie files you want to edit.)
- Display: A video card with 4 MB or more of video RAM, a screen resolution of 800 × 600 or more, 16-bit High color (65,000 colors, or more) or higher, and support for DirectX drivers.
- Sound card: 16-bit stereo sound card and speakers.
- Other equipment required: devices equipped with a standard USB jack, a CD-ROM drive.
Specifications (continued)
Macintosh
- Compatible operating systems: Mac OS 8.5.1 / 8.6 / 9.0 / 9.1 / 9.2 (Mac OS X (v10.0/v10.1) is not supported.)
- Memory: 64 MB, or more.
- Software required: QuickTime 4, or later.
- Hard disk space: the program requires about 100MB of free disk space to install, but it is recommended that you have 1 GB or above of usable disk space. (This may change depending on the size of the movie files you want to edit.)
- Display: A screen resolution of 800 × 600 , or higher, with 32,000 colors, or more.
- Other equipment required: a CD-ROM drive.
François
PIXELA ImageMixer for Sony 25
-PILOTUSB
- Image Transfer
-PIXELA ImageMixer for Sony
Sélectionnez "Yes, I want to restart my computer now".
PIXELA ImageMixer for Sony
- Sony Peripheral USB Driver
- Sony Peripheral USB Shim
PIXELA ImageMixer for Sony
PIXELA ImageMixer for Sony (suite)
Image Transfer et PILXELA ImageMixer for Sony
Customer Support If you have any questions/comments related to this product, please visit our Customer Support website at http://www.solny.com/SEL/service/conselec/ (If you do not have internet access, please call 1-800-22 SONY.)