
ILCE6000L - Camera SONY - Free user manual and instructions
Find the device manual for free ILCE6000L SONY in PDF.

| Type de produit | Interchangeable lens camera |
| Marque | Sony |
| Modèle | ILCE-6000L |
| Capteur d'image | CMOS APS-C (23.5 mm × 15.6 mm), 24.3 effective megapixels |
| Sensibilité ISO (images fixes) | ISO 100 - 25,600 |
| Vitesse d'obturation | 1/4000 s to 30 s, Bulb |
| Monture d'objectif | E-mount (Sony E) |
| Objectif fourni | E PZ 16-50 mm F3.5-5.6 OSS (power zoom) |
| Stabilisation d'image | Lens-based (SteadyShot) |
| Écran LCD | 7.5 cm (3.0-inch), 921,600 dots, tilting |
| Viseur | Electronic, 1,440,000 dots, 100% coverage |
| Alimentation | Rechargeable battery NP-FW50 (7.2 V, 1,080 mAh) |
| Chargeur | AC adapter AC-UB10C/UB10D (5 V, 0.5 A) |
| Connexions | Wi-Fi 802.11 b/g/n, NFC, micro-USB, micro-HDMI Type D |
| Support d'enregistrement | Memory Stick PRO Duo, SD/SDHC/SDXC (Class 4 or higher) |
| Formats de fichier | JPEG, RAW (ARW 2.3), AVCHD, MP4 |
| Dimensions (L×H×P) | 120.0 × 66.9 × 45.1 mm |
| Poids (avec batterie et carte) | 344 g |
| Poids (nu) | 285 g |
| Entretien | Clean the exterior with a soft, slightly damp cloth. Avoid solvents, alcohol, or insecticides. Clean the screen with a soft cloth. |
| Sécurité | Do not expose to rain or moisture. Handle battery with care. Do not look at the sun through the lens. |
| Pièces détachées et réparabilité | Battery NP-FW50, AC adapter AC-UB10C/UB10D, compatible E-mount lenses. Repair by Sony authorized service center. |
| Informations générales | Hybrid camera with electronic viewfinder, built-in flash (GN 6), Wi-Fi, NFC. Burst mode up to 11 fps. |
Frequently Asked Questions - ILCE6000L SONY
User questions about ILCE6000L SONY
0 question about this device. Answer the ones you know or ask your own.
Ask a new question about this device
Download the instructions for your Camera in PDF format for free! Find your manual ILCE6000L - SONY and take your electronic device back in hand. On this page are published all the documents necessary for the use of your device. ILCE6000L by SONY.
USER MANUAL ILCE6000L SONY
http://www.sony.net/SonyInfo/Support/
SONY.
4-532-055-41(1)
6000
E-mount
0009 X
Interchangeable Lens Digital Camera/Instruction Manual GB
Learning more about the camera ("Help Guide")
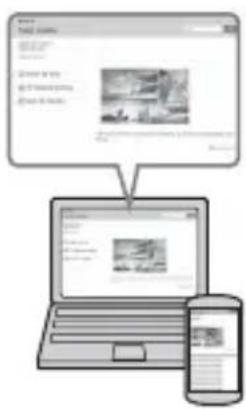
"Help Guide" is an on-line manual. Refer to it for in-depth instructions on the many functions of the camera.
①Access the Sony support page.
http://www.sony.net/SonyInfo/Support/
②Select your country or region.
③Search for the model name of your camera on the support page.
- Check the model name on the bottom of your camera.
Viewing the Guide
This camera is equipped with a built-in instruction guide.
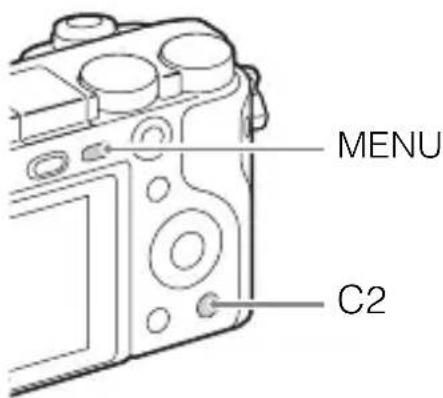
In-Camera Guide
The camera displays explanations for MENU items and the setting values.
①Press the MENU button or the Fn (Function) button.
②Select the desired item, then press the C2 button.
Shooting Tip
The camera displays shooting tips for the shooting mode selected.
①Press the C2 button in shooting mode.
② Select the desired shooting tip, then press on the control wheel. The shooting tip is displayed.
- You can scroll the screen using / and change shooting tips using .
Owner's Record
The model and serial numbers are located on the bottom. Record the serial number in the space provided below. Refer to these numbers whenever you call your Sony dealer regarding this product.
Model No. ILCE-6000
Serial No.
Model No. AC-UB10C/AC-UB10D
Serial No.
WARNING
To reduce fire or shock hazard, do not expose the unit to rain or moisture.
IMPORTANT SAFETY INSTRUCTIONS -SAVE THESE INSTRUCTIONS DANGER TO REDUCE THE RISK OF FIRE OR ELECTRIC SHOCK, CAREFULLY FOLLOW THESE INSTRUCTIONS
If the shape of the plug does not fit the power outlet, use an attachment plug adaptor of the proper configuration for the power outlet.
CAUTION
Battery pack
If the battery pack is mishandled, the battery pack can burst, cause a fire or even chemical burns. Observe the following cautions.
- Do not disassemble.
- Do not crush and do not expose the battery pack to any shock or force such as hammering, dropping or stepping on it.
- Do not short circuit and do not allow metal objects to come into contact with the battery terminals.
- Do not expose to high temperature above 60^ (140^) such as in direct sunlight or in a car parked in the sun.
- Do not incinerate or dispose of in fire.
- Do not handle damaged or leaking lithium ion batteries.
-
Be sure to charge the battery pack using a genuine Sony battery charger or a device that can charge the battery pack.
-
Keep the battery pack out of the reach of small children.
- Keep the battery pack dry.
- Replace only with the same or equivalent type recommended by Sony.
- Dispose of used battery packs promptly as described in the instructions.
AC Adaptor
Use the nearby wall outlet (wall socket) when using the AC Adaptor. Disconnect the AC Adaptor from the wall outlet (wall socket) immediately if any malfunction occurs while using the apparatus.
The power cord (mains lead), if supplied, is designed specifically for use with this camera only, and should not be used with other electrical equipment.
For Customers in the U.S.A. and Canada
RECYCLING LITHIUM-ION BATTERIES
Lithium-Ion batteries are recyclable.
You can help preserve our environment by returning your used rechargeable batteries to the collection and recycling location nearest you.
For more information regarding recycling of rechargeable batteries, call toll free
1-800-822-8837, or visit http://www.call2recycle.org/

Caution: Do not handle damaged or leaking Lithium-Ion batteries.
Battery pack and lens (If lens supplied)
This device complies with Part 15 of the FCC Rules. Operation is subject to the following two conditions:
(1) This device may not cause harmful interference, and (2) this device must accept any interference received, including interference that may cause undesired operation.
CANICES-3B/NMB-3B
This equipment complies with FCC/IC radiation exposure limits set forth for an uncontrolled environment and meets the FCC radio frequency (RF) Exposure Guidelines in Supplement C to OET65 and RSS-102 of the IC radio frequency (RF) Exposure rules. This equipment has very low levels of RF energy that are deemed to comply without testing of specific absorption ratio (SAR).
For Customers in the U.S.A.
If you have any questions about this product, you may call:
Sony Customer Information Center
1-800-222-SONY (7669)
The number below is for the FCC related matters only.
Regulatory Information
Declaration of Conformity
Trade Name:SONY
Model No.: ILCE-6000
Responsible Party: Sony Electronics Inc.
Address: 16530 Via Esprillo,
San Diego, CA 92127 U.S.A.
Telephone No.: 858-942-2230
This device complies with Part15 of the FCC Rules. Operation is subject to the following two conditions: (1) This device may not cause harmful interference, and (2) this device must accept any interference received, including interference that may cause undesired operation.
This equipment must not be co-located or operated in conjunction with any other antenna or transmitter.
CAUTION
You are cautioned that any changes or modifications not expressly approved in this manual could void your authority to operate this equipment.
Note:
This equipment has been tested and found to comply with the limits for a Class B digital device, pursuant to Part 15 of the FCC Rules.
These limits are designed to provide reasonable protection against harmful interference in a residential installation. This equipment generates, uses, and can radiate radio frequency energy and, if not installed and used in accordance with the instructions, may cause harmful interference to radio communications. However, there is no guarantee that interference will not occur in a particular installation. If this equipment does cause harmful interference to radio or television reception, which can be determined by turning the equipment off and on, the user is encouraged to try to correct the interference by one or more of the following measures:
- Reorient or relocate the receiving antenna.
- Increase the separation between the equipment and receiver.
- Connect the equipment into an outlet on a circuit different from that to which the receiver is connected.
- Consult the dealer or an experienced radio/TV technician for help.
The supplied interface cable must be used with the equipment in order to comply with the limits for a digital device pursuant to Subpart B of Part 15 of FCC Rules.
For Customers in Canada
This device complies with Industry Canada licence-exempt RSS standard(s). Operation is subject to the following two conditions: (1) this device may not cause interference, and (2) this device must accept any interference, including interference that may cause undesired operation of the device.
For Customers in Europe
Notice for the customers in the countries applying EU Directives
Manufacturer: Sony Corporation, 1-7-1 Konan Minato-ku Tokyo, 108-0075 Japan For EU product compliance: Sony Deutschland GmbH, Hedelfinger Strasse 61, 70327 Stuttgart, Germany
CE
Hereby, Sony Corporation, declares that this equipment is in compliance with the essential requirements and other relevant provisions of Directive 1999/5/EC. For details, please access the following URL:
http://www.compliance.sony.de/
Notice
If static electricity or electromagnetism causes data transfer to discontinue midway (fail), restart the application or disconnect and connect the communication cable (USB, etc.) again.
This product has been tested and found compliant with the limits set out in the EMC regulation for using connection cables shorter than 3 meters (9.8 feet).
The electromagnetic fields at the specific frequencies may influence the picture and sound of this unit.
Disposal of waste batteries and electrical and electronic equipment (applicable in the European Union and other European countries with separate collection systems)

This symbol on the product, the battery or on the packaging indicates that the product and the battery shall not be treated as household waste. On certain batteries this symbol might be used in combination with a chemical symbol. The chemical symbols for mercury (Hg) or lead (Pb) are added if the battery contains more than 0.0005% mercury or 0.004% lead. By ensuring these products and batteries are disposed of correctly, you
will help prevent potentially negative consequences for the environment and human health which could otherwise be caused by inappropriate waste handling. The recycling of the materials will help to conserve natural resources.
In case of products that for safety, performance or data integrity reasons require a permanent connection with an incorporated battery, this battery should be replaced by qualified service staff only. To ensure that the battery and the electrical and electronic equipment will be treated properly, hand over these products at end-of-life to the applicable collection point for the recycling of electrical and electronic equipment. For all other batteries, please view the section on how to remove the battery from the product safely. Hand the battery over to the applicable collection point for the recycling of waste batteries. For more detailed information about recycling of this product or battery, please contact your local Civic Office, your household waste disposal service or the shop where you purchased the product or battery.
For Customers in Singapore
Complies with IDA Standards DB00353
For customers who purchased their camera from a store in Japan that caters to tourists
Note
Some certification marks for standards supported by the camera can be confirmed on the screen of the camera.
Select MENU (Setup) 6 [Certification Logo].
If display is not possible due to problems such as camera failure, contact your Sony dealer or local authorized Sony service facility.
Table of contents
Preparing the camera Step 1 P.9
- Checking the supplied items
- Identifying parts
- Inserting the battery pack
- Charging the battery pack
- Inserting a memory card (sold separately)
- Attaching/removing the lens
- Setting the clock
Basic operation Step 2 P. 23
- Shooting still images/movies
Playback function Step 3 P.24
- Viewing images
Recording function Step 4 P.25
- Introduction of other functions
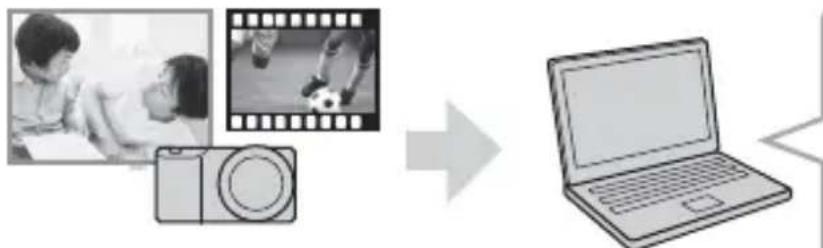
Importing images to the computer P. 26
- Features of PlayMemories Home™
Adding functions to the camera P. 28
- Adding functions to the camera
Others P. 29
- Number of still images and recordable time of movies
Notes on using the camera - Specifications
This manual covers several models supplied with different lenses.
The model name varies depending on the supplied lens. The available model varies depending on the countries/regions.
| Model name Lens | |
| ILCE-6000 Not supplied | |
| ILCE-6000L E16 – 50 mm | |
| ILCE-6000Y E55 – 210 mm and E16 – 50 mm | |
Checking the supplied items
First check the model name of your camera (page 8). The accessories supplied differ depending on the model.
The number in parentheses indicates the quantity.
Supplied with all models
- Camera (1)
- Power cord (mains lead) (1)^* (not supplied in the U.S.A. and Canada)

- Multiple power cords may be supplied with your camera. Use the appropriate one that matches your country/region.
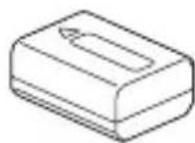
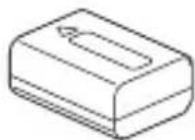
- Rechargeable battery pack NP-FW50 (1)
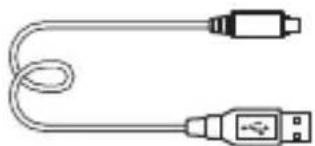
- Micro USB cable (1)

- AC adaptor AC-UB10C/UB10D (1)

Shoulder strap (1)

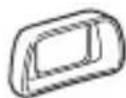
Eyepiece cup (1)

- Instruction Manual (this manual) (1)
- Wi-Fi Connection/One-touch (NFC) Guide (1) This guide explains the functions that require a Wi-Fi connection.
ILCE-6000
- Body cap (1) (attached to the camera)
ILCE-6000L
- E16 - 50 mm zoom lens (1) (attached to the camera)/Front lens cap (1) (attached to the lens)
ILCE-6000Y
- E16 - 50 mm zoom lens (1) (attached to the camera)/Front lens cap (1) (attached to the lens)
E55-210 mm zoom lens (1)/Front lens cap (1)/Rear lens cap (1)/Lens hood (1)
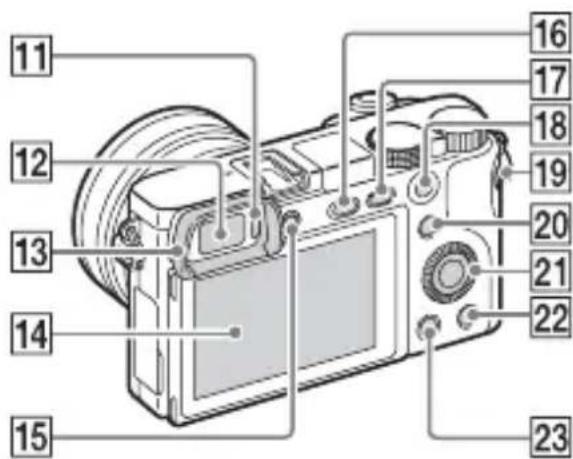
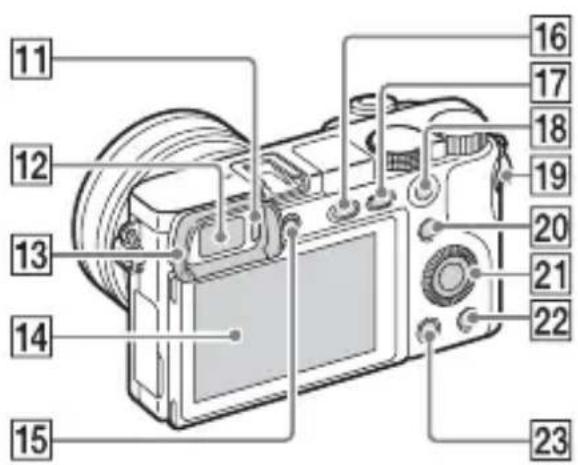
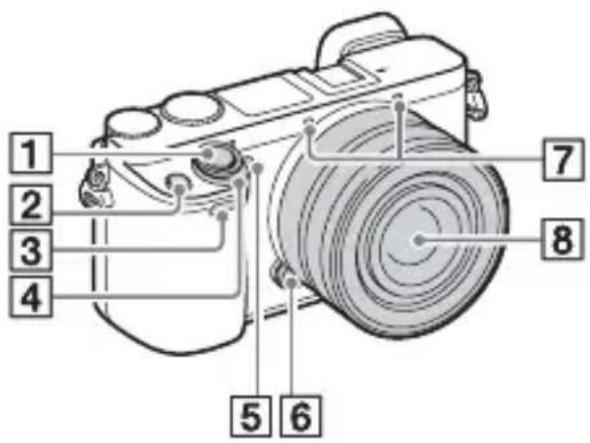
Identifying parts

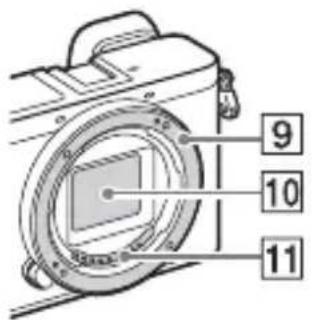
When the lens is removed
1Shutter button
C1 (Custom 1) button
3Remote sensor
4ON/OFF (Power) switch
5 Self-timer lamp/AF illuminator
6 Lens release button
7 Microphone 1)
8 Lens
9Mount
10Image sensor 2)
11 Lens contacts 2)
1) Do not cover this part during movie recording.
2) Do not touch this part directly.

1 Multi interface shoe 1)
2 Image sensor position mark
3 Hook for shoulder strap
4Wi-Fi sensor (built-in)
5 Flash
- Press the Flash pop-up button to use the flash. The flash does not pop up automatically.
- When not using the flash, press it back into the camera body.
6Mode dial
i (Intelligent Auto)/ i (Superior Auto)/
P (Program Auto)/
A (Aperture Priority)/ S (Shutter Priority)/
M (Manual Exposure)/
MR (Memory recall)/
(Movie)/
(Sweep Panorama)/
SCN (Scene Selection)
7Control dial
Charge lamp
9 Multi/Micro USB Terminal 1) Supports Micro USB compatible device.
10HDMI micro jack
1) For details on compatible accessories for the multi interface shoe and the Multi/Micro USB Terminal, visit the Sony web site, or consult your Sony dealer or local authorized Sony service facility. You can also use accessories that are compatible with the accessory shoe. Operations with other manufacturers' accessories are not guaranteed.
ni Multi Interface Shoe
Accessory Shoe
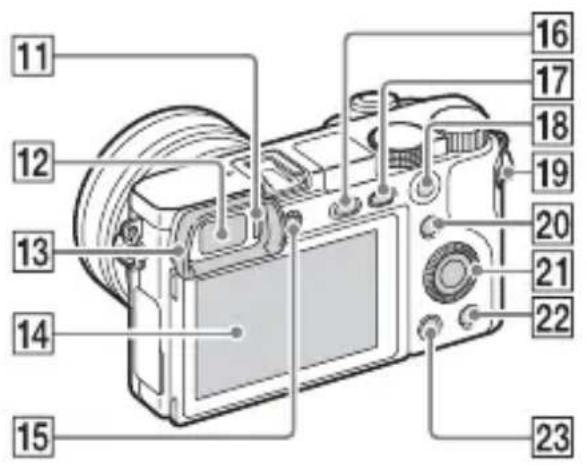
11Eye sensor
12Viewfinder
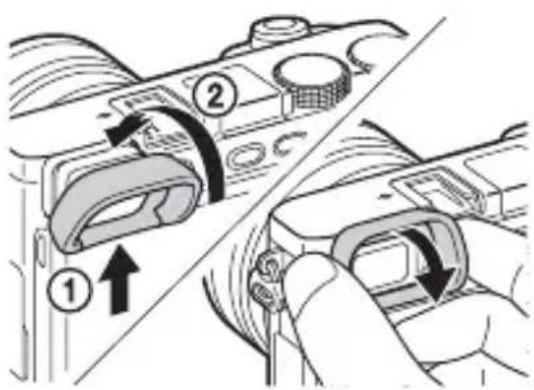
Eyepiece cup
- Not attached to the camera at the factory. It is recommended that you attach the eyepiece cup when you intend to use the viewfinder.
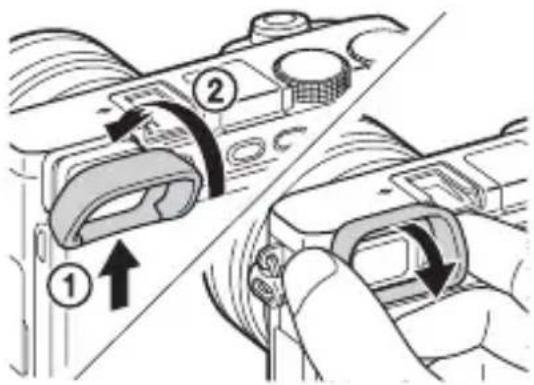
Attaching/removing the eyepiece cup
- Remove the eyepiece cup when you attach an accessory (sold separately) to the Multi Interface Shoe.
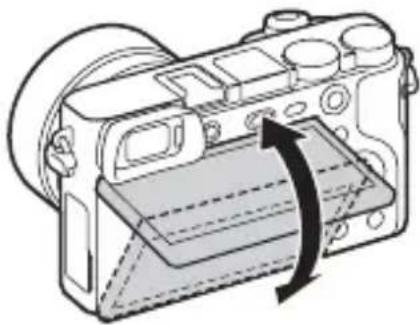
14LCD screen
- You can adjust the screen to an easily viewable angle and shoot from any position.
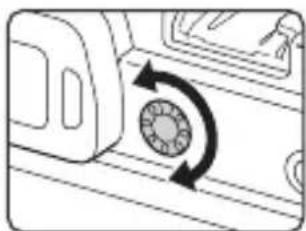
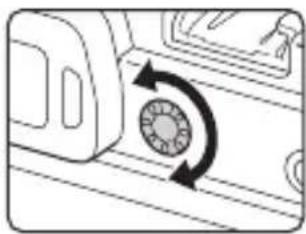
15Diopter-adjustment dial
- Adjust the diopter-adjustment dial to your eyesight until the display appears clearly in the viewfinder. If it is difficult to turn the diopter-adjustment dial, remove the eyepiece cup and then adjust the dial.
16(Flash pop-up) button
17 MENU button
18For shooting:AEL button For viewing:Playback zoom
MOVIE (Movie) button
20 For shooting: Fn (Function) button For viewing: (Send to Smartphone) button You can display the screen for [Send to Smartphone] by pressing the Send to Smartphone) button.
21Control wheel
22C2 (Custom 2) button/ (Delete) button
23 Playback) button
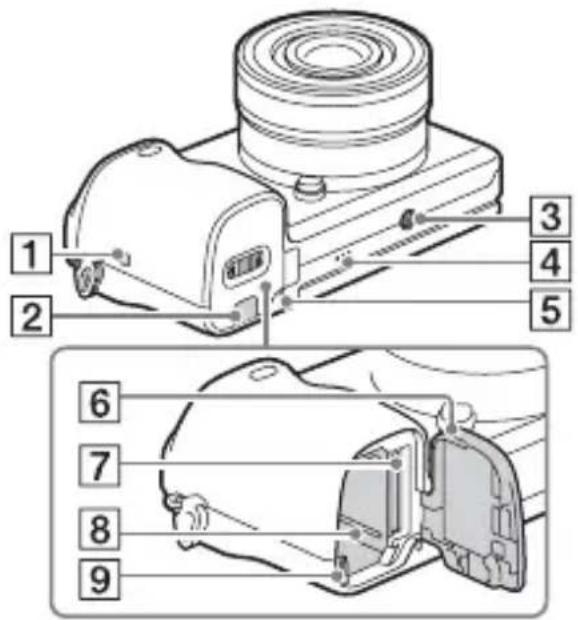
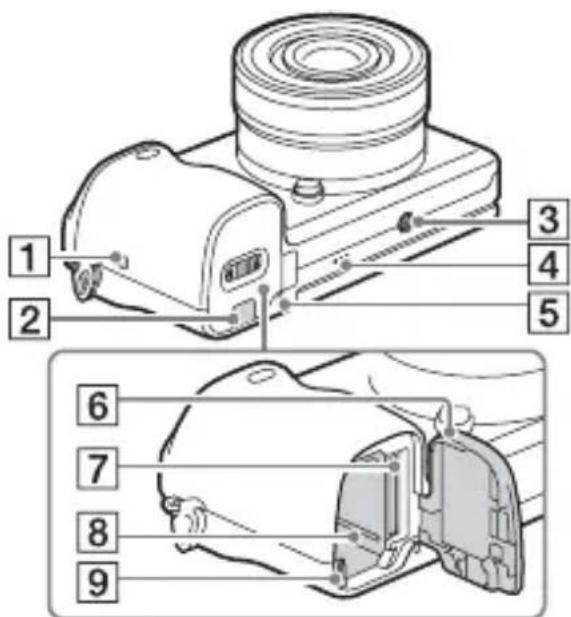
3 Tripod socket hole
- Use a tripod with a screw less than 5.5mm (7/32 inches) long. Otherwise, you cannot firmly secure the camera, and damage to the camera may occur.
4Speaker
5Access lamp
6 Battery/memory card cover
7Memory card slot
8 Battery insertion slot
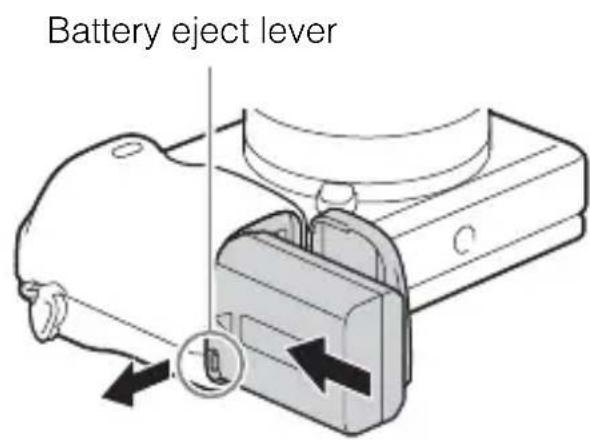
9 Battery eject lever
GB
1 (N Mark)
- Touch the mark when you connect the camera to a smartphone equipped with the NFC function.
NFC (Near Field Communication) is an international standard of the short-range wireless communication technology.
2 Connection plate cover
- Use this when using an AC-PW20 AC Adaptor (sold separately). Insert the connection plate into the battery compartment, and then pass the cord through the connection plate cover as shown below.
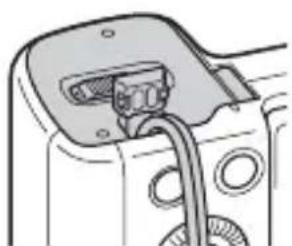
- Make sure that the cord is not pinched when you close the cover.
Lens
See page 36 on the specifications of the lenses.
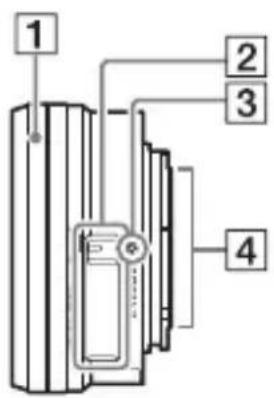
E PZ 16 – 50 mm F3.5 – 5.6 OSS (supplied with ILCE-6000L/ILCE-6000Y)
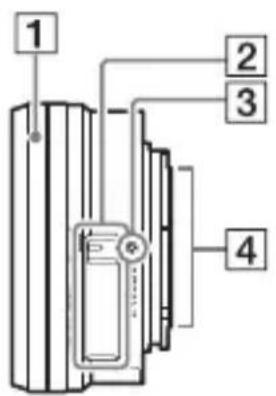
1Zooming/Focusing ring
2Zooming lever
3 Mounting index
4 Lens contacts 1)
1) Do not touch this part directly.
E55 - 210 mm F4.5 - 6.3 OSS (supplied with ILCE-6000Y)
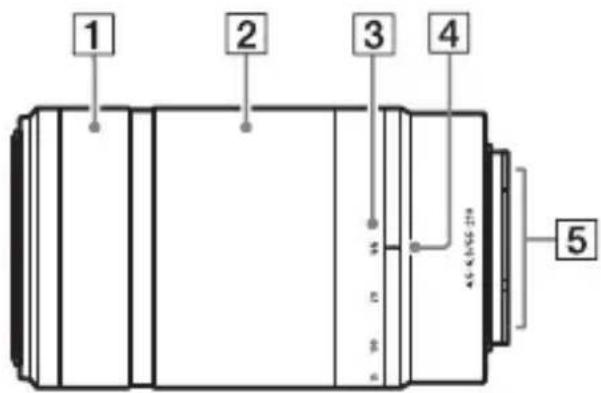

1 Focusing ring
2Zooming ring
3 Focal-length scale
4 Focal-length index
5 Lens contacts 1)
6 Mounting index
1) Do not touch this part directly.
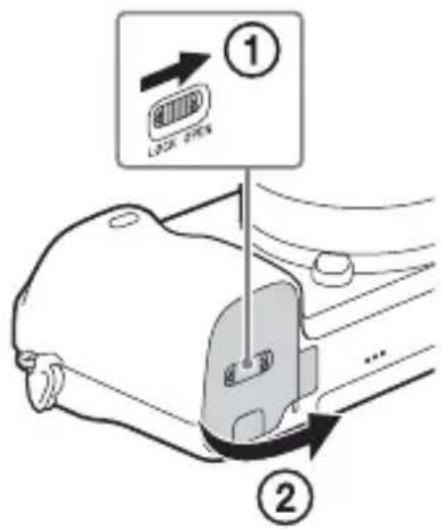
Inserting the battery pack
GB
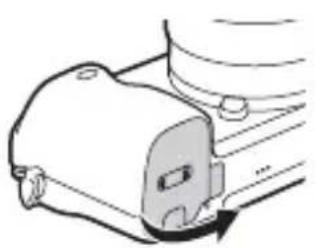
1 Open the cover.
2 Insert the battery pack.
- While pressing the battery eject lever, insert the battery pack as illustrated. Make sure that the battery eject lever locks after insertion.
- Closing the cover with the battery inserted incorrectly may damage the camera.
Charging the battery pack
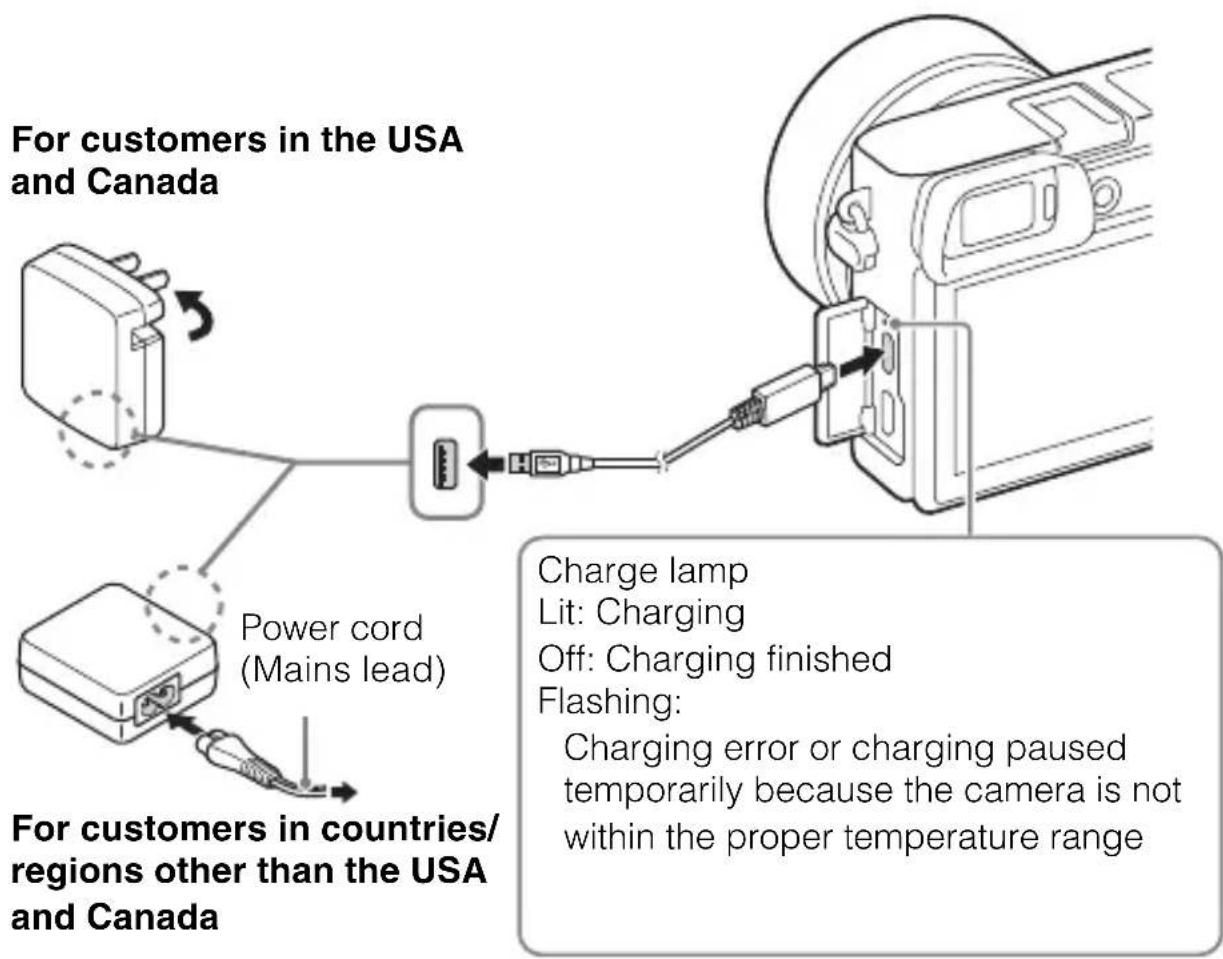
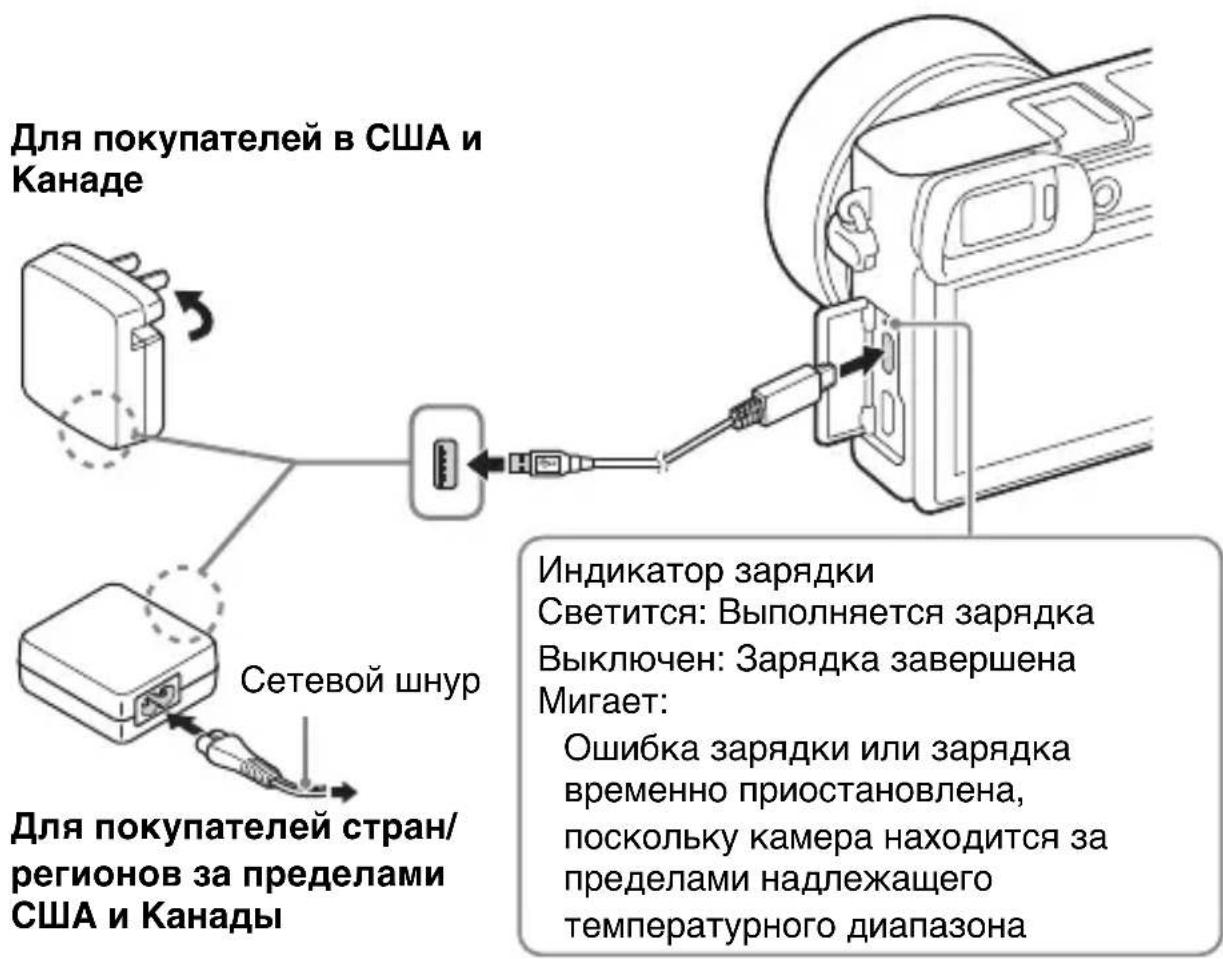
1 Connect the camera to the AC Adaptor (supplied), using the micro USB cable (supplied).
2 Connect the AC Adaptor to the wall outlet (wall socket). The charge lamp lights orange, and charging starts.
- Turn off the camera while charging the battery.
- You can charge the battery pack even when it is partially charged.
- When the charge lamp flashes and charging is not finished, remove and re-insert the battery pack.
Notes
-
If the charge lamp on the camera flashes when the AC Adaptor is connected to the wall outlet (wall socket), this indicates that charging is temporarily stopped because the temperature is outside the recommended range. When the temperature gets back within the appropriate range, the charging resumes. We recommend charging the battery pack in an ambient temperature of between 10^ to 30^ (50^ to 86^) .
-
The battery pack may not be effectively charged if the terminal section of the battery is dirty. In this case, wipe any dust off lightly using a soft cloth or a cotton swab to clean the terminal section of the battery.
- Connect the AC Adaptor (supplied) to the nearest wall outlet (wall socket). If malfunctions occur while using the AC Adaptor, disconnect the plug from the wall outlet (wall socket) immediately to disconnect from the power source.
- When charging is finished, disconnect the AC Adaptor from the wall outlet (wall socket).
- Be sure to use only genuine Sony brand battery packs, micro USB cable (supplied) and AC Adaptor (supplied).
- Power is not supplied during shooting/playback if the camera is connected to a wall outlet (wall socket) with the supplied AC adaptor. To supply power to the camera during shooting/playback, use the AC-PW20 AC adaptor (sold separately).
Charging time (Full charge)
The charging time is approximately 310 minutes using the AC Adaptor (supplied).
Notes
- The above charging time applies when charging a fully depleted battery pack at a temperature of 25^ (77^) . Charging may take longer depending on conditions of use and circumstances.
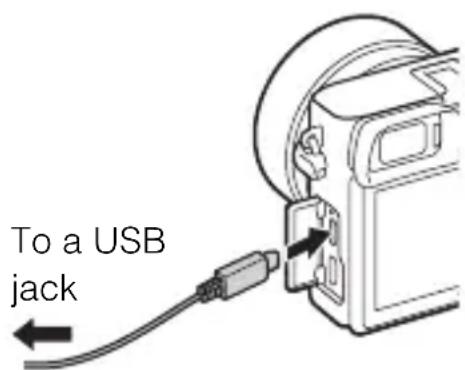
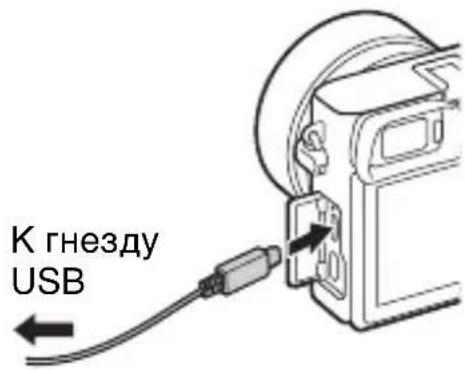
Charging by connecting to a computer
The battery pack can be charged by connecting the camera to a computer using a micro USB cable.
Notes
-
Note the following points when charging via a computer:
-
If the camera is connected to a laptop computer that is not connected to a power source, the laptop battery level decreases. Do not charge for an extended period of time.
- Do not turn on/off or restart the computer, or wake the computer to resume from sleep mode when a USB connection has been established between the computer and the camera. That may cause the camera to malfunction. Before turning on/off, or restarting the computer or waking the computer from sleep mode, disconnect the camera and the computer.
- No guarantees are made for charging using a custom-built computer or a modified computer.
Battery life and number of images that can be recorded and played back
| Battery life Number of images | |||
| Shooting (still images) | Screen Approx. 180 min. Approx. 360 images | ||
| Viewfinder Approx. 155 min. Approx. 310 images | |||
| Typical movie shooting | Screen Approx. 60 min. — | ||
| Viewfinder Approx. 60 min. — | |||
| Continuous movie shooting | Screen Approx. 90 min. — | ||
| Viewfinder Approx. 90 min. — | |||
| Viewing (still images) Approx. 275 min. Approx. 5500 images | |||
Notes
- The above number of images applies when the battery pack is fully charged. The number of images may decrease depending on the conditions of use.
-
The number of images that can be recorded is for shooting under the following conditions:
-
Using a Sony Memory Stick PRO Duo™ (Mark2) media (sold separately).
- When an E PZ 16 - 50 mm F3.5 - 5.6 OSS lens is attached.
- The battery pack is used at an ambient temperature of 25^ (77^) .
- [Viewfinder Bright.]: [Manual] [± 0]
-
[Monitor Brightness]: [Manual] [± 0]
-
The number for "Shooting (still images)" is based on the CIPA standard, and is for shooting under the following conditions:
(CIPA: Camera & Imaging Products Association)
DISP is set to [Display All Info].
- [Focus Mode]: [Automatic AF]
- Shooting once every 30 seconds.
- The flash is used once every two times.
- The power is turned on and off once every ten times.
-
The number of minutes for movie shooting is based on the CIPA standard, and is for shooting under the following conditions:
-
[Record Setting]: 60i 17M(FH)/50i 17M(FH).
- Typical movie shooting: Battery life based on repeatedly starting/stopping shooting, zooming, turning on/off, etc.
- Continuous movie shooting: Battery life based on non-stop shooting until the limit (29 minutes) has been reached, and then continued by pressing the MOVIE button again. Other functions, such as zooming, are not operated.
Inserting a memory card (sold separately)
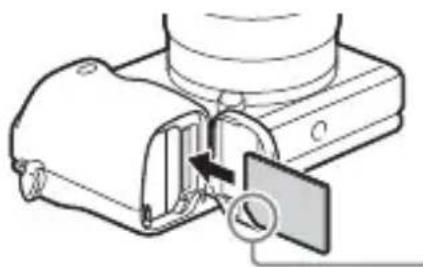
Ensure that the notched corner is faced correctly.
1 Open the cover (page 15).
2 Insert the memory card (sold separately).
- With the notched corner facing as illustrated, insert the memory card until it clicks into place.
3 Close the cover.
Memory cards that can be used
| Memory card For still images | For movies | ||
| A | Memory Stick XC-HG Duo™ | ✓ | ✓ |
| Memory Stick PRO Duo™ (Mark2 only) | ✓ | ✓ | |
| Memory Stick PRO-HG Duo™ | ✓ | ✓ | |
| B | SD memory card (Class 4 or faster) | ✓ | ✓ |
| SDHC memory card (Class 4 or faster) | ✓ | ✓ | |
| SDXC memory card (Class 4 or faster) | ✓ | ✓ |
- In this manual, the products in the table are collectively referred to as follows:
A: Memory Stick PRO Duo media
B:SD card
To remove the memory card/battery pack
Memory card: Push the memory card in once to eject the memory card. Battery pack: Slide the battery eject lever. Be sure not to drop the battery pack.
Notes
- Never remove the memory card/battery pack when the access lamp (page 13) is lit. This may cause damage to data in the memory card.
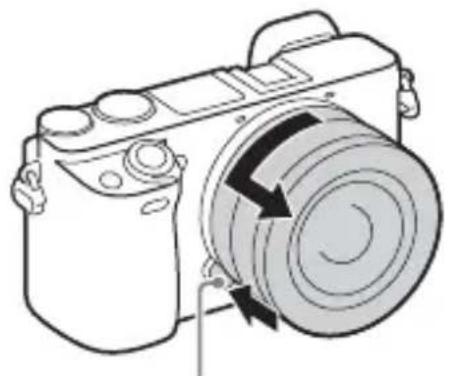
Attaching/removing the lens
Set the power switch of the camera to OFF before you attach or remove the lens.
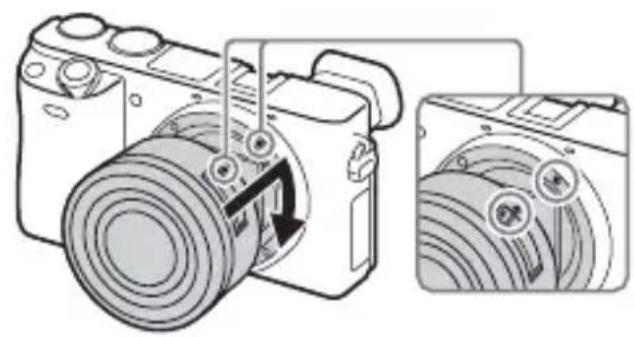
If the cap or the packaging lid is attached, remove it from the camera or the lens.
- Quickly change the lens somewhere away from dusty locations to keep dust or debris from getting inside the camera.
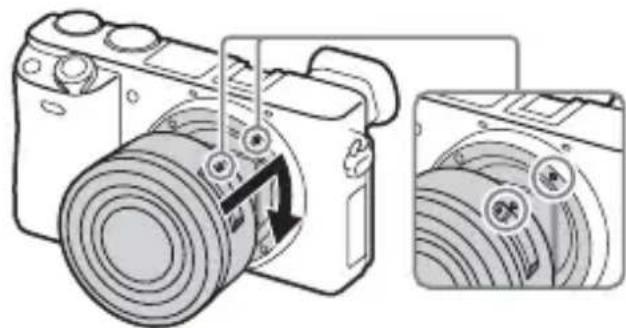
2 Mount the lens by aligning the white index marks on the lens and the camera.
- Hold the camera facing down to prevent dust from entering into the camera.
3 While pushing the lens lightly toward the camera, turn the lens clockwise until it clicks into the locked position.
- Be sure to put the lens on straight.
Notes
- When attaching a lens, do not press the lens release button.
- Do not use excessive force when attaching a lens.
- The Mount Adaptor (sold separately) is required to use an A-mount lens (sold separately). For details, refer to the operating manual supplied with the Mount Adaptor.
- When using a lens equipped with a tripod socket, attach the socket on the lens side to the tripod to maintain balance.
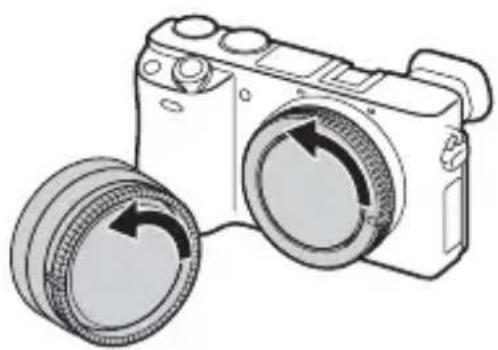
Removing the lens
Lens release button
1 Press the lens release button all the way in and turn the lens counterclockwise until it stops.
GB
Notes
- If dust or debris gets inside the camera while you are changing the lens and adheres to the surface of the image sensor (the part that converts the light source to a digital signal), it may appear as dark spots on the image, depending on the shooting environment. The camera vibrates slightly when it is turned off, due to the anti-dust function, to prevent dust from adhering to the image sensor. However, attach or remove the lens quickly somewhere away from dusty locations.
- If foreign material attaches to the image sensor, dust it off using a blower.
- Do not leave the camera with the lens removed.
- When you want to use body caps or rear lens caps, please purchase ALC-B1EM (Body cap) or ALC-R1EM (Rear lens cap) (sold separately).
- When you use a lens with a power zoom, set the power switch of the camera to OFF and confirm that the lens is completely retracted before switching lenses. If the lens has not retracted, do not press the lens in by force.
- When attaching the camera to a tripod, be sure not to touch the zooming/focusing ring by mistake.
Setting the clock
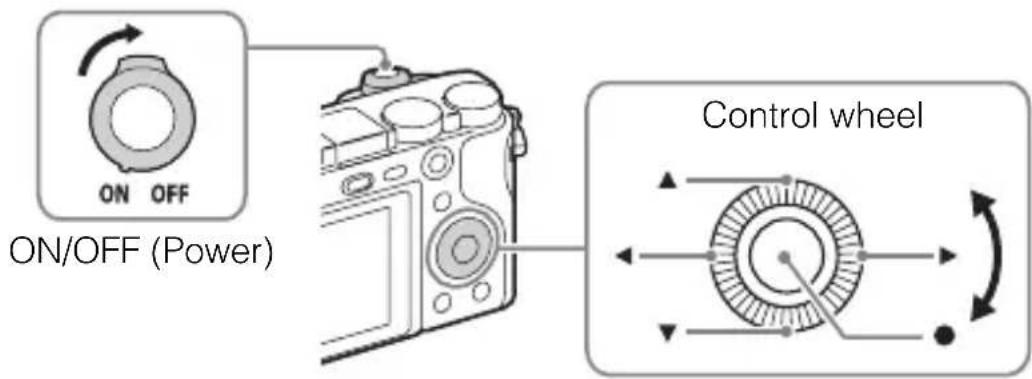
Select items: / / / / / / / / / / / / / / / / / / / / / / / / / / / / / / / / / /
Set:
1 Set the ON/OFF (Power) switch to ON.
The Date & Time setting is displayed when you turn on the camera for the first time.
- It may take some time for the power to turn on and allow operation.
2 Check that [Enter] is selected on the screen, then press on the control wheel.
3 Select a desired geographic location by following the on-screen instructions, then press .
4 Set [Daylight Savings], [Date/Time] and [Date Format], then press .
- When setting [Date/Time], midnight is 12:00 AM, and noon is 12:00 PM.
5 Check that [Enter] is selected, then press .
Shooting still images/movies
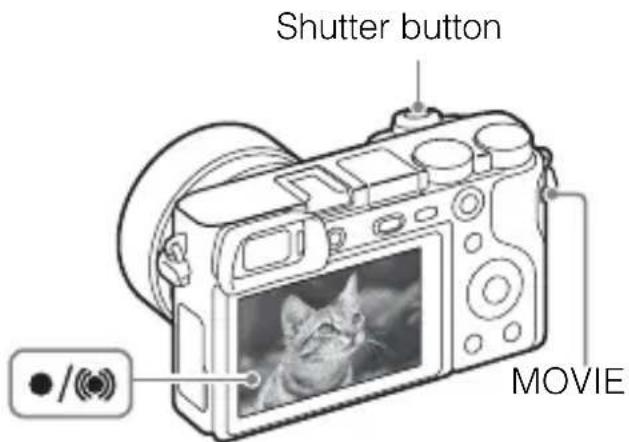
Shooting still images
1 Press the shutter button halfway down to focus.
When the image is in focus, a beep sounds and the or indicator lights.
2 Press the shutter button fully down to shoot an image.
Shooting movies
Press the MOVIE (Movie) button to start recording.
- When using a lens with a zoom lever: Move the zoom lever.
When using a lens with a zoom ring: Turn the zoom ring.
2 Press the MOVIE button again to stop recording.
Notes
-
Do not pull up the flash manually. This may cause a malfunction.
-
When using the zoom function while shooting a movie, the sound of the camera operating will be recorded. The sound of the MOVIE button operating may also be recorded when movie recording is finished.
-
For the continuous shooting time of a movie recording, refer to "Number of still images and recordable time of movies" (page 29). When movie recording is finished, you can restart recording by pressing the MOVIE button again. Recording may stop to protect the camera depending on the ambient temperature.
Viewing images
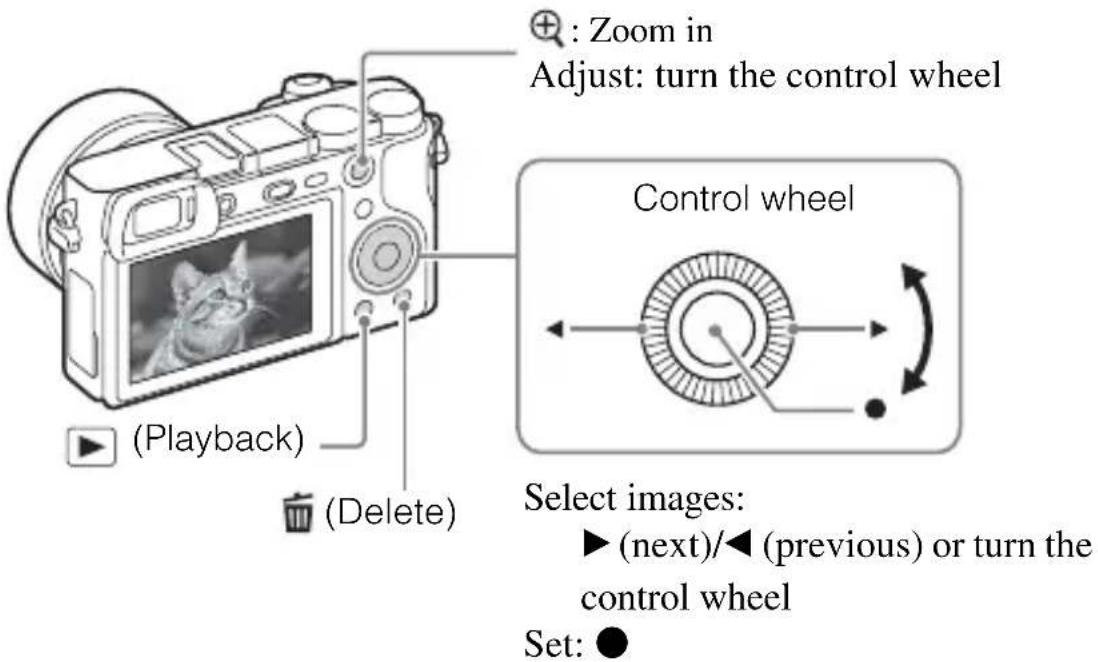
Selecting next/previous image
Select an image by pressing (next)/ (previous) on the control wheel or by turning the control wheel. Press in the center of the control wheel to view movies.
- Deleting an image
①Press the (Delete) button.
(2) Select [Delete] with on the control wheel, then press .
Returning to shooting images
Press the shutter button halfway down.
Introduction of other functions
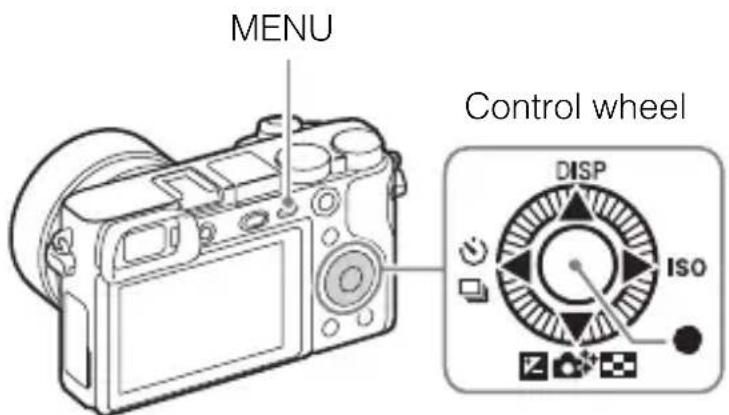
Control wheel
GB
DISP (Display Contents): Allows you to change the screen display.
ISO (ISO): Allows you to set the sensitivity based on the brightness.
Image Index): Allows you to view multiple images in a single-image screen at the same time.
(Photo Creativity): Allows you to operate the camera intuitively and shoot creative images easily.
(Exposure Comp.): Allows you to compensate the exposure and brightness for the entire image.
Drive Mode): Allows you to switch between shooting methods, such as single shooting, continuous shooting or bracket shooting.
- (Standard): [Lock-on AF] is assigned to this button in the default setting.
Fn (Function) button
Allows you to register 12 functions and recall those functions when shooting.
①Press the Fn (Function) button.
(2) Select the desired function by pressing / / / on the control wheel.
③Select the setting value by turning the control wheel.
Control dial
You can instantly change the appropriate setting for each shooting mode just by turning the control dial.
Features of PlayMemories Home™
The software PlayMemories Home allows you to import still images and movies to your computer and use them. PlayMemories Home is required for importing AVCHD movies to your computer.
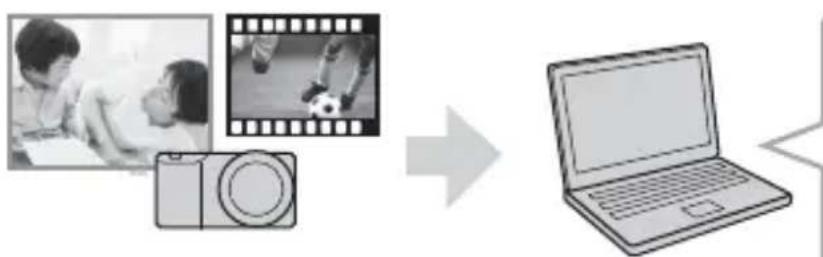
Importing images from your camera
Playing back imported images

For Windows, the following functions are also available:
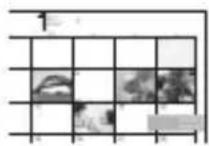
Viewing images on a calendar
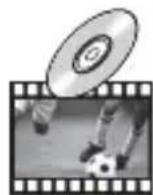
Creating movie discs


Uploading images to network services
Sharing images on PlayMemories OnlineTM

PlayMemories


- You can download Image Data Converter (RAW image editing software) or Remote Camera Control, etc. by performing the following procedure: Connect the camera to your computer launch PlayMemories Home click [Notifications].
Notes
- An Internet connection is required to install PlayMemories Home.
- An Internet connection is required to use PlayMemories Online or other network services. PlayMemories Online or other network services may not be available in some countries or regions.
- Use the following URL for Mac applications: http://www.sony.co.jp/imsoft/Mac/
- If the software PMB (Picture Motion Browser), supplied with models released before 2011, has already been installed on your computer, PlayMemories Home will overwrite it during the installation. Use PlayMemories Home, the successor software of PMB.
System requirements
You can find the system requirements for the software at the following URL: www.sony.net/pcenv/

■ Installing PlayMemories Home on a computer
Using the Internet browser on your computer, go to the following URL, and then install PlayMemories Home.
www.sony.net/pm/
- For details on PlayMemories Home, refer to the following PlayMemories Home support page (English only): http://www.sony.co.jp/pmh-se/
- When installation is complete, PlayMemories Home starts.
2 Connect the camera to your computer using the micro USB cable (supplied).
- New functions may be installed in PlayMemories Home. Connect the camera to your computer even if PlayMemories Home is already installed on your computer.
Notes
- Do not disconnect the micro USB cable (supplied) from the camera while the operating screen or the accessing screen is displayed. Doing so may damage the data.
- To disconnect the camera from the computer, click on the tasktray, then click (disconnect icon). For Windows Vista, click on the tasktray.
Adding functions to the camera
You can add the desired functions to your camera by connecting to the application download website (PlayMemories Camera Apps™) via the Internet.
http://www.sony.net/pmca
- After installing an application, you can call up the application by touching an NFC-enabled Android smartphone to the N mark) on the camera, using the [One-touch(NFC)] function.
Notes
- The application downloading function may not be available in some countries and regions. For details, refer to the application downloading website above.
Number of still images and recordable time of movies
The number of still images and recordable time may vary depending on the shooting conditions and the memory card.
Still images
[Image Size]: [L: 24M]
When [Aspect Ratio] is set to [3:2]*
| Quality\Capacity | 2 GB |
| Standard 330 images | |
| Fine 200 images | |
| RAW & JPEG 54 images | |
| RAW 74 images |
- When the [Aspect Ratio] is set to other than [3:2], you can record more pictures than shown above. (Except when [Quality] is set to [RAW].)
Movies
The table below shows the approximate maximum recording times. These are the total times for all movie files. Continuous shooting is possible for approximately 29 minutes (a product specification limit). The maximum continuous recording time of an MP4 (12M) format movie is about 20 minutes (limited by the 2 GB file size restriction).
(h (hour), m (minute))
| Capacity Record Setting | 2 GB |
| 60i 24M(FX)/50i 24M(FX) 10 m | |
| 60i 17M(FH)/50i 17M(FH) 10 m | |
| 60p 28M(PS)/50p 28M(PS) 9 m | |
| 24p 24M(FX)/25p 24M(FX) 10 m | |
| 24p 17M(FH)/25p 17M(FH) 10 m | |
| 1440×1080 12M 20 m | |
| VGA 3M 1 h 10 m |
- The recordable time of movies varies because the camera is equipped with VBR (Variable Bit-Rate), which automatically adjusts the image quality depending on the shooting scene. When you record a fast-moving subject, the image is clearer but the recordable time is shorter because more memory is required for recording. The recordable time also varies depending on the shooting conditions, the subject or the image quality/size settings.
Notes on using the camera
Functions built into this camera
- This manual describes 1080 60i-compatible devices and 1080 50i-compatible devices.
To check whether your camera is a 1080 60i-compatible device or 1080 50i-compatible device, check for the following marks on the bottom of the camera.
1080 60i-compatible device: 60i
1080 50i-compatible device: 50i
- This camera is compatible with 1080 60p or 50p-format movies. Unlike standard recording modes up to now, which record in an interlacing method, this camera records using a progressive method. This increases the resolution, and provides a smoother, more realistic image.
On use and care
Avoid rough handling, disassembling, modifying, physical shock, or impact such as hammering, dropping, or stepping on the product. Be particularly careful of the lens.
Notes on recording/playback
- Before you start recording, make a trial recording to make sure that the camera is working correctly.
- This camera is neither dust-proof, nor splash-proof, nor water-proof.
- Do not look at the sun or a strong light through a removed lens. This may cause irrecoverable damage to your eyes. Or it may cause a malfunction of the lens.
- If moisture condensation occurs, remove it before using the camera.
- Do not shake or strike the camera. It may cause a malfunction and you may not be able to record images. Furthermore, the recording media may become unusable or image data may be damaged.
Do not use/store the camera in the following places
- In an extremely hot, cold or humid place In places such as in a car parked in the sun, the camera body may become deformed and this may cause a malfunction.
- Under direct sunlight or near a heater
- The camera body may become discolored or deformed, and this may cause a malfunction.
-
In a location subject to shaking or vibration
-
Near a location that generates strong radio waves, emits radiation or is strongly magnetic
In such locations, the camera may not properly record or play back images.
-
In sandy or dusty places
-
Be careful not to let sand or dust get into the camera. This may cause the camera to malfunction, and in some cases this malfunction cannot be repaired.
On storing
Be sure to attach the front lens cap when not using the camera.
Notes on the screen, electronic viewfinder and lens
- The screen and electronic viewfinder are manufactured using extremely high-precision technology, and over 99.99% of the pixels are operational for effective use. However, some tiny black and/or bright dots (white, red, blue or green) may appear on the screen and electronic viewfinder. These dots are a normal result of the manufacturing process, and do not affect the recording.
- When the lens is operating, be careful not to let your finger be caught by the lens.
About the magnet
There is a magnet attached in the area around the flash. Do not put objects that are affected by magnetic fields, such as a floppy disk or a credit card to the screen or the camera body.
On using the lenses and accessories
It is recommended that you use Sony lenses/accessories designed to suit the characteristics of this camera.
Using the products of other manufacturers may cause the camera not to operate to its capability, or result in accidents and malfunctions of the camera.
Notes on shooting with the viewfinder
When shooting with the viewfinder, you may experience symptoms such as eyestrain, fatigue, travel sickness, or nausea. We recommend that you take a break at regular intervals when you are shooting with the viewfinder.
The required length or frequency of the break may differ depending on the individuals, so you are advised to decide at your own discretion. In case you may feel uncomfortable, refrain from using the viewfinder until your condition recovers, and consult your doctor as necessary.
Notes on the flash
- Do not carry the camera by the flash unit, or use excessive force on it.
- If water, dust or sand get into the open flash unit, it may cause a malfunction.
- Be sure to keep your fingers out of the way when you press the flash down.
On camera's temperature
Your camera and battery may get hot due to continuous use, but it is not a malfunction.
On the overheat protection
Depending on the camera and battery temperature, you may be unable to record movies or the power may turn off automatically to protect the camera.
A message will be displayed on the screen before the power turns off or you can no longer record movies. In this case, leave the power off and wait until the camera and battery temperature goes down. If you turn on the power without letting the camera and battery cool down enough, the power may turn off again or you may be unable to record movies.
On charging the battery
If you charge a battery that has not been used for a long time, you may be unable to charge it to the proper capacity.
This is due to the battery characteristics. Charge the battery again.
Warning on copyright
Television programs, films, videotapes, and other materials may be copyrighted. Unauthorized recording of such materials may be contrary to the provisions of the copyright laws.
No guarantee in the case of damaged content or recording failures
Sony cannot provide a guarantee in the case of failure to record or loss or damage of recorded content due to a malfunction of the camera or recording media, etc.
Cleaning the camera surface
Clean the camera surface with a soft cloth slightly moistened with water, then wipe the surface with a dry cloth. To prevent damage to the finish or casing:
- Do not expose the camera to chemical products such as thinner, benzine, alcohol, disposable cloths, insect repellent, sunscreen or insecticide.
Maintaining the screen
- Hand cream or moisturizer left on the screen may dissolve its coating. If you get any on the screen, wipe it off immediately.
- Wiping forcefully with tissue paper or other materials can damage the coating.
- If fingerprints or debris are stuck to the screen, we recommend that you gently remove any debris and then wipe the screen clean with a soft cloth.
Notes on wireless LAN
We assume no responsibility whatsoever for any damage caused by unauthorized access to, or unauthorized use of, destinations loaded on the camera, resulting from loss or theft.
Specifications
Camera
[System]
Camera type: Interchangeable lens digital camera
Lens: E-mount lens
[Image sensor]
Image sensor: APS-C format (23.5 mm × 15.6 mm) CMOS image sensor
Total pixel number of image sensor: Approx. 24700000 pixels
Effective pixel number of camera: Approx. 24 300 000 pixels
[Anti-dust]
System: Charge protection coating on Optical Filter and ultrasonic vibration mechanism
[Auto focus system]
System: Phase detection system/ Contrast detection system
Sensitivity range: EV0 to EV20 (at ISO 100 equivalent, with F2.8 lens)
[Exposure control]
Metering method: 1200-segment metering by the image sensor
Metering range: EV0 to EV20 (at ISO 100 equivalent, with F2.8 lens)
ISO sensitivity (Recommended exposure index):
Still images: AUTO, ISO 100 - ISO 25 600
Movies: AUTO, ISO 100 - ISO 12 800 equivalent
Exposure compensation: ± 5.0 EV (switchable between 1/3 and 1/2 EV steps)
[Shutter]
Type: Electronically-controlled, vertical-traverse, focal-plane type
Speed range:
Still images: 1/4 000 second to 30 seconds, BULB
Movies: 1/4 000 second to
1/4 second (1/3 EV step),
1080 60i-compatible device up to
1/60 second in AUTO mode (up to
1/30 second in [Auto Slow Shut.] mode)
1080 50i-compatible device up to
1/50 second in AUTO mode (up to
1/25 second in [Auto Slow Shut.] mode)
Flash sync speed: 1/160 second
[Recording media]
Memory Stick PRO Duo media, SD card
[LCD screen]
LCD panel: Wide, 7.5cm (3.0 type) TFT drive
Total number of dots: 921 600 dots
[Viewfinder]
Type: Electronic viewfinder
Total number of dots: 1440000 dots
Frame coverage: 100%
Magnification:
Approx. 1.07×
Approx. 0.70 × (35 ~mm -format equivalent) with 50 ~mm lens at infinity, -1 ~m^-1 (diopter)
Eye point: Approx. 23mm from the eyepiece, 21.4mm from the eyepiece frame at -1m^-1
Diopter adjustment: -4.0m^-1 to +3.0m^-1
[Input/output terminals]
Multi/Micro USB Terminal*: USB communication
HDMI: HDMI type D micro jack * Supports Micro USB compatible device.
[Power]
Battery type: Rechargeable battery pack NP-FW50
[Power consumption]
When using an E PZ 16 - 50 mm F3.5
- 5.6 OSS lens*
When using the viewfinder:
Approx. 2.8 W
When using an LCD screen:
Approx. 2.4 W
- supplied with ILCE-6000L/
ILCE-6000Y
[Others]
Exif Print: Compatible
PRINT Image Matching III:
Compatible
DPOF: Compatible
Dimensions (CIPA compliant)
(Approx.):
120.0mm× 66.9mm× 45.1mm
(4 3/4 inches × 2 7/8 inches ×
1 13/16 inches) (W/H/D)
Mass (CIPA compliant) (Approx.):
344 g (12.1 oz)
(including battery and Memory
Stick PRO Duo media)
285g (10.1 oz) (camera only)
Operating temperature: 0^ to 40^
(32°F to 104°F)
File format:
Still image: JPEG compliant (DCF)
Ver. 2.0, Exif Ver. 2.3, MPF
Baseline), RAW (Sony ARW 2.3
Format)
Movie (AVCHD format): AVCHD
format Ver. 2.0 compatible
Video: MPEG-4 AVC/H.264
Audio: Dolby Digital 2ch
Dolby Digital Stereo Creator
Manufactured under license from
Dolby Laboratories.
Movie (MP4 format):
Video: MPEG-4 AVC/H.264
Audio: MPEG-4 AAC-LC 2ch
USB communication: Hi-Speed USB (USB 2.0)
[Flash]
Flash guide number: 6 (in meters at ISO 100)
Recycling time: Approx. 4 seconds
Flash coverage: Covering 16mm lens
(focal length that the lens indicates)
Flash compensation: ± 3.0 EV
(switchable between 1/3 and
1/2 EV steps)
[Wireless LAN]
Supported format: IEEE 802.11 b/g/n
Frequency band: 2.4 GHz
Supported security protocols:
WEP/WPA-PSK/WPA2-PSK
Configuration method: WPS (Wi-Fi
Protected Setup)/Manual
Access method: Infrastructure mode
NFC: NFC Forum Type 3 Tag-compliant
AC Adaptor AC-UB10C/UB10D
Power requirements: AC 100 V to 240V 50Hz / 60Hz 70mA
Output voltage: DC 5 V, 0.5 A
Operating temperature: 0^ to 40^ (32^ to 104^)
Storage temperature: -20^ to +60^ (-4^ to +140^)
Dimensions (Approx.): 50mm× 22mm× 54mm (2 inches × 7/8 inches × 2 1/4 inches) (W/H/D)
Rechargeable battery pack NP-FW50
Battery type: Lithium-ion battery
Maximum voltage: DC 8.4 V
Nominal voltage: DC 7.2 V
Maximum charge voltage: DC 8.4 V
Maximum charge current: 1.02 A
Capacity: Typical 7.7 Wh (1080 mAh) Minimum 7.3 Wh (1020 mAh)
Lens
| Lens | E16 - 50 mm zoom lens1) | E55 - 210 mm zoom lens |
| Camera | ILCE-6000L/ ILCE-6000Y | ILCE-6000Y |
| Equivalent 35 mm-format focal length2)(mm) | 24 - 75 82.5 - | 315 |
| Lens groups/elements 8 - 9 9 - 13 | ||
| Angle of view2) | 83° - 32° 28.2° | - 7.8° |
| Minimum focus3) (m (ft.)) 0.25 - 0.3 | (0.82 - 1) | 1.0 (3.28) |
| Maximum magnification (×) 0.215 0 | 225 | |
| Minimum aperture f/22 - f/36 f/22 - | f/32 | |
| Filter diameter (mm) 40.5 49 | ||
| Dimensions (max. diameter × height) (Approx. mm (in.)) | 64.7 × 29.9 (2 5/8 × 1 3/16) | 63.8 × 10⁸ (2 5/8 × 4 3/8) |
| Mass (Approx. g (oz.)) 116 (4.1) 345 | (12.2) | |
| SteadyShot Available Available |
1) Power zoom.
2) The values for equivalent 35mm -format focal length and angle of view are based on digital cameras equipped with an APS-C sized image sensor.
3) Minimum focus is the shortest distance from the image sensor to the subject.
Design and specifications are subject to change without notice.
On focal length
The picture angle of this camera is narrower than that of a 35mm -format camera. You can find the approximate equivalent of the focal length of a 35mm -format camera, and shoot with the same picture angle, by increasing the focal length of your lens by half.
For example, by using a 50~mm lens, you can get the approximate equivalent of a 75~mm lens of a 35~mm -format camera.
Trademarks
Memory Stick and are trademarks or registered trademarks of Sony Corporation.
- "AVCHD Progressive" and the "AVCHD Progressive" logotype are trademarks of Panasonic Corporation and Sony Corporation.
- Dolby and the double-D symbol are trademarks of Dolby Laboratories.
- The terms HDMI and HDMI High-Definition Multimedia Interface, and the HDMI Logo are trademarks or registered trademarks of HDMI Licensing LLC in the United States and other countries.
- Windows is a registered trademark of Microsoft Corporation in the United States and/or other countries.
Mac is a registered trademark of Apple Inc. in the United States and other countries.
- iOS is a registered trademark or trademark of Cisco Systems, Inc.
- iPhone and iPad are registered trademarks of Apple Inc. in the United States and other countries.
- SDXC logo is a trademark of SD-3C, LLC.
- Android, Google Play are trademarks of Google Inc.
- Wi-Fi, the Wi-Fi logo and Wi-Fi PROTECTED SET-UP are registered trademarks of the Wi-Fi Alliance.
- The N Mark is a trademark or registered trademark of NFC Forum, Inc. in the United States and in other countries.
- DLNA and DLNA CERTIFIED are trademarks of Digital Living Network Alliance.
- Facebook and the "f" logo are trademarks or registered trademarks of Facebook, Inc.
YouTube and the YouTube logo are trademarks or registered trademarks of Google Inc.
- Eye-Fi is a trademark of Eye-Fi, Inc.
- In addition, system and product names used in this manual are, in general, trademarks or registered trademarks of their respective developers or manufacturers. However, the TM or marks may not be used in all cases in this manual.

InfoLITHIUM


HOMI

Additional information on this product and answers to frequently asked questions can be found at our Customer Support Website.
http://www.sony.net/
Responsible : Sony Electronics Inc.
Adresse: 16530 Via Esprillo, San Diego, CA 92127 E.-U.
Complies with IDA Standards DB00353
niMulti Interface Shoe
Accessory Shoe
(h (heure), m (minute))
| Capacité Réglage d'enreg. | 2 Go |
| 60i 24M(FX)/50i 24M(FX) 10 m | |
| 60i 17M(FH)/50i 17M(FH) 10 m | |
| 60p 28M(PS)/50p 28M(PS) 9 m | |
| 24p 24M(FX)/25p 24M(FX) 10 m | |
| 24p 17M(FH)/25p 17M(FH) 10 m | |
| 1440×1080 12M 20 m | |
| VGA 3M 1 h 10 m |
Batterie rechargeable NP-FW50
Format AVCHD Ver. 2.0
kompatibel
Video: MPEG-4AVC/H.264
Audio: Dolby Digital 2ch
Dolby Digital Stereo Creator
Konfigurationsmethode: WPS (Wi-Fi)
Protected Setup)/Manuell
niMulti Interface Shoe
Accessory Shoe
(CIPA: Camera & Imaging Products Association)
Pacco battery ricaricabile NP-FW50
(CIPA: Camera & Imaging Products Association)
Tip: Visor eletronic
Numero total de pontos: 1440000起点
(DCF Ver. 2.0, Exif Ver. 2.3, MPF
Baseline), RAW (Formato Sony
ARW 2.3)
Helpfunct. in camera
(CIPA: Camera & Imaging Products Association)
MPF Baseline), RAW (Sony ARW
2.3-formaat)
Bewegende beelden (AVCHD
Configuratiemethode: WPS (Wi-Fi Protected Setup)/Handmatig
Elementary apparatus
(CIPA: Camera & Imaging Products Association)
(wraz z akumulatorem
i Memory Stick PRO Duo)
285g (sam aparat)
Temperatura robocza: 0^ do 40^
Format pliku:
Film (Format AVCHD):
IaTa n3rOToBJIeHnI N3dJIInJ.
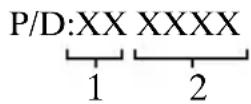
BbIMoKeTe y3HaTb DaTy H3rOToBJeHn Ha 3JEnyBa o6o3NaueHne "P/D: KOTOpoe HaxoHTcHa 3THKeTke Co IIItpnx KOJOM KapTOHHoKopo6Kn.
3HaKN, yKa3aHHbIe Ha 3TNKeTke co IITpNX KOJOM KapTOHHO Kopo6Kn.
- MecuH3rOToBJIeHHa
- TOn n3rToBJIeHHa
A-0,B-1,C-2,D-3,E-4,F-5,G-6,
H-7, I-8, J-9.
IaTa H3ROTOBJIeHnJAHTHn-HoHHOrO 6aTapeHOrO 6JIOKa yKa3aHbI Ha 6OKOBOCTOPOHe HJIn HA IOBepXHOCTN CHaKJIeHKOJ.
56yKBeHHO-UNΦPOBbIX CHMBOJIOB
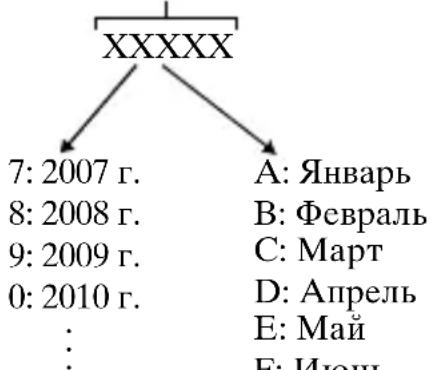
A:ЯHBapb
B:ΦeBpaJIb
C:Mapr
D: AIIpeJIb
E: Man
F: HIOHB
G: H0Jb
H:Abryct
I: Cenr8pb
J: OKTЯбpb
K: Hójípb
L:Декабpb
HaKMnTe KHOIIKy (IOJHrTHe BCbIHKN) IJIa NcIOJIb3OBAHHA BcIIHKN. BcIIIIka He IOIHMaetc aBTOMaTHYeCKN.
EcIN BcIIbIIka He HcIOJIb3yETc, OIyCTHTe ee B KOpIyc KaMepbl.
6ПиckpexHMOB i (HTeJIeKT.ABTO)/
i+ (CyIep aBTOpexHM)/ P (IpOraMMHOe aBTO)/ A (Ipnop.ДnaΦpaRMBI)/ S (Ipnop.BbIeRkN)/ M (PyHOn 3KcIO3nIIa)MR (BbI3OB IIaMRTN)/ (BnJeo)/ (PiHaOpamHbI O63Op)/ SCN (BbI6Op cHebl)
7ДиСКупразВлЕнЯ
8INHnKaTOp 3apaKn
Pa3bem Multi/Micro USB 1) -PoiJepKnBaet Micro USBCOBMeCTHMoe yCTpOcTBO.
10HDMI MmKpoRHe3do
1)ДЯ NOJUyeHnI NOJpO6HbIX CBeJeHH O COBMeCTHMbIX IIOJOHNTeJIbHbIX aKCEccyapax IIA MHOrOHTeppeHCHOro pa3beMa n pa3beMa Multi/Micro USB,IOceTHe Be6-caNT Sony IIN O6paTHTecb 3a KOHCyJIbTaIIeN K INJIepy Sony IIN B MeCTHBIn YIOJHOMOeHHbIn cepBnCHbIn IeHTp Sony. BbI TaKxe MoKeTe HcIOJIb3OBaTB aKCEccyapbl, COBMeCTHMbIe c pa3beMOM IJIa KpeIIeHnA kCEccyapOB. Pa6oTa c aKCEccyapAMn IpyHX IIPOH3BOJNTeJIeN He rapaHTnpYeTcra.
Multi Interface Shoe
Accessory Shoe

11Датунк okуляра
12BnOncKaTeJIb
13HaIa3HnK OkyJpa
- He yctaHaBJIHBAeTcHa KaMepy Ha 3aBOJe. PeKOMeHJyETcY cTaHOBHTb HaJIa3HNK OKyJaPa,ecJN IIpeIIOJaRaTeCnIIOJIb3OBaTb BINOINCKaTeJIb.
YcTaHOBka/CHaTne HaRJa3HnKa OkyIpa
CHIMTe HaJIa3HnK OKyJpa BO BpeMa yCTaHOBKn IOIOJIHNTeJIbHOrO aKceccyapa (IpoJaETcra OTJeJIbHO)Ha MHOrOnHTepFeienChbIn pa3beM.
14KK-əKpaH
BbIMoKxeOTpeRyJInpoBaTb 3KpaH,yCTaHOBnB eRO IIOXOPOIO BnIMMbIM yTJOM, IN BBIOJIHTb CbeMKy H3 JIO6OIOIIOJOKeHH.

15IinckpergyInpoBKn IIOITpa
- BbIOJIHnTe peRyJINpOBky c IOMOIIbIO IIcKa peRyJINpOBKn IHOITpa B COOTBeTCTBHN C BaIIM 3peHHe, IOKa B BINOHCaTEJe He IIOBHTcYeTKoe H3O6paXKeHne. EcJN BO3HnKaET TpyIHocTb IIpi IIOBOPTe INcKa peRyJINpOBKn IHOITpa, CHMITE HaJIa3HHK OKyJIpa, a 3aTeM IOBTOpHO BbIOJIHnTe peRyJINpOBKy IINcKa.
16KHOIIKa (IOHЯТиE BCIIbIINK)
17KhoIIKa MENU
18IIa cbeMK: KhoIka AEL IIa IPOcMoTpa: BocpoIN3BeJeHHe KpyIHbIM IIaHOM
19KhoIIka MOVIE(BnIeO)
20IIa cbeMKn: KHOIIKa Fn (FyHKIIIA) IIa IpoCmOTpa: KHOIIka (OTnpaB. Ha cMapTΦ.)
- BbIMoKTe OTo6pa3HTb 3KpaH IJIa [OTnpaB. Ha cMapTΦ.], HaxHMa KHOIIKy OTnpaB. Ha cMapTΦ.].
21KoJIecnKO yIpaBJIeHnIa
22KhoIIka C2 (IoiIb3ObaTeJIbcka 2)/ (YdaJIHTb)
23KhoIIka (BocIpOn3BeJeHne)
1 MeTka N)
- Pn IIOKJIIOueHnn KaMepbI K cMapTphiHy, KOtOpbI OcHaIeH cyHKiNeN NFC, IIpIKOCHNTecb K MeTke.
NFC (Near Field Communication)
IpeicTabJrEeT co6oM
MeKdyHapOnHbI cTaHApT
TexHOJIOTnB 6ecIIpOBOJHO
CB3N B KOPOTKOM IHaIa3OHe.
2KpbIIka coeHHHTeJIbHOIJIaCTINHbI
- IcnoJb3yIte ee npn HcIOJIb3OBaHnn aJaITepa IepemeHHoro ToKa AC-PW20 (IpOaTcra OTJeBHO). BCTaBBTe coeINHTeJIbHyIO IIaCTnHy BOTceK aKKyMjTOpa, a 3aTeM IIPOIyCTnTe IIPOBOI cKB03b KpbIIkky CoeINHTeJIbHOI IIaCTnHi, KaK IOKa3aHO HIXke.
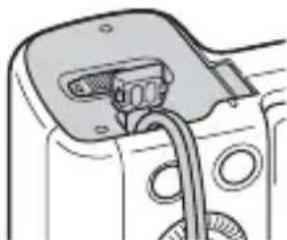
- Pn 3aKpbTnn KpbIuKN y6eITecb, YTO IPOBOJ He 3aIeMJIeH.
3OTBepCTHe rHe3Ja IJIa HTaTHBa
- IcnoJIb3yIte IIITaTHB c BInHTOM JINHOH MeHee 5,5 MM. B IpOTnBHOM cJyuae BbI He CMOKeTe IIOTHO 3aKpeINTb KaMepy, YTO MOKeT IIpNBecTN K ee IOBpeXJeHHIO.
4ДиHaMnK
5HnkaTOp IOCTyna
6KpbIuKa OTecka aKKyMyJIaTopa/KapTbI IaMHTN
7CJOT KaPTbI NaMRTN
8CJOTIIBACTaBKn aKKyMJIaTOPa
9PbIyaxok BbITaJIKNBaHnnaKKymJrTopa
06beKTHB
CM. cTp. 41 IO xapaKTepeNCTNKaM O6bekTINBOB.
E PZ 16 - 50 mm F3.5 - 5.6 OSS (прILAraeТСА K ILCE-6000L/ILCE-6000Y)
1KoJIbIcO 3yMMnPoBaHnIa/ okycnpoBkn
2PbIyaxok 3yMMnpoBaHn
3MeTka KpeJIeHnIa
4KoHTaKTbI IOcOeHHeHnO6BeKTHBa1)
1) He npkacaTecb HeNOCpeIcTBeHHO K 3TOH YacTN.
1 OTKpoIte KpbIshKy.
2 BcTaBbTe aKKymyIaTOp.
HaKIMa npIyaXOK BbITaJIKNBaHnA aKKyMjYrTopa, BcTaBbTe aKKyMjYrTop TaK, KaN IOKa3aHo Ha pncyHke. Y6eJNTecb, YTO pbIyaXOK BbITaJIKNBaHnA aKKyMjYrTopa 3aIeJIKNyJcHIOcJIe BCTaBKn.
BcIyue 3aKpbIBaHnKpbIIHKn C HeIIpaBnJIbHO BCTaBJIeHHbIM aKKyMyJITOpOM MOxHO IOBpeINTb KaMepy.
RU
3apЯdka aKKymyIaTopa
1 Поdkлочite kaMEpy Kaadantepy nepemehnHoro Toka (прILAraeTc)сnomoцькабеля micro USB (прILAraeTc).
2 Подсоевине радаNTepпеременHorTo TOKa K cTeBOI pO3eTKe.
HnHKaTOp 3apKn ropnt opaHexeBbIM IBeTOM, HnHaHHaETcra 3apKa.
- BbIKJIIOHTe KaMepy Ha BpeMa 3apIKN aKKMyJITopa.
- AkkyjTOp MOxH0 3apKaTb, JaXe ecJn OH YacTHUHO 3apXKeH.
- EcJIN JIaMIOUka 3apJIKN Mnraet H 3apJKA He 3aBepIIeHa, N3BJIeKHTe HCHOBa BCTaBbTe aKKyMyJIaTOP.
Приимechanicals
- EcJH HINKATOP 3apJIK Ha KaMepe MInrae T npI IIOJKIIOueHHaIaITepa IepMeHHORO TOKA K ceTeBOH p03eTKe, 3TO yKa3bIBaeT Ha TO, YTO 3apJIKa BpeMeHHO OCTaHOBJIeHa H3-3a BbIXOJa TeMIIepaTypbI 3a IIpeJebli peKOMeHNyEMOro DnAIIa3OHa. KorJa TeMIIepaTypa BO3BpaIaTcR K yCTaHOBJIeHHOMy DnAIIa3OHy, 3apJIKa BO3O6HOBJIaETCr. PeKOMeHNyETcR 3apJXaTB aKKUMyJIaTOp IIpN OKpykaIOIeH TemIIepaType ot 10^ do 30^ .
- EcJH yUacTOK pa3bema aKKyMyJIaTOPa 3aIrp3HeH, aKKyMyJIaTOp MOKeT He 3apKaTbcr 3ΦΦeKTHBHO. B ΘOM cJIyae CJeRka IIpoTpHTe IIJIb MЯrKoI TKaHbIO HJIN BaTHbIM TaMIOHOM, YTO6bl OYHCTHTb yUaCTOK pa3bema aKKyMyJIaTOPa.
- ΠодсоeДиHITe aДaПТeРпeMeEHORo TOka (ПprHJIaRaTeС) K 6ЛИжаIIeIe cTeBOI pO3eTKe. ПрвВОЗнКHOBEHIN KaKHX-JIbO HeHCIIpaBHOCTe I BO BpeMЯ ИСПОЛБЗOBaHЯ aДaПТeРа пepeMeEHORo TOka HemeДЛeHHO OTKJIIOHTe ПИТaHHe, OТСоeДИHHB IITeПCEЛbHyI O BJIky OT ceTeBOI pO3eTKI.
- По завершени зарядки OTКлючпесааПТЕ релеменHorO TOKa ot ceTeBOй po3eTKH.
- OśraTeJIbHo hCIOJIb3yIte ToJIbKO opHrHaJIbHbI aKKymJITop Sony, Ka6eJIb micro USB (πρnJIaRaetc) n aДaITeP IepemeHHoro Toka (πρnJIaRaetc).
- ПИтанne He ПОДаeTcR BO BpeMЯ cБeMKn/BOcIIpOu3BeJdeHnR, ecJIи KaMepa IIOДКЛIOUHeHa K ceTeBOrpo3eTke (IITeINceJIbHOrpo3eTKe) c IOMOIIbIO IIpHlaRaEMo r OaIaNTepa IIpeMeHHoro ToKa. IcNoJIb3yIte aIaITeP IIpeMeHHoro ToKa AC-PW20 (IpoJaetc OTJeJIbHo) IJIЯ ПОДaHu IITaHnR K KaMepe BO BpeMЯ cБeMKn/BOcIIpOu3BeJdeHnR.
BpeMa 3apAdkn (Ponna 3apAdka)
BpeM3ap4IKN C IIOMOIbIO aIaIITepa IepeMeHHORo TOKa (IprHJIaRaETcra) paBHO IIp6JIN3HTeJIbHO 310 MInHyT.
Приимechanicals
- YKa3aHHOe BbIe BpeM 3apJKN OTHOCHTcK 3apJKe IIOJIHOCTbIO pa3pJXeHHOTo aKKyMJuTOpa IIpn TeMIIepaType 25^ . 3apJka MoXeT BbIIOJIHrTbcR IOJIbIe B 3aBHCIMoCTn OT ycJIobN H O6CTOraTeJIbCTB HcIIOJIb3OBaHH.
3apKa npN pOdkIIOueHn K KOMNbIoTepy
AkkymyJIaTOp MoXHo 3apJITb IocpeIcTBOM IOIcOeINHeHnKaMepbI K KOMIIbIOTepy c IIOMOIbIO Ka6JIa micro USB.
PpmeaHna
- O6paTHTe BHHMaHHe Ha cJIeIyIOIIne oO6eHHocTH Ipr 3apJKe c IOMoIbIO KOMIbIOTepa:
- EcJn KaMepa IOnKJIIOueHa K HOyTOky C aBTOHOMHBIM IITaHHeM, ypOBeHb 3apJKN aKKyMyJIaTopa HOyTOkya cHN3HTc. He BblIOJIHnTe 3apJkY B TeYeHHe IIpoJOIXTeJIbHOrO IIepNoJa BpeMeHn.
-He cJIeIyET BKJIIOUaTb/OTKJIIOUaTb HJIN Ipe3aIpyKaTb KOMIIbIOTep JIN60 IpeBODHTb eRO B pa6OuHn peXHM N3 CIIaero, KOrJa MExKy KOMIIbIOTepOM H KaMepo YcTaHOBJIeHo USB-coeHNHeHne. 3TO MOxEt IIpNBecTH K HeHCIIpaBHOCTN KaMepbI. IpeEi BKJIIOUeHNEm/BbIKJIIOUeHNEm HJIN Ipe3aIpy3KoI KOMIIbIOTepa, HJIN IpeEi BBIBOOM KOMIIbIOTepa H3 CIIaIeRo peXHMa OTcoeIHHnte KaMepy OT KOMIIbIOTepa.
-3apKa c IOMOIIbIO KOMIIbIOTepa, BblIOJIHeHHoro Ha 3aKa3, HIN MOHΦHnIPOBaHHORO KOMIIbIOTepa He rapaHTnpyeTc.
BpeMa pa60TbI aKKymyJtopa N KOJInueCTBO CHIMKOB, KOTOpbIe MOryt 6bITb 3aIIncaHbI IN BOCpOu3BeDeHbI
KapTa IaMaTn: HaxMnte KapTu IaMaTn OINH pa3 IJIe ee N3BJIeueHn. AkKymJIaTOP: IpeEiBnHbTe pbIur BbITaJIKNBaHnA aKKymJIaTOPa. CJeIHTe 3a TeM, YTO6bI He yPOHNTb aKKymJIaTOP.
PpMueHn
- HNKoIa He BbIHMaTe KapTu NaMAYaKKMyJIaTOp, KOrJa RopHT HHnKaTOp IocTyHa (cTp. 15). 3TO MoXeT IIpNBecTH K IOBpeJdeHHIO DaHHbIX Ha KapTe NaMAYtH.
YcTaHOBka/ChrTne o6BeKTHBa
Ipeπ yctaHOBKO nJn cHrTHeM o6bekTHBa yCTaHOBNTe BbIKJIIOuAteJIb IIHTAHNaKaMepbI B IIOJOxKeHne OFF.
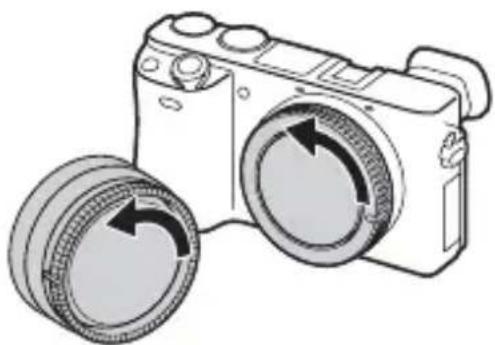
1 EcIn KpbIshka nIn ynaKOBoHna KpbIshka yCTaHOBJIeHbI, CHIMITE ee C kamepbI nIn C 6beKTnBa.
-БыICTpo cmeHHTe obBeKTHB IOJaJIbIiE OT IIbJIbHbIX MeCT, YTO6bl He IOnyCTNTb IOnaIaHnI IIJIIN IJIM Mycopa BHyTpB KaMepbl.
2 YcTaHOBnTe OBeKTHB, COBmecTnB 6eIbIe MeTKn Ha oBeKTHBe N Kamepe.
- IepKHTe KaMepy JInueBOI CTOpHOB BHN3 IJIa IIpeIOTbpaIeHNA IOBTOpHOro IIOIIaHnI IIbIJN B KaMepy.
3 AkkypaTHO 3aBnraJ OBeKtNB KAmepy, NOBOpaHbAte ero no YacOBov CTpeJIke Do Tex nOp, NOKa OH He 3aSeIKNHeTcR B QNKcnpOBaHHOM NIOJoxeHnn.
- Y6eIITecb, yTO o6BeKTHB yCTaHaBJIINBaETc8 6e3 IIpekeOca.
RU
PpMeeHn
- Pn yTaHOBKe oBeKTHBa He HaXMaTe KHOIIky OTCoeINHeHnO6BeKTHBa.
He npJIaRaIte Ype3MepHbIe ycJIINI ppN pNKePJIeHNIO6'BeKTHBa. - IIЯ ИСЮЛБЗОВАнЯ объЕКТИВа c A-ПepeхODHнКOM (ПрОДaEТСЯ OTДeJIbHO) HeO6XODIM yCTaHOBOUHbI aДaПТeР (ПрОДaEТСЯ OTДeJIbHO). ПОДрОБНье CBeДeHЯ IIpHBeДeHbI B pyKOBOДСТBE IIO 3KcIIJyTaUH, IIpHJIaRaEMOM K YCTaHOBOUHOMY aДaПТePy.
- Pn HcnoJIb3OBaHnn O6beKTHBa, OCHaIeHHOro rHe3IOM IITaTHBa, IIpHKpeIIHTe rHe3IO Ha o6BeKTHBe K IITaTHBV JJI COxpaHeHna paBHOBeCn.
Сразные obъektiva
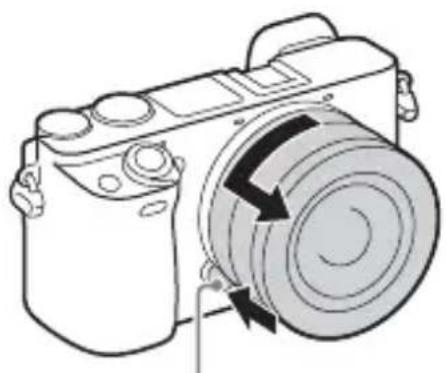
KhONka OTCOeDINHeHnOBSeKTnBa
1 Haxmnte KhoNky OTCOeDINHeHnA OBeKtNBa N NOBepHnte OBeKtNB IpoTnB YacOBoN CTpeJKN Do ynpopa.
PpMMeaHnA
- IIIIIaHIN BHyTpB KaMepbI IIbIJN HJIM Mycopa BO BpeMra 3aMeHbIO6BeKTHBa H OceHaHnEro Ha IOBepXHOCTn DaTUnKa H3O6paKeHHa (JeTaJIH,IIpeO6pa3yIOHe CBeT B IINΦpOBo CHHaJI), B 3aBNCMOCTn OT ycIOBnCbeMKn Ha I3O6paKeHH MoYr IOBHTbcr TeMHbIe ToKKn. IIprBBIKJIIOueHH Kamepa 6yTe HEMHO BROpOBaTB B pe3yJIbTaTe pa6OTbI yHKInu YdaJIeHH NBIJN, YTO6bI IIpeoTBPaNTb IIpiJINHaHne IIbJIH K DaTuNKU H3O6paKeHHa. Tem He MeHee, HaeBaTb HJIN CHHMaTB O6BeKTNB HVKHO bICTPO, IIaJIbIIe OT IIJIbHBIX MecT.
-
EcJH Ha JAtYHK H3O6paXeHHaIIO JIO NocToPOHHee BeIeCTBO, yJaJIHTe erO C IOMOIIbIO BO3IVXoYBKN.
He ocTabJIaIte KaMepy co CHaTbIM 6'beKTHBOM. -
EcJIN BbI XOTHTe INCIOJIb3OBAbTb KpbIIIKN 6aHHeTa INJIN 3aIHHe KpbIIIKN o6BeKTHBa, IIpno6peTHTe ALC-B1EM (KpbIIIIka 6aHHeTa) INJIN ALC-R1EM (3aHnRA KpbIIIIka 6bEeKTHBa) (IPOJaETcR OTJeJIbHO).
- IIpn HcIOJIb3OBaHHI IIpNBODHO 3yMa IpeEi 3aMeHOJ O6beKTHBa yCTaHOBHTe BbIKJIIOuHaTeJI bIIITaHHa KaMepbI B IOJOxKeHHe OFF n y6eINTEcB, YTO O6BeKTHB IOJIHOCTbIO BTaHyT. EcJIH O6BeKTHB He BTaHyT, He 3aKpbIBaHTe eRO IIpNHUYNTeJIbHO.
- IIpnIINKpeIIJIeHNN KaMepbI K IITaTHBy He IIpHKacaiTecb K KOJIbIy 3ymmnpoBaHn/ΦOKycnpoBKn IIO OIIIn6Ke.
YcTaHOBka YacOB
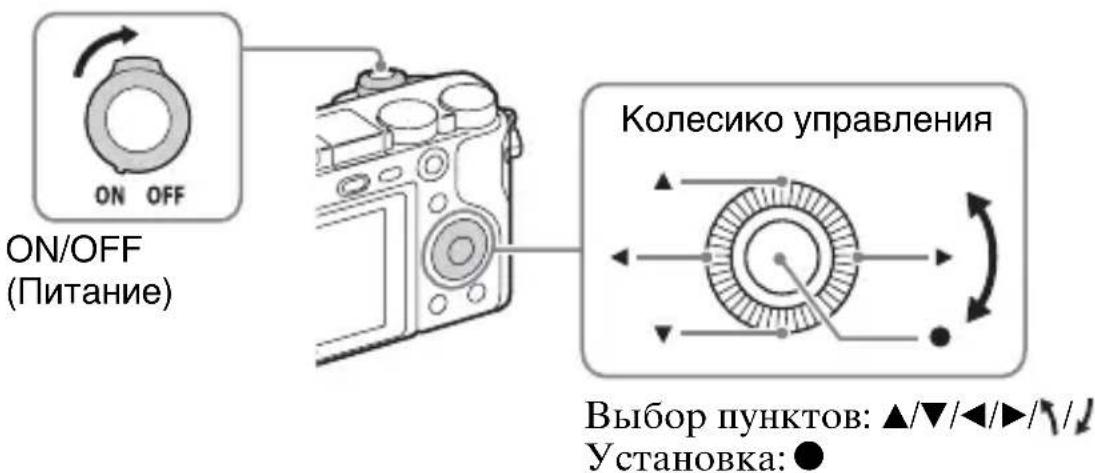
1 YcTaHOBnte BbIKIIOuateJIb ON/OFF (PITaHne) B ON. Ipi IIepBOM BKJIIOUeHHKamepbI 6yJeT OTO6paJKeHa yCTaHOBka IaTbI N BpeMeHn.
- IJIy BKJIIOUeHnI NITaHnI NIOJIyUeHnI NOCTYIIa K cyHKIIINM KaMEpbIMOKeT IOTpe6OBaTBcH HeKOTOpoe BpEM.
2 Y6eIntecb, yTO Ha 3KpaHe Bbl6paHO [BBOd], a 3aTeM HaxMITE Ha KOJecnke ynpabJIeHnI.
3 BbI6epnte HuxHoe reorpaqnueckoe MeCTOnIOJoxKeHne, CJIeDyI INCTpyKcIaM Ha 3KpaHe, a 3aTeM NaXmTe
RU
4 YcTaHOBnTe [JeTHee BpeM], [DaTa/BpeM] n [ΦOpMaT DaTbI], a 3aTeM HaXmITE ●.
-Пи установке [ДаТa/Bремя] плноь обзнayаetся kaK 12:00 AM, a плдень kaK 12:00 PM.
5 y6eIntecb, yTO BbIbpaHO [BBoI], a 3aTeM haxmnte
ΦOTOCbEMKa/BnndeOcBemKa

ΦOTOCbEMka
1 HaXmTe KHOkky 3aTBopa HanoJIOBHy dJa BbINOJIHeHnA QOKycuPoBKn.
EcJIH3o6paXeHHe HaxoIHTcBΦOKyce, pa3Jaetc8ByKOBOn CnHaJI N BbICBeUHbAeTcNHNkATOp ● nJIi
I MnpT n3o6paXeHn n3 KaMepbl

Bocnpon3BeJeHne mnpOpTnpoBaHHbIX CHIMKOB
ДЯ Windows takxe doctynbI cneyuOuNeФункиN:
PpocmOt p CHIMKOB nO KaJIeHdApI O
Co3dahne BndeOndc KOB


3arpy3ka CHUMKOB BCETeBbie CJI

CobmecTHoe
NCIOJIb3OBaHne
H3O6paXeHnB nporpaMMe
PlayMemories OnlineTM
PlayMemories

- BbIMoKeTe 3aRpy3nTb Image Data Converter (IporpaMMHoe o6ecIeueHHe IIO peJaKTHpOBaHHIO I3O6paXeHH RAW) IIIN Remote Camera Control n T.I., BbIIIOJIHNB cJIeIyIOUyIO IpoIeIpy: IOnCoEINHHTe KaMepy K KOMIIbIoTepy 3aIyCTnTe PlayMemories Home IeJIKNHTe [YBeIOMJIeHH].
PpmeaHn
-Дя установки PlayMemories Home Heo6xOIMO INHTepHET-coeINHeHne.
- ΠЯ ИспОЛьЗОВаня PlayMemories Online ИлиpyгИХ ceTeБых служб Heo6xOДМо ИНтepHET-coeДиЕнe. PlayMemories Online ИлиpyrgHe ceTeBbIe cIyЖБbl MOrYT 6bITb HeIOCTuПьБI B HeKOTOpbIX cTpahax Или peRHOHax.
- Исторы селедуюшни URL-aicpec Ддя пиложен Mac: http://www.sony.co.jp/imsoft/Mac/
- EcJn IIpoIpaMMHoe o6ecneueHne PMB (Picture Motion Browser), IOCTaBJIeMa c MoJeIaMn, BbIIyIeHHbIMn IIO 2011 r., yJx eYcTaHOBJIeHo Ha KOMIIbIOTepe, OHO 6yIeT 3aMeHeNo IIpHIOXeHHeM PlayMemories Home BO BpeM aYcTAHOBKn. HcIOJIb3yIte PlayMemories Home, 3aMeHy IIpoIpaMMHoro o6ecneueHne PMB.
CnCTeMHbIe Tpe6ObaHnA
CnCTeMHbIe Tpe6OBaHnK IIpOgrpaMMHomy OBeCIIeHu IIPNBeIeHbI IIO cJIeIyIOIeMy URL-aIpecy: www.sony.net/pcenv/

YctaHobka PlayMemories Home Ha KOMnbTepe
1 CnomoIbIO INHTepHeT-6pay3epa Ha KOMnbIoTepepeiDnte K cIeDyHouSeMy URL-aIpcCy, a 3aTeM yCTaHOBInTe PlayMemories Home.
www.sony.net/pm/
- Побьи ecbeHnO npJIOKeHn PlayMemories Home -пвeны Na cJIeIyIOUeI CTpaHnIe IOДePJKn PlayMemories Home (TOJIbKO Ha aHrJIInCKOMЯ3bIke): http://www.sony.co.jp/pmh-se/
- Послесаьершени установки заистеня рпюжень PlayMemories Home.
2 ПоdkлючITE kaMEpy K KOMNbIOTepy C NOMOuHo Ka6eJn micro USB (npnilaraetcra).
KoJIInUeCTBOΦOTOCHIMKOIBVpeM3aINCHMOKeT6bITbpa3HBIMB 3aBnCnMoCTNOTycIOBn CbeMKN KApTbI NaMRTN.
ΦOTOCHUMKU
[Размер n3o6p.]: [L: 24M]
Ecn [opMaT] yctaHOBJeHo B [3:2]*
(h (aacbI), m (MHHyTbI))
| Емковские Парамерblаan. | 2 Гб |
| 60i 24M(FX)/50i 24M(FX) 10 m | |
| 60i 17M(FH)/50i 17M(FH) 10 m | |
| 60p 28M(PS)/50p 28M(PS) 9 m | |
| 24p 24M(FX)/25p 24M(FX) 10 m | |
| 24p 17M(FH)/25p 17M(FH) 10 m | |
| 1440×1080 12M 20 m | |
| VGA 3M 1 h 10 m |
O6paIaITeScb c H3JeJIHem ocToPOxHo, He pa36npaIte I He MoINΦHIIpyIte erO, He IOIbEpraIte erO yIapHbIM I pyrHM HaIpy3KaM: He cTsyIte IIO HeMy, He poHnTe erO, a TaKxe He hAcTyIaIte Ha Hero. ByIbTe OcO6eHHO OCTOpOxHbI C O6bEKTHBOM.
PpmeHnno 3aHcN/BOcnpOn3BeDeHnO
- IpeiHaayaIOM 3aIINcN BbIIOJIHnTe IIpo6HyIO 3aIINcB, YTO6bI y6eIHTbcr B HaJIeKaIeJ pa6Ote KaMepbl.
- IaHHa KaMepa He YBJIeTcra IIbJIe3aIIHHeHHO, BJIaRO3aIIHHeHHO IN BOJOHeIIpOHnIaEMoI.
He cmOTpHte Ha coJIHcIe HJIN hCTOuHNK cJIbHOrO cBeTa uepe3 cHrTbI O6BeKTHB. 3TO MOKeT BbI3BaTb HeIOIIpaBIMoe IopaxeHne BaIIHX rJa3.
HJH JKe MoKcET IIpNBecTn K HeNCIIpaBHOCTn O6BeKTnBa.
- EcJH IIpoN3OoiTe KOHJeHcaUaIaIu, yJaJIHTe ee IpeJ NcIOJIb3OBaHHeM KaMepbl.
He TpIcHTe KaMepu H He IIOBepraTe ee yIapam. 3TO MoKeT IIpNBecTH K HeHcIIpaBHOCTn, H 3aIIINc bΦOTOCHMKOB cTaHET HeBO3MOXHO. BoJIee TOrO, MoKeT HcIIOpTHTbcra HocHTeJIb HΦOpMaIIHH NJIH MOrTy IIOBpeIITbcra DaHHbIeΦOTOCHMKOB.
He ncpoIb3yIe/He xpaHnte Kamepy B cIeDyuOuX MeCTax
B Ype3MePHO JapKOM, XOJIOHOM HIN BJIaXHOM MeCTe
B TaKHX MeCTax, KaK, HApPnMep, B aBTOMO6HJIe, IIpHIIapKOBAHHOM IIOI IIpYMBIM COJIHeUHbIMN JIyuaMNI, KOpIyc KaMepbI MOJKeT JeΦopMnPoBaTbcra, YTO MOJKeT IIpNBecTH N HeHCIIpaBHOCTN.
- ПОД пямьIM сОЛHEЧнБIM сBEТOM ИЛN BOЗЛe обогреВаTeJIЯ
Корпс Камеры может обесцBetHTьсЯ ИЛN DeфорМирOBaTBсЯ, И ЭТО может пивецк K HeHCПpaBHOCTN.
B MeCTe, IOIIBeRKeHHOM BCTpXHbHIO HJIN Bn6paIIH
B6JIH3n reHepaTOPOB cnJIbHbIX paIIOBOJH, HCTOuHNKOB paIHaIINHOHOro H3JIyueHHa, IJIIM B MeCTax C cnJIbHbIMMaTHHTHBIMN IOJIaMn B TaKHX MeCTax KaMepa MoKeT HeIIpaBNJbHO BbIIOJIHrTb 3aIINc bIIN BOCIpOn3BeJeHne fOTOCHMKOB.
B MeCTax c IOBbIeHHbIM coJIepKaHHeM IeCKa IIIN IIbIJN ByIbTe ocTOpOxHbI, YTO6bI He IOnIyCTHTb IOnIaHaHn IeCKa IIIN IIbIJN B KaMepy. 3TO MoKet IIpNBecTH K HeNCIIpaBHocTH KaMepbI, IN B HeKOTOpbIX CJIyAax 3Ta HeNCIIpaBHocTh He MoKet 6bITb yCTpaHeHa.
O xpaHeHm
He 3a6yIbTe ycTaHOBnTb IpeEINIOU KpbIIKky o6beKTnBa, KOrJa KaMepa He NCIOJIb3YeTcra.
Приимechаши OTHOCHTeNbHO 3KpaHa, 3JIeKTPoHHoro BVDONCKaTeI N OБъКТиВa
- Θкрази ṬлЕКТРОHHьИ BИДОнСКаTeЛь ИЗROTOВJIeHы C ИСПОЛБ3OBaHHeM Oсбо ВьICOKOTOч"HуТExHOLIOTи,ЧTO ПОЗBOJЯETПи ḋКСПЛУаТaΙΝИ NФФФЕKTINBHO ИСПОЛБ3OBaTb CBblIe 99,99% ПИКCEЛe.ОДнAKO Ha ḋКраН e NДЛЕКТРОHHOM BИДОнСКaTeЛe MOrY T ПОЯВЛЯТьСЯ МАЛЕнБКп TeMHыe H/NII N CBETЛьe TOUKN (6eJIrO, KpacHOrO, сИнero IJIIN 3eJIeHOrO ΠВeTa).Тakne TOUKN YBJIЯOTcpe3yЛьTaTOM ПОИЗВОДСТBEHHorO ПЮICEСA И HN B KoEМepe He BЛINHOT Ha 3aIIINCb.
- Pn pa6oTe o6bekTnBa 6yIbTe ocTOPOxHbI, YTO6bI BaIIIN IaJIbIbI He 6bln 3aIeMJIeHbI O6bekTnBOM.
O marhnte
Praom co BCIIIKoI IprKpeJIeH MaHHT. He pa3MeIaIte IpeIMetbI, Ha KOTOpbIe OTpuIaTeJIbHO BO3IeCTBHyOT MaHHTHbIe IOJIa, HApIMep INCKETbI HJIN KpeIHTHbIE KapTbI, Ha 3KpaH JIN Ha KopIyc KaMepbl.
06 nCnoJb3OBAHm OBn npHaJeXHOCTe
PekomeHdyetc HcIOJIb3OBaTb 6ObBeKTHBbI/IIpHaJIEJXHOCTN Sony, COOTBeTCTByIOUHe XapaKTepnCTNKam JaHHoK KamepbI. IcIOJIb3OBaHHe H3JeJIIN IIpyrNX IIPOIN3BOJNTeJei MoKTe IIpNBecTH K HEBO3MOJXHOCTN HcIOJIb3OBaHnBCEx IIapaMeTpOB KaMepbI INJIN IIpNBeJEET K IOJOMKaM IN HeHCIIpaBHOCTAM KamepbI.
PpmeHnOTHOCHTbHO CbeMKNCBNDONCKaTeJIeM
Bo BpeMcBemKn cIOMOIIbIO BnIOHcKaTeJIaMOryT BO3HNKHyTb TaKHe CmITOMbI, KaI IepeYToMJIeHne rJa3, yCTaJIOCTb, yKaUHbAHne HJIu TOIHOTa. Bo BpeMcBemKn cIOMOIIbIO BnIOHcKaTeJIaPeKOMeHdyeTcJ DeJaTb IIepepbIBbI Chee3 paBHOMepHBie IIpOMeKytKN BpeMeHn.
Tpe6yemam JINTEJIbHOCTb HJN YacTOTa IpepebIBOB MOKeT OTJINuATbcB 3aBnCHMOCTH OT INHNBUNyaJIbHBIX OCO6eHHOCTeH, IIO3TOMy peKOMeHJyETcR IIpHHMaTb peIeHHe Ha cBOe yCMOTpeHne. B cJyue yxUIIeHncaMOYvBCTBnRA BO3IepKHTecb OT INCIOJIb3OBAHnRA BINOONCKaTeJIa IO Tex IOp, IOKa CNMIITOMbI He NcYe3HyT, IN ObpaTNTecb K BpaUy B cJyuae HEo6XODIMOCTH.
PpmeHnOTHOCHTbHO BCpbIiKKn
He Iepenochte KaMepy, Iepka ee 3a BcIIbIiKy, H He IIpNlaRaTe K HeI Upe3MePHoe ycJIne.
- Понаданne BОДы, пьлл ИлппесkaВ OTКрыTуO BCПьИШКу может прпсгн
К HeHcПрabHOCtN.
CJIeIHTe 3a TeM, YTO6bI IIpN cKJIaIbIBaHHBcIIbIiIKn IaJIbUHe IIpeIIrTCTBOBaJIH ee IIepMeIeHNIO.
O TemnepaType kamepbi
KaMepaHaKKMyJITOP MORYT HArpeBaTbCBApe3yJIbTaTe IPOJOJIJKHTeJIbHOrO HcIOJIb3OBaHnA, HO 3TO He JABJIeTCa HeNCIIpaBHOCTbIO.
O 3aunTe ot neperpeBa
B 3aBnCHMOCTN OT TeMIIepaTpybI KaMepbI n aKKyMyJIaTOPa, BnJeocbEmKa MOKeT 6bITb HeBO3MOxHa HJIN IHTaHHe MOKeT BBIKJIIOuATbcra ABTOMaTHUeCKN JJIa 3aIHTbI KaMepbI.
IpeBbIKJIIOUeHHeM IIHTaHnI IINIpeTeM, KaK cTaHeT HeBO3MOJHa BIIeOCbEMKa, Ha 3KpaHe IIOBNTcCoO6IeHne. B 3Tom cIyuae ocTaBbTe IITaHHe BbIKJIIOUeHHbIM IIOJOxJITe, IOKa TeMIIepaTypa KaMepbI aKKymjTOpa He cHI3NTcI IO IIpHeMJIeMOrO ypOBHn. IIpn BKJIIOUeHHN IITaHnHE OCTbIBIeB IIOCTaTOuHOI CTeIeHN KaMepbI IIN aKKymjTOpa, IITaHHe MOKeT OTKJIIOUHTbcra CHOBa IIN BBIIIOJIHeHne BIIeOCbEMKn MoKeT CTaTb HeBO3MOJKHbIM.
O 3apYe aKKymyTopa
ПиЗаряДke aKKуМЛЯТОпа,КOTOPьн He HcIOЛь3OBaJIСВ TeЧЕНe IJInteJIbHOrO BpeMeHH,ЗapЯINTb eRO lo HaJIeJkaIeE mKOCTH MoXeT 6bITb HEBO3MOxHO.
To cBra3aHO c xapaKTepeHCTHKaMn aKKyMyJIaTopa. 3apAInTe aKKyMyJIaTOp eIe pa3.
IpeDynpexKdEHe o6 aBTopcknx npaBax
Ha TeJIeBn3HNOHHbIe IpOgpaMMbI,ΦHJIbMbI,BNIEOJIeHTbI IN JpyrHe MaTepeHaJIbIMoKeT pacIIpoCTpaHЯTbCra ABTOPcKoe IIpaBO. HeIIpaBOMOuHaJ Ipe3aINcTaKHX MaTepeHaJIOB MoKeT IIpoTHBOpeUHTb IIOJOxKeHNm 3aKOHa o6 aBTOPcKOM IIpaBe.
TapaHTnHe npedocTabJAreTcB clyuae nobpeKdHn HOpMaun nn c6o npn 3aunCn.
Sony He Mojke T IIpeIOcTaBnTb rapaHTIO B cIyue c6oA IIpi 3aIIncn, IIOTePn HJIN IOBpeKJIeHnI 3aIIncAHHO IHΦOpMaIIN BCJIeIcTBHe HeHCIIpaBHOCTH KamepbI HJIN HocHTeJIa HHΦOpMaIIN H T.I.
Чистka NOBepxHocTn KaMepbl
OuHCTHTe IOBepxHOCTb KaMepbIMaTkoTkaHbIO, CJIeTKaCMoueHHoB OIoN, a 3aTeM IIpoTpHTe IOBepxHOCTb cyXoTkaHbIO. YTo6bI He IIOBpeINITb IOKpbITHe HJIn KOpIyc:
- He IOJBepraIte KaMepy BO3JeIcTBHIO XHMUeCKHX BeIeCTB, TaKHX KaK pa36aBHTeJIb, 6eH3HH, cIIHPr, pa3OBbIe caJIΦeTKH, XIKKOCTb OT HaCeKOMbIX, COJIHHe3aIHTbI KpeM HJIN IHCEKTNI.
yxo3a 3KpaHOM
KpeMJIpyK nJIn yBJIaXHЯHOUIe cpeIcTBO,OCTaBIIeEeHa 3KpaHe,MOKeT IOBpeINb eTo IOKpbITHe. Ppr IIOnaJaHHu Yero-JIN6O Ha 3KpaH, HEmeJIJeHHo BbITpHTe erO.
- BbITnpaHHe c HaxHMOM C IIOMOIbIO caJIΦeTKN HJIN dpyrNX MaTePnaJIOB MOKeT IIpNBecTH K IOBpeKJdeHHIO NOKpbITnJ.
- EcJn Ha əKpaHe ocTaJIncb OTNeaTKn IaJIbIeB IJIIN IIJIb, peKOMeHnyeTc8 OCTOpOxHO yJaJIHTb INx, a 3aTeM HaUIncTO BbITEpeTb əKpaH MfKoN TkaHbIO.
Ppimechnno 6ecnpoBODHOJIOkaJIbHOJ cETN
MbI He Hecem OTBeTCTBeHHocTH 3a JIO6oe IOBpeJdeHHe, IpNnHeHHoe HecaHKUHOHPoBAHHbIM DOCTYIOm IJIH HeCAHKUHOHPoBAHHbIM IcIOJIb3OBaHHeM, COJIepXHMORO, 3aIpyKeHHORo Ha KaMepy, B pe3yJIbTaTe IOTepn IJIu KpaXn.
TexHnueckne xapaKTepeNCTnKN
Kamepa
[Cnctema]
TnI KaMepbI:UuΦpOBoi ΦoToaIIapaT co CMeHHbIM O6BeKTHBOM O6BeKTHB:O6BeKTHBc E-inepeXoHnKOM
[Датунк ИЗОБразжени]
MeToI 3aMepa:1200-cerMeHTHOe H3MepeHHe IaTtHKOM H3O6paJKeHHJ
ДиаэонэКсIOЗамера:OTEV0 IO EV20(IprnəKBHBAJIeHTe ISO100,cO6BJeKTHBOMF2.8)
UyBCTBHTeJIbHOcTb ISO (peKOMeHnyemay BeJInuHa 3KcIO3nui):
ΦOTOCHIMKII: AUTO, ISO 100-ISO 25600
BnIeO3aIinCn: AUTO, əKBbBaJIeHT ISO 100- ISO 12800
KOMIIeHcaIIHa 3KcIIO3NIIN: ± 5,0EV (IOCTyIINHO IpeKJIIOUeHne MeJxIy IIIaRamn 1/3 n 1/2 EV)
[3aTBop]
TII: CJIeKToHHbIM yIpaBJIeHnEM, BepTHKaJIbHOrO XoJa, IITOPHO- IIeJIeBOrTO TIIa
Диаэн Вьдержек:ФOTOCHMKn:OT1/4000ceKyHbI IO 30 ceKuH, BULBBnEo3aHncI:OT1/4000ceKuHbI IO 1/4 ceKuHbI (Ⅲar1/3EV),108060i-coBMecTHMoeyctroINCTBOIO1/60ceKuHbIBpeKIMe AUTO(IO1/30ceKuHbIBpeKIMe [ABTO MeJI.3aTB.])108050i-coBMecTHMoeyctroINCTBOIO1/50ceKuHbIBpeKIMe AUTO(IO1/25ceKuHbIBpeKIMe [ABTO MeJI.3aTB.])
Ckopoctb cnHxpoHn3aunn BCIIHK:1/160 ceKyHbI
[HocnteIb 3aIncn]
Memory Stick PRO Duo, Kapta SD
[KK-3KpaH]
KK-ⅡaHeJIb: IIIInpuHa, 7,5 cm (TIN3,0) cxema ynpabJIeHnA TFT
Obeee KoJIInueCTBO ToyeK: 921 600 ToyeK
[BudonckaTeIb]
TnI: ΘJIeKToHHbI BUNOnCKaTeJIb
O6iuee KOJIInueCTBO TOyeK: 1440000TOyeK
OTo6paXeHne KaJaPa: 100%
YBeJIInueHHe: pr6Jn3.1,07× pr6Jn3.0,70× (王KBINBaJIeHT 35-MMΦopMaTa)cO6bekTHBOM
50MMHa6ecKOHeUHOCTH,-1M-1
(IIOITpN)
ToUkaΦokycnroBKn:Piu6JIn3. 23MMOTOKyIpa,21,4MMOT paMKN OKyIpaHa-1M-1
PeryJInpOBka IIOIITpa: -4,0M^-1 IO +3,0M^-1
[Pa3beMbI BBOda/BbIBOda]
Pa3bem Multi/Micro USB*: USB-coeINHeHne
HDMI: MinkpOrgHe3do HDMI Tnna D
PRINT Image Matching III: COBMcCTHMa
DPOF: CoBmecTUMa
Pa3MepbI (B COOTBeTcTBnC CIPA) (PpH6JIH3.):
120,0MM× 66,9MM× 45,1MM (III/B/Γ)
Bec (B COOTBeTCTBnC CIPA) (PpH6JIn3.):
344r
(BKJIIOUa aKKyMMyJrTOPn
Memory Stick PRO Duo)
285 r (TOJIbKO KaMepa)
TeMIIepaTpa 3KcIIyatau: OTo 0^ Do 40^
ΦopMaT ΦaIIa: ΦOTOCHIMOK:B COOTBeTCTBnC JPEG (DCF Bep.2.0, Exif Bep.2.3, MPF Baseline), RAW (ΦopMaT Sony ARW 2.3) BnIeO3aIIncb (ΦopMaT AVCHD):ПоДeржka ΦopMaTa AVCHD Bercn 2.0 BnIeO:MPEG-4AVC/H.264 Ayno:Dolby Digital 2-KaH. Dolby Digital Stereo Creator -N3rTOBJIeHO IIO JInIeH3nn KOMIaHnDolby Laboratories. BnIeO3aIIncb (ΦopMaT MP4): BnIeO:MPEG-4AVC/H.264 AyIIO:MPEG-4 AAC-LC 2-KaH.
USB-coeINHeHne:Hi-Speed USB (USB 2.0)
[BcnbIwka]
BeIyIeeyIcIIOBCIIbIIIKN:6(B MeTpax IIpN ISO 100)
BpemI Ipepe3apAikn: Pnp6JIn3. 4ceKyHdbI
IIHaIa3OH JeIcTBnB BCIIbIKN: IOKpbIbAeT yroJ OXBaTa 16 MM o6BeKTHBOB (pOKychoe paCCTOJHHe, yKa3aHHoe Ha o6BeKTHBe)
KoppeKIIaBbIIIKN: ± 3,0 EV (IOcTyIHO IpeKJIIOueHne MeKJy IlaRaMn 1/3 n 1/2 EV)
[Becnpobodna Jokaibna ceTb]
050059, AImaTbI, yInuca IBaHnIOBa,
A. 58
IIOJIHNTeJIbHaIHHOpMaIINHIOIaHHOMU H3JeJIINHOOTBeTbIHa YAcTO 3aJaBaEMbIE BOIIPOcblMOrYT ObITb HaIeHbI HaHaIIeMeB6-caITe IIOJIepKKnIOKYNaTeJIeI.
http://www.sony.net/
RU
Ykpa'HcbKa
E-nevexiDnK
IaTa BnroToBneHnBnpo6y.
IaTa BnroTOBJIeHHa Bnpo6y 3a3HaueHa Ha IIO3HaUi «P/D:», JaKa 3HaxoHTbcra Ha etIKeTci 3i IITPnx-KoJOM Ha KapToHHi Kopo6ii.
3HaKn, 3a3HaueHi Ha cTnKcIi 3i IIITpNx-KoIOM Ha KapToHHi Kopo6ii.
- MicrBbBuroBJeHH
2.PiK BuroTOBJeHHa
A-0, B-1, C-2, D-3, E-4, F-5, G-6, H-7, I-8, J-9.
Pik Ta MicaB Bnpo6HNTBa JITIEBO-iOHORO 6aTapeHORO 6IOKy IPOHTAMIOBAHI Ha 6OKOBi IOBepxHi a6o Ha IOBepxHi 3 etHKeTKOIO.
KoI 3 5 nItePHnx Ta uΦpOBx cHMBOJIb

Sony Corporation 1-7-1, Konan, Minato-ku, Tokyo, Japan, 108-0075.
YIOBHOBaJKeHn IpeIcTaBHnK B YKpaIHi:
TOB «CoHi YKpaIIHa», ByJ. CnacbKa 30, M.KnIb, 04070, YKpaIIHa.

O6JiaHaHHB iINOBiJa e BmOram:
-TexhiHoro peIaMeHTy 6e3IeKn Hn3bKOBoJbTHoro eJIeKtpuHoro o6JaHaHHa (noctaHOBa KMY BiD 29.10.2009 No 1149)
-TexhiHoro perIaMeHTy 3 eJIeKTpomarHiTHoi cymicHOCTi o6JaHaHHa (IOCTaHOBa KMY BiI 29.07.2009 No 785)
Bnpo6HKn CoHi KopnopeHIN IHM orOIOIHyE, IIO npncTpiI ILCE-6000/IIuΦpOBn foTOaIapat 3i 3mHHM o6'EKTHBOM BiIIIOBIAe BmORam Ta iHIIIIM 3acTOcOBHM IIIOJKeHHaM TexHicHO perJIaMeHTy paIioo6JIaHaHHaI TeJIeKOMyHikaIIHO rKInueBOr (TePMHaJIbHOrO) O6JaHaHHra.
Отимати лжларцию влковиносту можа заадpecою TOB «Сони Ук paiна», ByЛ. Спасьka 30, М. Киев, 04070, Ук paiна, e-mail info@sony.ua.
Ochobha onepaia Kpok 2 cTOp. 24
-ФOTO-Ta BiDeO3HOMKa
HcIO B IyKkax Bka3ye Ha KJIbKiCTb.
IocetaeTb3 ycima Moedern
- Φοτοπαρατ (1)
- IIIHyp XXNBJIeHHY (1)* (He nocTaHaetbcy CIIA Ta KaHaJi)

*Ito foToaapanapaTa moKe 6yTu IooHaHO JeKJIbKa IIHypIB KHBJIeHHra. BnKOpncTOByTe ToI IHHyp,IO BiINOBiJaE yMOBaM ekCIIJyaTaui y BaIIi KpaIHi a6o perioHi.
- AkymyJIaTOpHn6JIOK NP-FW50 (1)
- Ka6eJIb Micro USB (1)
- AДаПТер 3MiHнО CTpyМY AC-UB10C/UB10D (1)

-ПлесовпpeMHb(1)

HaouHnK okyJaPa (1)
- Ioci6HnK 3 ekcnIyatauii (eH noci6HnK) (1)
Wi-Fi Connection/One-touch (NFC) Guide (1) YIbomyIOci6Hnky HabeJeHO IIOaCHeHHaYHKi,po6Ota KINX BImarae 3'eHaHHa Wi-Fi.
ILCE-6000
Kpnka Kopnyca (1) (BcTaHOBJIeHa Ha foToaIapati)
ILCE-6000L
- O6'ekTnB 3i 3mHHO ΦOKyCHOIO BiCTaHHIO E16 - 50 mm (1) (BcTaHOBJeHa Ha φoToaIapati)/ IpeJH KpIIka o6'ekTnBa (1) (BcTaHOBJeHa Ha o6'ekTnBi)
ILCE-6000Y
O6'ekTnB 3i 3MiHHoI OOKyCHO BICIaHHIO E16- 50 mm (1) (BcTaHOBJIeHa Ha oToaIapati)/IpeEINKpIIka 6'ekTnBa (1) (BCTaHOBJIeHa Ha 06'ekTnBi)
- O6'ekTnB 3i 3MiHHoO φOKyCHOIO BiIcTaHHIO E55 - 210 mm (1)/ IpeHnKpnIIka o6'ekTnBa (1)/ 3aHnIKOBIIaOHJIO o6'ekTHBa (1)/6JIeHJa o6'ekTHBa (1)
Elenements no to anapata

8O6'ekTnB
9BaioHcT
10IaTnK 3o6paXeHHa2)
11KoHTaKTn o6'ekTnBa2)
1) He 3aKpNBaIe Te IeIeMeHT III qac 3aIINcyBaHHa Bideo.
2) He TopkaTec8 6e3IOcepeHbO Iboro eJIeMeHTa.
BirgЯн 6e3 o6'ekTnBa
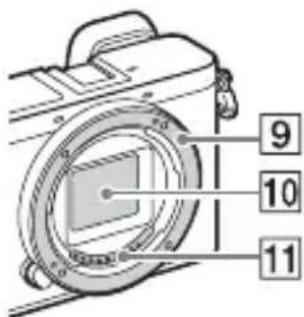
1KhoIIka 3aTbopa
2KhoIIka C1 (cpeiaJIbHa 1)
3CeHcopIyJIbTa IINCTaHIiHO KepyBaHHA
4IepeMnKaU ON/OFF (KINBJeHHa)
5IHHINKaTOp aBTOcHycky/ IIICBiTKa IJIa aBToΦOKyca
6KhoIIkaΦikcaTopa 06'ekTnBa
7MikpoΦoH 1)
UA
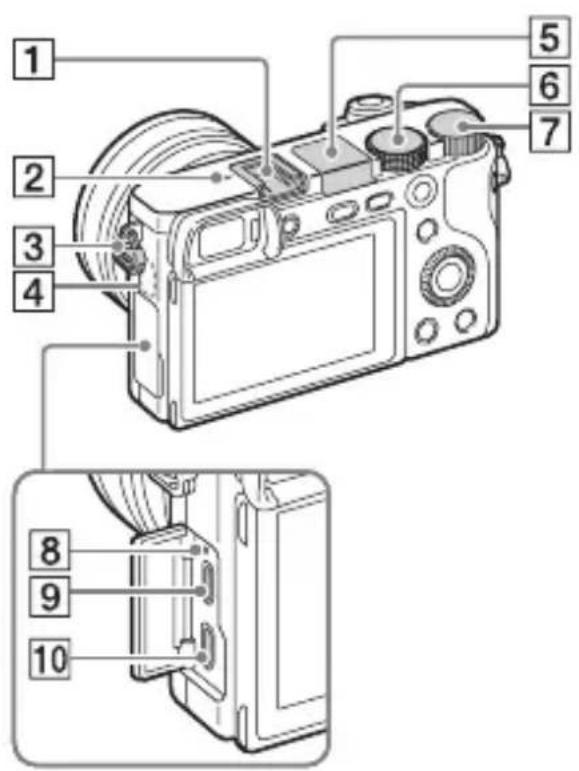
1 BaratoiHTeppeinchn po3'em1)
2Пиэнчka ПОJOKeHЯДaTиKa 3O6paJKeHЯ
3TayOKIJIaIIeYOBOROpemHn
4 CeHcop Wi-Fi (B6yIOBaHn)
5Cnajax
HaTnCHiTb KHOIIKy (PiHraTTcnaJaxy),IO6 IIINrtn cnaJax.CnaJax aBTOMaTHUHO He IINHimaETbcra.
- KIIO cIIaJax He IOTpi6Hnn, IOTnCHiTb Ioro Ha3aJy KOpIyc Bnpo6y.
6ДиckпepemkaHЯpexIMiB
i (IHTeJIeKTyaJIbHe aBTO)/
iO* (Cynepe aBTopeKIM)/
P (IporpaMHe aBTo)/
A (Piopnt. iaqpaMn)/
S (PiopHTeT BHTpIMKn)/
M (PyuHa ekCno3nii)/
MR (BiikJnKaH. nam'ATi)/
(ΦiJIbM)/
(Панорамний orяД)/
SCN (Bn6ip cieH)
7KoJIiIaTko KepyBaHnHa
8IHINKaTOp 3apJxKaHnHa
9Po3'em Multi/Micro USB 1)
PiTpmyIOb8 npHcTpoi, cyMiChi 3 po3'emOM Micro USB.
10Mikpopo3'emHDMI
1)ДЯOTPIMaHHIeTaJIbHOi iHΦopMaII Ipo cymiche npJIAIJaIJA 6araToIHTepeHcHOro po3'Emy Ta po3'emy Multi/Micro USB BiBiaIaIte Be6-caIT KOMIIaHI Sony a6o 3BepHiTbcra IO dJIepa Sony qu B MicueBn aBTOpN3OBaHm cepBicHn IeHTp Sony. MoKHa TaKoK BHKOPnCTOByBaTHI pNJlaIaIg, JKe cymicHe 3 PO3'EMOM IJIaIaIJa.Cymicha po6Ota 3 IprJlaIaIam IHINX BInpo6HnKIB He rapaHTyETbcra.
niMulti Interface Shoe
Accessory Shoe
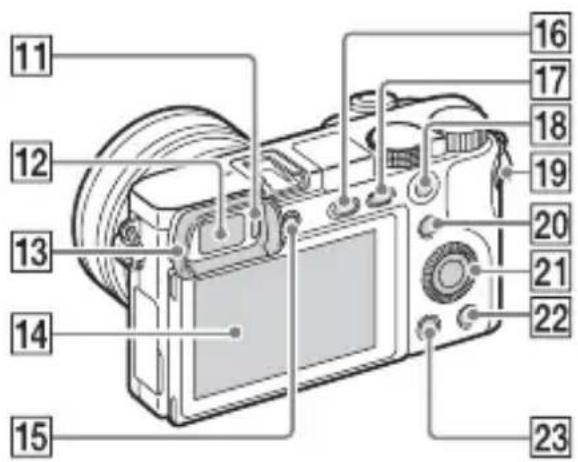
11 CeHcop OKa
12BnOuKaU
13HaouHnKokyIpa
He BCTaHOBJeHO Ha
foToaIapaT Ha Bnpo6HnTBI.
KIO BN IJIaHyTe
BHKOPNCTOByBaTH BnOIIyKaU,
peKOMeHNyETbCra II'EDHaTN
HaOHNK OKJIpa.
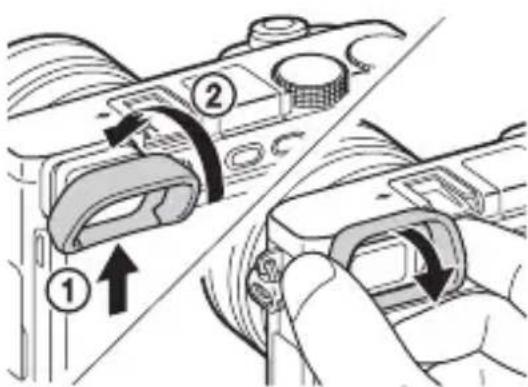
Пд'еданна/Вд'еданна
Наочнka okулра
3HimaTe HAOuHK OKyJaPa B pa3i iin'eHaHHn IIpHJaIaIIa (PpOdaetbcg OkpeMo) 6araToiHTeppeHcHOro po3'Emy.
14PK-ekpaH
EkpaH MoXHa HaxNJHT TaK, 3pyuHO 6yIO INBHTcra i 3HIMaTH 3 6yIb-koTO IOJIOKeHH.
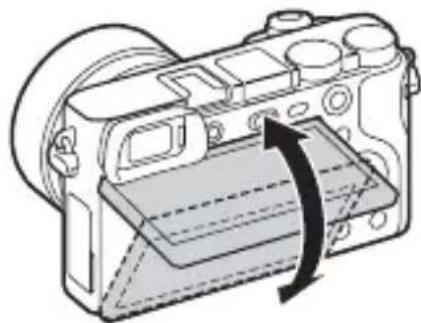
15ДиСК haJIaIITyBaHЯДIOIITpiI
- PeryIIOHTe IINCK HaJIaITyBaHHI IOITPIBIIIOBIHO IO CBOO 3OPY, IOKN IINCIJIeH He 6yIe YITKO BnHO y BnIOIyKaYi. KaIO BaXKO IOBePTaTH INCK HaJIaITyBaHHI IOITpi, 3HIMiTb HAOuHHK OKJIpa i BiIPeRyIIOHTe IINCK.
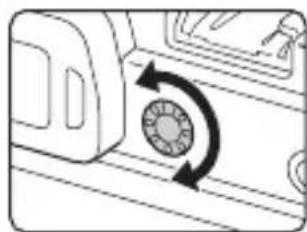
16KhoIIka (PiHraTTcnaJaxy)
17KhoIIka MENU
18IIIA 3HOMKn: KHOIIKa AEL IIIAIpeRJIaIy: MacHTa6yBaHHn iI qac BiITBOpEHn
19KhoIIka MOVIE (Bideo3HOMKa)
20IIJ3HOMK: KHOJIkaFn(BNKJIHKΦyHKiI) IJIaIpePeJIaIy: KHOJIka (HaicJI. Ha cMapTΦ.)
- IIa BiO6paKeHHeKpaHa [HaicJI. Ha cMapTΦ.] HaTnCKaIte KHOIIKy (HaicJI. Ha cMapTΦ.).
21ДиСК КерУВаHHЯ
22KHOIIKa C2 (cIeIiaJIbHa 2)/ KHOIIKa (BnJaJITN)
23KhoIIka (BIDTBOpEHn)
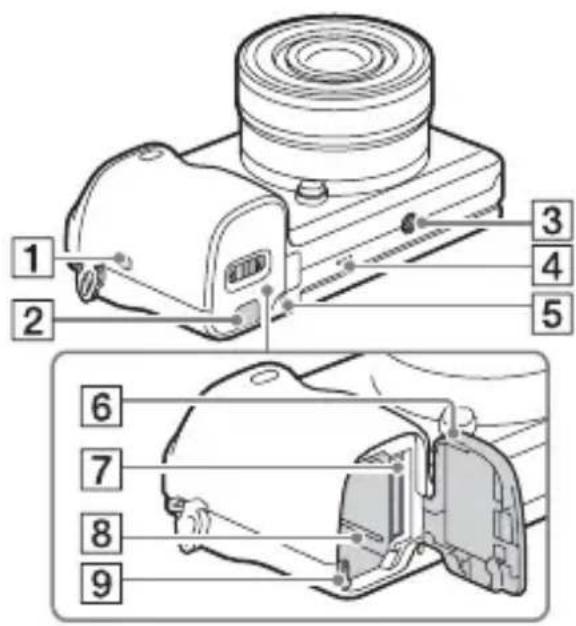
1 (n3HaUka N)
TopKHiTbcra iiei no3Hauchny pa3iPiEHaHHaOaIapata Io cMaprFOHy 3 IIITpHMKOIO fHKii NFC.
NFC (Near Field Communication, «3B'ЯЗК Ha HeBeJIHKHX BiIcTaHЯX») - Ie MIXHapOДнИ CTaHДapT TexHOJIOIi 6e3IpoTOBOrO 3B'ЯЗКу MaIOrO paIiyCy II.
2KpnIIka 3'eHnYBaJIbHOI IIaTHH
KopntyTeCnIeJIeMeHTOM y pa3i BHKOpHCTaHHaIaITepa 3mIHHO cTpyMy AC-PW20 (IpoJaETbcra OKpeMo). BcTaBTe 3'EnHyBaJIbHy IJIaTy y BiICiK aKyMyJIaTOPa Ta IIpocuHbTe IINHpYepe3 KPNIKy 3'EnHyBaJIbHOI IJIaTH, Jk 3O6paJKeHo HIXKHe.

- 3aKpNBaIOUH KpNIIky,CTeXKe, IIo6 He 3aIeMHTN IHHyp.
3Γhi3noДЛЯШТАВа
BnKOpHcTOByIte IITaTINb i3 IOBXNHOIO TBnHTa MeHIe 5,5 MM. Ha IIITaTNIi 3 IOBIM TBNHTOM HEMOXJIINBO HAIIHHO 3aΦikCyBaTH φOToanapat, IIO MOKe IIpN3BeCTN IO HO yIKoJKeHHA.
4TyuHOMOBeIb
5IHHaTOp IOcTyIy
6KpIIka Biiciky IJIa 6aTapei/ KapTu IIam'ATI
7IHI3IO IJIa KapTN NaM'ATi
8Biicik JIA BCTaHOBJeHHaTaapei
9BaKijb BnITOBxByBaHHaTaapei
06'ekTnB
Texhiuhi xapaKTepeNCTHKU 6'ekTnBiB,INBiTbcHa cSTOP.38.
E PZ 16 - 50 mm F3.5 - 5.6 OSS (Додастбяdoes ILCE-6000L/ILCE-6000Y)
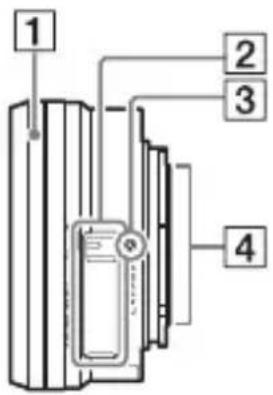
1KijbIeMacITa6yBaHH/ okycyBaHH
2BaxjiIbMacIITa6yBaHHa
3ПиЗнayka BCTaHOВJIeHHЯ
4KoHTaKTn 06'ekTnBa 1)
1) He TopKaITeC8 6e3IOcepeHbO IIbOro eJIeMeHTa.
E55-210 mm F4.5-6.3 OSS (Додастбяdo ILCE-6000Y)
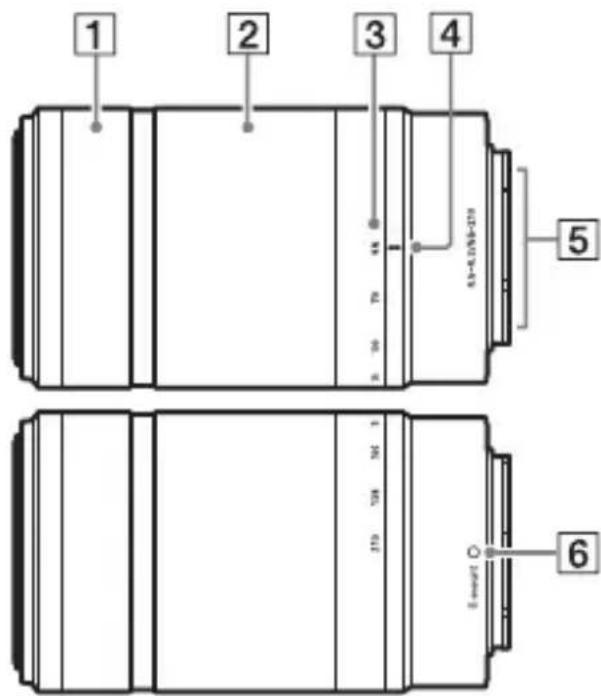
1KijbIeΦokycBaHnHa
2KijbIe TpaHcfoKaaii
3 IIIkaJaΦokycHoI BiIcTaHi
4Познayka Фokус hoi BiicTaHi
5KoHTaKTn 06'ekTnBa1)
6ПиознayкabCTaHOBJIeHHЯ
1) He TopkaITec6e3IOcepeHbO IboRo eJIeMeHTa.
UA
BctaHOBJIeHHaTapei

Baxinb BnTobxvBaHHaTaapei
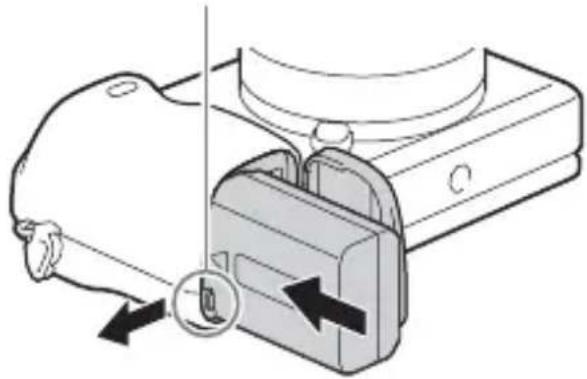
1 BidkpniTe KpiShky.
2 BcTaBTe 6aTapeio.
HaTnCKaHn Ha BaXJIb BnITOBxvBaHHa, BCTaBTe 6aTapeIO, JI K IOKa3aHO Ha MaJIIOHKy. BcTAHOBnBIIN 6aTapeIO, yIeBHITbcra, IIIO BaXJIb BnITOBxvBaHHa 6aTaapei 3aΦikcoBaHO.
- RaKIO 3aKpHTN HeIIpaBnJIbHO BCTaHOBJIeHy 6aTapeIc KpHIIKOIO, MoXHa IIOIIKOJNTN fOToaIapaT.
3apЯЖаHHaKymyJIaTOpHOro 6Joka
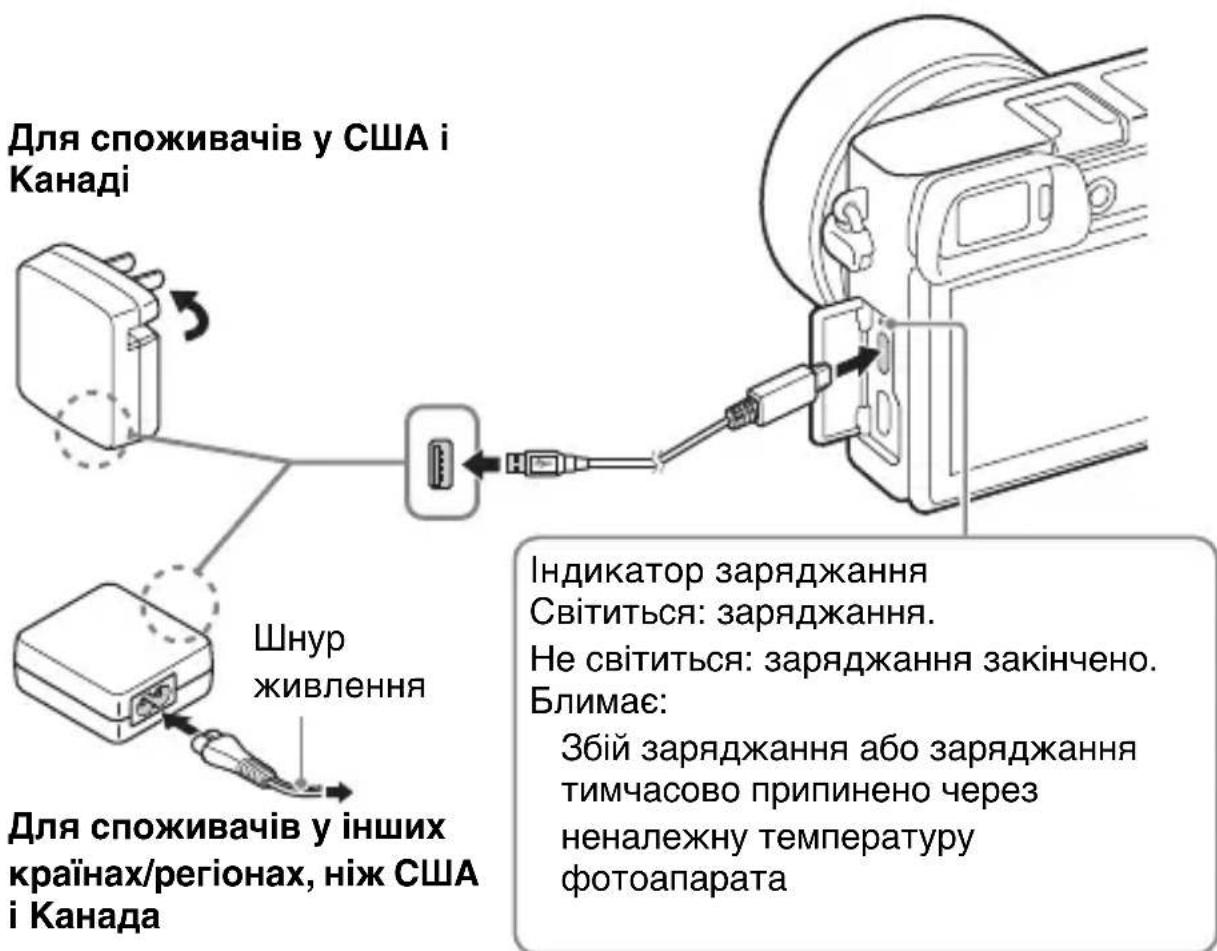
1 PiДКЛЮчITb ФОТоanapat Do aДaNTepa 3MiHOrO CTpyMy (ДODaEeTbcr) 3a ДОПOMorToKabeIIO micro USB (ДODaEeTbcr).
2ПiДКЛЮчITb aДaNTep 3MiHOrO cTpyMуdo eIeKTpNHOI pO3eTKI.
IHHKaTOp 3apJxKaHn8 3acBiyEcTbc8 opaHKeBm, i 3apJxKaHHn8 IOUHaETbc8.
BIMnKaIte foToaIapaT, 3apJxKaIOuN 6aTapeIo.
- BaTapeIO MOxHa 3apJxKaTH, HABiTb JIKIIO BOHa YactKOBO 3apJxKeHa.
- YKIIIO iHIIKKaTOP 3apJxKaHH6JIIMae, KOJIIN 3apJxKaHHIe He 3aBepIeHo, BnIMiTb i BCtAHOBiTb 6aTapeI0 3HOBy.
UA
PpIMITKn
- YKIIIO iHIIKKaTOP 3apIJIkaHHHa φoToaIIapati 6JIIMae, KOJIN aIaIITep 3MiHHOrO cTpyM yI'εIHaHO Ido po3eTKN, Πe IOBIiOMJIe Ipo Te, IIO 3apIJIkaHHa THMaCyOBO 3yIINHeHO, OCKJIbKN 3HaYeHHaTeMIIEpaTyprn E 6IJIbIHMM 3a peKOMeHIOBaHe. KOJIN TEMIIEpaTypa IIOBepHeTbcra IIO BIIIOBIIHNx 3HaYeHb, 3apIJIkaHHa BIINHOBTbcra. PaIIMO 3apIJIkaTH 6aTaapeIO 3a HABKOJIINHBoI TeMIIEpaTypn BiI 10^ Do 30^ .
BaTape MoKe He 3apJxKaTHcEeKTHBHO, KIIO ii KOHTaKTn 3a6pyHeHi. Y Icbomy BnnaKy 3JIeRka IIpoTpItb KOHTaKTn 6aTapei BiI INJy M'koIO raHicpKOIO aO BAthm TaMIOHOM. - IIiKJIIOUHTb aIaIITep 3MiHHORO cTpyMy (IOJaεTbcra) IIO eJIeKTpHoi pO3eTKN. JIIO IIJ Yac BnKOpNCtAHNRAaIITepa 3MiHHORO cTpyMy BnHnKHe 36iY pO6OTi, cIIJ HeaIHO BnHrTH NITKeKep i3 po3eTKN, IIO6 BiI'EDHaTH nIprncTpiBID MepeXKi KINBJIeHHra.
- По зakihneHhi 3apJxkaHnB Bi'εнha'Te aanTep 3MiHHoro ctpMy BiEJIeKTPnHoi pO3eTKN.
CiiBnKOpncTObyBaTH JInIe opnHHaJIbHi 6aTaapei, Ka6eJIb i3 po3'EMOM MIKpo-USB (IOJaETbcra) Ta aIaIPTep 3MiHHoro cTpyMy (IOJaETbcra) BnPo6HnITBa Sony.
-ЯкшофOTOaapanapTПДКЛIOUeHNOdoP03eTKNYepe3aIaITep 3MiHHORO cTpyMy,KINIOJaETbCra,IIJuaCfOTO3HOMKN/BiITBOpEHn3apJXKaHHHe BIKOHyETbCra.IJIa3a6e3IeueHnJKNBJIeHnФOTOaapanapaTa IIJuaC fTO3HOMKn/BiITBOpEHnKOpNCTyItecA C-PW20 aIaNITepom 3MiHHoro cTpyMy(IpoJaETbcg OKpeMo).
Tpnbalictb 3apdkaHHa (noBha 3apdka)
Yac 3apraJxKaHHaIIOHOMOIO aIaITepa 3MiHHoro cTpyMy (IOJaetbc) CTaHOBHTb IIpN6JIIN3Ho 310 XBNIHN.
PpMItKn
Bnue3raHn yac nO3NaaE TpNBaJIcTb 3apJxHaHH IOBHicTIO po3prJKeHOi 6aTapei 3a TeMnepaTypn 25 ^ C . 3aJeXHo Bi yMOB BnKOpNCtAHN Ta o6CTaBnH 3apJxKaHH MoKe TpNBaTH IOBIIe.
3apdkaHHaXOM npEHaHHdo KOMn'IOtepa
AkyjTOpHn 6JOK MoXHa 3apJxKaTH, IIeHNaBUn fOToaIpaT IO KOMI'IOTepa 3a IOnOMoTOU Ka6eJIIO MIKpo-USB.
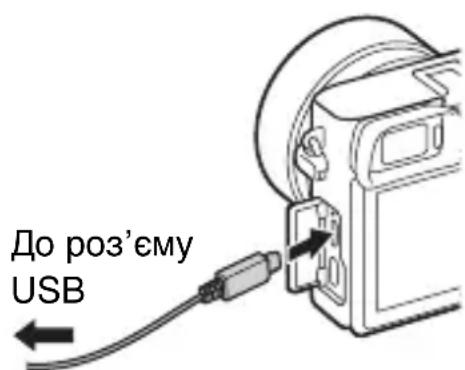
PpMItKn
- BnKohyUOn 3apJxKaHHB iN KOMI'IOTepa, 3ayBaXTe HAcTyIIHe:
-ЯкшофOTOaIapatпнeДиHoДОПOTaTHBHorO KOMI'IOTepa,якн He IIKJIIOUeHOДОДжepeJaЖИВJIeHHa,akymyJIaTOpTAtHBHOrO KOMI'IOTepa pO3prJkaeTbcra. He 3apJkaIteфOTOaIapatdoBHe, HIX IOTpio6Ho.
-Як imm Фотоапаразом i KOMI'IOTepom BcTaHOBJIeHo 3'\'eHaHHa USB, He BMNKaIte, He BIMNKaIte Ta He IIpe3aBaHTaXyIte KOMII'IOTep, He BnBOIbTe KOMII'IOTep 3i cIIJyOro peKHMу. Ie MoJKe IIpN3BecTHIo HeCIIpaBHOCTi ФotOaIIapata. IIpeJ TIm Jk BMNKaTn, BIMNKaTn a6o IIpe3aBaHTaXyBaTH KOMII'IOTep, a TaKOJ BmNKaTn IOrO 3 peKHMу cHy, BiI'EDHaIte ФotOaIIapat BiI KOMII'IOTepa. - 3apjaKanHnYepe3 HecepHn a6o MoHΦiKOBaHn KOMI'HOTeP He rapaHTyETbcra.
Tpmbaictb po6otn 6atapei Ta kiIbKicTB 306paXeHb, Aki MoxHa 3anncatn i BiIDTBOpHTN
Tunn Kaprnam'ATi, Aki Moxha BnKOpncTOByBaTH
| Карта пам'ятí | Для фотозимкíВ | Для вideофай vib | |
| A | Memory Stick XC-HG Duo™ | ✓ | ✓ |
| Memory Stick PRO Duo™ (Лизе дд) | ✓ ✔ ✔ | ✔ ✔ ✔ Mark2) | |
| Memory Stick PRO-HG Duo™ | ✓ | ✓ | |
| B | Карта пам'ятι SD (Класу 4 abo | ✓ | ✔ ✔ ✔ ✔ ✔ |
| Карtega пам'ятι SDHC (Класу 4 abo | ✓ ✔ ✔ | ✔ ✔ ✔ ✔ | |
| Карта пам'ятι SDXC (Класу 4 abo | ✓ ✔ ✔ | ✔ ✔ ✔ ✔ |
- Y IIbOMy IIOci6Hnky KOpNcTyBaYa KapTN IaM'Ati 3 Ta6JIuI y3aRaJIbHeHO Ha3INBaIOTb TaK:
A: Memory Stick PRO Duo
B: KapTKa SD
BnMaHNaKapTn nam'rti/6aTaapei
KapTKa IIam'ayi: IIo6 BnHHTN KapTy Iam'ayi, HATNCiTb Ha Hei OINH pa3.
AkymyJIaTOpHn6JIOK: NocyHbTe BaXJIb BnITOBxUBaHHaTaapei.
Будte obepexHIMn, IIo6 He BInyCTHTaTapeIO.
Ppimitkn
- HiKoJIH He BnImaTe KapTu Iam'ATi/6aTapeIO, JI KIIO iHNKaTOP IOCTyIIy (cTOp. 12) cBITHTbcra. Ie MoJKe IIpN3BecTH IO IONIKOJKeHHa HnHex Ha KapTi Iam'ATi.
YcTaHOBJIeHHa/BiD'cHaHHaO6'cKtNaBa
IpeTm k IIpHeHaTH a6o Bi'eHaTH o6'ekTHB, yCTaHOBiTB IepeMnKaU KHBJIeHHa foToaIIapaTa y IIOJxKeHHa OFF.

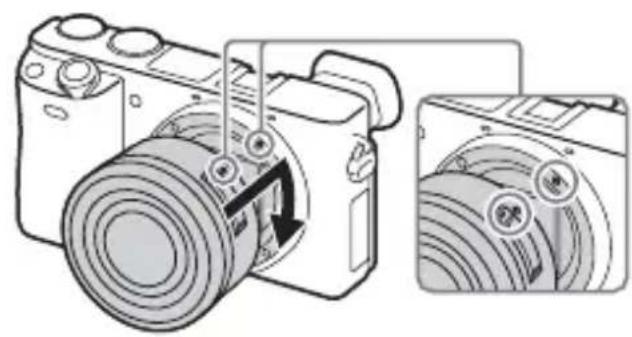
1 YKIO BCTaHOBJIeHO KpIshKy a6o NaKyBaJIbHy KpIshKy, 3HIMITb II 3 φOToanapata a6o o6'ekTnBa.
- IIIBnIKO 3aMIHiTB o6'ekTnB IOnaJIi BiI 3aIIJIeHnx MicIb, IIIO6 yHnKHyTN IOTpaIIJHnI INJIy a60 6pyuBy BCEpeINHy fOToaIapata.
2 BcTaHOBITb 06'ekTnB, cyMICTHBUn 6iJI iNo3HauchKn Ha 06'ekTnBi Ta Ha φoToanapati.
- Ⅲo6 3aio6irTHIIOITpaIIJIaHHIO IIJIy y FOToaIIapaT, TpImaIte HOrO IpeHbOIO YactINHOIO DOHN3Y.
3 3JIeIka npITnCKaHOn 6'ekTnB Do foToanapata, NOBepHiTb 06'ekTnB 3a rOdINHHNKOBIO CTpiIKOIO, DOKN BiH He Klaune y 3aΦiKCOBAHOMy nOJoxEHHi.
BcTaHOBJIIOHTe 06'ekTINB 6e3 nepeKocy.
PpIMITKn
-Пиц ус таюглелпго6'ekTNBa He HaTnCKaITe Ha KHOIIky φikcaTopa 06'ekTNBa.
-Пи'\'ЕнвIOчОБ'\'EKТИВ, He JOKJIaJaTc HaIMiPHX 3YCHJIb.
-
IIЯ BИКОРиСТаHHЯ 06'ЕKTиBa 3 A-ПepeXiДнКOM (ПроДaEТься OKpeMo) NOTPIбнй aДaIITep baiOnHeTa (ПрОДaEТься OKpeMo). IeTaJIbHy iHΦopMaIIO YHTaIte B Noci6Hnky 3 KOpHcTуВaHHЯ,ЯКи IODaEТься IDaIITepa baiOnHeTa.
-
Y pa3i BHKOPnCTaHHa 06'ekTtBa 3 rHi3IOM IJIa IIITaTHBa II'eHaHTe rH13IO Ha HBOMY IO IIITaTHBa IJIa 3a6e3IpeHHa pIBHObArH.
UA
Bid'edHaHHo6'ekTnBa
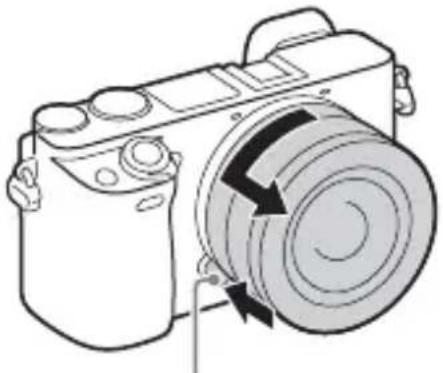
KhoNka fikcaTopa 06'ekTnBa
1 Повсгю habисить конь φikcaTopa 6'ekTnBa Ta повернitsb 6'ekTnB npOTn rOdHHNKOBoi CTpiJKN Do унору.
PnmuTkn
- RaIIO II qac 3mHn O6'ekTnBa IIJI qH 6pyI IOTpaIIb y fOToaIapat i IIOIae Ha IOBepxHIO JaTnKA 3o6paXeHHra (JeTaJIb, Jka IIpeTBOpIO EJKepeJIO CBiTla Ha IIqpoBn CnHaJI), BIn MOKe 3'ABHTncr Ha 3o6paXeHHy BnJIaI TeMHNX IIJAM, 3aJIeKHO BiYMOB 3IOMKn. BIMKHeHNI FOToaIapat 3JIeKa TpeMTtB BHacJIIOK III yHKII IIINJO3axHcTy, Jka 3aIO6irae HaIIIIaHHIO IIJIy Ha IaTnK 3o6paXeHHra. B 6yNb-IAKOmy pa3i, BCtaHOBJIOTe Ta Bi'EDHyIe O6'ekTHB IIIBNko IOnJaJIi BiI 3aIIJIeHNX MicIb.
- Y BnIaIKy IOTpaJIaHHra IIJy Ta iHINx peOBoHN Ha IaTUnK 3O6paKeHHYcVHbTe ix 3a IOnOMOrOIO dOToRpyIII.
He 3aJIINIaIte foTOaIIapaT 3 BiIOKpeMJIeHIM O6'ekTHBOM. - ΠΟδΚορικτυΒατης Κριπικόθου Kοριγκα ηι 3aΙΗΜ ΚΟΒΙαχΚΟ έλη Μός ΕκΤΗΝΑ, Πριπιδαῖτε ALC-B1EM (κριπικα Kοριγκα) ηι ALC-R1EM (3aΙΗΠΙΚOBΙαύΚ έλη Μός ΕκΤΗΝΑ) (ΠροίαεΤβσα OKρεΜΟ).
- Y pa3i BHKOpHCTaHHa 06'ekTHBa 3 IIITpHMKOIO TexHOJorii Power zoom BCTaHOBtB IepeMnKaU XNBJIeHHa FOToaIIapTa B IOJIOKeHHa OFF i IpeBipTe, HN 06'ekTHB IOBHICTHO BTARHyBCa, IpePd TUM, JIKHO 3MIHOBAtH. RaIIO O6'ekTHB He BTARHYBCa, He 3aIITOBXYte HORO CNJOIO.
- Y pa3i KpiIJIeHHa foToaIIapaTa Ha IIITaTHb y KOIHOMy pa3i He TOpKaIITecb KiJIbIa MacIIITa6yBaHHa/KIJIbIa fOKycyBaHHa.
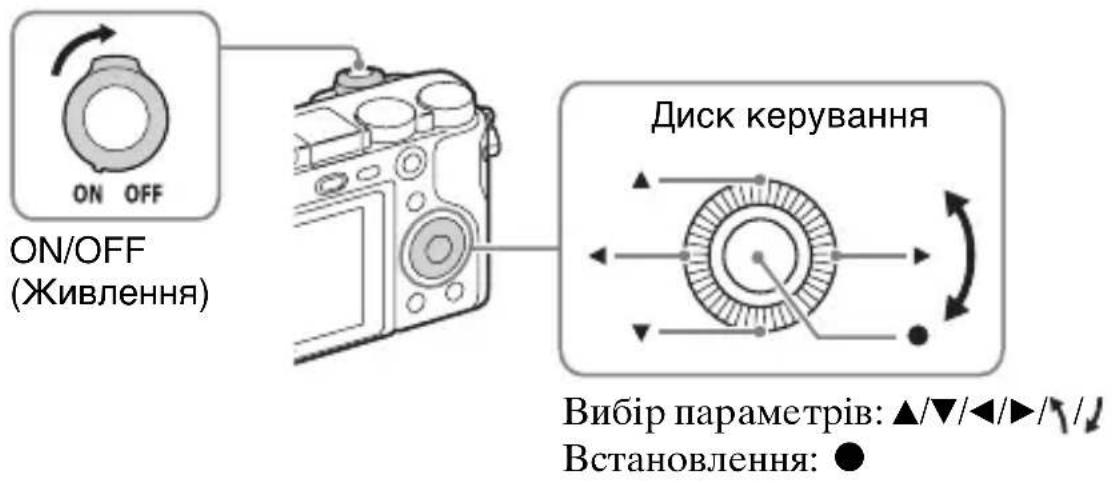
1 BcTaHOBiTb IepeMnKaU ON/OFF (xNvBJIeHn) y noJoxeHHr ON.
Iapametpn IaTH N yacy BiIO6paKaIOb8cI icJIePiIOrOBMNKaHHN foToaIIapaTa.
-Дя yBIMKHeHHЯЖИВJIeHHЯ Ta IOUaTKy po6OTn MoKe 3HaIObHTNcI DeKn Yac.
2 IpeBipTe, uHa ekpaHb6paHo [BbId] i HaTnchItb . Ha DnCKy KepyBaHHa.
3 Bn6epitb noTpibhe reorpaqiue he po3TaWyBaHHa, dOtpmMyuocb Bka3iBOK Ha ekpaHI, TOni HATNCHITb
4 HanaTnyTe napametpn [JIiTHiYac], [JaTa/Yac] Ta [ΦOpMaT DaTu], nicJyOHaTnCHiTb ●.
-Пидчac HaJIaIITyBaHHЯ napaMeTp a [IaTa/Yac] nIBHiy ноЗнayaeТьсяяк 12:00 AM,а пolyдень -як 12:00 PM.
5 IpeBipTe, uBbpaHO npHKT [BbiD], i HATnCHiTb
UA
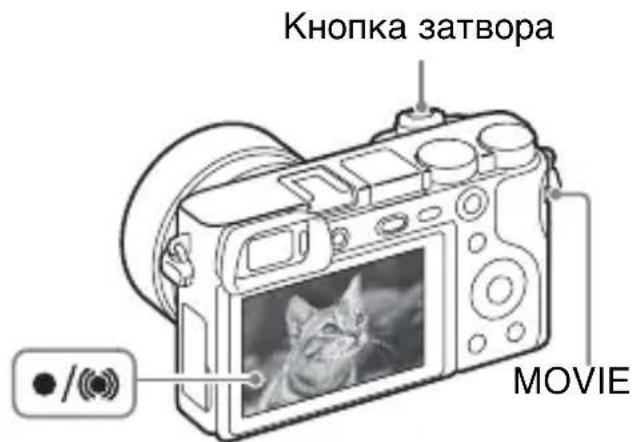
3HimahnHaΦOTorpaΦi
1 HaTnchItb KHONky 3aTBOpa HanoJIOBHy, 06 BnKOHaTuФOKycyBaHHa.
KoJIIN 3O6paJKeHHaHO,JIyHae 3ByKObHcHHaJI,i 3acBiyetybcra HnKaTOp a6o
Ja3MOry HaJIaIITyBaTHi 36epeTn 12 cyHKiiJ IJIaJIbIIOB BHKOpHCTaHHI II Yac 3HOMKn.
① HaTnchItb KHOIIKy Fn (BHKJInK yHKii).
② Bn6epiTb IOTpi6Hy φyHKIIIO 3a IOnOMOROK KHOIOK △/▼/▲/▶HaДИСКУ KEpyBaHHЯ.
③O6epTaIOUH INCK KepyBaHHa, Bn6epiTb IOTpi6He 3HaueHHa.
Koliuzatko kepybaHHa
JIINIE o6eptaHHaMKJIiTaTKa KepyBaHHa MOxHa MHTEBO 3MiHHTB iIIOBIDHe HaJIaITyBaHHa JIA KOxHOro peXkMy 3IOMKn.
*KIOIJIaIpaMeTpA [ΦOpMaT] BCTaHOBJeHO iHIIe 3HaueHHaHIJK [3:2],MOxHa 3aIINcaTH 6iJIbIIe 3O6paJKeHb,HIX Bka3aHO BVIIe. (KpIM BIIaIKIB, KOJIN IJIaIpaMeTpA [KicTB] BCTaHOBJeHO 3HaueHHa[RAW]).
BiDeo
BnKJIaIeHa HIXJy e Ta6JIINr IprN6JIIN3HO IOKa3ye MaKcIMMaJIbHy TpNBaJIiCt b 3aIIncy. Li 3NaueHnE cykyIINHO TpNBaJIiCtIO ycix BiJeO. Be3IpepeBHa 3HOMKa MoKe TpNBaTH IIprN6JIIN3HO 29 XBNIIN (o6MeJKeHO xapaKTePrcNTnKaMn BInpo6y). MaKcIMaJIbHa TprNBaJIiCt b 6e3IpepeBHOI BiJeO3HOMKn y φopMaTi MP4 (12M) cTaHOBnTb 6JIIN3bKO 20 XBNIIN (o6MeJKeHH 2 Γ6ДЯpo3Mipy φaIJy).
(h (roHHa), m (xBnJIHa))
| ЕмнICTь Налаш. заимесу | 2 Гб |
| 60i 24M(FX)/50i 24M(FX) 10 m | |
| 60i 17M(FH)/50i 17M(FH) 10 m | |
| 60p 28M(PS)/50p 28M(PS) 9 m | |
| 24p 24M(FX)/25p 24M(FX) 10 m | |
| 24p 17M(FH)/25p 17M(FH) 10 m | |
| 1440×1080 12M 20 m | |
| VGA 3M 1 h 10 m |
MaKcHMaJIbHa TpIbAJIcTb BiJeO3aIIHCy MoKe pi3HHTncr, OCKJIbKn foToaIapat 6JIaIHaHO cIcTeMoIO VBR (3MiHNa IIBNkicTb IOTOKy), Jka aBTOMaTHUHO HaJIaITOBYe JIKCTb 3O6paJxHRe 3aJIeXHO BID CIEHN 3IOMKn. IIq Yac 3IOMKn 06'ekTa, IIO IIBNko pyxaetbcR, 3O6paJxHRe eYITKIIM, a Yac 3IOMKn KOpOTIIH, aIXe IJIra 3aIINcy BiJeO Heo6XiINO bIJbIe Iam'ATi. TpIbAJIcTb 3aIINcy TaKoJx MoKe pi3HHTncb 3aJIeXHO BiI yMOB 3IOMKn, 06'ekTa 3IOMKn, a TaKoJ BiI HaJIaITyBaHb PO3Mipy Ta JIKocTi 3O6paJxHRe.
HotaTkN ⅢoI O KOpNCtUBaHHaΦOToanapaTOM
B6ydoBahi yHkuii foToanapata
- Y IIbOMy IIOci6Hnky OIIncaHI IIpncIpoi, cymicHi 3i cTaHapTaMn 1080 60i Ta 1080 50i.
IiO6 i3HaTnca, kHcTaHApT nIITpMMy e foToaIapat - 1080 60i nn 1080 50i, - IpeBipTe HaABHicTb Ha HxKHi NaHeJI TaKx IIo3HaUOK:
IpiNcTpi i3 nITprnMkoIO 1080 60i: 60i
Pnctpi i3 nItpmko1080 50i:50i
IIOBOJbTeC3 Bnpo6oM ObepeXHo, He po36HpaIte, He MoINΦiKyIte Horo, He IIaBaHTe φi3NcHMM cTpycAm Ta yIapam (HaIIpHKJIaI, yIapaM MOJOTKa), CJIkyIte, IIO6 Bnpi6 He BnaB i He NaCTyIpaIte Ha Bnpi6. OcoJIbBO oBepeXHOrO IOBOIXKeHHra NOTpe6ye 06'ekTHB.
Ppimitkn 0do 3ancy/BiD TBOpenhra
- IpeepIOyATKOM 3HOMKN 3pO6iTB IIpo6Hi φOTOrpaΦii, ΙO6 yIeBHHTNc8, ΙOΦOTOaIIapat IIpaIIOE HaJIeXHIM YINHOM.
- Βeɪ φοTOaɪpɑr T He e Hi IINJOHeIpOHHKHM, Hi BOIOHeIpOHHKHM, Hi 3axHⅢeHMM BiⅡ δpH3OK.
He IINBITbcra Ha coHue a6o IJxpeJeIO IOTyKHOro cBiTla Kpi3b 3HrTn O6'ekTnB.Ie MoKe 3aBdaTH HeBnIpaBHOi IIKOJI 3Opy.A6o JIe MoKe IIpN3BeCTn IO HeCIIpaBHOCTI O6'ekTnBa. - Y pa3i yTBOpEHHaKoHdEHCaII BOJIOrn IIepIHIIX BHKOpHCTOByBaTH foToaIapA, II cJIiYcVHyTN.
He trpycitb foToaIapat i He cTyKaIte IIO HbOMy. Ie MoKe cIpiuHHTBnHKHeHHaHEcIIpaBHOCTi I HeMOxJIINBICTb BnKOHaHHaIIHCy 3aIHNCy 3O6paKeHb.KpIM TOrO, MoKe BnHTN 3 JaNy Hocii IHΦOpMaII a6o MOxytb 3a3HaTNIOIKoJKeHb 3O6paKeHHa.
He BnKOpNCToBvIe/He 36epiraTe foTOanapat y HacTyHNx Miczax
- YДуже rapячnx, XOJOинх aбо BOЛOrnX Micijx
Y TaKHX Micix, k, HApNkJa, caJIOH aBTOMO6iJ, IIO cTOiTb Ha coHci, KopIyc fOpToaIapata MoKe 3JeΦopMyBaTHcR, a Ie MoKe cIIprHnHTn HeCIIpaBHiCTb.
PiI pIpMIM COHcHMM IpomIHm a6o IIO6JIn3y o6irpiBaay
Kopnyc foToaapanapaTa MoKe 3He6apBHTncb a6o 3JeΦopMyBaTHcB, a Ie MoKe cIIprHnHHTn HeCIIpaBHicTb.
-
Y micx, II O II IaIbTbcra ChIbHomy TpeMTiHHIO a6o Bi6paii
-
Y Miciex, De NOIINPIOJTOBcpaIOXBHJI, BIIINpOMIHIOEbCpaiaizia aOcnoCTepiraOTbcMaHIHTIIOJIa
Y TaKHX Micix fOToaIapaT MoKe He BnKOHyBaTH 3aIINC uN BiITBOpEHH 3o6paKeHb HaJIeXHIM YIHOM.
- Y miçyx 3 iBnueHm BmiCTOM nicky a6o nnjy
He IOnyckaIte IOTpaJIaHHI pICKy YI INJy y fOToaIapaT. Ie MoKe cIpruHHTn HeCIIpaBHiCt b fOToaIapaTa, Ika iHKoJIH MoKe 6yTu HEBIIpaBHOIO.
Ihopmaia 0do 36epiraHHa
He 3a6yBaIte OJraTn IpeHIO KpHIIky o6'ekTHBa, KOJIH φOToaIapaT He BHKOpNCTOByETbCra.
Iprnmitkn ⅢoDo ekpaHa, eJeKtpoHHoro BNDouyKaay Ta o6'ekTnBa
- EkpaH Ta eJIeKTPoHHn BnIOIyKaU BnROTOBJIeHO 3 BnKOpNCTaHHaM NaI3BnuaHNO BnCOKOTOuHOI TexHOJIOJI, IIO IO3BOJIe epeKTbHbO BnKOpNcTObYBaTH IOnaI 99,99% IIkceJIiB. OHaK Ha ekpaHi Ta eJIeKTPoHHOMy BnIOIyKaU MoKyTB 3'ABJIaTncr KpIXiTHi QOpHI Ta/a6o JCKpaBi IqTKn (6IIOro, YepBOHOrO, CInHbO r a60 3eJIeHOrO KoJIbOpy). HaBHicTb IINx IyToK e 3BnuHm HacJIikOM BnPo6HNo rpouecy i JKOHNUM He BIIJIBaE Ha 3aIINC 3O6paXeHHra.
-Пид час рбогн ob'ektnBa cTeЖte 3a THM,поб biH He 3aIeMHB пajbii.
Ppo marhit
HaBkoJIO cIIaIaxy BcTaHOBJeHO MaHIT. He IprHTyJIaIte Jo ekpaHa YIKOPnycy fOToaIapapa Ta peYi, Jki 3a3HaOTb BIIINBy MaHITHNX IIoJIb, HApNkJaI dNcKeTn YN KpeIHTHi KapTKN.
Biodomocti npo 6'ekTbN Ta npnaIaIaIaI
PeKOMeHIOBaHO BnKOpNCTOBvBaTH O6'ekTnBn/IIpNlaIaIg Sony,po3po6JIeHI BiIOBIDHO IO xapaKTepNCTHK IbOro fOToaIapaTa.
BnKOpncTaHHa IpoDyKii iHINX BnPo6HnKiB MoKe cIprNHHHTn HeIOBHe BnKOpncTaHHa MOJInBOcTei foToaIIapaTa a6o IIpn3BeCTn IO BiIMOB i
UA HeHaJIeXHoi po6OTn foToaIapata.
Popadni 3mOMKn 3 BNDoukykaueM
Плчac 3нOMКИЗ ВИКОпСТаHHЯ M BИДОПУКачa BИ може Т BiДЧУВАТи ПЕВНI INСКOMФОТ, HAПРИКЛад ИретаПPyжЕнг 3Оу, BTOMY, 3aKaЧУВАнгЧИ HYДOTу. Плчac 3нOMКИЗ ВИДОПУКачem peKOMeHДуETься peRyJIЯрно рОБNTи ПЕерВи.
PeKOMeHIOBaHa TpHBaJIicTb IpepeB a6o ix yactota e iHNBIyuaJIbHMn IIJI KOKHO, a TOMy BnpiIiYBaTHcme Bam. IKIO Bn BiIpyBaEte IINCKOMΦopt, IprHINHITb KOpNCtBuATncr BnIOUkayem, IOKN Bam He cTaHe KpaIe, i 3a IOTpe6OIO IPOKOHcyJIbTyIHTecr 3 LiKapem.
Ppimitkn 0do cnaaxy
He TpMaIe foToaIapat 3a cIIaIax i He IIprKJIaIaIte HaIMipHOi cHJIN do HbOTo.
- YKIO uepe3 BiIKpHTn CIIaJax ycepeHny IOTpaIITb BOJa, IIJI a6O IIICOK, Ie MoJKe cTaTN IIprUHHOIO HeCINpaBHOCTi.
- 3aKpHbAIOUcIaJIax,6yIbTe o6epeXHi,IIo6 He IIpHIIeMHTn IaJIbIi.
MeToI eKcIOBmipIOBaHHa:1200- ceTMeHTHe BmIPIOBaHHa TaTHNKOM 3O6paJKeHHa
IIaIIa3OH BIMIpIOBaHHa: BiEV0 IO EV20 (3a eKbIbJIeHTa ISO 100, 3O6'ekTINBOM F2.8)
UytJIINBicTb ISO (peKOMeHIOBaHn iHNeKc ekCIO3nii):
ΦotorpaΦi: AUTO,ISO 100- ISO 25600
BiJeOΦaJn: AUTO,
eKBiBaJIeHT ISO 100- ISO 12800
Kopekui eKcno3nii: ± 5,0 EV (MOxJIINBicTb IepemHKaHHa KpOKiB 1/3 Ta 1/2 EV)
[3aTBOP]
TIII: 3 eJIeKTPoHHm KepyBaHHaM, BepTKKaJIbHOrO XOHy, IITOPHOIIiJINHHOrTo TIIy
Iiia3OH BHTpIMKn:
ΦOTOrpaΦii:Bi1/4000cekyHn
Io 30cekyHn,BULB
BiJeOΦaJIi:N:Bi1/4000cekyHn
Io 1/4 cekyHn (i3KpOKOM
peRyJIIOBaHHeKcIIo3Hnii
1/3 EV)
Iprnctpoi 3 IIITprHMKIOO peJHmY 108060i-1o1/60cekyHINB peJHMI AUTO (IO 1/30cekyHIN BpeJHMI [ABT.IOBJI.3aTB.]) Iprnctpoi 3 IIITprHMKOIO peJHmY 108050i-1o1/50cekyHIN B peJHMI AUTO (IO 1/25cekyHIN BpeJHMI [ABT.IOBJI.3aTB.])
IIIbNikicTb cHxpoHi3auii 3i cnaJaxom:1/160cekyHn
[Hocii dαнx]
Memory Stick PRO Duo, KapTka SD
[PK-ekpaH]
PK-ⅡaHeJIb: IIIInpOKoΦopMaTHa IIaHeJIb, TFT 7,5 cm (TnI 3,0)
3araJIbHa KIJIbKicTb TOyOK: 921600TOyOK
[BnDowykau]
TnI: eJIeKtpoHnn BnIOuKyau
3aRaJIbHa KIJIbKicTb TOUOK: 1440000 TOUOK
OxonJIeHnKaIpy: 100%
36iJIbIeHHa:
πριδλ. 1,07 ×
Ipi6JI.0,70×(35MM-ΦopMaTy eKBiBaJIeHT)3O6'EKTHBOM 50MM Ha 6e3KiHeuHicTb,-1 M-1 (IioITPIA)
ToUka OgIaNy (ToUka 3HaXoJKeHHa OKa): IIpN6JI.23 MM BiO KUJaPa, 21,4 MM BiO npaBn OkjJaPa IIpn -1 M-1
HaJIaIITyBaHnI JIOITpIi: Bi-4,0 M-1 IO +3,0 M-1
[Bxidi/HBxidiHipo3'cMn]
Poz'Multi/Micro USB*: USB-3'eHaHnHa
HDMI: Míkpopo3'ém HDMI Túny D
*PiITpHMyIObCnIpnCTpoi, cymicHi 3 po3'emom Micro USB.
[Жиьмень]
TnI 6aTaapei: AkymyJIaTOPHnI 6JIOK NP-FW50
[Стохиваима лесковуеоньшни ]
Y pa3i BHKOpHCTaHHo6'ekTnBa EPZ16-50mmF3.5-5.6OSS* Y pa3i BHKOpHCTaHHa BnOuKyka: npN6JI.2,8Bt Y pa3i BHKOpHCTaHHa PKekpaHa: npN6JI.2,4Bt *doJaetbCJIOILCE-6000L/ ILCE-6000Y
[Inhe]
Exif Print: Cymichn
PRINT Image Matching III: Cymicn
DPOF: Cymichn
Po3mipn (3a cTaHapToM CIPA) (PpN6JI.):
120,0MM× 66,9MM× 45,1MM
(III/B/Γ)
Bara (3a cTaHДapTOM CIPA)
(πρηδι.): 344 r
(3 akyMyJrTOPOM Ta KapTKOIO
Memory Stick PRO Duo)
285 r (JHIIe foToaIapaT)
Poboua Tempepatya:
Bii0 ^ C eo 40^
ΦopMaT ΦaHJIy:
ΦOTOrpaΦi: cymichictb i3
ΦopMaTOMJPEG(DCFBep.2.0,
Exif Bep. 2.3, MPF Baseline),
RAW (ΦopMaT Sony ARW 2.3)
BiJeO (ΦopMaT AVCHD):
Cymichn i3 opmatom
AVCHD Ver. 2.0
BiJeo:MPEG-4AVC/H.264
3Byk: Dolby Digital 2-KaH.
Dolby Digital Stereo Creator
CTBopeHo IIOJIiEHN3II
KOMIIAHII Dolby Laboratories.
BiJeo (ΦopMaT MP4):
BiJeo: MPEG-4 AVC/H.264
3ByK: MPEG-4 AAC-LC 2-KaH.
USB-3'εДианнЯ: Hi-Speed USB (USB 2.0)
[Спалax]
Béniye YnscIIO cIIaJIaxy: 6 (y MeTpax 3a ISO 100)
YacIpe3apJkaHHa: Ipi6JI.4cekyHd
Kyt oxoJIeHHa cIIaIaxy: oxoJIIOe Kyt 30py 16 MM o6'ekTnBa (fokycHa BiIcTaHb, IIO3HaueHa Ha o6'ekTnBi)
Kopekui eKcno3nii cnaJaxy: ± 3,0EV (MOXJIIBicTb IepemKaHHa KpOKiB 1/3 Ta 1/2 EV)
[Be3dpoToBa IOKaIbHa mepeka]
ПиТримуВаний Формат: IEEE 802.11 b/g/n
YacrotnI iaIa3OH: 2,4 ΓΓ
ПиДТрИМУВаHI ПpoTOKоЛи 6e3ПeКИ: WEP/WPA-PSK/WPA2-PSK
MeToI KOnΦiRypaui: WPS (Wi-Fi Protected Setup)/BpyuHy
BHMOrnIOJKNBJIeHHa:3MiHHNcTpym100B-240B,50ΓU/60ΓU,70MA
BnxiHa haIpyra:PioctiHnCtpyM 5B,0,5A
Poboua TempepaTpya Bi0 0^ Io 40°C
IiHa3OH TeMnepaTyp 36epiraHHa: Bi -20 °C no +60 °C
Poz3mipn (piu6JI.): 50MM× 22MM× 54MM (III/B/Γ)
AkymyJIaTOpHn 6JOK NP-FW50
TnI 6aTaapei: JIitii-IOHnAkyMylrTop
MaKcHMaJIbHa HaIpyra: IocTiHHn cTpyM 8,4 B
HomHaJIbHa HaIpyra: IocTiHHcTpyM 7,2 B
MaKcHMaJIbHa HaIpyRa 3apJxKaHHa: IocTiiHn cTpyM 8,4 B
MaKcHMaJIbHnI cTpym 3apJxKaHHa1: 1,02A
CMHicTB:THIOBa-7,7BT/ro(1080MA/ro)MiHimaJIbHa-7,3BT/ro(1020MA/ro)
- Tillverkad under licenses from Dolby Laboratories.
Filmer (MP4-format):
(DCF Ver. 2.0, Exif Ver. 2.3, MPF
Baseline), RAW (Sony ARW 2.3 -muoto)
(CIPA: Camera & Imaging Products Association)
(h (time), m (minutt))
| Kapasitet Opptaksinnst. | 2 GB |
| 60i 24M(FX)/50i 24M(FX) 10 m | |
| 60i 17M(FH)/50i 17M(FH) 10 m | |
| 60p 28M(PS)/50p 28M(PS) 9 m | |
| 24p 24M(FX)/25p 24M(FX) 10 m | |
| 24p 17M(FH)/25p 17M(FH) 10 m | |
| 1440×1080 12M 20 m | |
| VGA 3M 1 h 10 m |
LCD-skjerm: Vid, 7,5 cm (3,0 type) TFT drive
For at slette et billed
① Tryk på (slet)-knappen.
(2) Vælg [Slet] med ▲ på kontrolhjulet og tryk derefter på ●.
(h (time), m (minut))
| Kapacitet Optageindstilling | 2 GB |
| 60i 24M(FX)/50i 24M(FX) 10 m | |
| 60i 17M(FH)/50i 17M(FH) 10 m | |
| 60p 28M(PS)/50p 28M(PS) 9 m | |
| 24p 24M(FX)/25p 24M(FX) 10 m | |
| 24p 17M(FH)/25p 17M(FH) 10 m | |
| 1440×1080 12M 20 m | |
| VGA 3M 1 h 10 m |
DK
Konfigurationsmetode: WPS (Wi-Fi Protected Setup)/Manuel
Adgangsmetode: Infrastrukturtilstand
NFC: NFC Forum Type 3 Tag-kompatibel
Lysnetadapter AC-UB10C/ UB10D
Strømkrav: Vekselstrøm 100 V til 240V , 50Hz / 60Hz , 70mA
Batterity: Lithium-ion-batteri
Maksimal spending: Jævnstrøm 8,4 V
Nominal spending: Javnstrøm 7,2 V
Maksimal opladningsspending: Jævnstrøm 8,4 V
- SONY.
- 6000
- Learning more about the camera ("Help Guide")
- Viewing the Guide
- In-Camera Guide
- Shooting Tip
- Owner's Record
- WARNING
- IMPORTANT SAFETY INSTRUCTIONS -SAVE THESE INSTRUCTIONS DANGER TO REDUCE THE RISK OF FIRE OR ELECTRIC SHOCK, CAREFULLY FOLLOW THESE INSTRUCTIONS
- CAUTION
- Battery pack
- AC Adaptor
- For Customers in the U.S.A. and Canada
- RECYCLING LITHIUM-ION BATTERIES
- Battery pack and lens (If lens supplied)
- For Customers in the U.S.A.
- Regulatory Information
- Declaration of Conformity
- Note:
- For Customers in Canada
- For Customers in Europe
- Notice for the customers in the countries applying EU Directives
- CE
- Notice
- Disposal of waste batteries and electrical and electronic equipment (applicable in the European Union and other European countries with separate collection systems)
- For Customers in Singapore
- For customers who purchased their camera from a store in Japan that caters to tourists
- Note
- Table of contents
- Preparing the camera Step 1 P.9
- Basic operation Step 2 P. 23
- Playback function Step 3 P.24
- Recording function Step 4 P.25
- Importing images to the computer P. 26
- Adding functions to the camera P. 28
- Others P. 29
- Checking the supplied items
- Supplied with all models
- ILCE-6000
- ILCE-6000L
- ILCE-6000Y
- Identifying parts
- When the lens is removed
- Lens
- E PZ 16 – 50 mm F3.5 – 5.6 OSS (supplied with ILCE-6000L/ILCE-6000Y)
- E55 - 210 mm F4.5 - 6.3 OSS (supplied with ILCE-6000Y)
- Inserting the battery pack
- Charging the battery pack
- Notes
- Charging time (Full charge)
- Charging by connecting to a computer
- Battery life and number of images that can be recorded and played back
- Inserting a memory card (sold separately)
- To remove the memory card/battery pack
- Attaching/removing the lens
- Removing the lens
- Press the lens release button all the way in and turn the lens counterclockwise until it stops.
- Setting the clock
- Shooting still images/movies
- Shooting still images
- Shooting movies
- Viewing images
- Selecting next/previous image
- - Deleting an image
- Returning to shooting images
- Introduction of other functions
- Control wheel
- Fn (Function) button
- Control dial
- Features of PlayMemories Home™
- System requirements
- ■ Installing PlayMemories Home on a computer
- Adding functions to the camera
- Number of still images and recordable time of movies
- Still images
- Movies
- Notes on using the camera
- Functions built into this camera
- On use and care
- Notes on recording/playback
- Do not use/store the camera in the following places
- On storing
- Notes on the screen, electronic viewfinder and lens
- About the magnet
- On using the lenses and accessories
- Notes on shooting with the viewfinder
- Notes on the flash
- On camera's temperature
- On the overheat protection
- On charging the battery
- Warning on copyright
- No guarantee in the case of damaged content or recording failures
- Cleaning the camera surface
- Maintaining the screen
- Notes on wireless LAN
- Specifications
- Camera
- [System]
- [Image sensor]
- [Anti-dust]
- [Auto focus system]
- [Exposure control]
- [Shutter]
- [Recording media]
- [LCD screen]
- [Viewfinder]
- [Input/output terminals]
- [Power]
- [Power consumption]
- [Others]
- [Flash]
- [Wireless LAN]
- AC Adaptor AC-UB10C/UB10D
- Rechargeable battery pack NP-FW50
- On focal length
- Trademarks
- Batterie rechargeable NP-FW50
- Pacco battery ricaricabile NP-FW50
- Helpfunct. in camera
- Elementary apparatus
- IaTa n3rOToBJIeHnI N3dJIInJ.
- 56yKBeHHO-UNΦPOBbIX CHMBOJIOB
- 06beKTHB
- E PZ 16 - 50 mm F3.5 - 5.6 OSS (прILAraeТСА K ILCE-6000L/ILCE-6000Y)
- 3apЯdka aKKymyIaTopa
- Приимechanicals
- BpeMa 3apAdkn (Ponna 3apAdka)
- 3apKa npN pOdkIIOueHn K KOMNbIoTepy
- PpmeaHna
- BpeMa pa60TbI aKKymyJtopa N KOJInueCTBO CHIMKOB, KOTOpbIe MOryt 6bITb 3aIIncaHbI IN BOCpOu3BeDeHbI
- PpMueHn
- YcTaHOBka/ChrTne o6BeKTHBa
- PpMeeHn
- Сразные obъektiva
- PpMMeaHnA
- YcTaHOBka YacOB
- ΦOTOCbEMKa/BnndeOcBemKa
- ΦOTOCbEMka
- PpmeaHn
- CnCTeMHbIe Tpe6ObaHnA
- YctaHobka PlayMemories Home Ha KOMnbTepe
- ΦOTOCHUMKU
- PpmeHnno 3aHcN/BOcnpOn3BeDeHnO
- He ncpoIb3yIe/He xpaHnte Kamepy B cIeDyuOuX MeCTax
- O xpaHeHm
- Приимechаши OTHOCHTeNbHO 3KpaHa, 3JIeKTPoHHoro BVDONCKaTeI N OБъКТиВa
- O marhnte
- nCnoJb3OBAHm OBn npHaJeXHOCTe
- PpmeHnOTHOCHTbHO CbeMKNCBNDONCKaTeJIeM
- PpmeHnOTHOCHTbHO BCpbIiKKn
- O TemnepaType kamepbi
- O 3aunTe ot neperpeBa
- O 3apYe aKKymyTopa
- IpeDynpexKdEHe o6 aBTopcknx npaBax
- TapaHTnHe npedocTabJAreTcB clyuae nobpeKdHn HOpMaun nn c6o npn 3aunCn.
- Чистka NOBepxHocTn KaMepbl
- yxo3a 3KpaHOM
- Ppimechnno 6ecnpoBODHOJIOkaJIbHOJ cETN
- TexHnueckne xapaKTepeNCTnKN
- Kamepa
- [Cnctema]
- [Датунк ИЗОБразжени]
- [3aTBop]
- [HocnteIb 3aIncn]
- [KK-3KpaH]
- [BudonckaTeIb]
- [Pa3beMbI BBOda/BbIBOda]
- [BcnbIwka]
- [Becnpobodna Jokaibna ceTb]
- Ykpa'HcbKa
- E-nevexiDnK
- IaTa BnroToBneHnBnpo6y.
- Ochobha onepaia Kpok 2 cTOp. 24
- IocetaeTb3 ycima Moedern
- Elenements no to anapata
- BirgЯн 6e3 o6'ekTnBa
- 06'ekTnB
- BctaHOBJIeHHaTapei
- 3apЯЖаHHaKymyJIaTOpHOro 6Joka
- PpIMITKn
- Tpnbalictb 3apdkaHHa (noBha 3apdka)
- PpMItKn
- 3apdkaHHaXOM npEHaHHdo KOMn'IOtepa
- BnMaHNaKapTn nam'rti/6aTaapei
- YcTaHOBJIeHHa/BiD'cHaHHaO6'cKtNaBa
- Bid'edHaHHo6'ekTnBa
- PnmuTkn
- 3HimahnHaΦOTorpaΦi
- Koliuzatko kepybaHHa
- BiDeo
- HotaTkN ⅢoI O KOpNCtUBaHHaΦOToanapaTOM
- B6ydoBahi yHkuii foToanapata
- Ppimitkn 0do 3ancy/BiD TBOpenhra
- He BnKOpNCToBvIe/He 36epiraTe foTOanapat y HacTyHNx Miczax
- Ihopmaia 0do 36epiraHHa
- Iprnmitkn ⅢoDo ekpaHa, eJeKtpoHHoro BNDouyKaay Ta o6'ekTnBa
- Ppo marhit
- Biodomocti npo 6'ekTbN Ta npnaIaIaIaI
- Popadni 3mOMKn 3 BNDoukykaueM
- Ppimitkn 0do cnaaxy
- [Hocii dαнx]
- [PK-ekpaH]
- [BnDowykau]
- [Bxidi/HBxidiHipo3'cMn]
- [Жиьмень]
- [Стохиваима лесковуеоньшни ]
- [Inhe]
- [Спалax]
- [Be3dpoToBa IOKaIbHa mepeka]
- AkymyJIaTOpHn 6JOK NP-FW50
- For at slette et billed
- Lysnetadapter AC-UB10C/ UB10D
Brand : SONY
Model : ILCE6000L
Category : Camera