
Alpha ILCA77M2Q - Camera SONY - Free user manual and instructions
Find the device manual for free Alpha ILCA77M2Q SONY in PDF.
User questions about Alpha ILCA77M2Q SONY
0 question about this device. Answer the ones you know or ask your own.
Ask a new question about this device
Download the instructions for your Camera in PDF format for free! Find your manual Alpha ILCA77M2Q - SONY and take your electronic device back in hand. On this page are published all the documents necessary for the use of your device. Alpha ILCA77M2Q by SONY.
USER MANUAL Alpha ILCA77M2Q SONY
© 2014 Sony Corporation Printed in Thailand

4536323420
ILCA-77M2
English
A-mount
Learning more about the camera ("Help Guide")
"Help Guide" is an on-line manual. You can read the "Help Guide" on your computer or smartphone. Refer to it for in-depth instructions on the many functions of the camera.
URL:
http://rd1.sony.net/help/ilc/1410/h_zz/

Owner's Record
The model and serial numbers are located on the bottom. Record the serial number in the space provided below. Refer to these numbers whenever you call your Sony dealer regarding this product. Model No. ILCA-77M2 Serial No.
WARNING
To reduce fire or shock hazard, do not expose the unit to rain or moisture.
IMPORTANT SAFETY INSTRUCTIONS -SAVE THESE INSTRUCTIONS DANGER TO REDUCE THE RISK OF FIRE OR ELECTRIC SHOCK, CAREFULLY FOLLOW THESE INSTRUCTIONS
If the shape of the plug does not fit the power outlet, use an attachment plug adaptor of the proper configuration for the power outlet.
CAUTION For Customers in the U.S.A.
Battery pack
If the battery pack is mishandled, the battery pack can burst, cause a fire or even chemical burns. Observe the following cautions.
- Do not disassemble.
- Do not crush and do not expose the battery pack to any shock or force such as hammering, dropping or stepping on it.
- Do not short circuit and do not allow metal objects to come into contact with the battery terminals.
- Do not expose to high temperature above 60^ (140^) such as in direct sunlight or in a car parked in the sun.
- Do not incinerate or dispose of in fire.
- Do not handle damaged or leaking lithium ion batteries.
- Be sure to charge the battery pack using a genuine Sony battery charger or a device that can charge the battery pack.
- Keep the battery pack out of the reach of small children.
- Keep the battery pack dry.
- Replace only with the same or equivalent type recommended by Sony.
- Dispose of used battery packs promptly as described in the instructions.
Battery charger
Use the nearby wall outlet (wall socket) when using the Charger. Disconnect the Charger from the wall outlet (wall socket) immediately if any malfunction occurs while using the apparatus.
The power cord (mains lead), if supplied, is designed specifically for use with this camera only, and should not be used with other electrical equipment.
and Canada
RECYCLING LITHIUM-ION BATTERIES
Lithium-Ion batteries are recyclable.
You can help preserve our environment by returning your used rechargeable batteries to the collection and recycling location nearest you.

For more information regarding recycling of rechargeable batteries, call toll free 1-800-822-8837, or visit http://www.call2recycle.org/
Caution: Do not handle damaged or leaking Lithium-Ion batteries.
Battery pack and lens (if lens supplied)
This device complies with Part 15 of the FCC Rules. Operation is subject to the following two conditions:
(1) This device may not cause harmful interference, and (2) this device must accept any interference received, including interference that may cause undesired operation.
CANICES-3B/NMB-3B
This equipment complies with FCC/IC radiation exposure limits set forth for an uncontrolled environment and meets the FCC radio frequency (RF) Exposure Guidelines and RSS-102 of the IC radio frequency (RF) Exposure rules. This equipment has very low levels of RF energy that are deemed to comply without testing of specific absorption ratio (SAR).
For Customers in the U.S.A.
If you have any questions about this product, you may call:
Sony Customer Information Center 1-800-222-SONY (7669).
The number below is for the FCC related matters only.
Regulatory Information
Declaration of Conformity
Trade Name: SONY
Model No.: ILCA-77M2
Responsible Party: Sony Electronics Inc.
Address: 16530 Via Esprillo,
San Diego, CA 92127
U.S.A.
Telephone No.: 858-942-2230
This device complies with Part15 of the FCC Rules. Operation is subject to the following two conditions: (1) This device may not cause harmful interference, and (2) this device must accept any interference received, including interference that may cause undesired operation.
This equipment must not be co-located or operated in conjunction with any other antenna or transmitter.
CAUTION
You are cautioned that any changes or modifications not expressly approved in this manual could void your authority to operate this equipment.
Note:
This equipment has been tested and found to comply with the limits for a Class B digital device, pursuant to Part 15 of the FCC Rules.
These limits are designed to provide reasonable protection against harmful interference in a residential installation.
This equipment generates, uses, and can radiate radio frequency energy and, if not installed and used in accordance with the instructions, may cause harmful interference to radio communications.
However, there is no guarantee that interference will not occur in a particular installation. If this equipment does cause harmful interference to radio or television reception, which can be determined by turning the equipment off and on, the user is encouraged to try to correct the interference by one or more of the following measures:
- Reorient or relocate the receiving antenna.
- Increase the separation between the equipment and receiver.
- Connect the equipment into an outlet on a circuit different from that to which the receiver is connected.
- Consult the dealer or an experienced radio/TV technician for help.
The supplied interface cable must be used with the equipment in order to comply with the limits for a digital device pursuant to Subpart B of Part 15 of FCC Rules.
For Customers in Canada
This device complies with Industry Canada licence-exempt RSS standard(s). Operation is subject to the following two conditions: (1) this device may not cause interference, and (2) this device must accept any interference, including interference that may cause undesired operation of the device.
For Customers in Europe
Notice for the customers in the countries applying EU Directives
Manufacturer: Sony Corporation, 1-7-1
Konan Minato-ku Tokyo, 108-0075 Japan
For EU product compliance: Sony
Deutschland GmbH, Hedelfinger Strasse 61, 70327 Stuttgart, Germany
CE
Hereby, Sony Corporation, declares that this equipment is in compliance with the essential requirements and other relevant provisions of Directive 1999/5/EC. For details, please access the following URL: http://www.compliance.sony.de/
Notice
If static electricity or electromagnetism causes data transfer to discontinue midway (fail), restart the application or disconnect and connect the communication cable (USB, etc.) again.
This product has been tested and found compliant with the limits set out in the EMC regulation for using connection cables shorter than 3 meters (9.8 feet).
The electromagnetic fields at the specific frequencies may influence the picture and sound of this unit.
Disposal of waste batteries and electrical and electronic equipment (applicable in the European Union and other European countries with separate collection systems)

This symbol on the product, the battery or on the packaging indicates that the product and the battery shall not be treated as household waste. On
certain batteries this symbol might be used in combination with a chemical symbol. The chemical symbols for mercury (Hg) or lead (Pb) are added if the battery contains more than 0.0005% mercury or 0.004% lead. By ensuring these products and batteries are disposed of correctly, you will help prevent potentially negative consequences for the environment and human health which could otherwise be caused by inappropriate waste handling. The recycling of the materials will help to conserve natural resources.
In case of products that for safety, performance or data integrity reasons require a permanent connection with an incorporated battery, this battery should be replaced by qualified service staff only. To ensure that the battery and the electrical and electronic equipment will be treated properly, hand over these products at end-of-life to the applicable collection point for the recycling of electrical and electronic equipment. For all other batteries, please view the section on how to remove the battery from the product safely. Hand the battery over to the applicable collection point for the recycling of waste batteries.
For more detailed information about recycling of this product or battery, please contact your local Civic Office, your household waste disposal service or the shop where you purchased the product or battery.
For Customers in Singapore
Complies with
IDA Standards
DB00353
For details on Wi-Fi functions, see the flyer "Wi-Fi Connection/One-touch (NFC) Guide."
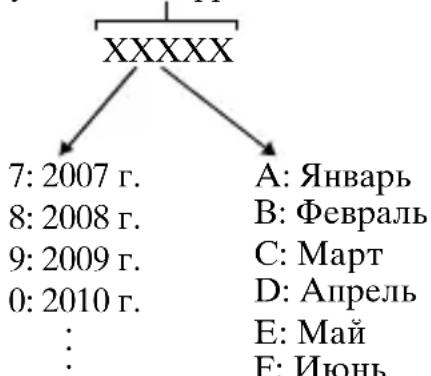
This manual covers several models supplied with different lenses.
The model name varies depending on the supplied lens. The available model varies depending on the countries/regions.
| Model name Lens | |
| ILCA-77M2 Not supplied | |
| ILCA-77M2Q Supplied (DT 16 - 50 mm zoom lens) | |
| ILCA-77M2M Supplied (DT 18 - 135 mm zoom lens) |
Notes on using your camera
Screen language
You can select the language displayed on the screen using the menu.
Shooting procedure
This camera has 2 modes for monitoring subjects: the monitor mode using the monitor, and the viewfinder mode using the viewfinder.
Functions built into this camera
- This manual describes 1080 60i-compatible devices and 1080 50i-compatible devices.
To check whether your camera is a 1080 60i-compatible device or 1080 50i-compatible device, check for the following marks on the bottom of the camera.
1080 60i-compatible device: 60i
1080 50i-compatible device: 50i
- This camera is compatible with 1080 60p or 50p-format movies. Unlike standard recording modes up to now, which record in an interlacing method, this camera records using a progressive method. This increases the resolution, and provides a smoother, more realistic image.
Creating an image database file
If you insert a memory card that does not contain an image database file into the camera and turn on the power, the camera automatically creates an image database file using some of the memory card's capacity.
The process may take a long time and you cannot operate the camera until the process is completed. If a database file error occurs, export all images to your computer using PlayMemories Home™, and then format the memory card using the camera.
No compensation for damaged content or recording failure
Sony cannot compensate for failure to record or loss or damage of recorded content due to a malfunction of the camera or recording media, etc.
Back up recommendation
To avoid the data loss, always copy (back up) data to other media.
Notes on the monitor, electronic viewfinder, lens, and image sensor
- The monitor and electronic viewfinder are manufactured using extremely high-precision technology, and over 99.99% of the pixels are operational for effective use. However, there may be some small black dots and/or bright dots (white, red, blue or green in color) that constantly appear on the monitor and electronic viewfinder. These dots are normal due to the manufacturing process and do not affect the images in any way.
- Do not hold the camera by the monitor.
- Do not expose the camera to sunlight or shoot sunward for a long time. The internal mechanism may be damaged. If sunlight is focused on a nearby object, it may cause a fire.
- There is a magnet on the back and around the rotating shaft of the hinge part of the monitor. Do not bring anything that is easily affected by a magnet, such as floppy disks or credit cards, near the monitor.
-
Images may trail across on the screen in a cold location. This is not a malfunction. When turning on the camera in a cold location, the screen may become temporarily dark. When the camera warms up, the screen will function normally.
-
The recorded image may be different from the image you monitored before recording.
Notes on shooting with the viewfinder
This camera is equipped with an Organic Electro-Luminescence viewfinder with high resolution and high contrast. This viewfinder achieves a wide viewing angle and a long eye relief. This camera is designed to provide an easily viewable viewfinder by appropriately balancing various elements.
- The image may be slightly distorted near the corners of the viewfinder. This is not a malfunction. When you want to see the full composition with all its details, you can also use the monitor.
- If you pan the camera while looking into the viewfinder or move your eyes around, the image in the viewfinder may be distorted or the color of the image may change. This is a characteristic of the lens or display device and is not a malfunction. When you shoot an image, we recommend that you look at the center area of the viewfinder.
- When shooting with the viewfinder, you may experience symptoms such as eyestrain, fatigue, travel sickness, or nausea. We recommend that you take a break at regular intervals when you are shooting with the viewfinder. The required length or frequency of the break may differ depending on the individuals, so you are advised to decide at your own discretion. In case you may feel uncomfortable, refrain from using the viewfinder until your condition recovers, and consult your doctor as necessary.
Notes on recording for long periods of time
- Depending on the camera and battery temperature, you may be unable to record movies or the power may turn off automatically to protect the camera. A message will be displayed on the screen before the power turns off or you can no longer record movies. In this case, leave the power off and wait until the camera and battery temperature goes down. If you turn on the power without letting the camera and battery cool enough, the power may turn off again or you may be unable to record movies.
- Under high ambient temperatures, the temperature of the camera rises quickly.
- When the temperature of the camera rises, the image quality may deteriorate. It is recommended that you wait until the temperature of the camera drops before continuing to shoot.
- The surface of the camera may get warm. This is not a malfunction.
Notes on importing AVCHD movies to a computer
When importing AVCHD movies to a computer, download and use the software PlayMemories Home from the following website:
www.sony.net/pm/
Notes on the flash
- Do not carry the camera by the flash unit, or use excessive force on it.
- If water, dust or sand get into the open flash unit, it may cause a malfunction.
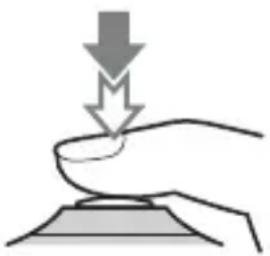
- Be sure to keep your fingers out of the way when you press the flash down.
Notes when playing movies on other devices
-
This camera uses MPEG-4 AVC/H.264 High Profile for AVCHD format recording. Movies recorded in AVCHD format with this camera cannot be played with the following devices.
-
Other devices compatible with AVCHD format that do not support High Profile
Devices incompatible with the AVCHD format
This camera also uses MPEG-4 AVC/ H.264 Main Profile for MP4 format recording. For this reason, movies recorded in MP4 format with this camera cannot be played on devices other than those that support MPEG-4 AVC/H.264.
- Discs recorded with HD (high definition) image quality can be played back only on AVCHD format-compatible devices. DVD-based players or recorders cannot play back HD image quality discs, as they are incompatible with the AVCHD format. Also, DVD-based players or recorders may fail to eject HD image quality discs.
- Movies recorded in 1080 60p/1080 50p format can be played back only on 1080 60p/1080 50p-supported devices.
Warning on copyright
Television programs, films, videotapes, and other materials may be copyrighted.
Unauthorized recording of such materials may be contrary to the provisions of the copyright laws.
The pictures used in this manual
The photographs used as examples of pictures in this manual are reproduced images, and are not actual images shot using this camera.
On the data specifications described in this manual
The data on performance and specifications are defined under the following conditions, except as described in this manual: at an ordinary ambient temperature of 25^ (77^) , and using a battery pack that has been fully charged until the CHARGE lamp has turned off.
How to turn off wireless network functions (Wi-Fi and NFC, etc.) temporarily
When you board an airplane, etc., you can turn off all wireless network functions temporarily.
Select MENU [Wireless] [Airplane Mode] [On].
If you set [Airplane Mode] to [On], an (airplane) mark will be displayed on the screen.
Notes on wireless LAN
If your camera is lost or stolen, Sony bears no responsibility for the loss or damage caused by illegal access or use of the registered access point on the camera.
Checking the supplied items
First check the model name of your camera (page 6). The accessories supplied differ depending on the model.
The number in parentheses indicates the number of pieces.
Supplied with all models:
- Camera (1)
- BC-VM10A Battery charger (1)
- Power cord (mains lead) (1)^* (not supplied in the U.S.A. and Canada)

- Multiple power cords may be supplied with your camera. Use the appropriate one that matches your country/region.
- Rechargeable battery pack NPFM500H (1)
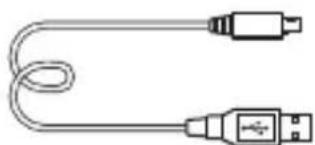
- Micro USB cable (1)
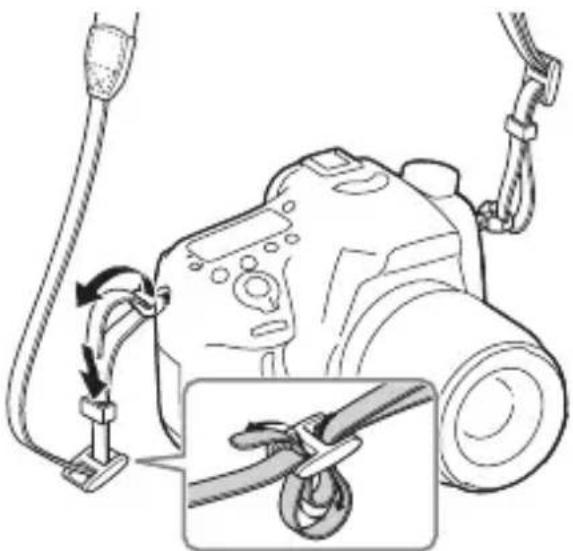
Shoulder strap (1)

For how to attach the shoulder strap to the camera, refer to page 15.
- Body cap (1) (Attached on the camera)

- Shoe cap (1) (Attached on the camera)
Eyepiece Cup (1) (Attached on the camera) - Instruction Manual (1) (this manual)
- Wi-Fi Connection/One-touch (NFC) Guide (1) This guide explains the functions that require a Wi-Fi connection.
ILCA-77M2Q:
- DT 16-50 mm zoom lens (1)/Front lens cap (1)/Rear lens cap (1)/Lens hood (1)
ILCA-77M2M:
- DT 18-135 mm zoom lens (1)/Front lens cap (1)/Rear lens cap (1)/Lens hood (1)
Identifying parts
See the pages in parentheses for details on operation for the parts.
Front side
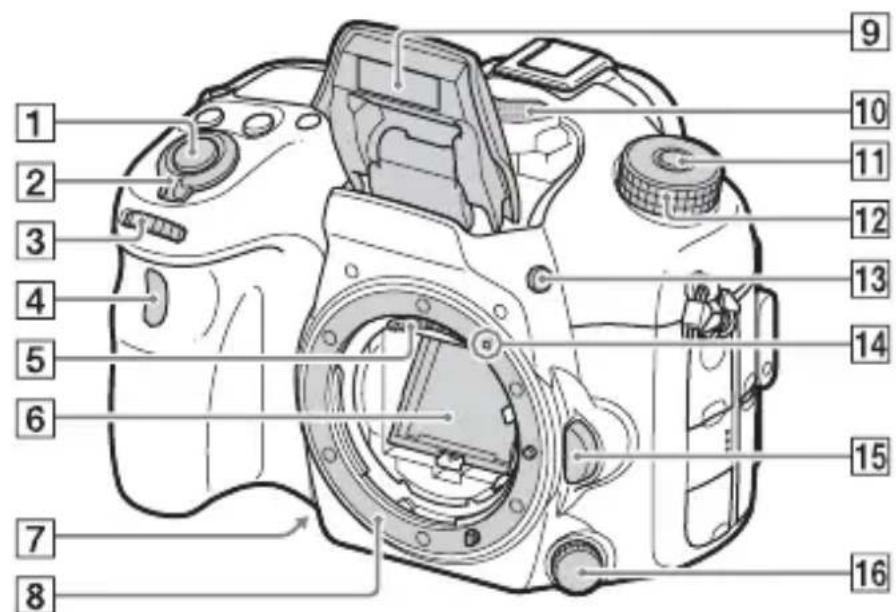
GB
1Shutter button (31)
2Power switch (29)
3Front control dial (18)
4 Remote sensor
5 Lens contacts
6Mirror
Preview button
8Mount
Built-in flash*
- Press the (Flash pop-up) button to use the flash.
- When not using the flash, press it back into the camera body.
10 Microphone**
11Mode dial lock release button (31, 35)
12Mode dial (35)
13 (Flash pop-up) button
14Mounting index (27)
15 Lens release button (28)
16 Focus mode dial
- Do not directly touch these parts.
** Do not cover this part during movie recording. Doing so may cause noise or lower the volume.
Rear side
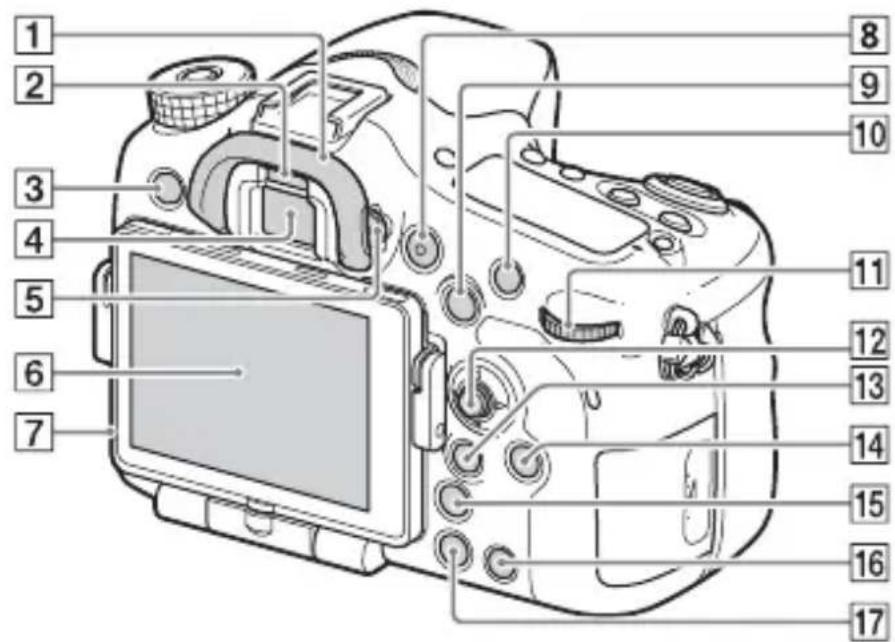
1Eyecup
2Eye sensor
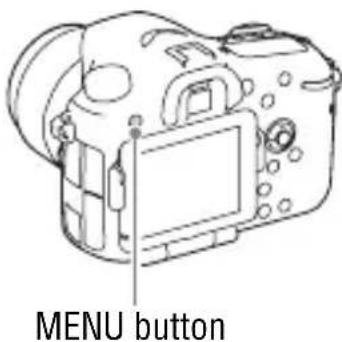
3 MENU button (20)
4Viewfinder*
- When you look into the viewfinder, the viewfinder mode is activated, and when you take your face away from the viewfinder, the screen mode returns to the monitor mode.
5Diopter-adjustment dial
- Adjust the diopter-adjustment dial according to your eyesight until the display appears clearly in the viewfinder.

6Monitor
7Light sensor
MOVIE button (32)
For shooting: AEL (AE lock) button/SLOW SYNC button For viewing: image index) button
10For shooting: AF/MF (Auto focus/manual focus) button For viewing: Enlarge) button
11Rear control dial (18)
12Multi selector
13For shooting: Fn (Function) button (19)
For viewing: Send to Smartphone) button
- You can display the screen for [Send to Smartphone] by pressing this button.
- When you attach a vertical grip (sold separately), pressing the (Image rotation) button on the vertical grip displays the [Send to Smartphone] screen.
DISP(Display) button
15 (Smart teleconverter) button
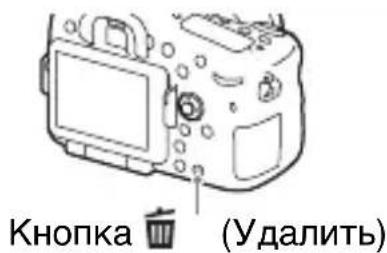
16C (Custom) button For viewing:Delete) button (34)
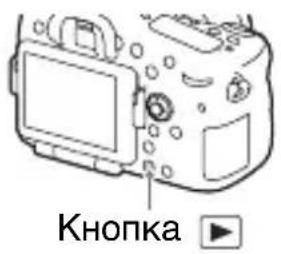
17 (Playback) button (33)
- Do not directly touch this part.
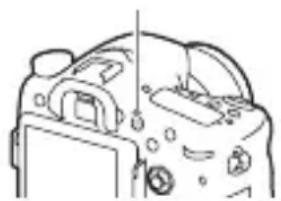
Top side
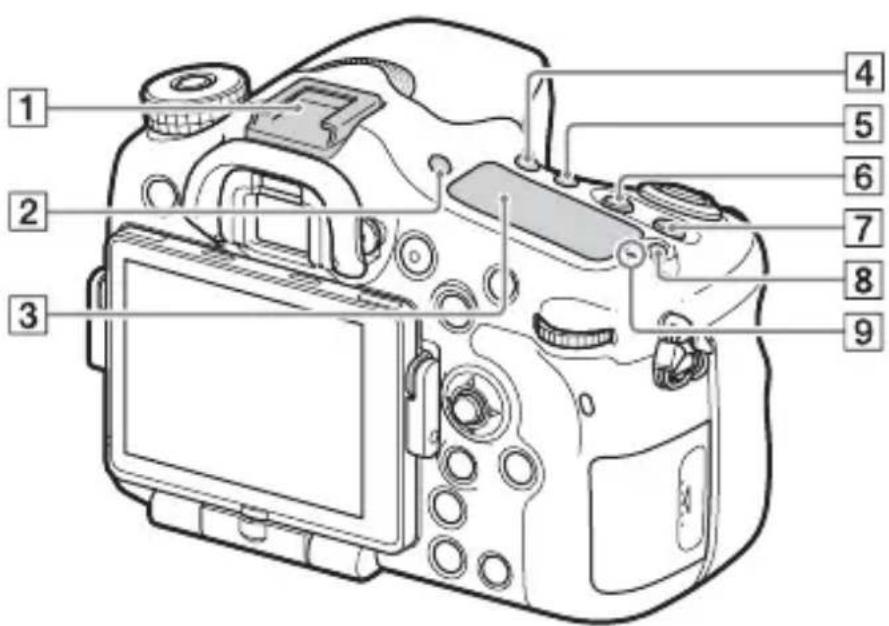
1Multi interface shoe*
2FINDER/MONITOR button
3Display panel
4 (Drive mode) button
5WB (White balance) button
6 (Exposure) button
ISO button
Display panel illumination button
9 Image sensor position mark
- For details on compatible accessories of the Multi interface shoe, visit the Sony website in your area, or consult your Sony dealer or local authorized Sony service facility.
Accessories for the Accessory Shoe can also be used.
Operations with other manufactures' accessories are not guaranteed.
ni Multi Interface Shoe
Accessory Shoe
Sides/Bottom


1 Microphone jack
- When an external microphone is connected, the internal microphone is turned off automatically. When the external microphone is a plug-in-power type, the power of the microphone is supplied by the camera.
2 Hooks for shoulder strap - Attach both ends of the strap onto the camera.
3 (Flash sync) terminal
4REMOTE terminal
- When connecting the RM-L1AM Remote Commander (sold separately) to the camera, insert the plug of the Remote Commander into the REMOTE terminal, aligning the guide of the plug with the guide of the REMOTE terminal. Make sure that the cord of the Remote Commander faces forward.
5Speaker
6DC IN terminal
- When connecting the AC-PW10AM AC Adaptor (sold separately) to the camera, turn the camera off, then plug the connector of the AC Adaptor to the DC IN terminal on the camera.
GB
7HDMI micro jack
8Multi/Micro USB Terminal*
Supports Micro USB compatible device.
9Access lamp
10 (mark)
- This mark indicates the touch point for connecting the camera and an NFC-enabled Smartphone. For details on the location of the N (N mark) on your Smartphone, refer to the operating instructions of the Smartphone.
- NFC (Near Field Communication) is an international standard of short-range wireless communication technology.
Wi-Fi sensor (built-in)
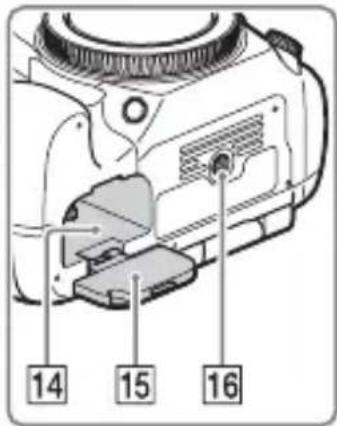
12Memory card insertion slot (24)
13Memory card cover (24)
14 Battery insertion slot (24)
15 Battery cover (24)
16 Tripod socket hole
- Use a tripod with a screw less than 5.5mm (7/32 inches) long. Otherwise, you cannot firmly secure the camera, and damage to the camera may occur.
* For details on compatible accessories for the Multi/Micro USB Terminal, visit the Sony website, or consult your Sony dealer or local authorized Sony service facility.
Lens
DT 16-50mm F2.8 SSM (Supplied with the ILCA-77M2Q)
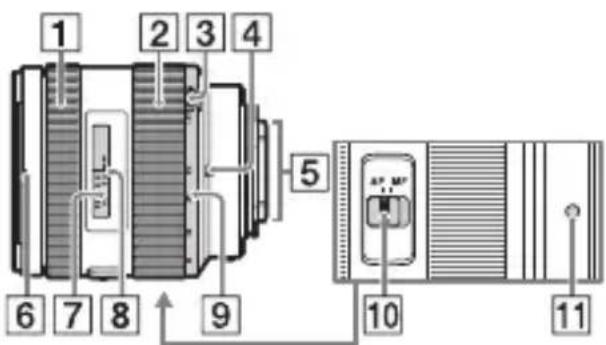
DT 18-135mm F3.5-5.6 SAM (Supplied with the ILCA-77M2M)
1 Focusing ring
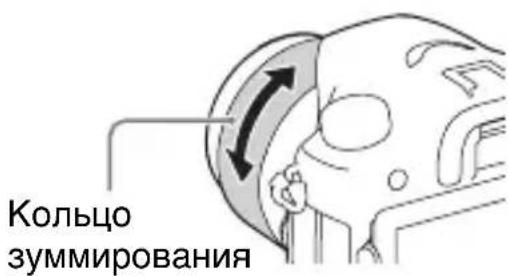
2Zoom ring
3Zoom lock switch
4 Focal-length index
5 Lens contacts*
6 Lens hood index
7Distance scale
8Distance index
9Focal-length scale
10Focusing mode switch
11Mounting index
* Do not directly touch this part.
-
The DT 16-50mm F2.8 SSM/DT 18-135mm F3.5-5.6 SAM are designed for Sony A-mount cameras (models equipped with an APS-C sized image sensor). You cannot use these lenses on 35mm-format cameras.
-
For the lenses other than DT 16-50mm F2.8 SSM/DT 18-135mm F3.5-5.6 SAM, refer to the operating instructions supplied with the lens.
Operating the camera
How to use the multi selector
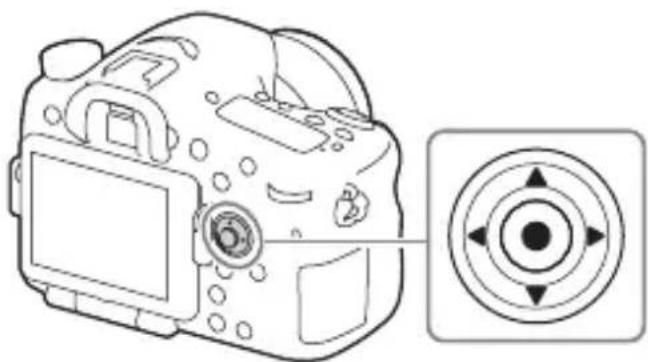
- You can use the up/down/left/right side of the multi selector to move the selection frame. Press in the center of the multi selector to set the selected item. In this manual, the up/down/left/right side of the multi selector is indicated by / / / .
- When you use on the multi selector in playback mode, you can display the previous or next image.
- [Standard] is assigned to in the center of the multi selector in the default settings. When you press , the autofocus function is activated and the camera focuses on the subjects in the central area of the monitor.
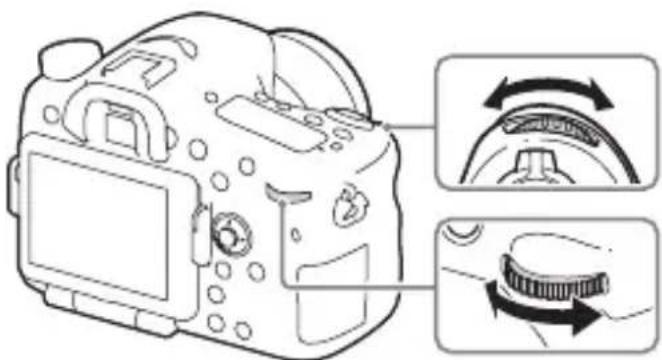
How to use the front dial/rear dial
You can turn the front dial or rear dial to change the settings required for each shooting mode with immediate effect.
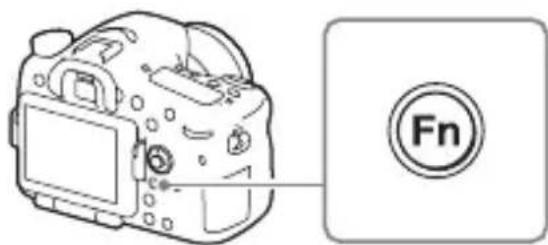
Selecting a function using the Fn (Function) button
This button is used for setting up or executing functions used frequently in shooting, except for functions from the Quick Navi screen.
1 Press the DISP button to set the screen mode to other than [For viewfinder].
2 Press the Fn button.
GB
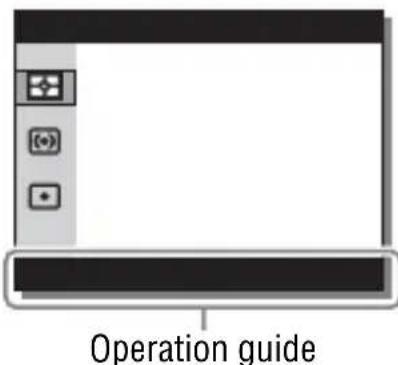
3 Select the desired item using / / on the multi selector.
The setting screen appears.
4 Select the desired setting by turning the front dial, then press on the multi selector.
- Some setting values can be finely adjusted by turning the rear dial.

To set the individual settings in the dedicated screen
In step 3, select a setting item and press on the multi selector to switch to the dedicated screen for the setting item. Set the items according to the Operation guide.
Functions that can be selected using the MENU button
You can set up the basic settings for the camera as a whole, or execute functions such as shooting, playback, or other operations.
1 Press MENU button to display the menu screen.
2 Select the desired setting item using / / / on the multi selector, and then press on the center of the multi selector.
- Select an icon at the top of the screen and press the on the multi selector to move to another MENU item.
3 Select the setting value, then press to confirm.
To display the Tile Menu
Allows you to select whether to always display the first screen of the menu when you press the MENU button.
MENU (Setup) 2 [Tile Menu] [On]
Using the In-Camera Guide
You can use [Custom Key Settings] to assign In-Camera Guide to the desired button.
The In-Camera Guide displays explanations for the currently selected menu function or setting.
1 Select MENU button (Custom Settings) 6 [Custom Key Settings] desired functions assigned to the button [In-Camera Guide].
Press the MENU button and use the multi selector to select a MENU item whose explanation you want to read, and then press the button to which [In-Camera Guide] is assigned.
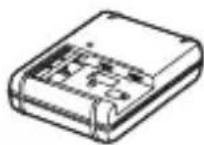
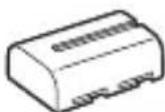
Charging the battery pack
When using the camera for the first time, be sure to charge the NP-FM500H InfoLITHIUM™ battery pack (supplied).
The InfoLITHIUM battery pack can be charged even when it has not been fully depleted.
It can also be used when it has not been fully charged.
The charged battery pack is discharged little by little, even when you do not use it. To avoid missing an opportunity to shoot, charge the battery pack again before shooting.
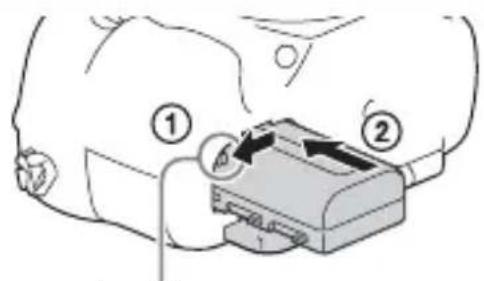
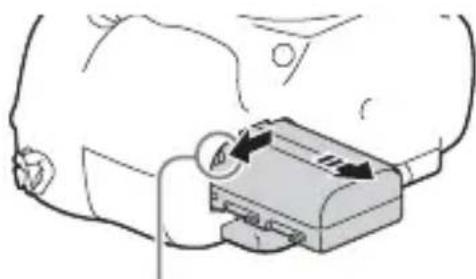
1 Insert the battery pack into the battery charger.
Push the battery pack until it clicks.
2 Connect the battery charger to the wall outlet (wall socket).
Light on: Charging Light off: Charge completed
Charging time (Full charge)
Approx. 175 minutes
- When charging a fully depleted battery pack at a temperature of 25^ (77^) .
- The CHARGE lamp turns off when charging is completed.
For the U.S.A and Canada
CHARGE lamp
For countries/regions other than the U.S.A. and Canada
GB
- The charging time differs depending on the remaining capacity of the battery pack or charging conditions.
- Be sure to use only genuine Sony brand battery packs.
- We recommend charging the battery pack in an ambient temperature of between 10^ to 30^ (50^ to 86^) . You may not be able to efficiently charge the battery pack outside this temperature range.
- Connect the battery charger to the nearest wall outlet (wall socket).
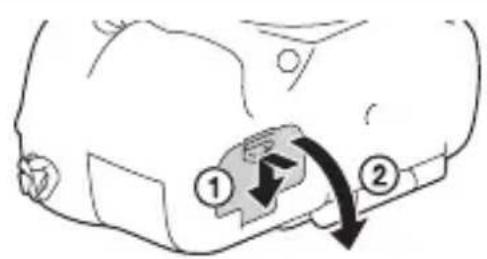
Inserting the battery pack/memory card (sold separately)
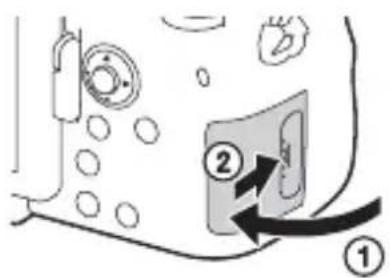
1 While sliding the battery cover open lever, open the cover.
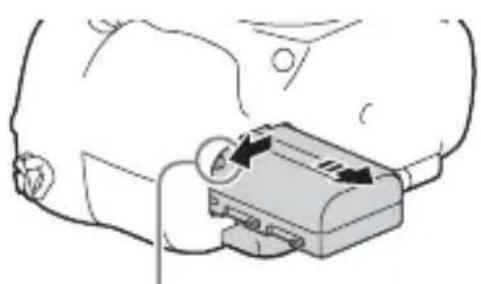
2 Firmly insert the battery pack all the way while pressing the lock lever with the tip of the battery.
Lock lever
3 Close the cover.
4 While sliding the memory card cover, open the cover.
5 Insert a memory card.
- With the notched corner facing as illustrated, insert the memory card until it clicks into place.
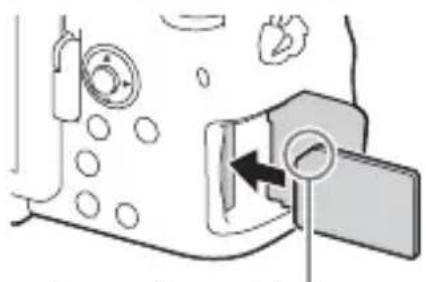
Ensure the notched corner faces correctly
6 Close the cover.
GB
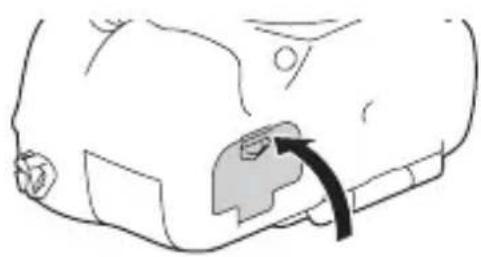
To remove the battery pack
Turn off the camera and slide the lock lever in the direction of the arrow. Be careful not to drop the battery pack.
Lock lever
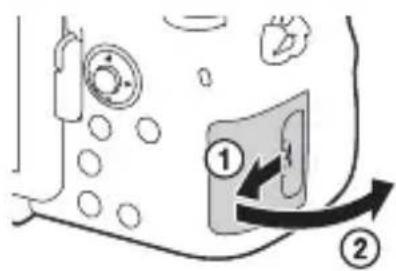
To remove the memory card
Check that the access lamp (page 16) is not lit, then open the cover, and push the memory card once.
To check the remaining battery level
The supplied battery pack is a lithium-ion battery pack that has functions for exchanging information related to operating conditions with your camera. The percentage of the remaining battery life is displayed according to the operating conditions of your camera.
| Battery level | “Battery exhausted.” | |||||
| High | You cannot shoot any more pictures. | |||||
Memory cards that can be used
You can use the following types of memory cards with this camera. However, proper operation cannot be guaranteed for all types of memory cards.
| Memory card For still images For | movies | ||
| A | Memory Stick PRO DuoTM (Mark2 only)√ | √ | |
| Memory Stick PRO-HG DuoTM | √ | √ | |
| Memory Stick XC-HG DuoTM | √ | √ | |
| B | SD memory card (Class 4 or faster) | √ | √ |
| SDHC memory card (Class 4 or faster) | √ | √ | |
| SDXC memory card (Class 4 or faster) | √ | √ |
- In this manual, the products in the table are collectively referred to as follows:
A: Memory Stick PRO Duo media
B:SD card
- This camera supports UHS-I-compatible SD cards.
Notes
- Images recorded on a Memory Stick XC-HG Duo media or an SDXC memory card cannot be imported to or played on computers or AV devices that are not compatible with exFAT*. Make sure that the device is compatible with exFAT before connecting it to the camera. If you connect your camera to an incompatible device, you may be prompted to format the card.
Never format the card in response to this prompt, as doing so will erase all data on the card.
- exFAT is the file system used on Memory Stick XC-HG Duo media and SDXC memory cards.
Attaching a lens
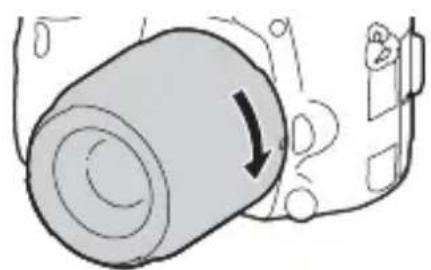
Set the power switch of the camera to OFF before you attach or remove the lens.
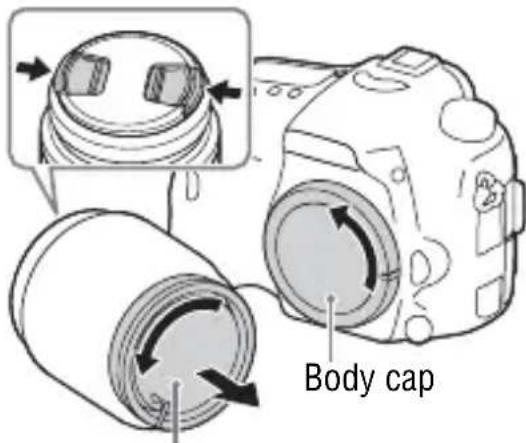
1 Remove the body cap from the camera and the rear lens cap from the rear of the lens.
- When changing the lens, quickly change the lens away from dusty locations to keep dust or debris from getting inside the camera.
- When shooting, remove the front lens cap from the front of the lens.
Front lens cap
Rear lens cap
GB
2 Mount the lens by aligning the orange index marks (mounting indexes) on the lens and camera.
- Hold the camera with the lens facing down to prevent dust from entering into the camera.
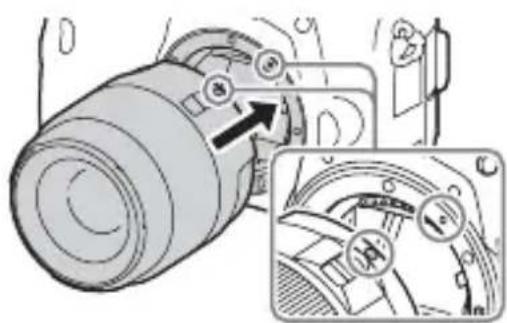
Orange index marks
3 While pushing the lens lightly toward the camera, turn the lens clockwise until it clicks into the locked position.
- Be sure to put the lens on straight.
Notes
- When attaching a lens, do not press the lens release button.
- Do not use force when attaching a lens.
- E-mount lenses are not compatible with this camera.
- When you use a lens for which a tripod socket is provided, attach the lens onto the tripod using the tripod socket provided to help balance the weight of the lens.
- When carrying the camera with a lens attached, hold both the camera and the lens firmly.
- Do not hold the part of the lens that is extended for the zoom or focus adjustment.
To remove the lens
1 Press the lens release button all the way in and turn the lens counterclockwise until it stops.
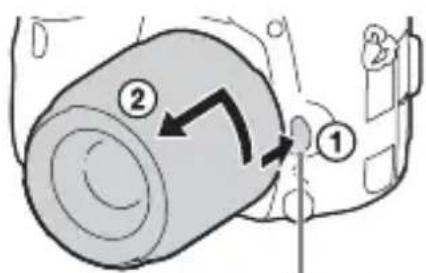
Lens release button
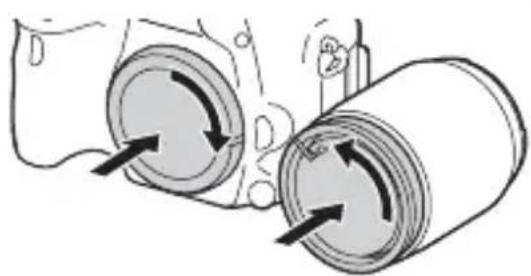
2 Attach the caps to the front and rear of the lens and the body cap to the camera.
Before you attach them, remove any dust from them.
Notes on changing the lens
When changing the lens, if dust or debris gets inside the camera and adheres to the surface of the image sensor (the part that converts the light to an electric signal), it may appear as dark spots on the image, depending on the shooting environment.
The camera is equipped with an anti-dust function to prevent dust from landing on the image sensor. However, always make sure to quickly change the lens away from dusty locations when attaching/removing a lens.
Setting the date and time
When you turn on the camera for the first time or after you initialize the functions, the screen to set the date and time appears.
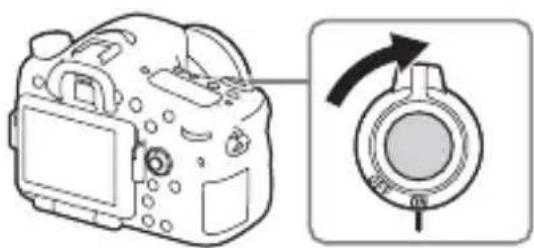
1 Set the power switch to ON to turn on the camera.
The screen to set the date and time appears.
- To turn the camera off, set the power switch to OFF.
2 Check that [Enter] is selected on the screen, then press on the multi selector.
![SONY Alpha ILCA77M2Q - Check that [Enter] is selected on the screen, then press on the multi selector. - 1](/content/2026/03/502224/images/54add0beda7ce245db4b49d378d082e6f56fb19bb4505d76f94fd6a08c751e2c.jpg)
3 Select a desired geographic location, and then press .
4 Select a setting item by using / on the multi selector, then press .
5 Select a desired setting by using / / on the multi selector, then press .
6 Repeat steps 4 and 5 to set other items, then select [Enter] and press .
To cancel the date and time setting operation
Press the MENU button.
Setting the date/time and area again
The date and time setup screen appears automatically when the power is turned on for the first time or when the internal rechargeable backup battery has been discharged. To reset the date and time, use the menu.
MENU button (Setup) 4 [Date/Time Setup] or [Area Setting]
Maintaining the date and time setting
This camera has an internal rechargeable battery for maintaining the date and time and other settings regardless of whether the power is on or off, or the battery is installed or not.
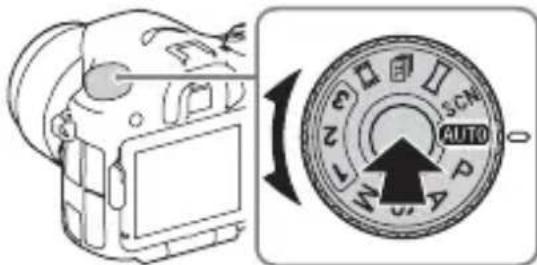
Shooting still images
In auto mode, the camera analyzes the subject and allows you to shoot with the appropriate settings.
1 Set the power switch to ON to turn on the camera.
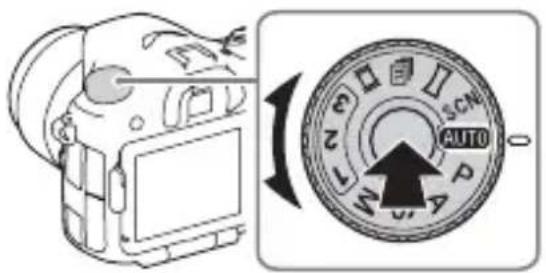
2 Set the mode dial to Auto Mode).
- Turn the mode dial while pressing the mode dial lock release button on the center of the mode dial.
GB
3 Look into the viewfinder and hold the camera.
When using a zoom lens, adjust the zoom ring to the proper size of the subject.

4 Press the shutter button halfway down to focus.
- When the image is in focus, a beep sounds and the or indicator lights.
5 Press the shutter button fully down to shoot an image.
- If [Auto Obj. Framing] is set to [Auto], when shooting faces, close-up (macro) subjects, or subjects tracked by [Lock-on AF], the camera analyzes the scene and automatically trims the captured image into a suitable composition. Both the original and the trimmed images will be saved.

1 Set the mode dial to Movie).
- When the [MOVIE Button] is set to [Always], the movie recording can be started from any shooting mode.
2 Press the MOVIE button to start recording.
MOVIE button
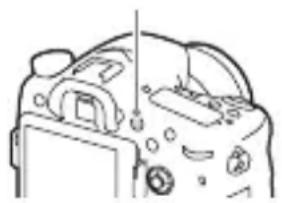
3 Press the MOVIE button again to stop recording.
Notes
- The sound of the camera in operation may be recorded while recording a movie. You can disable the sound recording by setting [Audio Recording] to [Off].
- The continuous recording time of a movie depends on the ambient temperature or the condition of the camera. See "Notes on continuous movie recording" (page 46).
- When the non appears, the temperature of the camera is too high. Turn the camera off and wait until the temperature of the camera decreases.
- When you are recording continuously for a long time, you may feel that the camera is warm. This is normal. Also, "Internal temp. high. Allow it to cool." may appear. In such cases, turn the camera off and wait until the camera is ready to shoot again.
Playing back images
1 Press the button.
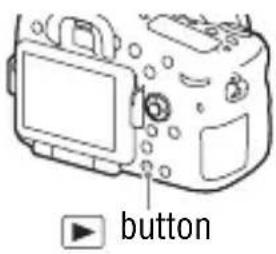
2 Select an image by pressing the / on the multi selector.
-
To play back movies, press on the multi selector.
-
If you press on the multi selector while playing back a movie, the control panel will be displayed.
| Control panel Action during movie playback | |
| ▶Playback | |
| ■Pause | |
| ▶Fast forward | |
| ▲Fast rewind | |
| ■Forward slow playback | |
| ▲Rewind slow playback | |
| ▶Next movie | |
| ▲Previous movie | |
| ■Frame advance | |
| ▲■Frame rewind | |
| Volume settings | |
| Closes the control panel | |
Notes
- Movies recorded using other devices may not play back on this camera.
Deleting images
Once you have deleted an image, you cannot restore it. Be sure that you want to delete the image before proceeding.
1 While displaying the image you want to delete, press the (Delete) button.
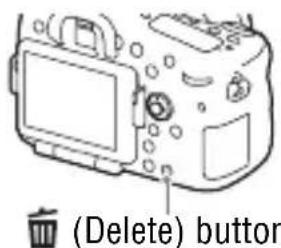
2 Select [Delete] with / on the multi selector, then press .
- To delete several images at a time, select MENU button
(Playback) 1 [Delete].
Notes
- Protected images cannot be deleted.
Selecting a shooting mode
Turn the mode dial while pressing the mode dial lock release button on the center of the mode dial.
The following shooting modes are available.
| AUTO (Auto Mode) A | Allows you to shoot still images with the settings adjusted automatically. |
| P (Program Auto) A | ows you to shoot with the exposure (the shutter speed and the aperture value) adjusted automatically. The other settings can be adjusted manually. |
| A (Aperture Priority) | Shoots by adjusting the aperture and changing the focus range, or by defocus the background. |
| S (Shutter Priority) A | adjusts the shutter speed to show the movement of the subject. |
| M (Manual Exposure) | Allows you to shoot after manually adjusting the exposure (the shutter speed and the aperture value) using the front or rear dial. |
| 1/2/3 (Memory recall) | Calls up settings pre-registered in [Memory] in the (Camera Settings). |
| (Movie) Allows you to change shooting settings and shoot a movie. | |
| (Cont. Priority AE) | Allows continuous shooting while the shutter button is fully depressed. The camera records the images continuously at a maximum of about 12 images per second. |
| (Sweep Panorama) | Allows you to shoot panoramic images by combining multiple images. |
| SCN (Scene Selection) | Allows you to shoot with preset settings according to the scene. |
Using the Wi-Fi and NFC one-touch functions
You can perform the following operations using the camera's Wi-Fi and NFC One-touch functions.
Saving images to a computer. Transferring images from the camera to a smartphone.

Using the smartphone as a remote control for the camera.

Viewing still images on a TV.
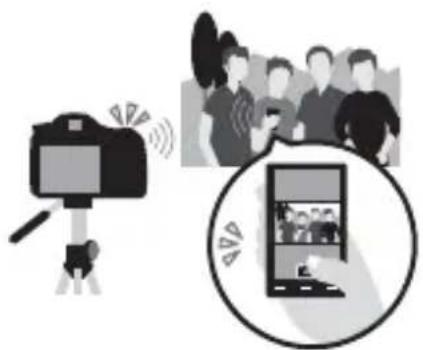
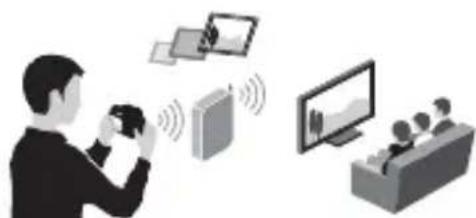
For details on the Wi-Fi and NFC One-touch functions, refer to the attached document "Wi-Fi Connection/One-touch (NFC) Guide" or to the "Help Guide" (page 2).
Connecting the camera to a wireless access point
Connect the camera to your wireless access point. Before starting the procedure, make sure you have the SSID (name of the access point) and password of your wireless access point with you.
1 MENU button (Wireless) 2 [Access Point Set.].
2 Use / on the multi selector to select the access point you want to connect to. Press in the center of the multi selector and enter the password if a key icon is displayed with a wireless access point, then select [OK].
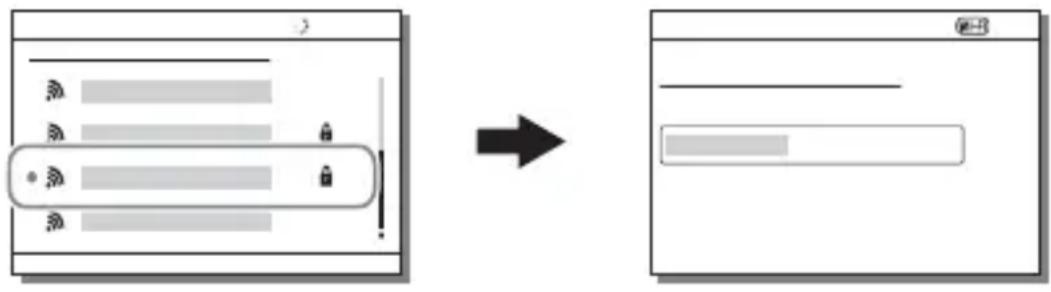
Notes
- If a connection is not established, see the wireless access point operating instructions or contact the administrator of the access point.
- To save images to a computer, install the following dedicated software on your computer.
When using Windows: Play Memories Home
www.保养.net/pm/
When using Mac: Wireless Auto Import
http://www.保养.co.jp/imsoft/Mac/
Using the software
Use the following applications to optimize use of the images shot with your camera.
- Image Data Converter
- PlayMemories Home
- Remote Camera Control
For details on installation, see pages 39 to 42.
System requirements
You can find the system requirements for the software at the following URL:
www.sony.net/pcenv/

Using Image Data Converter
With Image Data Converter, you can do the following:
- You can play back and edit images recorded in RAW format with various corrections, such as tone curve and sharpness.
- You can adjust images with white balance, exposure, and [Creative Style], etc.
- You can save the images displayed and edited on a computer.
- You can either save the image as RAW format or save it in a general file format.
- You can display and compare the RAW images and JPEG images recorded by this camera.
- You can rank images in 5 grades.
- You can apply color labels.
To use Image Data Converter, refer to Help.
Click [Start] [All Programs] [Image Data Converter] [Help] [Image Data Converter Ver.4].
Image Data Converter support page (English only)
http://www.sony.co.jp/ids-se/
Installing Image Data Converter
1 Download the software from the following URL and install it on your computer.
Windows:
http://www.sony.co.jp/imsoft/Win/
Mac:
- Log on as Administrator.
Using PlayMemories Home
The software PlayMemories Home allows you to import still images and movies to your computer and use them. PlayMemories Home is required for importing AVCHD movies to your computer.
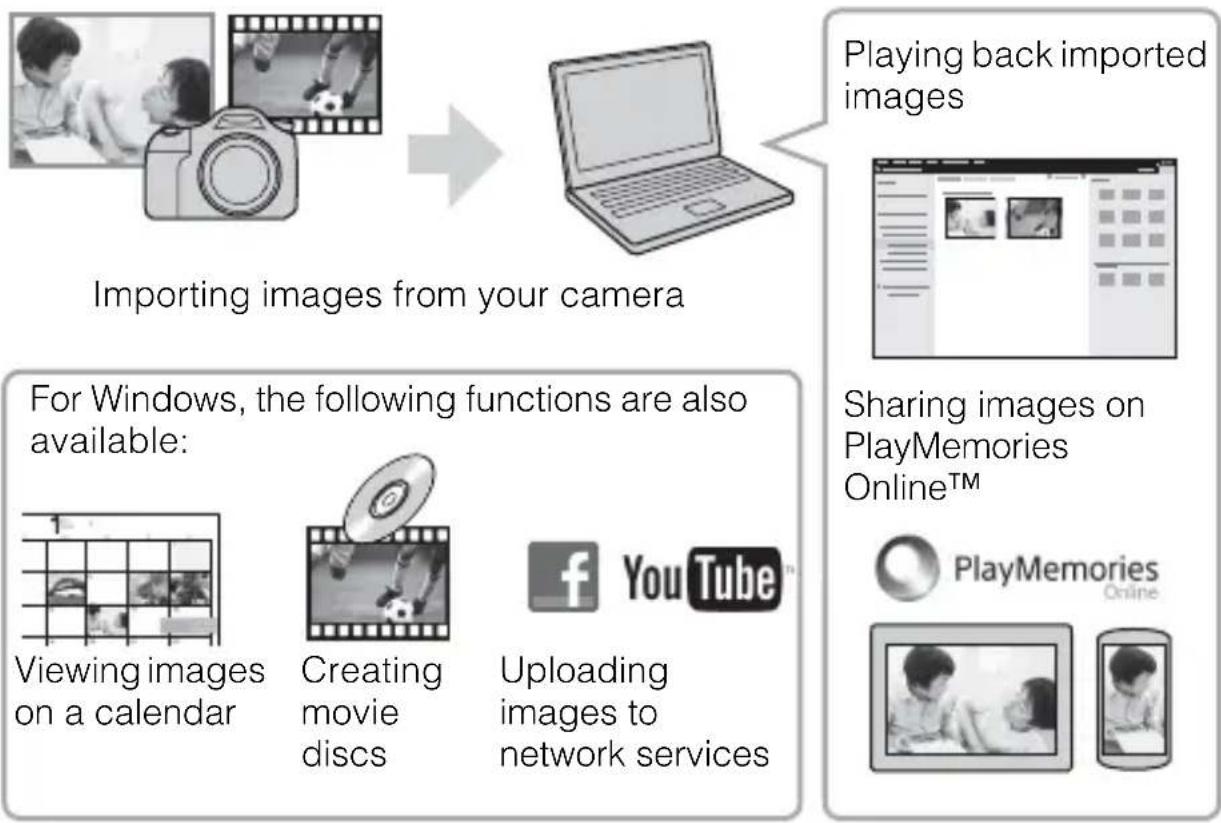
- You can download Image Data Converter or Remote Camera Control, etc. by performing the following procedure: Connect the camera to your computer launch Play Memories Home click [Notifications].
Notes
- An Internet connection is required to install PlayMemories Home.
- An Internet connection is required to use PlayMemories Online or other network services. PlayMemories Online or other network services may not be available in some countries or regions.
Refer to the following URL for Mac software: http://www.sony.co.jp/imsoft/Mac/ -
If the software PMB (Picture Motion Browser), supplied with models released before 2011, has already been installed on your computer, it will be overwritten by PlayMemories Home during the installation. Use PlayMemories Home, the successor software of PMB.
-
Movies recorded using the [60p 28M(PS)]/[50p 28M(PS)], [60i 24M(FX)]/[50i 24M(FX)] or [24p 24M(FX)]/[25p 24M(FX)] setting in [ Record Setting] are converted by PlayMemories Home to create an AVCHD recording disc. This conversion can take a long time. Also, you cannot create a disc with the original image quality. If you want to keep the original image quality, store your movies on a Blu-ray Disc.
Installing PlayMemories Home
1 Using the Internet browser on your computer, go to the following URL, then click [Install] [Run].
www.sony.net/pm/
GB
2 Follow the instructions on the screen to complete the installation.
Using Remote Camera Control
Connect the camera to your computer. With Remote Camera Control you can:
- Set up the camera or record an image from the computer.
- Record an image directly to the computer.
- Perform an Interval Timer Shooting.
Set up the following before use: MENU (Setup) 4 [USB Connection] [PC Remote]
Installing Remote Camera Control
1 Using the Internet browser on your computer, go to the following URL.
Windows:
http://www.sony.co.jp/imsoft/Win/
Mac:
2 Follow the instructions on the screen to download and install Remote Camera Control.
Notes
- An Internet connection is required to install Remote Camera Control.
Checking the number of images and recordable time of movies
When you insert a memory card into the camera and set the power switch to ON, the number of images that can be recorded (should you continue to shoot using the current settings) is displayed on the screen.
Notes
- When "0" (the number of recordable images) flashes in yellow, the memory card is full. Replace the memory card with another one, or delete images from the current memory card (page 34).
- When "NO CARD" (the number of recordable images) flashes in yellow, it means no memory card has been inserted. Insert a memory card.
The number of images that can be recorded on a memory card
The table below shows the approximate number of images that can be recorded on a memory card formatted with this camera. The values are defined using Sony standard memory cards for testing. The values may vary depending on the shooting conditions and the type of memory card used.
Image Size: L: 24M
Aspect Ratio: 3:2*
Memory card formatted with this camera (Units: Images)
| Capacity Size | 2 GB 4 GB 8 G B 16 GB 32 GB 64 GB | |||||
| Standard 330 660 1 | 350 2700 5 | 400 10500 | ||||
| Fine 200 410 820 1 | 650 3300 6 | 600 | ||||
| Extra fine | 100 200 | 400 820 | 1600 3250 | |||
| RAW & JPEG | 54 | 105 220 | 440 880 | 1 | 750 | |
| RAW | 74 | 145 300 | 600 1200 | 2 | 2400 | |
- When [Aspect Ratio] is set to [16:9], you can record more images than the numbers shown in the table above (except when [RAW] is selected).
The number of images that can be recorded using a battery pack
Note that the actual numbers may differ depending on the conditions of use.
| Battery life Number of images | ||
| Shooting (still images) | Screen Approx. | 240 min. Approx. 480 images |
| Viewfinder Approx. | 205 min. Approx. 410 images | |
| Actual shooting (movies) | Screen Approx. | 120 min. — |
| Viewfinder Approx. | 110 min. — | |
| Continuous shooting (movies) | Screen Approx. | 175 min. — |
| Viewfinder Approx. | 175 min. — | |
| Viewing (still images) | Screen Approx. | 270 min. Approx. 5400 images |
| Viewfinder Approx. | 320 min. Approx. 6400 images | |
Notes
- The above number of images applies when the battery pack is fully charged. The number of images may decrease depending on the conditions of use.
-
The number of images that can be recorded is for shooting under the following conditions:
-
The battery pack is used at an ambient temperature of 25^ (77^) .
Using the lens DT 16-50mm F2.8 SSM - Using Sony Memory Stick PRO Duo (Mark2) media (sold separately)
- [Viewfinder Bright.] is set to [Manual] [± 0] .
-
[Monitor Brightness] is set to [Manual] [± 0] .
-
The number for "Shooting (still images)" is based on the CIPA standard, and is for shooting under the following conditions:
(CIPA: Camera & Imaging Products Association)
-Focus mode: S (Single-shot AF)
- Shooting once every 30 seconds.
- The power turns on and off once every ten times.
-
The number of minutes for movie shooting is based on the CIPA standard, and are for shooting under the following conditions:
-
[Record Setting] is set to [60i 17M(FH)]/[50i 17M(FH)].
-
Typical movie shooting: Battery life based on repeatedly shooting, zooming, shooting stand-by, turning on/off, etc.
-
Continuous movie shooting: Battery life based on non-stop shooting until the limit (29 minutes) has been reached, and then continued by pressing the MOVIE button again. Other functions, such as zooming, are not operated.
Available recording time for a movie
The table below shows the approximate total recording times using a memory card formatted with this camera.
Memory card formatted with this camera (h (hour), m (minute))
| Capacity Record Setting | 2 GB | 4 GB | 8 GB | 16 GB | 32 GB | 64 GB | |
| 60i 24M(FX)/50i 24M(FX) | 10 m 20 | m 40 m 1 | h 30 m 3 h | 6 h | |||
| 60i 17M(FH)/50i 17M(FH) | 10 m 30 | m 1 h 2 h | 4 h 5 m | 8 h 15 m | |||
| 60p 28M(PS)/50p 28M(PS) | 9 m | 15 m 35 | m 1 h 15 | m 2 h 30 | m 5 h 5 m | ||
| 24p 24M(FX)/25p 24M(FX) | 10 m 20 | m 40 m 1 | h 30 m 3 h | 6 h | |||
| 24p 17M(FH)/25p 17M(FH) | 10 m 30 | m 1 h | 2 h | 4 h 8 h | |||
| 1440×1080 12M | 20 m | 40 m | 1 h 20 m | 2 h 45 m | 5 h 30 m | 11 h | |
| VGA 3M | 1 h 10 m | 2 h 25 m | 4 h 55 m | 10 h | 20 h | 40 h |
- Continuous shooting is possible for approximately 29 minutes (a product specification limit). The maximum continuous recording time of an MP4 (12M) format movie is about 20 minutes (limited by the 2 GB file size restriction).
Notes
-
The recordable time of movies varies because the camera is equipped with VBR (Variable Bit-Rate), which automatically adjusts image quality depending on the shooting scene. When you record a fast-moving subject, the image is clearer but the recordable time is shorter because more memory is required for recording. The recordable time also varies depending on the shooting conditions, the subject or the image quality/size settings.
-
The values shown are not for continuous recording time.
-
The recording time may differ depending on shooting conditions and the memory card used.
- When is indicated, stop recording the movie. The temperature inside the camera has increased to an unacceptable level.
- For details on movie playback, see page 33.
Notes on continuous movie recording
- It requires a lot of power to perform high quality movie recording or continuous shooting using the image sensor. Therefore, if you continue to shoot, the temperature inside the camera will rise, especially that of the image sensor. In such cases, the camera turns off automatically since higher temperatures affect the quality of the images or affect the internal mechanism of the camera.
- The duration of time available for movie recording is as follows when the camera starts recording after the power of the camera has been turned off for a while. (The following values indicate the continuous time from when the camera starts recording until the camera stops recording.)
| Ambient temperature Continuous recording time for movies | |
| 20°C (68°F) About 29 minutes | |
| 30°C (86°F) About 29 minutes | |
| 40°C (104°F) About 17 minutes |
- The duration of time available for movie recording varies with the temperature or condition of the camera before you start recording. If you frequently recompose or shoot images after the power is turned on, the temperature inside the camera will rise and the recording time available will be shorter.
- If the camera stops recording due to the temperature, leave it for several minutes with the power turned off. Start recording after the temperature inside the camera drops fully.
-
If you observe the following points, the recording time will be longer.
-
Keep the camera out of direct sunlight.
-
Turn the camera off when it is not being used.
-
The maximum size of a movie file is about 2 GB. When the file size is about 2 GB, recording stops automatically when [File Format] is set to [MP4], and a new movie file is created automatically when [File Format] is set to [AVCHD].
- The maximum continuous recording time is 29 minutes.
Specifications
Camera
[System]
Camera Type: Built-In-Flash Interchangeable Lens Digital Camera
Lens: Sony A-mount lens
[Image sensor]
Image format: 23.5mm× 15.6mm (APS-C format) CMOS image sensor
Total pixel number of image sensor: Approx. 24 700 000 pixels
Effective pixel number of camera: Approx. 24 300 000 pixels
[SteadyShot]
For still images: System: Image sensor-shift mechanism
For movies: System: Electronic
[Anti-Dust]
System: Charge protection coating on image sensor and image sensor shift mechanism
[Auto focus system]
System: TTL phase-detection system (with center F2.8 sensor), 79 points (15 points cross type)
Sensitivity Range: -2EV to 18 EV (at ISO 100 equivalent)
AF illuminator: Approx. 1m to 5m (3.3 ft. to 16.4 ft.)
[Electronic viewfinder]
Type: Electronic viewfinder (Organic Electro-Luminescence)
Screen size: 1.3cm (0.5 type)
Total number of dots: 2359296 dots
Frame coverage: 100%
Magnification: Approx. 1.09× Approx. 0.71× (35mm -format equivalent) with 50~mm lens at infinity, -1m^-1
Eye Point: Approximately 27mm from the eyepiece, 22mm from the eyepiece frame at -1m^-1 (CIPA standard compliant)
Diopter Adjustment: -4.0m^-1 to +3.0m^-1
[LCD monitor]
LCD panel: 7.5cm (3.0 type) TFT drive
Total number of dots: 1228800 (640× 4 RGBW) × 480) dots
[Exposure control]
Metering Cell: "Exmor" CMOS sensor
Metering method: 1200-zone evaluative metering
Metering Range: -2EV to +17EV on Multi segment, Center weighted, Spot modes (at ISO 100 equivalent with F1.4 lens)
ISO sensitivity (Recommended exposure index):
Still images: AUTO, ISO 50 to 25600 (1/3 EV step)
Movies: AUTO, ISO 100 to 12800 (1/3 EV step)
Exposure compensation: ± 5.0 EV (switchable between 1/3 EV and 1/2 EV steps)
[Shutter]
Type: Electronically-controlled, vertical-traverse, focal-plane type
Speed range:
Still images: 1/8000 second to 30 seconds, bulb
Movies: 1/8000 second to 1/4 second (1/3 step), up to 1/60 second in AUTO mode (up to 1/30 second in Auto slow shutter mode)
Flash sync speed: 1/250 second
[Built-In-Flash]
Flash G.No.: GN 12 (in meters at ISO 100)
Recycling time: Approx. 3 seconds
Flash coverage: Covering 16mm lens (focal length that the lens indicates)
Flash compensation: ± 3.0 EV (switchable between 1/3 EV and 1/2 EV steps)
Flash range:
| Aperture | F2.8 F4.0 F5.6 | ||
| ISO setting | 100 1 | m - 4.3 m (3.3 ft. - 14.1 ft.) | 1 m - 3 m (3.3 ft. - 9.8 ft.) |
| 200 1 | m - 6.1 m (3.3 ft. - 19.9 ft.) | 1 m - 4.2 m (3.3 ft. - 13.9 ft.) | |
| 400 1 | .4 m - 8.6 m (4.7 ft. - 28.1 ft.) | 1 m - 6 m (3.3 ft. - 19.7 ft.) | |
| 800 2 | m - 12 m (6.6 ft. - 39.8 ft.) | 1.4 m - 8.5 m (4.6 ft. - 27.8 ft.) | |
[Continuous shooting]
Continuous shooting speed:
Continuous Advance Priority AE:
Maximum 12 images per second/
Hi: Maximum 8 images per
second/Maximum
3 images per second
- Based on our measurement conditions. The speed of continuous shooting can be slower, depending on the shooting conditions.
The maximum number of continuous shots:
In Continuous Advance Priority AE mode
Extra fine: 53 images/
Fine: 60 images/
Standard: 64 images/
RAW & JPEG: 25 images/
RAW: 26 images/
In Continuous shooting
Extra fine: 56 images/
Fine: 75 images/
Standard: 93 images/
RAW & JPEG: 26 images/
RAW: 28 images
[Image zooming playback]
Scaling range:
Image size:
L: Approx. × 1.0 - × 18.8/
M: Approx. × 1.0 - × 13.3/
S: Approx. × 1.0 - × 9.4
[Recording format]
File format: JPEG (DCF Ver. 2.0, Exif Ver. 2.3, MPF Baseline) compliant, RAW (Sony ARW 2.3 format)
Movie (AVCHD format): AVCHD
format Ver. 2.0 compatible Video: MPEG-4 AVC/H.264
Audio: Dolby Digital 2ch, equipped with Dolby Digital Stereo Creator
Manufactured under license from Dolby Laboratories.
Movie (MP4 format):
Video: MPEG-4 AVC/H.264
Audio: MPEG-4 AAC-LC 2ch
[Recording media]
Memory Stick PRO Duo media, SD card
[Input/output terminals]
Multi/Micro USB Terminal*:
USB communication, Hi-Speed USB (USB 2.0)
- Supports Micro USB compatible devices.
HDMI: HDMI type D micro jack
Battery pack: Rechargeable battery pack NP-FM500H
[Power consumption]
When using a DT 16-50 mm F2.8 SSM*
When using the viewfinder:
Approx. 3.5 W
When using the screen:
Approx. 3.0W
- Supplied with ILCA-77M2Q.
[Others]
Microphone: Stereo
Speaker: Monaural
Exif Print: Compatible
DPOF: Compatible
PRINT Image Matching III:
Compatible
Dimensions:
142.6mm× 104.2mm×
80.9 mm (5 5/8 inches ×
4 1/8 inches × 3 1/4 inches)
(W/H/D, excluding protrusions)
Mass:
Approx. 726g (1 lb 9.6 oz) (with battery and Memory Stick PRO Duo media)
Approx. 647g (1 lb 6.8 oz) (body only)
Operating temperature: 0^ to 40^ (32^ to 104^)
[Wireless LAN]
Supported format: IEEE 802.11 b/g/n
Frequency band: 2.4 GHz bandwidth
Security: WEP/WPA-PSK/WPA2-PSK
Connection method: WPS (Wi-Fi Protected Setup)/Manual
Access method: Infrastructure mode
NFC: NFC Forum Type 3 Tag compliant
Design and specifications are subject to change without notice.
Battery charger/Battery
BC-VM10A Battery charger
Input rating: 100V - 240V AC, 50 / 60Hz,9W
Output rating: 8.4VDC 0.75 A
Operating temperature range: 0^ to 40^ (32^ to 104^)
Storage temperature range: -20^ to +60^ (-4^ to +140^)
Maximum dimensions:
Approx. 70mm× 25mm×
95 mm (2 7/8 inches × 1 inch ×
3 3/4 inches) (W/H/D)
Rechargeable battery pack NP-FM500H
Battery type: Lithium-ion battery
Maximum voltage: DC 8.4 V
Nominal voltage: DC 7.2 V
Maximum charge voltage: DC 8.4 V
Maximum charge current: 2.0A
Capacity:
Typical: 11.8 Wh (1650 mAh)
Minimum: 11.5 Wh (1600 mAh)
Maximum dimensions:
Approx. 38.2mm× 20.5mm×
55.6mm (1 9/16 inches ×
13/16 inches × 2 1/4 inches)
(W/H/D)
Lens
| Name (Model name) | DT 16-50mm F2.8 SSM(SAL1650) | DT 18-135mm F3.5-5.6SAM(SAL18135) |
| Equivalent 35mm-formatfocal length* (mm) | 24-75 27-202.5 | |
| Lens groups/elements 13-16 | 1-14 | |
| Angle of view*83°-32° 76°-12° | ||
| Minimum focus** (m (ft.)) | 0.3 (1) | 0.45 (1.48) |
| Maximum magnification (x) 0.2 | 2 0.25 | |
| Minimum aperture f/22 f/22-f/36 | ||
| Filter diameter (mm) 72 62 | ||
| Dimensions (max. diameter× height)(Approx. mm (in.)) | 81×88(3 1/4 × 3 1/2) | 76×86(3 × 3 1/2) |
| Mass (Approx. g (oz.)) 577 (20 | 3/8) 398 (14) |
- The values for equivalent 35mm-format focal length and angle of view are based on Interchangeable Lens Digital Camera equipped with an APS-C sized image sensor.
** Minimum focus is the shortest distance from the image sensor to the subject.
GB
- This lens is equipped with a distance encoder. The distance encoder allows more accurate measurement (ADI) by using a flash with ADI functionality.
- Depending on the lens mechanism, the focal length may change with any change of the shooting distance. The focal length assumes the lens is focused at infinity.
- The infinity position provides for some adjustment to compensate for focus shift caused by change in temperature. To shoot a subject at infinite distance in MF mode, use the viewfinder and set focus.
On focal length
The picture angle of this camera is narrower than that of a 35mm -format camera. You can find the approximate equivalent of the focal length of a 35mm -format camera, and shoot with the same picture angle, by increasing the focal length of your lens by half.
For example, by using a 50~mm lens, you can get the approximate equivalent of a 75~mm lens of a 35~mm -format camera.
On image data compatibility
- This camera conforms with DCF (Design rule for Camera File system) universal standard established by JEITA (Japan Electronics and Information Technology Industries Association).
- Playback of images recorded with your camera on other equipment and playback of images recorded or edited with other equipment on your camera are not guaranteed.
Trademarks

Memory Stick and
trademarks or registered trademarks of Sony Corporation.
- "AVCHD Progressive" and the "AVCHD Progressive" logotype are trademarks of Panasonic Corporation and Sony Corporation.
- Dolby and the double-D symbol are trademarks of Dolby Laboratories.
- The terms HDMI and HDMI High-Definition Multimedia Interface, and the HDMI Logo are trademarks or registered trademarks of HDMI Licensing LLC in the United States and other countries.
- Windows is a registered trademark of Microsoft Corporation in the United States and/or other countries.
Mac is a registered trademark of Apple Inc. in the United States and other countries.
- iOS is a registered trademark or trademark of Cisco Systems, Inc.
- iPhone and iPad are registered trademarks of Apple Inc. in the United States and other countries.
- SDXC logo is a trademark of SD-3C, LLC.
- Android, Google Play are trademarks of Google Inc.
- Wi-Fi, the Wi-Fi logo and Wi-Fi PROTECTED SET-UP are registered trademarks of the Wi-Fi Alliance.
- The N Mark is a trademark or registered trademark of NFC Forum, Inc. in the United States and in other countries.
- DLNA and DLNA CERTIFIED are trademarks of Digital Living Network Alliance.
- Facebook and the "f" logo are trademarks or registered trademarks of Facebook, Inc.
YouTube and the YouTube logo are trademarks or registered trademarks of Google Inc. - Eye-Fi is a trademark of Eye-Fi, Inc.
- In addition, system and product names used in this manual are, in general, trademarks or registered trademarks of their respective developers or manufacturers. However, the TM or marks may not be used in all cases in this manual.


Additional information on this product and answers to frequently asked questions can be found at our Customer Support Website.
http://www.sony.net/
GB
François
Monture A
Responsible : Sony Electronics Inc.
Adresse: 16530 Via Esprillo, San
Diego, CA 92127 E.-U.
Complies with IDA Standards DB00353
Temps de charge (charge complete)
Env. 175 minutes
(CIPA: Camera & Imaging Products Association)
Batterie rechargeable NP-FM500H
(CIPA: Camera & Imaging Products Association)
Messmethode: 1 200-Zonen
Mehrfeldmessung
Format AVCHD Ver. 2.0
kompatibel
Video: MPEG-4 AVC/H.264
Audio: Dolby Digital 2ch,
Verbindungsmethode: WPS (Wi-Fi Protected Setup)/Manuell
(CIPA: Camera & Imaging Products Association)
M: Aprox. × 1,0 - × 13,3/
S: Aprox. × 1,0 - × 9,4
Baseline), RAW (formato ARW
2,3 de Sony)
Smartphone] premendo Anything.
Con这对于 the camera, it is possible to use a camera with a built-in memory. This is because the camera can be used in the future as a portable camera for the purposes of monitoring the amount of memory that is available.
(CIPA: Camera & Imaging Products Association)
Pacco battery: Pacco battery
ricaricabile NP-FM500H
[Consumo]
Quando si usa un DT 16-50mm F2.8
SSM*
Instalar Remote Camera Control
(CIPA: Camera & Imaging Products Association)
Characteristicas techniques
Câmara
[Sistema]
Tipodecamara:Camara Digital de Objetivas intercambiavis flash incorporado
Ampliacao: Aprox.1,0
Aprox. 0,71× (equivalente ao formato de 35mm ) com objetiva 50~mm ao infinito, -1m^-1
M: Aprox. × 1,0 - × 13,3/
S: Aprox. × 1,0 - × 9,4
(CIPA: Camera & Imaging Products Association)
Aansluitmethode: WPS (Wi-Fi Protected Setup)/handmatig
Maximale laadstroom: 2,0 A
Capacitite: Typisch: 11,8 Wh (1650 mAh) Minimaal: 11,5 Wh (1600 mAh)
Maximale afmetingen: Ong. 38,2mm× 20,5mm× 55,6mm (b× h× d)
Lens
Elementary apparatus
(CIPA: Camera & Imaging Products Association)
Akumulator: Akumulator NP-FM500H
[Pobórmocy]
Ładowarka/Akumulator
Ladowarka BC-VM10A
Akumulator NP-FM500H
JaTa H3rOToBJIeHnJAHTn-NOHHOro 6aTapeHoro 6JIOKa yKa3aHbI Ha 6OKOBoN cTOpOHe HJIN Ha NOBepXHOCTN CHaKJIeIKoN.
56yKBcHHO-ⅢIΦpOBbIX CHMBOJIOB
- IOBepxHOCTb KaMepbIMoKet CtaTb TeIIIO. 3To He ABJAEtCnHeNCIIpaBHOCTbIO.
KpbIIka 6aHOnHeTa (1) (HaIeBaetcHa KaMepy)

KpbIIka pa3bema (1) (HaJeBaetcna KaMepy)
HaIa3HnK OkyJaPa (1) (HaJeBaetcHa KaMepy)
- INHcTpkyKuIy IIO 3KcIIlyaTaUHN (1) (aHHoe pyKOBoCTBO)
Wi-Fi Connection/One-touch (NFC) Guide (1) Данна спраВka пясняет Функии, Требуюиne coeДИнHeHЯ Wi-Fi.
RU
ILCA-77M2Q:
3ym-06bekTNB DT 16-50 mm (1)/PipeHnKa KpbIIka o6bekTnBa (1)/3aHnKa KpbIIka o6bekTnBa (1)/ CBeTo3aIHTHa 6JIeHda o6bekTnBa (1)
ILCA-77M2M:
- 3ym-06bekTnB DT 18-135 mm (1)/PipeHna Kpbiiika o6beKTHBa (1)/3aHna Kpbiiika o6beKTHBa (1)/ CBeTo3aIIHTHa 6JIeHda o6beKTHBa (1)
KomnoHeTbI KaMepbl
6 MoHITOp
7IaTnK OCBeHHOCTN
8KhoIIka MOVIE (39)
9ДлЯсьемки:КногkaAEL (6ЛОкровkaA3)/Kногka SLOWSYNC
13KpbIIka KapTbI NaMaTn (29)
14CJOTIJIABCTaBKn aKKyMyJIaTopa (29)
15KpbIIka aKKyMyJЯTopa (29)
16OTBepCTHe rHe3Ja IJIa HTaTINBa
- IcnoJIb3yIte IIITaTINB c BInHTOM IIJINHOI MeHee 5,5 MM. B IpOTnBHOM cJUyae IIIOTHO 3aKpeIIITb KaMepy HeBO3MOxH0, YTO MOKeT IIpNBecTH K ee IOBpeJKeHHIO.
*IJIaIOJIyuYeHnIIOIpO6HbIX CBeJeHN O COBMeCTHMbIX IIOJIHNTeJIbHbIX aKceccyapax IIJIa pa3beMa Multi/Micro USB, IocTeBe6-caT Sony IIN o6paTHTecb 3a KOHCyJIbTaIIeN K IINJIepy Sony IIN B MeCTHbI yIOJIHOMOyeHHbI cepBnCHbI ΚeHTp Sony.
06beKTHB
BbIKJIOHTe KaMepu H cIBINHbTe pIyauKOK qNKcaTopa B HaIIpaBJIeHNcTpeJKN. ByIbTe oCTOpOxHbI, YTO6bI He ypoHnTB aKKymjIaTOP.
PbIaXoKΦnKcauN
3CMOTPNTe B BnDOnCKaTeJIb n ydepxkBaIte KaMepy.
Ipn HcnoJb3OBaHH 3ym-06beKTHBa OTpeYJnpyTe KOJIbIO 3yMMnpOBaHH B COOTBeTCTBHN C pa3MepamN O6beKTa.
4HaXMMTe KHONky 3aTBopa HanoJIOBHy dIy BbINOJIHeHЯ ФOKycnpoBKn.
- EcJH n3O6paXeHHe haxoJIHTc8 B cOKyce, pa3Jaetc8 3ByKOBoI cnHaj N BBICBeYHBAeTc8 HnIKKaTOP JIN
RU
5ДЯ BыЮнHeHЯ CьeMKNaЖмITE KHONky 3aTBopaNoJIHOCTbIO BHN3.
- EcJIN [ABTO KaIrpnoB.] yCTaHOBJIeHO B [ABTO], IIpi NBIIIOJIHeHNN CbEmKN JINi, O6BeKTOB KpyIHbIM IJIaHOM (MaKPO) INIIN O6BeKTOB, OTcJIeJXnBaembIX φyHKInei [CJIeJNII AF], KaMepa aHaJIIN3IpyeT cIeHy i ABToMaTHUeCKN O6pe3aeT 3axBaueHHoe N3O6paJxHne I0 IOJXoJNIIe' KOMIO3NIHN. CoXpaHЯIOTcKaK opuRHaJIbHbIe, TAK N O6pe3aHHbIe N3O6paJxHnY.
1yctahOBNTe dNCK peKIMOB B noJIOXeHne (BndeO).
- EcJH [KHOIIKA MOVIE] yCTaHOBJIeHO B [BceIa], BnIeOCbEMKa MOKeT 6bITb HaHaTa B JIO6OM peXIMe CbEMKN.
2Haxmnte KhoNky MOVIEДЯ NaHaJa 3aIncn.
KhoNka MOVIE
3Euple pa3 haxmnte KhONky MOVIE dIy npekpaueHn 3aIncn.
PpmeaHn
- Bo BpemBnIeO3aIIncn MoKet 6bITb 3aIINcaH 3Byk pa6OTbI KaMepbl. Bbl MoKTe BBIKJIIOHTb 3aIINcb 3ByKa IIyTeM yCTaHOBKN [3aIINcb 3ByKa] B [BbIKJI].
BpeMa HeIpepbIBHO BnDeO3aIIINcN 3aBHCNT OT OKpyKaIOJIe NTeMIIepaTpybI HJIn COCToHnRA KaMepbI. CM. "PiPmEuaHnRA IIO HeIpepbIBHO BnDeO3aIIINcN" (ctp. 55). - Повлелене 3начka [03начаet, YTO TeMперatype KaМеры JBЛЯETcя слшКOM BbICOKо. Быклioчnte kaМepу И NOДОжДИTe, NOKa TeMперatype KaМеры He ChIN3HITcя.
- IIINTEJIbHOH HeIIpepbIBHO 3aIINCH BbIMoKTe IIOUyBCTBOBaTb, YTO KaMepa HaIpeBaetc. 3To HOpMaJIbHOe ABLJeHHe. TaKKe MoKTe IIOBJIaTbcN INIIKAuN "KaMepa IepepeJIacb. I03BOJIte KaMepe ocTbITb." B TaKnx CJUYaX BBIKJIOHTe KaMepy N IIOJOxJNTe, IOKa KaMepa He 6yIeT cHOBA FOTOBa K CBeMKe.
RU
Bocnpon3BedeHne cHmKOB
1HaXMMTe KHonky
2 Bыберп Te n3o6paхеHne, habкmaЯ Ha MylbTn- ceJIeKTope.
-
Дя ВоспюнЗBEДЕНЯ BИДEO3aПиСeн HaЖмITE -Ha MyЛьти- ceJIeKTOpe.
-
IIpn HaXkATnH ▼Ha MyJIbTH-ceJIeKTope BO BpeM RAocIpOn3BeJeHHBnE03aIINCH 6yIeT OTO6paJKeHa IaHeJIb yIpaBJIeHHN.
BnIeO3aIIHcN, 3aIIncAHHbIe c IOMoIbIO npYrNX yCTPOIcTB, MOryT He BOCIIpON3BOJNTbcra Ha daHHoK KaMepe.
Ydajehne CHIMKOB
BbI He cMOKeTe BOCCTaHOBHTb CHMOK IocJIe erO yJaJIeHn. IpeI TeM, KaK IIpoIOJIgHTb, yOeIITecb, YTO BbI XOTHe yJaJIHTb CHMOK.
1Ipn OTO6paXeHn Chmka, KOtOpbH HxKHO ydaJIntb, HaxMnte KHONKy (ydaJIntb).
2 Bыберпe [УдалNTь] с помоцью ▲/▼ ha мультиселектоpe, a 3aTeM нажмITE ●.
-Дяудайеня HeckoJIbKnx ChHmKOB 3a pa3 BbI6epHTe KHOIIky MENU (BocIpOn3Be-ДeHHe)1→[YdaIITb].
Приимechаю
3aIIHHeIe oTOCHmKn He MOryT 6bITb yJaJIeHbI.
Bb6op peXmamcBeMkn
YcTaHOBKa npIloXeHnR Remote Camera Control
1C nOmoIbI O IHTepHET-6pay3epa Ha KOMNbITope nepeiDnte K cJeDuOuSeMy URL-aDpecy.
Windows:
http://www.sony.co.jp/imsoft/Win/
Mac:
(CIPA: Camera & Imaging Products Association)
-
PeKHM φokycnpoBKN: S (Покадровы AF)
-CbemkaYepe3KaJkbie30cekyH.
-Питанн eвклioчаeТся n BBiKJIIOUaeTcЯ chepe3 KaXIbIe IecrTa pa3. -
KoJIInueCTBO MmHyT IJIa BnIeOcBeMKn cOrJaIacHO cTaHJapTy CIPA n cbeMKN BCJIeIyIOIIx ycIOBHX:
-Параметр [тлараметры 3аи.]установлесн ha[60i 17M(FH)]/[50i 17M(FH)].
-TnHnHa BnIeocbemKa:BpeMa 6a3npyetcHa IOBTOPOIeC8cEMKe,3yMMHPOBaHH,0XHdaHH CbEmKN,BKJIIOUeHHN/ BBIKJIOUeHHN I T.II.
- HeIIpepbIBHna BnIeocbEmka: BpeMa pa6oTbI aKKyMylTopa 6a3npyeTcra Ha HeIIpepbIBHOcBeMKe IIO IOCTHXKeHHa IIpeJIa (29 MInHyT), a 3aTeM IIpoJIoJXaIOUSeIcR IOBTOPbIM HaKATHeM KHOIIKN MOVIE. JpyrHe cyHKuHN, KaK 3yMMNPOBaHHe, He NcIOJIb3yIOTcra.
[BcTpoeHHa BcNbIiSha]
BeIyIe ee YIcJIo BCIIbIITIKN: GN 12 (B MeTpax IIprn ISO 100)
BpeIepe3apKn:Pi6Jn3. 3ceKyuHbI
IHaIa3OH IeBCTBnB BcIIbIIIKN:
RU
| Диафразма | F2.8 F4.0 F5.6 | ||
| Уstановka ISO | 100 1 M | -4,3 M | 1 M -3 M |
| 200 1 M | -6,1 M | 1 M -4,2 M | |
| 400 1,4 M | M -8,6 M | 1 M -6 M | |
| 800 2 M | -12 M | 1,4 M -8,5 M | |
[HenpepbIBHa cbeMa]
CkopocTb HeIpepbIBHOcbeMKn: Iprnoptet A3 npn HeIpepbIBHOIpoTJxKKe: MaKcHym 12 H3O6paXeHN B ceKyHdy/MaKcHym8 H3O6paXeHN B ceKyHdy/ MoKcHym 3 H3O6paXeHNB ceKyHdy
Ha oCHOBaHHn co6CTBeHHbIX KpHTepHeB H3MepeHn. CkOpocTb HeIpepbIBHOcBeMKn MOKeT 6bITb HHXe B 3aBHCIMOCTH OT YCJIOHN CbeMKn.
MaKcHMaJIbHOe KOJIInueCTBO HeIIpepbIBhIX CHIMKOB: BpeXnme IIpIopHTeTa A3 IIpr HHeIIpepbIBHOI IpOTJxKKe CBepXBbICOKOE: 53 CHIMKOB/ BbICOKOE: 60 CHIMKOB/ CtaHApTHOE: 64 CHIMKOB/ RAW II JPEG: 25 CHIMKOB/ RAW: 26 CHIMKOB/ IIpr HHeIIpepbIBHOI cBeMKe CBepXBbICOKOE: 56 CHIMKOB/ BbICOKOE: 75 CHIMKOB/ CtaHApTHOE: 93 CHIMKOB/ RAW II JPEG: 26 CHIMKOB/ RAW: 28 CHIMKOB
[Bocnpo3BeDeHne cHmKOB KpynhbIM nlaHOM]
[Pa3beMbI BBOda/BbIBOda]
Pa3bem Multi/Micro USB: USB-coeINHeHne, Hi-Speed USB (USB 2.0) ПоДлержнВаeТ Micro USB-COBMeCTHMbIe ycTpoNCTBa.
YroJIΦOTOCbEMKnДaHHOrO KaMepbI yKe, Yem y KaMepbI 35-MM
ΦopMaTa. BbIMoKTe HaHTN IIpH6JIIN3HTeJIbHbI' KKBnBaJIeHT
ΦOKyCHOrO paCCToHnKaMepbI 35-MMΦOpMaTa IJIaΦOTOCbEMKn C
TaKHM Je yrJOM, yBeJIINuBaJ OKychoe pacCTOJHHe oBbeKTnBa
HaIOJIOBInHy.
HaipnMep, npn HcIOJIb3OBaHHN 50 MM O6beKTHBa Bbl MOKeTe
IIOJIyHTb Iprn6JIN3NTeJIbHbI'KKBnBaJIeHT 75 MM O6BeKTnBa KaMepbI
35 MM opMaTa.
O COBmecTnMoCTn φopMaTOB DaHHbIX n306paXKeHn
- Даннай КамеруюВлЕТВОРЯET yньерсаль"HOMу стандарту DCF (Design rule for Camera File system), установленьому JEITA (Japan Electronics and Information Technology Industries Association).
BocnpOn3BeJeHne H3O6paJKeHn, 3aIINcaHHbIX BaIIe KaMePO, Ha npYROM o6OpUIOBaHn H BocPOn3BeJeHne BaIIe KaMeo I3O6paJKeHn, 3aIINcaHHbIX nJIH OTpeJaKTIpOBAHHbIX Ha npYROM o6OpUIOBaHn, He rapaHTnpyeTc.
TobapHbIe 3HaKn
Memory Stick 3AEBJIOITc TOBapHbIMN 3HaKaMn JIN 3apeHnCTpnpOBaHHbIMN TOBapHbIMN 3HaKaMn Sony Corporation.
- "AVCHD Progressive" И Логотни "AVCHD Progressive" Альперся Товарныз haKaMaH Panasonic Corporationи Sony Corporation.
Dolby H cHMBOJI B BnIe CdBIOEHHO 6yKBbl D YBJIaIOTc TOBaPbIMN 3HaKaMn Dolby Laboratories.
- TepMuHbI HDMI n HDMI High-Definition Multimedia Interface n JIOrOTHI HDMI yBJIaIOTcra TOBapHbIMn 3HaKaAMn NJIu 3apeTnCTpHPOBaHHbIMn TOBapHbIMn 3HaKaAMn HDMI Licensing LLC B CIIA n npyrx cTpaHax.
- WindowsяВлЯетс
3apeГИСТРИРОВаHHbIM TOВарнБIM
3HaKOM Microsoft Corporation B
CoeДиНЕнБIx IIITaTax AmeprКн
n/NJIN ДPyгnx CтpaHax.
MacЯВлЯЕТС
3apeГИСТРИРОВАнБIMTOВарНБIM
3HaKOMAppleInc.BCoeДинHeHbIXRU
IIItaTAXAmeprHKNIIpyrHx
cTpahax.
- iOS RNAJRAETCA3apeHnCTpnpOBaHHbIM TOBapHBIM3HaKOM HJITTOBapHBIM 3HaKOM Cisco Systems, Inc.
- iPhone i iPad yBJIaIOTcra 3apeHnCTpnpOBaHHbIMu TOBaHPbIMn 3HaKaAMn Apple Inc. B CoeINHeHHbIX IIITaTAX AmePHKN I pyTHX cTpaHax.
JIoTOniSDXCABJIaTeTcTaTOBapHBIM3HaKOM SD-3C,LLC.
Android, Google Play yBJIaIOTcT ToBapHbIMn 3HaKaAMn Google Inc.
Wi-Fi, JIorOTn Wi-Fi n Wi-Fi PROTECTED SET-UP ABJIaOTc3apeHCTpnpOBaHHbIMN TOBapHBIM 3HaKaAMN KOMIIaHH Ni-Fi Alliance.
MeTka N YBJIeTcra TOBapHbIM 3HaKOM HJIN 3apeRnCTpnpOBaHHbIM TOBapHbIM 3HaKOM NFC Forum, Inc. B CoeHNHeHHbIX IIITaTAX AmePKN IN B IpyTHX cTpaHax.
DLNA n DLNA CERTIFIED YBJIOTcT TOBapHbIMN 3HaKaMn Digital Living Network Alliance.
- Facebook И ЛогOTиП "f" АВЛЯИТСА
TOBAPHBIM 3HaKaMн ИЛь
3aperHCTpHpOBaHHbIMN
TOBAPHBIM 3HaKaMн KOMIIaHIN
Facebook, Inc.
YouTube ⅡIorOTn YouTube JBJIOTc TOBapHBIMN 3HaKaMn JIN 3apeHCTpHPOBaHHbIMN TOBapHBIMN 3HaKaMn KOMIIaHH Google Inc.
- Eye-Fi YIABJIaETcT OBaPbIM 3HaKOM Eye-Fi, Inc.
Kpome TOrO,Ha3BaHnIcCTeM H3JeJIn,HCIOJIb3YeMbIeBJaHHOM pYKOBOJCTBe,ABJIaOTcR,OBbIuHO TOBapHBIMN 3HaKaAMN JIN 3apeHCTpnpOBaHHbIMN TOBapHBIMN 3HaKaAMN IX COOTBeTCTByIOIInx pa3pa6OTtIKOB JIN IIPOIN3BOJNTeJIe. OJHaKO 3HaKN TM NJI IN HCIOJIb3yIOTcR He BO BCEx CJUyAax B JaHHOM pYKOBOJCTBe.

InfoLITHIUM


N3roTOBNTeNb: CoHn KopnopeuH
Adpec: 1-7-1 KoHaH, MnHaTo-Ky, TokNo 108-0075, YnOHHa
CTpaHa-npOn3BOdnteNb: TaunHaND
ИМнорТер на Терптори Стpan TamoxенHoro coH3a 3AO «СонЗл ektpoHnKc», PocSry, 123103, MockBa, KapamblweBckn npoe3d, 6
Opran3aun,ynonHMOeHHn npHmAtb npeTeHNOT noTpe6nteNe Ha TeppNTOpn Ka3axCTaHa
3AO «CoHn 3JIeKTPoHnKC>
IpeIcTaBnteJIbCTBO B Ka3axCTaHe,
050059,AImaTbI,yuNca IBaHnIOBa,
d.58
IIOJIINTeJIbHaN HOpMaIIH IO IaHHOMy N3JeJInO N OTBeTbI Ha Yacto 3aJaBaemBIE BOIpocbl MOrYT 6bITb HaIeHbI Ha HAIIeM Be6-caTe IIOJIepKKn IOKyIIaTeJIe.
http://www.sony.net/
RU
YkpaHcbKa
A-перекIDнк
AkymyIaTOPHa 6aTapee
KIO HeIIpaBbIbHO IOBOIDHTNc3 aKymJIaTOPOHO 6aTapeEIO, BOHa MOKe BNoxyHHTN, cIIpNUHHNTN IOXeKy aOo HabiT BHKJIHKaTH XiMiHi OIIKN. IOTpIMyIteCra HabeJeHNX HIXQYe 3acTepeKeHb.
He po3bnpaIte akymyJIaTOpHy 6aTapeIO.
He po3aBIOHTe, He 6HITe Ta He npHKJaIaHTe cHJy Do aKymJrTOpHOi 6aTapei. He 6HITe ii MOJOTKOM, He KIJaHTe Ta He HAcTyIIaHTe Ha Hei.
He 3aMkaTe KOHTaKTn aKymyIaTOpHOi 6aTapei Ta 3aIO6iraTe IOTpaIIJIaHHIO MIX HIMMeTaJIeBHX IIpeJMeTiB.
He IIaBaIte aKymyIaTOpHy 6aTapeIO II TeMIIepaTyprn IOnHaI 60^, HApNKJaI II BINJBOM IprmIX COHyaHnx IpomcHbY IprnIapKObaHomy aBTOMObiJIi.
He iIiHaJIIOHTe aKymyJITOPHy 6aTaapeIO Ta He KnJaAHTe ii y BOrOhb.
He TopkaTecra NIOKoJKeHOi JIiT iHoo 6aTapei a6o TaKOi,3 AkoBNTiKae piHa.
3apjaKaTe akyMyJIaTOpHy 6aTapeIO,JIHIIe BnKOpHCTOBYUOuOpHrHaJIbHm 3apJHm IIpncTpI Sony a6o npncTpI, kH moKe 3apJxKaTH akyMyJIaTOpHi 6aTaapei.
- TpHMaIte aKymyJIaTOpHy 6aTapeIO I03a IocxHicTIO MaJIeHbKnx IiTeN.
- TpmaTe aKymyJIaTOpHy 6aTapeIO cyXOIO.
- 3amHIOHTe akymyIaTOpHy 6aTapeIO IINiE Ha TaKy camy a6o eKBiBaJIeHTHy, kY peKOMeHdye KOMIIaHia Sony.
- IIIBnIko yTHJI3yIe BnKOpHcTaHi aKyMyJIaTOpHi 6aTapei, Jk OIIncAHO B IHCTpyKuix.
3apHn npncpti
PiKJIIOUITb 3apHnI IprncTpiI IO eJIeKTPnuHOi PO3eTKn. HeraHo BID'EDHaHTe 3apHnI IprncTpiI BiEJIeKTPnuHOi PO3eTKn, kIIO IIJ vac BHKOpHCTaHHaOBJaHNaHHBUNHKJa 6yDb-ka HeCIIpaBHicTB.
3a HaBHOCTi B KOMJIeKTi Ka6eJIO
KHBJIeHHI IORO cJIJ BHKOPHCTOBYBaTH
JIHIIe 3 IIMΦOToAIIapaTOM.BiH He
IIpH3HaYeHHI JIA BHKOpHCTaHHI 3
IHINMI eJIeKTPoHHMNI pHcTPOAMN.
ДаТа BИROTOВЛЕнHA BИРОБY.
IaTa BnroTOBJIeHHa 3a3HaueHa Ha Bnpo6i Ta yNaKOBuHa eTKeTu3i IIItpnx-KoJOM y HacTyHOMy oOpMaTi: MM-YYYY,Je MM-MicraY,YYYY - pIK BnroTOBJIeHHa.
Bnpo6nK: Sony Corporation, 1-7-1
Konan Minato-ku Tokyo, 108-0075
Japan (JHONH)
ДяЗaHTiB IIOO BiINOBiHocTi
Bnpo6y 3rIHO 3aKoHoaBvnx aKTiB CC:
Sony Deutschland GmbH, Hedelfinger
Strasse 61, 70327 Stuttgart, Germany
(HimeuHa)
CE
IIM KOPIIopaii Sony Corporation IIITBepKye,IO Ie O6JaHaHHaBIIOBIJaO OOB'3KOBHM BHMORAM Ta iHIM BiIOBIHNM IOJIOKeHHaIHeKTHB 1999/5/EC. JIA OTpMaHHaIeTaJIbHOi IHOpMaii BIIBiJaTe Be6 -caHT:
http://www.compliance.sony.de/
PpMItka
KIOIINBIIINBOM cTaTHUHOI
JIeKTPKN a6o eJIeKTPOMaHITHO
IOIA IPOUC epeaui DaHnx 6yde
IepeBaHn, Ipe3aNyCTiTb IIpcCTPI
a6o Bi'EDHaHTe Ta IOBTOpHo
IIpHeJHaHTe Ka6JIb, IIO
BVKOpNCToBvETbcra IJIa Ipeaui DaHnx (USB, Toio).
Pe3yJIbTaTH TecTyBaHb IIbOro BnPo6y IeMOHCTpyIOTb IHO BIIIOBiiHicTb BHMOrAm IIOIO O6MeJKeHb, 3a3HaueHHx y IInpeKTHBi EMC, kci CTocyIOTbcr BHKOpHCTaHHa 3'eINHyBaJIbHNX Ka6eJIiB, KOPOTIIHX 3a 3 MeTpH.
Ha BiINOBiINHx YacTOTax eJIeKTPOMaHIHTI IOJI MOnKyTB BIIINBaTH Ha JIKCTb 3O6paJKeHHa i 3ByKa, BiITBOPIOBAHnx BInpo6om.
Ipepeo6ka BnKOpncTaHnx
eIementiB XnBJIeHHa, CTaporo
eIeKtpuHOrO Ta eIeKtpoHHoro
0bJaHaHHa (3acTOcoBycTbcraB
CbponecBkOMy coo3i Ta iHux
EBponecBkNX KpaIHax i3
CnCTeMaMn po3dIJIbHorO 3bnpaHHa
cmIT)

MoJHa Bn6paTH MoBy, Ka BiO6paKaTHMeTbC8 BekpaHHnx MeHIO.
PpOec 3nOMKn
IeH fOToaIapat IIITprnMye 2 peXHMnCTeXeHHra 3a 06'EKTaMH:peXHMMOHiTopa,BYKOMy 3o6paXeHHBnBOiHTbcra Ha MOHiTOP,i peXHMBNIOIlyKaHa,BYKOMy 3o6paXeHHBNBOiHTbcra Ha BNIOIlyKa.
B6ydoBaHi yHKuii foToanapaTa
- Y IIbOMy IIOci6Hnky OINcaHI
IIpNCTpoi, cyMiChi 3i cTaHApTaMH
1080 60i Ta 1080 50i.
IIO6 IIi3HaTnCs, JkNcTAHapr
IIITprMMye fOToaIapaT - 1080 60i YN
1080 50i, - IpeBipTe HaABHicTB Ha
HNKHi IIaHeJI TaKHX IO3HaQOK:
IIpNCTpii i3 IIITprMKOIO cTaHApTy
1080 60i - 60i
IIpNCTpii i3 IIITprMKOIO cTaHApTy
1080 50i - 50i - IeH foToaIapaT iIITrpHMye BiJeo fOpMaTy 1080 60p a6o 50p. Ha BiIMHy BiI cTaHApTHNX IOHeJIaBHa peXHMIB 3aIIncy, kI BHKOPnCTOBYBaJIN Upe3PraIKOBy po3rOpTKy, IeH foToaIapat III qac 3aIINcy BHKOPnCTOBYe IocJIIOBHy po3rOpTKy. Ie IIbHIyE po3JIbHiCt b i 3a6e3IneUye 6JIbIII 3rJaIXeHe Ta peaJIiCTuHHe 3O6paJxHnI.
CTbOpEHNaIy 6a3n DaHnx 306paXKeHb
KIO BCTaHTn y fOToaIapat KapTy Iam'ATi,Ha kIn HeMae faiJy 6a3n DaHx 3o6paXKeHb,Ta yBIMKHyTH XNBJIeHH, fOToaIapaT aBTOMaTHUHO CTBOPHTb faJI 6a3n IaHnx 3o6paXKeHb, BNKOpNCTOByOuN YactINHy O6'Emy KapTN IaM'ATi.
IeH IpoIec MoKe TpNBaTH IOBRO,i KOpNCTyBaTnC H oToaIIapA TOM IO NOrO 3aBepHHeHH HeMOxJIInBO.Y pa3i IOMNIKn FaiJy 6a3n DaHnx ekIopTyIte Bci 3o6paXKeHH Ha KOMI'IOTe 3a IOnOMoroIO IporpaMn PlayMemories HomeTM i BiΦopMaTyIte KapTu Na'M'Ati Ha φotoaIIapati.
Biccythictb komneHcaqii 3a nozkodxeHHBmicty a6o HemoxJnBiCtB BnKohHHaNc
KOMIIaHia Sony He Ipepe6aaye HaanHHa KOMIeHcaii y BnIaKy HEmOxJIInBOcTi BHKoHaHHa3aHcy NbTpaTH a60 IIIOKOJKeHHa3aHCAHO BVMcTy BHaCJIIOK HeCnPaBHOCTi fOToaHapata, Hocia iHOpMaTTOIO.
PekomeHdaucii 0do CTBopeHHpe3epBnX koni
JIa 3aIO6iraHHbTpaTI JaHnx 3aBXnKoIIIOHTe ix (CTBOpIOHTpepeBHiKOII)Ha iHnn Hocii.
Iprmitkn 7oDo MOHITopa, eNeKTPoHHoro BnDo7yKa7a, 06'ekTnBa Ta DaTynka 3O6paJKeHHa
- MoHITOP Ta eJIeKTPoHHN BnIOIyKaU BnTOOBJIeHO 3 BnKOpNCtAHHm HaJ3BnuaHb BnCOKOTOuHOi TexHOJIOTII, IIO IO3BOJIe eΦeKTINBHO BnKOpNCTOByBaTH IIoHaJI 99,99 % IIkceJIiB. OdHaK Ha MOHITopi Ta eJIeKTPoHHOMy BnIOIyKaU MoKe 6yTH BnIHNO KpnXiTHi YOpHI Ta/a6o JcKpaBi IaTKN (6IJIoro, YepBOHOrO, CInHbORO a60 3eJIeHOrO KOJIbOpy). HaABHICTb TaKHX IYrTok E HopMaJIbHOIO IJIa IpoIecy BnTOOBJIeHN H iHjK He BnJIiBaE Ha 3O6paJKeHHa.
He TpmaTe foToaapanapTa 3a MOHITOP. - OsepiraTe foToaIapat BiJ i coHnHx IIpOmeHb i He 3HimaTe, cIpyBaBII NOrO IIO COHJIa, TpNBaIIH Yac. MoKHa IIOIKoHTN BHyTpiiHmexaHI3M foToaIapata. RaIIO coHryHe CbiTIO cFokycETbcra Ha o6'ekTi, IIO 3HaXoIHbCn IO6JIIN3y, MOKe BHHKNHYTN IOKeJa.
-Позаду та habьколо оберTOBOrOBaJIa IIIapHipa MOHITopa BCTaHOBJIeHo MaHIT. He IIINOCbTe JIOMHITopa TaKi IIpeIMETn,ЯKI JIErKO 3a3HaOTb HeRaTINBHOrO BIIINBy MaHITy,a caMe IINCKeTHa6O KpeINTHi KapTKN. - Y XOJIIOHOMy cepeIOBnIi 3O6paJxHHe Ha ekpaHIMoKytb BIIIBOPHOBaTHc3 eΦeKTOM «IIIJIeHpy».Ie He e O3HaKOIO HeCIIpaBHOCTi. Y pa3i yBIMKHeHHa FOToaIapata B XOJOHOMy Micii ekpaH MOKe TImuacBO IOTemHiTn.KoJIH FOToaIapat HaPietbc, ekpaH IIpaIIOBAtHMe HaJIeXHHM YINHOM.
3HrTe 3o6paKeHHa MoKe Biipi3HraTncB iI 3o6paKeHHa,Ke Bn 6auiH Ipeep 3HOMKOIO.
Iopadn 3mOMKn 3 BNDwykaeM
IeH fOToaIapat O6laHaHO opraHiHIM eJIeKTPoJIOMiHeCIIeHTHM BnIOUyKaueM 3XapaKTepeNtKamn BncoKoi po3JIbHocTi Ta KOHTpactHocTi. IeH BnIOUyKaay 3a6e3IeYye IInpOKn KyT orJMy Ta BeINKY fOKcHy BiCTaHb. BnIOUyKaeyu IbOMy fOToaIapati JIeTKO KOpHCTyBaTHcR, aIXKe B HbOMy HaJIeXKnM YINHom BpiIBHOBaXeHO p3Hi eJIeMeHTH.
3o6paKeHHa MoKe 6yTH 3JIeRka BnKpNBJIeHIM IO KYTaX BnIOIIyKaHa. Ie He e O3HaKOIO HecIpaBHOcti. IIo6 IpeERJHyTH Bce 3o6paKeHHa i3 Bcima JeTaJIaMM, MOxHa TaKOx BnKOpNCaTH MOHiTOP.
-ПиДчacпаногам hoi 3HOMKU chepe3 BnIOuYkau a6oПиДчac 3OpOBoro ORJIaIy 3O6paXeHHy BVIOUIyKaUIMOxke 6yTH BHKpHBJIeHM, a6o Jx MOxC 3MInHTnc KOIip 3O6paXeHHa. IeЯBnIe npITamHaHHe po6oti O6'ekTnBa qH IIprHcTpoIO BiIO6paXeHHa i He BBaJkaETbcr HecIIpaBHicTIO.ПиДчac 3HOMKn paIIMO INBHTncy U ceHTp BnIOIIyKaua.
-Пид уасьOMK3ВИКОпсТаHHЯ m BnIOIIykaч aBnMOжTe BiДУВaTH nIeBHn IINCKOMΦoPТ,HaIIpNKJIaI nIpeHaIIpyJxKeHn 3Opy, BTOMy, 3aKaUyBaHn qHHyToY.Пи dac 3HOMKn 3 BnIOIIyKaчem peKOMeHnyeTbcspeRyJIarpHo pObHTn IIpepeBn.
PeKOMeHIOBaHa TpHbJIicTb NepePB a6o iX YacToTa e iHNiBiiJaYbHIMN IJIa KOxHOrO, a TOMy BnpiIiYBaTHcme Bam. KIO Bu BiIiYBaTe IINCKOMΦOpT, IIpHInHiTb KOpHCTyBaTHcra BIIIOIIyKaUeM, IOKH Bam He cTaHe KpaIe, i 3a IOTpe6oIO IIPOKOHcyJIbTyIHTecr 3 JIkapem.
PpIMiTkn 0do TpBaIoi 3HOMKn
3 MeTOIO 3axHCTy, 3aJIeJxHO BiTEmIIepaTpHi foToaIapapaTi 6aTapei, Bam MOKe He BlaTnC8 3aIINcaTH BiJeO, a6o XHBJIeHHMoKe BHMKHyTncb ABTONaTHUHO.
IpeTMM,AK BIMKHeTbCJKNBJIeHHa6o BiJeO3aHc 6iJIbIe He 6yIeMOXJIINBM,HaekpaHI 3'ABHTbcIIOBIOMJIeHHa.Y taKOMy pa3iBIMKHITb foToaIapat i 3aueKaITe,IOKN BIIaIe TeMIIepaTypafoToaIapata i 6aTaapei. JKiIOYBiIMKHyTH foToaIapat, He JaBIIIINHOMy Ta 6aTaapei IOCTaTHBOOXJOHOHT, XNBJIeHHaMOKe 3HOBYBIMKHyTHcA,i BN He 3MOKeTe3aHNCyBaTH BiJeO.
- 3a BncoKoi TeMIIepaTpyn 3OBHIIHHbOTo cepeIOBnIa TeMIIepaTpya foTOaIapata IIIBNUIyETbcra IIBNko.
- Y pa3i πiBnHηeHHa TempepaTyprn ΦoToaIapata MoKe IoripHTncb kicTB 3O6paKeHHa. Ipei IIPOIOBKeHHaM 3HOMKn peKOMeHNyETbcra 3aueKaTH, IOKH He 3HN3HTbcra TempepaTypa ΦoToaIapata.
-Поверхня соToaIapaTа може harpiTHc. He He O3HaKOIO HecIIpaBHOCTi.
Приитkin садо IMnopтувань Bideo Фор matу AVCHD ha KOMп'teP
Y pa3i imIIOpTyBaHHa BiJeO fOpMaTy AVCHD Ha KOMII'IOTe 3aBaHTaXTe i BHKOPHCTOByIe IIPOrpaMy PlayMemories Home 3 Be6-caHTy: www.sony.net/pm/
Ppimitkn 0oDo cnaaxy
He TpImaIe foToaIapat 3a cIIaJax i He IprHKJaIaIe HaIMipHOi CNJIN DO HbOro.
- YKIO uepe3 BiIKpHTn cIIaJax ycepeINHy IOTpaINTb BOJa, IIJI a6O IIcOK, Ie MoKe cTaTH IIprHNOHO HeCIIpaBHOctI.
3aKpHbAIOUcIaJIax,6yIbTe o6epeXHi,IIo6 He IIpHIIeMHTn IaJIbIi.
PpIMITKn 0oDo BiD TBOpEHnB BiDeo Ha iHux npucTpox
- ΦоTOaIapaT BnKOpHCTOBye KoIeK MPEG-4AVC/H.264 High Profile ⅡЯЗИСУ BiIeO y φopMaTi AVCHD. BiIeO, 3aIIncahi y φopMaTi AVCHD 3aДОПOMIoTO IIbIOrO φoTOaIapaTa, HEMOXJIINBO BiITBOPHTN Ha TaKHX IIpIcTpOax:
-iHiii npncTrooi, cymichi 3 fOpMaTOM AVCHD, kKi He IIITpmyIOTb High Profile;
- IIpncTpoi, HecymicHi 3 fOpMaTOM AVCHD.
ΦOTOaIIapat BnKOpHCTOBye TaKoJ KoIeK MPEG-4AVC/H.264 Main Profile 3aIINcy BiJeO y φopMaTI MP4.Tomy BiJeO,3aIINcaHe IINM φOTOaIIapaTOMy φopMaTI MP4, MoXHa BiITBOPHTI JInIe Ha THX IIpIcTPOAx,ЯKI IIITpIMyIOTb KOIeK MPEG-4AVC/H.264.
-ДиСКИ i3 306paJKeHЯm HD (BnCOKoi YITKOCi) MoXHa BiITBOpIbAToH JINIIe Ha IIpIcTPOx,ЯKI IIITprHMyOTb φOpMaT AVCHD.ПрогРаВaI a6O 3aIIncyUoI IIpIcTpoI Ha 6a3i DVD He BITBOPIOOTb IINCKI 3 BiIeO BnCOKoi YITKocTi (HD), OCKIJIbKN BOHN He IIITprHMyOTb φOpMaT AVCHD.KpIM TOrO,III qac cIpObN BnIMaHHa I3 BiIeO BnCOKoi YITKocTi HD i3 IIporPabawiv a6O 3aIIncyUOuHx IIpIcTpoIB Ha 6a3i DVD MoJKe CtATncs 36iI.
- BiJeO, 3aIIncahi y fOpMaTi 1080 60p/ 1080 50p, MoKHa BiITBOpIOBaTH JINHe Ha IIpHcTpOax i3 IIITpHMKOIO fOpMaTy 1080 60p/1080 50p.
PonepeJxHnI 0do aBTopcbKnx npaB
Ha TeJIeBi3iHHi InpOrpaMn, fIJIbMn, BiJeocTpIcKN Ta iHIIi MaTepiAJIH MoKe PO3IOBcIOJxKyBaTHcA BTOpcbKe IIpaBO. HecaHKIioHOBAHn Ipe3aIINc TaKHX MaTepiAJIb MOKe cyIepeHTN IOJOXKeHHaM 3aKOHy Ipo aBTOpcbKi IIpaBa.
3o6paXeHHa, 10 BnKOpNCTOBYIOTBcB V cIbOMy noci6Hnky
ΦOTOrpaΦi, IIO BnKOpHCTOByIOTbCBA IIpNKJIaIax IIbOTo Ioci6HNKa, -Ie peIIpoJyKObaHI 3o6paXKeHHa, iix He 6yIIO 3HrTO 3a IOnOMOIO IIbOTo φOTOaIapata.
Про Тхични данi, HabeendeHy zubomy noci6nky
Po6oHi xapaKTepeHCTHKn Ta TexHiuHi JaHi Bn3HaueHi 3a OIIncAHnx HIXKYe yMOB, OKpIM BnIaIKiB, Bka3aHNx y IIbOMy IIOci6HKNy: 3a 3BVuaHoi TeMIIepaTpyn cepeJIOBNIua 25^ i BHKOpNCtAHNIOBHiCTUO 3apJKeHOi 6aTaPei, Jka 3apJXJaIacr, IOKn He 3rag iHINKaTop CHARGE.
TmuaCoBe BnMKHeHna Функiй 6e3dpoToBOoi Мерекi (Wi-Fi, NFC too)
Y pa3i IIOcaIKN B JIiTak TOIO MOJHa TImuacOBO BHMKHyTN Bci yHKii 6e3npOTOBOI mepexi.
Bn6epitb MENU
[Be3IpoTOBn] [PeKIMIOJIbOTy] [YBiMK].
JaIOIJIaIpaMeTpap [PexHMIOJbOToy] BCTaHOBHTn 3HaueHn [YBIMK], Ha ekpaHI BiIO6paKaATmEtbc IIO3HaUka
(JIitak).
Iprnmtkn 7oDo 6e3dpoTOboi IokaJIbHOI mepexi
Y pa3i BTPaTH a6o BnKpaJeHHa
ΦOTOaIapapaT a KOMIIaHia Sony He Hece
JKOJIHOI BiINIOBjaJIbHOCTi 3a MOXJIHBi
36HTKN YI IIKOy, 3aIOIaHI
HecaHKIioHOBaHIM IOCTUOM a6o
BnKOpHcTaHHaM 3apeecTPOBaHOI TOKHa
IOCTUHy Ha ΦOTOaIapai.
Ipebipka npnaand, 0o doaTbcra
CnoaTky IpeBipTe Ha3By MoJeIi fOToaIapata (ctop. 5). KomJIeKr IIpIIaIIra, IIO IOJaETbcr, 3aJIeXHTb BiIM MoJeIi. YnCIO B DyKkax Bka3ye Ha KJIbKicTB IIITyK.
IocTaUaCTbC8 3 ycima MoeJIaMn:
- Φοτοapanapat (1)
3apaHnI npncTpIi BC-VM10A (1)

IIIhyp KINBJIeHHr (1)* (He IOJaETbCra JJIa MOJeJIeH, IIpN3HaueHnx IJIa CIIIA NaHaIi)

*I0 foToaIapaTa MoKe 6yTH IOHaHO IekJIbKa IIHHypIB XINBJIeHHN. BnKOpHCTOBYHTe TOIIHHyp, IIO BiIIIOBIIaE yMOBaM eKCIJIyaTaUiY BaIi KpaIHi a6o perioHi.
- AkymyJIaTOpHn 6JOK NPFM500H (1)
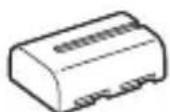
Ka6eJIb Micro USB (1)
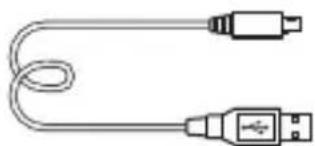
- IJIeOvBn peMiHb (1)

IHCtpyKuIO 3 npKpIIJIeHHa peMeHa IO foToaIapata IHBiTbcra Ha cTOp.17.
Kpnika Kopnyca (1) (BCTaHOBJIeHa Ha foToaIapati)

Kpuiika KoIoJkn (1) (BcTaHOBJeHa Ha foToaIapati)
HaouHnK OkyJaPa (1) (BCTaHOBJIeHN Ha foToaapanapati)
- Noci6HnK 3 ekCnJIyataa (1) (eH noci6HnK)
Wi-Fi Connection/One-touch (NFC) Guide (1) YIbomyIOci6HnkyHaBeJeHO IIOrCheHHaYHKi,po6Ota kNX BImarae 3'eHaHHaWi-Fi.
ILCA-77M2Q:
- O6'ekTnB 3i 3miHHOIO φokycHOIO BiIcTaHHIO DT 16-50 mm (1)/IpepeHЯ KpIIka o6'ekTnBa (1)/3aIHi KOBIIaYOk IJIa o6'ekTnBa (1)/ 6JIeHJa o6'ekTnBa (1)
ILCA-77M2M:
- O6'ekTnB 3i 3MiHHIO φokycHO BicTaHHIO DT 18-135 mm (1)/IpepeHnja KpIIka o6'ekTnBa (1)/3aHniJ KOBIIaQoK IJIa o6'ekTnBa (1)/ 6JIeHda o6'ekTnBa (1)
UA
Elenentn foToanapata
IokJIaIHy iHΦopMaIIO Ipo BnKOpIcTaHHЯ YacTHN IINBiTbcr Ha cToPiHKax, IIO 3a3HaueHi y IyKkax.
Переднасторoga
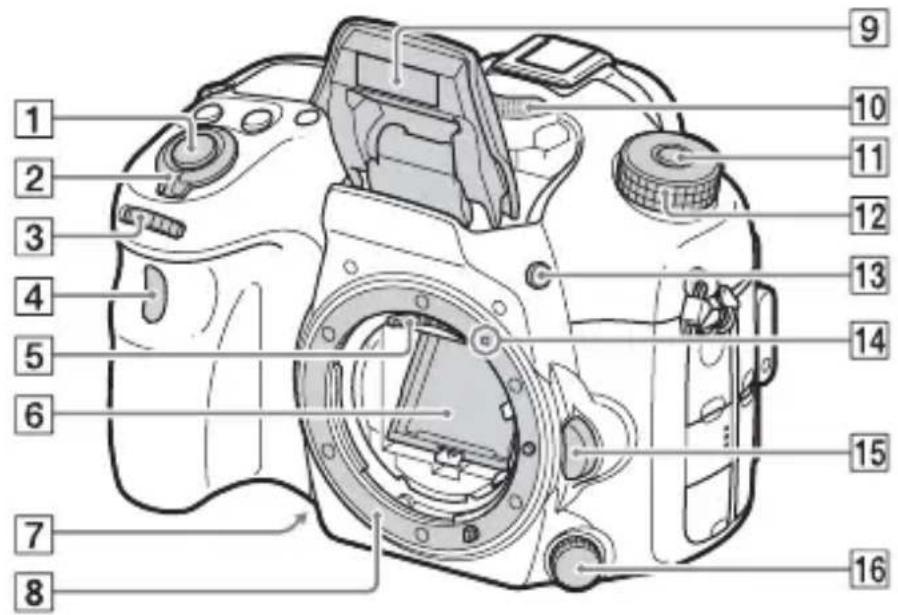
1KhoIIka cIycky (36)
2IpeemkaJxNBJeHHra (34)
3IpepeHKeJiHaTko KepyBaHHa (21)
4CeHcopIyJbTa IINCTaHIIHOrOKepyBaHHa
5KoHTaKTn O6'ekTnBa*
6Дзеркалo*
7KHOIIKa IIOIpeHbOro IepeJIaIy
8BaioHcT
9B6yIOBaHn cnaJax*
HaTnchIb KHOIIKy (IIINHrTTcnaJaxy),IO6 IIINHrTH cnaJax.
- KIIO cIIaJax He IOTpi6Hn, IOTINCHITb IORO Ha3aJy KOpIyc BInpo6y.
10Mikpooh**
11KHOIIKa pO36JIOkyBaHHn IINcKa IIepeMnKaHHn peXIMiB (36,41)
12Дискперемкиня ржимь (41)
13KhoNka (iHraTcnaJaxy)
14ПОЗнauкаВСТаHOBJIeHHЯ(31)
15KhoIIkaΦikcaTopa o6'ekTnBa (32)
16ДиСКперемнкання ржИму
ФOKUCYBAHHЯ
He TopkaǐTecǎ 6e3nocepéndhbo unx yactnH.
*He 3aKpNbAitte uei
eIemEn T iD yac
3aIncyBaHnB Bideo.
HeIoTpmaHnY ciEi
BIMOrn MoKe CnpuHHTN
NoBy ShymiB Yu
3MeHsEHH pIBH
ryuHocTi.
UA
3aHnCTOpOHa
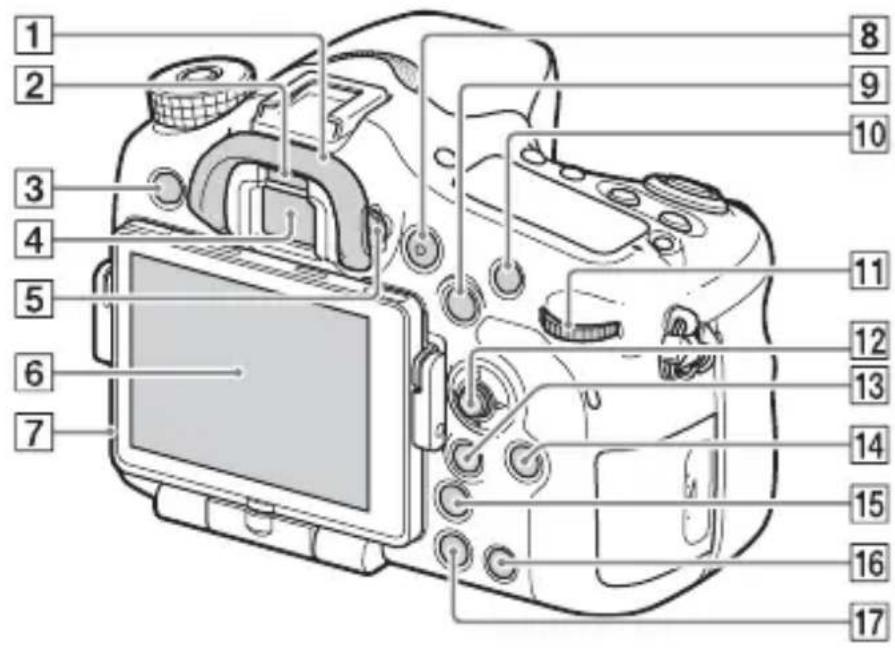
1HaoyHnK
2 CeHcop OKa
3KhoIIKa MENU (24)
4BnIoNyka*
- KIIO IINBHTncb y BINOIIyKaU, BMNKaETbcra peKIM BINOIIyKaUa, a KIIO BiBeCTn OJIuYra BiBIOIIyKaUa, 6yJe BCTaHOBJieHo peKIM IIpeTJMy Chepe3 MOHiTOP.
5ДиСКHaJIaIITyBaHHЯДIOПТПI
- PeryIIOHTe IINCK HajaITyBaHHaIOITpiH, IOKN 3O6paXKeHHaY BINOIIyKaHi He BiO6paXaTHMeTbcra YITKO.
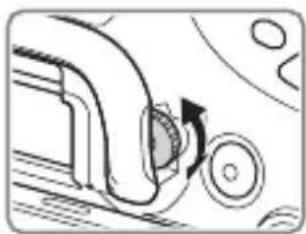
6 MoHiTop
7CencopcBiTJIa
8KhoIIka MOVIE (38)
9ДлЯЗнOMКИ:КНОПKaAEL (6ЛOKУВаHHЯ aBTOMaTHUHOi ekCNo3Hii)/KHOПKa SLOW SYNC
Для пергляду: Кногka (перглад миhiаюр 30бражень)
10ДлЯЗИOMКИ:KHOПКА AF/MF (aBToMaTnUHeФOKycBaHnry/ pyuHcΦOKycBaHHa) ⅡIЯпepeглЯу:KHOПКa (36iJIbIeHHa)
13aHHe KOJIiHaTko KepyBaHHa (21)
12MyJIbTINceJIeKTop
13IIa 3IOMKn: KHOIIKa Fn (fynKci) (22) IIa IpeIy: KHOIIka (HaicJI. Ha cMapTΦ.)
3a IOnOMOIOIiEi KHOIIKMOJHa BiO6pa3HTn ekpaH cyHKii [HaicJI. HacMapTΦ.]
-Якio npNKpipJIeHoBepTNkaJIbHy pyKy(IpoJaETbcg OKpeMo)iKaIOHaTNCHTN KHOIKyO6epTaHn3o6paJKeHHa Hii, BIO6pa3NTbcg ekpaH[HaicJI. Ha cMaprФ].
14KhoIIkaDISP (BIO6paJxHn)
15KhoIIka (po3ymHn TeJIeKOHBepTop)
16KhoIIka C (cneiaJIbHa) IJIaIpeIJIaIy: KHOIIka (BnJaJIeHn) (40)
17KhoIIka (BiTbOpEHn) (39)
*He TopkaǐTecr Žičī Частин.
BnД 3rOpN

1BaTaToiHTeppeHcHn po3'EM*
2KHOIIKa FINDER/MONITOR
3INΦopMaιηHa NaHeJIb
4KhoIIka /pO6OTn IITOpKn)
5KHOIIKa WB (6aJIaHc 6iJIoRo)
6KHOIIka (ekno3nii)
7KHOIIKa ISO
8KHOIIKa IIcBiTKn IHOpMaIIHoiI NaHeJIi
9ПиБнayka ПОJOжЕнЯДаТУнka 3OбpaЖeня
*IJIa OTpIMaHHaJeTaJIbHOi IHOpMaIII Ipo IIpHJaIIa, cyMicHe 36araToIHTepeHcHMM po3'EMOM, BiBiaaTe Be6-caNT KOMHaHI Sony y cBOeMy perioHi a60 3BepHiTbcra Io nnJIepa Sony nMicIeBOrO aBTOpH3OBaHO rHTpy o6cJIyTOBvBaHHaSony.
MoXHa TaKoX BnKOpHCTOByBaTH npJIaIaIg IJIg PO3'Emy IJIg IOJaTkoBOrO npJIaIaIg.
Cymichictb i3 npnlaam iHINX Bnpo6HKnB He rapaHTyeTbcra.
Multi Interface Shoe
Accessory Shoe
BnrgIa360ky/3Hn3y
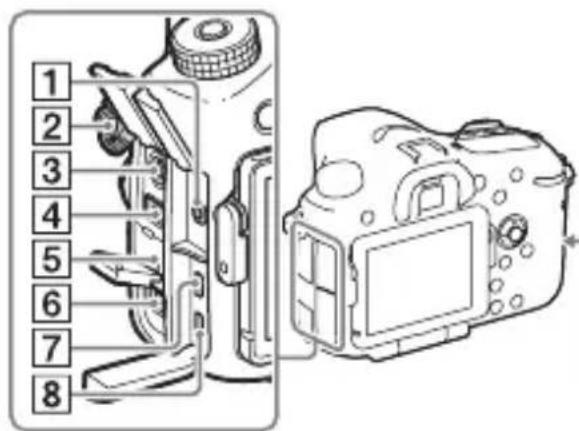
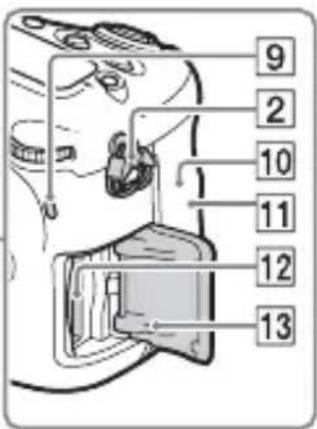
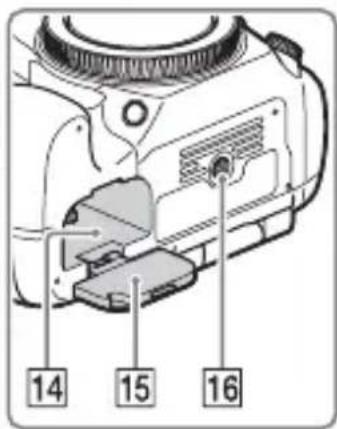
1Po3'EmIJIaMiKpOΦoHa
Ypa3iPiEHaHHa 3OBHIINHbOTo MIKPOoHa BHyTpiiHHiMikPOoH BMnKaETbCra aBTOMaTHUHO. KIOIiKJIIOyeHO 3OBHIINiMikPOoH,AKI IITpIMyEOJKINBICTb KNBJIeHHRAO MIKPOoHa IOCTaYaTmEtbcr IIMΦOTOaIapaTom.
2TauchnДJIЯПЛeYOBOrOpemeha
- PpHKpiiTb 6nIbKaHpi peMeHaIo foToaapanapaTa.

3Po3'em cHxpoHiai3i 3i cnaJaxOM)
4Po3'EM REMOTE
- KIIO IO FOToaIapata II'EnHaHO IyIbT INCTaHIIINHO KEpyBaHH RA M-L1AM (IpOJaETbcra OKpeMo), BCTaBTe IIITEKepe BID IIyJIbTa INCTaHIIINHO KEpyBaHHA y po3'EM REMOTE i BnpiBnaTe IIO3NaUky Ha IIITEKepi 3 IIO3NaUKOHa po3'EMI REMOTE. YIeBHITbcra, IIO Ka6eJb IIyJIbTa INCTaHIIINHO KEpyBaHHA cIprMOBaHH yIepei.
5IyHOMOBeB
UA
6Po3'EMDCIN
- IIo6 nIeHaTn aIaITepe 3MiHHO cTpyMy AC-PW10AM (IpoJaetbca OKpeMo) IIO foToaIapata, BIMKHiTB foToaIapat, TOni IIN'eHaIte po3'em aIaITepa 3MiHHoro cTpyMy IO po3'emy DC IN foToaIapata.
7Mikpopo3'emHDMI
8Po3'em Multi/Micro USB*
PiTpMyIOb8 npIcTpoi, cymChi 3 po3'EMOM Micro USB.
9IHHaTOp IOCTyIy
10 (H3HaUka N)
- Ie MapkyBaHHa Bka3ye Ha TOUky IOTIKy IJIa 3'EINHaHHa FOToaIapata CMapTfoHy 3 IIITpIMKOIO TexHOJOriNFC. DeTaJIbHy IHOpMaIIO Ipo PO3TaIIyBaHHa N (IO3HaKN N) Ha cMapTfoHi YHTaIte B iHCTpyKII 3 BHKOpNCtAHn CMapTfoHy.
NFC (Near Field Communication, «3B'ЯЗOK на HeBEJIKNKx BiДСТанях») - Ze mIXHapOДнИ CTaHДapT TexHOJIOIi 6e3ДрOTOBOrO 3В'ЯЗКу MaJIoTO paДiyCy II.

IobiKa 3 BnKOpncTaHHa
UA
Функц,якIMожнвбраTN 3aДОПOMOROIO KHONKIN MENU
Mожна налaitовырази оснobни пааметри спота параза aбо 3апскати Фунkiii, тaki як 3йOMka чи BiДТВореHHЯ, та виконын iHшо оррацii.
1ДЯ BiOobpaXeHHЯ ekpaHa MeHIO HaTnCHiTb KHOIky MENU.
2 3a ДОПOMORЮ KHONOK ▲/▼/▲/ >Ha MyЛьТиСеЛeКТоPI ВИберITьnotpiбнйNYнКТ, TOДI HATиСHITь KHONКY ● Ha MyЛьТиСeЛeKТоPI.
Bn6epiTb nIKToRpaMy Bropi ekpaHa i 3a IIOIOMOIO KHOIOK / Ha MyJIbTtCeJIeKTopi IpeEiITb IIO iHIOrO IIyHKTy MENU.
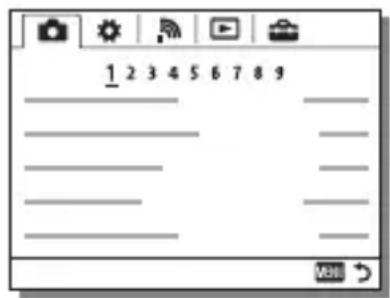
3 Bn6epiTb nOtpi6He 3HaueHNe i HaTncHiTb KhoNky ● ДЯ пIDТВерджЕнг.
Biodo6paXeHHaMO3aHOrO MeH0
BnKopncTaHnB6yDoBaHoI DoBikn
3aДОПOMΟΤΟΙΝΑρΑΜΕΤΡa [ΠαρΑΜ.ΚJIΙΟΥΚΟΡΙΝΑ ]Можна ΠПИЗHAЧИТΝ BБУДΟВАНΥ ΜΟΒΙΚΥ ΠЕВΗΙΝΚΗΟΠΙ.
B6yIOBaHa IOBiKa BiIOobpaKae IIOJcHHeHHa BIOpaHOi Ha JaHIM MOMENT yHKii a6o IapamEtpa MeHIO.
1 HaTnchItb KhoNky MENU (HaJaWtYBaH. KopncTyBaa) 6 [Iapam. KJIouc.KOpnc.] noTppi6Hi yHKci, npu3Nauehi KhoNci [B6yDoBaHa doBiKa].
HaTnchItb KhoIky MENU i 3a DoIOMoTOIO MyJIbTnCeJIeKTopa Bn6epiItb IyHKT MENU, IOnsHeHnI Do IkoRo IOTpi6HO IOnHTaTH, ToDi HaTnchItb KhoIky, Iki IIprncBOeHO yHKuio [B6yIOBaHa IOBiKa].
UA
3apяДжаннayakymyЛТOPHOrO 6лoka
- IpeT NIM YK BCTaHOBJIIOBAtN KpHIIKN, BnJaJIiTB i3 HNX IIJI.
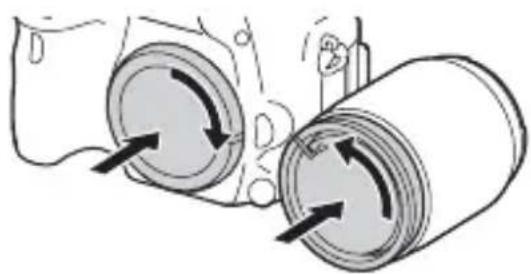
Ppimitkn 0do 3miHn 6'ekTnBa
Якwoпд часзMiHNo6'ekTnBaПиЛЧИбpyД NOTpaIITb y фOTOanapat i ПОпаDEHa NOBepxHIOДaTчнKa 3O6paJKeHHa (JeTaJIb, Яka IIepeTBOpIOcBiTIOHa eJIeKTPnHn CnHaN), BiH MoJKe 3'YBHTNcHa 3O6paJKeHHi Y BnIJaI TeMHnx IJIaM, 3aJIeJXHO BiД yMOB 3HOMKn.
ΦOTOaIIapaT o6IaIHaHO ΦyHKiEIO 3axHcTy BiI IINJy IJIa 3aIIObiHaHHaOcIgKByBaHHIO IIJy Ha IaTChK 3o6paXKeHHa. Ipote cJIi3aBxIIN BCTaHOBJIObATn a60 BiI'cIHyBaTH O6'ekTIN BIBNko i IIOaJIi BiI 3aIIJIeHNX MicIb.
UA
BcTaHOBJIeHHaTnIyacy
IicJIyBIMKHeHnA FOToaIapata BnepIe a6o iHiiaJIi3auii FyHKii 3'YBJIeTbcE kpaH IJIaBCTaHOBJEHn DaTH N acy.
1uob yBimKhytn foToanapaT, BCTaHObitb nepemkauch KnBJeHry y noJoxeHH ON.
3'YBNTbcEKpaH IJIABCTaHOBJeHHJaTn N Yacy.
IIO6 BnMKHyTN FOToaIapaT, BCTaHOBIb IepeMnKaU XNBJIeHHB IIIOJXKeHH OFF.
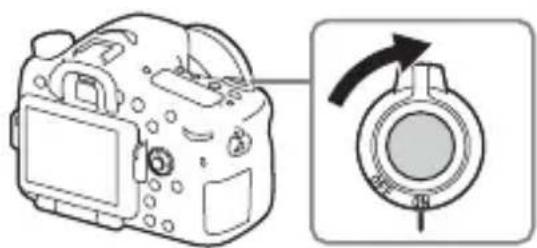
2ПepeBiPte,Чи Ha ekpani Bn6paHo [Bxid] i HaTncHITb KHOngKy ●Ha MyJbTncEneKTopi.
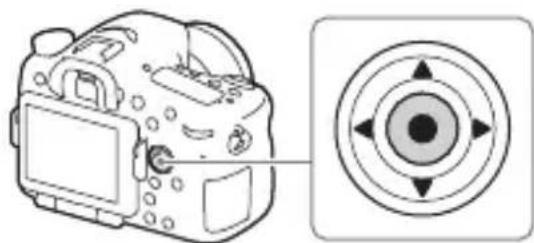
3Bn6epiTb noTpbi6He reorpaΦiUHe po3TaUyBaHHaHaTusChiTb
4 3a ДОПOMΟΤΟ ΚΗΝΟΚ Δ/V Na MυήνιςΕΝΤΟρινινόβεριν τηνίνηνιντομ, τοῦ ἀντηκίντους ΚΗΝΟΚ.
5 3a Дономою Кнорok ▲/▼/▲/» на мультустеньки Виковайтоотрибни налштуваши, тоци нату симпь кногку Ⓒ.
6Ioo6 hanaTbyBATn iHwi napameTpN, NOBtopiTB dii Kpokiv 4 i 5, Todi Bn6epitb [Bxid] i HataChiTb KhoNky
CkacyBaHHBCTaHOBJIeHHaTn N acy
HaTnCiIb KhoIky MENU.
2p03noatn 3aHnc, HATNCITb KhoNky MOVIE.
Khoonka MOVIE
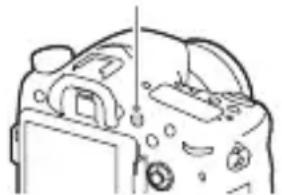
3Uo6 3yHHTN 3aHcYBaHHa, HATNCHiTb KHOkky MOVIE ue pa3.
Ppimitkn
-ПидчасВideO3HOMKMOKe 3aIINcYBaTHSCy 3ByKpo6OTnФOTOaIIapapa.T. MoxHa 3aIO6IrTH 3aIINcy 3ByKy,BN6paBIIIДЯпapameTp a [3aIINC 3ByKy] 3HaueHHra[BIMK].
- TpIbJIcTb 6e3IIepePBHOrO 3aIINcy BiJeO 3aJIeJXHTb BiI TeMIIepaTypn OToUyIOHO cepEOBmIa a6o cTaHy fOtoaIapata. YHTaITe «IprIMiTkn IIOIo HeIIepePBHOi BiJeO3HOMKn» (cTOp. 53).
- Пява пiktогами BiДчNTь пpo habTO BnCOky TeMIIepaTypy
фOTоanapata. ВIMКИТь ФОТоanapat i 3aueKaITe, ПOKн He 3HH3HTbcr HoTO
TeMIIepaTypa.
-Пид уас ТрИВалоi 6e3пepeрВHOI 3йOMКи ФОТаПаРаТ може haRpiTиСя. Ie HopMaJIbHo. TaKox може 3'ЯВHTиСя ПОБДOMЛeHЯ «Висokeda BHyтpiПИЯ TeMIIepaТура. ДайTe Камеро IXOJOHyTH.». Y TaKOMy BnIaNky ВIMKNiTiB ФОТаПаРаТ тa 3aueKaITe, ДOKи BiH He 6уde rOTOBи ДО ПОДaJIbПОI 3йOMКИ.
Як immo 3o6paKeHHBnJaJIeHO, BiHOBHTN Ioro HeMOxJINBO. 3aBXI INpeBipIte, uH cnpabii Bn6paHe 3o6paKeHHIOTpi6Ho BnJaIHTN.
1 BiDobpa3nBwN 3o6paxKeHHa, Ke nOtpi6Ho BuaIHTu, HATNCHITb KhONKy (BuaIHTu).
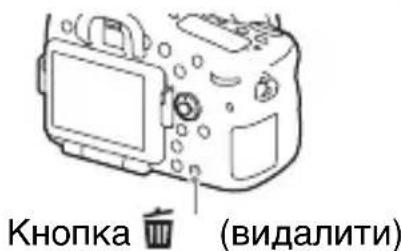
2 3a donomoroIO KhoNk Na MyIbTnCeJIeKTopi Bn6epiTb nyHKT [BndaIHTn] i HaTnCHiTb KhoNky
- IIo6 BnIaJIHTN OJHOuacHo KJIbKa 3O6paXKeHb, HATNCiTb KHOIIKy MENU (BiITBOpEHHa) 1 [BnIaJIHTN].
Pnmitkn
BuaJIInTH 3O6paKeHHa, JIA KNX BCTaHOBJeHO 3axHCT, HEMOXJIINBO.
Bn6ip pexmy 3noMkn
(HaJIaIITyBaH.) 4 [USB-3'eIHaHn] [BiIaJIeHnI PIK]
HaJIaIITyBaHnHaIIOITpIi: Bi-4,0 M-1 IO +3,0 M-1
[MoHiTop]
PK-ⅡaHeJIb:7,5cm(THII3,0), 6a3yETbcraHaTexHOJIorii TFT
3aaraIbHa KJIbKicTb Toyok: 1228800 (640× 4 RGBW)× 480)ToyoK
[KepyBaHHeKcNo3nciE]
KJIITINHka Bn3HaueHHeKcNo3nii: daTnK «Exmor» CMOS
MeToI eKcIOBmIpIOBaHHa: 1200-3OHaJIbHe OiHIOBaJIbHe 3aMipIOBaHHa
Iiapa3oH BIMipIOBaHHa: Bi-2 EV 1o +17 EV, 6aRaTOcerMeHTnH, IeHTpO3BaJxKeHn, TOUKOBn peXHMn (3a eKBiBaJIeHTa ISO 100 3 06'ekTINBOM F1,4)
UyTJIINBicTB ISO (peKOMeHIOBaHn iHneKc ekCNo3nii): FOTo3HIMKn: AUTO, BiI ISO 50 1o 25 600 (i3 KpOKom peRyJIIOBaHHaekCIO3nii 1/3 EV) BiJeO: AUTO, BiI ISO 100 I0 12 800 (i3 KpOKom peRyJIIOBaHHaekCIO3nii 1/3 EV)
Kopekui eKcno3nii: ± 5,0 EV (MOJINBicTb IepemKaHHa Kpokib 1/3 Ta 1/2 EV)
[3aTBop]
TII:3eJIeKToHHm KepyBaHHaM, BePTHKaJIbHOrO XoIy, IITOPHOIiJINHHOrO TIIpy
Iiapa3oH BnTpIMKn:
fOTOn3HIMKn: 1/8000ceKyuHn
Io 30 ceKyuH, a TaKoJk pyHa
BnTpIMKa
BiJeO: 1/8000ceKyuHn Io
1/4 ceKyuHn (KpOK 1/3), Io
1/60 ceKyuHn B
aBTOMaTHUHOMy peXHMi (Io
1/30 ceKyuHn y peXHMi
aBTOMaTHUHOI IOBROi
BnTpIMKn)
IIIBnIckTb cHxpoHi3auii 3i cHaJaxom:1/250ceKyHIN
[B6ydoBaHn cnaIax]
CπaJIax (BéIyue yIscIIO): GN 12 (y MeTpax 3a ISO 100)
UacIpe3apJxkaHnHa: Iprn6JI. 3 cekyHn
Kyt oxoJIeHHcnaJaxy: oxoJIIOe Kyt 30py 16 MM o6'ekTHBa (fokycHa BiIcTaHb, IIO3HaueHa Ha o6'ekTnBi)
Kopekii eKcno3nii cnaJaxy: ± 3,0EV (MOxJIHBicTB IepemKaHHKpOKiB 1/3 Ta 1/2 EV)
Iiapa3oH cnaJaxy:
| Дiaфпарma | F2.8 F4.0 | F5.6 | ||
| OSI KHHKHeH | 100 1 M | -4,3 M | 1 M -3 M | 1 M -2,1 M |
| 200 1 M | -6,1 M | 1 M -4,2 M | 1 M -3 M | |
| 400 1,4 | M -8,6 M | 1 M -6 M | 1 M -4,3 M | |
| 800 2 M | -12 M | 1,4 M -8,5 M | 1 M -6,1 M | |
[HepepeBha 3mOMka]
IIIBNikicTb HeIepepBHOi 3HOMKn: HeIepepBHa 3HOMKa 3 IpiOpHTeTom aBTOeKcIO3Hii: MaKcHMym 12 3o6paXKeHb 3a ceKyHny/ MaKcHMym
8 3o6paKeHb 3a ceKyuHny/
L0:MaKcHMyM
3 306paXeHHa 3a ceKyuHny
-ДаиHa ochOBi yMOB BnMipHOBaHHa. IIIbNdkicTb HeIpepePBHOI 3HOMKn MoKe 6yTNIOBIJIbHIiHa 3aJIeXHo BiI yMOB 3HOMKn.
MaKcHMaJIbHo I03BOJIeHa KJIbKicTb KaIpiB HeIpepeBHOI 3HOMKn:
ByMOBax HeIepepBHOi 3HOMKn 3PiopHTeTom aBTOEKcIO3HIIi HaBnua:53 3o6paXeHb/
BncoKa: 60 3o6paKeHb/
CtanhapTHH:64306paXKeHb/
RAW i JPEG: 25 306paЖeNb/
RAW: 26 306paXeHb/
Y peKIMi HeIepepBHOi 3HOMKII
HaBnua: 56 3o6paKeHb/
BncoKa: 75 3o6paXKeHb/
Aydio: MPEG-4 AAC-LC 2-KaH.
[Hocii daHnx]
Memory Stick PRO Duo, KapTKa SD
[Bxidhi/Bnxidhi po3'cMn]
Po3'EM Multi/Micro USB*:
AkymyJIaTOpHn6JIOK: AkymyJIaTOpHn6JIOK NP-FM500H
[Стохивансяеонрий]
Upa3i BnKOpncTaHnD T16- 50mm F2.8 SSM* y pa3i BnKOpncTaHnBnOuKaHa: np6JI.3,5BT y pa3i BnKOpncTaHnEeKpaHa: np6JI.3,0BT
*IocTaaetbcs 3 ILCA-77M2Q.
[Inhe]
MikpofoH: Ctepeo
Гуномовь: Монфоший
Exif Print: Cymichn
DPOF: IIITpIMyETbca
PRINT Image Matching III: Cymicn
Pozmipn: 142,6MM× 104,2MM× 80,9MM (I/IB/T,HeBpaXOByOuN BnCTyII)
Bara:
[ \text{Прибл. 726 r (З батуарецю i Memory Stick PRO Duo)} ]
[ \text{Прибл. 647 r (Линшеморпунс)} ]
Poboya TeMIIepaTypa: BiD 0^ do 40^
[Bé3dpoToBa lokaJIbHa mepexa]
ПiДТрИмУВангфорMaT: IEEE802.11b/g/n
ЧаСТOTНи ДiАпaЗоH:2,4ГТц
БeЗПeKa:WEP/WPA-PSK/WPA2-PSK
Cnoci6PiKJIIOueHn:WPS(Wi-Fi Protected Setup)/BpyuHy
Cnoci6IOCTyIy:peXIM iHΦpaCTpyKTypn
NFC:cymichicTBi3 NFC Forum Type 3 Tag
KoHcTpkyiTaTexHiXapaKTePncTnKNMOxTyb3MiHOBaTnca6e3IOBIDOMJIeHHJ.
3apdHn npncTpip/ BaTapea
3apdHn npncptpi BC-VM10A
BxiHa IOTyXHicTb: 100 B - 240 B 3MiHHoro cTpyMy, 50/60 Tt, 9BT
BuxiHa IOTyXHicTb: 8,4 B IocTiHoro cTpymy,0,75 A
IIaIa3OH TeMIIepaTpyn BHKOpHcTaHHa: Bi0°C 40°C
Iiapa3oH TeMpepaTpyn 36epiraHHa: Bi -20 ^ C Io +60 ^ C
MaKcHMaJIbHi po3Mipn: 6 70MM× 25MM× 95MM (III/B/T)
AkymnyTopn6loK NP-FM500H
TnI 6aTaapei: JiTi-iOHHaKymyJIaTOP
MaKcHMaJIbHa HaIpyra: IocTiHHn cTpym 8,4 B
HomHaJIbHa HaIpyra: IocTiHnI cTpyM 7,2 B
MaKcHMaJIbHa HaIpyRa 3apJxKaHHa:IOCTiHnCtpyM 8,4B
MaKcHMaJIbHN cTpyM 3apJxKaHHa:2,0A
EMHicTb: TIOBa:11,8BT/roI
(1650 mA/roI)
MihimaJIbHa: 11,5 Bt/roJ
(1600 mA/roπ)
MaKcHMaJIbHi po3MipI: IIpI6JI. 38,2 MM × 20,5 MM × 55,6 MM (III/B/T)
UA
O6'ekTnB