USER MANUAL PBRM 39 C2 PARKSIDE
Operating and Safety Instructions
Translation of Original Operating Manual
FR BE CH
TONDEUSE THERMIQUE
Before reading, unfold the page containing the illustrations and familiarise yourself with all functions of the device.
DE A CH
GB/IE/NI/CY/MT Operating and Safety Instructions Page 01
Table of contents: Page:
- Explanation of the symbols on the device 2
- Introduction 4
- Device description (Fig. 1-16)
- Scope of delivery (Fig. 1 - 2) 4
- Proper use 4
- Safety instructions 5
- Technical data 7
- Unpacking 7
- Assembly. 7
- Before commissioning 8
- Start up 9
- Operation 9
- Cleaning 10
- Transport 11
- Storage 11
- Maintenance 11
- Disposal and recycling 13
- Troubleshooting 14
- Warranty certificate 15
- Exploded view 257
- Declaration of conformity 260
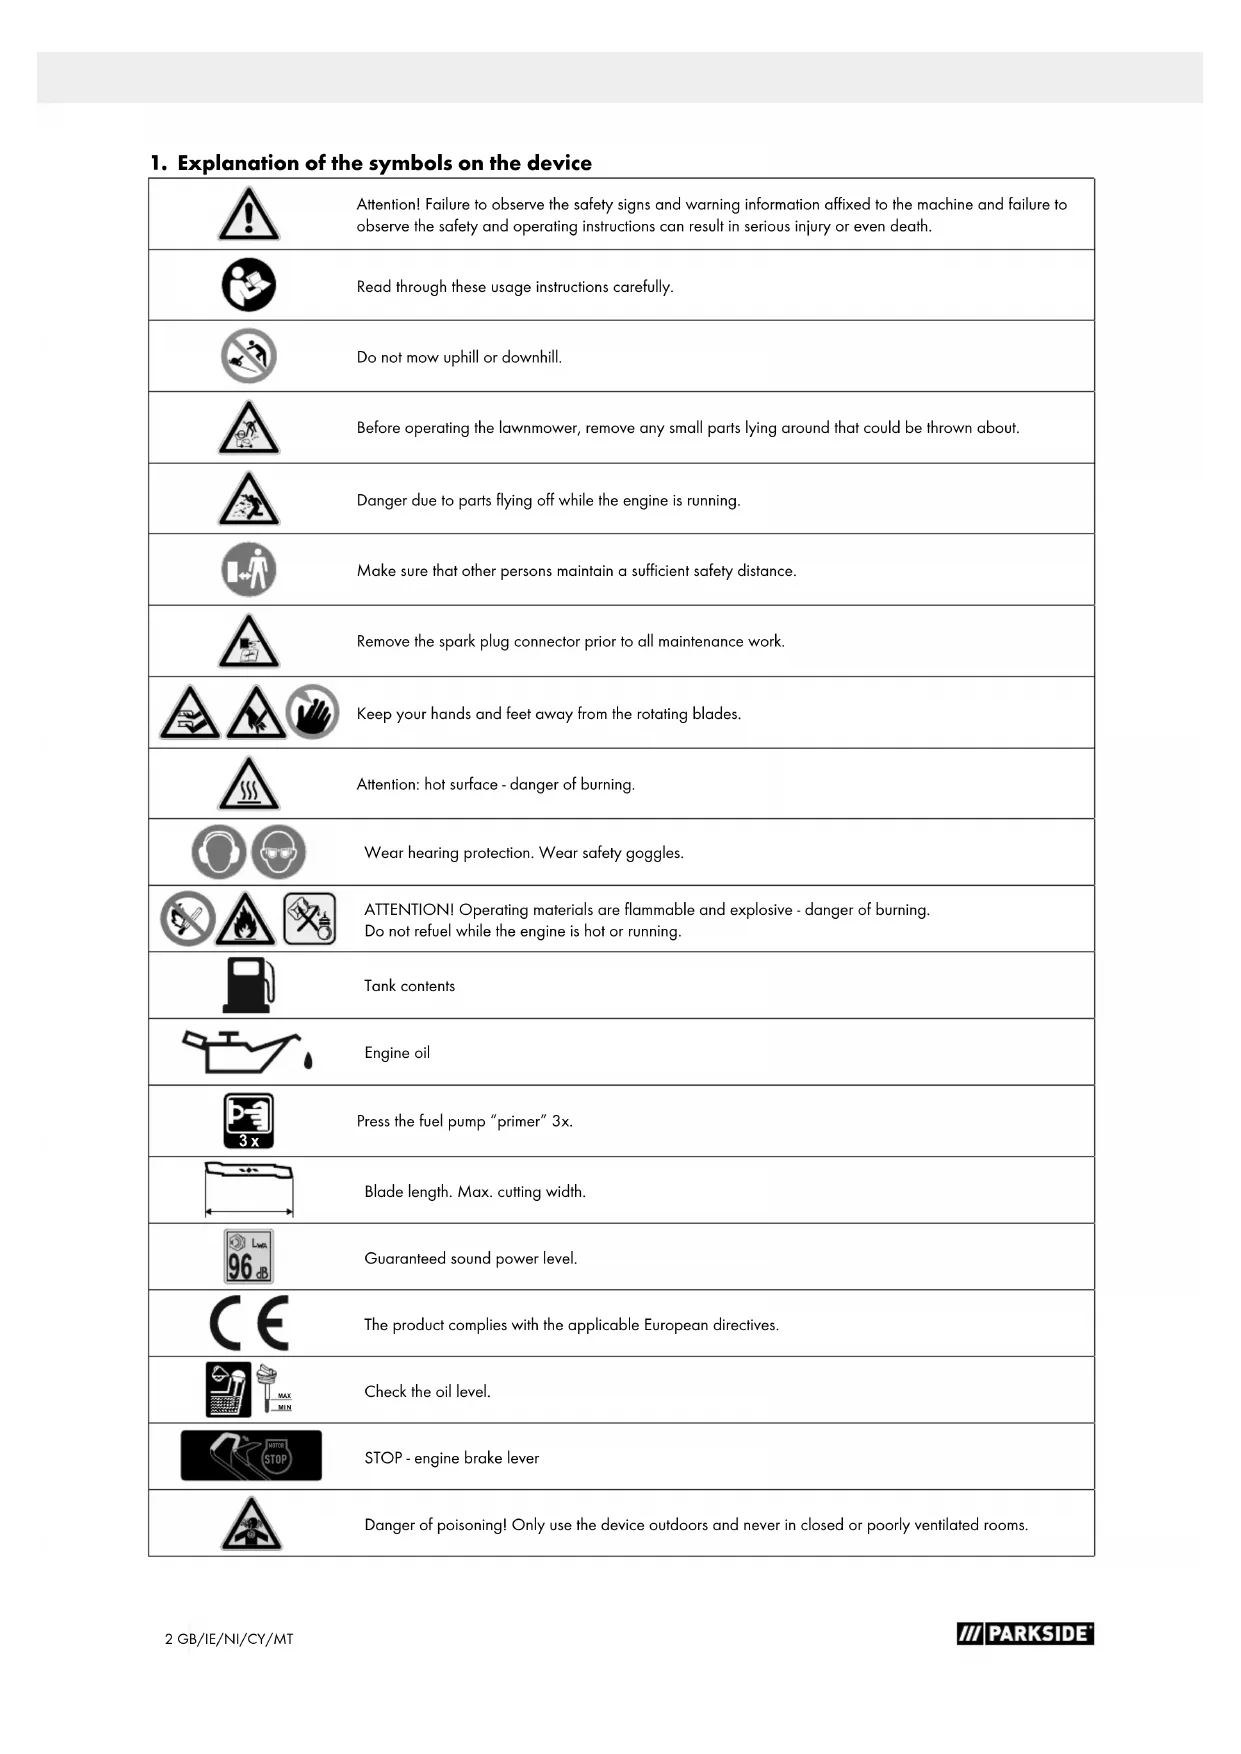
1. Explanation of the symbols on the device
| Attention! Failure to observe the safety signs and warning information affixed to the machine and failure to observe the safety and operating instructions can result in serious injury or even death. |
| Read through these usage instructions carefully. |
| Do not mow uphill or downhill. |
| Before operating the lawnmower, remove any small parts lying around that could be thrown about. |
| Danger due to parts flying off while the engine is running. |
| Make sure that other persons maintain a sufficient safety distance. |
| Remove the spark plug connector prior to all maintenance work. |
| Keep your hands and feet away from the rotating blades. |
| Attention: hot surface - danger of burning. |
| Wear hearing protection. Wear safety goggles. |
| ATTENTION! Operating materials are flammable and explosive - danger of burning.
Do not refuel while the engine is hot or running. |
| Tank contents |
| Engine oil |
| Press the fuel pump "primer" 3x. |
| Blade length. Max. cutting width. |
| Guaranteed sound power level. |
| The product complies with the applicable European directives. |
| Check the oil level. |
| STOP - engine brake lever |
| Danger of poisoning! Only use the device outdoors and never in closed or poorly ventilated rooms. |
| ▲ Attention! | We have marked points in these operating instructions that impact your safety with this symbol. |
| DANGER! | Signal word to indicate an imminently hazardous situation which, if not avoided, will result in death or serious injury. |
| WARNING! | Signal word to indicate a potentially hazardous situation which, if not avoided, could result in death or serious injury. |
| CAUTION! | Signal word to indicate a potentially hazardous situation which, if not avoided, could result in minor or moderate injury. |
| NOTE | Signal word to indicate a potentially hazardous situation which, if not avoided, could result in product or property damage. |
2. Introduction
Manufacturer:
Scheppach GmbH
GünzburgrsteraBe 69
D-89335 lichenhausen
Dear Customer
We hope your new device brings you much enjoyment and success.
Note:
In accordance with the applicable product liability laws, the manufacturer of this device assumes no liability for damage to the device or caused by the device arising from:
- Improper handling.
- Failure to comply with the operating instructions.
- Repairs carried out by third parties, unauthorised specialists.
- Installing and replacing non-original spare parts.
- Improper use.
Note:
Read the whole text of the operating manual before assembly and commissioning.
This operating manual should help you to familiarise yourself with your device and to use it for its intended purpose.
The operating manual includes important instructions for safe, proper and economic operation of the device, for avoiding danger, for minimising repair costs and downtimes, and for increasing the reliability and extending the service life of the device.
In addition to the safety instructions in this operating manual, you must also observe the regulations applicable to the operation of the device in your country.
Keep the operating manual at the device, in a plastic sleeve, protected from dirt and moisture. They must be read and carefully observed by all operating personnel before starting the work.
The device may only be used by personnel who have been trained to use it and who have been instructed with respect to the associated hazards. The required minimum age must be observed.
In addition to the safety instructions in this operating manual and the separate regulations of your country, the generally recognised technical rules relating to the operation of such machines must also be observed.
We accept no liability for accidents or damage that occur due to a failure to observe this manual and the safety instructions.
3. Device description (Fig. 1-16)
- Steering
- Engine brake lever
- Upper push bar
- Star grip nut
- Cable clip
- Lower push bar
- Tank cover
- Fuel tank
- Air filter cover
9a. Air filter
- Fuel pump "primer"
11.Wheel
11a Wheel cap
11b Wheel bolt
11c Wheel washer
- Spark plug connector
12a. Spark plug
- Exhaust pipe
- Oil dipstick
- Discharge flap
- Grass collection basket
- Rope hook
- Pull starter
- Blake
- Blade screw
- Washer
- Engine spindle
- Carburettor screw
4. Scope of delivery (Fig. 1-2)
- 1 × Petrol lawnmower with upper push bar (3)
- 2 × Star grip nut (4)
- 1 x Cable clip (5)
- 2 x Lower push bars (6)
- 4 x Wheel (11)
- 1 × Grass collection basket (16)
- 1 x Rope hook (17)
- 2 x Screw M8 (A)
- 2 x Washer (B)
- 2 × Screws 4.0 × 12mm (C)
- 2 x Velcro tape (D)
- 1 × Operating manual
5. Proper use
The petrol lawnmower is intended for private use i.e. for use in home and gardening environments. Private use of the lawnmower refers an annual operating time generally not exceeding that of 50 hours, during which time the machine is primarily used to maintain small-scale, residential lawns and home/hobby gardens. Public facilities, sporting halls, and agricultural/forestry applications are excluded.
The machine may only be used in the intended manner. Any use beyond this is improper.
The user/operator, not the manufacturer, is responsible for damages or injuries of any type resulting from this.
An element of the intended use is also the observance of the safety instructions, as well as the assembly instructions and operating information in the operating manual.
Persons who operate and maintain the machine must be familiar with it and must be informed about potential dangers. In addition, the applicable accident prevention regulations must be strictly observed.
Other general occupational health and safety-related rules and regulations must be observed.
The liability of the manufacturer and resulting damages are excluded in the event of modifications of the machine.
The machine may only be operated with original parts and original accessories from the manufacturer.
Please note that our equipment was not designed with the intention of use for commercial or industrial purposes. We assume no guarantee if the device is used in commercial or industrial applications, or for equivalent work.
Due to physical danger to the user, the lawnmower must not be used for the following work (incomplete list):
- for trimming bushes, hedges and shrubs,
for cutting climbing plants,
- for lawn care on roof plantings and in balcony boxes,
- for chipping and shredding tree and hedge cuttings,
- for cleaning pavements (vacuuming, blowing away),
for levelling ground elevations, such as molehills.
- for transporting cuttings, except in the grass collection basket provided.
WARNING
For your own safety, please thoroughly read this manual and the general safety instructions before turning the device on. If you give the device to third parties, always include these usage instructions.
6. Safety instructions
We have marked points in the operating manual that impact your safety with this symbol:
Furthermore, the operating manual contains other important text sections that are marked with the word "ATTENTION!".
Attention!
When using equipment, several safety warnings must be observed to prevent injuries and damage. For this reason, please carefully read this operating manual / safety instructions. If you hand the device over to another person, please hand over this operating manual / safety instructions as well. We accept no liability for accidents or damage that occur due to a failure to observe this manual and the safety instructions.
DANGER
A failure to observe these instructions poses an extreme danger of death or the risk of life-threatening injuries.
WARNING
A failure to observe these instructions poses a danger of death or the risk of serious injuries.
CAUTION
A failure to observe these instructions poses a minor to moderate danger of injury.
NOTE!
A failure to observe these instructions poses a risk of damage to the engine or other property.
Who is not permitted to use the device:
- Children and other people who do are not familiar with the usage instructions (local stipulations may specify a minimum age for users.)
- People under the influence of alcohol, drugs and medication, as well as those who are tired or ill.
Safety instructions for hand-operated lawnmowers
- Read the usage instructions with due care. Familiarise yourself with the settings and proper operation of the machine.
- Never allow children or other persons who are unfamiliar with the usage instructions to use the lawnmower. Contact your local governmental agency for information regarding minimum age requirements for operating the lawnmower.
- Never mow while people, especially children or animals are nearby. Always keep in mind that the operator is responsible for accidents involving other persons and/or their property.
- Only mow when visibility is good. It is necessary to keep third parties away.
- If you give the equipment to any other person, give them this operating manual as well.
- Always wear sturdy, non-slip footwear and long trousers when mowing. Never mow barefoot or in sandals.
- Check the terrain on which the machine will be used and remove all objects that could be caught up and violently flung out of the chute (like stones, toys, sticks and wires etc.).
-
Switch off the engine, wait for it to stop and disconnect the spark plug connector if
-
You are leaving the device.
- You are removing blockages or obstructions.
- The device has been in contact with foreign objects.
- Malfunctions and unusual vibrations occur on the device.
WARNING
Petrol is highly flammable:
- Only store petrol in the designated containers.
- Only refuel the device outdoors and do not smoke when filling.
- Petrol must be filled before starting the engine. While the engine runs or if the lawnmower is hot, the fuel cap must not be opened and petrol must not be filled.
- If petrol overflows, no attempts should be made to start the engine. Instead, the machine must be removed from the area contaminated with petrol. Do not try to start the engine until the fuel vapours have evaporated.
- For safety reasons, the fuel tank cap and other fuel caps must be replaced if damaged.
- Never store petrol near a source of sparks. Always use a tested canister. Keep petrol away from children.
- Replace defective silencers.
- Prior to use, always perform a visual inspection to check whether the blade and fastening bolts are worn out or damaged. To prevent an imbalance, worn out or damaged blades and bolts may only be replaced in sets.
Handling
- Make sure that all nuts, pins and screws are securely tightened so that the device is kept in a safe working condition.
- Never store the machine with petrol in the tank inside a building in which fuel vapours may come into contact with naked flames or sparks.
- Allow the engine to cool before storing the machine in enclosed spaces.
- In order to avoid fire hazards, keep the engine, exhaust pipe and the area around the fuel tank free of grass, leaves and leaking grease (oil).
- Regularly check the catch basket for signs of wear and loss of functionality.
- For safety reasons, replace worn or damaged parts.
- If the fuel tank has to be drained, you must do this outdoors.
- Do not run the combustion engine in closed rooms in which hazardous carbon monoxide can collect.
- Only mow in daylight or with good artificial lighting.
- Avoid using the device on wet grass as far as possible.
- Do not use the lawnmower in a thunderstorm - risk of lightning strike!
Always maintain good footing on inclines.
- Only guide the machine at walking pace.
- The following applies to wheeled machines: Always mow across hills i.e. never straight up or straight down. Take particular care when changing direction on a slope.
- Do not mow on excessively steep slopes and nearby rubbish tips, ditches and dykes. Take particular care when reversing the lawnmower or pulling it towards you.
- Stop the blade when the lawnmower has to be tilted, when transporting over areas other than grass and when moving the lawnmower to and from the area to be mowed.
- Caution! The lawnmower must not be used without either the full grass catcher or the self-closing separating guard for the ejection opening in place.
- Never use the lawnmower if the blade or safety grilles are damaged, or without the attached guards, e.g. deflectors and/or grass catching devices.
- Do not adjust and overclock the engine speed settings.
- Release the engine brake and disengage all cutting tools and drives before starting the engine.
- Start the engine with care, in accordance with the manufacturers instructions. Ensure that your feet are far enough away from the blade.
- Do not tilt the lawnmower when you start the engine unless the lawnmower must raised off of the ground a little in order to start it. In this case, only tilt as far as absolutely required and only lift the side away from the operator.
- Do not start the engine if you are standing in front of the ejector chute.
- Never out hands and feet on or under rotating parts. Always keep clear of the ejection opening.
- Never lift or carry a lawnmower while the engine is running.
- Stop the engine and make sure that all moving parts have come to a standstill and that the ignition key, if present, is removed:
- Before you dislodge any blockages or clogs in the ejector chute.
-
Before checking or cleaning the lawnmower or performing work on it.
-
If it came into contact with a foreign object. Inspect the lawnmower for damage and perform the required repairs before starting again and working with the lawnmower. If the lawnmower begins to experience exceptionally strong vibrations, immediately switch it off and check it.
- Any time you leave the lawnmower.
-
Before you refuel.
-
When the engine runs out, close the throttle valve. If the engine has a petrol shut-off valve, close it after mowing.
- Operating the machine with excessive speed can increase the risk of accidents.
- Be careful when adjusting the device and avoid trapping fingers between the moving blade and rigid parts of the device.
- Be particularly careful when mowing on yielding ground, nearby rubbish tips, ditches and dykes.
- Avoid mowing in places where the wheels have trouble gripping or mowing is unsafe in any other way.
- Watch out for traffic near a road.
Exercise particular caution when moving backwards and pulling the lawnmower.
Risk of tripping! Before reversing, make sure there are no small children behind you.
- The user must be adequately trained in the use, adjustment and operation of the machine (including prohibited operations).
- Check the device regularly and make sure that all start locks and push buttons are working properly before each use.
- Please note that improper maintenance, the use of non-compliant spare parts, or the removal or modification of safety devices can result in damage to the device and serious injury to the person working with it.
- Please note that the lawnmower's safety systems or equipment must not be tampered with or deactivated. Never remove any safety-related parts.
- Please note that the user must not change or manipulate any sealed engine speed control settings.
- Use only blades and accessories recommended by the manufacturer. Use of other tools and accessories may result in injury to the user.
- Always keep the lawnmower in good operating condition.
- It is necessary to take enough breaks to reduce noise and vibration exposure.
Residual risks and accident protective measures
Neglect of ergonomic principles
Negligent use of personal protective equipment (PPE)
Careless use or omission of personal protective equipment may result in serious injury.
- Wear prescribed protective equipment.
Human behaviour, misconduct
- Always concentrate fully on all work.
Residual danger - Can never be excluded.
Danger from noise
Hearing damage
Prolonged unprotected work with the device may cause hearing damage.
- Always wear hearing protection as a matter of principle.
Behaviour in an emergency
In case of an accident, initiate the necessary first aid measures and seek medical assistance as quickly as possible.
7. Technical data
Engine type 4-Stroke engine/air cooled
Displacement 131 cm³
Working speed 2800 rpm
Engine power. 2.4 kW/3.3 hp (3600 rpm)
Fuel............ Regular grade petrol/lead-free max. 10% bioethanol
Tank capacity. 0.85
Engine oil.. SAE 10W-30/SAE 10W-40
Tank capacity / oil .0.4 I
Cutting height adjustment. 30 - 66 mm/3-fold
Grass collection basket capacity. 35
Cutting width. 39 cm
Weight 16.3 kg
Technical changes reserved!
Noise & vibration
Noise data
Sound pressure level L_PA 80.7 dB
Measurement uncertainty K_PA 3 dB
Sound power level L_WA 94 dB
Measurement uncertainty K_WA 1.79 dB
Wear hearing protection.
Excessive noise can result in a loss of hearing.
If necessary, adhere to rest periods and limit the duration of work to the bare minimum.
For your personal protection and the protection of nearby persons, wear suitable hearing protection.
Vibration parameters
Vibration a_by7.218m / s^2
Measurement uncertainty K_h 1.5 m/s²
Keep the noise level and vibration to a minimum!
- Only use faultless devices.
- Maintain and clean the device at regular intervals.
- Adapt your working methods to the device.
- Do not overload the device.
- Have the device checked if necessary.
- Switch the device off if it is not in use.
- Wear protective gloves.
Warning!
In case of extended working periods, the operating personnel may suffer circulatory disturbances in their hands (vibration white finger) due to vibrations.
Raynaud's syndrome is a vascular disease that causes the small blood vessels on the fingers and toes to cramp in spasms. The affected areas are no longer supplied with sufficient blood and therefore appear extremely pale. The frequent use of vibrating devices can cause nerve damage in people whose circulation is impaired (e.g. smokers, diabetics).
If you notice unusual adverse effects, stop working immediately and seek medical advice.
Observe the following information to reduce hazards:
- Keep your body and especially your hands warm in cold weather.
- Take regular breaks and move your hands to promote circulation.
- Ensure as little vibration as possible at the device via regular maintenance and stable parts on the device.
8. Unpacking
- Open the packaging and carefully remove the device.
- Remove the packaging material, as well as the packaging and transport safety devices (if present).
- Check whether the scope of delivery is complete.
- Check the device and accessory parts for transport damage. In the event of complaints the carrier must be informed immediately. Later claims will not be recognised.
- If possible, keep the packaging until the expiry of the warranty period.
- Familiarise yourself with the device by means of the operating manual before using for the first time.
- With accessories as well as wearing parts and spare parts use only original parts. Spare parts can be obtained from your specialist dealer.
- When ordering please provide our article number as well as type and year of manufacture for your equipment.
Attention!
The device and the packaging material are not children's toys! Do not let children play with plastic bags, films or small parts! There is a danger of choking or suffocating!
9. Assembly
Caution!
Danger of injury due to rotating blade. Only work on the device when the engine is switched off and the blade is stationary.
Some parts of the delivery come disassembled. For quick and easy assembly, read and follow the instructions below.
Note!
You will need the following additional tools, which is not included in the scope of delivery, for assembly, and also for maintenance work:
One oil collecting tray, flat (for oil change)
A 1 litre measuring beaker (oil / petrol-proof)
- A petrol can (5 litres are sufficient for approx. 6 operating hours)
- A funnel (suitable for the tank's petrol filling nozzle)
Household wipes (to wipe up oil/petrol residue; dispose of these at a filling station)
- A petrol extraction pump
- An oil can with hand pump
- Pliers
Phillips screwdriver
- Slotted-head screwdriver
- Open-end wrench/socket spanner
9.1 Installation of the lower push bar (6) (Fig. 3)
Attention! Make sure that the throttle cable is not squeezed when mounting the push bars (3 + 6) .
- Fit the two lower push bars (6) in the holes provided.
- Fasten each of these with a 4.0 × 12 ~mm screw (C). Ensure that the pull cord, which will be fastened later with a cable clip (5), and the Bowden cable are not in the way (Fig. 6).
9.2 Mounting the upper push bars (3) and attaching the pull starter (18) (Fig. 4, 5, 6)
- Screw the upper push bar (3) to the lower push bar (6) with an M8 bolt (A), a washer (B) and a star grip nut (4) on the left side (Fig. 4).
- Then screw the upper push bar (3) on the right side to the lower push bar (6) with an M8 bolt (A), the cable pull hook (17), a washer (B) and a star grip nut (4) (Fig. 5).
- Hook the handle of the pull starter (18) into the cable hook (17) (Fig. 5).
- Fix the cable pull with the enclosed cable clip (5) to the lower push bar (6) (Fig. 6).
9.3 Fitting the wheels (Fig. 7+8)
- Unscrew the pre-assembled wheel bolts (11b) together with the wheel shims (11c) with an open-end spanner AF 21 and put them aside.
- Remove the wheel cap (11a) on the wheel (11) with a screwdriver if necessary (Fig. 8).
- Now fit a wheel washer (11c), a wheel (11) and a wheel bolt (11b) into the thread with the desired cutting height. You can choose between a cutting height of 30 - 66 mm.
ATTENTION:
Note the marking on the head of the wheel bolt (11b) (L = left-handed thread, R = right-handed thread)
- Fit the wheels (11) at the same cutting height.
- Put the wheel caps (11a) back on the wheels (11).
10. Before commissioning
ATTENTION!
Always make sure the device is fully assembled before commissioning!
WARNING!
Health hazard!
Inhalation of petrol/lubricating oil vapours and exhaust gases can cause serious damage to health, unconsciousness and in extreme cases death.
- Do not breathe petrol/lubricating oil vapours and exhaust gases.
- Operate the product outdoors only.
NOTE!
Product damage
Using the product without or with too little engine and gearbox oil can result in engine damage.
- Fill with petrol and oil before commissioning. The product is supplied without engine and gearbox oil.
NOTEI
Environmental damage!
Spilled oil can pollute the environment permanently. The liquid is highly toxic and can quickly lead to water pollution.
- Fill/empty oil only on level, paved surfaces.
- Use a filling nozzle or funnel.
- Collect drained oil in a suitable container.
- Wipe up spilled oil carefully immediately and dispose of the cloth according to local regulations.
- Dispose of oil as per local regulations.
NOTE!
Risk of damage!
If incorrectly stored or undrained fuel is used, the carburettor may become clogged or engine operation may be affected.
- Put unused fuel in an airtight vessel and store it in a dark, cool room.
Check before operation
- Check all sides of the engine for oil or fuel leaks.
- Check the engine oil level.
- Check the fuel level - the tank should contain at least 0.4L.
- Check the air filter condition (see section 16.5).
- Check the condition of the fuel lines.
- Make sure that the spark plug connector (12) is attached to the spark plug (12a).
- Look for signs of damage.
- Check that all protective covers are in place and all screws, nuts and bolts are tightened.
10.1 Filling up with engine oil (Fig. 9)
Attention!
The lawnmower is delivered without engine oil. Therefore, ensure that you add oil before starting it up. Use multigrade oil (SAE 10W-30 or 10W-40) for this.
Check the oil level every time before commissioning. An oil level that is too low can damage the engine.
- Place the lawnmower on a level, even surface.
- Unscrew the oil dipstick (14).
- Fill the tank with engine oil (SAE 10W-30/SAE 10W-40) using a funnel (not included in scope of delivery). Note the max. filling capacity of 400ml . Carefully fill the oil up to the lower edge of the filling nozzle.
- Wipe the oil dipstick (14) with a clean, lint-free cloth.
- Re-insert the oil dipstick (14) and pull it out again. Check the oil level without screwing the oil dipstick (14) back in.
- The oil level must be within the middle mark on the oil dipstick (14).
- If the oil level is too low, add the recommended amount of engine oil (max. 400 ml).
- Then screw the oil dipstick (14) in again.
10.2 Filling up with petrol (Fig. 10)
DANGER!
Risk of fire and explosion!
When filling, fuel may ignite and even explode. This can lead to severe burns or death.
- Switch off the engine and let it cool down.
- Keep heat, flames and sparks away.
- Only fill up with fuel outdoors.
- Wear protective gloves.
- Avoid contact with skin and eyes.
- Move at least three meters away from the refuelling area before starting the engine.
- Watch out for leaks. If petrol is leaking, do not start the engine.
Attention!
The lawnmower is delivered without petrol. It is therefore essential to fill with petrol before commissioning. Use only E10 unleaded petrol.
- Clean the area surrounding the filling area. Impurities in the fuel tank (8) lead to operational faults.
- Carefully open the tank cover (7) so that any possible overpressure can be relieved.
- Fill the fuel tank (8) with petrol using a funnel (not included in the scope of delivery). Note the max. filling capacity of 0.85 litres. Carefully fill the petrol up to the lower edge of the filling nozzle.
- Close the tank cover (7) again. Ensure that the fuel cap is tightly sealed.
- Clean the tank cover (7) and the surroundings.
- Check the fuel tank (8) and fuel lines for leaks.
- Move at least three meters away from the refuelling area before starting the engine.
11.Start up
NOTE: Some noise pollution from this device is unavoidable. Postpone noisy work to approved and designated times. If necessary, adhere to rest periods and limit the duration of work to the bare minimum. For your personal protection and the protection of nearby persons, wear suitable hearing protection.
11.1 Blade stop device
Before each use, you must check the blade stop device. Start the engine as described in 12.2.
- Release the engine brake lever (2). The engine switches off and the blade (19) is braked.
- The blade (19) must stop within 7 seconds.
11.2 Setting the cutting height (Fig. 7+8)
Attention! Adjust the cutting height only when the engine is switched off and the spark plug connector (12) has been pulled out.
-
The cutting height is adjusted via the wheels (11). Three different cutting heights can be set (see section 9.3).
-
In dense, tall grass, set the highest cutting level and mow more slowly. A high cutting height should be selected for the first cut of the season. Adjust the cutting height so that the device is not overloaded. (See section 9.3)
- Set the cutting height depending on the actual length of the lawn.
-
Carry out several passes so that a maximum of 4 cm of lawn is removed at a time.
The correct cutting height for
-
ornamental grass is about 30 - 45 mm
-
utility turf about 40 - 65 mm.
11.3 Preparing the area to be mowed
- Before mowing, carefully examine the area.
- Remove stones, sticks, bones, wires, toys and other objects that may be ejected by the device.
- Ensure that no other people are present on the surface to be mowed.
12. Operation
Working instructions
- Only cut with sharp, flawless mowing blades (19) so that the blades of grass do not fray and the lawn does not turn yellow.
- To achieve a clean cut, guide the lawnmower in the straightest possible paths. These strips should always overlap by a few centimetres so that no patches remain.
- Keep the underside of the lawnmower housing clean and be sure to remove grass debris. Deposits make the starting process more difficult, impair cutting quality and grass discharge.
- On slopes, the cutting path should be made perpendicular to the slope. It is possible to prevent the lawnmower from slipping by lifting it upwards at an angle.
12.1 Mowing with the grass collection basket (16)
Attention! Do not operate the device without the grass collection basket (16) fully attached.
Attention! Danger of injury!
Only remove or attach the grass collection basket (16) when the engine is switched off and the blade (19) is stationary.
12.1.1 Inserting the grass collection basket (16) (Fig. 11)
- Lift the rear discharge flap (15).
- Hold the grass collection basket (16) by the carrying handle.
- Hang the grass collection basket (16) in the grass collection basket suspension provided at the rear of the device.
- Put down the rear discharge flap (15), it holds the grass collection basket (16) in position.
12.1.2 Emptying the grass collection basket (16) (Fig.11)
WARNING
Before removing the grass collection basket (16), switch off the engine (see 12.3) and wait for the blade (19) to stop.
Attention! Danger of injury!
Remove the grass collection basket (16) only when the engine is switched off and the blade (19) is stationary.
As soon as grass cuttings are left lying behind on the ground during mowing, the grass collection basket (16) must be emptied.
- To remove the grass collection basket (16), lift the rear discharge flap (15).
- Take out the grass collection basket (16) by the carrying handle. In accordance with the safety regulations, the discharge flap (15) closes when the grass collection basket (16) is unhooked and closes the rear ejection opening.
If grass cuttings remain in the opening, it is advisable to pull the lawnmower back about one metre to make it easier to start the engine.
Attention: Do not remove cuttings in the lawnmower housing and on the working tool by hand or with your feet, but with suitable aids, e.g. brush or hand brush.
To ensure good collection, the grass collection basket (16) and in particular the air filter (9a) must be cleaned from the inside after use.
12.2 Starting the engine
Warning: The blade (19) rotates when the engine is started. Do not start the device if the grass collection basket (16) is not inserted.
12.2.1 Starting the engine (Fig. 1+12)
- Check the petrol and engine oil levels before each start (see sections 16.2 and 16.3). Make sure that the spark plug connector (12) is connected to the spark plug (12a).
- In colder temperatures, press the fuel pump "primer" (10) three times. This makes it easier to start the device.
- Stand behind the lawnmower. One hand pushes the engine brake lever (2) to the steering (1), the other pulls the pull starter (18).
- Start the engine with the pull starter (18). To do this, pull the handle out approx. 10-15 cm (until resistance is felt). And then pull hard with a jerk. If the engine does not start, pull on the pull starter (18) again.
- Due to protective coating on the engine, a small amount of smoke may be present during the initial use of the device and should be considered normal. This is a normal process.
Note: Only use the fuel pump "primer" (10) (Fig. 1) when the machine is cold!
Attention!
- Do not let the pull starter (18) whip back in.
- In case of cool weather, it may be necessary to repeat the starting process numerous times.
12.3 Switching off the engine
WARNING!
Danger of injury!
After switching off the engine, the blade (19) continues to run for a few seconds. If you touch the rotating parts, you may cut yourself.
- Wait until the blade (19) comes to a standstill.
- Do not stop the blade (19) with your hand.
- Wear protective gloves.
-
Keep the blade (19) away from your feet.
-
To switch off the engine, release the engine brake lever (2). Wait until the blade (19) stops.
- Disconnect the spark plug connector (12) from the spark plug (12a) to prevent the engine from restarting.
12.4 After mowing
- Always allow the engine to cool down before parking the lawnmower in an enclosed space. Remove grass, leaves, grease, and oil before storage. Do not store other objects on the lawnmower.
- Check all screws and nuts before the next use. Tighten up loose screws.
- Empty the grass collection basket (16) before the next use.
- Please also observe the chapter "Storage".
13. Cleaning
WARNING!
Danger of injury and burning!
The product can start unexpectedly and cause injuries.
- Switch off the engine before carrying out any cleaning or maintenance work.
- Allow the engine to cool down.
- Remove the spark plug connector (12) from the spark plug (12a).
WARNING!
Health hazard!
Inhaling petrol/lubricant vapours may lead to severe health damage, loss of consciousness and, in extreme cases, to death.
- Do not inhale petrol/lubricant vapours.
- Operate the product outdoors only.
13.1 Clean lawnmower
Cleaning with a garden hose is only recommended at low pressure. A high-pressure cleaner is not suitable for cleaning the lawnmower.
Unhook the grass collection basket (16) and brush it out with a hand brush. You can also roughly clean the housing of the lawnmower with the sweeper. For larger soiling, you can wipe the lawnmower with a damp cloth.
Note: Before tilting the lawnmower, empty the fuel tank fully with a fuel scavenge pump (not included in the scope of delivery).
Do not tilt the lawnmower beyond 90 degrees.
- It is best to tilt the lawnmower backwards. Make sure that the spark plug (12a) is pointing upwards. If the spark plug (12a) points downwards, oil can leak out and cause major damage to the engine and carburettor.
- Alternatively, you can tilt the device on its side, but you must make sure that the air filter cover (9) is on the upper side.
- Clean the underside of the lawnmower with a spatula and hand brush. The spatula helps to remove coarse and larger plant debris from the area of the blades (19). Cleaning the underbody is easier and more thorough immediately after use. Then dirt and plant residues are still fresh and can be loosened more easily.
- If necessary and if the dirt is difficult to remove, you can also use a special cleaner. Do not use aggressive cleaning products such as cold cleaners or white spirit.
- Check that the grass ejection is clear of grass residues and remove these if necessary.
14. Transport
WARNING!
Danger of injury!
Unintended and unexpected start-up of the product may lead to injuries.
- Switch the engine off before transporting.
- Allow the engine to cool down.
- Remove the spark plug connector (12) from the spark plug (12a).
IMPORTANT: For transport, the cutting height must always be set in the highest position.
- Empty the fuel tank (8) with a petrol suction pump (not included in the scope of delivery) (see 16.4.).
- Drain the engine oil from the warm engine (see 16.3).
- Clean the cooling fins of the cylinder and the housing (see 13.1.).
- Fold in the upper push bar (3) (see 15.2.).
- Wedge a few layers of corrugated cardboard between the upper push bar (3) and lower push bar (6) and the engine to prevent any chafing.
15. Storage
Attention! Do not store the device with the grass collection basket (16) full. In hot weather, the grass begins to ferment under heat. There is a risk of fire.
Store the device and its accessories in a dark, dry and frost-free place that is inaccessible to children. The optimum storage temperature lies between 5 and 30^ .
Store the device in its original packaging.
Cover the device to protect it from dust or moisture. Store the operating manual with the device.
- Clean and maintain the device before storage.
- Never store the lawnmower with petrol in the fuel tank inside a building in which fuel vapours may come into contact with naked flames or sparks.
-
Allow the engine to cool down before you put the lawnmower in an enclosed area.
-
In the event of prolonged storage, empty the fuel tank with a petrol suction pump (not included in the scope of delivery) (see 16.4.).
- In order to avoid fire hazards, keep the engine, exhaust pipe and the area around the fuel tank free of grass, leaves and leaking grease (oil).
15.1 Preparing the lawnmower for long-term storage
WARNING! Do not remove the petrol in enclosed spaces, near fire or when smoking. Petrol fumes can cause explosions and fire.
- Empty the fuel tank (8) with a petrol suction pump (not included in the scope of delivery) (see 16.4.).
- Carry out an oil change (see 16.3).
- Remove the spark plug connector (12) from the spark plug (12a). Remove the spark plug (12a) with a spark plug wrench (not included in the scope of delivery).
- Fill the cylinder with approx. 20ml of oil from an oil can.
- Pull the pull starter (18) slowly so that the oil protects the inside of the cylinder.
- Screw the spark plug (12a) back in.
- Clean the cooling fins of the cylinder and the housing (see 13.1.).
- Be sure to clean the entire device to protect the paint.
- Store the device in a well-ventilated area.
15.2 Folding the upper push bar (3) together WARNING!
Risk of jamming!
Always hold the upper push bar (3) with one hand at the highest point.
- Never place fingers between the upper push bar (3) and lower push bar (6).
For space-saving storage, the upper push bar (3) is foldable.
- Remove the grass collection basket (16).
- Unhook the pull starter (18) from the cable hook (17).
- Loosen the star grip nuts (4) on the upper push bar (3) slightly (do not open completely).
- Move the upper push bar (3) down. The cables must not be pinched in the process.
16. Maintenance
WARNING!
Have maintenance and repair tasks that are not described in this operating manual, carried out by a specialist workshop. Use only original spare parts. There is a risk of accident! Always carry out maintenance and cleaning work with the engine switched off and the spark plug connector removed. There is a danger of injury!
Let the device cool down before all maintenance and cleaning tasks. Elements of the engine are hot. There is a danger of injury and burning!
The product can start unexpectedly and cause injuries.
- Switch off the engine before carrying out any cleaning or maintenance work.
- Allow the engine to cool down.
- Remove the spark plug connector (12) from the spark plug (12a).
- Regular, careful servicing is required to guarantee the safety level and performance of the device.
- Make sure that all nuts, pins and screws are securely tightened so that the device is in a safe working condition.
- Regularly check the grass collection basket (16) for signs of wear and loss of functionality.
- For safety reasons, replace worn or damaged parts.
- Check that the wheels (11) are secured.
To ensure the smooth running of the wheels (11), we recommend cleaning the wheel axles and wheel hubs at least once per season.
- Any work not described in this operating manual must be performed by an authorised specialist workshop only.
16.1 Changing the blade (19) (Fig. 13)
Attention! There is a danger of injury if you work with a damaged blade (19).
For safety reasons you should only ever have your blade (19) sharpened and balanced by an authorised specialist workshop. For optimum results it is recommended that the blade (19) should be inspected once a year.
When changing the blade (19), only use original spare parts.
- Empty the fuel tank (8) with a petrol suction pump (not included in the scope of delivery) before removing the cutting edge. Never tip the lawnmower to the side or for- wards with a full petrol or oil tank! This will damage the engine and void the warranty.
- Hold the blade (19) tightly with one hand.
- Turn the blade screw (20) anti-clockwise using a screw - driver AF17 (not included in the scope of delivery) from the engine spindle (22). Remove the washer (21).
- Re-install the new blade (19) in reverse order. Fasten the blade screw (20) properly. Make sure that the blade (19) is correctly positioned and flush against the engine spindle (22).
- The tightening torque of the blade screw (20) is 45Nm . Also replace the blade screw (20) when replacing the blade (19).
16.1.1 Damaged blades (19)
Should the blade (19) come into contact with an obstruction, shut down the engine immediately and remove the spark plug connector (12).
- Check the blade (19) for damage.
- Damaged or bent blades (19) must be replaced.
- Never attempt to bend a bent blade (19) back to straight again.
- Never mow the lawn with a bent or heavily worn blade (19) as this will cause vibrations and can lead to further damage to the lawnmower.
16.2 Checking the oil level (Fig. 9)
WARNING!
Health hazard!
Inhaling petrol/lubricant vapours may lead to severe health damage, loss of consciousness and, in extreme cases, to death.
- Do not inhale petrol/lubricant vapours.
- Operate the product outdoors only.
NOTE!
Product damage
Using the product without or with too little engine and gearbox oil can result in engine damage.
- Fill with petrol and oil before commissioning. The product is supplied without engine and gearbox oil.
- Use only engine oil SAE 10W-30 or SAE 10W-40.
NOTE!
Environmental damage!
Spilled oil can pollute the environment permanently. The liquid is highly toxic and can quickly lead to water pollution.
16.3 Oil change
The engine oil change should be completed annually before the start of the season while the engine is at operating temperature and shut off.
Use only engine oil SAE 10W-30 or SAE 10W-40.
- Place the lawnmower on a level, even surface.
- Unscrew the oil dipstick (14).
- Using an oil pump and a hose (not included in the scope of delivery), suck out the engine oil through the filling nozzle.
- Fill up with fresh engine oil and check the oil level (see 16.2.).
- Hold a collection container under the hose of the petrol extraction pump (not included in the scope of delivery).
- Unscrew and remove the tank cover (7).
- Push the hose of the petrol suction pump into the fuel tank (8) and drain the petrol completely using the petrol suction pump.
-
Retighten the tank cover (7).
-
To ensure that no petrol remains in the carburettor, the remaining petrol must be drained out of the carburettor. To do this, place a suitable container (not included in the scope of delivery) under the carburettor and open the carburettor screw (23) with the aid of a screwdriver AF10 (not included in the scope of delivery).
16.5 Maintenance of the air filter (9a) (Fig. 14) DANGER!
Risk of fire and explosion!
If not cleaned correctly, fuel may ignite and even explode. This can lead to severe burns or death.
- Clean the air filter (9a) only by knocking it out.
- Never clean the air filter (9a) with petrol or flammable solvents.
NOTE!
Risk of damage!
Operating the engine without the filter element in place can cause engine damage.
- Never run the engine without the air filter element in place.
Fouled air filters (9a) diminish the engine output due to reduced air supply to the carburettor. Regular inspection is therefore essential.
The air filter (9a) should be checked every 25 operating hours and cleaned as required. The air filter (9a) must be checked more often in case of very dusty air.
- Take off the air filter cover (9) and remove the air filter (9a).
- Clean the air filter (9a) only by knocking it out.
- Replace a defective air filter (9a) with a new one.
- Put the air filter (9a) back in place and replace the air filter cover (9).
16.6 Maintenance of the spark plug (12a) (Fig. 15+16)
Check the spark plug (12a) for contamination for the first time after 10 operating hours and clean it with a copper wire brush if necessary. Then maintain the spark plug (12a) every 50 operating hours.
- Pull off the spark plug connector (12) with a twisting motion (Fig. 15).
- Remove the spark plug (12a) with a spark plug wrench (not included in the scope of delivery).
- Use a feeler gauge to set the gap to 0.75mm(0.030^ ) Refit the spark plug (12a) and take care not to overtighten it.
16.7 Engine brake lever (2) (Fig. 1 + 12)
The engine is equipped with a mechanical brake which has to be checked regularly. When releasing the engine brake lever (2), the blade (19) must come to a standstill within 7 seconds.
A running blade (19) produces clearly perceptible wind noises. The running of the blade (19) is signalled by the wind noise generated and can thus be controlled.
Note: If you notice that the blade stopping device is not working correctly, please contact the customer service or a specialist workshop.
Ensure that the device is in a flawless condition for its entire service life. Improper maintenance may lead to life-threatening injuries.
16.8 Repairs
After any repair or maintenance work, make sure that all safety-related parts are in place and in perfect condition. All parts which may cause injury must be kept where they are inaccessible to children or others.
Attention: According to the German Product Liability Act, no liability is accepted for damage caused by improper repairs or by not using original spare parts.
Such work should be performed by a customer service centre or an authorised specialist. The same applies to accessory parts.
Please provide the following information in the event of any enquiries:
Machine data - type plate
- Engine data - type plate
Important note in the case of repairs:
For return delivery of the device for repair, please ensure for safety reasons that it is free of oil and fuel when it is sent to the service centre.
16.9 Spare parts / accessories
Blade - Article no.: 7911200630
Engine oil - Article no.: 7850000025
With this product, it is necessary to note that the following parts are subject to natural or usage-related wear, or that the following parts are required as consumables.
Wearing parts*: Spark plug, air filter, blade, V-belt
- may not be included in the scope of delivery!
17. Disposal and recycling
Notes for packaging


The packaging materials are recyclable. Please dispose of packaging in an environmentally friendly manner.
Fuels and oils
- Before disposing of the device, the fuel tank and the engine oil tank must be emptied!
- Fuel and engine oil do not belong in household waste or drains, but must be collected or disposed of separately!
- Empty oil and fuel tanks must be disposed of in an environmentally friendly manner.
18. Troubleshooting
The following table shows fault symptoms and describes remedial measures in the event of your machine failing to work properly. If you cannot localise and rectify the problem with this, please contact your service workshop.
| Fault Possible cause Remedy |
| Machine runs unsteadily and vibrates heavily | Screws are loose Check screws | |
| Blade fasteners are loose Check blade | blade fasteners |
| Blade is unbalanced Replace blade | |
| Engine does not run | Engine brake lever not pressed Press engine brake lever |
| Throttle in wrong position Check setting |
| Spark plug is defective Replace spark plug |
| Fuel tank empty Refill with fuel | |
| Contaminated fuel Empty fuel tank and fill with clean fuel |
| Cold environment Press the fuel pump "primer" |
| Engine defective | Contact authorised customer service |
| Engine runs unsteadily | Air filter dirty | Clean the air filter |
| Spark plug dirty | Clean the spark plug |
| Lawn turns yellow, uneven mowing results | Blade is blunt | Sharpen the blade |
| Cutting height is too low | Set correct height |
| The discharge of grass clippings is unclear | Cutting height is too low | Adjusting the cutting height |
| Blade is worn | Replace the blade |
| Grass collection basket blocked Empty the grass collection basket or remove the blockage |
19. Warranty certificate
Dear Customer,
All of our products undergo strict quality checks to ensure that they reach you in perfect condition. In the unlikely event that your device develops a fault, please contact our service department at the address shown on this guarantee card. Of course, if you would prefer to call us then we are also happy to offer our assistance under the service number printed below. Please note the following terms under which guarantee claims can be made:
These guarantee terms cover additional guarantee rights and do not affect your statutory warranty rights. We do not charge you for this guarantee.
- Our guarantee only covers problems caused by material or manufacturing defects, and it is restricted to the rectification of these defects or replacement of the device. Please note that our devices have not been designed for use in commercial, trade or industrial applications. Consequently, the guarantee is invalidated if the equipment is used in commercial, trade or industrial applications or for other equivalent activities. The following are also excluded from our guarantee: compensation for transport damage, damage caused by failure to comply with the installation/assembly instructions or damage caused by unprofessional installation, failure to comply with the operating instructions (e.g. connection to the wrong mains voltage or current type), misuse or inappropriate use (such as overloading of the device or use of non-approved tools or accessories), failure to comply with the maintenance and safety regulations, ingress of foreign bodies into the device (e.g. sand, stones or dust), effects of force or external influences (e.g. damage caused by the device being dropped) and normal wear resulting from proper operation of the device.
The guarantee is rendered null and void if any attempt is made to tamper with the device.
- The guarantee is valid for a period of 3 years starting from the purchase date of the device. Guarantee claims should be submitted before the end of the guarantee period within two weeks of the defect being noticed. No guarantee claims will be accepted after the end of the guarantee period. The original guarantee period remains applicable to the device even if repairs are carried out or parts are replaced. In such cases, the work performed or parts fitted will not result in an extension of the guarantee period, and no new guarantee will become active for the work performed or parts fitted. This also applies when an on-site service is used.
In order to assert your guarantee claim, please contact the service partner shown below. If the complaint is within the guarantee period, we will provide you with a return slip, with which you can return your defective device free of charge to us. It would help us if you could describe the nature of the problem in as much detail as possible. If the defect is covered by our guarantee then your device will either be repaired immediately and returned to you, or we will send you a new device.
Of course, we are also happy offer a chargeable repair service for any defects which are not covered by the scope of this guarantee or for units which are no longer covered. To take advantage of this service, please send the device to our service address.
Service-Hotline (GB): Service-Hotline (IE): Service-Hotline (NI)
0080040034003 0080040034003 0080040034003
{O,OO EUR/Min.} {O,OO EUR/Min.} {O,OO EUR/Min.}
Service-Email (GB): Service-Email (IE): Service-Email (NI):
service.GB@scheppach.com
service.IE@scheppach.com
service.NI@scheppach.com
Service Address (GB): Service Address (IE): Service Address (NI):
Forest Park & Garden LetMeRepair
Forest Park & Garden
Coed Court, Taffsmead Road
1 Langlands Court / Kelvin South Business Park
Coed Court, Taffsmead Road
Treforest, Ind. Estate, Pontypridd CF375SW CF375SW
East Kilbride G75 0YB
Treforest, Ind. Estate, Pontypridd
Service-Hotline (CY):
service.IT@scheppach.com
Service Address (CY):
GEORGE C SOLOMONIDES & SON LTD
PO.BOX 56236 / 169, LEONTIOS A'
GR-3305 LIMASSOL/CYPRUS
At www.lidl-service.com you can download this and many more manuals, product videos plus installation software.
The QR code takes you directly to the Lidl service page (www.lidl-service.com) and you can open your operating manual by entering the article number (IAN) 420141_2204.
Inhalt:
Seite:
service.AT@scheppach.com
service.CH@scheppach.com
Service-Adresse (DE): Service-Adresse (AT):
Chere CLIENT, Cher Client
Service-hotline (BE):
0080040034003
0,00 /Min.
Service-Hotline (CH):
0080040034003
[0,00 / Min ]
Email du service (FR):
service.FR@scheppach.com
E-mailadres (BE):
service.BE@scheppach.com
Service-Email (CH):
service.CH@scheppach.com
Scheppach France Strassburg
2, Impasse Jean Millot
FR-6700 Strasbourg
Serviceadres (BE):
Service Center Bruyninckx
Guldendelle 30
BE-1930 Zventem (Nossegem)
Service-hotline (BE):
0080040034003
(0,00 €/Min.)
E-mailadres / Email du service (NL):
service.NL@scheppach.com
E-mailadres (BE):
service.BE@scheppach.com
Serviceadres/Adresse du service (NL):
service.IT@scheppach.com
Service-Email (CH):
service.CH@scheppach.com
service.HR@scheppach.com
Usluga-Adresa (HR):
Microtec sistemi d.o.o.
Ilirska 33
HR - 10000 Zagreb / Croatia

Na stranici www.lidl-service.com możete preuzeti ovaj i mnogo drugih piručnika, filmova o proizvodima i instalacijski softver.
S pomocu QR koda izravno prelazite na stranicu Lidl Service (www.lidl-service.com) i unosjenem broja articka (IAN) 420141_2204 mozte otvoriti svoj priručnik za uporabu.
Cuprins: Pagina:
- Explicitarea symbolurilr de pe aparat 205
- Introducere 207
- Descrierea aparatului (fig. 1-16). 207
- Pachetul de livre (fig. 1-2) 207
- Utilizarea conforma cu destinataia 207
- Indicati de securitate 208
- Date tehnice 210
- Despachetare 211
- Montajul 211
- Inainte de punerea in functiune 212
- Panerea in functiune 213
- Regim de fonctionare 213
- Curataea 214
- Transportul 215
- Depoziture 215
- Intretjinerea currenta 216
- Eliminarea ca desequi revalorificarea 218
- Remedierea avarilor 219
- Certificatul de garantie 220
- Vedere explodata 257
- Declarata de conformitate 260
Günzburger Straße 69
D-89335 Ichenhausen
Stimate client,
Vä dorim sā aveji multe satisfacti si mult succes in lucrul cu noul dumneavoastrā aparat.
Indicatie:
Stimata clienta, stimate client,
Hotline serviciu (RO):
0080040034003
(0,00 EUR/Min.)
Serviciu de e-mail (RO):
service.RO@scheppach.com
Adresa serviciu (RO):
Machine House S.R.L.
He noeMaMe OTROBOPHOCT 3a 3IOnOlyKu NnN uTeH, Bb3HnKaHannopadn HeCnA3BaHe Ha TOBa PbKOBoDCTBO NnHa Yka-3aHnTa 3a 6e3oNaCHOCT.
3. OnncaHne Ha ypega (fhr. 1-16)
1.3aBnBxaou noct
2. Ioc3a cnnpaHOTO yCTPOINCTBO Ha DBnIATeT
3. TopHa noDbNgha ckO6a
4. Taima Ha 3Be3Doo6pa3Ha Ta DpbXka
5. Ka6eHa cko6a
6. DOnHa noDnBnKHa CkO6a
7. Kanak ha pe3epboopa
8. 5eH3nHOB pe3epBoaP
9. Kanak ha Bb3duwHnHn HnTbp
9a.Bb3nyweHnntbp
10. TopnbHa nomna Primer
11. Koneno
11a Kanak ha konenoto
11b. BuHT ha konenoto
11c PnnoxHa Waa6a Ha konenoto
12. Jyna Ha 3anaTnTeHa CBeue
12a.3anannenHa Cbeu
13. Aycnyx
14. Macnon3MepBaTeHa ueKa
15. Knana 3a nXbPnAHe
16. Konektopha qaHTa 3a TpeBa
17. Kyka 3a Bbke
18. Bxekn cTapTeP
19. Hox
20. BnHT 3a HOXOBe
21. Nopnoxha wa6a
22. WnHdEn Ha DBnraTeTae
23. BnHT Ha Kap6ypatopa
4. O6em Ha doctabkata (phr. 1-2)
- 1 x 6eH3nHOBA Kocayka 3a TpeBa c ropHa noDbHexHa ckO-6a (3)
2xraiknHa3B3e3006pa3Hata npbXka (4)
- 1 x ka6eHa cko6a (5)
2xdoHNn noDBXHH cKo6n (6)
- 4 x konena (11)
- 1 x KonekTopha yaHa 3a TpeBa (16)
1xkyka3aBbxke(17)
- 2 x BnHTa M8 (A)
- 2 x noДолбнha wαн6a (B)
- 2 x BnHTa 4,0 x 12 mm (C)
- 2 x Béncko neHTn (D)
1xpbkoBoCTBO3ynotpe6a
5. Ynotpe6a no npedHa3haueHne
BENHOBATA KOCAYKa 3a TpeBa e NOxOJaHa 3a NnHOn non3BaHe BDOMaun H Xo6n rpaHH. KocayKte 3a TpeBa 3a YacTHNE DOMaun H Xo6n rpaHH Ca Te3n, YnTo roAnHa yNotpe6a ObHKHOeHo He HaXbPn50 caca n KOHTe H3NONBAT PpeMHo 3a NOpBkKa Ha MopABn H TpeBH NnOuH, Ho He Ha ObseCTBeH CbOpXeHn, NapKOBe, CNOpTHN CbOpXeHn, KaKTo H B CeNCKOTO IropCKOTO CTONAHCTBO.
MaunHata moKe da ce n3non3ba cAmo cbnacHo HeHto npedHa3haueHne. BcKa pa3nuaBa a ce ot ToBa ynotpe6a he e no npedHa3haueHne.
3a BcKaKbB Bd npOn3TuAun OT ToBa uetn HnHapAnBAHNr OTROBOPHOCT HOCn Notpe6ntenr/onepatopbT, a He npOn3BOuNTenr.
Cbctabha qact ot ynOtpe6ata no npedHa3hauhene e cbso n CnA3BaHETO HA yKa3aHHATA 3a 6e3onacHOCT KAKTO n pkoBOIDCTBOTO 3a MOHTAX N yKa3aHHATA 3a EKcNlloatauN B pkoBOIDCTBOTO 3a ynOtpe6a.
Mnata, KOnto o6cnjxkbat n noaibpkat MaunHata, Tpa6Ba da ca 3ano3Hatn C Hero n da ca nHphiOpMpanu OHOCHO Bb3-MOxhIne OAnCHOt.
OcbEN TOBA Tp86Ba Da Ce Cn3BAt HAI-TOHO N DeHCTBaUNTe npEINmcaHHa 3a TpyoBa 6eONachOCT.
Ipyn 06nn npabnna B o6nactte TpyoBa MeuHnHa I texnka Ha 6e3onacnoct CbIo Tp8Ba Da Ce cb6nOaBAt.
PpomeHn no MaunHata OcbOboKdABat N3uINo npOn3BouHnTeT OTOROBOPHOCT 3a Bb3HNKHANB PeyITAT OT TOBA qETN.
MaunHata MoKe Ta ce H3non3Ba cAmO cOpuHaHAnH pe- 3epBHN qactn n OpuHaHAnH npHaJNeXHoCTn Ha npOn3BO- nTEn.
Mon, o6bphete BnHmAHne, ye HauHte ypeHn He ca KOHcTpypanu c npedHa3NaueHHe 3a TbproBCKa, npofoecnoHAn Ha nn npomnIeHa ynotpe6a. He noemame rapaunna, aKO ypeBt ce n3non3Ba B TbproBCKn, 3aHaarTuNckn nn npomnIeHH npednpnTn, KaKTo n npn paBHocnHn DeHocTH.
Iopadn f3nuecka onachoct 3a notpe6nten, kocaykata 3a TpeBa He Tp86Ba Da ce n3non3Ba 3a cnedhata pa6ota (He- mbneh cnccbk):
3a noopra3BaHe Ha xpactn, KIN nIeT n Wy6paqni;
3a p3ahe Ha yBbHn paCTeHH;
3a rpnka 3a TpeBnTe nnoiHa noKpmbHte HocaxKeHHn B6aNKoHcNte caHbeta;
3a p3aHe npa3pO6BaHe Ha n3pe3Kn OT dpBeta N KnB nnet;
- 3a NOUHCTBAHE Ha TpTOApHn (H3CMYKBAHe, H3NYXBaHe);
3aH3pABHBBAHe HA KynHH, HApHmep Ha KbptuHH;
- 3a TpaHcnpOpTnpeHa OKOceHa TpeBa,OCBEN B npEbn-DeHATA 3a CENTa KOLeKTopcka YAHTA 3a TpeBa.
PNEUYPPEKDEHNE
3a Baawa co6cbTbHea 6e3onacHocT, Mo7, npoyetete BnHaMa -TeIHO TOBa pkoBOcTBo n O6uHTe yKa3AHn 3a 6e3onacHocT, npEIN da nyChete ypeDa B EKcnnoataua. Ako ue npdeOCTABrte ypeDa Ha TpeTH Nua, BnHATN m DabAte N Ta3n HnCTpykun 3a ynOTpe6a.
6. YkaaHaHa 3a 6eOnacHOCT
B HactoIooTo pkoOIOCTBO 3a ynoTe6a c To3n 3hak CMe O6o3Haunm MeCTata, KOnTO 3acrAT BaWATA 6e3onachocT:
OcbEN TOBA pKOBODCTBOTO 3a ekCnnoatauny CbIbpka npyn BaxHN nacxN, KOHTO CA 06o3Hauehn C dymata,BHIMA - HNE!
BHHMaHHe!
PnH3nON3BaHTo Ha ypeHn Tp6Ba Da ce Cn3BAT HAKO npenAa3HN MepKn 3a 6e3oNaCHOCT, 3a Da ce npedTbpataHapAHABHHN HcTeH. 3aTOBA npoYeTe BHMAtEnHO HactoJIoTO pKOBODCTBO 3a yNotpe6a / HactoUHTe Yka3AHN 3a 6e3oNaCHOCT. Ako Tp6Ba Da npedAte ypeHa HtpEn Hnua, MoJ npedeAte CbIO ToBA pKOBODCTBO 3a yNotpe6a / TeH YKa3AHN3a 6e3oNaCHOCT. He noEAME OTOBOPHOCT 3a 3nONyKn HnN IeTN, B3HNKHANl NopADn Hecna3BaHe Ha TOBA pKOBODCTBO HnN Ha Yka3AHNrTa 3a 6e3oNaCHOCT.
ONACHOCT
Hecna3baheTo Ha Ta3n HNCTpykunue ye Doobede do haHroIraMa onaCHOCT 3a XNBOTA Nn Do pck OT HapaHbAHNA, 3actpaawabaun XNBOTA.
PPEyPEXKDEHNE
Hecna3BaHeto Ha Ta3n HNCTpyKun MoKe da Nobene do Cmbpt, peCn. TeKKn HapAHBaHN.
BNAGOP3YMNE
Hecna3baheo Ha Ta3n HNctpykun MoKe da doBepe do neKn Do cpen HapahraHHa.
YKA3AHME!
Hecna3baheTo Ha Ta3n HcTpyKunM OKe Ja DObene Do no BpeDa Ha DnraTeJn Nn Dpyn MaTepHaJIH nIeH.
KoH He Tp6Ba Da u3non3Ba ypea:
-Дeuи npynte nua, konto he ca npoyen Hnctpykunra 3a ynotpe6a (MeCTHne pa3npope6n moKe o onpeTeJr MTMHmAnHata Bb3pact Ha notpe6nteJ.)
- Πιητα, KOHTo ca nOa BnHHeTo Ha anKoxoN, HApKOTuHn Nn NEkapCTBa, yMopeHn ca nn ca 60hN.
YkaaHnna 3a 6e3onachocT 3a pbyHO BOeHN KocauKn 3a TpeBa
- PpOcETe BHNMaTeHNO HNCTpyKunTa 3a yNtpe6a. 3aNo3HaTte Ce c HAcTpoKnTe n C npABnHOTo N3NON3BaHe HA MaSHnHATA.
Hikora He no3BbAaHe Ha dea Hn npyXopa, KOHTo He ca npouen Hnctpykunra 3a ynoTpe6a, da n3non3Bat Kocayata 3a TpeBa. MeCTHne pa3npoe6n Morat da onpeenr MTMHMANHATA Bb3pact Ha notpe6nten.
- HNKORA He Kocete, DOKATO Ha6n3o HMa dpytn Xopa, oco6eHO Deca, HIN JHBOHTN. He 3a6paBraIte, ye onepaTopbT HIN Notpe6ntenr Ca OTROBOPHN 3A HINuDeHTN, BKNIOBaUHn dpytn Xopa HIN TAAHOTO NMyueCTBO.
Kocete cAmo npn do6pa BnuHmoct. Heo6xOuMo e da dbpxnte trpnte nua daney.
Ako Tp6Ba Da npedeane Te ypeHa TpeH Nua, MoJnnpaTe CbUo H TOBA pKkOBOCTBO 3a ynTope6a.
- Пь Време На Косец Биharг Нocete Здравп Нжлбразип се овки И дыг панталони. He Kocete 6och nIn B nekn caHdaniN.
-
PpOBepe TepeHa, Ha KoTo ige Ce H3non3Ba MaunHata, n OCTpaHete BCNUKn npedMeTH KATO KAMbHN, IrpauKN, npbukn HxuNn np., KOHTo MORAT Da 6bDat yNoBEHNnn N3XBpNeHN.
-
ɪnʌkɪnjuəte Dɪbɪrætɪeɪ,ɪnʌyɑkətɪeɪ da cʌpɛ nɪsʌkɪnjuəteɪ
- lyŋaɪta Ha 3aɪaɪnɪteɪnHata Cbeɪt, Kɔrato
- octabraɪte ypeɪda;
-OTCTpaHbATE3anywBaHHn Hnn npenTCTBn;
-ypebnTe6nB KOnhtAKT Cuyknn TeNo;
-Bypea ce noBraBAT HeH3npabHocTHn Heo6uHaHH Bn6paun.
IPEUYPKDEHNE
BeHnBt e CINHO 3aIaNIM:
CbxpaHbAHTe 6EH3nH CAMOB INpeBnEHN 3a TOBA CbdoBe.
3apejdaIte ropHb cAmo Ha OTkpHTo H He nywete.
-П repin da cnapate dbrarnta, tr6Ba da 3apeinte c 6eH3n. DOKATO dbrarnta paBOTn nIn npu ropeua ko -caKa 3a TpeBa kanaQkata He pe3epBoapa He 6nBa da ce OTBapra Hn Da ce DonnBa 6eH3n.
Ako e n3TeKbN 6eH3nH, He Tpa6Ba da ce npabn ONNT 3a CTapTnpahe Ha ABnAten. Bmecto TOba MaunHata Tpa6 BA da CEOTpAHN OT 3AmBpcEHATA C 6eH3n NOBbpXHOCT. BcakBN ONHTn 3a Naene Tpa6Ba da ce H36rBAT, DOKATO 6eH3HHOBITE N3napHnCe H3naprT.
- Ot cbo6paxhen 3a cnpyhpoct 6eHNHOBnT pe3epBoap n npn nobpea.
- HnKOra He cBxpaHbBaIte 6eH3Ha B 6nH3OCT O n3ToUHnKa Ha NcKpn. BuHAR n3non3BaIte TectBaHa Ty6a. PpbXTe 6eH3Ha daneu ot deua.
CmeheTe dekeKTHHwMyo3arnywnTen.
- Ппеди уnotpe6a BHHarIn npOBeRbAte Bn3yAnHdoann Hoxbt N 3akpenBaUnite 6oTOnBe ca n3HOceHN nHn NOBpeDeHN. 3a n36raBaHe Ha De6aHaNc n3HOceHNte nHn NOBpeDeHN HOXobe n 3akpenBaUni 6oTOnBe Tp86Ba da ce CMEHr CAMO B KOMIINeKT.
Bopabehe
- YBepete ce, Ye BCNUKn rauKN, 6oNTObe N BInHTObe ca 3IpaBO 3aterHATN N ye ypeBt e B 6eONaCHO pa6oTHO cbcToHHne.
Hnkora He cxbxaPbBaTe MaunHata C 6eH3nB pe3epBoa pa B crpda, KbTeo 6eH3nHOBnTe HnapeHn MoRat da Bn3AT B KOHTAKC OTKpHT NAMbK HnN HCKpn.
- Octabete Dnuratene Na ce oxlaan, npedn da npnbepete MAHNHATA B 3ATBOpeho NOMEeHHe.
3a ana 36erHete onacnocTta ot noxap, na3eTe ABHrataen, aycnyxa H peepboapa 3a ropno uCTn OT TpeBa, ncta nn H3Tu4aqa rpec (H3Tu4aio macno).
- PeoBHO npOBepaBaeKoneKTOpHTo yCtpoiCTBO 3a TpeBa 3a H3HOcBaHe nn 3aY6bHa fYHKUHOHAnHOCT.
- Ot cbo6paqehn 3a 6e3onacchoT noDMHeHrTe H3HoceHN mnn nobpehen qactn.
Ako e Heo6xoJIMO da H3npa3Hnte pe3epBoapa 3a ropuBO, TOBA Tp6Ba Da cTane Ha otKpHTo.
He octabrIte IbIraten C bTpeHIO ropehe da pa60tn B 3aTbopeHH NOMeHEn, B KOnTO MOKe Da ce HATpyna onaceh BbInepoJe OKnC.
Kocete cmo Ha IHeBHa CBettnHa Hn npu Do6po N3KycTBeHO OCBetneHne.
Ako e B3MOxHO, H36raBaIte da H3nonBate ypea, KoraTO TpeBata e MOKpa.
3a6paheo e n3non3baHeTo Ha Kocaykata 3a TpeBa No Bpeme Ha rpbmotBeHua 6py -Onachoct otMbHHn!
BHHaH3aemaHTe cta6nueH ctoeK KOrato pa6oHTe HaCKNOHOBe.
Bodete MaunHata cAmO c neWexOHa ckopocT.
CneHnO ce oTHac 3a MaunHH Bbpxy konena: Kocete HanpeuHO Ha cKnOHa, HNKORA HArope nHn HADony. bDeTe Oco6eHO BHMaTeHN, KOrato CMeHrte NocOKaTa HA dBXKHeHne NO cKnOH.
- He kocete no npekaneho CTpbmHn cknHOhe n B 6n3OCT do cmTeNua, KaHabKn nn nn. BbTe oco6eHo npedna3nBn, Korato o6pTaTe Kocaykata 3a TpeBa nn n TaPnate KbM ce6e cn.
Cnpete Hoja, Korato ce Hanara HaknaHne Ha Kocaykata 3a TpeBa, npn TpaHcnopTnpaHe Bbpxy NIOuN, pa3NHyN ot TpeBa, n npn npMeCTBaHe Ha Kocaykata 3a TpeBa KbM n OT OKOceHata NIOU.
- 5naropazymne! Kocaykata 3a TpeBa He Tp86Ba da ce nno3Ba, aKO He e noCTabeHo nbHOTO KOeKTOPOHO yctpoiCTBO 3a TpeBa HnN Camo3aTBapAto Ce 3aHTHO yctpoiCTBO HA OTBopa 3a NxBbPnHe.
Hnkora He n3non3Baute Kocayata 3a TpeBa c nobpehen 3aunTHn yctpoiCTBa nn 3aunTHn pewetkn nn 6e3 MoHTnpAHn 3aunTHn yctpoiCTBa, Hap. otpaxatelenn lamapHHn H/nn KoneKtopHN yctpoiCTBA 3a TpeBa.
He npomehnte hactpoikne ha perynatopa ha DbrarTeIa He npebnabaiote o6opotne Ha DbrarTeIa.
- Ocbo6oTe cnpaqukata Ha nDbiratena n pa3eHHete BcnHn pexKeun HnctpyMeHTn n 3aBnKBAHH, npen da CTaptnpate Dbraratena.
- CtrpnpaTe DnHrAteTEn BHNMaTeNHO, CbIaChO HcHcTpKuHnte Ha npOnBDoHTeN. YBepeTe ce, ye KpaKaTa ca Ha HoCTaBHo pa3ctoHHe OT HOKa.
Korato cnapate ABHata, He haknaHte KocaykaTa 3a TpeBa,OCBeH aKO onepaunraHe H3NCKBa Ta Da 6bDe nobHHata. B To3n CnyaH aHKNoHete camo tonkoB, KOKNOTO e Heo6xOdmo, n NobHNHete daJeHATA Ha noTpe6nteTcPana.
- He CTaptnpaTne DnBraTeN, Korato cTone nped KaHana 3a N3XbPnHe.
Hnkora He noctabayte pueete nn KpaKaTa cn Bbpxy nn noid Bbptaunite ce qactn. BnHar n ctoIte daney ot OTbopa 3a N3XbprnaHe.
Hikora He Bnraite He npenacayte Kocayka 3a TpeBa pa6oteu Dniratet.
Cnpete IINrataTe n ce yBepete, Ye BCnUKN DnBHexu n ce qactn ca cnpen n ne KInOuyb3a 3anAnBaHeto, aKO HMa TaKbB, e n3BaJeH:
-ⅡpeiIa pa36noknpate Hnn OTCpaHInTe 3anywBaHNrTa B KaHana 3a NxBbPnHe.
-Ппдд npobepaBte, noHCTBaTe nnn pa6oHTne no Kocaykata 3a TpeBa.
-Пиуларвчждю.Поберетe кocaykata 3a tpeBa 3a noBpeHn Hapabete Heo6xOHNMTe peMOHTn, npEIN da a cTAPtIPate n da pa6OTne OTHOBc Hei. Heo6xOHNMa e Hea6abHn npOBepKa, aKo Kocaykata 3a TpeBa 3anOuHe d Bn6pnpa Heo6nuAHO.
-Korato ce otdaneneHTe OT Kocayata 3a TpeBa.
-ПпедидаЗардente ropИBO.
Korato Dniratentcnpe,3aTbopete npocenobata knana. Ako Dniratentep Cha6dennCcnpateneh Knanan 3a
HnBO Ha 3BykoBa MouHocL W4 94 dB
Tpeka npn n3MepeBaHeTo K W.A 1,79 dB
Hocete 3auntra 3a cnyuxa.
B3deIcTBHeTo Ha Wym MoKe da npuHH 3ary6a Ha cnyxa. Ako e Heo6xOIMO, CnBaTe nepNoHa noouVBka n orpaHnuHte pa60THOTo BpeMe Do Hai-BaxHOTo.
3a Bawata NnHa 3aunita Ha xopata B6n3oct Tpa6ba Da HocHTe NOxOJa 3aunita 3a cnya.
Napametpn Ha Bn6paunnte
Bn6paunra a. 7,218 m/s²
Pepka npn H3MeBaHTo K. 1,5 m/s²
OrpaHnUaBHe 06pa3yBaHTo Ha Wym N Bn6pa- cHNTe Do MNHMYM!
- 3non3baite caMo 3npabHn ypeu.
- PoiobpxaIte n NouHCTBaIte peIOBHO ypeia.
Cbo6pa3aBaaTe HauHnHa cn Ha pa6oTa cnpmaO ypea.
- Henpetrobpaite ypeia.
- Pn Hjka B3naarate npoBepka Ha ypea.
- ɪnəkʌnəʊbaɪte ypeədə, kɔrato toh He ce nɪsənɪ3Ba.
Hocete3aunTHnpbkABu.
Ppeynpexkene!
B cnyaHa npoIbIxHnHa pa6ota MoKe Ja ce CTnHe do HapUweHnHa KpbBoO6paueHneTo (CnHpOM Ha 6eNna npct),IbXaunCe HA Bn6paunu B pueTe Ha onepatopa. CnHpOMbT Ha PeHo e cbIOBO 3abOBA He, np Koeto manKITE KpbBOHOCHn CbDOBE Ha npCTHe Ha pueTe n KpaKaTc a CeCBnBAT CnA3MaTHNo. 3acerHaTte UyacTbUn Beue He nonyabat DoCTaBHyo KpbN NopAn Ta3n npnuHa n3rnEaT MHO 6neu. YecToTo n3non3BaHe Ha Bn6pnpauu ypeNi MoKe Ja npnuHHn YbpexKaHa He HepBnte npnNu, uHTo opocBaHe Ha KpaHnUte e HApUeHo (HanPImep nyauu, DnAbetn). Ako 3a6eJnxHe hKaKBO Heo6nuAHo YbpexJaHe, He3a6abHo npkepatete pa6otata cn Hce KOHCytnpaite c nekap.
Cb6nHoaBauTe cneHNte yka3aHn, 3a da HAMnTe onacHOCTHe:
B cyuheo Bpeme npbxte Tnoto cn, n oco6ho pueTe, tonnn.
- PpaBete peoOBHn nouBnN n DBXKeTe pbcTe cH, 3a da CTMyInpate KpbBooo6paueHneTo.
- OchrypeTe B3MoXHO Hn-HnCKa B6paunHa MaunHata ue3 peoBHa nOndpBxka n 3npabO 3akpenHu actn Ha ypea.
8. Pa3onakObaHe
- OTBOPeTe onaKOBkATA H BHNMaTeJIHO n3BaJeTe ypeJa.
- Otrpahe Te onakobbHnMaTeepHAn, KaTo H onakobbHuHHe n TpaHCnOpTHnTe OCnHyPbKN (aKo HMa TaKnBA).
- PpOBepTe nnN o6embT Ha IOCTaBkata e nBneH.
- PpOBepe Te ypeHa n npHnAnJnxHocHTne 3a nobpeHn ot TpaHCnOpTnpaHeto. Pn peKlamauu NocTbAynKbT Tp6Ba da 6bJe yBeDomeH He3a6abHo. No-KbCHn peKlamauu H ne ce npn3HAVBt.
- No Bb3MoXHOCT 3ana3eTe onakOBkata do n3TuHae Ha raPahuOHnCpOK.
- Ppden ynoptpe6a ce 3ano3haIe cypeena nocpeiCTBOM pboKOIOCTBOTO 3a ynoptpe6a.
3a npnHaJnxHocTH, KaKTo 3a nHocBaun ce H pe3epBHN qactN, n3non3BaIne cAmO opHnHaHn qactN. Pe3epBHN qactN moKete da cn Ha6abIne ot Baun cneuHaHnIpaH DocTABYNK.
- Pn npbukn nocoubaTe HaaHn Homep Ha apTKyn, KaKTo n Tnna n rOHNATA Ha pON3BOdCTBO HA ype#.
BHMMHHe!
YpeBt n onakOBbHnrt MATEpHn He ca nrpauka 3a Deca! Deca He 6NuBa Da nprar c nlaTmacobu Top6nuKn, Fonno n dpe6hn qactn! CbueCTByBa onachoct ot norbuane H zadywabane!
9. MoHTaX
Bnaropasymne!
Onachoct ot HapahraBahe ot BbptaunCe HOK. Pa6otete cypeda camo Korato Dnurateen e 3- KInouhen HOKbt e HenoDbHXeH.
PnIOOCTaBkata HAKON YACTN ca DEMOHHTpaHNI. CnIO6BaHeTo e NecHO, AOK CE cna3BAT cneHHTe YK3AHJr.
YkaaHne!
3a pa6ota no MONTAX N OINpBxka ue Bu Tpa6bat cneHnTe DObnHnTeHN HnCTpyMeHTN, KOHTo He Ca BKIOueHN B 06XBATA Ha DoCTABkata:
- eHHa IIIOCKa BAHNUka 3a Cb6npaHe Ha MacNoto (3a CMHa HA MACNOTO)
- Мергелянaya Камka C BmecHTMocT ] nHtp (yToHnBa HAMACNO/6EH3HH)
- Ty6a 3a 6eH3nH (5 nHTpa ca doCTaTBuHN 3a OKONO 6 pa-60THN Yaca)
- yHnra (3a da cBoTBeCTBa Ha IbpNoBnHaTa 3a nIhHe C6eHN HA pe3epBoapa)
- DOMAKHCKN KbpnnuKn (3a N36bpcBaHe Ha octaTbU O T MACNO/6EH3HH; N3XbBpIHa He 6EH3HIOCTAHU)
NOMNA 3a N3TOUBAHE Ha6EH3HH
- Ty6a 3a Macno c pbuHa NOMnA
Kneun
KpbctTaOTBepTKa
- NIOCKD OTBepTKa
BnKoo6pa3eHraeehKnIOU/rryXraeehKnIO
9.1 MoHTIpaHe Ha donHHTe noDnXHH cKo6n (6) (fNr.3)
BHMMaHHe!YBepeCe,yeXnnoTo3aRa3TaHeepnTH-CHATO,KORATO MOHTnPate NOBnKHNTE CkO6n (3 + 6)
- NocTabete DBeTe IOJHH NOJBHXHN CkO6n (6) B npEeBn-DeHnTE OTBOpN.
- 3akpenete r n C bHNT 4,0 x 12 mm (C). PnTu ToBa ce yBepete, Ye 3aDnKBaUIne BbKeta, KOHTO NO-KbCHO ue 6bDat 3akpenen H c Ka6eHa cKo6a (5), He npveat (fHr. 6).
9.2 MoHTIpaHe Ha TOpHnTe NODBnKHN CkO6n (3) n 3akpenBaHe Ha BbXeHHa CTapTep (18) (fnr. 4,5,6)
- 3aBHTeTc rohata noBnKHa cko6a (3) KbM noHATA noBnKHa cko6a (6) C nomouita Ha BnHT M8 (A), noNIOxHa wa6a (B) nraKa ha 3Be3Doo6paHata npbXka (4) ot na-Bata ctpana (fur.4).
2.CnTToBA3aBnHTe rOpHATA NOBnKHa cKo6a(3)OTAChata CtpaHa KbM DOnHATA NOBnKHa cKo6a (6)C BnHT M8(A), KYkata Ha 3aBnKBaUnTe BxKeta (17), noDnOxHa wa6a (B) nraKa H3Be3do06pa3Hata npBka (4)(pHr.5).
- 3aKaayete npbKata Ha BbXeHna cTapTe (18) B Kykata 3a BbXeTo (17) (fNr.5).
4.ФИКСИРаTe 3aIbIbXbIaUTo bIe c npInOxHeta Ka6enHa cKo6a (5) KbM IOnHata NODbIXHb Co6a (6) (ΦnI.6).
9.3 Mohtax Ha konenata (fmr.7+8)
- OTBHnTe npEeBapHTeHNOHTnpaHHTe BnHTOBe Ha KONenOTo (11b) 3aeHNo C noJIOxHnTe WaHn HA KONenOTo (11c) c NOMoUHa HnKoo6pa3eH raeueH KnHou SW 21 n Hn OCTABete HAcTpHa.
- Ako e Heo6xOaMo cBaIe KanauKaTa (11a) Ha KonenTo (11) c NOMOHTa Ha OTBePTka (Hr. 8).
- Cera noctabete noDnOxHa wa6a Ha konenoTO (11c), koneno (11) n BnHT 3a koneno (11b) B pe36ata c xena-hata BnCOUHa Ha p3aHe. MoXeTe Da n36npuate MeKdy BnCOUHa Ha p3aHe ot 30-66 mm.
BHIMAHNE:
06bphete BHHMaHHe Ha MapKnipOBkata Bbpxr nabaTHa BnHTa HA konenoto (11b) (L = npba pe36a, R = da Cha pe36a)
- MoHTnpaTe KOeneta (11) Ho CbuaTa BncounHa Ha pa-3aHe.
- NocTaBeTe 06paTHo KaNauchKeTe Ha Konenata (11a) Bbpy Konenata (11).
He cIapTnpaIte ypeia, aKO KoneKtopHata YaHTa 3a TpeBa (16) He e noCTabeHa.
12.2.1 Craptipane Ha Dnuratena (pnr. 1+12)
1.Поверразьгынвata Ha 6eH3nHa nДВИrTeHOTOMacno npedn BCaKo CTapTIPaHe (BIXTe p3denn 16.2n 16.3).Ybepete ce,ye lyNata Ha 3anaNTenHATAcBeu (12)e CbP3aHa KbM 3anaNTenHATA CBeu (12a).
2. Пи no-HnCKn Tempepatypn haTncheTe TpN nbTu 6yToHa TOpNBHa nompa „Primer" (10). ToBa yneChra b cIapTnpaHeto Ha ype#.
3. 3actahe 3aJ Kocaukata 3a TpeBa. EHaTa pKa HATNCKA NOCTa 3a CNHpaHOTO yCTPOINCTBO HA DnHratae (2) KBM 3aBnKBAunna NOCT (1), dpyraT a pKa Tp6Ba da e Bbpxy BxkeHHa CTapTeP (18).
4. CtaptnpaTne DBnraTe n c nomouTa Ha BbXeHnC CTap- Tep (18). 3a ceTn H3BpnaTe npBxKata HABh C OKo- no 10-15 cm (DOKato NOyYBCTBaTe cbnpOTNBHeHne). IV cne ToBa DpbHnTe p3ko. AKO DBnraTeHr He ce CTap- Tnpa, DpbNHeTe Owe BeHNbX BbXeHn CTapTep (18).
5. NopaДиЗаитEN cnoB bByxDbIraTeN, MoKe Ia HMa neko konHueCTBO dM, KOrATO n3non3BaTe ypeDa 3a IIbP - Bn mT. Toba e Hopmanen npocec.
Yka3aHHe: H3non3Baute 6yToHa TOpNBHa nomna "Primer" (10) (Φn. 1) cmo Korato MaunHata e ctyuDeHa!
△Bhumahne!
- He no3B0BaIte Ha BbXeHnI cTApTeP (18) da ce BbPhe 6paTHo.
- Pn xnaHno BpeMe moKe da ce HANOKn da noBtOpHte cTApTObATA npoueDpya HkONko nbltn.
12.3 NkouBaHe Ha ABnraTeNa
PNEpyPExKdEHHe!
Onachoct ot HapaHbahe!
CneH3KIOUbaHeTo Ha DIBIaTeNa HOXbT (19) npOdbNJaBaDa pa6oTH HAKONKO cekyHn. Ako DOKOCHete Bbptaunite ce yactH, MoKe Ja Ce nopexeTe.
-ИЗчakай Te,ДOKATO HOKbt cnpe (19).
- He cnipaite hoka (19) c pka.
-Hocete3aunTHnpbkabu.
-Дрьхte hoxa(19)daneuy ot kpaKaTa cn.
- 3a da cnpete nBnraTeNa,ocbo6oJeTe nocta 3a cnnpauHOTO yCTpoiCTBO Ha nBnraTeNa (2).N3yakaiTe,doKaToHOKbt (19)cnpe.
2.ИЗлбрайе пуната на залиntenнata с蜱ц (12) ot залиntenнata с蜱ц (12a), 3a有很大пpenotьразиTe He-BONHO CTaptnupaHe Ha DBIratena.
12.4 Cneia KocHe
BHHaHn octabTne DbHrataTe da ce oxnaH, npedn da npH6epete Kocaykata 3a TpeBa B 3aTbOpeHo nOmeueHne. OctpaHete TpeBaT, nIcTata, cMa3OuHIne MaTePnAni N macnata npEn CbXpaHene. He noctabTne npdmetn BbpxKocaykata 3a TpeBa.
- PpOBepe BCnUKN BnHTObe n raKn, npEi Da n H3non3-Bate OTHOBO. 3aTeHene pa3XnA6eHnte BnHTObe.
- ɪnɪpəaɪnɪe Kɒneɪkɪpθɪpʌtæ Yɑʌŋtæ ɪsɪpəbæ (16), nɪpeɪn iːdʒi.
MOna, CnA3BaIte n IraBa ,CbXpaHeHne".
13.Почuctванe
PNEpyPExKDEHHeI
Onachoct ot HapaHbahe n mrapahe!
IpojKtB MoKe Ia ce cTApTnpa HeoayakBaHo, KoTo Ia DOBeNe IO HapaHbAHn.
- PpeIN BCRAKKBn pa60tn no noocntBaHne n noDpBxKa H3-KNIOUBAHTe DnIgATEJ.
-Octabete DBnrgate na ce oxnaa.
-ⅢaBpnaTe nynata Ha 3anannenHata cbeu (12) or 3anannenHata cbeu (12a).
△PNEyIPEKDEHNEI
Onachoc3a 3apabeto!
Bnubaheto Ha 6eH3HOBn H3npaepHH/napoOT cma304HO macno moKe da doBeene Do cepno3HN ybpexdHaHa 3dpabeto, 6e3cb3HaHne N BekCTpeMH cnuyan -do Cmbpt.
-He BnHbAte 6eH3nHOBtE n3napen/napTe oT cma3OCHOTOMACNO.
-Ⅰ3noBbAte npOdykTa cMo Ha oTKpIto.
13.1 NocntBaHe Ha Kocaykata 3a TpeBa
NoucTBaHTo C rpaunHcN MapKyu Ce npenopbYBa cmo C HnCKo HnIraHe. Ypei 3a NocHTBaHe NoI BnCOKO HaJIraHe He e nOxOJus 3a NocHTBaHe HA Kocayata 3a TpeBa.
Okahe Konektopnata yantata 3a tpeba (16) n a nochte c pya h e tka. Moxete cbto taKa da noochtte rpy6o kopyca ha kocaykata 3a tpeba c nomouta ha yetkata. Pnno-rolem 3ambpcraBHH Moxe Ta n3bpuwe T Kocaykata 3a tpeba C BnaXHa Kbpna.
Yka3aHHe: Ppei Da HAKNOHTE Kocaykata 3a TpeBa, H3- npa3Hete HanbIHO 6eH3INOBnpe3epBoap C nomOuTa Ha NOMNATA 3a H3TOUBAHe Ha 6eH3HH (He e BKNIOyeHa B O6ema HA DOCTABKATA).
Kocaukata 3a TpeBa He Tp6Ba da ce HaknaHa nobeye ot 90 rpaunyca.
- Han-do6pe e da haknohnte kocaukata 3a Tpeba Ha-3aI. Ybepete ce, ye 3anaanntenHATA cBee (12a) coyn Harope.Ako 3anaanntenHATA CBEU (12a) coun HADONY, MOxE da n3teue maclo n da npuHH cepno3HN no-BpeHn H dNBraTeN n KAPbypatopa.
- Kato antephata Mojete da HakoHte ypeHa Ha-ctpaHn, Ho ce ybepete, Ye kanakbt Ha B3nyHHa fInTbp (9) e ot ropHata cTpHa.
3.Поунстete ДолнataЧаftHa Kocaykata 3a TpeBa C no- moцla Ha Wnatyna n pbuHa Yetka. Wnatyna nomara 3a OCTpaHЯBaHe Ha eIprte H no-roIeMn pactHTenHn OCTaBzO NT OTHa HA HOxA (19).NouchTbaHeto Ha dbHOTO e No-NeCHO Hno-O6ctOtoHn BeHara cneD yno- tpe6a.Toraba MpbCOTnTa n pactHTenHIne octaTbU Ca BCE OUI CBEXN MOrat Da ce paXna6rT no-neCHO.
4.Ako e Heo6xOdmo n Ako 3aMbpcBaHeto e Tpydno 3a OTCTpaHbAhe, MoKeTe da N3non3Bate n CneuHaen nouchTbaa npenapat. He Tpr6Ba da ce N3non3Bat arpecbHN nouchTbaa npenapatn, Kato cTydeHN nouchTbaa npenapatn HnN 6eH3N 3a npomBahe.
5.Поверете ДдИВИХБВРЕнATERТревHAЯмOCATAOKOCEHATPBEBAIOTCTpaHETe,akoEneo6xoAnmo.
14. TpaHcnpTupaH
PNEpyPExKDEHHeI
Onachoct ot HapaRaBahe!
CnyaHnOTo HnoayKaBaHO CTapTnPaHe Ha npOyKta MoKe Da npuHHn HapaRaBn.
-ИЗкlioуete ДИгател npedtpaHcnpotnpaHe.
-OctabeteBnntaTeIaCeOxnaI.
-ⅢaBpnaTe npata Ha 3anntenHata cBee (12) ot 3anntenHata cBee (12a).
BAXHO:3a TpaHcnpTnPahe Tp86Ba BnHaHn Da HactpoBATE BnCOuHHATA Ha p83Ae H Hau-BnCOKa No3Hn.
- Ⅰзпразн electe 6eH3HHOBnpe3epBoap (8) c nomoUta Ha nomnata 3a 13TOyBaHe Ha 6eH3HH (He e BkIIOueHa B o6ema Ha IOCTABKATA) (BIXTe. 16.4.).
- 13neite DBHrataeHOTo Macno OT tonnnn ABHratae (Bvckte 16.3.).
3.Поунстete oxлaxдаиnte pe6paHaцинньраИКорпуca(BnXTe13.1).
- CbheTe rohpata noBnKHa cko6a (3) (BnxTe 15.2.).
- YbHnTe HnKoNcNoBennane MeJx rOpHaTn NOBnKa cKo6a (3), DOnHnTe NOnBnKnH cKo6u(6) n DBnRatena, 3a da n36eHrHe TpueHe.
15. Cbxpahene
BHMHHe! He cbxpaHbAte ypea c nbHa KoneKtopHa qHTa 3a TpeBa (16). B ropeo Bpeme Tpeba 3anouBA da fepeMeHTnpa noB b3neJCTBHeTo Ha tonHHata. CbIeCTByBa onaCHOCT ot NOXap.
CbxaHbAte ypea n HcROBtne npHaIeKHO HA TbMHo, cyxo n 3aunTeHO OT 3ampb3BaHe, KaKTo n HeIOCTbnHO 3a Deca MRCTO. ONTMaHnata TemnepaTpa Ha cbxpaHEHne e mexky 5 n 30^
CbxpaHbAte ypea B opunHaHata My onakOBka.
Iokpnite ypea, 3a da ro 3aunntte ot npax nnn Bnara.
CbxpaaBaeIe pkoBDCTBTO 3a ynoTpe6a npn ypea.
- Ppden cbxpanenhe nouchbaite n noDbpxaite ypeda.
- HnKora He cbxpaHraBaIte Kocaykata 3a TpeBa C 6eH3nB pe3epBoapa 3a 6eH3nB Crpda, KbTeO 6eH3nHOBITE n3napenH MOrat Da Bn3at B KOHTKT C OTKpH NnMnNckpn.
- Octabete Dbratena da ce oxlanu, npedn da npnbepete Kocaykata 3a TpeBa B 3aTbopeho NomeueHne.
B cnuyaHa nO-bnro CbxpaHHe H3npa3Hete 6eH3nHOBnpe3epBoap c NOMoHTa Ha NOMnata 3a N3TOvBaHe Ha 6eH3n (He e BkIIOueHa B O6ema Ha DoCTABkata) (BnXte 16.4.).
3a da n36erhete onachoct ot noxap, noanbpxkaite IBNrataen, aycnyxa n 30nata okono 6eHnHOBpe3epBoap qCTN OT TpeBa, nIcTA nn H3TNuaa rpec (macno).
15.1 NpOdrToBka 3a cbxpaHHe H a Kocaykata 3a TpeBa
PNEpyNPEKDEHNE! He n3ToyBaIte 6eH3nHa B 3aTBOpeNo npocTaHCTBO, 6n3o Do O8h HnDOKato NyWHTe.
Ta3OBHTnapnMOratda npuHrT ekCnno3nn Hn noKap.
- Ⅰзпразн electe 6eH3nHOBnЯ pe3epBoaP (8) c nomoUta Ha nomnata 3a 13TOyBaHe Ha 6eH3nH (He e BKIOUeHa B o6ema Ha IOCTABKATA) (BIXTe. 16.4.).
2.CmeheTe macnTo 16.3
- ⅢaBpnaTe npnata Ha 3ananitentnata Cbeu (12) ot 3ananitentnata Cbeu (12a). Cbaene 3ananitentnata Cbeu (12a) c nomouta Ha knou 3a 3ananitentn Hn Cbeun (He e BKnIOueH bOeMa Ha doCTABkata).
4.CnomoutaHaTy6a3aMacnoHantbHteOkono20ml MacNOBUNNHbpa.
5.ИЗдрпаиte 6abHо bЖeнь CTapTeP (18),taKaYe MACNOTOДa 3aunHb BbTpEuHOCHTa HcHnHbpa.
- 3aBnHTe OTHOBO 3aONHEnHata CBeu (12a).
- Nouchte Te oxnaaJauaTe pe6pa Ha uHnHbpa H Kopnyca (BnKte 13.1.).
8.Поунstete ueHЯ ypeД,3aДа 3aunHTe naKobata 6oJ.
- CbxaHraBaIte ypea B IO6pe npOBetpHBO MAcTo.
15.2 Cbbahe Ha rohpata noBnxHa cko6a (3) PEPyIPEKJDEHNE!
Onachoct or npuunbahe!
BnHaI npBxTe rohata noBnxHa cko6a (3) c eHa pbKa B HAI-BnCOKATA TOKA.
-Hnkora He noctabnte npbctne MeKny ropnata nonBnxHa 3 nONHnTe NOBnKHN CkO6n (6).
3a da ce cneTn MRCTo npn CbXpaHHeH, TropHata noDbNkHa ckO6a (3) e crBaema.
-
CbaneTe KoneKtopHata YaHaTa 3a TpeBa (16).
-
Otkaute BbkeHnA cTApTe (18) ot Kykata 3a BbKeTo (17).
- Pa3xna6eTe neko raiknTe Ha 3Be3doo6pa3HaTo npbKa (4) Ha rophata noDbnxHa cko6a (3) (He pa3BnBaIte dokpan).
4.CbHete rohpata noDnBnKHa cko6a (3) HADony. Ka6e- nIte He Tp8Ba Da ce npHunBt.
16. Nopdapbxxka
PNEpyIPEKDEHNE!
Pemontnpepa0tn pa60nte no npdaBkkaT, konTO He ca onncanu B TOBA pbkoBDCTBO 3a eknoataun, Tp6Ba da ce n3Bpbwbat ot cneHannepbHn cepBn. N3no3BaTe camo opnHnHn pe3epBnV qactn. CbseCTbBya onachoct ot 3lononyka! BnHar n3Bbpwaite pa6otete no 06cnyxbaheto n nouchTbaHeto npn n3KnIOyeh Dbraten n n3bypnHa lyna Ha zanaHttenhata cBeue. CbseCTbBya onachoct ot hapaHbahe! BnHar octabraIte ypebt da ce oxladn ppein npdaBxKa n nouchTbaHe. Elenenthe Ha dBHrata ca ropeun. CbseCTbBya onachoct ot hapaHbAbe Hn3rapaHe!
PpojkyTbMoKeJaCe cTapTnpa HeoayKaBaHo, Koeto Ja doBene Jo HapaHbaHn.
-
PpeINBcAkaKBn pa60TH NO noOHCTBAHe nNoaPbXKa H3-KNIOUBAITE DBHrataTna.
-Octabete DnHratae na ce oxna.
-3nbpnaTe npata Ha 3anntenHata Cbeu (12) ot 3anntenHata Cbeu (12a).
-
Heo6xOaMa e peoBHO, BHMaTeHNo texHnuecko 06cnykBaHe, 3a da ce rapaTHnpa HnBoto Ha 6e3onachocnt HnepomeHeHa pa6ota Ha ycTpoiCTboto.
- YBepete ce, ye BCnKn raiKn, 6oITOBe n BVHTObe ca 3npaBO 3aterHATn Nye ypeBt e B 6e3onacHO pa6oTHO cbTOHHe.
- PeioBHO npOBepaBaIte KOleKtopHata qHaT3 a TpeBa (16) 3a n3HOcbA He Hn 3ary6bHa fYHKUHOHAnHOCT.
- Ot cbo6paxeHn 3a 6e3onacnoCT noDMeHnTe n3HoceHn nn nobpeHn qactn.
- PpOBepe Taann konenata (11) ca do6pe 3aKpenenH.
- 3a da ocnhypnte 6e3npo6nemHoto fynKuHOHpaHe Ha konenata (11), npenopbYBaMe da noNCTBaTe ocTe H raBHHte Ha konenata nohe BeINbX Ha ce3OH.
Pa60HTe, KOTo He ca OnncaHb HactoIto PbkoBoCTBO 3a yOnTe6a, Tpa6Ba Da ce N3BbPWBat Camo B Otopu3HpaH CneuaHn3HpaH cepBn3.
16.1 CmHa Ha HoXa (19) (Φur. 13)
BHHMaHHe!Pn pa6ota c nobpehen HOX cbuecTByBa onaCHOCT OT HapaaBahe (19).
-Hocete3aunTHpkbauu!
Ot cbo6paqehn 3a 6e3onacnoct octabTne HOxA (19) da 6bTe 3atoeyn 6anahcnpancamo B otOpn3npaH cneua-n3npaH cepBn3.3a da ce noCTnHe ONTHMaH e3yntat ot pa6oTata, npenopbBa ce HOxBT (19) da ce npOBepRaBeHNbX roNnHO.
PnCmHaHa HOXbT (19) Morat Da ce H3non3BaT cAmo opHnnHnpe3epBHN qactn.
1.петдсваocгнeto,H3npa3Hete6eH3nHOBnpe3epBoap(8)cnomoHTaHa NOMnata 3a H3TOUBAHe Ha6eH3n(He e BkIoUeHa B O6emaHa DoCTabKata).Hn-Kora He HAKNaHre Kocaukata 3a TpeBa HactpaHn HnHanpeC nIbEN pe3epBoap 3a 6eH3n HnMmacNo!Toba ue IOBeTe DO nobpeHa HdBrAtenNue OTMeHN ra-panyra.
2.ДьбхTe 3лраво HOKa(19)cEdHa pБka.
3. 3abptete BHTa 3a HOka (20) 6bpaTHo Ha YacobHnko -Bata cTpeNkca c NOMOHTa Ha raeuen KIOU SW17 (He e BKNIOueH B O6ema HA DOCTABKATA) OT WNNHEna Ha DBHRatena (22). Chemete noNIOXHATA wa6a (21).
4.Crno6eTe OTHOBHOBnHOx(19)B o6paTeHpe.3aKpenete npabnHo BnHTa 3a HOBa (20).YbepTe ce,yeHOxbt(19)eNo3uOHHpaH npabnHo H eHa eDHaNNHc nnHdena Ha Dnuratena (22).
5. MoMeHbT Ha 3aTaRaHe Ha BnHTa 3a HoXka (20) e 45 Nm. Pn HcMaHa Ha HOXka (19) CMeHete N BnHTa 3a HOXka (20).
16.1.1 NopedeHn HoxoBe (19)
Ako HOxbt (19) e Bn3no B KOtAkr C npenrCTBne, He3a6abHo cnpete Dnuratena Hn3bpaNaTe Nynata Ha 3anaHntHa-ta Cbeu (12).
- PpOBepeTe Hoxa (19) 3a noBpeHn.
- POBpeHHeIe HnN OfBHaTH HoXOBe (19) Tp86Ba da ce CMeHrT.
Hikora He n3npaBnTe orbHaT HoX (19).
Hikora he pa6oTe c orbHaT Hn CnHNo H3HoceH HoX (19), TOBa npuHHra Bn6paunn MoKe da Nobe de do DonbHntenHa nobpeHa Kaocaykata 3a TpeBa.
16.2Поберка Ha HNBOTo Ha MacNoto (ФИ.9) ПРДУПЕЖDEHNE!
Onachoct3a3dpabeto!
Bnubaheto Ha 6e3HOBn H3napenna/napo ot cma304 Ho Macno Moke da doBene do cepno3n YbpekdaHn Ha 3npabeto, 6e3cb3HAnne n Bekctpemn Cnyuan -do cmpt.
-HeBnubaHTe6eH3HHOBHTe H3napenra/napteOT CMA3OHTO MACNO.
- Ⅰ3non3BaBte npOdykTa cMo Ha oTKpHTo.
YKA3AHME!
Iopexkahe Ha npoaykta
Pa6ota Ha npOyKta 6e3 HnC TbBpIe MaNko DnBnAtenHo HnpeDyKtopHO MacNo MoKe Da NobeJe Do nobpeXdahe Ha DnBnAten.
-Ппдп nuckaheTo B ekcnnoataua Haneite 6e3nH nnn MacNo. ПpoDyKbT ce noctab 6e3 dBnIaTeNHO n peDyKTopHo macNo.
-ИЗпбаитсамоДВигатeнHo Macno SAE 10W-30 ИИ SAE 10W-40.
YKA3AHVEI
Ekonorunn uetn!
N3TeKlOTo MacNo MoKe TpaHNo Da 3aMbpcn OKoHNata cTpeNa. TeuHocTa e cnHNo OTOPBHa N MoKe 6bp3o Da NOBe- de Do 3aMbpcBaHe Ha BOData.
-Пинerte/ИЗTOваITE MacIOTOCAMOBbpxpypaHn,TbppnIOBbpxHOCTN.
-Ⅲnon3BaIte nploBnHa 3a 3apeXdane nHn yHn.
-Cb6npaIte H3TOeHOTo MACNO B NOxOJaCbI.
-He3a6abHO H36bpwe pa3nTOTO macno n H3xBpnetepapuana cblnaccho mecTHnte pa3npope6n.
-3xBbPnIte macnoTo cbnaCHO meCTHHe pa3npen6n.
1. Nocatabete Kocaukata 3a TpeBa Bbpxy paBHa NObpxHOCT.
2. OTBHTETe MACNON3MepBatenHata 14
3. 136bpueteMacnon3MepBaTeHHataueka(14)c uHcTa Kbpna6e3BnacnHKn.
4. Noctabete OTHOBO MACNOH3MEpBaTeHNHATA 14) n H3BADeTe OTHOBO. IpoBepete HNBOTo HA MACNOTO, 6e3 da 3a-BnHTbATE 06paTHo MACNOH3MEpBaTeHNHATA 14).
5. Hboto Ha macnoto Tpa6Ba da e B pamknte Ha cpehata mapkpobka bpxy macnon3mepbaTeHata ueka (14).
6. Ako HNBOTO Ha MacNoto e TBbpe HnckO, doneite npenopbuaHOTo KOJIueCTBO MACNo (MAKc. 400 ml).
7. CnToBa 3aTeHHeTe OTHOBo MacNON3MepBateHata ueKa (14).
16.3 CmaHa Ha Macnoto
CmHata Ha DnHrataeHToMa cNo Tpa6Ba da ce N3BbPwBa exKeroIHO npEn CmHata Ha Ce3OHa npN DoCTnHan pa6oTHa Temnepatypa n H3Knouen DnHraten.
I3non3BaTe cAmo DnrgatEnHo MacNo SAE 10W-30 nnSAE 10W-40.
- Noctabete Kocaukata 3a Tpeba Bbpxy pabHa NOBbpxHOCT.
- OTbHHTeMaONH3MePBeTENHata 14).
- C nomouta Ha macneHa nomna H Mapkyu (He e BkIOUeH B O6ema Ha IOCTABKATA) Ncmyte IBNrataJIHOTo MacIIO npE3 IbPNOBHATA 3a 3apeXkahe.
- HanbHHeTe C npACHO ABnIaTeNHO MacNo I npOBepeTe HMBOTO HA MACNOTO (BnKTe 16.2.).
16.4 NsTouBaHe Ha 6eH3nHa c nomna 3a NsTouBaHe Ha 6eH3nH (fNr. 10)
- NocTabete npHemEn cbI noM mapkya Ha nomnata 3a H3TOvBaHe Ha 6eH3HH (He e BkInOueHa B O6ema Ha doCTabKATA).
- OTbHnTe KaNaKa Ha pe3epBoapa (7) n ro cbaneTe.
- BkapaTe Mapkya Ha 6eH3nHObata cmykaTeHa NOMa B 6eH3nHOBna pe3epBoap (8) n H3TOvete 6eH3nHa c NOMOHTA HA NOMATA 3a H3TOUBAHe Ha 6eH3NH.
- 3aterHete OTHOB BnHTOBete Ha KanaKa Ha pe3epBo-apa [7].
- 3a da ce rapaHTnpa, ye B kap6ypatopa He octaba 6eHN, octaHAnHt 6eHN Tp86Ba da Ce n3OtuN OT HrO. 3a cENTa noCTabete noXoJau CbI (He e BKIOUeyen B o6ema Ha doCTABkata) noKap6ypatopa N OTBHTe BVHTa Ha Kap6ypatopa (23) c nomouTa HA rauehen KInou SW10 (He e BKIOUeyen B o6ema Ha doCTABkata).
16.5 NopdpbKKa Ha Bb3aYuHn fnnTbp (9a) (fnr. 14)
ONACHOCT!
Onachoct or noxap n ekcnnoa!
TropBoTo MoKe da ce 3anann n eBentyanHO da ekcnnoi npa npn HnnpabnHnNoocntBaHe.ToBa BoNn ro cepno3n H3rapaHn nn Cmbpt.
-NoCHTBaIe BB3DyUHnA φHITbp (9a) cAmO KATO rO H3TynBATE.
-Hnkora He nouchteBaTe B3DyuHnA nItp (9a) c 6eH3nHnn 3anaanmu pa3TbOpHTenn.
YKA3AHVEI
Onachoct or nobpekdahe!
P6oTata Ha DnBnFateIe 6e3 NoCTaBeH HINbpeH enEmeHT MoKe Ia DoBene IIO NobpeHa DnBnFateIe.
-Hnkora He octabnTe Dniratena da pa60TH 6e3 noctabeH enemeh Ha Bb3DyUHHn HnTbp.
3ambpcehnrt B3dyyen hntbp (9a) HamaIraBa MoHocTtHa Dniratena nopadn HeIOCTaBHyo NODaBaHe Ha B3dyXkbM Kap6ypatopa.CneIOBATENo peIOBHnTe npOBepKn caOT CbuectBeHO 3NaueHne.
Bb3dyuHnT pHnTp bpa da ce npOBepBa Ha BceKn 25 pa60TH uaca H npn Heo6xOUMoc T da ce noHCTBa. PpH cHnHO 3anpaWen Bb3dyx Bb3dyuHnT pHnTp bHa da ce npOBepBa No-ecto.
- Cbane Kaaka Ha B3dyuHnHa HnTbp (9) n 3BaTe B3dyuHnHa HnTbp (9a).
2.ПочнсТВаМTe BB3ДУшнЯ ФиNTьр (9a) само кATO ro H3TYNBATE.
- CmeheTe NOBpeHnBaB3dyuWeH cHnTbp (9a) c HOB.
- Noctabete Bb3dyuHHH HnHtp (9a) 6opatho Ha macto To My nocstabete Kanaka H bBb3dyuHHH HnHtp (9).
16.6 Nopdpbxxka Ha 3anannenHata cBee (12a) (Φπr. 15+16)
3a nbpBn nptnpoBepe 3ananHnHata Cbeu (12a) cne10 pa6oTHn Yaca 3a 3ambpcBaHe n noVncTe, ako e He-06xOIMO, C meHa TeNeHa Yetka. CneT OBA o6cnyXbaTe 3ananHtHATA CBEU (12a) Hb BCEKn 50 pa6oTHn Yaca.
1.ИЗьрайе lyнata Ha 3anaiTeHnata Cbeu (12) c BbptenBO DBNKeHne (ФИR.15).
2. Cbane 3anaHnTeHnHa cBee (12a) c nomoTa Ha KIOU 3a 3anaHnTeHH CBeu (He e BkIOueH B O6ema Ha doCTABkata).
3.CnomoutaHa y6bep Hactpoite pa3ctoHHe Ha 0,75 mm(0,030")。NocTabete OTHOBO 3aAnntenHata CBei (12a),KATO BHHMABATE Da He 3aterHete npekaneno.
16.7 Noc3a cnnpauhoto yctpoictBO HA ABurate- (2) (Φn.r. 1+12)
DnBnraTeNa e o6OpyBaH c MexaHnHa cnnpaKa, KOrTo TpaBa da ce npoBepRa peNoBHO. Korato ocBo6OanHe noCTa 3a CNpauHOTo yCTpoNcTBo Ha DnBnraTeNa (2), HOKbT (19) TpaBa da Cnpe B pAMKnTe Ha 7 cekynn.
Дижшгс hoK(19) npH3BexJa rcho DOnOBmH yMoBe ot Btbpa.Дижehneto Ha HoKa(19) ce CnHannHpa ot Wyma HbTbpa N NO To3N HauHH MoKe Ja ce KOHTpOInpa.
Yka3aHHe: Ako 3a6eJKeHte, ye yctpoiCTBoto 3a cnipane Ha HOKa He paobTH npabINHO, CbIpxKete ce c OTena 3a 06cnykBaHe Ha KInnENTn Hn Cbc CneuAnnHpuH cepBu3.
Ybepete ce, ye ypeBt e B ottnuHc bctoHne pne3 enn c n ekCnnoataaOnHe HKnBOT. HenpabnnHATA noDnbpKk MoKe da DoBee do XNBOTo3OCTpaWAbaHn HapaHBAHn.
16.8 PeMoHT
Cne peMOHT HnH NoDpBkaCe yBepete,Ye BCNUKn qactn, Cbbp3AHn C6eONaChOcTtCaHaMaTOTOn nHa CBOTNHO CTsOHe. CbXpaHBAIte YACTHe, KOnTO MOrAT Da npHnHrHapAHBaHe, Ha MaCTo, HeIOCTbHNo 3a Dpyu Nua n Deua.
BHHMaHHe: CbINaCHO 3aKaHOHa 3a OTROBOPHOCTTa 3a npOdyKTHe He Ce HOCn OTROBOPHOCT 3a 9eTN, npNHNHeHn OT Henpa-BINHepeMOHT NnHn3NoN3BaHe Ha opHnHaHn pe3epBHN qACTn.
06aTeCeBcepB3eHcHTbpHnHaOTOpn3npaHcneua-nCT.CbTOBAxN3aakcecoapHe.
Pn3aHTBaHna,MOJnoNocOyBaTe CneHNHe DaHHN:
- DAHHN OT TINOBATA Ta6eKNa Hc MaunHata
- DAnHHOTTHNOBATA Ta6eNka HaDbHrataTeNa
Baxho yka3aHHe B cnuyaHa peMOHT:
PnBpueHHe Ha ypeHa 3a peMOHT oBpHete BHHMaHHe, ye OT cbo6paKeHn 3a ChryPhoCT ypeBt Tp8Ba Da ce H3npaHn 6e3 Macno n ropHbO Ha cepBn3Hata CTauHn.
16.9 Pe3epBn yactn/npHaadneXhoctn
Hox-aptkyen No: 7911200630
Дигатенho macno - aptkyneH Ng: 7850000025
16.10 CepBnHa HhOpMaun
Tp6Ba da ce HMa npedBn, ye cneHnte qactn Ha to3n npOyKT ca 06eKt HA n3HOCBAHe nopadn n3HOCBAHe nIN Ha eCTBeHO n3HOCBAHe, pecn. cneHnte qactn Ca Heo6xoJIMN KATO KOHCymATNBi.
Bb30n3HocBaun ce qactn*: 3anaanenHa Cbeu, B3nywe Hnntbp, HOK, KInHOBuJeH pebk
* He 3a BkIIOueHn 3aIbIxNtEnHb BOeMa Ha IOCTaBkTaI
17. IVXbPnHe npueKnnpaHe
YKa3AHMaOnAKOBkata


OnakobbHnTe matepnaHn ca peuNKnpyemM.Mon,3xBpneTo onakOBkata no npnpooc606pa3eH HauH.
Moxkete da ce Hhopmnpate oTHOCHO B3MOXHocHTe 3a HxBpnaHe Ha nneNn or ynotpe6aypeuOn ot Baunte 06nnckn nn rpaackn Bnactn.
TopBa Macna
- Ppden n3xBpnte ypeDa, 6eH3nHOBnT pe3epBoap n pe3epBoaPbT 3a DnIrTeNHO MacNo Tp8Ba Da 6bDat n3npa3HeH!
- TOpHbToH N DnBtAtenHTo MaCNo He Tp86Ba Da ce H3xBbpNt 3aEHNo C 6ntOBITE OTNaBtu HnB KcAHAn3aunrTa, a Tp86Ba Da ce cb6upat HnXbPnT pa3dEnHo!
- PpaHHTpepeepBOApn 3a Macno n ropNO Tpa6Ba da ce HxBbPnT no ekONoTHue HauHH.
18. OtrtpaHraBaHe Ha Heu3npabHoctn
CneBaata Ta6nua noka3Ba cHNTOMHTe 3a nobpeH N OINcBA kak morat da Bn nomotHAT, aKo MaunHATA Bn He pa60TH npabHNO. Ako He moXeTe HaMePHTe nOCTpaHHTe np6nema, CbpxkTe ce cbc cepBn3.
| Hem3npabnoct Bv3moxha npuynha Otrtpaunbahe |
| Hectabnna pa6ota, cnHa Bv6pa-zaHa Ha ypeDa | PazxnabeTe Bnhta Pnpoveka Ha B | HHTOBete |
| PazxnabeHo 3akpenBaHe Ha HoJa | Pnpoveka Ha 3akpenBaHeTo Ha HoJa |
| HoxbTe HneBaanCnpan CmHa Ha | Hoxa |
| Двигателг He ce Staptnpa | Hepatichat loct 3a cnipauho- to uctpoiCTBO Ha DnBiratela | HATINCHete locta 3a cnipauhoto yctpoiCTBO Ha DnBiratela |
| Грша поцya Ha nocta 3a ra3ta | Pnpoveka Ha Na CTpojKite |
| Дeфektna 3anaiTeHa cBeu Cm | Ha Ha 3anaiTeHa cBeu |
| Бehinob pe3epBoaR ppa3en Пьлнe | Hene Ha rOpINO |
| Замрсeo Hopino Bn3pRaBaHe | Пьлнe He Ha 6e3nHOBria pe3epBoaR c ChSTO rOpINO |
| Стudета срета Hatnckane Ha 6y | Ona TropBHa nOMNa „Primer" |
| Дeфekteng DnBiratel Пocetete OTO | N3Inpan cepBn3 3a texnuecko o6cnjx-BaHe |
| Двигателг pa6otn HcpavbHomepHo | Замрсeн Bv3dUweH φinltbp Поч | CTBaHe Ha Bv3dUwHЯ φinltbp |
| Замрсeн 3anaiTeHa cBeu Пo | QuCTBaHe Ha 3anaiTeHa cBeu |
| Травata noXbIYBa, HcpavbHomepHo OTPa3BaHe | HoxbT He e ocTbp | 3aTOUBaHe Ha HOxa |
| Тьрдe NsCKa BncoUHnHa Ha ряЗанe | HactpoiKa Ha npabnHata BncoUHnHa |
| Изхьрл�но Ha TpeBa He e qincto | Тьрдe NsCKa BncoUHnHa Ha ряЗанe | HactpoiKa Ha BncoUHata Ha ряЗанe |
| Изноe Hox | СмЯнa Ha HOxa |
| ЗanyeHa konektorpHa qantHa 3a TpeBa | ИзпраЗвeHa Ha konektorpHa qantHa 3a TpeBa Ии OTcPAnBaHe Ha 3anyuBaHeto |
19.「apanuia
Ybaxma KnneHt, 3a to3n ype nonyuabate 3 roHNr rapanua ot datata Ha noKynkata. B cnuya H ha HecbotbetCTBHe Ha npodykta c dorobopa 3a npoda6ba Bhe hme 3akohno npabo da npedBHTe peknamaun nped npodabaay H npodykta npu ycnoBHATA n Cpokote, onpeeneHH BnaBa TpeTa, pa3en II n III n rnaB aetbpta ot 3akoha 3a npedoctabhe Ha uphiopo cbbpxahne uphiobnu ycnytnn 3a npoda6ba H ctoKn (3NLCUYNC) *
BauHne npaba, npoun3nuaaOn ot nocouenHte pa3npoe6b, he ce orpaunuabat ot haata no-dony npedctabeHa tproBcKa rapaunia, He ca cBbp3aHn c paxoJn 3a notpe6nteHte Hn e3aBncMo ot He npdaBauT ha npodykTa OTROBap 3a nnncata Ha cbotbetCTBHe Ha notpe6ntenckata ctoka C doorObopa 3a npodax6a cblnaccho 3IUCUYNC.
TapaanHnHn ycnoBna
Tapaunohnnp cok e 3 roHHn Oatata Ha nonyabahe Ha ctokata. Na3e do6pe opHHanHata kacoba 6enejka. To3n dokyment e Heo6xOaM Kato oKo3aTeNCTBO 3a nokykata. Ako B pAMKHTe Ha TPNr oDHHOT ATA tata Ha 3akynybahe Ha To3n npdykt ce noBn defeKT HA MATEPNA HIN npON3BOdCTBeH deFeKT, npOyktIe 6bJe 6e3natho peMOHTPAH INN 3amehen. RapauHnra npeiNoara B pAMKHe HA TPNrOOnHHra rapauHnOHen cok Ia Ce npEclabT neFeKTHnT ypei, KACOBATA 6enejka (KACOBt 60), KaKTo N BCuKN bpyTN DOKyMeHTN, YcTAHOBAuHN HANmHTo HA DeFeKT NNCMeHO Da CE OBCHN B KAKBO CE CbCTOn DEeKtBT N KORA E B3HNKHAn. Ako DeFeKTB e NOkpNT OT Hauata rapaun, Bne Ie noyHTe o6paTHo peMOHTPAH INN HOB npOyKT. B cnyaHa 3amraHa NEeFekTha cTOKA NpBOHauHInTE rapaunOHnHcpoK n rapaunOHnYcNOBnaCe 3ana3Bat. B cnyaHa peMOHT Ha DEeKTHa cTOKA, cPOkBT Ha peMOHTCe np6abKaM rapaunOHnHcpoK. 3a eBEHTayHnHO HANmHInTe u YcTAHOBeHn Nobpei N DEeFekTI OSe npu NOkynkata Tp8Ba da ce cbo6uB BeHHara cnepaONAKOBaHTo. EbeHTyAnHte peMOHT CNeHNTUVAhe Ha rapaunOHnHnCPOK ca cpeuy 3annaahe.
Pemontb Hn 3amraHata Ha npodykta He npopaxkat HOBA rapaunia.
06xbat Ha rapaunra
UpeBt e npOn3BeHe nprKlnBO cnpoE CTpoHne H3NCKBaHn 3a KaecTBO n IO6pocBcEhto H3NHTan npenIOctBaKa. IapauHnraTa He 06XbaJia KOHCyMaTHBnTe, KAKTo NactHe Ha npOdykta, KOHTo NOIeKAT Ha HopMaHNO H3HOCBAHe, nopAoi Koeto Morat Da 6bDat pa3nHexdHn Kato 6bp3o H3HOCBaAn Ce qactn (Haipmep fHITPN ININ pRCTABKN) ININ NobpeHte Ha yynPiuBv qactn (HanpImep Pekcbau, 6ateHN ININ TAKBa npOn3BeHn O t Cbkno). IapauHnraTa OTnada, aKO ypeBt e nobpeHem npaHn HenpaBnHO H3NON3BaHe INN B peYnta HaeOsbcEETBAHHe HA TexHHuecka NoIDPbXka. 3a npabunHata ynotpe6a Ha npOkyTA Tp86Ba ToH o ce CnaBt BCNUK YKA3AHN B YnbTBaHTo 3a EKcnNoaTuH. IpeHa3- Naehne TBn, KOto He ce npOpobvat OT yNbTaHoTe 3a EKcnNoaTuHn INN 3a KOHTo NPdpynpeXdaBa, Tp86Ba 3aBnKInTeHn da CE H36Bt. IpOpyKbT e npEnHa3Hauen Camo 3a YactHa, a He 3a npOceCnoHaHa ynotpe6a. PnN 3noynotpe6a H enpaBnHto TpeTIPaHe, ynotpe6a Ha cnla n pn INTEPBHeuHn, KOto He ca INBbPWeHn OT KNOHa HA Hsna OTOpN3HpaH cepBn, rapaHnraTa OTnada.
PpoeDypa npra npaHnOHeN cnyuai
3a da ce rapaHTnpa 6bp3a 06pa6oTKa Ha Baunn cnyau, cneBbnte cneHNTe yka3AHN:
3a BCnHKn 3aHTbHnnoTROBte KACOBata 6eEka HneHTnKauHHnHOmep (IAN 420141_2204) kato doka3aTeJcTBO 3a nOKyNkata.
B3emete aptnkyinHnH Homep or a6pnHata Ta6enKa.
- PnBb3HKnBaHe HcYHKUHOHaHHn HnDpytn DeEeKTH nbpBO Ce CbPjKeTe NO TeneOHa Hn Upe3 HmEnC dOnyNocOeHNr cepBN 3EN OTen. CneT TOBA uE nonyHTe DOnbHnTeHn HaHfOpMauna3a ypeJdaHeto Ha BaWata peKnaaun.
Cnei cIyacByae C hauncaepBn3 moKeTe da n3npaHTe deeKTHnna npOyKT Ha noocouHn Bn aPec HA cepBn3a 6e3natho 3a Bac, kato npnoKhte KACOBATA 6eneKka (kacOBra 6oh) nocouHTe NcMeHO B KaKBO ce cbctOn deeKbTt H Kora e Bb3nKhan. 3a da ce n36erHAT np6neMn c npemaHTo n DonbHnTeHN pa3XoAn, 3aNbJNHTenHO hON3BaIte caMo aDpeCa, KOto Bn e noco-uen. Ochypete n3npaaHeto Da He e kato ekcnpecen ToBap nn Kato npyr cneuHanet ToBap. n3pataTe ypeDa 3aedHO C BCHKN npHHaNNKHOCT, DoCTABEHn pni NOKyKnA, n OCNpyPeTe DOCTaBHyo CNpyPha TPAHCNOPTHa ONAKOBKa.
PemOHTeH cepBn3/MBbHrapaHOnHO 06cnyXBAHe
Pemontn n3BbH rapaunrta moKeTe da B3NoKHe Ha KNOHa H NsHn cepBn3 cpeu 3aNaane. ToC yDobonctBne ue Bn Hanpabn npedBa-pntenHa kAnkyan. MoKem Da o6pa6oTBame camo ypeN, KOHTO ca DoCTaTHO ONAKOBAHn H3npateHH c pAchnpTHn pa3xOnn.
BHHMaHHe: 3npateTe Baun Ha KNoHa Ha Hau nceBn Noocnten H cyKa3aHHe 3eEekTa.
YpeHte, npEeMeT ha 13BbHrapaHcnoHO o6cnyBaHe, H3npaTeHN c HennateHN TpaHcnpTHn pa3XoHN - C hanoKeH nnATEK, Kato ekCnpcehen Hnn dpyr cneuaneH TOBap - He ce npHemat.
Hne 3BbpsnM 6e3nIaTHo 3XbpeHTo HA nIpaTeHte ot Bac dekeTHypeHm.
CepBn3Ho 06cnyXbaHe
BbIrapn
Ten.: 00800 4003 4003
E-Meɪn: service.BG@scheppach.com
IAN 420141_2204
Bhocnten
Mon, 06bphete BnmaHne, ye cneBaaunr aDpec He e aDpec Ha cepBn3a. PpBO Ce Cbpxe T ropeNoocOeHn cepBn3en ceHTbp.
Provita-92 SD
2 DABENSKO SHOSE str.
4300 Karlovo
* Kato nuecko nie - notpe6nten, he3abncnmo ot hactoata tbprobka rapaunna, Bne ce non3bate ot npaba H a 3akohobata rapaunna, npedoctabeha ot 3akoha 3a npedoctabane Ha cnpofo Cbpbxahne n npoobn ycnyn 3a npodax6ata ha ctokn / 3NUCUYNC/. No-cneuaHNO Bne Hmate npabo npn HecbotbetCTBne Ha cToKaTda 6bne H3bpyhen pemont nn 3amra H no BaW n36op, OCBeh Ako TOBa e HeBb3MOXHO Hn E Cbbp3aHc HENPONOPUHOHn RoEMn paXOHN 3a npoDaay. Bne Hmate npabo H nponopuHOHn HAMANBAHe Ha eHATA Hn Ha pa3BaJHne Ha dorOBopa npn Hauyne Ha ycnobnTa Ha nn. 33, an. 3 ot 3NUCLYNC. YcnoBnTa n cpoKobete Ha 3akOHOBata rapaunca ca pernameHTnpaHn Brraba Tpeta, paDen II n III n Brraba YetBbpta Ha 3NUCLYNC

OT www.lidl-service.com mokeTe da n3ternite Te3n mHoro npytn pBkoBoCTBa, BndeoklnnoBe 3a npodyKTH INHCTaIauNoHe coFtyep.
C QR KOA OINBATE INPEKTHO HA CTPAHNUATA Lidl Service (www.lidl-service.com) M MoXe Ta OTBOpHTe BaoTe pKOBODCTBO 3a EKCNNOATAuN, BbEJaDNk ApTNKYNHn HOMep (IAN) 420141_2204.
PepieXoEva:
Σελiδa:
- E\xiynon twv oupboaw npw on ookeu 240
- Eioayyn 242
- Iepiypaqn nC ouakeunc (Eik. 1-16) 242
- Napadotoo uiko (Eik. 1-2) 242
- PpOeIeVn XpH
- Yno8eiEic aoeaaleiac 243
- Texviká xapaktπiσιká 245
- Anouoekuaola 246
- uvaipoloyon 246
- Piv ano tn thon oE laireupvia 247
- Θεση σε λειουργία 248
- Aetroupyia 248
- Kaapiooc 250
- Metaopá 250
- Atoθηκευση 250
- 2uvthpnoan 251
- Anoppiyn kai avakukwon 253
- Avnterwion npoBaaatwv 254
- Eyyunon 255
- 257
- 260
PuououocKo. 30-66mm/3n
Xwptikotra oakou oulloyc ypaaioiu 35 L
PAdroSc konh39 cm
Bapoc 16,3 kg
Me Tyn Etiuiae N Teyivov TpoTOnioeWvI
Oobpoc&Kpaabaouoi
Xapaktnpiotikic tiic oopou
Emineo nxtiknc piocn L 80,7 dB
Opate npootateutikayvial
Tia loyouc aoaaleiac,avaeETeTO akovma kai Tnyo- taMn tou maiaipou (19) mO voe eva Eouaoosotnevo kai EeiikueuEvo uvepyelo. Tia va enituxete To bIanto anoTeAeopaepaiaocuviotata vadivete to maiaip1 (19) yia 5eyxo pia fopadto xpovo.
Tia tv avtikataaon tou maayaiipou (19) emitpetetai va xpn- aiponoiovtai mvo yvnoia avtaalaktkia.
- Piv aphiipetetn lamda, aedeatote to peZepboudp BevJvncs (8) tn Bontheia avtiaac apappofoanc BevZivncs (Dev Tepiauavetai oTo npapodeto uiko). Not n yelpete tn XlookonttiK npxavnpoc to nai npoc ta empoc av Eivai Yepiauevo to peZepboudp BeVzivncs n to peZepboudp Aabiou! Kati Teioo Ta npokalaei Znui aTo potep kai n Eyyunon tha naevi va ixuei.
- KpatnoTe to x a l p i (19) 0TaOepa Me To eva Xepi.
- NepioppeTn 8a maaiipou (20) apotepa n Bo- ntheia evoc kleiisio bldawatoc ap.17 (ev nepilaiabvetai oto npapotoe uikoi) kai aphiote Tnv ano tvn atpakto potep (22). Aphiote Tn podelta (21).
- Eykataohtnote to veo paaiip1 (19) me nvyntiato p0n oepia evepyeivw. Tepeewote kavovika tn bida paaipiou (20). Pooetxiote wote to paaipl (19) va exei tonoetnthetai owotkai va ephiapuOzoi otny atpakto potep (22) xwpic va npoeEeI.
- H potn ouophiic nC biDac paaxaiipou (20) eivai 45 Nm. Avtikaoiotate kai n BiDa paaxaiipou (20) otav avtikaiotate to paaxaipi (19).
16.1.1 Moxaipi (19) nou ixei unootei Znmuia
Av to maiaip (19) eEi ep0e ie aefu eva mio6io, oBIOte aoeWC to potep kai aphiote tov ouvdeo muouzi (12).
Elambdaeav to paaiap1 (19) exu unootei Znmuia.
Av to paxalpi (19) exi unoote i n yuioe, toe npene va atikataoTael.
Not ETEIeEVAIOwOeEva paai (19) nou exi Luyioe.
Not e npv epyaote e eva paxai (19) nou exe auvi ne napouiaevtovnphiop. H xpon evoc teoiou pa xaiipoutheta pokaale kpaabaouc kai mopei va exei oav ouventeia nepiaootepez qmuoc otxlookoattikn xxavn.
16.2 'Eeeyxoc tsc std0mnc laioi (Eik.9)
PPOEIADONOIHSH!
Kivduvoγia mvy uyεia!
H eoiho h ao uuidoeewe vzlvnc/ aiavitko laiou mpoei va npoEvnoiapiec balec stny ueia, anwaiia twaiohoeiw kai o akpalepiinwoeis akopa kai thavato.
Mny eioivte avaohuiaceis bevzivn/ imavtkoua- 8iou.
Xpnoiopoioite to npoiov mov o e avoikto eWtepiok Xwpo.
YNOAElEHI
Znmu oTo npoiob
Av npoiov xpnoiomointhetai xwpi c n e nou liyo aabi oTo p kai adi KI BWtiou eTdoooc, mtopei va npokntheta i Znmuia oTo oToep.
Ppoaetete Bevzivn kai aabi npiv ano tn thean ae aleitoupyia.To npoiov npapabldetai xwpic laodi potep kai aabi ki-βwriou metadooons.
XpnoiopoioieIe pOvo Ado KIVnTnpwv Ttou SAE 1OW-30 nSAE 1OW-40.
YNOAEEHI
Avoiktn ypaum npic (GR/CY):
0080040034003
{0,00 €/Min.)
Aizouvone-mail (GR):
service.GR@scheppach.com
Aieuon e-mail (CY):
service.CY@scheppach.com
AeouvOn aepic (GR/CY):
GEORGE C SOLOMONIDES & SON LTD
PO.BOX56236/169,LEONTIOSA
GR-3305 LIMASSOL/CYPRUS

Ano Tn 8ieuuvan www.lidl-service.com mtopeite va katebetae auto kai noaaa aaaa eyyxepia, bivteo npoiovuvkai loyioik oykataaonc.
MeTovKwioaQRetaBaiveTe aentueeiaoc otneoiadgunptnnc tou Lidl (www.lidl-service.com) kai mtopeite va avoile Tc oDnyie xphanoc ac Eiaoyovtac tov kwio npoiovtoc (IAN) 420141_2204.
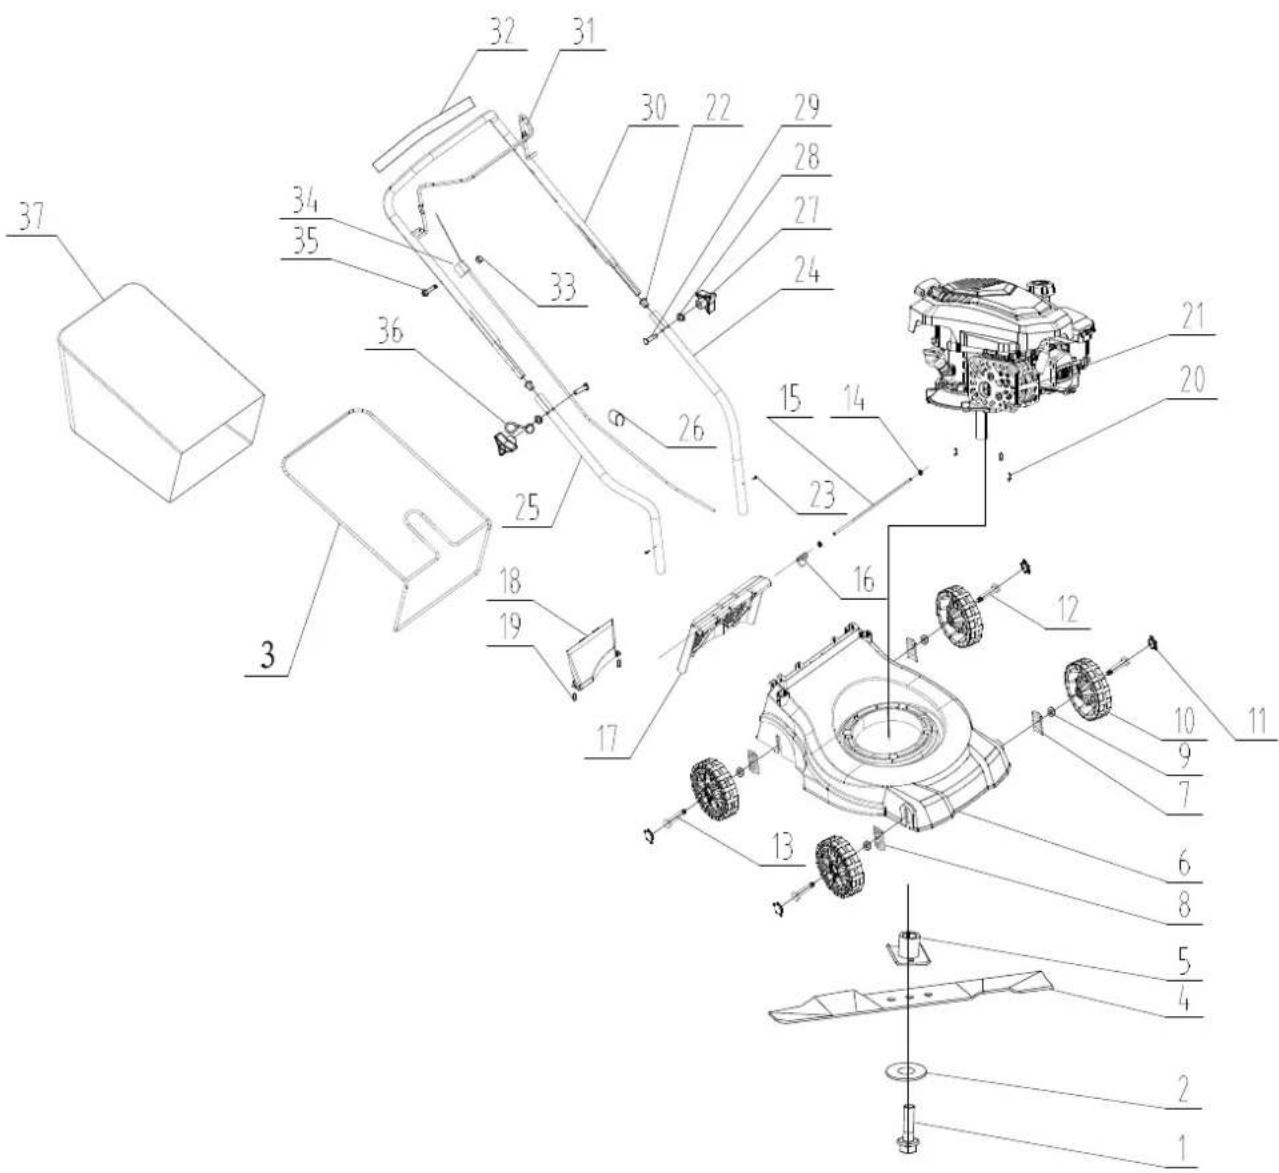
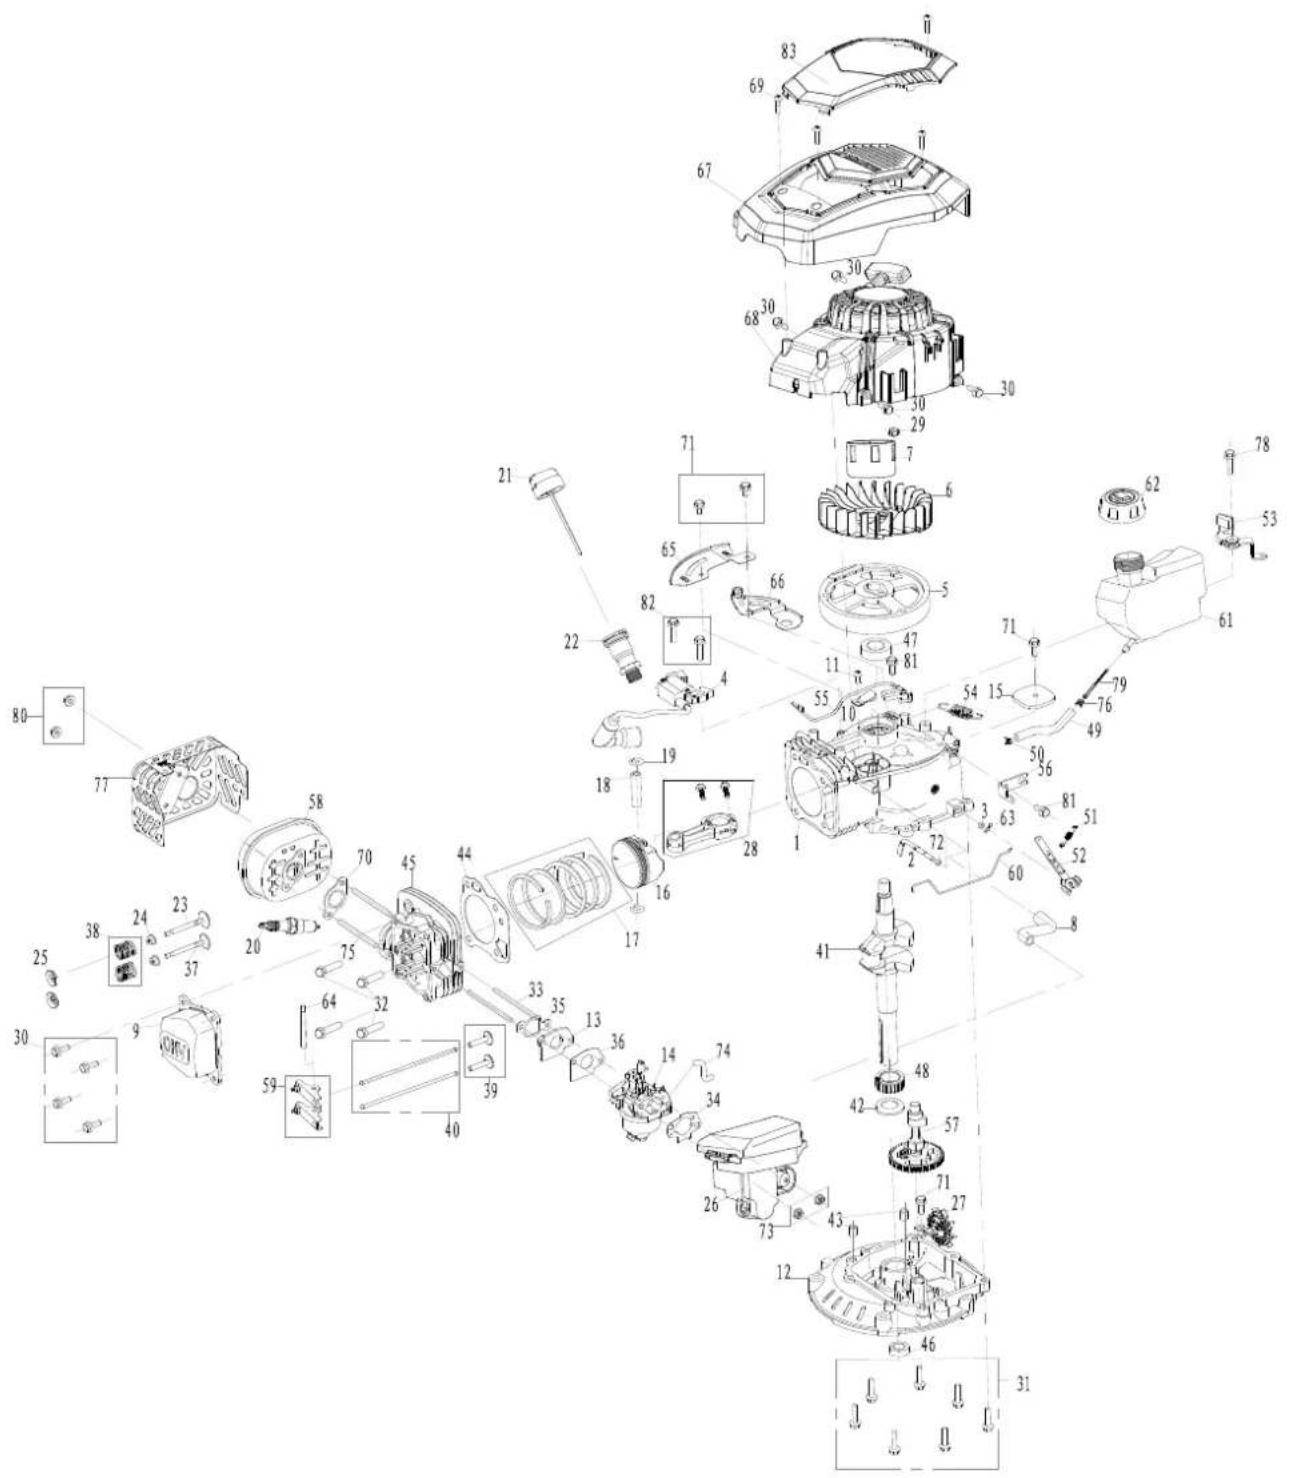
Translation of the original EC declaration of conformity
Standard references:
EN 5395-1:2013/A1:2018; EN 5395-2:2013/A2:2017; EN 14982:2009
This declaration of conformity is issued under the sole responsibility of the manufacturer.
Subject to change without notice
Documents registrar: Thomas Schuster Gunzburger Str. 69, D-89335 Ichenhausen


CE
SCHEPPACH GMBH
Günzburgrster.69
D-89335 Ichenhausen
FSC
www.fsc.org
MIX
Paper from responsible sources
C135543

FSC
www.fsc.org
MIXTE
Papier issu
de sources
responsible
FSC C135543