Sensixx DS38 ProHygienic TDS383110H - Iron BOSCH - Free user manual and instructions
Find the device manual for free Sensixx DS38 ProHygienic TDS383110H BOSCH in PDF.

User questions about Sensixx DS38 ProHygienic TDS383110H BOSCH
0 question about this device. Answer the ones you know or ask your own.
Ask a new question about this device
Download the instructions for your Iron in PDF format for free! Find your manual Sensixx DS38 ProHygienic TDS383110H - BOSCH and take your electronic device back in hand. On this page are published all the documents necessary for the use of your device. Sensixx DS38 ProHygienic TDS383110H by BOSCH.
USER MANUAL Sensixx DS38 ProHygienic TDS383110H BOSCH
Register your new Bosch now: www.bosch-home.com/welcome
Thank you for buying the Sensixx DS38 steam station, the new steam-ironing system from Bosch.
Carefully read through the operating instructions for the appliance and safeguard them for future reference.
You can download this manual from the local homepages of Bosch.
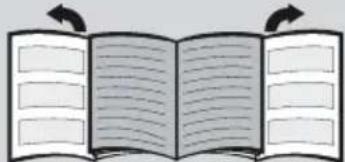
Open the leaflet sides
General safety instructions
The iron must not be left unattended while it is connected to the supply mains.
- Remove the plug from the socket before filling the appliance with water or before pouring out the remaining water after use.
The appliance must be used and placed on a stable surface.
- When placed on its stand, make sure that the surface on which the stand is placed is stable.
The iron should not be used if it has been dropped, if there are visible signs of damage or if it is leaking water. It must be checked by an authorized Technical Service Centre before it can be used again.
- With the aim of avoiding dangerous situations, any work or repair that the appliance may need, e.g. replacing a faulty mains cable, must only be carried out by qualified personnel from an Authorised Technical Service Centre.
This appliance can be used by children aged from 8 years and above and persons with reduced physical, sensory or mental capabilities or lack of experience and knowledge if they have been given supervision or instruction concerning use of the appliance in a safe way and understand the hazards involved. Children shall not play with the appliance. Cleaning and user maintenance shall not be made by children without supervision.
- Keep the iron and its cord out of reach of children less than 8 years of age when it is energized or cooling down.
CAUTION. Hot surface.
Surface is liable to get hot during use.
This appliance is designed only for household use up to 2000m above sea level.
- This appliance has been designed exclusively for domestic use and must not be used for industrial purposes.
- This appliance must be used only for the purposes for which it was designed, i.e. as an iron. Any other use will be considered improper and consequently dangerous. The manufacturer will not be held responsible for any damage arising from misuse or improper use.
- This appliance is to be connected and used in accordance with the information stated on its characteristics plate.
- This appliance must be connected to an earthed socket. If it is absolutely necessary to use an extension cable, make sure that it is suitable for 16A and has a socket with an earth connection.
- If the safety fuse fitted in the appliance blows, the appliance will be rendered inoperative. To restore normal operation the appliance will have to be taken to an authorised Technical Service Centre.
- In order to avoid that, under unfavourable mains conditions, phenomena like transient voltage drops or lighting fluctuations can happen, it is recommended that the iron is connected to a power supply system with a maximum impedance of 0.37 . If necessary, the user can ask the public power supply company for the system impedance at the interface point.
- The appliance must never be placed directly under the tap to fill the water tank.
- Unplug the appliance from the mains supply after each use, or if a fault is suspected.
- The electrical plug must not be removed from the socket by pulling the cable.
-
Never immerse the iron in water or any other fluid.
-
Do not leave the appliance exposed to weather conditions (rain, sun, frost, etc.)
Important:
- This appliance reaches high temperatures and produces steam during use, this could cause scalds or burns if not used properly.
- The steam hose, base station, metal plate at the bottom of the removable iron pad (2) and in particular the iron can get hot when used. This is normal.
- Never aim the steam at people or animals.
- Do not allow the power cable to come into contact with the soleplate when it is hot.
- Be aware that the system can keep on steaming for a short additional time after releasing the steam trigger. This is a normal function.
Advice on disposal
Our goods come in optimised packaging. This basically consists in using non-contaminating materials which should be handed over to the local waste disposal service as secondary raw materials. Your local town council can give you information about how to dispose of obsolete appliances.
This appliance is labelled in accordance with European Directive 2012/19/EU concerning used electrical and electronic appliances (waste electrical and electronic equipment - WEEE).
The guideline determines the framework for the return and recycling of used appliances as applicable throughout the EU.
Description
- Water tank
- Removable iron pad
- Iron lock system "SecureLock"
- "Calc" automatic clean warning indicator light
- "Water tank empty" indicator light
- Energy saving "eco" button and indicator light (green)
- Ironing programme indicator lights
-
"Calc'nClean" decalcification programme and indicator light
-
Programme selector and illuminated ring.
- "on-off" power button.
- Steam hose
- "Calc'nClean Perfect" scale collector*
- Mains cable with storage facility
- Steam release button
- Steam shot button "PulseSteam"
- Iron pilot light
- Soleplate
- Fabric-protection soleplate cover*

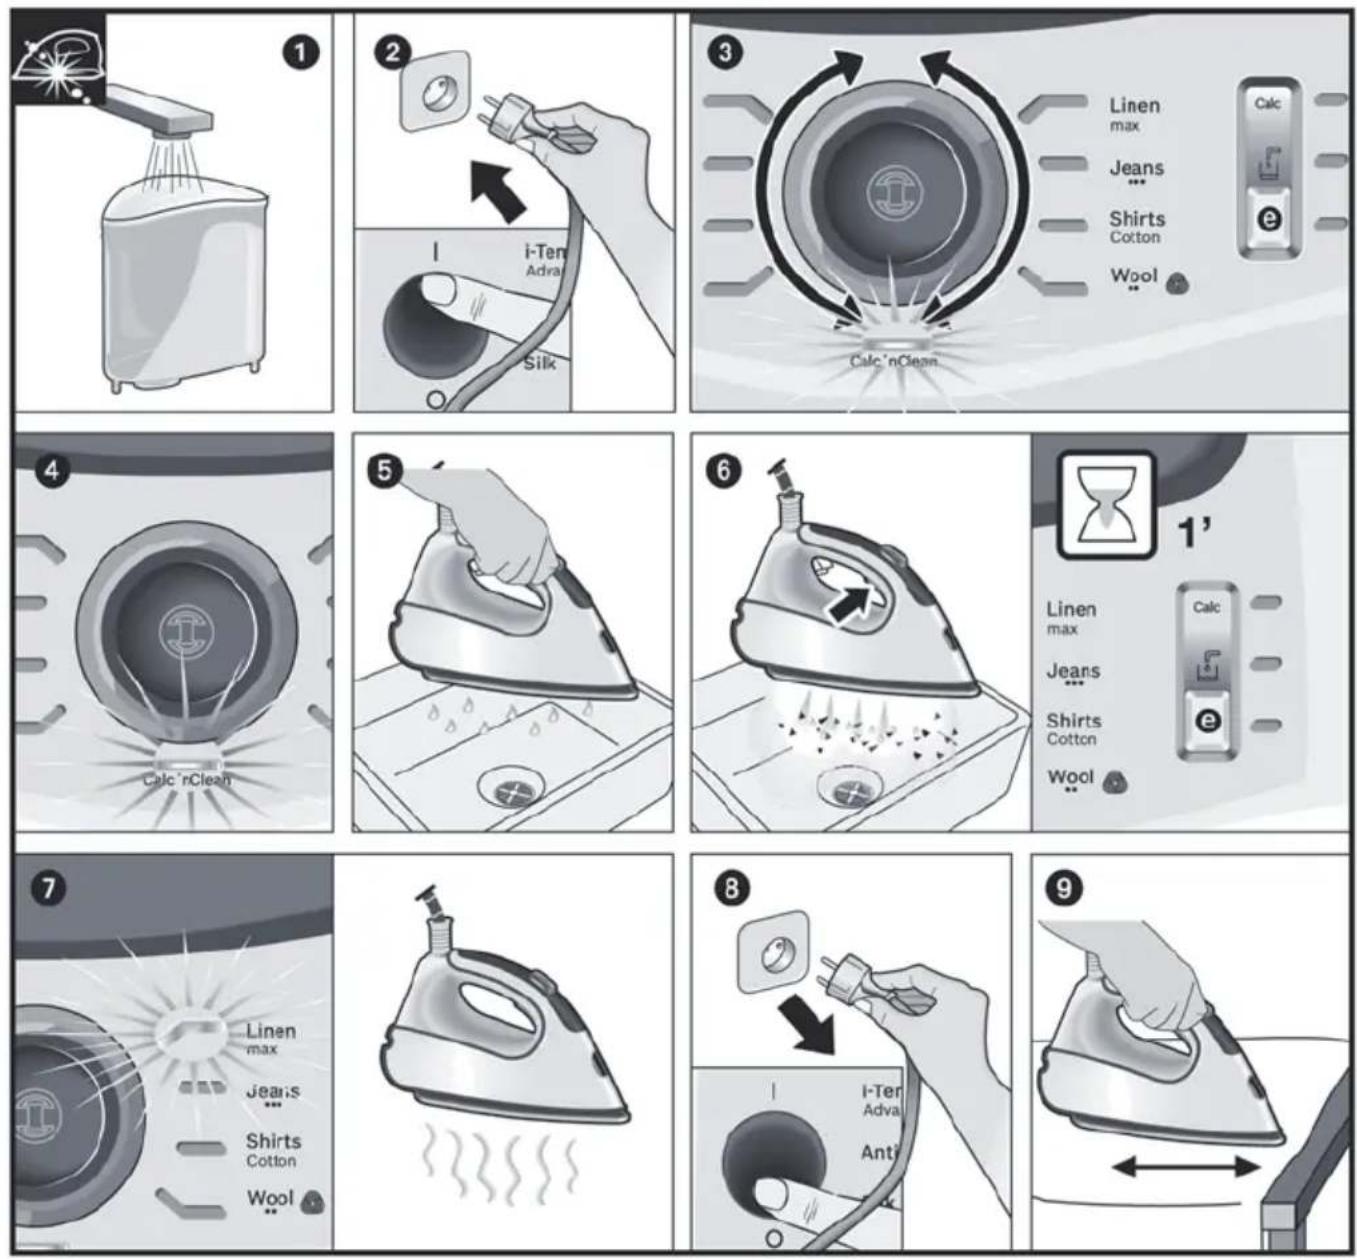
1. Preparations
See the leaflet sides
- Release the iron from its lock system (3) by pulling the lever located at the heel of the iron backwards.
- Remove any label or protective covering from the soleplate (17).
- Place the appliance horizontally on a solid, stable surface. You may remove the iron pad from the appliance and place the iron on it on another solid, stable, horizontal surface.
- Fill the water tank, making sure not to pass the "max" level mark.
- Unwind the mains cable (13) fully and plug it into an earthed socket.
- Set the power button (10) to the on position.
- The appliance will shift automatically to the "i-Temp Advanced" programme (see section 3.1). The corresponding indicator light (7) will flash, and after a few minutes, will remain lit continuously. Two beeps will be heard indicating that the appliance is ready to use.
The steam generator will take more time to reach this state only upon the initial heating up, or after performing the de-scaling operation (Calc'nClean).
When water is already present in the steam generator during regular use, heat up time to reach the operating temperature will be faster.
- This appliance has a built-in water level sensor. The "Water tank empty" indicator light (5) will light and three beeps will be heard when the water tank has to be filled.
Attention! If the water tank is empty when one of the ironing programs is selected, the indicator light (7) corresponding to such programme will flash until the water tank is filled.
Important:
- Normal tap water can be used. To prolong the optimum steam function, mix tap water with distilled water 1:1. If the tap water in your area is very hard, mix tap water with distilled water 1:2.
- You can inquire about the water hardness with your local water supplier.
- The water tank can be filled at any time while using the appliance.
- To avoid damage and/or contamination of the water tank and the boiler, do not put perfume, vinegar, starch, descaling agents, additives
or any other type of chemical product into the water tank.
Any damage caused by the use of the aforementioned products, will make the guarantee void.
- The iron is not designed to rest on its heel. Please always position it horizontally on the iron pad (2).
- The iron pad can be placed into the specially designed recess on the appliance or somewhere suitable alongside the ironing area.
Never rest the iron on the appliance without the iron pad!
- During its first use the iron may produce certain vapours and odours, along with white particles on the soleplate (17), this is normal and it will stop after a few minutes.
- While the steam release button is pressed, the water tank may produce a pumping sound, this is normal, indicating that water is being pumped to the steam tank.

2. Programme selection
See the leaflet sides
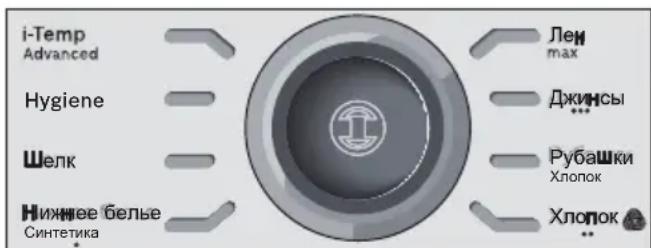
Your steam station has a programme selector (9) for choosing the different ironing programs.
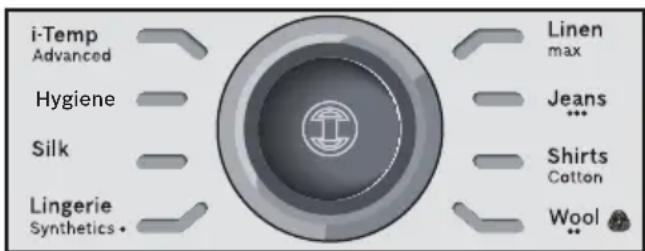
Each programme automatically sets an appropriate combination of temperature and steam which is suitable for the kind of garment selected. By turning the programme selector you can choose the kind of garment and fabric to be ironed. The corresponding indicator light (7) will flash until the temperature and steam level suitable for the programme selected are reached. From this moment on, the indicator light will remain lit continuously and two beeps will be heard indicating that the appliance is ready to use. If the garment to be ironed does not correspond to any of the programs supplied, check the temperature instructions shown on the care label of the garment.
Temperature
Programme
Synthetics
-
- Wool**
Cotton / Jeans
max Linen
Tips:
- Sort your garments out based on their cleaning symbol labels, always starting with clothes that have to be ironed at the lowest temperatures.
- For mixed fabrics, select the temperature corresponding to the most delicate fabric.
If you are not sure what the garment is made of then begin ironing at a low temperature and decide on the correct temperature by ironing a small section not usually seen when worn - At the beginning of each use, it is possible that drops of water will be dispensed alongside steam.
Therefore, it is advisable to try the iron on the ironing board or a piece of cloth to start with.
- For better ironing results, iron the last strokes without steam to dry the garment.
** The wool cycle of this iron has been approved by The Woolmark Company for the ironing of pure wool products provided that the products are ironed according to the instructions on the garment label and those issued by the manufacturer of this iron. R1502. In UK, Eire, Hong Kong and India the Woolmark trade mark is a certification trade mark.

3. Special programs

3.1 "i-Temp Advanced" programme
See the leaflet sides
This steam station has an "i-Temp Advanced" programme. If this programme is selected, an appropriate combination of temperature and steam is set, which is suitable for all fabrics that can be ironed.
The "i-Temp Advanced" programme prevents clothes from being damaged due to an unsuitable temperature being selected.
The "i-Temp Advanced" programme does not apply to fabrics that cannot be ironed. Please check the garment care label for details or try ironing on a part of the cloth not visible normally.

3.2 "AntiShine" programme*
See the leaflet sides
This steam station has an "AntiShine" programme. If this programme is selected and the steam release button (14 or 15^* ) is regularly pressed, the risk of shiny marks on the garment due to the ironing is reduced.

3.3 "Hygiene" programme*
This steam station is equipped with a special "Hygiene" programme.
The innovative hygienic steam technology removes 99.9% of microbes. Suitable for all kinds of fabrics and extremely efficient in both thick and delicate garments. The unique combination of temperature and interval steam provides a sanitizing effect requiring no chemical additives.
Please proceed as follows:
-
Choose the "Hygiene" programme by turning the selector (9).
-
Place the iron on the garment or fabric you want to disinfect.
-
Press continuously the steam release button (14) on the bottom of the handle to release powerful shots of hygienic steam. Slowly iron the whole garment to enhance the final result.
Notes:
To ensure the high efficiency of the Hygiene programme, the system has to be reset after 20 minutes. "Hygiene" indicator lamp blinks five times and the steam generator switches automatically to the "i-Temp Advanced" programme.
- If desired to continue in the "Hygiene" programme, please wait till the Program-LED of the "i-Temp Advanced" programme stops blinking followed by two beeps. After that, you can choose again the "Hygiene"-programme by turning the selector (9).
- Energy saving setting cannot be activated while the "Hygiene" programme is selected.

3.4 "Calc'nClean" programme
See section 11.
See the leaflet sides
This appliance has a special function for tackling difficult creases.
When the steam release button is activated, the steam generator will release three powerful shots of steam so that the steam reaches even deeper into the fabrics.
Briefly press the steam shot button (15^) on the top of the handle.
Remarks:
It is possible to stop the shots of steam by quickly pressing the steam button again.
- Some water drops may appear when you use the "PulseSteam" function for the first time.
The water drops will disappear after you have used the function for some time.
5. "Intelligent steam" function
This system has intelligent steam control, which, after releasing the steam release button (14 or 15^* ), provides a small amount of additional steam.
The additional steam can always be stopped by briefly pressing the steam release button once again.

6. Ironing without steam
Begin ironing but without pressing the steam release button (14 or 15^* ).

7. Vertical steam
See the leaflet sides
This can be used to remove creases from hanging clothes, curtains etc.
Warning!
Never direct the steam jet at garments that are being worn.
Never aim the steam at people or animals.
- Select "Jeans / ···" programme to get the optimal steam amount.
-
Hold the iron in an upright position 15cm away from the garment being steamed.
-
You can steam iron curtains and hanging garments (jackets, suits, coats...) by placing the iron in a vertical position and pressing the steam release button (14 or 15^* ).

8. Energy saving "eco" button
Push the energy saving button 6).
If the energy saving setting is selected, you can save up to 30% of the energy and 40% of the water consumption (^*) , and still achieve good results when ironing most of your garments.
It is advisable to use the normal energy setting only for thick and very wrinkled fabrics.
(*) In comparison to the maximum setting.

9. Auto shut-off
If during ironing, the steam release button (14 or 15^* ) on the iron handle is not pressed for a certain length of time (8 minutes), the steam station will automatically switch off.
The illuminated ring around the programme selector (9) will flash when auto shut-off has been activated. Three beeps will be heard at the same time.
To switch the steam station back on, press the steam release button again.

10. Fabric protection soleplate cover
See the leaflet sides
The fabric-protection soleplate cover (18^*) is used for steam-ironing delicate garments at maximum temperature without damaging them. Use of the soleplate cover also does away with the need for a cloth to prevent shine on dark materials.
It is advisable to first iron a small section on the inside of the garment to see if it is suitable.
To attach the soleplate cover to the iron, place the tip of the iron into the end of the soleplate cover and pull the elastic strap over the lower rear of the iron until it fits tightly. To release the soleplate cover, pull the elastic strap and remove the iron.
The fabric-protection soleplate cover may be purchased from our customer service or from our website.
Accessory code
(After-sales)
Name of accessory
(online shop)
00571510 TDZ2045

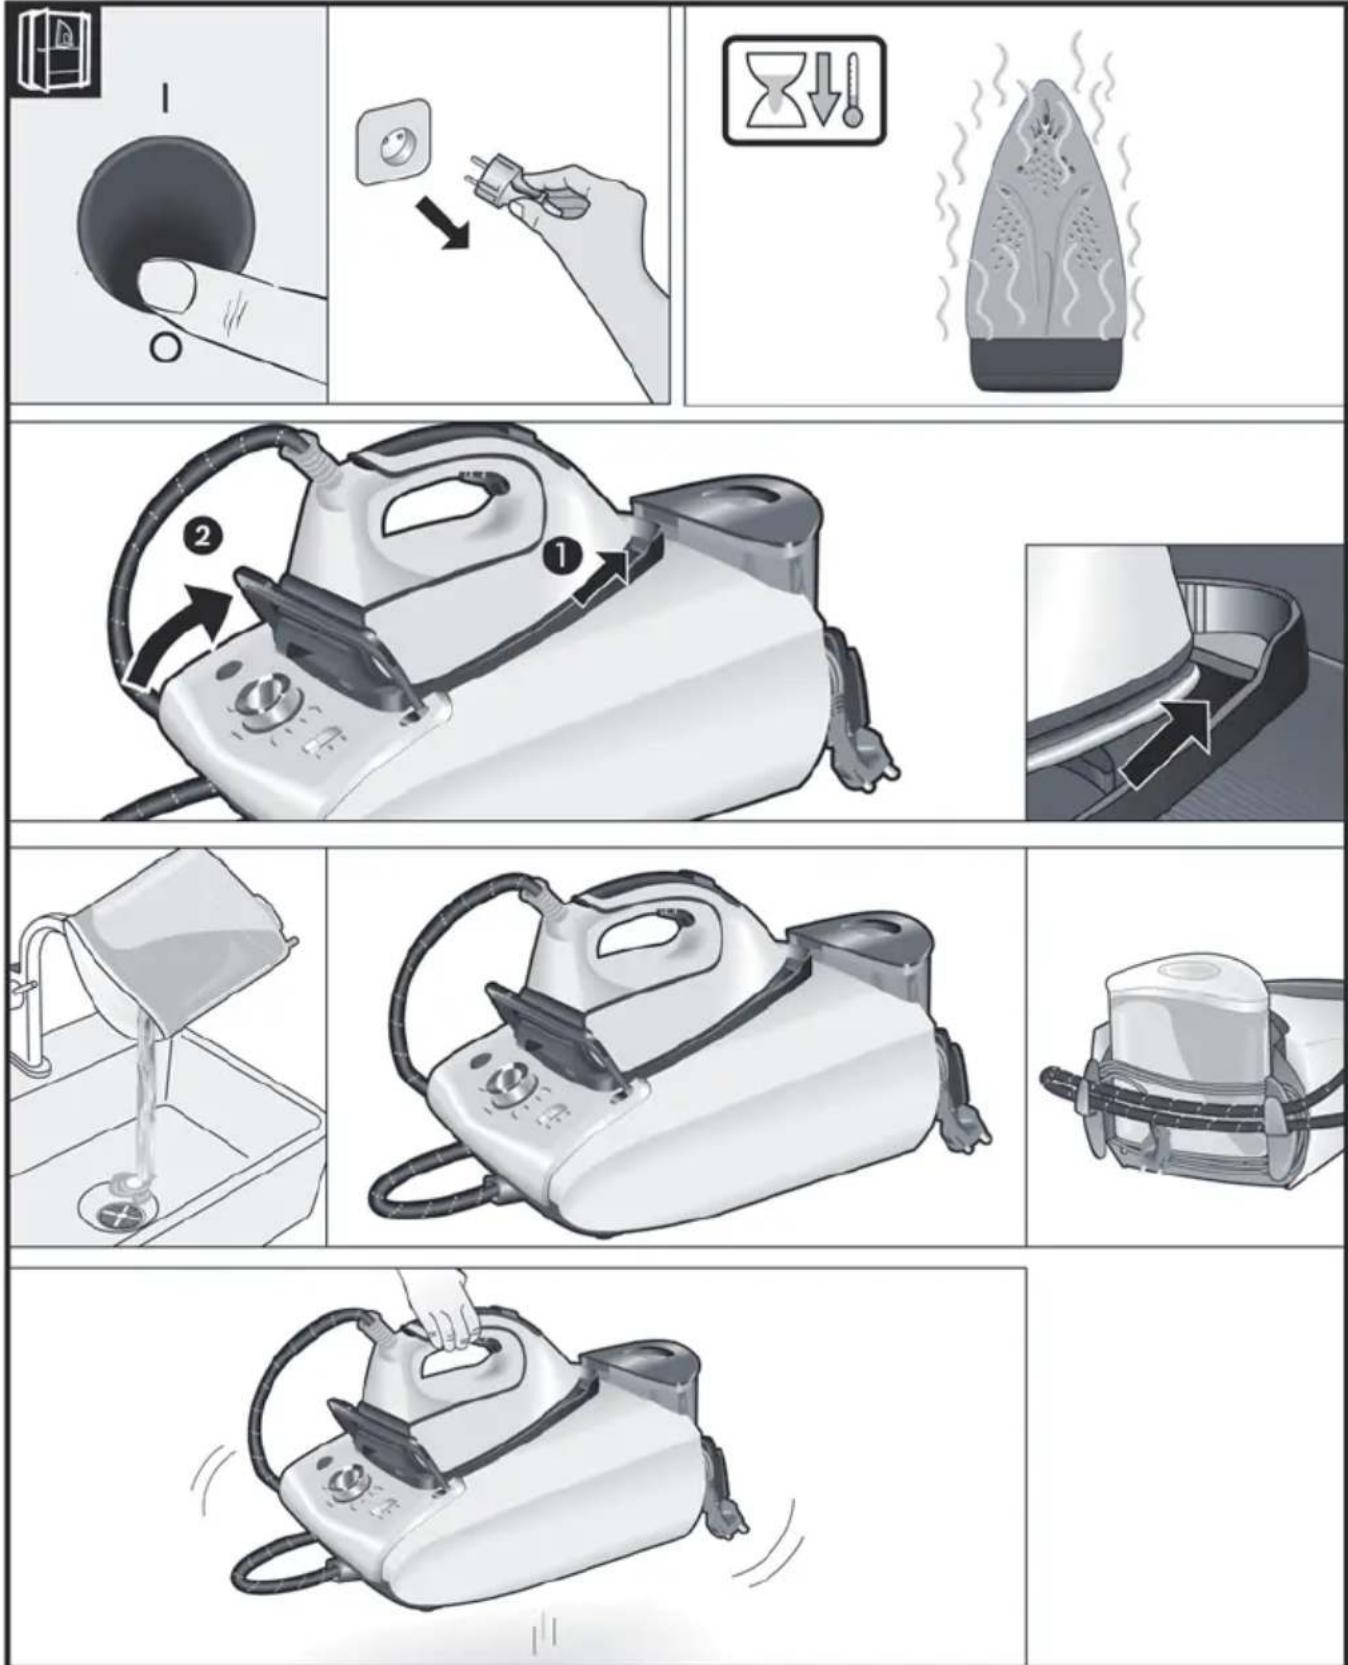
11. Calc'nClean Perfect
Automatic clean warning
The "Calc" automatic clean warning indicator light (4) will flash indicating that boiler and iron steam chamber must be rinsed.
Leave the appliance unplugged for more than two hours, check carefully that the appliance is cold and that the water tank (1) is empty.
Please proceed as follows:

11.1 Cleaning the Boiler
See the leaflet sides
Do not use descending agents for rinsing out the boiler, as they could damage it.
Fix the iron to the stand by inserting the tip of the iron into the front slot and moving the lock system (3) against the heel of the iron. Place your appliance on the edge of your kitchen sink.
Unscrew the scale collector (12^*) and take it out.
To wash the scale collector, place it under the water tap and wash it up until calc residues are removed. Squeeze it as indicated in the picture a).
To obtain the best result, you may immerse the scale collector for approximately 30 minutes in tap water (250 ml) mixed with a measure (25 ml) of descending fluid, as indicated in the picture b).
Then, rinse it again with water (very important!).
The descending fluid can be obtained from our Aftersales Service or Specialist outlets:
Accessory code
(After-sales)
Name of accessory
(Specialist outlets)
00311715 TDZ1101
Holding your steam generator in upside down position, and using a jug, fill the boiler (in the base unit) with 1/4 litre of water.
5 Shake the base unit for a few moments and then empty it completely over a sink or bucket.
To obtain the best result, we recommend that this operation is performed twice.
Important: before re-closing, make sure no water remains in the boiler.
Replace and tighten up the scale collector.

11.2. Rinsing the iron steam chamber
See the leaflet sides
1 Fill the tank with tap water.
Plug in the mains cable and set the power button (10) to the "I" position.
3 By turning the programme selector (9), choose "Calc'nClean" decalcification programme. The indicator light (7) will start flashing.
Wait until the indicator light (8) stops flashing and remains lit continuously. Two beeps will be heard at the same time.
Hold the iron over the sink or a container to collect the water.
Press the steam release button (14) and gently shake the iron. Boiling water and steam will be released, carrying scale and/or deposits that might be inside.
After approximately one minute, the "Calc" automatic clean warning indicator light (4) will go off.
Keep on shaking the iron gently for five minutes while the steam release button is pressed, so that water and steam clean the chamber completely.
Without pressing the steam release button (14), turn the programme selector (9) and choose "Linen / max" programme. The water in the steam chamber will start evaporating.
Wait until all the water inside the chamber has been evaporated. Then, you can set the power button (10) to the "O" position.
To clean the soleplate, immediately rub off any residue by running the hot iron over a wet cotton cloth.

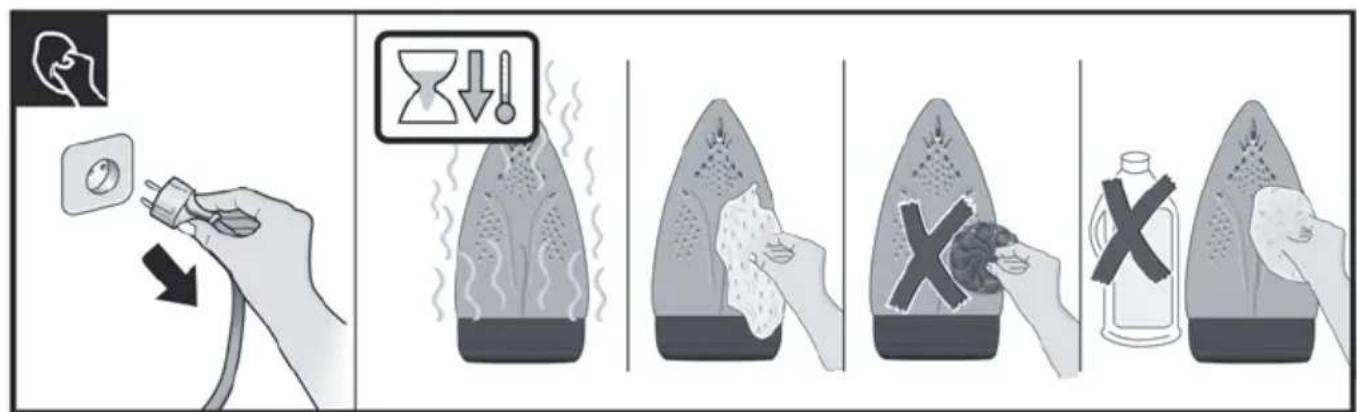
12. Cleaning & Maintenance
See the leaflet sides
Attention! Risk of burns!
Always unplug the appliance from the mains supply before carrying out any cleaning or maintenance operation on it.
- After ironing, pull out the plug and allow the appliance to cool down before cleaning.
- Wipe the housing, handle and iron body with a damp cotton cloth.
- If the soleplate is soiled with dirt or scale, clean it with a damp cotton cloth.
- If the cloth is synthetic, it may melt due to the high temperature on the soleplate. Switch off the steam and rub off any residue immediately with a thickly folded, damp cotton cloth.
- Never use abrasive products or solvents. To keep the soleplate smooth, you should avoid hard contact with metal objects. Never use a scouring pad, or chemicals to clean the soleplate.

13. Storing the appliance
See the leaflet sides
- Set the power button to the "O" position and disconnect the mains cable.
- Always allow the appliance to cool down before storing it.
- Place the iron on the iron pad (2), standing on the soleplate, and fix it by inserting the tip of
the iron into the front slot and moving the lock system (3) against the heel of the iron.
- Empty the water tank, store the mains cable on the cord storage facility and the steam hose in the storage fixing. Do not wrap the cords too tight.
- Hold the iron's handle when moving the appliance.

Tips to help you save energy
Steam production consumes the most energy. To help minimise the energy used, follow the advice below:
- Start by ironing the fabrics that require the lowest ironing temperature. Check the recommended ironing temperature on the label on the garment.
- Try to iron the fabrics while they are still damp and reduce the steam setting. Steam will be generated from the fabrics rather than the iron.
- If you tumble dry your fabrics before ironing them, set the tumble drier on the 'iron dry' programme.

Trouble shooting
| Problem Possible causes Solution | ||
| The "Calc" indicator light (4) flashes. | 1. Boiler and iron must be rinsed. 1. Rinse the boiler and the iron according to the cleaning instructions in this manual. | |
| The ironing programme indicator light (7) flashes continuously. | 1. The water tank (1) is empty. 1. Fill the water tank. | |
| The steam generator does not come on. | 1. There is a connection problem. | 1. Check the mains cable (13), the plug and the socket. |
| 2. The power button is not switched on. | 2. Set the power button (10) to the "l" position. | |
| The iron does not heat up. | 1. The power button is not switched on. | 1. Set the power button (10) to the "l" position. |
| 2. The temperature is set to a low position. | 2. Set the temperature to the desired position. | |
| The iron begins to smoke when switched on. | 1. During first use: certain components on the appliance have been lightly greased at the factory and may produce a little smoke when initially heated. | 1. This is completely normal and will stop after a short while. |
| 2. During subsequent use: the soleplate may be soiled. | 2. Clean the soleplate according to the cleaning instructions in this manual. | |
| Problem Possible causes Solution | ||
| Water flows through the holes on the soleplate. | 1. The water is condensing inside the pipes because steam is being used for the first time or has not been used for a long time. | 1. Point the iron away from the ironing area and press the steam release button until steam is produced. |
| Dirt comes out through the soleplate. | 1. There is a build up of scale or minerals in the boiler and iron. 2. Chemical products or additives have been used. | 1. Carry out a cleaning cycle (see "Calc'nClean Perfect" section). 2. Never add products to the water. Use tap water mixed 50% with distilled or demineralised water. To prolong the optimum steam function, mix tap water with distilled water 1:1. If the tap water in your area is very hard, mix tap water with distilled water 1:2. Clean the soleplate with a damp cloth. |
| The iron does not produce any steam. | 1. The boiler is not switched on or the water tank is empty. 2. The water tank is not fitted onto the housing correctly. | 1. Set the power button (10) to the "I" position, and/or fill the water tank. 2. Fit the water tank back onto the hou sing correctly. |
| The ironed garment turns dark and/or sticks to the soleplate. | 1. The selected temperature is too high and has damaged the garment. | 1. Select a suitable temperature for the material being ironed and clean the soleplate with a damp cloth. |
| The soleplate turns brown. | 1. This is a regular consequence of continued use over a long period of time. | 1. Clean the soleplate with a damp cloth. |
| The appliance makes a pumping sound. | 1. Water is being pumped into the steam tank. 2. The water tank is not fitted onto the housing correctly. 3. The sound will not stop. | 1. This is normal. 2. Fit the water tank back onto the hou sing correctly. 3. If the sound will not stop, do not use the steam generator and contact an authorised technical service centre. |
| Loss of pressure during ironing. | 1. Steam release button has been activated for too long a period of time, that is, it has been pressed too frequently. | 1. Use the steam release button at intervals. This improves the ironing result as the textiles will be steamed, dried and ironed properly. |
| Water spots appear on the garment during ironing. | 1. May be caused by steam condensed on the ironing board. | 1. Wipe the textile cover of the ironing board, and iron any water drops to dry them. |
| Water spots appear on the garment during use of the "PulseSteam" function. | 1. Water spots are caused by steam condensation in the hose when cooling down after use. | 1. Water drops stop coming out of the soleplate after using the "PulseSteam" function for some time. |
| The hose gets hot during use. | 1. This is normal. It is caused by the steam passing through the hose during steam ironing. | 1. Place the hose on the opposite side so that you cannot touch the hose during ironing. |
| Water leakage from the boiler. | 1. Scale collector (12*) located at the bottom of the appliance is loose. | Tighten up the scale collector. |
| The iron does not stop steaming after placing it on the pad (2). | 1. "PulseSteam" function has been activated. | 1. Just press the trigger once again and the iron will stop steaming at once. |
If the above does not solve the problem, get in touch with our customer service.
3.3 "Hygiene" program*
6. Stryking uten damp
4. Funcão "PulseSteam"
5. Funcão "Intelligent steam"
EviKec oyniec aOpaalεia
3.1 "i-Temp Advanced" program
3.1 Program "i-Temp Advanced"
3.3 Program "Hygiene"
Po3rOpHtB cKaIaJeHi CToPiKm
3araJIbHI npaBnla Texhikn 6e3neKn
He 3aIIwaIte yBIMKHeHy y po3eTky npacky6e3 harJy.
BiKlHcyIb npicptiB iEeKtpomepekepeTtM, k HAnOBHTN Ioro BOIOO a6OBnHTN 3aIIuK BODn nCJy BHKOpNCtAHHnPaackn.
Дани писрий сдд ВИКОПСТОВУВАТИ ТAPОЗMIДУВАТИ на CTIИКИ NOВЕХHI.
YKuo Bn cTaBnte Noro Ha NiDcTaBky, nepeBipTe, 0o6 nobepxHra ha kki CTOiTb NiDcTaBka, bynactiKOHO.
He Kopnctyntec npacko, kso BOHaJaIa, kso Ha Hi E BnIMi O3NaIOwKOJKeHb Ta kso 3 He Teue Boa.Ipeed nobTOPHM BnkopncTahnram npackyciD nepeBipTuB aBtOpN3OBAHOMy cepBic-entpi.
Kabel XnBHeHn YbOTo PnCTpoH HeMOxe 6yTu 3amHeHn KopnctyBaueM. KaokaIb NowKOJKeHO a6o cIiD 3AmHtN,3aHa NOBHHa IPOBOdHTncr TiIbKn BaBTOpn3OBaHOMy cepBic-TeHTpi.
Dahn npinctpi moke BnKOpncTOByBaTnCra DITbMn BiD 8 pOKiB ta ocobamn 3 06mxeHnMn φi3nHnMn, CeHCOPHnMn Yn MeHTaJIbHnMn 3di6HOCTaMn a6o ocobamn, 10 He MaOTb DOCTaTHbOro DOCBiDy 3HaHb, 3a yMOBNonepeHNbOro OTPMaHnI INCTpykTaJxy 3 6e3neuHOI ekCnIyataui npinctpo Ta po3ymiHn NOB'3aHOI 3 NOro BnKOpncTaNHnM He6e3neKn a6o 3a yMOBn Hargny 3 6oky BiINOBiJaNbHOI OC6N. He Do3BOJrTe dITram rpaTnC 3 eJeKtpoPncTpoem. He DonyckaTbc npoBeDeHHn IpoUeDyp 3 OUnSeHHra DOrIy 3a npinctpoem DiTbMn 6e3 HaIpy dopocInx.
CniikyuIte, 06 npacka Ta 3naHyp 3naHypnncy HneOcKHomy dITeMolodwe 8 pokiv micci, koi npictriin nnKIOueHn Do eJeKTpomepeXiafo oxoJoxeTbcra.
YBAGA. Tapya noBepxHn. IiJ yac BnKOpncTaHHn noBepxHn MoKe po3irpiTnCn.
Cey npncptpi npn3naeHn TiIbKn dJa no6yTOBOro BnKOpncTaHHa y MicceBOcTi, po3TaawObaHin He Bnue 2000 M naD pIBhem Mopra.
-Дани npicpii CTBopeHO BnKIOUHNO nI NObyTOBOro BVKOpNCtAHnTa He MoXHa BVKOpNCTOByBaTn DnRA BnPo6HnUx Zine.
-Дани писрий сдн ВИКОПСТОВВАТN TINьк
3a пиЗнЧЕНЯМ,TO6TO,ДЯ пасУВАн.
ВИКОПСТАнHA 3БуД-яКОЮ INJOIO MeTOIO
ВВЖабЯСТьСЯ HeDopeЧИМ I TOMY He6e3NeчHIM.
ВИрOBнК He Hece BiДnobiДальНOCTi 3a 6уД-
яКI NOшКODжЕНЯ,СпрчИнHeHпРавиьнHIM
ЧИ HeDopeЧИМ ВИКОПСТАнHAМ.
-Перед ТИМ,Як пдкночиnpсстридоел ektpomepeki,превірte,шбнанpyractpymy BiДnobiдаHAнpy3i,ЗаЗнayehiHa Tabnuci 3ХаразкетрстNKamn.
-Дани писчпс сд пдкюатиdo 3a3emлесно розетк.у pa3i ВИКОПСТАння повжувача,пepeВірт,цoВьому € DBОПЯрна розетka на 16 A 3 a3emЛЕннЯM.
JaKuo 3ano6ixHnK npucTpoOp03nlaBnEtbc, nOdaIbwe BnKOpncTaHHnnpucTpoHemoxKnBe. Uo6 npucTpi3HOBy Mir HopMaIbHo npaUOBaTu, NOrocNlD BiHeCTNu do ABTOPu3OBAHOro cepBic-ueHTpy.
- 3ao63anobirn Tmuaocbmy naHHo Hapnya6o 6nMaHHIO OCBiTIOBaIbHINx npncTpoIBy pa3i BnHKHeHH HeCnpraTINBHX yMOB B eNeKtpomepexi, npEHNHyTe npacky do eNeKtpomepexi 3 MaKcImaJIbHM OnopOM 0.37 Ω.y pa3i noTppe6n KopNCTyBaU MoKe 3BepHyTnca Do eHeproNoctaayabHOI KOMNaHII 3a iHOpMaueio npo onip Mepexi y Micci 3'edHaHH
Hikojn He TpmaTe npncpti nKpaHOM,io6 Hbpatn B hbofo BoNi.
JaKuo Bam 3daeTbcra, 10 npncTpii noWKoJKeHn, HeaHNO BiKluOHTb NOro BiD eNEkTpOmepeXi. TaK camo BiKluOuaTe NOro BiD MepeXi 1Opazy nCnBn BIKOpNCtAHn.
He MoXHa BnTaryBaTu WTeNceJIb 3 pO3eTKNCMnKaHOn 3a Whyp.
Hikoln He 3aHypioNe npacky uHnaporehepatop y B0dy a6o B iHwi piDHH.
He 3aIiHaTe npicTpii nID iEIOHEcnpnAeTINBnX IORoHNx yMOB (niD OUsem,Ha COHci,Ha MOp03i Ta iH.).
BaxJInBo!
Дани писрип пд час ВИКОПСТАнг po3irpiBaCTbCSdo BnCOKoi Tempepatу Ta reHepye napy, ue moxe npu3BecTu Do onikib BiD KOHTaKTy 3 rapaUMN NOBepxHЯM Nn napoU y BInpaIky He HeDoQilbHOrO BVIKOpCtAHH.
- Y npoueci BnKOpncTaHHa ShaHr dny napu, napoba cTahzia, MetaneBa nPactna H B OCHOBi 3HIMHOI pIDCTaBKn Dny npackn (2) i oco6nbo cama npacka MoKyb HarpiBaTncs. Lc HOpMaNbHo.
HikonHe cnpMoByte napy Ha IIOe YI TBapuH.
CniikkyiTe, uo6 shyH he Topkabcra rapyoi iDowBn npackn.
MaTe Ha yBa3i, 0o nicJy BIDnyckaHnK HONKn BInycky napu cncTeMa MoKe npOIOBkyBaTN NODaHH Napu npotraom ue KINbKOx ceKyHd. LcE HOpMaJIbHnM.
PekomeHdaqii 3 yTuJIi3aqi
HaWi TOBapn NOCTaAOTbc8 y NOKpaUeHIn ynaKoBci. Ce 03Naue, 00 dIra He BIKOpNCTOByIOb8 MaTePiAn, kI He BIKnKaIOb 3a6pydHenH8 HABKOINHbOro CepeOBOu7a Ta kI cIi BiDAtn Do MlCueBoi Cnyx6n yTniI3auii BiXODIB KBTOPHHy CnpOBHy. Y MlCueBi paDi BaWoRo MiTa BN 3MOKeTe OTPMaTI nPo Te, kCnID yTNI3yBaTu CTapi eNeKTponpncTpoi.
Ue npncpti MapkobAHn BiIOBIDHO Do BmOr Ebponecboi DnpeKtBn 2012/19/EC zoDo eNektpuHnx Ta eNekTpoHHnx npncptoB, kI BnWn3 ekcnnyataui (BiIxOdiB Bd
eNeKTpHnX Ta eNeKtpOHnX npncTpoB - WEEE).
LЯ ДиpeKTHBa BCTaHOBJIIOH HOpMn NobepHeHH Ta yTNIi3auii BnKOpNCtAHnx eNeKTpOpiNcTpoIB Ta DiE Ha BciI TepNTopii EC.
Oncn pnctroho
- Pe3epByap dIa BODI
2.3HIMHa nikka dny npackn - Cnctema pfikcaui npackn "SecureLock"
- INДикатop, lo nonepeДжаe npo Heo6xIDHicTb abTomatnUHOrO ouuJeuHЯ «Calc»
- INdkaTOp «Pe3epByap dny BOi npOjKHi
- INdikatop (3eJehn) i KhoNka «eco»
- IIndkaTopn nporpam npacyBaHHa
- Поррама вдалени нашиу «Calc'nClean» Та iнданкатop
-
Перемпа роррам i кльцеbe niдсиуваши
-
BIMnKaJXnBJIeHHr
- UHyp dnn napn
- ΦínbTp dЯ BùdàJIeHЯ ḀKaɪnǔy "Calc'nClean Perfect"*
- Ka6eIb JxuBneHHa 3 npucTOcyBaHHaM nn 3roptaHHa
- Khonka Bnnycky napi
- Khoika Bvnysky napn "PulseSteam"
16.ИнданkaTOp npackn
17.Пиошва - TkaHnH*
1.Пид�товka
TINB. cknadeni CTOPiHKN
- BiD'EDHaIe npacky BiD cncTemn φikcai (3), NOTARHyBUn DoHn3y BaXJIb, UO yTpIMYe HIXKHO qACTnHY npackn.
- 3HimiTb Bci etnKeTkn Ta 3axnchy ynaKOBky 3 niDOWBn npackn (17).
- YctaHOBIb npicptpi rOpn3OHTaIbHo Ha MiCy Ta CTiKy NOBepxHIO. MoKHa 3HrTn NiKJaDky DnI npackn 3 npictpoTO Ta NOKlaCTn II Ha IHsy MIChy, CTiKy, rOpn3OHTaJIbHy NOBepxHIO.
- HanobhItb pe3epByap dny BOnn TaK, 0o6 BOna He nepeBnuSyBaJa BIdMtKy MaKcImaJIbHorO pIBHra.
- NobHicTIO pO3rOpHITb Ka6eJIb XKNBNeHHa Ta niKJIHOuHTb Ioro DO 3a3emHeHOI PO3eTKn.
- YctaHOBITb rOIOBnBIMnKaU (10) Ha no3HaKy «YBMKHeHO».
- Ппстрий.autоматиносямкеться на рогаму «i-Temp Advanced» (ДИВ. роздд 3.1). BiДnobий Иndикатop (7) поим ratи,а чебец Декльkaxbинин 3aropntься
noctiHnM cBITnom. Bn noyyeTe dBa 3BykoBi CnHaJI, kI NOBIOMJHOb npo rOToBHicTh npncTPO DO pO6OTn.
IaporehepaTop noTpe6ye 6ilbwe yacy dny IocraHHeHHa cbo rO cTany nIac noaTKOBoro HarpibaHHa ta nicna npoBeeHHn ppoedypn Ounuehn Bid hakiny (Calc'nClean).
KoINB Ipocei peryIpyHoro BIKOpNCtAHNBA naporehepatopi npncyTHBaOda, Yac HarpibahnI dIa DOcayHeHHPO6OoITemnpaTpycckopoyETbcra.
- Zei npicpii ochauehen y6yobAHm ceHcOpom pIBNa BOIN. Y pa3i Heo6XiHocTi HAnOBHeHHpe3epByapa dIa BOIN 3aOpntbcr iHnKaTOp «Pe3epByap IJIa BOIN nopoxHi (5) i Bn nouyTe TpN 3BykOBnx CnHaHn.
Ybara! KaOypa3i Bn6opy OndHiei 3 nporpam npacyBaHHpe3epByap nnBOn 6ynde npoKhim,To iHdkatOp (7) uei nporpamMnraTme, nKn Bu He HanoBHnTe pe3epByap nnBOn.
BaxJInBO!
- Bn Moxe Te BnKOpNCToBvBaTn 3BnuaHny BOy 3 BOOnpOBOy.
ДяТOrO 6o6 NODOBKHTN ONTUMaJIbHy DiOФyHKcii BiInapIOBaHHa,po36abJYTe BOOpPoiBDHY BDOY DnCTINbOBAHOU y cnIBiDHOWeHHi 1:1.B TOMy BNpaKy, RaIoo KOpCTKicTB BoNDy BaWOMy perioHi 3aHaDTKO BnCOKa,peKOMeHnyEMO po36abJrTNI BOOpPoiBDHY BDOY DnCTINbOBAHOU y cnIBiDHOWeHHi 1:2.
HOpMaIIO OToO CTyPeHIO XOpCTKocTi BOIN Bn MoKeTe OTpMAtn Ha NiDpNEmCTBi BOOnOCTaayHn BaWOrO MicTa.
-Пд уас ВИКОРиСТаHHЯ пиСТpoI Bn можete
нанOBHHTи pe3eрВуap BODIO y 6yДь-якIN
MOMeHT.
yHnkaIte nooKOJxHeNb Ta/a60 3a6pydHHeHHpe3epByapy dJa BOni Ta 6aky naporehepaTopa, He BVKOpNCtOBuYTe apomAtn3aTOpN, OcET, domiUKn, 3acOb n npOTn hKnNy Ta iHsi ximiuHi 3acOb n.
Hikonn He cTaBTe npacky Ha Kopnyc npncTropo 6e3 ndknaDKn dny npackn!
-Пд уас nepшо ВИКОпСТангЯ пackи 3 Hei moKут b itn cneцфicHI 3anaxn Ta napa, a 3 NiIoшВи можут сиnatся 6ili npoшинк. Lc e HOpMaIbHIM Ta npuINHITbcR 3a KInbKa XBUNH.
KoHnHaTncHeHO KhoNky BInyScKy napi, Bm moXeTe noUytu 3Byk nomn y cepeDnHi npictpoHO. Lc HOpMaIbHo Ta O3Haue, Io BOda nepeKaHycTBcra Do 6aKy naporeHepaTopa.
2. Bn6ip nporpaMn
TINB. cknadeni CTOPiHKN
Iapoba ctauniz ochauneHa nepemkaayem nporpaM (9), 3a donomoroio koro Bn moKeTe Bnbpatnpi3Hi nporpam npacybaHHa.

KoXHa nporpaMa aBTOMaTnUHO 3aDaHaNExHy KOM6iHaCuIO HalaStyBaHb TempePaTyPi nOdaI napu, 10 NiDxOHTb IJa npacyBaHHra Tnx abo IHux Bnpo6IB.
IobepTaOuN nepeMnKa nporpa, Bn moKeTe Bn6upaTn Tn OJary a60 TkAHnH, Aky Heo6xidHO npacyBaTu. BiNoBIDH nIHnKaTOp (7) MmraTIme, NOKn npacka He HarpietbCry Do nOTpi6Hoi Tempepatypi I He 3aic pexm noaui napi, neped6aueHn nporpamoio.
Notim iHdkatop 3aropntbca noctiHm Cbitnom, i Bn noyte Dba 3bykoBx cnHaJI, Io NOBIOMIIOb npo roTOBHCt b npicToIO do pOboTn. RaKso matepian Bpu6y, kNn Heo6XiHo npacyBaTu, He BiIOBIAe JODHi 3 HaraBHX nporpaM, O3haHOMTeC3 peKOMHeaJiAMn Ioo TeMnepaTypn npacvBaHHa, HabeJeHMn Ha npNIky Bpu6y.
Temnepaotypa Iporpama
CnHTeTuKa (Synthetics)
Bobha (Wool)
BabOBha (Cotton) /Джинси (Jeans)
max ΜbOH (Linen)
Iopadn:
- Po36epiB 6iIN3Hy B 3aJIeJXHOCTI BiD cIMBOJIB Ha eTUKeTKax Ta noUHaIte npacyBaHHa
3aBXdN 3peeu, zo nOTpe6yIOb HauHHXQoITempepaTpy npacyBaHn.
-Дяпасувань оягу 3i 3MiшаоT TkaHHN Bn6epiTB Tempepaty, lo BIDNoBidae NaibbIa DeJIkATHi TKAHHI.
JaKIO Bn He BneBHeHi, 3 KIOI TKAHNH 3po6JIeHO 6iIN3Hy, NoCHITb npacyBaHHa 3 HauHHXQoi TempepaTyra O6epiTb nOtpi6Hn Bam pIBeH harpibaHHa nonpacyBaBwn HeBeInKy dIinHky, kY He BnDHO iD qac BnKOpNCtAHN 6iIN3HN.
- Uop3y Ha noaTky BnKOpncTaHn npackn pa3om i3 napoIO MOKyTB BnxOHTN KpanPi BOi. Tomy cnoataKpy peKomeHdyETbcr npOBecTu npackoIO no douCi dny npacyBaHHa 60 nNo Henotpi6hni TkaHHi.
Дя OTPIMaHHЯ ONTImaJIbHnx pe3yIbTaIb HAnpkiHci npacyBaHHra BmKHiB napy Ta KInbKa pa3i npOBeITb npackoIO no TkaHHi 6e3 3BOLOXeHHra, zo6 do6pe npocuHTn II.
** Pexum npacyeaHna BOHNHX eupo6ie uei i npacku c.xeaneho kompanicTo The Woolmark Company. Noo moxHa buKOpucmo8yamu dna npacyaHnE eupo6ie 3 uCmoi BOHn 3 a yMo6u, odNak npacyamu ix nompi6Ho bIDnoeiHO do eKa3iok Ha emukemci eupo6y ma ihcmpykui eupo6Huka uei npacku . R1502.

3. CneuiaIbHi nporpaMn

Ipacynte, He haTnCKaHOn Ha KHOKNy BUNyCKy napi (14 a6o 15^*

7. BepTnkaJIbHa napa
TnB.cknadeni ctopiHKn
BndaJIeHHa3MOpwOHa nIbBiWeHomy OJ3i, Utopax Too.
ybara!

Hikon He obo6nIte ctpymom napn OJr, naRHyTn Ha IIOdei.
Hikon He cnpye napy Ha IIOe Hn TBapnH.
- Bn6epitb nporpamy «Jeans / …», uo6 npacka Bnpobjna onTImaIbHy KJIbKicTb napi.
- TpmaTe npacky y BepTKkaIbHomy noJoxeHHi Ha BiIcTaHi 15 cm BiI oJary, kNIO6po6JIeTbcra napoi.
- 3aBicn Ta OJrHa nIiKax (niJxakn, KocTOMn, NaIbTa Too) MoXHa npacyBaTu 3 napOu, yTpmyOnn npacky y BepTKaIbHomy NIOJOeHHI Ta HATNCKAIOUH Ha KHONKY BUNyCKy nap (14 a6o 15^*

8. Ehepro36epexeHHa
HaTnCHiTb Ha KhoNky eHepro36epiraioyoro peXnMy ⑥.
Ehepro36epiraoun pekmcnpnre ckopoehno cnoxkbaHH ehepri MaJKe Ha 30% ta cNoxkBaHH BOH (^*) MaJKe Ha 40% ,do3BOJIOU npu bOmy OTPMaTn kICHN pe3yIbTaT nD vac npacyBaHH 6ilbwoCTi BnIDIB OJary.
PekomeHdyEbCBAKOpNCTOByBaTNpeXIM npacyBaHH6e3 ehepro36epexKeHH TINbKN DnnpacyBaHH TOBCTNX Ta dYke 3IM'ATNX TKAHN.
(*) Y npiBHHH 3 HauynomykHiuum pexumom.

9. ABTOMATUHHe BUMKHeHHa
Kuio niuac npacyBaHHKHOKNy Bnnycky napi (14 a6o 15^* )Ha puuipnackn He HATNCKaTN npOTAROM NeBHoro yacy (8 XBUNH),napoBa CTAHUABTOMaTHNO BUMUKaETBCr.
Kilbuebe NiicBiyBaHH,po3TaioBaHe HABKOIO nepemikaya nporpam (9),noHne MIRATn y pa3i AKTINBAuii FyHKui ABTomaTHURO BIMKHeHH. Y ueMoment Bn nouyete Tpr 3ByKOBi CnHaII. Uo6 3HOBy yBIMKHTn napoby cTAnciIO, cnId ue pa3 HaNTCHTu KHONKY BNyCKy napN.

TextileProteq
10. TkaHHN

DnB.cknaedhiCTopinKn
Данha Hacадka (18*)ВИКОПСТОВЕТБСА Дпя 6e3neuHOro npacyBaHHЯ DeIiKATHnx TkaHnHa MaKcMaIbHi TeMnepaTpyi 3 BИKOPNCTaHHa napi. ВИКОПСТAHнЯ HacadknДЯ DeIiKaTHnx
TKaHH TAKOX 3HimaC NOTpe6y KOpNCyBaTnCraHhipKOIO DnA yHnKHeHHa 6nCKy Ha TemHnxTKaHHaX.
PekomeHdyEcBcpo3noaTu npacyBaHHHa HeBeJIHKOMy 7MaTky BHyTpiiUHbOIO NOBepXHi Odary Ta nepeBipNT pe3yIbTaT.
Uo6 OJARrHn HacaKHy Ha npacky, yCTaHOBiTb Hic npackn B KHeu HacaKn DnA DeJIkaTHnx TKAHH Ta npotraHITb enactNHy CTpiKy NOnaD 3aHbO HxKbHO uACTnHOIO npackn, Uo6 HacaKa 3akpinnaC. 06 3nTu HacAdKy DnA DeJIkaTHnx TKAHH, NotarHITb 3a eJaCTNuHy CTpiKy Ta CTaRHiTb HacaKy 3 npackn.
HacaKy dny deIikaTHnx TkaHH MoXHa npu6aTu y haWomy cepBic-ueHTpi a6o y cneuii3OBaHnx Maar3nHex.
ApTnKyI DoaTkoBOro
obnaHaHHa (y BiDini
nicJnpOdaXHoro
06cnyroByBaHHa)
HaMeHyBaHn npnaDy (ycneiai3OBaHnx MaRa3NuHax)
00571510 TDZ2045

11. Calc'nClean Perfect
PonepeJxHn npo Heo6xHicTb aBTOMaTHOro OuHcHn
IIndkaTop aBTOMaTnUHoro OUnuHenra «Calc» (4) MInrataMe y pa3i Heo6xIdNocti OUnuHenna naporehepaTopa i napoBoi kamepnpackn.
BidknHouitb npicpti i 3aunuTe noy u bomy cTaHi 6iNbH Hx Ha DBi rOHN,NOTIM nepekoHaTecra, xo BIn OxonoHyB, a pe3epByap dna BOn (1) npoxhni.
BukohaiTe taki iii:

11.1 OuHsEHHa 6aka naporehepaTopa
TINB. cknadehi ctopinkn
He BnKopncToByIte dIy oBnonickyBaHHa6ky naporehepatopa 3ac06n dIy BnDaJIeHHa HauNy. BOH moKyTB nOwKOJNTn Ioro.
3aФikcynTe npacky, NOMICTNBHn HIC npackn B nepeDni Na3 i npNTncHyBn BaxiNb CnCTemn ikcaii (3)do HxKhBoI yactHHn npackn. IocTabTe npicTpiH na KpaN KyxOHHO paKOBHH.
BiiKpyTITb pInbTp (12* Ta BnTARHITb Noro.
3 Ⅲo6 npoucnTn KOJekTop Ira 3bOpy Hakiny, NOMictiB NOrO NiI npOTOnHy BODy Ta npOMnTe
IIO NOBHORO BvdaJIeHHraJHnIKIB HAKINy. BiIXKMITb KOJIeKTop Ira 36Opy HAKINy, JOKoKa3aHO Ha MaIIIOHky a).
Ioo6doocrtn hainkpaosrpe3yltaty,3aHypTe KOIEKTop dIy 360py HAKINy npi6JIN3HO Ha 30 xBNIHN y BOIOnpoBIDHy BDOy (250 M), 3MiUAny 3 Heo6xIDHO KJIbKicTIO (25 M) cneiaIbHOi pIDHH Iy BuaJeHHa HAKINy, JIK Oka3aHO HA MaIIOHKy b).
Iotim konektop dny 36opy hakiny cni3HOBy npomTN iD npotoHIO BOIOO (dYxBe BaxnBO!).
Pidiny dny BuaJaleHHaKuny MoXHa npu6aTuB Hauix BiDinax nicnnpoJxHoro 06cnyrobyBaHHa 6oB Cneuii3OBAHnx MaraIHax:
ApTnKyI DoJaTkoBOrO
oblaHaHnna (y BiDiiNi
nicnnpoDaXHoRo
6cnyroByBaHHa)
HaMMeHyBaHnnpaIaIy (y cpeiJIi3OBAHnx mara3nHax)
00311715 TDZ1101
4 Ytpmyu nporehepaTop doropnHoramn,3a donomoro kuxy BInnte y 6ak naporehepatopa (B ochobi Kopnyca) 1/4 nItpa BOIN.
5 DekiIbka cekyHn notpyciTb naporehepaTOp, a notim nobHicTHo cnopoxHITb Ioro y paKOBHy u y BiDpo. Pe3yIbTaT 6yde KpaUIM, JaUO noBTOpNTu OOnepaCiIO DbiHi.
BaxJnBO! NpeTm, J3HOBy 3aKpntn naporehepatop, nepecbiuItbcry, y no y Noro 6aui 3OBcIM He NiunnoCBAOn.
6 YcTaHOBt bIbTp i IiInbHo 3aKpyTITb NOrO.

11.2 OuHcHnHa napoBoi kamepn npackn
TINB. cknadeni CTOpIHKn
1 HanobhItb pe3epByap IJRA BOIN BOIOI 3 KpaHy.
Пидклioчть ka6eь кИВпeнгяdo eIeKtpomepexi ta yctahOBiTB roJIOBнBIMnkau (10)Ha no3NaUkY «I».
3Повертаюн поемпачnpогам(9), Bиберъ порamy Видаленин haKuny «Calc'nClean».Индкатop(8)ноHe MnraTn.
3auekaTe, nOKn iHdkaTOp (8) He nepectaHe Mrratn I He 3aropntbcra NoCTiHHM CbitlOM. Y ueMomeHT Bn nouyTe dBa 3BykObi cnHaJI.
5Пидимитьпpackунад кухоню paKOBINHOO aboMICTKOIO NOcydINHOДЯ 36OPY BOДN.
6 HaTnCHiB Na KhoNkU BnPyckaHnna nap (14) Ta obepexHo nOtpyciB npacky. Hakn Ta BiKnaJeHHB BnDyTb 3 rapyOu BOIOU Ta napoI. IHnKaTOP aBTOMaTHHO OChIeHHA «Calc» (4) 3rache npnbI3Ho uepe3 oHy XBnIHy.
IpoDobKyuTe ObepeXHo Tpactn npacky npOTrOM n'ATN XBUNH, yTpmyOuN npu CbOMy KhONkY BnUyCKaHH NaPn HaTNCHyTOH, UoB BoDa i npa nobHicTIO OChCTNu NapOBy KaMepy.
7 BiDnycTbWn KHONky BInyckaHHa napi (14), nobepHIb nepemKau nporpaM (9) i Bn6epITb nporpamy «Linen / max».Boa y napoBi kamepi noue BInnapoByBaTncr.
3auekaTe,doKnHeBunapyEcBcBcBOda, 303aHmHnacBkamepi.PicnaZboroMOxHa BCTaHOBHTIroOBHnBmHKauch(10)Ha no3NaKy «O».
9 06 ouhntn niOowBy npacku, Biipa3y BuaIb yci 3aunuKn 6pydy, npobibn rapayo npackoio no BOJorim 6abOBHnHc cepBetui.

12. OuichiHnTa DOrIa
TnB.cknadeHcTropinKn

Yeasa!IChyHe6e3neKa onikie!
Tpe6ydb-aykIMN 3axoamn 3 OunuHnTa DoIy 3a npncToeM 3aBXdN BmKaNte NOro 3 pO3ETKn.
1.ПicЯ npacyBaHHB BmKHiTb npucTpi 3 po3eTKI Ta daTe Homy OxOnohTy npeD ouHcEHnM.
2. Порпть корпс napоBoi CTanu, руку ta kорпс пpackи BONoroю raHupikkoio.
3.Якшо niOoBBy 3a6pydHeNo a6o Ha Hi nHaKnI, OuHCTiB II BONOrOIO 6abOBHraHO IO raHcyIPOIO.
4.Якwo CnHTeTuHa TKAHnHa po3nlaBnIacnyiBnN BOM 3aHaTOb BucOKoi TemnepaTyPi nIOWB, BiKIOUcITb NOaCy npu N BiDpa3y X 3uCTiTb HAIINII MATEpiaJ 3a DOnOMoTO BOLOTO 6aBOBHReHOI TKaHnHi, CKJaDeHOI DeKiNbKa pa3iB.
5. Hikon He BnKOpncToBnyTe a6pa3nBHi 3ac06 Ta po3uHHnKn. 1o6 niTpmyBatn NOBepxHIO nIOWBn rnaDeHbKOIO, cNl d yHnKaTn p3KOrO KOHTaKTy 3 MeTaJIeBnMn PpeDMeTamN. Y KOdHomy pa3i He BnKOpncToBnyTe dnn OunueHHa NiDoWBn XopCTKI r6kn dIra MmTTa Nocdy n ximuihi peohBuHN.
TnB.cknadeni ctopinkn
- YctahOBiTb rOIOBHN BmNkau Ha no3HaCy «O» Ta BiKlIOUHTb Ka6eJIb KINBHeHHa BiEneKtpomepeXi.
2.Перед ТИМ,Як сховати napOBу CTaHцIO,BOHa NOВИнHA OXОЛOHуTN.
3.YctaHObitb npacky Ha niicTaBky (2) niooWoBO DOHN3y 3aQICynte ii, NOMICTNBWH HIC npackn B nepeHni na3 i npNTCHyBwIN BaxJIb CNCTEMN φikcaui (3) Do HxKhboi YactHH npackn. - CnpoXHITb pe3epByap IJNA BOn Ta CXOBAte KaBEnb XINBHeHHaY BIDcIK dJIa 36epirAHn KaBeJIIO 3a DOnOMOrOc NCTeMn 3MOyBaHHa KaBEnIO, a napOBuN UHaHR 3aΦikCyIte 3a DonOMorO o KicCaTopa. He 3roptaIte uHypn HADTO TYRO.
5.Пдчac nepemiiueHЯ npncTpoTO TpmaTe npacky 3a pyky.
Binbwe Bcboe eHeprii BntpaacTbcra Ha yTBOpEHNApN. 3aouadntn eNeKTpoEhepi, doTpMMyTecb TaKx npaI:
-Поунайтпасувань 3блнЗи,юnotpebye HaHnKyOro TemnepaTyphoro pexmy.PekomeHdoBaHy Tempepatypy npacsybaHHЯ MOXHa NOINBUTNcHаярlnkax peuei.
- HamaraiTecra npacyBatn 6iH3Hy,doKo BOHa ige B0Iora, BCTaHOBJIIOUCh napoperyJrTop Ha MeHsu PO3HaCy. TaKIM YINHom npa yTBOPIOBaTMeTbcR B CepeDHHI TKAHNH, a He B npacci.
- RaIO Bn KopncTyecb cyuINbHOIO MaunHOIO, obnpaTe nporpamy "nid npacky".

YcyHeHH HeCnpaBHOCTeH
| ПюбLEMа Можлівi | почини Рішени | |
| Иndикатор «Calc» (4) MИга. | 1. Слид onolochуtni 6ak naporehepatorpa та пrackи, як Ze onicaHO в дani iHCTpykцii. | 1. Onolochiь 6ak naporehepatorpa та пrackи, як Ze onicaHO в дani iHCTpykцii. |
| Иndикатор погами пасуваня (7) постіно мИга. | 1. Pezeрbyap Дя ВODи (1) похнii. | 1. HanobnItb pezeрbyap Дя ВODи. |
| Парoreheparot He BIMKAeTbCry. | 1. ПюбLEMи 3i 3'EDнаннam. | 1. Перевірte kaБель кИВлeннЯ (13), StTeNceьы Та розету. |
| 2. Ие увімКнedo KhoIGNy rolOBHOrO BIMNKaЧa. | 2. Устовіть rolOBнй BIMNKaч (10) на познayку «I». | |
| Пpackа He HargiBaeTbCry. | 1. Ие увімКнedo KhoIGNy rolOBHOrO BIMNKaЧa. | 1. Устовіть rolOBнй BIMNKaч (10) на познayку «I». |
| 2.Обно НИЗБКИ Semператугий реким. | 2. Задаітsenotriбні Tempepaтугий реким. | |
| Коли пackу увімКнedo, 3 Hei iDeДИМ. | 1. Під час п��oro BIVKOpstahня: Deяki DeТаWIппсtrpoMu Na 3aВОdi 3MaşúYOTb, TOMу піd час п��oro HargiBaHня пackу може ВДiJЯТSCЯ HeVeLIIka kIlbkicTbДИМy. | 1. Ze absoHTHO HopmaJIbHo Ta ckopo пrichinntbCry. |
| 2. Піріtodальшому BIVKOpstahnii: MoxlNiBO, πiodoшBa 3a6pudHeHa. | 2. OuchtіtB пidovBu TAK, як Ze onicaHO в дani iHCTpykцii. | |
| Kpiizb otвори y niðoши Teue BODa. | 1. ВODa KoHdEhCyEtbcry TpybKaX, TOMу zuO yap BIVKOpstOBuEYtbcry BnepUe a6o DoBRO He BIVKOpstOBuYBaBcry. | 1. Спразмійе пackу позAzOnу пасуваньу ТАКьka paZiB NaTisChiTb Na KhoIGNky BIVnyScyпapri, дokи He noчne BIXODHTnnapa. |
| ПюбLEMможлгы | почини Рішени | |
| 3 OTьоров пidòшви винождь б rud. | 1. U 6akу naporehepatorpa ta y npacuiz yTBoribcna hakin abi mihepalbhi BiKlndaehnra. 2. Byuno BvNKoprcstaHO ximiuHni zacobu abi Domiшк. | 1. Виконайte ünkln Ochilehenry (ДИВ. роздд Функцia "Calc'nClean Perfect"). 2. Нikоли He dodaBaite y Bovd storpHni peoyOBHn BvNKoprcSTOBuIte Bovdy 3 кран, 3MiuaHny Ha 50% 3Дистиьовано abo deminepanizobAOBOJIO. Дял onTImmaIbHoiRobotn i PodobxeHnre TepmiHcy JuxxbnnapOBO'Функцii 6baKAnO 3MiUyBAtN Bovdy 3 Каун 3Дистиьовано Bovdy cπiBvIbHouenHi 1:1.ЯkuOу BaIoMvy PerioHni Bovdy 3 Кран duJyekJxopcTKa, 3MiUyIe Bovdy 3 Кранa 3Дистиьовано Bovdy cπiBvIbHouenHi 1:2.Очирт bpiDoyu 3a DoonomOrOBOBoroi raHuprkn. |
| 3 пяски He iide napa. | 1. Пя soreн�ерatop He yBIMKHeNo abo pezepeByap dlya Bovni nopoknii. 2. PezepeByap dlya Bovni noarho zakrilneho Na naporeheparoti. | 1. YctahobitroLobNHn BvmNKauch (10)Ha nozhauchy «I» Ta (afo) habOBHITb pezepeByap dlya Bovni. 2.Правильно zakpiniBtpezepeByap dlya Bovni na naporeheparoti. |
| Pechi Temhimaotb ta (a60) prinklejoToBcdo piodoшви. | 1. Ообano 3anaDTo BvSCOKy Tempepatуpy, i ze 3abdae shkoDi NkAHNi. | 1.ОberpItb TempepatуprHni pexKm, zuo biDIOViAde Tyny TkaHnHn, Ta OChIbTb piodoWby BOLORO IO raHuprkO. |
| Пidòшь CTana kopruchnevoIO. | 1. Ze HopmalbHyн hAcNiDok BvNKoprcstahnhy npackn. | 1. OChIcIb NiDoxBy 3a DoonomOrOBOBoroi raHuprkn. |
| Усрedihi princstpoMu chTu 3byk усмoktuВанн. | 1. Boda NepeKaChEtsb CnmoNo DO baku nporeheparota. 2. PezepeByap dlya Bovni noarho zakrilneho Na naporeheparoti. 3. 3byk He npriipnHcTbcra. | 1. Ze HopmalbNo. 2.Правиьно зakpiniBtpezepeByap dlya Bovni na naporeheparoti. 3.ЯkuOЗ bvyk He npriipnHcTbcra, He BvNKoprcstobuyte Naporeheparot Ta 3BepHITbdo ABTOZOBaHOCErbCHOrO ceHTpy. |
| Пid чac npacvbanhyпадаes Tnck. | 1. 3aHaIto Dobro HATsCy To KhoIky BvNysCny npapr. | 1. Hatnckaite KhOnky BvNysCny npapr 3 DeqKm ITeRbAOM. Ze npokpauNtB pezUYbTaTI npacvbanhy, ocklbKy TKAHNHa 3aJIuSbTAMMeTbCS cyxoIO Ta kpaue 36epiratime foPomy. |
| Y proucei npacvbanhy Na Bvrobi 3'ЯВлЯOTbcB MoKpri PIIaMn. | 1. Ha douzi dlya npacvbanhy 3i6pbavcB KOHDcHcT. | 1. Bvtriptb TkaHInHe Nokpurt TdoUki dlya npacvbanhy Ta ckpustAteTce rnapKOIO dlya PiaCsuYBaHn Da OdoKn, He BvNKoprcSTOBuHnnpay. |
| Пid чac BvNKoprcstahnhy phykui PulseSteam Na Bvrobi 3'ЯВлЯOTbcB MoKpri PIIaMn. | 1. Mokpi PIIaMy 3'ЯВлЯOTbcB BvAcNiDok KondeHcaci II npapri npocOJokHnnpackn pICrI NaBvKoprcstahnhy. | 1. 3a umovn BvNKoprcstahnhy phykui PulseSteam npotrayom neBHorO uacy KpamII Bovni He 6bytB npocOyBaTncs3 nIDouWBn npackn. |
| Пid чac BvNKoprcstahnhy ShlaHr NaHarpBaetbcg. | 1. Ze e HopmalbHym. Ze TrpAnJaTbTomU, zoPi ndac npacvbanHy 3 BvNKoprcstahnHy m npapri ShlaHrom npoxOHTb npapr. | 1. Peremicrtb Zhlanr y npotnilexHn 6iK TakKim YHOM, zoB vH TopKaIinCny IOrO npotrayom npacvbanhy. |
| 3 baky npacoreheparota Tceve BODa. | 1.ФiIbTp (12*), po3taosobanHy y Na diHПпСТЮг, зakpiniIeHn HeHaIeXHnM YINHom. | 1. UijbNo 3akpinItb φiNb trp. |
| Пися розміценny npackn Na iindctabzi 3 Hei prodobjyec BvXodnti npapa. | 1. BvNysCy npary npri3BeNo do akTbAsCiФунciII PulseSteam. | 1. Ze pa3 hataNchHt ha KhoNky — BixiD napri Bvdpa3y npriPinnHbcs. |
KoJ0 KaHa 3 HabeJeHx Bnue di He ycBae npo6nemy, 3BepHiTbCra Do aBTOpN3ObaHoro cepBicHoro ceHTpy.
Cnacn6o 3a nokynky napOBov cTaHcnn Sensixx DS38, HOBov npopeccnoHaIbHO cnCTeMbI napOBoro rJaXeHnO r Bosch.
YBaJHo npoHTaIe IHCTpyKciHO 3 ekCnnyataiDaHOrO pncTpoTO ta 36epexiTb II Ha MaN6yTHc.
Cey noci6nK moXHa 3aBaHTaXnTn 3 Be6-CTopiHKn Bosch dJa BaWooi kpaInn.
Pa3BepHnTe cNoxehhIe CTpaHnIbI
Obuntpruknn no 6e30napoctn
He octabnIte yTIOg 6e3 npncMOtpa, noka OH BKJIIOueH B cETb.
Ipeed Tem, KaK HanoHHTb np6op BOoJ nn BblNTb OCTaTKN BObl Iocne ero nCNoJIb3OBAHnA, BblTaUte WTeNCeIbHyU BNkU n3 PO3eTKN.
Pnp6opdoJKeHNCNoIb3OBAtbcn N OMeUaTbcn Ha yCToYHBOI NOBepxHOCTN.
Pn nomeeHnn npnbopa Ha ero noCTabky ybeNTecb, YTO NOBepxHOCTb, Ha KOTOpOH hXoNDTCa NOCTabKa, yCTOuHbA.
He noIb3yItecB yTHorom, ecn OH ynaI, ecn Ha hem BnHbI RAHbIe CneblIOBpeJdeHnra, nIe cIeOH npOnyckaet Body. Ipeed BO306HOBJIeHNem ICNoJIb3OBAHnra npi6opa ero Heo6xOIMo 6yJeT IPOBepITb BAIBOpN3OBaHHOM ueHTpe TexHnueCKOrO O6cIyXuBaHnra.
Hyp nTaHn 3ToR np6opa He dOnJxH 3aMeHrTbCn Onb3OBaTeJIeM. Ecn Hyp nTaHn IOBpeKdEHN HxKaETcB 3aMeHe, 3TO dOnJXHO DeNaTbCn TOIbKO B aBTOpN3OBAHHOM cEHTp eTexHueCKoRo 06cnyKuBaHn.
DaHHbI np6Op moKET nCnOJIb3OBaTbcra DeTbMn CTapwe 8 letn nnuamn COrpaHnueHHbIMN cH3nueckmN, CeHCOPHBIMN yMCTBeHHbIMN CnOCo6HOCTaMn IIO BO JINCAAMN, He IMeUcIMN COOTBeTCTBYUoTe rO ONbTa N 3HaHn, Pn YcNOBn NOnyueHn rMn PpeBapntelbHoro INHCTpykTaJa o 6e3OpanchOn 3KcPnyataun np6opn rONHMAnr CBr3aHHoC eR0 NCNoJIb3OBaHNem ONaCHOCTn IIN NOI pncmOTpOM OTBeTCTBeHHbIX LIu. He pa3pewaIte Detram nIgPaTB c 3JeKtponp6opom. He donyckaetc npOBedeHne OunchTKn n Oepaun no yxody 3a np6opom DeTbMn 6e3 npncMOtpa B3pocblix.
YTHI HnHpy DoJXHbI HaxOHTbcB MeCTaX, HeIOCTyINbIX IJIaTeMnaIe 8 JeT, KOrda np6Op BkIIOueH B po3eTKy IJIIOCTbIBaET NocJe NCNoJIb3OBaHnI.

OCTOPOXHO. Topya noBepxHocTb.
B npocece nCnoIb3OBaHnI NOBepXHOCTb MOxET HArpeBaTbcr.
Даньй пибор педназаун ИСКЛЮЧТЕЛБН ДЯ 6ыTOВОИ NCПОЛьЗOBAHЯ на ВсICOTedo 2000 m habурвем моря.
-Даньий Зелковорпбор пedingаз nauseя Исторовая ТолбКВ Домшинх усюнгх, NO3Tomу He Донуckaetca erо помышених поименhoe.
3TOT np6Op DOJXeH nCNoB3OBAbCToTBKO B CEJAX, B KOTOpbIX OH 6bl pa3pa6OtaH, HbIMN CNOBAM, TObKO kAK yTHOr. IIO6aIpyraopMa nCNoB3OBAHnI np6opa 6yDet CHTaTbCRA He npabUNbHOI, CNeIOBaTeJIbHO, OAnCHO.Ipon3BOIDTeJIb He 6yDet HeCTN OTBETCTBEHHOCtB 3a IIO60 yUeP6, Bbl3BaHHBIHnepaBUNbHbIM IIN HeHaDJIeKauIm NcNoB3OBAHNEM np6opa.
- Ipeed BkIIOUeHEm npu6opa B ceTb y6eINTEcb, YTO HAnpJKeHne B cETn COOTBeTCTByet 3HaueHNO, yKa3aHHOMy Ha Ta6JIuKc C TexHnueckmXapaKtepNCTKamM npu6opa.
3a3emnHny po3eKy. PnpncnoJb3OBAHyn ydnnHteY6eHntecb, yTO OH cha6xeh 6nnojpho po3eTko 16 A c 3a3emnHeHem.
- Ecni Плавкий пededохсань, кOTOpbIM cha6ken npnbop, neperoprt, npnbop 6ydet OTKIOUeH.ДЯ BOCCTaHOBNeHnH HOpMaIbHOI pa60tI npnbop HxKHO 6ydet DOCTaBHTB B aBTOpN3OBaHHbI ueHtp TexHnueCKOro 06cnykBaHnI.
Bo n36exaHne BpeMeHHoro naeHnnaHapjxehn HnMI MeuHaN OCBETeNbHbIX np6opOB npn He6IaROpnraTHbX ycIOBnx paObTb CTeN, peKOMeHnyETc NOkJIIOUaTb yTOK 3NEKTPOcETn C MaKcMmaJIbHbIM conpoTnBHeHem 0.37 Ω. Pn Heo6xOdUmocTn nObl3ObaTeNb MoXe TNOJyHTb INHΦOpMaunio O cOnpOTnBJeHn N B TOUke CoeINHeHn, o6paTnBUnCb B 3HeproCha6xaUOу KOMNaHnIO.
- Пибор НКOrДа He ДОЛжЕн NOMEuaTbСЯ NOД BOДОПВОДнБИ KpaH ДЯ ERо HANOJIHeHЯ BOДОI.
-При подзренин На Heиспразвhoeсь срауOTКлIOчITE npIN6Op OT cETN.Тakke BCERdaOTKIIQUaIte erO OT cETN NOcNe KaJdORONCNoJIb3OBaHnI.
Bnka np6opa He doJxHa BbIeprnBaTbcra n3 p03eTKn pbIKOM shHypa nHTAHna.
HnkOrda He norpykaTe yTIOr IIN napOBo pe3epByap B BOy IIN IIO6yIO INHyIO KnIDKOCTb.
He octabnIte np6op noB 03deNCTBnEM nOroHbIX ycNoBn (doJx, cOnHeuHbIX lyuei, MOpO3a nT. d.).
BaxHo
- 3TOT np60bO BO Bpempa60bI harpeBaetcdo BBICOKoTemnpaTypbI reHepnpyet nap,TO MOKET Bbl3BaTb OXoRn npu HENpaBnBHOJ KcPnyataun np60pa.
B npocece nCnoIb3ObaHna napOBou IuaHr, napOBa CtaHcua, MeTaNuecka IInactHa B OCHOBAHn CbeMHO NOCTABN dny yTHora (2) IN BOCO6eHHOCTn Cam yTHOr MOryT HArpeBaTbcra. 3TO HopMaNbHo. - HnKOrda He HanpaBnaIe nap Ha IHOdei nn JxNBOTHbIX.
Cneinte,HTobI shHyp He cnpnKacanc C nooBoe eue ropey ythora. - ImeiTe B BVdy, YTO NocIe OTnyckHnK HONKn BbInycka npa CnCTema MoKeT IpOIoJXaTb NODaHy npa B TeueHne HeCKoJIbKnx CeKyHd. 3TO HopMaJIbHo.
CobetbI no yTnIn3aun
IpoDyKnna HaWei CnpMbI NOCTaBnEeTcB ONTIMN3INPOBaHHOYNAKOBKe. YNaKOBKa Ipn3BeHeHa N3 He3aRpa3HnOux OKpyKaIOUyO cpey MaTePnAIOB, KOTOpbIe NoDJIeKAT yTNIN3aUN B MeCTHO CnyX6e No yTNIN3aUN OTxODB B KaYeCTBe BTOpNUHOro cbIp8n. INΦopMaunO6 yTNIN3aUN OTPa6OTaHHbIX 3NEkTpONPi6OpOB Bbl MOKeTe NOJyHTb B MeCTHO aDMNHnCTpaUN.
Даньий пибор МаркиробанВ COOTBETCTBиC ДиpeКТИВОй 2012/19/ EC o6 отра6оТавих 3ЛeКТрчecknx И 3ЛeКТроньх пиборax (o6 оTXODaX 3ЛeKТрчecKOу И 3ЛeKТронHorO obopydoBaHЯ — WEEE).
B Hei onpeJeHbI OCHOBHbI IpaBnla c6opa n yTnIn3aunn OTPa6oTabuNX 3JekTpnuyecknx n 3JekTpOHHbIX np6OpOB Ha Bcei Teppntopn EC.
OncsaHne
1.EMKOCbIJIABBODbI
2. CbemHa nOCTabKa dny yTtora
3. CnctemaФнкcaиуTHORA «SecureLock»
4. CBeTOBoi HnDnKaTOp, npEynpeXdaHouuNi O Heo6xOaUMocTN aBTOMaTHueCKoN OChCTKn «Calc»
5. CBETOBON INHДИΚATOP «EMKOCTBДЛЯ BOДы nycta»
6. CBetOBoN uHdNKaTOp (3eJIeHbI) n KhoNka «ECO»
7. CBeTOBbIe INHdNkATOpbl nporpamM rJaxKeHnA
8. Порогамma удаленин Нakини «Cale'nClean» И СБЕТОВОИНДИКАТОР
9. NpeeknouateIb nporpaMM n KoblueBaJ noDCBETka
10. BbIKnIOuATEJIb NITaHINr
11. Napoboi shnaHr
12. Φильтpr дя удаленин Нakип «Calc'nClean Perfect»
13. Hyp nHaH yCtpoBOM dJa xpaHeHn Hhupa
14. Khonka BbInycka n3 noOnBbI
15. Khonka Bbinycka n3 nooowBbl «PulseSteam»
16. CnHaJIbHaj IaMNoUka yTHora
17.ПоюшВа
18. 3aunTHa TeKCTnIbHna noDouBa*

1.Подrostobka
t CM. cnoxeHHbIe cTpaHnUbl
- OTCOEINHInTe yTHOr OT CnCTeMbI ΦHKcauNN (3), NOTAHyB BHN3 pbUar, pacnoJIOKeHHbI 3a yTHOrOM.
- YdaJInte BCE 3TKeTkn INN 3aIHTHOE NOKpbITHe C NOdoBbI yTJra (17).
- NomeCTnTe np6op rOp3oHTaJbHo Ha TBepdYU OCTOnuHByIO NOBepxHOCTb.MoXHO CHrTb IocTAbKy dIra yTORa c np6opa n NOMEcTtB YTOr Ha IOCTaBky Ha dpyroN TBepDoI YCTOnuBOr rOp3oHTaJIbHOINOBepxHOCTn.
- HanonHnte emKocTb dna BObl, He npeBbIaer OTMeTKy MAcMmaJIbHO yPoBn 3anoJHeHnA.
- Nohocbpoa3MoTaTe uHyp nHTAHnB KKnHouHTe ero B 3a3EmHeHHyO p03eTKy.
- YctaHOBtTe IJIaBBHbI BbIKIOuAteJIb NITaHn (10) B noJoxHe «BKl.»
- Пибор abTomatnueckn nepeKnOuHTcRa Ha nporpaMMy «i-Temp Advanced» (cM. pa3dE 3.1). CoOTBeTCTByUoUsn CBeTOBOn INHdkaTop
(7)HaunHtMnraTb,aYepe3HeckoIbKO MmHyT 3aropntcnoCTOHHbIM CBetOM.BblycJIbIwnte Dba 3ByKOBbIX CNHaJa,COO6uaOuix O roTOBHOCTn np6opa K pa6ote.
Pn nepBOM HarpBaHnn n noCne npoBeDnna npoUdpbI ydaJIeHnHaKnN (Calc'nClean) Tpe6yETc 6OJIbWe BpEmn dJn nepExoJa naporeHepaTopa B daHHoe COCTOHNHe.
Korda B npoecce perynphoro nCnoIb3OBaHnB naporehepaTope npncyTCTByeT BOda, BpemHaRpeBaHnI dIIOCTNKeHnPa6Oey TemnepaTypbI cokpauaaeTc.
8.ДаHHьпибор OсHAцен BCtpoEHнБIM DaTчКOM yPoBЯ BODы.Прн Heo6xOДМOCТn HANOJIHNTb EMKOCTb ДЯ BODы 3aROpNTc CBETOBОИ ИДИКATOP «EMKOCTb ДЯ BODыpycta》(5)иВы усblшITE Tpr 3ByKOBbIX CnIHajla.
BhmuHne! Ecnn npn BbIbope oJHOuN3 nporpaMM rnaXeHnE mKoCTb dJRA BObl 6ydt npctOn,TO CBETOBO uHdNKaTOp (7) daHHoN pporpaMMbl 6ydt MIRATb, noka Bbl He HanoJIHNTe EMKOCTb dJRA BObl.
BaxHo:
Bo3MOxHNO HcNoJIb3OBAHne BOIOnpoBOJHO BODbl.
ДляdoJIROBEchOrIO nCNoIb3OBAHnЯФyHKcInnnapa,CMeUINBaIte BOJOpBODHyO BODy CdNCTnJIIpOBaHHoB COOTHOWeHN 1:1.EcnB BaSeMecTHocTn BOJOpBODHaB BOa OeHb JecTKa,CMeUINBaIte ee C dNCTnJIIpOBaHHoB BOOnB COOTHOWeHN 1:2.
BbMOxTe y3HaTb O XeCTKoCTn BaSei BOOpPBOHOH BObl y OTBeTCTBeHHOH 3a BOOCha6XeHne opraHn3aun.
Bpe3epByapIJIBAIOBMOKHOOJINBaTBOy BJIIO60MOMeHT BO Bpempa60tI np60pa.
Bo n36exaHne noBpeXdEHHn/ nnn 3aqr3HeHHn EMKoCTb dIy BODbl n naporeHepaTopa, He nCNoJIb3yInTe apomATn3npOBaHHyO BDOy, yKCyc, KpaXMaJ, cpeCTBa dIy ydaJIeHHn HaKIIIN N IIO6bIe dpyrIe XIMNueckn CpeCTBa
JIO6oe NOBpeXdeHne, BbI3BaHHoe nCNoJIb- 3OBaHHem yka3aHHbIX BblIe cpeIcTB, npINBODNT K ppeKpaUeHNIO DeIcTBnRA rapaHTnN.
-ДанньиуTюг HeДОЛжeh CTOЯТь ВертИкально. Bcerda cTаБыTe erO rOpI3OHTaIbHo Ha noDCTaBkyДЯ yTóra (2).
- IOnCTaBka DnIy TIOHa MoXeT NOMEuTaBcB B CneunalbHo NODrTOBHeHHyU HnUy Ha np6ope nnB JIO6oe NODxOJaUee MeCTo PAnOM C30HOJnaKeHn.
Hnkorda he octabnayte yTOr ha npnbope 6e3 noctabkn dny yTora!
Bo BpemnepBoro nCnoB3oBaHn yTOra MOryT NOABnTbCn HEKOTOpbIe 3anaxn I nap, a TaKke 6enblte qactnCbI Ha NDoowBe yTOra. 3To HopMaJIbHO n PpeKpaTNTcR YpeE3 HeckOJIbKO MNHyT.
Bo Bpemna KhoNKn BbInycka npape3epByap nra BoDbMoKeT n3daBaTb 3Byk pa6oTaIOUeRo Hacoca. To HopMaIbHo n yka3bIbaeT,TO BOa 3aKaunBaETcB NaporeHepaTop.

2. Bыбop поррамь
CM. cnoxehhbe ctpaHnbl
Iapobaa cTaHuaOcHaueHa nepeKIOuateJeem nporpamM (9), c nOMoUbIO KOtOporo Bb moKeTe BBnpaTb pa3NnHbIe nporpAmMb rnaJehn.
Kaxdaj nporpamma aBtOMaTnueckn 3aJaET HaJIeKaUyIO KOMbHaCNIHO HAcTpoEk TEMpePaTypbI NIOaN napa, KOtopa NODxOHT dIra INaJKeHRA Tex INI INhIx IN3DeIIN.
IobopaunBa npeKnOuataJI nporpaMM, Bbl MoKeTe BbIbpaT TIN OJExDbI NII TKAHN, KOtOpYIO Heo6xOIMO rJaNTb. CoOTBETCTByIOUm CBeTOBOH INDInKaTOp (7) 6ydt MIRaTb, NOKa yTIOr He HarpeeTcAo HxNHO TeMnepaTypbI N He 3aDeiCTByeT pexIM IOnaUn npap, PpeDyCMOTpeHHbI 3aDaHHoN nporpaMMoJ.
3aTeM CBeTOBoi INDnKaTOp 3aROpNTcI NOCTOAHbIM CBeTom, N Bbl YcNbIuNTe DBa 3ByKOBbIX CNHaJa, COo6uaHOUnx O rOTOBHOCn npnbopa K paBoTe.
EcnMaTePnAn n3denn, KOtOpoe Heo6xOaHMO rnaTb, He COOTBeTCTByeT HN ODHON 3 NMeUxxCn PpOrpaMM, O3HaKOMbTEcB C peKOMeHdaunm No Tempeatype rJaXeHn, npBedeHHbIM Ha npIbke n3denn.
| Tempepatya | Поррамma |
| • Си nteteпka (Synthetics) | |
| • Шерст b (Wool)** | |
| ••• | Хлопok (Cotton) / Джинс bI (Jeans) |
| max Лен (Linen) | |
COBeTbl:
- OtcopTnpuIte npeDMeTbI oDeKDbI no CnMBOJAM INCTpyKcNIM DnI rIaXeHnHa Ix YApIbIkax, Bcerda NaHnAra C OdeJdbI n 6eJIbI, KOTOpBle HUxHO TlaIITb Pn CaMbIX Hn3Knx Tempepatypax.
-Дяглжehн Odexbln3 CmeuHNoi TkaHn BbIbepnte Tempeatpy, KOTopar COOTBeTCTByET HAn6Oone DeNkAToHoi TkaHn. - Пи comHeHЯxВToHocTnOnpeJeHЯ MaTePnaJa,ИЗ KOTOpOrcIeJahnpedMeT OdExdbI,HaunHaIte rIaIITb npn Hn3KoI TempepaTyPeIpeaIte,Kakay TempepaTypa IpaBnIbHa,nyTem rJaXeHЯ He6OJIbWoTO yUacTka,KOTOpbI ObBuHOr He BvIeH,ecNHaDeTb 3TOT ppeMet OdExdbI.
KaJdbi pa3 B Haayane nCnoB3OBAHn yTHora BMeCTe C napOM MoryT BbIXoDHT KaJIIN BObl.
TIO3TOMy peKOMeHnyETc ChaJaI npOBecTn yTHOrom nO rJaIbHOJ DOCKe HNN KcCKy HeHyXHOJ TKAHN.
Дяпolyчени ONTUMaJIbHOro pe3yIbTaTa
pepeKOKOHuaHnem rJaXeHnO TKNIOUHTe nap i
HeCKOJIbKO pa3 npOBeDHTe NO TKAHN yTHOrom 6e3
YBnaJxHEnH, YTO6bl XopoIo WbICyUINtB ee.
**IaHexue daHbIM ymIo2oM u3deu u3 Yucmou wepcmu odo6peHo kOmnaHueu The Woolmark Company npu ycNoBuU co6nOdeHua peKomeHdaquu no 2JaXeHuO, yKa3aHHbIX Ha npIbIke odexdbI, a maKxe peKomeHdaquu npou3Bodumena daHHO ymIo2a.R1502.

3. CneuaJIbHbIe nporpaMMbl

HaHnHaIe TnaIbTb, He Haxmam KHOkky BbInycka napa (14 nn 15*).

7. Béptикальный nap
t CM.cnoxoeHHbe ctpaHnbl
DaHHyO yHKUIO MOXHO NcNoB3OBaTb dIydaJIeHnA CKJaDOK C BnCraJe ODeJDbI, WTOPN T. D.
BHHMaHne!

Hnkorda He nCnoB3yIte cTpyo npa
dna o6pa6Otkn Odekbl, HaeToi Ha
JIIOdei.
HnKOrda He HappaBnaIte nap Ha JIOpei N XNBOTHbIX.
- BbIbepnTe nporpamMy «Jeans / …», yTo6bl yTbI BbIpa6aTbIbAonOTmAmNbHoe KOJIueCTBO napa.
2.ДерхиTe yTIOB B BePTnKaJIbHOM NOnOxehNHa paCCToHm 15 cm OT OeKdI, KOTopaOBpa6aTaIBaETcI napOM. - Moxho o6pa6aTbIbTaB napom wTOpbl n BnCraSyU OeJdy (NnDxaKn, PnA TbB, NaNbTO n T. d.) pacnoJIOXnB yTOr BEpTNKaIbHo n Haxkab Ha KhONky BbInycka npa n3 noDoWBbl (14 nn 15*).

8.Знeprocбержени
HaxmTe KhoNky 3Heproc6eperaHouoero peXnma (6).
Bb6paB 3heproc6beperaH pexHM, Bbl MoXeTe c3KohOMnTb Do 30% 3Heprn N Do 40% BoDbl (^*) , NOyua OTnUHbIe pe3yNbTaTbI rnaKeHHa 6OJIbWHCTBa TEkCTnIbHbIX n3dJIIn.
PekomeHdyetcnaCNOb3ObaTbObbHybIpeXIMpacxOda3HeprnTOJbKOdIraTgJaKeHnToJTOCTOnN CINbHO N3MToT KaHN.
(*) No cpaehHuO ycmaHoEneHHbIM MaKcumAnbHbIM 3HaueHuEM.

9. ABTomatnueckoe OTKJIouyehne
EcnB npocece rnaKeHnKHOJa BbInycka npa n3 noDooBbl (14nn 15*Ha pyue yTOra He haxmaeTcB TeueHne OnpedeJeHHoro BpeMeHn (8 MnHyT),napOBa CtaHcNAr ABTOMaTnueckn OTKnIOuayetc.
KoIbueBaNoDCBETka,paCnoJIOKeHHaBOKpy nepeKluOyateTn npOrpamM (9),HaChET MIRatb npn aKTINBaUcH yHKUIn ABOTMATNueCKORO OTKnIOUeHn. B 3TOT MOMENT Bbl ycNbIiHTe Tprn 3ByKObbIX CnHaJa.
YTo6bI CHOBa BKNIOHTb napOByIO CTAHUIO,CHOBa HaxMnte KhoNky BblNycka npa n3 NOOWBbl.

10. 3auntHaTekCTnIbHaNoDOWBa
CM.CJIOXeHHbIeCTpaHnUbI
3Ta noOoBa nCnoB3yeTcra (18^*) dna rnaKeHb c napOM deNkATNbIX Beuei npu MaKcMaJIbHOI TemnepaType, He nobpeJdA uX. NcNoIb3OBaHHe 3aUHTHO TKeCTINbHOI NOOWBbl TAKKe ICKHouaET Heo6xOIMOCtB NCNOB3OBaTB TpRnKy DnI pPeDOTBpaUeHn6Iecka Ha TEMhBXTKaHx. Mbl peKomeHdyem Bam nepei HauaIOM rnaKeHb nonpo6oBaT b IaNTb Ha He6OJBwOM yAcTke Ha ByTpHen CTOpOHe Beun I NoHa6IIOdaTb pe3yIbTaTbl.
YTO6bI yCTaHOBnTb 3aUHTHyIO NOOWBBy, NOMECTNE OCTpbI KOnHcK YTHOrA B KOHeu 3aUHTHO NDOUBBI IN NOTAHNTe 3a 3NaCTNUHYo NEHTy BDoJI HIXKHeN 3aHN He YTHOrA Do Tex NOP, noka OHa He 6byET ODeTa. YTO6bI CHrTB 3aUHTHyIO NOOWBBy, NOTAHTE 3a 3NaCTNUHYo NEHTy, YTO6bI OTDeJInTb NDOoWBBy OT YTHOrA.
3aunTHyTO TeKCTnIbHyIO NOOUIBY MOXHO npnoobpctn B cnyk6e NoCTnpoJax IINB CneuaJIIM3NPOBaHHbIX MaRa3HAX.
Aptnkyi nHaJneXHocTnE (BOTdene nocJe npOaXHoro 06cnyxBaHna)
HaHMeHOBaHne npHaIeJXHoCTN (B CpeUaIIu3IPOBaHbIX MaRa3INHax)
00571510 TDZ2045

11. Calc'nClean Perfect
PpeynpeXeHne O Heo6xOaMocTN aBTOMaTHueCKo OuNCTKI
CBeTOBOn HnDnKATOp ABToMaTHUeCKo OuNCTKn «Calc》(4)6yTeT MInrA Tb TOM Cnyuae,ecnn 6yTeHoe6xOJnma OuNCTka naporehepaTopa n KaMepbI npoo6pa3OBAHn yTOra.
OTKIOUHTe np6Op n octabTe eToB 3TOM COCTOHN 60Jee Yem Ha dBa yaca, 3aTeM y6eHNTecb, YTO OH OCTbI, a EMKOCTb DJIa BOdbI (1) nycta.
BbInonHnTe cIeDyIOUne DeIcTBnA:
11.1Чистkaбaka naporehepaTopa
CM. cnoxoeHHbIe cTpaHnHbI
He nCnoIb3yInTe IJnI npOMbIBaHnI naporehepaTopa CpeICTBa IJnYdJIeHnI HAKIN, NOTOMy UTO OHN MOrYT erO NOBpeIITb.
3aФнксypyTe yTIOr, nOMeCTnB HOC yTHOra B nepeHn na3 n npKxAB pbUar CnCTeMbI φHKCaUN (3) K HxKHeN YaCTn yTHOra. NocTabbTe np6Op Ha kpaIo paKOBuHbI.
2 BbikpyTnte fnnbTp (12^*) n3BNeKeTe ero.
3Дя npOMbIaHn6Ioka HAKONJIeHnHaKINI NOMeCTIe ero NOc CTpyIO npOTouHO BODBI IN pOMOIte DO NOLHO ydaJIeHnOCTaTKOB HaKINI.COXMITE ero TaK, KaK 3TO IOKa3aHO Ha pncyHke a).
Дя NOуня ONTUMaMbHOrO pe3yIbTaTAMOxHo NOrpy3nTb 6Iok HAKONJIeHЯ HAKINHa 30 MInHyT B BodY n3-NoJ KpaHa (250 m),CmeuHHyO C OndHmМepo (25 m) cpeCTBaOT HAKIN, KaK NOKa3aHO Ha pncyHke b).
3aTeM CHOBA npOMoIe 6IOK BOIoN (3TO OueHb BaxHo!).
KnKoCTb dIy ydaJIeHna HAKUN MOxHO npNo6peCTN B OTdIe NocIePdoaXHorO 0cIyKNaBaHna IIN B CneUaIIIN3uPoBaHHbIX MaRa3NuHax.
AptkynnHaJneXHocTnC (BOTJeI NocJepoJaXHoRO 06cnyKuBaHn)
HaMeHOBaHne npHaJNeJXHOCTN (B CpeuNaI3nPOBaHbIX MaRa3nHax)
00311715 TDZ1101
4 IpepeBepHnTe naporehepaTOp n C NOMOuBcTaKaHa 3aJeIe T B 6ak, HaxoJusncB KOpnyce npoBOB cTahun, 1/4 J BObl.
B TeueHne HeckOJIbKINx MNHy TBCTpXHNTe Kopnyc napOBOn CTaHcUN N NOHOCbIO BblJeTc COePJKMoe 6aKa B paKOBHy INN B Bdpo. IJI NaIpyeHn HAnNyUHX Pe3yNbTaTOB Mbl peKOMeHdyem PPOBOINTB 3Ty ONEpaHIO DBAJDbI.
Baxho: npexde yem cHOBa 3akpbItb 6ak naporehepaTopa, ybeNTecb B TOM, YTO B HEM He octanocb BObl.
6 YcTaHOBnTe pNJIbTp nIIOTHO 3aKpyTnTe erO.

11.2 OuIncTa KaMepbI napoo6pa3OBaHn yTIOra
CM. cNoXeHHbIe CtpaHnbl
HaNoJIHnTe EMKoCTb IJa BOIbI BOIOJ N3 KpaHa.
BknHouHTe yTOr B po3eTKy uYcTaHOBnte rnaBHyB bIKIOuATEIb nTuHaHn (10) B noJoxHeN e I
3ПоворауньпегкючateьnporpaMM(9), BbIbepnte nporpamMy ydaJIeHnHaKnN «Calc'nClean》.CBeTOBOn HndNKaTOp (8) NaHET MraTb.
4 IOnOxJNTe, NOKa CBETOBU INHnKATOp (8) He nepeCTaHET MIRatb H He 3arOpTcra NOCToRHHbIM CBEtOM. B 3TOT MOMeHT Bbl VCblIWIte DBA 3BYKObbIX CNHaJa.
5 IOnHMMTe yTOr Ha paKOBnHO nn HAd eMKoCTbIO, NOxOJaIeN dIa c6opa BblBaHOSeCBAObl.
6 Haxmnte Ha KhoNky BbInycka npa n3 nooBbl (14) n octopoxkno NOTpcnte yTOr. N3 nooBbl NOIbETcKnTOK, n NaHcHT BbIXOITb nap, ydaJra IMeOuNEcY aCTNUKN HaKnnn N/nn OTNOXKeHN. CBeTOBOI HHdkaTOP abTomatuecko OuncTKn «Calc» (4) norachet npnbni3ntbHo uepe3 oHy MNHYTV.
IpoDOnJkaTe OCTOPOXHO TpAChTuYTOB TeueHHe PAnu MNHyT, yDepXnBaPn 3ToM KHOKNy BbInycka npa n3 NDoOWBbHaXaToi, YTO6bI BOda n nap NOpHOCbIO ONUCTINK Kamepy napoo6pa3OBaHHa.
OTnyCTnB KHOKNy BbInyCKa npa n3 noDoWBbl (14), nobepHnte nepeKIOUoateIb nporpaMM (9) n BbI6epHte nporpamMy «Linen / max».Boa BV kamepe napoo6pa3OBaHnHaunHeT NCnapaTbCra.
8 IOnOxDnTe, noka He nCnapNTc Bcra BODa, OCTaBsaacr B kamepe. Nocne 3Toro MOxHO yCTaHOBtB rABybI BBkHouaTeNb NHTAHN (10) B noLoXeHne «O».
9 UTo6bI ONUCTnTb NODOWBy yTHOra, npOBeiNTe yTHOrOM NO MOKPON XIONuATOBymaxHOn caIpeTKe, He DOxNuDAcB erO OCTbBaHnA.

12.Чистка и ухов
CM. cnoxoeHHbIe cTpaHnHbI

BHumaHue! Cyuecmeyem onachocmb oxorob!
Ipeed npoBeHnem IIO6bIX DeiCTBn no YnctKe n yXOdy 3a 3NeKtpOpnp6opom, cJeDyET 6o3aTeNbHO OTKNIOHTb erO OT 3NeKTPocetN.
1.Послглжehухдьвiklioчпс npибори3 cetи IOxIDTEcB OCTbBaHnI NOOWBbl yTIOra, npexdyeem YNCTNTb npi6op.
2.ПоТРИTe KOPNYC napOBОN CTaHcUN,pyuKу n KOpNYC yTHOrA BnaxHOr TkaHbIO.
3. Ecnn Ha nooWBe yTora ocTanaCb rpa3b nnHaKnB, ONUCTNTe ee BnaXHOH XNONaTO6yMaXHO TkaHbO.
4.EcnCnHTeTneckaTKaHb paCnnaBnacb NOB 03DeNCTBnEM CnUkOM BbICOKOI TEMpePaTybl NDOuBbYyTOrA,OTKIOHHTe NOdau npa n cpa3y JcNCTnte HAnPiM MaTePnA1C NMOUBO BnaxHOXNONaTO6ymaxHO TKAHN, CNOKeHHoB HeCKoJIbKO CNOEB.
5. HnKOrIa He noIb3yItec b 6pa3nHBbIMn cpeiCTbAMn nI npactBopnteYAMn. Inra coXpaHHe rnaKoCTn NOOWBbl yTtora cNeDuET n36eRaTb ee pe3KOro KOHTAKTa C MeTaNueCKmN ppeMeTaMn. Hn B Koem Cnyuae He nCNoJIb3yIte dIra ONUCTKn NIOoWbbl yTtora JxecTKne r6kN dIra MbITbЯ NOCyDbI IN XmNueCKne BeIecTba.

13. Xpahenne npn6opa
CM. cnoxoeHHbIe cTpaHnUe
- YcTaHOBnTe TnAbHbI BbIKIOuAteIb NITaHnB INoIOXeHne «O» n OTKnIOUHTe UHyp NITaHnO T3JIeKTPocETn.
- Npeed y6opko np6opa ha xpaHeHne DOxNTecb erO octbBaHn.
- YctaHOBnte yTIOHa NOCTaBky (2) NIOOWB0B BnH3 n 3aΦNkCnpyIte erO, NOMeCTNB HOC yTIOrA B nepeHNn pa3 n npxKab pbIar cNCTeMbI ΦNKCaUNn (3) K HxKHeu qactn yTIOra.
4.CneTe BOy n3 pe3epByapa dny BObbl, CNOXnTe uHyp nHTaHnB O TDeJeHne dny XpaHEnn I 3aФнKcnpuIe NapOBoi UHaHr B npEpyCMOTpeHHOM KpeJIeHn. He cMaTbIbAitTe UHypbl CNIuKOM TYTO.
5.Пиперemeшни napOBоCTaHцИ ydepxBaIte yTOr 3a pyKy.

CoBeTbI NO 3KoHOMN 3JneKtpO3Heprn
Bolbwe Bcero 3Heprn pacxoyetca Ha
Bbipabotky npapa. YTo6bl cokpatntb notpe6leneHne
3Heprn, npndepknaIbTeCb cJeDyUOuX
pekomehdaun:
HaunhaTe rnaKeHne c 6eJIb, KOtOpoe Tpe6yeT MInHMaJIbHOrO TempeATyphoro pexima rnaKeHn. PekomeHyEmyTo TEMepaTypy rnaKeHn MOxHO NOCMOTpeTb HaApIbIke n3dEJIy.
CTapaIteCb IraIHTb CnErKa BnaXHbIe N3dEJIa, NOCTaBnB NapOperyJrTOp Ha MeHbUHO OTMeTKy. Ppr 3Tom nap 6yDet o6pa3OBbIBaTbcB CaMOI TKaHI, a He BV TIORe.
- Ecnn Bbl cyuinte 6enbe B cyuunbHOH MaUNHe, nCNOJb3yIte nporpamMy "noD yTHor".
| ПюбLEMа Bo3moхыпь поочны Способ устранения | |||
| С被告� Иndикатор «Cale» (4) магает. | 1. СnéдуET onolochутб naporehepatор и утог. | 1. Onolochite naporehepator и утог в COOTBECTBIMС ИНСТУКУМИ NO ONUCTKE,ПробodeHHbIMВ Дадим руховodостve. | |
| С被告о Иndикатор пюрравмьглаженя (7)notstoryн� магает. | 1. Emkocstb дя Вody (1) nucta. 1. HanonHite emKocstb дя Вody. | ||
| Палoreheparatop HeВКлочаetcra. | 1. Взнлкma пюбLEMа сэл ektrческIM coeДиЕнeM. | 1. Пюверьte shHyр п�таня (13),штенье lyHuO BvILKy iPo3eTky. | |
| 2. Главнь Вькlioчateьпитаня He BKlIoUeH. | 2. Установite Главнь Вькlioчateьпитаня (10)В поожени «I». | ||
| Утог HeHargBaetcra. | 1. Главнь Вькlioчateьпитаня He BKlIoUeH. | 1. Установite Главнь Вькlioчateьпитаня (10)В поожени «I». | |
| 2. Вьбан Нзкий TempepaTyprhboweypeKM. | 2. Установite Нжнь TempepaTyprhboweypeKM. | ||
| При Вкlioчении u3уTGORA ВьХODIT ДblM. | 1. Р pineerbOM IncnoIb3OBaHIM: NaЗавODE на НекToPbIE DeTalNiInpiv6opa NaHOCINrA HEMHOROSMa3KII, KOTOPaRpiпrelBOMHargBe yTHOra MoJezet BvDJeTbHeBOLlbSIOE KOJIuYeCTBO DblIma. | 1. ЭTO COBERSEHNO HopMaIbHoe AByLeHne,Чepe3 HeCKOJIbKO MInHy T OHO ПпeKpaTITcR. | |
| 2. Р pine noceJeYUoSeMnCNoIb3OBaHIM: BO3MOXHo,poToobBa yTHOra 3aRpy3NeHa. | 2. OChSTITE pINOswBy yTHOra B COOTBeTCTBIM CInHCTPyKUZMn PO ONUCTKe,ПробodeHHbIMNВ Дадим руховodостve. | ||
| Чeredо оТberstия Впадошеву TGORA npOTEkaetВODa. | 1.В tryp6kax obpa3OboBbAeTcRBoHbI KoHdEHCAT,пockoIbkyпада пара IncnoIb3yEtcRBrPbIe NII INOscIe ppoIdoJxHtBHLOgo nepepblya. | 1. OTbeDITE yTuGOr 3OHyIлЯжении инжмITE кнОКу BvIlNyCsKa пара u3 пошынь HeckOЛьКо pa3,пoka He obpa3yEtcRnap. | |
| Из пошыу TGORAВьOXIDIT Гразь. | 1. В EmKocStnДя параобразOBaIacb Hakinb IlinMinHepaIbHbIe OTLOJoxeHry. | 1. ВьЮннite zuKIp OUCSTKN (CM. pa3deIФункцya "Calc'nClean Perfect"). | |
| 2. БылпincnoIb3OBaHbIxHmUeCKeCpeCedCTBa IlinKakne-TO do6abKbI. | 2. Нikor'da He do6abVnye B BodупocstopOHnne BeIeCTBA.NcpoIb3yIte BODу u3 КраHA,СmeшанHyOnHa 50% cДиCTUlpOBAHBOHoi IlinДemMHepaIb3OBAHBOBnO BODу.ЧтБыОБсpeuNTbДиTEbHуOиAzΦpeKTIBHyUOpa6oty CnCTeMbIpoDAuNpapa,СmeшавTe BODу u3 КраHA cДиCTUlpOBAHBOHOBODу BCOOTHoueHIN 1:1.ЕсIn BODa u3 КраHA BВaIeM paioHe OChy b JeeCTKAY,Сmeшавte ee CДиCTUlpOBAHBOHOBODу BCOOTHoueHIN 1:2.OчсTITE noDOWBv ByTHOra BvAnxHObTtkAbyu. | ||
| Пироблим Возиможаные поочны Спостаюнения | |||
| Утю не вираватыот nap. | 1. Порогенератор не вираваты не вираваты не вираваты не вираваты не вираваты не вираваты не вираваты не вираваты не вираваты не вираваты не вираваты не вираваты не вираваты не вираваты не вираваты не вираваты не вираваты не виabayот Nap. | 1. Установке паловский вьклочател пistaшия (10) в поожени «I» и (или) на поинite emkoctь дд воры. | |
| 2. Розервар дд воры Нетравлно установлен на naporehepatore. | 2. Р锌авлно установITE pezerвар дд воры на поreserhepator. | ||
| В поочесе плajжени ожда Tem overheет и (или) плajinaев К пошев утюа. | 1. Вибраимая temпераура слшковом виска, что риз等工作 к поразхendeю ожда. | 1. Виберіte temпераура, которay пліжени матеріалдаан Horo Тл,在 oчіstіte пошву утюга влажно тkaнь. | |
| Пложва утюа CTANOBITCS kорочево. | 1. ЭтоHopmaльhoe с Videства ecрьога утюа. | 1. Ouchstite пошву утюга влажно тkaнь. | |
| Из пирobа доноспся 3вук paебы наоса. | 1. Вoda на��имается в emkocstь дд пара. | 1. ЭтоHopmaльно. | |
| 2. Розервар дд воры Нетравлно установлен на naporehepatore. | 2. Р锌авлно установITE pezerвар дд воры на поreserhepator. | ||
| 3. 3вук не пизаet. | 3.Есл 3вук не пизаet, He nspользүйтөрөрөрөрөрөрөрөрөрөрөрөрөрөрөрөрөрөрөрөрөрөрөрөрөрөрөрөрөрөрөрөрөрөрөрөрөрөрөрөрөрөрөрөрөрөрөрөрөрөрөл. abtopinizobahnii сервicnbii сеHTP. | ||
| Вхode плajжени падает дадемп. | 1. Кнорka виypska пара ИЗ падшьы бila Нжatable в Точenvide ддтөногу Всpeми. | 1. Испoly�үtte кнорky виypska пара ИЗ падшьы чeredз нековотьп интэрвалы Всpeми.Это улчшт рezултытглжени, похл背у ткань оztанется сухи и сухот лушдew derka'tфору. | |
| Во врем плajжени на ожда плajнотся моррье потна. | 3TO мозеть визвно Tem, что пар кондэнриется на Гладиь поддун ддосke. | 1.Протриптей 키анове рокьүүлүйногддэдүлүдэдүлүдэдүлүдэдүлүдэдүлүдэдүлүдэдүлүдэдүлүдэдүлүдэдүлүдэдүлүдэдүлүдэдүлүдэдүлүдэдүлүдэдүлүдэдүлүдэдэдүлүдэдүлүдэдүлүдэдүлүдэдүлүдэдүлүдэдүлүдэдүлүдэдүлүдэдүлүдэдүлүдэдүлүдэдүлүдэдүлүдэдүлүдэдүлүдэд应有的 ддэдүлүдэдүлүдэдүлүдэдүлүдэдүлүдэдүлүдэдүлүдэдүлүдэдүлүдэдүлүдэдүлүдэдүлүдэдүлүдэдүлүдэд应有的 ддэдүлүдэдүlүдэдүлүдэд应有的 ддэдүлүдэд应有的 ддэдүлүдэд应有的 ддэдүлүдэд应有的 ддэдүлүдэд应有的 ддэдүлүдэд应有的 ддэдүлүдэд应有的 ддэдүлүдэд应有的 ддэдүлүдэд应有的 ддэдүлүдэд应有的 д徴а. пспспьгддэдэдэдэдэдэдэдэдэдэдэдэдэдэдэдэдэдэдэдэдэдэдэдэдэдэдэдэдэдэдэдэдэдэдэдэдэдэдэдэдэдэдэдэдэдэдэдэдэдэд应有的 ддэдүлүдэдэдэдэдэдэдэдэдэдэдэдэдэдэдэдэдэдэдэдэдэдэдэдэдэдэдэдэдэдэдэдэдэдэдэдэдэдэдэдэдэдэдэдэдэдэдэдэдэд内的 пспспьгддэдэдэдэдэдэдэдэдэдэдэдэдэдэдэдэдэдэдэдэдэдэдэдэдэдэдэдэдэдэдэдэдэдэдэдэдэдэдэдэдэдэдэдэдэд内的 пспспьgддэдэдэдэдэдэдэдэдэдэдэдэдэдэдэдэдэдэдэдэдэдэдэдэдэдэдэдэдэдэдэдэдэдэдэдэдэдэдэдэдэдэдэдэдэдэдэдэдэdэдэдэдэдэдэдэдэдэдэдэдэдэдэдэдэдэдэдэдэдэдэдэдэдэдэдэдэдэдэдэдэдэдэдэдэдэдэдэдэдэдэдэдэдэдэдэдэдэдэdгу. пспспьгддэдэдэдэдэдэдэдэдэдэдэдэдэдэдэдэдэдэдэдэдэдэдэдэдэдэдэдэдэдэдэдэдэдэдэдэдэдэдэдэдэдэдэдэдэdэдэdэdэdэdэdэdэdэdэdэdэdэdэdэdэdэdэdэdэdэdэdэdэdэdэdэdэdэdэdэdэdэdэdэdэdэdэdэdэdэdэdэdэdэdэdэdэdэdэdэdэ dэdэdэdэdэdэdэdэdэdэdэdэdэdэdэdэdэdэdэdэdэdэdэdэdэdэdэdэdэdэdэdэdэdэdэdэdэdэdэdэdэdэdэdэdэdэdэdэdэdэt. пспспьгддэдэдэдэдэдэдэдэдэдэдэдэдэдэдэдэдэдэдэдэдэдэдэdэdэdэdэdэdэdэdэdэdэdэdэdэdэdэdэdэdэdэdэdэdэdэdэdэdэdэdэdэdэdэdэdэdэdэdэdэdэdэdэdэdэdэdэdэdэdэdэe пспспьгддэдэдэдэдэдэдэдэдэдэдэдэдэdэdэdэdэdэdэdэdэdэdэdэdэdэdэdэdэdэdэdэdэdэdэdэdэdэdэdэdэdэdэdэdэdэdэdэdэd\\\\\\\\\\\\\\\\\\\\\\\\\\\\\\\\\\\\\\\\\\\\\\\\\\\\\\\\\\\\\\\\\\\\\\\\\\\\\\\\\\\\\\\\\\\\\\\\\\\\\ | |
EcnHn Ondo n3 npBBeHHbIX BblIe DeIcTBn He ycTpaHareT np6nemy, o6paTntecb V ABTOpN3OBaHHbI CepBnCHbI ueHtp.
RO·Instruetiuni de folosire
5. Functia "Intelligent steam"
(Magazine de specialitate)
00571510 TDZ2045

11. Calc'nClean Perfect
Avertizare la curatarea automata
| الله الحرفه | الله الحرفه | الله الحرفه | الله الحرفه |
| الله الحرفه | الله الح註冊 | الله الح註冊 | الله الح註冊 |
| الله الح註冊 | الله الح註冊 | الله الح註冊 | الله الح註冊 |
| الله الح註冊 | الله الح註冊 | الله الح註冊 | الله الح註冊 |
| الله الح註冊 | الله الح註冊 | الله الح註冊 | الله الح註冊 |
| الله الح註冊 | الله الح註冊 | الله الح註冊 | الله الح註冊 |
| الله الح註冊 | الله الح註冊 | الله الح註冊 | AL |
| الله الح註冊 | الله الح註冊 | AL | AL |
| الله الح註冊 | AL | AL | AL |
| الله الح註冊 | AL | AL | AL |
| الله الح註冊 | AL | AL | AL |
| الله الح註冊 | AL | AL | AL |
| الله الح註冊 | AL | AL | AL |
| الله الح註冊 | AL | AL | AL |
| الله الح註冊 | AL | AL | AL |
| الله الح註冊 | AL | AL | AL |
| الialelelelelelelelelelelelelelelelelelelelelelelelelelelelelelelelelelelelelelelelelelelelelelelelelelelelelelelelelelelelelelelelelelelelelelelelelelelelelelelelelelelelelelelelelelelelelelelelelelelelele | |||
| الialelelelelelelelelelelelelelelelelelelelelelelelelelelelelelelelelelelelelelelelelelelelelelelelelelelelelelelelelelelelelelelelelelelelelelelelelelelelelelelelelelelelelelelelelelelelelelele | |||
| الialeLELELELELELELELELELELELELELELELELELELELELELELELELELELELELELELELELELELELELELELELELELELELELELELELELELELELELELELELELELELELELELELELELELELELELELELELELELELELELELELELELELELELELELELELELELELELELELELELELELELELE | |||
| الialeLELELELELELELELELELELELELELELELELELELELELELELELELELELELELELELELELELELELELELELELELELELELELELELELELELELELELELELELELELELELELELELELELELELELELELELELELELELELELELELELELELELELELELELELELELELELELELE | |||
| الialelelelelelelelelelelelelelelelelelelelelelelelelelelelelelelelelelelelelelelelelelelelelelelelelelelelelelelelelelelelelelelelelelelelelelelelelelelelelelelelelelele | |||
| الialelelelelelelelelelelelele白 | AL | AL | AL |
| AL | AL | AL | AL |
| AL | AL | AL | AL |
| AL | AL | AL | AL |
| AL | AL | AL | AL |
| AL | AL | AL | AL |
| AL | AL | AL | AL |
| AL | AL | AL | AL |
| AL | AL | AL | AL |
| AL | AL | AL | AL |
| AL | AL | AL | AL |
| AL | AL | AL | |
| AL | AL | AL | |
| AL | AL | AL | |
| AL | AL | AL | |
| AL | AL | AL | |
| AL | AL | AL | |
| AL | AL | AL | |
| AL | AL | AL | |
| AL | AL | AL | |
| AL | AL | AL | |
| AL | AL | AL | |
| AL | AL | AL | AL |
| AL | AL | AL | |
| AL | AL | AL | |
| AL | AL | AL | |
| AL | AL | AL | |
| AL | AL | AL | |
| AL | AL | AL | |
| AL | AL | AL | |
| AL | AL | AL | |
| AL | AL | AL |
aill llll j k 1 1 1 1 1 1 1 1 1 1 1
y. j 1.4
.7 .5
a
1 1
. jujiuall elay jui jial 5ai
1
a a a a a a a a a a a a a a a
11"10
2
9 9 9 9 9 9 9 9 9 9 9 9 9 9 9 9 9 9 9 9 9 9 9 9 9 9 9 9 9 9
(8)
3
(8)
clllg 1e g g
5
14 120 120 120 120 120 120
aill jaiy aaiy ai yaiy ay
.(4) "Calc"
aal
a 1
JolS Jok
(14)jLb!jlaiaa
."Linen / max" (9)
j 1
a 1
(10)
“O”
yIe Ii
a 1
aiaaa aaii
aiy 12

aaiiaai
1

g 1 jgl 1 g
15 15
AaBaa 2yBol
aaii 10111111111111111111111111.2
AIIa
i 1
aillaa aiaea aieae aeae aee
a c111 111 111 111 111 111 111 111 111 111 111
P 1
suiagjg 1
(4) "Calc"
j Iolai 51, jie L J 52
(1)
y
4
11:
A

5
6
1
y
.
olsoaiojdo Jdo Jdo Jdo Jdo Jdo
(3)
Jusall 1ie jglal .sall
(*12)
1
2
7
Jaa aae ae aee eae aee
LaBolal.
(a) y 令 y = k^x
j 1
(250) 30
1 25
bi = ai - 1 + ai - 2 + ai - 3 + ·s + a1 + a0
(1) p^a ) e.lally 120 a.
aia jya jao aikai kll jil jilw gle Jgssal jay
aaiiaai jaii i 1
aalaaal aalaaal aalaaal
J 1 J
.
acll aepn 5,lae! gall
12 = 12
1
5
6
8

(6)
1 40% 30% 30%
yall 2aill lal bai all gao piau y aag .aa
silaogglaiaa 9

(15 14) jlll g k j j lbc aall s
8 (jla 8) iia o jai jg all jao gall
. kilaogj jlll d g g
a a a a a a a a a a a a a a a a a a a a a a a a a a a a a a a a a a a a a a a a a a a a a a a a a a a aaa
1 1
a 11 11 11 11 11 11
aill llll jy. alsly cii 10 sall iil
aaii iiaaa aiee
150 200000000000000000000000000
y1 yolll (iiaaiil jiall)
TDZ2045 00571510
小 x_0 = 2
"Intelligent steam" 5
g j 15 14
biuill jis n 1i jilj i j! lai J say .jij j j j j
6

14) 15
.7

aaiy
i 1
1
J 1

J 1
"Hygiene" 99.9% 99.9% 99.9% 99.9% 99.9% 99.9% 99.9% 99.9% 99.9% 99.9% 99.9% 99.9% 99.9% 99.9% 99.9% 99.9% 99.9% 99
JiHg i 1.9
aai j 1 2
Jal (14) jll 1j jlc sia aai bai .3
S
aill jll jn ydi jy dai jai
aill aii iil cbl lsl
15 < x < 20.
Golal aaiil aill 1000000000000000000000000000000000000000000000000000000000000000000000000000000
Hygiene" jai jai jai jai jai jai jai jai jai jai jai jai jai jai jai jai jai jai jai jai jai jai jai jai jai jai jai jai jai jai jai jai jai jai jai jai jai jai jai jai jai jai jai jai jai jai jai jai jai jai jali jali jali jali jali jali jali jali jali jali jali jali jali jali jali jali jali jali jali jali jali jali
.9) J 100
"Calc'nClean" 3.4

11.
“PulseSteam”.4

a
aaii iiaii aiei iiaia iiaia iiaia iiaia iiaia iiaia iiaia iiaia iiaia iiaia iiaia iiaia iiaia iiaia iiaia iiaia iiaia iiaia iiaia iiaia iiaia iiaia iiaia iiaia iiaia iiaia iiaia iiaia iiaia iiaia iiaia iiaia iiaia iiaia
15) j 12
iill aieeall jai jia iabii all wll
sll 1j 1 j 1 j 1 j 1 j 1 j 1 j 1 j 1 j 1 j 1 j 1 j 1 j 1 j 1 j 1 j 1 j 1 j 1 j 1 j 1 j 1 j 1 j 1 j 1 j 1 j 1 j 1 j 1 j 1 j 1 j 1 j 1 j 1 j 1 j
cI 1000000000000000000000000000000000000000000000
Laaaspaasall jll gssj say aaii ojs
a 1
a 1
jol jol sall jodai d, jzll Jaxiin Jol iie
120 1
.
jai jia jia clai jia jia
2

J11s J11s 11s J11s J11s J11s J11s J11s J11s J11s J11s J11s J11s J11s J11s J11s J11s J11s J11s J11s J11s J11s J11s J11s J11s J11s J11s J11s
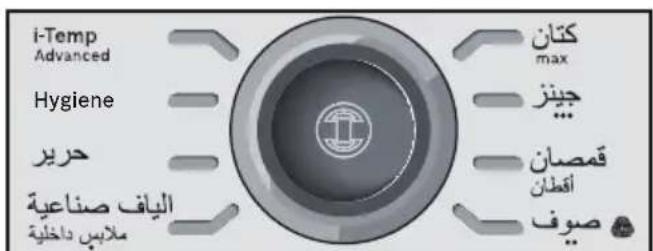
Jg 100000000000000000000000000000000000000000000
E 150000000000000000000000000000000000000000000000000000000000000
Jaiinai jia jiall Jaiinai jie all
4.2 2
glg2y gill jzJzJzI 1
pia 2a jai Jaaai J5. aii yS oS S
jglalbguo jg piojg Juaa
100
C. 1,2,3 , 4,5,6 , 7,8
jL 12g. jzjg jzjj 12
jieiiee 1
160
jie jie jie jie jie jie jie jie jie jie jie jie jie jie jie jie jie jie jie jie jie jie jie jie jie jie jie jie jie
yollll aalll llae yj. Jbn j
- = ( x1,y1) , = ( x2,y2)
iiaai iiaii jia jia jia jia jia jia
ailllglol
a glcy 1y ySll 120! pIi: oSoll
jpiinall jay g jill icg .g 0.37
J 1
Jusgill gao 1ie plll glzao
j jill 1d j jll all j jll g a j j
.
a1 = 12,b2 = 35,b3 = 48,b4 = 516
S_ OBC = 12 · BO · CD = 12 × BO × CD = 12 × 2t
S OBC = S BOC + S_ CBA
Jil gai jia clal gl jia jia jia jia jia
S OBC = S BOC + S_ CBA
()
( 12 + 13 - 13) · ( 1 + 13 - 13)
jiee 1
"10
j11
aikll 12
*Calc'nClean Perfect
slll 13
j.14
*PulseSteam" jzj
aio ooll ayol jaiol .16
ol all 2c13.17
*gaii gaii -alal alal .18
all jis 1
111 2
"SecureLock" 3
"Calc" 4
"5
()“slaa”aalb jj
51 7
ai jlll llll all jolal .8
"Calc'nClean"
aaiiaai 9
aaiiaai
Sensixx DS38
Caijai J. Bosch
JL
aiai g yic jjll Jaoai Jd oJc
- Lai 4.11 E 2011 JU 15 So
a
.Bosch
aalee
alilii jiey
j
□
□ a1c 1
□
Jaaiaiaiaiaiaiaiaiaiaiaiaiaiaiaiaiaiaiaiaiaiaiaiaiaiaiaiaiaiaiaiaiaiaiaiaiaiaiaiaiaiaiaiaiaiaiaiaiaiaiaiaiaiaiaiaiaiaiaiaiaiaiaiaiaiaiaiaiaiaiaiaia
A
jlll lalil 15
J 1 J 2. j 2 3 4 5 6 7 8 9 0
jglalil
.
.2jL5jj 1c g cIyJgSll Jell
□
a 1
.

.
KZ·ПаидаланухэнideriHyckaylbik
Sensixx DS38 6y cTaHcuaCbIH, Bosch ycbihfah XaHa 6yMeH YtIKTey Kyeecin catbIn anFaHbIb3 ywiH anrbl3 6iNipemi3.
Acnanka aphanfah naДanaHny kOHHderi HcayIbIKtbl MyKnT OKbl NbIfbHb3 Da, OHbl 6oJaaKa caTan KOnbIHb3.
Byn Hycaynbiktb Bosch kOmnaHnrcbHbIH Xepriikti 6actbl 6eTepineh KykTe n anyfa 6ona.
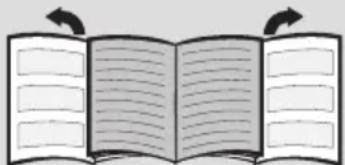
KaibnataBH KaKTabbiAiy
KannbKayinci3ik
XenireKocbInbTpyFaHytikTi KapaycbI3KaIdbipMaHbI3.
Acnanka cy tontbpydah 6ypbH HeMece OHbl naJaIaNHydAn KeiH cy KaIdbIfbIH TerydeH 6ypbH aIaJIbI aIbIPbIH YraIbIKTaH IbIFapBih3.
Acnan opHbIKtbI 6eTTe naJaIaNbIn, opHaJacybl KaKeT.
AcnantbI OHbIH TypaftbHa opHaJacTbipy Ke3iHde TypaK opHaJackaH 6eTTIH opHbIKTbI eKeHdiriHe K03 JeTKi3iHi3.
Ytik kynarah jkaFDAa Hemece OHda 3aKbIMdAHydbiH aHbIK i3depi 6oIraH Hemece on cy xi6epren JkaFdaJa Ohbl naDanaH6aHbI3. Acnantbl kaTata naDanahydaan 6ypbIH OHbl eKineTTi TexHnKaNbIK KbI3MeT Kepcety optabIfbl Tekcepyi Tnic.
Kayinti KaFdaJnapdbI 6oJbIpMay, acnan KaKeT eteTih Ke3 KeJrEHN Kymblc Hemece XeHdey, Mbicalbl, akaynlbXeJI Ka6eInh aybICTbipy TEK KaHa eKildeHren TexHnKaJbIK KbI3MeT KepCety optaJIbIFbIHda XacAlybl Tnic.
Kayinci3 naДаануTypaIbI aIdbH aHa HycKaMa any XeHe acnantbl naДaHymen 6aJIaHbICTbI KayintI YfBlnFah XafdaJaHemece Xayantbl TynFaIapDbH KapaybIMeH 8 JAcTaH aCKaH balaIapfa XeHe DeHe, ce3Hy XeHe akbl-oi KaBineTepi WeKTeyIi TyIaIapfa Hemece cAnKeCiHwe Toxipnbeci MeH 6iImi JOK TyIaIapFA aTaJFaH acnantbl naДaJalHyfa 6oJaBl. BaIaNapDbH acnann en OiHaybHa xoJ bEpMeHi3. EpeceKTePdiH kapaybIHcbI3 6aIaNapFA KypblfBiHb Ta3aNay MeH KyTIM Xacayfa XoJ bEpMeHi3.
Acnan Kocynbl TpyraH HeMece naJaHaHaHHaN KeiH cyyfa KoBilFaH Ke3iHne Ytik nen OHbIH cbIMxjEJIci 8 xactah Kiwi 6aIaIapDbIH KOJIbI XeTneTIn XepJepDe opHaIacByI KepeK.
ABAHJIAHbI3. bIcTBiK 6eT. KoIaHy 6apbcBHa 6eT KbI3ybl MymKiH.
Бул acnanTek TpyMbICTbIK XaFdaIa TeHi3 DeHreInHeH 2000 M xofapbl naIdaIahbIy ywiH XacaKaTaNFaH.
- Atanfah acnan yin kafdaibHda naiahaHyra apHaIraH, coHdbkTaH OHbl eHdipictiK MaKcaTTapfa KOndaHyra Konl bepimei.
- ByI acnIaK KaHa apHaIbMaKCaTbHa cain, rHn yTik petiHde fHa KOJaHaBlyb Tnic. AcnantbH Ke3 KeJreH backaIaN aIaHaBHyb6ypbic XHe, COHdbIKTaH, Kayinti 6oBbIn TaHbIaDbI. Hdipywi KpyblfblbI dyPbIC HeMece TnicTI TypeI naIdaIaHaBaydAn naiDa 6oNraH Ke3 KeJreH 3anaI ysiH kayapKeepwnik aptnaIbI.
- ByanacnTbTexHnKaIbIK CnNaTTaMaJapbl Ka3bnFaH TaKtaWdaFbI aKnapaTaKa cKeKc Kocy XHe KOJaHy KaKeT.
- Byn acnantbI jkpre TybiktafAH yawbikka Kocy kaxket. 3apTkbiTbMIHdeTTI Tpyde nainanany kaxket 6oNfah KaFdaJa, on 16 A caikec XeHe jkpre TybikTaNY Kocblmbi 6ap YawbikneH Xa6DbiktafHaHbIHa Ke3 keTKi3iHi3.
- Erep acnantbH k6abikTaywbl 6aKbIfblCaKaTahDbipfblwbl Kyin KeTce, acnan ewiN KaIaNbl. KaIbINTbl Kymbcbl H KaIIbHa KeTIpy ywiH acnantbl eKiJeTTeHReH TexHnKaIbIK KbI3MeT Kepcety opTaNbIFbHa XeTKi3y KaXeT 60naBl.
- ByhIn anDbH any ywiH etnei kepHeyin TEmeHdeyi Hemece kapbIKTaHdbIpydbIH aybTKybI Ky6blnbCTapbl cekinDi Herizri XaFBIMCbI3 XaFdaunapda YtikTi Keeprici 0,37 Ω 6apbHwa Xofapbl 3neKtp XeNiciHe Kocyfa Kehec bepinei.
Kaxet XaFdaJa naiDaHaHybI 3neKtpMeH KaMTy KOMNaHnCbIHah NocblNy HYKTecIHderi Keepri Typabl aKnapaTbI ana anadbl.
Cy koHTeHepin TOnTbIpy MaKcaTbIHda acnantbI eWkaWah cy Ky6bIpy WymeriHi actbHa ticKeNe opHaNactbIpyra 60MaJdbI. -
AcnantbI ap6ip kOJaHbIcTah KeiH Hemece akaynbIK 60nybl MyMkiH XaFdaIa KyaT XeiciciHe aKbIpaTbIHbI3.
AubipdbihcbimbIHywibkTaHKJkbIn 乌bifapyfa60JMaIdbI. -
Ytikti ewkaaah da cyfa Hemece Ke3 KeJreH backca cybIKtbIKKa baTbIPMaHbl3.
- AcnantbI aya-paBJI xaFdaJnapbIHbIN ocepine (XaH6bIp, KYN caynepei, a3x XHe T.6.) KaNDbIpMaHbI3
Byn:
- PnIaIaNHy 6apbIcbIHda 6yI acnAn Jxofapbl TeMnepaTypara DeiH KbI3aIbI XHe 6y IbIFapaIbI, 6yI dypbc NaIdaJHa6aFaH XaFdaIaDa KYIOJIepDI TyDbIPbI MymKiH.
Ytik TocemecinH (2) Ty6iHderi 6y wnaHrici, Herizri CtaHnra, MeTann TaKTacbl XeHe ocipece YtIK naDanaHbInFaH Ke3de Kbl3bIN KeTyI MymKiH. Byn KaNbIntbI XaFdaN. - BydBi eUkaan aamapra Hemece XaHyapnpra 6aftTamaHb3.
KyaT cbIMbIHbIH 0TKip 3aTTapMeH Hemece Kbl3bIN TpyFaH YtIKTIH TaabHImeH XaHacybiH 6oJdbIpMaHbI3.
BydI icke Kocy KypaIbIH Xi6eprenHeh Kein H Kyne Kbicka KocbIMwa yaKbITTa 6y IblfapaTbIHbI TypaIbIXabapap 60nbIHb3. Byn KaIbINTbIXymbcXaFdaBI.
Kadere kapaTy TypalbKeHec
Bi3iH TayapnapbIMb3bIH KaTAmacbl Dypbc OINaCTbIPbIFan. ByI Heri3iHeN ekIHwi Iwnki3aT peIHne KaIbIKTapbl Kdere Jkapaty BoBHwa JepriikTI KbImET Kepcety OptaBfbiHa Xi6epiNy Tnic NaCTamaHbIH MaTePnaIapdbI KOJaHydAn TpyaBl. Eckipren KypblIbnapdbI Kdere Jkapaty TypaBl aKnapattbl JepriikTI kana ekIMwiniIRHeH anyblb3ra 60nabI.
Бул acnanTa konДаныТьИн эл ektpnik кэHe зл ektpондыК acnanTapra KaTbIcTbI 2012/19/EO EуponaЛьВИ ДиpeKTиВасыHa сαнКec бeлгинReH (эл ektpnik кэHe эл ektpoHДыКжбДыКаДыКтapbl
-33KK).
Byn Hycaynbik EO 6apnbik aymarbl ywiH KOJaHaBInaTbIH naDanaHbInFaH acnantapdbi KaTapy XHe KaTta eHdey BoHbHaXaannbI waPTapdbI aHbIKTaNDbI.
Cnnattama
- Cy KoHTeHepi
- AInb6aJIbyyTik Tecemeci
- "SecureLock" ytiKi KyIbInTay Kyyneci
- "Calc" abTomTb Ta3anay TypaJIe eckepTy INHДИΚAToPbIHbI H WAmbl
- "Cy KoHTeHepi 6oc" INHdNkaTOp 7aMbI
- KyaattbI yHemdey "eco" Tymmeeci XeHe HndnKaTOp WAmbl (Kacbl)
- YtikTey 6aFapJaMaMacbHbIH INHdNkaTOp WamdApbl
- "Calc'nClean" KaIbUuΦnKaTTapDbI JxOJ 6aFapIaMaCbI JxHe INHdNkATOp IaMbI
- BaFДapIaMa ceIeKTopbI JxHe cEyIeJIeHreH caKuHa.
- "Kocy-ewipy" Kyat Tynmeueci.
- By wlahrici
- "Calc'nClean Perfect" kaK XnHaBfIbIbI*
- Koinmacbi 6ap keji ka6eni
- BydBi 6ocaty TymMeucesi
- "PulseSteam" 6y cokkbicb tymeupeci*
- YtikTIN INHnKaTOP WAmbl
- Ta6aH
- Kopfahbiw Tokbima Ta6aH KaKnaFbI*

1.ДаиьИндыIKTap

Kaibnataih KaTapbIH Kepy
- YtIKTH apTKbl XaFbIHda opHaJnackan nHITipeKTI apTKa TapTy apKbIbI yTtKi KYJbINTay KyneciHeN (3) 6ocatbIHbI3.
- BeJricin Hemece KopfaybiW KanTamaHbI Ta6aHbIHah (17) anbIn KoYbIHb3.
- AcnantbI KeJdeHeHHeH Teric, TypaKbI 6eTKe KOnbHbI3. Ytik TceMeciH acnantah anyfa 6oJaDbI XeHe YtIKTi 6acka 6epiK, TypaKbI, KeJdeHeH 6eTke KoiofA 6oJaDbI.
- Cy konTeHepiN ToTbipraH Ke3de cy "max" DeHreB 6enriciHeH Xofapbl 6oImaybHa Ke3 XeTKi3iHi3.
- XeJI ka6eJIiH (13) ToJIbIbIMeH TapKaTbIN aJIbIHbI3 XeHE OHbI Xepe TYbIKTaJFaH po3eTKaFA XaJFaHBI3.
- KyaT TyImeUeciH (10) KocyIbI KyiHe OPhaTbIHbI3.
- Acnan abTomaTbI Tpye "i-Temp Advanced" 6arJapnAmacbHa aybicaDbI (3.1 6eJIIMiH kapaHbI3). Tnici nHdkaTop wambl (7)
XbInbInkTan, bipHeWe MNHyTTaH KeiH TpyaKtbl Typde XaHbIn TpyaBl. Eki Dbl6bIcTbIK CNrHaN ecTIjin, acnantbIn naJaJaHaBlyf a daBH eKeHdiRIN KepceTeDi.
By rehepaTopb TEK 6acTaNbI KbI3bipy Ke3iHne Hemece KaK KeTipy apekeTi (Calc'nClean) opbHdAnFaHHaH KeiH ocbl KyIre JeTy ywiH KebipeK yaKbIT KaKeT eTeDi.
Cy aTeTteri naIaIaNHy 6apbIcBInDa
aJIeKaIaHb 6y reHepaTopbIHda 6ap 6oJFaHda,
Kymbc TeMnepaTypacbHa KeTy yWIn Kbl3dbpy
yaKbITb XblIaMbIpaK 6oJaDbI.
- Byn acnanta kipictipinrech cy deHreinihn daTurri 6ap. "Cy KoHTeINHepi 6oc" INDkATOp 7ambl (5) XaHaDbI XHe cy KoHTeINHepi TOnybl KaKet 6oNfAHaDa Yw Dbl6bICTbIK CnHaNecTIneDi.
Ha3ap aydapbIbI3! Erep yTikTey 6aFdapnamapbIHbH 6ipi TaHdaJFaH Ke3de cy KOHTeHepi 6oc 6oNca, MyHdaJ 6aFdapnamaFcEKeC KeNeTIH INDnKaTOp 7Mb1 (7) cy KOHTeHepi TOJMaFAHsa XbINbIKTaIbI.
Byn
KaIbIbI bIyMeKTeH aIbIHfAH cybl naIaIaNHyfa 60laIb. OHTaIbI 6y fUHKcIcIBHbIH Kbl3Met Mep3IMiH y3apTy ywiH, WymeKTeH aJIbIHfAH cybl Ta3apTbIJFaH cymeH 1:1 apaKaTbIHacbIHda apaJAcTbIPbIHbI3. C3dIn aMafBbIH3daFb I WymeKTeH aJIbIHfAH cy KepeMek cy 6oIca, OHbl Ta3apTbIJFaH cymeH 1:2 apaKaTbIHacbIHda apaJAcTbIPbIHbI3.
Cydbin KepMeKtiniri Tpyanbl Xepriikti cy XeTKi3yUwicInen 6inyHizre 6oanaBbl.
Cy koHTeHepiH acnantbI naIdaIaHy 6apbICbIHda Ke3 KeJIreH yaKbITTa TOnTbIpYfa 6oIaNbl.
Cy KOHTeHepi MeH 6oJIepDIn 3aKbIMdaNyBH XHe/HemecE NaCTaHybIH 6oNDbipMay yWih cy KOHTeHepiH napfom, cipke, kpaXmaI, KaTbI KeTipriu 3aTTapDbI, KocnapanapdbI HeMece XmMnAblk eHIMdepDIn eWkaHdaJ 6acaTypin KocnaHbI3.
Korapbda aatafah Kypaandapdbi KOJaHydaH TybHaRaH Ke3 KeJreH 3aKbIMdaHy KeniJeMe KywiHIn KOyblNybiHa eKeIeI.
- Ytik Ta6aHbIHda KAty ywiH XacaMaHaH. Ohbl apkaWan TIK Kynde Ytik TecemecInDe (2) opHaJnactbipbHbI3.
Ytik Tecemecih acnantafbl aphaibj KacaKaTaNfah KaNTara Hemece YtIKTey aMafbHaH TbIC TnicTi Jepre KOIfa BoJaBl.
Ytikti ewkaaah acnantbH yctiHe Tocemeci3 KoMaHbI3!
Anraaw pet naJaIaIaNHy Ke3iHne yTik 6eJrini 6ip 6y meH niCTi epi TaBaHbIHda (17) aK 6eJIweKTePdi Tydbipybl MymKiH, 6yN KaIbINTbl XaFdai JxHe 6ipHeSe MInHyTTaH KeiH TOKtaIbI.
- BydBi 6ocaty TyMeueci 6acbInFaH Ke3e, cy KOHTeHepi copy Dbl6bcih WbIFapy MymKiH, 6yI KaNbITbI XaFdaI cyDbIH 6y KOHTeHepiHe copbInFaHbIH KepceTeDi.

By cTaHcNcBbHda ap TpyPi YtikTey
6aFapnamapbIH TaHdayfa apHaIFaH
6aFapnaMa ceJIeKTopbl (9) 6ap.
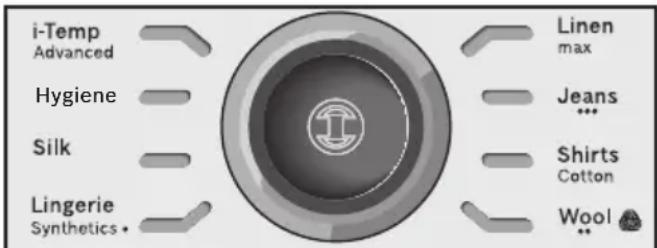
Op faapama TaHdaHaN KIM TypiHe
XapacbIMdbI TemnepaTypa MeH 6yDbIH TniCTi
TipkeciH aBTOMaTTbI Type OPhataDbI.
Baapama CeNEKTopbH bypay apkbbl
YtIKTeJIeTIN KNIM MeH MaTaHbIH TyPiH TaHdAyFa
6oJaB. TnicTI INDnKaTOP WAmbl (7) TaHdaIraH
BaFapama YwIH XapamDbI TemnepaTypa MeH
6y DeHreInHe XeTnerE Hse XbInbIBkTaIbI.
Ocbl Me3ETeH bactan, INDnKaTOP WAmbl
TypaKbTbIX KaHbIH TypaDbI XeHE eKI Dbl6bICTbIK
CnHaI ecTiin, acnantbIH naDaJahbIyra
DaBH eKeHdiRiH KepcTeDi.
Erep yTKeTeTIN KNIM KOJKeTImdi
SaFapamaJapdbIH eWkaChbCiHa COnKEc
KeImeCe, KIMHiN KYTIM 3aTTaHbAcbIHnda
KepcTeJInReH TemnepaTypa HycKaynapbIH
TekcepH3.
Temperatura
Programa
CnHTeTnKa
KyH
MaKaTa
MaKc.3bIfbip
KeHe:
KnIMdepi Ta3anay 6enrinepiHIN XancbipMaIapbl 6oBbHwa ipikTeHi3. OpkaaHaE h a3 TemnepaTypada yTikTeNyre TnicTi KImHen 6actahbl3.
- Apanac MaTanap ywiH, en ceImTaJMaTara CnKeC KeIeTIH TempePaTypaHbI TaHaHbI3. Erep KIMHH MaTePnaIbH 6iMceH3, yTKteydi TEmeH TempePaTypaJa 6actaHbI3 XHe KUREH Ke3De aDeTTe KepIH6eHTIn KiKcHTaB 6eJIkTi yTKtey apKbIbI TaICTi TempePaTypaHbI aHbIKTaHbI3
- Θp KoIdaHydbi 6acTay aIdbIHda, cy TaMusbInapbI 6y BoNbIMeH dispensed 6bIfapbIInybl MymKiH.
- CoHbIKTaH yTikTi aIbImeH yTikTey TaKTacbIHda Hemece 6ip KeceK MaTaDa KoJaHbIN KepiHi3.
KakcbI yTikTey hAtnxKepeihe kon XeTki3y MaKcTaBHnA KNIMdePdi KeNTipy YwiH, yTikTeyDIn CObIHDa 6ycbI3 yTikTeHi3.
**Бул умikmin КУннен Укалган Бимdepiузд узд май рд mazа КУннен Жасалган KUIMdepoin 3ambeicihdezi ке ocbl умki m eHdipywi Ka6dbikmafah Hyckaynapra cau умikmey yuin kondahyra боламьин The Woolmark Company Кулmarан. R1502

3. Apнайы 6aFДapЛamalap

3.1 "i-Temp Advanced" 6aftapnaamacbl
KaibnTaH XaTapBIn Kepy
By cTahnucbHda "i-Temp Advanced"
6aFapnaMaCb 6ap. Erep 6yn 6aFapnaMa
TaHaJraH 6oIca, yTKteyre 6oNaTbIH 6apNbIK
MaTaNAP ysiH xapacbIMdbI TempepaTypa MeH
6yDbH TniCi TIpKecimi opHaTbInaDbI.
"I-Temp Advanced 6aTapnAmacbi" Dypbc TaHdaJMaFaH TempepaTypaIbI KIM 3aKbIMdaJyblH aJdbH aJaBl.
"I-Temp Advanced" 6aIapnamacbIH yTikteyre 60MaTbIH MaTanapra KOndaHyra 60MaNdbI. KInMHIN KapNbIKwacbIHda KeTIpiInreH YcBHeCTapRa JyRiHi3 HEmece KInReHde KepiHBeiTin Xepdi yTikTeN KepiHi3.

3.2 “AntiShine” 6aФapJaMaCbI*
XaBbInaTbH XaKTapbH Kepy
By 6y cTaHcNcBnHa "AntiShine"
6aFapnAmacb 6ap. Erep 6yn 6aFapnama
TaNanfah 6oJca XaHe 6yDbI 6ocaty TymMeucesi (14 Hemece 15^* ) Kni 6acblnca, KmIMde
YtikTeyDen naiDa 6oNaTBIn XaJIbIpaFaH
6enrIepDIn opbIn any Kayni a3aAdbI.

3.3 "Hygiene" 6aFaplamacbI*
By 6y cTaHcNcB apHaBb "Hygiene" 6a4apnAmacbIMeH Ka6dbkTaNFaH.
Byn JxHaaptnaBil rurnHeHbIK 6yMeH eHdey TexHoIorNcBIMKpO6TapbIH 99,9 naBIsH K0aDb. MaTalapdbIH 6apbIK Typnepi ywiH XapaMdbI XeHe KaBbIH MeH ce3IMTaI 6yNbIMdAp ysiH acA TImDi 6oBbIN TaBbIaNbI.
TemnepaTypa MeH apalbIK 6ydbIH 6iperei TipkeciMi XIMnIbIK KocnaIapDbIH KaKeTIHCI3 3aIaNcbl3daHdbIpblIsh ecepdi KaMTaMaCbI3 etedi.
TomeHderiJe epeKeTeiHi3:
- CeIeKTopbI (9) 6ypay apKbIbI "Hygiene" 6aIapJaMaCbIH TaHdaHbI3.
- YtikTi 3aJanaIcbl3daHdbpy KaKet KIM He MaTaFa KOJIbIHbI3.
- TnneHaBbIK 6ydbIH yIKeH MeJIWePepin 6byfApY yIiN TyTKaHbIH TeMeHI XaFBiHaFBI 6ydbI bocAty tyImeWecIH (14) 6ipHeWe pet 6acbHbI3. CoHfBI HtIXKeHi JAKCapTy yIiH KNIMdi akbpHdAn TOIbIFImeYtIKTeHi3.
EckepTnepe:
"Hygiene" 6aIapnAmacbHbIH XOFapbl HtNKeJIirIH KaMTamacb3 ety yUHH, KyeHcI 20 MInHyTTan KeiH 6actanKbI KaNNbHa KeNTipy KaKet. "Hygiene" INdNKatop IaMbI 6ec pet XbINbIKTaIbI XHe 6y rehepaTopbi "i-Temp Advanced" 6aIapnAmacbHa aBTOMaTTbI TypDe aybicaIbI.
ErepapekeTITiHygiene"6aFapnAmacbHda
kajractbypKaKet 6oJca,"i-Temp Advanced"
6aFapnAmacbHbH6aFapnAmaXapbIK
DIOdbI XbINbJIbIKayDbI TOKTaTbIn,eki
DbIBCTbIK CnHAn 7bIKnaraHwa KyTiHi3.
Bydah Kein ceNektOpdbI (9) bypay apkbbl "Hygiene"6aFapnAmacbH KaTataHaHbI3.
KyaTbI yHemdey peTteYiH "Hygiene" 6aFapnaMacbi TaHaanFaH Ke3e 6eJceHdipy Mymki H emc.

3.4 "Calc'nClean" 6aFapnamacbl
116eJIMIH KapaHbI3.
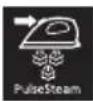
4. "PulseSteam" Функцясbl
XaBnIaTbIH XaKTapBH Kepy
Byn acnanta KaTbI 6yKteyepdi Ka3yFa apHaJFaH apHaNbIM yHKun8ap.
Byb6ocaty TuMeeweci 6eNceHdpinreH Ke3de, 6y rehepaTopby w KaTb by cokkbicbin 1bIfapadla,6y MaTa iWine Tinti Tepehipek eHei.
TyTKaHbIH KOFapfbl KaftbIHdafbl 6y COKKbcbl TyMeWeciH (15*) XbIaDAM 6acbHb3.
Anatnap:
- By TYImeUeCIN KbIJaM KaI Ta 6acy apKbIbI b6y COKKbIaPbIH TOKaTfA 60JaBl.
“PulseSteam"Функцясbl anfaW pet naindaHbIraHda,6ipa3 cy tamuIapbl nainda 6onybl MymkIn.Функцянbl 6ipa3 yaKbl TnaindaHaHcH COH CY TAMuIapbl KOblnabl.
5. "Intelligent steam" Функцясы
Byn Jyne de nHTeNKeTyaIbI 6ybl 6bacpy KypaIbI 6ap, on 6ybl 6ocaty TyMeWeeciH (14 Hemece 15^* ) 6ocatKaHHan KeiH KocbIMwa 6ybln a3FaHTa MeIsepiH KaMTaMaCbI3 eTeDi. KocbIMwa 6ybl apdaibm 6ybl 6ocaty TyMeWeeciH kaTa 6acy apkblbI TOKtAtyfa 6oJaBl.

6.БусьИЗ yTikTey
YtikTei 6aTaHb3, 6ipak 6yDbI 6ocaty Tymmeuein 6acnHa3 (14 Hemece 15^*

7. Tik kyndeeri 6y
KaBnAubH XaKTabbH Kepy
BynФункия iniHin Tpyran Knimdepereri, nepdenepeperi xhe T.6. 6yKteyepdi xa3y ywiH KOnDaHbIJaDbI.
EckepTy!

By afbHbH ecki 6yIbIMdapFa TikeJe 6aFBITTamaHbI3.
Буды ewkaшан aamapra Hemece XaHyapnapra 6arblTAmhbl3.
- OHTaIbI 6y MeIWepiHe KOnKeTki3y yUiH "JxNHCbl /···" 6aFdApJaMaCbIH TaHaHbI3.
- YtikTi 6yMeH eHdJIReH KIMHeH 15 cm apbl TIK Kynde yCTaHbI3.
- YtikTi TIK KyIre KOIO XeHene 6yDbI BocatTy TymMeueciH (14 Hemece 15^* ) bacy apKbIbI Temip nepdeneepi XeHene acnabl KniIMdi (NndkaKTap, KcOHTOMdeP, KypTeIep...) 6yMeH eHdeYe 6oJabl.

8. KyaattbI yHemdey "eco" Tymeeweci
KyaattbI yHemdey TymMeWeecin 6acbHb3 (6).
Erep KyattbI yHemdey pettey taHaJraH 60n
KyaattbIH 30 naBIsBH XHe cy TyTbHydbIH 40
naBIsBH yHemDei anacbI3 *XHe
KnIMepiHi3dH K6icin YtIKteren Ke3e coHa
KaKcbI HtNXeJepre Xete anacbl3.
Kanbintbl Kyat petteyih TeK xhiiKe xe He eTe yinanaHrah matanap ywiH naDanaHy ycblnabl.
(^*) Makcumanobipemmeymeh canbicmbipFaHda.

9. ABToMaTTbI eWipy
Erep ytktey 6apbcihda ytk tykacbHafbl
6ydbl 6ocaty Tymeeweci (14 Hemece 15^* ) 6enrili
6ip MEP3imde (8 MmHyT) 6acblmai Typca, 6y
ctahnrcbl aBTOMaTTbl Tpyde eweidi.
ABTomaTTbl ewipy 6encHeipiren Ke3de,
6aFdapnaMa ceNeKTopbHbH (9) aHaJnacbHdaftbl
cayneI caKHa XbInbIKTaIdbI. Yw Dbl6bICTbk
CnHaI
6ip yaKbTTa eCTIJIeI.
By cTaHcIaCbIH KaIHaKaOy yWIn 6yDbl 6ocatTyuMeWeecIH KaITadH 6acBhl3.

10. Matahbi KopfaiTbIH Ta6aH
XaBnataBH XaKTapBH Kepy
MaTePnAnDbI KOpFauTbIH YtIK KOHdbIpMacbi (18*) H3iK MaTanapDah TirInreH KNIMdepdi eH Kofapfbl TeMnepaTypaDa 3aKbIMdaMaJ byme HytKeiHde KOnDaHbIaNabi. Ta6aH Xa6bIHbIH naJaIaNHy KyHriPT MaTanapDa XbIINbIP daK KaIdbIpMay yuH KOnDaHbIaNbIH dctypni WyBepekti KaKet etneNi
HətIXeHi TeKcepy MaKcaTbIHda anDbimHe MaTaHbIi uKi 6eTIHderi KiUKeHe XepDi YtIKTeyre KeHec 6epinei.
Tabah Xa6bHbH yTikKe 6eKtTy yWHi H yTKTH yWbH Ta6ah Xa6bHbHbIH WTeIHe OPHAbHb3 XaHe CO3bIFbI TACnAbH yTKTH TeMeHri apTkbl XaFbHbH yTlHeh 6epi K6eKTImEreHwe TapTBHb3. Ta6ah Xa6bHbH bOcAty wih CO3bIFbI TACnAbH TApTBIn, YTKTI WbIFapbHbI3. KopFaHbI ToKbIma Ta6aHdbI catyDah KeiHRI KbI3MeT 6eNIMHe HeMece Be6-caITbIMbI3daH catbIn anyfa 6oJaB1.
KocbIMwa KypaIbIH KObl (Kenildi Kbi3MeT KepceTy opTaIbIfbl)
KocbIMuKaPaNDbH aTaybl (MaMaHaNDbipBlnFaH dyKeHep)
571510 TDZ2045

11. Calc'nClean Perfect
ABTomaTbI Ta3anay TypaJIbI eCkepy
"Calc" abTomatbTa3aJay TypaIbI eckepTy INdikatop wambl (4) KblnbIbIKtan, 6oJIpe MeH yTikTH by Ty3iNy kamepaBt H Ta3aJay Kepek eKeHdiirn 6inDipei.
Acnantbki eki cafattan apTbik yaKbITka axbipatyni KaIdbipbIHb3, acnan cybkXhe cy KOHTeHepi (1) 6oc ekeHdiin MyKnT TeKcepH3. TEmeHderiJepeket etIH3:

11.1Боилердітазалay
XaBbTaBtH XaKTabBtH Kepy
Boinepdi Ta3anay ywiH kaK KeTipriu 3aTTapdbi naDanaHaBbI3,ce6eO np aOp OHbl 3aKbIMdaybl MYMKIN.
YtIKTH yMbIH anDbIHfbl OnbIKKa eHri3y XHe KynbINTay KyneciH (3) YtIKTH apTkbl XafbiHa
KapcbjXblnXbI TY apkbIbI YTI KTI Tyfbipra 6ekitiH3. AcnantbI bIDbc-aK XyaTbIH WYHfbINaHbIH XneIHe KOybHbI3.
2 KaK XnHaBbIbH (12*) 6ypan WbIFapbIb3.
3 KaKaXHaBbIbH Kyy yWiH:
a) KaK XINHaBbIbH Cy WMyMeRIH acTbHa OPHAJaCTbIPbIn, KaK KaNDbIKTapbl KOIBIMarHaJXyBbHb3. OHcypeTTe KepceTIirReHdei KbICbHb3.
b) KaK XnHaftbIbIH KaKTbI KeTipriu CyNbIKTbIKTbIH MNeIWepiMeH (25 Mn) apaJnactbIPbINFaH WMyKeTeh aJIbIHfAH cyFa (250 Mn) 6aTbIPbIHbl3.
KaK KeTipriu CyNbIKTbIKTbI KeniDi Kbl3MeT Kepcety opTaIbIFbIMbI3DaH HeMeCe MaMaHaHaDbIPbIJFaH DyKeHdepDeH anyFa 6oJaBl:
KocbIMwa KypaIbIH KObl (Kenildi KbI3Met Kepcety opTaIbIfbl)
KocbIMwa KypaIbIH aTaybl (MaMaHdaHdbIpbINfahn dyKeHdep)
311144 TDZ1101
4 By rehepaTopbIn aydapblfAn Kynde yCTan XeHe Kymbipa naIdaIaNbIn, BoIIepdi (Herizri 6enimderi) 1/4 nITp cyMeH TOITbIPbIHbI3.
5 Herizi 6eimdi 6ipa3 yaKbIT cinkin, OHbl Hfbluifa HeMece Wemiuke ToIbIfbImeH Terin 6ocatbIbI. Y3ik Htixere Kety yuH ocbl apekeTTi eki petOpbIHday ycblnlaBl.
Byn MaHbI3DbI: KaTaNa6y aNDbIHda, 6oJIepe cydbH KaImaHaNbHa K03 KeTki3iHi3.
6 KaK xHaftbH aybIcTbipBn, 6epiK 6eKtiH3.

11.2. By Ty3iNy kamepacbH Ta3aJay
KaibnataBH XaKTapbH Kepy
1 KoHTeHepDi WymekTeH.
2 Keni KaBeiin XaIra, KyaT TymMeueciH (10) "I" KyiHe opHaTbIHbI3.
3 Baftapnama CeIeKTopbH (9) 6ypay apKbIbI, "Calc'nClean" KaIbIuΦnKaTTapDbI JKOI 6aftapnAmacbIH TaHdaHbI3. INdNkatop 7ambl (7) KblbIbIKtai bactaIdbI.
4 INdikatop wambl (8) XbInbIbIKTaydbI TOKtaKaHwa XaHE TypaKbI XaHbIN TypMaFaHwa KyTe TypbHb3. Eki Dbl6bICTbICnHah 6ip yaKbTTa ectiJeDi.
5 Cydbj XnHay yuH yTikTi uYHfbJlHa He KOHTeHepDIn YCTiHe H YCTaHbI3.
6 BydbI 6ocaty Tymeewecin (14) 6acbHb3 Xhe yTikTi akblipbIHdAn ceJIknDeTIH3. Ka KHe/Hemece Ty3JnicTepeIN KaNdbIFbIH Ketipin, yTikTH TabahbIHan KaHaK cy afbIn, 6y mbira bactaHbI.
UamamEn 6ip MNHyTTan KeiH, "Calc" aBtOMaTTbI Ta3aNay TypaJIbE cKepeTy INdNKaTOp 7aMbI (4) eWeedi.
BybI bocaty tymeu c6acbltin TyprAh Ke3de, cy MeH 6y kamepaHbTolbIFbIMeH Ta3anaaTbIHd aEIn ytIKti akbpHdAn cenkijdtiHi3.
7 Bydbl 6ocaty Tymeewecih (14) 6acnai, 6aFapama ceJIeKTopbH (9) bpaHbI3 XHe "3bHbIP / MaKc." 6aFaplamacbIH TaHaHbI3. By ty3iny kamepacbIHdafbI cy 6yra aHana 6actaIbI.
8 Kamepada6ykin cy 6yra aHnmaHaHa KaTHi3. COnaH KeiH KyaT TymMeueciH (10) "O" KyiHe opHaTa anacbI3.
9 Ta6aHbI Ta3aJay ywiH, bICtbIK yTikTi cyJIbIMaKtA KINm YcTIHeN Jypr3y apKbIbI Ke3KeJrEHN KaIbIKTbI KeTipiHi3.

12. Ta3aJay XəHe TexHnKaJIbI Kbl3MeT KεpCeTy
XaBbInaTbH XaKTabH Kepy

Ha3ap aydapbHbI3! Kyuin kany kayni 6ap!
Ke3 KeIreH Ta3aJay XeHe TexHNkaJIbIK Kbl3MeT KepcTeY XyMbICTapbIH Xypri3yJeH 6ypbIn acnAnTbIH aWaNbI aNbIPbIH YawbIKTaH WbIFapbIHbI3.
- Ytiktereh coh aibipdbiaxbipatbIn, Ta3aay anDbIHda acnantbI cyblHbI3.
- YtiktiH KopnycbiH, TyTkacbH XaHe Ta6aHbH Dblkbl WybepeKneH CypTiHi3.
- Erep Ta6an KipMeH He KaKneH JaCTaHraH 6oJca, OHbl bIJaIbI MaKTa MaTaMeH Ta3aJaHbI3.
- MaTa CnHTeTnKaIbIK 6oNca, on yTik TaBaHbIHbIH Xofapbl TempepaTypacbIHbIH ocepineH epin KeTyi MymKIn. MyHdai KaJaIda 6yDbl eWipin, Ke3 KeJrReH KaIDbIKTbI Depey KaIbIH 6yKTeJIreH, Kypfak MaKTa MaTaMeH cyptiHi3.
- A6pa3nBti eHimDep He epitKiWtepdi eWkaWah naIdaIaHa6aHbI3. Ytik Ta6aHbIHbIH TericTirih caKtay ywiH OHbIH MeTJI 3aTTapMeH JxHaCybHa J0J bepMeH3. YtIKTI Ta6aHbIH Ta3aIay ywiH eWkaWah Da bIDbc KyyfA
apHaJFaH KaTbI bICKbIIITap MeH XHMnJIbIK 3aTTapIbI NaJaJaHa6aHbI3.

13. AcnantbI caKtay

Kaibnataih KaKTapbIH Kepy
- Kyat Tynmeecin "O" KnyiHe opHaTbHb3 XaHe KeJI Ka6eJIi H aKbIpaTbHb3.
- AcnantbI caKaTay aJIbIHJa aPkaIIaH CyblbIHbI3.
- Ta6aHda TpybIn, YtIKTi Tcemecine (2) OPhaTbHbI KHe YtIKTiH YllbIH aIIbIHfbl OyBikKa eHri3y KHe KyIbIITay KYneCIN (3) YtIKTiH apTKbI KaFbHa KapcbI KblkBiTy apKbIbI 6ekiTHi3.
- Cy KOHTeHepiH 6OcaTbHb3, KeJI Ka6eJIiH cbIMdbI caKtay KaITacbIHda KHe 6y IHaHricIH caKtay 6ekitkiHne caKaTaHb3. CbIMdApDbI TbIM TbIFb3 opaMaHb3.
- AcaNTbI KblkbHcy Ke3iHde YtikriT TTKacBHHCTaTI TypbHb3.

ÖheprnayHbI yHeMdey 6oBbIHwa KeHeceTp
KyaT K3i K6iHece 6y TY3yTe KeTei. Kyat K3iH
PaiJaHaHyIbI a3aHTy YIiH TMeHdErI
KeHeCTepi KaPaHbI:
Ytikteydi eH a3 temnepatypabIK Ytiktey Taptioh KaKeT eTeiH KNIMHeb6aCTaHb3.
YtikteydiH KaKeTTi TeMIIepaTypacbIH 6YbIMHBIH XaIcBiPmacbIHAn KOpyre 60JaIbI.
By pteriHIN ToMeHipeK 6eIgire KoIbI, a3aIa IbIMKblMaTaHbI YtIKTeYrTe TbIPbcIbIbI. By Ke3e by YtIKTe eMec, MaTaHbIH 3iHJe TY3iJIeTIH 6oJaIbI.
Erep ci3 MaTaHbI KeTTipy MaIIHHAcbIHJa KeTTipCeHi3, "BycI3 YTIkTey" 6aFJapIaMaCbIH KJIaHbIHbI3.
| Macele bIrkTmAl | ce6eTrep Ⅶeɪm | |
| "Calc"инДиКATOP шамы(4) ЖыПБЛБТСАДы. | 1.Бойер мен утikti тазалay көрек. | 1.Бойер мен утikti осы�н�уckayлбтаб тazалay�нсayларынсаөдкес |
| Ytiktey багдамасы инДиКATOP шамы(7) уздikс3 ЖыПБЛБТСАДы. | 1.Су контейни(1) boc. 1.Су контейни.TOTьрьИЗ. | |
| Бу reHepaTOpby Косылмайды. | 1.Байалыс Mэсelени opbIH anДы. | 1.Жел kabeniH (13), aibipdIжehe posetkaHbTeKcepiH3. |
| 2. Куат түмeeсi ковлмafан. | 2. Куат түмeeсiн (10) "I" куиHe opHaTBHbI3. | |
| Ytik кьзбайды. 1. Альш рет падалану барысында: көбip acnantaraftb Курмдacstap 3aybITTa cənl МaianHraHжэ He alraш pet Кьзган кеinde TUTIN shIFapByb МуMKH. | 1.Куат түмeeсiн (10) "I" куиHe opHaTBHbI3. | |
| 2. Көин падалынган кеinde: Табан падалы муMKH. | 2. TempepaTpyaHbI Kaalaylby Kiyre opHaTBHbI | |
| Ytik кьзьлfанда Одан ТUTIN shIFa бacrakdы. | 1.Альш рет падалану барысында: көбip acnantaraftb Курмдacstap 3aybITTa cənl МaianHraHжэ He alraш pet Кьзган кеinde TUTIN shIFapByb МуMKH. | 1.Бул kabittbJx JaFdai JxHe 6ipa3 yakltTah Куин ToKtaIbI. |
| 2.Табанды осы�н�уckayлбтбТаЗалay нчKaylaRaHa CseKec TazalaHbI3. | ||
| Су tabандыf tecikter apkblы aradы. | 1.Су түктөрдin iшинde buyanaDы, cesbei bumeh утiktey alraш рет падалынluya demece y3ak уaklt paildaanhaBIMaFAN. | 1. Ytikti утiktey aiMaFbHaN apbI KoynHbI3 Же He By ShIFapBybIMaFANa 6bDy Bocaty Түмeeсiн 6acbHbI3 |
| Kip tabanhah шыfasы. | 1.Бойер hemese утikte кak He Minerpandap XInaIdbI. | 1.Тазалay aiHaMbHbIN opbIДaHbI3 ("Cal'nClean Perfect" beLimH kapaHbI3). |
| 2.Химялбк eHimder hemese Kocanap naiaanbHbIaI. | 2.Суfa eskaaH anHmderdi KocanbHbI3. ДостuindeHren hemese MineraPbI ketipirtreH cymen 50% apanaCTbIPbIraH шумктЕн ablHraH cydIЯ nidaanbHbI3. Онтайы 6byФункцясbIbIcN KbI3MeT МерзimH y3apTu yUHIn,шумктЕн ablHraH cydIЯ ta3apTbIaHaN cymen 1:1 apakatbHacbHdA apanaCTbIPbIbI3. CizdIn aiMaFbHbI3daRbI ShUyMKeTHe ablHraH cy kepMek cy bOJca, onbI ta3apTbIFaH cEmeH 1:2 apakatbHacbHdA apanaCTbIPbIbI3. TabaHdI bILFaIbI MaTAmEH Ta3alaHbI3. | |
| Ytik ewkahanday Бушгармады. | 1.Бойер ковлмаган hemese cy КонтейнрсIбoc. | 1.Куat түмeeсiH (10) "I" куиHe opHaTBHbI3 xOHe/Hemese cy кonteHepiH TOJIbIbIbI3. |
| 2.Су контейнepi koprunc iшин dypbc 6ekitllmeReH. | 2.Су кonteHepiH koprunca duþbIctan kaɪtadaH 6ekitllH3. | |
| Месе biktmaj | себentерmessage | |
| Ytikтелен ким Кара ТUCKE аиhalды жэne/ Неме табанга Жабicbп Тур. | 1. Танданган Temnéрату вим Жогары жэne кимдд зakымдаы. | 1. Ytikтелен И матерпал ушin ТИСТI Temnéрату вим тадаыз жэн Табанды Блficdы matameh таразалыз. |
| Табан коньр ТUCKE aiHaHdbl. | 1. Бул узak мерзим di уздikci3 пайдаличдын edetteri нотижeci.. | 1. Табанды bilfalsы matameh таразалыз.. |
| Acnantan copy Дыбысы Шыfasы | 1. Су bu konteinerhepe copbylnda. 2. Су konteinerepi kopnycka дурьс 6ekitimereн. 3. Дыбыс тokтамаы. | 1. Бул калынл bu karдай. 2. Су konteinerepi kopnycka kainta dam dypbctan 6ekitiniz. 3.Еер дыбс тok tamaca, bu reheparotbivn пайдалибаныз жэн оkljetті Тхнkaлык Кызмет керс耗 optaыfcын хабарласы. |
| Ytiktey Барысында КысыIM shыfынbl. | 1. Буды bocatyту яймeecci TыIM узak sesendii boлган кээн сэнkeсиншту киibбылп Турran. | 1. Буды bocatyту яйmeeccin yziniicstepmen пайдалиынл b3.Бул утiktey hétinxecih жak capтады, сбебi тokымалap bумeh ehandeldi, кебedi жэн дурьс утiktelidi. |
| Ytiktey Барысында су Дытары кимдde пайда солады. | 1. Бул жагдay утiktey takтасында Будын кондениланын байлбicitы boлуы муdki. 6. | 1. Ytiktey taftacbivn TOkblma kaknafbn cyprihiz kээн оларды Кррату ушin кe3 Калгсу Су дakтабин утikteliz. |
| Су дakтабi "PulseSteam" Функциясын пайдалиу | 1.Су дakтабi падаланган сон салкындату кezihdeшалтб Бу конденилсын байлбicitы boлadы. | 1. "PulseSteam" Функциясын bipa3 уaklt пайдалианган кeин су тamшыларын Табаннш улcfуы тokтайды. |
| Шалг пайдалиу барысында Кызды. | 1.Бул калынт buжагд. Бул Буншун apылы etyden пайda 6oladы. | 1. Шалгire утiktey bapысында ТИмейтIDs Оны Карama-Карсы КаKKа Кочын. TOKТады. |
| Боиердану агда... | 1. Асданын тубihan оралackан ках кинafышы (12*) bocan ketti. | 1. Кад кинafышын берik bekittiz. |
| Ytik песmere (2) Кочьлфанн Кechin ТOKтамаы. | 1. "PulseSteam" Функциясы бelenд. | 1. Icke косу кральн ча ра Када басындз жэн утik bipдeн жуmbicын ТOKТады. |
Korapbda6epinreH ueiimdepH ekaibcbl KemeKTecneren Kaafda, oKeJnti TexHKaIbIK KbI3MeT KepceTy opTaIbFbHa xaabapnaCbHbI3.