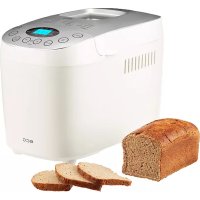
PCB 82120 - Bread maker ECG - Free user manual and instructions
Find the device manual for free PCB 82120 ECG in PDF.

User questions about PCB 82120 ECG
0 question about this device. Answer the ones you know or ask your own.
Ask a new question about this device
Download the instructions for your Bread maker in PDF format for free! Find your manual PCB 82120 - ECG and take your electronic device back in hand. On this page are published all the documents necessary for the use of your device. PCB 82120 by ECG.
USER MANUAL PCB 82120 ECG
9. Bezlepkov chlieb (GLUTEN FREE)
Pre chlieb z bezlepkovej muky a bezlepkovych zmesi na pecenie. Bezlepkova muka vyzaduje dlhsi cas na absorpciui tekutin a ma takisto odlišné charakteristiky kysnutia.
10. Kolac (CAKE)
Hnetenie, kysnutie a pecenie ak pri pecni chleba, no kysnutie s pridanim sdy alebo prasku do peciva.
11. Džem (JAM)
9. Glutenfreies Brot (GLUTEN FREE)
Please read carefully and keep for future reference.
Warning: The safety measures and instructions contained in this manual do not include all potential conditions and scenarios. The user must understand that common sense, caution and care are factors that cannot be integrated into a product. Therefore, the user is responsible for these factors when using and operating this appliance. We are not liable for damages caused during shipping, by incorrect use, or the modification or adjustment of any part of the appliance.
Fundamental precautions shall be observed when using the product, including the following:
- Always power the appliance from the power supply of the same voltage, frequency and required capacity according to the product type label. The outlet must be installed in accordance with applicable electrical codes according to EN.
- Do not use the appliance if the cable or the plug are damaged, if it fell or if there was any other damage and it does not work properly.
- Do not immerse the appliance and the power cord in liquids, do not expose to rain or humidity and use water only for cooking in accordance with this operating manual.
- The appliance must not be used close to water, in bathrooms, showers or close to pools, where it might fall in water or water may splash the product.
- Do not bend the power cord over the edge of a table or other sharp edges, do not twist them or leave them in the vicinity of hot surfaces.
- Always use the appliance on an even, stable surface to prevent overturning it. Do not use the product in sinks, dripping off areas and other places with uneven surface. The appliance must be placed in a stable position with handles placed so as to avoid spilling of hot liquids.
-
Do not put it in places where it may be exposed to excessive heat from stoves, heaters, gas appliances etc. Do not place it on the electrical or gas cookers and ovens.
-
If you do not use the appliance, switch it off and unplug it from power. Disconnect the power cord by pulling the plug – never by pulling the power cord.
- Never connect and switch the appliance on without inserting properly the pan with non-stick surface.
- Do not leave the appliance on with empty pan.
- Check the power cord, the plug and whole appliance regularly for any damage. If you find any damage stop using the appliance immediately and contact the service centre.
- Do not use the appliance for any other purpose than it is designed for.
- Do not use outside.
- Store the appliance inside in a dry place.
- Do not try to repair or modify the appliance or change its parts. There are no parts inside repairable by the user.
- Let the appliance cool down before cleaning and storing it.
- Do not place other objects on the appliance, do not insert foreign objects in the openings and do not use it close to walls, drapes, etc.
- The appliance warms up during operation. Do not cover any openings. Do not touch hot surfaces. Always use handles and buttons.
- Do not try to carry a hot appliance.
- Do not switch the appliance on if it lies on the side or is upside down.
- Using accessories and attachments not recommended by the manufacturer may endanger persons and property.
-
This appliance is designed for household use and similar places, like:
-
kitchenettes in shops, offices and other work places
- appliances used in the agricultural industry
- by guests in hotels, motels and other residential areas
-
in bed and breakfast establishments
-
This appliance may not be plugged in an outlet controlled by a timer or controlled remotely.
-
ECG is not liable for damage or injury caused by negligence or improper use. Prior to use do not forget to read carefully all instructions and information. The external surface of this device heats up and may cause burns. Do not leave unattended when children are present.
-
This appliance can be used by children aged eight and older and by the physically, sensory or mentally impaired or by individuals with insufficient experience and knowledge, if supervised or trained to use the appliance in a safe manner and understand potential dangers. Children must not play with the appliance. Cleaning and maintenance operations performed by the user shall not be carried out by children, if they are not older than 8 years and under supervision. Children under the age of 8 must be kept away from the appliance and its power cable.
Do not immerse in water!
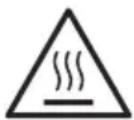
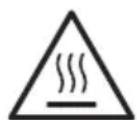
Hot surface!
Marked surfaces become hot during use
GB
Danger for children: Children may not play with the packaging material. Do not let children play with the plastic bags. Risk of suffocation.
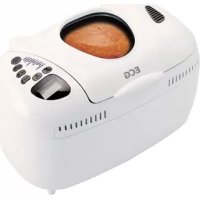
DESCRIPTION

Bread make parts
- Lid
- Observation window
- Two kneading paddles
-
Removable baking pan
-
Control panel B with indicator
-
Body of the bread maker
-
Hook for removing kneading blades
- Measuring cup 400ml
- Measuring spoon

Control panel
START/STOP button
- Press START/STOP to start a program. The indicator lights up and the colon starts flashing. After starting a program all other buttons except for START/STOP are inactive.
- Press the button START/STOP for half a second to enter the pause mode. If you do not perform any action within 10 minutes, the program resumes and will continue until it is completed.
- When you press the button START/STOP for three seconds, you cancel an active program. When the program stops it is indicated by a beep. This function (turning off by long press) is there to prevent accidental cancelling of the program.
If you want to remove the bread, press START/STOP to end the baking process.
MENUButton
- Press MENU to select the required program. Each time you press a button (accompanied by a beep) you switch to the next program. The display shows the numbers of different programs in succession.
COLOR button
- Press COLOR to select the required browning setting: LOWER (light), MEDIUM (medium), DARK (dark) or RAPID (rapid). The COLOR and RAPID options can only be used in some programs, see the "SETTING OPTIONS" table in the "BAKING BREAD INSTRUCTION" chapter.
LOAF SIZE button
- Use this button to select the gross weight of the loaf (750 g, 1000 g, 1250 g). The LOAF SIZE selection can only be used in some programs, see the "SETTING OPTIONS" table in the "BAKING BREAD INSTRUCTIONS" chapter.
TIMER + / - buttons
- You can use timer to postpone baking to a later time. Press (+) and (-) to delay the process by up to 15 hours. The set time will appear on the display. The minimum possible delay time is dependent on the selected program and the size and the degree of baking of the bread.
Notes:
- Set the timer only after selection of the program (MENU), weight (LOAF SIZE) and browning (COLOR).
- Do not use timer with recipes using eggs and milk products (milk, cream, cheese...).
- Press (+) (-) to select when the bread should be ready. Keep in mind that you have to add to the the delay time the length of the program. After completing the program the appliance switches for 1 hour to keep warm mode. Press (+) or (-) to prolong or shorten the delay interval. (one step 10 minutes). Maximum timer delay is 15 hours. The countdown starts after pressing the START/STOP button. The indicator on the display flashes.
OPERATINGINSTRUCTIONS
STARTING
Before first use
- Read all instructions and important information.
- Remove all packaging, including labels and stickers and wipe the surface with a damp dishwashing cloth. Make sure that all the parts were supplied in good condition.
- Wash all accessories in warm soapy water using a sponge or dish towel. Rinse off the detergent well and dry everything thoroughly. Do not use abrasive cleaning products, scrubbers or metal utensils, the non-stick surface could be damaged.
- Never immerse the appliance, cable or plug in water.
- Place the bread maker on a flat, heat resistant surface.
- Switch the bread maker to baking mode and bake on empty for about 10 minutes. You can detect a slight odor when you first switch it on. This is normal and the odor will disappear in few seconds. Then let it cool down and again clean all removable parts. After you dry them thoroughly and assemble them, the appliance is ready to use.
Attention: Danger of falling objects. The bread maker can rock or move during kneading. You have to place the bread maker always in the middle of the kitchen counter, far from the edge.
On/Off
- Before use, always check for damaged power cord or plug.
- Plug the power cable of the bread maker in the electrical outlet. A beep sounds and the display shows "03:15". The colon between "3" and "15" does not flash. Default program is "1". The arrows are directed to "1250g" and "MEDIUM", which are the default settings.
- Press MENU to select a program (see the list of the programs), press LOAF SIZE to select the size of the loaf (weight) and press COLOR for degree of browning. Press TIMER +/- in case you want to set postponed start.
- Press the button START/STOP to start the set program.
Note: Long press the button START/STOP to stop the baking process and the bread maker returns to default settings.
Power outage
In case of power outage of less than 10 minutes the program will automatically continue when power is restored without pressing START/STOP. In case that the power outage lasts longer, the program will not resume and
the display will show default state. If the dough started to rise, remove the ingredients from the pan of the bread maker and start anew. If the dough did not start to rise yet before the power outage happened, you can enter the program again from the beginning and start it by pressing START/STOP.
Warning messages on the display
Note: Message HH and LL does not appear in the JAM and BAKE programs.
HHH - This warning means that the temperature in the bread pan is too high. Press START/STOP to stop the program, disconnect the power cable, open the lid and let the appliance cool thoroughly for 10-20 minutes before you restart it.
- This warning means that the temperature in the dough container is too low. Place the bread maker in a warmer environment. Once the container has warmed to its operating temperature, this message disappears after about 20 minutes.
- This warning means that the thermal sensor is disconnected. Press START/STOP to stop the program and disconnect the power cable. Have the sensor checked in an authorized service center.
- This warning means that a short circuit has occurred in the heat sensor. Have the sensor checked in an authorized service center.
Keep warm temperature
After finishing the baking program, the bread maker will beep 10 × and will enter the temperature hold mode for 1 hour. The display shows 0:00.
If you want to end the temperature hold mode, press the button START/STOP for 3 seconds (until you hear two beeps).
Tip: Removing the bread immediately after baking prevents the crust from browning, but it is crispier.
List of programs
1. Basic bread (BASIC)
For white and mixed bread mainly containing basic bread flour.
2. French bread (FRENCH)
For light breads baked from fine flour. Usually the bread is fluffy and has crispy crust. The program is not suitable for baking recipes requiring butter, margarine or milk.
3. Whole wheat bread (WHOLE WHEAT)
For baking whole wheat bread. This setting has a longer period of preheating enabling the grain to soak up water and swell. We do not recommend using the delayed start, which could impair the final quality of the bread. Whole grain flour usually produces a crispy thick crust.
4. Sweet bread (SWEET)
For breads with ingredients such as fruit juices, grated coconut, raisins, dry fruits, chocolate or added sugar. Due to longer rising stage, the bread will be light and fluffy.
5. Quick program (SUPER RAPID)
Time of kneading, rising and baking is shorter than for the basic bread. The bread is denser. Quick breads are prepared with baking powder and baking soda, which are activated by moisture and heat. For perfect quick bread it is recommended to place all the liquids at the bottom of the pan and dry ingredients on top. During the initial mixing of bread dough the dry ingredients could accumulate in the corners of the pan and it may be necessary to assist the machine with mixing to prevent clumping of flour. In this case use rubber spatula.
6. Dough (DOUGH)
This program can prepare yeast dough for buns or pizza, etc., which will be baked in regular oven. This program does not contain the baking stage.
7. Pasta dough (PASTA)
This program prepares the dough for pasta. This program does not contain the rising and baking stages.
8. Program for making bread containing buttermilk or yoghurt (BUTTERMILK BREAD)
9. Gluten free bread (GLUTEN FREE)
For bread made of gluten free flour and gluten free mixtures for baking. Gluten-free flours require longer for the absorption of liquids and also have different rising characteristics.
10.Cake (CAKE)
Kneading, rising and baking as with baking bread but rising with the addition of soda or baking powder.
11.Jam (JAM)
Use this program to produce jams and marmalades from fresh fruit. Do not increase the amount and do not let the food overflow over the edge of the baking pan during cooking. If the pan of the bread maker overflows, immediately turn the bread maker off and carefully remove the baking pan. Let it cool and clean it thoroughly.
12. Baking (BAKE)
If you need to finish baking the bread, because it is too light or insufficiently browned. This program does not contain rising and dough resting stages.
When the program is finished, the "BAKE" mode keeps the bread warm. This prevents unwanted moisture. Is you want to interrupt the BAKE function, press the button START/STOP for 3 seconds. To switch off the bread maker entirely, disconnect the appliance from the electricity.
In Programs 1, 2, 3, 4, 5, 6, 8 and 9 an acoustic signal will sound and the message "F J J" will appear on the display in the time appropriate for adding toppings (e.g. nuts, grains or fruits). The ingredients thus added will remain baked on the surface of the bread, because the kneading process has already been completed.
If you have chosen a delayed start or want to have the ingredients baked inside the bread, add them to the baking pan right at the beginning along with the other raw materials. So that the kneading and rising process proceeds properly, we recommend that the ingredients should be chopped thoroughly.
Instructions for baking bread
Note: Some programs allow/do not allow individual settings, see the table below:
Setting options
| Program number | Program name | Loaf size | Colour | Rapid | Message "add" to add toppings | Delayed start | Keep warm |
| 1 BASIC YES | YES YES YES YES YES | ||||||
| 2 FRENCH YES | YES YES YES YES YES | ||||||
| 3 WHOLE WHEAT YES | YES YES YES YES YES | YES YES | |||||
| 4 SWEET | YES YES YES YES YES | YES YES | |||||
| 5 | SUPER RAPID | YES | YES | NO | YES | YES | YES |
| 6 | DOUGH | NO | NO | NO | YES | YES | NO |
| 7 | PASTA | NO | NO | NO | NO | YES | NO |
| 8 BUTTERMILK BREAD | YES YES | NO | YES YES | YES | |||
| 9 | GLUTTEN FREE | YES | YES | NO | YES | YES | YES |
| 10 | CAKE | YES | YES | NO | NO | YES | YES |
| 11 | JAM | NO | NO | NO | NO | NO | NO |
| 12 | BAKE | NO | YES | NO | NO | YES | YES |
- Grasp the handle of the baking pan and pull it out of the bread maker.
- Attach the kneading blades to the drive shaft inside the baking pan. We recommend that the blades be lightly lubricated with butter or margarine. Their removal after the bread baking will be easier.
-
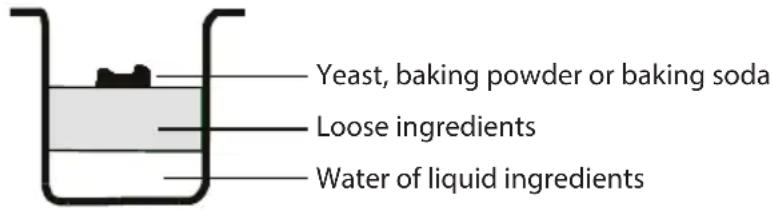
Place ingredients in the baking pan in order specified by the recipe. First add liquids, loose ingredients (sugar, salt, and then flour) and finally yeast, baking powder or baking soda.
-
Measure ingredients carefully and add to baking dish according to the recipe.
Note: make a small dent with your finger on the top of the heaped flour and put the yeast in it. Make sure that the yeast does not come into contact with salt or liquids.
Tip: Measure the individual ingredients including additions (nuts, raisins) in advance.
- Put the baking pan back into the bread maker and make sure that it is firmly seated in place. Then close the cover of the bread maker.
Note: The baking pan must be properly seated in its place to ensure proper mixing and kneading of the dough.
-
Plug the bread maker in the electrical outlet. You will hear a beep and the LCD display will show default program 1.
-
Press MENU to select the required program.
- Using the button LOAF SIZE set the arrow to the required weight (750 g, 1000 g, 1250 g). Programs 6, 7, 11 and 12 do not allow weight selection of the dough.
- Press COLOR to set the baking degree to LOWER (light), MEDIUM (medium), DARK (dark), RAPID (rapid). Programs 6, 7 and 11 do not allow baking degree selection.
- By pressing the buttons TIMER + / - you can set delayed start. (Not available for program 11).
Note: Do not use this function for recipes with milk products, eggs, etc. If you want the bread maker to start making bread immediately, you can skip this step.
- Press START/STOP to start program. The bread maker will beep once, and the colon in time display will flash. The red indicator is continuously on. The kneading paddle starts mixing the ingredients. If the delayed start is activated the kneading paddle starts mixing ingredients only at set time. If the delayed start is set, the red LED will be continuously on after approx. 30 seconds of flashing.
- In time suitable to add other ingredients (fruit, nuts, raisins) the bread maker beeps ten times. Open the lid and pour in the ingredients. This time will vary according to a particular program. Programs 7, 10, 11 and 12 do not allow adding of ingredients.
- After the process is complete the bread maker beeps ten times and the bread maker goes into keep warm mode for one hour. When you press the button START/STOP for three seconds you can stop the keep warm mode. Disconnect the power cable and using oven mitts open the lid of the bread maker.
- Let the loaf cool slightly before removing it. Then with oven mitts turn the baking pan slightly counterclockwise and remove it by the handle from the bread maker.
Warning: Baking pan and bread can be very hot! Proceed carefully.
- Using oven mitts turn the baking pan upside down over a cooling wire mesh or over clean kitchen counter (with folded handle of the pan) and shake it gently until the bread falls out. You can gently loosen the loaf from the walls of the non stick pan using soft spatula. Once you remove the bread remove the kneading paddles from the loaf using a hook. Clean them and carefully store them for next use. Attention: Proceed carefully, the bread is hot. Never remove the paddles using hands.
- Let the bread cool about 20 minutes before slicing it. We recommend that you slice the bread using electric slicer or serrated knife.
Note: You can store the uneaten bread for up to 3 days in a tight plastic bag at room temperature. You can store the bread in a refrigerator in a plastic bag for up to 10 days.
Best ambient temperature
The bread maker is able to work in a wide range of temperatures, however the room temperature can affect the size of the loaf. The recommended room temperature is in the 15^ to 34^ range.
Notes on ingredients
Bread flour
Bread flour is the main ingredient in the baking of bread and is recommended in most recipes for yeast bread. It has high protein and gluten content (it can also be called high gluten flour) and after rising keeps the volume of the dough and prevents its fall. The flours differ in different areas. Gluten content is higher than in the medium-ground/fine flour, so that it can be used to bake larger loaves with richer internal texture.
Medium-ground/fine flour
Flour without baking powder suitable for "quick" bread or bread baked in quick program. Bread flour is more suitable for yeast bread.
Whole grain flour
Whole grain flour is ground from whole cereal grains. Bread made from this flour will have more fibre and higher nutritional content. Whole grain flour is heavier and in consequence the loaves can be smaller and have heavier texture.
Contains nutrients from the outer skin of the grain and gluten. Many recipes usually combine whole grain and bread flours to produce optimum results.
Rye flour
Rye flour, also called dark-grain flour, is a kind of flour high in fibre and is similar to whole grain flour. To achieve a large volume after rising it must be used in combination with a high percentage of bread flour.
Self-rising flour
Flour containing baking powder, used mainly to bake cakes. Do not use self-rising flour in combination with yeast.
Corn and oat flour
Corn or oat flour is ground from maize or oats. These flours are optional ingredient when baking coarser bread, they improve flavour and texture.
Sugar
Sugar is "food" for yeast and enhances sweet taste and the color of the bread. It is a very important element for rising of the dough. White sugar is usually used, but some recipes may require brown sugar or icing sugar.
Yeast
Yeast is a living organism and for maintaining freshness should be stored in the refrigerator. It needs carbohydrates from sugar and flour as food. Yeasts for use in the bread maker are sold under various names: Yeast for bread maker, dry yeast or instant yeast. The yeast produces carbon dioxide during rising. Carbon dioxide makes the dough fluffy and softens the inside of the bread. Check the expiration date before use. Return the unused yeast in the refrigerator immediately, high temperatures kill the yeast. When the dough does not rise it is usually caused by bad yeast.
Salt
Salt is necessary to improve the taste of the bread and the color of the crust. It is also used to limit the activity of the yeast. Never use too much salt in a recipe. The bread will be bigger with lesser amount of salt.
Eggs
Eggs can improve bread texture, make it more nutritious and larger. The eggs must be mixed with other liquid ingredients.
Fat, butter and vegetable oil
Fat can refine the bread and extend its durability. Butter should be melted before adding it to liquid ingredients or cut into small pieces.
Baking powder
Baking powder is used for rising quick bread and cakes. Since it does not need long time for rising and produces air on chemical principle, the air will generate bubbles refining the texture of the bread.
Baking soda
Similar use like baking powder. You can use it in combination with baking powder.
Water and other liquids (always added first)
Water is a basic ingredient for bread baking. Generally, the water should be at room temperature. Some recipes may require milk or other liquids improving the taste of the bread. If the recipe requires milk products never use the delayed start function.
Tips to bake a good bread
Use exactly measured amounts.
One of the most important conditions for baking good bread is the correct amount of ingredients. Measure carefully each ingredient and add to the baking pan exactly according to the recipe. We strongly recommend that you use a measuring cup or a measuring spoon, because the wrong amount could significantly affect the result.
Correct order of the ingredients
Always add the ingredients in order according to the recipe.
FIRST: Liquid ingredients
THEN: Dry ingredients
FINAL:Yeast
Yeast should be added only to dry flour and should not come into contact with a liquid or salt. If you set a long interval for the delayed start, never add perishable ingredients such as milk or eggs. After the first thorough kneading of dough a beep will sound, indicating the time to put in fruit ingredients into the mixture. If these ingredients were added too soon, they would lose their flavour during the long mixing.
Liquid ingredients
Water, fresh milk or other liquids should be measured with a measuring cup with distinct markings and neck. Place a cup on the kitchen counter and bend, so that you can accurately check the level of the liquid. When measuring oil and similar ingredients, clean the cup thoroughly.
Measuring the dry ingredients
Gently pour the measured ingredient in the measuring cup using a spoon and then even it with knife. Never scoop the ingredient directly with the measuring cup, you could scoop up to one teaspoon more this way. Never press down the content of the measuring cup. Tip: Stir the flour before measuring to aerate it. When measuring small amounts of dry ingredients, e.g. salt or sugar, use a measuring spoon and make sure that it is even when measured.
TROUBLESHOOTING
| PROBLEM POSSIBLE | CAUSE SOLUTION | |
| Odor or smell of burning • Flour or other ingredients spilled out or fell out of the baking pan in the appliance. | • Disconnect the bread maker from power supply and let it cool completely. Wipe off the excess ingredients with paper towel. | |
| The ingredients do not mix even though you hear the motor running. | • Incorrectly inserted baking pan or the kneading paddle. • Too many ingredients. | • Make sure that the kneading paddle is entirely inserted on the shaft. • Measure exact ingredients. |
| The display shows "HHH". • The internal temperature of the bread maker is too high. | • Let the bread maker cool between individual programs. Disconnect the appliance from the power supply, open the lid and remove the baking pan. Let cool 15 - 30 minutes before starting a new program. | |
| The display shows "LLL". • The operating temperature of the bread maker is too low. | • Place the bread maker in a warmer environment. The message disappears in about 20 minutes when the bread maker heats up. | |
| The display shows "EE0". • The heat sensor is disconnected. | • Have the sensor checked by an authorized service centre. | |
| The display shows "EE1". • A short circuit occurred in the heat sensor. | • Have the sensor checked by an authorized service centre. | |
| The window is fogged or covered with condensed water drops. | • This may occur during rising or mixing. | • Condensation usually disappears in the baking stage. Clean the window between uses. |
| The kneading paddle is removed together with the bread. | • Thicker crust when setting higher degree of browning. | • There is nothing unusual in removal of kneading paddle together with the loaf. Once the loaf cools, pull out the paddle from the loaf using a spatula. |
| The dough is not thoroughly mixed; flour or other ingredients adhered to the sides of the baking pan; the loaf is coated in flour. | • An incorrectly installed baking pan or kneading paddle. • Too many ingredients. • Gluten free flour is usually very moist. It could require external intervention in the form of scraping the walls using rubber spatula. | • Make sure that the baking pan is properly inserted in the bread maker and the kneading paddle is properly attached to the shaft. • Make sure that the ingredients are properly measured and added in correct order. • Remove the excess flour after the loaf is baked and cools off. Add water with teaspoons until the dough forms into a loaf. |
| The dough has risen too high or it raises the lid of the bread maker. | • Incorrectly measured ingredients (too much yeast, flour). • There is no kneading paddle in the baking pan. • You have forgotten to add salt. | • Measure the ingredients exactly and make sure that you added sugar and salt. • Try reducing the amount of yeast by ¼ spoon (1,2 ml). • Check the installation of the kneading paddle. |
| Dough does not rise; small loaf. | • Incorrectly measured ingredients or bad yeast. • Raising the lid while program is running. | • Measure exactly all ingredients. • Check the expiration date of the yeast and flour. • The liquids should be at room temperature. |
| The baked bread has caved in on the top. | ·The dough has risen too fast. ·Too much yeast or water. ·An unsuitable program was selected for this recipe. | ·Measure exactly all ingredients. ·Lower the amount of water or yeast a bit. ·Select a correct program. |
| The crust is too light. | ·Raising the lid while program is running. | ·Do not open the lid while a program is running. ·Set higher browning degree for crust. |
| The crust is too dark. · Too much sugar in the recipe. | ·Lower a bit the amount of sugar. ·Set the browning of crust to lower degree. | |
| The shape of the loaf is irregular. | ·Too much yeast or water. ·The kneading paddle pushed the dough to one side before rising and baking. | ·Measure exactly all ingredients. ·Lower the amount of water or yeast a bit. ·Some loaves may have an irregular shape, especially those made from whole grain flour. |
| Baked loaves have various shapes. | ·They differ by the type of bread. | ·Whole grain or multigrain breads are denser and may be smaller than the basic white bread. |
| The bottom has holes or there are holes inside. | ·Dough too moist, too much yeast, no salt. ·Water too hot. | ·Measure exactly all ingredients. ·Lower a bit the amount of water or of yeast, check the amount of salt. ·Use water at room temperature. |
| Underdone or sticky, doughy bread. | ·Too much water. ·Wrong program selected. | ·Lower a bit the amount of water, measure all the ingredients exactly. ·Select a correct program. |
| The bread is squeezed when sliced. | ·The bread is too hot. ·Let the bread cool for 15–30 minutes before slicing. | |
| The bread has heavy, dense texture. | ·Too much flour. ·Not enough water. | ·Try to use more water or less flour. ·Whole grain bread will have denser texture. |
| The bottom of the baking pan is darkened or stained. | ·Result of washing it in dishwasher. | ·This is a normal occurrence and does not affect the quality of the bread. |
CLEANING AND MAINTENANCE
Never immerse the base in water or any other liquid and do not wash it in the dishwasher.
ATTENTION: ALWAYS unplug and let cool the bread maker before cleaning it.
Cleaning the kneading paddle:
If it is difficult to remove the kneading paddle, pour a little water in the bottom of the baking pan and let soak for about 1 hour. Wipe the paddle thoroughly with moist cloth. You can wash the kneading paddle and the baking pan in the dishwasher.
Cleaning the removable baking pan:
- Remove the pan by turning it counterclockwise and pull it out by the handle. Wipe the inside of the pan with moist cloth. Do not use sharp objects or abrasive products. Before putting it back into the bread maker the baking pan has to be entirely dry.
Cleaning the outer surface and the lid of the bread maker
- Wipe the outer surface, lid and the inside of the observation window with moist cloth. Do not use abrasive cleaners, you could damage the surface finish.
Accessories
- Wash it using dishwashing liquid and a sponge. Rinse and wipe off the excess water.
Appliance storage
Before storing, make sure that the appliance has thoroughly cooled down, it is clean and dry, and the lid closed.
TECHNICAL SPECIFICATIONS
Maximum size of bread is 1250g
Nominal voltage: 220 - 240V 50Hz
Nominal input power: 850 W
WARRANTY: The following situations void the warranty:
Incorrect or inappropriate handling of the device, failure to observe safety measures applicable to the device, the use of force, alterations or repairs made by a party other than an authorized service centre.
Components subject to normal wear and tear are not covered under the warranty.
USE AND DISPOSAL OF WASTE
Wrapping paper and corrugated paperboard - deliver to scrapyard. Packing foil, PE bags, plastic elements - throw into plastic recycling containers.
DISPOSAL OF PRODUCTS AT THE END OF LIFETIME
Disposal of electric and electronic equipment (valid in EU member countries and other European countries with an implemented recycling system)
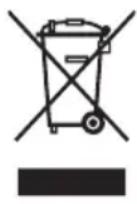
The represented symbol on the product or package means the product shall not be treated as domestic waste. Hand over the product to the specified location for recycling electric and electronic equipment. Prevent negative impacts on human health and the environment by properly recycling your product.
Recycling contributes to preserving natural resources. For more information on the recycling of this product, refer to your local authority, domestic waste processing organization or store, where you purchased the product.
This product complies with EU directive requirements on electromagnetic compatibility and electrical safety.
08/05

The instruction manual is available at website www.ecg-electro.eu.
Changes in text and technical parameters reserved.
SIGURNOSNEUPUTE
9. Kruh bez glutena (GLUTEN FREE)
Za kruh od brašna bez glutena i od smjesa za pečenje bez glutena. Bezglutensko brašno zahtijeva više vremena za aporspciju tekuciina i ima drugacije karakteristike dizanja.
10. Kolac (CAKE)
Gnječenje, dizanje i pečenje su isti kao kod obicnog kruha, ali dizanje se postiže dodavanjem sode bikarbone ili práška za pecivo.
11. Džem (JAM)
BEZBEDNOSNA UPUTSTVA
9. Hleb bez glutena (GLUTEN FREE)
9. Pain sans gluten (GLUTEN FREE)
9. Pane Senza glutine (GLUTEN FREE)
Do not immerse in water!
ES
Leivaküpsetamise juhised
9. Maize bez glutena (GLUTEN FREE)
Maizei, kas veidota no miltiem bez glutena un cepsanas maisijumiem bez glutena. Miltiem bez glutena ir nepiecesams ilgaks laiks skidrumu uzuksanai, ka arir atskirigas rugsanas ipasibas.
10. Kuka (CAKE)
Micisana, rugsana un cepsana ir tada pati, kapejot maizi, tauc tiek pievienota soda vai cepampulveris.
250 69 Klicany, Czech Rep. e-mail: ECG@kbexpert.cz
HU
K+B Progres, a.s.
U Expertu 91 tel.: +420 272 122 111
250 69 Klicany, Czech Rep. e-mail: ECG@kbexpert.cz
DE
Distributor fur DE: K+B E-Tech GmbH & Co. KG
Barbaraweg2,DE-93413 Cham
250 69 Klicany, Czech Rep. e-mail: ECG@kbexpert.cz
IT
K+B Progres, a.s.
U Expertu 91 tel.: +44 776 128 6651 (English)
250 69 Klicany, Czech Rep. e-mail: ECG@kbexpert.cz
ES
K+B Progres, a.s.
U Expertu 91 tel.: +44 776 128 6651 (English)
250 69 Klicany, Czech Rep. e-mail: ECG@kbexpert.cz
ET
K+B Proges, a.s.
U Expertu 91 tel.: +420 272 122 111
250 69 Klicany, Czech Rep. e-post: ECG@kbexpert.cz
LT
K+B Progres, a.s.
U Expertu 91 tel.: +420 272 122 111
250 69 Klicany, Czech Rep. el. pastas: ECG@kbexpert.cz
LV
K+B Progres, a.s.
U Expertu 91 tel.: +420 272 122 111
250 69 Klicany, Czech Rep. e-pasts: ECG@kbexpert.cz