PCB 538 - Bread maker ECG - Free user manual and instructions
Find the device manual for free PCB 538 ECG in PDF.

| Product type | Bread machine |
| Brand | ECG |
| Model | PCB 538 |
| Maximum bread weight | 1.3 kg |
| Nominal power | 800 W |
| Nominal voltage | 230 V~, 50 Hz |
| Noise level | < 65 dB |
| Baking programs | Basic, Quick, French, Rapid, Whole Wheat, Cake, Dough, Bake, Jam, Sandwich |
| Crust setting | Light, Medium, Dark |
| Bread size | 1.0 kg or 1.3 kg |
| Delayed start | Up to 13 hours |
| Keep warm | 1 hour after baking |
| Power failure memory | Up to 10 minutes |
| Display | Digital display with remaining time |
| Included accessories | Kneading paddles, non-stick pan, hook, measuring spoon, graduated cup |
| Pan material | Non-stick coating |
| Safety | Overheating protection, temperature sensor |
| Cleaning | Do not immerse, clean with damp cloth, wash pan with soapy water |
| Repairability | Spare parts available from professional after-sales service |
| General information | Compliant with EU directives |
Frequently Asked Questions - PCB 538 ECG
User questions about PCB 538 ECG
0 question about this device. Answer the ones you know or ask your own.
Ask a new question about this device
Download the instructions for your Bread maker in PDF format for free! Find your manual PCB 538 - ECG and take your electronic device back in hand. On this page are published all the documents necessary for the use of your device. PCB 538 by ECG.
USER MANUAL PCB 538 ECG
natural_image
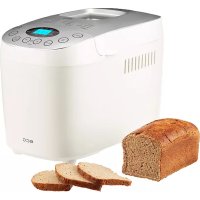
White industrial bread maker with a golden-brown baked bun and control buttons (no visible text or symbols)PCB 538
PEKÁRNA NA CHLEBA
NÁVOD K OBSLUZE
PEKÁREŇ NA CHLIEB
NÁVOD NA OBSLUHU
WYPIEKACZ DO CHLEBA
INSTRUKCJA OBSŁUGI
KENYÉRSÜTŐ
HASZNÁLATI ÚTMUTATÓ
BROTBACKAUTOMAT
BEDIENUNGSANLEITUNG
BREAD MAKER
INSTRUCTION MANUAL
PEKAČ KRUHA
UPUTE ZA UPORABU
PEKAČ KRUHA
NAVODILA
APARAT ZA PEČENJE HLEBA
UPUTE ZA UPORABU
MACHINE A PAIN
MODE D'EMPLOI
MACCHINA PER IL PANE
- Kneading hooks
- Baking pan
- Lid
- Viewing window
- Baking area
- Control panel
- Hook removal tool
- Measuring spoon
- Measuring cup
HR/BIH
Do not immerse in water! – Neponořovat do vody!
OVLÁDACÍ PANEL
Read carefully and save for future use!
Warning: The safety measures and instructions, contained in this manual, do not include all conditions and situations possible. The user must understand that common sense, caution and care are factors that cannot be integrated into any product. Therefore, these factors shall be ensured by the user/s using and operating this appliance. We are not liable for damages caused during shipping, by incorrect use, voltage fluctuation or the modification or adjustment of any part of the appliance.
To protect against a risk of fire or electric shock, basic precautions shall be taken while using electrical appliances, including the following:
-
Make sure the voltage in your outlet corresponds to the voltage provided on the appliance label and that the socket is properly grounded. The outlet must be installed according to valid safety instructions.
-
Do not operate bread maker with a damaged cord. All repairs including cord replacements shall be performed by a professional service centre! Do not remove protective covers of the appliance, risk of electric shock!
-
Protect the appliance against direct contact with water and other liquids, to prevent potential electric shock.
-
Do not leave the bread maker running unattended.
-
Do not use the bread maker to heat a room!
-
Supervision is recommended when baking a product that has not been tested before!
-
Do not immerse the bread maker into water (not even partially)!
-
Handle the appliance in such manner to prevent injuries (for example burning, scalding). Hot steam is released from vents and the surface of the bread maker is hot while baking.
-
If smoke coming from the bread maker is caused by the prepared ingredients catching fire, leave the lid closed, immediately switch the bread maker off and unplug cord from outlet.
-
Leaving the bread maker cord connected to outlet unattended is not recommended. Disconnect the cord from the electrical outlet prior to performing maintenance. Do not pull the cord from the outlet by yanking the cable. Unplug the cable from the outlet by grasping the plug.
-
Do not use the bread maker outdoors or in moist environments. Do not touch the cord or bread maker with wet hands. Risk of electric shock.
-
Close supervision is necessary for operating the bread maker near children!
-
Do not allow the cord to touch hot surfaces or lead the cord over sharp edges. To extend the service life of the appliance, do not wind the cord around the bread maker.
-
The temperature of surfaces near the operating appliance can be hotter than usual. Place the bread maker out of reach of other objects to ensure sufficient air circulation needed for its proper operation.
-
Do not cover the area between the surface and baking form and do not insert any objects into this area (for example fingers, spoons, etc.). The area between the surface and baking form must be vacant.
-
Do not touch the baking pans during or after use or hot parts of the baked product, until is cools off. Only touch the handle to prevent from burning yourself.
-
The baking pans have a non-stick surface making them easy to clean. Do not use metal or hard objects or tools to clean inner/outer parts of the appliance and for handling the bread, to prevent from damaging the surfaces of baking pans.
-
Keep the bread maker away from hot surfaces and sources of heat (for example, hot plates).
-
This appliance shall not be used by persons (including children), whose physical, sense or mental inability or insufficient experience and skills prevent him from safely using the appliance, if they are not supervised or if they have not been instructed to use of the appliance by a person responsible for their safety. Child supervision is essential to prevent them from playing with the appliance.
-
Use the toaster only in accordance with the instructions given in this manual. The manufacturer is not liable for damages caused by improper use of the appliance and accessories (for example, spoiling food, injury, burning, scalding, fire, etc.).
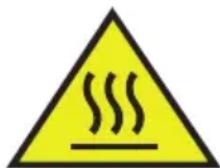
Hot surface
Do not immerse in water!
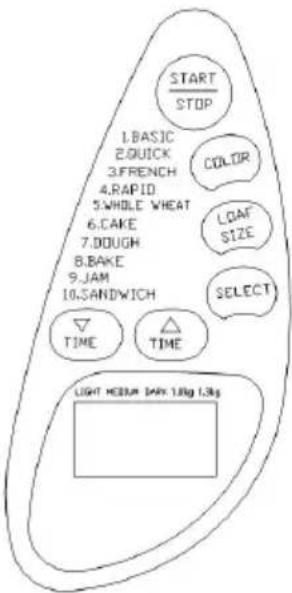
CONTROL PANEL
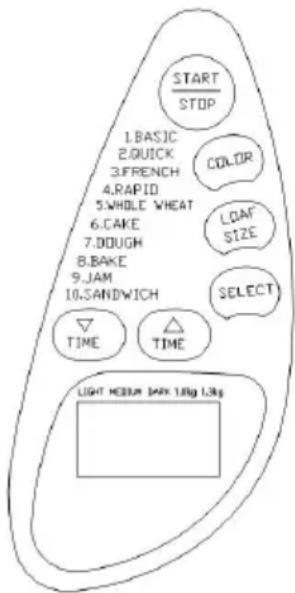
1. Display - basic settings
After switching on the bread maker, the display will read BASIC. For example "1 3:30". The number 1 represents the selected program, 3:30 represents the preparation time for the selected program. The positioning of the two arrows provides information regarding the selected brownness of the baked bread and weight. The primary settings upon connecting the bread maker is (size II and MEDIUM brownness). The progress of the program can be monitored on the display during operation. The time gradually counts down as the program proceeds.
2. START/STOP button
This button starts and stops the program. When the START/STOP button is pressed, the numbers on the display begin to flash. BASIC is displayed. Press the SELECT button to change the program to another. Holding the STOP button down for about 3 seconds will trigger a sound (beep), the program will end, this procedure also applies if you wish to end the 60min. warm-up process.
3. COLOR button
Set the desired bread brownness, i.e. namely: LIGHT / MEDIUM / DARK.
4. LOAF SIZE button
Set the weight of bread for individual programs (see table and recipes). 1.0 kg for smaller loafs of bread, 1.3 kg for larger loafs of bread.
5. SELECT button
Use this button to select one of the following programs:
BASIC - for white wheat and brown rye bread, also for herbal and raisin bread. This is the most commonly used program. QUICK - for fast preparation of white, wheat and rye bread. Bread baked with this mode is smaller and has a thicker middle.
FRENCH - for baking light bread, french bread with a crispy crust and light middle.
RAPID - mixing, rising and baking of bread at extra short durations. Water (or other liquid ingredient) with a temperature of 48–50 °C must be used for this program.
WHOLE WHEAT - for baking whole wheat bread. This setting provides a longer period for warming up and filling grains with water. Using this program in combination with the TIME -/+ function is not recommended.
CAKE- ingredients are mixed and baked for the time set. Mixing the ingredients beforehand into to parts and then pouring them into the baking dish is recommended.
DOUGH - only dough is prepared in this mode, no baking. The prepared dough can be used for bread rolls, pizza etc. Any kind of dough can be prepared in the bread maker using this setting.
BAKE - for baking brown bread or cakes.
JAM - preparing jam from fresh fruit or marmalade.
SANDWICH - for baking light bread with a soft and rough crust.
6. TIME button
Set the bread baking preparation time. The start of QUICK, RAPID, CAKE and JAM programs cannot be postponed. The hours and minutes, after which the preparation process should begin, shall be added to the respective basic time for the specific program. The maximum period that can be set is 13 hours.
Example: It is 8:30 PM and the bread shall be finished the next day at 7:00 AM, i.e. in 10 hours and 30 minutes. Press and hold the TIME button until the display shows 10:30, i.e. the time between the current time (8:30 PM) and the period, when the bread shall be finished. The time is set at increments of 10 minutes.
Attention: Do not use ingredients that can spoil when using the time function. This includes milk, eggs, fruit, yoghurt, onions etc.!
BREAD MAKER FUNCTIONS
Sound functions
A sound is triggered:
• whenever any of the program buttons are pressed,
- during the second kneading cycle under the BASIC, WHOLE WHEAT, QUICK, CAKE and SANDWICH programs to signal that cereals, fruit, nuts or other ingredients can be added,
• when the program ends,
• a repetitive beep noise is triggered during warm-up at the end of the baking process.
Keeping warm
Bread is automatically kept warm for a period of 1 hour after the baking process concludes. To remove the bread, turn off the program by pressing the START/STOP button.
Memory
In case of a power outage during the bread making process, the program will automatically continue, even without pressing the START/STOP button, providing power is restored within 10 minutes. If the power outage would last longer than 10 minutes, data will not be stored in the memory and you must use new ingredients and turn the bread maker on again. If the dough did not reach the rising stage at the time of the power outage, you can press the START/STOP button and restart the program from the beginning.
Safety functions
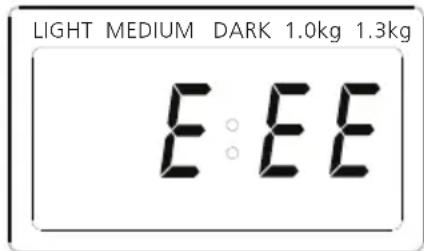
- If the temperature of the bread maker is too high (over 40 °C) for example after previous use, the display will show H:HH, a sound is triggered upon pressing the START/STOP button repeatedly. Hold the START/STOP button down until H:HH is cleared and the basic settings are displayed. Remove the baking form and wait until the bread maker cools down.
- If E:EE is displayed after pressing the START/STOP button (see fig. 2 below), the temperature sensor circuit has been disconnected. Have an authorized technician inspect the sensor.

Fig. 1 Fig. 2
Preparing for use – programming phases for baking bread
- Before using the appliance for the first time, wash the parts which will come into contact with food using hot water and detergent. Carefully rinse with clean water and wipe dry, or leave to dry.
- Set the program to BAKE and turn the bread maker on without inserting ingredients, and then let the bread maker cool down. Mild smoke coming out of the appliance is not a problem. Place the bread maker on a flat and dry surface. Connect the cord to the socket.
- Use both hands to insert the baking form into the bread maker and push it to make sure it is well inserted in the centre of the baking area. Then insert two kneading hooks onto the baking form shafts. Put the ingredients into the form in the order prescribed in the respective recipe. Close the lid. Set the desired program on the control panel (SELECT / LOAF SIZE / COLOR / TIME). Finish by pressing the START button.
- The bread maker automatically begins mixing and kneading dough, until the proper consistency is reached. After the final kneading cycle is completed, the bread maker is heated to the optimal temperature for the dough to rise. The bread maker then automatically sets the temperature and baking time.
- If at the end of the baking program, the bread is too light, use the BAKE program for further browning. Press the START/STOP button and then select the BAKE program and start the bread maker. A sound will be played after the baking process is finished. You can remove the bread from the appliance. The one hour warm-up is then started.
Preparing bread
- Insert the baking form into the bread maker, push until it clicks into its correct position. Place the kneading hooks onto the shafts. Turn the kneading hooks clockwise, until they click into their correct position. We recommend placing baking margarine into the form before installing the kneading hooks to prevent dough from sticking to the hooks. Removing the kneading hooks from the loaf of bread will also be easier.
- Insert the ingredients into the baking form. Respect the order listed in the recipe. Liquid ingredients or water are usually added first, followed by sugar, salt and flour, yeast or baking powder always comes last.
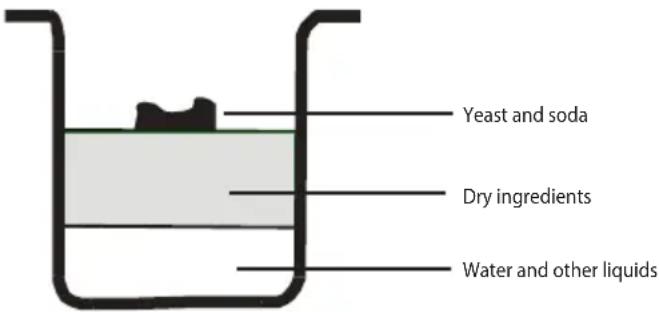
- Form a small hole into the flour and insert the yeast here. Make sure it does not come into contact with the liquids or salt.
-
Close the lid carefully and connect the cord into the socket.
-
Press the SELECT button repeatedly, until the desired program is selected.
- Press the COLOR button to select the desired crust colour.
- Press the LOAF SIZE button to select the weight (1kg or 1.3kg).
- Set the postponing time by pressing the TIME ▲ or TIME ▼ button. You can skip this step if you plan on beginning the bread making process immediately.
- Start the preparation process by pressing the START/STOP button.
- A long beep will sound during the preparation phase with programs BASIC, FRENCH, WHOLE WHEAT, CAKE, SANDWICH selected. This informs the user that the ingredients can be added. Open the lid and insert the required ingredients. Steam can be released from vents during baking. This is normal.
- One beep will sound after the process is complete. Pressing and holding the START/ STOP button for a period of about 3 seconds stops the process and the bread can be removed. Open the lid and use oven mitts to firmly grip the baking form and remove it from the bread maker.
- Notice: the baking form and bread can be very hot! Always pay attention.
- Leave the baking form to cool before removing the loaf of bread. Then use a non-sticking spatula and gently separate the sides of the loaf from the form.
- Turn the form upside down on a grate or a clean counter and gently shake until the loaf of bread becomes completely free.
- Leave the bread to cool down for about 20 minutes before slicing. We recommend slicing the bread with an electric slicer or bread knife, not using a fruit knife or kitchen knife. Otherwise the bread could become deformed.
- If you do not have the space or did not press the START/STOP button after the process finishes, the bread will be kept warm automatically for a period of 1 hour. 10 beeps will sound after this period ends and the bread maker will be switched off automatically.
- If you are not using the bread maker or do not wish to finish the process, turn the appliance off and disconnect the cord from the socket.
- Note: Before slicing the loaf of bread, remove the kneading hooks from the bottom of the bread using tools. The loaf is hot, therefore you should never remove the kneading hooks with your hands.
- Note: If you do not intend to eat the entire loaf of bread, we recommend storing the remaining bread in a plastic bag or container. Bread can be stored at room temperature for up to 3 days. If you need to store the bread for a longer period, insert it into a plastic bag or container and place it into the freezer. Store for a maximum period of 10 days. Since home-made bread does not contain any preservatives, its storage period is generally not higher than bread purchased at a store.
End of programming phases
After the program has ended, pull the baking form out and place it on a heat resistant surface (for example a cutting board). If the bread does not fall from the form onto the surface, move the kneading hooks several times from side to side until the bread is separated. The bread can then be easily sliced and completely removed from the kneading hooks.
PROGRAM OVERVIEW - TIMING
| Menu number 1 | 2 | 3 | 4 | 5 | 6 | 7 | 8 | 9 | |||||
| BASIC QUICK FRE NCH RAP D WHOLE W HEAT CA KE DOUGH BAKE JAM SANDWICH | |||||||||||||
| Size | I. | II. | I. | II. | I. | II. | |||||||
| Approximate weight of bread (g) | 1000 | 1300 | 1000 | 1300 | 1000 | 1300 | |||||||
| Preparation time (hr.) | 3:20 | 3:30 | 1:58 | 3:50 | 1:52 | 3:30 | 3:40 | 2:00 | 1:50 | 1:00 | 1:20 | 3:09 | 3:20 |
| The following times are prescribed in minutes | |||||||||||||
| Pre-heating, motor not running - heating ON/OFF 5/25 s | 17 | 20 | 5 | 22 | 3 | 37 | 40 | 22 | - | Heating ON/OFF 15/15 s | 11 | 22 | |
| Mixing | 3 | 3 | 3 | 3 | 3 | 3 | 3 | 3.5 | 3 | - | 15 | 3 | 3 |
| 1. Kneading | 2 | 2 | 2 | 2 | 2 | 2 | 2 | - | 2 | - | - | 2 | 2 |
| 2. Kneading heating ON/OFF 5/25 s | 13 | 13 | 20 | 16 | 5 | 13 | 13 | Whipping 12.5 (min.) and heating 8 (min.) OFF/OFF 5/25 s | 16 | - | - | 13 | 13 |
| Signal for adding ingredients | |||||||||||||
| Time shown on displayed (hr.) | approx. 2:54 | approx. 2:57 | approx. 1:33 | - | - | approx. 2:44 | approx. 2:47 | approx. 1:49 | - | - | - | approx. 2:34 | approx. 2:34 |
| 1. Yeasting heating ON/OFF (5/25 s)* | 45 | 45 | - | 45 | - | 45 | 45 | - | - | - | - | 45 | 45 |
| Dough smoothing | 1 | 1 | - | 1 | - | 1 | 1 | - | - | - | - | 1 | 1 |
| 2. Yeasting heating ON/OFF (5/25 s)* | 18 | 18 | 7 | 25 | 7 | 18 | 18 | - | 45 | - | 45 | 18 | 18 |
| Dough smoothing | 1 | 1 | - | 1 | - | 1 | 1 | - | - | - | - | 1 | 1 |
| 3. Dough yeasting heating ON/OFF (5/25 s)** | 45 | 45 | 25 | 50 | 27 | 35 | 35 | - | 22 | - | - | 39 | 39 |
| Baking heating ON/OFF (22/8 s) upon reaching a temperature of 8/22 s. | 55 | 62 | 55 | 65 | 65 | 55 | 62 | 80 | - | 60 | 45 mixing/baking heating ON/OFF 15/15 s | 56 | 56 |
| Maturing phase | - | - | - | - | - | - | - | 16 | - | - | 20 | - | - |
| Warming up (min.) | 60 | 60 | 60 | 60 | - | 60 | 60 | - | - | - | - | 60 | 60 |
| Pre-programming | |||||||||||||
| Time switch (hr.) | 13 | 13 | - | 13 | - | 13 | 13 | - | 13 | 13 | - | 13 | 13 |
QUESTIONS AND ANSWERS
Bread sticks to the container after being baked.
Leave the bread to cool after baking for about 10 minutes, then turn the form upside down. Move the kneading hooks after baking from left to right if necessary. Grease the form including kneading hooks for the next baking process.
How to prevent holes in the bread caused by kneading hooks?
Kneading hooks can be removed by fl our-covered hands in the final phase of dough yeasting.
The dough rises over the edge of the container.
This occurs particularly if wheat flour is used, caused by a higher content of gluten.
a) Reduce the amount of fl our and adapt other ingredients. The fi nished bread product will still have a suffi cient volume.
b) Spread a tablespoon of hot melted margarine on the dough.
The bread has not raised enough.
a) If a V-shape groove is formed in the middle of the bread, the flour does not contain enough gluten. This indicates the flour contains an insufficient amount of proteins (which occurs mainly in summers with high rainfall), or the flour is too moist. Measure: add a tablespoon of wheat gluten for each 500 g of flour.
b) If the bread is narrow in the middle, this can be caused by one of the following: the temperature of water was too high, too much water was used, or the flour was low on gluten.
When can the lid be opened during operation?
Generally, the lid of the bread maker can be opened always during the kneading phase. During this phase, small amounts of fl our or liquids can be added. If bread is intended to have certain aspects after baking, proceed as follows:
Before the final yeasting phase, open the lid and carefully slit the crust with a pre-heated knife, scatter cereal on to the bread or spread a mixture of potato flour and water to achieve a shiny surface. This, however, is the last moment where the lid can be opened, otherwise the bread product will sink.
What is whole grain wheat fl our?
Whole grain flour is produced from all types of cereals (grains), including wheat. The term “whole grain” indicates the flour was milled from entire grains and therefore contains indigestible particles and a darker colour. The use of whole grain flour, however, does not give the bread a darker colour, as generally perceived.
What is required when using rye fl our?
Rye fl our does not contain gluten and the bread will barely rise. To make the bread easily digestible, whole grain rye bread must be prepared with yeast.
How many various types of fl our exist and how do I use them.
a) Corn, rice and potato fl our is suitable for individuals allergic to gluten or for those suff ering from malabsorption syndrome or stomach diseases. See respective recipes in the book of recipes.
b) Flour from spelt wheat is expensive, but does not contain chemical additives, since wheat grows on very poor land and does not require any fertilizer. Spelt fl our is particularly suitable for allergic persons. It can be used for all recipes
described in the recipe book and containing type 405, 550 and 1050 fl our.
c) Flour from millet is particularly suitable for individuals suff ering from many allergies. It can be used for all recipes prescribing type 405, 550 and 1050 fl our, as described in the entire recipe book.
d) Flour from hard wheat is suitable for baguettes thanks to its consistency and can be replaced with hard wheat semolina.
How to make fresh bread that is easier to digest?
By adding a mashed cooked potato to the fl our and subsequently kneading the dough makes fresh bread easier to digest.
What if the bread tastes like yeast?
a) This taste is usually removed by adding sugar. Adding sugar gives the bread a lighter colour.
b) Add 1 tablespoon of vinegar into the water for small loafs of bread and 2 tablespoons for larger loafs.
c) Use buttermilk or kefi r instead of water. This applies to all recipes and is recommended for improving the freshness of bread.
Why does bread made in the bread maker taste different from the bread made in a typical oven?
This depends on the different level of moistness: bread baked in the typical oven is dryer due to a larger baking area, whereas bread baked in the bread maker appliance is moister.
CLEANING AND MAINTENANCE
Disconnect the appliance from the electrical output prior to performing any maintenance. Cleaning should always be performed on a cooled down appliance and regularly after every use! We recommend spreading heat resistant grease on the new baking form prior to first use and leave it to warm up in the bread maker for a period of about 10 minutes at 160^ C. After cooling, clean (polish) the baking form from any grease using a paper towel. This is recommended to protect the non-stick surface. This procedure can be repeated from time to time. Use a mild detergent for cleaning. Do not use chemical cleaning substances, benzine, oven cleaners or detergents, which scratch or otherwise damage the coating. Remove all ingredients and crumbs from the lid, surface and baking area using a damp cloth.
Do not immerse the bread maker into water or fill the baking area with water! The lid can be removed for easier cleaning. For this purpose, open the lid to a vertical position and remove it with a slight pull. Wipe all outer surfaces of the baking form using a damp cloth. The inner area can be washed with a small amount of liquid detergent. Both the kneading hooks and driving shafts must be cleaned immediately after use. If the kneading hooks remain in the form, they will be hard to remove later. In this case, fill the container with warm water and let stand for about 30 minutes. Then remove the kneading hooks.
The baking form contains a non-stick surface. Therefore, do not use metal tools, which could scratch the surface during cleaning. It is normal that the colour changes over time. This change under no circumstance affects its efficiency.
ELIMINATING PROBLEMS
If you come across a problem while using the bread maker, before referring to a service centre, first go over the following information:
Problem Cause Solution
| Smoke is coming from the baking area or from vents. | Ingredients stick to the baking area or on the outer side of the baking form. | Disconnect the cord from the socket and clean the outer part of the baking form or baking area. |
| The middle of the bread is sinking and is moist on the bottom. | The bread remained in the baking form too long after the baking and warming process ended. | Remove the bread from the baking form before the warming phase ends. |
| Bread is hard to remove from the baking form. | The bottom side of the loaf sticks to the kneading hooks. | Move the shafts from side to side until the bread falls out. Clean and kneading hooks and shafts after baking. Fill the baking form with warm water for about 30 minutes, as necessary. The kneading hooks can then be easily removed and cleaned. |
| The ingredients are not mixed correctly and the bread is not baked properly. | Incorrect program settings. Check the selected program and other settings. | |
| The START/STOP button was pressed during operation. | See chapter Bread Maker Functions (repetitive functions). | |
| The lid was opened several times during operation. | Do not open the lid until the final yeasting phase has finished. | |
| Long-term power outage during operation. | See chapter Bread Maker Functions (repetitive functions). | |
| The rotation of kneading hooks is blocked. | Check whether the kneading hooks are blocked by grains etc. Remove the baking form and check if the shafts rotate freely. Refer to customer service if this is not the case. | |
| The baking form is lifter during the kneading phase. | The dough is too thick. Kneading hooks are blocked and the baking form is pushed up. | Open the lid and add a small amount of liquid to the dough. Then close the lid again. |
| The bread maker cannot be started. The display shows H:HH. | The bread maker is still hot from the last baking cycle. | Hold the START/STOP button down, until the BASIC setting is displayed. Remove the baking form and leave the bread maker to cool. Then return the baking form to its position, set the program again and start the bread maker. |
QUESTIONS AND ANSWERS REGARDING RECIPES
Comments on recipes
1. Ingredients
Since each ingredient plays a specific role for successfully baking bread, measuring is just as important as the order in which ingredients are added.
- The most important ingredients such as liquid, flour, salt, sugar and yeast (either dry or fresh can be used) affects the successful result of dough preparation and bread making. Always use the correct amount in the correct ratio.
- Use warm ingredients if the dough shall prepared immediately. If you wish to set the program phase time function, cold ingredients are recommended to avoid yeast from rising prematurely.
- Margarine, butter and milk affect the taste and smell of bread.
- To achieve a lighter and thinner crust, the amount of sugar can be reduced by 20% without affecting the successful baking result. If you prefer a softer and lighter crust, replace sugar with honey.
- If you wish to add cereal grains, leave them to be filled with water overnight. Reduce the amount of flour and liquids (by up to 1/5). Yeast is essential for rye fl our.
- If you wish to have an especially light bread, rich on nutrients for stimulating the function of intestines, add wheat oats to the dough. The respective dose is 1 tablespoon per 500g of flour and increase the amount of liquid by 1 tablespoon.
2. Adapting doses
If the doses need to be increased or reduced, ensure that the ratios listed in the original recipes is respected. To achieve perfect results, follow the below listed basic rules for adapting ingredient doses:
- Liquids/flour: The dough shall be soft (but not too soft) and easily kneaded, without becoming fibrous. A sphere should be made by light kneading. This, however, is not the case with heavy dough such as dough made from whole grain rye or cereal bread. Check the dough 5 minutes after the first kneading phase. If the dough is too moist, adding small doses of flour will achieve the proper consistency. If the dough is too dry, add water by the spoon during the kneading process.
- Substituting liquids: When using ingredients, prescribed by the recipe, containing liquids (for example, curd, yoghurt etc.), the amount of liquids should be reduced to the assumed overall amount. If you are using eggs, you must beat them in the measuring cup and add additional liquids to reach the overall amount. Dough will rise quicker at higher altitudes (above 750 m above sea level). In this case, the amount of yeast can be lowered by 1/4 to 1/2 of a teaspoon to proportionately reduce its raising. The same applies for soft water.
3. Adding and measuring ingredients and amounts
• Always add liquids first, yeast last. To slow down the yeasting process (particularly when using the timing function), avoid the yeast from coming into contact with liquid.
• Always use the same unit of measures for measuring. Weights in grams shall always be measured precisely.
- For millilitres, you can use the included measuring cup, which has a scale from 50 to 300ml .
- Fruit, nut or cereal ingredients: If you wish to add further ingredients, you can do so through special programs after the sound goes off. If you add the ingredients too early, they will be crushed during the kneading process.
4. Weight and volume of bread
- Small differences can come up for precise weight information. The actual weight of the bread depends highly on the moistness during the preparation phase.
- All breads with a significant portion of wheat achieves great volume and reaches over the edge of the container after the final yeasting phase for the greatest weight class. The bread, however, will not spill. The portion of bread outside the form will turn brown easier compared to the bread inside the form.
- Where the QUICK (Sprint) program is suggested for sweet breads, you can use ingredients in smaller amounts (this also applies for the CAKE program for making lighter baked goods).
5. Baking results
- The baking result depends on local conditions (soft water / high relative humidity / high altitude / ingredient consistency etc.). Therefore the information in recipes make up reference points, which can be suitably adapted. Do not become discouraged if your first attempt at a different recipe fails. Try to find the cause and have another attempt by changing the doses.
- If the bread is too pale, you can reach the desired brown colour in terms of the baking program.
• We recommend baking a test product before setting the function for use over night, so if needed, you can make the necessary changes.
Problem Cause Solution
| The bread rises too fast. | Too much yeast, too much flour, not enough salt (or several of these causes). | a/b |
| The bread will not rise or only a little. | No yeast or insufficient amount of yeast.Old or expired yeast.Liquid was too hot.Yeast came into contact with liquid.Incorrect type of flour or expired flour.Too much or not enough liquid.Not enough sugar. | a/bdcdda/b/fa/b |
| Bread rises too much and spills onto the baking form. | Yeast leavens more if the water is too soft.Too much milk affects the yeast leavening. | ec |
| The middle of the bread keeps sinking. | The volume of dough is greater than the form and the bread sinks.The yeasting process is too short, or is not long enough due to excessive temperatures of water or baking area or too moist. | c/gc/g |
| There is a dip in the bread after the baking process fi nishes. | Too much liquid. | a/b |
| The bread structure is heavy and lumpy. | Too much fl our or not enough liquid.Not enough yeast or sugar.Too much fruit, coarse fl our or one of the other ingredients.Old or expired fl our. | a/ba/bbbd |
| The middle of the bread is raw. | Too much or not enough liquid.The recipe contains moist ingredients. | a/b/ff |
| Open or rough bread structure or too many holes. | Too much water.No salt.High moistness, water too hot.Too much liquid. | fbgcc |
Problem Cause Solution
| The bread on the surface is raw. Volume is too high compared to the baking form.Too much fl our, especially for white bread.Too much yeast and not enough salt.Too much sugar.Sweet ingredients in addition to sugar. | a/eba/ba/bb |
| Edges are uneven or lumpy. Bread did not cool down enough (steam was not released) g | |
| Lumps of fl our on the crust. Flour was not processed well during the kneading process. e |
Problem solving:
a) Measure the ingredients correctly.
b) Set ingredient doses.
c) Use another liquid or leave to cool to room temperature. Add the ingredients prescribed by the recipe in the correct order. Create a small hole in the centre of the flour and insert crumbled yeast or dry yeast. Avoid the yeast coming into direct contact with the liquid.
d) Use only fresh and properly stored ingredients.
e) Adapt the amount of liquid. If ingredients containing water are used, the dose of added water must be appropriately reduced.
f) In case the climate is very moist, reduce the amount of water by 1 to 2 tablespoons.
g) Remove the bread from the form immediately after baking and leave to cool on a suitable surface (for example a wooden cutting board) for at least 15 minutes before slicing.
TECHNICAL INFORMATION
Max. weight of bread 1.3 kg
Nominal voltage: 230 V\~50 Hz
Nominal input power: 800 W
Noise level: < 65 dB
USE AND DISPOSAL OF WASTE
Wrapping paper and corrugated paperboard – deliver to scrapyard. Packing foil, PE bags, plastic elements – throw into plastic recycling containers.
DISPOSAL OF PRODUCTS AT THE END OF LIFETIME
Disposal of electric and electronic equipment (valid in EU member countries and other European countries with an implemented recycling system)
The represented symbol on the product or package means the product shall not be treated as domestic waste. Hand over the product to the specified location for recycling electric and electronic equipment. Prevent negative impacts on human health and the environment by properly recycling your product.
Recycling contributes to preserving natural resources. For more information on the recycling of this product, refer to your local authority, domestic waste processing organization or store, where you purchased the product.
This product complies with EU directive requirements on electromagnetic compatibility and electrical safety.
The instruction manual is available at website www.ecg-electro.eu. Changes in text and technical parameters reserved.

SIGURNOSNE UPUTE
QUESTIONS ET REPONSES
4. Pulsante LOAF SIZE (DIMENSIONE FETTA)
CÓMO ELIMINAR PROBLEMAS
PEČAT I POTPIS PRODAVATELJA
K+B Progres
PROIZVAJALEC ali DAJALEC GARANCIJE:
K+B Progres, a.s.; MBS: 61860123
250 69 Klíčany, Czech Rep. el. paštas: ECG@kbexpert.cz
- Dovozce neručí za tiskové chyby obsažené v návodu k použití výrobku. - Dovozca neručí za tlačové chyby obsiahnuté v návode na použitie výrobku. - Importer nie ponosi odpowiedzialności za błędy drukarskie w instrukcji obsługi do produktu. - Az importör nem felel a termék használati útmutatójában fellelhető nyomdahibákért. - Der Importeur haftet nicht für Druckfehler in der Bedienungsanleitung des Produkts. - The importer takes no responsibility for printing errors contained in the product's user's manual. - Uvoznik ne snosi odgovornost za tiskarske greške u uputama. - Uvoznik ne jamči za morebitne tiskovne napake v navodilih za uporabo izdelka. - Uvoznik ne preuzima nikakvu odgovornost za štamparske greške sadržane u uputstvu za upotrebu proizvoda. - Le fournisseur ne peut être tenu responsable des erreurs d'impression contenues dans le mode d'emploi du produit. - L'importatore non sarà ritenuto responsabile per eventuali errori di stampa contenuti nel manuale dell'utente del prodotto. - El importador no asume ninguna responsabilidad por errores de impresión en el manual del usuario del producto.