
Bravia KDL50WG663 - Television SONY - Free user manual and instructions
Find the device manual for free Bravia KDL50WG663 SONY in PDF.



| Product Type | LED Full HD TV |
| Brand | Sony |
| Model | Bravia KDL50WG663 |
| Screen Size | 50 inches (126 cm diagonal) |
| Resolution | 1920 x 1080 pixels (Full HD) |
| Dimensions (without stand) | Approximately 1130 x 660 x 80 mm (W x H x D) |
| Weight (without stand) | Approximately 16 kg |
| Power Supply | AC 220-240 V, 50/60 Hz |
| Power Consumption | 120 W (max standby <0.5 W) |
| Display Technology | LED with direct backlight |
| Viewing Angle | 178° horizontal / 178° vertical |
| Connectivity | 2x HDMI, 1x USB, Ethernet, built-in Wi-Fi, optical audio output, antenna input |
| Main Features | Teletext, timer, parental control, sleep mode, EPG |
| Wall Mounting | Compatible with Sony SU-WL450 bracket (recommended), use at least 4 screws of 8 mm |
| Maintenance and Cleaning | Clean with a soft, dry cloth. Do not use solvents or abrasive products. |
| Safety | Do not expose to moisture, do not block ventilation openings, do not allow children to climb on the TV. |
| Spare Parts and Repairability | Wall mounting screws not included. Removable table stand. For any repairs, contact a Sony authorized installer. |
| Warranty | 2 years (according to applicable legislation) |
Frequently Asked Questions - Bravia KDL50WG663 SONY
User questions about Bravia KDL50WG663 SONY
0 question about this device. Answer the ones you know or ask your own.
Ask a new question about this device
Download the instructions for your Television in PDF format for free! Find your manual Bravia KDL50WG663 - SONY and take your electronic device back in hand. On this page are published all the documents necessary for the use of your device. Bravia KDL50WG663 by SONY.
USER MANUAL Bravia KDL50WG663 SONY
- In the actual model names, the "□□" indicates numbers and/or characters specific to each model.
To Customers: For product protection and safety reasons, Sony strongly recommends that installation of your TV be performed by Sony dealers or licensed contractors. Do not attempt to install it yourself.
To Sony Dealers and Contractors: Provide full attention to safety during the installation, periodic maintenance, and examination of this product.
Sufficient expertise is required for installing this product, especially to determine the strength of the wall for withstanding the TV's weight. Be sure to entrust the attachment of this product to the wall to Sony dealers or licensed contractors and pay adequate attention to safety during the installation. Sony is not liable for any damage or injury caused by mishandling or improper installation.
For safety and proper installation, follow the Wall-mount Bracket Operation Instructions, TV Setup Guide, and the directions in this manual.
On Safety
Thank you for purchasing this product.
To Customers
Sufficient expertise is required for installing this product. Be sure to subcontract the installation to Sony dealers or licensed contractors and pay special attention to safety during the installation. Sony is not liable for any damages or injury caused by mishandling or improper installation, or installing any other than the specified product. Your Statutory Rights (if any) are not affected.
To Sony dealers
Sufficient expertise is required for installing this product. Be sure to read this instruction manual thoroughly to do the installation work safely. Sony is not liable for any damages or injury caused by mishandling or improper installation. Please give this manual to the customer after installation.
This instruction manual shows the correct handling of the product and important precautions necessary to prevent accidents. Be sure to read this manual thoroughly and use the product correctly. Keep this manual available for future reference.
Products by Sony are designed with safety in mind. If the products are used incorrectly, however, it may result in a serious injury through fire, electric shock, the product toppling over, or the product dropping. Be sure to observe the precautions for safety to prevent such accidents.
CAUTION
Specified products
This Wall-Mount Bracket is designed for use with the products specified TVs. For TVs, refer to their Reference Guide to verify that the Wall-Mount Bracket can be used.
To Customers
WARNING
If the following precautions are not observed, serious injury or death through fire, electric shock, or the product dropping can result.
Be sure to subcontract the installation to licensed contractors and keep small children away during the installation.
If the Wall-Mount Bracket or the TV is not installed correctly, the following accidents may occur. Be sure licensed contractors carry out installation.
The TV may fall and cause a serious injury such as a bruise or a fracture. - If the wall on which the Wall-Mount Bracket is installed is unstable, uneven, or not perpendicular to the floor, the unit may fall and cause injury or property damage. The wall should be capable of supporting a weight of at least four times the TV weight. (Refer to your TV's Reference Guide for its weight.) - If the installation of the Wall-Mount Bracket on the wall is not sufficiently sturdy, the unit may fall and cause injury or property damage.
Be sure to subcontract moving or dismounting of the TV to licensed contractors.
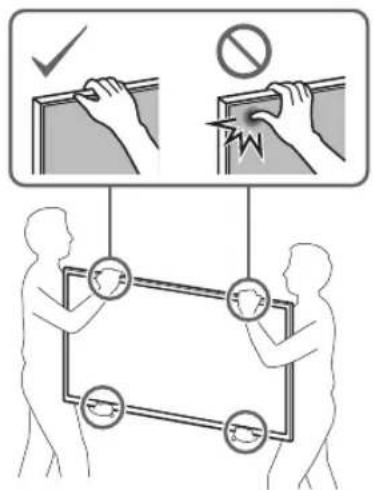
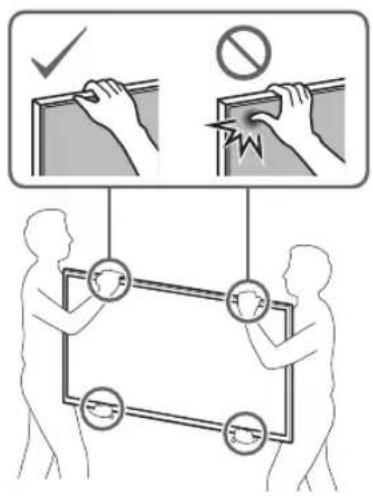
If persons other than licensed contractors transport or dismount the TV, it may fall and cause injury or property damage. Be sure that two or more persons (three or more persons for 75 inches and above TV set) carry or dismount the TV.
Do not remove screws, etc., after mounting the TV.
If you do so, the TV may fall and cause injury or property damage.
Do not make alterations to the parts of the Wall-Mount Bracket.
If you do so, the Wall-Mount Bracket may fall and cause injury or property damage.
Do not mount any equipment other than the specified product.
This Wall-Mount Bracket is designed for use with the specified product only. If you mount equipment other than specified, it may fall or break, and cause injury or property damage.
Do not apply any load other than the TV on the Wall-Mount Bracket. Do not shake the TV left/right, up/down.
If you do so, the TV may fall and cause injury or property damage.
Do not lean on or hang from the TV.
Do not lean on or hang from the TV as it may fall on you and cause serious injury.
CAUTION
If the following precautions are not observed, injury or property damage may occur.
Do not handle the product with excessive force during cleaning or maintenance.
Do not apply excessive force on the topside of the TV. If you do so, the TV may fall and cause injury or property damage.
Precautions
- If you use the TV installed on the Wall-Mount Bracket for a long time, the wall behind or above the TV may become discolored or the wallpaper may come unstuck, depending on the material of the wall.
- If the Wall-Mount Bracket is removed after installing it on the wall, the screw holes are left.
- Do not use the Wall-Mount Bracket in a place where it is subjected to mechanical vibrations.
Installing the Wall-Mount Bracket
To Sony Dealers
WARNING
The following instructions are for Sony dealers only. Be sure to read the safety precautions described above and pay special attention to safety during the installation, maintenance, and checking of this product.
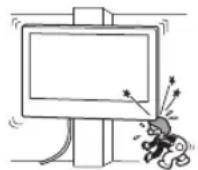
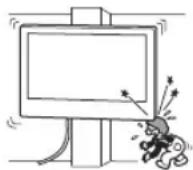
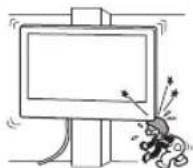
Do not install the Wall-Mount Bracket on wall surfaces where the corners or the sides of the TV protrude away from the wall surface.
Do not install the Wall-Mount Bracket on wall surfaces such as a pillar, where the corners or the sides of the TV protrude away from the wall surface. If a person or object happens to hit the protruded corner or side of the TV, it may cause injury or property damage.
Do not install the TV over or under an air conditioner.
If the TV is exposed to water leaks or air current from an air conditioner for a long time, it may cause a fire, an electric shock, or a malfunction of the TV.
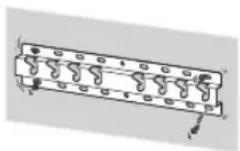
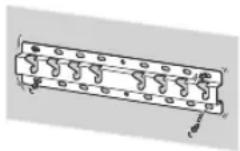
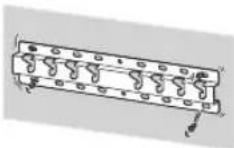
Be sure to install the Wall-Mount Bracket securely to the wall following the instructions in this instruction manual.
If any of the screws are loose or fall out, the Wall-Mount Bracket may fall and cause injury or property damage. Be sure to use the appropriate screws for the material of the wall and install the unit securely using four or more screws of 8 mm diameter (or equivalent).
Be sure to use the supplied screws and attachment parts properly following the instructions given in this instruction manual. If you use substitute items, the TV may fall and cause bodily injury to someone or damage to the TV.
Be sure to assemble the bracket properly following the instructed procedure explained in this instruction manual.
If any of the screws are loose or fall out, the TV may fall and cause bodily injury to someone or damage to the TV.
Be sure to tighten the screws securely in the designated position.
If you fail to do so, the TV may fall and cause bodily injury to someone or damage to the TV.
Be careful not to subject the TV to shock during installation.
If the TV is exposed to shock, it may fall or break apart. This may cause injury.
Be sure to install the TV on a wall that is both perpendicular and flat.
If you fail to do so, the TV may fall and cause injury.
After proper installation of the TV, secure the cables properly.
If people or objects get tangled with cables, this may result in injury or damage to the TV.
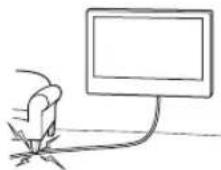
Do not allow the mains lead or the connecting cable to be pinched.
If the mains lead or the connecting cable is pinched between the unit and the wall or is bent or twisted by force, the internal conductors may become exposed and cause a short circuit or an electrical break. This may cause a fire or an electric shock.
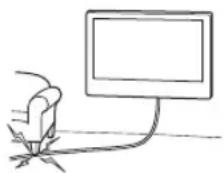
The screws needed to secure the Wall-Mount Bracket to the wall are not supplied.
Use the appropriate screws for the wall material and structure when mounting the Wall-Mount Bracket.
Installing the TV onto the wall
Installation procedure differs, depending on your TV.
Use the Wall-Mount Bracket SU-WL450 to install the TV to the wall.
Note
- If the Table-Top Stand is attached to the TV, detach the Table-Top Stand beforehand. See the Setup Guide and follow in reverse order the steps to detach the Table-Top Stand.
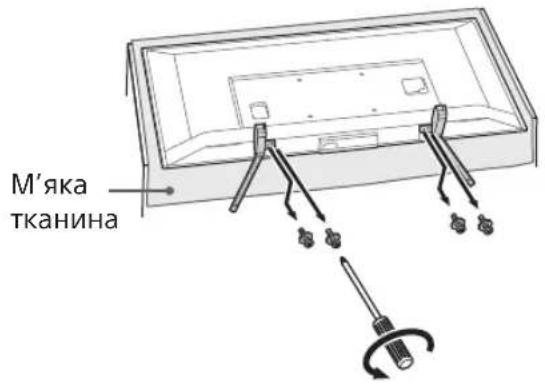
- Place the TV with its screen facing down on a level and stable surface covered with a thick and soft cloth, when securing the Attachment parts for Wall-Mount Bracket or when removing the Table-Top Stand from the TV to prevent damaging the surface of the LCD display.
- Be sure to store the removed screws in a safe place, keeping them away from children.
Preparing for installation
- Have the TV's Reference Guide and Setup Guide at hand before installation.
- Be sure to have a Phillips screwdriver that fits the screws prior to the assembly.
- Confirm the installing position of your TV.
- Prepare four or more screws of 8 mm diameter and one screw of 5 mm or equivalent (not supplied). Select screws suitable for the material of the wall.
Checking the parts
Supplied with SU-WL450
- Verify that all the parts are included.
| A Base (20) (1) B Pulley (2) | |
| ◎ PSW 6x20 (4)◎ PSW 4x20 with Bush (2) | |
| E Spacer (20) (2) E Belt (1) | |
| G Bush (20) (M4) (2) G PSW 4x20 (2) | |
| I Base Adaptor (2) I PSW 4x10 (8) | |
| K Spacer (60) (2) L PSW 6x50 (2) | |
| M Bush (M4) (2) N PSW 4x50 (2) |
Deciding on the installation location
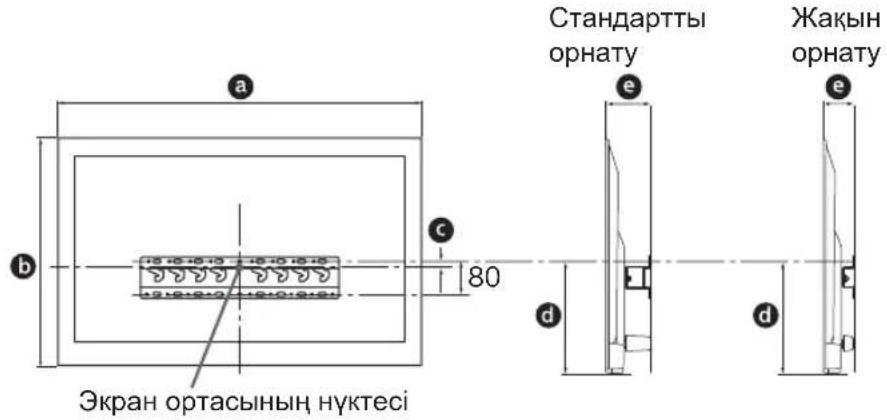
1 Decide on the installation location.
Make sure that the wall has enough space for the TV and is capable of supporting a weight of at least four times that of the TV.
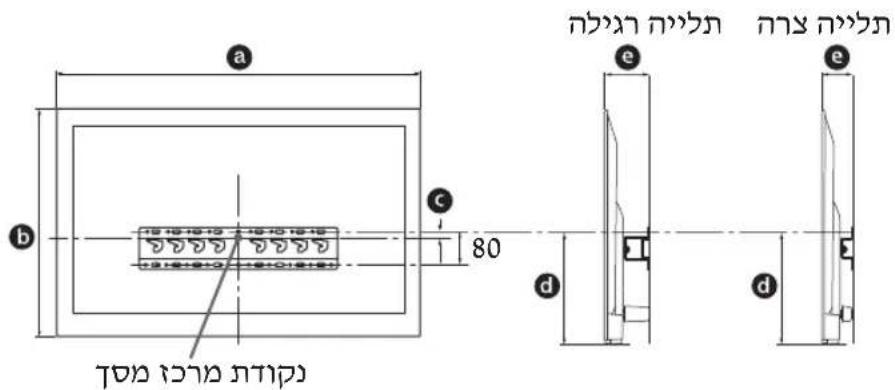
Refer to the following table on installing the TV to the wall. Refer to your TV's Reference Guide for the TV's weight.
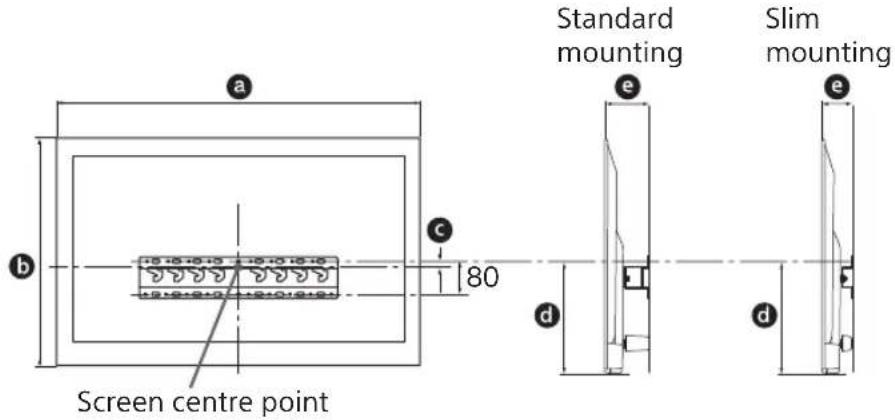
Unit: mm
| Model Name | Display dimensions | Screen centre dimension | Length for mounting | |||
| a | b | c | d | e | ||
| Standard mounting | Slim mounting | |||||
| KDL-50WG6□□ | 1,130 660 21 358 130 88 | |||||
| KDL-43WG6□□ | 974 572 54 346 130 88 | |||||
Note
- Figures in the table may differ slightly depending on the installation.
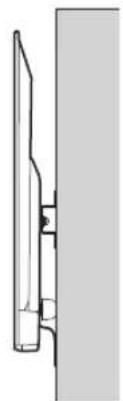
- When your TV is installed on the wall, the upper side of the TV slightly leans forward.
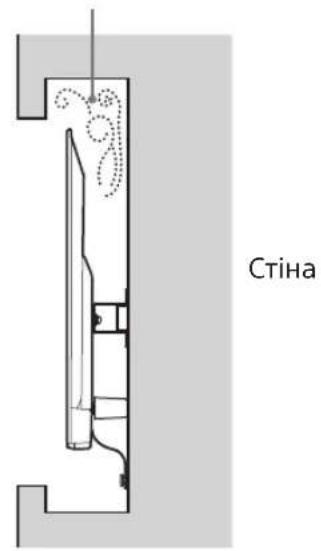
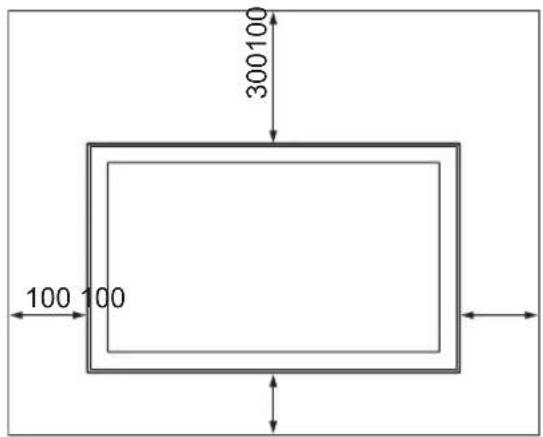
Allow for suitable clearance between the TV and the ceiling and protruding parts of the wall as shown below.
Unit: mm
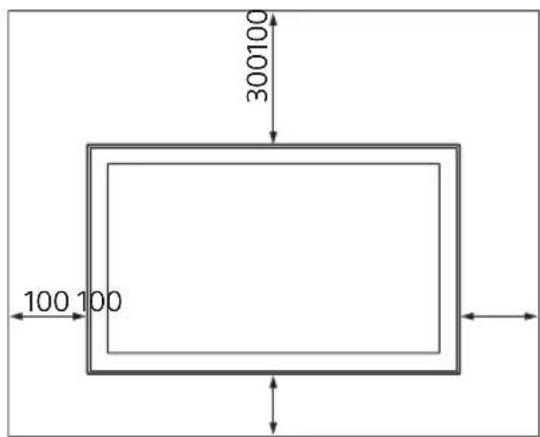
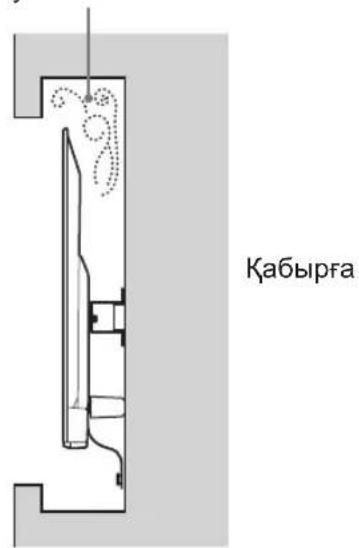
To ensure proper ventilation and prevent the collection of dirt or dust:
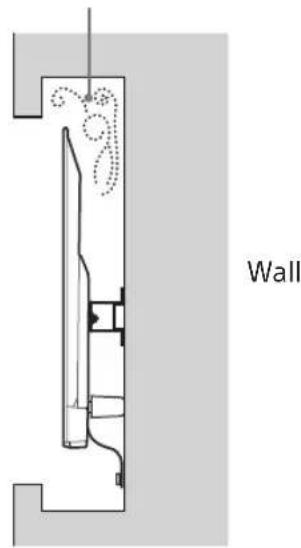
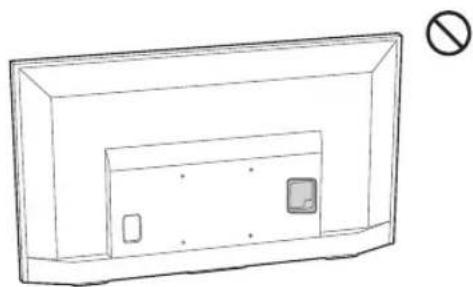
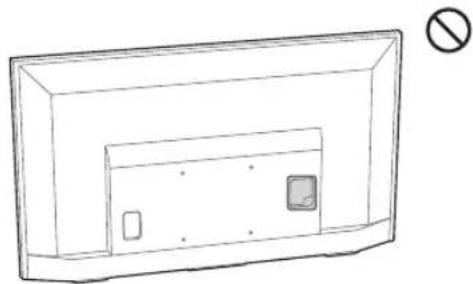
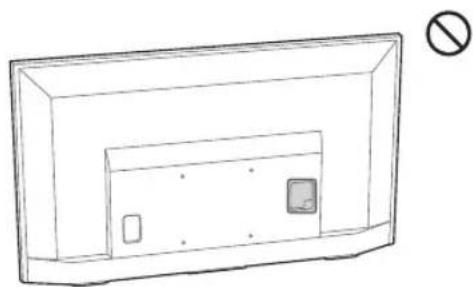
Do not lay the TV set flat, install upside down, backwards, or sideways. - Do not place the TV set on a shelf, rug, bed or in a closet. - Do not cover the TV set with a cloth, such as curtains, or items such as newspapers, etc. - Do not install the TV set as shown below.
Air circulation is blocked.
Note
- If you intend to route the cables in the wall, make a hole in the wall to insert the cables before beginning the installation.
To prevent pinching the cables, prepare a hole in the wall somewhere outside the perimeter of the Base (20) A, Base Adaptor 1 and Spacer (20) E, Spacer (60) K.
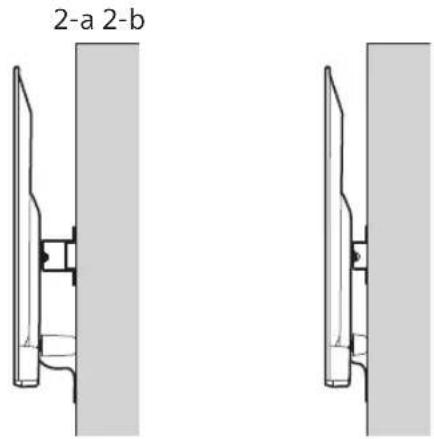
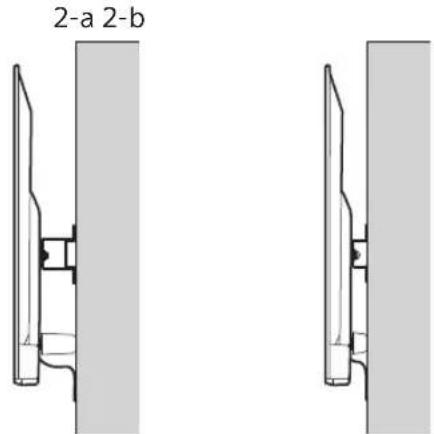
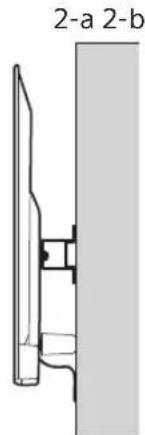
2 Select Wall mounting style. It is selectable as shown below.
2-a Standard mount
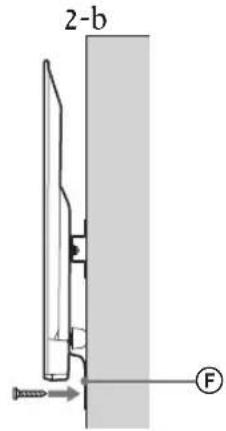
2-b Slim mount
Refer to the table of step 1.
WARNING
- When 2-b is selected, rear terminal access is limited.
2-a 2-b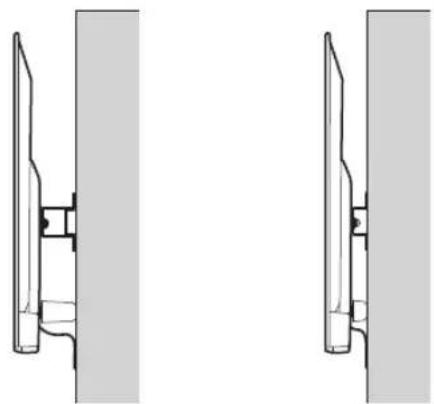
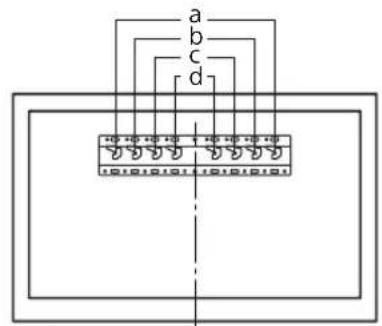
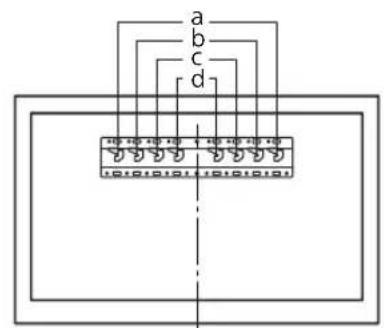
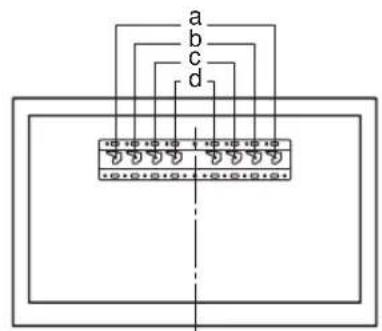
3 Refer to the below table about the Base Adaptor fitting location. In case of selecting 2-b, then skip this step.
| Model Name Hook location | |
| KDL-50WG6□□ | c |
| KDL-43WG6□□ | |
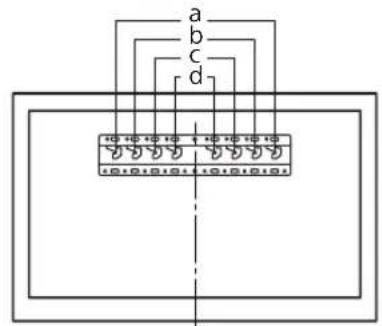
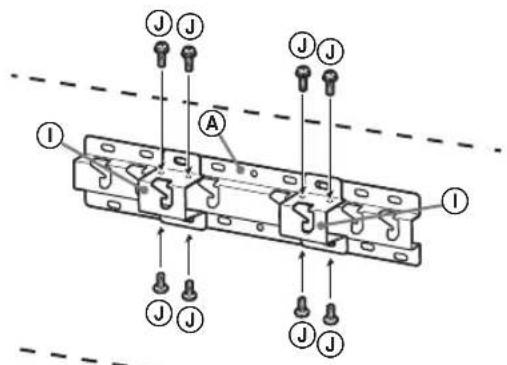
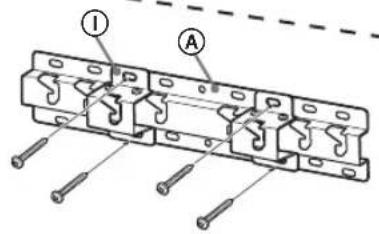
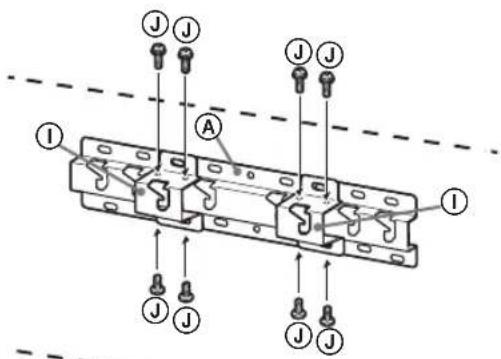
Fit Base Adaptor ① by using Screw (PSW 4x10) ② to Base (20) ④ when selecting 2-a.
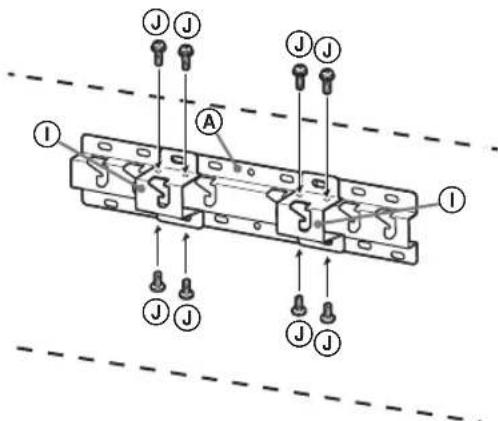
4 Decide the positions of the screws for installing the Base (20) A.
Refer to the specifications on page 12. When selecting 2-a, please use the hole positions of Base Adaptor ①
WARNING
The wall that the TV will be mounted on should be able to support a weight of at least four times that of the TV (Refer to your TV's Reference Guide for its weight.). - Determine the strength of the wall the TV will be mounted on. Reinforce the wall sufficiently, if necessary.
Installing the Base on the wall
- Use four or more screws of 8mm diameter or equivalent (not supplied).
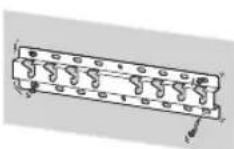
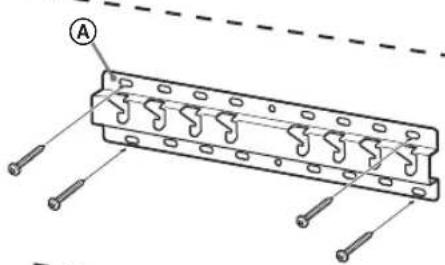
- Fit four screws to the holes of Base Adaptor ① with Base (20) A (2-a only). Install the Base (20) A on the wall horizontally.
Standard mounting (2-a)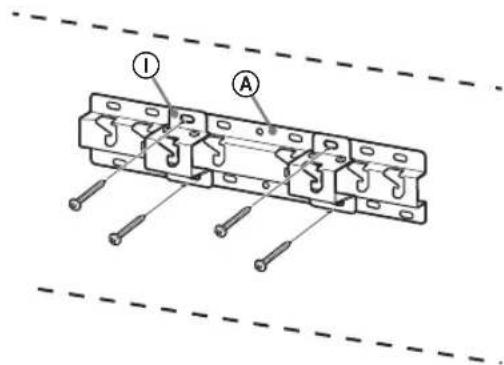
Slim mounting (2-b)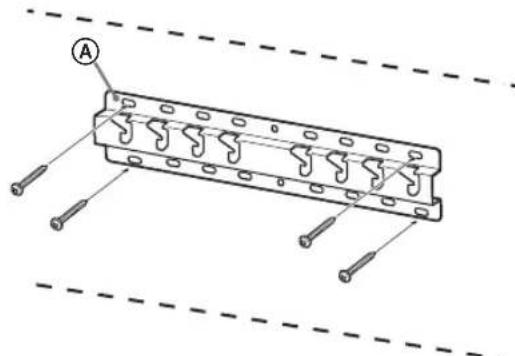
Preparing for the installation of the TV
Refer to the Setup Guide for stand installation.
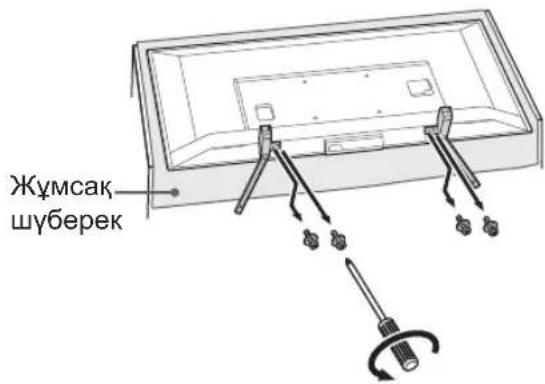
1 Detach the Table-Top Stand from the TV.
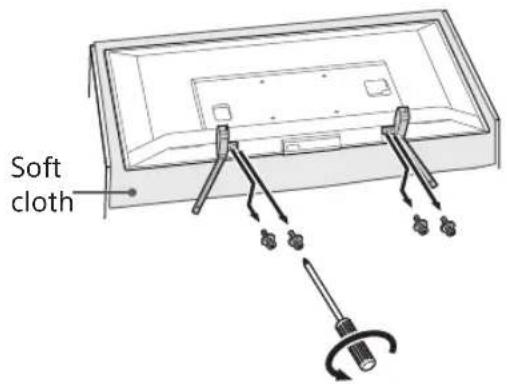
Note
Make sure to place the TV on a soft cloth to prevent damaging the display's surface. - When installing the Wall-Mount Bracket, do not use the screws removed from the Table-Top Stand. - Be sure to store the removed Table-top Stand and its screws in a safe place, keeping them away from children. You will need them if you want to use the TV on a table in the future. The Table-Top Stand cannot be purchased separately.
WARNING
- Be sure the TV is in the vertical position before switching it on. The TV set must not be powered on with the LCD panel face down to avoid uneven picture uniformity. If pressure or shock is applied to the surface of the TV, the TV may break or become damaged.
- Lay the TV face down on a stable and level surface with the Table-Top Stand hanging over the edge of the surface. Having the TV face and the base of the Table-Top Stand on the same level surface will create an unstable working condition and can damage the TV.
- When detaching the Table-Top Stand from the TV, hold the Table-Top Stand securely.
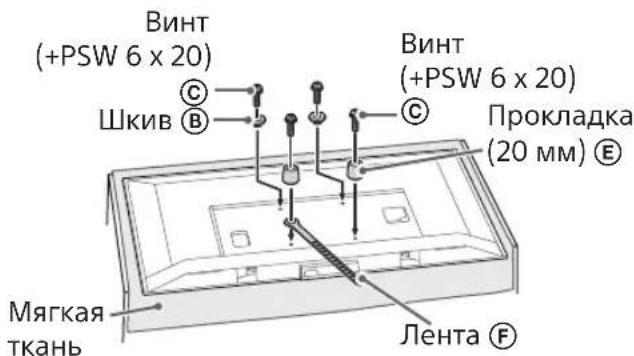
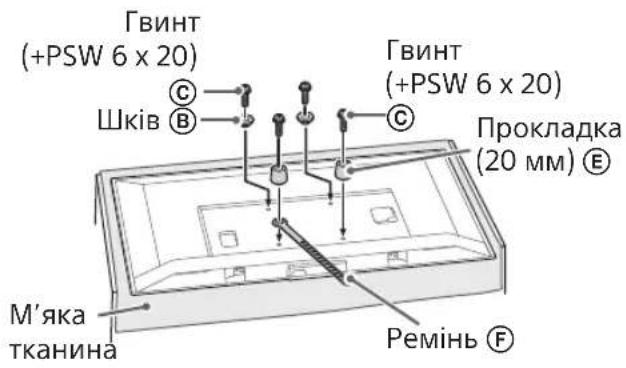
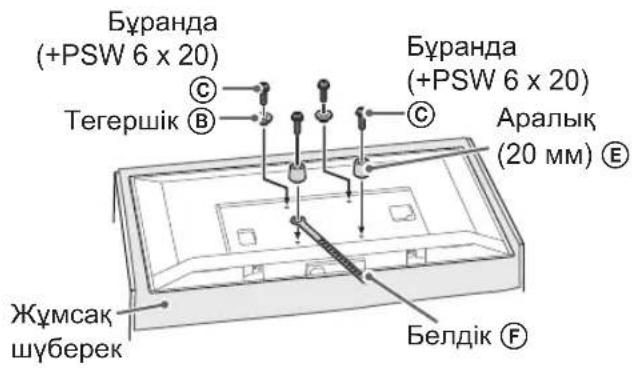
2 Attach the Attachment parts for Wall-Mount Bracket. Check the Attachment parts by referring to "Supplied with SU-WL450" in "Checking the parts" on page 5.
Note
- Firmly secure the Attachment parts using screws.
- When using an electric screwdriver, set the torque setting to approximately 1.5 N·m {15 kgf·cm}.
- Be sure to store the used or unused parts in a safe place for future use. Retain this manual for future reference.
Standard mounting (2-a)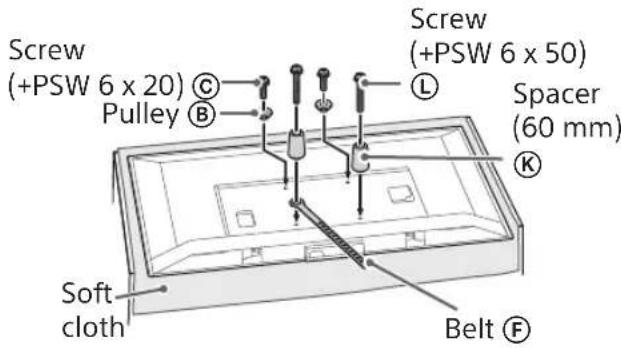
Slim mounting (2-b)
Note
- You cannot use some of the terminals on the rear of the TV when using this mounting style.
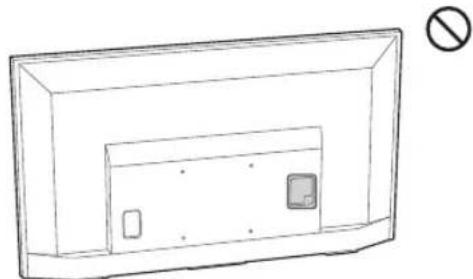
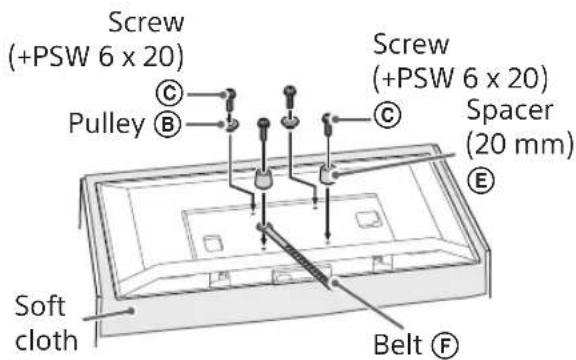
3 Connect the necessary cable(s) to the TV.
Make sure to connect the cables before installing the TV on the wall. You will be unable to connect the cables when the TV is installed.
Refer to the Reference Guide supplied with your TV.
Note
- Subcontract the cable routing in the wall to a licensed contractor.
- Bundle the connecting cables to prevent stepping on them before wall mounting.
Installing the TV on the wall
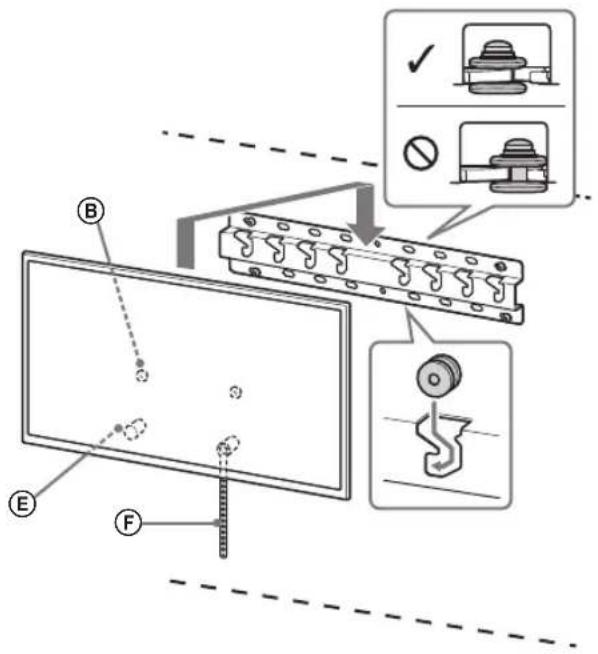
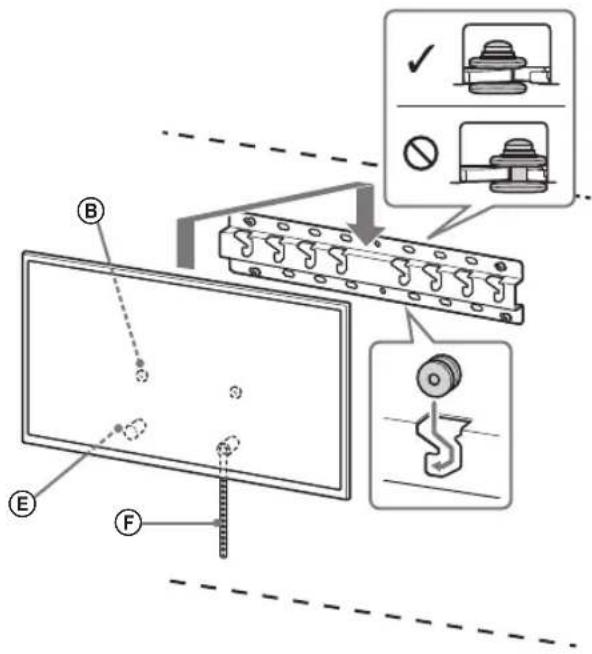
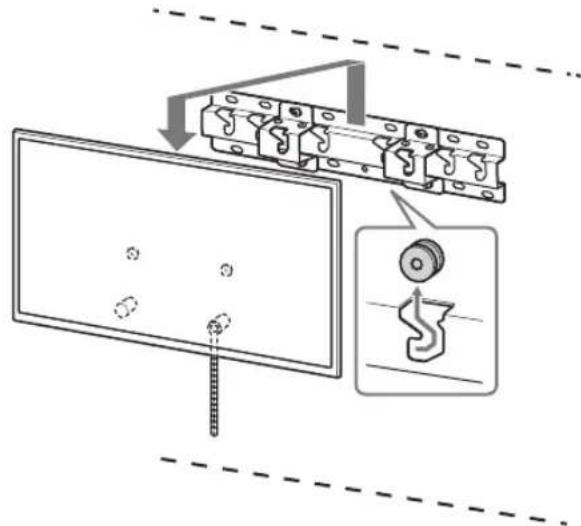
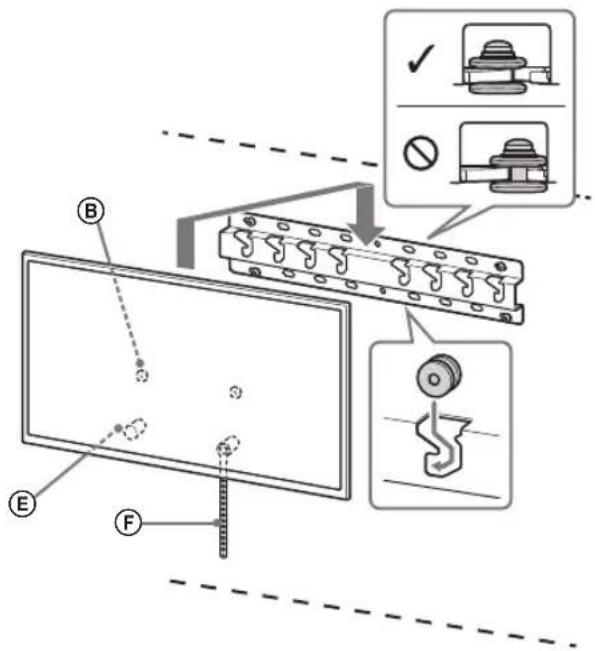
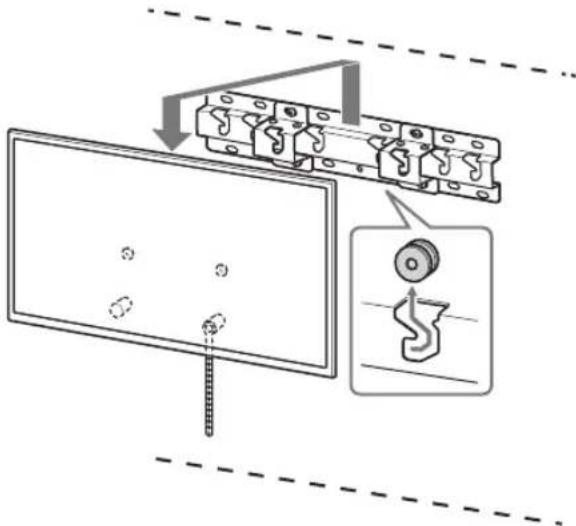
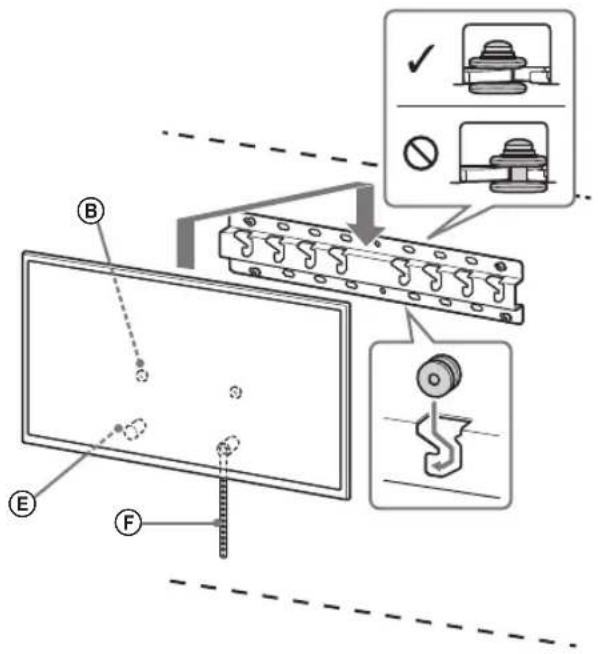
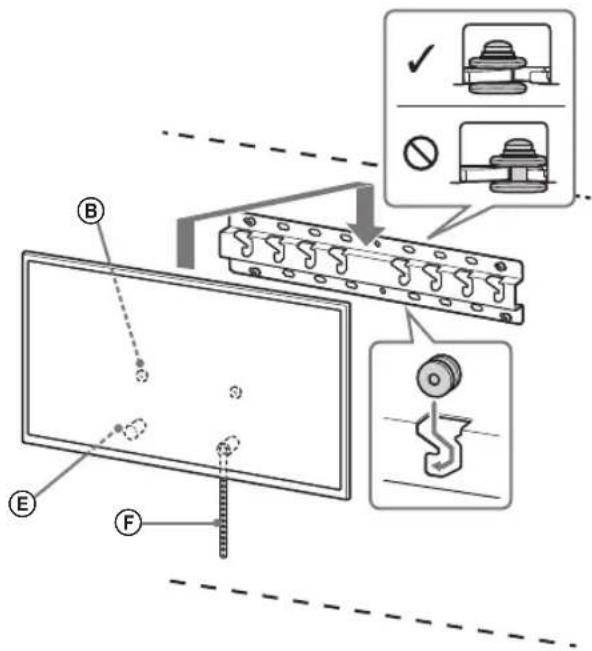
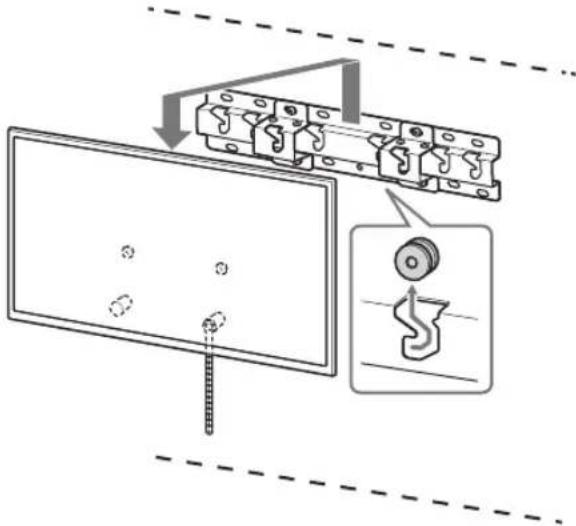
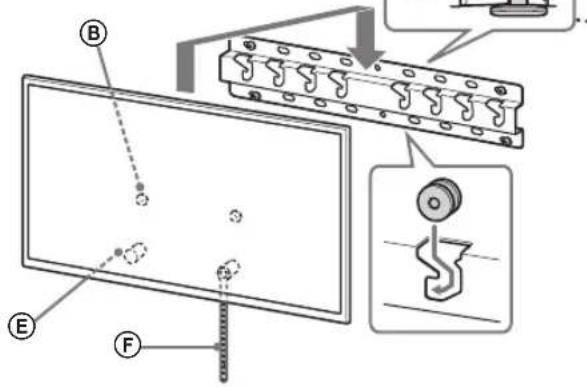
1 Install the TV onto the Base or Base Adaptor.
- For the location of the Pulleys (B) to hang on the Base or Base Adaptor, refer to the table of step 3 in "Deciding on the installation location" on page 7.
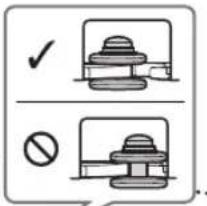
- Gently slide down the TV and hang the Pulleys (B) attached to the rear of the TV to the Base or Base Adaptor, making sure to confirm the shape of the holes. After installing the TV on the wall, confirm the Pulleys (B) are firmly latched into the Base or Base Adaptor.
- Release both hands slowly to ensure that the TV does not fall.
Standard mounting (2-a)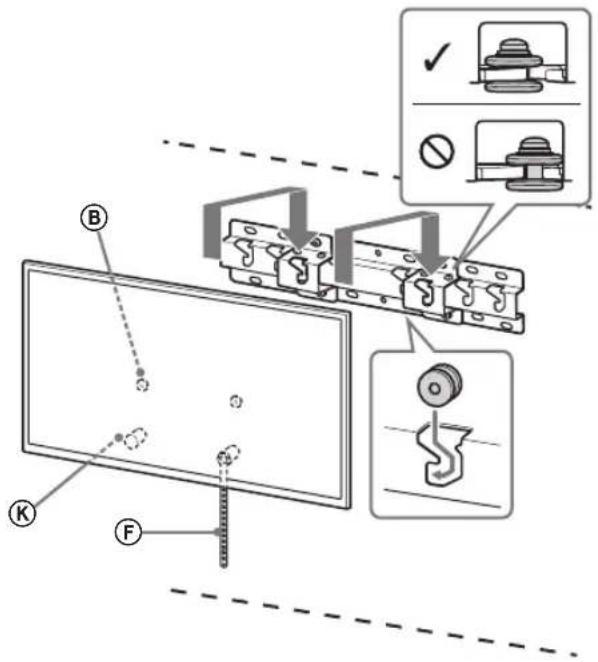
Slim mounting (2-b)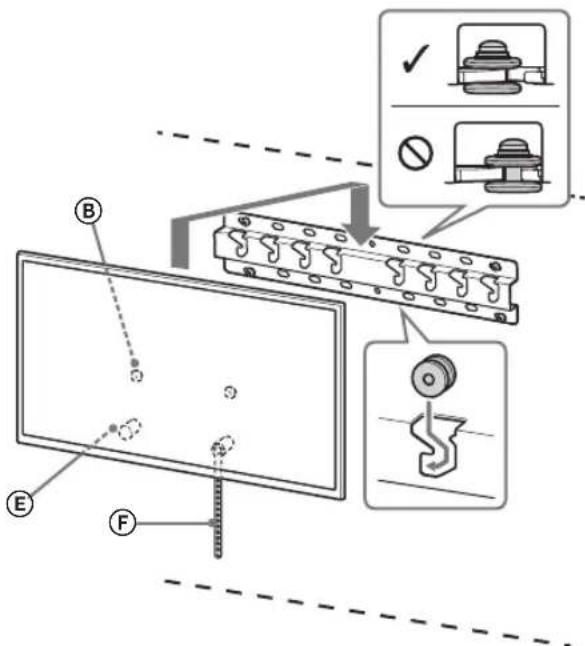
WARNING
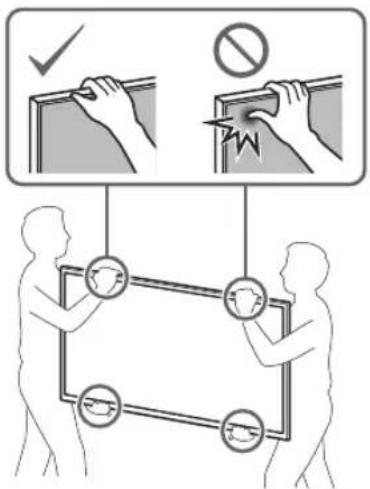
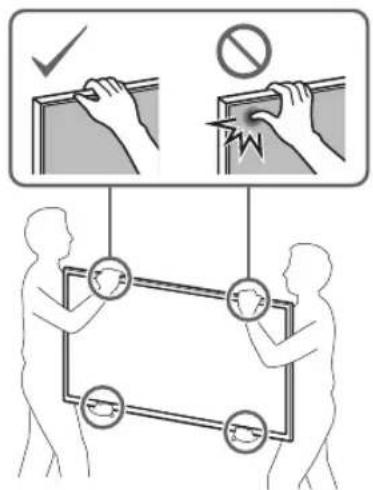
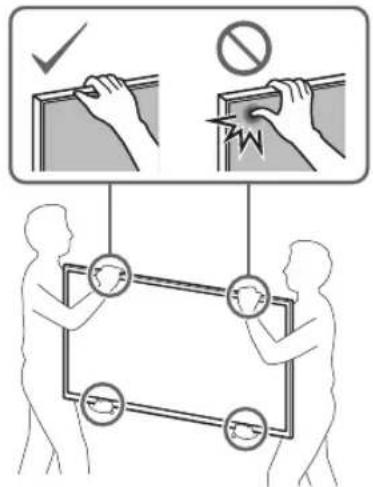
- Be sure that two or more persons (three or more persons for 75 inches and above TV set) hold the TV when carrying it.
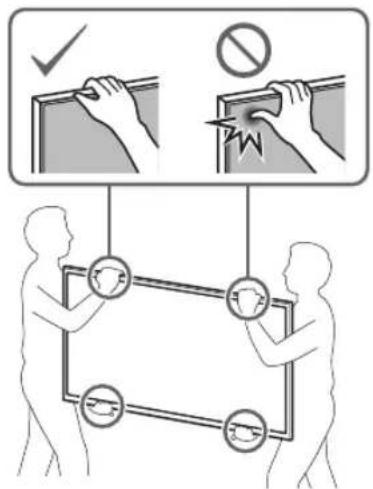
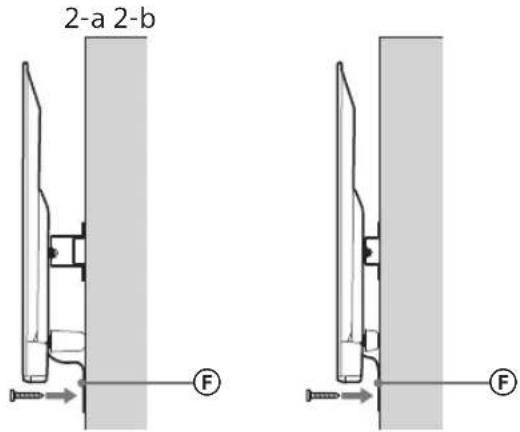
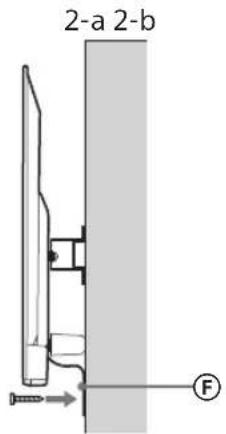
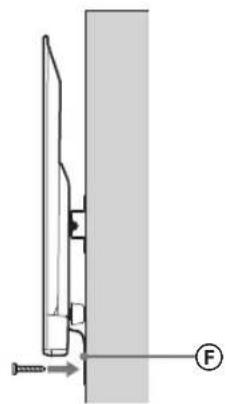
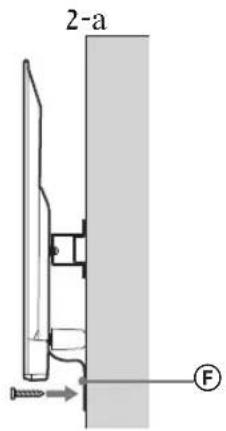
2 Preventing the bottom of the TV from shifting.
Take up the slack of Belt F and attach it to the wall tightly.
2-a 2-b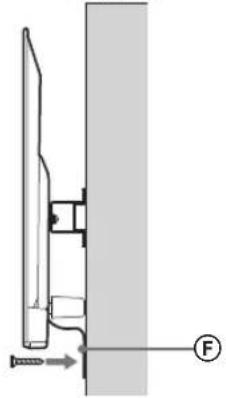
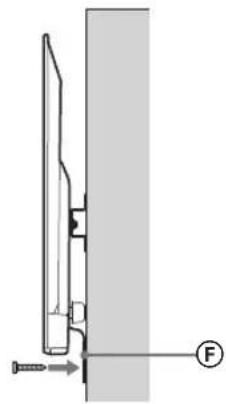
- Use a 5 mm diameter screw or equivalent (not supplied).
Note
Try to pull the bottom of the TV towards yourself slightly, to make sure that it does not move forward. If there is any movement, it is not fixed correctly, and the Belt should be secured firmly again.
Confirming the completion of the installation
Check the following points.
- The Pulleys (B) are firmly hung onto the Base or Base Adaptor.
- The cord and the cable are not twisted or pinched.
- The Belt (F) is tight with no slack.
WARNING
- Improper placement of the mains lead, etc., may cause fire or electric shock through a short circuit. Be sure to confirm the completion of the installation for safety.
Other information
When removing the TV, reverse the previous installation procedure.
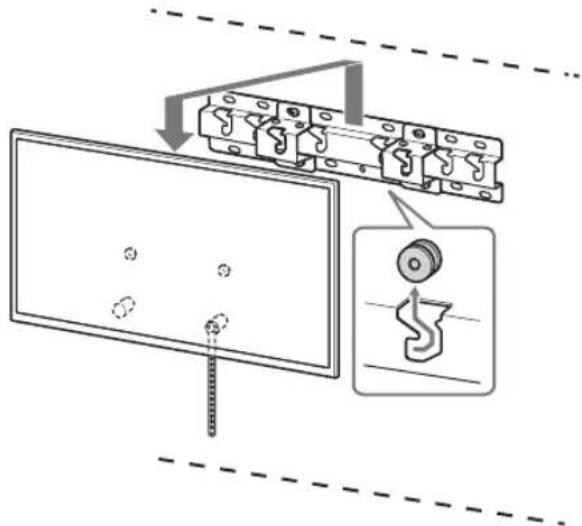
WARNING
- Be sure that two or more persons (three or more persons for 75 inches and above TV set) hold the TV when removing it.
Specifications
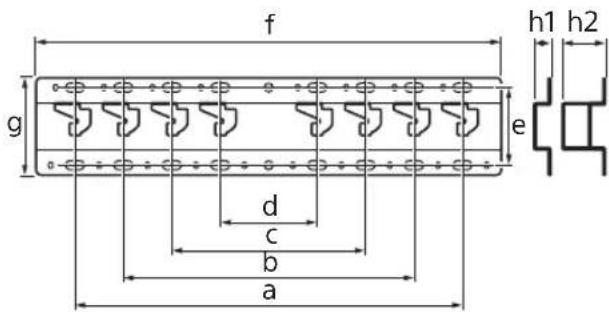
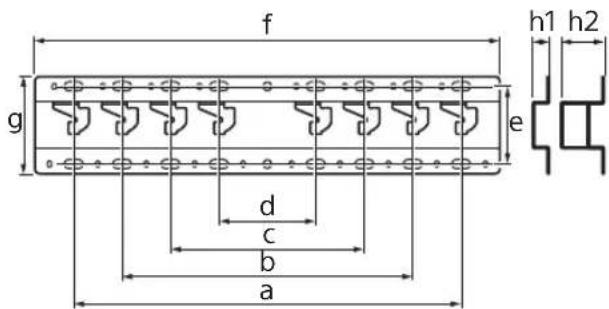
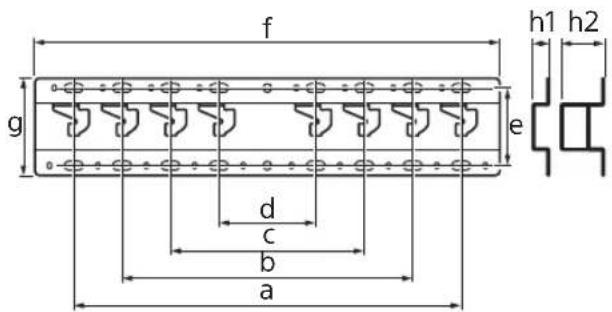
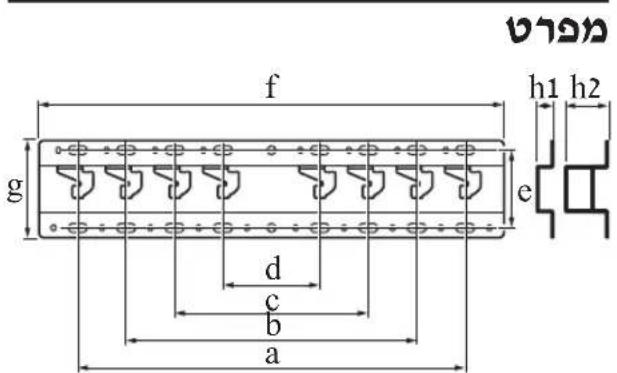
Dimensions: (Approx.) [mm]
a : 400
b : 300
c:200
d : 100
e:80
f:480
g : 100
h1:20(case2-b)
h2:60(case 2-a)
Weight (base only): (Approx.) [kg]
0.8
Design and specifications are subject to change without notice.
Dimensions: (approx.) [mm]
a: 400
b: 300
c: 200
d: 100
e: 80
f: 480
g: 100
h1: 20 (case 2-b)
h2: 60 (case 2-a)
Weight (base only): (approx.) [kg]
0.8
Dimensions: (approx.) [mm]
a: 400
b: 300
c: 200
d: 100
e: 80
f: 480
g: 100
h1: 20 (case 2-b)
h2: 60 (case 2-a)
Weight (base only): (approx.) [kg]
0.8
Preparation for installation
1 Find the TV's location.
Dimensions: (approx.) [mm]
a: 400
b: 300
c: 200
d: 100
e: 80
f: 480
q: 100
h1: 20 (case 2-b)
h2: 60 (case 2-a)
Wall-mounting bracket
For the installation of the product, experience is required. Read this manual carefully to perform the installation safely and completely. Sony is not responsible for damage or injury caused by improper use or installation. Give this manual to the customer after installation.
This manual shows the correct procedures for working with the product. The important precautions that must be followed to avoid accidents are described. Read this manual carefully and use the product correctly. Keep this manual for future reference.
Sony products are designed with safety in mind. However, if the product is used incorrectly, it may cause serious injury or damage due to fire, electric shock, or falling of the product. Follow the safety precautions to prevent such incidents.
WARNING
Product information
This wall-mounting bracket is designed for use only with the specified televisions. Refer to the TV manuals to verify that this bracket can be used for wall mounting.
To customers
PRECAUTIONS
If these safety measures are not followed, it could lead to serious injury or death from fire, electric shock, or product falling.
Have the installation performed by a licensed installer or qualified personnel during installation.
If the wall mount bracket is not installed correctly, serious incidents may occur. Make sure the installer is a licensed installer.
The TV may fall and cause serious injury, including death. If the wall on which the wall mount bracket is installed is unstable, not perpendicular to the floor, or not strong enough, the structure may fall and cause injury or property damage. The wall must be able to support the weight of the TV, as it will be subjected to the TV's weight. (See the TV's reference guide regarding its weight.) If the wall mount bracket is not installed securely, the structure may fall and cause injury or property damage.
Make sure you have followed the instructions for installing the TV by a licensed installer.
If the product is transported or disassembled by an unlicensed installer, it may fall and cause injury or property damage. Make sure two people (three or more people for a TV with a 75-inch size) carry or disassemble the TV.
Do not tighten the screws after installing the TV.
If you drop it, the TV may fall and cause injury or damage to property.
Do not skip the wall mount installation instructions.
If you drop it, the wall mount may fall and cause injury or damage to property.
Do not install other equipment except the specified product.
This wall mount is designed for use only with the specified product. If you install equipment other than the specified one, it may fall and cause injury or damage to property.
Do not place the wall mount on any other product than the TV. Do not place the TV on a slanted or uneven surface.
If you drop it, the TV may fall and cause injury or damage to property.
Do not lean on or hang from the TV.
This device should not be placed near a heater, as it may fall and cause serious injury.
WARNING
If the prescribed safety measures are not followed, injury or property damage may occur.
Do not operate the product with a damaged power cord during cleaning or maintenance.
Do not apply excessive force to the top part of the TV. If you damage it, the TV may fall and cause injury or property damage.
Precautions
If you use the TV for a long time, the wall-mount bracket installed on the wall may become loose depending on the wall material. If the wall-mount bracket is detached from the wall after installation, the screws may remain in the wall. Do not use the wall-mount bracket as a shelf, as it may be subjected to mechanical stress.
Wall-Mount Bracket Installation
For Sony dealers
WARNING
These instructions are intended solely for Sony dealers. Follow the safety precautions described below, paying special attention to safety during installation, maintenance, and inspection of the product.
Do not install the wall-mount bracket on a wall surface where the TV's vents or sides protrude beyond the wall surface.
Do not install the wall-mount bracket on a wall surface, such as a column, where the TV's vents or sides protrude beyond the wall surface. If the TV is subjected to impact or falls, it may cause injury or property damage.
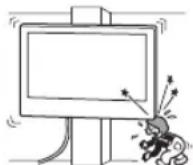
Do not install the TV on or under an air conditioner.
If the TV is exposed to dripping or splashing water or to air conditioner condensation, it may cause fire, electric shock, or malfunction of the TV.
Mount the wall mount bracket securely to the wall, following the instructions in this manual.
If any of the screws are loosened or damaged, the wall mount bracket may fall and cause damage to property. Use appropriate screws for the wall material and mount the bracket securely, using at least four screws with a diameter of 8 mm (or equivalent).

Use the correct screws and mounting parts as instructed in this manual. If you use substitute parts, the TV may fall and cause personal injury or damage.
Make sure you install the bracket correctly by following the procedure described in this manual.
If any of the screws are loosened or damaged, the TV may fall and cause personal injury or damage.
Tighten the screws securely in the indicated position.
If you do not do this, the TV may fall and cause personal injury or damage.
Be careful not to hit the TV during installation.
If the TV is subjected to impact, it may fall and cause injury. This could lead to damage.
Mount the TV on a wall that is perpendicular and flat.
If you do not do this, the TV may fall and cause damage.
After properly mounting the TV, secure the cables properly.
If people or objects get caught on the cables, this may cause damage or injury to the TV.
Do not allow the power cord or connecting cables to be pinched.
If the power cord or connecting cables are pinched between the bracket and the wall, or if they are bent or pulled with force, the internal wires may be damaged and cause a short circuit or electric shock. This may cause a fire or electric shock.
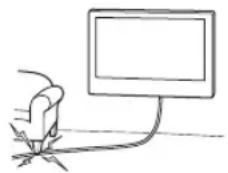
The screws required for securing the wall mount bracket to the wall are not included in the package.
Use appropriate screws for the wall material and structure when mounting the bracket to the wall.
Mounting the TV on the wall
The mounting procedure differs depending on the TV.
Use the wall mount bracket SU-WL450 to mount the TV on the wall.
Precautions
If the AC power cord is attached to the TV, first remove the AC power cord. Refer to the setup guide and follow the steps in reverse order to remove the AC power cord. Place the TV screen face down on a flat and stable surface covered with a thick and soft cloth while attaching the wall mount bracket parts or removing the AC power cord from the TV, to prevent damage to the LCD display surface. Do not forget to store the removed screws in a safe place, keeping them away from children.
Preparing for mounting
The TV setup guide must be at hand before starting the mounting. - Prepare a Phillips screwdriver, which corresponds to the bolts. - Choose the mounting position for the TV. - Prepare four screws with a diameter of 8 mm and one screw with a diameter of 5 mm or equivalent (not included in the package). Select screws suitable for the wall material.
Checking the parts
Supplied with SU-WL450
- Check that all parts are present.
| A Oснова (20) (1) B | Makapa (2) |
| ◎ PSW 6x20 (4)◎ | PSW 4x20 c Втулka (2) |
| E Дистанционна Втулka (20) (2) | F Колан (1) |
| ◎ Bтулka (20) (M4) (2) | H PSW 4x20 (2) |
| ◎ Aдантета Oснова (2) | J PSW 4x10 (8) |
| ◎Дистанционна Втулka (60) (2) | L PSW 6x50 (2) |
| ◎ Bтулka (M4) (2)◎ | PSW 4x50 (2) |
Determining the mounting location
1 Select the mounting location.
Ensure that the wall has sufficient space for the TV and is capable of supporting the weight, which is at least four times the TV's weight. Refer to the following table regarding mounting the TV on the wall. Refer to the TV's reference guide regarding its weight.
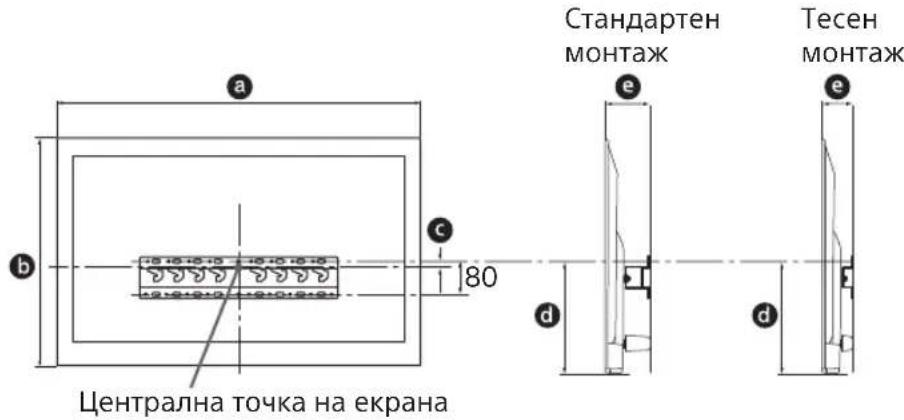
Determine the locations of the screws for mounting on the base (20).
See the specifications on page 12.
When you choose option 2, use the correct position of the holes for the adapter on the base.
WARNING
- The wall on which the TV will be mounted must be able to support at least four times its weight (see the TV's user manual regarding its weight).
- Determine the strength of the wall on which the TV will be mounted. If necessary, reinforce the wall sufficiently.
Mounting the base on the wall
- Use four screws with a diameter of 8 mm or equivalent (not supplied). Secure the four screws in the holes of the adapter on the base with the base (20) (see figure 2).
- Mount the base (20) horizontally on the wall.
Standard mounting (figure 2-a)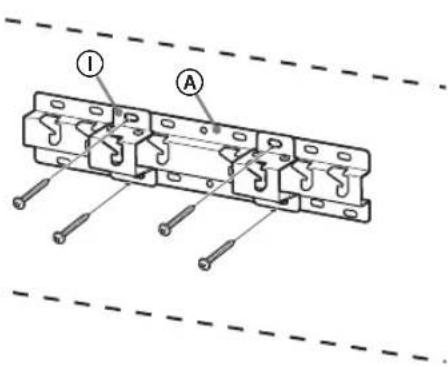
Tight mounting (figure 2-b)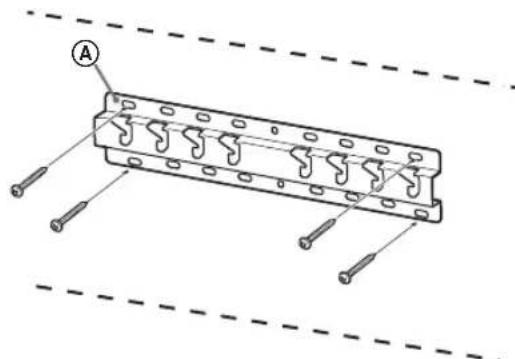
Preparation for mounting the TV
Installation and setup instructions.
1 Remove the stand from the TV.
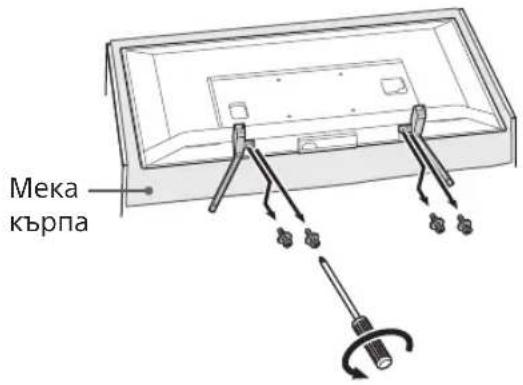
Note
- Make sure you have placed the TV on a flat surface to prevent damage to the screen. When mounting the wall mount bracket, do not use the screws from the stand. The stand and its screws are not included. You will need them if you plan to use the TV with the stand later. The stand cannot be purchased separately.
WARNING
- Before installing the TV, make sure it is in a vertical position. The TV should not be connected to the power outlet, and the screen should face down to avoid unevenness in the picture. If the surface of the TV is subjected to pressure or impact, it may be damaged. - Place the TV with the screen down on a stable and flat surface, with the stand placed on the surface. If the TV and the stand are not on the same level, this will lead to unstable operating conditions and may damage the TV. When removing the stand from the TV, hold the stand firmly.
2 Prepare the parts for the wall mount bracket. Check the parts by comparing them with the "Supplied with SU-WL450" in "Parts Check" on page 5.
Note
Secure the parts with screws. When using an electric screwdriver, set the tightening torque to approximately 1.5 N·m {15 kgf·cm}. Store the used or unused parts safely for future use. Keep this manual for future reference.
Standard mounting (2-a)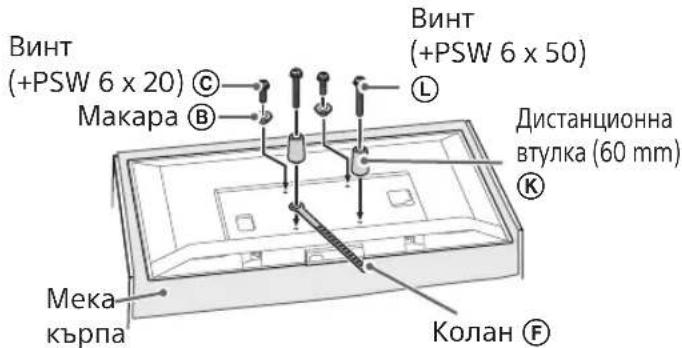
Thin mounting (2-b)
Note
- When installing the TV, do not use the screws that came with the TV.
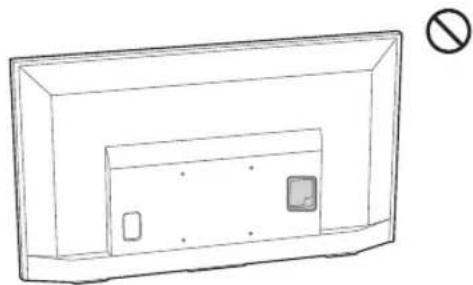
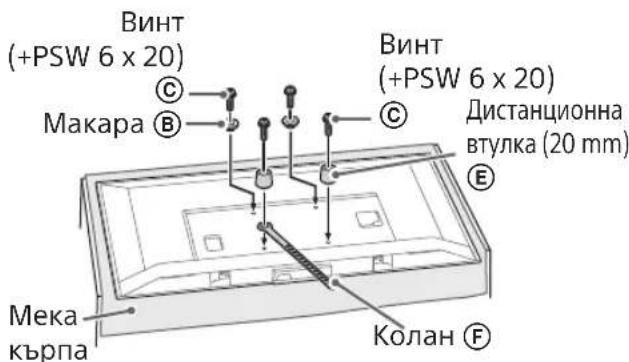
3 Connect the necessary cables to the TV.
Make sure you have connected the cables before mounting the TV on the wall. You may not be able to connect them after the TV is mounted. Refer to the manual supplied with your TV.
Make sure to have the wall brackets installed by a licensed installer. Collect the cable connections so that they do not hang down before mounting on the wall.
Mounting the TV on the wall
1 Mount the TV onto the base stand.
For the location of the markers ⑧ for drilling on the base stand, see the table in "Determining the mounting position" on page 7. Carefully place the TV on a flat surface and attach the markers (B) to the back of the TV, aligning them with the base stand, while checking the shape of the hole. After mounting the TV, verify that the markers are correctly attached to the base stand. It is important to follow the steps in order to ensure the TV does not fall.
Standard mounting (2-a)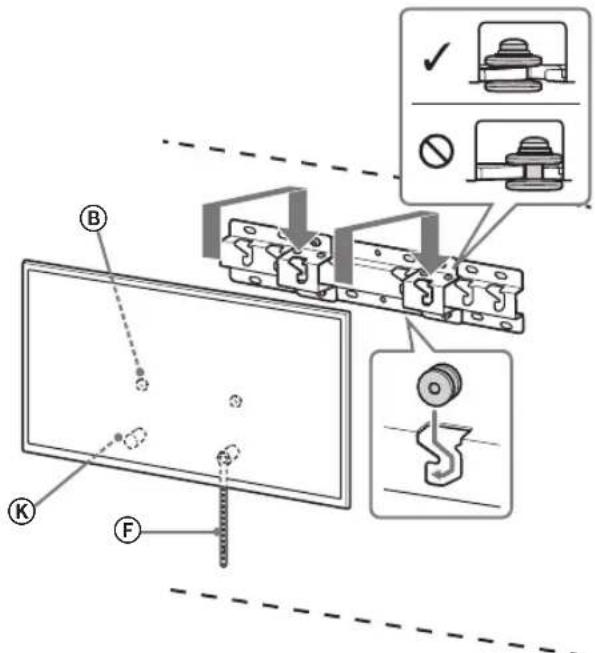
Tight mounting (2-b)
WARNING
- Make sure that the wall (or the wall bracket for TV sizes 75 inches and above) can support the TV when carrying it.
Failure to follow the safety precautions below may result in death or serious injury from electric shock, fire, tipping over, or falling of the product.
Be sure to contact a licensed technician, and do not allow children to be near the installation area.
Incorrect installation of the wall mount for wall mounting of the TV may cause the accidents listed below. For installation, be sure to contact licensed technicians.
The TV may fall and cause serious injury, such as fractures or fractures. If the wall on which the wall mount is installed is not strong enough, is uneven, or is not vertical, the product may fall and cause injury or damage to property. The wall must support at least four times the weight of the TV. (To find out the weight of the TV, see the reference manual.) - If the wall mount installation is done on a wall that is not strong enough, the product may fall and cause injury or damage to property.
Safety precautions regarding children
Do not allow children to climb on the TV. Keep small parts out of the reach of children to prevent them from swallowing or choking.
Do not remove the screws from the TV stand.
Otherwise, the TV may fall and cause injury or property damage.
Do not disassemble or modify the stand for wall mounting.
Otherwise, the wall-mount stand may fall and cause injury or property damage.
Do not install any equipment other than the specified one on the stand.
This wall-mount stand is intended for use only with the specified products. If you install equipment not intended for such mounting on this mounting stand, it may fall or be damaged, and may also cause injury or property damage.
To avoid overloading the wall-mount stand, do not place anything on it other than the TV. Do not tilt the TV left/right or up/down.
Otherwise, the TV may fall and cause injury or property damage.
Do not lean on the TV or hold onto it.
Do not lean on the TV or hold onto it, as it may fall and cause serious injury.
WARNING
If the following precautions are not observed, there is a risk of injury or property damage.
Care must be taken not to apply excessive force.
Do not overload the top of the TV. Otherwise, the TV may fall and cause injury or property damage.
Precautions
The wall mount bracket for the wall-mounted installation is used in confined spaces for a short period of time, so depending on the wall material, behind or above it, walls may need to be reinforced or covered. After removing the wall mount bracket for wall-mounted installation, holes will remain in the wall. Do not use the wall mount bracket in places with mechanical vibrations.
Do not install the wall mount bracket on walls where the edges of the TV will protrude beyond the edges of the wall.
Do not install the wall mount bracket on wall surfaces (for example, on columns) where the edges of the TV will protrude beyond the edges of the wall surface. Hitting the protruding edges of the TV may cause injury or damage to property.
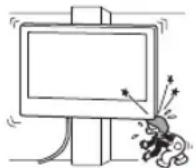
Do not place the TV under or over an air conditioner.
If the TV is exposed to continuous airflow from an air conditioner or a flow of air from an air conditioner for a long period of time, this may cause a fire in the TV, electric shock, or malfunction of the TV.
Be sure to securely fasten the wall mount bracket to the wall, following the instructions provided in this manual.
If any of the screws are loose or fall out, the wall mount bracket may fall and cause injury or damage to property. When performing the installation, use screws that match the wall material and securely install the device, using no less than four 8 mm screws (or equivalent).
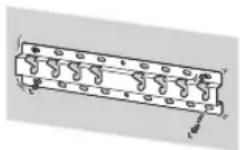
Be sure to use the screws and parts included in the kit for fastening and strictly follow the instructions provided in this installation manual. If other fastening materials were used during installation, the TV may fall and be damaged or cause injury.
Be sure to perform the assembly of the bracket, exactly following the instructions provided in this installation manual.
If any of the screws are loose or fall out, the TV may fall and be damaged or cause injury.
Securely tighten the screws in the designated fastening holes.
Otherwise, the TV may fall and be damaged or cause injury.
Make sure that the TV is not subjected to impacts during installation.
Impacts may cause the TV to fall and be damaged. This may lead to injury.
Install the TV on the wall only if it is positioned at a right angle to the floor.
In any case, the TV may fall and cause injury.
After installing the TV, ensure that the cables are positioned safely.
Cables that present a tripping hazard or obstruction may cause injury or damage to the TV.
Do not allow the power cord and connecting cables to become tangled.
Connecting cables.
If the power cord or connecting cable is pinched between the device and the wall or other obstruction, the insulation of the internal wires may be damaged, which could cause a short circuit or break. This may result in fire or electric shock.
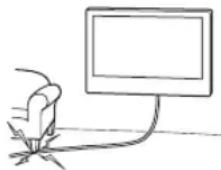
Screws for mounting the bracket for wall installation to the wall are not included in the delivery set.
When mounting the bracket for wall installation, use screws that match the material and structure of the wall.
The product should be stored in its cardboard packaging in a cool, dry, well-ventilated room away from direct sunlight. Storage temperature: from -20°C to +60°C. Storage humidity: < 80%.
Do not place the TV on a shelf, carpet, bed, or in a closet.
Do not cover the TV with cloth, such as curtains, or with newspapers, etc.
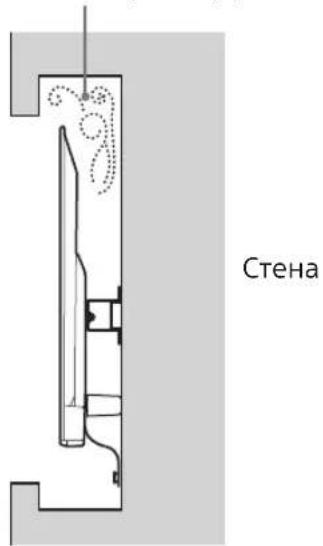
Do not place the TV as shown in the figure below.
Air circulation is obstructed.
Application
- Before installation, if you plan to route cables through the wall, also determine the cable openings and drill holes in the wall. To prevent cable damage, prepare the holes in the wall outside the perimeter of the base (20) A, the base (20) E, and the gasket (60) K.
2 Select the installation method. The distance from the rear of the TV to the wall can be selected as shown below.
2-a Standard mounting
2-b Compact installation
See step 1 in the table.
CAUTION
-When selecting option 2-b, access to the rear terminals is restricted.
3 The location of the base adapter mounting brackets is shown in the table below. If you select option 2-b, skip this step.
Model name Bracket position
KDL-50WG6□□
KDL-43WG6□□
C
Attach the base adapter ① to the base (20) using the screw (PSW 4x10) when selecting option 2-a.
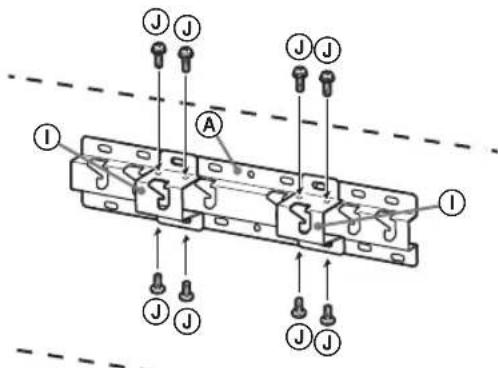
4 Determine the screw positions for installing the base (20).
See specifications on page 13. When selecting option 2-a, use the hole positions of the base adapter ①.
CAUTION
The table or surface on which the TV is placed must be able to support at least four times the weight of the TV (to find out the weight of the TV, see the reference guide).
- Check the strength of the wall on which the TV will be installed. If necessary, reinforce the wall.
Wall mount installation
- Use four or more screws with a diameter of 8 mm or equivalent (not included in the package). Insert the four screws into the holes of the wall mount base ① and attach it to the base (20) A (only 2-a).
- Install the base (20) A horizontally on the wall.
Standard mounting (2-a)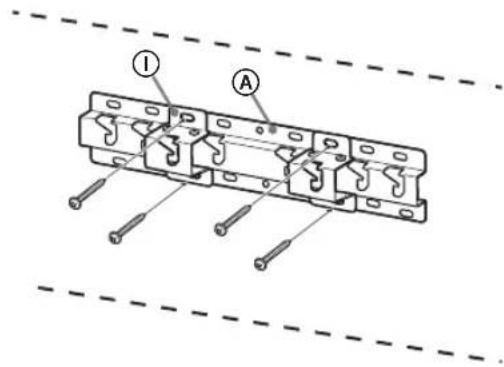
Compact installation (2-b)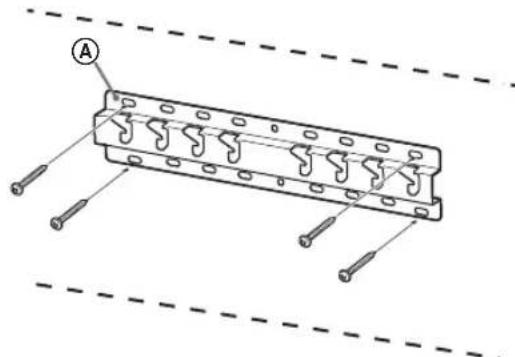
Compact installation (2-b)
Note
You will not be able to use some connectors on the rear panel of the TV with this type of installation.
Connect the necessary cables to the TV.
Before installing the TV on the wall, be sure to connect the cables. After installing the TV, connecting the cables will be impossible. See the reference guide included with the TV.
Note
- Route the cables in an orderly manner. - Before mounting the device on the wall, connect the cables so that you do not accidentally step on them.
Wall mounting the TV
1 Installing the TV on the base for the stand base.
The location of the hooks and the base for the stand base can be found in Table 3 in the "Determining the installation position" section on page 8. - Carefully lower the TV and hook the hooks (B) installed on the rear of the monitor onto the base for the stand base, aligning with the holes. - After installing the TV on the wall, make sure that the hooks are securely fastened to the base for the stand base. Gently hold both hands and verify that the TV is securely installed.
Standard mounting (2-a)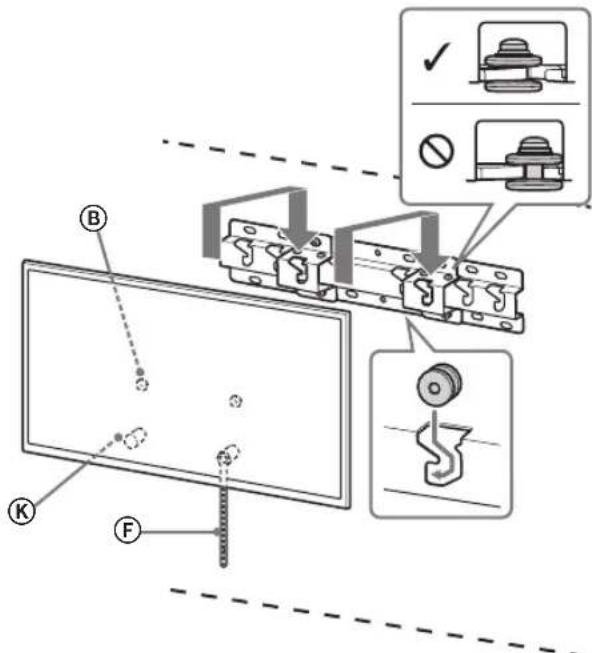
Compact installation (2-b)
WARNING
- Make sure that the TV is held by two or more people (three or more people for TVs with a 75-inch diagonal or larger) when carrying it.
2 Preventing the lower part of the TV from shifting.
- Tighten the strap F and securely attach it to the wall.
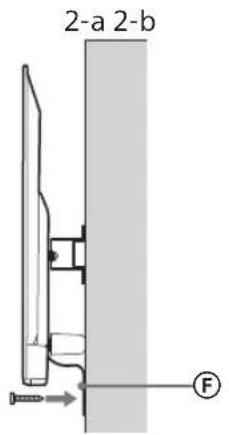
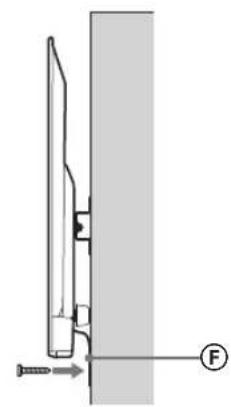
- Use a screw with a diameter of 5 mm or its equivalent (not supplied).
Note
Gently pull the lower part of the TV toward you to ensure it does not move forward. If there is any slight movement, the TV is not secured properly, and strap F should be tightened further.
- Hooks ⑧ are securely hooked onto the base for the stand base.
- The cord and cable are not twisted or pinched.
- Strap F is securely attached without slack.
WARNING
- Improper installation of the TV may result in injury or electric shock due to a short circuit. To ensure safety, make sure all installation steps are completed.
Initial Information
To remove the TV, perform the procedure described above in reverse order.
WARNING
Make sure the monitor is held by two or more people (or more people if the TV is larger than 75 inches) when removing it.
Technical Specifications
Dimensions: (approx.) [mm]
Do not unscrew the screws, as they are for TV mounting.
If you do this, the TV may fall and cause serious injury or damage.
Do not remove the parts of the bracket for partial mounting.
If you do this, the bracket for partial mounting may fall and cause serious injury or damage.
Do not install any other devices other than the specified one.
The bracket for partial mounting is intended for use only with the specified product. If you install other devices, the bracket may fall and cause serious injury or damage.
Do not use the bracket for partial mounting for any purpose other than mounting the TV. Do not tilt the TV up/down or left/right.
If you do this, the TV may fall and cause serious injury or damage.
Do not place the TV on an unstable surface.
Do not place the TV on an unstable surface, as it may fall and cause serious injury.
WARNING
Failure to follow the safety precautions listed below may result in serious injury or property damage.
During cleaning or servicing, do not apply excessive force to the product.
Do not apply excessive force to the top of the TV. If you do, the TV may fall and cause serious injury or property damage.
Safety Precautions
If the TV is installed on a wall mount for partial mounting and will be used for a long time, depending on the material of the wall, the wall surface behind the TV or above it may become unstable, or the wall may be damaged.
For partial mounting, install the mounting screws securely into the wall studs. Do not use the wall mount for partial mounting in locations where mechanical vibrations occur.
Installing the Wall Mount for Partial Mounting
For Sony brand TVs
WARNING
The instructions below are intended for Sony brand TVs. Please read the safety precautions described above and pay special attention to safety during installation, servicing, and inspection of this product.
Do not install the wall mount for partial mounting on walls where the edges or sides of the TV protrude beyond the wall surface.
Do not install the wall mount for partial mounting on such surfaces, because in these locations the edges and sides of the product protrude beyond the wall surface. If a person or object accidentally hits the protruding sides of the TV, it may cause injury or property damage.
Place the TV on the floor or on a stand.
If the TV is placed for a long time in a place exposed to direct sunlight or near a heat source, it may cause a fire, electric shock, or malfunction of the TV.
Install the wall mount bracket securely to the wall according to the instructions in this manual.
If the screws are loose or fall out, the wall mount bracket may fall and cause injury or damage. The screws must match the material of the wall. To ensure secure installation, use the provided screws with a diameter of 8 mm (or equivalent).
Use the screws from the accessory kit for installation according to the instructions in this manual. Use of replacement parts may cause damage to the TV or injury.
Assemble the bracket securely, following the procedure described in this manual.
If the screws are loose or fall out, the TV may fall and cause injury or damage.
Tighten the screws securely in the specified position.
If not done, the TV may fall and cause injury or damage.
When mounting the wall mount bracket, use screws appropriate for the wall structure and material.
Store the product in the cardboard box, in a dark, dry, clean place with good ventilation, away from moisture and dust. Storage temperature: -20 to +60°C. Storage humidity: <80%.
Wall mounting of the TV
The installation procedure depends on the TV model.
To mount the TV on the wall, use the wall mount bracket SU-WL450.
SUPPRIMER
If the wall-mounted bracket is installed, remove it. Follow the user manual and perform the corresponding steps in reverse order to remove the wall-mounted bracket. Do not use the remote control until the wall-mounted bracket is installed. If the wall-mounted bracket is installed or the wall-mounted bracket is changed, place the TV on a flat, stable surface, with the screen facing down, on a soft cloth or cushion. Keep the screen protected in a safe, dry place for later use.
Preparing for installation
- Before installation, carefully read the user manual and the installation guide for the TV.
- Before assembling, make sure you have the cross screwdriver and the screws.
- Check the installation position of the TV. Prepare four screws with a diameter of 8 mm and one screw with a diameter of 5 mm or equivalent (not included in the package). Select the screws according to the material of the wall.
Checking the parts
Package contents: SU-WL450
- Check that all parts are included in the package.
| AБаза(20)(1)ВШК | В(2) |
| CГВИNTPSW6x20(4) | DГВИNTPSW4x20i3ВТУЛКОЮ(2) |
| EПрOKладka(20)(2) | FРемиь(1) |
| GВтулka(20)(M4)(2) | HГВИNTPSW4x20(2) |
| IПерек中级6aЗn(2) | JГВИNTPSW4x10(8) |
| KПрOKладka(60)(2) | LГВИNTPSW6x50(2) |
| МВтулka(M4)(2) | NГВИNTPSW4x50(2) |
Determining the installation position
1. Determine the installation position.
Make sure the wall has sufficient dimensions and can support the weight, at least four times the weight of the TV.
The screws required for installing the TV on the wall can be found in the table below. The weight of the TV can be found in the manual for the TV.
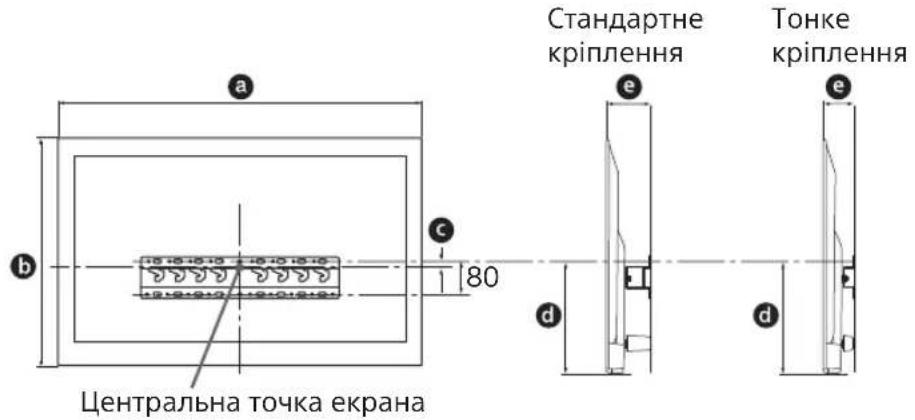
Unit: mm
Do not cover the TV with cloth (or similar) or other materials, such as newspapers. Do not install the TV as shown below.
Instructions
__SUPPIMER__
To route the cables to the wall, make a hole in the wall to insert the cables before starting installation. To prevent cable entanglement, make a hole in the wall outside the perimeter of the base (20) A, passing under the base ① and the grommet (20) E, and the grommet (60) K.
2 Choose the wall mounting method. Choose the height of the wall mount for your TV as shown below.
- If you choose option 2, access to the stand will be limited.
3 The installation position of the stand is based on the table below. If option 2 is chosen, skip this step.
| Ha3Ba модени PoЗташуванnersaTeXIb |
| KDL-50WG6☐☐C |
| KDL-43WG6☐☐ |
Precise mounting (option 2)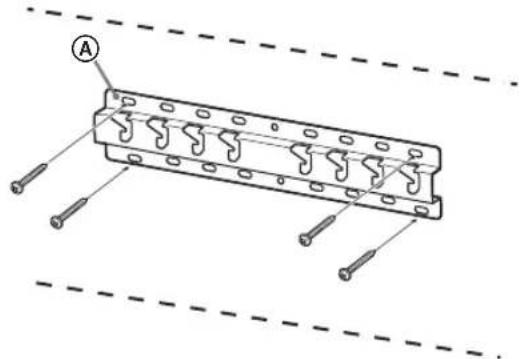
Preparing for TV installation
IIN. Refer to the manual for installation instructions.
1 Remove the stand from the TV.
Stand
- Do not damage the stand; place a soft cloth on the surface where you will place the TV. Do not use the stand for mounting screws that are screwed into the stand. Keep the stand and the screws in a safe, dry place. They are needed if you want to install the TV on a table. The stand is not sold separately.
WARNING
-Do not place the TV vertically. To avoid forming an uneven image, do not turn on the TV with the screen facing down. Pressing or hitting the TV surface may crack or damage it. Place the TV flat on a stable, flat surface so that the stand is level. If the TV surface is not level with the stand, the operating conditions will be unstable, and the TV may be damaged. Keep the stand away from the TV.
2 Secure the mounting elements of the stand for wall mounting. Check the presence of all mounting elements using the list "Supplied with SU-WL450" in the "Checking the Parts" section on page 5.
Tighten the wall-mount elements with screws. -For the outer bracket, set the tightening torque to approximately 1.5 N·m {15 kgf·cm}. -Be sure to keep the used or unused components in a safe place for future use, in case they are needed. Keep this manual for future use.
Standard mounting (2-a)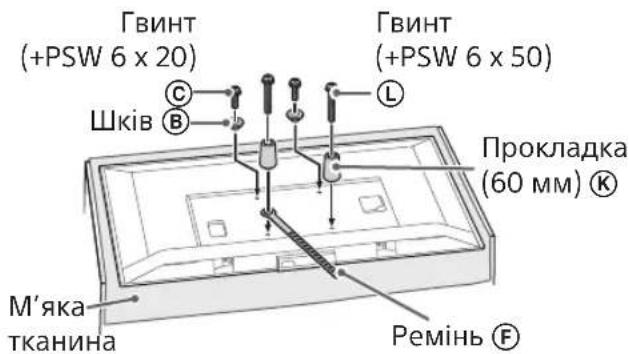
Tight mounting (2-b)
Mounting
- With this mounting option, you will not be able to use some inputs on the rear of the TV.
Connect the TV cables.
Check the cable connections before mounting the TV on the wall. After mounting the TV, it will be impossible to connect the cables. Note: Connect to the TV.
Mounting
- Have the cables laid in the wall by a licensed contractor. Connect the connection cables in advance to prevent them from getting caught under the wall before mounting.
Mounting the TV on the wall
1 Mount the TV on the base or the base adapter.
- Press the hooks ⑧, by which the TV is lifted onto the base or the base adapter, see the table for the installation step in section I "Determining the mounting position" on page 7. -Carefully lower the TV and press the hooks ⑧, attached to the rear of the TV, onto the base or the base adapter (they must fit the hole sizes).
- After mounting the TV on the wall, make sure that the hooks are securely locked in the base or the base adapter. -Carefully push the TV with both hands to make sure it does not fall.
Standard mounting (2-a)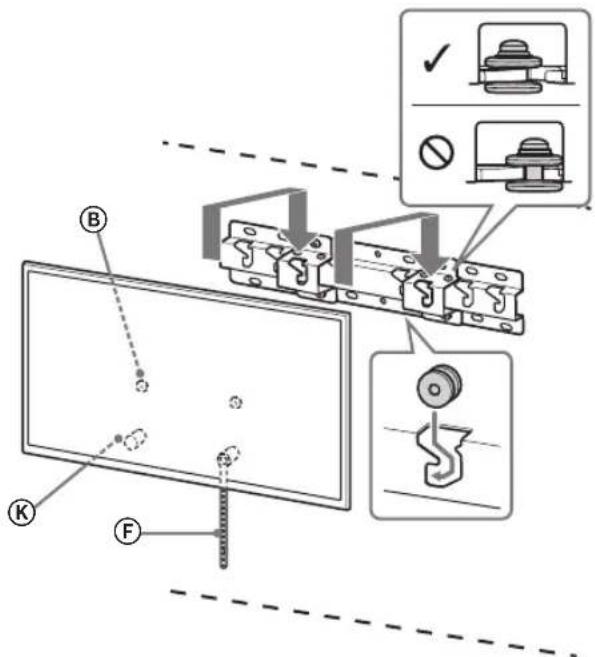
To the key pin (2-b)
WARNING
According to the TV installation instructions, you must support the TV while tilting it (the TV diagonal is 75 inches or more).
2 To avoid damage to the lower part of the TV.
Check the gap between the part and the wall, and if necessary, attach the part to the wall.
Use a screwdriver with a 5 mm tip or equivalent (not included in the delivery set).
Note
Try to gently pull the lower part of the TV towards you to make sure it does not move forward. If the TV moves, close it correctly and it is necessary to close the part F again.
Check after installation is complete
Check the assigned points below.
- If the plug is inserted into the base or into the base adapter.
- The cord and cable are not crossed or pinched.
- Part F is securely closed without gaps.
WARNING
- Incorrect placement of the power cord can cause interference or electric shock to persons due to short circuit. For safety reasons, be sure to check everything after installation is complete.
INFORMATION SHEET
Under no circumstances should you touch the TV until the specified installation procedure has been completed.
WARNING
Explain to the TV viewer that the TV should be handled by at least two people (due to the TV's weight and size).
Technical specifications
Dimensions: (approx.) [mm]
a: 400
b: 300
c: 200
d: 100
e: 80
f: 480
g: 100
h1: 20 (view 2-b)
h2: 60 (view 2-a)
Bar (approx.) [kg]
0.8
Design and technical specifications are subject to change without notice.
Thin installation (2-b)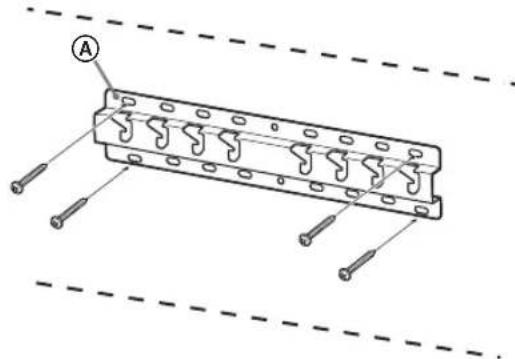
Thin installation (2-b)
Note.
Thin installation (2-b)
WARNING
Weight (base only): (approx.) [kg]
0.8
Do not place heavy objects on the device during operation.
The device may heat up during operation. If the surface is sensitive, the device may cause damage or discoloration.
Accessories
If the mounting brackets are not installed correctly, they may become unbalanced and the device may fall or cause injury. After installing the mounting brackets, check that they are secure. The mounting brackets must be installed by qualified personnel.
Installing the mounting brackets
Sony dnilnepepi ywiH
ECKEPTY
Keneci Hcykaynap Tek Sony dinyepnepine aphanrah. Korfapbda 6epinreH andbin any wapanapabH bIN nbIbIFbH3 xHe ocb KpyblfBbOpHaTy, oFAH KYTIM Xacay, OHb Tkepey Ke3iHde aca Ha3ap aydpabHb3.
Ka6biprara 6ekity kpoHwTeHH
TeIeIuIapdbIH
6ypbIHTapbI He KaNTaJIbI Ka6bIpra 6eTIHeH WbIFbIN TypaTbIH OpbIHApFa opHaTNaHbI3.
Ka6biprafa 6eKity KPOHtTeHHIN TepeiAapdbin BypbiuTapbl He KaNTanbl Ka6bipra 6eTIHeH uBbl Tpyatbl GaraH cekindiOpBnIaPFA opHaTNaHb.4Am Hemece BaCa 3aT TepeiAapdbin uBbln TyfAH bpyuBHa HE KAANTaBHa COkSa,On Xkapatanyhmece MyNk 3akBmDahbl MYMKH.
TeJeIaApbIH caIKbIHDaTkbIHTbIH yCTHe He actbHa opHaTnAb3.
Teeindapra caKbHdATkbUHTa3ak yaBt 60bi cy tamubapbAkca He cAnkbH ay a coKca, ON eptke, TOK coryr hemece TeeindapabH Dpybc XyMbic ICTemeyIHe ekenyi MymkH.
Ka6biprara 6ekity KPOHHTeHHIOB1 NaIaIaNHy HcayNbIFbIHcY OTBIPbIMMbIKTan 6ekITiHi3.
Bypanapabih6piKofanbinHeTycin Kanran bonca,KabiprfaBeKity KpohuTeHIn Kynan, XkapaktaHEmece MYNIIT3aKbIMDaHbHa ekenyi MymkH.KabipraHbMaTePnAbla cain bypanapabnnaDnanaHbI3Kehe DnAmetpi8MM(HEmeceYKcac)60natbH Tep He Odaan Kaen Bypanapabn naDnanaHa OTbIPn KpyanDbMbIKtan BeKtiH3.
BepinreH 6ypaHdaIap meh 6ekity 6eIweKTePin OcbI HyckayNbIKTaftbI HyckaynapFa cyneHe OTbIPbIN dypbc naindaHaHbIHbI3. KocankbI 3JeMeHTTepdi naindaHaHcaHbI3, TepeiHap Kynan, 6ipeyre DeHe XapaKaTbIH canybl Hemce TeJeHdApbl 3aKbIMDaaybl MymkiH.
HcyaynbkTa 6epiReh npoceDypanapra cyneHe OTbIPBn KPOHwTeHdi DypbICTa
KypactbipbIHbl3.
Bypanapapb6pi jkorfanca Hemece Tycin Kanfah Bonca, Tepeuap Kynan, Bipeyre DeHe KapakatbH canyib Hemece Tepeuapdp3akmbmdaybyMymkiH.
The grooves must be secured in place.
If the main body is not properly secured, it may move or shift during operation.
Do not install the cables during installation.
If the cables are not installed, they may become loose or damaged. This may cause malfunction.
The cables must be installed perpendicular to the wall and floor.
If not, the cables may become loose or malfunction.
After the cables are properly installed, secure the cable ducts properly.
If doors or other objects are in the way, it may be necessary to move the cables or the installation.
The power cord or extension cable must be kept short.
If the power cord or extension cable is pinched between the wall and the floor, or if it is damaged or cut, it may cause a short circuit or electric shock. This may cause fire or electric shock.
The brackets for securing to the wall are provided.
When securing the brackets to the wall, be careful not to damage the wall material with the screws.
Installing the cables on the wall
The installation procedure for the cables may vary depending on the type.
To install the TV on the wall, use the SU-WL450 wall-mount bracket.
Instructions for use, instructions for use and safety instructions. Read the safety instructions carefully, follow the instructions for use and keep them for future reference. To prevent damage and for your safety, the TV must be installed by qualified personnel. If the TV is not installed correctly, the TV may fall and cause injury or damage. Keep children away from the TV and do not place the TV on unstable surfaces.
Safety instructions
Before installation, read the safety instructions and installation instructions. Use a Phillips screwdriver for the screws. Do not overtighten the screws. Use screws with a diameter of 8 mm or larger, and a length of 5 mm or more (or longer). Use screws that fit the material of the TV.
Wall mounting
Provided with the SU-WL450
- If you have any questions, contact your dealer.
| A Heri3 (20) (1) B Terepiik (2) | |
| ◎ PSW 6x20 (4)◎ TblfbiH PSW 4x20 (2) | |
| ◎ ApaIbIK (20) (2)◎Белдik (1) | |
| ◎ TblfbiH (20) (M4) (2) | ◎ H PSW 4x20 (2) |
| ◎ Heri3ri和个人器 (2) | ◎ J PSW 4x10 (8) |
| ◎ ApaIbIK (60) (2) L | PSW 6x50 (2) |
| ◎ TblfbiH (M4) (2) N | PSW 4x50 (2) |
Identifying the installation location
1 Identify the installation location.
Make sure there is a suitable place for the TV and that the TV is not exposed to direct sunlight or heat sources.
Refer to the instructions for installing the TV on the wall. For safety, refer to the safety instructions for the TV.
Unit: mm
| Ynlri hemipi | Зкран салем dipei | Зкран opтасын cIeшемi | Орнату узbingibfbl | |
| a | b | c | d | |
| Стондарты bI opHaTy | ||||
| KDL-50WG6□□ | 1130 660 21 358 130 88 | |||
| KDL-43WG6□□ | 974 572 54 346 130 88 | |||
Instructions
It is possible to adjust the angle of the TV after installation. The TV can be tilted forward and backward.
Leave a space between the TV and the wall as shown in the figure.
Before installing the device, read the safety instructions carefully:
- Do not install the device near heat sources, open flames, or in direct sunlight. Do not install the device in damp, dusty, or sandy places, or near cabinets. Do not cover the device with curtains, newspapers, or other similar items.
- Install the device on a stable surface. The device has been blocked.
Instruction
If cables are routed through walls, they must be installed properly. To prevent cables from being pinched, the main (20) A, main terminals ① and auxiliary (20) E, auxiliary (60) K must be routed through the wall with proper cable routing.
2. Install the cables correctly. The device's rear panel must be accessible for maintenance.
2-a Standard installation 2-b Cable installation
1. Refer to the installation steps.
WARNING
-2-b When installing, the rear terminal may be hot.
3. Refer to the installation steps for securing the main terminals. When installing, follow these steps.
| Y NFLI HEMIPI IIMEK OPHBI |
| KDL-50WG6□□C KDL-43WG6□□ |
Terminal ① main (PSW 4x10) ② When installing, secure to the main (20) A terminal.
4. Determine the location of the terminals for installing the main (20) A.
Refer to the diagrams on page 12. When installing, connect the terminal ① main to the test point.
Before installing the cable, check the cable for any damage (see the section "Checking the cable"). Check that the cable is securely connected. If necessary, tighten the connection.
Installing the cable
- If the diameter is 8 mm, do not use a cable that is thinner or thicker than this. Secure the cable to the base (20) using the clamps (20) (see figure 2-a). Install the cable into the base (20) as it comes.
Standard installation (2-a)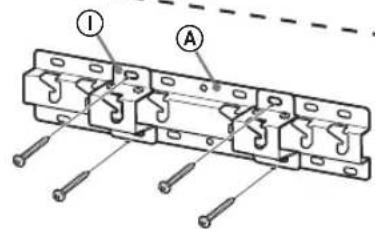
Correct installation (2-b)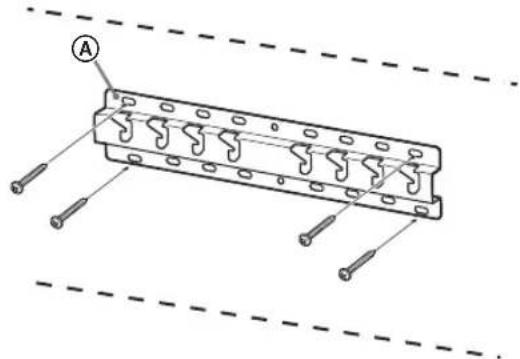
Cable installation guide
Check the installation carefully.
1. Remove the protective cap from the connector.
Note
- To prevent damage, place the cables in the designated location. When installing the cable, remove the protective caps from the connectors. After removing the protective caps, keep the connectors clean and protect them from dust. If the cables are not used, keep the protective caps on. Do not remove the protective caps unnecessarily.
When connecting the cable, ensure it is properly aligned. To ensure a secure connection, the cable connector should be inserted straight into the device. If the connectors are not aligned, the connection may be loose or damaged. Insert the cable connector straight into the device. If the cable connector and the device connector are not aligned, the connection may be damaged, and the cable may need to be replaced. - When removing the cable from the device, pull the connector straight out.
2. For installing the cable, refer to the installation manual. See the section "Installation" in the manual for the "SU-WL450" bracket.
Note
Before connecting the electrical wires, make sure the power is turned off. When the electrical plug is inserted, the analysis is performed. - Do not connect the wires to the socket before the analysis is completed. Follow the instructions in the manual to avoid any danger. We have downloaded this document for your safety.
Standard installation (2-a)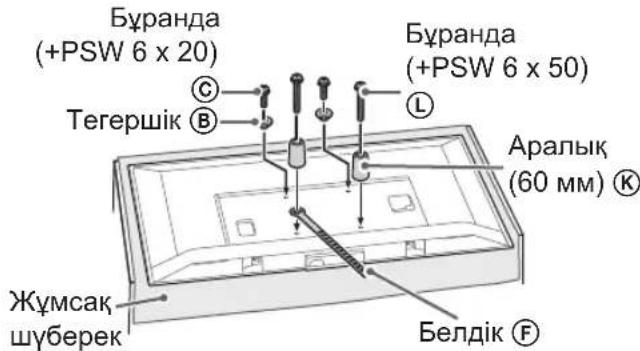
Proper installation (2-b)
Instructions
- During installation, it is possible that some terms may be used that are not familiar to you.
Connect the cables (cables) to the terminals.
Before connecting the cables, make sure they are properly installed. After installation, the cables may be moved. Check the instructions carefully before connecting.
Instructions
To connect the cables, you need to have the appropriate tools. Before connecting the cables, make sure they are properly installed.
Installing the terminals
1. Install the terminals on the base or base plate.
For the terminals on the base or base plate, see the section "Identifying the installation location" in step 3. - After installing the terminals, connect the wires to the base or base plate, and arrange them properly. - After installing the terminals, make sure they are securely attached to the base or base plate. To avoid any damage, use both hands when handling the terminals.
Standard installation (2-a)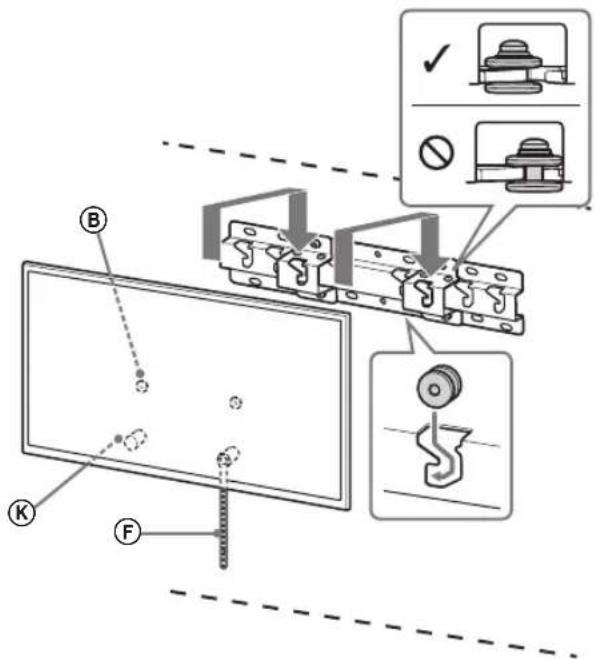
Proper installation (2-b)
NOTE
Install the telephone set (75 Ohm line or telephone line) according to the installation instructions.
2. Do not connect the telephone set to the mains electricity supply.
- The bell (F) may ring when you try to lift the handset.
- Diameters of 5 mm or more may cause damage (not recommended).
HycKay
To connect the telephone set, refer to the telephone set's connection diagram and connect the wires carefully. If necessary, the bell (F) may be connected.
Installation procedure
Check the connections.
The telephone set is connected to the line terminals. - The line and handset are not connected or are disconnected. - The bell (F) is connected.
WARNING
The telephone set may be damaged if it is connected to a line with a voltage higher than 75 V or if it is connected to a line with a voltage higher than 75 V. The telephone set may be damaged if it is connected to a line with a voltage higher than 75 V.
Other equipment
The telephone set must be installed in accordance with the installation procedure.
WARNING
Install the telephone set (75 Ohm line or telephone line) according to the installation instructions.
Technical specifications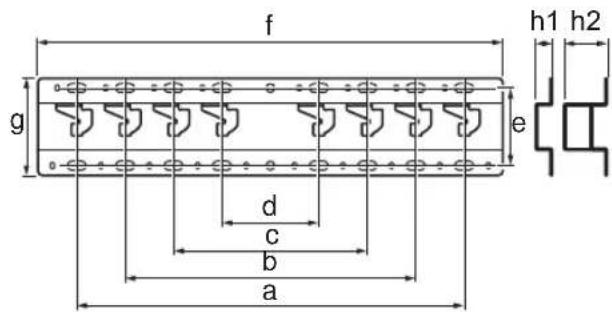
and by the way, this is not a real text
this is not a real text
and so on
and so on
and so on
#
and so on
and so on
and so on
177
and so on
and so on
07712 0316 7-5y 1310777777 .
and so on
Sony
SU-WL450
| (2) 陳鈞⑧ | (1) (20) 陳鈞⑧ |
| (2) PSW 4x20⑥ | (4) PSW 6x20⑥ |
| (1) 陳鈞⑤ | (2) (20) 陳鈞⑤ |
| (2) PSW 4x20⑧ | (2) (M4) (20) 陳鈞⑥ |
| (8) PSW 4x10① | (2) 陳鈞⑦⑧① |
| (2) PSW 6x50① | (2) (60) 陳鈞⑧ |
| (2) PSW 4x50⑨ | (2) (M4) 陳鈞⑧ |
(2-a) (20) ① v'v'v JN Jpn by A (20) nn npnn
(2-a) n7n7n7n7
(2-b) nynn
ONnnn,2-a nynny
87 10
A
4 npnn
A(20)
.12 0y
yinnn nipnwn,2-annny
.①
77
ynnn nn nnnn npwn nn 10 mnnn bn yyn nnnnnynnn .npnn no ny
·
.
nppnn pinn, nnnnnp
2 nnnn nn nn nn nn nn nn nn
nnnnnnn nn nnnn nn nnnn nn nnnnnnnnnnnnnnnnnnnnnnnnnnnnnnnnnnnnnnnnnnnnnnnnnnnnnnnnnnnnnnnnnnnnnnnnnnnnnnnnnnnnnnnnnnnnnnnnnnnnnnnnnnnnnnnnn
1
.
#
077777777
yOyOyOyOyOyOyOyOyOyOyOyOyOyOyOyOyOyOyOyOyOyOyOyOyOyOyOyOyOyOyOyOyOyOyOyOyOyOyOyOyOyOyOyOyOyOyOyOyOyOy
77
PN.00N 00 - mnnn, m: -2y no 5 - -
#
3
.
n 的一个
1 IN DODN
nnn nn n nn nn nn nn
by napn,ovan by nnbn
.
·
.
NTN
(2-a) n7n7n7n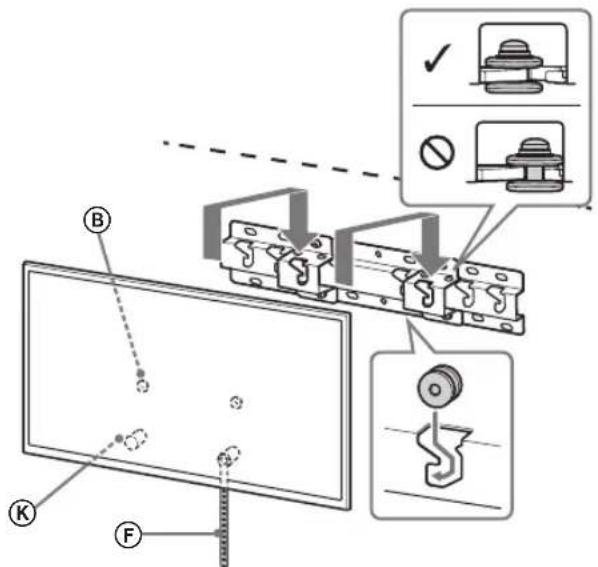
2nnn nn (2-b) nnnn
. nnnn
- nnnnF nn nn nn
n 5 7
. (Pnno) n
nyn
77
[1] (7):
400: a
300: b
200: c
100: d
80: e
480: f
100: g
(2-b nnp) 20: h1
(2-a nnp) 60: h2
0.8
y
Therefore, the area of triangle OBC equals the area of triangle COD plus the area of triangle BOC.
∴ PB BA
![SONY Bravia KDL50WG663 - [1] (7): - 1](/content/2026/03/465055/images/4a6f235f937a16dcda569594437983da8773bc0a72cc95b4cb4dfcc7d84202ce.jpg)
77
ybn75
nannnny
- ON SAFETY
- TO CUSTOMERS
- TO SONY DEALERS
- CAUTION
- SPECIFIED PRODUCTS
- WARNING
- BE SURE TO SUBCONTRACT THE INSTALLATION TO LICENSED CONTRACTORS AND KEEP SMALL CHILDREN AWAY DURING THE INSTALLATION
- BE SURE TO SUBCONTRACT MOVING OR DISMOUNTING OF THE TV TO LICENSED CONTRACTORS
- DO NOT REMOVE SCREWS, ETC., AFTER MOUNTING THE TV
- DO NOT MAKE ALTERATIONS TO THE PARTS OF THE WALL-MOUNT BRACKET
- DO NOT MOUNT ANY EQUIPMENT OTHER THAN THE SPECIFIED PRODUCT
- DO NOT LEAN ON OR HANG FROM THE TV
- DO NOT HANDLE THE PRODUCT WITH EXCESSIVE FORCE DURING CLEANING OR MAINTENANCE
- PRECAUTIONS
- INSTALLING THE WALL-MOUNT BRACKET
- DO NOT INSTALL THE TV OVER OR UNDER AN AIR CONDITIONER
- BE SURE TO INSTALL THE WALL-MOUNT BRACKET SECURELY TO THE WALL FOLLOWING THE INSTRUCTIONS IN THIS INSTRUCTION MANUAL
- BE SURE TO ASSEMBLE THE BRACKET PROPERLY FOLLOWING THE INSTRUCTED PROCEDURE EXPLAINED IN THIS INSTRUCTION MANUAL
- BE SURE TO TIGHTEN THE SCREWS SECURELY IN THE DESIGNATED POSITION
- BE CAREFUL NOT TO SUBJECT THE TV TO SHOCK DURING INSTALLATION
- BE SURE TO INSTALL THE TV ON A WALL THAT IS BOTH PERPENDICULAR AND FLAT
- AFTER PROPER INSTALLATION OF THE TV, SECURE THE CABLES PROPERLY
- DO NOT ALLOW THE MAINS LEAD OR THE CONNECTING CABLE TO BE PINCHED
- THE SCREWS NEEDED TO SECURE THE WALL-MOUNT BRACKET TO THE WALL ARE NOT SUPPLIED
- INSTALLING THE TV ONTO THE WALL
- NOTE
- PREPARING FOR INSTALLATION
- CHECKING THE PARTS
- SUPPLIED WITH SU-WL
- DECIDING ON THE INSTALLATION LOCATION
- DECIDE ON THE INSTALLATION LOCATION
- INSTALLING THE BASE ON THE WALL
- PREPARING FOR THE INSTALLATION OF THE TV
- DETACH THE TABLE-TOP STAND FROM THE TV
- ATTACH THE ATTACHMENT PARTS FOR WALL-MOUNT BRACKET. CHECK THE ATTACHMENT PARTS BY REFERRING TO "SUPPLIED WITH SU-WL450" IN "CHECKING THE PARTS" ON PAGE
- SLIM MOUNTING (2-B)
- CONNECT THE NECESSARY CABLE(S) TO THE TV
- INSTALLING THE TV ON THE WALL
- INSTALL THE TV ONTO THE BASE OR BASE ADAPTOR
- PREVENTING THE BOTTOM OF THE TV FROM SHIFTING
- CONFIRMING THE COMPLETION OF THE INSTALLATION
- OTHER INFORMATION
- SPECIFICATIONS
- DIMENSIONS: (APPROX.) [MM]
- WEIGHT (BASE ONLY): (APPROX.) [KG]
- PREPARATION FOR INSTALLATION
- FIND THE TV'S LOCATION
- WALL-MOUNTING BRACKET
- PRODUCT INFORMATION
- HAVE THE INSTALLATION PERFORMED BY A LICENSED INSTALLER OR QUALIFIED PERSONNEL DURING INSTALLATION
- MAKE SURE YOU HAVE FOLLOWED THE INSTRUCTIONS FOR INSTALLING THE TV BY A LICENSED INSTALLER
- DO NOT TIGHTEN THE SCREWS AFTER INSTALLING THE TV
- DO NOT SKIP THE WALL MOUNT INSTALLATION INSTRUCTIONS
- DO NOT INSTALL OTHER EQUIPMENT EXCEPT THE SPECIFIED PRODUCT
- DO NOT PLACE THE WALL MOUNT ON ANY OTHER PRODUCT THAN THE TV. DO NOT PLACE THE TV ON A SLANTED OR UNEVEN SURFACE
- DO NOT OPERATE THE PRODUCT WITH A DAMAGED POWER CORD DURING CLEANING OR MAINTENANCE
- WALL-MOUNT BRACKET INSTALLATION
- DO NOT INSTALL THE WALL-MOUNT BRACKET ON A WALL SURFACE WHERE THE TV'S VENTS OR SIDES PROTRUDE BEYOND THE WALL SURFACE
- DO NOT INSTALL THE TV ON OR UNDER AN AIR CONDITIONER
- MOUNT THE WALL MOUNT BRACKET SECURELY TO THE WALL, FOLLOWING THE INSTRUCTIONS IN THIS MANUAL
- MAKE SURE YOU INSTALL THE BRACKET CORRECTLY BY FOLLOWING THE PROCEDURE DESCRIBED IN THIS MANUAL
- TIGHTEN THE SCREWS SECURELY IN THE INDICATED POSITION
- BE CAREFUL NOT TO HIT THE TV DURING INSTALLATION
- MOUNT THE TV ON A WALL THAT IS PERPENDICULAR AND FLAT
- AFTER PROPERLY MOUNTING THE TV, SECURE THE CABLES PROPERLY
- DO NOT ALLOW THE POWER CORD OR CONNECTING CABLES TO BE PINCHED
- THE SCREWS REQUIRED FOR SECURING THE WALL MOUNT BRACKET TO THE WALL ARE NOT INCLUDED IN THE PACKAGE
- MOUNTING THE TV ON THE WALL
- PREPARING FOR MOUNTING
- DETERMINING THE MOUNTING LOCATION
- SELECT THE MOUNTING LOCATION
- DETERMINE THE LOCATIONS OF THE SCREWS FOR MOUNTING ON THE BASE (20)
- MOUNTING THE BASE ON THE WALL
- PREPARATION FOR MOUNTING THE TV
- REMOVE THE STAND FROM THE TV
- THIN MOUNTING (2-B)
- CONNECT THE NECESSARY CABLES TO THE TV
- MOUNT THE TV ONTO THE BASE STAND
- TIGHT MOUNTING (2-B)
- BE SURE TO CONTACT A LICENSED TECHNICIAN, AND DO NOT ALLOW CHILDREN TO BE NEAR THE INSTALLATION AREA
- SAFETY PRECAUTIONS REGARDING CHILDREN
- DO NOT REMOVE THE SCREWS FROM THE TV STAND
- DO NOT DISASSEMBLE OR MODIFY THE STAND FOR WALL MOUNTING
- DO NOT INSTALL ANY EQUIPMENT OTHER THAN THE SPECIFIED ONE ON THE STAND
- TO AVOID OVERLOADING THE WALL-MOUNT STAND, DO NOT PLACE ANYTHING ON IT OTHER THAN THE TV. DO NOT TILT THE TV LEFT/RIGHT OR UP/DOWN
- DO NOT LEAN ON THE TV OR HOLD ONTO IT
- APPLICATION
- A STANDARD MOUNTING
- B COMPACT INSTALLATION
- MODEL NAME BRACKET POSITION
- WALL MOUNT INSTALLATION
- COMPACT INSTALLATION (2-B)
- WALL MOUNTING THE TV
- INSTALLING THE TV ON THE BASE FOR THE STAND BASE
- PREVENTING THE LOWER PART OF THE TV FROM SHIFTING
- INITIAL INFORMATION
- TECHNICAL SPECIFICATIONS
- DO NOT UNSCREW THE SCREWS, AS THEY ARE FOR TV MOUNTING
- DO NOT REMOVE THE PARTS OF THE BRACKET FOR PARTIAL MOUNTING
- DO NOT INSTALL ANY OTHER DEVICES OTHER THAN THE SPECIFIED ONE
- DO NOT USE THE BRACKET FOR PARTIAL MOUNTING FOR ANY PURPOSE OTHER THAN MOUNTING THE TV. DO NOT TILT THE TV UP/DOWN OR LEFT/RIGHT
- DO NOT PLACE THE TV ON AN UNSTABLE SURFACE
- DURING CLEANING OR SERVICING, DO NOT APPLY EXCESSIVE FORCE TO THE PRODUCT
- SAFETY PRECAUTIONS
- INSTALLING THE WALL MOUNT FOR PARTIAL MOUNTING
- FOR SONY BRAND TVS
- DO NOT INSTALL THE WALL MOUNT FOR PARTIAL MOUNTING ON WALLS WHERE THE EDGES OR SIDES OF THE TV PROTRUDE BEYOND THE WALL SURFACE
- PLACE THE TV ON THE FLOOR OR ON A STAND
- INSTALL THE WALL MOUNT BRACKET SECURELY TO THE WALL ACCORDING TO THE INSTRUCTIONS IN THIS MANUAL
- ASSEMBLE THE BRACKET SECURELY, FOLLOWING THE PROCEDURE DESCRIBED IN THIS MANUAL
- TIGHTEN THE SCREWS SECURELY IN THE SPECIFIED POSITION
- WALL MOUNTING OF THE TV
- SUPPRIMER
- PACKAGE CONTENTS: SU-WL
- DETERMINING THE INSTALLATION POSITION
- DETERMINE THE INSTALLATION POSITION
- SUPPIMER
- PREPARING FOR TV INSTALLATION
- STAND
- MOUNTING
- CONNECT THE TV CABLES
- MOUNT THE TV ON THE BASE OR THE BASE ADAPTER
- TO THE KEY PIN (2-B)
- TO AVOID DAMAGE TO THE LOWER PART OF THE TV
- CHECK AFTER INSTALLATION IS COMPLETE
- INFORMATION SHEET
- THIN INSTALLATION (2-B)
- DO NOT PLACE HEAVY OBJECTS ON THE DEVICE DURING OPERATION
- ACCESSORIES
- INSTALLING THE MOUNTING BRACKETS
- SONY DNILNEPEPI YWIH
- ECKEPTY
- KA6BIPRARA 6EKITY KPOHWTEHH
- TEIEIUIAPDBIH
- YPBIHTAPBI HE KANTAJIBI KA6BIPRA 6ETIHEH WBIFBIN TYPATBIH OPBIHAPFA OPHATNAHBI
- TEJEIAAPBIH CAIKBIHDATKBIHTBIH YCTHE HE ACTBHA OPHATNAB
- KA6BIPRARA 6EKITY KPOHHTEHHIOB1 NAIAIANHY HCAYNBIFBIHCY OTBIPBIMMBIKTAN 6EKITIHI
- HCYAYNBKTA 6EPIREH NPOCEDYPANAPRA CYNEHE OTBIPBN KPOHWTEHDI DYPBICTA
- KYPACTBIPBIHBL
- THE GROOVES MUST BE SECURED IN PLACE
- DO NOT INSTALL THE CABLES DURING INSTALLATION
- THE CABLES MUST BE INSTALLED PERPENDICULAR TO THE WALL AND FLOOR
- AFTER THE CABLES ARE PROPERLY INSTALLED, SECURE THE CABLE DUCTS PROPERLY
- THE POWER CORD OR EXTENSION CABLE MUST BE KEPT SHORT
- THE BRACKETS FOR SECURING TO THE WALL ARE PROVIDED
- INSTALLING THE CABLES ON THE WALL
- SAFETY INSTRUCTIONS
- WALL MOUNTING
- PROVIDED WITH THE SU-WL
- IDENTIFYING THE INSTALLATION LOCATION
- IDENTIFY THE INSTALLATION LOCATION
- INSTRUCTIONS
- INSTRUCTION
- INSTALLING THE CABLE
- CABLE INSTALLATION GUIDE
- PROPER INSTALLATION (2-B)
- CONNECT THE CABLES (CABLES) TO THE TERMINALS
- INSTALLING THE TERMINALS
- INSTALL THE TERMINALS ON THE BASE OR BASE PLATE
- HYCKAY
- INSTALLATION PROCEDURE
- OTHER EQUIPMENT
- AND SO ON
- Y
- SONY
- SU-WL
- NNNN NN NN NN NN NN NN NN
- NNN NN (2-B) NNNN
- NNNN
- NYN
- [1] (7)
Brand : SONY
Model : Bravia KDL50WG663
Category : Television