0731 AA - Grass trimmer SKIL - Free user manual and instructions
Find the device manual for free 0731 AA SKIL in PDF.
User questions about 0731 AA SKIL
0 question about this device. Answer the ones you know or ask your own.
Ask a new question about this device
Download the instructions for your Grass trimmer in PDF format for free! Find your manual 0731 AA - SKIL and take your electronic device back in hand. On this page are published all the documents necessary for the use of your device. 0731 AA by SKIL.
USER MANUAL 0731 AA SKIL
natural_image
Illustration of a handheld electric shaver tool with attached metal bracket (no text or symbols)GB ORIGINAL INSTRUCTIONS 12
(F) NOTICE ORIGINALE 15
D ORIGINALBETRIEBSANLEITUNG 18
(NL) ORIGINELE GEBRUIKSAANWIJZING 21
(S) BRUKSANVISNING I ORIGINAL 25
(DK) ORIGINAL BRUGSANVISNING 27
(N) ORIGINAL BRUKSANVISNING 30
FIN ALKUPERÄISET OHJEET 33
(E) MANUAL ORIGINAL 36
(P) MANUAL ORIGINAL 40
(1) ISTRUZIONI ORIGINALI 43
(H) EREDETI HASZNÁLATI UTASÍTÁS 46
(CZ) PÜVODNÍM NÁVODEM K POUŽÍVÁNÍ 49
(TR) ORİJINAL İŞLETME TALİMATI 52
(PL) INSTRUKCJA ORYGINALNA 55
UA ОРИГІНАЛЬНА ІНСТРУКЦІЯ
З ЕКСПЛУАТАЦІЇ 59
GR ΠΡΩΤΟΥΠΟ ΟΔΗΓΙΩΝ ΧΡΗΣΗΣ 62
RO INSTRUCTIUNI DE FOLOSIRE
ORIGINALE 66
BG ОРИГИНАЛНО РЪКОВОДСТВО
ЗА ЕКСПЛОАТАЦИЯ 69
SK PÔVODNÝ NÁVOD NA POUŽITIE 73
HR ORIGINALNE UPUTE ZA RAD 76
(SRB) ORIGINALNO UPUTSTVO ZA RAD 79
SLO IZVIRNA NAVODILA 82
EST ALGUPÄRANE KASUTUSJUHEND 85
(LV) ORIGINĀLĀ LIETOŠANAS PAMĀCĪBA 88
LT ORIGINALI INSTRUKCIJA 91
(MK) ИЗВОРНО УПАТСТВО ЗА РАБОТА 94
(AL) UDHËZIMET ORIGJINALE 97
AR دليل الاستعمال 105
④ RAHENMAI AUSLI 103
| GB | EU declaration of conformityLine trimmer Article number | We declare under our sole responsibility that the stated products comply with all applicable provisions of the directives and regulations listed below and are in conformity with the following standards. |
| F | Déclaration de conformité UETaille-bordure Numéro d'article | Nous déclarons sous notre propre responsabilité que les produits décrits sont en conformité avec les directives, règlements normatifs et normes énumérés ci-dessous. |
| D | EU-KonformitätserklärungRasentrimmer Sachnummer | Wir erklären in alleiniger Verantwortung, dass die genannten Produkte allen einschlägigen Bestimmungen der nachfolgend aufgeführten Richtlinien und Verordnungen entsprechen und mit folgenden Normen übereinstimmen. |
| NL | EU-conformiteitsverklaringTrimmer Productnummer | Wij verklaren op eigen verantwoordelijkheid dat de genoemde producten voldoen aan alle desbetreffende bepalingen van de hierna genoemde richtlijnen en verordeningen en overeenstemmen met de volgende normen. |
| S | EU-konformitetsförklaringGrästrimmer Produktnummer | Vi förklarar under eget ansvar att de nämnda produkterna uppfyller kraven i alla gällande bestämmelser i de nedan angivna direktiven och förordningarnas och att de stämmer överens med följande normer. |
| DK | EU-overensstemmelseserklæringGræstrimmer Typenummer | Vi erklærer som eneansvarlige, at det beskrevne produkt er i overensstemmelse med alle gaeldende bestemmelser i fölgende direktiver og forordninger og opfylder følgende standarder. |
| N | EU-samsvarserklæringGresstrimmer Produktnummer | Vi erklærer under eneansvar at de nevnte produktene er i overensstemmelse med alle relevante bestemmelser i direktivene og forordningene nedenfor og med følgende standarder. |
| FIN | EU-vaatimustenmukaisuusvakuutusViimeistelyleikkuri Tuotenumero | Vakuutamme täten, että mainitut tuotteet vastaavat kaikkia seuraavien direktiivien ja asetusten asiaankuuluvia vaatimuksia ja ovat seuraavien standardien vaatimusten mukaisia. |
| E | Declaración de conformidad UECortabordes Número de artículo | Declaramos bajo nuestra exclusiva responsabilidad, que los productos nombrados cumplen con todas las disposiciones correspondientes de las directivas y los reglamentos mencionados a continuación y están en conformidad con las siguientes normas. |
| P | Declaração de conformidade CEAparador de relva Número do produto | Declaramos sob nossa exclusiva responsabilidade que os produtos mencionados cumprem todas as disposições e os regulamentos indicados e estão em conformidade com as seguintes normas. |
| I | Dichiarazione di conformità UETagliabordi Codice prodotto | Dichiariamo sotto la nostra piena responsabilità che i prodotti indicati sono conformi a tutte le disposizioni pertinenti delle direttive e dei regolamenti elencati di seguito, nonché alle seguenti normative. |
| H | EU konformitási nyilatkozatSzegélynyíró Cikkszám | Egyedüli felelőséggel kijelentjük, hogy a megnevezett termékek megfelelnek az alábbiakban felsorolásra kerülő irányelvek és rendeletek valamennyi idevágó előírásainak és megfelelnek a következő szabványoknak. |
| CZ | EU prohlášení o shoděStrunová sekačka Objednací číslo | Prohlašujeme na výhradní zodpovědnost, že uvedeny výrobek splňuje všechna příslušná ustanovení niže uvedených směrnic a nařízení a je v souladu s následujícími normami. |
| TR | AB Uygunluk beyaniKenar kesme makinesi Ürün kodu | Tek sorumlu olarak, tanımlanan ürünün aşağıdaki yönetmelik ve direktiflerin geçerli bütün hükümlerine ve aşağıdaki standartlara uygun olduğunu beyan ederiz. |
| PL | Deklaracja zgodności UEPodkaszarka Numer katalogowy | Oświadczamy z pełną odpowiedzialnością, że niniejsze produkty odpowiadają wszystkim wymaganiom poniżej wyszczególnionych dyrektyw i rozporządzeń, oraz że są zgodne z następującymi normami. |
| RU | Заявление о соответствии ЕСТриммер Товарный номер | Мы заявляем под нашу единоличную ответственность, что названные продукты соответствуют всем действующим предписаниям нижеуказанных директив и распоряжений, а также нижеуказанных норм. |
| UA | Заява про відповідність ЄСТример Товарный номер | Мизаевляемо під нашу одноособову відповідальність, що названі вироби відповідають усім чинним положеням нищеозначених директив і розпоряджень, а також нижчеозначеним нормам. |
| GR | Ділшош пістótнітає ЕХортокоптікó меснівєцас Арібмо́с еуретнріоу | Дплівовіме ќа апоклеистикії має еубівн, óти та аваферо́мева проїо́вта аvtισοιχουν σε όλες τις σχετικές διατάξεις των πιο κάτω ανаферо́менων οδηγιών και κανονισμών και ταυτίζονται με τα ακόλουθα πρότυπα. |
| RO | Declarație de conformitate UETrimmer pentru gazon Număr de identificare | Declarăm pe proprie răspundere că produsele mentionate corespund tuturor dispozițiilor relevante ale directivelor și reglementărilor enumerate în cele ce urmează și sunt în conformitate cu următoarele standarde. |
| BG | EC декларация за съответствиеТример за трева Каталожен номер | С пълна отговорност ние декларираме, че посочените продукти отговарят на всички валидни изисквания на директивите и разпоредбите по-долу и съответства на следните стандарти. |
| SK | EU vyhlásenie o zhodeStrunová kosačka Vecné číslo | Vyhlasujeme na výhradní zodpovednosť, že uvedeny výrobok spĺňa všetky prislušné ustanovenia nižšie uvedených smernic a nariadení a je v súlade s nasledujúcimi normami. |
| HR | EU izjava o sukladnostiŠišač tratine Kataloški broj | Pod punom odgovornošću izjavljujemo da navedeni proizvodi odgovaraju svim relevantnim odredbama direktiva i propisima navedenima u nastavku i da su sukladni sa sljedećim normama. |
| SRB | EU-izjava o usaglašenostiTrimer za travu Broj predmeta | Na sopstvenu odgovornost izjavljujemo, da navedeni proizvodi odgovaraju svim dotičnim odredbama naknadno navedenih smernica u uredaba i da su u skladu sa sledećim standardima. |
| SLO | Izjava o skladnosti ESObrezovalnik Številka artikla | Izjavljamo pod izključno odgovornostjo, da je omenjen izdelek v skladu z vsemi relevantnimi določili direktiv in uredb ter ustreza naslednjim standardom. |
| EST | EL-vastavusdeklaratsioonMurutrimmer Tootenumber | Kinnitame ainuvastutajatena, et nimetatud tooted vastavad järgnevalt loetletud direktiivide ja määruste köikidele asjaomastele nõuetele ja on kooskõlas järgmiste normidega. |
| LV | Deklaracija par atbilstību EK standartiemAuklas trimmeris Izstrādājuma numurs | Mēs ar pilnu atbildību paziņojam, ka šeit aplūkotie izstrādājumi atbilst visiem tālāk minētajās direktīvās un rīkojumos ietvertajām saistošajām nostādnēm, kā arī sekojošiem standartiem. |
| LT | ES atitikties deklaracijaŽoliapjovė Gaminio numeris | Atsakingai pareiškiame, kad išvardyti gaminiai atitinka visus privalomus žemiau nurodytų direktyvų ir reglamentų reikalavimus ir šiuos standartus. |
| MK | EU-изјава за сообразностТример на трева Број на артикл | Со целосна одговорност изјавуваме, дека опишаните производи се во согласност со сите релевантни одредби на следните регулативи и прописи и се во согласност со следните норми. |
| AL | EU Deklarata e konformitetitPrerëse bari Numri i nenit | Ne deklarojmë me përgjegjësinë tonë të vetme se produktet e paraqitura janë në përputhje me të gjitha dispozitat e zbatueshme të direktivave dhe rregulloreve të listuara më poshtë dhe janë në përputhje me standardet si më poshtë. |
| 0731 F0150731.. 2006/42/EC | 2014/30/EU2011/65/EU2000/14/ECEN 60335-1:2012 + A11:2014EN 50636-2-91:2014EN 55014-1:2006 + A1:2009 + A2:2011EN 55014-2:2015EN 61000-3-2:2014EN 61000-3-3:2013EN 50581:2012 |
| GB | 2000/14/EC: Measured sound power level 95.3 dB(A), uncertainty K = 1.1 dB, guaranteed sound power level 96 dB(A); conformity assessment procedure in accordance with annex VIProduct category: 33Notified body : DEKRA Certification BV (0344), Meander 1051, 6825 MJ Arnhem, NLTechnical file at:* |
| F | 2000/14/CE : Niveau de puissance acoustique mesuré 95,3 dB(A), incertitude K = 1,1 dB, niveau de puissance acoustique garanti 96 dB(A) ; procédure d'évaluation de conformité selon l'annexe VICatégorie de produit: 33Centre de contrôle cité : DEKRA Certification BV (0344), Meander 1051, 6825 MJ Arnhem, NLDossier technique auprès de:* |
| D | 2000/14/EG: Gemessener Schalleistungspegel 95,3 dB(A), Unsicherheit K = 1,1 dB, garantierter Schalleistungspegel 96 dB(A); Bewertungsverfahren der Konformität gemäß Anhang VIProduktkategorie: 33Benannte Stelle: DEKRA Certification BV (0344), Meander 1051, 6825 MJ Arnhem, NLTechnische Unterlagen bei:* |
| NL | 2000/14/EG: Gemeten geluidsvermögensniveau 95,3 dB(A), onzekerheid K = 1,1 dB, gegarandeerd geluidsvermögensniveau 96 dB(A); beoordelingsmethode van de overeenstemming volgens bijlage VIProduktkategorie: 33Aangewezen instantie: DEKRA Certification BV (0344), Meander 1051, 6825 MJ Arnhem, NLTechnisch dossier bij:* |
| S | 2000/14/EG: Uppmätt bullernivå 95,3 dB(A), osäkerhet K = 1,1 dB, garanterad bullernivå 96 dB(A); konformitetens bedömningsmetod enligt bilaga VIProduktkategori: 33Angivet provningsställe: DEKRA Certification BV (0344), Meander 1051, 6825 MJ Arnhem, NLTeknisk dokumentation:* |
| DK | 2000/14/EG: Målt lydeffektniveau 95,3 dB(A), usikkerhed K = 1,1 dB, garanteret lydeffektniveau 96 dB(A); overensstemmelsesvurderingsprocedure som omhandlet i bilag VIProduktkategori: 33Bemyndiget organ: DEKRA Certification BV (0344), Meander 1051, 6825 MJ Arnhem, NLTekniske bilag ved:* |
| N | 2000/14/EF: Målt lydeffektnivå 95,3 dB(A), usikkerhet K = 1,1 dB, garanter lydeffektnivå 96 dB(A); samsvarsvurderingsmetode i henhold til vedlegg VIProduktkategori: 33Bemyndiget organ: DEKRA Certification BV (0344), Meander 1051, 6825 MJ Arnhem, NLTeknisk dokumentasjon hos:* |
| FIN | 2000/14/EY: Mitattu äänitehotaso 95,3 dB(A), epävarmuus K = 1,1 dB, taattu äänitehotaso 96 dB(A); vaatimustenmukaisuuden arviointimenetelmå liitteen VI mukaisestiTuotekategoria: 33Ilmoitettu laitos: DEKRA Certification BV (0344), Meander 1051, 6825 MJ Arnhem, NLTekniset asiakirjat saatavana:* |
| E | 2000/14/CE: Nivel medido de la potencia acústica 95,3 dB(A), tolerancia K = 1,1 dB, nivel garantizado de la potencia acústica 96 dB(A); método de evaluación de la conformidad según anexo VICategoria de producto: 33Lugar denominado: DEKRA Certification BV (0344), Meander 1051, 6825 MJ Arnhem, NLDocumentos técnicos de:* |
| P | 2000/14/CE: Nivel de potência acústica medido 95,3 dB(A), insegurança K = 1,1 dB, nivel de potência acústica garantido 96 dB(A); processo de avaliação da conformidade de acordo com o anexo VICategoria de produto: 33Organismo notificado: DEKRA Certification BV (0344), Meander 1051, 6825 MJ Arnhem, NLDocumentação técnica pertencente à:* |
| I | 2000/14/CE: Livello di potenza sonora misurato 95,3 dB(A), incertezza K = 1,1 dB, livello di potenza sonora garantito 96 dB(A); procedimento di valutazione della conformità secondo l'allegato VICategoria prodotto: 33Organismo notificato: DEKRA Certification BV (0344), Meander 1051, 6825 MJ Arnhem, NLDocumentazione tecnica presso:* |
| H | 2000/14/EK: Mért hangteljesítmény-szint 95,3 dB(A), K szórás = 1,1 dB, garantált hangteljesítmény-szint 96 dB(A); a konformitás kiértékelési eljárást lásd a VI függelékbenTermékkategória: 33Bejelentett szervezet: DEKRA Certification BV (0344), Meander 1051, 6825 MJ Arnhem, NLMuszaki dokumentumok megőrzési pontja:* |
| CZ | 2000/14/ES: Změřená hladina akustického výkonu 95,3 dB(A), nejistota K = 1,1 dB, zaručená hladina akustického výkonu 96 dB(A); metoda posouzení shody podle dodatku VIKategorie výrobku: 33Ohlašovaci orgán : DEKRA Certification BV (0344), Meander 1051, 6825 MJ Arnhem, NLTechnické podklady u:* |
| TR | 2000/14/AT: Ölçülen ses gücü seviyesi 95,3 dB(A), tolerans K = 1,1 dB, garanti edilen ses gücü seviyesi 96 dB(A); uygunluk değerlendirme yönemi ek VI uyarıncaÜrün kategorisi: 33Onaylayan kuruluş: DEKRA Certification BV (0344), Meander 1051, 6825 MJ Arnhem, NLTeknik belgelerin bulunduğu yer:* |
| PL | 2000/14/WE: Pomierzony poziom mocy akustycznej 95,3 dB(A), niepewność K = 1,1 dB, gwarantowany poziom mocy akustycznej 96 dB(A); procedura oceny zgodności zgodnie z załącznikiem VIKategoria produktów: 33Urząd zatwierdzający: DEKRA Certification BV (0344), Meander 1051, 6825 MJ Arnhem, NLDokumentacja techniczna:* |
| RU | 2000/14/EC: Измеренный уровень звуковой мощности 95,3 dB(A), погрешность K = 1,1 dB, гарантированный уровень звуковой мощности 96 dB(A); процедура оценки соответствия согласно приложения VIKатегория продукта: 33Уполномоченный орган: DEKRA Certification BV (0344), Meander 1051, 6825 MJ Arnhem, NLTехническая документация хранится y:* |
| UA | 2000/14/EC: Виміряна звукова потужність 95,3 дБ(А), похибка = 1,1 дБ, гарантована звукова потужність 96 дБ(А); процедура оцінки відповідності відповідно до додатку VIКатегорія продукту: 33Уповноважений орган: DEKRA Certification BV (0344), Meander 1051, 6825 MJ Arnhem, NLТехнічна документація зберігається у:* |
| GR | 2000/14/EK: Метрнієvnі отáбмін пхитикің іохуос 95,3 dB(A), аваофáлеіа K = 1,1 dB, εγγυημένη отáбмін пхитикің іохуос 96 dB(A) - бідбікасія аξιολόγησης тңс пістотттас оўмфшва ме то пара́рттіма VIКаттүоріа проїо́вток: 33Армобіос форе́ас : DEKRA Certification BV (0344), Meander 1051, 6825 MJ Arnhem, NLТехника ёγγραфа стп:* |
| RO | 2000/14/CE: Nivel măsurat al puterii sonore 95,3 dB(A), incertitudine K = 1,1 dB, nivel garantat al puterii sonore 96 dB(A); procedură de evaluare a conformității potrivit anexei VICategorie produs: 33Organism notificat: DEKRA Certification BV (0344), Meander 1051, 6825 MJ Arnhem, NLDocumentație tehnică la:* |
| BG | 2000/14/EO: Измерено ниво на звуковата мощност 95,3 dB(A), неопределеност K = 1,1 dB, гарантирано ниво на мощността на звука 96 dB(A); метод за оценка на съответствието съгласно приложение VIКатегория на продукта: 33Нотифициран орган : DEKRA Certification BV (0344), Meander 1051, 6825 MJ Arnhem, NLТехническа документация при:* |
| SK | 2000/14/ES: Odmeraná hladina akustického výkonu 95,3 dB(A), neistota K = 1,1 dB, zaručená hladina akustického výkonu 96 dB(A); metóda posúdenia zhody podľa dodatku VIKategória produktu: 33Oboznámený orgán: DEKRA Certification BV (0344), Meander 1051, 6825 MJ Arnhem, NLTechnické podklady má spoločnost:* |
| HR | 2000/14/EZ: Izmjerena razina učinka buke 95,3 dB(A), nesigurnost K = 1,1 dB, zajamčena razina učinka buke 96 dB(A); postupak ocjenjivanja sukladnosti prema dodatku VIKategorija proizvoda: 33Obaviješteno tijelo: DEKRA Certification BV (0344), Meander 1051, 6825 MJ Arnhem, NLTehnička dokumentacija se može dobiti kod:* |
| SRB | 2000/14/EG: Izmereni nivo ostvarene buke 95,3 dB(A), nepouzdanost K = 1,1 dB, garantovani nivo ostvarene buke 96 dB(A); postupak ocenjivanja usaglašenosti prema prilogu VIKategorija proizvoda: 33Obavešteno telo : DEKRA Certification BV (0344), Meander 1051, 6825 MJ Arnhem, NLTehnička dokumentacija kod:* |
| SLO | 2000/14/ES: Izmerjena raven zvočne moči 95,3 dB(A), negotovost K = 1,1 dB, zagotovljena raven zvočne moči 96 dB(A); postopek za presojo skladnosti v skladu s prilogo VIKategorija izdelka: 33Priglašeni organ: DEKRA Certification BV (0344), Meander 1051, 6825 MJ Arnhem, NLTehnična dokumentacija pri:* |
| EST | 2000/14/EÜ: Möõdetud helivõimsustase 95,3 dB(A), möõtemääramatus K = 1,1 dB, garanteeritud helivõimsustase 96 dB(A); vastavuse hindamise meetod vastavalt lisale VI Teavitatud asutusTootekategoria: 33Teavitatud asutus: DEKRA Certification BV (0344), Meander 1051, 6825 MJ Arnhem, NLTehnilised dokumentid saadaval:* |
| LV | 2000/14/EK: Izmērītais trokšna jaudas līmenis ir 95,3 dB(A), izkliede K ir = 1,1 dB, garantētais trokšna jaudas līmenis ir 96 dB(A); atbilstības novērtēšana ir veikta saskaņa ar pielikumu VIIzstrādājuma kategorija: 33Pilvarotā iestāde : DEKRA Certification BV (0344), Meander 1051, 6825 MJ Arnhem, NLTehniskā dokumentacija no:* |
| LT | 2000/14/EG: Išmatuotas garso galios lygis 95,3 dB(A), paklaida K = 1,1 dB, garantuotas garso galios lygis 96 dB(A); atitikties vertinimas atliktas pagal priedą VIProdukto kategorija: 33Notifikuota jstaiga: DEKRA Certification BV (0344), Meander 1051, 6825 MJ Arnhem, NLTechninė dokumentacija saugoma:* |
| MK | 2000/14/EG: Измерено ниво на звучна јачина 95,3 dB(A), несигурност K = 1,1 dB, загарантирано ниво на звучна јачина 96 dB(A); постапка за процена на сообразноста според прилог VIКатегорија на производ: 33Назначено тело: DEKRA Certification BV (0344), Meander 1051, 6825 MJ Arnhem, NLТехничка документација кaj:* |
| AL | 2000/14/EC: Niveli i fuqisė sė zērit i matur 95,3 dB(A), pasiguria K = 1,1 dB, niveli i fuqisė sė zērit i garantuar 96 dB(A); procedura e vlerēsimit të konformitetit nė pērputhje me shtojcēn VIKategori produkti: 33Organizmi i njoftuar : DEKRA Certification BV (0344), Meander 1051, 6825 MJ Arnhem, NLDosja teknike nė:* |
| *Skil BVKonijnenberg 624825 BD BredaThe Netherlands | |
| Olaf DijkstraapApproval ManagerSkil BV, Konijnenberg 62, 4825 BD Breda, NL01.04.2017 |
text_image
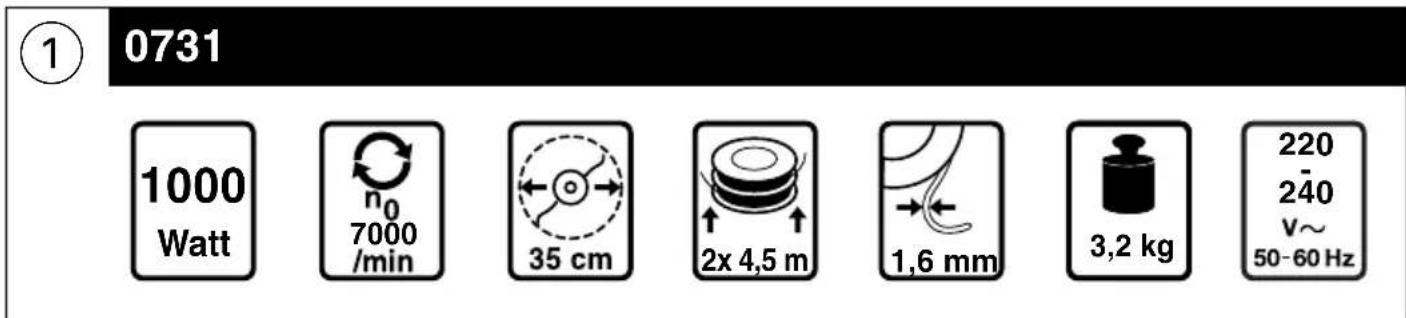
1 0731 1000 Watt n₀ 7000 /min 35 cm 2x 4,5 m 1,6 mm 3,2 kg 220 240 V~ 50-60 Hz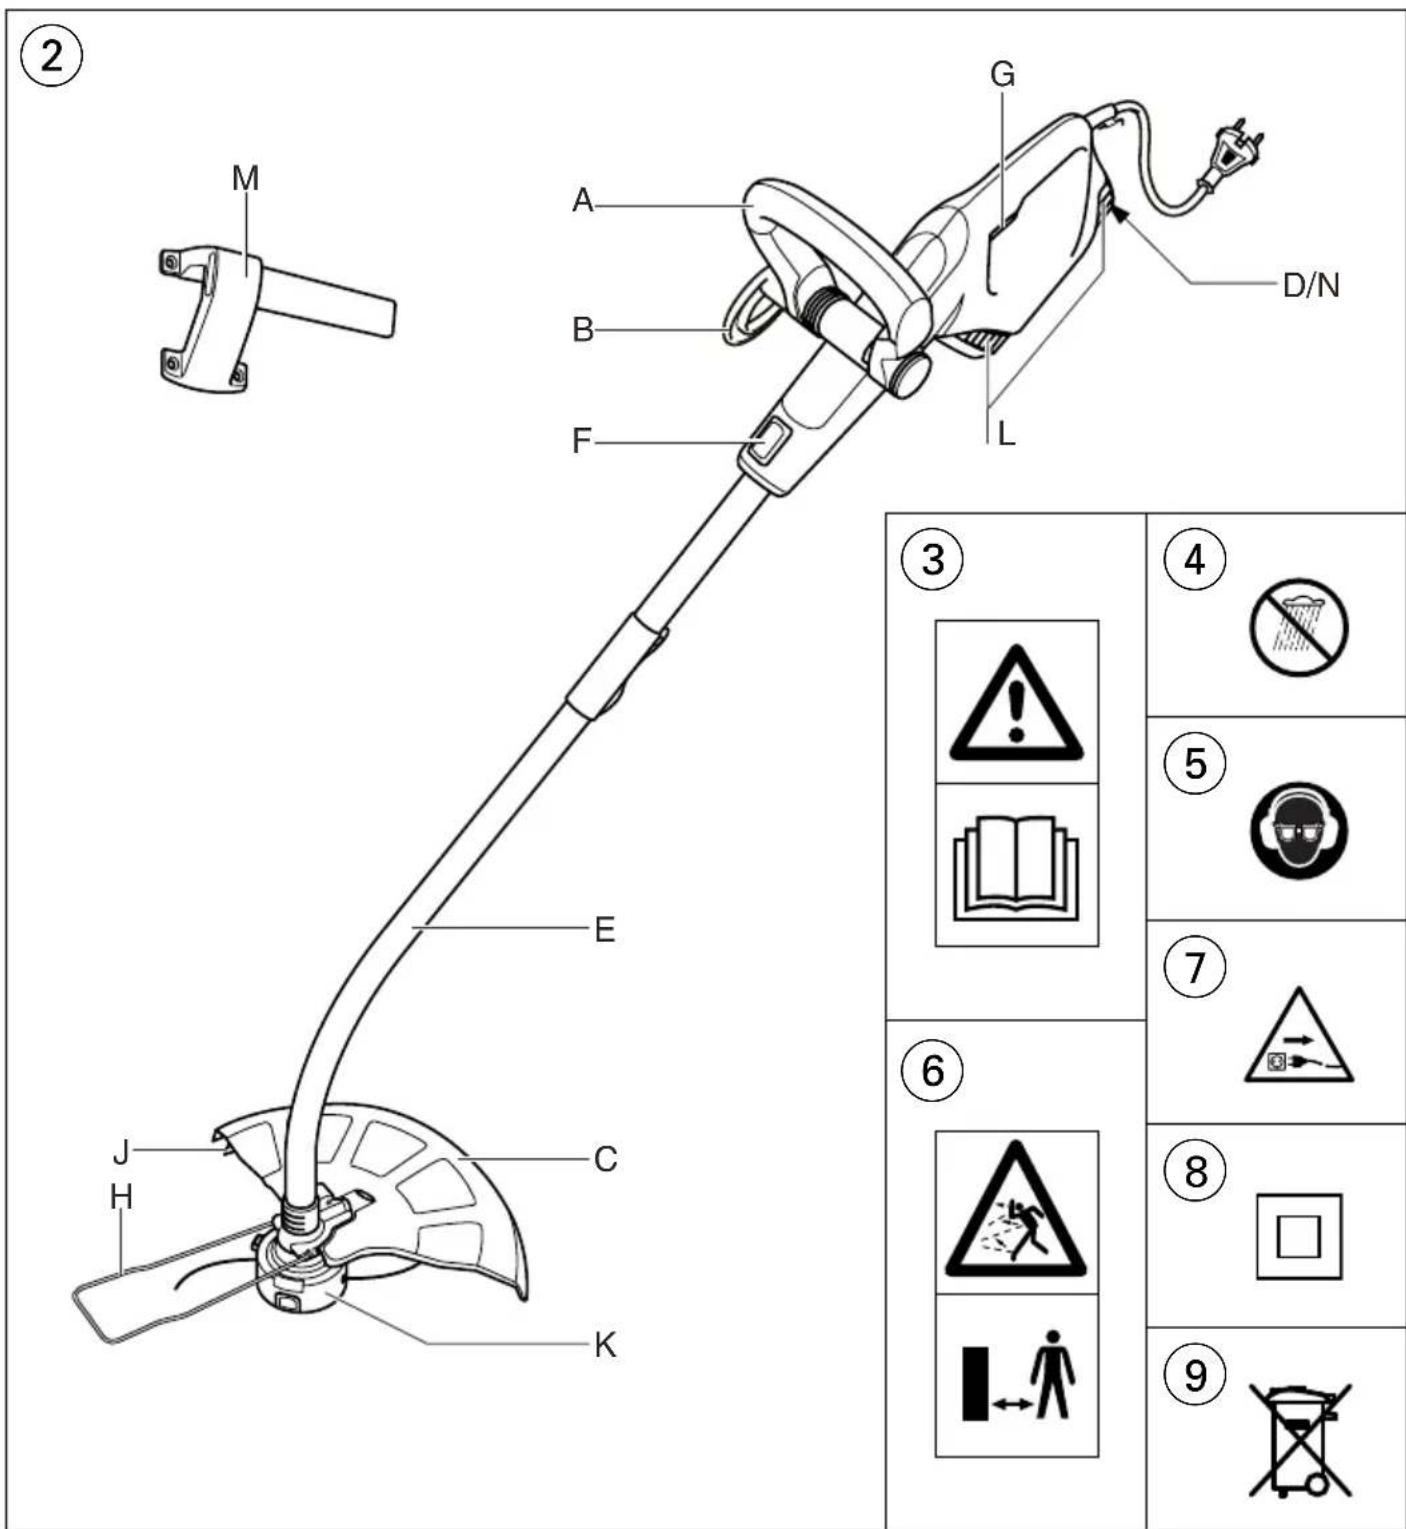
text_image
② M A B F G D/N L ③ ④ E C J H K ⑤ ⑥ ⑦ ⑧ ⑨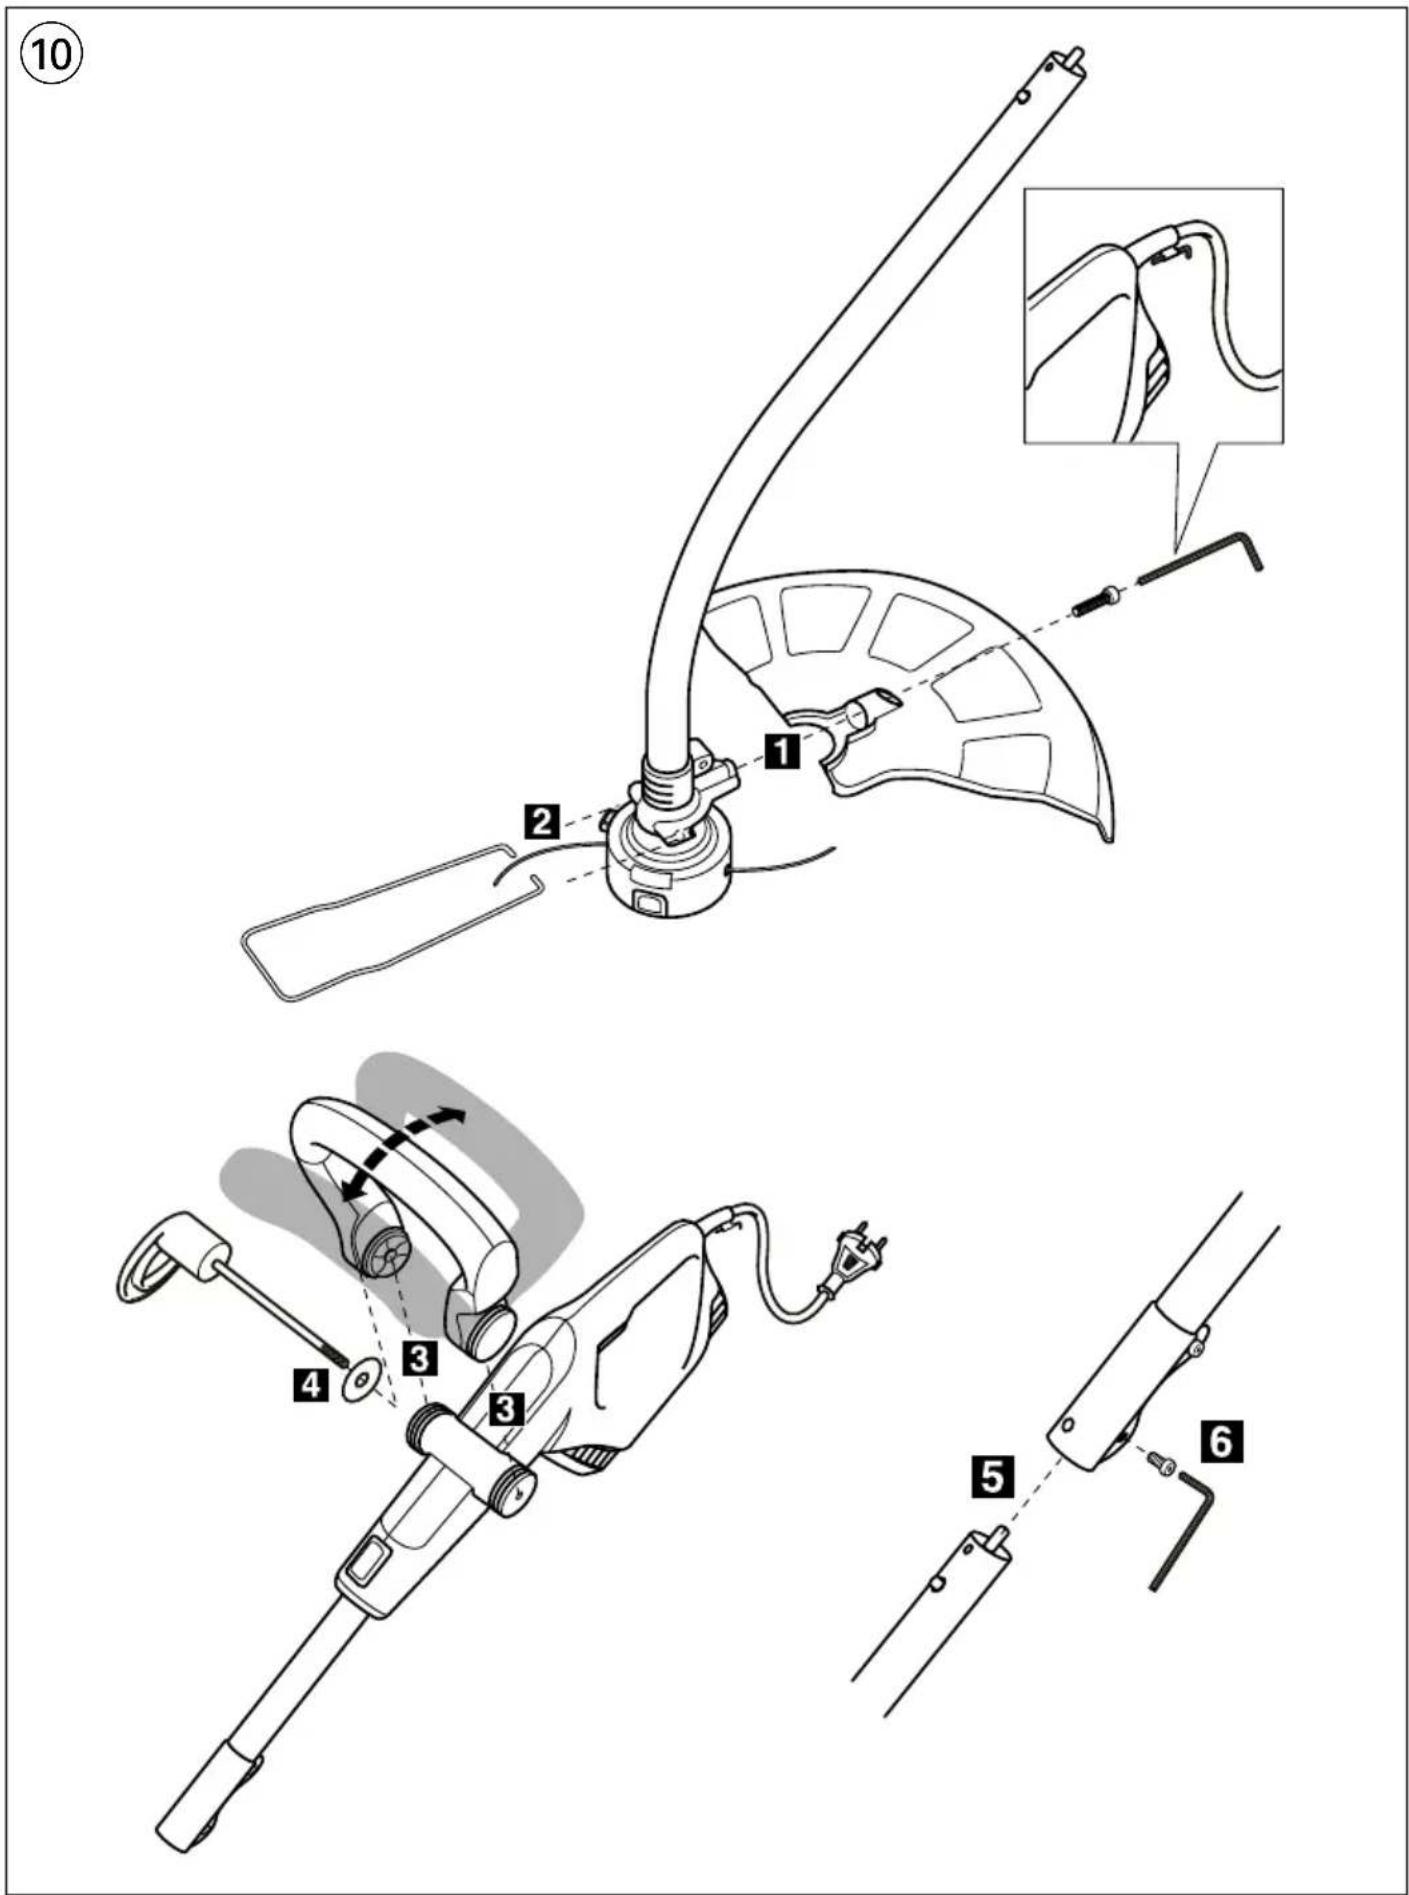
text_image
Technical diagram showing a mechanical assembly with numbered components and an inset close-up of the component being installed.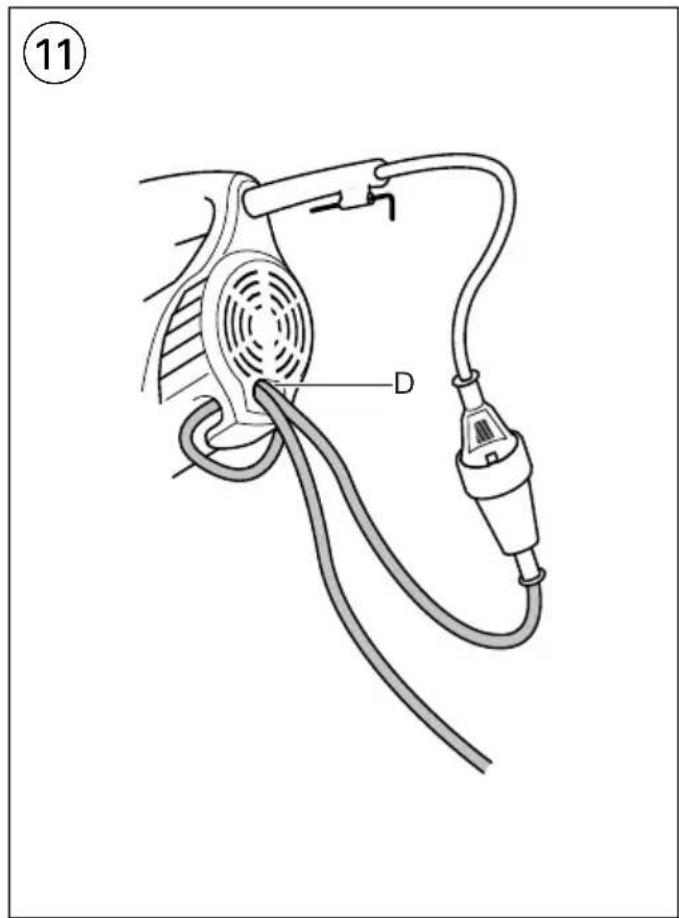
text_image
11 D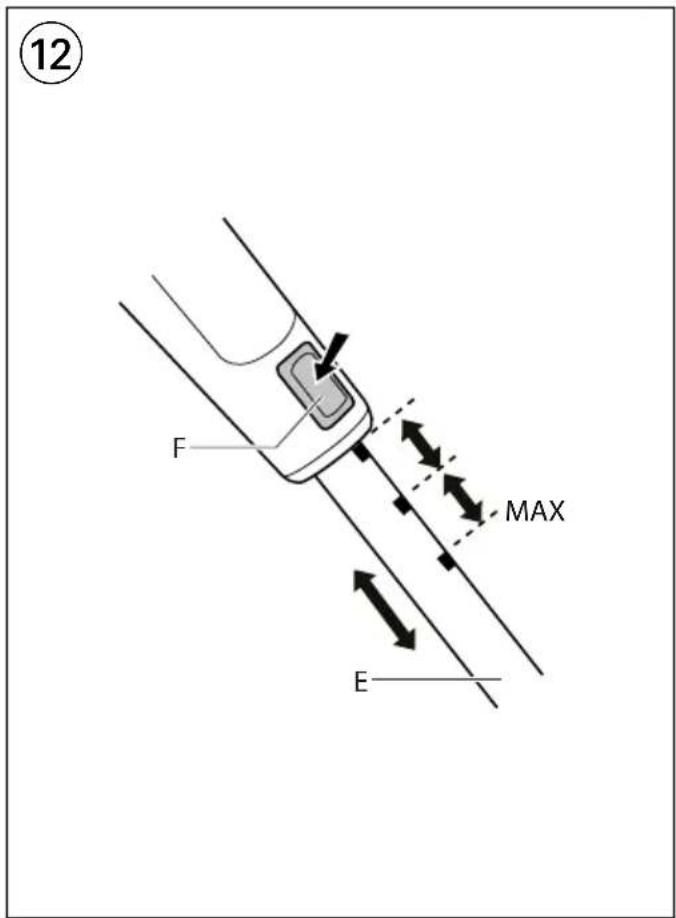
text_image
12 F MAX E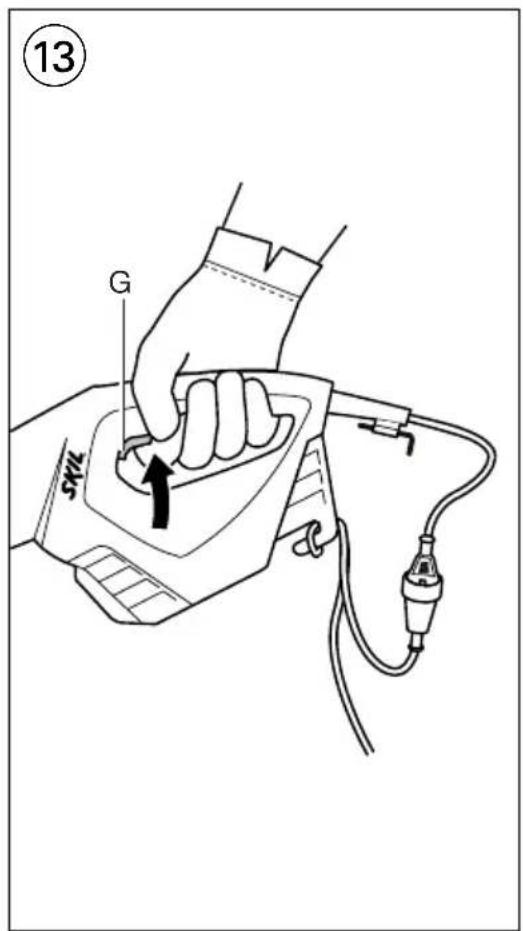
text_image
13 G 7405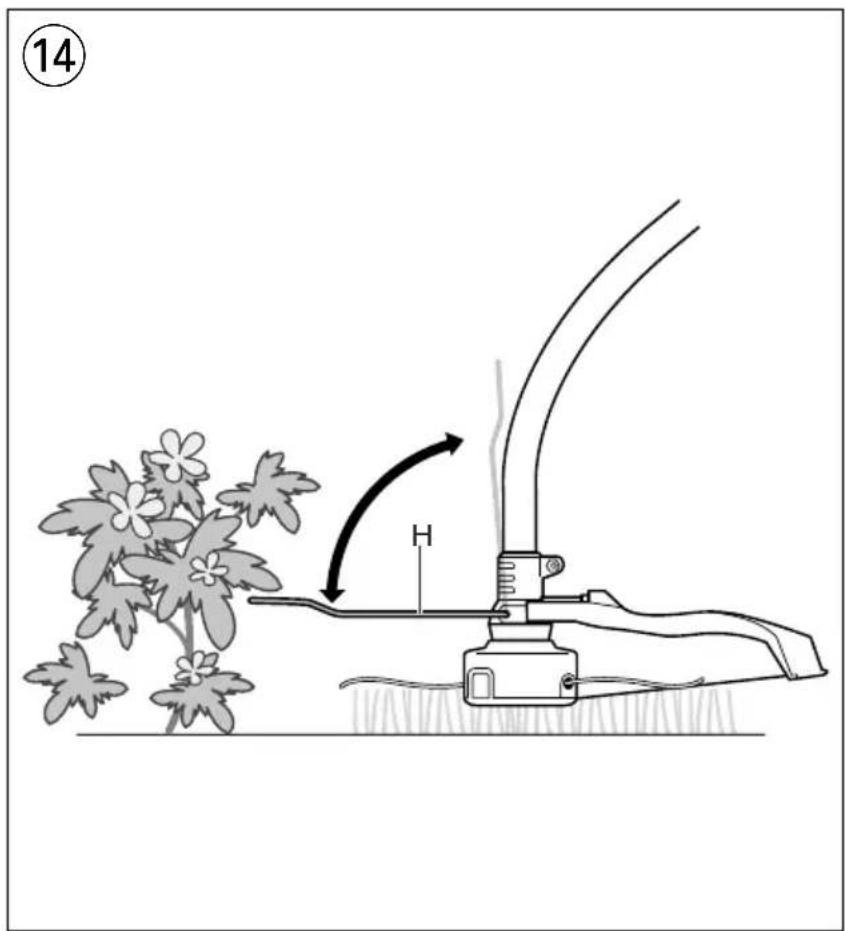
text_image
14 H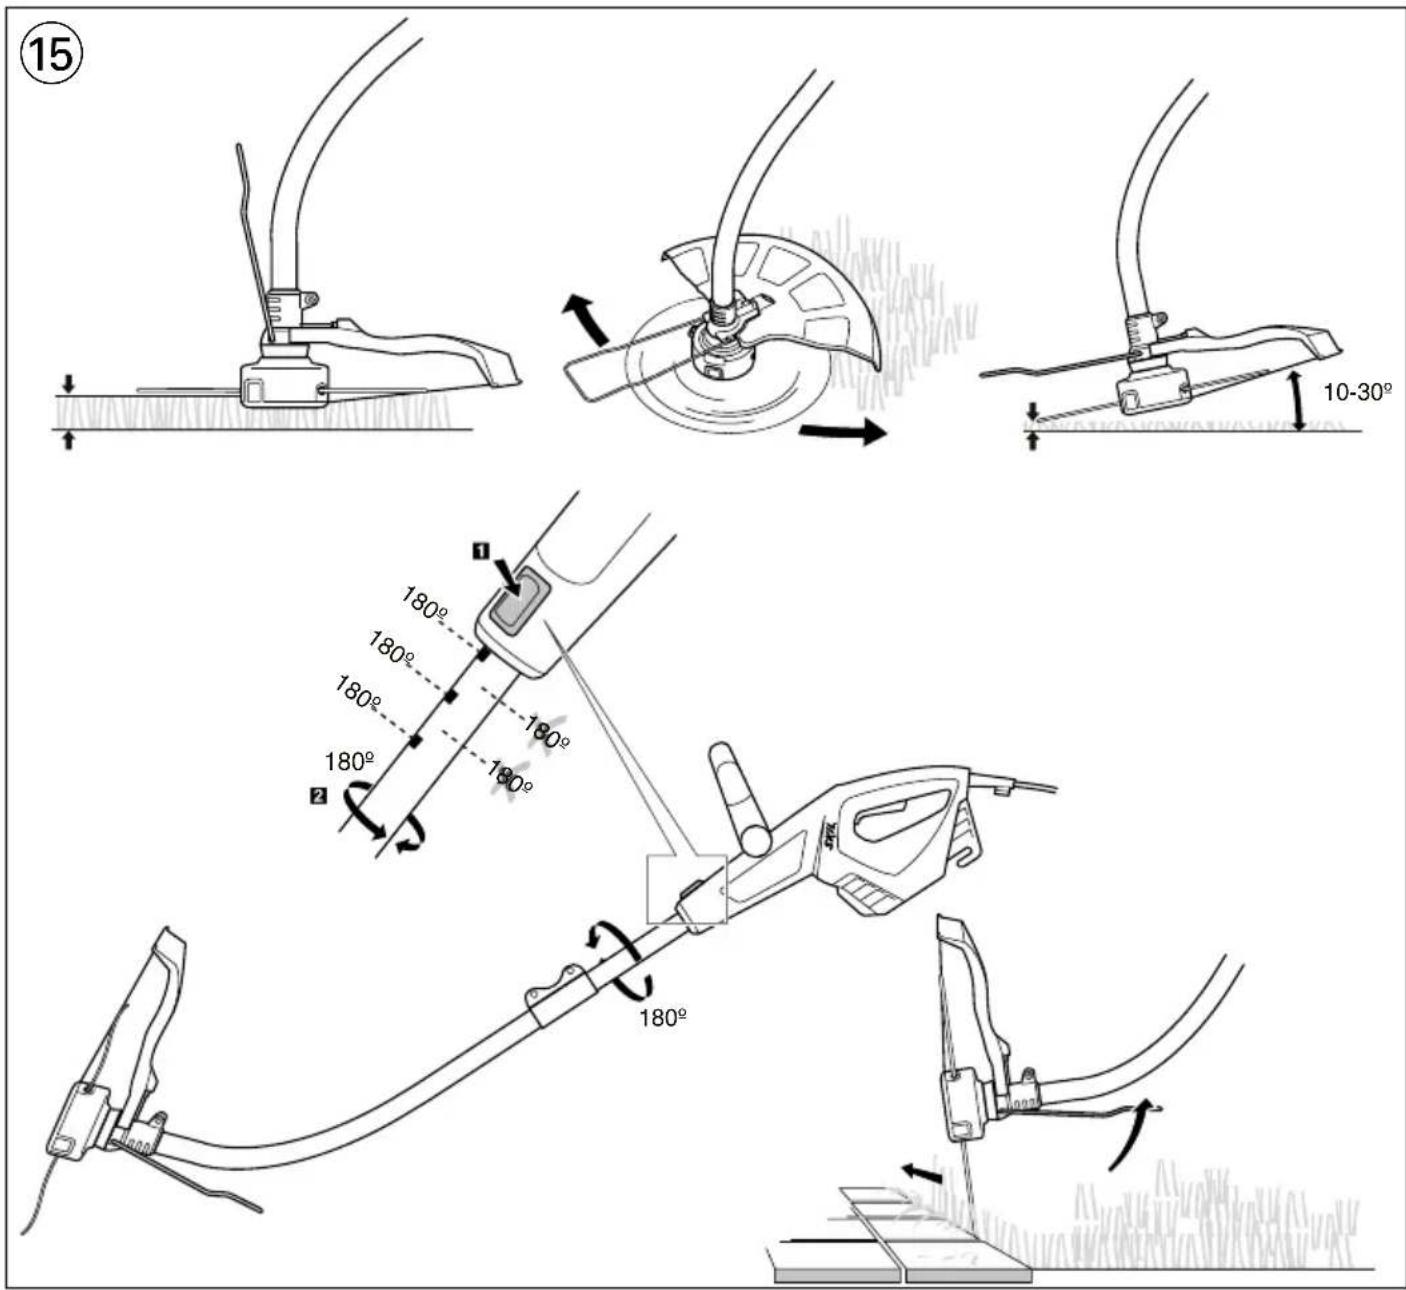
text_image
(15) 10-30° 180° 180° 180° 180° 180° 2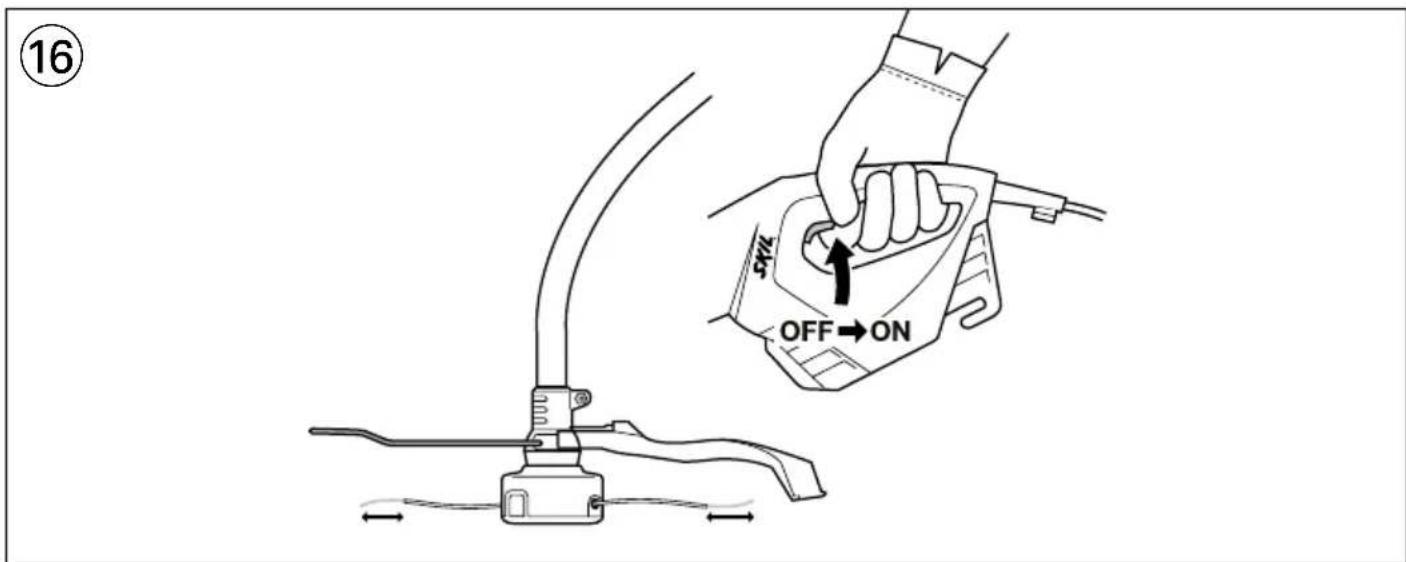
text_image
16 OFF→ON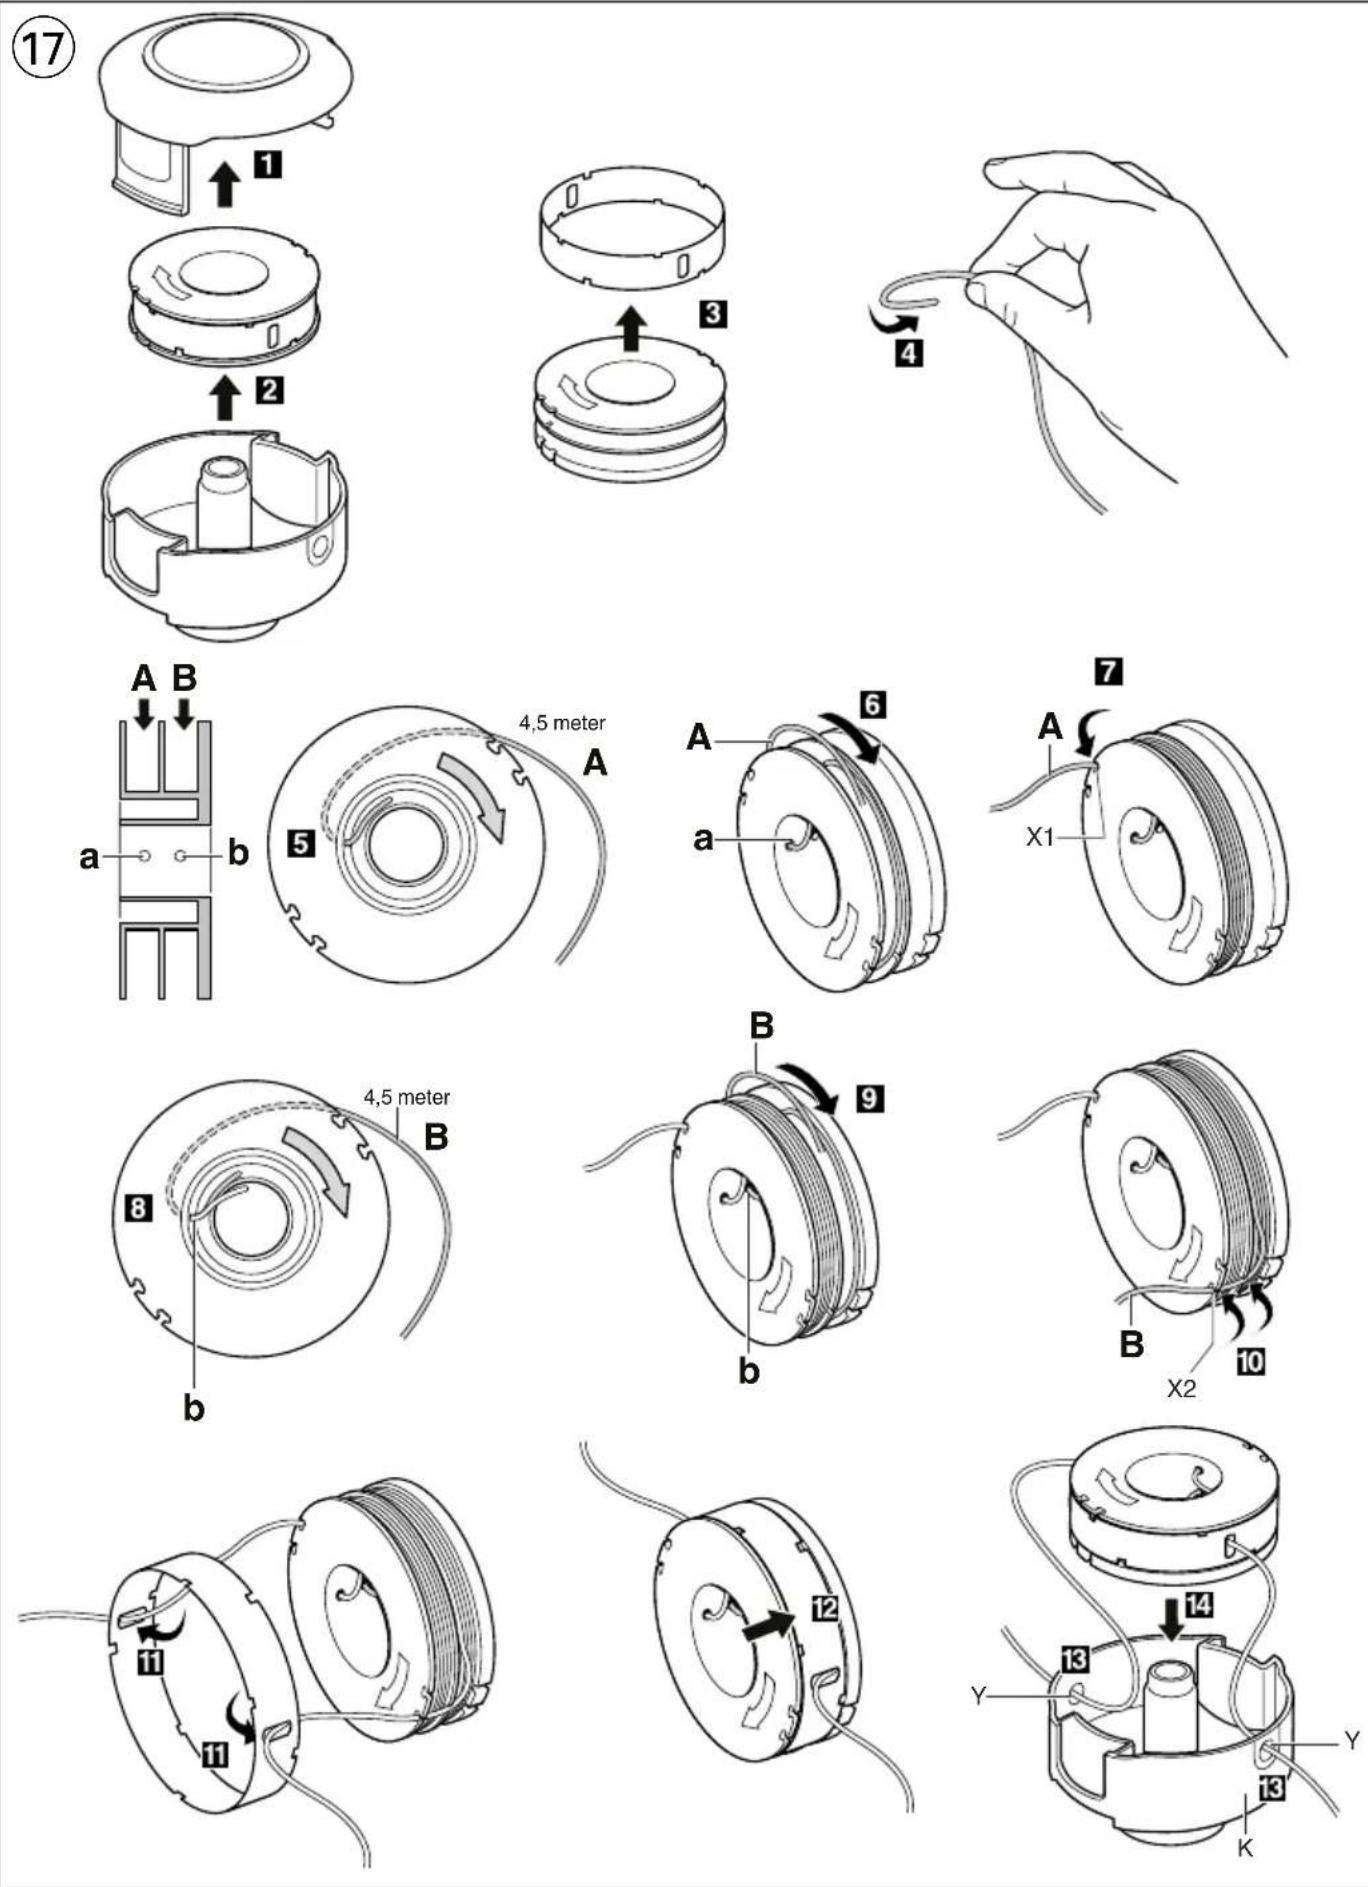
text_image
18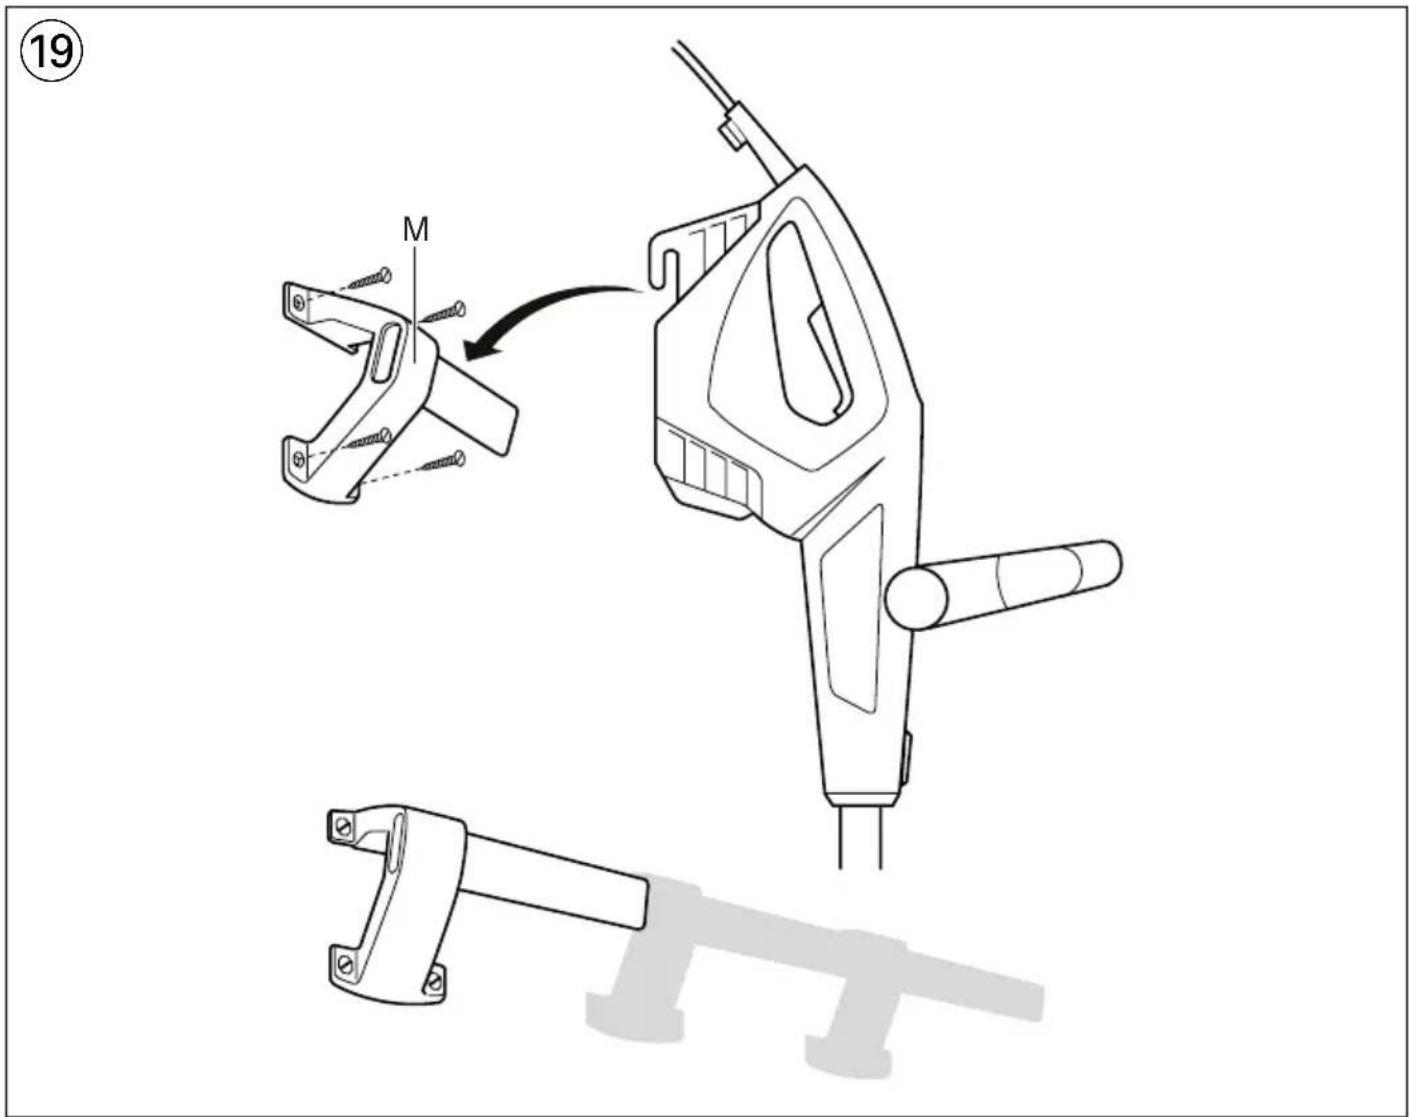
text_image
19 M
text_image
ACCESSORIES → WWW.SKIL.COMGB
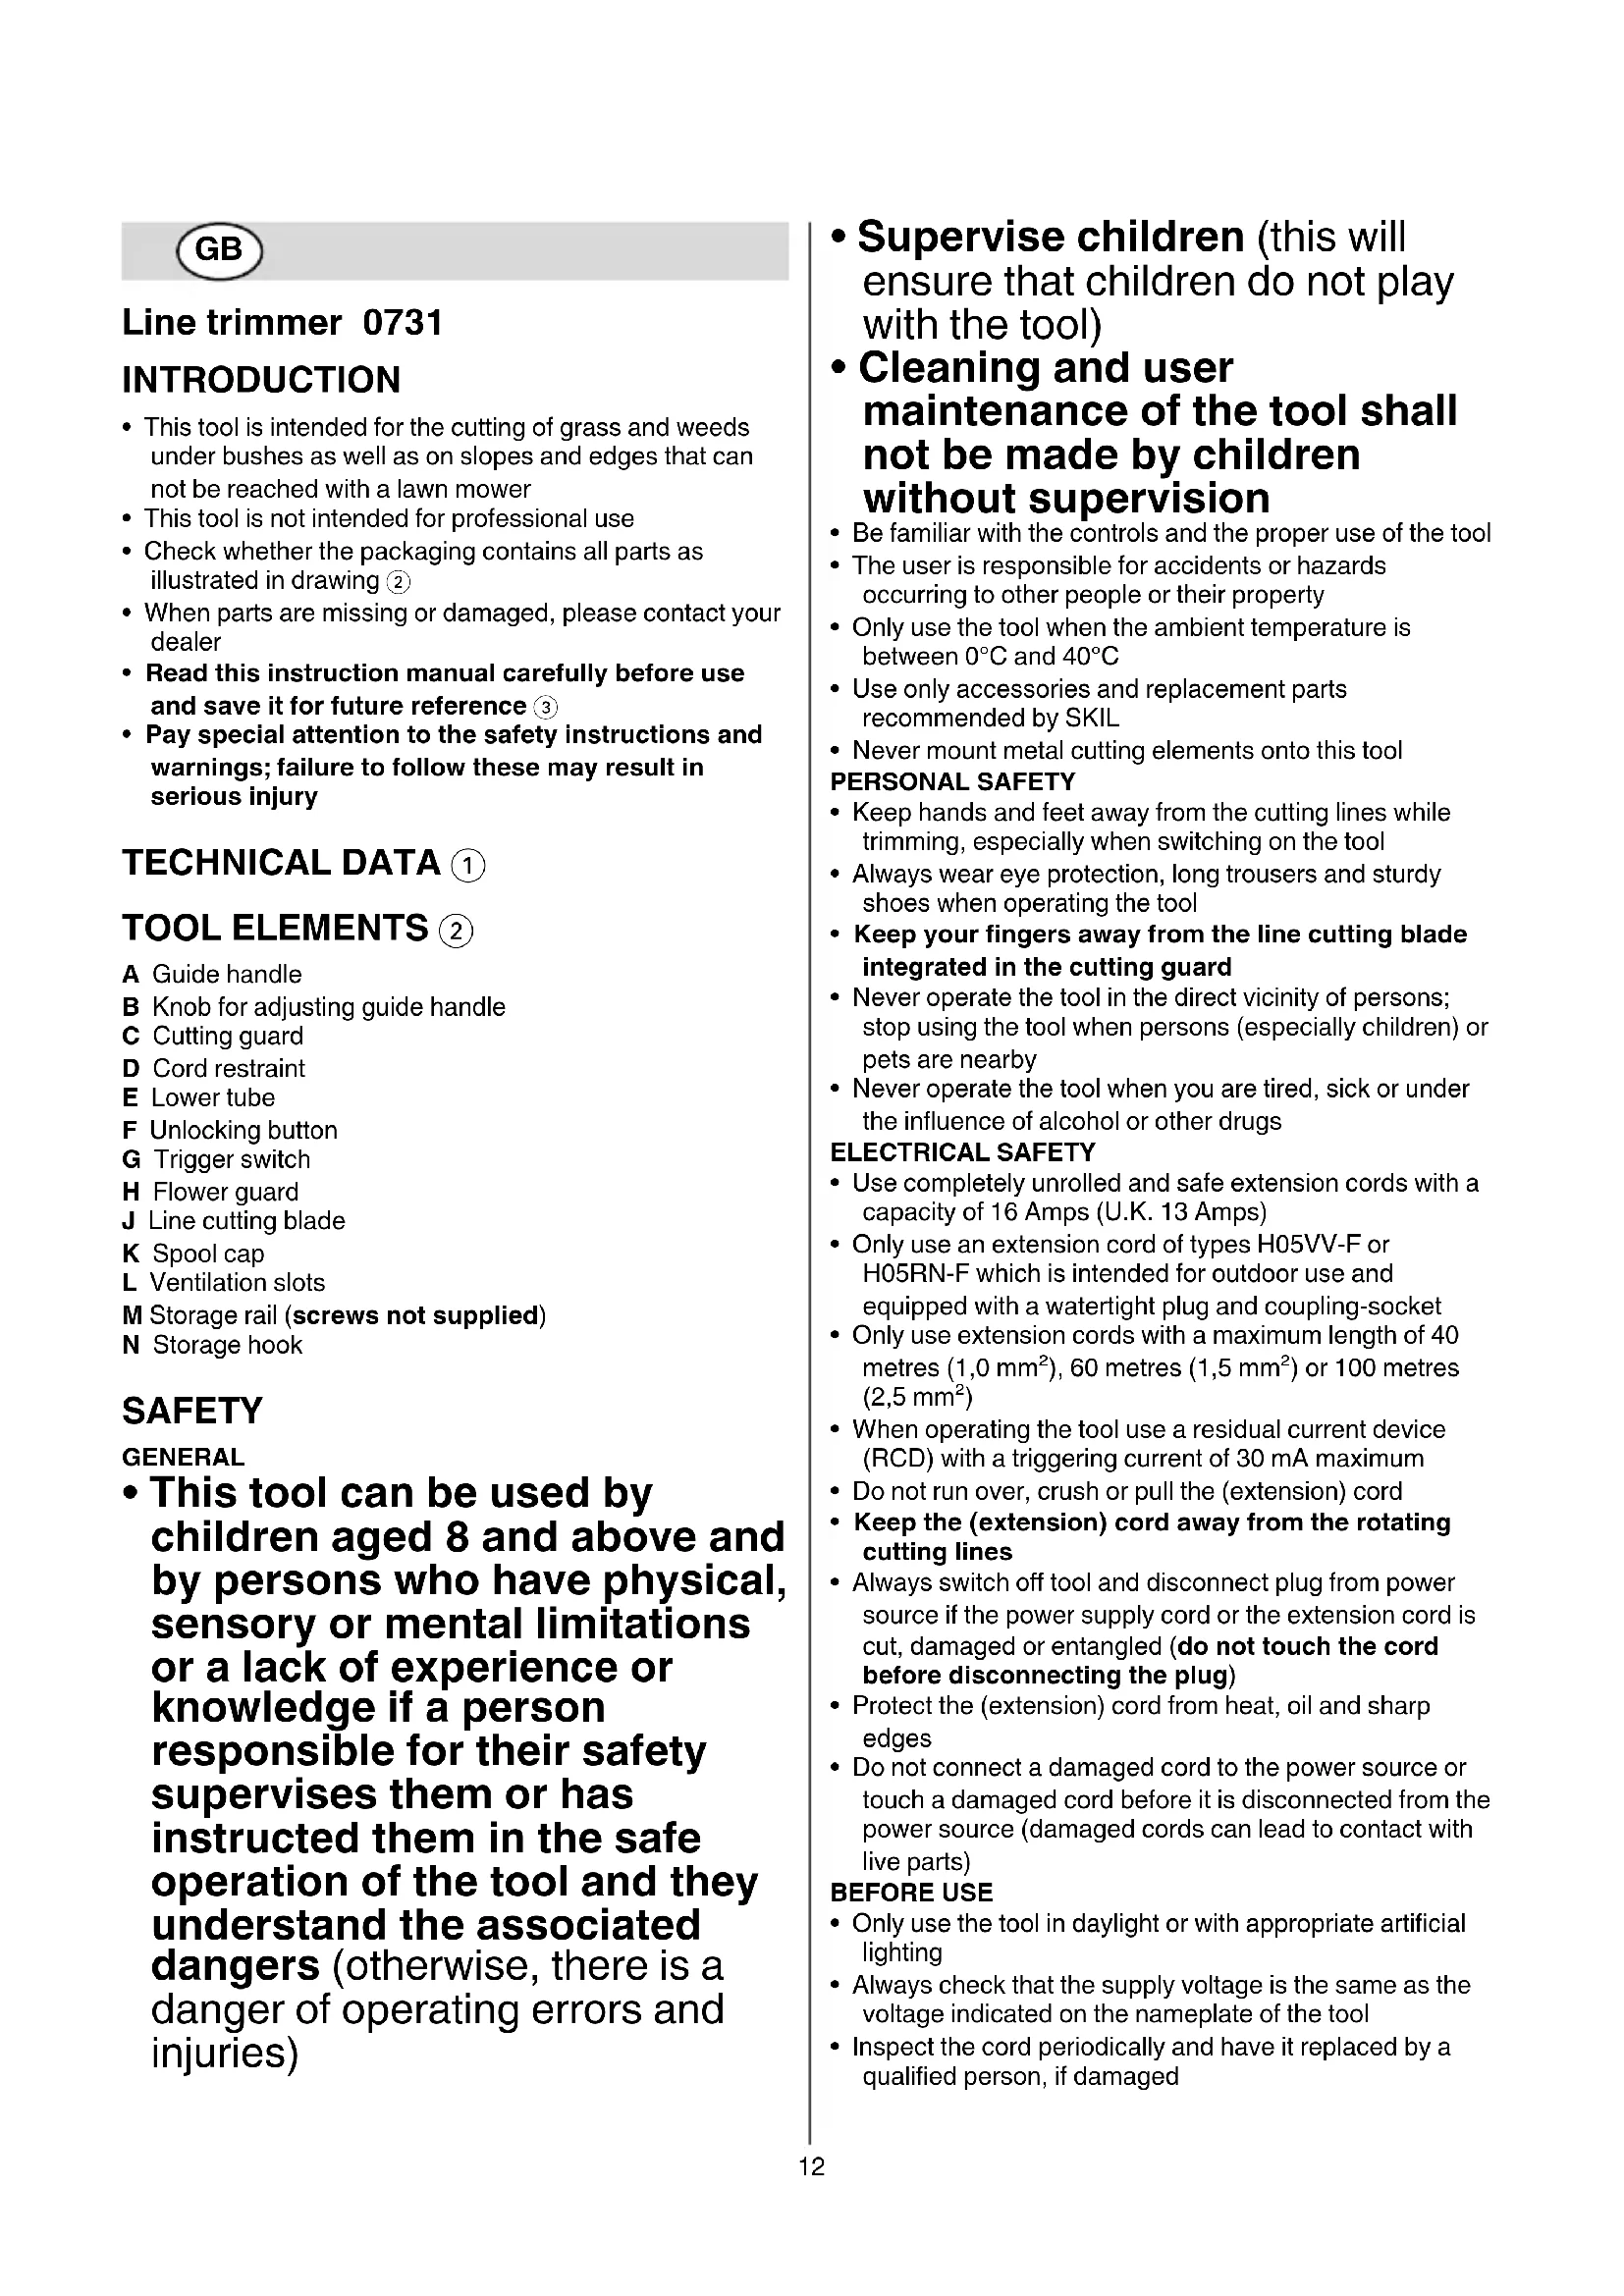
Line trimmer 0731
INTRODUCTION
- This tool is intended for the cutting of grass and weeds under bushes as well as on slopes and edges that can not be reached with a lawn mower
• This tool is not intended for professional use - Check whether the packaging contains all parts as illustrated in drawing ②
- When parts are missing or damaged, please contact your dealer
- Read this instruction manual carefully before use and save it for future reference ③
- Pay special attention to the safety instructions and warnings; failure to follow these may result in serious injury
TECHNICAL DATA ①
TOOL ELEMENTS ②
A Guide handle
B Knob for adjusting guide handle
C Cutting guard
D Cord restraint
E Lower tube
F Unlocking button
G Trigger switch
H Flower guard
J Line cutting blade
K Spool cap
L Ventilation slots
M Storage rail (screws not supplied)
N Storage hook
SAFETY
GENERAL
- This tool can be used by children aged 8 and above and by persons who have physical, sensory or mental limitations or a lack of experience or knowledge if a person responsible for their safety supervises them or has instructed them in the safe operation of the tool and they understand the associated dangers (otherwise, there is a danger of operating errors and injuries)
- Supervise children (this will ensure that children do not play with the tool)
• Cleaning and user maintenance of the tool shall not be made by children without supervision - Be familiar with the controls and the proper use of the tool
- The user is responsible for accidents or hazards occurring to other people or their property
- Only use the tool when the ambient temperature is between 0°C and 40°C
- Use only accessories and replacement parts recommended by SKIL
- Never mount metal cutting elements onto this tool PERSONAL SAFETY
- Keep hands and feet away from the cutting lines while trimming, especially when switching on the tool
• Always wear eye protection, long trousers and sturdy shoes when operating the tool
- Keep your fingers away from the line cutting blade integrated in the cutting guard
- Never operate the tool in the direct vicinity of persons; stop using the tool when persons (especially children) or pets are nearby
- Never operate the tool when you are tired, sick or under the influence of alcohol or other drugs
ELECTRICAL SAFETY
- Use completely unrolled and safe extension cords with a capacity of 16 Amps (U.K. 13 Amps)
- Only use an extension cord of types H05VV-F or H05RN-F which is intended for outdoor use and equipped with a watertight plug and coupling-socket
- Only use extension cords with a maximum length of 40 metres (1,0 mm ^2 ), 60 metres (1,5 mm ^2 ) or 100 metres (2,5 mm ^2 )
- When operating the tool use a residual current device (RCD) with a triggering current of 30 mA maximum
- Do not run over, crush or pull the (extension) cord
- Keep the (extension) cord away from the rotating cutting lines
- Always switch off tool and disconnect plug from power source if the power supply cord or the extension cord is cut, damaged or entangled (do not touch the cord before disconnecting the plug)
- Protect the (extension) cord from heat, oil and sharp edges
- Do not connect a damaged cord to the power source or touch a damaged cord before it is disconnected from the power source (damaged cords can lead to contact with live parts)
BEFORE USE
- Only use the tool in daylight or with appropriate artificial lighting
• Always check that the supply voltage is the same as the voltage indicated on the nameplate of the tool -
Inspect the cord periodically and have it replaced by a qualified person, if damaged
-
Inspect the extension cord periodically and replace it, if damaged (inadequate extension cords can be dangerous)
- Never use the tool when cord is damaged; have it replaced by a qualified person
- Never operate the tool with a damaged cutting guard or without the cutting guard mounted
- Check the functioning of the tool before each use and after any impact; in case of a defect, have it repaired immediately by a qualified person (never open the tool yourself)
- Before use, thoroughly inspect the cutting area and remove any object that the tool may sling during cutting (such as stones, loose pieces of wood, etc.)
DURING USE
- Avoid using the tool in bad weather conditions, especially when there is a risk of lightning
- Do not use the tool on wet lawns
- Keep proper balance and footing at all times; do not overreach
- Keep proper footing on slopes and do not mow extremely steep slopes
- Operate the tool at a walking pace only (do not run)
- The cutting lines continue to rotate for a short time after the tool is switched off
- Do not cut grass which is not on the ground (e.g. on walls or rocks)
- Do not cross roads or gravel paths with the tool still running
- Do not get distracted and always concentrate on what you are doing
- Always switch off tool, disconnect plug from power source, and ensure that all moving parts have come to a complete standstill
- whenever leaving the tool unattended
- before clearing jammed material
- before checking, cleaning or working on the tool
- after striking a foreign object
- whenever the tool starts vibrating abnormally
- Always ensure that the ventilation openings are kept clear of debris
EXPLANATION OF SYMBOLS ON TOOL
③ Warning! Read the instruction manual
④ Do not expose tool to rain
⑤ Wear protective glasses and hearing protection
⑥ Pay attention to the risk of injury caused by flying debris (keep bystanders a safe distance away from work area)
⑦ Immediately disconnect the plug if the (extension) cord is damaged or cut through while working
⑧ Double insulation (no earth wire required)
⑨ Do not dispose of the tool together with household waste material
WHEN CONNECTING NEW 3-PIN PLUG (U.K. ONLY):
- If for any reason the old plug is cut off the cord of this tool, it must be disposed of safely and not left unattended
- Do not connect the blue (= neutral) or brown (= live) wire in the cord of this tool to the earth terminal of the plug
USE
- Assembly instructions ⑩
- the sequence of the numbers appearing in the drawing corresponds with the sequence of the steps to be followed for assembling the tool
- guide handle A ② can be adjusted by loosening/tightening knob B ②
! never use the tool without cutting guard C ②
! firmly tighten all screws, bolts and nuts
- Cord restraint ⑪
- hook the loop in the extension cord over restraint D as illustrated
- pull tight to secure the extension cord
• Height adjustment ⑫
For adjusting the tool height so that your front arm is straight when trimming
- unlock tube E by pushing button F
- extend tube E to the desired height (3 positions)
- On/off ⑬
- switch on tool by pressing trigger switch G
- switch off tool by releasing trigger switch G
! after switching off the tool the cutting lines continue to rotate for a few seconds
- allow the cutting lines to stop rotating before switching on again
! do not rapidly switch on and off
- Trimming
! ensure that the cutting area is free of stones, debris and other foreign objects
! start trimming only when tool runs at full speed
- start trimming near the mains socket and move away while working
- cut long grass in layers (always start from the top)
- only trim with the tip of the cutting line
- do not cut damp or wet grass
- prevent the cut grass from clogging the spool (do not make heavy cuts)
- do not overload the tool
- carefully cut around trees and bushes, so that they do not come into contact with the cutting lines
- use flower guard H ⑭ to protect vulnerable flowers
- keep the tool away from solid objects in order to protect the cutting lines against excessive wear
- be aware of the kickback forces that occur when solid objects are touched
- Holding and guiding the tool ⑮
- for cutting long grass slowly swing the tool from right to left and vice versa
- for cutting shorter grass tilt the tool as illustrated
- for trimming edges turn the cutting head 180^ as illustrated (possible only when lower tube E is fixed in one of the three height positions)
- hold tool firmly with both hands, so you will have full control of the tool at all times
- maintain a stable working position
- always hold the tool well away from your body
- Line feeding ⑯
- two cutting lines will be released and cut off to the correct length by line cutting blade J each time the tool is switched on
! take care against injury from line cutting blade J
- after line feeding always return the tool to its normal operating position before switching on
- feed the lines regularly to maintain full cutting circle
- when the motor runs without load and no grass is cut, the cutting lines are worn or broken; rewind the spool or replace the spool system
- Rewinding spool ⑰
In case the cutting lines fail to protrude from spool cap K
! switch off the tool and disconnect the plug
- remove spool system from tool and take out spool from spool cap K
- tightly rewind both cutting lines evenly in layers in arrow direction
- insert both lines into spool slots X and ensure that they are securely in place (leave sufficient length of line)
- thread both lines through spool holes Y before placing the rewound spool into spool cap K
! ensure that the spool is located securely in place, then release both lines from slots X by pulling them firmly
- mount spool system onto tool (turn spool clockwise until it clicks into place) ⑱
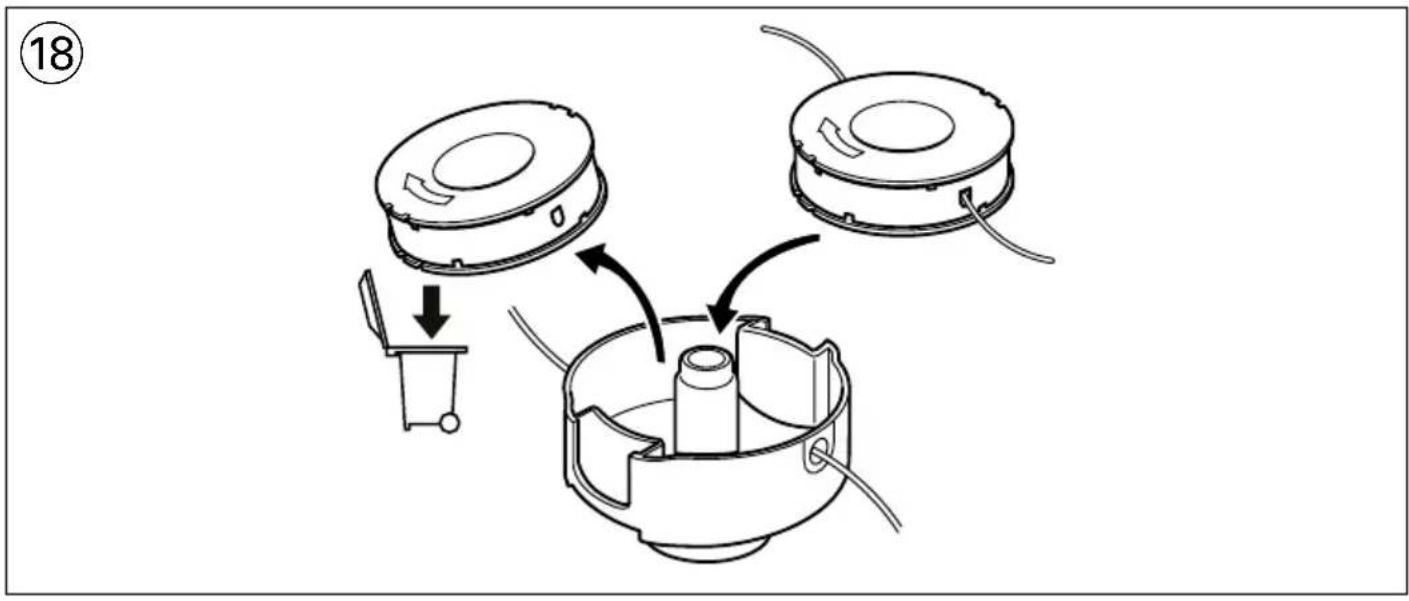
- Replacing spool ⑱
! switch off the tool and disconnect the plug
- simply remove/mount old/new spool as illustrated
- after replacing the spool test-run the tool for at least one minute without load to ensure that the tool is operating properly
! be sure tool is switched off when plugging in
MAINTENANCE / SERVICE
• This tool is not intended for professional use
- Always switch off tool, disconnect plug from power source, and ensure that all moving parts have come to a complete standstill
- Always keep tool and cord clean (especially the ventilation slots)
- clean the tool with a damp cloth (do not use cleaning agents or solvents)
- clean line cutting blade J ② and cutting guard C ② after each use
-
clean ventilation slots L ② regularly with a brush or compressed air
-
Regularly check the condition of the cutting head and the tightness of nuts, bolts and screws
- Regularly check for worn or damaged components and have them repaired/replaced when necessary
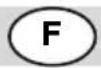
- Storage 19
- store the tool indoors in a dry and locked-up place, out of reach of children
- securely mount storage rail M on the wall with 4 screws (not supplied) and horizontally leveled
- If the tool should fail despite the care taken in manufacturing and testing procedures, repair should be carried out by an after-sales service centre for SKIL power tools
- send the tool undismantled together with proof of purchase to your dealer or the nearest SKIL service station (addresses as well as the service diagram of the tool are listed on www.skil.com)
TROUBLESHOOTING
- The following listing shows problem symptoms, possible causes and corrective actions (if these do not identify and correct the problem, contact your dealer or service station)
! switch off the tool and disconnect the plug before investigating the problem
★ Tool does not operate
- power supply socket faulty -> use another socket
- extension cord damaged -> replace extension cord
★ Tool operates intermittently
- internal wiring defective -> contact dealer/service station
- on/off switch defective -> contact dealer/service station
★ Tool vibrates abnormally
- grass too high -> cut in stages
★ Tool does not cut
- line too short/broken off -> feed the line by switching tool off and on again
★ Line cannot be fed
- spool empty -> replace spool
- line entangled inside spool -> inspect spool; rewind if necessary
★ Line keeps breaking
- line entangled inside spool -> inspect spool; rewind if necessary
- trimmer incorrectly used -> only trim with the tip of the line; avoid stones, walls and other hard objects; feed the line regularly
ENVIRONMENT
- Do not dispose of electric tools, accessories and packaging together with household waste material (only for EU countries)
- in observance of European Directive 2012/19/EC on waste of electric and electronic equipment and its implementation in accordance with national law, electric tools that have reached the end of their life must be collected separately and returned to an environmentally compatible recycling facility
- symbol ⑨ will remind you of this when the need for disposing occurs
NOISE / VIBRATION
- Measured in accordance with EN 60335 the sound pressure level of this tool is 84 dB(A) and the sound power level 95 dB(A) (standard deviation: 1 dB), and the vibration 2.9 ~m / s^2 (triax vector sum; uncertainty K = 1.5 ~m / s^2 )
-
The vibration emission level has been measured in accordance with a standardised test given in EN 60335; it may be used to compare one tool with another and as a preliminary assessment of exposure to vibration when using the tool for the applications mentioned
-
using the tool for different applications, or with different or poorly maintained accessories, may significantly increase the exposure level
- the times when the tool is switched off or when it is running but not actually doing the job, may significantly reduce the exposure level
! protect yourself against the effects of vibration by maintaining the tool and its accessories, keeping your hands warm, and organizing your work patterns
Taille-bordure
0731
INTRODUCTION
VEDLIKEHOLD / SERVICE
APKALPOŠANA / APKOPE
TECHNINIAI DUOMENYS ①
PRIETAISO ELEMENTAI ②
A Kreipiamoji rankena
C Apsauga
D Laido laikiklis
B Reguliatorius kreipiamajai rankenai reguliuoti
E Apatinis vamzdis
text_image
Diagram illustrating a mechanical assembly with labeled components and directional arrows indicating motion or flow.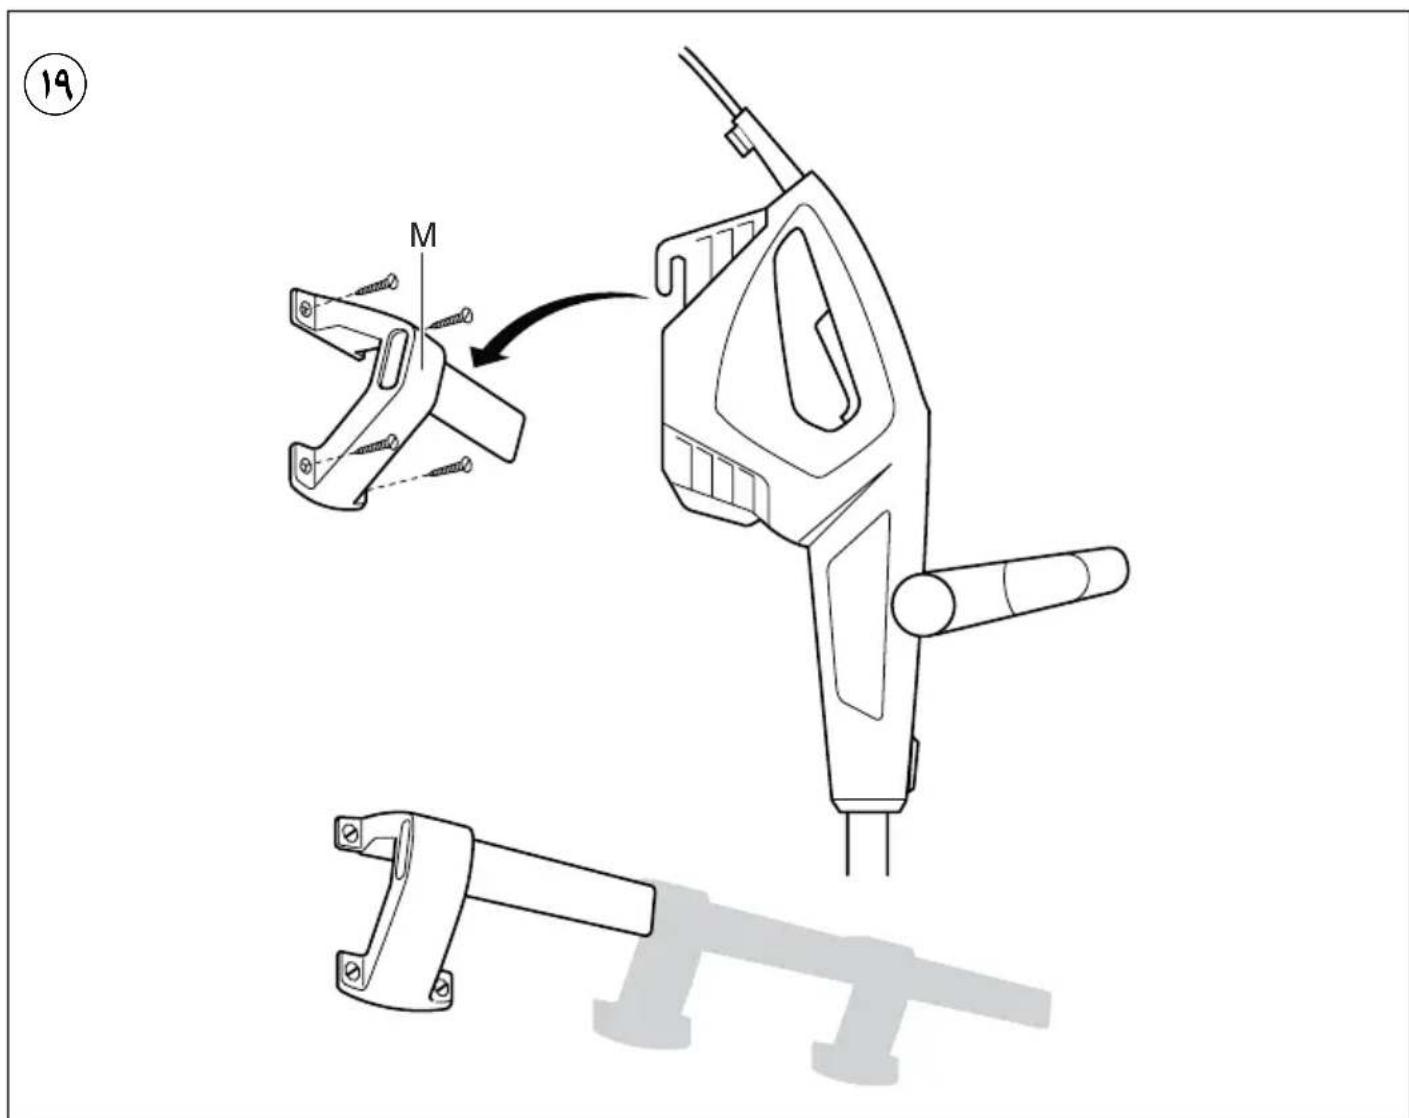
text_image
19 M
text_image
Diagram of a medical or electrical device with labeled component D and connection lines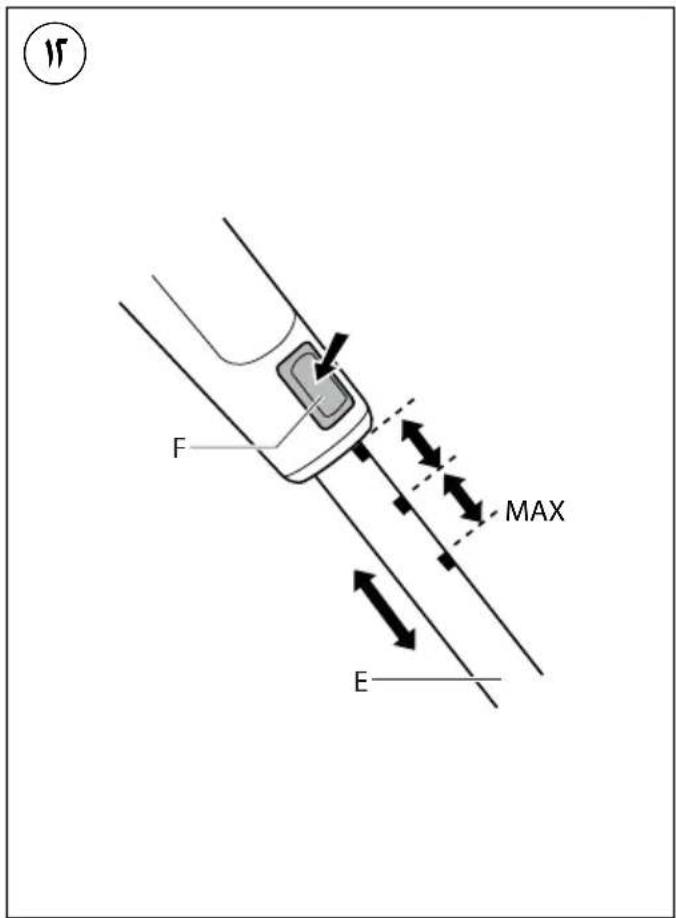
text_image
15 F MAX E
text_image
70kS G
text_image
Diagram illustrating a mechanical or agricultural operation with labeled components and directional arrows, including a plant and a tool.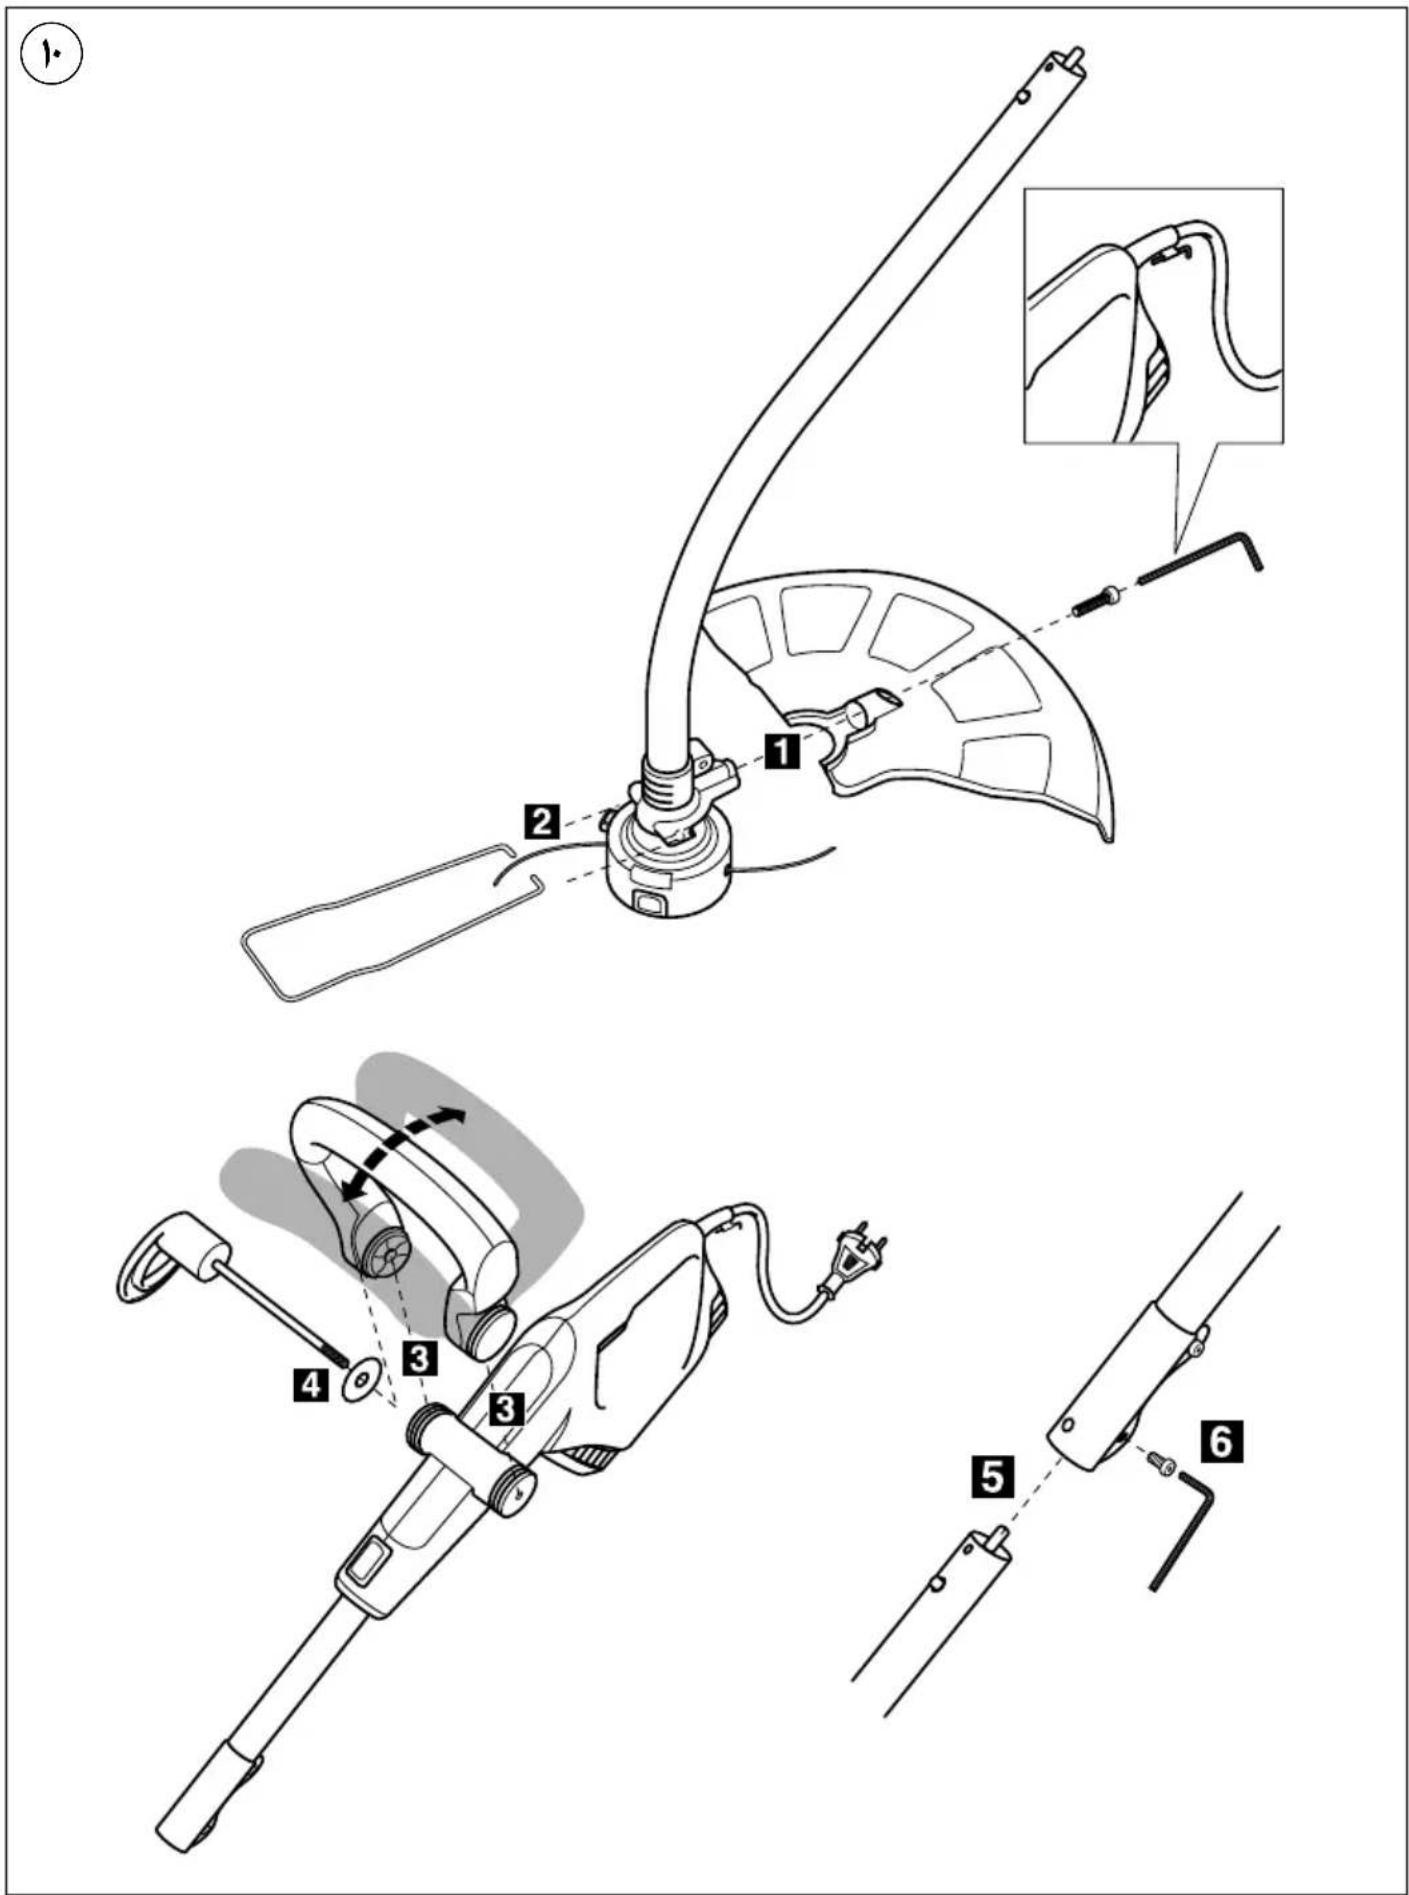
text_image
Technical diagram illustrating the installation steps of a mechanical device with numbered components and an inset showing a cable or cable assembly.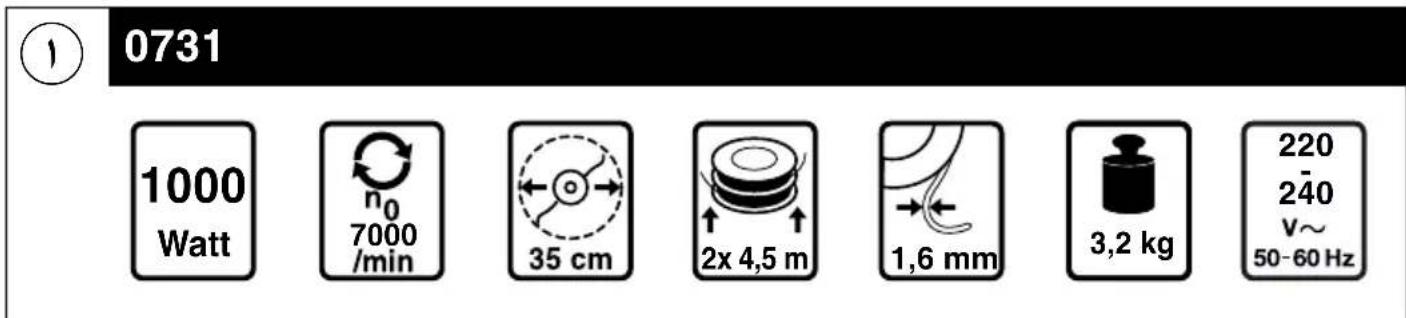
text_image
0731 1000 Watt n₀ 7000 /min 35 cm 2x 4,5 m 1,6 mm 3,2 kg 220 240 V~ 50-60 Hz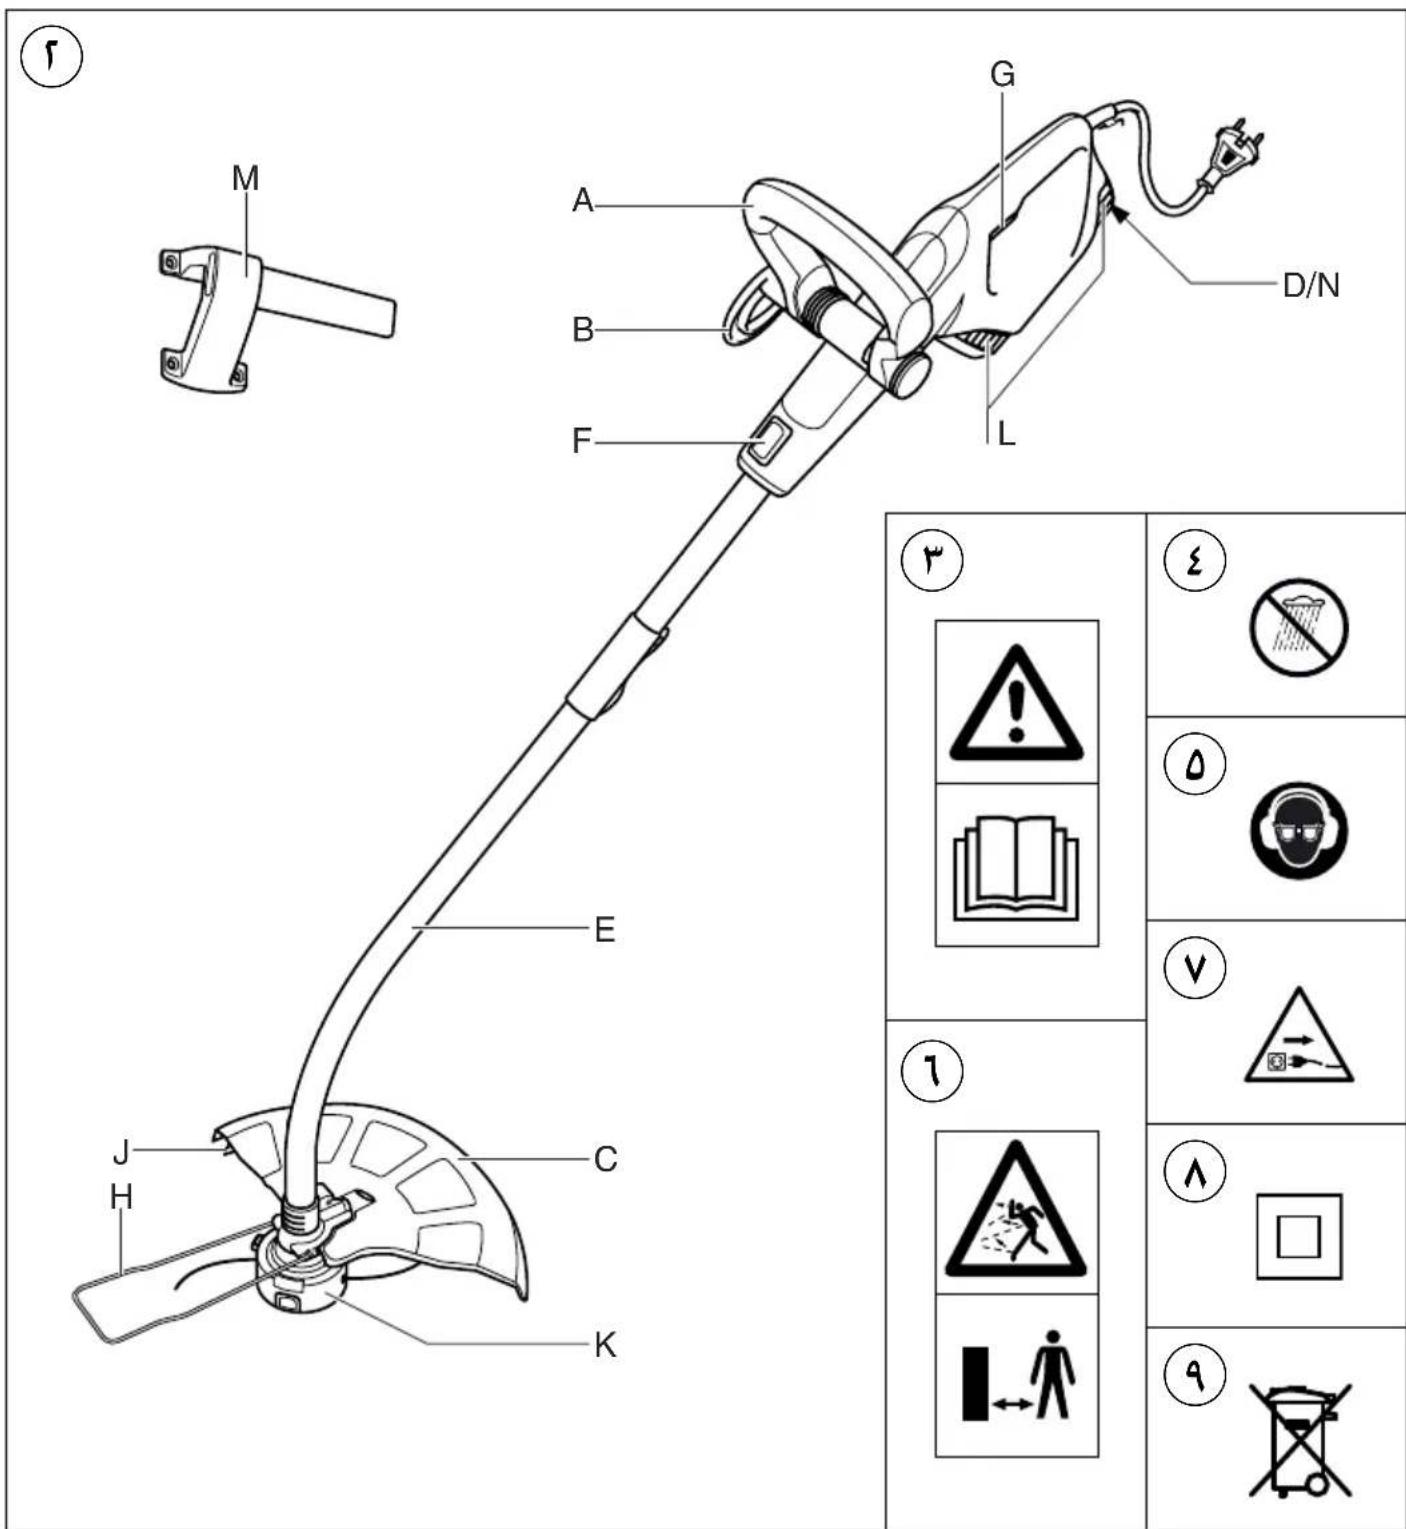
text_image
Technical diagram of a handheld device with labeled parts and safety warning symbols in Chinesenatural_image
Illustration of a handheld metal detector with a curved handle and base (no text or symbols)
text_image
دليل الاستعمال AR راهنماي اصلی FA